
BS 140 eM - Gardening tool accessory Wolf Garten - Free user manual and instructions
Find the device manual for free BS 140 eM Wolf Garten in PDF.
| Product type | Handle with integrated battery for gardening tools |
| Brand | Wolf Garten |
| Model | BS 140 eM |
| Power supply | Integrated lithium-ion battery, non-removable |
| Rated voltage | 14.4 V (estimated for a 140 eM tool) |
| Battery capacity | 2.0 Ah (common estimate for this type) |
| Dimensions (L x W x H) | Approx. 100 x 40 x 30 cm (estimate) |
| Weight | Approx. 1.5 kg (estimate) |
| Compatibility | Tools and accessories approved by the manufacturer (hedge trimmers, grass trimmers, etc.) |
| Compatible charger | Charger approved by Wolf Garten (model-specific) |
| Main functions | On/off switch, engagement lock switch, optional central handle |
| Safety | Protection against deep discharge and overheating, automatic shutdown in case of overheating |
| Maintenance and cleaning | Clean contacts with a dry cloth, keep handle clean and dry |
| Recommended storage temperature | 0 to 23 °C |
| Charge level before storage | Approx. 60% |
| Warranty | According to the manufacturer's or importer's provisions |
| Spare parts and repairability | Repairs exclusively by a specialized workshop; original spare parts |
| General information | Do not expose to rain; wear protective gloves; read the instructions before use |
| Disposal | Do not dispose of with household waste; recycle at an approved center |
Frequently Asked Questions - BS 140 eM Wolf Garten
User questions about BS 140 eM Wolf Garten
0 question about this device. Answer the ones you know or ask your own.
Ask a new question about this device
Download the instructions for your Gardening tool accessory in PDF format for free! Find your manual BS 140 eM - Wolf Garten and take your electronic device back in hand. On this page are published all the documents necessary for the use of your device. BS 140 eM by Wolf Garten.
USER MANUAL BS 140 eM Wolf Garten
natural_image
Illustration of a long-handled tool with handle and lever (no text or symbols)
Bedienstiel
Operating arm
Manche de commande
BS 140 eM
A
text_image
1 2 3 4 5 6 7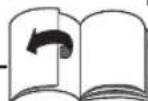
text_image
B 1 2 3 4 5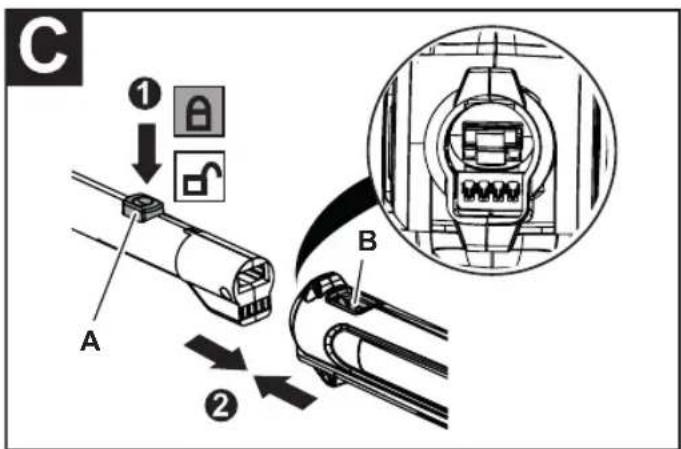
text_image
C ① ↓ A B ②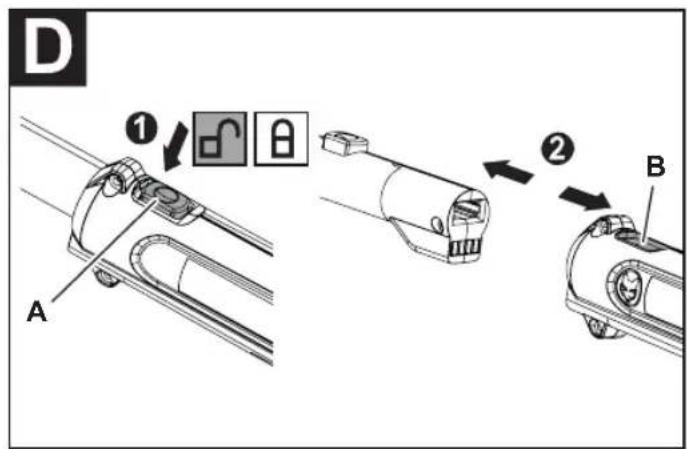
text_image
D ① A ② B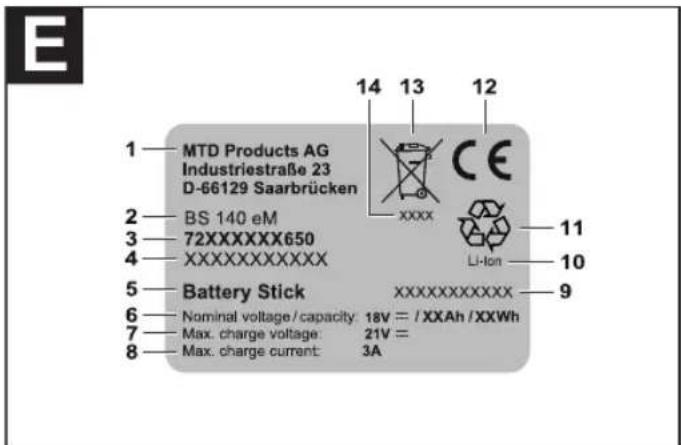
text_image
1—MTD Products AG Industriestraße 23 D-66129 Saarbrücken 2—BS 140 eM 3—72XXXXXXXX650 4—XXXXXXXXXXXX 5—Battery Stick 6—Nominal voltage/capacity: 18V = /XXAh /XXWh 7—Max. charge voltage: 21V = 8—Max. charge current: 3A 14 13 12 CE XXXXX Li-Ion 11 10 9F
a
natural_image
Technical line drawing of a mechanical clamp or tool with two probes inserted (no text or symbols)b
natural_image
Technical line drawing of a mechanical clamp or bracket assembly with mounting holes (no text or symbols)C
natural_image
Technical line drawings of mechanical components including a clamp, clamping ring, and handle (no text or symbols)d
natural_image
Line drawing of a tool applying material to a cylindrical component (no text or symbols)e
natural_image
Pure technical line drawing of a mechanical or electrical component with no text, numbers, or symbols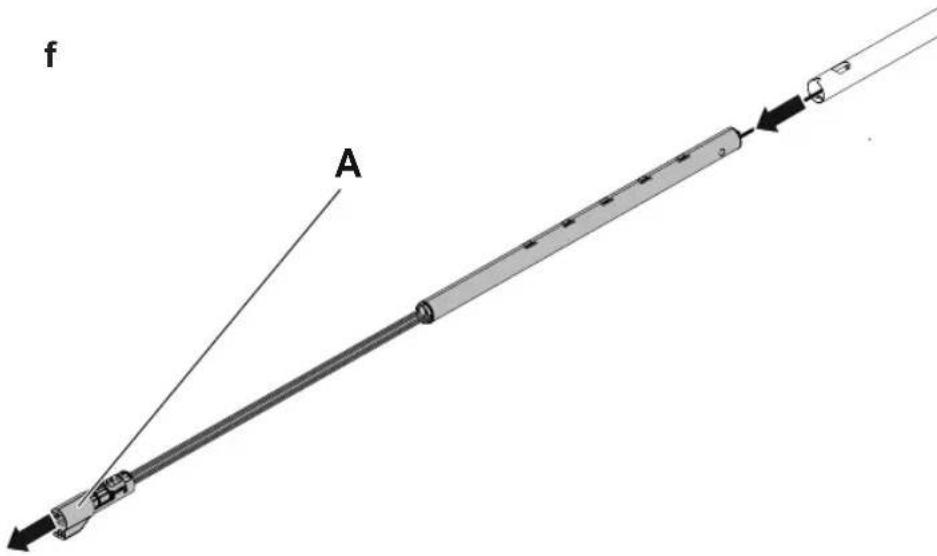
text_image
f A
DE Deutsch 8
(Original operating instructions)
FR Français 18
Meaning of the symbols....13
For your safety....13
Safety information....14
Intended use....15
Identification plate....15
Operating elements....15
Operation....15
Transport and storage 16
Servicing / Care 17
Warranty 17
Environmentally-friendly disposal....17
Meaning of the symbols

WARNING!
To reduce the risk of injury, read the operating instructions!
Caution!
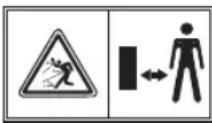
Do not allow any other persons to enter the danger area.
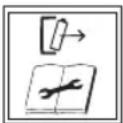
Before any work on the device, first remove the operating arm with the permanently installed power pack.

Wear safety gloves!

Do not leave the device in the rain!

Note
Observe the symbols and their meaning in the operating instructions manual of the attachment devices.
For your safety

Before using your device for the first time, read these operating instructions carefully and act accordingly. Keep this operating instructions manual for later use or subsequent owners.
→ It is essential that you read the safety information before using for the first time! Failure to observe the operating instructions and the safety information can result in damage to the device and pose a danger to the operator and other persons.
→ All persons involved with first use, operation and servicing of the device, must have appropriate qualifications.
The making of unauthorised changes or conversions is not permitted
Do not make any changes to the device or convert it to make other machinery. Such changes can result in personal injury and incorrect operation.
→ Repairs to the device must only be performed by trained persons who have been instructed to do so.
When doing so, always use original spare parts. This ensures that the safety of the device is maintained.
Important information regarding the power pack
The power pack / power pack unit is permanently installed in the operating arm. Any work on the power pack / power pack unit must only be carried out by a specialist workshop.
Thereby, the term "power pack" refers to the complete operating arm, in which the power pack/power pack unit is permanently installed.
Information symbols in this manual
The signs and symbols in this manual should help you to use the manual and product quickly and safely.

Note
Information to ensure the most effective and practical use of the device.
For your safety
→ Action step
Requires you to perform an action.
√ Action result
This is the result of a sequence of action steps.
[1]Item number
Item numbers are indicated in the text by square brackets [].
A Illustration label
Illustrations are numbered with letters and identified in the text.
① Step number
The defined sequence of action steps is numbered and identified in the text.
Danger levels
The following danger levels are used in these operating instructions to indicate potentially dangerous situations:
DANGER!

The dangerous situation is highly likely and, if the measures are not followed, will result in severe injury and even death.
WARNING!

A dangerous situation may occur and, if the measures are not followed, will result in severe injury and even death.
CAUTION!

A dangerous situation may occur and, if the measures are not followed, will result in slight or minor injuries.
Attention!
A possibly harmful situation may occur which if not avoided will result in property damage.
Safety information content
DANGER!

Type and source of the danger!
Consequences of non-observation
➢ Measure for preventing the danger
Safety information
Electrical safety
Keep the operating arm / power pack away from rain or damp.
Keep the device clean. Dirt increases the risk of an electric shock.
➢ Never short-circuit the operating arm / power pack contacts.
Keep the unused operating arm / power pack away from paper clips, coins, keys, nails, screws or other small metal objects that could cause short circuiting of the contacts. A short-circuit between the power pack contacts could result in burns or fire.
Protection of yourself and others
Vapours can escape if the power pack is damaged or used incorrectly. Ensure a supply of fresh air is available and see a doctor if you do not feel well. The vapour can irritate the airways.
Liquid may leak from the power pack if it is used incorrectly. Avoid contact with this liquid. If contact occurs, rinse off with water. If the liquid comes into contact with the eyes, also seek medical assistance. Leaking battery fluid may lead to skin irritation and burns.
Keep children away from the operating arm / power pack.
Children must be supervised to ensure they do not play with the operating arm / power pack.
The device can be used by children aged 8 or older as well as by persons with limited physical, sensory or mental abilities or lack of experience and knowledge, insofar that they are supervised or have received instructions about the safe handling of the operating arm/power pack and understand the associated dangers. Otherwise there is a risk of incorrect use and injuries.
General safety information
Before initial start-up, perform a visual inspection of the operating arm / power pack to check for damage.
Do not use any damaged, defective or deformed power packs.
Do not place the power pack in a fire.
Only charge the power pack with the chargers approved by the manufacturer.
Safety information
Do not store the operating arm / power pack in locations in which the temperature may exceed 40°C.
Observe all instructions and information contained in the power tool operation manuals concerning how the operating arm can be mounted.
Observe all instructions and information contained in the instruction manual of the charger, which is provided for charging the power pack unit in the operating arm.
If the charger or mains cable is damaged, pull out the mains plug immediately. Repairs may only be performed by an authorised specialist dealer. Improper repairs can result in significant danger for the user.
Intended use
The operating arm with the permanently installed power pack / power pack unit is only intended for use in electrical power tools/accessories approved by the manufacturer.
The power pack / power pack unit must only be charged using the charger approved by the manufacturer. Information concerning regarding approved chargers, electrical power tools and accessories can be obtained from your salesman or directly from the manufacturer.
Identification plate
Position
The identification plate is located on the operating arm.

Note
The identification is considered as a document. It must never be altered or obliterated.
Layout E
1 Manufacturer
2 Model name
3 Model number
4 Serial number
5 Device group
6 Rated voltage / type of current / capacity / energy
7 Maximum charging voltage
8 Maximum charging current
9 Cell type
10 Lithium-ion power pack
11 Recycling symbol
12 CE mark
13 Disposal instruction
14 Year of manufacture
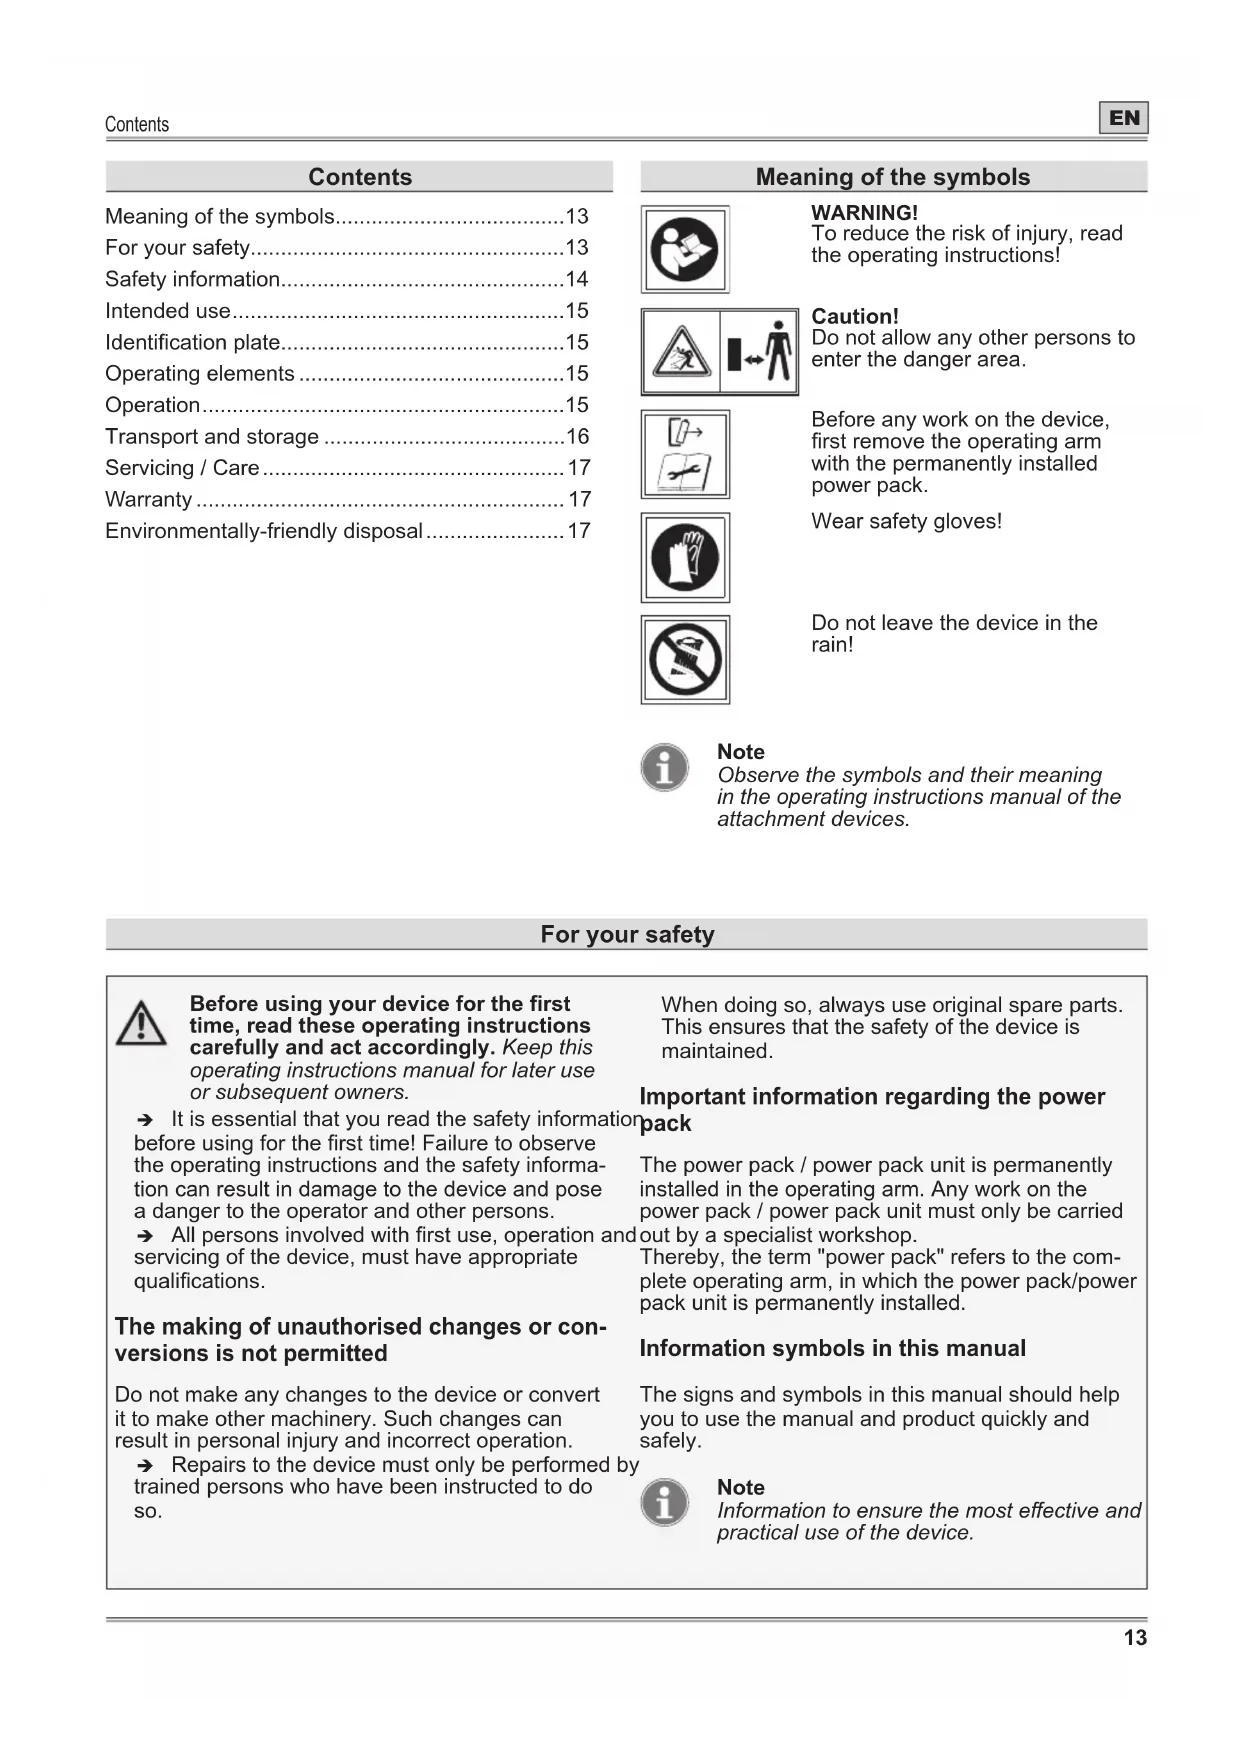
Operating elements
Operating elements A
1 Lock-on switch
2 On/off switch on handle
3 Handle
4 Holding area for the hand / fastening area for the optional middle handle
5 Middle handle*
6 Locking button
7 Contact plug of the power pack unit permanently installed in the arm
*optional accessories
Operation

WARNING!

Risk of injuries or material damage.
➢ Only charge the power pack using the charger approved by the manufacturer.
Note
The power pack is supplied partially charged. Before first use, fully charge the power pack to ensure full capacity of the power pack.

Note
The power pack becomes hot during operation.
Charge discharged power packs within a week, because their service life is significantly reduced if they are stored in a discharged state.

Note
The lithium-ion power pack can be charged in any charge status and charging can be interrupted at any time without damaging the power pack.
General information about the power pack
The Li-ion power pack is protected against deep discharge and overheating while in use. If the power pack is discharged and the power pack temperature is greater than 70 °C , the electrical power tool is protected by a protective circuit so that the tool being used no longer moves.
→ If the power pack is overheated, allow it to cool.
Mounting / adjusting the middle handle A B (optional accessories)

Note
The middle handle is available as an optional accessory for the operating arm. It is used to easily hold the operating arm during work / use with a wide variety of power tools, such as a trimmer unit, hedge trimmer unit, etc.
→ Open the quick release attachment on the middle handle B 1.
→ Place the middle handle on the encased area
[4] of the operating arm at the desired position
B 2.

Note
The middle handle must only be mounted on the encased area of the operating arm since this area is simultaneously used as an adjustment limitation for the middle handle.
→ Slide the middle handle to the desired height and adjust the inclination (depending on the design)
B 3 4.
→ Attach the middle handle by closing the quick-release lever B 5.
Connect the operating arm with the power tool C
→Press the locking button [A] on the operating arm and insert the operating arm into the receptacle on the power tool until the locating button [B] engages into the receptacle ① ②.
Attention!
Ensure that it is engaged properly.
Remove the operating arm on the power tool D
Attention!
Switch off the power tool before removing the operating arm and wait for all moving parts of the power tool to come to a standstill.
→Press the locking button [A] on the operating arm ①.
→ Pull the operating arm fully out of the receptacle of the power tool unit [B] ②.

Note
Observe all instructions and information from the instruction manual of the expandable power tools as well as of the charger.
Transport and storage
Transport
→ Secure the device sufficiently to prevent its unintentional slipping if you are transporting it on or in a motor vehicle.

Note
Li-ion power packs are subject to the requirements of the dangerous goods act. The user can transport the power packs by road without additional documentation. If sending via a third party (e.g. airfreight or freight forwarding) special requirements in respect of packaging and labelling must be observed. In this case, refer to a hazardous goods expert for preparation of the package.
→ Only send the operating arm with the permanently installed power pack / power pack unit if the operating arm is undamaged.
- Apply insulating tape to open contacts.
- Pack the operating arm with the permanently installed power pack / power pack unit so that it cannot move within the package.
→ It may be necessary to adhere to other related national regulations.
Storage
→ Clean your device thoroughly at the end of every season.
→ Always store the device in a dry and safe location that is inaccessible to children.
→ Store the operating arm with the permanently installed power pack in a cool and dry location. Recommended storage temperature approx. 0 - 23°C.
→ Keep the operating arm and especially its plastic components away from brake fluids, petrol, mineral oil containing products, penetrating oils etc. They contain chemical substances that can damage, attack or destroy the plastic components of the operating arm.
Fertilizers and other garden chemicals contain substances that may have a highly corrosive effect on the metal parts of the operating arm. Therefore, do not store your operating arm in the vicinity of these substances.
→ Charge the power pack before storage.
→ Charge the power pack after a long period of non-use.

Note
The operating arm with the permanently installed power pack should have a charge status of approx. 60%.
The operating arm can be inserted and stored the designated charger until the next used or for long-term storage without any hesitation. For this purpose however, remove the mains plug of the charger out of the mains socket.
Servicing / Care

WARNING!

Risk of injuries or material damage.
➢ Never open the operating arm, in which the power pack unit is permanently installed.
➢ Cleaning and care work must only be performed if the operating arm (power pack) is separate from the charger / power tool.
Do not use water to clean the operating arm, the electric attachment tools or the charger.
➢ Servicing must only be performed by a qualified expert.
→ Keep the operating arm clean and dry.
→ Clean the contacts of the operating arm with a soft dry cloth.
Warranty
The warranty conditions of our local company or importer apply in all countries.
Under the terms of the warranty we will repair faults on your device free of charge, insofar as material or manufacturing defects are the cause. To make a claim under warranty please contact your seller or your nearest branch.
Environmentally-friendly disposal
Power tools, accessories and packaging must be disposed of via an environmentally compatible recycling chain.
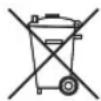
Power packs/batteries:
Do not dispose of power packs/batteries with domestic waste, by burning or throwing into water. Power packs/batteries must be collected, recycled or disposed of in an environmentally-friendly manner.
Power tool (without power packs/batteries):
Do not throw power tools into domestic waste! Take it to a suitable disposal facility.

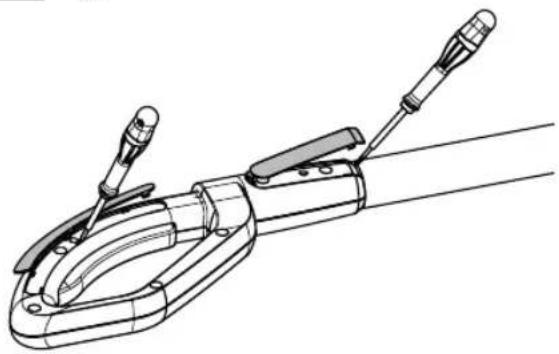
Important information regarding disposal
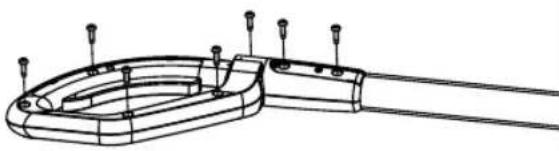
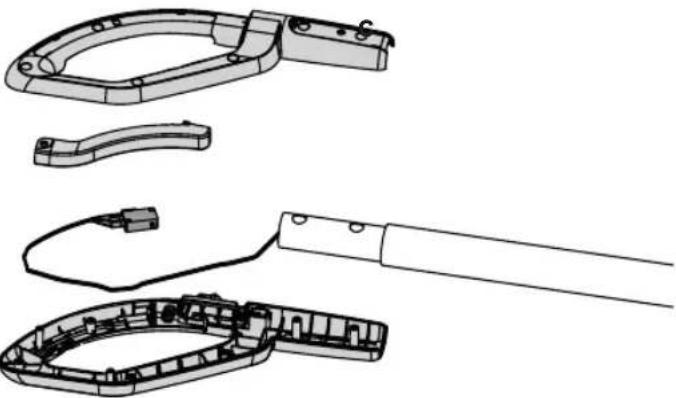
The Li-ion power pack of the operating arm is not replaceable. Once the power tool reaches the end of its useful life, remove the Li-ion power pack as described below and dispose of the complete power pack (with cable, microswitch and plastic connecting piece) in accordance with the applicable regulations at a suitable recycling point or a collection point for waste electrical and electronic equipment.
- Remove the plastic covers on the handle of the right half housing using a slotted screwdriver Fa.
- Remove the 7 screws of the housing halves on ft the handle F b.
- Remove the two half housings of the handle to uncover the microswitch Fc.
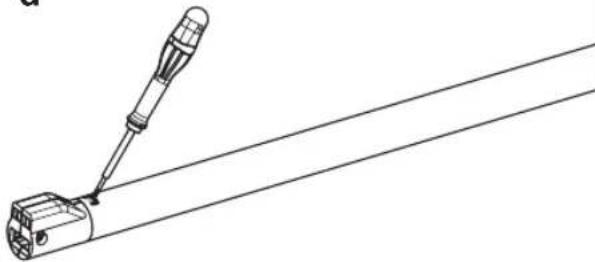
- At the bottom end of the arm, use a slotted screwdriver to bend the retaining lug of the tube upwards so that the plastic connecting piece can subsequently be removed Fd.
- Remove the lock knob using a slotted screw-driver Fe.
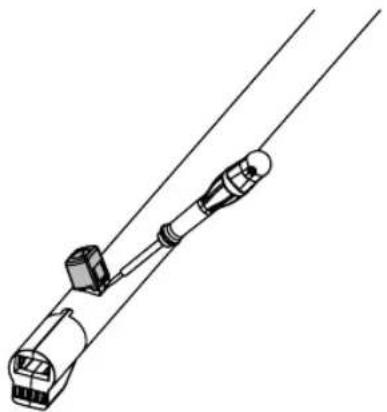
- Pull the complete power pack, with cable and microswitch, out of the tube of the operating arm by pulling on the plastic connecting piece [A] Ff.
- Tape off all contact points.
- Dispose of the just removed power pack complete with cable, microswitch and plastic connecting piece at an appropriate recycling centre, or dispose of it at an official collecting point for waste electrical and electronic equipment.
Table des matières
Signification des symboles ...... 18