GS 10 eM - Grass trimmer Wolf Garten - Free user manual and instructions
Find the device manual for free GS 10 eM Wolf Garten in PDF.
| Product Type | Cordless Grass Shear |
| Brand | Wolf Garten |
| Model | GS 10 eM |
| Power Supply | Integrated battery in the control handle (not supplied) |
| Tilt Angle | 7 horizontal positions + vertical position |
| Cutting Blade | Steel blade |
| Wheels | Yes, for easy movement |
| Protective Cover | Yes, for transport and storage |
| Switch | With lock-out for safety |
| Cutting Width | Approx. 20 cm (estimate) |
| Weight | Lightweight (not specified) |
| Sound Level | Guaranteed (see rating plate) |
| Use | Edge trimming and small lawns |
| Maintenance | Clean with dry cloth, lubricate blade after use |
| Safety | Automatic stop, overload protection, lock |
| Warranty | In accordance with manufacturer's conditions |
| Compatible Accessories | Control handle (Power Handle) and optional central grip |
Frequently Asked Questions - GS 10 eM Wolf Garten
User questions about GS 10 eM Wolf Garten
0 question about this device. Answer the ones you know or ask your own.
Ask a new question about this device
Download the instructions for your Grass trimmer in PDF format for free! Find your manual GS 10 eM - Wolf Garten and take your electronic device back in hand. On this page are published all the documents necessary for the use of your device. GS 10 eM by Wolf Garten.
USER MANUAL GS 10 eM Wolf Garten
Meaning of the symbols. 17
For your safety. 17
Safety information. 18
Intended use. 21
Identification plate. 21
Operating controls 21
Using for the first time. 21
Operation 22
Servicing 23
Transport and storage 23
Troubleshooting 24
Warranty 24
CE Declaration of Conformity 24
Environmentally-friendly disposal 24
Meaning of the symbols

WARNING!
To reduce the risk of injury, read the instruction manual!
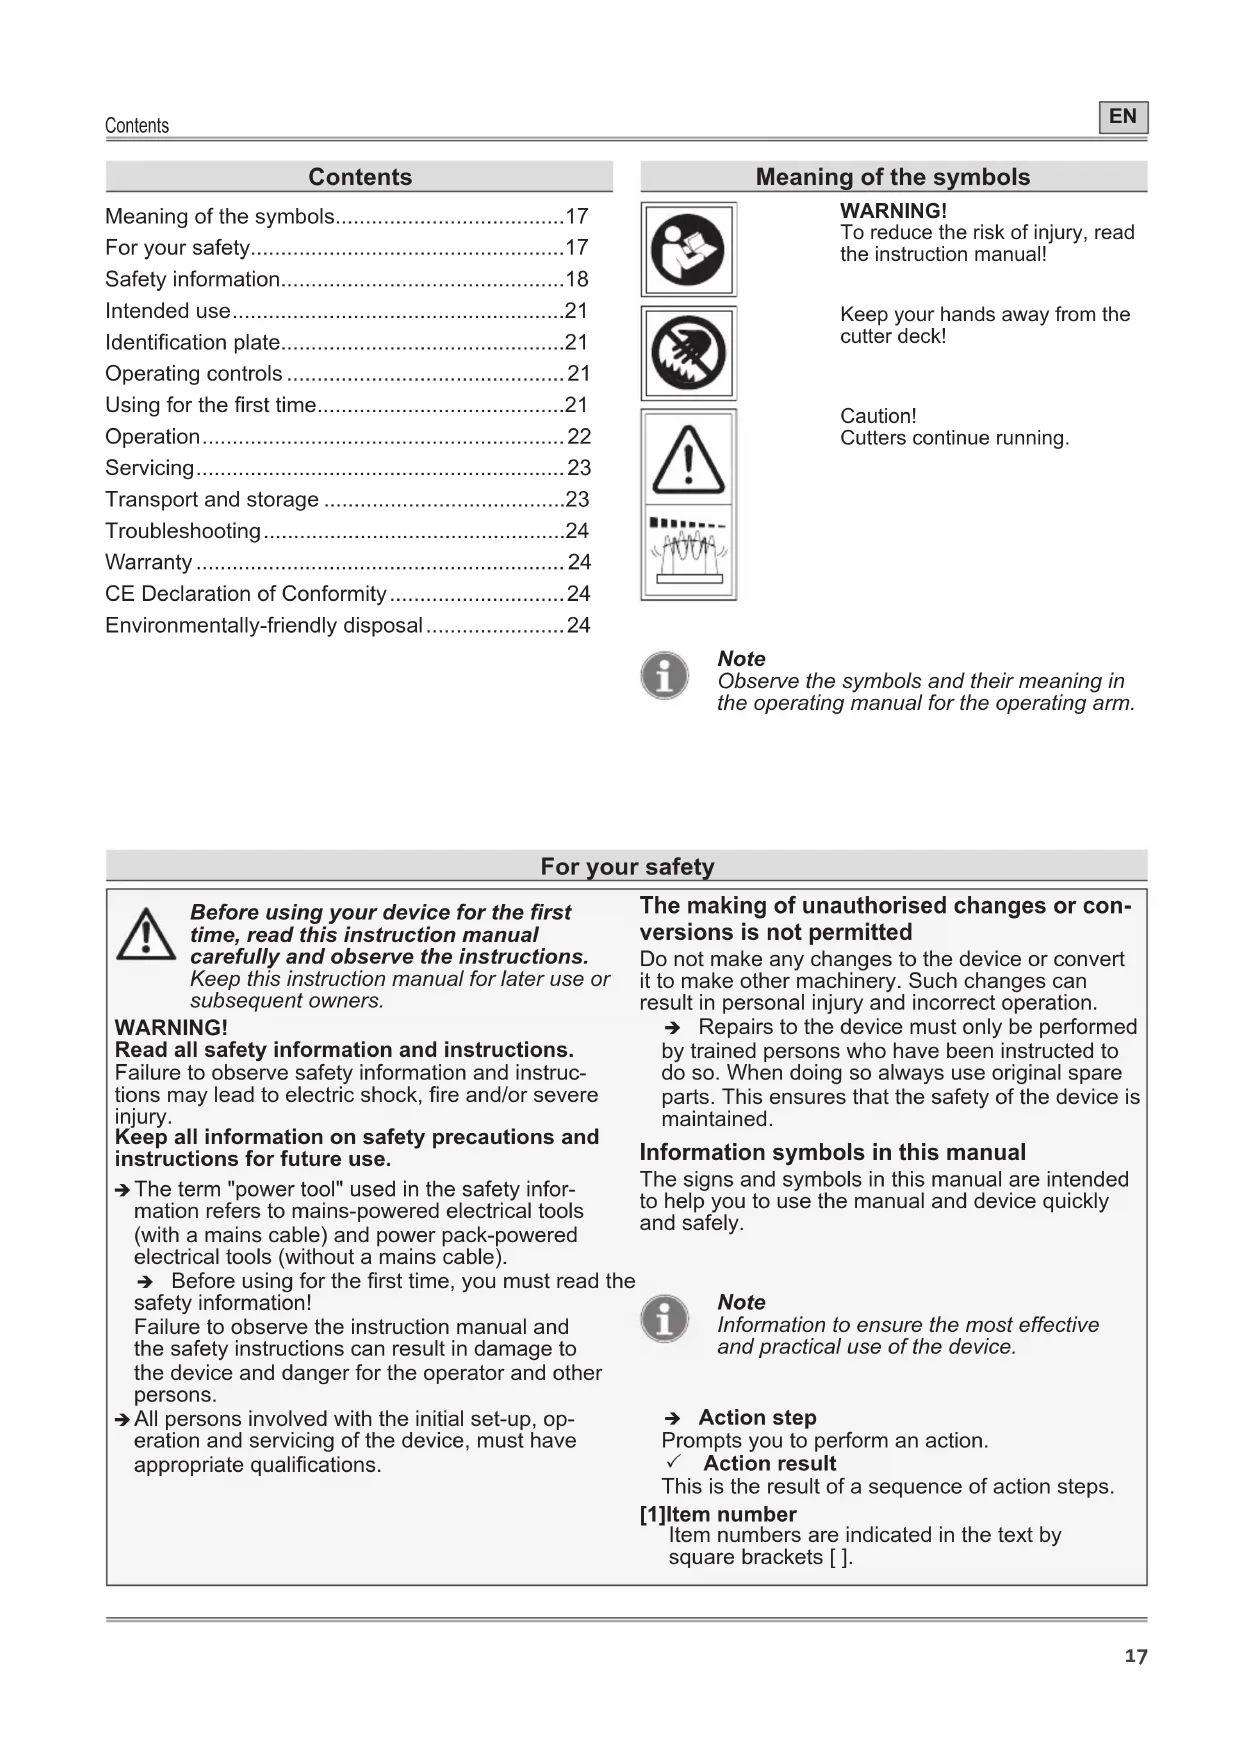
Keep your hands away from the cutter deck!

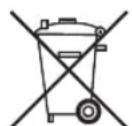
Caution!
Cutters continue running.

Note
Observe the symbols and their meaning in the operating manual for the operating arm.
For your safety

Before using your device for the first time, read this instruction manual carefully and observe the instructions.
Keep this instruction manual for later use or subsequent owners.
WARNING!
Read all safety information and instructions.
Failure to observe safety information and instructions may lead to electric shock, fire and/or severe injury.
Keep all information on safety precautions and instructions for future use.
The term "power tool" used in the safety information refers to mains-powered electrical tools (with a mains cable) and power pack-powered electrical tools (without a mains cable).
Before using for the first time, you must read the safety information!
Failure to observe the instruction manual and the safety instructions can result in damage to the device and danger for the operator and other persons.
All persons involved with the initial set-up, operation and servicing of the device, must have appropriate qualifications.
The making of unauthorised changes or conversions is not permitted
Do not make any changes to the device or convert it to make other machinery. Such changes can result in personal injury and incorrect operation.
Repairs to the device must only be performed by trained persons who have been instructed to do so. When doing so always use original spare parts. This ensures that the safety of the device is maintained.
Information symbols in this manual
The signs and symbols in this manual are intended to help you to use the manual and device quickly and safely.

Note
Information to ensure the most effective and practical use of the device.
Action step
Prompts you to perform an action.
√ Action result
This is the result of a sequence of action steps.
[1]Item number
Item numbers are indicated in the text by square brackets [ ].
For your safety
A Illustration label
Illustrations are numbered with letters and identified in the text.
Step number
The defined sequence of steps is numbered and identified in the text.
Danger levels of warning information
The following danger levels are used in this instruction manual to indicate potentially dangerous situations:

DANGER!

A dangerous situation is highly likely and, if the measures are not followed, will result in severe injury and even death.

WARNING!

A dangerous situation may occur and, if the measures are not followed, will result in severe injury and even death.

CAUTION!

A dangerous situation may occur and, if the measures are not followed, will result in slight or minor injuries.
Attention!
A possibly harmful situation may occur which if not avoided will result in property damage.
Safety information content

DANGER!

Type and source of the danger!
Consequences of non-observation
Measure for preventing the danger
Safety information
Workplace safety
a) Keep your work area clean and well lit. Messy and poorly lit work areas can lead to accidents.
b) Do not use the power tool in an explosive environment, where there are inflammable liquids, gases or dusts. Electrical power tools may create sparks, which could ignite the dust or vapours.
c) Keep children and other persons away from the power tool during use. You can lose control of the device when distracted.
Electrical safety
a) Keep power tools away from rain and water. The ingress of water into a power tool increases the risk of an electric shock.
Personal safety
a) Pay attention, be aware of what you are doing and go about your work with the electric power tool prudently. Do not use any power tools if you are tired or under the influence of drugs, alcohol or medication. One moment of inattention when using the power tool may lead to serious injury.
b)Wear personal protective equipment and always wear safety glasses. The wearing of personal protective equipment such as dust masks, non-slip safety shoes, protective helmet or hearing protection reduces the risk of injury depending on the type and use of the power tool.
c) Prevent unintentional start-ups. Ensure that the power tool is switched off before connecting it to the power supply and/or the power pack, picking it up or carrying it. If you hold your finger to the switch when carrying the power tool or connect the device to the power supply when it is switched on, this can lead to accidents.
d) Remove any adjustment tools or spanners before switching the power tool on. A tool or spanner located in a turning device component may lead to injuries.
e) Adopt a normal posture. Ensure you are standing securely and that you maintain your balance at all times. This will ensure that you can maintain better control of the power tool if unexpected situations occur.
f) Wear suitable clothing. Do not wear any loose clothing or jewellery. Keep hair, clothing and gloves away from moving parts. Loose hair, clothing, jewellery or long hair may get caught by moving parts.
Safety information
Use and handling of the power tool
a) Do not overload the device. Use the electric power tool designed for your work. Your work is performed better and safer with the appropriate power tool in the specified power range.
b) Do not use a power tool with a defective switch. An electric power tool which can no longer be switched on or off is dangerous and must be repaired.
c) Pull the plug out of the socket and/or remove the power pack before configuring any device settings, changing accessory parts or storing the device away. This precautionary measure prevents the unintended start of the power tool.
d) Keep unused power tools out of the reach of children. Do not let people use the device who are unfamiliar with it or who have not read these instructions. Electric power tools are dangerous when used by inexperienced persons.
e) Treat power tools with care. Check that moving parts are in perfect working order and are not jammed. Also check whether parts are so damaged that they impair the function of the power tool. Have damaged parts repaired prior to using the device. Many accidents originate from poorly maintained electric power tools.
f) Keep cutting tools sharp and clean. Cutting tools with sharp cutting edges which are treated with care become stuck less frequently and are easier to run.
g) Use power tools, accessories, insertion tools, etc. in accordance with these instructions. Take the work conditions and the activity to be performed into consideration. The use of electric power tools for applications other than those intended may lead to hazardous situations.
Use and handling of the battery tool
a) Charge the power packs only with chargers that are recommended by the manufacturer. There is a risk of fire if a charger that is suitable for a specific type of battery is used with other batteries.
b) Only use the power packs intended for this purpose in power tools. Use of other power packs can result in injuries and fires.
c) Keep the unused power pack away from paper clips, coins, keys, nails, screws or other small metal objects that could cause short circuiting of the contacts. A short-circuit between the power pack contacts could result in burns or fire.
d) Liquid may leak from the power pack if it is used incorrectly. Avoid contact with this liquid. If contact should occur, rinse off with water. If the liquid comes into contact with the eyes, also seek medical assistance. Leaking battery fluid may lead to skin irritation and burns.
Service
a) All repairs to the power tool must be carried out by qualified specialist technicians and with original spare parts only. This ensures that the safety of the power tool is maintained.
Safety information for grass shears
Keep all body parts away from the cutting blade. Do not attempt to remove grass cuttings or hold material to be cut with the blade running. Only remove jammed grass cuttings with the device switched off. One moment of inattentiveness when using the grass shears could result in serious injuries.
Only carry the grass shears with the motor switched off and the blade stationary. When transporting or storing the grass shears, always pull on the cover. Careful handling of the device reduces the risk of injury from the blade.Only hold the power tool by the insulated handles, because the cutting blade can come into contact with hidden power cables or even its own power cable. Contact of the cutting blade with a live cable can conduct electrical voltage into metallic device parts resulting in an electric shock.
Check for hidden objects in the lawn, such as stones, wire, etc..
Hold the device firmly with both hands.
Switch the device off and remove the operating arm after contact with a foreign body. Check the device for damage, and, if necessary, arrange for repair by a specialist workshop.
Switch the device off and remove the operating arm if the device starts to vibrate excessively. Arrange for the device to be checked and, if necessary, repaired by a specialist workshop.
Protection of yourself and others
Do not operate the grass shears when there are people (especially children) or animals in the immediate vicinity. Ensure children do not play with the grass shears.
Stop using the device if persons (especially children) or animals are nearby.
This device must not be used by children or persons with reduced physical, sensory or mental capabilities or with inadequate experience and knowledge. Likewise persons must be familiar with this instruction manual before using the device. The minimum age for using the device may be specified by local or national legislation.
Safety information
Only switch the motor on if your feet and hands are at a safe distance from the cutting element.
Always disconnect the device from the power information about vibrations:
formation about vibrations:
supply if you are leaving it unattended or removing a blockage.
Always wear sturdy shoes and long trousers as well as other appropriate personal protective equipment (safety glasses, ear defenders, safety gloves etc.) when working on the grass shears. Wearing personal protective equipment reduces the risk of injuries. Do not wear loose clothing, etc., which could be caught by the cutting tool.
Before use
Before use, make sure you are familiar with the grass shears, their functions and operating elements.
Do not use grass shears if the switch is defective and can no longer be switched on or off. It must be repaired by a qualified expert or workshop.
Never use a device with damaged or missing guards or covers. It must be repaired or replaced by a qualified expert or workshop.
Before making adjustments to the device or cleaning it, switch off the device and remove the operating arm in which the power pack is permanently installed.
Do not use grass shears with a defective or heavily worn cutting element. It must be repaired or replaced by a qualified expert or workshop.
Tips for use
Read and observe the operating manuals of the charger and the operating arm in which the power pack is permanently installed.
Never leave the grass shears unattended during breaks and store in a secure location.
Hold the grass shears parallel to the ground when switching on, otherwise there is a risk of injury.
Also when working maintain a safe distance relative to the cutting tool.
Take extra care if you are walking backwards. Risk of tripping!
Switch the motor off when carrying the device to or from separate working positions.
Never bypass or manipulate switching mechanisms installed on the device (e.g. by taping the switch to the handle).
Always be aware of your environment and possible hazards which you may not be able to hear because of the noise of the device.
Vibrations can cause nerve damage and impair the blood circulation in the hands and arms.
When working in the cold, wear warm clothing and keep your hands warm and dry.
Take breaks.
If you notice that the skin of your fingers or hands goes numb, tingles, hurts or goes white, stop working with the machine and, if necessary, consult a doctor.
The specified vibration emission values:
- Were measured according to a standardised testing procedure.
- Make it possible to estimate the power tool emissions and compare these with different power tools. Dependent on the conditions of use, the state of the power tool or tools inserted for use with it, the actual vibration load may be higher or lower. When estimating the emissions, consider doing so during work pauses and phases when the tool is under reduced load. Based on the correspondingly adjusted estimated values, take protective actions, e.g. organisational actions.
After use
Switch the device off, remove the operating arm from the device and check the device for damage. Attention, danger! Cutting tool continues running!
If you need to clean or service the device, switch it off and remove the operating arm.
Always wait until the cutting tool comes to a standstill.
Removal of the protective equipment must only be performed with the motor stationary and the operating arm removed.
Ensure that ventilation slots are free from dirt.
Do not clean the grass shears using water.
Always fit the protective cover after use and when not using.
Safety information
General safety instructions
Spare parts must meet the requirements of the manufacturer. Therefore, use only original spare parts or those spare parts authorised by the manufacturer. When replacing spare parts, always observe the supplied fitting instructions. Remove the operating arm in which the power pack is permanently installed beforehand.
Repairs must only be performed by a qualified expert or workshop. Specialist workshop addresses can be found on our website.
These grass shears are intended for lawn maintenance in private gardens. The device must not be used for purposes other than those intended because of the risk of bodily injury to the user or other persons.
Even if all safety and operating instructions are heeded, there is always a residual risk of injury and property damage. Always be conscious of this!
Do not use the device if it is raining or there is a risk of storms.
Replace all worn or damaged information signs on the device.
Only use the power packs/operating arms with permanently installed power packs as approved by the manufacturer together with the corresponding chargers. The designations of the approved power packs/operating arms with permanently installed power packs and chargers are listed in the enclosed CE Declaration of Conformity.
Intended use
The grass shears are intended solely for maintaining lawn edges and small lawn areas in private gardens. Any other use is classed as an unintended use. The user is liable for any damages arising from unintended use.
Identification plate
Position
The identification plate is located on the casing of the device.
Structure G
1 Manufacturer
2 Device group
3 Model name
4 Rated voltage, current type
5 Weight
6 IP code
7 Disposal note
8 Year of manufacture
9 Guaranteed sound level
10 CE label
11 Model number
12 Serial number
Operating controls
Operating elements H
1 Lock-on switch
2 On/off switch on handle
3 Handle
4 Holding area for the hand / fastening area for the optional middle handle
5 Operating arm * (with permanently installed power pack)
6 Locking button
7 Cutting blade
8 Protective cover
9 Wheels
10 Working angle adjustment locating button
*Necessary operating element (not supplied)
Using for the first time
Supplementary documentation

Ensure the supplied instruction manuals of the charger and operating arm are available and that you have read and understood them before using the device.
Power pack charging
WARNING!

Only charge the power pack using the charger approved by the manufacturer. The designations of the approved chargers are listed in the enclosed CE Declaration of Conformity.
Attention!
The power pack is supplied partially charged. Before using the device for the first time, fully charge the power pack to ensure effective performance.

CAUTION!

The power pack is permanently installed in the operating arm.
The power pack must be charged in accordance with the instructions in the supplementary documentation.
Adjusting the working angle A B

WARNING!

Risk of injuries due to the cutting tool.
Only adjust the device with the motor switched off and the cutting tool at a standstill.
Before any work on the device, remove the operating arm with the permanently installed power pack beforehand.
The device can be set in any of seven different working angles. This allows you to easily reach problematic and difficult-to-access positions in the garden.
Horizontal adjustment A
Press and hold the locating button.
Set the working angle
Release the locating button.
The locating button of the grass shears engages audibly.
Vertical adjustment
Pull the head of the grass shears [A] out in a forward direction and hold it 0.
Turn the head of the grass shears through 90^ to the left or right ②.
Guide the head of the grass shears slowly back until it engages in position 3.
The head of the grass shears engages audibly.

Note
The vertical position is, for example, required for cutting flower bed borders where there is no vertical edge, etc..
Connecting the grass shears to the operating arm C
Press the locking button [A] on the operating arm and insert the operating arm into the locator of the grass shears until the locating button [B] engages 12.
Attention!
Ensure the button is correctly engaged

Note
A middle handle is available as an optional accessory for the operating arm. You can find more information and assembly instructions in the operating manual for the operating arm.
Operation
Operating times
Please observe the times stipulated in local byelaws. Check with your local authorities to determine if there are any operating time limitations.
Switching on the device D

WARNING!

Risk of injuries or material damage
During operation, always hold on to the device with both hands. One hand holds the handle, the other hand holds the operating arm in the encased area or the optionally available middle handle.
Always ensure you are standing safely.
Remove the protective cover.
Press the lock-on switch [A] on the handle 1.
Simultaneously press the on/off switch [B] on the handle 2.
Release the lock-on switch.
The device operates.
Switching the device off D
Release the on/off switch on the handle.
The device is switched off.

Note
The cutting tool continues to run for a brief period after being switched off.

Note
The lock-on switch automatically returns to its initial position when you release the on/off switch.
Cutting
Hold the device in the work position.
→ Always guide the grass shears with the wheels on the ground.
Ensure a correctly set working angle so that the cutting tool does not cut into the ground.
Work slowly and carefully.
Do not cut the lawn too close to the ground.
Removing the operating arm with permanently installed power pack F
Switch the device off.
Press the locking button [A] on the operating arm 1.
Pull the operating arm fully out of the locator of the grass shears unit [B] ②.
Servicing

WARNING!

Risk of injuries or material damage.
Only clean or service the device when the motor and the cutting tool are both stationary.
Before any work on the device, remove the operating arm with the permanently installed power pack beforehand.
Do not clean the device with water.
Repair and service work as well as the replacement of safety elements must be performed by a qualified expert or workshop.
Wear safety gloves before any work on the cutting blade.
Cleaning
Switch the device off and wait until the cutting tool comes to a standstill before removing the operating arm.
Clean the grass shears after every use, especially the ventilation slots, using a dry cloth or, in the event of heavy soiling, a brush.
Carefully clean the cutting blade after each use.
After use, spray the cutting blade with conditioning oil to ensure a long service life for the grass shears. Where possible, use an environmentally-friendly lubricant.
Do not oil the grass shears during use.
To oil the grass shears, place them on their side and apply a thin oil film to the cutting blade.
Transport and storage

WARNING!

Risk of injuries due to the cutting tool.
Before transport or storage, switch off the device and wait until the cutting tool comes to a standstill.
Remove the operating arm before transport or storage.
Always fit the protective cover before transport and storage.
Transport
Secure the device sufficiently to prevent its unintentional slipping if you are transporting it on or in a vehicle.
Storage
Clean your device thoroughly at the end of every season.
Always store the device in a dry and safe location that is inaccessible to children.
Store the operating arm and grass shears separately.
Store the operating arm in a cool and dry location. Recommended storage temperature approx. 0 - 23^
- Keep the grass shears and especially their plastic components away from brake fluid, petrol, mineral oil containing products, penetrating oils etc. They contain chemical substances that can damage, attack or destroy the plastic components of the grass shears.
Fertilizers and other garden chemicals contain substances that may have a highly corrosive effect on the metal parts of the grass shears. Therefore do not store your grass shears in the vicinity of these substances.
Troubleshooting
WARNING!

Risk of injuries or material damage
In case of doubt always take your device to a specialist workshop.
Before any inspection or any work on the device, switch off the motor and remove the operating arm.
| Problem Possible cause Remedy | |
| The device switch- es off. | The power pack is too hot. Allow the power pack to cool. |
| The power pack is discharged. Charge the power pack. | |
| The temperature of the device (electronics) is too high. Allow the device to cool and if necessary, clean the ventilation slots | |
| Overcurrent release If this occurs again take your device to a specialist workshop. | |
| The device will not switch on. | The power pack is discharged. Charge the power pack. |
| Overcurrent release If this occurs again take your device to a specialist workshop. | |
| Power pack temperature too high or too low. Allow the power pack to cool down or heat up. | |
| The power pack is defective. Arrange for the power pack and oper- ating arm to be checked by a specialist workshop. | |
| The cutting blade becomes hot. | The cutting blade is blunt. Consult a specialist workshop. |
| There is a lot of friction because of a lack of Oil the cutting blade. lubrication. | |
| Uneven running, severe vibration of the grass shears. | The cutting blade is damaged. Consult a specialist workshop. |
| The cutting blade fastening has come loose. Consult a specialist workshop. | |
Warranty
The warranty conditions of our local company or importer apply in all countries. Under the terms of the warranty we will repair faults on your device free of charge, insofar as material or manufacturing defects are the cause. To make a claim under warranty please contact your seller or your nearest branch.
CE Declaration of Conformity

Further details about the device are contained on the separately enclosed CE Declaration of Conformity, which forms part of this instruction manual.
Environmentally-friendly disposal
Power tools, accessories and packaging must be disposed of via an environmentally compatible recycling chain.
Power packs/batteries:
Do not dispose of power packs in domestic waste, by burning or throwing into water. Power packs must be collected, recycled or disposed of in an environmentally-friendly manner.
Power tool (without power packs/ batteries):
Do not throw your power tool away with domestic waste! Take it to a disposal facility.
Table des matieres
Sorg for et stabilt stasted.
Fjern vernendekselet.
Trykk pa sperrebrytereen [A] pa handtaket 1.
Trykk pa/avbryeren [B] pa händta2samtidig.
→ Slipp sperrebryteren igjen.
Apparatet er i drift.
Slá maskinen av D
ZaTnapakivvvaevpynoTe.
TnV aopala oac
AOTeIeOaEvpeYeiac
Edw BpEITE TO aTATEAua iaC oipac BnpaTuw EvpyeiWv.
[1]Apiθμoσ θεοησ
Oi apiooi eoeewv etionmaivovtai oTo keiuevo aykuAeC[]
A ATTEIKOVIOIOTIKI OJauVOn
Oi EIKoEvEivai apiOunuevEc ypaMaTa KAI ETIOIQAIVovTAt eOa oTo KEIpEvo.
1 ApiooC hmuoc Evpeiaac
Kata tn diapkeia xpnoan
Aiaaote kai tnpeite Tc odnyiecs xponoTou 1- ooptiotn kai tnc laaicns xeipioou otnv otroia evai evomegaatwpevoosuooewutnc.
Kata n biakotn twv epyaow, mny aqnvTe TOTe avetinnpnto to yalidi ykaov. Duale To o e aqaaec mepos.
Kata tv Evepyotoin, Kpatate To paaii Tnpaalna TpoC to edaqoc, iadawc utapxie kivduoc Tpaumatou ulikw zmiw.
Akóμn kai katá th δiapkeia tnc εpyaσiac, kpa-tate aTROSTaON aσφaλεiαc aTTO εpyaλεio KOITNS.
Na eioTe iiaitepea TPOoEeTKoi otav KIVnoTe TPOc Ta TIOw. YIaPxEi KivDuvoc va OKovTa-psiE!
ATVEpyoTIOIETo pOtep Kata Tn eTaopoc aTio/TPoC Ta eiovwEv aOneia Epyaioic.
MnV aTouakpuveKai nXeipieote TOTe TIG EYkATEOTnEVEs OTN OoKEun OUV-ETIKEC DIATAEGIC (T.X. Meow ouvdeonc Tou diakottn OTn Aβn).
Pooexe TavTo Tepiaalov Oac Kai Ya evexoevouc Kivouous, Touc otroiouc MTOpei va mV akouoTe Aoyw Twv OopuBwTnC oukeunc.
He npn6nnkaiTe pykn K peky- memy MexaHn3My
OctopoxHo!
Pexyunm MexaHn3m Bpaaetcno INepu.

Yka3aHue
Yumbeaume 6ce o6o3HaueHua, pa3Meuehhble e pyko0b0cme no 3Kcnnyamauu umaH2 ynpaeHeHu, u ux 3HaueHue.
BnI nCTOuHnK OaCHOCTn!
PocneDCTBnI rHOpuPoBaHnI
Mepa no ppeIOToBpaueHnO onacHocTn
Yka3aHnno TeXnke 6e3onachoctn
Bé3onachocTb Ha pa6ooyem MecTe
a) MecTo pa6Otbl DOJXHO 6bITb YnCTbIM H Xopo- OoOCBeueHbIM. BecnopdOK nIINOTcyTCTBne OCBeueHna Ha pa6OHeM MeTe MOKeT npNBecTn K HeCHaCTbIM CnyyAraM.
b) He nCnoJb3yIte 3NeKtpOnHCTpyMeHT BO B3PbIBOONaCHOM OKpyKeHH, rIe NMeOTcR TropOue XnIKoCTN, Ra3bl NII NBIL. 3NeKtpOnHCTpyMeHTb O6pa3yIOT NCKpbI, KOtOpBle MOrytBOcPNaMeHHTb NII NBIN Napbl.
c) Bo Bpemn nCnoB3OBAHnna 3neKtpOnHCTpyMeHTa He noDnyckaIte K ce6e DeTeu npyrnx Niu. Ecnn Bbl OTBneyeTecb, Bbl MoKeTe noTepeTb KOHTpoJIb HAd yCTpoINCTBOM.
3NeKtpnuecka 6e3onacHocTb
a) Bepernte 3JIeKTPoHnHCTpyMeHTbI OTdoXnIcbipocTn. IonaDaHne BOdbi BHyTpB 3JIeKTPoHHCTpyMeHTa NOBblIaet ONaCHOctb NopaxKeHNr 3JIeKTPuYeCKIM TOKOM.
БezonaachoctbIIOJeI
a) ByNbTe BHNMaTeJbHbI, cJeDnTe 3a TeM, yTo Bbl DeJaTe, n NpOxOuIne pa3ymHo K pa6oTe c 3neKTPoHnCtpymeHTom. He nCnoNb3ynte 3neKTPoHnCtpymeHT, ecn Bbl yCTaNN HaxODNTecb NOB BnnaHHem HApKOTnuecknx BeSeCTB, aJNKOrOJI NN MeDNKaMeHTOB. CeKHyHdHa HEBHNMaTeJbHOCTb BO BpEmr INcNoIb-30BaHnA 3neKTPoHnCtpymeHTa MoKeT npNBecTu K cepBe3HbIM TpaBMam.
b)Bcerda nCnoIb3yIte cpeCTBa HnDnBnDyaJIbHON 3aunTbI N HocHTe 3aunTHbIe OcKn. NcnoIb-3OBAHne CpeCTB INDnBnDyaJIbHOH 3aunTbI, TaKHX KaK nbIe3aunTHaMacka, HeCKoJIb3aJua3aunTHaOByB, KACKA INN IpOTnBOUHMhIE HayuHNKi, B 3aBNCIMOCTN OT TnPa I CNOCo6a npImeHeHna 3JeKTPoINHCTpymeHTa, CHNkaeT pNCK POnyueHn TpaBM.
c) PnIMTe MepbI, NCKIOaOuJe 3anyck yCTPOCTBa No HeoctopoxHocTn. IpePe NOKIOueHEm 3JEKTponHCtpymeHa K 3JEKTpUeCKoN CeTH n/ INN KaKKyMylrTopHO Batapee, a TaKKe IpePe erO NOBemOM N IpeHoCKoYbEaNTecb, YTO 3JEKTPOHCTpyMeHT BbIKIOueH. EcIN BO BpeMa IpeHoCKn 3JEKTponHCtpymeHa DepXaTb NaIeCu Ha BbIKIOuHaTe- JIe INN OCTaBtB eR O BKIOUeHHbIM B 3JEKTpUeCKyo CETb, 3TO MOKET PPUBECTN K HeCuaCTbIM CInyHaAM.
Yka3aHnnoTexHnke6e3onachOCTn
d) IpeeB BkIIOueHEm 3JIeKTPoHnHCTpyMeHTa y6epnte peRyInpOBOUHbIe IHCTpyMeHTbI n raeuHbIe KJIouH. INCTpyMeHT uIN KJIIOU, HaxoJaunsc BO BpaauoUeNc DeTaN YcTPOuCTBa, MOKeT npNBecTu K TpaBMam.
e) N36eraIte Heyo6hIx NOIOKeHn TeHa. CnE dTe 3a XopoWey yCTOuYBOcTbIO n Bcerda NoepKNaIe paBHOBeCne. 3TO NO3BOJNT Bam lyUwe KOHTpOJInpOBAt b 3JIeKtpOnHCTpyMeHT B HeOxNJaHHbIX CNTyaUnx.
f) Hocnte noDxOaIyO oExdy. He hocnte npoctopHyO oExdy n nn ykpaewHn. Depxnte BOJIOcbl, OExdy n nepaTkn BdaTI N OT DBNxyuXcR deTanei. IodBHXhIe DeTaII MOnr 3axBaNTb CBO6oNDHyO oExdy, ykpaewHn n nn dnnHHle BOIOcbl.
IcnoIb3OBAHne 3NeKtpOnHcTpymeHTa n o6paueHne c Hm
a) He neperpykaite yctpoinCTBO. IcnoIb3ynte dIra pa60tI nOxOJaIIN 3NeKTPoHnCtpymENT.C nOJ xOJaIIM 3JIeKTPoHnCtpymENTOM Bbl moXeTaB lyuwe i 6e3oNachee B yka3aHHom pa6oHem dnaana3oHe.
b) He nCnoB3yIte 3JIeKtpOHCTpyMeHT C HEnCnPabHBIM NepeKJIIOHaTeJEM. 3JIeKtpOHCTpyMeHT, KOTOpBn IpeCTaJI BKNIOUOHaTbCRA JIN BBIKIOUOHaTbCRA, YBJIaETcR ONaChbIM N HyKDaETCB PemOHTe.
c) Npeed BbINOJIHeHem peryInpOBOK yCTpOInCTBa, 3aMeHOI npHaJnxHocTe Hn nepepeBbOM pa60Tb C Hm BbIHbTe CeTeByIO BNkYn3 PO3ETKn n/nn CHMNTe AKKymJITOPHYo 6atapeio. Tn MEPbl NO3BOJr NT6ExKaTb He- npeDbNdeHHoro 3anycka 3neKTPOINHCTpyMeHTa.
d) XpaHnTe HeNCNoB3yEmbIe 3NeKTPoHnCtpymeHTbIB He DoCTynHom dIa DeTeMecTe. He No3BoJnTe Hc NOJIb3OBAtB yCTPOHCTBO JNlUaM, KOTOpbIe He O3HaKOMnINCb C Hm NII KOTOpbIe He IpoQyN DaHHbIE HNCTpyKqMN. 3NeKTPoHnCtpymeHTbI YBnIYOTcR ONaHbIMN, ECNI OHN NCNOB3yOTcR HEONbITbIMN JNlUaMn.
e) TuaTeNbHO yxaKaBaIte 3a 3neKtpOnHCTpyMeHTAMN. Y6eInTecb B 6e3ynpueHoi pa6ote NOBnXhblx DeTaIe, OTCyTCTBnN x 3aeHaHH, N0lOMOK NOBpeXdEHN, HApYsAIOuNX pa6Oly 3JekTPoHcTpymEtA. IpeD npmHeHem NOBpeXdEHbIe DeTaII NDOJXHbI 6bITb OTpeMOHTIpOBAHbl. PpUHHoM MHOIX HeCchaTbIX CnyaEB ABLJeTcR NIOXoe TEXHueCKOE 6cbNyKbAHne 3JekTPoHcTpymEtOB.
f) Pexyuune uHCTpyMeHTbI DOJXHBi 6bITb OcTpblMN uNCHTBIMN. YxoxeHHbIe pexyuine uHCTpyMeHTbIC OCTpbIMN pexyuImM KpOMkAm 3aeaIOTpeKe uNX Ierue HAnpaBnTb BO Bpempa60tbl.
g)NcnoJb3yIte 3JIeKtpOnHCTpymeHT, npHaJd- NEXHOCTH, BCTABHbIe NHCTpymeHTbI IN T. D. B COOTBETCTBnC 3TmMn NHCTpyKUaMn. Pn3TOM yHTbIBaTe pa6Oyne ycNoBn H BblONHReMbIN BND pa6ObI. PnpMeHeHne 3JIeKtpOnHCTpymeHTOB B cEJx, OTNIuHbIX OT npEdyCMoTpeHHbIX, MOXET pInBeCTN K ONaChbIM CNTyaUaMn.
IcnoJb3OBAHHe aKKyMylTOpHOro IHCTpyMeHTa N o6paueHHe c Hm
a) 3apaxaTe aKymyIaTOPbIe 6aTapeu TOnbKO C NOMOsbIO 3apAaHbIX yCTpOInCTB, peKomeHDoBaHHbIX npoN3BOAnTeJem. OnacHocTB noXapa npi nCNoJIb3OBAHn 3apAHO rO yCTpOInCTBa, paccHTaHHOrHa onpeJeHeHHbI rIN aKKymyIaTOpHbIX 6aTapei, c aKKymyIaTOphbIMn 6aTapeMm dpyrOToTnA.
b) IcnoIb3yIte B 3JekTpOuHCTpyMeHTax ToIbko npedHa3HaueHHbIe dIra Hnx akKymJaTOpHbIe 6aTapen. IcnoIb3oBaHne dpyrnx aKKymJaTOpHbIX OaTapen MoXet PnBECTN K TpaBMam N OnacHOCTn Noxapa.
c)He depknte He nCnoB3yIOuNecra aKKymyIaTOpHbIe 6aTapen pAOM c KaHcIepckMnCKpeKamN,MOHeTamN,KIOUaMn,ΓBO3dAMN, WypynAm NIN DpyrMM MeKNM MeTaJIINYeCKMn PpeDMeTAMN, KOTOpBIE MOrY T 3aMKHyTb INX KOHTaKTbl. KopotKoe 3aMbIkaHne MeKdy KOHTaKTAm aKKymyIaTOpHOJ 6aTapen MoKet npNBecTNI KOKoRAM INN K NOxApy.
d) B cnyuae HnpaBnIbHoro npimeHeHn 3 akKymyIaTOPHO 6aTapeH MoXeB BblTeYb XNDKOCTb. N36eraute KOtAKTa C Hei. Ppu cnyaHOM KOnTAKe IpnOme BoDoH. B cnyuaeNONaHaHn XNkOCTn B rJa3a DOONHHTeBHO O6paTInTeCb 3a MeDnUHcKo NmOoubHO BblTeKwA aKKymyIaTOPHaJ XNkOCTb MOXeTnpNBecTn K pa3dpaxHeHnM KOxN INN OXOrAM.
CepBnchoe 06cnyKnaHne
a)IopyuAte peMOHT BaWero 3NeKtpOHcTpyMeHTa TOJbKO KBaINΦnUPOBaHHbIM CneuHaNCTAm N TOJbKO C NcNOJb3OBAHHeM OpRnHaNbHbIX 3aNCACTeN. 3TO NO3BOJNT COxpaHHTb6e3OnacHOCTb 3NeKtpOHcTpyMeHTa.
Yka3aHnno TeXnKe 6e3OnacHocTn dJa ra3oHHbIX HOxHnU
ДерхиTe BCEЧаТи TEЯ ВдAn OT HOxa. He nbIaTecb ydaJIaTb obpe3aHbI MaTePnaI nIIy ydepxnBaTb obpe3aEmbI MaTePnaI BO Bpempa6ToBHOxa.YdAnrYe 3acTpRbUm IOpe3aHHbIM MaTePnaI TOJbKO NocLe Bbl- KInOueHnY cTpoNCTBa.CeKHyDHaRe HEBHMaTeJIbHoCTb BO BpeM YcNoJIb30BaHnRA3OHbIX HOxHnC MoXeT npNBecTn K cepbe3HbIM TpaBMam.
IpehenocTe ra3oHHbIe HOXHnUcI TOJIbKO npBbIKIOueHHOM DBNrAteNe I OCTaHOBJIeHHOM HOKe.Bo Bpem TpaHCnOpTnPOBKn IIN XpaHeHnra3oHHbIX HOXHnC BCERDa HaDeBaHTe 3aunTHbIyexOJ.OctopoxKhoe o6paueHne cycTroPcTBOM yMeHbShaet OnaCHOCTb TpaBMnPoBaHnHOxOM.
Yka3aHnno TExHnke 6e3OnachOCTn
ДерхиTe 3ЛeКТponHCTpyMeHT TOJbKO 3a H30-ЛИрOBaHHbIe NOBepxHOCTHДЯ 3axBaTа,ТAK KaK HOx MOxET COpNkoCHyTbCЯ CO CkPbITbIM 3ЛeKТponPoBOdAmu Ин Jс CceTeBBIM Ka6eIem yctpoiCTBa.В pe3yIbTaTe KOHTaK-Ta HOxCa HaxODAIzMcя NOd HAnpJxHeHEm NPOBODOM MeTaNIIueCKne DeTaNl YcTpoiCTBa NonaIaOT NOd HAnpJxKeHne,чTO MOxET pInBeCTN K NopaxKeHIO 3JIeKTPnueCKm TOKOM.
O6cneNyTe ra3OH Ha HAnuHne cKpbITbIX 06bEKTOB, HanpMep, KamHei, npoBOJOKN T. n.
Bo Bpempa6oTbI cra0HHbIMN HOXHncaMn HIN BO3ne HIX Bcerda Hocnte npouHyO 6yBb N DnHHbIe Wtahbl, a TaKxe NCNoJb3yInTe NOxOJaUne CpeDCTBa INHNBnDyaJIbHOH 3aunTbI (3aunTHbIe OChK, nPOTNBOwymHbIe HayuHKn, pa6Oue nepaATKn T. d.). IcnoJb-3OBaHHe CpeDCTB INDNBnDyaJIbHOH 3aUnTbI CHJxAet ONaCHOCTb TpaBM. He Hocnte Cbo6oHyO ODEXy N T. P., KOTOPa MoKET 6bITb 3axBaYeHa peKyuIm NHCTpyMeHTOM.
Kpenko depknte yctpoicTBo o6enmu pykampeepnpnmeHneM
BbIKIOHTe yCTPOINCTBO N OTCOEDHINTe OT HrO uTahry ynpaBHeHn IocNe KOHTaKTA C NOCTOPOHnM npEMeTOM. PpOBepTe yCTPOINCTBO Ha NaIInue NOBpeXJeHn N O6paNTecb B CNEuAIN3NpOBaHHyU MaCTepCKyU DnI INx UcTpaHEnHn.
EcnycpoCTBOHaHTCnHkOMCNbHO Bn6pnpoBaTb,BblIOUHTeeroNOTCOEHNTe OT Hero WtAHy ynpabJeHn.Obpatntecb BCNEuaJIIN3IPOBAHHyIO MaCTepCKyIO JnI npOBepKn I pni Heo6XOIMOCTN peMOHTa.
HnBnuIbHa 3aunTa n 3aunTa npyrnx
He 3anyckaIte ra3oHHbIe HOXHnUcbl, ecJN B HEnocpeDCTBeHHoB 6IIN3OCTn HaxoJrTcA IHOu (B OOC6eHHOCTn - DeTu) JIn JKNBOTHbIe. CJIeInte 3a Tem, YTO6bl DeTu He INpAnC rA3OHbIMN HOXHnUcaMn.
BbIKIOHHTe MaUNHy, ecn pRdOM hXoTcR JHO (B OOC6eHHOCTN - DeTn) NIN DOMaUHHe XNBOTHbIe.
3To yctpoCTBO He DoJXHO 3KcnnyaTnpoBaTcBn DeTbMn NIuCaMn C OpraHnueHHbIMNΦn3NuYeCKmN, CeHCOPHBIMn Nn UyMcTBeHNbIMn CnOco6HoCTaMn, a TaKxE - npn OTcyTCTBn ONbITA n 3HaHn. Kpome TOrO, 3To yctpoCTBO He DoJXHO 3KcnnyaTnpoBaTcBnIuCaMn, He O3HaKOMNBWMncs C HactoaMpyKOBoDcTBom NO 3KcnNyataun. MeCThie npednncaHnMyrOy TycTaHaBnBaTb OpraHnueHnra Bo3paCTa NOnb3OBaTeJeN.
Bknioaute DburaTeIb ToIbko npu ycNoBn, UTO Baun HOrn u pyKn HaxoJrTc Ha 6e3onacHOM pacCToAHn OT pexyUero yCTpoNCTBa.
EcN Bbl co6npaTeCb ocTaBnTb MaunHy 6e3 npncmOTpa nn ydaNTb 3a6NBwnncr B Hee MaTePnaI, BcERda OTKlOuaTe MaunHy OT 3NeKtpoNTaHn.Перед наразим pa60тbl O3HaKOMbTecb c ra3OHbIMN HOXHncaMn,nxФуHKnmaN n 3JIeMeHTaMn ynpabJIeHn.
He nCnoJb3yIte ra3oHbIe HOxHnUcbl,ecn Ix BbIKNIOuYaTeIb HeNCnpaBeH NepeCTaI BKIOUaTbcra NII BBIKNIOuATbcr. NopyHTe erOp eMOHT KBaJIINΦuINPOBaHHOMy CneuaJIInCTy NII cNeuaJIIN3uPObAHHO MaCTepCKOi.
He 3KcNpyuTy eYCTpOcTBo C NOBpeXDeHbIMn HIN OTCyTCTBYIOUIMN 3aUNTHbIMN yCTPOIcTBAMn IN KpbIiKamn. IopyuHTe INx peMOHT INN 3aMeHy KBaIIuΦuNpuOBaHHOMy CneUaINCtTy INN CNEuNaIIm3NuPoBAHHoM MacTePcKOJ.
Передизменин Habстpoek yctpoicTBa Ии erо ouhCTKoB BblIOHHTe yctpoiCTBO ИИЗВЛЕКЛТЕ wTaHry ynpaBJIeHn, B KOTOPОн HaxODIITcAKKymyIaTOp.
He 3KcnpnytpyTe ra3oHHbIe HOXHnCbIC HeNCppaBhbIM nnn CnIbHO N3HOWeHHbIM peJxUm yCTpoiCTBOM. IopyuAHTe nx pemont nnn 3ameHy KBaJIncnPupOBaHHOMy cneuAnCTy nnn Cneuaan3nPobAHHO MaCTepCKoI.
BoBpeM npImMeHeHn
Почтinteи co6nIOdaIte Tpe6OBaHna pyKoBOODCTBa NO 3KcNpyatauIN 3apAHorO yctpoiCTBa N wTaHr n ynpaBHeHna, B KOTopoJ yCTaHOBJIeH aKKyMylTOp.
Bo Bpem nepepbIBOB pa6oTe Hn B KOEM cnyuae He octaBnIte ra3OHHbIe HOXHNuBi 6e3 npncmOTpa n XpaHnTe nx B HaJeKHom MecTe.
Bo BpemBkIIOueHnra3OHbIX HOXHNu depXnTe nX npaJIeNbHO 3eMJe, B npOTNBHom Cnyae cyecTByeT onacHOCTb TpaBM.
Bo Bpempa6oTbI BbIepeKnBaIte 6e3onacHoe pacCTOaHHe K pexyUeMy HhCTpyMeHTy.
BydbTe oO6eHHO OCTopoXHbI, DBuRaCb Ha3ad. OnaCHOCTb cNOTbikaHnra!
Bo Bpem TpaHcnpTnpOBn yctpoNCTBa npn nepexoJe Mekdy OTdEJIbHbIM MeCTaMn pa60tbl Bcerda BblKnIouaIte DBNrAteJb.
Yka3aHnnoTexHnke6e3onachOCTn
He nepembikaTe yctaHOBHeHbIe Ha ycTpoiCTBe ycTPOiCTBa BKIOUeHn N BbIKIOUeHn N He H3MeHnTeHX (HaNPmEp, NyTem npMa-tbIBAHN BAIKIOUaTeJIa Ha pyKoTKe).
NocToHNO cJeIte 3a OkpykaOuSei o6ctaHOBkoN uYHTbIBaIe BO3MOXHbIe paKTOpblOnaCHOCTN, KOtOpbIE BbI He MoKeTe ycJIbIwATb n3-3a Wyma ot pa6oTaIOUero yCTpoINCTBa.
Yka3aHna, kacaOuunecBn6paun:
Bn6paun MoKet npNBeCTn K NOBpeKeHnM HepBHO nCtEmbI HApUeHNO cIpKyJauu KPOBn B cocydaX pyk N ppeDnJeuN.
Bo BpeMa pa6oTbI npHn3KoN TempepaType HocHTe TepnyO OdekU n CneDntE, YTO6bl Baun pyKn 6bln B TeNne n cyxImn.
ДeJaTe nepepbIbbl.
B cnyae OHemHn KOx n naIbueB nn pyK, NOBHeHn 3yda, 60JeBbIX OuyeHn nn no-6eHn npekpaTne pa6Ory C MaunHOu N, B cnyae Heo6xoDmocTn, o6paTneTcB K BpaUy.Yka3aHHbIe 3HaueHnBn6paUHOHNOHMmCCNN:
-Измеряотся по CTaHДapTn3NUpOBaHHOу MeTO-DIke NcblTaHn.
I03BOJIAOT OueHnBaTb yPOBEH 3MnCCnI 3NEKTPoHnCTpyMeHTa N BblIOJIHHaTb CpABHeHne pa3NIuHbIX 3NEKTPoHnCTpyMeHTOB. B 3aBNCIMOCTN OT ycNOBn IpIMeHHeH, COCTOHN 3NEKTPoHnCTpyMeHTa INI pa6Oyero IHCTpyMeHTa PaKTtuecka Harpy3ka MoKeT 6blTB 6ONbWe INI MeHbWe. PnB BblONHeHn OceHN KUyHTbBAIte NepepbIBbI B pa6Ote INepNoDbl Hn3KOH Harpy3Kn. PpIMTe MEPbl 3aunTbI, COOTBeTCTByIOUne IN3MepeHHbIM 3HaueHnAM, HApPIMep,oprAHHaUNOHhble MEPbl.
Pocne npmeHenna
BbIKIOHTe yCTPOINCTBO,OTCOEHNHTe OT Hero wTaHry ynpaBHeHn I npOBepbTe yCTPOINCTBO Ha npeDMET NOBpeKdEHN. BHMaHne, onacHocTb! Pexyun mNCHtpymeHT pa6Otaet no INhePun!
Ecnn Bam Heo6xOJMo BbINOHNHTb pa60TbI NO TexHnueckomy 06cnyXnBaHNIO N OuNCTke yCtpoiCTBa, BblIKlOHTeero N OTcoEINHNTe OT Hero wTaHry ynpaBHeHna.
Bcerda doxndaTecb octaHOBKn pekyuero HnCTpyMeHTa.
CHImaTb 3aunTHbIe ycTpoNCTBa MOxHO TOnb-KO npn BbIKNoyehHom DBNrAtene N OTCoeHNHeHHo WtahRe ynpabJeHn.
CneiTe 3a TeM, yTo6bI BeHTnJIaUNOHHbIE 9eHN He 6bln 3arpa3HeHbl.
He MoTe ra3OHHbIe HOXHNcBi BODoI.
ПослпримеониИВслуаe HeNCNoIb-3OBaHnBcERda yctaHaBnBaIte 3aunTHbI KoxyX.
06zne yka3aHnno TeXnke 6e3OnacHocTn
3aunactn DOJXHbI COOTBeTCTBOBaTb Tpe6oBaHnM, yCTaHOBHeHHbIM npOn3BOdnteNem.1030my nCNOJb3yIte TOJbKO oprHnHaJIbHbIe 3aunactn IIN ODo6peHHbIe npOn3BODnteNem3aunactn. Ppi 3ame He BcERda Co6nIOdaTe npInraeMbIe IHCTpyKUIN NO yCTaHOBKe, ppeBapNTeJIbHO OTCOeDNHTe UTAHry ynpabJeHnA, B KOTOPON HaxODNTcAKKMyJLANTop.
IopuyaIte npoBeHne peMOHTa NCKIOUyTeIbHO KBaIIuΦnIupOBaHHOMy CneuaJIInCTUINcneuaJIN3NpOBAHHoMactepckoi. Adepca cneuaJIN3npOBaHHbIX MacTepckx yka-3aHbI Ha HaWei Be6-CTpaHnce.
3Tn ra30HbIe HOXHnCbI npeHa3HaueHbI IyXoDa 3a ra3OHOM B DOMaUHem XO3YNCBc.
13-3a onachocTN TpaBMnpOBaHn NOJb3OBaTeJI
IIIN dpyrNX JIODeYCTPONCTBO HeJIb3Y NCNOJIb-
3OBaTb B HECBOINCTBEHHbIX EMy CEJAX.
Дахе npс co6nIOeHnB CEx yka3aHnNo TExHke 6e3oNaChOcTn uypaBNeHnO cyueCTByeT OCTaTOUHbI PNCK TpaBM N MaTePn- anbHorO yuep6a. Bcerda nomHnte o6 3tOM.
He 3Kcnnyatpyy Te yCTpoNCTBO BO BpeMa Doxna nn rpo3bl.
YcTaHaBnBaIte Ha ycTpOoiCTBO HOBbIe yKa3aTeIbHbIe Ta6JIuKIN BMeCTO N3HOWeHHbIX INN NOBpeXdeHHbIX.
NcnoIb3yIte ToIbKO OoOpeHHbIe npOn3BODnTeJem aKKymJrTOpHbIe 6atapei, WtAHn ynpaBHeHn C nHTerpnpoBaHHbIMn aKKymJrTOpAMn I 3apAHybe YCTPONCTBa. O6o3HaueHn Oo6peHHbIX aKKymJrTOpHbIX 6atapei n WtAnr ynpaBHeHn C nHTerpnpoBaHNbIMn aKKymJrTOpAMn yka3aHbI B npInaRaemOJ DeKnapaun COOTBeTCTBn EC.
PpimMeHHeNoHa3HaueHnIO
Tae Tae Ta 3a pAMN rOJICTBe. IIO6oe BbIXoJIe ee 3a 3TN paMK INCNOJB3OBAHne CHTaETcR npIMHeHem He NO Ha3HaYeHIO. 3a yep6, npON3oWeDmB cIyae npIMeHnHe No HA3HaYeHIO, OTBeyaET NOb3OBaTeJIb.
PacnopTna Ta6nUka
IOnJoxKeHne
PacnopTHa Ta6JnUka HaxOuNTcHa KOpnyce yCTpoiCTBa.
CtpyKTypa G
1 PpOn3BODInTeJIb
2pynnna yctpoicTB
3Ha3BaHneMoJeJI
4 HomnHaJIbHoe HAnpJxKeHne, TnT ToKa
5 Bec
6CTeeneh3aunTbI
7 yKa3aHne no yTuJIn3aUIN
8ToaBbInycka
9「apaHTnIpOBaHHoe3HaueHne 3ByKOBoMooHOCTH
103HaKCE
11Homep moeJIu
12 CepinHbH HOMep
3JIeMeHTbI ynpaBJeHnA
3JIeMeHbI ynpaBneHnHa
1 KhoIka 6JIOKINPOBKN BKJIIOUeHnA
2 BbiknioaTeIb Ha pyuKe
3 PykoTka
4 MeToIpyKn/MecToKpeJIeHnOOnuHaJIbHOcpeHNe pyKOaTKN
5 5tahra ynpablenen *C nHTerpnpoBaHHbIM akkymyIaTOpOM
6 KhoIka pa36nOKnpOBKn
7 Hox
8 3aunTHbIKoKyx
9 Koneca
10 KhonkaФнкcaumpeynpovBkn pa6oeryrla
*Heo6xOaMbI 3JIeMeHT ynpabJeHnA (He BXoNT B KOMPJIeKT NOCTaBKn)
BBoD B 3KcnnyaTaunio
DOnONHHTeJIbHaJ DOKyMeHTaU

BBOHTE yCTPOINCTBO B 3KcNPyATAUIOIINb B TOM cnyae,ecn y Bac IMeIOTc npNJaraEMbIE pyKOBoDCTBa NO3KcNPyATAuHN 3apJHOrO yCTPOINCTBaI WtAHrN ynpablenn N Bbl noHAn n co6JIHOaTe nx.
3apnka akkymyIaTopa

PPEyPPEXDEHNE!

3apjKaTb aKKMyJrTOJbKO C NOMOcHOb Oo6peHHOro npOn3BODHTeJIem 3apJdHorO yCTpoiCTBa. O603aueHnro Oo6peHHbIX 3apJdHbIX yCTpoiCTB yka3aHbI B npUNaRaEMoI DeKnapaun COOTBeTCTBnE EC.
BhumaHue!
AkkymyIaTOP NOCTABTRETCB YACTNUHO 3apxKehHom COCTOHN.ДЯ OBeCneHnRA NOHOM MOUHOCTH aKKymyIaTOPHO BAtapeN NOHOCTBIO 3aprAnTe ee neped nepBbIM NcNoJIb3OBaHHeM.

OCTOPOXHO!

AkkymyIaTOp INTeTpPoBaH B IUtHaRy ynpabNeHn.
→3apyInte aKKymJITOP B COOTBETCTBUN C H-CTpyKUIMN, CODEpXaUIMMCRA B DOONHHTeJIbHOJ DOKyMeHTaUIN.
Perynnpovka pa6oeryrnaA B

PENEYNPEXKDEHNE!

OnachocTb TpaBMnpoBaHnapeKyuIMMHCTpyMeHToM.
BbInonHnIe HAcTpoNky yCtpoNCTBa TOJbKO pRn BbIKNIOHcHOM DnIRaTeNe IN HeNoDBNXHOMpeKyuEEMNHCTpyMeHTe.
Передлioбын pa6oTamHa yctpoiCTBe OTOeINHЯITE UTaHry ynpaBJeHnRA,В KOTOpO HAXODHTcAKKMyJrTOp.
PpeDyCMOTpeHO (B 3aBNCIMOCn OT nCNOJHeHn) 7 BapnaHTOB perynipOBKn pa6oeryrna yrna ycTpoIcTbA. Blaornapa IM MOxHo ydo6Ho nO6uPaTbcK CLOXHBIM IN TpydHOIOCTyINHbIM MeCTaM.
PerynnpobKa no ropn3oHTaJI A
HaxMnte KHOJkyΦHKCaUNu ydepxuBaHTe ee B HaxkATOM NIOJOKeHN 1.
→HactpoTe pa6oyny
→ OTnyctnte KhoNkY qNKcaunn.
KhoNka qnKcaunra3oHHbIX HOxHnCnKcnpyeTcRcoIeJyKom.
Perynnpobka no BepTukkai E
→NotaHnTe roJIOBky ra3OHbIX HOxHnU [A] Bnpei n ydepkBaIte ee 1.
→ПовернITE Гловку HOЖиц Ha 90° BЛЕВО ИЛN BnpaBO 2.
MeDneHNO nepemeCTNTe rONOBKY HOXHNu Ha3aI, noka OHa He 3aΦNKcnpyETcB 3TOM NIOJOKEHIN
YcTpaHHeH HeCnPaBHOCTe

PNEyPEXKDEHNE!

Onachoctb noJyehn TpaBM n NOBpeKdEHN mMyeCTBa
При BO3нКНовен ComHeHи BCeIa O6paauTecb B CneuaJIuN3IpoBaHHyIO MaCTepckyIO.
Перед Каддю npоверков Ии пегд Наом pa6OT c yctpoiCTBOM BbIKIOUaIte DBURAteNB OTOcoeINHЯITE wTaHry ynpabNeHn.
PpO6Jema Bo3MOxHa npuHa Cnoc06 ycTapeHnA