LT 25 eM - Grass trimmer Wolf Garten - Free user manual and instructions
Find the device manual for free LT 25 eM Wolf Garten in PDF.
| Product type | Cordless electric grass trimmer |
| Brand | Wolf Garten |
| Model | LT 25 eM |
| Category | Grass trimmer |
| Power supply | Lithium-ion battery permanently mounted in the handle (removable) |
| Rated voltage | 18 V (typical, depending on approved battery) |
| Weight | Approx. 2.5 kg (estimate) |
| Angle adjustment | 3 positions |
| Line adjustment | Automatic (at each start/stop) and manual |
| Line type | Nylon (original spool) |
| Protective cover | Yes, removable for spool replacement |
| Handle | Main handle with switch and optional center handle |
| Control handle | Removable with integrated battery (not supplied with the device) |
| Operation | On/off switch with locking switch |
| Safety | Mandatory eye and ear protection; protective cover; automatic shut-off |
| Maintenance | Brush cleaning; do not wash with water; replace spool if necessary |
| Spare parts | Spool, spool cover, line cutting blade, protective cover |
| Warranty | According to manufacturer's conditions (see manual) |
| Intended use | Domestic: lawn and edge maintenance |
| Certification | CE marking |
Frequently Asked Questions - LT 25 eM Wolf Garten
User questions about LT 25 eM Wolf Garten
0 question about this device. Answer the ones you know or ask your own.
Ask a new question about this device
Download the instructions for your Grass trimmer in PDF format for free! Find your manual LT 25 eM - Wolf Garten and take your electronic device back in hand. On this page are published all the documents necessary for the use of your device. LT 25 eM by Wolf Garten.
USER MANUAL LT 25 eM Wolf Garten
natural_image
Illustration of a long-hand adjustable tool with handle and base (no text or symbols)
Rasentrimmer
Trimmer
Taille-herbe
LT 25 eM
text_image
A B ① A ② C
text_image
B ① A ② B
text_image
C "clic" ① ②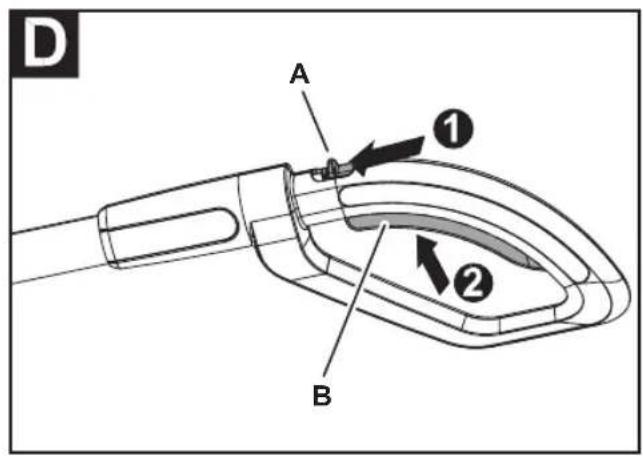
text_image
D A ① ② B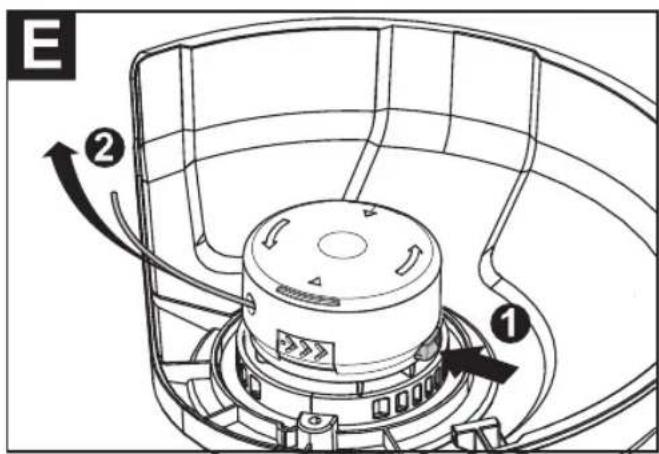
text_image
E ② ①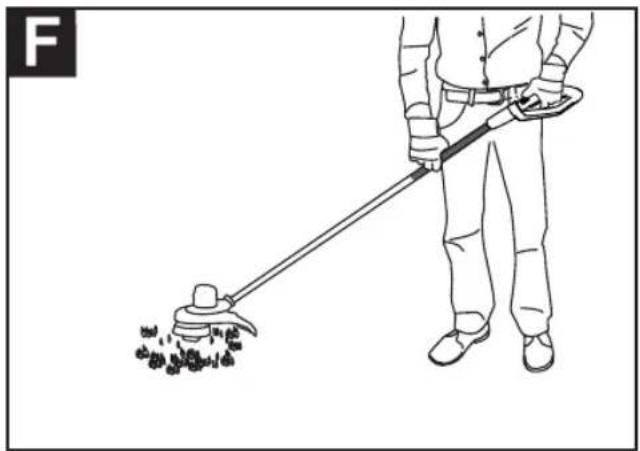
natural_image
Line drawing of a person using a long-handled tool to clean debris (no text or symbols)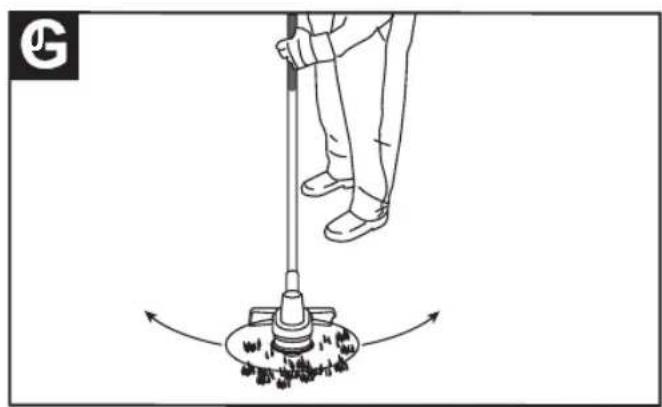
natural_image
Line drawing of a person using a mop to lift a surface with arrows indicating motion (no text or symbols)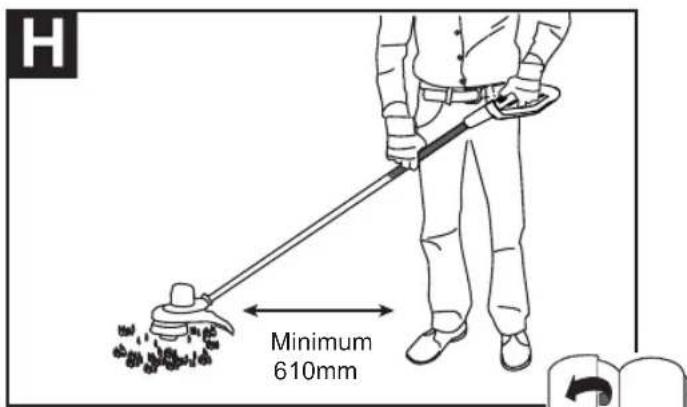
text_image
H Minimum 610mm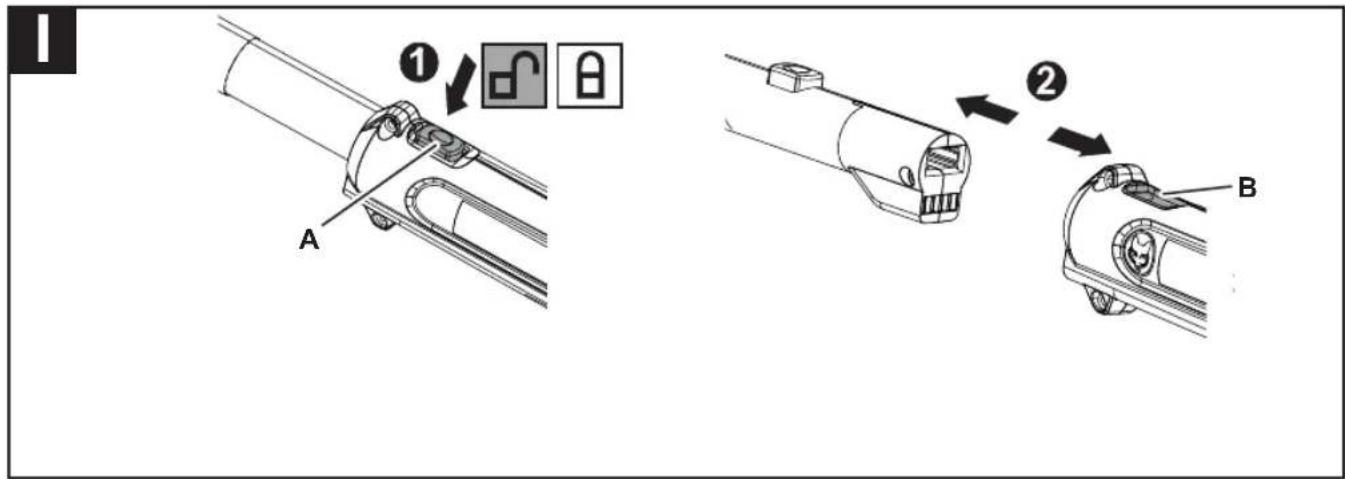
text_image
① A ② B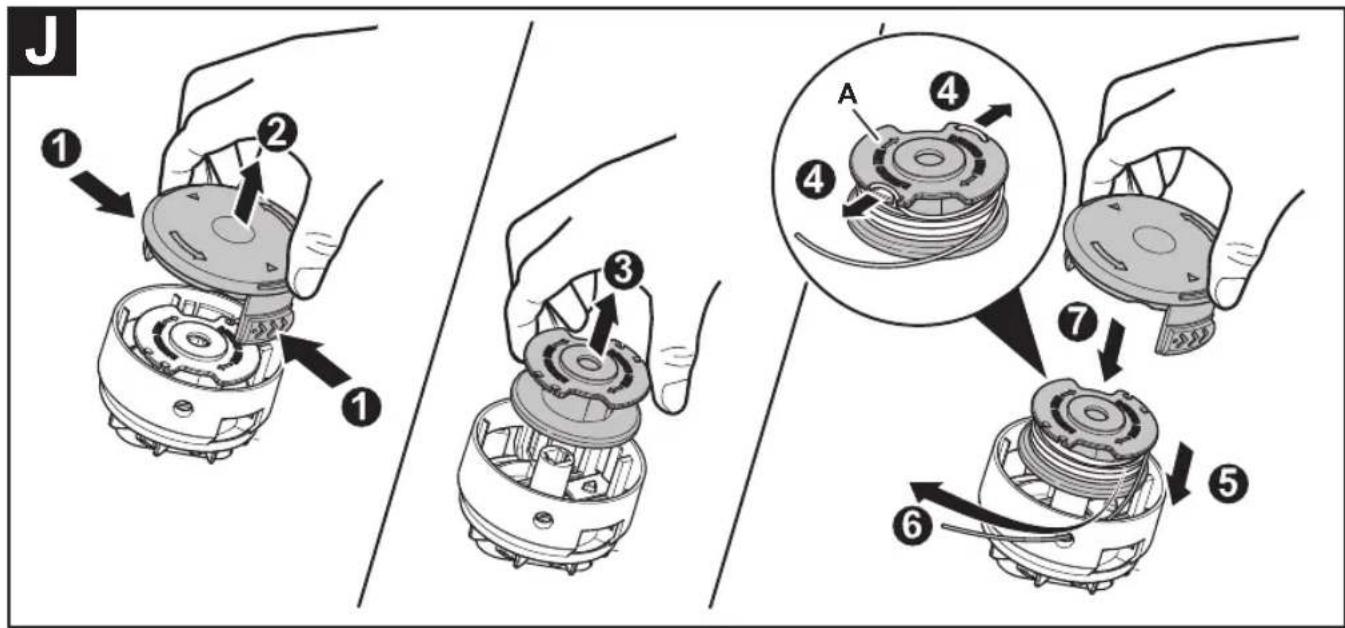
text_image
J 1 2 1 3 A 4 7 5 6
text_image
K 1 MTD Products AG Industriestraße 23 D-66129 Saarbrücken 2 Lawn Trimmer 3 LT 25 eM 4 5 6 12 11 72XXXXXXXX650 XXXXXXXXXXXX 18V XX min⁻¹ XX kg 10 CE xxxx 7 8 9 LWA XXX dBL
text_image
Technical diagram of a cleaning tool with numbered parts for identification
DE Deutsch 8
(Original operating instructions)
FR Français 27
Meaning of the symbols....18
For your safety....19
Safety information....20
Intended use....22
Identification plate....22
Operating controls 22
First use....22
Assembly 23
Operation....23
Servicing....24
Transport and storage 25
Troubleshooting....26
Warranty 26
CE Declaration of Conformity 26
Environmentally-friendly disposal 26
Meaning of the symbols

WARNING!
To reduce the risk of injury, read the instruction manual!


Wear safety goggles! / Wear ear defenders!

Wear ear defenders!

Wear safety goggles!
Caution!
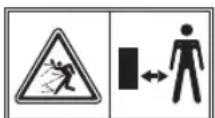
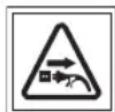
Do not allow any other persons to enter the danger area.
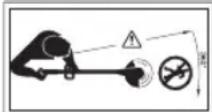

Do not leave the device in the rain!
Danger! Pull out the mains plug before adjustment, cleaning or servicing and if the power cable is damaged!
- When using mains powered machines.

Note
Observe the symbols and their meaning in the operating manual for the operating arm.
For your safety

Before using your device for the first time, read this instruction manual carefully and observe the instructions.
Keep this instruction manual for later use or subsequent owners.
Read all safety information and instructions.
Failure to observe safety information and instructions may lead to electric shock, fire and/or severe injury.
Keep all information on safety precautions and instructions for future use.
→The term "power tool" used in the safety information refers to mains-powered electrical tools (with a mains cable) and power pack-powered electrical tools (without a mains cable).
→ Before using for the first time, you must read the safety information!
Failure to observe the instruction manual and the safety instructions can result in damage to the device and danger for the operator and other persons.
→ All persons involved with first use, operation and servicing of the device, must have appropriate qualifications.
For your safety
The making of unauthorised changes or conversions is not permitted
Do not make any changes to the device or convert it to make other machinery. Such changes can result in personal injury and incorrect operation.
→ Repairs to the device must only be performed by trained persons who have been instructed to do so. When doing so always use original spare parts. This ensures that the safety of the device is maintained.
Information symbols in this manual
The signs and symbols in this manual should help you to use the manual and device quickly and safely.

Note
Information to ensure the most effective and practical use of the device.

Step
Requires you to perform an action.

Action result
This is the result of a sequence of steps.
[1]Item number
Item numbers are indicated in the text by square brackets [].
A Illustration label
Illustrations are numbered with letters and identified in the text.
① Step number
The defined sequence of steps is numbered and identified in the text.
Danger levels of warning information
The following danger levels are used in this instruction manual to indicate potentially dangerous situations:

DANGER!

A dangerous situation is highly likely and, if the measures are not followed, will result in severe injury and even death.

WARNING!

A dangerous situation may occur and, if the measures are not followed, will result in severe injury and even death.

CAUTION!

A dangerous situation may occur and, if the measures are not followed, will result in slight or minor injuries.
Attention!
A possibly harmful situation may occur which if not avoided will result in property damage.
Safety information content

DANGER!

Type and source of the danger!

Consequences of non-observation

Measure for preventing the danger

CAUTION!

The power pack is permanently installed in the operating arm.
Attention!
The power pack is permanently installed in the operating arm.
Safety information
Protection of yourself and others
For safety reasons, children or persons who are not familiar with the instruction manual and operation of the trimmer, must not use it. The minimum age of users may be defined by local or national legislation.
Do not operate the trimmer when there are people (especially children) or animals in the immediate vicinity. Ensure children do not play with the trimmer.
➢ Stop working if you notice any people (especially children) or pets nearby.
This device must not be used by children or persons with reduced physical, sensory or mental capabilities or with inadequate experience or insufficient knowledge. Likewise persons must be familiar with this instruction manual before using the device. The minimum age for using the device may be specified by local or national legislation.
- Cleaning and servicing may not be carried out by children.
Only switch the motor on if your feet and hands are at a safe distance from the cutting element.
Always wear sturdy shoes and long trousers as well as other appropriate personal protective equipment (safety glasses, ear defenders, safety gloves etc.) when working with the trimmer. The wearing of personal protective equipment minimises the risk of injury. Do not wear loose clothing, etc., which could be caught by the cutting tool.
The operator or user is responsible for accidents, injuries to other people or damage to their property.
Before use
Before use, make sure you are familiar with the trimmer, its functions and controls.
Do not use any trimmer whose switch is defective and which can no longer be switched on or off. It must be repaired by a qualified expert or workshop.
➢ Never use a device with damaged or missing guards or covers. They must be repaired or replaced by a qualified expert or workshop.
Before use, make sure that the lawn is free from branches, stones, wire etc. and look out for such objects the whole time when trimming.
Before making adjustments to the device or cleaning it, switch off the device and remove the operating arm in which the power pack is permanently installed.
Read and observe the operating instructions of the charger and the operating arm in which the power pack is permanently installed.
Tips for use
Beware of injuries to the feet and hand caused by the cutting element.
➢ Always remove the operating arm from the device:
- Whenever you leave the device unattended.
- Before removing blockages.
- Before checking cleaning or working on the device.
- After impacting a foreign body to check the device for damage.
- For immediate checking if the device starts to vibrate excessively.
Do not use the device in potentially explosive atmospheres containing flammable liquids, gases or dusts. The trimmer may create sparks, which could ignite the dust or vapours.
➢ Never leave the trimmer unattended during breaks and store it in a secure location.
➢ Hold the trimmer parallel to the lawn when switching on, otherwise there is a risk of injury.
Also when working maintain a safe distance relative to the rotating line.
Do not reach into the area of the rotating line.
Do not injure yourself on the line cutter. After pulling out new line, always hold the device in its normal working position before you switch it on.
Always hold on to the device with both hands during operation. One hand holds the handle, the other hand holds the operating arm in the cased area or the optionally available middle handle.
- Wear suitable safety goggles and ear defenders!
➢ Adopt a normal posture. Ensure you are standing securely and that you maintain your balance at all times. Pay particular attention, if you are working on a slope. Do not run, rather walk forwards at a steady pace. This will ensure that you can maintain better control of the device if unexpected situations occur.
Take extra care if you are walking backwards. Risk of tripping!
Safety information
➢ Remove the operating arm from the device when carrying the device to or from separate working positions.
➢ Never bypass or manipulate safety devices installed on the device.
Do not push the line box into the ground or hit it against wall edges. If the line box suddenly receives a heavy blow, be prepared for increased vibration at the handle. If this does occur, the device must be checked and, if necessary, repaired by a qualified expert or workshop.
Information about vibrations
Vibrations can cause nerve damage and impair the blood circulation in the hands and arms.
When working in the cold, wear warm clothing and keep your hands warm and dry.
Take breaks.
If you notice that the skin of your fingers or hands goes numb, tingles, hurts or goes white, stop working with the machine and, if necessary, consult a doctor.
The specified vibration emission values:
- Were measured according to a standardised testing procedure.
- Make it possible to estimate the power tool emissions and compare these with different power tools. Dependent on the conditions of use, the state of the power tool or tools inserted for use with it, the actual vibration load may be higher or lower. When estimating the emissions, consider doing so during work pauses and phases when the tool is under reduced load. Based on the correspondingly adjusted estimated values, take protective actions, e.g. organisational actions.
After use
Switch the device off, remove the operating arm, in which the permanently installed power pack is located, from the device and check the device for damage. Attention, danger! Cutting tool still running!
If you need to clean or service the device, switch it off and remove the operating arm, in which the power pack is located, from the device.
Always wait until the cutting tool comes to a standstill and do not touch any moving dangerous parts without first removing the operating arm, in which the permanently installed power pack is located, from the device.
➢ Removal of safety devices or replacement of the line spool must only be performed with the operating arm removed, in which the permanently installed power pack is located. Use only original line spools and observe the fitting instructions!
➢ Ensure that ventilation slots are free from dirt.
Do not clean the trimmer using water.
Store the device in a secure location.
Store the device out of reach of children.
Do not repair the device yourself; it must be repaired by a qualified expert or workshop.
➢ Let the device cool down before putting it away and/or storing it.
General safety information
➢ Never replace the non-metallic cutting element with a metallic cutting element!
Always wait until the cutting tool comes to a standstill and do not touch any moving dangerous parts without first removing the operating arm, in which the permanently installed power pack is located, from the device.
Spare parts must meet the requirements of the manufacturer. Therefore, use only original spare parts or those spare parts authorised by the manufacturer. When replacing spare parts, always observe the supplied fitting instructions. Remove the operating arm, in which the power pack is located, from the device beforehand.
➢ Repairs must only be performed by a qualified technician or service centre. Specialist workshop addresses can be found on our website.
Only use the power packs intended for this purpose in power tools.
Use of other power packs can result in injuries and fires.
This trimmer is intended for the care of lawn edges and smaller grass and lawn areas in private households. The device must not be used for purposes other than those intended because of the risk of bodily injury to the user or other persons.
Only use the trimmer in daylight or under bright artificial light. Keep your work area clean and well lit.
Only use the trimmer in dry weather conditions. Keep the device away from rain or dampness and do not use it during a storm. The ingress of water into the trimmer increases the risk of an electric shock.
Safety information
Prior to removal of the operating arm, the device must be switched off beforehand.
Even if all safety and operating instructions are heeded, there is always a residual risk of injury and property damage. Always bear this in mind.
➢ Replace all worn or damaged information signs on the device.
Only use the power packs/operating arms approved by the manufacturer with permanently installed power packs and chargers.
The designations of the approved power packs/ operating arms with permanently installed power packs and chargers are listed in the enclosed CE Declaration of Conformity.
For reasons of safety, installation/removal and disposal of the power pack in the operating arm may only be performed by a specialist workshop during the service life of the device.
Intended use
The trimmer with inserted line spool is intended solely for the care of lawn edges and smaller grass and lawn areas in private households.
Any other use is classed as an unintended use. The user is liable for any damage arising from unintended use.
Incorrect/abnormal use
This trimmer should not be used in public facilities, parks, sports grounds, roads etc. nor in agriculture or forestry.
To prevent bodily injury to the user, the trimmer must not be used to cut thicker branches or for shredding for the purpose of composting.
Identification plate
Position K
The identification plate is located on the trimmer casing.

Note
The label has the status of a certificate. It must never be altered or obliterated.
Layout
1 Manufacturer
2 Device group
3 Model name
4 Rated voltage, kind of current
5 Engine speed in rpm
6 Weight
7 Disposal instruction
8 Year of manufacture
9 Guaranteed sound level
10 CE mark
11 Model number
12 Serial number
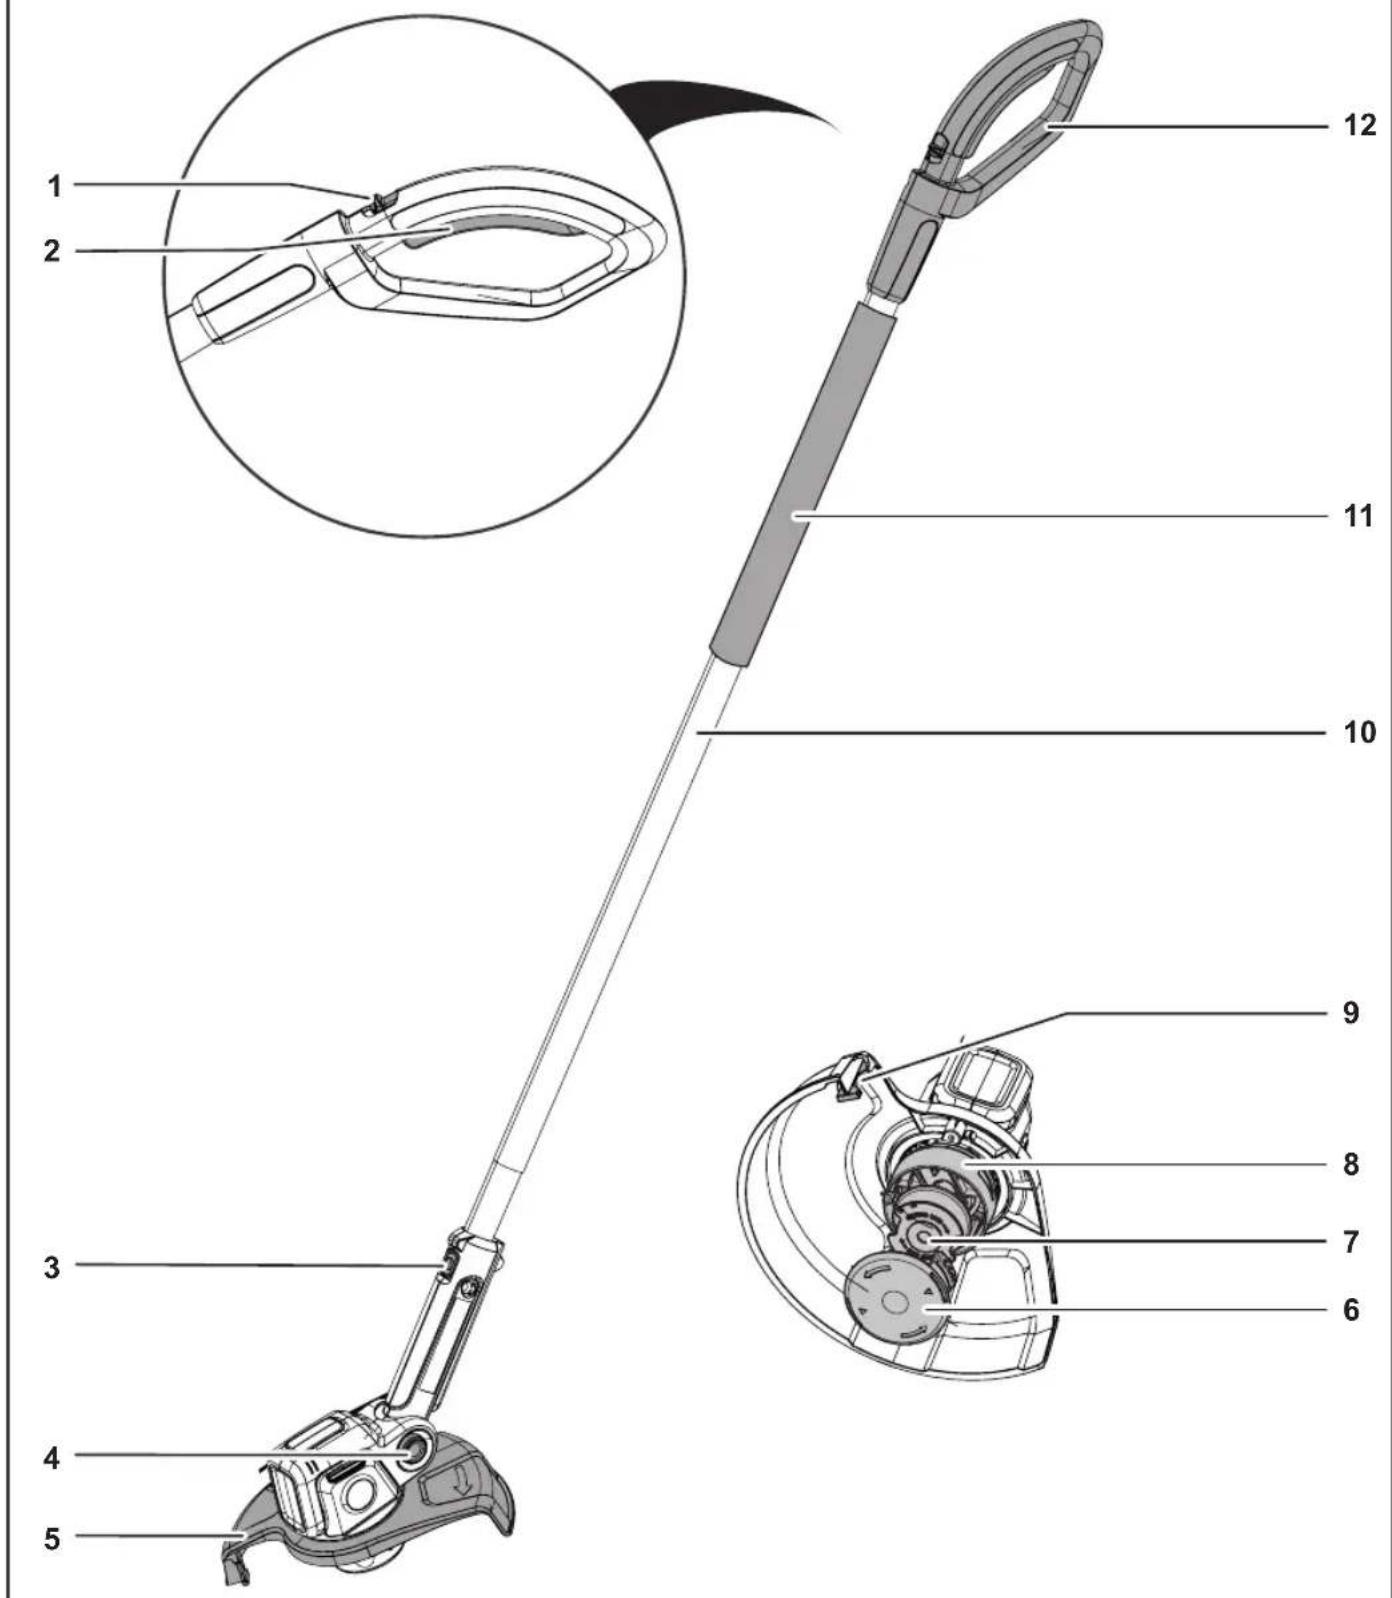
Operating controls
Operating elements L
1 Lock-on switch
2 On/off switch on the handle
3 Locking button
4 Working angle adjustment locating button
5 Protective cover
6 Spool cap
7 Line spool
8 Line box
9 Line knife
10 Operating arm * (with permanently installed power pack)
11 Holding area for the hand / fastening area for the optional middle handle
12 Handle
*Necessary operating element (not supplied)
First use
Supplementary documentation

Make sure the supplied instruction manuals of the charger and operating arm are available. Please read and understand them before using the device.
Power pack charging
WARNING!

Only charge the power pack using the charger approved by the manufacturer. The designations of the approved chargers are listed in the enclosed CE Declaration of Conformity.
Attention!
The power pack is supplied partially charged. Before first use, fully charge the power pack to ensure full capacity of the power pack.

CAUTION!

The power pack is permanently installed in the operating arm.
→ Power pack charging must be carried out according to the instructions in the supplementary documentation.
Operating times
→ Observe local regulations.
→ Check with your local authorities to determine if there are any operating time limitations.
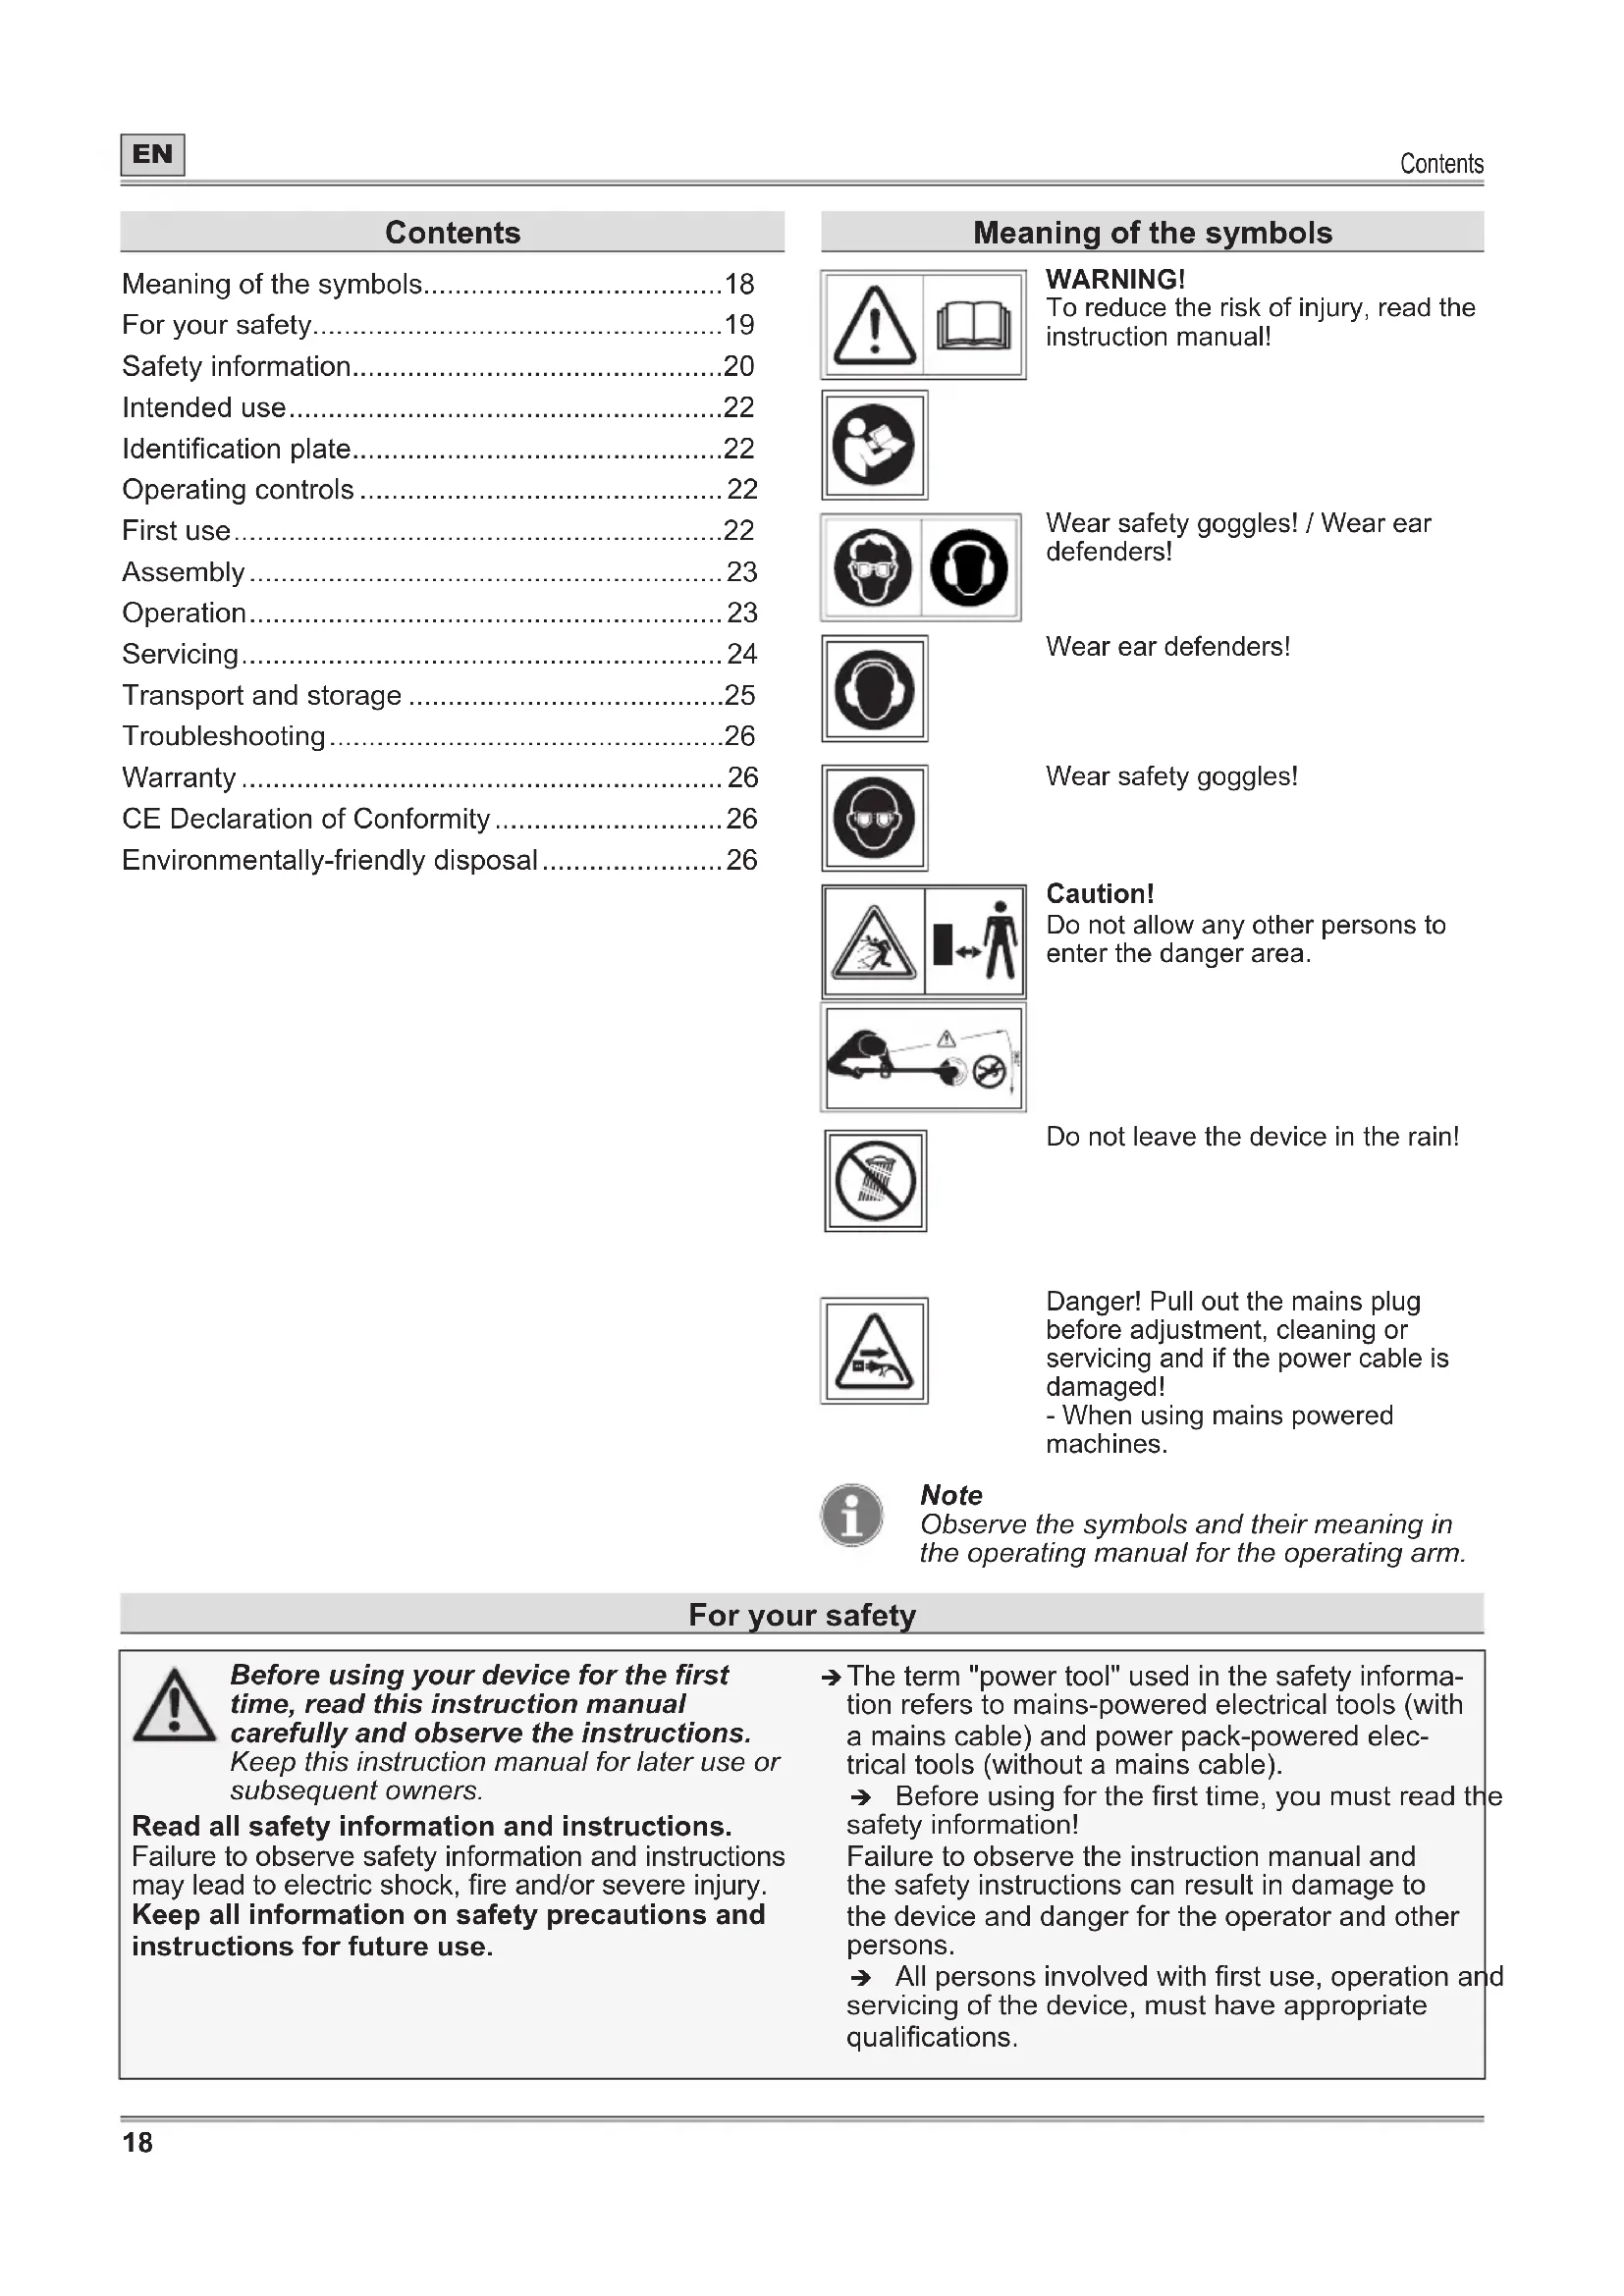
Assembly

WARNING!

Risk of injuries due to the cutting tool.
➢ Only adjust the device with the motor switched off and the cutting tool at a standstill.
➢ Do not reach into the area of the rotating line.
Before any work on the device, remove the operating arm with the permanently installed power pack beforehand.
Fitting the protective cover A
→ Position the protective cover [A]the motor housing ①.
→ Fasten the protective cover to the motor housing [B] using the supplied screws [C] ②.

Note
Only tighten the screws by hand.
Adjusting the working angle C

WARNING!

Risk of injuries due to the cutting tool.
Only adjust the device with the motor switched off and the cutting tool at a standstill.
Do not reach into the area of the rotating line
Before any work on the device, remove the operating arm with the permanently installed power pack beforehand.
The trimmer can be set in any of three different working angles. This allows you to easily reach problematic and difficult-to-access positions in the garden.
→ Press and hold the locating button
→ Set the working angle
→ Release the locating button.
√ The locating button of the lawn trimmer engages audibly.
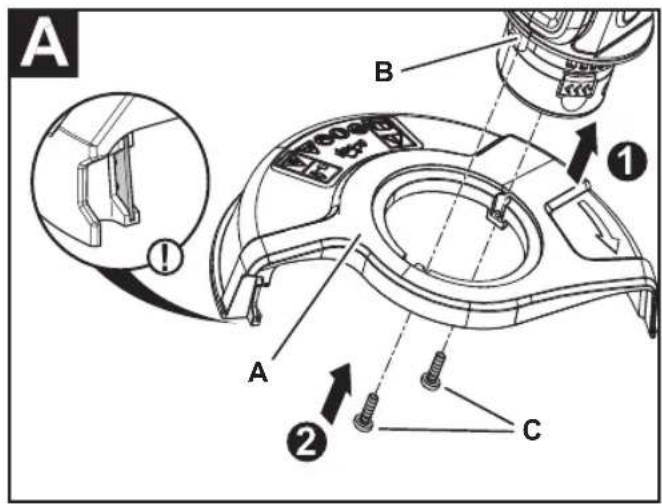
Connecting the trimmer unit to the operating arm B
→Press the locking button [A] on the operating arm and insert the operating arm into the receptacle on trimmer until the locking button [B] engages ① ②.
Attention!
Ensure the button is correctly engaged.

Note
A middle handle is available as an optional accessory for the operating arm. You can find more information and assembly instructions in the operating manual for the operating arm.
Operation

WARNING!

Incorrect handling of the power pack and the charger
Risk of injuries and material damage
Read and observe the operating manual of the operating arm and the charger.
Switching on the device D

WARNING!

Risk of injuries or material damage.
➢ Always hold on to the device with both hands during operation. One hand holds the handle, the other hand holds the operating arm in the cased area or the optionally available middle handle.
→Press the lock-on switch [A] on the handle ①.
→ Simultaneously press the on/off switch [B] on the handle ②.
→ Release the lock-on switch.
√ The device operates.
Adjusting the line
Automatic
With each switching off and on the line is adjusted out of the line cassette.

Note
Frequently switching on and off without reason results in increased line wear.

Note
If the cutting line becomes too short during operation due to wear, switch the device off and then back on again to extend the working length of the cutting line automatically.
Manual E

WARNING!

Risk of injuries due to the cutting tool.
➢ Only adjust the device with the motor switched off and the cutting tool at a standstill.
Do not reach into the area of the rotating line.
Before any work on the device, remove the operating arm with the permanently installed power pack beforehand.

CAUTION!

Risk of injury on the line cutter
➢ After pulling out new line, always hold the device in its normal working position before you switch it on.
Manual line adjustment may be necessary during first use after changing the line spool.
→ Press button
→ Pull the line ②ut
Switching the device off D
→ Release the on/off switch [B] on the handle.
√ The device is switched off.

Note
The cutting tool continues to run for a brief period after being switched off.

Note
The lock-on switch automatically returns to its initial position when you release the on/off switch.
Working on the trimmer F G H

WARNING!

Hold the rotating line roughly parallel to the ground (not inclined by more than 30^ ). This trimmer is not an edge trimmer. Do not incline the trimmer so that the line rotates at a right angle to the ground. The resulting flying debris could cause severe injuries!
→ With the trimmer switched on, hold it at an appropriate angle and move it from side to side F G.
→ Maintain a minimum distance 610 mm between your feet and the protective cover H.
Practical trimming tips G H
→ Cut using the tip of the cutting line. Do not use excessive force when moving the cutting head through uncut grass.

Note
Wire and picket fences result in increased line wear and even in breaking of the line. The line may wear quickly on stone and brick walls, kerbstones and wooden surfaces.
→ Do not move the line head over the surface of the ground or other surfaces.
→ In the case of long grass, cut from up to down and doe not exceed the height of 30 cm in the process.
→ Hold the trimmer so that it is inclined towards the area to be cut.
→ When cutting, rotate the trimmer from left to right. This prevents cuttings hitting the operator.
→ Avoid trimming trees and bushes, bark, wooden slats, wall cladding and fence posts. The line could quickly and easily damage them.
Removing the operating arm with permanently installed power pack 1
→ Switching the device off
→ Press the locking button [A] on the operating arm ①.
→ Pull the operating arm out of the receptacle of the trimmer unit [B] completely ②.
Servicing

WARNING!

Risk of injuries or material damage due to moving parts.
Only clean or service the device if the motor is stationary and also the cutting tool.
Before any work on the device, remove the operating arm with the permanently installed power pack beforehand.
Do not clean the device with water.
Repair and service work as well as the replacement of safety elements must be performed by a qualified expert or workshop.
Cleaning the trimmer
→ Switch the trimmer off and wait until the cutting tool comes to a standstill and remove the operating arm.
→ Clean the device with a hand brush after every use.
→ Clean the ventilation slots and underside of the device at regular intervals to remove grass residues.
Replacing the line spool J

WARNING!

Risk of injuries due to the cutting tool.
➢ Only adjust the device with the motor switched off and the cutting tool at a standstill.
Do not reach into the area of the rotating line.
Before any work on the device, remove the operating arm with the permanently installed power pack beforehand.
→ Simultaneously strongly press both of the engaging lugs of the spool cap together ① and pull it off ②.
→ Remove the line spol
→ If necessary, remove any dirt.
→ Extend the thread out of the new spool fitting (optional accessories) [A] ④
→ Insert the spool in the line fox
→ Thread the end of the thread of the coil through the eye of the line box ⑥.
→ Simultaneously strongly press both of the engaging lugs of the spool cap together and push it on to the line spool until it engages ⑦.
Transport and storage

WARNING!

Risk of injuries due to the cutting tool.
Before transport or storage, switch off the device and wait until the cutting tool comes to a standstill.
Remove the operating arm before transporting or storing the device.
Transport
→ Secure the device sufficiently to prevent its unintentional slipping if you are transporting it on or in a motor vehicle.
Storage
→ Clean your device thoroughly at the end of every season.
→ Always store the device in a dry and safe location that is inaccessible to children.
→ Store the operating arm and trimmer separately.
→ Store the operating arm in a cool and dry location. Recommended storage temperature approx. 0 - 23°C
→ Keep the trimmer and especially its plastic components away from brake fluids, petrol, mineral oil containing products, penetrating oils etc. They contain chemical substances that can damage, attack or destroy the plastic components of the trimmer.
→ Fertilizers and other garden chemicals contain substances that may have a highly corrosive effect on the metal parts of the trimmer. Therefore do not store your trimmer in the vicinity of these substances.
Troubleshooting

WARNING!

Risk of injuries or material damage
In case of doubt always consult a specialist workshop.
Before any inspection or any work on the device, switch off the motor and remove the operating arm.
Problem Possible cause Remedy
| The device switches off. | The power pack is too hot. Allow the power pack to cool. | |
| The power pack is discharged. Charge the power pack. | ||
| The temperature of the device (electronics) is too high. | Allow the device to cool and if necessary, clean the ventilation slots | |
| Overcurrent release If this occurs again take your device to a specialist workshop. | ||
| The device will not switch on. | The power pack is discharged. Charge the power pack. | |
| Overcurrent release If this occurs again take your device to a specialist workshop. | ||
| Power pack temperature too high or too low. | Allow the power pack to cool down or heat up. | |
| The power pack is defective. Arrange for the power pack and operating arm to be checked by a specialist workshop. | ||
| Automatic line adjustment does not work. | The spool is empty. Replace the line spool. | |
| The toothing between the line box and the line spool is dirty. | Use a brush to remove dirt from the parts. | |
| The line has torn off and is pulled into the line spool. The line has become caught in the spool. | Take off the line spool, if necessary rewind the line by gently pulling and insert the spool. | |
| The line is welded onto the spool. Remove the welded line part, if necessary rewind the line by gently pulling and insert the spool. | ||
| The line breaks off too frequently. | The line comes into contact too frequently with fixed objects, e.g. fences, trees, etc. | Maintain a sufficient distance away from objects. |
Strong vibrations Device fasteners have come loose. Consult a specialist workshop.
Warranty
The warranty conditions of our local company or importer apply in all countries. Under the terms of the warranty we will repair faults on your device free of charge, insofar as material or manufacturing defects are the cause. To make a claim under warranty please contact your seller or your nearest branch.
CE Declaration of Conformity

Further details about the device are contained on the separately enclosed CE Declaration of Conformity, which forms part of this instruction manual.
Environmentally-friendly disposal
Power tools, accessories and packaging must be disposed of via an environmentally compatible recycling chain.
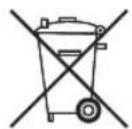
Power packs/batteries:
Do not dispose of power packs/batteries in domestic waste, by burning or throwing into water. Power packs/batteries must be collected, recycled or disposed of in an environmentally-friendly manner.
Power tools (without power packs/batteries):
Do not throw your old power tool away with the domestic waste. Take it to a disposal facility.