
Master Cook 209424 - Deep fryer Hendi - Free user manual and instructions
Find the device manual for free Master Cook 209424 Hendi in PDF.
| Product type | Professional electric deep fryer |
| Brand | Hendi |
| Model | Master Cook 209424 |
| Oil tank capacity | 10 L |
| Temperature range | 50 - 190 °C |
| Electrical power | 6600 W |
| Supply voltage | 380-415 V 3N~ 50/60 Hz |
| Protection class | Class I (mandatory earthing) |
| Ingress protection rating | IPX3 |
| Dimensions (W x D x H) | 302 x 687 x 375 mm |
| Net weight | 12 kg |
| Material | Stainless steel (body) and tank |
| Adjustable thermostat | Yes, with heating indicator light |
| Cold zone | Yes, to extend oil quality |
| Frying baskets included | Yes (1 basket) |
| Thermal protection device | Yes, with reset button |
| Oil levels min/max | Indicated by MIN and MAX marks |
| Recommended use | Professional (catering, kitchen) |
| Maintenance and cleaning | Clean the exterior with a damp cloth and mild detergent; do not immerse or use a high-pressure cleaner |
| Spare parts and repairability | Original parts available from the supplier; repair by a qualified technician |
Frequently Asked Questions - Master Cook 209424 Hendi
User questions about Master Cook 209424 Hendi
0 question about this device. Answer the ones you know or ask your own.
Ask a new question about this device
Download the instructions for your Deep fryer in PDF format for free! Find your manual Master Cook 209424 - Hendi and take your electronic device back in hand. On this page are published all the documents necessary for the use of your device. Master Cook 209424 by Hendi.
USER MANUAL Master Cook 209424 Hendi
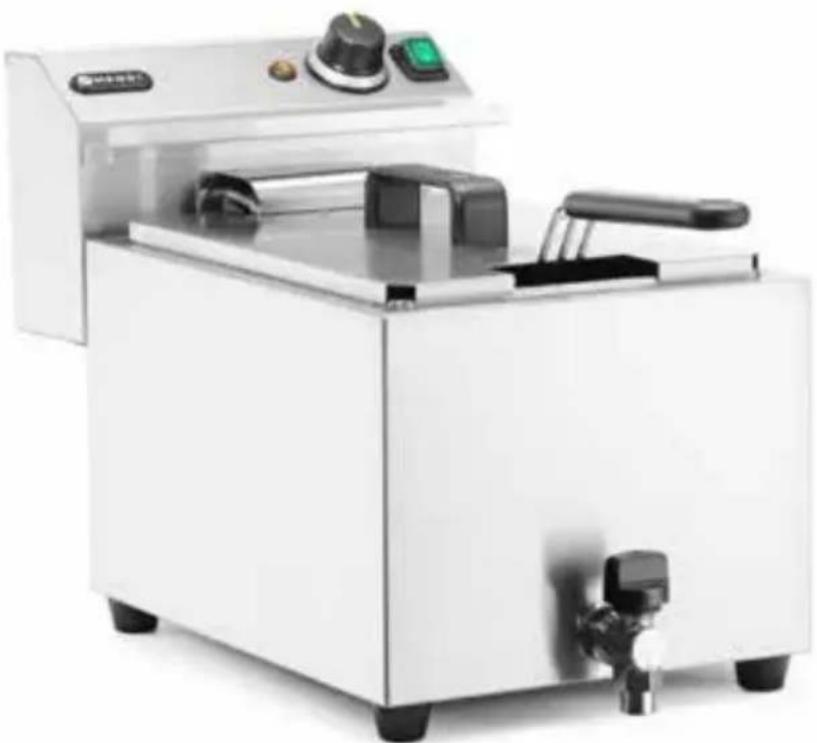
DEEP FRYER PROFI LINE WITH DRAIN TAP, 400 V
209424
natural_image
Exterior view of a white stainless steel kitchen<|im_start|> Puerto Rico electric stove (no visible text or symbols)You should read this user manual carefully before using the appliance.
Keep these instructions with the appliance.
natural_image
Simple line drawing of a house inside a rounded square (no text or symbols on the house itself)For indoor use only.
natural_image
Symbol of a trash bin crossed with no text or numbers, enclosed in a square frame (no readable text)

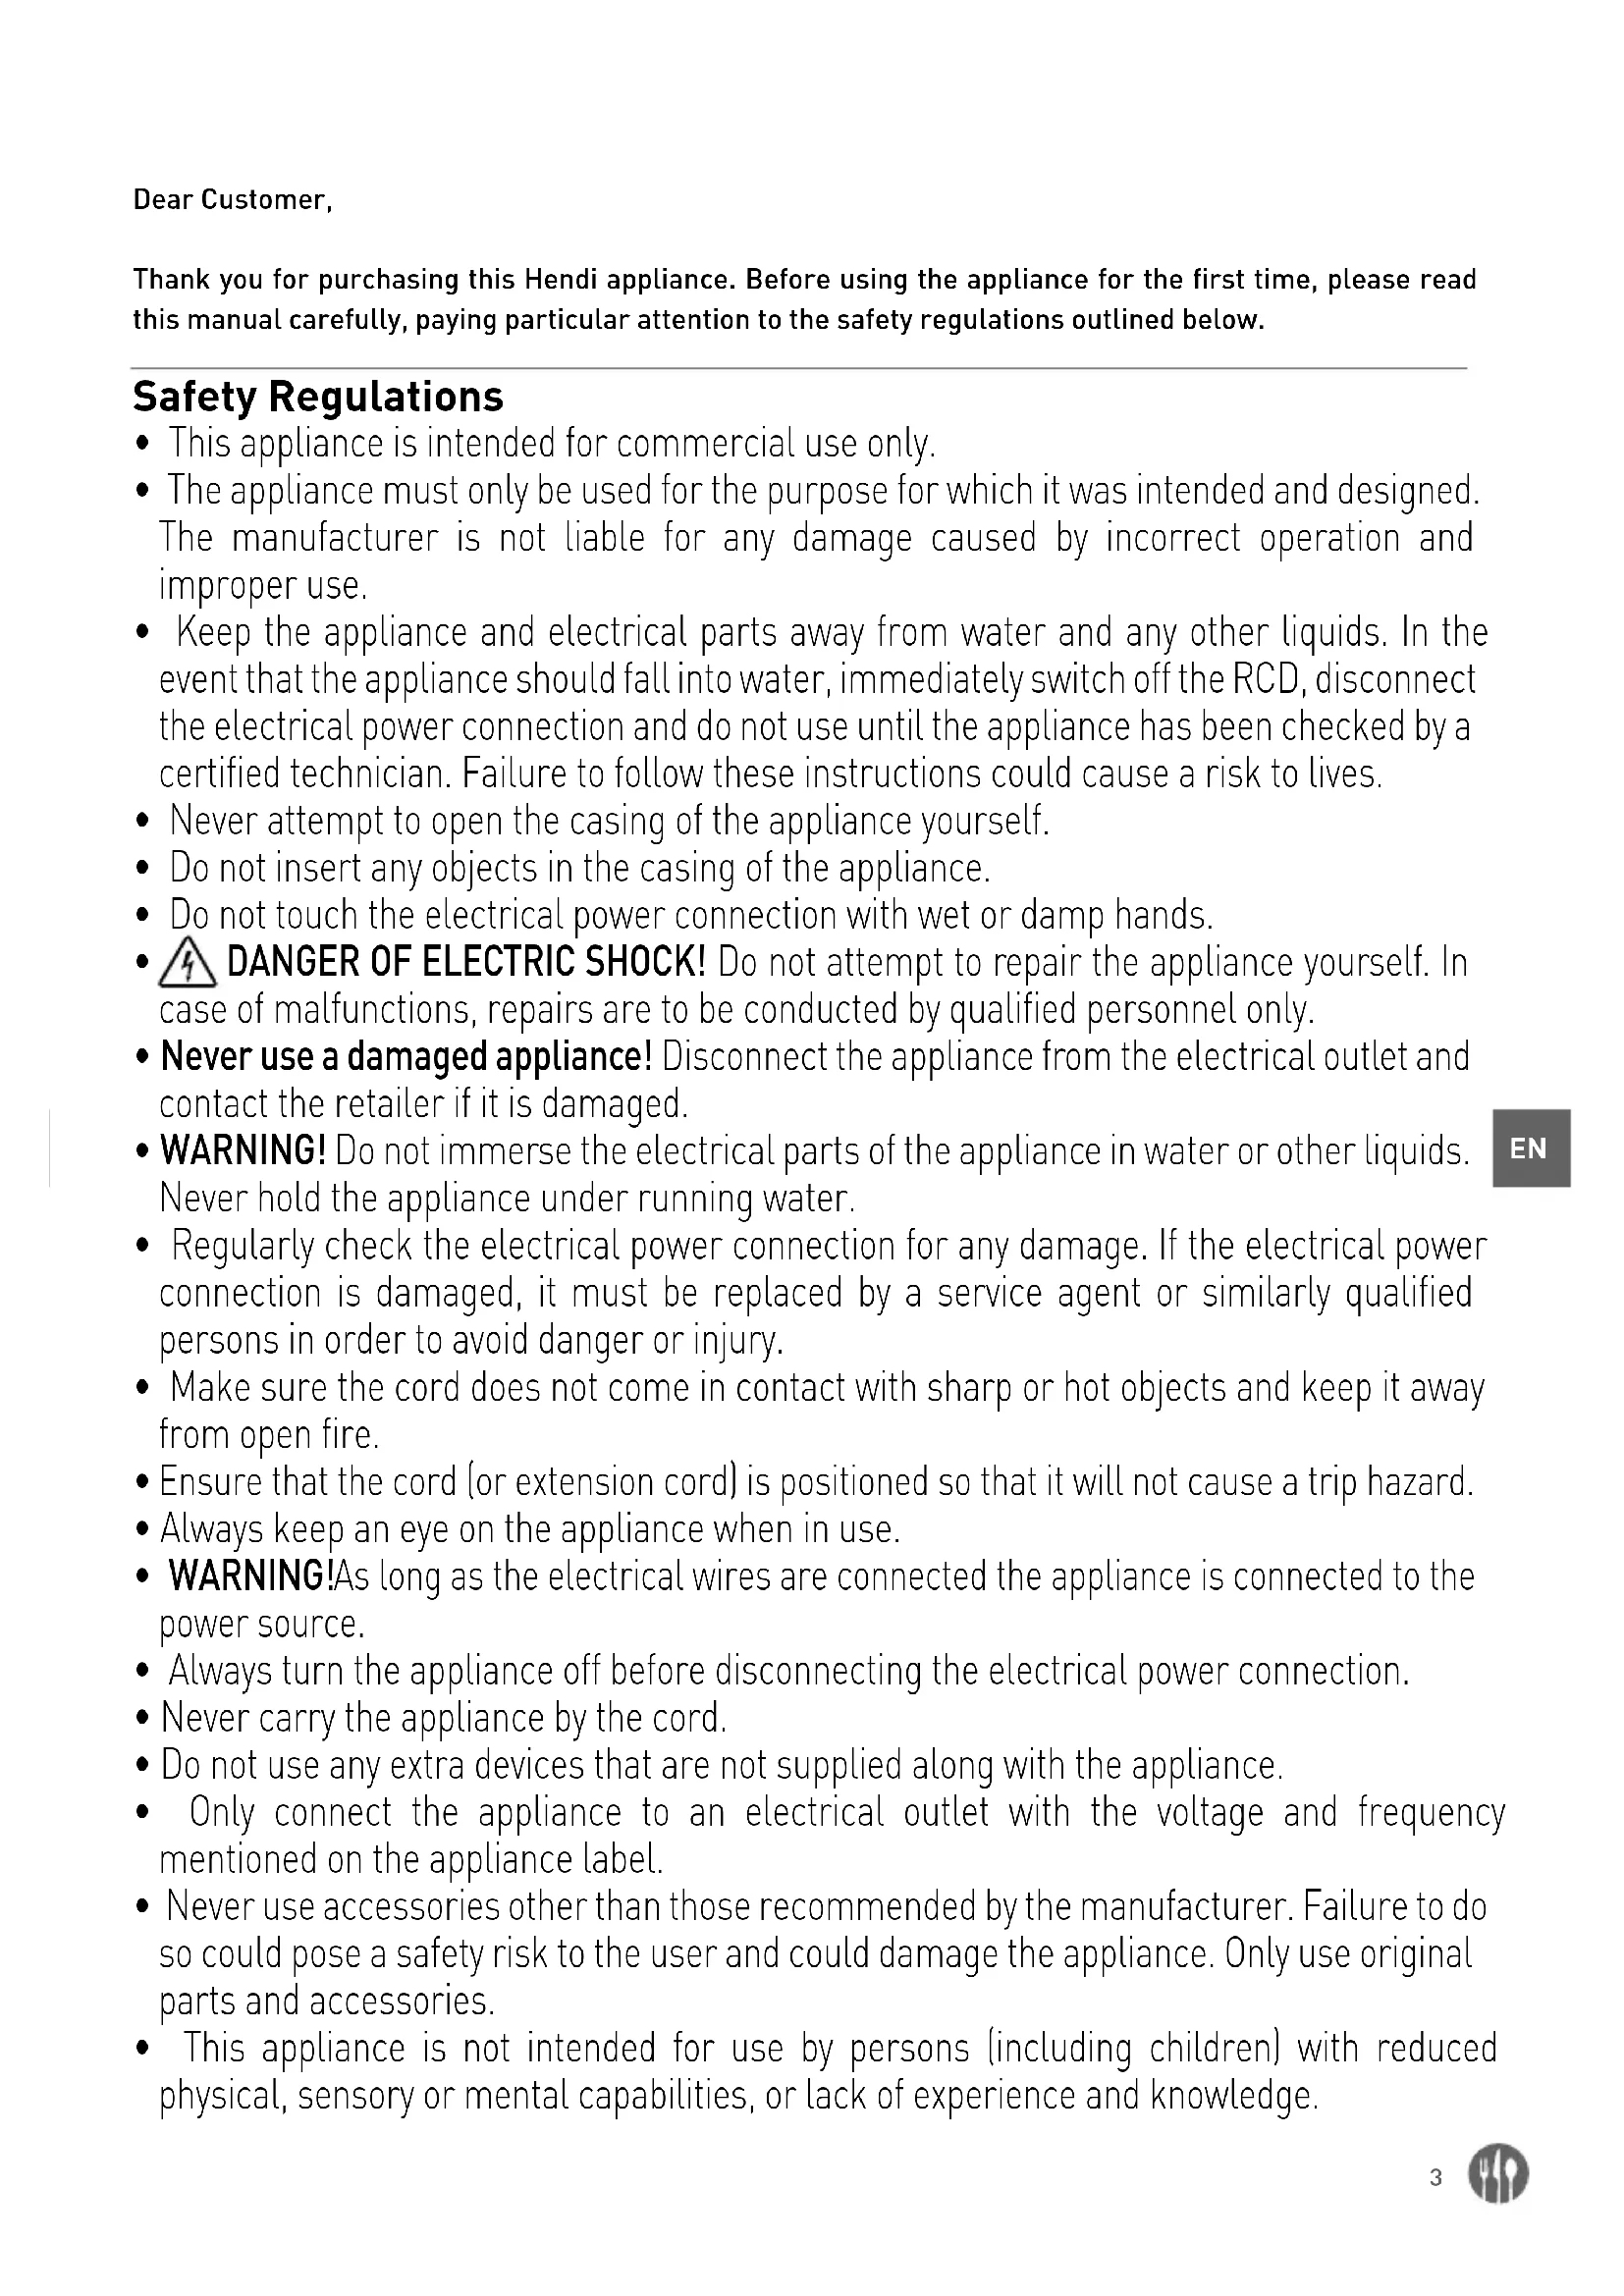
Thank you for purchasing this Hendi appliance. Before using the appliance for the first time, please read this manual carefully, paying particular attention to the safety regulations outlined below.
Safety Regulations
- This appliance is intended for commercial use only.
- The appliance must only be used for the purpose for which it was intended and designed. The manufacturer is not liable for any damage caused by incorrect operation and improper use.
- Keep the appliance and electrical parts away from water and any other liquids. In the event that the appliance should fall into water, immediately switch off the RCD, disconnect the electrical power connection and do not use until the appliance has been checked by a certified technician. Failure to follow these instructions could cause a risk to lives.
- Never attempt to open the casing of the appliance yourself.
- Do not insert any objects in the casing of the appliance.
- Do not touch the electrical power connection with wet or damp hands.
- DANGER OF ELECTRIC SHOCK! Do not attempt to repair the appliance yourself. In case of malfunctions, repairs are to be conducted by qualified personnel only.
- Never use a damaged appliance! Disconnect the appliance from the electrical outlet and contact the retailer if it is damaged.
- WARNING! Do not immerse the electrical parts of the appliance in water or other liquids. Never hold the appliance under running water.
- Regularly check the electrical power connection for any damage. If the electrical power connection is damaged, it must be replaced by a service agent or similarly qualified persons in order to avoid danger or injury.
- Make sure the cord does not come in contact with sharp or hot objects and keep it away from open fire.
- Ensure that the cord (or extension cord) is positioned so that it will not cause a trip hazard.
• Always keep an eye on the appliance when in use. - WARNING! As long as the electrical wires are connected the appliance is connected to the power source.
• Always turn the appliance off before disconnecting the electrical power connection. - Never carry the appliance by the cord.
- Do not use any extra devices that are not supplied along with the appliance.
- Only connect the appliance to an electrical outlet with the voltage and frequency mentioned on the appliance label.
- Never use accessories other than those recommended by the manufacturer. Failure to do so could pose a safety risk to the user and could damage the appliance. Only use original parts and accessories.
-
This appliance is not intended for use by persons (including children) with reduced physical, sensory or mental capabilities, or lack of experience and knowledge.
-
This appliance must not be used by children under any circumstances.
- Keep the appliance and its cord out of reach of children.
- Always disconnect the appliance from the mains if it is left unattended or is not in use, and before assembly, disassembly or cleaning.
- Never leave the appliance unattended during use.
Special safety precautions
- CAUTION! DANGER OF BURNS! The temperature of the heating surface and other accessible surface is very high during use. Touch the control panel only.
- When this appliance is to be positioned in close proximity to a wall, partitions, kitchen furniture, decorative finishes, etc., it is recommended that they are made of non-combustible material; if not, they shall be cladded with a suitable non-combustible heat insulating material, and that the closest attention be paid to fire prevention regulations.
- Do not place the appliance on a heating object (gasoline, electric, charcoal cooker, etc.). Keep the appliance away from any hot surfaces and open flames. Always operate the appliance on a level, stable, clean, heat-resistant and dry surface.
- Do not use the appliance near explosive or flammable materials, credit cards, magnetic discs or radios.
- This appliance is not intended to be operated by means of an external timer or separate remote-control system.
- Do not fill oil below MIN – level and beyond the MAX – level in the oil tank.
- WARNING: Danger of fire exists if oil level below “L” (Min) marking or no oil in the oil container.
- WARNING: Do not fry too wet foodstuffs and too much food at each time to avoid excessive foaming and spill out of oil. Maximum batch load is approximately 1kg.
- Allow at least 20 cm spacing around the appliance for ventilation purpose during use.
- Only use suitable oil or fat for frying. Replace the oil or fat at regular intervals. Over cooked or dirty oil or fat can be ignited if it is overheated."
- Do not use plastic cutlery during operation.
- DANGER! Never use old oil, old oil has a reduced flash point and is more prone to surge boiling which increases the risk of fire and dangerous situations.
- WARNING! Deep frying moist foods and large quantities at once has an negative influence on the boiling point of the oil.
- Always clean the appliance and other accessories after each use (-->Cleaning and maintenance).
- Do not use water jet, flush directly with water or steam cleaner as the parts will get wet and electric shock might be resulted.
- CAUTION! Securely route the power cord if necessary in order to prevent unintentional pulling or contact with the heating surface.
- Do not wash the appliance with water. Washing can cause leakages and increase the risk of electric shock.
-
Do not clean or store the appliance unless it is completely cooled down.
-
No part is dishwasher safe.
- The electrical installation must satisfy the applicable national and local regulations.
- The Fryer tank and element should be placed in a safe position in your kitchen before usage due to the hot contents when in use.
- Regularly change the old oil to reduce releasing of dioxins which are carcinogenic.
Intended use
- This appliance is intended for professional use and can be operated only by qualified personnel.
- The appliance is designed only for frying appropriate food only such as French fries, etc. Any other use may lead to damage of the appliance or personal injury.
Grounding installation
This appliance is classified as protection class
I and must be connected to a protective ground. Grounding reduces the risk of electric shock by providing an escape wire for the electric current. - Operating the appliance for any other purpose shall be deemed a misuse of the device. The user shall be solely liable for improper use of the device.
This appliance is equipped with a cord having a grounding wire. The wires must be connected to the electrical power source that is properly installed and grounded.
Preparations before using for the first time
- Check to make sure the appliance is undamaged. In case of any damage, contact your supplier immediately and do NOT use the appliance.
- Remove all the packing material and protection film (if applicable).
-
Clean the appliance with luke-warm water and a soft cloth.
-
Place the appliance on a level and steady surface, unless mentioned otherwise.
- Make sure there is enough clearance around the appliance for ventilation purposes.
- Keep the packaging for storing your appliance when not in use for an extended period of time.
Installation
- Place the appliance on a level, stable, clean, heat-resistant and dry surface with its rubber feet.
- Carefully install the back support with heating element on the rear edge of the oil container.
Note:
- Make sure that the pin on the back support is in the correct position & properly mounted.
- The appliance should be placed in a safe position in your kitchen before use due to hot hazard when in use.
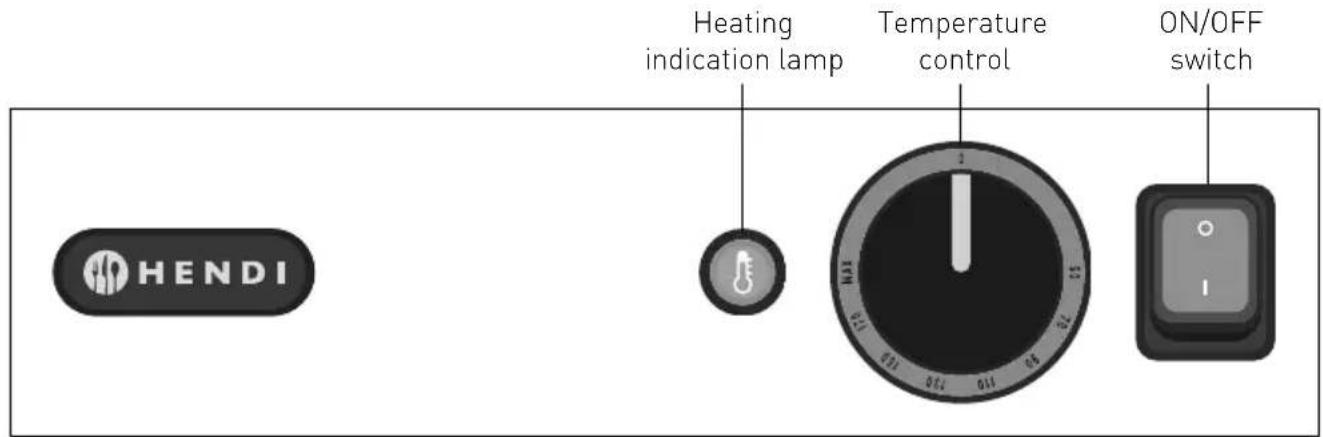
Control Panel
Power supply line connection
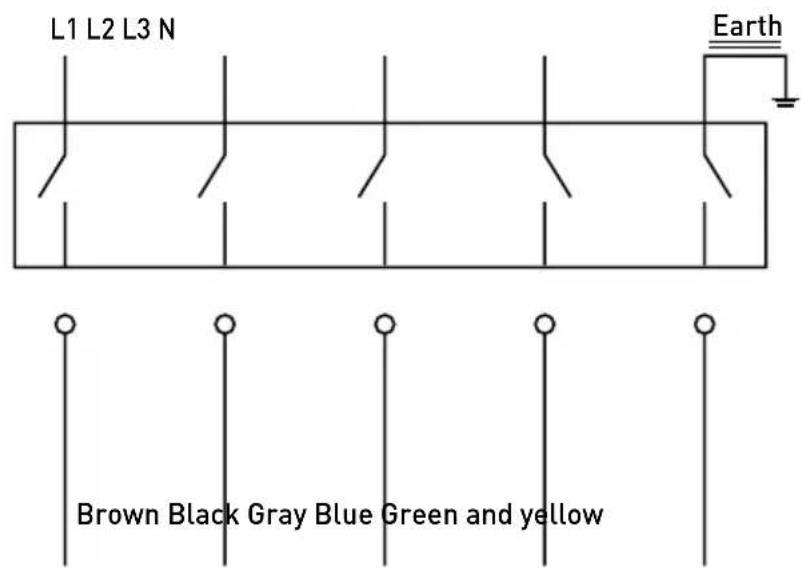
Attention: The power supply lines should be connected by authorized technician.
Operation
- Disconnect the power from the mains.
- Fill the container with oil or hydrogenated oil until the MAX line.
Note! Solid fats must be preheated before filling, this avoids burnt fat and overloading (See "Solid Fat"). - Connect the internal wires of the power cord to a suitable electrical supply outlet. (See --> power supply line connection)
-
Turn on the appliance by using the green on/off button on the operating panel. The green lamp in the switch will light.
-
Set the thermostat to the desired temperature. The orange lamp will light.
- When the set temperature is reached, the orange lamp goes out.
- During deep frying the temperature lamp will light off and on to indicate that the heating element will maintain its indicated temperature.
- You can now use the deep fryer.
NOTE: It is normal that the relais sounds the ON/OFF sound during operation.
Deep-frying
The deep fryer is designed with a unique cold zone to allow crumbs and residue to sink to the bottom this also enables the usable life of the fat/oil to extend considerably.
Regularly check if there is sufficient oil or fat in the container. The level should never be below the MIN line.
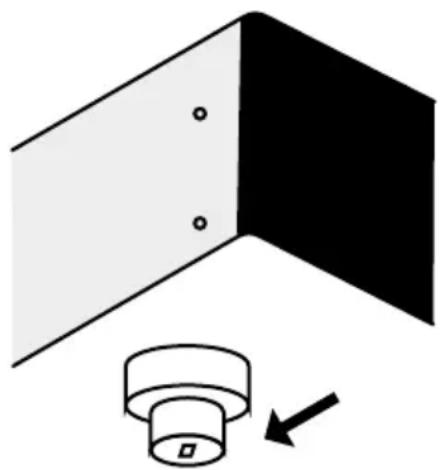
RESET the Hi-limiter (thermal cut-out)
Please note that the RESET button is located at the bottom of the detachable control panel with a protective cap (See line drawing)
- Disconnect the deep fryer from the electrical outlet first.
- Allow the deep fryer to completely cool down.
- Remove the detachable control panel from the support.
- Unscrew the black protective cap of the RESET button.
- Press the RESET button of the Hi-limiter (thermal cut-out). You should hear a click sound.
- Screw back the protective cap on the RESET button.
- Reinstall the detachable control panel on the support.
natural_image
Diagram showing a corner joint with two panels, one black and one white, and a small cylindrical component with an arrow indicating direction (no text or symbols)Deep frying tips
- Preferably use only liquid frying oil or liquid frying fat.
- The recommended temperature for frying chips and snacks is 175^ C max.
- Remove ice and crumbs from frozen foods.
-
Do not deep-fry too much at one time. This can cause the oil or fat to cool down too much. Cooled down oil/fat does not properly sear the surface of the food, so that more fat will be absorbed. When used intensively, crumbs and other debris should be filtered out of the oil/fat.
-
Replace oil or fat in time. Use test strips or test equipment regularly to track when oil/fat should be replaced.
- Before oil starts to foam, smoke or gets too viscous you should replace it. Also replace the oil/fat when it has a strong smell or taste.
- Do not mix fresh oil with used oil.
Solid Fat
- If you use against our advice solid fat anyway: heat the oil slowly in the lowest position until melted. When the fat has melted you can set the proper frying temperature.
- When using solid fat, allow the blocks of fat to melt slowly on a moderate heat in a normal frying
pan. Carefully pour the melted fat into the deep fat fryer. Plug in the mains plug and switch on the deep fat fryer.
- Remove the deep frying basket after use from the fat. This prevents the basket becoming stuck in the solidified fat.
After use
- Turn off the appliance by switching off the switch and disconnecting the electrical parts from the mains.
- Do not move the deep fryer until it and its contents have cooled down.
- Put the lid on the deep fryer, so that the fat does not age.
Cleaning and maintenance
- Always disconnect the electrical parts from the mains before cleaning the appliance.
- Beware: Never immerse the appliance in water or any other liquid!
- Clean the outside of the appliance with a damp cloth (water with mild detergent).
- Never use aggressive cleaning agents, abrasives or chlorinated cleaners. Do not use any sharp or pointed objects. Do not use petrol or solvents! Clean with a damp cloth and detergent if necessary. Do not use abrasive materials.
Troubleshooting
| Fault Symptoms Possible cause | Possible solution | ||
| Appliance does not work at all | Green switch indicator not lit & orange heating indicator not lit | Control panel not seated properly on bracket | Properly seat the control panel on the bracket |
| No mains power Check the electrical installation | |||
| Appliance is switched off Switch on the appliance | |||
| Microswitch defective Contact your supplier | |||
| AC contactor defective Contact your supplier | |||
| Appliance does not heat up | Green switch indicator is lit & orange heating indicator not lit | Thermostat set to a low temperature | Set the thermostat to a higher temperature |
| Hi-limiter (thermal cut-out) tripped. | Reset the Hi-limiter (thermal cut-out) (See RESET on page 5) | ||
| Hi-limiter (thermal cut-out) defective. | Contact your supplier | ||
| Thermostat defective Contact your supplier | |||
| Appliance does not reach the set temperature | Green switch indicator is lit & orange heating indicator is lit, but excessive frying time or temperature | Thermostat defective Contact your supplier | |
If after these controls, the malfunctioning continues, it is advisable to contact your supplier for assistance. In case of any doubt, always contact your supplier!
Technical specification
| Item no. 209424 | |
| Operating voltage and frequency | 380-415V 3N~ 50/60Hz |
| Rated power | 6600 W |
| Protection class | Class I |
| Waterproof protection class | IPX3 |
| Temperature range | 50 - 190°C |
| Ambient temperature | 5 - 45°C |
| Capacity | 10 L |
| Dimensions | 302x687x(H)375mm |
| Net weight (approx.) | 12 kg |
Remarks: Technical specification is subjected to change without prior notification.
Warranty
Any defect affecting the functionality of the appliance which becomes apparent within one year after purchase will be repaired by free repair or replacement provided the appliance has been used and maintained in accordance with the instructions and has not been abused or misused in any way. Your statutory rights are not affected. If the appliance is claimed under warranty, state where and when it was purchased and include proof of purchase (e.g. receipt).
In line with our policy of continuous product development we reserve the right to change the product, packaging and documentation specifications without notice.
Discarding & Environment
When decommissioning the appliance, the product must not be disposed of with other household waste. Instead, it is your responsibility to dispose to your waste equipment by handing it over to a designated collection point. Failure to follow this rule may be penalized in accordance with applicable regulations on waste disposal. The separate collection and recycling of your waste equipment at the time of disposal will help conserve natural resources and ensure that it is recycled in a manner that protects human health and the environment.
For more information about where you can drop off your waste for recycling, please contact your local waste collection company. The manufacturers and importers do not take responsibility for recycling, treatment and ecological disposal, either directly or through a public system.
natural_image
Diagram showing a corner panel with two black panels and a cylindrical component with an arrow indicating direction (no text or symbols)natural_image
Diagram showing a 3D corner joint with black and white panels, and a mechanical component with a downward arrow (no text or symbols)Frituurtips
natural_image
Diagram showing a corner panel with two black panels and a cylindrical component with an arrow indicating direction (no text or symbols)natural_image
Diagram showing a corner joint with two panels, one black and one white, and a small cylindrical component with an arrow indicating direction (no text or symbols)Conseils de friture
natural_image
Diagram showing a 3D corner panel with black and white panels, a cylindrical component with a square hole, and an arrow indicating direction (no text or symbols)IT
natural_image
Diagram showing a corner panel with two black panels and a small cylindrical component with an arrow indicating direction (no text or symbols)natural_image
Diagram showing a corner joint with two black panels and a pipe fitting with a directional arrow (no text or symbols)natural_image
Diagram showing a 3D corner panel with black and white panels, a cylindrical component with a square hole, and an arrow indicating direction (no text or symbols)natural_image
Diagram showing a corner joint with two panels, one black and one white, and a small cylindrical component with an arrow indicating rotation (no text or symbols)natural_image
Diagram showing a corner joint with two panels, one black and one white, and a mechanical component with a downward arrow (no text or symbols)natural_image
Diagram showing a corner panel with two black panels and a small cylindrical component with an arrow indicating direction (no text or symbols)Sütési tippek
natural_image
Diagram showing a 3D corner joint with black and white panels, a cylindrical component with a square hole, and an arrow indicating direction (no text or symbols)natural_image
Diagram showing a corner joint with two panels, one black and one white, and a small cylindrical component with an arrow indicating direction (no text or symbols)Frittimisnõuanded
natural_image
Diagram showing a corner joint with two panels, one black and one white, and a small cylindrical component with an arrow indicating direction (no text or symbols)natural_image
Diagram showing a 3D corner joint with black and white panels, a cylindrical component with a square hole, and an arrow indicating direction (no text or symbols)Gilaus kepimo patarimai
natural_image
Diagram showing a 3D corner joint with black and white panels, and a mechanical component with a downward arrow (no text or symbols)Dicas para fritar
natural_image
Diagram showing a corner panel with two black panels and a small cylindrical component with an arrow indicating direction (no text or symbols)natural_image
Diagram showing a corner joint with two panels, one black and one white, and a small cylindrical component with an arrow indicating rotation (no text or symbols)Tipy na hlboké smaženie
natural_image
Diagram showing a corner joint with two panels, one black and one white, and a small cylindrical component with an arrow indicating direction (no text or symbols)Nasveti za cvrtje
Hendi Food Service Equipment GmbH
Ehring 15
Hendi Food Service Equipment Romania S.R.L.
PKS Hendi South East Europe SA
5 Metsovou Str.
18346 Moschato, Athens, Greece
Tel: +30 210 4839700
Email: info@pks-hendi.com
Hendi Italia S.R.L.
Via Leonardo da Vinci 4
39100 Bolzano (BZ), Italy
Tel: +39 800 727 438
Email: office.italy@hendi.eu
Hendi HK Ltd.
1208, 12/F Exchange Tower
33 Wang Chiu Road, Kowloon Bay, Hong Kong
Tel: +852 2154 2618
Email: info-hk@hendi.eu
Find Hendi on internet:
www.hendi.eu
www.facebook.com/HendiToolsforChefs
www.linkedin.com/company/hendi-food-service-equipment-b.v.
www.youtube.com/HendiEquipment
- A változtatások, a nyomtatási és a betűzési hibák fenntartva.
- Всі права захищені щодо змін, можливі помилки друку та верстки.
- Neid juhiseid võidakse muuta ja need võivad sisaldada trükivigu.
- Šī instrukcija var tikl mainīta, tajā tāpat var būt drukas klūdas.
- Šios instrukcijos gali būti keičiamos, jose taip pat gali pasitakyti spausdinimo klaidy.
- Alterações, impressão e erros de composição reservados.
- Reservado el derecho a realizar modificaciones, errores de impresión y tipografía.
- Zmeny, chyby v tlači a sadzbe vyhradené.
- Spremembe, tiskanje in tipnastavitev napake shranjenih.

- DEEP FRYER PROFI LINE WITH DRAIN TAP, 400 V
- Safety Regulations
- Special safety precautions
- Intended use
- Grounding installation
- Preparations before using for the first time
- Installation
- Operation
- Deep-frying
- RESET the Hi-limiter (thermal cut-out)
- Deep frying tips
- Solid Fat
- After use
- Cleaning and maintenance
- Warranty
- Discarding & Environment
- Frituurtips
- Conseils de friture
- Sütési tippek
- Frittimisnõuanded
- Gilaus kepimo patarimai
- Dicas para fritar
- Tipy na hlboké smaženie
- Nasveti za cvrtje
- Hendi Food Service Equipment GmbH
- Hendi Food Service Equipment Romania S.R.L.
- PKS Hendi South East Europe SA
- Hendi Italia S.R.L.
- Hendi HK Ltd.
- Find Hendi on internet:
Brand : Hendi
Model : Master Cook 209424
Category : Deep fryer