FSK 250 - User Guide FESTOOL - Free user manual and instructions
Find the device manual for free FSK 250 FESTOOL in PDF.
| Product Type | Miter cutting rail |
| Brand | Festool |
| Model | FSK 250 |
| Cutting length | 250 mm (for material thickness of 50 mm) |
| Bevel cutting range | -45° to +60° |
| Weight | 0.97 kg |
| Power supply | Without power supply (accessory for cordless saw) |
| Main functions | Precise cutting of wood and panels, adjustable miter cuts, automatic saw return to starting position, pendulum protective cover |
| Safety | Pendulum protective cover, clamp fixation, safety instructions included |
| Maintenance | Regular cleaning of adjustment and guide devices, keep pendulum protective cover clean, remove dust and chips with compressed air or a brush |
| Spare parts | Use only genuine Festool parts, repair by the manufacturer or authorized workshops |
| General information | 96-page user manual available in multiple languages |
| Intended use | Cutting wood and panels |
| Available adjustments | Adjustable angle stop, adjustable guide play, adjustable cutting depth on the saw |
| Included accessories | Clamp for fixing on the workpiece |
Frequently Asked Questions - FSK 250 FESTOOL
User questions about FSK 250 FESTOOL
0 question about this device. Answer the ones you know or ask your own.
Ask a new question about this device
Download the instructions for your User Guide in PDF format for free! Find your manual FSK 250 - FESTOOL and take your electronic device back in hand. On this page are published all the documents necessary for the use of your device. FSK 250 by FESTOOL.
USER MANUAL FSK 250 FESTOOL
natural_image
Three parallel metallic strips with no text or symbols visible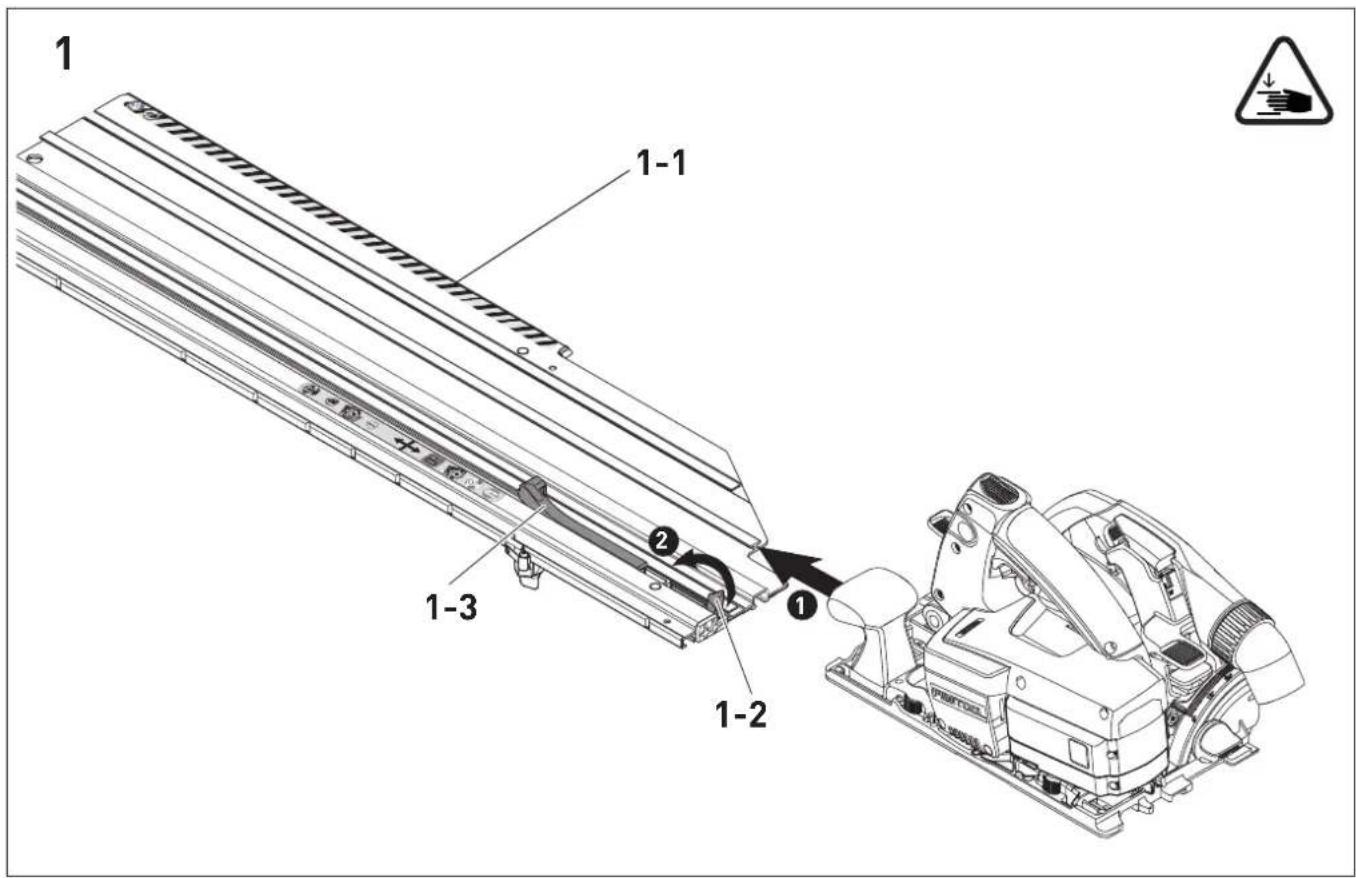
text_image
1 1-1 2 1-3 1-2 1
text_image
2 2-3 2-2 2-13
text_image
3 3-1Inhaltsverzeichnis
text_image
Diagram showing four blue circular icons with icons: a mechanical device, a gear shift, a wheel switch, and a parking sign.Arbeitsposition
text_image
Traffic warning sign with hazard symbols and directional arrows, including a circular hazard symbol and a traffic light symbol.Sägevorgang
1 Symbols....9
2 Safety warnings....9
3 Intended use 10
4 Technical data.... 10
5 Commissioning.... 10
6 Assembly....10
7 Working with the power tool....10
8 Service and maintenance....11
1 Symbols

Warning of general danger

Read the operating instructions and safety instructions.

Tip or advice

Handling instruction

Risk of pinching fingers and hands!

Danger area! Keep hands away!

Cutting injury hazard caused by exposed saw blade

Do not place down any saws with exposed saw blades
Pendulum guard open
Pendulum guard closed

Parked position

Place down saws with closed pendulum guards only

Use the fastening clamp supplied to secure the cross cutting guide rail to the workpiece.
2 Safety warnings
2.1 General safety warnings
Warning! Read all safety warnings and instructions which have been supplied with the mounting device or the portable circular saw. Failure to observe the information and safety warnings may lead to electric shocks, fires and/or serious injuries.
Keep all safety warnings and instructions for future reference.
The term "power tool" used in the safety warnings refers to mains-powered power tools (with power cable) and battery-powered power tools (without power cable).
- Disconnect the plug from the socket and/or remove the battery before adjusting the tool settings or changing accessory parts. Some accidents are caused by power tools starting accidentally.
- Secure the power tool safely on the mounting device before using it. If the power tool slips on the mounting device, you may lose control of the tool.
- Place the mounting device on a solid, even and horizontal surface. If the mounting device slides or wobbles, it may not be possible to control the power tool safely and reliably.
- Check the function of the pendulum guard prior to use and do not use the power tool if it does not function correctly.
- When working, always hold the power tool with both hands on the handles. This reduces the risk of injury and is a prerequisite for precise work.
- Before use, always check the function of the cross cutting guide rail and ensure that all warning notices are legible and attached to the cross cutting guide rail in as-delivered condition. If the warning notices are missing, non-compliance with the instructions can cause a higher risk of injury.
2.2 Other risks
In spite of compliance with all relevant design regulations, dangers may still present themselves when the machine is operated, e.g.:
- Touching the part of the saw blade that protrudes below the cross cutting guide rail:
- When approaching the workpiece,
- During cutting,
English
- When lifting the saw before the pendulum guard is closed.
- Touching rotating parts from the side: Saw blade, clamping flange, flange screw,
- Machine kick-back when it jams in the workpiece,
- Touching live parts when the housing is open and the mains plug is still plugged in,
- Workpiece parts being thrown off,
- Parts of damaged tools being thrown off,
- Noise emissions,
- Dust emissions.
3 Intended use
The cross cutting guide rail is designed for sawing wood and panel materials.
It enables precise and clean cuts, in particular angled cuts can be performed simply and with repeat accuracy. The saw automatically moves back to the initial position after the sawing process.
This power tool may only be used by experts or instructed persons.

The user is liable for improper or non-intended use.
4 Technical data
| Cross cutting guide rail | FSK 250 FSK 420 FSK 670 | ||
| Cutting length (with material thickness of 50 mm) | 250 mm 420 mm 670 mm | ||
| Angled cuts | -45°- +60° | -60°- +60° | -60°- +60° |
| Weight 0.97 kg 1.25 kg 1.64 kg | |||
5 Commissioning
Before initial use, saw the splinter guard [1-1]:
▶ Position saw with the entire guide plate at the rear end of the cross cutting guide rail.
▶ Swivel saw to 0^ position and set maximum cutting depth.
▶ Switch on saw.
▶ Slowly drop the splinter guard across the entire length without setting down.
The edge of the splinter guard now corresponds exactly to the cutting edge.
6 Assembly
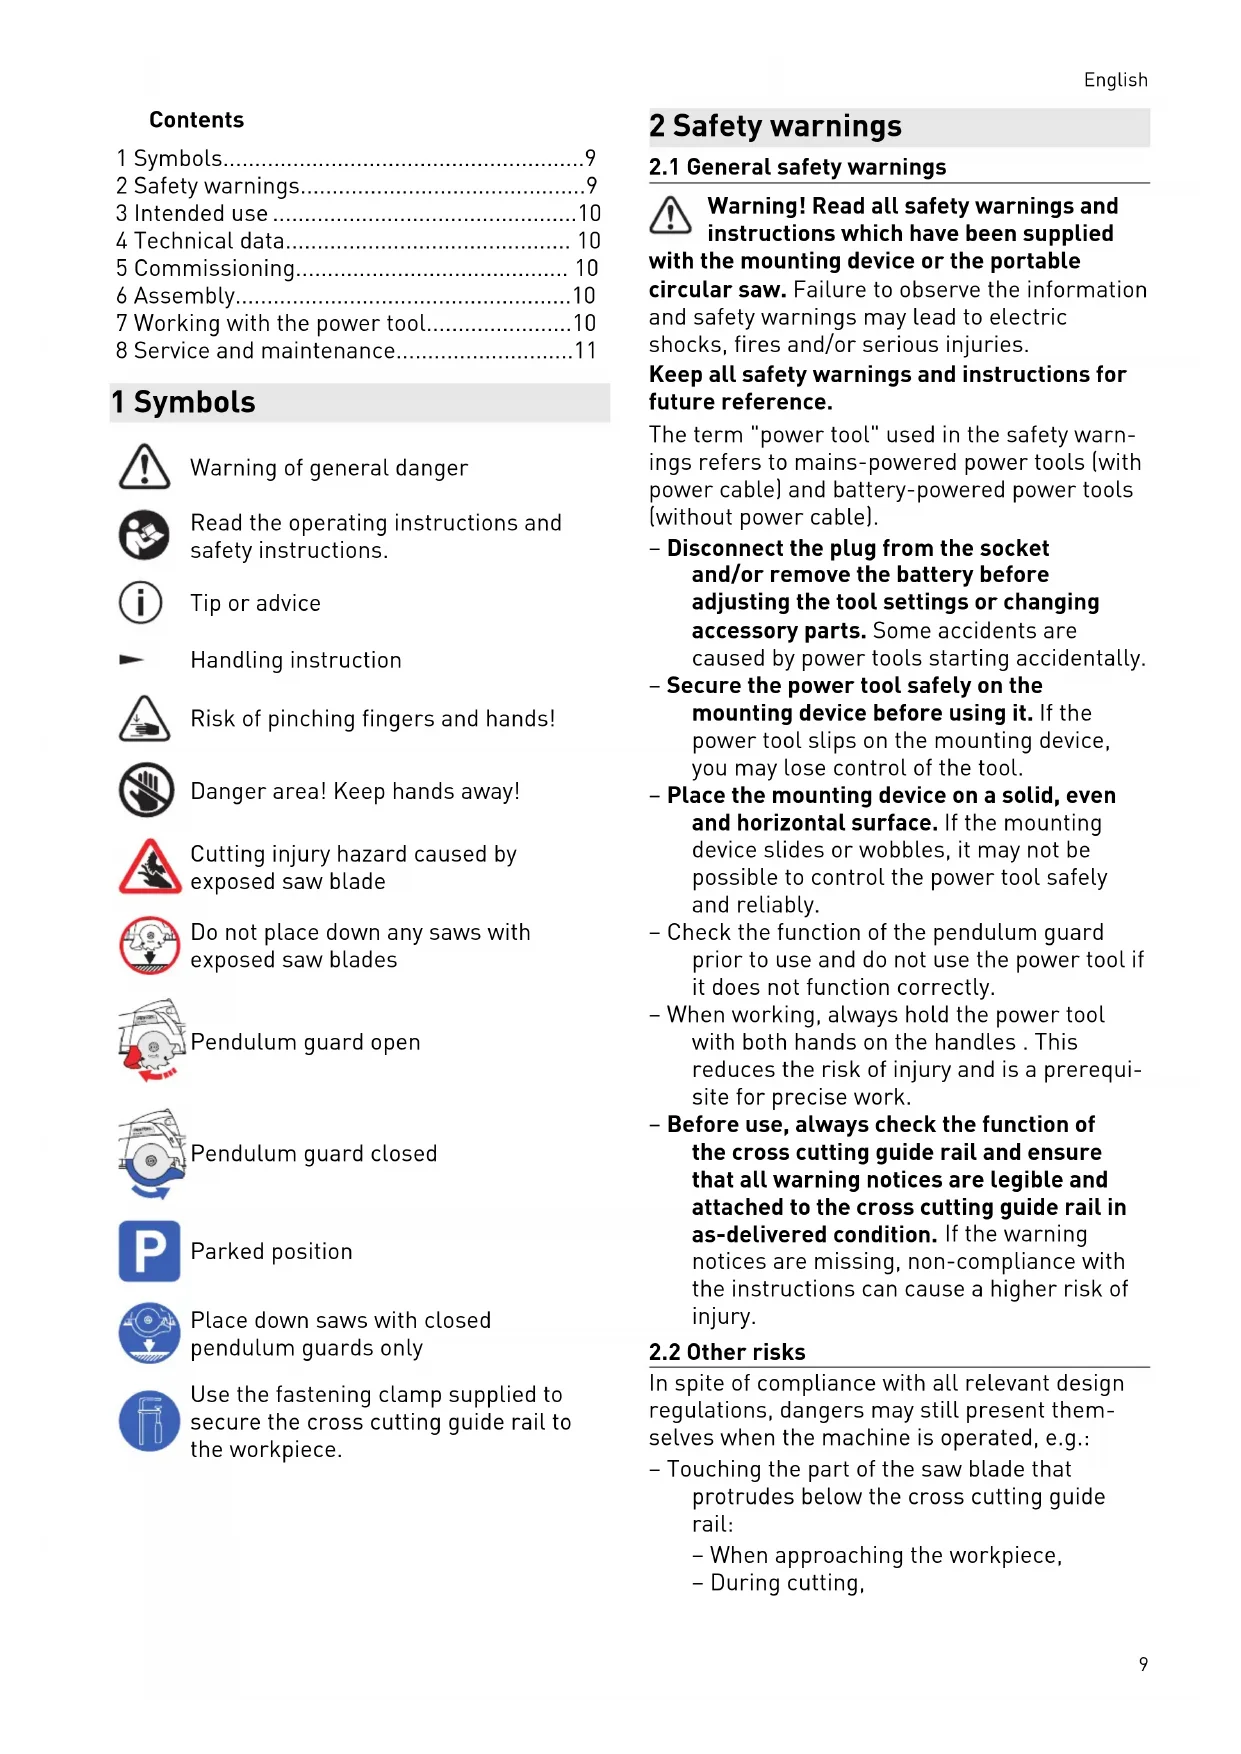
6.1 Connecting the saw to the cross cutting guide rail
▶ Slide the saw onto the cross cutting guide rail in the sawing direction.
The saw engages in the sliding block [1-3]. The quick fastener [1-2] locks in behind the saw table.
The saw is securely connected to the cross cutting guide rail.
6.2 Separating the saw from the cross cutting guide rail
▶ Push the saw forward slightly in the sawing direction.
▶ Turn the quick fastener [1-2] forward.
- Remove the saw by pulling it backward against the sawing direction.
7 Working with the power tool
Every time before use, check that the cross cutting guide rail is retracted correctly and have it repaired, if necessary.
Never use if automatic retraction is not operating correctly.
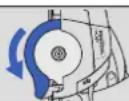
7.1 Settings
▶ Open rotary knob at adjustable stop[2-1].
▶ Adjust angle at the scale [2-3].
▶ Close rotary knob at adjustable stop [2-1].
▶ Adjust cutting depth and cutting angle to saw.
- Adjust the guide play between the saw table and the cross cutting guide rail using the two adjustable jaws [2-2].
The saw must run slightly above the rail.


WARNING
Risk of injury
Exposed rotating saw blade
- Keep your hands away from the cutting area and the saw blade.
▶ Do not reach under the workpiece.
▶ Never hold a workpiece in your hand or support it with your leg.
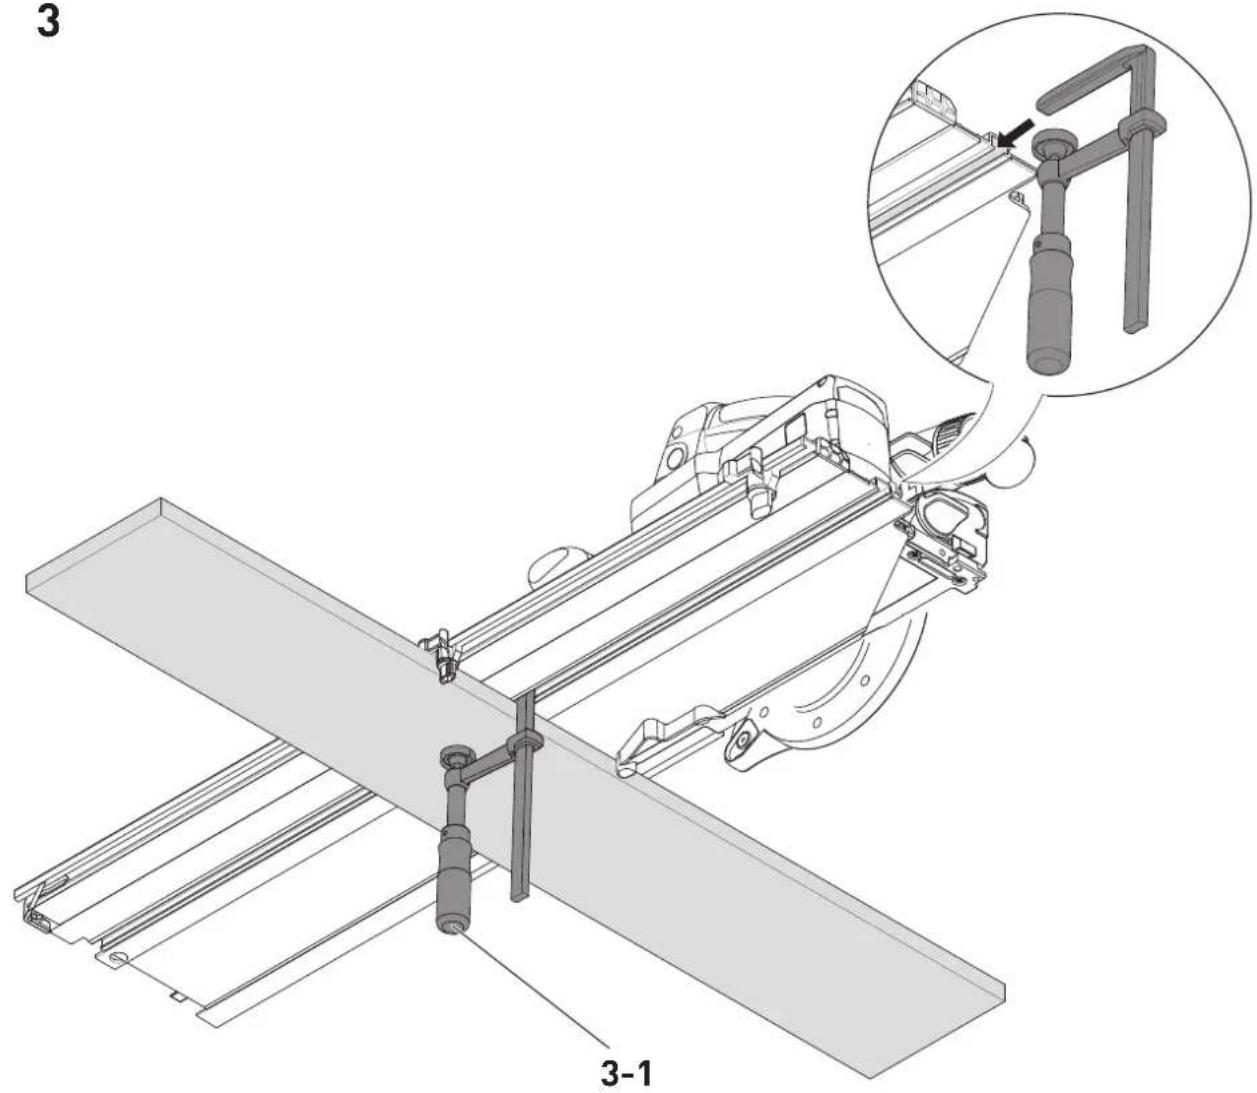
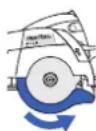
The cross cutting guide rail must be attached on the workpiece with a fastening clamp [3-1] or similar clamping tool before sawing. This prevents the saw accidentally being lifted from the workpiece and the saw blade therefore being exposed.
If the saw or the pendulum guard fails to return to its initial position (parked position), stop the sawing process and remove the battery pack or disconnect the mains plug from the socket.
Check whether the tool is functioning properly and remove any trapped wood splinters.
The parked position and working position of the saw are marked on the cross cutting guide rail as follows:
Parked position
Closed pendulum guard


Working position
Open pendulum guard


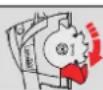


Sawing process
- Place the adjustable stop [2-1] and the fixed stop against the workpiece and position cross cutting guide rail.
▶ Attach the cross cutting guide rail to the workpiece with a fastening clamp [3-1] or similar clamping tool.
▶ Switch on saw.
▶ Push saw in sawing direction.
Pendulum guard opens.
▶ Saw section.
▶ Switch off the saw after sawing procedure.
▶ Bring the saw back to the parked position.
The pendulum guard closes.
▶ Remove the fastening clamp.
▶ Lift the cross cutting guide rail from workpiece.
Placing down the saw

WARNING
Risk of injury when placing down the saw with the saw blade exposed
▶ Never place down any saws with exposed saw blades
▶ Bring the saw back to the parked position before placing it down.
8 Service and maintenance

Customer service and repairs must only be carried out by the manufacturer or service workshops. Find the nearest address at:
www.festool.co.uk/service

Always use original Festool spare parts. Order no. at:
www.festool.co.uk/service

Cleaning the machine regularly, especially the adjusting devices and guides, is important safety factor.
Observe the following information:
The pendulum guard must always be able to move freely and close independently. Always keep the area around the pendulum guard clean. Clean dust and chippings by blowing out with compressed air or using a brush.
Sommaire
text_image
Four blue icons with corresponding labels: water pump, directional valve, circular valve, and parking sign.Position de travail
text_image
Traffic warning signs including a circular hazard symbol, triangular warning triangle, gear mechanism, and directional arrowSciage
flowchart
graph LR
    A[" pump "] --> B[" directional control "]
    B --> C[" parking sign "]
    C --> D[" bidirectional arrow "]
    style A fill:#333,stroke:#fff,color:#fff
    style B fill:#f9f,stroke:#000
    style C fill:#ccf,stroke:#000
    style D fill:#cfc,stroke:#000
Posición de trabajo
text_image
Four safety warning signs with icons and arrows, including a gear hazard symbol and a right-pointing arrow.Serrado
natural_image
Four blue icons representing different operational or mechanical functions: pump, valve, gear shift, and parking sign (no text or symbols)Pracovní poloha
text_image
Four safety warning signs with icons and arrows, including a gear mechanism, triangular warning symbol, gear hazard symbol, and directional arrow.Řezání
text_image
Four icons representing different operational or system states: water pump, directional valve, circular valve, and parking sign.Arbejdsposition
text_image
Traffic warning sign with four directional symbols: no traffic, attack, gear, and exit arrowSavning
text_image
Four blue circular icons with icons and a parking sign, likely representing safety or security features.Tööasend
text_image
Traffic warning sign with four directional arrows indicating hazard zones and a vehicle aheadSaagimine
text_image
Four icons representing different parking and traffic management features: water pump, directional valve, vehicle wheel, and parking sign.Käyttöasento
Pendelsuojus avattuna

text_image
Traffic warning sign with four directional arrows indicating hazard zones and a left-pointing arrowSahaaminen
text_image
Four safety warning signs with icons and symbols: circular hazard, triangular warning, warning sign, and left-pointing arrow.Postupak piljenja
▶ Podesivi graničnik [2-1] i fiksni graničnik stavite suprotno od izratka i postavite formatnu vodilicu.
- Pričvrstite formatnu vodilicu na izradak vijčanom stegom [3-1] ili sličnim steznim alatom.
▶ Uključite pilu.
▶ Pomičite pilu u smjeru piljenja.
Njišući štitnik se otvara.
▶ Otpilite izrezak.
▶ Nakon piljenja isključite pilu.
▶ Vratite pilu u zaustavni položaj.
Njišući štitnik se zatvara.
▶ Skinite vijčanu stegu.
▶ Podignite formatnu vodilicu s izratka.
Odlaganje pile

UPOZORENJE
Opasnost od ozljede pri odlaganju pile sa slobodnim listom pile
- Nikada ne odlazite pilu sa slobodnim listom pile
- Prije odlaganja stavite pilu u zaustavni položaj.
text_image
Four blue icons with corresponding labels: water pump, directional valve, wheel switch, and parking sign.text_image
Traffic warning sign with four directional arrows and a circular hazard symbol, indicating hazard or accident.Fürészelés
text_image
Four icons representing different parking and security measures: lock, helmet, wheel switch, and parking sign.Vinnslustaða
Blaôhlífin opin

text_image
Traffic warning signs including front, side, and right arrows indicating directions of attack or hazard.Verklag við sögun
text_image
Four blue circular icons with white outlines and icons, including a valve, gear shift, wheel switch, and parking sign.Posizione di lavoro
text_image
Four safety warning signs with icons: circular hazard symbol, triangular warning triangle, gear mechanism, and right-pointing arrow.Procedura di taglio
text_image
Four blue icons with corresponding labels: industrial pipe, HVAC fan, circular valve, and parking sign.작업 위치
펜둘럼 가드 열림

text_image
Traffic warning signs including circular, triangular, and directional arrows indicating hazard zones or traffic conditions쓰잉 과정
text_image
Four blue icons with corresponding labels: electrical circuit, directional valve, circular valve, and parking sign.Darbiné padètis
text_image
Traffic warning sign with hazard symbols and directional arrows indicating accident or hazard zonesPjovimo procesas
natural_image
Four blue circular icons with icons: a mechanical device, a head-mounted device, a gear shift, and a parking sign (no text or symbols)Darba stāvoklis
text_image
Four traffic warning signs with icons: circular, triangular, gear, and warning sign, indicating different directions of congestion or risk.Zāgēšanas gaita
text_image
Four icons representing different operational or system states: water pump, directional valve, circular valve, and parking sign.Arbeidsstilling
text_image
Traffic warning sign with hazard symbols and directional arrows, including a circular hazard symbol and three warning signs.Saging
text_image
Four icons representing different parking and utility services: electrical circuit, directional valve, circular valve, and parking sign.Werkpositie
Pendelbeschermkap geopend

text_image
Traffic warning signs including traffic cone, lightning bolt, and warning sign with arrowsZagen
text_image
Four blue circular icons with white symbols: water pump, directional valve, gear shift, and parking sign.Pozycja robocza
Ostona wahliwa otwarta

text_image
Traffic warning symbols including circular hazard, triangular warning sign, gear warning, and left-pointing arrowCiecie
text_image
Four icons representing different operational or safety measures: emergency exit, directional control, circular valve, and parking sign.Pracovná poloha
text_image
Traffic warning sign with four directional arrows and symbols: circular, triangular, gear, and right-pointing arrowProces rezania
text_image
Four safety warning signs with icons: no hazard, triangular warning, gear mechanism, and left-pointing arrowPostopek žaganja
▶ Nastavljivi prislon [2-1] in trdni prislon prislonite na obdelovanec in namestite čelilno vodilo.
Z vijačno spono [3-1] ali podobnim pritrdilnim orodjem pritrdite čelilno vodilo na obdelovanec.
▶ Vklopite žago.
- Žago potiskajte v smeri žaganja.
Nihajni zaščitni pokrov se odpre.
▶ Odžagajte del obdelovanca.
▶ Ko prenehate z žaganjem, izklopite žago.
- Žago povlecite v parkirni položaj.
Nihajni zaščitni pokrov se zapre.
▶ Snemite vijačno spono.
▶ Čelilno vodilo dvignite z obdelovanca.
Odlaganje žage

text_image
OPOZORILOtext_image
Four icons representing different parking or emergency services: water pump, directional valve, circular valve, and parking sign.Radni položaj
Pomični zaštitni poklopac otvoren

text_image
Traffic warning sign with circular and triangular traffic symbols indicating accident or hazard zonesPostupak testerisanja
▶ Postavite podesivi graničnik [2-1] i fiksni graničnik na radni komad i postavite šinu za prorezivanje.
▶ Pričvrstite šinu za prorezivanje pomoću para stega [3-1] ili sličnog alata za zatezanje za radni komad.
▶ Uključite testeru.
▶ Gurajte testeru u smeru testerisanja.
Pomični zaštitni poklopac će se otvoriti.
▶ Odsecite komad testerom.
▶ Nakon testerisanja isključite testeru.
▶ Povucite testeru nazad u položaj za zaustavljanje.
Pomični zaštitni poklopac se zatvara.