SS5675 - Coffee machine Sogo - Free user manual and instructions
Find the device manual for free SS5675 Sogo in PDF.
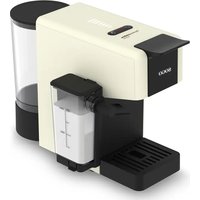
| Product type | Multi-capsule coffee machine |
| Brand | Sogo |
| Model | SS5675 |
| Voltage | 220-240 V |
| Power | 1450 W |
| Frequency | 50/60 Hz |
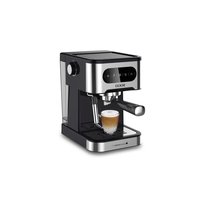
| Pressure | 19 bars |
| Water tank capacity | 0.6 L |
| Standby consumption | 0.0 W |
| Off consumption | 0.44 W |
| Automatic shut-off | After 15 minutes of inactivity |
| Capsule compatibility | Nespresso, Dolce Gusto, pods, ground coffee, tea |
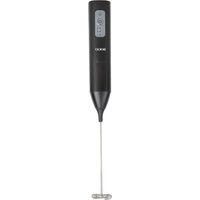
| Steam function | Yes (steam nozzle for frothing milk) |
| Included filters | Filter for ground coffee 1 cup, filter for ground coffee 2 cups, filter for pods/tea bags |
| Adjustable coffee volume program | Yes, customizable |
| Removable drip tray | Yes |
| Removable water tank | Yes |
| Cleaning | Do not immerse, clean with a damp cloth |
| Recommended descaling | Every 300-400 cups or 1-2 months |
| Safety | Automatic shut-off, safety locking handle |
| Material | Plastic and metal |
Frequently Asked Questions - SS5675 Sogo
User questions about SS5675 Sogo
0 question about this device. Answer the ones you know or ask your own.
Ask a new question about this device
Download the instructions for your Coffee machine in PDF format for free! Find your manual SS5675 - Sogo and take your electronic device back in hand. On this page are published all the documents necessary for the use of your device. SS5675 by Sogo.
USER MANUAL SS5675 Sogo
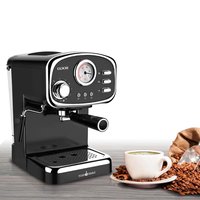
natural_image
White and red SOGO coffee maker with black handle (no visible text or symbols)
natural_image
Red and black SOGO brand milk dispenser (no visible text or symbols on device body)
Descarga tu manual
Download your manual
ref. SS-5675 / 5675-R

text_image
CE RoHS 2016/8/03/EUESPAÑOL P. 3
ENGLISH P. 14
FRANÇAIS P. 25
PORTUGUESE P. 36
DEUTSCH P. 47
ITALIANO P. 58
ČEŠTINA P. 69
DANSK P. 80
SLOVENSKI P. 91
HRVATSKI P. 102
POLSKI P. 113
ROMÂNĂ P. 124
УКРАЇНСЬКА P. 135
CATALÀ P. 146
Declaration of conformity, Responsibility of Electronic products disposal, Importers Details and After-sales service on the last pages.
text_image
A B C D E F G H Itext_image
Diagram illustrating the step-by-step cooking process of a coffee maker, showing steps from mixing to pouring liquid.natural_image
Illustration showing a plug connecting to an electrical outlet and a hand pressing a button (no text or symbols present)text_image
Diagram illustrating coffee machine operation with icons for coffee cup, power button, and coffee mug, plus a hand cursor interacting with the device.natural_image
Line drawing of a modern coffee maker with a circular base and lid (no text or symbols)
natural_image
Technical line drawings of three mechanical components with no visible text or symbolsPara cápsulas NESPRESSO®, STARBUCKS® by NESPRESSO®, LAVAZZA® Y L'OR®
Para cápsulas NESCAFÉ® DOLCE GUSTO®
text_image
Diagram of a coffee maker with labeled parts and directional arrows indicating componentstext_image
Technical diagram of a mechanical device with numbered components and directional arrows indicating assembly or movement.text_image
Diagram of a portable water dispenser with labeled parts and directional arrows indicating ports or featurestext_image
Diagram illustrating a coffee machine with icons for menu, click, and press, plus a cup of tea.text_image
Diagram of a coffee maker with labeled parts and directional arrows indicating componentsnatural_image
Simple line drawing of a coffee maker with a cup above it and a downward arrow below (no text or symbols)text_image
Diagram of a coffee maker with labeled parts including inlet, outlet, and basetext_image
Diagram illustrating a coffee maker with icons and a hand interacting with it, showing menu options like 'OK', 'Cancel', and 'Delete'.text_image
Diagram of a coffee maker with labeled parts and directional arrows indicating parts of the device.natural_image
Technical illustration of a mechanical device with two views (1 and 2), showing internal components and gauges (no text or symbols)text_image
Diagram of a portable water heater with labeled parts and directional arrows indicating ports or connections.text_image
Illustration of a coffee maker with icons and a hand interacting with it, showing menu options for food access.text_image
Diagram showing a coffee maker with three buttons and a power plug, illustrating the process of adding or using a power outlet.
text_image
Hand icon pointing at three circular icons: coffee cup, power button, and mug, symbolizing coffee-related functions.natural_image
Line drawing of a kitchen appliance with a lid and handle, no text or symbols presentLimpieza holistica
ADVERTENCIAS
natural_image
Diagram of a coffee maker with a hand operating the cup, showing no text or symbols on the device itself.text_image
Diagram showing a hand washing a blender with a checkmark indicating the correct solution, alongside a glass of liquid and a crossed-out cup.natural_image
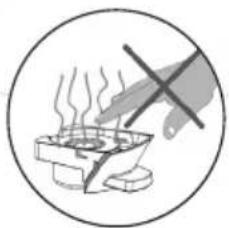
Illustration of a hand using a crossed-out X-brimbing tool to stir a steaming pot (no text or symbols)
text_image
Diagram showing a portable water purifier with a hand holding a warning sign and a warning symbol, alongside its electrical outlet.natural_image
Technical line drawing of a mechanical component with a cylindrical pin and mounting bracket (no text or symbols)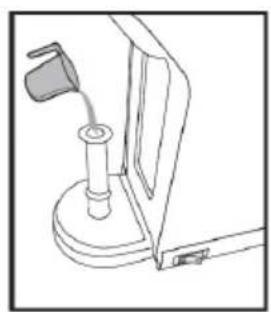
natural_image
Line drawing of a mechanical device with a handle and base mount (no text or symbols)
natural_image
Line drawing of a hand holding a cylindrical object mounted on a base, with no visible text or symbolsMODO DE AHORRO DE ENERGÍA
• Always read the instruction book carefully before using.
- This manual can be downloaded from our web page www.sogo.es
- Keep these instructions for future reference.
fety instructions for the user
GENERAL PRECAUTIONS
General precautions during the use of electrical equipment
- Do not use the appliance for any other purpose than described in this manual.
- Do not use or store the appliance outdoors.
• Always place the appliance on to the flat and even surface. - This product is intended for indoor, non-industrial, non-commercial and only for household use. Do not use the item outdoors or for any other purpose. Misuse or improper handling may cause problems in the appliance and cause injury to the user.
- The unit must be used only for the intended purposes. No liability is accepted for damages arising from improper use or wrong handling.
- Ensure that the voltage indicated on the nameplate matches the mains voltage before plugging in the appliance.
- Always remove the plug from the power socket when the appliance is not in use. Do not leave the appliance unattended when switched on.
- Close supervision is necessary when any appliance is being used by or near children.
- Before cleaning or storing your appliance, always unplug the appliance from the power supply and let it cool down.
- The device is not completely disconnected from the power source, even after it has been turned off. To disconnect it completely, disconnect it from the mains plug.
- The appliances are not intended to be operated by means of an external timer or separate remote-control system.
- This appliance is intended to be used in household and similar applications such as
– staff kitchen areas in shops, offices and other working environments;
– farm houses;
– by clients in hotels, motels and other residential type environments; - bed and breakfast type environments

Restrictions on use to avoid personal injury
- Do not let the appliance operate unattended.
- Do not place or operate this appliance near water sources.
- Do not place or operate the appliance and its power cord on or near hot surfaces (e.g., stove plates) or open flames.
- Do not leave the power cord hanging from sharp edges and keep away from hot objects and flames. Do not wind the cord around the appliance and do not bend it.
- Never use accessories that are not recommended by the manufacturer.
- The use of accessories not recommended or sold by the appliance manufacturer may result in fire, electric shock or injury to persons.
- When you want to remove the plug from the wall contact, please do this at the plug itself and not by pulling on the cable or the appliance itself.
- To avoid electric shock, make sure your hands are dry before plugging or unplugging.
- Do not use the device with wet hands, on damp floors or when the atmosphere is humid, there is a risk of electric shock.
- While using the appliance, make sure that the power cord must not be caught or crushed.
- Do not let the motor unit, cord or plug get wet to protect against risk of electric shock.
- Be careful, while handling electrical appliances, as the surface of the heating element is subject to residual heat after use. Any misuse may cause potential injury to the user and may damage the appliance.
- Do not touch the outer surface of the appliance as it can get very hot during operation. Instead, use the handle or mitts.
- Never immerse the appliance or the plug-in water or any other liquid. In the event of the appliance falling in water, disconnect immediately from the mains supply and take it to an authorized service agent for repair before reusing.
- Do not use the appliance if it has fallen on the floor, if there are visible signs of damage or if it has a leak.
- Do not use the appliance if the cable or plug is damaged. In case of the cord be damaged, it must be replaced only by the manufacturer, its service agent or similarly qualified persons in order to avoid Hazard.
- In case of appliance malfunction, or if it has been damaged in any manner, return the appliance to the nearest authorized service facility for examination, repair or adjustment.
- In case of hardware problems, do not attempt to repair the product yourself. Repairs should only be carried out by qualified technicians.

Restrictions on use when used with children and elders
- The appliance is not to be used by persons (including children) with reduced physical, sensory or mental capabilities, or lack of experience and knowledge, unless they have been given supervision or instruction.
- Children should be supervised to ensure that they do not play with the appliance.
• Children shall not play with the appliance. - This appliance can be used by children aged from 8 years and above and persons with reduced physical, sensory or mental capabilities or lack of experience and knowledge if they have been given supervision or instruction concerning use of the appliance in a safe way and understand the hazards involved.
- Cleaning and user maintenance shall not be made by children unless they are older than 8 and supervised.
- Keep the appliance and its cord out of reach of children less than 8 years.

Instructions to follow when using the appliance
- The appliance has been incorporated with a grounded plug. Please ensure the wall outlet in your house is well earthed.
- Be careful to not to get burned by the steam.
- Do not touch the hot surface of appliance (such as steam wand, and the brewing filter while in use). Use handle or knobs.
- Do not let the coffee maker operate without water.
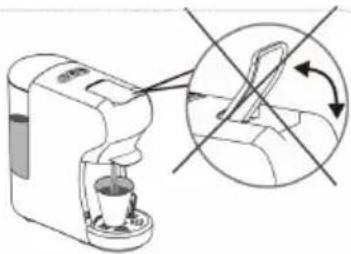
- Do not remove the metal funnel, when appliance is brewing coffee or when steam and hot water escape from metal funnel and ensure to release the pressure in water tank before removing metal funnel.
- Relief pressure through steam wand before removing tank cover or metal funnel.
- WARNING: The filling aperture must not be opened during use.
- WARNING: Potential injury from misuse.
WARNING: high risk to get burn! Do not touch the hot parts of coffee maker.
- The coffee-maker shall not be placed in a close cabinet.
- Do not touch or move the coffee maker while in use.
- Never use the coffee maker in the environment of high temperature, high magnetic field and humidity, do not place the coffee maker on or hot surface or beside fire or another electrical appliance, such as
on the top of refrigerator, avoid to be damaged.
- When the appliance prompts trouble, never operation the appliance, do not place the foreign object into the brewer.
- Never use the detergent or hot water for cleaning the brewing component, to avoid the running component is lack of lubricant oil and the component will be distortion as the high temperature.
- To avoid a circuit overload when using this product, do not operate another high-wattage product on the same electrical circuit.
- A short power supply cord is provided with this product. An extension cord is not recommended for use with this product, but if one must be used:
- The marked electrical rating of the cord must be at least as great as that of the product.
- Arrange the extension cord so that it does not hang where it can be tripped over or pulled unintentionally.
CLEANING AND MAINTENANCE
Kindly refer to the cleaning and maintenance section for details on how to clean surfaces which comes in the contact of food.
3. TECHNICAL SPECIFICATIONS
| Voltage Power | Frequency Pressure | Capacity | ||
| 220-240V 1450 | W 50 – 60Hz 19 Bar | 0,6L |
This product complies with EU regulation 2023/826 under directive 2009/125/EC on the Eco design requirements.
Power consumption in off mode: 0.44 W
Power consumption in standby mode: 0.0 W
Time after which the product enters into off mode: 15 min.
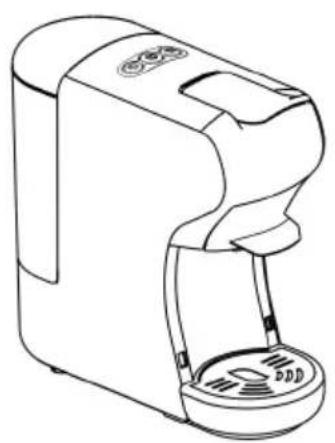
4. PARTS DESCRIPTION
UNPACKING
-
Remove your Multi Capsule coffee machine from its packaging.
• After unpacking, please check that the following parts are included: -
Water tank
- Coffee machine
- Manual
text_image
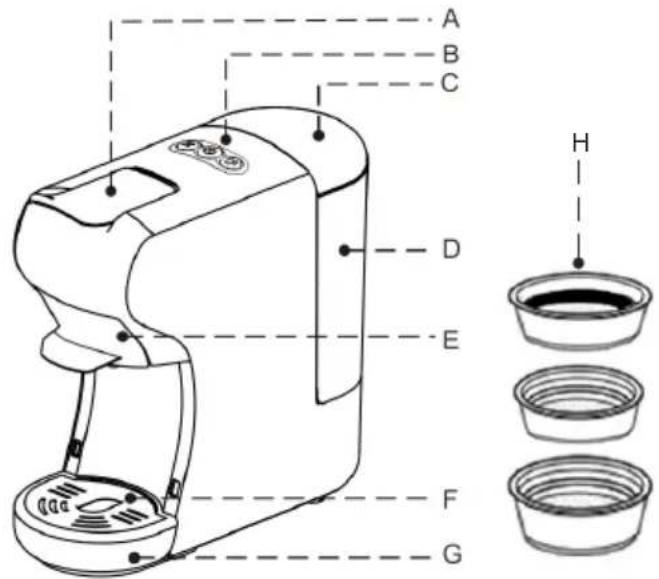
A B C D E F G H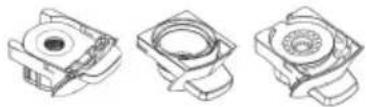
| N° Name | |
| A Handle | |
| B Buttons | |
| C Water tank cover | |
| D Water tank | |
| E Brewing basket | |
| F Drip tray cover | |
| G Drip tray (removable) | |
| H I. 1 coffee pod and tea sachet filter | |
| I This coffee maker includes 3 compatible adapters |
5. INSTRUCTIONS FOR USE
STARTING UP
Before using for the first time
Caution: Improper handling of electrical equipment is dangerous and can be lethal. Please pay attention to the safety precautions in this manual, in particular the following:
• Danger of scalding: beware of hot water!
- Do not operate the machine with an empty water tank or water is less than MINIMUM level.
- Do not open the handle when the machine is brewing.
• Always pull out the power plug before cleaning the machine.
• Only use the machine in a dry room.
- Thoroughly rinse out the water tank with fresh water before using for the first time. Clean the Capsule coffee machine using a damp cloth only.
Tip:
Keep the packaging for transporting the machine (e.g. for removals, servicing, etc.).
Note:
You may find a little water remaining in the machine.
In order to ensure that this machine works perfectly, it was tested with water before leaving the factory.
- There are two ways to fill the water tank: directly into the machine, by using for example a jug, or by removing the water tank.
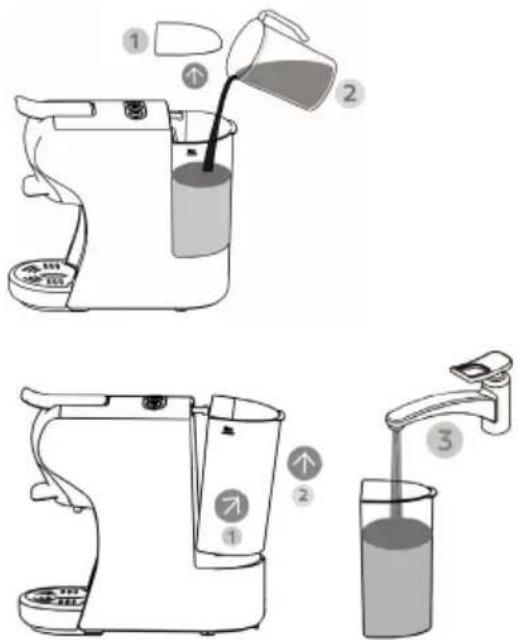
text_image
Diagram showing three steps of a coffee maker's usage: pouring liquid, pouring into a stand mixer, and pouring liquid into a clear glass.Filling without removing the tank
- Raise the water tank cover.
- Fill the tank with cold fresh water (the maximum temperature of the water is 35^ C).
- The maximum capacity is 0.6 litre.
- Low down the tank cover.
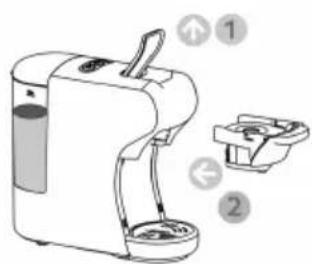
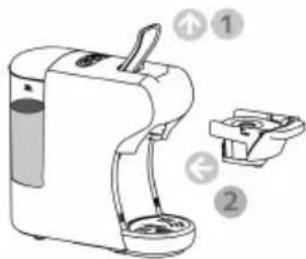
Filling by removing the water tank
- Hold the water grip at tilting angle as shown in direction to remove the water tank from the machine.
- Fill the tank up to the "MAX" mark with cold fresh water (the maximum capacity is 0.6 litre).
- Slide the water tank slowly on water tank base, when the water tank outlet is inserted in the inlet receptacle, push firmly on the water grip as shown in direction 2 to lock the water tank.
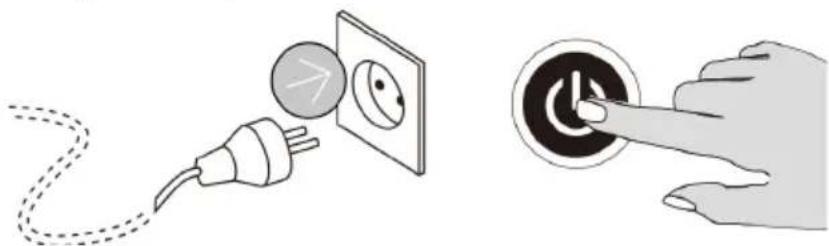
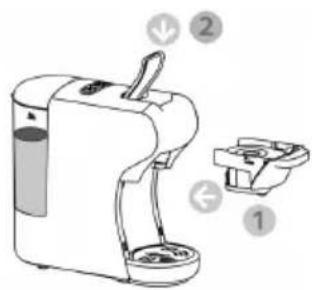
2. Plug in the appliance and turn it on
The lights at buttons become steady, when the machine is heated up, heating up time is 45 seconds approximately.
natural_image
Illustration showing a power plug connecting to an electrical outlet and a hand pressing a button (no text or symbols present)Flushing out the machine and internal piping
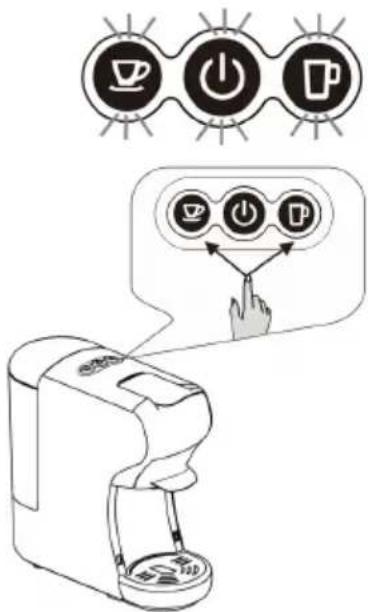
Before using for the first time or after long breaks (holidays for example) the machine must be purged. This short procedure can thoroughly purge and clean the internal tubing.
3. Press the small cup / big cup button, wait for the appliance to complete the flush out.
• Before pressing the button, make sure that:
• The handle is closed without capsule inside.
• The water tank is full.
- The water tank is firmly in place, otherwise water may leak a large bowl (250ml size or above) is placed under the dispenser.
- Press the small cup / big cup button to start flush out.
- Open the handle when the flush out process stopped automatically.
Suggest to select/press big cup button to flushing out the machine and the internal pipe.
text_image
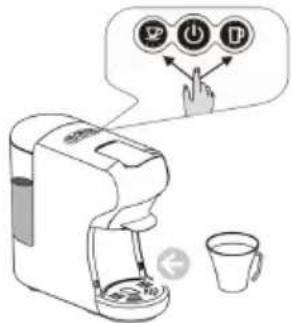
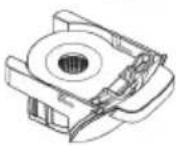
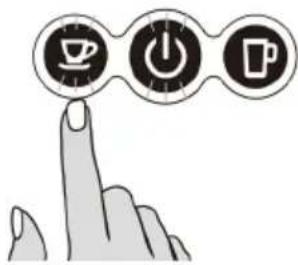
Diagram illustrating coffee machine operation with icons for coffee cup, power button, and coffee cup (with control buttons)Coffee preparation by using various adapters and filters
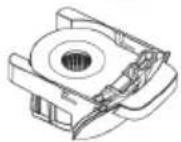
Tips: The machine has different adaptor for different capsules, details refer to bel.
natural_image
Line drawing of a modern coffee maker with a circular base and ventilation slots (no text or symbols)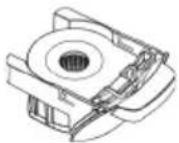
For NESPRESSO®, STARBUCKS® by NESPRESSO®, LAVAZZA® & L'OR® capsules

For NESCAFÉ® DOLCE GUSTO® capsules
For Ground coffee, tea, infusions and coffee pods
For NESPRESSO®, STARBUCKS® by NESPRESSO®, LAVAZZA® & L'OR® capsules
1.

text_image
Diagram of a coffee maker with labeled parts and directional arrows indicating parts of the device.- Open the handle
• Pull out the brewing basket
2.

text_image
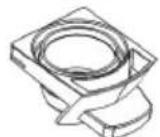
Technical diagram of a mechanical assembly with numbered components and directional arrows indicating motion or assembly.- Open the brewing basket cover lid.
- Insert a capsule to the brewing basket
3.

text_image
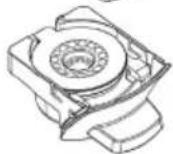
Diagram of a coffee maker with labeled parts including a handle, base, and fan base- Push in thebrewing basket with capsule
- Close the handle
4.
text_image
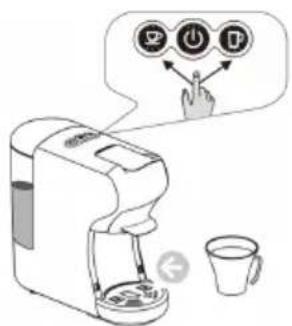
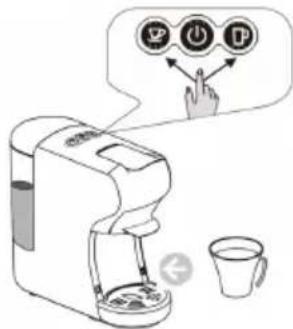
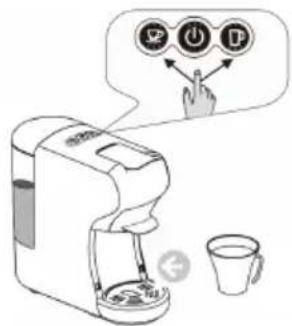
Diagram showing a coffee maker with three icons and a hand interacting with it, accompanied by a cup and a coffee cup.- Place a cup under the dispenser
- Press the desired coffee button only once.
- The selected button will blink and the machine will start brewing, brewing will stop automatically, when reaches the default brewing time (+/-25S for small cup, +/-47s for big cup), default setting can be changed as per need( please refer to "how to program brewing time" instruction).
- Lift the handle and pull out the brewing basket to remove the used capsule to throw into the garbage container. Tips: when press the desired coffee button, the led light might flashes the light for few seconds and then start brewing.(it means that the machine is heating up).
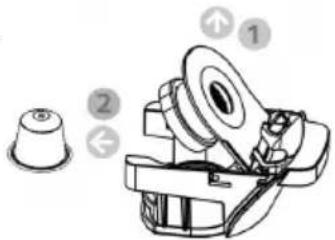
FOR CÁPSULES NESCAFE® DOLCE GUSTO®
1.
text_image
Diagram of a coffee maker with labeled parts and directional arrows indicating parts of the device.- Open the handle
• Pull out the brewing basket
2.

natural_image
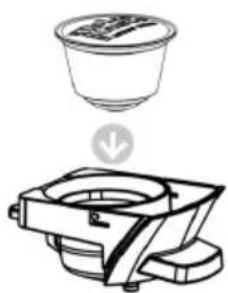
Line drawing of a coffee maker with a cup above it and a downward arrow indicating rotation (no text or symbols)- Insert a capsule to the brewing basket.
3.

text_image
Diagram of a coffee maker with labeled parts and parts numbered 1, 2, and 3- Push in the brewing basket with capsule
- Close the handle
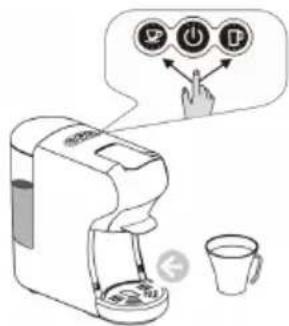
4.
text_image
Diagram illustrating a coffee maker with icons for sorting, lifting, and adding to a cup, accompanied by a speech bubble showing the same icons.- Place a cup under the dispenser
- Press the desired coffee button only once.
- The selected button will blink and the machine will start brewing, brewing will stop automatically when reaches the default brewing time (+/-25S for small cup, +/-47s for big cup), default setting can be changed as per need( please refer to "how to program brewing time" instruction).
- Lift the handle and pull out the brewing basket to remove the used capsule to throw into the garbage container.
Tips: when press the desired coffee button, the led light might flashes the light for few seconds and then start brewing.(it means that the machine is heating up).
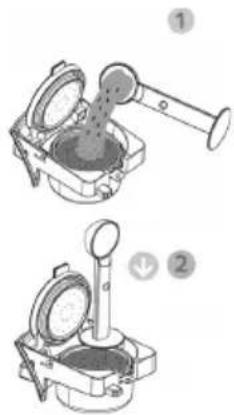
FOR GROUND COFFEE, TEA, INFUSIONS AND COFFEE PODS
1.

text_image
Diagram of a coffee maker with labeled parts and directional arrows indicating parts 1 and 2- Open the handle 2.
• Extract the adapter basket - This machine has 2 filters for this adaptor, one for ground coffee / tea and the other for coffee pods
- Change the filter, depending, that you are going to prepare
natural_image
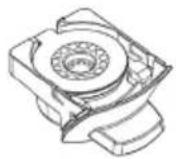
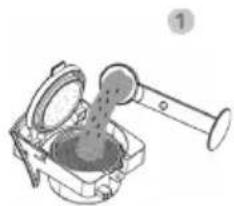
Technical illustration of two mechanical devices with gauges and a handle, labeled 1 and 2 (no text or symbols on the devices themselves)- Add the ground coffee, tea or infusion in the coffee adapter and tea
- Press down the ground coffee
3.

text_image
Diagram of a portable water dispenser with labeled parts 1, 2, and directional arrows indicating ports or features.- Push in the brewing basket with ground coffee or tea
- Close the handle
4.

text_image
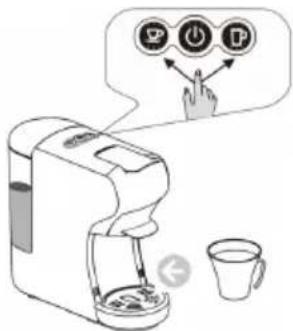
Illustration of a coffee machine with icons and a hand pointing to it, accompanied by a speech bubble containing three labeled buttons (✓, ⏻, ⚪).- Place a cup under the dispenser
- Press the desired coffee button only once.
- The selected button will blink and the machine will start brewing then complete the brewing process, dispensing will stop automatically when reaching the default brewing time (+/-25S for small cup, +/-47s for big cup), default setting can be programmed, please refer to "how to program brewing time" instruction.
- Raise the handle and pull out the brewing basket to throw used coffee into the garbage container.
Tips: when press the button, maybe the desired button LED flash a few seconds first, then start brewing. the flash process is for heating.
Note: To prepare tea can be used tea powder or tea bags, to prepare the tea with the tea powder need to use coffee powder filter and with tea bags coffee pods filter can be used.make sure to remove the string and label, while using tea bags before putting in the adaptor.
NESPRESSO®, NESCAFÉ® DOLCE GUSTO®, STARBUCKS® by NESPRESSO®, LAVAZZA®, L'OR®, are registered trademarks/ brands of its rightful owners. We or our products do not have any affiliation or association with or any endorsement from the owners of these trademarks / brands.
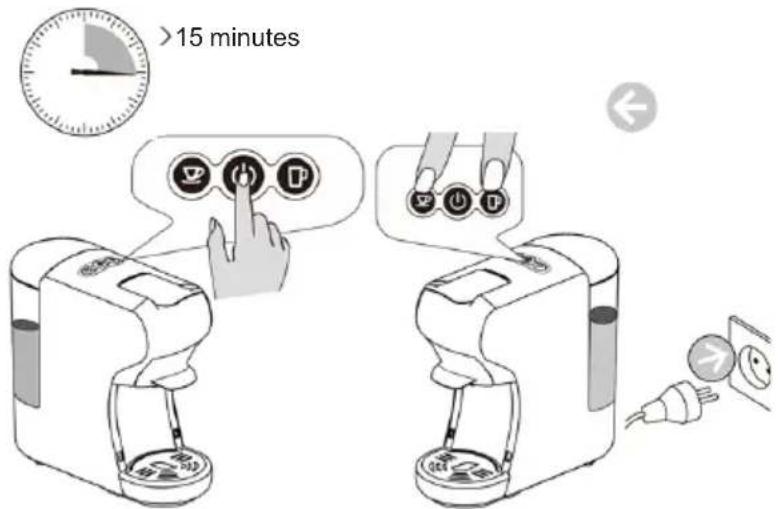
STANDBY MODE
1. Factory Default setting: Standby Mode: 15 mins
It means the machine will turn off after 15 mins of inactivity and all the indicator lights will go off. Press the switch button to reactivate the standby mode again.
2. Standby mode setting:
Keep pressing the small cup button and big cup button, insert the plug to the socket. The power light will switch on. At this point if standby mode deactivate again, just press the small cup button, the small cup button light turns off and the standby mode get cancelled completely. To reactivate the standby mode, press the small cup button again, the small cup button light will turn on again and the standby mode will be reactivated.
3. Factory default setting
Press the big cup button, insert the plug to the socket. The indicator light of buttonswill flash twice. It means the machine come back to factory default setting.
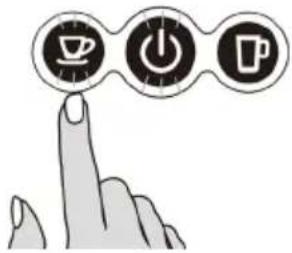
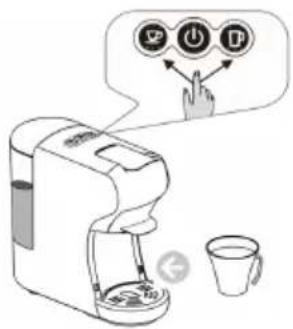
4. Coffee Volume Setting
Place the coffee cup below coffee outlet II. The machine is in normal working condition. Switch on the coffee maker and wait until coffee maker gets preheated and ready to prepare coffee, place the coffee capsule in the filter. To configure the coffee volume setting, press the small cup button as usual and keep it pressed until you get your desired amount of coffee and then
1.2.
text_image
>15 minutes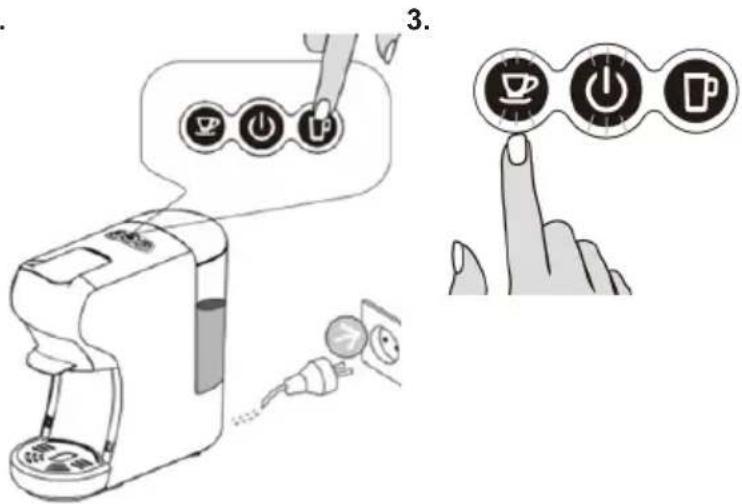
text_image
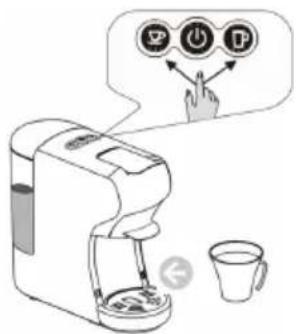
Diagram illustrating coffee machine operation with icons for menu, power button, and coffee cup, plus a finger pointing to the counter.release the button. Once you get the desired amount of coffee following the process mentioned above, your coffee maker automatically configured for that amount of coffee.
Note: In the same way you can configure Big cup coffee volume setting as well, the only change will be, that instead of small cup button need to press big cup button.
III. To bring back the coffee maker on the factory setting for small cup coffee volume need to follow the process mentioned above in point no. 3.
Note: The same way you can restore the factory setting of big cup coffee volume.
7. Cleaning and maintenance
Risk of fatal electrical shock and fire. Never immerse the appliance or part of it in water. Make sure to unplug the machine before cleaning. Do not use any strong cleaning agent or solvent cleaner. Do not use sharp objects, brushes or sharp abrasives. Do not place in a dishwasher.
text_image
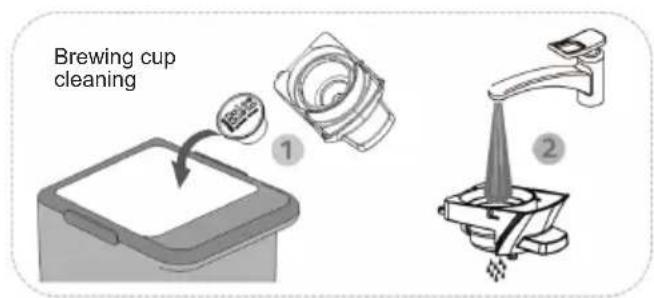
Brewing cup cleaning ① ②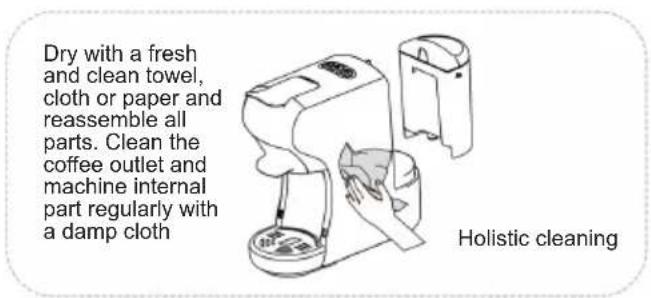
text_image
Dry with a fresh and clean towel, cloth or paper and reassemble all parts. Clean the coffee outlet and machine internal part regularly with a damp cloth Holistic cleaningWARNING TIPS
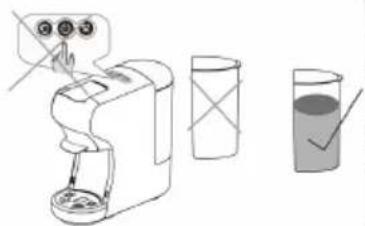
Prohibited splashing water to the machine
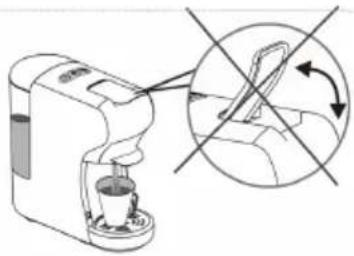
Prohibited to open the handle when brewing
natural_image
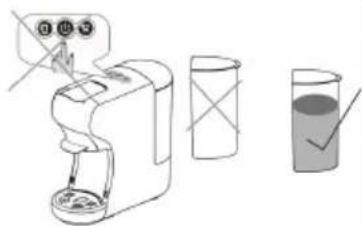
Illustration of a coffee maker with a hand operating the machine and a magnified inset showing a hand holding a bag (no text or symbols present)Before brewing, make sure there is more than 20ml water in the water tank
text_image
Diagram showing a hand holding a switch next to a digital device, with three labeled containers and a checkmark indicating a solution.There is a sharp needle in the Capsule Adaptor slot. Donot put the hand or Finger to any part near the needle, after the adaptor is removed.
natural_image
Simple line drawing of a steaming pot with a hand crossed out, enclosed in a circle (no text or symbols)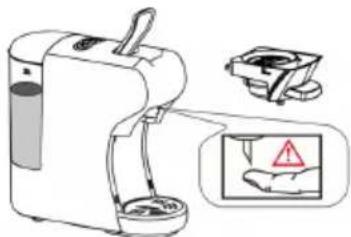
text_image
Diagram showing a portable water purifier with labeled components and warning symbolsAdaptor is still very hot after brewing Be careful!
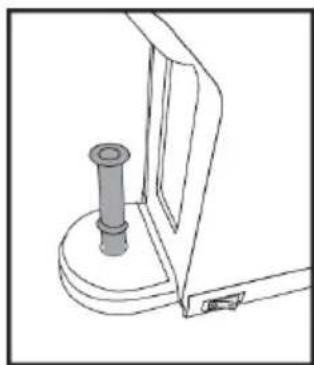
INDUCING THE WATER, MANUALLY INTO COFFEE MACHINE AND PUMP
The very first time or after long pauses (e.g. holidays) the machine might not pump the water. So Before using the machine again this short procedure of inducing the water manually into the machine using the pipe, helps pump and internal circuit to self-priming.
Insert the pipe into the water entrance located underneath water tank.
Fill water into the pipe.
Push manually with the help of pusher to introduce the water into the machine, so that the internal circuit get filled with water.
After doing steps mentioned above machine will be able to pump the water on its own.
Note: If necessary, repeat the process for 2-3 times.
natural_image
Technical line drawing of a mechanical component with a cylindrical pin and mounting bracket (no text or symbols)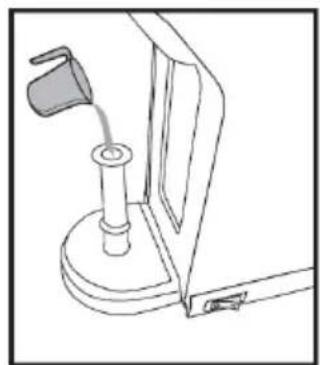
natural_image
Line drawing of a mechanical device with a lever and base mount (no text or symbols)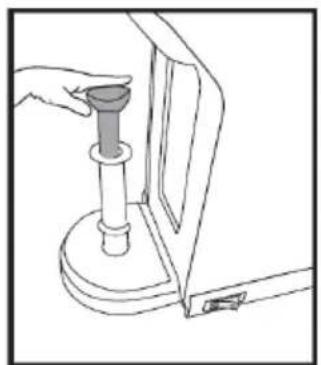
natural_image
Line drawing of a hand using a tool to lift a cylindrical component (no text or symbols)ENERGY SAVING MODE
The machine enters energy saving model automatically once the machine is idle for 15 minutes, the back light of two buttons and power indicator will switch off. To quite energy saving mode, please press power button, appliance will start to warming up with lights blinking, when the buttons are lit steadily, the machine is ready to brew coffee.
DECALCIFICATION
Decalcification / Maintenance
Drinking water varies according to region. The lime particles in hard drinking water are deposited as residues in the machine and can block the piping and cause damage to it. To prevent this, make sure to decalcify the machine at the very least after making 300 to 400 cups of coffee or in any case if the output falls significantly, after one or two months. Decalcification must be done correctly to prevent damage. So, it is essential to follow these instructions.
Important:
-
Never clean the machine with vinegar. This causes damage and makes your coffee taste bad.
– Damage caused by incorrect decalcification or failure to decalcify is not covered by the guarantee.
– Caution: beware of hot water! -
Recommendations: purchase commercially available decalcifier (decalcifying liquid), diluted according to the manufacturer's instructions; pour the mixture in the water tank
-
Make sure there is without capsule inside the machine.
-
Place a large bowl under the dispensing head to collect the decalcification diluted and lime residue.
-
Fill the water tank with water to maximum level mixed with decalcifying solution, make sure the solution is dissolved completely.
-
Press the large button to run decalcifying water as you brew coffee normally, repeat for several times to run out the entire tank water.
-
Repeat the process to run another tank of water mixed with decalcifying solution.
-
Repeat the process to Flush out the intern circuit with a tank of fresh water (without the decalcifying solution) to clean the internal circuit completely.
| PROBLEM CAUSE SOLUTION | ||
| No coffee is brewed The water tank is empty Fill water in the water tank | ||
| The coffee is not hot enough - The Cold cups /mugs- Scale build-up in machine- Cold machine. | - Preheat cup / mug- Descale- For cold machine, brewing a cup of water to warm up the circuit | |
| Water on table - The Cold cups /mugs- Scale build-up in machine- Cold machine- Water tank is leaking- Drip tray is full of water | - Check if the valve on water tank is stuck.- Empty the drip tray. | |
| Handle can not close The brewing basket is not placed well | Push the brewing basket into correct position | |

PORTANT:
text_image
A B C D E F G H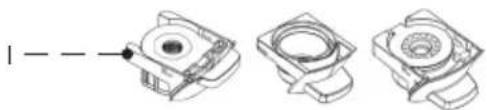
natural_image
Three technical line drawings of mechanical components with no visible text or symbolstext_image
Diagram showing three steps of a coffee maker's cleaning process: pouring liquid, pouring into a stand mixer, and pouring into a clear glass.natural_image
Illustration showing a plug connecting to an electrical outlet and a hand pressing a button (no text or symbols)text_image
Diagram illustrating coffee machine operation with icons for coffee cup, power button, and coffee cup (with three buttons) connected to a hand gesture.natural_image
Line drawing of a modern coffee maker with a circular base and lid (no text or symbols)
Pour capsules NESPRESSO®, STARBUCKS® by NESPRESSO®, LAVAZZA® et L'OR®
Pour capsules NESCAFÉ RDOLCE GUSTO

text_image
Diagram of a handwashing machine with labeled parts and directional arrows indicating componentstext_image
Technical diagram of a mechanical device with numbered components and directional arrows indicating assembly or movement.text_image
Diagram of a portable electric stove with labeled parts and directional arrows indicating componentstext_image
Diagram showing a coffee maker with icons for menu, keyboard, and printer, connected to a cup and a hand gesture.text_image
Diagram of a coffee maker with labeled parts and directional arrows indicating parts of the device.natural_image
Line drawing of a food container with a cup above it, showing a circular arrow indicating direction (no text or symbols)text_image
Diagram of a portable electric water heater with labeled parts and directional arrows indicating componentstext_image
Diagram illustrating a coffee maker with icons and a hand interacting with it, showing menu options like 'OK', 'Cancel', and 'Delete'.text_image
Diagram of a coffee maker with labeled parts and directional arrows indicating componentsnatural_image
Mechanical device with lever and gear assembly (no visible text or symbols)text_image
Diagram of a coffee maker with labeled parts and directional arrows indicating parts of the device.natural_image
Technical line drawing of a mechanical device with a dial and base, no visible text or symbolstext_image
Diagram illustrating a coffee maker with three circular buttons labeled 'OK', 'ON', and 'P' interacting with a hand, accompanied by a cup.text_image
> 15 minutes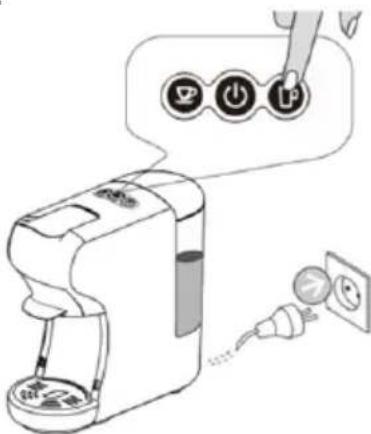
text_image
Diagram showing a hand holding a power button labeled 'P' connected to a device with a close-up of its electrical outlet.3.
text_image
Hand pointing at three circular icons with coffee cup, power button, and mug symbols, suggesting a process or interface.natural_image
Diagram of a coffee maker with a hand operating the machine and a circular arrow indicating rotation (no text or symbols present)text_image
Diagram showing a hand washing a blender with a checkmark indicating the correct answer, alongside a glass of liquid and a crossed-out cup.natural_image
Simple line drawing of a steaming pot with a hand holding a cross above it, enclosed in a circle (no text or symbols)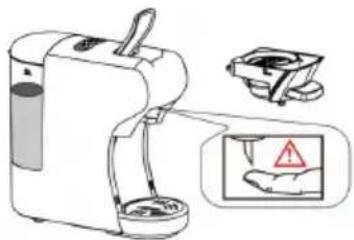
natural_image
Illustration of a portable water purifier with a hand holding a small container and a warning sign (no text or symbols present)natural_image
Technical line drawing of a mechanical component with a cylindrical pin and base (no text or symbols)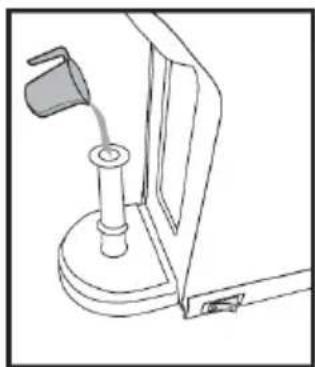
natural_image
Line drawing of a mechanical device with a lever and base mount (no text or symbols)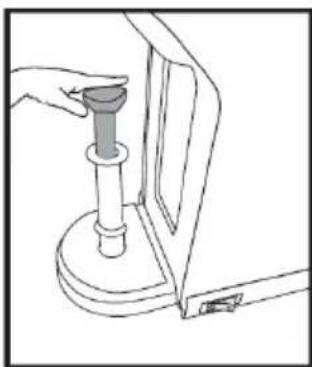
natural_image
Line drawing of a hand using a pressure pump to press down a wall-mounted device (no text or symbols)MODE ÉCONOMIE D'ÉNERGIE
text_image
A B C D E F G H Itext_image
Diagram showing three steps of a coffee maker's cleaning process: pouring liquid, pouring into a stand mixer, and pouring into a clear glass.natural_image
Illustration of an electrical outlet with a plug and cable, showing a circular component with an arrow pointing to it (no text or symbols present)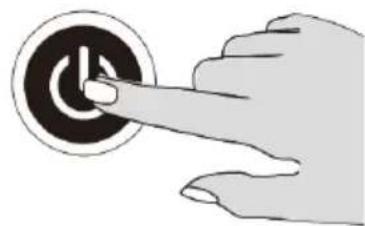
natural_image
Hand pointing at a circular button with a plus sign (no text or symbols visible)text_image
Diagram illustrating coffee machine operation with icons for coffee cup, power button, and coffee cup (with hand icon pointing to function buttons)natural_image
Line drawing of a coffee maker with a side panel and lid (no text or symbols)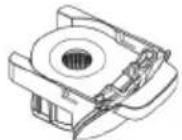
Para cápsulas NESPRESSO®, STARBUCKS® by NESPRESSO®, LAVAZZA® E L'OR®
Para cápsulas NESCAFÉ® DOLCE GUSTO®
text_image
Diagram of a coffee maker with labeled parts and directional arrows indicating componentstext_image
Technical diagram of a mechanical device with numbered components and directional arrows indicating assembly or movement.text_image
Diagram of a portable water dispenser with labeled parts and ports, showing internal components and safety indicators.text_image
Diagram illustrating a coffee maker with icons and a hand interacting with it, showing menu options like 'OK', 'Cancel', and 'Delete'.text_image
Diagram of a water purifier with labeled parts and directional arrows indicating flow or movement.natural_image
Diagram of a food processor with a cup and base, showing internal components (no text or symbols)text_image
Diagram of a coffee maker with labeled parts including a handle, spool, and basetext_image
Diagram illustrating a coffee maker with icons and a hand pointing to it, showing menu options for coffee (OK, Edit, Stop) and a cup.text_image
Diagram of a coffee maker with labeled parts and directional arrows indicating componentsnatural_image
Mechanical device with lever and gear assembly (no visible text or symbols)text_image
Diagram of a coffee maker with labeled parts and directional arrows indicating components• Empurre a cesta de preparo com café moído ou chá
- Feche a Alça
text_image
Diagram illustrating a coffee machine with icons for menu, click, and press functions, plus a cup.text_image
Diagram showing a hand inserting a power button into a coffee maker, with icons and labels indicating the device's function.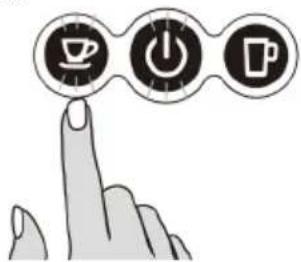
text_image
Hand icon pointing at three circular icons: coffee cup, power button, and mug, symbolizing coffee-related functions.natural_image
Line drawing of a hand washing machine with a lid and base, labeled 'Lim' (no text or symbols on the diagram itself)Limpeza holística
DICAS DE AVISO
natural_image
Diagram of a coffee maker with a hand operating the cup, showing no text or symbols on the device itself.text_image
Diagram showing a hand washing a blender with three buttons and a clear checkmark indicating liquid level.natural_image
Illustration of a hand using a crossed-out X-shaped tool to stir a steaming pot (no text or symbols)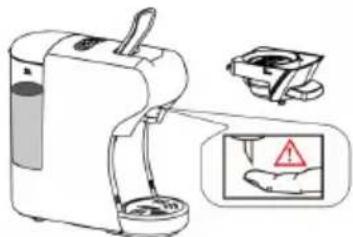
natural_image
Illustration of a portable water purifier with a hand holding a warning sign (no text or symbols present)natural_image
Technical line drawing of a mechanical component with a cylindrical pin and base mount (no text or symbols)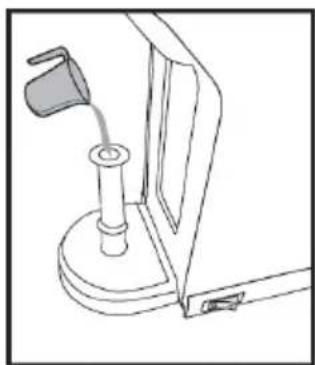
natural_image
Line drawing of a mechanical device with a handle and base mount (no text or symbols)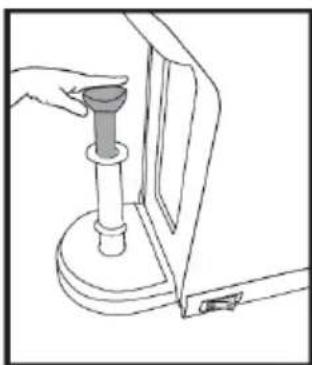
natural_image
Line drawing of a hand operating a mechanical device with a cylindrical component (no text or symbols)MODO DE POUPANÇA DE ENERGIA
text_image
A B C D E F G H Itext_image
Diagram illustrating the step-by-step cooking process of a coffee maker, showing pouring liquid from a cup into a stand mixer and pouring liquid into a clear glass.natural_image
Illustration of an electrical outlet connected to a plug, showing a circular component and a dashed line indicating cable (no text or symbols)
natural_image
Hand pressing a button on a circular button (no text or symbols visible)text_image
Diagram illustrating coffee machine operation with icons for coffee cup, power button, and coffee cup (with hand icon pointing to control buttons)natural_image
Line drawing of a modern coffee maker with a circular base and lid (no text or symbols)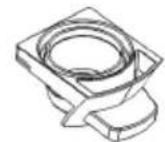

Für NESPRESSO®, STARBUCKS® by NESPRESSO®, LAVAZZA® UND L'OR® Kapseln
text_image
Diagram of a coffee maker with labeled parts and directional arrows indicating componentstext_image
Technical diagram of a mechanical device with numbered components and directional arrows indicating assembly or movement.text_image
Diagram of a coffee maker with labeled parts and directional arrows indicating componentstext_image
Diagram illustrating a coffee machine with icons for sorting, sorting, and lifting a cup, accompanied by a speech bubble indicating the process.text_image
Diagram of a coffee maker with labeled parts and parts numbered 1 and 2natural_image
Line drawing of a coffee maker with a cup and base, no text or symbols presenttext_image
Diagram of a portable device with labeled parts and directional arrows indicating ports or connectionstext_image
Diagram illustrating a coffee maker with icons and a hand interacting with it, showing menu options like 'OK', 'Cancel', and 'Delete'.text_image
Diagram of a coffee maker with labeled parts and directional arrows indicating componentsnatural_image
Technical illustration of a mechanical device with two views (labeled 1 and 2), showing internal components without any text or symbols.text_image
Diagram of a portable electric water heater with labeled parts and directional arrows indicating componentstext_image
Diagram illustrating a coffee maker with icons for POS, USB, and P, showing a hand interacting with the printer.NESPRESSO®, NESCAFÉ® DOLCE GUSTO®, STARBUCKS® by NESPRESSO®, LAVAZZA®,
text_image
Diagram showing a coffee maker with three control buttons labeled 'Control', 'Reset', and 'Insert' connected to a toolbar.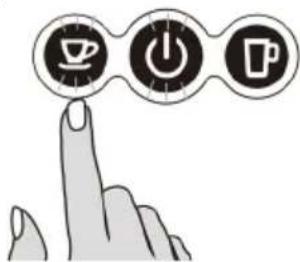
text_image
Hand pointing at three icons: coffee cup, power button, and mug, symbolizing tea-related activities.natural_image
Line drawing of a kitchen mixer with a side panel and lid (no text or symbols)natural_image
Diagram of a coffee maker with a hand gesture showing no text or symbols (no readable text or symbols)text_image
Diagram illustrating a handwashing or cleaning procedure on a blender, with labeled steps and a checkmark indicating the correct step.natural_image
Illustration of a hand using a crossed-out pen to stir a steaming pot (no text or symbols)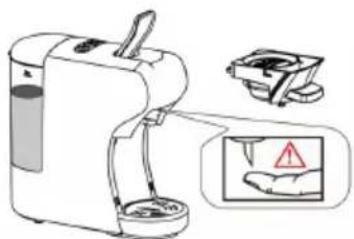
text_image
Diagram showing a water purifier with warning labels and a hand gesture, including a magnified inset showing a hand holding a warning sign.natural_image
Technical line drawing of a mechanical component with a cylindrical pin and base (no text or symbols)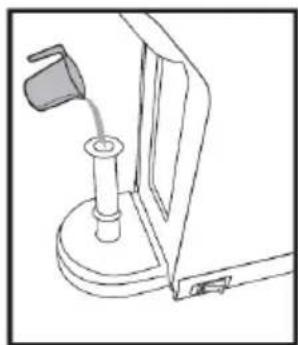
natural_image
Line drawing of a mechanical device with a lever and base mount (no text or symbols)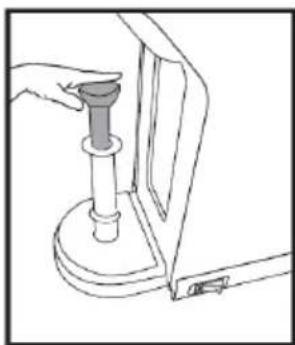
natural_image
Line drawing of a hand holding a mechanical component, no text or symbols presentENERGIESPARMODUS
text_image
A B C D E F G H Itext_image
Diagram illustrating the step-by-step cooking process of a coffee maker, showing steps from adding liquid to pouring into a glass.natural_image
Illustration of an electrical outlet connected to a plug, showing a circular component and a curved wire (no text or symbols)
natural_image
Hand pointing at a circular button with a plus sign (no text or symbols visible)text_image
Diagram illustrating coffee machine operation with icons for coffee cup, power button, and coffee cup, showing a hand interacting with the device.natural_image
Line drawing of a modern coffee maker with a circular base and lid (no text or symbols)
Per capsule NESPRESSO®, STARBUCKS® by NESPRESSO®, LAVAZZA® E L'OR®
Per capsule NESCAFÉ RDOLCE GUSTO
text_image
Diagram of a coffee maker with labeled parts and directional arrows indicating componentstext_image
Technical diagram of a mechanical device with numbered components and directional arrows indicating assembly or movement.text_image
Diagram of a portable device with labeled parts and directional arrows indicating componentstext_image
Illustration of a coffee maker with icons and a hand interacting with it, accompanied by a cup and a coffee cup nearby.text_image
Diagram of a water purifier with labeled parts and directional arrows indicating flow or movement.natural_image
Line drawing of a coffee maker with a cup above it and a circular arrow indicating rotation (no text or symbols)text_image
Diagram of a portable water dispenser with labeled parts and directional arrows indicating ports or featurestext_image
Diagram illustrating a coffee maker with icons for menu, menu button, and click-through gesture, plus a cup.text_image
Diagram of a coffee maker with labeled parts and directional arrows indicating componentsnatural_image
Diagram of a mechanical device with a lever and internal components (no text or symbols)text_image
Diagram of a portable electric water heater with labeled parts 1, 2, and directional arrows indicating components.text_image
Diagram of a coffee maker with three labeled buttons ( turned, click, press) and a hand pointing to it, accompanied by a cup.text_image
Diagram illustrating a mechanical device with labeled parts and directional arrows, including a magnified view of the component.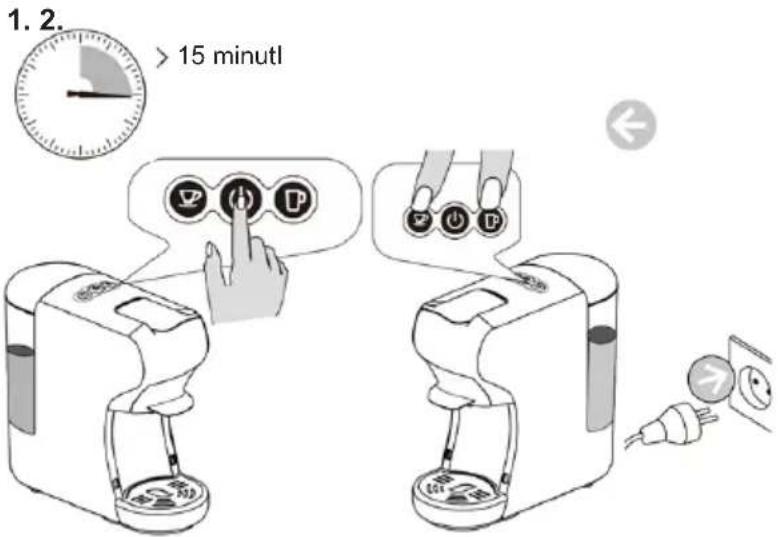
text_image
1. 2. > 15 minutl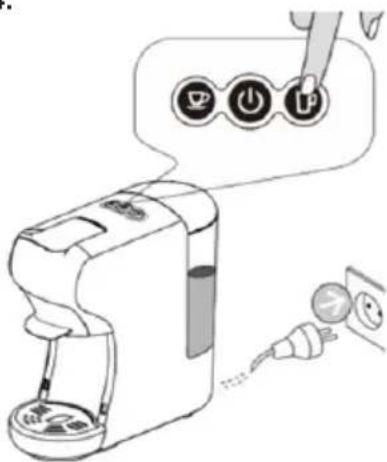
text_image
Diagram showing a hand inserting a device into three labeled buttons with icons, illustrating the process of switching or cleaning.3.
text_image
Hand icon pointing at three circular icons: coffee cup, power button, and beer mug, symbolizing coffee-related functions.natural_image
Line drawing of a hand washing a Pu-branded blender with a lid (no text or symbols)Pulizia olistica
natural_image
Diagram of a coffee maker with a hand gesture showing no text or symbols (no readable text or symbols)text_image
Diagram showing a hand holding a small object above a blender, with three labeled containers and a checkmark indicating a solution.natural_image
Illustration of a steaming pot with a hand holding a crossed-out X sign, enclosed in a circle (no text or symbols)
natural_image
Illustration of a portable coffee maker with a hand holding a cup, accompanied by a warning sign and magnified view (no text or symbols on the device itself)natural_image
Technical line drawing of a mechanical component with a cylindrical pin and base (no text or symbols)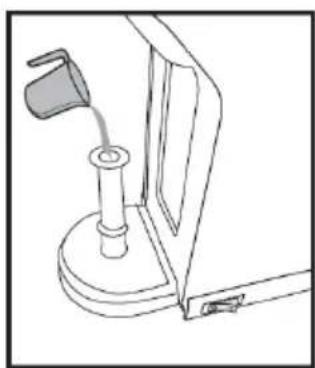
natural_image
Line drawing of a mechanical device with a lever and base mount (no text or symbols)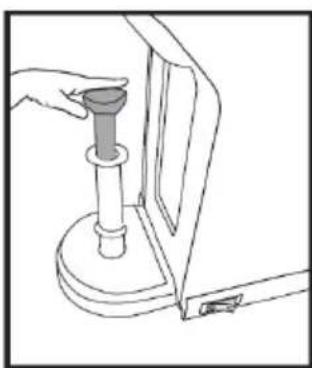
natural_image
Line drawing of a hand holding a cylindrical object inserted into a container (no text or symbols)MODALITÀ DI RISPARMIO ENERGETICO
text_image
A B C D E F G H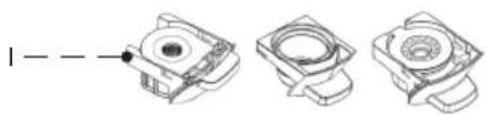
natural_image
Three technical line drawings of mechanical components with no visible text or symbolstext_image
Diagram showing three steps of a coffee maker's tea being poured into a glass, with numbered instructions for each step.natural_image
Illustration showing a plug connecting to an electrical outlet and a hand pressing a button (no text or symbols)text_image
Diagram illustrating coffee machine operation with icons for coffee cup, power button, and coffee mug, showing a hand interacting with the device.natural_image
Line drawing of a modern coffee maker with a circular base and lid (no text or symbols)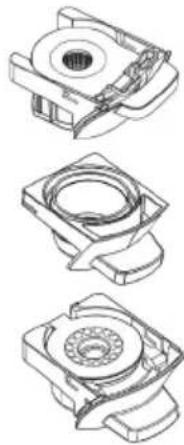
natural_image
Technical line drawings of three mechanical components with no visible text or symbolsPro NESPRESSO®, STARBUCKS® by NESPRESSO®, LAVAZZA® & L'OR® kapsle
Pro NESCAFÉ® DOLCE GUSTO® kapsle
text_image
Diagram of a coffee maker with labeled parts and directional arrows indicating componentstext_image
Technical diagram of a mechanical device with numbered components and directional arrows indicating assembly or movement.text_image
Diagram of a portable coffee maker with labeled parts and directional arrows indicating ports or featurestext_image
Diagram illustrating a coffee machine with icons for menu, keyboard, and coffee cup, accompanied by a speech bubble indicating action.text_image
Diagram of a coffee maker with labeled parts and directional arrows indicating componentsnatural_image
Simple line drawing of a coffee maker with a cup above it and a downward arrow below (no text or symbols)text_image
Diagram of a coffee maker with labeled parts including tray, cup, and standtext_image
Diagram illustrating a coffee maker with icons for sorting, lifting, and adding to a cup, accompanied by a speech bubble showing the same icons.text_image
Diagram of a coffee maker with labeled parts and directional arrows indicating parts of the device.natural_image
Mechanical assembly diagram showing a lever lifting a component (no text or symbols visible)text_image
Diagram of a portable water heater with labeled parts and directional arrows indicating ports or connections.text_image
Illustration of a coffee maker with icons and a hand interacting with it, showing menu options for food access.text_image
Diagram showing a coffee maker with three buttons and a power plug, illustrating the process of adding or using a power outlet.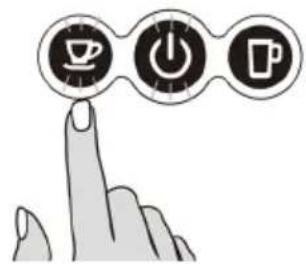
text_image
Hand icon pointing at three circular icons with coffee cup, power button, and mug symbols, suggesting a process or function.natural_image
Diagram of a coffee maker with a hand operating the cup, showing no text or symbols on the device itself.text_image
Diagram showing a hand washing a blender with a checkmark indicating the correct solution, alongside a glass of liquid and a crossed-out cup.natural_image
Simple line drawing of a hand using a crossed-out pen to stir a steaming pot (no text or symbols)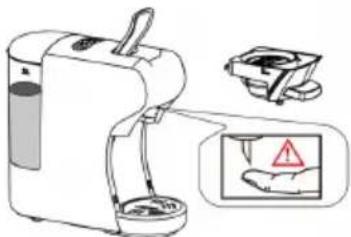
text_image
Diagram showing a portable water purifier with a hand holding a warning sign and a warning symbol, alongside its electrical outlet.natural_image
Technical line drawing of a mechanical component with a cylindrical pin and bracket (no text or symbols)
natural_image
Line drawing of a mechanical device with a handle and base mount (no text or symbols)
natural_image
Line drawing of a hand holding a cylindrical object mounted on a base, next to a vertical panel (no text or symbols)REŽIM ÚSPORY ENERGIE
text_image
A B C D E F G H Itext_image
Diagram showing three steps of a coffee maker's cleaning process: pouring liquid, pouring into a stand, and pouring into a clear glass.natural_image
Illustration showing a plug connecting to an electrical socket and a hand pressing a button (no text or symbols)text_image
Diagram illustrating coffee machine operation with icons for coffee cup, power button, and coffee mug, plus a hand cursor interacting with the device.natural_image
Line drawing of a coffee maker with lid and side panel (no text or symbols)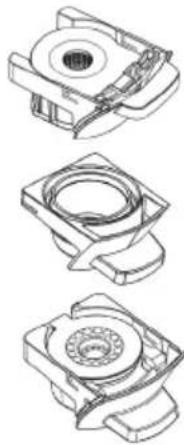
natural_image
Three technical line drawings of mechanical components with no visible text or symbolsTil NESPRESSO®, STARBUCKS® by NESPRESSO®, LAVAZZA® & L'OR® kapsler
Til NESCAFÉ® DOLCE GUSTO® kapsler
Til malet kaffe, te, infusioner og kaffepuder
TIL NESPRESSO ,STARBUCKS NESPRESSO ,AVAZZA L'OR Rapsler
1.

text_image
Diagram of a coffee maker with labeled parts and directional arrows indicating componentstext_image
Technical diagram of a mechanical device with numbered components and directional arrows indicating assembly or movement.text_image
Diagram of a portable water dispenser with labeled parts and directional arrows indicating ports or featurestext_image
Diagram showing a coffee maker with three icons (save, press, print) and a hand interacting with it, next to a cup.- Placer en kop under dispenseren
text_image
Diagram of a coffee maker with labeled parts and directional arrows indicating assembly or movement.natural_image
Line drawing of a food processor with a cup and lid, showing internal components (no text or symbols)text_image
Diagram of a coffee maker with labeled parts and parts numbered 1, 2, and 3text_image
Diagram showing a coffee maker with icons for menu, click, and adder, plus a cup, illustrating the process.- Placer en kop under dispenseren
text_image
Diagram of a coffee maker with labeled parts and directional arrows indicating parts of the device.natural_image
Diagram of a mechanical device with a lever and internal components (no text or symbols)text_image
Diagram of a coffee maker with labeled parts and directional arrows indicating components- Luk håndtaget
text_image
Diagram showing a coffee maker with icons for parking, using a hand to interact with a coffee cup and click buttons labeled 'P' and 'W'.- Placer en kop under dispenseren
text_image
Diagram showing a coffee maker with three buttons labeled 'OK', 'ON', and 'ON' connected to an electrical outlet, indicating a power switch or power connection.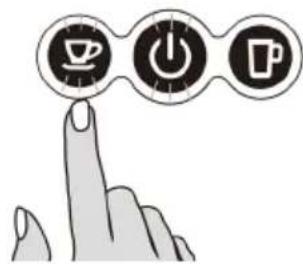
text_image
Illustration showing three icons: coffee cup, power button, and coffee cup with a finger pointing to it.natural_image
Illustration of a coffee maker with a hand gesture showing no text or symbols (no readable text or symbols)text_image
Diagram showing a hand holding a device with three circular buttons and a checkmark, alongside a glass of liquid.natural_image
Simple line drawing of a steaming cup with a hand holding a cross above it, enclosed in a circle (no text or symbols)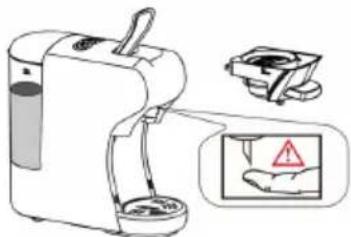
natural_image
Illustration of a portable water purifier with a hand holding a warning sign (no text or symbols present)natural_image
Technical line drawing of a mechanical component with a cylindrical pin and base (no text or symbols)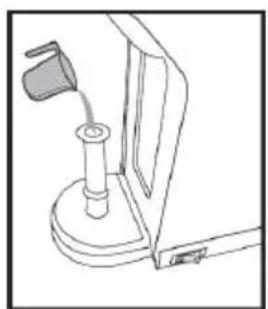
natural_image
Line drawing of a mechanical device with a handle and base mount (no text or symbols)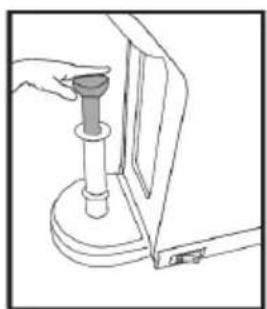
natural_image
Line drawing of a hand holding a mechanical component, no text or symbols presentENERGIBESPARENDE TILSTAND
text_image
A B C D E F G H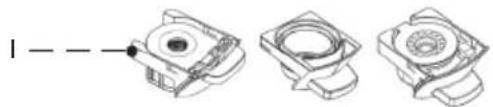
natural_image
Three technical line drawings of mechanical components with no visible text or symbolstext_image
Diagram showing three steps of a coffee maker's tea being poured into a glass, with numbered instructions for each step.natural_image
Illustration showing a plug connecting to an electrical outlet and a hand pressing a button (no text or symbols present)text_image
Diagram illustrating coffee machine operation with icons for coffee cup, power button, and coffee mug, showing a hand interacting with the device.natural_image
Line drawing of a modern coffee maker with a circular base and lid (no text or symbols)
natural_image
Technical line drawings of three mechanical components with no visible text or symbolsZa NESPRESSO®, STARBUCKS® by NESPRESSO®, LAVAZZA® & L'OR® kapsule
Za NESCAFÉ® DOLCE GUSTO® kapsule
Za mleto kavo, čaj, napitke in kavne stroke
Za NESPRESSO ,STARBUCKS by NESPRESSO ,LAVAZZA R L'OR Rapsule
1.
text_image
Diagram of a coffee maker with labeled parts and directional arrows indicating components- Odprite ročaj - Izvlecite košaro za kuhanje
2.
text_image
Technical diagram of a mechanical device with numbered components and directional arrows indicating assembly or movement.- Odprite pokrov košare za kuhanje. - Vstavite kapsulo v košarico za kuhanje
3.

text_image
Diagram of a portable water dispenser with labeled parts and directional arrows indicating components- Potisnite v notranjost košara za kuhanje s kapsulo - Zaprite ročaj
4.
text_image
Diagram showing a hand interacting with a coffee machine, with icons for menu, play button, and coffee cup nearby.- Pod dozirno posodo postavite skodelico.
text_image
Diagram of a coffee maker with labeled parts and directional arrows indicating components- Odprite ročaj - Izvlecite košaro za kuhanje
2.
natural_image
Simple line drawing of a coffee maker with a cup above it and a downward arrow below (no text or symbols)- Odprite pokrov pokrova košare za obdelavo. - Vstavite kapsulo v košaro za kuhanje.
3.
text_image
Diagram of a portable electric water heater with labeled parts including ports, buttons, and control panel• Potisnite v košara za kuhanje s kapsulo
- Zaprite ročaj
4.

text_image
Diagram illustrating a coffee maker with icons and a hand interacting with it, showing menu options like 'OK', 'Cancel', and 'Delete'.- Pod dozirno posodo postavite skodelico.
text_image
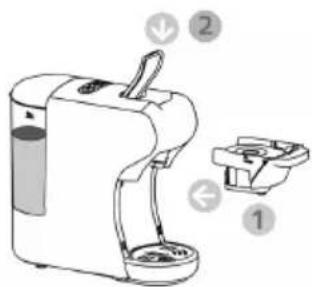
Diagram of a coffee maker with labeled parts and directional arrows indicating parts of the device.- Odprite ročaj
- Izvlecite košarico adapterja
• Ta aparat ima 3 filtre za ta adapter, 2 za mleto kavo/čaj in drugega za kavne stroke.
• Zamenjajte filter, odvisno od tega, kaj boste pripravili.
2.
natural_image
Mechanical assembly diagram showing a lever lifting a component (no text or symbols visible)• V adapter za kavo in čaj dodajte mleto kavo, čaj ali poparek.
• Pritisnite gumb mleta kava
3.

text_image
Diagram of a portable water heater with labeled parts and directional arrows indicating ports or connections.text_image
Illustration of a coffee maker with icons and a hand interacting with it, showing menu options for food access.- Pod dozirno posodo postavite skodelico.
text_image
Diagram showing a coffee maker with three buttons labeled 'OK', 'Cancel', and 'Add' connected to an electrical outlet, likely illustrating a power or usage process.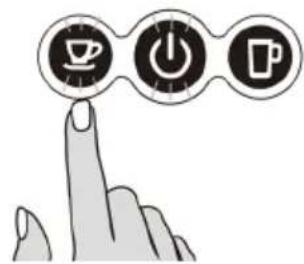
natural_image
Illustration of a hand pointing at three circular icons: coffee cup, power button, and mug (no text or symbols)natural_image
Line drawing of a Celostno appliance with lid and base, no text or symbols presentNASVETI ZA OPOZARJANJE
Prepovedano brizganje vode na stroj
natural_image
Diagram of a coffee maker with a hand operating the cup, showing no text or symbols on the device itself.text_image
Diagram showing a hand washing a blender with a checkmark indicating the correct solution, alongside a glass of liquid and a tray.natural_image
Simple line drawing of a hand using a crossed-out arrow to stir a steaming pot (no text or symbols)
text_image
Diagram showing a portable water purifier with labeled components and warning symbolnatural_image
Technical line drawing of a mechanical component with a cylindrical pin and base (no text or symbols)
natural_image
Line drawing of a mechanical device with a handle and base (no text or symbols)
natural_image
Line drawing of a hand holding a cylindrical object mounted on a base, with no visible text or symbolsNAČIN VARČEVANJA Z ENERGIJO
text_image
A B C D E F G H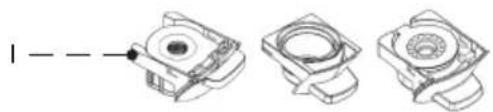
natural_image
Three technical line drawings of mechanical components with no visible text or symbols| N° Ime | |
| A Ručka | |
| B Gumbi | |
| C Poklopac spremnika za vodu | |
| D Rezervoar za vodu | |
| E Košara za izlijevanje | |
| F Poklopac posude za kapanje | |
| G Posuda za kapanje | |
| H I. 1 filter za jednodoznu kavu i vrećica od čaja | |
| I Ovaj aparat za kavu uključuje 3 adaptera kompatibilan |
5. UPUTE ZA UPORABU
STARTING GORE
Prije prve uporabe
Oprez: Nepravilno rukovanje električnom opremom je opasno i može biti smrtonosno. Obratite pozornost na sigurnosne mjere opreza u ovom priručniku, posebno na sljedeće:
text_image
Diagram showing three steps of a coffee maker's usage: pouring liquid, pouring clear liquid, and pouring clear liquid into a glass.Punjenje bez skidanja spremnika
- Podignite spremnik za vodu poklopac.
- Napunite spremnik hladnom svježom vodom (maksimalno temperatura vode je 35°C).
- Maksimalni kapacitet je 0,6 litra.
- Nisko dolje u spremniku poklopac.
natural_image
Illustration showing a power plug connecting to an electrical outlet and a hand pressing a button (no text or symbols present)3. Ispiranje stroja i unutrašnjosti cijevi
text_image
Diagram illustrating coffee machine operation with icons for coffee cup, power button, and coffee cup (with control buttons)Priprema kave pomoću raznih adaptera i filtera
Savjeti: Stroj ima različite adaptere za različite kapsule, detalji se odnose na bel.
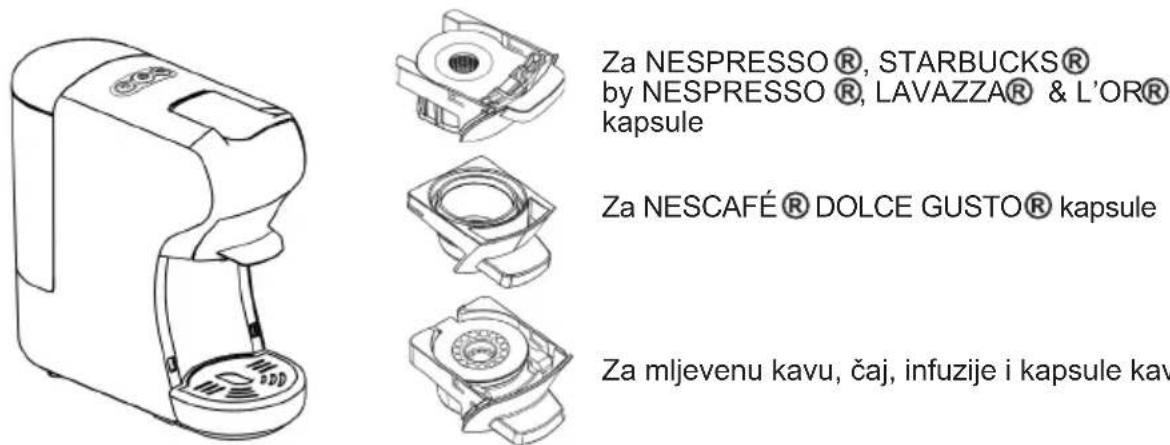
Za NESPRESSO®, STARBUCKS® by NESPRESSO®, LAVAZZA® & L'OR® kapsule
Za NESCAFÉ® DOLCE GUSTO® kapsule
Za mljevenu kavu, čaj, infuzije i kapsule kave
Za NESPRESSO ,STARBUCKS by NESPRESSO ,LAVAZZA L'OR Capsule
1.

text_image
Diagram of a water purifier with labeled parts and directional arrows indicating componentstext_image
Technical diagram of a mechanical device with numbered components and directional arrows indicating assembly or movement.- Otvorite poklopac košare za kuhanje poklopac.
- Úmetnite kapsulu u košaru za kuhanje
3.
text_image
Diagram of a portable water dispenser with labeled parts and directional arrows indicating ports or features• Gurnuti u košarica za kuhanje s kapsulom
• Zatvorite ručku
4.
text_image
Diagram showing a coffee maker with three icons (save, press, add) and a hand pointing to it, alongside a cup and a coffee cup.• Stavite šalicu ispod dispenzer
text_image
Diagram of a coffee maker with labeled parts and directional arrows indicating assembly or positioning.natural_image
Line drawing of a food processor with a cup and lid, showing internal components (no text or symbols)- Otvorite poklopac poklopca košare za kuhanje
- Umetnite kapsulu u košaru za kuhanje
3.

text_image
Diagram of a portable electric water heater with labeled parts and directional arrows indicating components• Gurnite u košarica za kuhanje s kapsulom • Zatvorite ručku
4.
text_image
Diagram showing a coffee maker with icons and a hand pointing to it, alongside a cup and coffee cup.• Stavite šalicu ispod dispenzer
text_image
Diagram of a coffee maker with labeled parts and directional arrows indicating components- Otvorite ručku.
- Izvadite košaru adaptera
natural_image
Technical illustration of a mechanical device with two views (① and ②), no visible text or symbols.- Dodajte mljevenu kavu, čaj ili infuziju u adapter za kavu i čaj
• Pritisnite dolje the mljevena kava
3.

text_image
Diagram of a portable water dispenser with labeled parts and directional arrows indicating ports or features• Gurnite unutra the košaru za kuhanje s mljevenom kavom ili čajem
• Zatvorite ručka
4.
text_image
Diagram illustrating a coffee maker with three digital buttons (Pay, Edit, Print) and a hand interacting with it, alongside a cup.• Stavite šalicu ispod dispenzer
Pritisnite the željeni kava dugme samo jednom.
- The odabrano dugme htjeti treptati i the stroj htjeti start kuhanje piva zatim potpuna the kuhanje piva proces, izdavanje htjeti Stop automatski kada dostizanje the zadana vrijednost kuhanje piva vrijeme (+/-25S za mali kupa, +/- 47s za velika kupa), zadana vrijednost postavljanje može biti programiran, Molim uputiti do “kako do program kuhanje piva vremenska uputa.
- Podići the ručka i Vuci van the kuhanje piva košara do baciti koristi se kava u the smeće spremnik. Savjeti: kada pritisnite the gumb, možda the željeni dugme LED bljesak a nekoliko sekundi prvi, zatim početi kuhati. the bljesak proces je za grijanje.
Bilješka: Za pripremu čaj može biti koristi se čaj puder ili čaj torbe, do pripremiti the čaj s the čaj u prahu potrebno je koristiti filtar za kavu u prahu, a za vrećice čaja može se koristiti filtar za mahune kave. obavezno ga uklonite the niz i označiti, dok korištenjem čaj torbe prije stavljanje u the adapter.
NESPRESSO®, NESCAFÉ® DOLCE GUSTO®, STARBUCKS® by NESPRESSO®, LAVAZZA®, L'OR®, are registered trademarks/ brands of its rightful owners. We or our products do not have any affiliation or association with or any endorsement from the owners of these trademarks / brands.
NAČIN PRIPRAVNOSTI
1. Tvornička zadana postavka: Način mirovanja: 15 min
text_image
Diagram showing a coffee maker with three buttons labeled 'P', 'O', and 'I' connected to a power outlet, indicating a power switch or battery.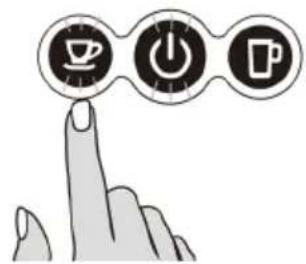
text_image
Hand icon pointing at three circular icons with coffee cup, power button, and mug symbols, symbolizing a process or function.text_image
Brewing cup cleaning ① ②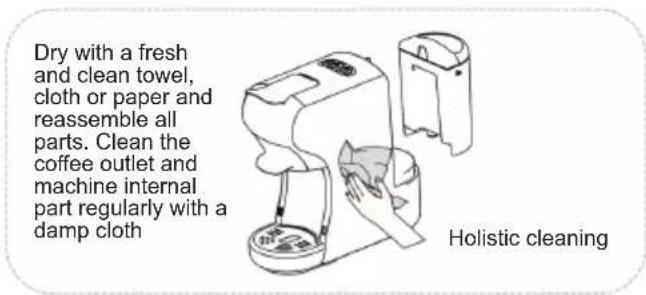
text_image
Dry with a fresh and clean towel, cloth or paper and reassemble all parts. Clean the coffee outlet and machine internal part regularly with a damp cloth Holistic cleaningSAVJETI ZA UPOZORENJE
Prohibited splashing water to the machine
Prohibited to open the handle when brewing
natural_image
Illustration of a coffee maker with a cup and a hand holding a tray, showing a crossed-out arrow (no text or symbols present)Before brewing, make sure there is more than 20ml water in the water tank
text_image
Diagram showing a hand washing a cup with three buttons and a checkmark indicating a completed step.There is a sharp needle in the Capsule Adaptor slot. Donot put the hand or Finger to any part near the needle, after the adaptor is removed.

natural_image
Illustration of a steaming pot with a hand holding a crossed-out triangular object (no text or symbols)
natural_image
Illustration of a portable water purifier with a hand gesture and warning symbol (no text or labels)Adaptor is still very hot after brewing Be careful!
UPISIVANJE VODE, RUČNO U APARAT ZA KAVU I PUMPU
natural_image
Technical line drawing of a mechanical component with a cylindrical pin and bracket (no text or symbols)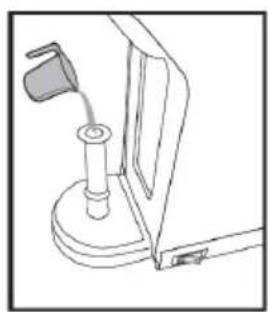
natural_image
Line drawing of a mechanical device with a lever and base mount (no text or symbols)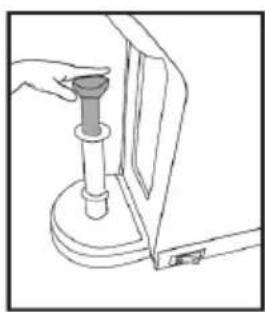
natural_image
Line drawing of a hand operating a mechanical device with a cylindrical component (no text or symbols)NAČIN UŠTEDE ENERGIJE
text_image
A B C D E F G H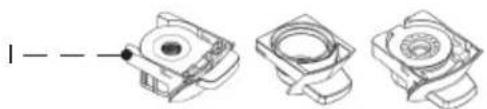
natural_image
Three technical line drawings of mechanical components with no visible text or symbolstext_image
Diagram showing three steps of a coffee maker's tea being poured into a glass, with numbered instructions for each step.natural_image
Illustration showing a plug connecting to an electrical outlet and a hand pressing a button (no text or symbols present)text_image
Diagram illustrating coffee machine operation with icons for coffee cup, power button, and coffee mug, showing a hand interacting with the device.natural_image
Line drawing of a modern coffee maker with lid and spout (no text or symbols)
natural_image
Three technical line drawings of mechanical components with no visible text or symbolsDia NESPRESSO®, STARBUCKS® by NESPRESSO®, LAVAZZA® & L'OR® kapsułki
Dla NESCAFÉ® DOLCE GUSTO® kapsułki
text_image
Diagram of a water purifier with labeled parts and directional arrows indicating flow or movement.text_image
Technical diagram of a mechanical device with numbered components and directional arrows indicating assembly or movement.text_image
Diagram of a portable electric water heater with labeled parts and directional arrows indicating componentstext_image
Diagram illustrating a coffee machine with icons for menu, keyboard, and coffee cup, accompanied by a speech bubble showing action buttons.text_image
Diagram of a coffee maker with labeled parts and directional arrows indicating componentsnatural_image
Simple line drawing of a coffee maker with a cup above it and a downward arrow below (no text or symbols)text_image
Diagram of a portable electric water heater with labeled parts including ports, buttons, and control paneltext_image
Diagram illustrating a coffee maker with icons and a hand interacting with it, showing menu options like 'OK', 'Cancel', and 'Delete'.text_image
Diagram of a coffee maker with labeled parts and directional arrows indicating parts of the device.natural_image
Technical illustration of a mechanical device with two views (top and bottom) showing internal components and a handle, no text or symbols present.text_image
Diagram of a portable water heater with labeled parts and directional arrows indicating ports or functions.text_image
Illustration of a coffee maker with icons and a hand interacting with it, showing menu control buttons.text_image
Diagram showing a coffee maker with three buttons and a power plug, illustrating the process of adding or using a power.
text_image
Hand icon pointing at three circular icons with coffee cup, power button, and mug symbols, suggesting a process or function.natural_image
Diagram of a coffee maker with a hand operating the cup, showing no text or symbols on the device itself.Przed
text_image
Diagram showing a hand washing a blender with a 'OK' button and a checkmark indicating completion or rejection.W gnieździe
natural_image
Illustration of a hand using a crossed-out X-shaped tool to stir a steaming pot (no text or symbols)
natural_image
Illustration of a portable water purifier with a hand holding a warning sign (no text or symbols present)natural_image
Technical line drawing of a mechanical component with a cylindrical pin and bracket (no text or symbols)
natural_image
Line drawing of a mechanical device with a handle and base mount (no text or symbols)
natural_image
Line drawing of a hand holding a cylindrical object next to a mechanical component (no text or symbols)TRYB OSZCZEDZANIA ENERGII
text_image
A B C D E F G I Htext_image
Diagram illustrating three steps of a coffee maker's usage: pouring liquid, pouring into a stand mixer, and pouring into a clear glass.natural_image
Illustration showing a plug connecting to an electrical outlet and a hand pressing a button (no text or symbols)text_image
Diagram illustrating coffee machine operation with icons for coffee cup, power button, and coffee cup (with hand icon pointing to a coffee machine)natural_image
Line drawing of a modern coffee maker with a circular base and lid (no text or symbols)
natural_image
Three technical line drawings of mechanical components, showing different assembly or assembly states (no text or symbols present)Pentru NESPRESSO®, STARBUCKS® by NESPRESSO®, LAVAZZA® & L'OR® capsule
Pentru NESCAFÉ® DOLCE GUSTO® capsule
text_image
Diagram of a handwashing machine with labeled parts and directional arrows indicating componentstext_image
Technical diagram of a mechanical device with numbered components and directional arrows indicating assembly or movement.text_image
Diagram of a portable water heater with labeled parts and directional arrows indicating components4.

text_image
Diagram showing a coffee maker with three icons (save, edit, print) and a hand pointing to it, next to a cup.text_image
Diagram of a coffee maker with labeled parts and directional arrows indicating componentsnatural_image
Line drawing of a food processor with a cup and lid, showing internal components (no text or symbols)text_image
Diagram of a portable coffee maker with labeled parts and directional arrows indicating componentstext_image
Diagram illustrating a coffee maker with icons and a hand interacting with it, showing menu options like 'OK', 'Cancel', and 'Delete'.text_image
Diagram of a coffee maker with labeled parts and directional arrows indicating parts 1 and 2text_image
Diagram of a portable water dispenser with labeled parts and directional arrows indicating ports or featurestext_image
Diagram illustrating a coffee maker with icons for POS, USB, and P, showing a hand interacting with the machine.NESPRESSO®, NESCAFÉ® DOLCE GUSTO®, STARBUCKS® by NESPRESSO®,
text_image
Diagram showing a coffee maker with three buttons and a power plug, illustrating the process of adding or using a power outlet.
text_image
Hand icon pointing at three circular icons with coffee cup, power button, and mug symbols, suggesting a process or function.natural_image
Illustration of a coffee machine with a hand holding a cup, showing a cross-sectional view of the device (no text or symbols present)text_image
Diagram showing a hand washing a blender with a checkmark indicating the process, alongside a glass of liquid and a tray.natural_image
Simple line drawing of a steaming pot with a hand holding a crossed-out object (no text or symbols)
natural_image
Illustration of a portable water purifier with a hand holding a warning sign (no text or symbols present)natural_image
Technical line drawing of a mechanical component with a cylindrical pin and base (no text or symbols)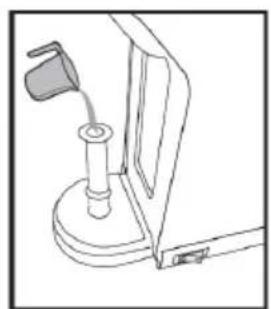
natural_image
Line drawing of a mechanical device with a lever and base (no text or symbols)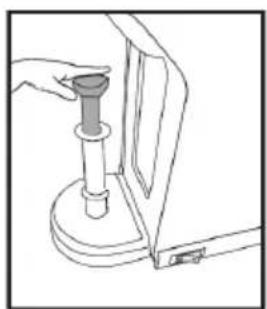
natural_image
Line drawing of a hand holding a cylindrical object next to a vertical panel, with no visible text or symbols.MODUL DE ECONOMISIRE A ENERGIEI
text_image
A B C D E F G H Itext_image
Diagram illustrating the step-by-step cooking process of a coffee maker, showing steps from serving liquid to pouring into a clear glass.natural_image
Illustration showing a plug connecting to an electrical outlet and a hand pressing a button (no text or symbols present)text_image
Diagram illustrating coffee machine operation with icons for coffee cup, power button, and coffee mug, plus a hand cursor interacting with the device.natural_image
Line drawing of a modern coffee maker with a circular base and lid (no text or symbols)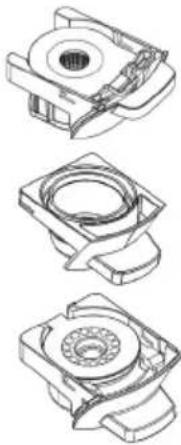
natural_image
Three technical line drawings of mechanical components, no text or symbols presentДля NESPRESSO®, STARBUCKS® by NESPRESSO®, LAVAZZA® & L'OR® капсули
Для NESCAFÉ® DOLCE GUSTO® капсули
text_image
Diagram of a water purifier with labeled parts and directional arrows indicating flow or movement.text_image
Technical diagram of a mechanical device with numbered components and directional arrows indicating assembly or movement.text_image
Diagram of a coffee maker with labeled parts and directional arrows indicating componentstext_image
Diagram illustrating a coffee machine with icons for menu, click, and press, alongside a cup of tea.text_image
Diagram of a coffee maker with labeled parts and directional arrows indicating componentsnatural_image
Simple line drawing of a coffee maker with a cup above it and a downward arrow below (no text or symbols)text_image
Diagram of a portable electric water heater with labeled parts including ports, buttons, and control paneltext_image
Diagram illustrating a coffee maker with icons and a hand interacting with it, showing menu options like 'OK', 'Cancel', and 'Delete'.text_image
Diagram of a coffee maker with labeled parts and directional arrows indicating parts of the device.text_image
Diagram of a portable water heater with labeled parts and directional arrows indicating ports or connections.text_image
Diagram illustrating a coffee maker with three digital icons (Sp, Power, Print) interacting with a hand and a cup, suggesting a coffee machine operation.text_image
Diagram showing a coffee maker with three buttons and a power plug, illustrating the process of adding or using a power.
natural_image
Illustration of a hand pointing at three circular icons: coffee cup, power button, and mug (no text or symbols)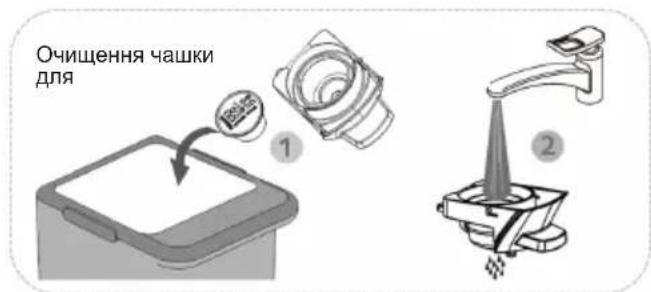
natural_image
Diagram of a coffee maker with a hand gesture showing no text or symbols (no readable text or symbols)text_image
Diagram showing a hand washing a blender with a checkmark indicating the correct solution, alongside a glass of liquid and a crossed-out cup.natural_image
Simple line drawing of a hand using a crossed-out pen to stir a steaming pot (no text or symbols)
natural_image
Illustration of a portable water purifier with a hand holding a small container, accompanied by a warning sign (no text or symbols present)natural_image
Technical line drawing of a mechanical component with a cylindrical pin and base (no text or symbols)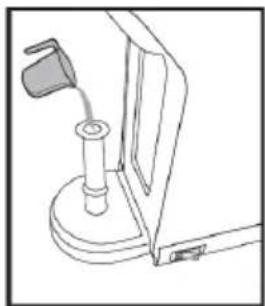
natural_image
Line drawing of a mechanical device with a handle and base (no text or symbols)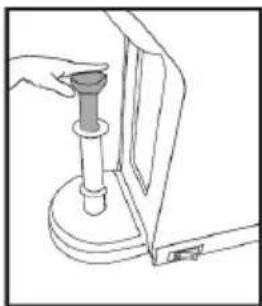
natural_image
Line drawing of a hand operating a mechanical device with a handle and base (no text or symbols)text_image
A B C D E F G H Itext_image
Diagram illustrating three steps of a coffee maker's usage: pouring liquid, pouring into a stand mixer, and pouring into a clear glass.natural_image
Illustration showing a plug connecting to an electrical outlet and a hand pressing a button (no text or symbols present)text_image
Diagram illustrating coffee machine operation with icons for coffee cup, power button, and coffee mug, showing a hand interacting with the device.natural_image
Line drawing of a modern coffee maker with a circular base and lid (no text or symbols)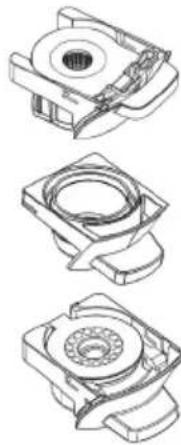
natural_image
Three technical line drawings of mechanical components, showing different assembly or assembly states (no text or symbols present)Per a càpsules NESPRESSO®, STARBUCKS® by NESPRESSO®, LAVAZZA® i L'OR®
Per a càpsules NESCAFÉ® DOLCE GUSTO®
text_image
Diagram of a coffee maker with labeled parts and directional arrows indicating componentstext_image
Technical diagram of a mechanical device with numbered components and directional arrows indicating assembly or movement.text_image
Diagram of a portable device with labeled parts and directional arrows indicating componentstext_image
Diagram showing a hand interacting with a coffee machine, with icons for sorting, sorting, and lifting a cup.text_image
Diagram of a coffee maker with labeled parts and directional arrows indicating componentsnatural_image
Line drawing of a food processor with a cup above it and a downward arrow indicating compression (no text or symbols)text_image
Diagram of a coffee maker with labeled parts including tray, cup, and standtext_image
Diagram illustrating a coffee maker with icons and a hand interacting with it, showing menu options like 'OK', 'Cancel', and 'Delete'.PER A CAFÈ MOLT, TE, INFUSIONS I MONODOSI
1.

text_image
Diagram of a coffee maker with labeled parts and directional arrows indicating componentsnatural_image
Technical illustration of a mechanical device with two views (1 and 2), showing internal components and gauges (no text or symbols)text_image
Diagram of a portable water heater with labeled parts and directional arrows indicating ports or functions.text_image
Diagram illustrating a coffee maker with icons for POS, USB, and P, showing a hand interacting with the machine.text_image
>15 minutes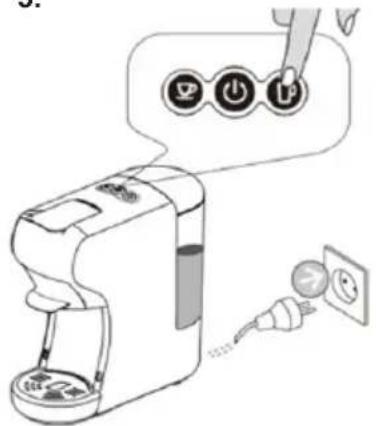
text_image
Diagram showing a coffee maker with three buttons and a power plug, illustrating the process of adding or using a power outlet.
natural_image
Illustration of a hand pointing at three circular icons: coffee cup, power button, and mug (no text or symbols)natural_image
Line drawing of a NaCl water heater with lid and base (no text or symbols)Neteja holistica
ADVERTIMENTS
natural_image
Diagram of a coffee maker with a hand gesture showing no text or symbols (no readable text or symbols)text_image
Diagram showing a hand washing a blender with a checkmark indicating the correct solution, alongside a glass of liquid and a crossed-out cup.natural_image
Illustration of a hand using a crossed-out X-brimbing tool to stir a steaming pot (no text or symbols)
natural_image
Illustration of a portable water purifier with a hand holding a warning sign (no text or symbols present)natural_image
Technical line drawing of a mechanical component with a cylindrical pin and mounting bracket (no text or symbols)
natural_image
Line drawing of a mechanical device with a handle and base (no text or symbols)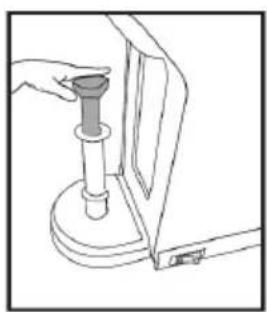
natural_image
Line drawing of a hand holding a cylindrical object mounted on a base, with no visible text or symbolsMODE D'ESTALVI D'ENERGIA
DÉCLARATION DE CONFORMITÉ
DECLARATION OF CONFORMITY
This device complies with EU Low Voltage Directive 2014/35/EC.
Electromagnetic Compatibility Directive 2014/30/EU. Directive 2015/863/EU on the restriction of the use of certain hazardous substances in electrical.
Directive 2009/125/EC on the eco-design requirements applicable to energy-related products.

This symbol on the product or on the packaging indicates that this product can't be disposed as normal rubbish or household waste. All the electrical, electronic equipment's and battery-operated units must recycle in proper manner and according to the local municipal laws. You can recycle them by taking them to government authorized disposal centres or specialized bins which you can find in any nearby big super markets, electronics or electro domestics products stores or malls who have these types of facilities available.
Designed by: SOGO based on European quality standards Imported by: Sanysan Appliances S.L, NIF: B98753056, C/ Barcas 2, 2, 46002 Valencia, Spain Product manufactured in CHINA. After-sales service: www.sogosat.com sogosat@sogosat.com / 0034 902 222 161