
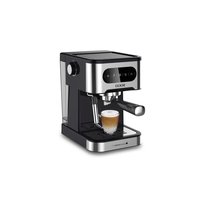
SS-7660 - Coffee machine Sogo - Free user manual and instructions
Find the device manual for free SS-7660 Sogo in PDF.

User questions about SS-7660 Sogo
0 question about this device. Answer the ones you know or ask your own.
Ask a new question about this device
Download the instructions for your Coffee machine in PDF format for free! Find your manual SS-7660 - Sogo and take your electronic device back in hand. On this page are published all the documents necessary for the use of your device. SS-7660 by Sogo.
USER MANUAL SS-7660 Sogo
natural_image
White and black SOGO water heater device with control panel (no visible text or symbols)
Descarga tu manual
Download your manual
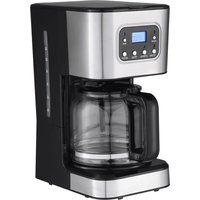
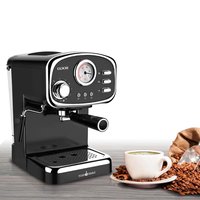
ESPRESSO COFFEE MAKER 4 in 1
MACHINE A CAFE ESPRESSO 4 en 1
CAFFETTIERA ESPRESSO 4 in 1
ESPRESSO KÁVOVAR 4 v 1
ESPRESSO-KAFFE-MAGER 4 i 1
APARAT ZA PRIPRAVO KAVE ESPRESSO 4 v 1
APARAT ZA ESPRESSO KAVU 4u1
ESPRESSO COFFEE MAKER 4 w 1
Declaration of conformity, Responsibility of Electronic products disposal, Importers Details and After-sales service on the last pages.
natural_image
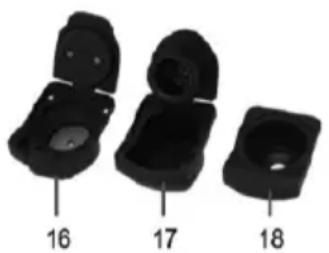
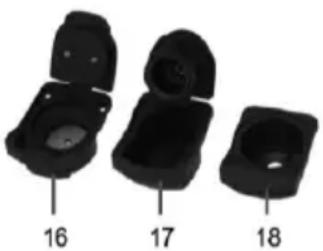
Three black plastic mechanical components with numbered labels (16, 17, 18) pointing to different features (no text or symbols on parts)5. INSTRUCCIONES DE USO
PUESTA EN MARCHA
natural_image
Illustration of a digital brush tool and its corresponding action diagram showing the process from device to touch (no text or symbols present)MODO DE ESPERA
natural_image
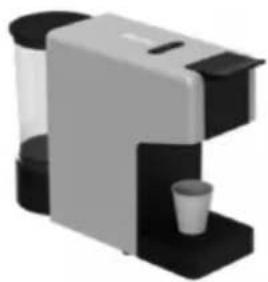
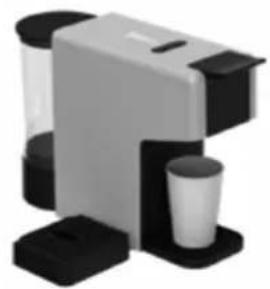
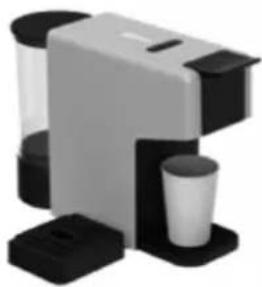
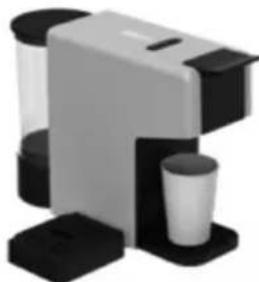
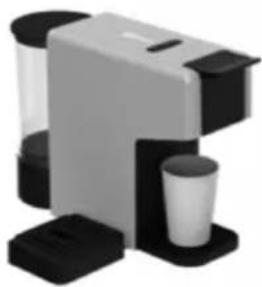
3D rendering of a modern coffee maker with black and white casing, no visible text or symbolsPlace the cup under the coffee dispenser for a classic espresso

natural_image
3D rendered image of a modern office or beverage unit with black and white panels (no text or symbols visible)Remove the drip tray to use cups of different sizes for a long coffee
PREPARACIÓN DE CAFÉ
natural_image
3D rendering of a gray and black industrial machine with directional arrows indicating motion (no text or symbols)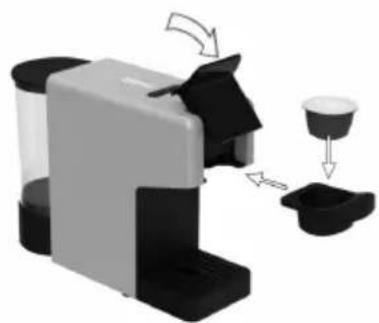
natural_image
Illustration of a coffee maker with a cup and side cups, showing mechanical components without any text or symbols.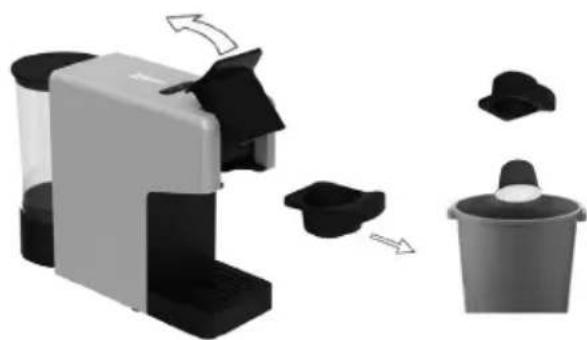
natural_image
Illustration of a microwave oven with black plastic cups and a bucket, showing internal components and airflow direction (no text or symbols)natural_image
Three-step illustration of a coffee maker's washing machine, showing step-by-step assembly and packaging (no text or symbols)
natural_image
Illustration of a coffee maker with rotating arms and a close-up of its head (no text or symbols)| Quantity programmable | |||
| Min | Default | Max | |
| Latte | 5 sec | 20 sec | 60 sec |

natural_image
Hand pouring liquid into a glass container using a digital creamer (no text or symbols visible)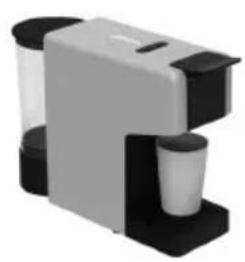
natural_image
3D rendering of a gray and black electronic device with a white cup, no visible text or symbols
• Always read the instruction book carefully before using.
- This manual can be downloaded from our web page www.sogo.es
- Keep these instructions for future reference.
fety instructions for the user
GENERAL PRECAUTIONS
General precautions during the use of electrical equipment
- Do not use the appliance for any other purpose than described in this manual.
- Do not use or store the appliance outdoors.
• Always place the appliance on to the flat and even surface. - This product is intended for indoor, non-industrial, non-commercial and only for household use. Do not use the item outdoors or for any other purpose. Misuse or improper handling may cause problems in the appliance and cause injury to the user.
- The unit must be used only for the intended purposes. No liability is accepted for damages arising from improper use or wrong handling.
- Ensure that the voltage indicated on the nameplate matches the mains voltage before plugging in the appliance.
- Always remove the plug from the power socket when the appliance is not in use. Do not leave the appliance unattended when switched on.
- Close supervision is necessary when any appliance is being used by or near children.
- Before cleaning or storing your appliance, always unplug the appliance from the power supply and let it cool down.
- The device is not completely disconnected from the power source, even after it has been turned off. To disconnect it completely, disconnect it from the mains plug.
- The appliances are not intended to be operated by means of an external timer or separate remote-control system.
- This appliance is intended to be used in household and similar applications such as
– staff kitchen areas in shops, offices and other working environments; - farm houses;
– by clients in hotels, motels and other residential type environments;
– bed and breakfast type environments

Restrictions on use to avoid personal injury
- Do not let the appliance operate unattended.
- Do not place or operate this appliance near water sources.
- Do not place or operate the appliance and its power cord on or near hot surfaces (e.g., stove plates) or open flames.
- Do not leave the power cord hanging from sharp edges and keep away from hot objects and flames. Do not wind the cord around the appliance and do not bend it.
- Never use accessories that are not recommended by the manufacturer.
- The use of accessories not recommended or sold by the appliance manufacturer may result in fire, electric shock or injury to persons.
- When you want to remove the plug from the wall contact, please do this at the plug itself and not by pulling on the cable or the appliance itself.
- To avoid electric shock, make sure your hands are dry before plugging or unplugging.
- Do not use the device with wet hands, on damp floors or when the atmosphere is humid, there is a risk of electric shock.
- While using the appliance, make sure that the power cord must not be caught or crushed.
- Do not let the motor unit, cord or plug get wet to protect against risk of electric shock.
- Be careful, while handling electrical appliances, as the surface of the heating element is subject to residual heat after use. Any misuse may cause potential injury to the user and may damage the appliance.
- Do not touch the outer surface of the appliance as it can get very hot during operation. Instead, use the handle or mitts.
- Never immerse the appliance or the plug-in water or any other liquid. In the event of the appliance falling in water, disconnect immediately from the mains supply and take it to an authorized service agent for repair before reusing.
- Do not use the appliance if it has fallen on the floor, if there are visible signs of damage or if it has a leak.
- Do not use the appliance if the cable or plug is damaged. In case of the cord be damaged, it must be replaced only by the manufacturer, its service agent or similarly qualified persons in order to avoid Hazard.
- In case of appliance malfunction, or if it has been damaged in any manner, return the appliance to the nearest authorized service facility for examination, repair or adjustment.
- In case of hardware problems, do not attempt to repair the product yourself. Repairs should only be carried out by qualified technicians.

Restrictions on use when used with children and elders
- The appliance is not to be used by persons (including children) with reduced physical, sensory or mental capabilities, or lack of experience and knowledge, unless they have been given
supervision or instruction.
- Children should be supervised to ensure that they do not play with the appliance.
• Children shall not play with the appliance. - This appliance can be used by children aged from 8 years and above and persons with reduced physical, sensory or mental capabilities or lack of experience and knowledge if they have been given supervision or instruction concerning use of the appliance in a safe way and understand the hazards involved.
- Cleaning and user maintenance shall not be made by children unless they are older than 8 and supervised.
- Keep the appliance and its cord out of reach of children less than 8 years.

Instructions to follow when using the appliance
- The appliance has been incorporated with a grounded plug. Please ensure the wall outlet in your house is well earthed.
- Be careful to not to get burned by the steam.
- Do not touch the hot surface of appliance (such as steam wand, and the brewing filter while in use). Use handle or knobs.
- Do not let the coffee maker operate without water.
- Do not remove the metal funnel, when appliance is brewing coffee or when steam and hot water escape from metal funnel and ensure to release the pressure in water tank before removing metal funnel.
- Relief pressure through steam wand before removing tank cover or metal funnel.
- WARNING: The filling aperture must not be opened during use.
• WARNING: Potential injury from misuse.
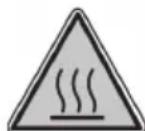
WARNING: high risk to get burn! Do not touch the hot parts of coffee maker.
- The coffee-maker shall not be placed in a close cabinet.
- Do not touch or move the coffee maker while in use.
- Never use the coffee maker in the environment of high temperature, high magnetic field and humidity, do not place the coffee maker on or hot surface or beside fire or another electrical appliance, such as on the top of refrigerator, avoid to be damaged.
- When the appliance prompts trouble, never operation the appliance, do not place the foreign object into the brewer.
- Never use the detergent or hot water for cleaning the brewing component, to avoid the running component is lack of lubricant oil and the component will be distortion as the high temperature.
• To avoid a circuit overload when using this product, do not operate
another high-wattage product on the same electrical circuit.
- A short power supply cord is provided with this product. An extension cord is not recommended for use with this product, but if one must be used:
- The marked electrical rating of the cord must be at least as great as that of the product.
- Arrange the extension cord so that it does not hang where it can be tripped over or pulled unintentionally.
CLEANING AND MAINTENANCE
Kindly refer to the cleaning and maintenance section for details on how to clean surfaces which comes in the contact of food.
3. TECHNICAL SPECIFICATIONS
| Voltage Frequency Power | |
| AC220-240W 50Hz 1400W |
This product complies with EU regulation 2023/826 under directive 2009/125/EC on the Eco design requirements.
Power consumption in off mode:<0.3W
Power consumption in standby mode: <0.5W
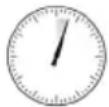
Time after which the product enters into off mode: 9 min.
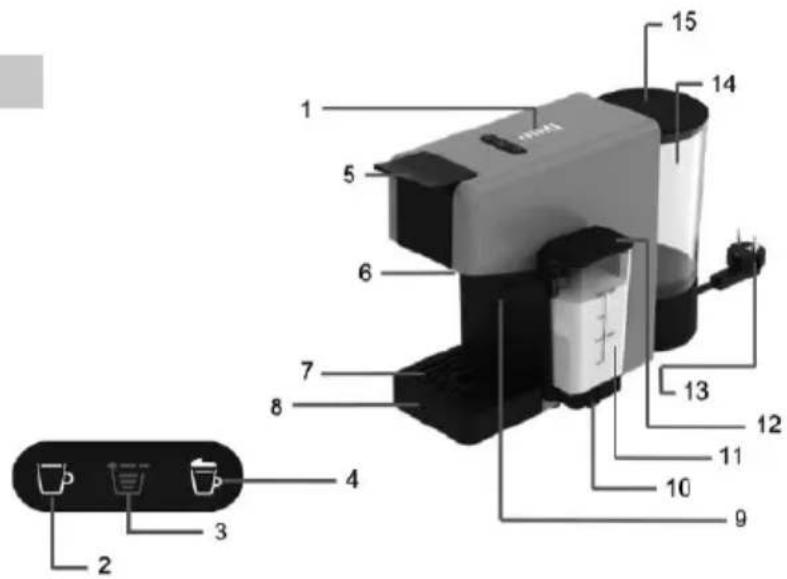
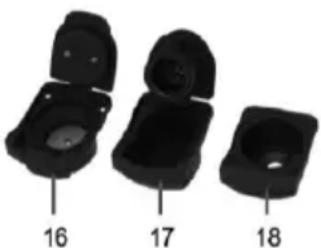
4. PARTS DESCRIPTION
- Volume light
- Coffee button
- Volume Selector Button
- Latte Button
- Capsule loader lever
- Coffee dispensing unit
- Drip tray grill
- Drip tray
- Milk spout
- Milk container support
- Milk container
- Refill lid
- Power supply cable
- Water tank
- Water tank cover
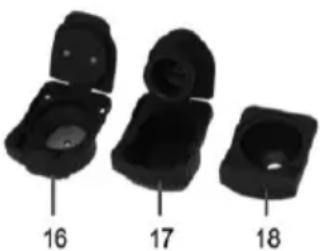
- Ground coffee holder
- Nespresso®* capsule holder
- Dolce Gusto®* capsule holder
- Coffee pod holder

natural_image
Three black plastic mechanical components with numbered labels (16, 17, 18) on their bases, no text or symbols present.5. INSTRUCCIONES DE USO
STARTING UP
Before using for the first time
Caution: Improper handling of electrical equipment is dangerous and can be lethal. Please pay attention to the safety precautions in this manual, in particular the following:
- Danger of scalding: beware of hot water!
- Do not operate the machine with an empty water tank or water is less than MINIMUM level.
- Do not open the locking handle when the machine is brewing.
• Always pull the power plug out before cleaning the machine. - Only use the machine in a dry room.
- Thoroughly rinse out the water tank with fresh water before using for the first time. Clean the Capsule coffee machine using a damp cloth only.
Tip: Keep the packaging for transporting the machine (e.g. for removals, servicing, etc.).
Note: You may find a little water remaining in the machine. In order to ensure that this machine works perfectly, it was tested with water before leaving the factory.
HOW TO USE
Starting the machine:
NOTE: Place the coffee machine on a flat and stable surface, far from water and heat sources. Do not connect the machine to the mains supply. Machine damages due to non-observance of these indications are not covered by warranty.
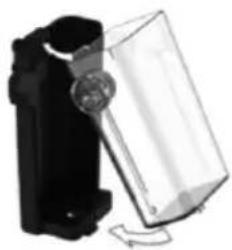
1- Lift and remove the water tank itself.
2- Rinse off the tank.
3- Fill the water tank up to the MAX level indicated, using only fresh drinking water. Fit the tank back into place, then close by using the cover.
NOTE: Hot water and other liquids can damage the tank and the machine. Do not operate the machine without water: make sure that there is enough water in the tank.
4- Plug in the coffee machine plug into power outlet.
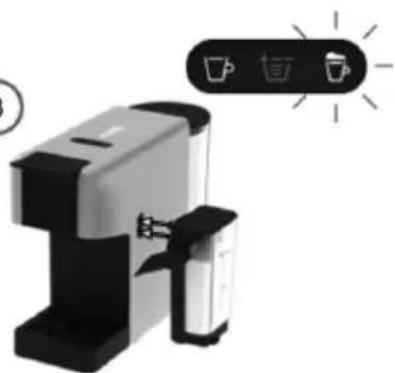
5- By pressing any buttons, coffee machine strats the heating. Buttons light will start blinking.
6- The machine will be ready for use, when the buttons light up to a steady light.
7- At first power-on, supply at least 500ml of water with out capsule placing a container under the Coffee dispensing unit.
8- Coffee volume can be select with the help of volume selector button. Press the coffee button to extract the coffee. Once coffee extract finishes, machine stops working. To prepare another cup of coffee, press the coffee button again.
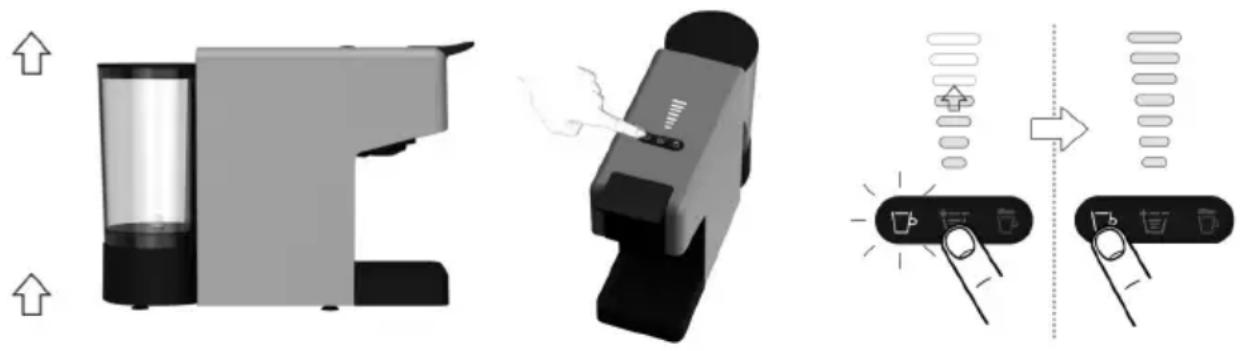
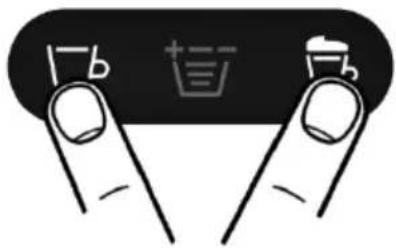
STAND-BY MODE
Automatic power off:
- To ensure the energy conservation the machine automatically enters into the power off position, after 9 minutes of not being used.
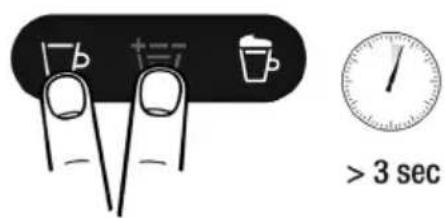
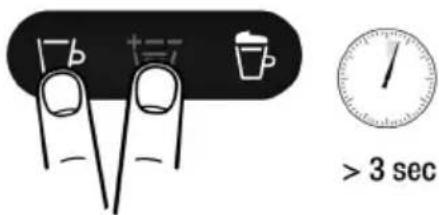
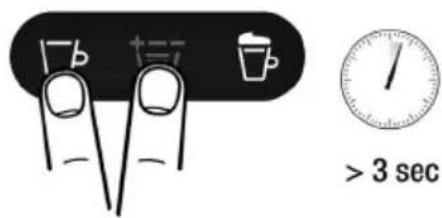
Manual power off
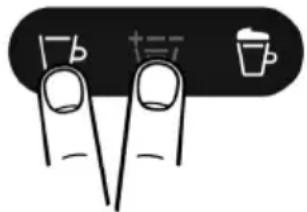
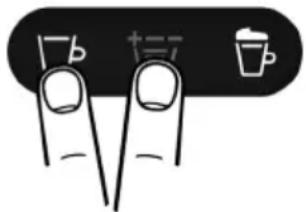
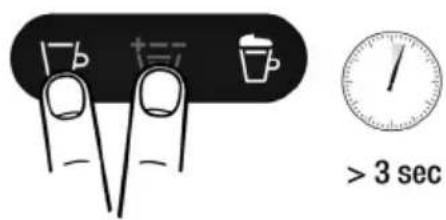
- To turn off the machine manually, press simultaneously the “Espresso and Cappuccino” buttons at least for 1 second, then release button, all indicator lights turn off, indicating that the machine is switched off.
Power on
- The machine can be reactivated by pressing the any buttons again.
COFFEE DISPENSING
To prepare the coffee, make sure that the Power/Volume buttons lights up with steady white light. Never put fingers or objects in the capsule-holder. Only compatible capsules must be introduced in the capsule-holder. Single-dose capsules are prepared to dispense one coffee/product. DO NOT use the capsules more than once. Inserting two or more capsules can cause the machine to malfunction. To always have a coffee at the perfect temperature, it is recommended to preheat the cup with hot water. Position the cup under the dispensing spout without inserting the capsule. Press one of the switch-on/supply buttons to supply hot water enough to pre-heat the cup. If power supply is interrupted during the coffee supply cycle, restore power supply and restart the coffee extraction procedure.
If water finishes in the tank during the extraction cycle, please press power button to stop machine. Then proceed as follows:
1- Fill the water tank up to the MAX level indicated.
2- Press the power-on/supply button previously selected. The button will start flashing and the coffee extraction procedure will restart.
natural_image
3D rendering of a modern coffee maker with black and gray casing (no text or symbols visible)Place the cup under the coffee dispenser for a classic espresso

natural_image
3D rendered image of a gray and black electronic device with a white cup, no visible text or symbolsRemove the drip tray to use cups of different sizes for a long coffee
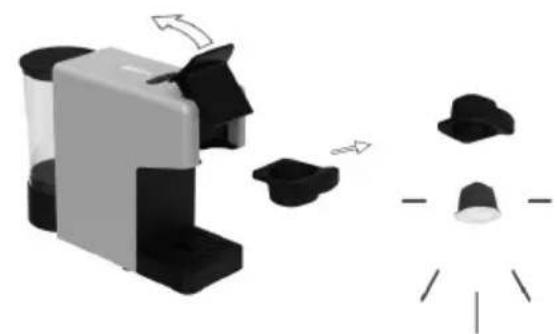
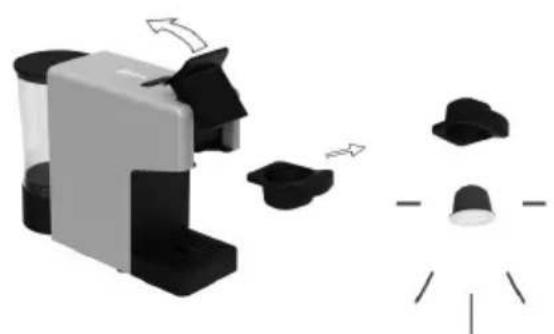
4. COFFEE PREPARATION
How to prepare an expresso coffee
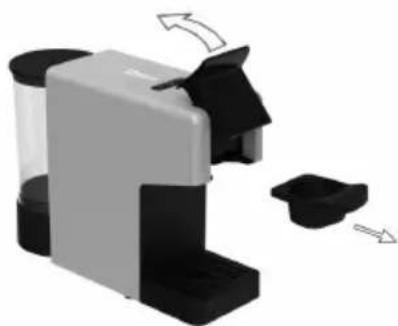
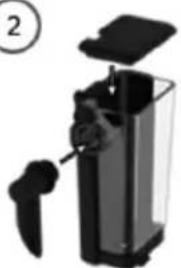
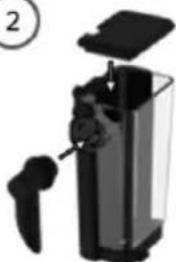
1) Open locking handle and pull out the capsule holder
2) Insert the capsule in the capsule holder and insert it back in the machine. Close the locking handle.
natural_image
Mechanical device with black and gray components, showing a close-up of a mechanical assembly (no text or symbols visible)
natural_image
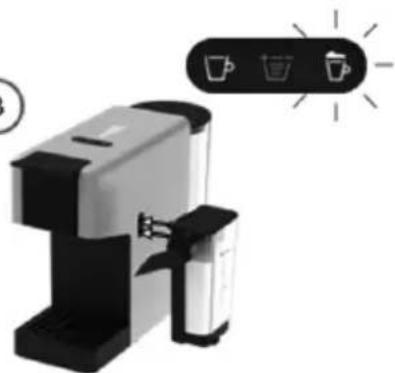
Illustration of a coffee maker with a cup and a side cup, showing mechanical components without any text or symbols.3) Indicator light starts blinking while machine is heating.
Once indicator lights steady, means the machine is ready to be used.
Use the volume selector to set the volume display in accordance with the number of bars shown on capsule or select amount of bars to your own taste.
4) By pressing the Coffee button, beverage preparation starts. Wait to stops.
( Extraction can be stopped at any time manually by pressing the start button.)
5) When the machine stops preparing coffee, after few seconds, open the locking handle. Do not open the lever too early.
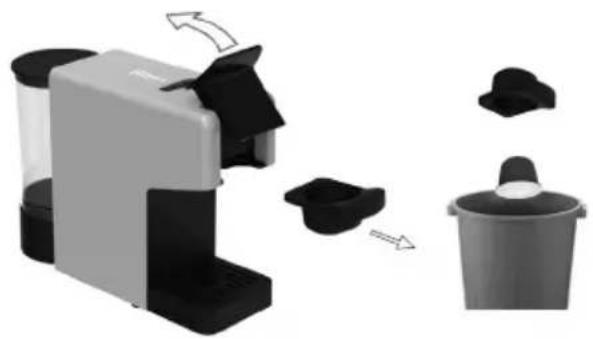
Pull out the capsule holder and remove used capsule. Dispose the capsule properly.
natural_image
Illustration of a coffee maker with a lid and a bucket, showing mechanical components and motion arrows (no text or symbols)6) Rinse both sides of the capsule holder with water and dry. Inset capsule holder into machine. Enjoy your hot coffee.
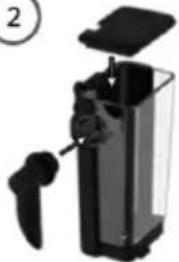
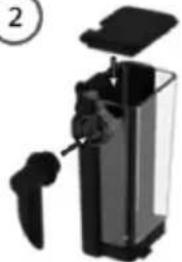
HOW TO PREPARE A LATTE COFFEE
Assemble / Disassembling the Rapid Latte cup System

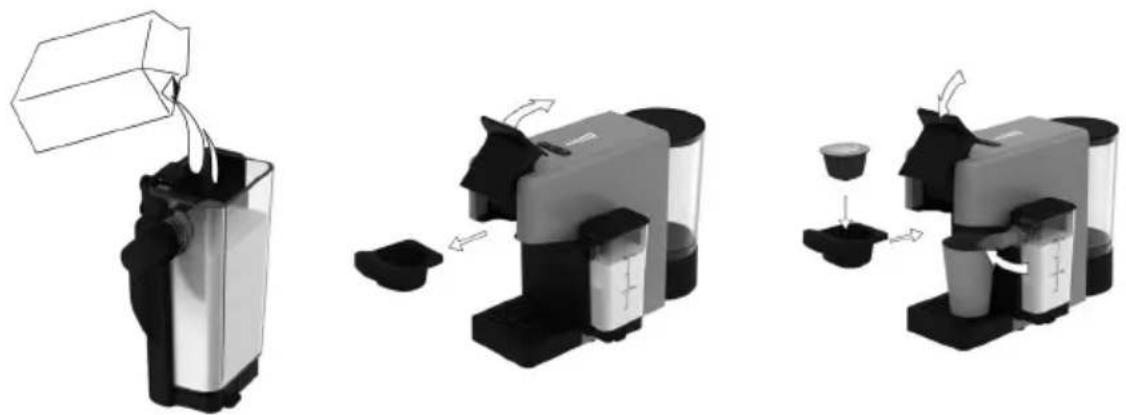
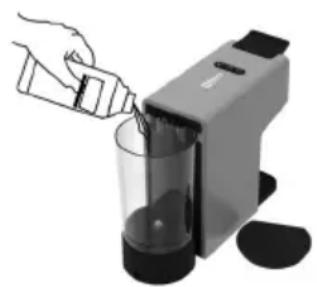
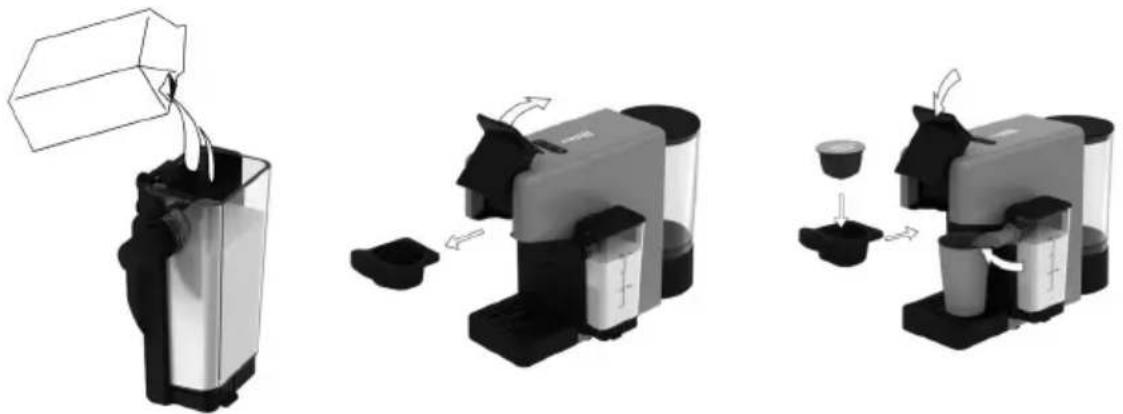
1) Fill the milk container up to the MAX indicator (200MI) (Min. 100ml). Place the lid and connect the Latte cup System to the machine. Latte light starts blinking while machine starts heating. Once, indicator lights steady white the machine is ready to be used.
NOTE: The machine will use all milk quantity in, the milk jug and will stop automatically when empty! For a perfect milk froth, use skimmed or semi-skimmed cow milk at refrigerator temperature (about 4°C). You can use soy, almond or oat drink for your preparations. In such case, it is required to clean the Rapid Cappuccino System after each use in the dishwasher.
Warning: Plant-based beverages contain allergens (gluten, almond, soy) and should be handled carefully by persons suffering from food allergies. The volume of froth depends on the nature of the beverage used, and its temperature.
2) Open locking handle and pull out the capsule holder.
3) Insert the capsule in the capsule holder and insert back in the machine. Close the locking handle.
natural_image
Three-step illustration of a coffee maker's processing process, showing step-by-step assembly and final packaging (no text or symbols)4) Press the Latte button. (20 sec)
5) Use the volume selector to set the volume display in accordance with the number of bars shown on capsule or select amount of bars to your own taste, then press the Coffee button.
6) When the machine stops brewing, open the locking handle. Pull out the capsule holder and remove used capsule. Dispose the capsule properly.
NOTE: The preparation starts after approximately 15 seconds blinking lights.
You don't have to wait for the milk to finish, you can press the coffee button directly. After the milk extraction finishes, coffee extraction will starts.
7) When milk needs to be added, remove the milk container lid and fill the milk container up. Do not exceed the MAX level. Repeat operations 2\~6.
Be careful: When pouring the milk into the milk container pay attention it does not spill out of it. If necessary, clean well with a cloth. Do not place the milk pack on the milk container because the container could unhooking from the machine.
8) After a period of non use of maximum 30 minutes after your milk coffee preparation, disassemble the milk jug referring to section "Assemble / Disassembling the Rapid Latte cup System", and clean all 4 dismantled components in dishwasher or hand wash. Then dry all parts with a clean towel, cloth or paper and reassemble.
flowchart
graph TD
    A["Device Icon"] --> B["Device Icon"]
    style A fill:#f9f,stroke:#333
    style B fill:#bbf,stroke:#333

natural_image
Illustration of a coffee maker with black and gray parts emitting smoke from a fan (no text or symbols)PROGRAMMING LATTE QUANTITY
NOTE: We recommend you to keep factory settings for Latte to ensure the best in cup results for each of our coffee varieties.
Follow the step 1\~3 of section "Preparing Latte"
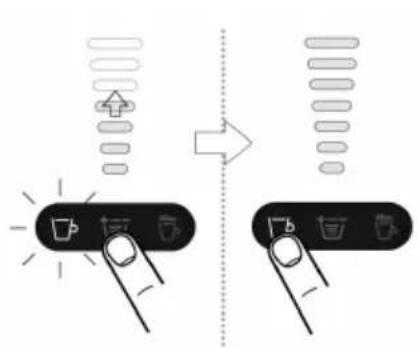
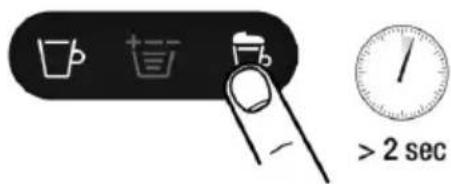
Touch and hold Latte button for at least 2 sec to enter the programming mode. Brewing starts and button blinks fast.
Release button when desired volume is reached. Latte volume is now stored for the next Latte preparations.
| Quantity programmable | |||
| Min | Default | Max | |
| Latte | 5 sec | 20 sec | 60 sec |
RESTORING QUANTITY TO DEFAULT SETTINGS
NOTE: This procedure resets coffee volumes & power off timing to the default values.
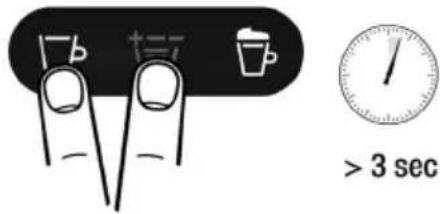
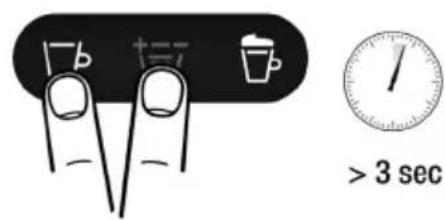
Touch and hold Espresso and volume button for at least 3 sec to enter the restoring quantity mode. Then release button, All buttons blink 3 times: all volumes are reset to default settings.
6. MAINTENANCE AND CLEANING
Never use solvents, alcohol or other aggressive substances or ovens for drying the coffee machine components. Wash machine components (electric components excluded) with cold/lukewarm water and non-abrasive clothes/sponges. All removable components can be cleaned by using a dishwasher. Do not leave water in the tank and water circuit for more than 3 days. If this is the case, drain the tank and circuit, rinse it and refill it with fresh water, then carry out a delivery without capsule before making any coffee or other beverage.
CLEANING RAPID LATTE CUP SYSTEM
Put the 4 dismantled components in the upper tray of your dishwasher and run a program at high temperature ( 50^ C / 60^ ) or Soak all components in with hot drinking water together with mild/soft detergent for at least 30 minutes and rinse thoroughly with hot drinking water.
COFFEE DISPENSER CLEANING
To clean the dispenser, perform a weekly coffee brewing procedure without inserting the capsule.
CLEANING THE CAPSULE COLLECTING DRAWER AND THE DROP COLLECTING
The used capsule collecting drawer and the drop collecting drawer should be emptied and cleaned after making coffee 4/5 times or every two/three days.
NOTE: Take off the drip tray and remove the drip tray grill, Rinse with water.
- Limescale normally builds up with extended use of the appliance; the machine needs descaling every 3-4 months and/or whenever a reduction in water flow is noticed
In the event of any operational conflict, this use and maintenance manual shall prevail on any indication specified on accessories and/or components sold separately. For descaling can be used a descaling product for coffee machines of non-toxic and/or harmful type, commercially available.
Caution: Do not drink the descaling solution and products- dispensed until the completion of the cycle.
Never use vinegar as a descaling solution.
natural_image
Hand pouring liquid into a glass container using a digital brush (no text or symbols visible)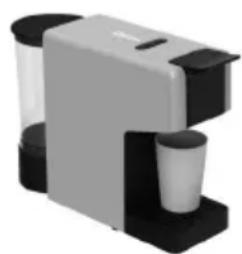
natural_image
3D rendering of a gray and black electronic device with two cups (no text or symbols visible)
natural_image
Illustration of a finger pressing down on a button with icons for zoom, press, and download (no text or symbols)1- Remove and empty the water tank
2- Refill the tank with a descaling solution and water as specified on the package of the descaling product. Refit the tank.
3- Place a suitable container under the spout.
4- Repeatedly press the volume selector button to 7th gear, then press the coffee button, and then supply two cups (approximately 150 ml each) of water.
5- Allow the descaling solution to work for about 15-20 minute.
6- Switch-on the machine pressing any button, Repeatedly press the volume selector button to 7th gear, then press the coffee button preparation will stop automatically.
7- Repeat the step 6 until the water tank is completely empty.
8- Remove the tank and rinse it with fresh drinking water. Fill it completely.
9- Place a suitable container under the dispenser. Press Coffee button, then supply the full content of the tank.
10- When the water is finished, refill the tank and repeat the steps 6. When finished, the 5nd of the descaling cycle is completed.

PORTANT:

natural_image
Three black plastic mechanical components with numbered labels (16, 17, 18) pointing to different features.MISE EN MARCHE
MODE VEILLE
Arrêt automatique :
natural_image
3D rendering of a modern coffee maker with black and gray casing (no text or symbols visible)Place the cup under the coffee dispenser for a classic espresso

natural_image
3D rendered image of a modern coffee maker with black and white compartments (no text or symbols visible)Remove the drip tray to use cups of different sizes for a long coffee
PRÉPARATION DU CAFÉ
natural_image
3D rendering of a gray and black coffee maker with directional arrows indicating motion (no text or symbols)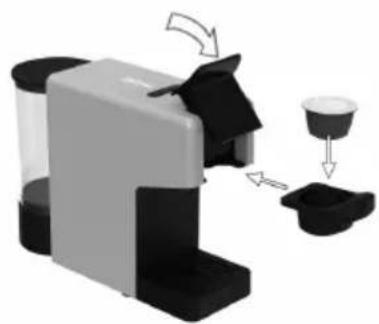
natural_image
Illustration of a coffee maker with a cup and a side stack, showing mechanical components (no text or symbols)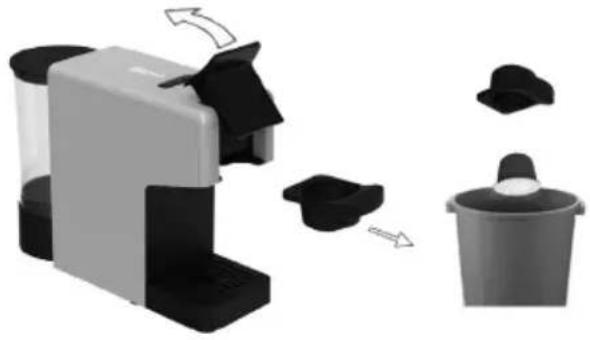
natural_image
Illustration of a coffee maker with a bag being removed from its side, showing mechanical components and a final container (no text or symbols present)natural_image
Illustration of a black plastic device with a transparent lid and a curved base (no text or symbols)2

natural_image
Black and white photo of a portable coffee maker with handle and lid, no visible text or symbols
natural_image
Product photo of a coffee maker with a coffee cup icon and a lightbulb symbol (no text or labels)2) Open locking handle and pull out the capsule holder.
3) Insert the capsule in the capsule holder and insert back in the machine. Close the locking handle.
natural_image
Three-step illustration of a coffee maker's washing machine, showing step-by-step assembly and packaging (no text or symbols)| Quantity programmable | |||
| Min | Default | Max | |
| Latte | 5 sec | 20 sec | 60 sec |
natural_image
Illustration of a hand pouring liquid into a glass container using a digital cream brush (no text or symbols visible)
natural_image
Exterior view of a modern office building (no signage)

natural_image
Three black plastic mechanical components with numbered labels (16, 17, 18) indicating part numbers, no text or symbols present.MODO DE ESPERA
natural_image
3D rendering of a modern coffee maker with black and gray casing (no text or symbols visible)Place the cup under the coffee dispenser for a classic espresso
natural_image
3D rendered image of a modern coffee maker with black and gray casing, no visible text or symbolsRemove the drip tray to use cups of different sizes for a long coffee
PREPARAÇÃO DE CAFÉ
natural_image
3D rendering of a gray and black coffee maker with directional arrows indicating motion (no text or symbols)
natural_image
Illustration of a coffee maker with a cup and base, showing mechanical components and directional arrows (no text or symbols)
natural_image
Illustration of a microwave oven with a brush and a bucket, showing mechanical components (no text or symbols)natural_image
Illustration of a mechanical device with a transparent lid and black base (no text or symbols visible)2
natural_image
Black and white photo of a portable coffee maker with lid, handle, and spout (no visible text or symbols)③
natural_image
Illustration of a coffee machine with a lightbulb icon and a coffee cup symbol (no text or labels)natural_image
Three-step illustration of a coffee maker's processing process, showing step-by-step pouring, mixing, and blending (no text or symbols)| Quantity programmable | |||
| Min | Default | Max | |
| Latte | 5 sec | 20 sec | 60 sec |

RESTAURAR OS VOLUMES PREDEFINIDOS DE FÁBRICA
natural_image
Hand pouring liquid into a glass container using a digital creamizer (no text or symbols visible)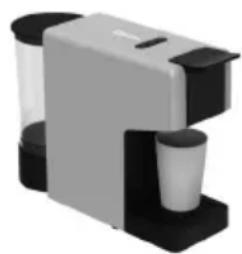
natural_image
3D rendering of a gray and black industrial device with a cup, no visible text or symbols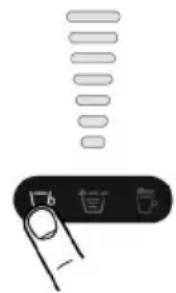
natural_image
Illustration of a finger pressing a button with icons, no text or symbols presentnatural_image
Three black plastic mechanical components with numbered labels (16, 17, 18) pointing to different shapes (no text or symbols on parts)INBETRIEBNAHME
STANDBY-MODUS
natural_image
3D rendering of a modern coffee maker with black and gray casing, no visible text or symbolsPlace the cup under the coffee dispenser for a classic espresso
natural_image
3D rendered image of a modern kitchen appliance with a cup and side shelves (no text or symbols visible)Remove the drip tray to use cups of different sizes for a long coffee
KAFFEEZUBEREITUNG
natural_image
3D rendering of a gray and black industrial machine with directional arrows indicating motion (no text or symbols)
natural_image
Illustration of a coffee maker with a cup and a side stack, showing mechanical components without any text or symbols.
natural_image
Illustration of a coffee maker with a lid and a cup, showing a process step (no text or symbols)natural_image
Diagram of a black cylindrical device with a transparent lid and a circular button, labeled with number 1 (no text or symbols on the device itself)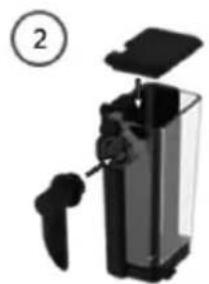
natural_image
Black and white photo of a portable coffee maker with lid and handle, no visible text or symbols
natural_image
Illustration of a coffee maker with a coffee cup icon and a lightbulb symbol (no text or labels)natural_image
Three-step illustration of a coffee maker's processing process, showing step-by-step pouring and shifting (no text or symbols)| Quantity programmable | |||
| Min | Default | Max | |
| Latte | 5 sec | 20 sec | 60 sec |
3 sec
natural_image
Hand pouring liquid into a glass container using a digital cream machine (no text or symbols visible)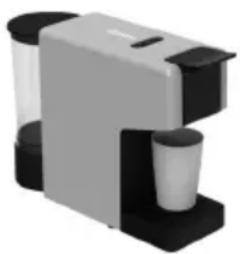
natural_image
3D rendered mechanical device with black and gray components (no visible text or symbols)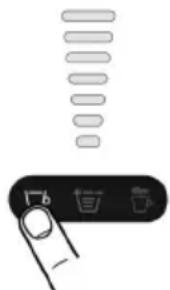
5. ISTRUZIONI PER L'USO

natural_image
Three black plastic mechanical components with numbered labels (16, 17, 18) pointing to different features.AVVIAMENTO
MODO STAND-BY
natural_image
3D rendering of a modern coffee maker with black and gray casing, no visible text or symbolsPlace the cup under the coffee dispenser for a classic espresso
natural_image
3D rendered image of a modern office lamp with two cups and black base (no text or symbols visible)Remove the drip tray to use cups of different sizes for a long coffee
natural_image
3D rendering of a gray and black coffee maker with a spool, showing mechanical components and directional arrows (no text or symbols)
natural_image
Illustration of a coffee maker with a cup and side cups, showing mechanical components without any text or symbols.
natural_image
Illustration of a coffee maker with a lid and a cup, showing mechanical components and a rotating arrow (no text or symbols)natural_image
Illustration of a black and white object with a circular emblem, possibly a device or tool, next to a transparent rectangular frame (no text or symbols visible)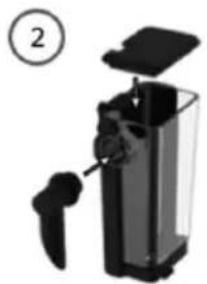
natural_image
Black and white photo of a portable water dispenser with handle and spout, no visible text or symbols
natural_image
Illustration of a coffee maker with a lightbulb icon and number 3, no text or symbols presentnatural_image
Three-step illustration of a coffee maker's processing process, showing step-by-step assembly and final packaging (no text or symbols)natural_image
Illustration of a coffee maker with a tray and a coffee cup, showing a simple 3D view of its components (no text or symbols)| Quantity programmable | |||
| Min | Default | Max | |
| Latte | 5 sec | 20 sec | 60 sec |

natural_image
Hand pouring liquid into a glass container using a digital cream brush (no text or symbols visible)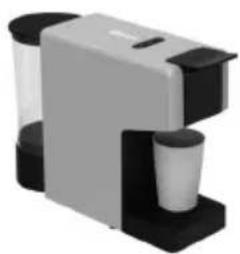
natural_image
3D rendered image of a mechanical device with black and gray components (no visible text or symbols)

natural_image
Three black plastic mechanical components with numbered labels (16, 17, 18) pointing to different shapes (no text or symbols on parts)5. NÁVOD K POUŽITÍ
SPUŠTĚNÍ
POHOTOVOSTNÍ REŽIM
natural_image
3D rendering of a modern coffee maker with black and gray casing, no visible text or symbolsPlace the cup under the coffee dispenser for a classic espresso
natural_image
3D rendered image of a modern office or beverage unit with black and gray components (no visible text or symbols)Remove the drip tray to use cups of different sizes for a long coffee
PŘÍPRAVA KÁVY
natural_image
3D rendering of a white and black coffee maker with a side view showing its spool, no text or symbols present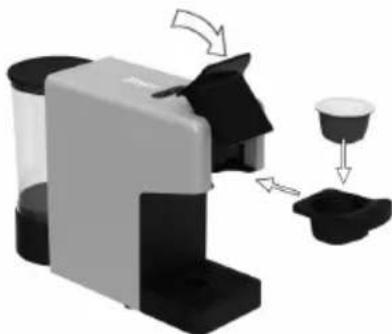
natural_image
Illustration of a coffee maker with a cup and a side stack, showing mechanical components without any text or symbols.
natural_image
Illustration of a coffee maker with a lid and a cup, showing mechanical components and a rotating arrow (no text or symbols)natural_image
Illustration of a black and white device with a transparent lid and a curved base (no text or symbols visible)2
natural_image
Diagram of a portable electronic device with a handle and control panel (no text or symbols visible)3

natural_image
Illustration of a coffee maker with a lightbulb icon and three cups (no text or symbols)natural_image
Three-step illustration of a coffee maker's washing machine, showing step-by-step assembly and packaging (no text or symbols)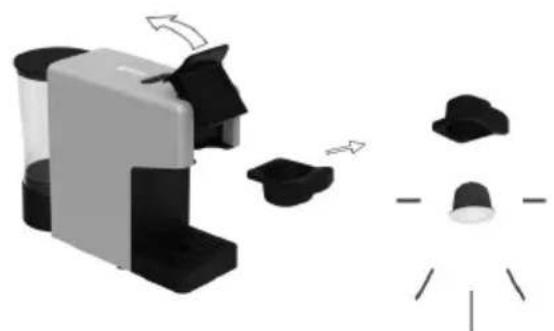
natural_image
Illustration of a coffee maker with a tray and a coffee cup emitting powder, showing motion arrows (no text or symbols)PROGRAMOVÁNÍ MNOŽSTVÍ LATTE
| Quantity programmable | |||
| Min | Default | Max | |
| Latte | 5 sec | 20 sec | 60 sec |
OBNOVENÍ MNOŽSTVÍ NA VÝCHOZÍ NASTAVENÍ
natural_image
Three black plastic car parts with numbered labels (16, 17, 18) indicating part numbers, no text or symbols present.5. INSTRUKTIONER TIL BRUG
OPSTART
STAND-BY-TILSTAND
Automatisk slukning:
natural_image
3D rendering of a modern kitchen appliance with a glass and black casing (no text or symbols visible)Place the cup under the coffee dispenser for a classic espresso
natural_image
3D rendered image of a modern office or beverage unit with a glass container, black base, and cup (no text or symbols visible)Remove the drip tray to use cups of different sizes for a long coffee
TILBEREDNING AF KAFFE
Sådan laver du en expresso-kaffe
natural_image
3D rendering of a gray and black coffee maker with a spool, showing mechanical components and directional arrows (no text or symbols)
natural_image
Illustration of a coffee maker with a cup and a side cover, showing mechanical components without any text or symbols.
natural_image
Illustration of a food processor with a lid and bucket, showing a mechanical shift process (no text or symbols)natural_image
Black and white photo of a handheld device with a transparent cover and a circular dial (no visible text or symbols)2

natural_image
Illustration of a portable device with a handle and lid, no visible text or symbols3
natural_image
Illustration of a coffee maker with a lightbulb icon and three cups, no text or symbols presentnatural_image
Illustration of a container with a handle and a box above it, no text or symbols present.
natural_image
3D rendering of a coffee maker with black and gray casing, showing mechanical components and motion arrows (no text or symbols)
natural_image
3D rendering of a coffee maker with spools and cups (no text or symbols visible)
natural_image
Illustration of a coffee maker with a fan and a coffee cup, showing a tray and spool (no text or symbols)PROGRAMMERING AF LATTE-MAENGDE
| Quantity programmable | |||
| Min | Default | Max | |
| Latte | 5 sec | 20 sec | 60 sec |
GENDANNELSE AF MÆNGDE TIL STANDARDINDSTILLINGER
natural_image
Hand pouring liquid into a glass container using a digital brush (no text or symbols visible)
natural_image
3D rendered image of a modern office or beverage machine with black and gray components (no visible text or symbols)
natural_image
Three black plastic mechanical components with numbered labels (16, 17, 18) pointing to different shapes (no text or symbols on parts)5. NAVODILA ZA UPORABO
ZAČETEK DELOVANJA
Pred prvo uporabo
REŽIM STOJENJA
Samodejni izklop:
natural_image
3D rendering of a modern kitchen appliance with a glass and cup (no text or symbols visible)Place the cup under the coffee dispenser for a classic espresso

natural_image
3D rendered image of a modern office or beverage unit with glass and cup (no text or symbols visible)Remove the drip tray to use cups of different sizes for a long coffee
PRIPRAVA KAVE
Kako pripraviti kavo expresso
natural_image
Exterior view of a modern kitchen appliance with black and gray casing, showing internal components and directional arrows (no text or symbols)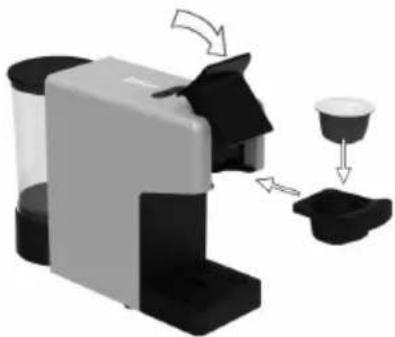
natural_image
Illustration of a coffee maker with a cup and directional arrows indicating process (no text or symbols)
natural_image
Illustration of a coffee maker with a bag and a bucket, showing mechanical components and a recycling symbol (no text or labels)6) Obe strani držala za kapsule sperite z vodo in osušite. Nosilec kapsul vstavite v stroj. Uživajte v vroči kavi.
KAKO PRIPRAVITI KAVO LATTE Sestavljanje / razstavljanje sistema skodelic Rapid Latte
1
natural_image
Illustration of a black handheld device with a transparent cover and a circular dial (no text or symbols)2

natural_image
Illustration of a portable device with a handle and lid, no visible text or symbols3

natural_image
Illustration of a coffee maker with a lightbulb icon and three cups, no text or symbols presentnatural_image
Three-step illustration of a coffee maker's processing process, showing step-by-step steps from pouring into a container (no text or symbols)4) Pritisnite gumb Latte. (20 s)
natural_image
Illustration of a coffee maker with a bag and a coffee cup emitting powder, emitting rays (no text or symbols)PROGRAMIRANJE KOLIČINE LATTE
| Quantity programmable | |||
| Min | Default | Max | |
| Latte | 5 sec | 20 sec | 60 sec |
natural_image
Three-step illustration of a coffee maker's processing process, showing step-by-step assembly and shift (no text or symbols)
natural_image
Three black plastic components with numbered labels (16, 17, 18) shown for size reference (no text or symbols on parts)5. UPUTE ZA UPOTREBU
POKRETANJE
Prije prve upotrebe
Pažnja: Nepravilno rukovanje električnom opremom može biti opasno i smrtonosno. Obratite pozornost na sigurnosne upute u ovom priručniku, osobito na sljedeće:
STANJE PRIPRAVNOSTI
natural_image
3D rendering of a modern kitchen appliance with a glass and black casing (no text or symbols visible)Place the cup under the coffee dispenser for a classic espresso

natural_image
3D rendered image of a modern office or beverage unit with black and white components (no visible text or symbols)Remove the drip tray to use cups of different sizes for a long coffee
PRIPREMA ESPRESSA
Kako pripremiti espresso kavu
1) Otvorite ručku za zaključavanje i izvucite držač kapsula.
natural_image
3D rendering of a white and black milk dispenser with a small inset showing a drop, no text or symbols visible
natural_image
Illustration of a coffee maker with a cup and side cups, showing mechanical components without any text or symbols.3) Svjetlosni indikator počinje treptati dok se uređaj zagrijava. Kada indikator svijetli neprekidno, uređaj je spreman. Pomoću gumba za odabir količine postavite količinu prema broju critica na kapsuli ili prema vlastitom ukusu.

natural_image
Illustration of a coffee maker with a lid and a bucket, showing mechanical components and a rotating arrow (no text or symbols)6) Isperite obje strane držača kapsula vodom i osušite. Vratite ga u uređaj. Uživajte u svojoj vrućoj kavi.
KAKO PRIPREMITI LATTE KAVU Sastavljanje / rastavljanje Rapid Latte Cup sustava
①

natural_image
Illustration of a black and white object resembling a device or tool, with no visible text or symbols.2
natural_image
Black and white illustration of a portable device with handle and lid (no text or symbols)3

natural_image
Illustration of a coffee maker with a lightbulb icon and a coffee cup symbol (no text or labels)1) Napunite spremnik za mlijeko do oznake MAX (200 ml), minimalno 100 ml. Stavite poklopac i spojite Latte sustav na aparat. Svjetlo za latte počinje treptati dok se uređaj zagrijava. Kada indikator svijetli stalno bijelo, uređaj je spreman za upotrebu.
natural_image
Three-step illustration of a coffee maker's washing machine, showing step-by-step assembly and packaging (no text or symbols)4) Pritisnite gumb za latte (20 sekundi).
natural_image
Illustration of a coffee maker emitting black beans with motion arrows indicating process (no text or symbols)PROGRAMIRANJE KOLIČINE ZA LATTE
| Quantity programmable | |||
| Min | Default | Max | |
| Latte | 5 sec | 20 sec | 60 sec |
natural_image
Three-step illustration of a coffee maker's processing process, showing step-by-step assembly and final shipment (no text or symbols)2- Napunite spremnik otopinom za uklanjanje kamenca i vodom, prema uputama na ambalaži sredstva. Vratite spremnik.
3- Postavite odgovarajući spremnik ispod izlaza.
4- Višekratno pritisnite gumb za količinu do 7. stupnja, zatim pritisnite gumb za kavu i ispustite dvije šalice (oko 150 ml svaka).
5- Ostavite otopinu da djeluje 15–20 minuta.
6- Uključite uređaj pritiskom na bilo koji gumb. Ponovno odaberite 7. stupanj količine i pritisnite gumb za kavu — priprema će se automatski zaustaviti.
7- Ponavljajte korak 6 dok se spremnik potpuno ne isprazni.
8- Uklonite spremnik, isperite ga svježom pitkom vodom i ponovno ga napunite.
9- Postavite spremnik ispod izlaza. Pritisnite gumb za kavu i ispustite cijeli sadržaj spremnika.
10- Nakon što se voda potroši, ponovno napunite spremnik i ponovite korake iz točke 6. Završetkom ovog postupka, ciklus uklanjanja kamenca je završen.

AŽNE:
5. INSTRUKCJE UŻYTKOWANIA
natural_image
Three black plastic mechanical components with numbered labels (16, 17, 18) pointing to different shapes (no text or symbols on parts)URUCHOMIENIE
TRYB CZUWANIA
natural_image
3D rendering of a modern coffee maker with black and gray casing, no visible text or symbolsPlace the cup under the coffee dispenser for a classic espresso

natural_image
3D rendered image of a modern office lamp with two cups and black base (no text or symbols visible)Remove the drip tray to use cups of different sizes for a long coffee
PRZYGOTOWANIE KAWY
natural_image
3D rendering of a gray and black coffee maker with a spool, showing mechanical components and directional arrows (no text or symbols)
natural_image
Illustration of a coffee maker with a cup and side cups, showing mechanical components without any text or symbols.
natural_image
Illustration of a coffee maker with a bag and a bucket, showing mechanical components and motion arrows (no text or symbols)natural_image
Illustration of a person holding a rectangular object with a circular emblem (no text or symbols visible)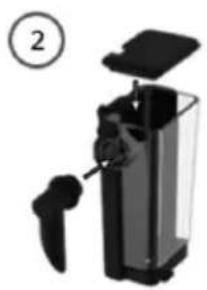
natural_image
Black and white photo of a portable electronic device with a handle and lid, no visible text or symbols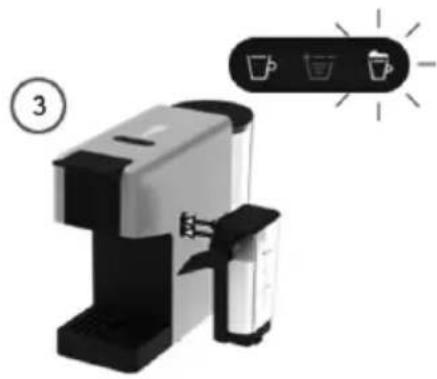
natural_image
Illustration of a coffee maker with a lightbulb icon and number 3, no text or symbols presentnatural_image
Three-step illustration of a coffee maker's mixing and processing process, showing step-by-step assembly and final packaging (no text or symbols)natural_image
Illustration of a coffee maker with black and gray parts emitting smoke or vapor (no text or symbols)PROGRAMOWANIE ILOŚCI LATTE
| Quantity programmable | |||
| Min | Default | Max | |
| Latte | 5 sec | 20 sec | 60 sec |

PRZYWRACANIE ILOŚCI DO USTAWIEN DOMYŚLNYCH
natural_image
Hand pouring liquid into a glass container using a digital cream brush (no text or symbols visible)
natural_image
3D rendering of a mechanical device with black and gray components (no visible text or symbols)

natural_image
Three black plastic mechanical components with numbered labels (16, 17, 18) shown for size reference.ÎNCEPERE
MOD STAND-BY
Oprire automată:
natural_image
3D rendering of a modern coffee maker with black and gray casing, no visible text or symbolsPlace the cup under the coffee dispenser for a classic espresso

natural_image
3D rendered image of a modern office lamp with two cups and black base (no text or symbols visible)Remove the drip tray to use cups of different sizes for a long coffee
PREPARAREA CAFELEI
natural_image
3D rendering of a gray and black coffee maker with a spool, showing mechanical components and directional arrows (no text or symbols)
natural_image
Illustration of a coffee maker with a cup and side cups, showing mechanical components without any text or symbols.
natural_image
Illustration of a microwave oven with a lid and a bucket, showing mechanical components and airflow direction (no text or symbols)natural_image
Illustration of a person holding a rectangular object with a circular emblem (no text or symbols visible)
natural_image
Black and white photo of a portable electronic device with a handle and lid, no visible text or symbols
natural_image
Illustration of a coffee maker with a lightbulb icon and number 3, no text or symbols presentnatural_image
Simple line drawing of a container with a handle and a box above it, no text or symbols present.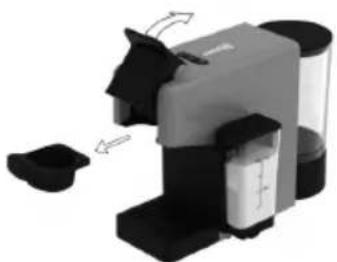
natural_image
Mechanical device with black and gray components, no visible text or symbols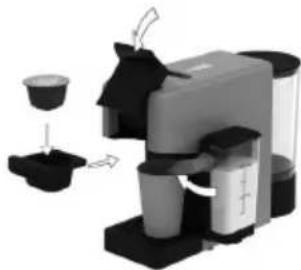
natural_image
Product photo of a modern coffee maker with a coffee cup and stand mixer (no visible text or labels)flowchart
graph TD
    A["Device Icon"] --> B["Arrow"]
    B --> C["Device Icon with Ring"]
    style A fill:#f9f,stroke:#333
    style C fill:#bbf,stroke:#333

natural_image
Illustration of a coffee maker with a coffee cup and its corresponding kitchen utensils (no text or symbols)PROGRAMAREA CANTITĂȚII DE LATTE
| Quantity programmable | |||
| Min | Default | Max | |
| Latte | 5 sec | 20 sec | 60 sec |

RESTAURAREA CANTITĂTII LA SETĂRILE IMPLICITE
natural_image
Hand pouring liquid into a glass container using a digital cream brush (no text or symbols visible)
natural_image
3D rendered image of a mechanical device with black and gray components (no visible text or symbols)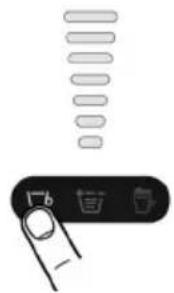
natural_image
Three black plastic mechanical components with numbered labels (16, 17, 18) pointing to different shapes (no text or symbols on parts)ПЕРШИЙ ЗАПУСК
natural_image
3D rendering of a mechanical device with black and gray components (no visible text or symbols)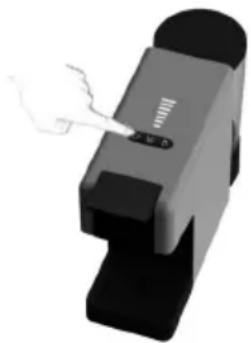
natural_image
3D rendered image of a mechanical device with a pointer and control knob (no text or symbols visible)
РЕЖИМ ОЧІКУВАННЯ
natural_image
3D rendering of a modern coffee maker with black and gray casing, no visible text or symbolsPlace the cup under the coffee dispenser for a classic espresso
natural_image
3D rendered image of a gray and black electronic device with a white cup, no visible text or symbolsRemove the drip tray to use cups of different sizes for a long coffee
ПРИГОТУВАННЯ КАВИ
natural_image
3D rendering of a gray and black electronic device with directional arrows indicating motion or movement (no text or symbols)
natural_image
Illustration of a coffee maker with a cup and side cups, showing mechanical components without any text or symbols.
natural_image
Illustration of a microwave oven with black plastic cups and a lid, showing internal components and motion arrows (no text or symbols)natural_image
Illustration of a black handheld device with a transparent glass cover and a circular button (no text or symbols)②

natural_image
Black and white photo of a portable electronic device with a handle and lid, no visible text or symbols
natural_image
Illustration of a coffee maker with a lightbulb icon and number 3, no text or symbols presentnatural_image
Three-step illustration of a coffee maker's processing process, showing step-by-step steps from pouring into a container (no text or symbols)
3 sec
natural_image
Hand pouring liquid into a glass container using a digital creamizer (no text or symbols visible)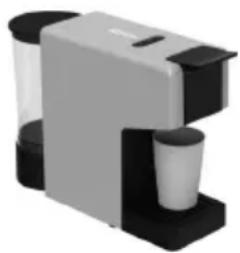
natural_image
3D rendering of a gray and black electronic device with a white cup, no visible text or symbols
natural_image
Simple line drawing of a finger pressing down on a toolbar with icons (no text or symbols)5. INSTRUCCIONS D'ÚS
natural_image
Three black plastic mechanical components with numbered labels (16, 17, 18) on their caps, shown from different angles (no text or symbols on parts)POSADA EN MARXA
MODE D'ESPERA
Apagat automatic:
natural_image
3D rendering of a modern coffee maker with black and gray casing, no visible text or symbolsPlace the cup under the coffee dispenser for a classic espresso

natural_image
3D rendered image of a gray and black plastic device with a white cup, no visible text or symbolsRemove the drip tray to use cups of different sizes for a long coffee
natural_image
3D rendering of a gray and black industrial machine with directional arrows indicating motion (no text or symbols)
natural_image
Illustration of a coffee maker with a coffee cup and a side stack (no text or symbols)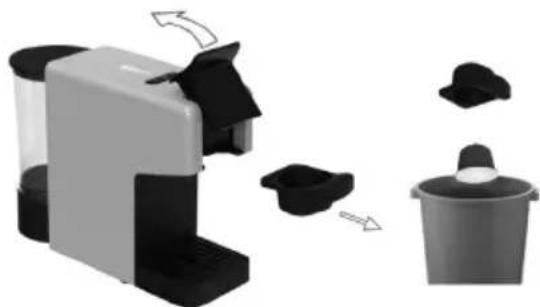
natural_image
Illustration of a coffee maker with a bag and a bucket, showing a process step (no text or symbols)natural_image
Illustration of a black mechanical device with a transparent lid and a curved base (no text or symbols)2
natural_image
Illustration of a portable device with handle and lid, no visible text or symbols3
natural_image
Illustration of a coffee maker with a lightbulb icon and three cups, no text or symbols presentnatural_image
Three-step illustration of a coffee maker's mixing and pouring process, showing step-by-step steps (no text or symbols)| Quantity programmable | |||
| Min | Default | Max | |
| Latte | 5 sec | 20 sec | 60 sec |

natural_image
Hand pouring liquid into a glass container using a handheld device (no text or symbols visible)
natural_image
3D rendering of a gray and black electronic device with a white cup, no visible text or symbols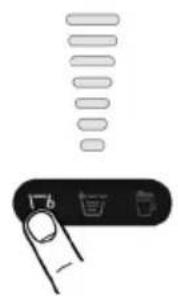
natural_image
Illustration of a finger pressing a button with icons for download, refresh, and exit (no text or symbols)DÉCLARATION DE CONFORMITÉ
DECLARATION OF CONFORMITY
This device complies with EU Low Voltage Directive 2014/35/EC.
Electromagnetic Compatibility Directive 2014/30/EU. Directive 2015/863/EU on the restriction of the use of certain hazardous substances in electrical.
Directive 2009/125/EC on the eco-design requirements applicable to energy-related products.

This symbol on the product or on the packaging indicates that this product can't be disposed as normal rubbish or household waste. All the electrical, electronic equipment's and battery-operated units must recycle in proper manner and according to the local municipal laws. You can recycle them by taking them to government authorized disposal centres or specialized bins which you can find in any nearby big super markets, electronics or electro domestics products stores or malls who have these types of facilities available.
Designed by: SOGO based on European quality standards Imported by: Sanysan Appliances S.L, NIF: B98753056, C/ Barcas 2, 2, 46002 Valencia, Spain Product manufactured in CHINA. After-sales service: www.sogosat.com sogosat@sogosat.com / 0034 902 222 161
- INSTRUCCIONES DE USO
- PUESTA EN MARCHA
- MODO DE ESPERA
- PREPARACIÓN DE CAFÉ
- fety instructions for the user
- GENERAL PRECAUTIONS
- General precautions during the use of electrical equipment
- Restrictions on use to avoid personal injury
- Restrictions on use when used with children and elders
- Instructions to follow when using the appliance
- WARNING: high risk to get burn! Do not touch the hot parts of coffee maker.
- CLEANING AND MAINTENANCE
- TECHNICAL SPECIFICATIONS
- PARTS DESCRIPTION
- STARTING UP
- Before using for the first time
- HOW TO USE
- STAND-BY MODE
- Automatic power off:
- Manual power off
- Power on
- COFFEE DISPENSING
- COFFEE PREPARATION
- How to prepare an expresso coffee
- HOW TO PREPARE A LATTE COFFEE
- PROGRAMMING LATTE QUANTITY
- RESTORING QUANTITY TO DEFAULT SETTINGS
- MAINTENANCE AND CLEANING
- CLEANING RAPID LATTE CUP SYSTEM
- COFFEE DISPENSER CLEANING
- CLEANING THE CAPSULE COLLECTING DRAWER AND THE DROP COLLECTING
- PORTANT:
- MISE EN MARCHE
- MODE VEILLE
- Arrêt automatique :
- PRÉPARATION DU CAFÉ
- PREPARAÇÃO DE CAFÉ
- RESTAURAR OS VOLUMES PREDEFINIDOS DE FÁBRICA
- INBETRIEBNAHME
- STANDBY-MODUS
- KAFFEEZUBEREITUNG
- ISTRUZIONI PER L'USO
- AVVIAMENTO
- MODO STAND-BY
- NÁVOD K POUŽITÍ
- SPUŠTĚNÍ
- POHOTOVOSTNÍ REŽIM
- PŘÍPRAVA KÁVY
- PROGRAMOVÁNÍ MNOŽSTVÍ LATTE
- OBNOVENÍ MNOŽSTVÍ NA VÝCHOZÍ NASTAVENÍ
- INSTRUKTIONER TIL BRUG
- OPSTART
- STAND-BY-TILSTAND
- Automatisk slukning:
- TILBEREDNING AF KAFFE
- Sådan laver du en expresso-kaffe
- PROGRAMMERING AF LATTE-MAENGDE
- GENDANNELSE AF MÆNGDE TIL STANDARDINDSTILLINGER
- NAVODILA ZA UPORABO
- ZAČETEK DELOVANJA
- REŽIM STOJENJA
- Samodejni izklop:
- PRIPRAVA KAVE
- Kako pripraviti kavo expresso
- KAKO PRIPRAVITI KAVO LATTE Sestavljanje / razstavljanje sistema skodelic Rapid Latte
- PROGRAMIRANJE KOLIČINE LATTE
- UPUTE ZA UPOTREBU
- POKRETANJE
- Prije prve upotrebe
- STANJE PRIPRAVNOSTI
- PRIPREMA ESPRESSA
- Kako pripremiti espresso kavu
- KAKO PRIPREMITI LATTE KAVU Sastavljanje / rastavljanje Rapid Latte Cup sustava
- PROGRAMIRANJE KOLIČINE ZA LATTE
- AŽNE:
- INSTRUKCJE UŻYTKOWANIA
- URUCHOMIENIE
- TRYB CZUWANIA
- PRZYGOTOWANIE KAWY
- PROGRAMOWANIE ILOŚCI LATTE
- PRZYWRACANIE ILOŚCI DO USTAWIEN DOMYŚLNYCH
- ÎNCEPERE
- MOD STAND-BY
- Oprire automată:
- PREPARAREA CAFELEI
- PROGRAMAREA CANTITĂȚII DE LATTE
- RESTAURAREA CANTITĂTII LA SETĂRILE IMPLICITE
- ПЕРШИЙ ЗАПУСК
- РЕЖИМ ОЧІКУВАННЯ
- ПРИГОТУВАННЯ КАВИ
- INSTRUCCIONS D'ÚS
- POSADA EN MARXA
- MODE D'ESPERA
- Apagat automatic:
- DÉCLARATION DE CONFORMITÉ
- DECLARATION OF CONFORMITY
Brand : Sogo
Model : SS-7660
Category : Coffee machine