
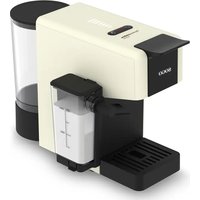
SS-5667 - Coffee machine Sogo - Free user manual and instructions
Find the device manual for free SS-5667 Sogo in PDF.

| Product Type | Espresso coffee machine with steam nozzle |
| Brand | Sogo |
| Model | SS-5667 |
| Power supply | AC 220-240V, 50-60Hz, 1350W |
| Pump pressure | 20 bar |
| Water tank capacity | 1.5 L |
| Main functions | Espresso, cappuccino, latte, hot water, steam function |
| Coffee volume adjustment | Customizable (memory up to 60 seconds) |
| Steam nozzle | To froth milk and heat liquids |
| Filter holder | Aluminum alloy, single cup and double cup filters |
| Water tank | Removable for easy cleaning |
| Descaling | Alert after 300 cups, automatic 25-minute process |
| Maintenance and cleaning | Cleaning after each use, descaling every 1-2 months |
| Housing material | Plastic and metal |
| Country of manufacture | China |
| After-sales service | www.sogosat.com - Tel. 0034 902 222 161 |
| Warranty | Not specified in the manual |
Frequently Asked Questions - SS-5667 Sogo
User questions about SS-5667 Sogo
0 question about this device. Answer the ones you know or ask your own.
Ask a new question about this device
Download the instructions for your Coffee machine in PDF format for free! Find your manual SS-5667 - Sogo and take your electronic device back in hand. On this page are published all the documents necessary for the use of your device. SS-5667 by Sogo.
USER MANUAL SS-5667 Sogo
natural_image
Exterior view of a modern SOGO coffee maker with digital display and control buttons (no readable text or symbols on main body)
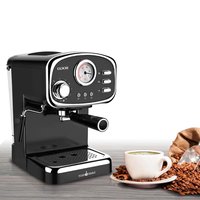
CAFETERA ESPRESSO ESPRESSO COFFEE MAKER CAFETIÈRE EXPRESSO MÁQUINA DE CAFÉ ESPRESSOMASCHINE CAFFETTIERA ESPRESSO
-
Important Note P. 14
-
Symbol definitions P. 14
-
Safety instructions for the user P. 14
I. General precautions during the use of electrical equipment P. 14
II. Restrictions on use to avoid personal injury P. 15
III. Product use restrictions due to poor condition or breakdown P. 16
IV. Restrictions on use when used with children and elders P. 17
V. IMPORTANT WARNING P. 18
VI. Instructions to follow when using the device P. 18
- Technical specifications P. 20
- Parts description P. 20
- Instructions for use P. 20
- Cleaning and maintenance P. 23
- Declaration of conformity P. 70
- Responsibility of disposal, details of the manufacturer and after-sales service P. 71
ÍNDICE
Panel de control:
• Always read the instruction book carefully before using.
- This manual can be downloaded from our web page www.sogo.es
- Keep these instructions for future reference.
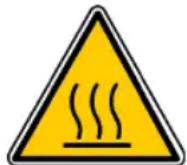
2. Symbol definitions


GENERAL PRECAUTIONS
1
1- Important information and useful hinds on use
2- Warning against dangerous situations in terms of life and property
3- Warning against hot surfaces
4- Cautions while using electrical and electronic equipment.
3. Safety instructions for the user
GENERAL PRECAUTIONS
General precautions during the use of electrical equipment
- Do not use the appliance for any other purpose than described in this manual.
- Do not use or store the appliance outdoors.
• Always place the appliance on to the flat and even surface. - This product is intended for indoor, non-industrial, non-commercial and only for household use. Do not use the item outdoors or for any other purpose. Misuse or improper handling may cause problems in the appliance and cause injury to the user.
- The unit must be used only for the intended
purposes. No liability is accepted for damages arising from improper use or wrong handling.
- Ensure that the voltage indicated on the name-plate matches the mains voltage before plugging in the appliance.
• Always remove the plug from the power socket when the appliance is not in use. Do not leave the appliance unattended when switched on. - Close supervision is necessary when any appliance is being used by or near children.
- Before cleaning or storing your appliance, always unplug the appliance from the power supply and let it cool down.
- The device is not completely disconnected from the power source, even after it has been turned off. To disconnect it completely, disconnect it from the mains plug.
- The appliances are not intended to be operated by means of an external timer or separate remote-control system.
- This appliance is intended to be used in household and similar applications such as
- Staff kitchen areas in shops, offices and other working environments;
- Farm houses and by clients in hotels, motels and other residential type environments;
- Bed and breakfast type environments;
- Catering and similar non-retail applications
II. △ Restrictions on use to avoid personal injury
- Do not let the appliance operate unattended.
- Do not place or operate this appliance near water sources.
-
Do not place or operate the appliance and its power cord on or near hot surfaces (e.g., stove plates) or open flames.
-
Do not leave the power cord hanging from sharp edges and keep away from hot objects and flames. Do not wind the cord around the appliance and do not bend it.
- Never use accessories that are not recommended by the manufacturer.
- The use of accessories not recommended or sold by the appliance manufacturer may result in fire, electric shock or injury to persons.
- When you want to remove the plug from the wall contact, please do this at the plug itself and not by pulling on the cable or the appliance itself.
• To avoid electric shock, make sure your hands are dry before plugging or unplugging. - Do not use the device with wet hands, on damp floors or when the atmosphere is humid, there is a risk of electric shock.
- While using the appliance, make sure that the power cord must not be caught or crushed.
- Do not let the motor unit, cord or plug get wet to protect against risk of electric shock.
- Be careful, while handling electrical appliances, as the surface of the heating element is subject to residual heat after use. Any misuse may cause potential injury to the user and may damage the appliance.
- Do not touch the outer surface of the appliance as it can get very hot during operation. Instead, use the handle or mitts.
III. ▲Product use restrictions due to poor condition or breakdown
- Never immerse the appliance or the plug-in water or any other liquid. In the event of the appliance falling in water, disconnect immediately from the mains supply and take it to an authorized service agent for repair before reu-
sing.
- Do not use the appliance if it has fallen on the floor, if there are visible signs of damage or if it has a leak.
- Do not use the appliance if the cable or plug is damaged. In case of the cord be damaged, it must be replaced only by the manufacturer, its service agent or similarly qualified persons in order to avoid Hazard.
- In case of appliance malfunction, or if it has been damaged in any manner, return the appliance to the nearest authorized service facility for examination, repair or adjustment.
- In case of hardware problems, do not attempt to repair the product yourself. Repairs should only be carried out by qualified technicians.
IV. Restrictions on use when used with children and elders
- The appliance is not to be used by persons (including children) with reduced physical, sensory or mental capabilities, or lack of experience and knowledge, unless they have been given supervision or instruction.
• Children should be supervised to ensure that they do not play with the appliance. - Appliances can be used by persons with reduced physical, sensory or mental capabilities or lack of experience and knowledge if they have been given supervision or instructions concerning use of the appliance in a safe way and understand the hazards.
• Children shall not play with the appliance. - This appliance can be used by children aged from 8 years and above and persons with reduced physical, sensory or mental capabilities or lack of experience and knowledge if they
have been given supervision or instruction concerning use of the appliance in a safe way and understand the hazards involved.
- Cleaning and user maintenance shall not be made by children unless they are older than 8 and supervised.
- Keep the appliance and its cord out of reach of children less than 8 years.
V. IMPORTANT WARNING
- To avoid a circuit overload when using this product, do not operate another high-wattage product on the same electrical circuit.
- 'A short power supply cord is provided with this product. An extension cord is not recommended for use with this product, but if one must be used:
- The marked electrical rating of the cord must be at least as great as that of the product.
- Arrange the extension cord so that it does not hang where it can be tripped over or pulled unintentionally.
VI. Instructions to follow when using the device
- The appliance has been incorporated with a grounded plug. Please ensure the wall outlet in your house is well earthed.
- Be careful to not to get burned by the steam.
- Do not touch the hot surface of appliance (such as steam wand, and the brewing filter while in use). Use handle or knobs.
- Do not let the coffee maker operate without water.
- Do not remove the metal funnel, when appliance is brewing coffee or when steam and hot water escape from metal funnel and ensure to
release the pressure in water tank before removing metal funnel.
- Relief pressure through steam wand before removing tank cover or metal funnel.
- ⚠️ WARNING: The filling aperture must not be opened during use.
- ⚠️ WARNING: Potential injury from misuse.
- WARNING: high risk to get burn! Do not touch the hot parts of coffee maker.
- The coffee-maker shall not be placed in a close cabinet.
- Do not touch or move the coffee maker while in use.
- Never use the coffee maker in the environment of high temperature, high magnetic field and humidity, do not place the coffee maker on or hot surface or beside fire or another electrical appliance, such as on the top of refrigerator, avoid to be damaged.
- When the appliance prompts trouble, never operation the appliance, do not place the foreign object into the brewer.
- Never use the detergent or hot water for cleaning the brewing component, to avoid the running component is lack of lubricant oil and the component will be distortion as the high temperature.
CLEANING AND MAINTENANCE
Kindly refer to the cleaning and maintenance section for details on how to clean surfaces which comes in the contact of food.
4. TECHNICAL SPECIFICATIONS
| Voltage Power Frequency Pressure Capacity | ||||
| AC 220-240V 13 | 50W 50 – 60Hz 20 | Bar 1,5L | ||
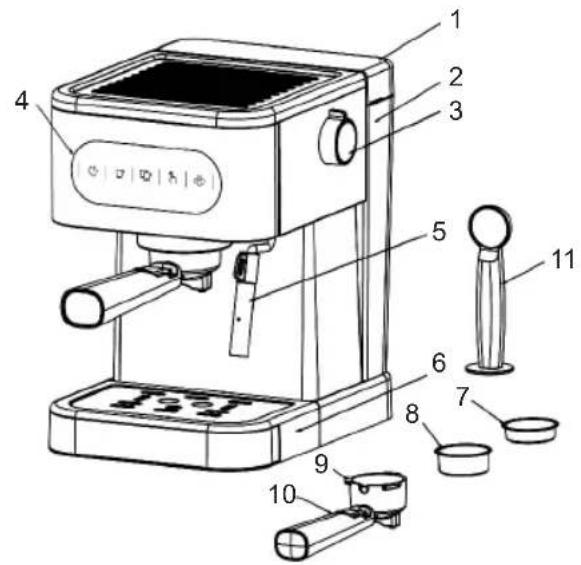
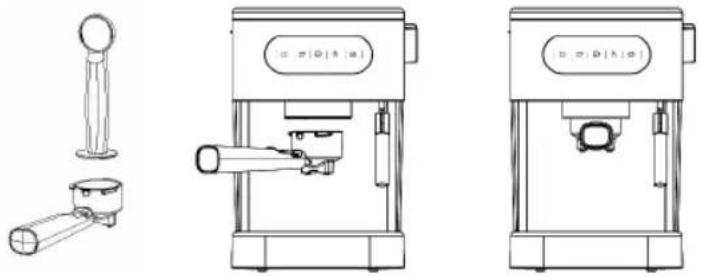
5. PARTS DESCRIPTION
- Tank cover
- Water tank
- Steam knob
- Control panel
- Frothing nozzle
- Drip tray
- One cup of filter
- Two cups of filter
- Funnel
- Aluminium alloy filter holder
- Coffee spoon
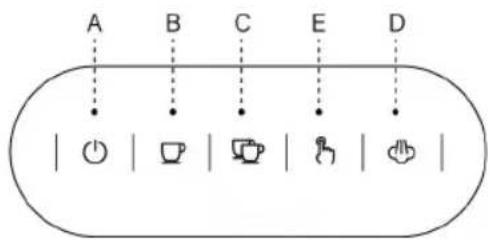
Control panel
A. Power switch
B. Button in one cup
C. Buttons in two cups
D. Steam knob
E. Manual control of coffee volume
flowchart
graph TD
    A["A"] --> B["B"]
    B --> C["C"]
    C --> E["E"]
    E --> D["D"]
    D --> E
    E --> F["O"]
    F --> G["杯"]
    G --> H["杯"]
    H --> I["手"]
    I --> J["手"]
INSERTING THE FILTER
- To insert the selected filter in the porta-filter, make sure to align the notch on the filter with the groove inside the porta-filter.
- Turn the filter to the left or right to lock in place. This will help secure the filter in the porta-filter.
6. INSTRUCTIONS FOR USE
Before the first use
To ensure the first cup of coffee tastes excellent, you should rinse the coffee maker with warm water as following:
- Pull out the water tank of the coffee maker. Pour water into water tank, the water level should not exceed the "MAX" mark in the tank, then insert it into the coffee maker.
- Note: The appliance is supplied with a removable tank for easy cleaning, you can fill the tank with water firstly, and then insert the tank into the appliance.
- Set steel mesh into metal funnel (no coffee in steel mesh), then put the metal funnel under the metal funnel holder, and turn it anticlockwise until it is fixed tightly.
- Place an espresso cup you have prepared on drip plate. Make sure the steam knob is at the "O" position. Note: As the appliance is not equipped with any cup or jug, prepare your own jug or cup.
- Plug in the power, then press the "Power ⏻", button, the machine beeps. "one cup" and "two cups" button light flashes three times and coffeemaker starts to preheat. (Make sure that the steam knob is on "OFF". If it is "/", the four lights will flash together and it will not work.)
- When the indicator light of "one cup" and "two cups" is always on, press the button of "one cup" to wash the coffee filter or coffee cup with hot water.
MAKE ESPRESSO COFFEE:
- When the coffeemaker is in preheating mode process, the grounded coffee powder (the coffee powder neither too thick nor too fine) can be loaded into the "metal filter" and then compressed with the Pressing spoon. Clean the coffee powder at the edge of the funnel with a brush or hand (if 1 cup is needed, use 1 cup filter and in case if 2 cups are needed, use 2 cups filter).
- Insert the funnel and lock it tightly as per picture below, then place the coffee cup under the funnel.
natural_image
Technical line drawings of three different mechanical devices with no visible text or symbols- When the “☐” or “☐” light is on, press the “☐” button several times and the coffee starts to flow out 1 cup of coffee. (or press the key “☐” to release 2 cups of coffee or press the key “☐” Manual control of outflow coffee volume, up to 90S)
- At the same time, adjust the position of the coffee cup to let the coffee flow into the cup along the cup wall.
- Wait for the coffee to drip, it's done!
PREHEATING
To make a cup of good hot Espresso coffee, it is recommended to preheat the appliance before making coffee, including the funnel and cup, so that the coffee taste will not be influenced by the cold parts.
WARNING: do not leave the coffee maker unattended during making coffee, as you need operate manually sometimes! Note: During brewing coffee or making steam, it is normal that the ready indicator is likely to extinguish, it only means that the heater is heating up to keep the temperature at the standard range.
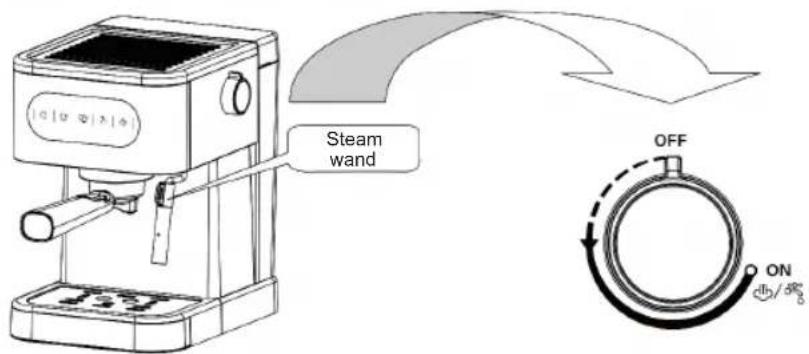
MAKE CAPPUCCINO:
You can get a cup of cappuccino by topping a cup of espresso with frothing milk.
Note: during making steam, the metal funnel must be assembled in position.
Method:
- Prepare espresso according to the part "MAKE ESPRESSO COFFEE", and make sure that the steam knob is at the "O" position.
- Press down steam button "115" and wait for for until the steam indicator illuminates.
- Fill a jug with about 100 grams of milk for each cappuccino to be prepared, you are recommended to use whole milk at refrigerator temperature (not hot!).
- In order to get better milk foam performance, it is recommended to keep steam knob at open position for approx. 15s, since the early steam contains too much water and let the water flow down. Then keep the knob at "O" position and conduct next step.
-
Insert the steam wand into the milk about two centimetres, then turn the steam knob slowly in anticlockwise, steam will come out from the steam wand. Frothed milk is produced by moving vessel round from up to down.
Note: Never touch steam outlet during steam jetting and be careful not to burnt. Note: Never turn the steam knob rapidly, as the steam will accumulate rapidly in short time which may increase the potential of the risk of explosion. -
When the required purpose is reached, you can turn the steam knob to the "O" position.
-
Press and release the ON/OFF button "⏻" to cut off the power source.
-
Pour the frothed milk into the espresso prepared, now the cappuccino is ready. Sweeten if desired, sprinkle the froth with a little cocoa powder.
Note: Please follow the operation as below if the steam outlet is blocked: firstly turn the steam knob to "O" position and make the coffee maker cool down for about half an hour, then poke the steam outlet for several times with a needle about 1mm in diameter, finally, press down the coffee/steam button "☐" and turn on the steam knob to check if the appliance can produce steam normally when the steam indicator (yellow) illuminates. Please contact the service department if the appliance cannot produce steam after operate as above.
FROTHING MILK / PRODUCING STEAM TO HEAT LIQUIDS
The steam wand can be used to froth milk and make hot beverages like drinking chocolate, water or tea.
Method:
- Remove the removable tank and fill it with desired water, the water level should not exceed the "MAX" mark in the tank. Then insert the tank into the appliance properly.
- Then connect the appliance to power supply.
- Press "☐" and then "☐". At this time, the "☐" indicator starts flashing until the indicator turns on normally and the preheating is completed.
- Pour the iced whole milk into the latte art cup 1/3 of the way, insert the steam nozzle 2CM into the milk surface, then slowly turn the "steam knob" until the steam starts to come out.
(Note: Steam quantity can be adjusted according to personal proficiency and with the help of steam knob. Release some little water in the steam pipe before foaming).
- When the temperature of milk reaches about 75 degrees and the milk foam begins to inflate, trun the "steam knob" to "OFF" and press "☐" to close.
HOT WATER FUNCTION
Press the “☐”, switch, turn the “steam knob” to “/☐”, and the steam pipe starts to continuously discharge hot water; Turn the “steam knob “ to” OFF “stop the hot water.
Note: after steaming, we recommend you allow the maker to cool down at least for 5 min before making coffee again. Otherwise burnt odor may occurred in your Espresso coffee. If you want to make coffee immediately, follow the next steps: First, press and release the steam button "⚡" to the higher position; dip the steam wand into a cup; secondly, press the pump control button down to the lower position and turn on the steam control knob and there will be water flow out from steam wand; after the ready indicator extinguish, press and release the pump control button to the higher position, then turn the steam control knob to "O" position. When the ready indicator illuminates, you can start to brew coffee again.
COFFEE VOLUME SETTING FUNCTION
- After the machine is heated up (when the "☐D" and "☐☐D" indicator lights become stay on, press and hold the "☐D" for 3 seconds at the same time, and the funnel starts to pour coffee. When the desired amount is reached, then press the "☐D" button, you will listen a sound from the machine. That means the time has been memorized. The next time you press the "☐D", button, press this time to make coffee (the longest time is 60 seconds, The setting is invalid for more than 60
seconds, remaining at the default time.) Single cup flow is set to 40\~60ml.
- "☐" Key memory function setting is the same as above. Double cup flow setting value is 80\~110ml.
- Restore factory Settings: press and hold "☐" + "☐" for 3 seconds at the same time. When both keys are in on position and emits the beep sound for once, means the factory settings have been restored.
DESCALING FUNCTION
Once the machine has brewed 300 cups of coffee, it will remind you to descale. (When “☐”, “☐”, “☐” and “☐” all 4 keys flasesh 5 times at the same time, and the machine beeps 5 times). At this time, if you press and hold “☐” + “☐” for 2 seconds at the same time, the descaling process will be cancelled, the “☐” indicator light will flash 3 times, and it will beep 3 times to indicate that the coffee maker is came out of de-escalation mode. After turning on the power again, the blue indicator light of the power button will stop flashing, and the counting will start again; When the descaling reminder appears on the machine, press and hold “☐” it for 5 seconds, the (“☐”, “☐” and “☐”) indicator lights will light up in turn, and the display will be displayed linings sequence. The machine will enter into cleaning mode. The “☐” “ indicator light start flashing. Press the switch key once to switch on and off. The indicator light is always on. At this time, turn on the steam knob to start the cleaning process. The whole process lasts for 25 minutes, and make sure there is enough water in the water tank to do whole of this process. The user can turn off the steam knob to clean the hot water and coffee outlets. After 25 minutes, the cleaning is over After that, the machine beeps three times, only the power light is on, and enters the normal preheating standby mode.
COOLING FUNCTION
In case need to prepare the coffee after steam function, turn off the steam button "√". As the temperature is quite high, one cup and two cups of indicator light Start flashing, so it is time to that the machine needs to be cooled. At this time, rotate the steam knob "√/√", the machine starts to pump water, and the steam pipe starts to continuously discharge water and cool down. After the indicator light flashes quickly, turn the "steam knob" to "OFF" and stop cooling down. It can make coffee when the power indicator is on.
7. CLEANING AND MAINTENANCE:
- Cut off power source and let the coffee maker cool down completely before cleaning.
- Clean housing of coffee maker with moisture-proof sponge often and clean water tank, drip tray and removable shelf regularly then dry them.
Note: Do not clean with alcohol or solvent cleanser. Never immerse the housing in water for cleaning. - Detach the metal funnel by turning it clockwise, get rid of coffee residue inside, then you can clean it with cleanser, but at last you must rinse with clear water. Do not wash the metal funnel in a dishwasher.
- Clean all the attachments in the water and dry thoroughly.
Note: Clean the appliance after every use in order to make it work properly.
CLEANING MINERAL DEPOSITS
- To ensure your coffee maker can operate efficiently, internal piping is clean and the peak flavor of coffee, you should clean away the mineral deposits left every 1-2 months.
- Fill the tank with water and descaler to the MAX level (the proportion of water and descaler is 4:1, details refer to the instruction of descaler. Please use "household descaler", you can use the citric acid (obtainable from chemist's or drug stores) instead of the descaler (one hundred parts of water and three parts of citric acid).
- According to the program of preheating, put the metal funnel (no coffee powder in it) and carafe (jug) in place. Brew water per "PREHEATING".
- Press down the ON/OFF button to turn on the unit, the power indicator (red) will be illuminated, you should press the pump control button to the lower position, make sure the coffee/steam button, again, and wait for a moment, the coffee maker begins to be heated.
- When the ready indicator (green) illuminates, it shows the heating is finish. Pressing down the pump control button to the lower position and make two cups coffee (about 2Oz). Then close the pump and wait for 5s.
-
Press down the coffee/steam button to the lower position, waiting for until the yellow indicator is illuminated. Make steam for 2min, then turn the steam knob to the "O" position to stop making steam. Press the ON/OFF button to turn off the unit immediately, make the descaler deposit in the unit at least 15 minutes.
-
Restart the unit and repeat the steps of 4-6 at least 3 times.
- Then pressing and release the coffee/steam button to the higher position, when the green lamp is illuminated, press down the pump control button to the lower position to brew until no descaler is left.
- Then brewing coffee (no coffee powder) with tap water in the MAX level, repeat the steps of 4-6 for 3 times (it is not necessary to wait 15 minutes in step of 6), then brewing until no water is left in the tank.
- Repeat the step of 9 at least 3 times to make sure the piping is cleanly.
TROUBLESHOOTING
| PROBLEM REASON METHOD | ||
| No water/steam 1. | Check whether there is water in the water tank/or whether water tank is stuck in place2. Water is not added in advance in the machine.3. The machine is not preheated. | Fill the tank with water and turn on the power switch and the coffee switchHow to add water to the machine: press the hot water button, and the pump will start to add water into the machine until there is water flowing out from the steam nozzle or funnel.The machine needs to be preheated. |
| No grease The coffee powder is too thick/the beans are not grinded properly. | Replace the coffee powder and flatten it with a press | |
| No steam 1. Plug the steam outlet.2. Steam switch is not on or preheating is not completed to turn on steam | Use a small wire through the steam holeClean the steam pipe with hot water after foaming.Turn on the steam switch, and wait for the preheating to complete before steam | |
| Más o menos café | Too much or too little coffee powder | According to the standard amount of powder, 1 cup with 1 tablespoon to pressure, coffee powder shouldn't be too thick or too fine. Too thick coffee can not be completely extracted, too fine affect the amount of coffee. |
| The milk does not foam well | Check if it is whole milkBefore the steam key is warmed up, it starts to milk | Use whole milkSteam can only be started after the steam indicator light turns from flashing to constant light. |
| No coffee, coffee light and steam light flash | The temperature is too high after steaming | Water cooling |
| Coffee doesn't get hot. | In the steam state, the steam switch is not off | Turn the steam switch to OFF |
1. IMPORTANT
Panel de control:
Painel de controle:
natural_image
Technical line drawings of three different types of coffee machines, including a cylindrical stand and two variants with no visible text or symbols.Bedienfeld:
natural_image
Technical line drawing of a mechanical device with no visible text or symbolsnatural_image
Technical line drawings of three different types of industrial devices, including a cylindrical tool and two identical views (no text or symbols present)DECLARATION OF CONFORMITY
This device complies with EU Low Voltage Directive 2014/35/EC.
Electromagnetic Compatibility Directive 2014/30/EU. Directive 2015/863/EU on the restriction of the use of certain hazardous substances in electrical.
Directive 2009/125/EC on the eco-design requirements applicable to energy-related products.


This symbol on the product or on the packaging indicates that this product can't be disposed as normal rubbish or household waste. All the electrical, electronic equipment's and battery-operated units must recycle in proper manner and according to the local municipal laws. You can recycle them by taking them to government authorized disposal centres or specialized bins which you can find in any nearby big super markets, electronics or electro domestics products stores or malls who have these types of facilities available.
Designed by: SOGO based on European quality standards
Imported by: Sanysan Appliances S.L, NIF: B98753056, C/ Barcas 2, 2, 46002 Valencia, Spain
Product manufactured in CHINA. After-sales service: www.sogosat.com sogosat@sogosat.com / 0034 902 222 161
- ÍNDICE
- Panel de control:
- Symbol definitions
- Safety instructions for the user
- GENERAL PRECAUTIONS
- General precautions during the use of electrical equipment
- △ Restrictions on use to avoid personal injury
- ▲Product use restrictions due to poor condition or breakdown
- Restrictions on use when used with children and elders
- IMPORTANT WARNING
- Instructions to follow when using the device
- CLEANING AND MAINTENANCE
- TECHNICAL SPECIFICATIONS
- PARTS DESCRIPTION
- Control panel
- INSERTING THE FILTER
- INSTRUCTIONS FOR USE
- Before the first use
- MAKE ESPRESSO COFFEE:
- PREHEATING
- MAKE CAPPUCCINO:
- Method:
- FROTHING MILK / PRODUCING STEAM TO HEAT LIQUIDS
- HOT WATER FUNCTION
- COFFEE VOLUME SETTING FUNCTION
- DESCALING FUNCTION
- COOLING FUNCTION
- CLEANING AND MAINTENANCE:
- CLEANING MINERAL DEPOSITS
- IMPORTANT
- Painel de controle:
- Bedienfeld:
- DECLARATION OF CONFORMITY
Brand : Sogo
Model : SS-5667
Category : Coffee machine