climacontrol+ M - Climate control EHEIM - Free user manual and instructions
Find the device manual for free climacontrol+ M EHEIM in PDF.
User questions about climacontrol+ M EHEIM
0 question about this device. Answer the ones you know or ask your own.
Ask a new question about this device
Download the instructions for your Climate control in PDF format for free! Find your manual climacontrol+ M - EHEIM and take your electronic device back in hand. On this page are published all the documents necessary for the use of your device. climacontrol+ M by EHEIM.
USER MANUAL climacontrol+ M EHEIM
text_image
climacontrol+ L Type 3752 climacontrol+ M Type 3751climacontrol+ S Type 3750

natural_image
Simple graphic of a sun with a large 'X' symbol crossed out by a lightning bolt (no text or symbols present)
natural_image
Weather icon showing a cloud with raindrops and a black 'X' symbol (no text or numbers)
natural_image
Simple icon of a steaming hot pot with a cross symbol (no text or labels)
natural_image
Isometric line drawing of a refrigerant appliance with heat exchanger and ventilation slots (no text or symbols)B

text_image
max 180 cm
text_image
C max 180 cm
text_image
D max 180 cm
text_image
E ① 1/4 ② 1/4
text_image
F ③ ④ ⑤ ⑧ ⑦ ⑥ OUT IN
text_image
G S T U V ⑨ ⑩
natural_image
Isometric line drawing of a refrigerant appliance with cooling fins and heat exchangers (no text or symbols)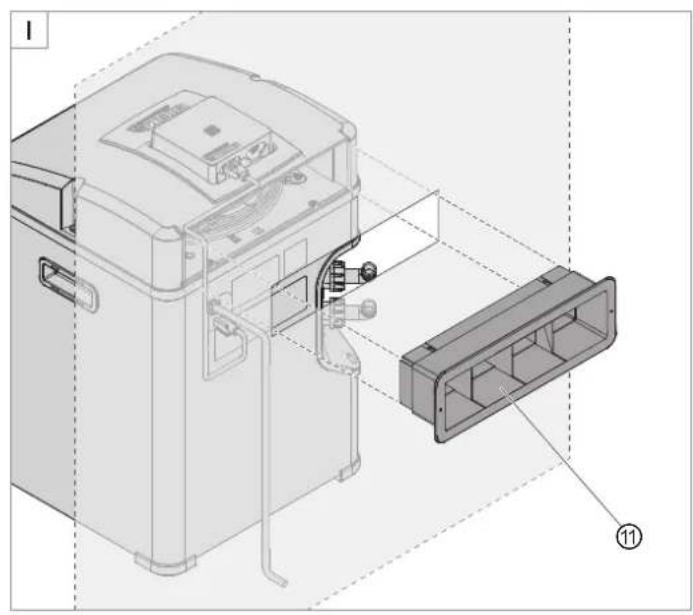
natural_image
Technical diagram of a device with internal components and labeled parts (no readable text or symbols)
text_image
J ⑫ ⑬ ⑭ ⑮ ⑯ ⑰ ⑱ ⑲ ⑳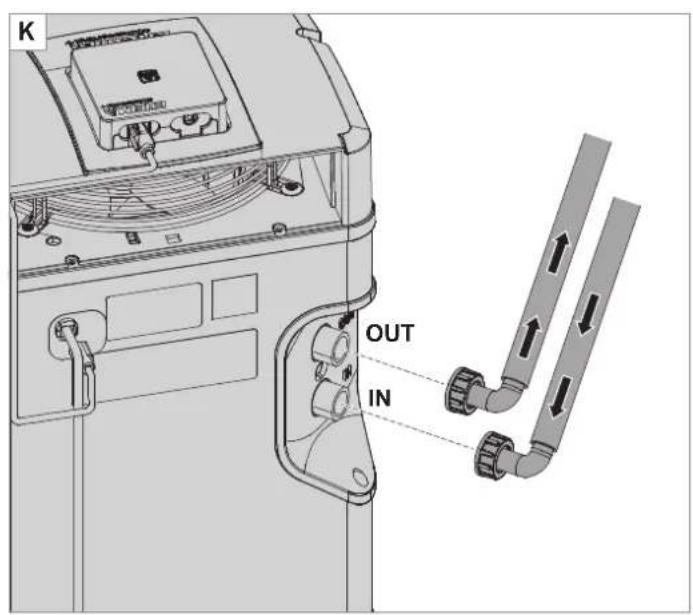
text_image
K OUT IN
text_image
L AUX SET 88.0°C °F
text_image
M ⑱ BRELLA ⑲
text_image
N 19 20text_image
ACDC Adapter Power Supply Chord Drip Loop AquariumOperating manual (translation)
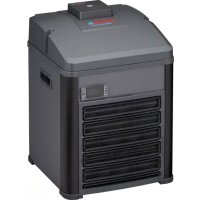
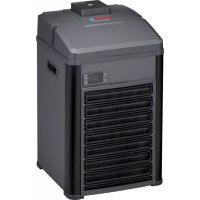
Aquarium climate control unit climacontrol+
General user instructions
Information on using the operating manual

▶ Before using the appliance for the first time, the operating manual must be read fully and understood.
- Consider the operating manual as part of the product and keep in a safe and accessible location.
▶ Enclose this operating manual if passing the appliance on to a third party.
Symbol explanation
The following symbols are used on the appliance.

The appliance must only be used indoors, and exclusively for aquariums.

The climate control unit is of protection class I.

The WiFi controller is of protection class III.

The appliance is certified according to the relevant national regulations and directives, and conforms to EU standards
The following symbols and signal words are used in this operating manual.

DANGER!
Risk of serious personal injury or death from a general source of danger.

DANGER!
Danger of electric shock with the risk of serious personal injury or death.

DANGER!
Danger resulting from the use of flammable materials. In case of fire, risk of serious personal injury or death.

WARNING!
Danger of serious personal injury or health hazard.

CAUTION!
Note on the risk of material damage.

Note with useful information and tips.
Typographical conventions:
☒A Reference to a figure, in this case, reference to figure A.
▶ You are prompted for an action.
Application
EHEIM climacontrol+ is an electronically controlled climate control unit for aquariums. It ensures the constant control of the water temperature.
The appliance and all parts included in the scope of delivery are intended for private use and must only be used:
· for aquarium-related purposes
· for controlling the temperature of the water in freshwater and salt water aquariums
· indoors
· in compliance with the technical data
The following limitations apply to the appliance:

· Do not use for commercial or industrial purposes
· the water temperature may not exceed 35^ C
· the temperature of caustic, inflammable, aggressive or explosive substances, food or drinking water may not be controlled
· never operate without a water flow.
Safety
Risks for persons and property can arise from this appliance if the appliance is improperly used or not used as intended or if the safety instructions are not heeded.
For your safety

Do not let the appliance packaging and small parts get into the hands of children or people who are unaware of how to handle them, as hazards can arise (danger of suffocation!). Keep away from animals.
This appliance is not intended for use by persons (including children) with reduced physical, sensory or mental capabilities, or lack of experience and knowledge, unless they are under the supervision of someone responsible for their safety or have received instruction on usage of the appliance from said person. Children should be supervised to ensure that they do not play with the appliance.
- Only for European markets:
This appliance can be used by children from the age of 3 and by persons with reduced physical, sensory or mental capabilities or lack of experience and/or knowledge if they are supervised and have been instructed in the safe use of the appliance and have understood the resulting dangers. Children must not play with the appliance. Cleaning and user maintenance must not be carried out by children unless they are supervised.
Before use, carry out a visual inspection to ensure that the appliance, especially the mains cable and switching power supply unit, are undamaged.
- Do not use the appliance if it is not working properly or is damaged.
- Never use the climate control unit or the WiFi controller if the mains cable or switching power supply unit are damaged.
- The mains cable of the switching power supply unit cannot be replaced. If the cable is damaged, the switching power supply unit must be scrapped.
- If the mains cable of the climate control unit is damaged, it has to be replaced by an authorised EHEIM customer service point or a qualified electrician.
Do not pull or carry the device at the mains cable. Pull on the plug and not on the cable or appliance in order to disconnect from the power supply.
- Never put a finger or any object through the slots of the ventilation grille. The contact with the fan propeller can cause injuries.
- Only carry out the work described in these instructions.
- Protect the mains cable against heat, oil and sharp edges.
· Never make technical modifications to the appliance. - Only use original spare parts and accessories for the appliance.
· Repairs must only be carried out by an EHEIM service centre.

- We recommend protecting all electrical aquarium appliances via a residual current protective device with a rated residual current of 30 mA maximum.
- If they are not being used, always disconnect all devices in the aquarium from the power supply before you install/remove any parts and before all cleaning and maintenance work.
- Protect the socket, mains plug and switching power supply unit from moisture. A drip loop must be formed with the mains cable. This prevents any water running along the cable to the mains socket, which would result in a short-circuit.
- The electrical data of the appliance and the switching power supply unit have to match that of the power grid. This data is found on the type plate, the packaging and in these instructions.
- Do not attach multiple sockets or portable power supply units to the rear of the device.
- The device complies with the radio equipment directive 2014/53/EU. The full text of the EU declaration of conformity is available online here: www.eheim.com.
- Only use the switching power supply unit that has been supplied with the WiFi controller. If it needs to be replaced, then an original EHEIM switching power supply unit has to be used.

- The device contains the flammable coolant R290. Any work with it has to be performed by experienced expert personnel trained in the R290 gas managed process.
· The cooling circuit must not be damaged. - When disposing of the appliance, proceed as described in the chapter "Decommissioning and disposal".
Assembly and installation
Unpacking

CAUTION! Material damage.
▶ Take into account the weight of the device. Always use the recessed grips to carry the device.

Preserve the packaging for a safe future storage or transportation.
- Open the packaging and remove the accessories.
- Use the recessed grips to pull the device upwards and out of the packaging.
- Remove the Styrofoam trays and plastic bags.
- Ensure that the scope of delivery is complete.
- Check all components for transport damage.
Installation site
- In order to ensure the intended and safe operation of the device, it must never be exposed to the elements or direct heat sources. The device can be used in ambient temperatures from 10^ to 38^ .
- The device always has to be placed below the water level of the aquarium. Note that the maximum installation height is 180 cm.
Preparation (☒E/F)
- Place the cover ① onto the climate control unit.
- Secure the cover with the wrench ② by tightening the screws on the left and the right a quarter turn clockwise.
- Connect the WiFi controller ⑤ to the climate control unit with the RJ45 data cable③.
- Connect the WiFi controller to the ④ switching power supply unit.
- Remove the plugs at the connection IN ⑥ and the connection OUT ⑦.

Keep the plugs. They can be used as transport protection to prevent the leaking of residual water.
Placement in the base cabinet of the aquarium or the cabinets (☒G/H/I)

Maintain a minimum distance of at least 50 mm to the walls and doors of the cabinet. Keep the ventilation openings free.
- Choose an even surface for the placement of the device.
- Saw a section ⑨ of approx. 200 × 200 mm (approx. 400 cm²) into the rear wall of the cabinet (for example) in order to ensure the fresh air supply and the laying of hoses and electrical installations.
- Saw a section for receiving the warm exhaust air duct ⑪ into the cabinet ⑩ in order to ensure that the warm air of the device can leave the cabinet.

- Use the self-adhesive template for marking the opening.
- We recommend placing the opening for the warm exhaust air duct in the back wall of the cabinet. This allows the digital display to be clearly visible from the front. Please note the dimensions in the following table:
| Warm exhaust air duct dimensions | ||
| S 260 mm | ||
| T 74 mm | ||
| U > 60 mm | ||
| V | climacontrol+ S 343 mm | |
| climacontrol+ M 385 mm | ||
| climacontrol+ L 427 mm | ||
- Following the hose installation, slide the device against the respective wall and push the warm exhaust air duct onto the device from behind through the opening.
Free-standing placement

Maintain a minimum distance of at least 50 mm to walls, furniture, etc. in order to ensure an optimal fresh air supply and the removal of warm air.
- Choose an even surface for the placement of the device.
Installing the hoses (J/K)

CAUTION! Material damage.
▶ Only operate the device with filtered, clean water.

Take note of the installation examples ☒B/C/D.
- In order to ensure an optimal and efficient circulation performance of the filter, we recommend operating aquarium filters and climate control units with separate water circuits (☒C).
- For a simpler installation, we recommend slightly greasing the connecting parts with Vaseline.
- Guide the hose (∅ 16/22) through the hose clamp ⑫ and the hose lock ⑬.
- Slide the union nut ⑭ onto the hose connecting piece⑯.
- Insert the seal ⑮ into the union nut.
- Connect the hose to the hose connecting piece.
For a hose of ∅ 19/27, first pull the reducing coupling ⑰ onto the hose connecting piece. Then connect the hose.
- Secure the hose connection to the hose lock. Use pliers for this.
- Connect the pressure side of the filter and/or pump (return flow into the aquarium) with the connection IN of the climate control unit. Connect the return flow of the water to the aquarium to the connection OUT at the climate control unit.
- Tighten the union nuts of the two hose connecting pieces hand-tight. Do not use pliers!
Maintenance

DANGER! Electric shock!
▶ Prior to any maintenance, pull the switching power supply unit of the WiFi controller and the mains plug of the climate control unit.

CAUTION! Material damage.
- Do not use hard objects or aggressive cleaning agents for cleaning.
▶ All components are not dishwasher-resistant.

The following sections describe maintenance work necessary for optimum and fault-free operation. Regular maintenance prolongs the service life and assures functionality of the climate control unit over a long period.
Cleaning the air filter

Recommended maintenance
Clean the air filter 19 approx. every 2 – 3 weeks but at least once a month.
- Fold the plastic grilles ⑳ at the front side of the climate control unit forward.
- Remove the air filter and clean it with lukewarm water.
- Reinsert the dry air filter at the front side and close the plastic grille.

Prior to disconnecting the hose lines from the climate control unit, stop the water circuit by turning off the pump and/or filter. Press the hose clamps ⑫ together to prevent water from leaking out.
Commissioning

CAUTION! Material damage.
- Do not operate the climate control unit without a water flow. - Ensure that the water circuit has been established and the piping has been ventilated completely.
- Start the pump and/or filter in order to start the water circuit.
- Wait approx. 2 minutes to ensure the piping has been ventilated completely.
- Check to ensure that the hose connections ⑥/⑦ of the climate control unit are watertight (☒F).
- Insert the switching power supply unit ④ of the WiFi controller into the mains socket.
- Insert the mains plug Ⓑ of the climate control unit into the mains socket. The display at the front says OFF (☒L).
Operation with WLAN connection

CAUTION! Material damage.
▶ Do not connect any devices other than the WiFi controller included in the scope of delivery.
System requirement
WLAN-enabled terminal device (smartphone, tablet, notebook etc.)
Creating the network
- Insert the switching power supply unit in the mains socket. The status LED 18 illuminates.

- The status LED flashes white: The network is being searched for or created
- The status LED illuminates blue: A new network has been established.
· The display of the device shows the current water temperature. - When it is first started, the compressor starts with a delay of 2 minutes.
Connecting to the WLAN network
- Open the network settings of your terminal device (smart-phone, tablet, notebook etc.).
- Connect the terminal device to the WLAN network (SSID) EHEIM clima XXXXXXXX.
- Enter the network security key.

You can find the security key of the network on the label at the back of the WiFi controller. Alternatively, you can also scan the QR code 1 (see label) to establish the connection.
Calling up the website
- Open your web browser and enter the following address: http://192.168.1.1, eheimdigital oder eheimdigital.local

Alternatively, you can also scan the QR code 2 (see label) to open the software in the browser.
Initial configuration
- Select the desired language from the language selection and follow the instructions for the initial configuration.

A comprehensive set of instructions for the software can be found on the main page via the QR code, or downloaded at www.eheim.com.
Meaning of the status LED
- The status LED flashes white: The network is being searched for or created
- The status LED illuminates blue: The device has established a network.
The status LED illuminates green: The device is connected to another EHEIM digital device
Information on the display (☒L)
When it is in operation, the display of the device always shows the current water temperature.
| Symbol meaning | |
| OFF The device is switched off. | |
| °C The water temperature is measured in degrees Celsius. | |
| °F | The water temperature is measured in degrees Fahrenheit. |
| [80W7] | Flashes: Cooling mode is being prepared.Illuminated: Cooling is switched on. Climate control unit is cooling. |
| Illuminated: Heating is switched on. Climate control unit heats. | |
Decommissioning and disposal
Storing and overwintering

- Take the appliance out of the water circuit of the aquarium.
- Clean the appliance
- Store the appliance in a frost-proof place.
Disposal

When disposing of the appliance, pay attention to the relevant statutory regulations.
Information on the disposal of electrical and electronic appliances in the European Union: Within the European Union, disposal of electrically operated appliances is governed by national regulations that are based on the EU Directive 2012/19/EU on waste electrical and electronic equipment (WEEE). The appliance may no longer be disposed of with the municipal or household waste.
The appliance will be accepted free of charge at municipal collection points or recycling centres. The product packaging is made up of recyclable materials. Dispose of them in an environmentally responsible manner and take them for recycling.
Clearing faults

DANGER! Electric shock!
▶ Before clearing faults, remove the mains plug and the switching power supply unit.
Fault Possible cause Remedy
| The display does not switch on | No power supply | ► Make sure that the mains plug has been plugged into the socket all the way |
| Display always says OFF | WiFi controller not operational | ► Make sure that the switching power supply unit has been plugged into the socket all the way► Check whether the cable of the switching power supply unit is connected with the WiFi controller and has been plugged in all the way |
| Insufficient water cooling or water heating, target temperature is not reached | Insufficient water circuit | ► Check whether the aquarium filter or the pump are working► Check the hose installation for bends or constrictions► Clean the aquarium filter and/or pump► Clean the piping |
| Cooling or heating output too low for the amount of water | ► Check the performance data (see technical data) | |
| Aquarium and/or piping insufficiently insulated or the hose lines are too long | ► Insulate the piping or the walls of the aquarium► Keep the hose lines as short as possible | |
| Increased flow resistance due to additional accessories in the hose system (e.g. CO2 reactors, UVC clarifiers or other units) | ► Reduce the flow resistance► Operate the climate control unit with a separate water circuit | |
| No warm exhaust air from the warm exhaust air duct | ► Cooling compressor does not work properly Contact the EHEIM customer service: www.eheim.com |
For other faults, please contact EHEIM Service.
Error messages

DANGER! Electric shock!
▶ Before clearing faults, remove the mains plug and the switching power supply unit.
Message Possible cause Remedy
| P1 | Water temperature sensor is defective | ▸ Contact the EHEIM customer service: www.eheim.com |
| P2 Temperature sensor for the overheating protection is defective | ▸ Contact the EHEIM customer service: www.eheim.com | |
| HA | Water temperature is above the set target temperature | ▸ Check whether the aquarium filter or the pump are working▸ Check the hose installation for bends or constrictions.▸ Clean the aquarium filter and/or pump▸ Clean the piping |
| ▸ Check if the cooling function is switched on | ||
| HA2(Overheating) | Air filter and/or ventilation grille dirty ▶ Clean the air filter | |
| Ambient temperature too high | ▸ Make sure that the device is operated in an ambient temperature of no more than +38°C. | |
| Ventilation system damaged | ▸ Contact the EHEIM customer service: www.eheim.com | |
| LA | Water temperature is below the set target temperature | ▸ Check whether the aquarium filter or the pump are working▸ Check the hose installation for bends or constrictions.▸ Clean the aquarium filter and/or pump▸ Clean the piping |
| ▸ Check if the heating function is switched on | ||
For other faults, please contact EHEIM Service.
Technical data
| climacontrol+ S M L | ||||
| Type 3750 3751 | 3752 | |||
| Aquarium size up to | 500 l | 1000 l | 2000 l | |
| Mains voltage/frequency | 230 V / 50 Hz | |||
| Power consumption (cooling mode) | 260 W (230 V) | 300 W (230 V) | 400 W (230 V) | |
| Cooling output: * | ||||
| Water temperature 25°C1 | max. | 500 l | 1000 l | 2000 l |
| Water temperature 12°C2 | max. | 200 l | 300 l | 500 l |
| Noise level / 80 cm (cooling mode) | ~47 – 50 dB | ~50 – 53 dB | ~51 – 54 dB | |
| Power consumption (heating mode) | 300 W | |||
| Heating output Δt** | ~15°C | ~10°C | ~6°C | |
| Hose connection for hose ∅ | IN | ∅ 16/22 mm / with reducing coupling 19/27 mm | ||
| OUT | ||||
| Water flow | min. | 500 l/h | ||
| max. | 800 l/h | |||
| System pressure | max. | 1 bar / 14.4 psi | ||
| Weight | 17.0 kg | 18.7 kg | 19.7 kg | |
| Dimensions (L × W × H) | 310 × 310 × 447 mm | 310 × 310 × 489 mm | 310 × 310 × 531 mm | |
| Switching power supply unit | ||||
| Type | 7341218 | |||
| Plug | EUR | |||
| Input | 100 – 240 V / 50/60 Hz / 0.4 A | |||
| Output | 5 V DC / 1 A / 5 W | |||
* = value calculation: 1× Aquarium with cover, room temperature 30°C, thermal load
^1 Model S and M = 0.3 W/I, Model L = 0.2 W/I,
^2 = 0.1 W/l
** = value calculation 1× Aquarium with cover, room temperature 20°C,
t = temperature difference: room temperature to water temperature
Spare parts
See page 3.
text_image
AC/DC Adapter Power Supply Cord Drip Loop AquariumTerminal compatible WLAN (smartphone, tablette, notebook, etc.)
Connexion au réseau
Élimination/destruction

text_image
AC/DC Adapter Power Supply Cord Drip Loop Aquarium
text_image
AC/DC Adapter Power Supply Cord Drip Loop Aquariumtext_image
AC/DC Adapter Power Supply Cord Drip Loop Aquarium
Instalar as mangueiras (☒J/K)
CUIDADO! Danos materiais.
text_image
AC/DC Adapter Power Supply Cord Drip Loop Aquariumtext_image
AC/DC Adapter Power Supply Cord Drip Loop Aquariumtext_image
ACDC Adapter Power Supply Cord Drip Loop Aquariumtext_image
AC/DC Adapter Power Supply Cord Drip Loop Aquarium
text_image
ACDC Adapter Power Supply Chord Drip Loop AquariumValmistelu (☒E/F)
text_image
AODC Adapter Power Supply Chord Drip Loop AquariumHazırlık (☒E/F)
text_image
AC/DC Adapter Power Supply Cord Drip Loop Aquariumtext_image
AC/DC Adapter Power Supply Cord Drip Loop Aquariumtext_image
AC/DC Adapter Power Supply Cord Drip Loop Aquarium
text_image
ACDC Adapter Power Supply Chord Drip Loop Aquarium- Uređaj obavezno mora da se postavi niže od nivoa vode u akvarijumu. Pritom imajte na umu maksimalnu visinu postavljanja od 180 cm.
Priprema (☒E/F)
- Postavite poklopac ① na klima uređaj.
- Učvrstite poklopac tako što ćete ključem ② okrenuti vijke s leve i desne strane udesno za četvrt kruga.
- Povežite WiFi kontroler ⑤ signalnim kablom RJ45 ③ sa klima uređajem.
- Priključite WiFi kontroler na strujni adapter ④.
- Uklonite zatvarače sa priključaka IN ⑥ i OUT ⑦.

Sačuvajte te zatvarače. Možete da ih koristite prilikom transporta kao zaštitu od curenja zaostale vode.
text_image
ACDC Adapter Power Supply Cord Drip Loop Aquarium
text_image
ACDC Adapter Power Supply Chord Drip Loop AquariumМясто за монтиране
text_image
ACDC Adapter Power Supply Cord Drip Loop AquariumМонтаж и установка
Распаковка

text_image
AC/DC Adapter Power Supply Cord Drip Loop Aquariumtext_image
AC/DC Adapter Power Supply Chord Drip Loop Aquarium
text_image
AC/DC Adapter Power Supply Chord Drip Loop Aquarium
Reproduction or copying – even parts thereof – only with the express permission of the producer.