
E7US14MN - Steam cleaner ELECTROLUX - Free user manual and instructions
Find the device manual for free E7US14MN ELECTROLUX in PDF.
| Product type | Vertical garment steamer with integrated ironing board |
| Brand | Electrolux |
| Model | E7US14MN |
| Power supply | Mains (see rating plate) |
| Water tank | Removable, manual filling |
| Heat-up time | Approximately 45 to 70 seconds |
| Steam functions | ECO, Refresh, Delicate, Wool, Cotton, Linen |
| Steam adjustment | Button to adjust steam amount |
| Included accessories | Brush, glove, hanger, ironing board |
| Material | Not specified (plastic and metal) |
| Dimensions (approx.) | Adjustable height up to approximately 1.5 m |
| Weight | Not specified |
| Maintenance | Regular descaling with white vinegar |
| Cleaning | Non-abrasive damp cloth |
| Replacement parts | Water tank, steam hose, nozzle (available from customer service) |
| Repairability | Repair by authorized after-sales service |
| Warranty | Not mentioned |
| Environmental information | Recyclable, do not dispose of with household waste |
Frequently Asked Questions - E7US14MN ELECTROLUX
User questions about E7US14MN ELECTROLUX
0 question about this device. Answer the ones you know or ask your own.
Ask a new question about this device
Download the instructions for your Steam cleaner in PDF format for free! Find your manual E7US14MN - ELECTROLUX and take your electronic device back in hand. On this page are published all the documents necessary for the use of your device. E7US14MN by ELECTROLUX.
USER MANUAL E7US14MN ELECTROLUX
natural_image
Line drawing of a portable vacuum cleaner with attached circuit board (no text or symbols)1. ▲BEZPEČNOSTNÍ INFORMACE
Tootekood (PNC): 900 923 464/3
Mudel: EGRFK1
1. ⚠ SAFETY INFORMATION
Before the installation and use of the appliance, carefully read the supplied instructions. The manufacturer is not responsible for any injuries or damage that are the result of incorrect installation or usage. Always keep the instructions in a safe and accessible location for future reference.
- This appliance can be used by children aged from 8 years and above and persons with reduced physical, sensory or mental capabilities or lack of experience and knowledge if they have been given supervision or instruction concerning the use of the appliance in a safe way and understand the hazards involved.
- Children should be supervised to ensure that they do not play with the appliance.
- Keep all packaging away from children and dispose of it properly.
- Keep children less than 8 years of age away from the appliance and its cord when in use and when cooling down.
- Cleaning and user maintenance shall not be made by children without supervision.
- Care should be taken when using the appliance due to the emission of high temperature steam to avoid the risk of burns.
- Do not install or use a damaged appliance or accessories. Do not change the specification of this appliance. All service or repairs must be carried out by the Authorised Service Centre.
- Turn off the appliance and disconnect it from the mains after each use, before moving or carrying out any maintenance.
- If the supply cord is damaged, it must be replaced by the manufacturer, its service agent or similarly qualified persons in order to avoid a hazard.
- Use only accessories, parts or tools recommended for this appliance.
2. SAFETY INSTRUCTIONS
- This appliance is intended to be used in household (indoors) and similar applications.
- Do not use a damaged appliance.
- The appliance shall be installed in accordance with local wiring regulations.
- Make sure that the parameters on the rating plate are compatible with the electrical ratings of the mains.
• Always use a correctly installed shockproof socket. - Do not pull the mains cable to disconnect the appliance. Always pull the mains plug.
- Do not let the appliance stay unattended while it is connected to the mains.
- Do not immerse the appliance body, cord or plug in water. Keep the mains cable away from sharp objects and heat sources.
• Always place the appliance on a flat and stable surface. - Do not hold the hose directly or twist the hose connector when using the appliance to avoid the risk of burns.
- Do not point the steam nozzle directly at people, animals, or easily damaged clothing (such as leather clothing) during the use of the appliance.
- Do not pull the steam hose to move or lift the appliance.
- Do not expose the appliance to very high or freezing temperatures.
• Always use purified water to iron clothes. - Never use the appliance with the empty water tank. Do not exceed the maximum filling volume as indicated on the water tank.
- During use, the indicator light is turned off and then turned on, which is caused by the startup of appliance overheat protection and will recover after a period of time.
- Concerning the lamp(s) inside this product and spare part lamps sold
separately: These lamps are intended to withstand extreme physical conditions in household appliances, such as temperature, vibration, humidity, or are intended to signal information about the operational status of the appliance. They are not intended to be used in other applications and are not suitable for household room illumination.
- Do not use harsh abrasive cleaners or sharp metal scrapers to clean the appliance to avoid damaging the surface or water leakage.
• Refer to corresponding chapters for details on filling, cleaning, and descaling of the appliance. - Store the appliance in a dry place to avoid possible moisture condensation inside the appliance.
- Before storing, let the appliance cool down, empty the water tank, and wind up the mains cable. Always place the steam nozzle in an upright position on the steam nozzle hook.
- Before disposal, disconnect the appliance from the mains and cut off the mains cable.
Environmental Concerns
This symbol on the product or on its packaging indicates that the product contains a rechargeable battery which shall not be disposed with normal household waste.
Recycle materials with the symbol 📊. Put the packaging in relevant containers to recycle it. Help protect the environment and human health by recycling waste of electrical and electronic appliances. Do not dispose of appliances marked with the symbol 🌘 with the household waste. Return the product to your local recycling facility or contact your municipal office.
3. PRODUCT DESCRIPTION
General description
Garment steamer uses high temperature steam for ironing. It is more effective with ironing delicate materials or heavy fabrics and removing creases.
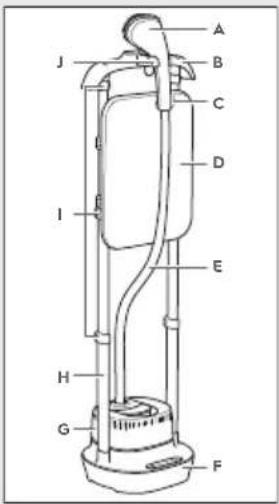
A. Steam head
B. Hanger
C. Steam head hook
D. Ironing board
E. Steam hose
F. Base unit
G. Water tank
H. Adjustable poles
I. Pole locks
J. Hanger and steam head hook
Accessories


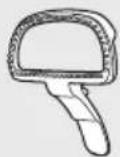
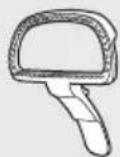
Brush
To improve ironing results. Align the back of the brush with the steam nozzle and press the bucket at the bottom of the brush.
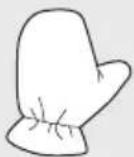
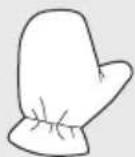
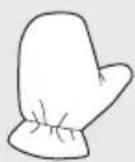
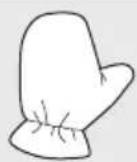
Glove
To avoid burns during iron- ing.
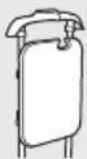
Ironing board
To place the clothes on a stable surface. It can be used vertically or horizontally.
4. BEFORE FIRST USE

Remove all the packaging, labelling and protective film.

Clean the product with hot water, mild detergent and a soft cloth.

Dry the product.
5. DAILY USE

Assembling
Step 1 Open the pole lock. Stretch the telescopic rod to fully unfold each section.
Step 2 Lock the rod lock.
Step 3 After the telescopic rod is fully extended, align the bulge of the telescopic rod with the jack groove on the base unit.
Step 4 Press down the telescopic rods until they click.
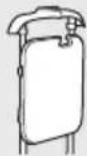
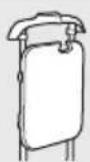
Filling the water tank
⚠️ Before filling the water tank, disconnect the power supply.
Step 1 Hold the water tank handle and lift it up.
Step 2 Unscrew the water tank cover.
Step 3 Fill the water tank.
Step 4 Screw back the water tank cover.
Step 5 Hold the water tank handle. Make sure the water tank cover points downwards. Check the water quantity and ensure that there is no water leaking from the position of the water tank cover.
Step 6 Place the water tank vertically on the base unit.
✗ Do not use water containing additives (starch, spices, aromatic substances, softeners, etc.).
① Power on
⚠️ Before using the product, always check if the appliance is not damaged.
Step 1 Plug the appliance.
Step 2 Press the power button.
Step 3 Press the adjustment button.
Step 4 After approximately 45-70 seconds, the steam nozzle will start to generate steam.
Ironing the clothes
⚠️ Never iron the clothes you are wearing.
Do not touch the high-temperature steam and the steam nozzle panel during ironing.
⚠️ Pay attention to prevent the danger of steam splashing when using the appliance.
Avoid the steam nozzle aiming at people or animal.
Step 1 Hang the clothes on the hanger.
| Step 2 Hold the steam nozzle and keep it vertical. | ||
| Step 3 Attach the steam nozzle to the clothes and iron down. | ||
| i During use, part of the steam will condense in the hose, causing a "gurgling sound", which is normal. If this happens, straighten the steam nozzle and hose upward to make the condensate flow back into the water tank. | ||
| Icon Function Application | Steam amount | |
| 10 | ON/OFF To turn on and off the appliance. | - |
| ECO To steam with more efficient use of energy. | ||
| Refresh To refresh the garments with light steam. | ||
| De-wrinkle functions: To de-wrinkle the garments with steam. | ||
| Delicate To steam thinner and delicate clothes with lower amount of steam. | ||
| Wool To steam thicker clothes made from wool with more steam. | ||
| Cotton To steam thicker clothes made from cotton with more steam. | ||
| Linen To steam thicker clothes made from linen with more steam. | ||
| Steam button To regulate the amount of steam. Press the button the add/remove steam. | - | |
6. HINTS AND TIPS

Tips to improve the effects of ironing
- Check the care label provided by the clothing manufacturer before ironing to choose correct settings.
- Fasten the button on the shirts collar to prevent the clothes from slipping off during ironing.
- When moving the steam nozzle, brush the clothes gently.
- Do not use the steamer for silk and velvet.
- The ironing effect on the reverse side of some clothes is better.
- Ironing heavy fabrics may take longer.
- When ironing the lower position of the clothes, straighten the steam nozzle and hose upward from time to time to avoid steam condensation.
- Do not use a brush for plush materials.
Use Garment refresh kit Pure - ultimate fabric finish with long-lasting freshness
PNC: 900 923 464/3
Model: EGRFK1
- Keep clothes fresh for longer.
- Wash less and save more.
- Gentle to clothes and appliance.
- Works with all Electrolux garment steamers and steam irons.
For more information check: www.electrolux.com/shop
7. CARE AND CLEANING

CAUTION: Before cleaning, wait until the product is cold.
√ DOs
- Clean the product surface with a damp cloth or non-abrasive sponge.
• Always clean and dry the product throughly. - Use only white vinegar for descaling.
X DON'Ts
- Avoid aggressive cleaning agents.
- Do not clean the product with abrasive materials.
- Do not soak the steam nozzle in water or other liquids.
- Do not inject water through steam nozzle hole or calcium removal port.
Storage
• After use, place the steam nozzle on the steam nozzle hook.
• After winding up the power cord, tie it with a tie tape.
- Let the steam nozzle cool down completely.
- Before pulling out telescopic rod from the appliance, it is necessary to fully retract each telescopic rod.
- Do not lift or carry the appliance by holding the ironing board or steam pipe.
- Do not bend the steam hose during storage.
Descaling
This appliance needs to be descaled regularly. For the descaling frequency, check the table below.
Step 1 Remove the water tank from the main unit.
Step 2 Fill the water tank.
Step 3 Shake the water tank gently and till it to drain the water.
Step 4 Pour the mix of 200 ml of water and 200 ml of white vinegar into the water tank, place it on the base unit, and gently shake the main engine to fill the boiler with water.
| Step 5 Let the appliance stand for about 8 hours. | ||||
| Step 6 Shake the main engine gently. | ||||
| Step 7 Turn the calcium removal knob clockwise. Tilt the product and drain the solution. | ||||
| Step 8 Turn the calcium removal knob clockwise. | ||||
| Step 9 Fill the water tank to its full capacity and load it into the appliance. | ||||
| Step 10 Repeat the procedure from steps 5-9. | ||||
| Step 11 Turn on the power supply and start the appliance, so that it can continuously release steam.⚠ During this process let the product stand until the water in the water tank is completely used up and no steam is sprayed from the steam nozzle. | ||||
| Step 12 Turn off the host power and unplug the power plug. | ||||
| Classification Hardness in mg / L | Hardness in mmol / L | Hardness in dGH / °dH | Descaling frequency | |
| Soft | 0 - 60 0 - 0.60 0.3 - 3.00 | More than 1 year or unnecessary | ||
| Moderately hard | 61 - 120 0.61 - 1.20 3.72 - 6.75 9 - 12 months | |||
| Hard 121 - 180 1.21 - 1.8 6.78 - 10.08 6 - 9 months | ||||
| Very hard > 181 > 1.81 > 10.14 3 - 6 months | ||||
| Descaling frequency is based on the using estimation of 2 tanks per week. | ||||
| The recommended time of self-cleaning is around 36 hours (based on water hardness more than 10 °dH).• Detergent: 200 ml of white vinegar + 200 ml water or 380 ml of water + 20 ml of citric acid. | ||||
8. TROUBLESHOOTING
| Problem | Possible cause Solution | |
| No steam is released and the power light is off. | Connection problem. | Check the power supply cable, plug, and outlet. |
| The appliance is not switched on. | Press the ON/OFF button. | |
| No steam is released but the power light is on. | The water level in the water tank is too low. | Fill water into the water tank. |
| Water leakage from the steam nozzle. | The steam nozzle cracked. | Replace with a new set of steam hose. |
| Condensation from the steam hose. | Lift the steam nozzle in up-right position. | |
| Water leaking out from the water tank. | The water tank cracked. | Replace with a new water tank. |
| The steam hose is in U-shape or bent for a long peri- od of time. | Lift the steam hose in up-right position. | |
| The water tank is deformed. | Filling up the water tank with hot water. | Replace with a new water tank. |
| Chemical residue from inad-equate cleaning process. | ||
| The steam output is too little. | The switch or the heating unit is damaged. | Contact an Authorized Serv-ice Centre. |
| There is a gurgling sound when the appliance oper-ates. | Condensation from the steam hose. | Lift the steam nozzle in up-right position. |
| The steam hose is in U-shape or bent for a long peri- od of time. | Lift the steam hose in up-right position. | |
1. ⚠TURVALLISUUSOHJEET
A. Parna glava
B. Vješalica
C. Kuka za parnu glavu
D. Daska za glačanje
E. Crijevo za paru
F. Podnožje jedinice
G. Spremnik za vodu
H. Podesivi stupovi
I. Brave za stupove
J. Vješalica i kuka za parnu glavu
Dodatna oprema
Četka
Za poboljšanje rezultata glačanja. Poravnajte stražnju stranu četke s mlaznicom za paru i pritisnite košaru na dnu četke.
Rukavica
5. SVAKODNEVNA UPORABA

Sastavljanje
- korak Otvorite blokadu stupa. Rastegnite teleskopsku šipku kako biste potpuno ras-klopili svaki dio.
- korak Zaključajte blokadu šipke.
- korak Nakon što se teleskopska šipka potpuno izvuče, poravnajte izbočinu teleskopske šipke s žljebom na podnožju jedinice.
- korak Pritisnite teleskopske šipke prema dolje dok ne kliknu.

3. PRODUKTA APRAKSTS
Vispārīgs apraksts
A. Damphode
B. Henger
C. Damphodekrok
D. Strykebrett
E. Dampslange
F. Baseenhet
G. Vanntank
H. Justerbare stenger
I. Stangläser
J. Henger og damphodekrok
Tilbehør
Børste
Nr produktu (PNC): 1600–1400–1200–1000–800–600–400–0
Model: EGRFK1
A. Duză abur
B. Umeraş
A. Parná hlavica
B. Vešiak
C. Háčik na parnu hlavicu
D. Doska na žehlenie
E. Parná hadica
F. Základňa
G. Nádržka na vodu
H. Nastavitelné tyče
I. Poistky tyčí
J. Vešiak a hák na parnú hlavicu
Príslušenstvo

Kefa
A. Glava pare
B. Obešalnik
C. Kljuka za glavo pare
D. Likalna deska
E. Cev za paro
F. Osnovna enota
G. Posoda za vodo
H. Nastavljivi drogovi
I. Ključavnice na drogu
J. Kavelj za obešalnik in glavo za paro
Pripomočki

Krtča
Za boljše rezultate likanja. Poravnajte zadnji del krtače s parnim nastavkom in pritisnite posodo na dnu krtače.
Rokavica
ELECTROLUX APPLIANCES AB
BUSINESS SECTOR EMA-EMEA (SEE)
ST GÖRANSGATAN 143
SE-105 45 STOCKHOLM
SWEDEN
TEL: +46 (8) 738 60 00
FAX: +46 (8) 738 63 35
www.electrolux.com
A. Парова голівка
В. Кронштейн
A. Dampfkopf
B. Kleiderbügel
C. Dampfkopfhaken
D. Bügelbrett
E. Dampfschlauch
F. Gerätefuss
G. Wassertank
H. Verstellbare Stangen
natural_image
Symbol of a trash bin crossed with a diagonal line, representing no waste or discharge (no text or labels)natural_image
Recycling symbol with three arrows forming a triangle (no text or labels)
- ▲BEZPEČNOSTNÍ INFORMACE
- ⚠ SAFETY INFORMATION
- SAFETY INSTRUCTIONS
- Environmental Concerns
- PRODUCT DESCRIPTION
- General description
- Accessories
- Brush
- Glove
- Ironing board
- BEFORE FIRST USE
- DAILY USE
- Filling the water tank
- ① Power on
- Ironing the clothes
- HINTS AND TIPS
- Tips to improve the effects of ironing
- CARE AND CLEANING
- √ DOs
- X DON'Ts
- Storage
- Descaling
- TROUBLESHOOTING
- ⚠TURVALLISUUSOHJEET
- Dodatna oprema
- Četka
- Rukavica
- SVAKODNEVNA UPORABA
- Sastavljanje
- PRODUKTA APRAKSTS
- Vispārīgs apraksts
- Tilbehør
- Børste
- Príslušenstvo
- Kefa
- Pripomočki
- Krtča
- Rokavica
Brand : ELECTROLUX
Model : E7US14MN
Category : Steam cleaner