
HG34 - Grinder SCHEPPACH - Free user manual and instructions
Find the device manual for free HG34 SCHEPPACH in PDF.

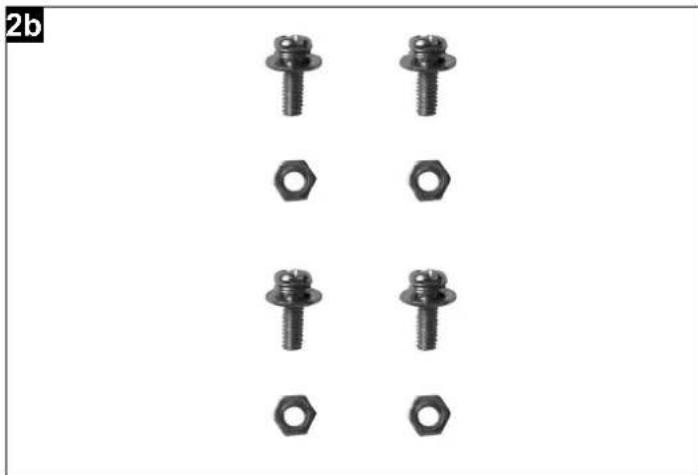
| Product type | Multifunction bench grinder with flexible shaft |
| Brand | Scheppach |
| Model | HG34 |
| Rated voltage | 220-240 V~ / 50 Hz |
| Power consumption | 120 W (S1) |
| No-load speed | 0 - 9900 min⁻¹ (adjustable) |
| Wheel diameter | 75 mm |
| Wheel thickness | 20 mm |
| Wheel bore | 10 mm |
| Max. peripheral speed | 50 m/s |
| Protection class | II (double insulation) |
| Weight | 3.1 kg |
| Sound pressure level (L_WA) | 82.8 dB(A) |
| Sound power level (L_pA) | 95.8 dB(A) |
| Vibration (a_h) | ≤ 2.5 m/s² (K=1.5 m/s²) |
| Number of wheels supplied | 2 (1 grinding + 1 polishing) |
| Included accessories | Flexible shaft, spark guard, workpiece support, 100 accessory pieces |
| Machinable materials | Metals, plastics, wood (with suitable wheels) |
| Main functions | Grinding, polishing, deburring, engraving, cutting, milling, cleaning |
| Maintenance and cleaning | Clean after use with a damp cloth and mild soap; no aggressive products |
| Safety | Safety glasses, dust mask, hearing protection required; adjustable spark guard |
| Wear parts | Wheels, carbon brushes, deburring discs, angle guides, V-belt |
| Storage temperature | 5 °C to 30 °C, frost-free |
Frequently Asked Questions - HG34 SCHEPPACH
User questions about HG34 SCHEPPACH
0 question about this device. Answer the ones you know or ask your own.
Ask a new question about this device
Download the instructions for your Grinder in PDF format for free! Find your manual HG34 - SCHEPPACH and take your electronic device back in hand. On this page are published all the documents necessary for the use of your device. HG34 by SCHEPPACH.
USER MANUAL HG34 SCHEPPACH
natural_image
Mechanical industrial machine labeled 'scheppach' with attached tubing and control panel (no readable text beyond label)HG34
| DE | DopperschleiferOriginalbetriebsanleitung | 6 |
| GB | Bench grinderTranslation of original instruction manual | 16 |
| FR | Touret multifonctionsTraduction des instructions d'origine | 26 |
| NL | Slijpmachine met twee schijvenVertaling van de oorspronkelijke gebruiksaanwijzing | 36 |
| IT | Smerigliatrice da bancoTraduzione delle istruzioni per l'uso originali | 46 |
| CZ | Dvoukotoučová bruskaPřeklad originálního návodu k obsluz | 56 |
| SK | Dvojitá brúskaPreklad originálneho návodu na obsluhu | 65 |
| NO | BenkslipemaskinOversettelse av opprinnelig bruksanvisning | 75 |
| SE | BänkslipmaskinÖversättning från originalbruksanvisningen | 84 |
| PL | Szlifierka stołowaTłumaczenie z oryginalnej instrukcji obsługi | 93 |
| EE | TopeltkäiTõlge Originaalkasutusjuhend | 103 |
| LV | Divripu slīpmašīnaTulkošana no oriģinālā lietošanas instrukcija | 113 |
| LT | Dvigubas šlifuoklisVertimas originali naudojimo instrukcija | 122 |
| SI | Dvojna brusilna napravaPrevod iz originalnih navodil za uporabo | 131 |
| HU | Kettős köszörűAz eredeti útmutató fordítása | 140 |
| FI | KaksoishiomakoneKäännös alkuperäisestä käyttöohjeesta | 150 |
1


natural_image
Six different types of bolts arranged in two rows, each with a separate hex nut (no text or symbols)2

3

natural_image
Close-up of a mechanical assembly with tool and component, no visible text or symbols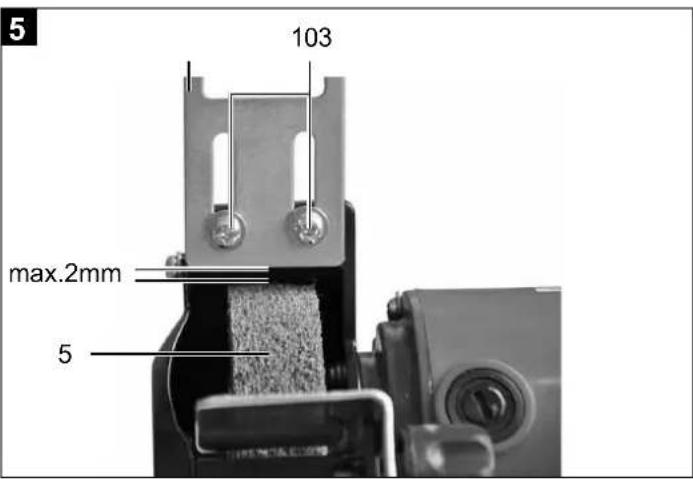

natural_image
Industrial machine with labeled parts, showing internal components and a close-up inset of two small components (no text or symbols visible)


natural_image
Six different types of metal cutting tips arranged in a row, no text or symbols visible

natural_image
Five identical metallic test tubes with circular bases, arranged in a row (no text or symbols visible)


Günzburger Straße 69
D-89335 Ichenhausen
Verehrter Kunde
Explanation of the symbols on the equipment
Symbols are used in this manual to draw your attention to potential hazards. The safety symbols and the accompanying explanations must be fully understood. The warnings themselves will not rectify a hazard and cannot replace proper accident prevention measures.
 | Caution - Read the operating instructions to reduce the risk of inquiry |
 | Wear ear-muffs. The impact of noise can cause damage to hearing. |
 | Wear a breathing mask. Dust which is injurious to health can be generated when working on wood and other materials. Never use the device to work on any materials containing asbestos! |
 | Wear safety goggles. Sparks generated during working or splinters, chips and dust emitted by the device can cause loss of sight. |
| △ Achtung! | WARNING: Disregard results in a risk of death or injury, or damage to the tool. |
Table of contents: Page:
- Introduction...... 18
- Layout and items supplied (Fig. 1).... 18
- Scope of delivery....18
- Proper use.... 18
- Safety instructions.... 19
- Technical data 21
- Before putting the machine into operation 22
- Operation....22
- Cleaning, maintenance....24
- Storage....24
- Accessories....24
- Disposal and recycling 24
1. Introduction
Manufacturer:
scheppach
Günzburger Straße 69
D-89335 Ichenhausen
Dear customer,
We hope your new tool brings you much enjoyment and success.
Note:
According to the applicable product liability laws, the manufacturer of the device does not assume liability for damages to the product or damages caused by the product that occurs due to:
- Improper handling
• Non-compliance of the operating instructions - Repairs by third parties, by not authorized service technicians
- Installation and replacement of non-original spare parts
• Application other than specified - A breakdown of the electrical system that occurs due to the non-compliance of the electric regulations and VDE regulations 0100, DIN 57113 / VDE0113
Please observe the following:
Read through the complete text in the operating instructions before installing and commissioning the device.
The operating instructions are intended to help the user to become familiar with the machine and take advantage of its application possibilities in accordance with the recommendations.
The operating instructions contain important information on how to operate the machine safely, professionally and economically, how to avoid danger, costly repairs, reduce downtimes and how to increase reliability and service life of the machine.
In addition to the safety regulations in the operating instructions, you have to meet the applicable regulations that apply for the operation of the machine in your country.
Keep the operating instructions package with the machine at all times and store it in a plastic cover to protect it from dirt and moisture. Read the instruction manual each time before operating the machine and carefully follow its information.
The machine can only be operated by persons who were instructed concerning the operation of the machine and who are informed about the associated dangers. The minimum age requirement must be complied with.
In addition to the safety instructions contained in this operating manual and the specific regulations of your country, the technical rules generally accepted for the operation of machines of the same type must be observed. We accept no liability for damage or accidents which arise due to non-observance of these instructions and the safety information.
2. Layout and items supplied (Fig. 1)
- On/Off switch
- Safety window
- Spark deflector
- Safety hood
- Grinding wheel
- Polishing wheel
- Workpiece support star screw
- Workpiece support
- Mounting holes
- Spark deflector adjusting screw
- Speed controller
- Flexible shaft
- Locking pin
- Wrench
3. Scope of delivery
- Double-wheel grinder
• Safety glass with spark deflector - Workpiece support
- Flexible shaft
• 100-piece accessories - Operating manual
4. Proper use
The double-wheel grinder is a combination tool for the grinding and polishing of metals, plastics and other materials using the appropriate grinding wheels.
The flexible shaft is designed for the grinding, deburring, polishing, engraving, cutting, milling and cleaning of wood, metal and plastic in modelmaking, in workshops and in the home. Use the tool and its accessories only for the applications described.
The machine is allowed to be used only for its intended purpose! Even when the equipment is used as prescribed it is still impossible to eliminate certain residual risk factors. The following hazards may arise in connection with the machine's construction and layout:
- Contact with the grinding wheel where it is not covered.
- Catapulting of parts from out of damaged grinding wheels.
- Catapulting of workpieces and parts of workpieces.
- Damage to hearing if essential ear-muffs are not
used.
The equipment is allowed to be used only for its prescribed purpose. Any other use is deemed to be a case of misuse. The user/operator and not the manufacturer will be liable for any damage or injuries of any kind resulting from such misuse.
Please note that our equipment has not been designed
for use in commercial, trade or industrial applications. Our warranty will be voided if the equipment is used in commercial, trade or industrial businesses or for equivalent purposes.
Residual risks
Even if you use this electric power tool in accordance with instructions, certain residual risks cannot be rules out. The following hazards may arise in connection with the equipment's construction and layout:
- Lung damage if no suitable protective dust mask is used.
- Damage to hearing if no suitable ear protection is used.
- Health damage caused by hand-arm vibrations if the equipment is used over a prolonged period or is not properly guided and maintained.
5. Safety instructions
General power tool safety warnings
⚠ WARNING: Read all safety warnings, instructions, illustrations and specifications provided with this power tool.
Failure to follow all instructions listed below may result in electric shock, fire and/or serious injury.
Save all warnings and instructions for future reference.
The term "power tool" in the warnings refers to your mains-operated (corded) power tool or battery-operated (cordless) power tool.
1. Work area safety
a) Keep work area clean and well lit. Cluttered or dark areas invite accidents.
b) Do not operate power tools in explosive atmospheres, such as in the presence of flammable liquids, gases or dust. Power tools create sparks which may ignite the dust or fumes.
c) Keep children and bystanders away while operating a power tool. Distractions can cause you to lose control.
2. Electrical safety
a) Power tool plugs must match the outlet. Never modify the plug in any way. Do not use any adapter plugs with earthed (grounded) power tools. Unmodified plugs and matching outlets will reduce risk of electric shock.
b) Avoid body contact with earthed or grounded surfaces, such as pipes, radiators, ranges and refrigerators. There is an increased risk of electric shock if your body is earthed or grounded.
c) Do not expose power tools to rain or wet conditions. Water entering a power tool will increase the risk of electric shock.
d) Do not abuse the cord. Never use the cord for carrying, pulling or unplugging the power tool. Keep cord away from heat, oil, sharp edges or moving parts. Damaged or entangled cords increase the risk of electric shock.
e) When operating a power tool outdoors, use an extension cord suitable for outdoor use. Use of a cord suitable for outdoor use reduces the risk of electric shock.
f) If operating a power tool in a damp location is unavoidable, use a residual current device (RCD) protected supply. Use of an RCD reduces the risk of electric shock.
3. Personal safety
a) Stay alert, watch what you are doing and use common sense when operating a power tool. Do not use a power tool while you are tired or under the influence of drugs, alcohol or medication. A moment of inattention while operating power tools may result in serious personal injury.
b) Use personal protective equipment. Always wear eye protection. Protective equipment such as a dust mask, non-skid safety shoes, hard hat or hearing protection used for appropriate conditions will reduce personal injuries.
c) Prevent unintentional starting. Ensure the switch is in the off-position before connecting to power source and/or battery pack, picking up or carrying the tool. Carrying power tools with your finger on the switch or energising power tools that have the switch on invites accidents.
d) Remove any adjusting key or wrench before turning the power tool on. A wrench or a key left attached to a rotating part of the power tool may result in personal injury.
e) Do not overreach. Keep proper footing and balance at all times. This enables better control of the power tool in unexpected situations.
f) Dress properly. Do not wear loose clothing or jewellery. Keep your hair and clothing away from moving parts. Loose clothes, jewellery or long hair can be caught in moving parts.
g) If devices are provided for the connection of dust extraction and collection facilities, ensure these are connected and properly used. Use of dust collection can reduce dust-related hazards.
h) Do not let familiarity gained from frequent use of tools allow you to become complacent and ignore tool safety principles. A careless action can cause severe injury within a fraction of a second.
4. Power tool use and care
a) Do not force the power tool. Use the correct power tool for your application. The correct power tool will do the job better and safer at the rate for which it was designed.
b) Do not use the power tool if the switch does not turn it on and off. Any power tool that cannot be controlled with the switch is dangerous and must be repaired.
c) Disconnect the plug from the power source and/or remove the battery pack, if detachable, from the power tool before making any adjustments, changing accessories, or storing power tools. Such preventive safety measures reduce the risk of starting the power tool accidentally.
d) Store idle power tools out of the reach of children. Do not allow persons unfamiliar with the power tool or these instructions to operate the power tool. Power tools are dangerous in the hands of untrained users.
e) Maintain power tools and accessories. Check for misalignment or binding of moving parts, breakage of parts and any other condition that may affect the power tool's operation. If damaged, have the power tool repaired before use. Many accidents are caused by poorly maintained power tools.
f) Keep cutting tools sharp and clean. Properly maintained cutting tools with sharp cutting edges are less likely to bind and are easier to control.
g) Use the power tool, accessories and tool bits etc. in accordance with these instructions, taking into account the working conditions and the work to be performed. Use of the power tool for operations different from those intended could result in a hazardous situation.
h) Keep handles and grasping surfaces dry, clean and free from oil and grease. Slippery handles and grasping surfaces do not allow for safe handling and control of the tool in unexpected situations.
5. Service
a) Have your power tool serviced by a qualified repair person using only identical replacement
parts. This will ensure that the safety of the power tool is maintained.
⚠ WARNING
Danger due to electromagnetic field
This power tool generates an electromagnetic field during operation. This field can impair active or passive medical implants under certain conditions.
- In order to prevent the risk of serious or deadly injuries, we recommend that persons with medical implants consult with their physician and the manufacturer of the medical implant prior to operating the power tool.
⚠ Safety advice relating specifically to bench grinders
- Do not touch the mains lead if it becomes damaged or cut through while you are using the device. Pull the plug out of the mains socket immediately and have the device repaired by a suitably qualified person or at your service centre.
- Do not operate the device if it is damp and do not use it in a damp environment.
- If you use the device outdoors, always connect it through a residual current device (RCD) with a maximum trip current of 30 mA. If using an extension lead, always use one that is approved for outdoor use.
- If a dangerous situation arises, pull the mains plug immediately out of the mains socket.
- Always work with the mains lead leading away from the rear of the device.
- Dang er of fire from flying sparks!
Grinding metal creates flying sparks. For this reason, always make sure that nobody is placed in any danger and that there are no inflammable materials near the working area.
⚠ Warning! Noxious fumes!
Working with harmful / noxious dusts represents a risk to the health of the person operating the device and to anyone near the work area.
- Wear protective glasses, hearing protection, dust protection mask and protective gloves.
Danger of burns!
The workpiece gets hot during grinding. Never touch the part you are grinding. Allow the workpiece to cool sufficiently first. When grinding for longer periods, stop grinding from time to time and allow the workpiece to cool before continuing. Do not operate the device for continuous periods exceeding 30 minutes.
- The double grinding machine is intended for dry grinding of the surfaces of metal objects. The device may only be used for dry grinding.
- Do not grind materials containing asbestos. Asbestos is a known carcinogen.
- Do not use damaged grinding wheels.
- Only use grinding wheels with details that corre-
spond with those given on the device rating plate. The circumferential speed should be equal to or greater than the value given on the device rating plate.
- Adjust the eye guard mounts (spark deflectors) and the eye guards periodically so that wear on the grinding wheels can be evened out. Keep the gap as small as possible.
- Avoid contact with the moving grinding wheel.
- Never leave the device working unattended.
- Never use the device for a purpose for which it was not intended.
- Before you insert the mains plug into the socket, always check that the device is switched off.
- Always switch the device on before bringing the workpiece into contact with the grinding wheel. After grinding, lift off the workpiece before switching the device off.
- Hold the workpiece firmly with both hands at all times when working.
• Always keep proper footing and balance. - After you have finished grinding metal, allow the grinding wheel(s) to come to a standstill.
- When taking a break from your work, before carrying out any tasks on the device itself and when you are not using the device, always pull the mains plug out of the mains socket.
- Handle the device carefully and treat it with respect. Always keep the device clean, dry and free of oil or grease.
- Remain alert at all times! Always watch what you are doing and proceed with caution. Do not use the device if you cannot concentrate or you are feeling unwell.
- Store grinding wheels in such a way that they are not subject to mechanical loads or damaging environmental influences.
6. Technical data
| Mains voltage | 220-240 V~ / 50 Hz |
| Power rating | 120 W S1 |
| Idle speed n_0 | 0 - 9900 min ^-1 |
| Grinding wheel diameter | 75 mm |
| Polishing wheel diameter | 75 mm |
| Wheel thickness | 20 mm |
| Wheel hole diameter | 10 mm |
| Max. peripheral speed | 50 m/s |
| Protection class | II |
| Weight | 3,1 kg |
Technical changes reserved!
*S1: Continuous operation with constant load
Sound and vibration
Sound and vibration values were measured in accordance with EN 62841.
Noise
Sound power level L_WA 82,8 dB(A)
Sound pressure level L_pA 95,8 dB(A)
Uncertainty K_wa/pA 3 dB(A)
Wear ear-muffs.
The impact of noise can cause damage to hearing.
Total vibration values (vector sum of three directions) determined in accordance with EN 62841.
Vibration emission value a_h ≤ 2.5 m/s^2
K uncertainty = 1.5 m/s ^2
Warning!
The specified vibration value was established in accordance with a standardized testing method. It may change according to how the electric equipment is used and may exceed the specified value in exceptional circumstances.
The specified vibration value can be used to compare the equipment with other electric powertools.
The specified vibration value can be used for initial assessment of a harmful effect.
Keep the noise emissions and vibrations to a minimum.
- Only use appliances which are in perfect working-order.
• Service and clean the appliance regularly. - Adapt your working style to suit the appliance.
- Do not overload the appliance.
- Have the appliance serviced whenever necessary.
- Switch the appliance off when it is not in use.
- Wear protective gloves.
Unpacking
Danger of choking or suffocating
The packaging material, packaging and transport safety devices are not children's toys. Plastic bags, foils and small parts can be swallowed and lead to choking.
- Keep packaging material, packaging and transport safety devices away from children.
- Open the packaging and carefully remove the product.
- Remove the packaging material, packaging and transport safety devices (if applicable)..
-
Check the completeness of the scope of delivery. The customer service must be notified immediately of any complaints. Later claims will not be recognised.
-
Check the scope of delivery for transport damage. The transport company must be notified immediately of any complaints. Later claims will not be recognised.
- Keep the packaging until the end of the warranty period.
- Read through the operating manual completely.
- Only use original spare parts or accessories. Original spare parts or accessories can be obtained from your dealer.
- Check that the data on the type plate matches with the mains power data.
7. Before putting the machine into operation
Before you connect the equipment to the mains supply make sure that the data on the rating plate are identical to the mains data.
Always pull the power plug before making adjustments to the equipment.
Pull the power plug before doing any maintenance or assembly work on the equipment.
- The machine must be set up so that it stands firmly, i.e. it must be securely screwed to a work bench or similar.
- All covers and safety devices have to be properly fitted before the equipment is switched on.
- The grinding and polishing wheel must rotat freely.
- Check that the voltage on the rating plate is the same as your supply voltage before you connect the equipment to the power supply.
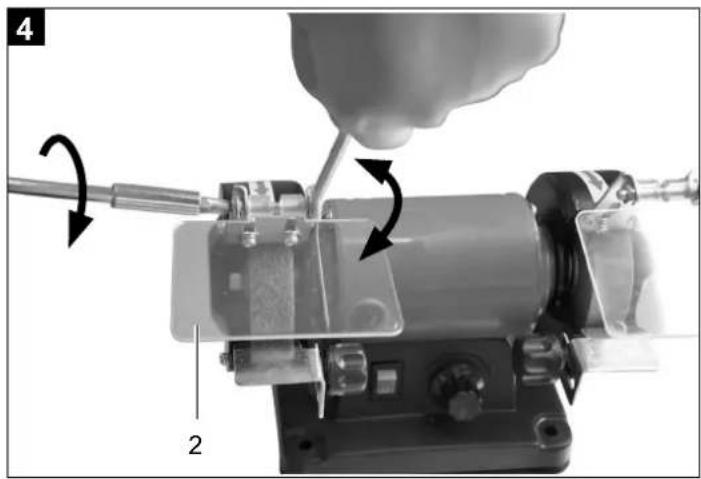
7.1 Fitting the spark reflector (Fig. 2-4 / Item 3)
Fit the spark reflector (3) to the double wheel grinder using the adjusting screw (10).
7.2 Adjusting the spark refl ector (Fig. 5 / Item 3)
- Adjust the spark deflector (3) using the adjusting screw (10) so that the distance between the dry grinding wheel (5) and the spark deflector (3) is as small as possible and certainly does not exceed 2 mm.
- Adjust the spark deflector (3) periodically to compensate for wear on the wheel.
7.3 Fitting the workpiece supports (Fig. 6 / Item 8)
Secure the workpiece supports (8) to the double wheel grinder using the star screw (7).
7.4 Adjusting the workpiece supports (Fig. 7 / Item 8)
- Adjust the workpiece supports (8) using the star screws (7) so that the distance between the dry
grinding wheel (5) and the workpiece support (8) is as small as possible and certainly does not exceed 2 mm. • Adjust the workpiece supports (8) periodically to compensate for wear on the dry grinding wheel (5).
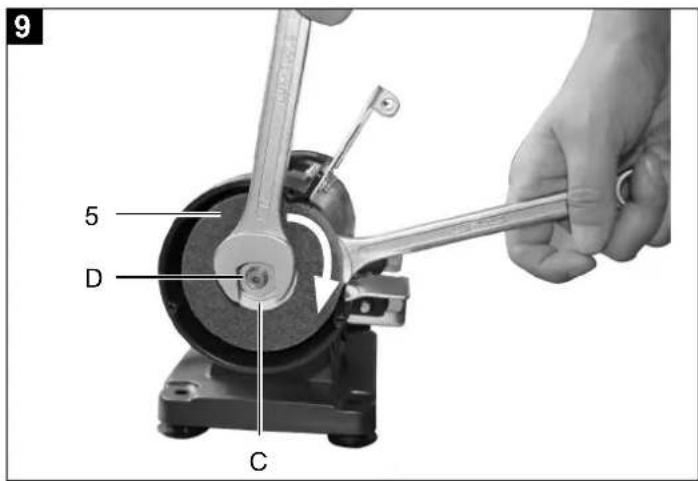
7.5. Changing the wheels (Fig. 8-9)
- Remove the 3 screws (A) holding the side section of the safety hood (B) and remove the safety hood.
Slacken the nut (D) (Important: The grinding wheel on the left is fastened with a lefthanded thread and the grinding wheel on the right with a right-handed thread) by holding the nut of the grinding wheel mount on the opposite side. - Then remove the flange (C) and replace the grinding wheel (5). To assemble, proceed in the reverse order. The grinding wheel is mounted with the help of a rag. Mount the flange (C) and the nut (D) on the shaft and hold steady with the help of a rag when you tighten the nut (D).
7.6 Installing the flexible shaft (Fig. 10)
- Insert the internal axle (a) of the flexible shaft (12) into the guide shaft of the equipment.
- Secure the fastening nut of the flexible shaft to the equipment thread by hand (left-hand thread).
Important!
When you work with the flexible shaft (12), the safety glass (2) must be placed right up against the workpiece support (8) in order to prevent uncontrolled touching of the wheels.
7.7 Inserting the various tools into the flexible shaft (Fig. 11)
- Press the supplied locking pin (13) into the hole in the flexible shaft (12) and turn the shaft until the pin latches in place.
- Now undo the collet chuck nut.
- Insert the required tool into the sleeve as far as the stop and screw the collet chuck nut tight.
8. Operation
8.1 On/Off switch (1)
• To switch on the equipment set the On/Off switch
• (1) to position I.
- Move the On/Off switch (1) to position 0 to switch
- off the equipment.
Important!
When you are not working with the fl exible shaft (12), it is not allowed to be mounted on the equipment because it could then fly around out of control.
After switching on, wait for the equipment to reach its maximum speed of rotation. Only then should you begin with the grinding.
8.2. Speed selector (Fig. 1)
The required speed can be set with the speed control (11).
8.2.1 Speed of the fl exible shaft
The correct speed depends on the tool used and the type of material being processed.
8.3. Information on speed settings
- Small cutters/grinding pins: High speed
• Large cutters/grinding pins: Low speed
8.4. Work practice
- Exert only moderate pressure on the workpiece so that it can be machined at constant speed.
- Instead of accelerating your work, high pressure will cause the drive unit to slow down and even stop, thus overloading the motor.
- For your own safety, it is essential to secure small workpieces with a screw clamp or vise.
- Precision work/engraving: hold the drive unit like a pen.
- Rough work: hold the drive unit like the handle of a hammer.
8.5 Grinding
- Place the workpiece onto the workpiece support (8) and slowly guide the workpiece towards the grinding wheel (5) at the desired angle to the point where workpiece and grinding wheel make contact.
- Move the workpiece slightly back and forth to produce an optimal grinding result. This way the grinding wheel (5) will be evenly worn. Allow the workpiece to cool down occasionally.
Important!
If the grinding wheel becomes jammed during operation, remove the workpiece and wait until the tool reaches its top speed again.
8.6 Polishing
- Apply a thin coating of polishing paste to the grinding surface of the polishing wheel (6) (Fig. 18/ Item 3).
- Press on the workpiece in the polishing direction and move back and forth from left to right in a pendulum action.
- Always carry out polishing work in the direction of rotation of the polishing wheel (6).
Important!
Polishing in the opposite direction to the direction of rotation of the polishing wheels can cause damage to the polishing wheels, which in turn can result in injuries.
Electrical connection
The electrical motor installed is connected and ready for operation. The connection complies with the applicable VDE and DIN provisions. The customer's mains connection as well as the extension cables used must also comply with these regulations.
Damaged electrical connection cable
The insulation on electrical connection cables is often damaged.
This may have the following causes:
- Pressure points, where connection cables are passed through windows or doors
- Kinks where the connection cable has been improperly fastened or routed
- Places where the connection cables have been cut due to being driven over
- Insulation damage due to being ripped out of the wall outlet
- Cracks due to the insulation ageing
Such damaged electrical connection cables must not be used and are life-threatening due to the insulation damage.
Check the electrical connection cables for damage regularly. Ensure that the connection cables are disconnected from electrical power when checking for damage.
Electrical connection cables must comply with the applicable VDE and DIN provisions. Only use connection cables of the same designation.
The printing of the type designation on the connection cable is mandatory.
Connections and repair work on the electrical equipment may only be carried out by electricians.
If the power cord of this device is damaged, it must be replaced by the manufacturer, their service department or a similarly qualified person to avoid dangers.
AC motor
- The mains voltage must be 220 - 240 V\~.
- Extension cables up to 25 m long must have a cross-section of 1.5 ~mm^2 .
- Extension cables over 25 m long must have a cross-section of 2.5 ~mm^2 .
Connections and repair work on the electrical equipment may only be carried out by electricians.
Please provide the following information in the event of any enquiries:
• Type of current for the motor
• Data of machine type plate
• Data of motor type plate
9. Cleaning, maintenance
Always pull out the mains power plug before starting any cleaning work.
9.1 Cleaning
- Keep all safety devices, air vents and the motor housing free of dirt and dust as far as possible. Wipe the equipment with a clean cloth or blow it with compressed air at low pressure.
- We recommend that you clean the device immediately each time you have finished using it.
- Clean the equipment regularly with a moist cloth and some soft soap. Do not use cleaning agents or solvents; these could attack the plastic parts of the equipment. Ensure that no water can seep into the device. The ingress of water into an electric tool increases the risk of an electric shock.
9.2 Maintenance
There are no parts inside the equipment which require additional maintenance.
Service information
Please note that the following parts of this product are subject to normal or natural wear and that the following parts are therefore also required for use as consumables.
Wear parts*: grinding medium, Carbon brushes, sharpening wheel, angle gauge, v-belt
* Not necessarily included in the scope of delivery!
10. Storage
Store the equipment and accessories out of children's reach in a dark and dry place at above freezing temperature. The ideal storage temperature is between 5 and 30 °C. Store the electric tool in its original packaging.
11. Accessories
11.1. Accessories (Fig. 12)
b Cutting-off wheel
c Grinding roller (large)
d Grinding belt (small)
e Grinding wheel
11.2. Accessories (Fig. 13)
f Molding cutter (trapeze)
g Molding cutter(ball-shaped)
h Molding cutter(cone)
i Metal grinding pin (cylindrical)
j Metal grinding pin (cone)
k Metal grinding pin (ball-shaped)
11.3. Accessories (Fig. 14)
I Grinding pin (finely granulated)
m Grinding pin (cylindrical fine)
n Grinding pin (cone fine)
o Grinding pin (cylindrical finely granulated)
p Grinding pin(very finely granulated)
11.4. Accessories (Fig. 15)
q Grinding pin (truss head, rough)
r Grinding pin(truss head small, rough)
s Grinding pin (cone rough)
t Grinding pin (Round rough)
u Grinding pin (Round small, rough)
v Grinding pin (truss head middle, rough)
11.5. Accessories (Fig. 16)
E Trapezebrush small
F Trapezebrush large
G Roundbrush
H Trapezebrush large brass
I Roundbrush brass
J Trapezebrush small brass
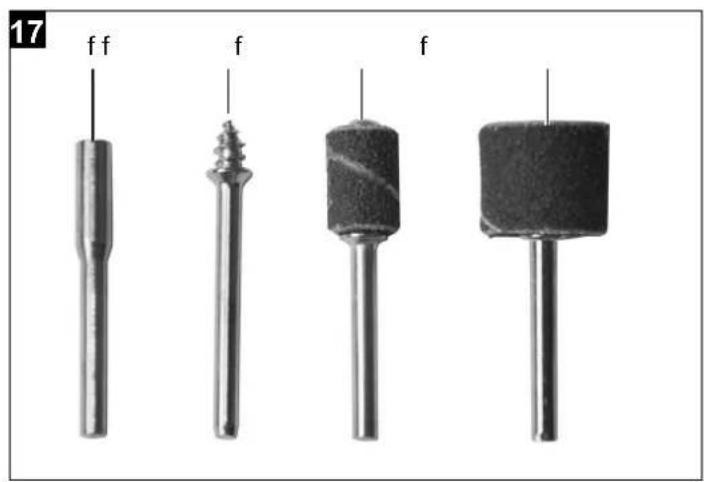
11.6. Accessories (Fig. 17)
K Grinding wheel insertion
L Screw insertion
M Grinding cylinder for grinding roller small
N Grinding cylinder for grinding roller large
11.7. Accessories (Fig. 18)
O Felt polishing cone
P Felt polishing wheel (small)
Q Felt polishing wheel (large)
R Grinding stone
S Polishing paste
11.8. Accessories (Fig. 19)
N Clamping sleeve 2.0-3.2 mm
12. Disposal and recycling
The equipment is supplied in packaging to prevent it from being damaged in transit.
This packaging is raw material and can thus be used again or can be reintegrated into the raw material cycle.
The device and its accessories are made of different materials, such as metals and plastics.
Take defective components to special waste disposal sites. Check with your specialist dealer or municipal administration!
Old devices must not be disposed of with household waste!

This symbol indicates that this product must not be disposed of together with domestic waste in compliance with the Directive (2012/19/EU) pertaining to waste electrical and onic equipment (WEEE).
This product must be disposed of at a designated collection point.
This can occur, for example, by handing it in at an authorised collecting point for the recycling of waste electrical and electronic equipment. Improper handling of waste equipment may have negative consequences for the environment and human health due to potentially hazardous substances that are often contained in electrical and electronic equipment. By properly disposing of this product, you are also contributing to the effective use of natural resources. You can obtain information on collection points for waste equipment from your municipal administration, public waste disposal authority, an authorised body for the disposal of waste electrical and electronic equipment or your waste disposal company.
Günzburger Straße 69
D-89335 Ichenhausen
Cher client
Günzburger Straße 69
D-89335 Ichenhausen
Geachte klant,
7.3 Fitting the workpiece supports (Fig. 6 / Item 8)
Secure the workpiece supports (8) to the double wheel grinder using the star screw (7).
7.4
Günzburger Straße 69
D-89335 Ichenhausen
Egregio cliente,
Günzburger Straße 69
D-89335 Ichenhausen
Vážený zákazníku,
Günzburger Straße 69
D-89335 Ichenhausen
Vážený zákazník,
Günzburger Straße 69
D-89335 Ichenhausen
Kjære kunde,
K Slipeskive-innsetting
L Skrue-innsetting
M Slipesylinder for liten sliperull
N Slipesylinder for stor sliperull
Günzburger Straße 69
D-89335 Ichenhausen
Ärade Kund,
Günzburger Straße 69
D-89335 Ichenhausen
Szanowny kliencie,
Günzburger Straße 69
D-89335 Ichenhausen
Austatud klient!
⚠️ Hoiatus! Mürgised aurud!
Günzburger Straße 69
D-89335 Ichenhausen
Godātais klient!
Günzburger Straße 69
D-89335 Ichenhausen
Gerbiamas kliente,
Günzburger Straße 69
D-89335 Ichenhausen
Spoštovani kupec,
želimo vam veliko veselja in uspeha pri delu z vašim novim strojem.
Ob vestilo:
Günzburger Straße 69
D-89335 Ichenhausen
Tisztelt vásárló!
Günzburger Straße 69
D-89335 Ichenhausen
Arvoisa asiakas,
CE - Declaration of Conformity
| 2014/29/EU | 2004/22/EC | 89/686/EC_96/58/EC | 2000/14/EC_2005/88/EC | ||||
| 2014/35/EU | 2014/68/EU | 90/396/EC | |||||
| X | 2014/30/EU | X | 2011/65/EU* | ||||
 | Annex V | ||||||
| Annex VINoise: measured L_WA = xx dB(A); guaranteed L_WA = xx dB(A)P = xx KW; L/∅ = cmNotified Body:Notified Body No.: | |||||||
| Annex IVNotified Body:Notified Body No.:Certificate No.: | 2010/26/EC | ||||||
| Emission. No: | |||||||
Standard references:
EN 62841-1:2015; EN 62841-3-4:2016/A11:2017; EN ISO 12100:2010;
EN 55014-1:2017; EN 55014-2:2015; EN 61000-3-2:2014; EN 61000-3-3:2013
This declaration of conformity is issued under the sole responsibility of the manufacturer.
Apparent defects must be notified within 8 days from the receipt of the goods. Otherwise, the buyeris rights of claim due to such defects are invalidated. We guarantee for our machines in case of proper treatment for the time of the statutory warranty period from delivery in such a way that we replace any machine part free of charge which provably becomes unusable due to faulty material or defects of fabrication within such period of time. With respect to parts not
manufactured by us we only warrant insofar as we are entitled to warranty claims against the upstream suppliers. The costs for the installation of the new parts shall be borne by the buyer. The cancellation of sale or the reduction of purchase price as well as any other claims for damages shall be excluded.
Garantie FR


- Verehrter Kunde
- Explanation of the symbols on the equipment
- Table of contents: Page:
- Introduction
- Manufacturer:
- Dear customer,
- Note:
- Please observe the following:
- Layout and items supplied (Fig. 1)
- Scope of delivery
- Proper use
- Residual risks
- Safety instructions
- Work area safety
- Electrical safety
- Personal safety
- Power tool use and care
- Service
- ⚠ WARNING
- ⚠ Safety advice relating specifically to bench grinders
- ⚠ Warning! Noxious fumes!
- Danger of burns!
- Technical data
- Sound and vibration
- Noise
- Wear ear-muffs.
- Warning!
- Keep the noise emissions and vibrations to a minimum.
- Unpacking
- Before putting the machine into operation
- Fitting the spark reflector (Fig. 2-4 / Item 3)
- Adjusting the spark refl ector (Fig. 5 / Item 3)
- Fitting the workpiece supports (Fig. 6 / Item 8)
- Adjusting the workpiece supports (Fig. 7 / Item 8)
- Changing the wheels (Fig. 8-9)
- Installing the flexible shaft (Fig. 10)
- Important!
- Inserting the various tools into the flexible shaft (Fig. 11)
- Operation
- On/Off switch (1)
- Speed selector (Fig. 1)
- Speed of the fl exible shaft
- Information on speed settings
- Work practice
- Grinding
- Polishing
- Electrical connection
- AC motor
- Cleaning, maintenance
- Cleaning
- Maintenance
- Service information
- Storage
- Accessories
- Accessories (Fig. 12)
- Accessories (Fig. 13)
- Accessories (Fig. 14)
- Accessories (Fig. 15)
- Accessories (Fig. 16)
- Accessories (Fig. 17)
- Accessories (Fig. 18)
- Accessories (Fig. 19)
- Disposal and recycling
- Old devices must not be disposed of with household waste!
- Cher client
- Geachte klant,
- 7.4
- Egregio cliente,
- Vážený zákazníku,
- Vážený zákazník,
- Kjære kunde,
- Ärade Kund,
- Szanowny kliencie,
- Austatud klient!
- ⚠️ Hoiatus! Mürgised aurud!
- Godātais klient!
- Gerbiamas kliente,
- Spoštovani kupec,
- Ob vestilo:
- Tisztelt vásárló!
- Arvoisa asiakas,
- CE - Declaration of Conformity
- Standard references:
- Garantie FR
Brand : SCHEPPACH
Model : HG34
Category : Grinder