BELLE RPC 6080 - Vibratory plate Lescha - Free user manual and instructions
Find the device manual for free BELLE RPC 6080 Lescha in PDF.
User questions about BELLE RPC 6080 Lescha
0 question about this device. Answer the ones you know or ask your own.
Ask a new question about this device
Download the instructions for your Vibratory plate in PDF format for free! Find your manual BELLE RPC 6080 - Lescha and take your electronic device back in hand. On this page are published all the documents necessary for the use of your device. BELLE RPC 6080 by Lescha.
USER MANUAL BELLE RPC 6080 Lescha
natural_image
Technical line drawing of a mechanical device with a handle and frame structure (no text or symbols)- Spare Parts Book
• Pièces Détachées - Libro Despiece
- Lista de Peças
• Onderdelen Boekje
• Reservedele Skrift
• Ersatzteilhandbuch
• Manuale dei Ricambi - Bruksanvisning
• Bruksanvisning
• Varaosaluettelo
• Lista Części Zamiennych
• Запасные Части Книга
• Varuosade Nimekiri - Rezerves Dalu Saraksts
- Atsarginiu Daliu Sarašas
• Част Списък
• Část Barevný Pruh
• Részek Oldalra Dől - Rezervni Djelovi Knjiga
174
GB Operators Manual
US Operators Manual
F Manuel De L'Opérateur
E Manual del Operador
P Manual de Operação
NL Handleiding
DK Betjeningsvejledning
D Bedienungshandbuch
① Manuale Dell'Operatore
s Bruksanvisning
NO Betjene Håndbok
SF Käyttöohje
PL Instrukcja Obstugi
RUS Руководство для оператора
EST Kasutusjuhend
LV Lietotāja rokasgrāmata
LT Naudojimo Instrukcija
BG Оператор Ръчен
cz Na'vod K Obzluze
HUN Kezelők Kézi
HR Uputstvo za rukovatelja
6
15
22
30
38
46
54
62
70
78
86
94
102
110
118
126
134
142
150
158
166

BELLE
LIGHT
CONSTRUCTION
EQUIPMENT
EC DECLARATION OF CONFORMITY / DECLARATION CE DE CONFORMITE / DECLARACIÓN DE CONFORMIDAD CE / DECLARAÇÃO CE DE CONFORMIDADE / EG-VERKLARING VAN OVEREENSTEMMING / EF OVERENSSTEMMELSESERKLÆRING

We, Belle Group Sheen UK, Sheen, Nr. Buxton, Derbyshire, SK17 0EU, GB, hereby certify that if the product described within this certificate is bought from an authorised Altrad Belle dealer within the EEC, it conforms to the following EEC directives: 2006/42/CE (This directive replaces directive 98/37/EC), Electromagnetic Compatibility Directive 2014/30/UE (as amended by 89/336/EEC, 92/31/EEC, 93/68 EEC & 2004/108/CE). The Waste Electrical and Electronic Equipment (WEEE) 2012/19/UE (as amended by 2002/96/CE), the low voltage directive 2014/35/UE (as amended by 2006/95/CE), BS EN ISO 12100-1:2003 Safety of machinery and associated harmonised standards, where applicable. Noise emissions conform to directives 2000/14/EC Annex VI & 2005/88/EC, for machines under article 12 the notified body is AVT Reliability, Unit 2 Easter Court, Europa Boulevard, Warrington, Cheshire, WA5 7ZB, GB. Noise Technical files are held by Ray Neilson at the Belle group Head Office address which is stated above.

PRODUCT TYPE ...... TYPE DE PRODUIT...... TIPO DE PRODUCTO......
MODEL...... MODELE...... MODELO......
SERIAL No..... N° DE SERIE..... N° DE SERIE.....
natural_image
Empty rectangular frame with dashed border (no text or symbols)Signed by:
Signature:
Medido por:
Assinado por:
Getekend door:
Uunderskrevetaf:

text_image
O.NahRay Neilson
Managing Director - On behalf of BELLE GROUP (SHEEN) UK.
Date of Declaration - 2007....
natural_image
Empty white square with dashed border (no text or symbols)Unterzeichnet vo:
Firmato da:
Undertecknat:
Signatur:
Allekirjoitus:
Podpisat:

text_image
O.Nathi Ray NeilsonPRODUKTA TIPS ......
МОДЕЛЬ......
MUDEL ....
MODELIS......
СЕРИЙНЫЙ НОМЕР ......
SERIANUMBER......
SĒRIJAS NR. ....
ДАТА ВЫПУСКА ......
VALMISTAMISE KUUPÄEV.
IZGATAVOŠANAS DATUMS
УРОВЕНЬ ШУМА ЗАМЕР
HELITUGEVUSE TASE
IZMĚRĪTAIS SKANAS
ПРОИЗВЕДЕН /
MÕÕDETUD /
JAUDAS LÍMENIS /
......(ГАРАНТИРОВАН)
.(GARANTEERITUD)
(GARANTÉTAIS)
ЧАСТОТА......
KAAL......
MASA......
GAMINIO TIPAS ......
ВИД НА ПРОДУКТА......
natural_image
Empty rectangular frame with dashed border (no text or symbols)Podepsal:
Semnat de:
Aláírás:
Potpisao:
Imzalayan:
Podpísal:

text_image
O.NahRay Neilson
Director General - in numele BELLE GROUP (SHEEN), UK
This manual has been written to help you operate and service the 'RPC' safely. This manual is intended for dealers and operators of the 'RPC'.
Foreword
The ‘Machine Description’ section helps you to familiarise yourself with the machine's layout and controls.
The ‘Environment’ section gives instructions on how to handle the recycling of discarded apparatus in an environmentally friendly way.
The ‘General Safety’ and ‘Health and Safety’ sections explain how to use the machine to ensure your safety and the safety of the general public.
The ‘Start and Stop Procedure’ helps you with starting and stopping the machine.
The ‘Trouble Shooting Guide’ helps you if you have a problem with your machine.
The 'Service & Maintenance' section is to help you with the general maintenance and servicing of your machine.
The ‘Warranty’ Section details the nature of the warranty cover and the claims procedure.
The ‘Declaration of conformity’ section shows the standards that the machine has been built to.
Directives with regard to the notations.
Text in this manual to which special attention must be paid are shown in the following way:

CAUTION
The product can be at risk. The machine or yourself can be damaged or injured if procedures are not carried out in the correct way.

WARNING
The life of the operator can be at risk.

WARNING
WARNING
Before you operate or carry out any maintenance on this machine YOU MUST READ and STUDY this manual.
KNOW how to safely use the unit's controls and what you must do for safe maintenance. (NB Be sure that you know how to switch the machine off before you switch on, in case you get into difficulty.)
ALWAYS wear or use the proper safety items required for your personal protection. If you have ANY QUESTIONS about the safe use or maintenance of this unit, ASK YOUR SUPERVISOR OR CONTACT: Altrad Belle (UK): +44 (0) 1298 84606

Contents
How To Use This Manual 6
Warning 6
Machine Description....7
Technical Data....7
Reasons For Compaction....7
General Safety 8
Health and Safety 8
Pre-Start Checks....9
Start and Stop Procedure....9 - 10
Operating Instructions....10
Environment 11
Trouble Shooting Guide....11
Service & Maintenance 12 - 13
Warranty 13
Declaration of conformity....2
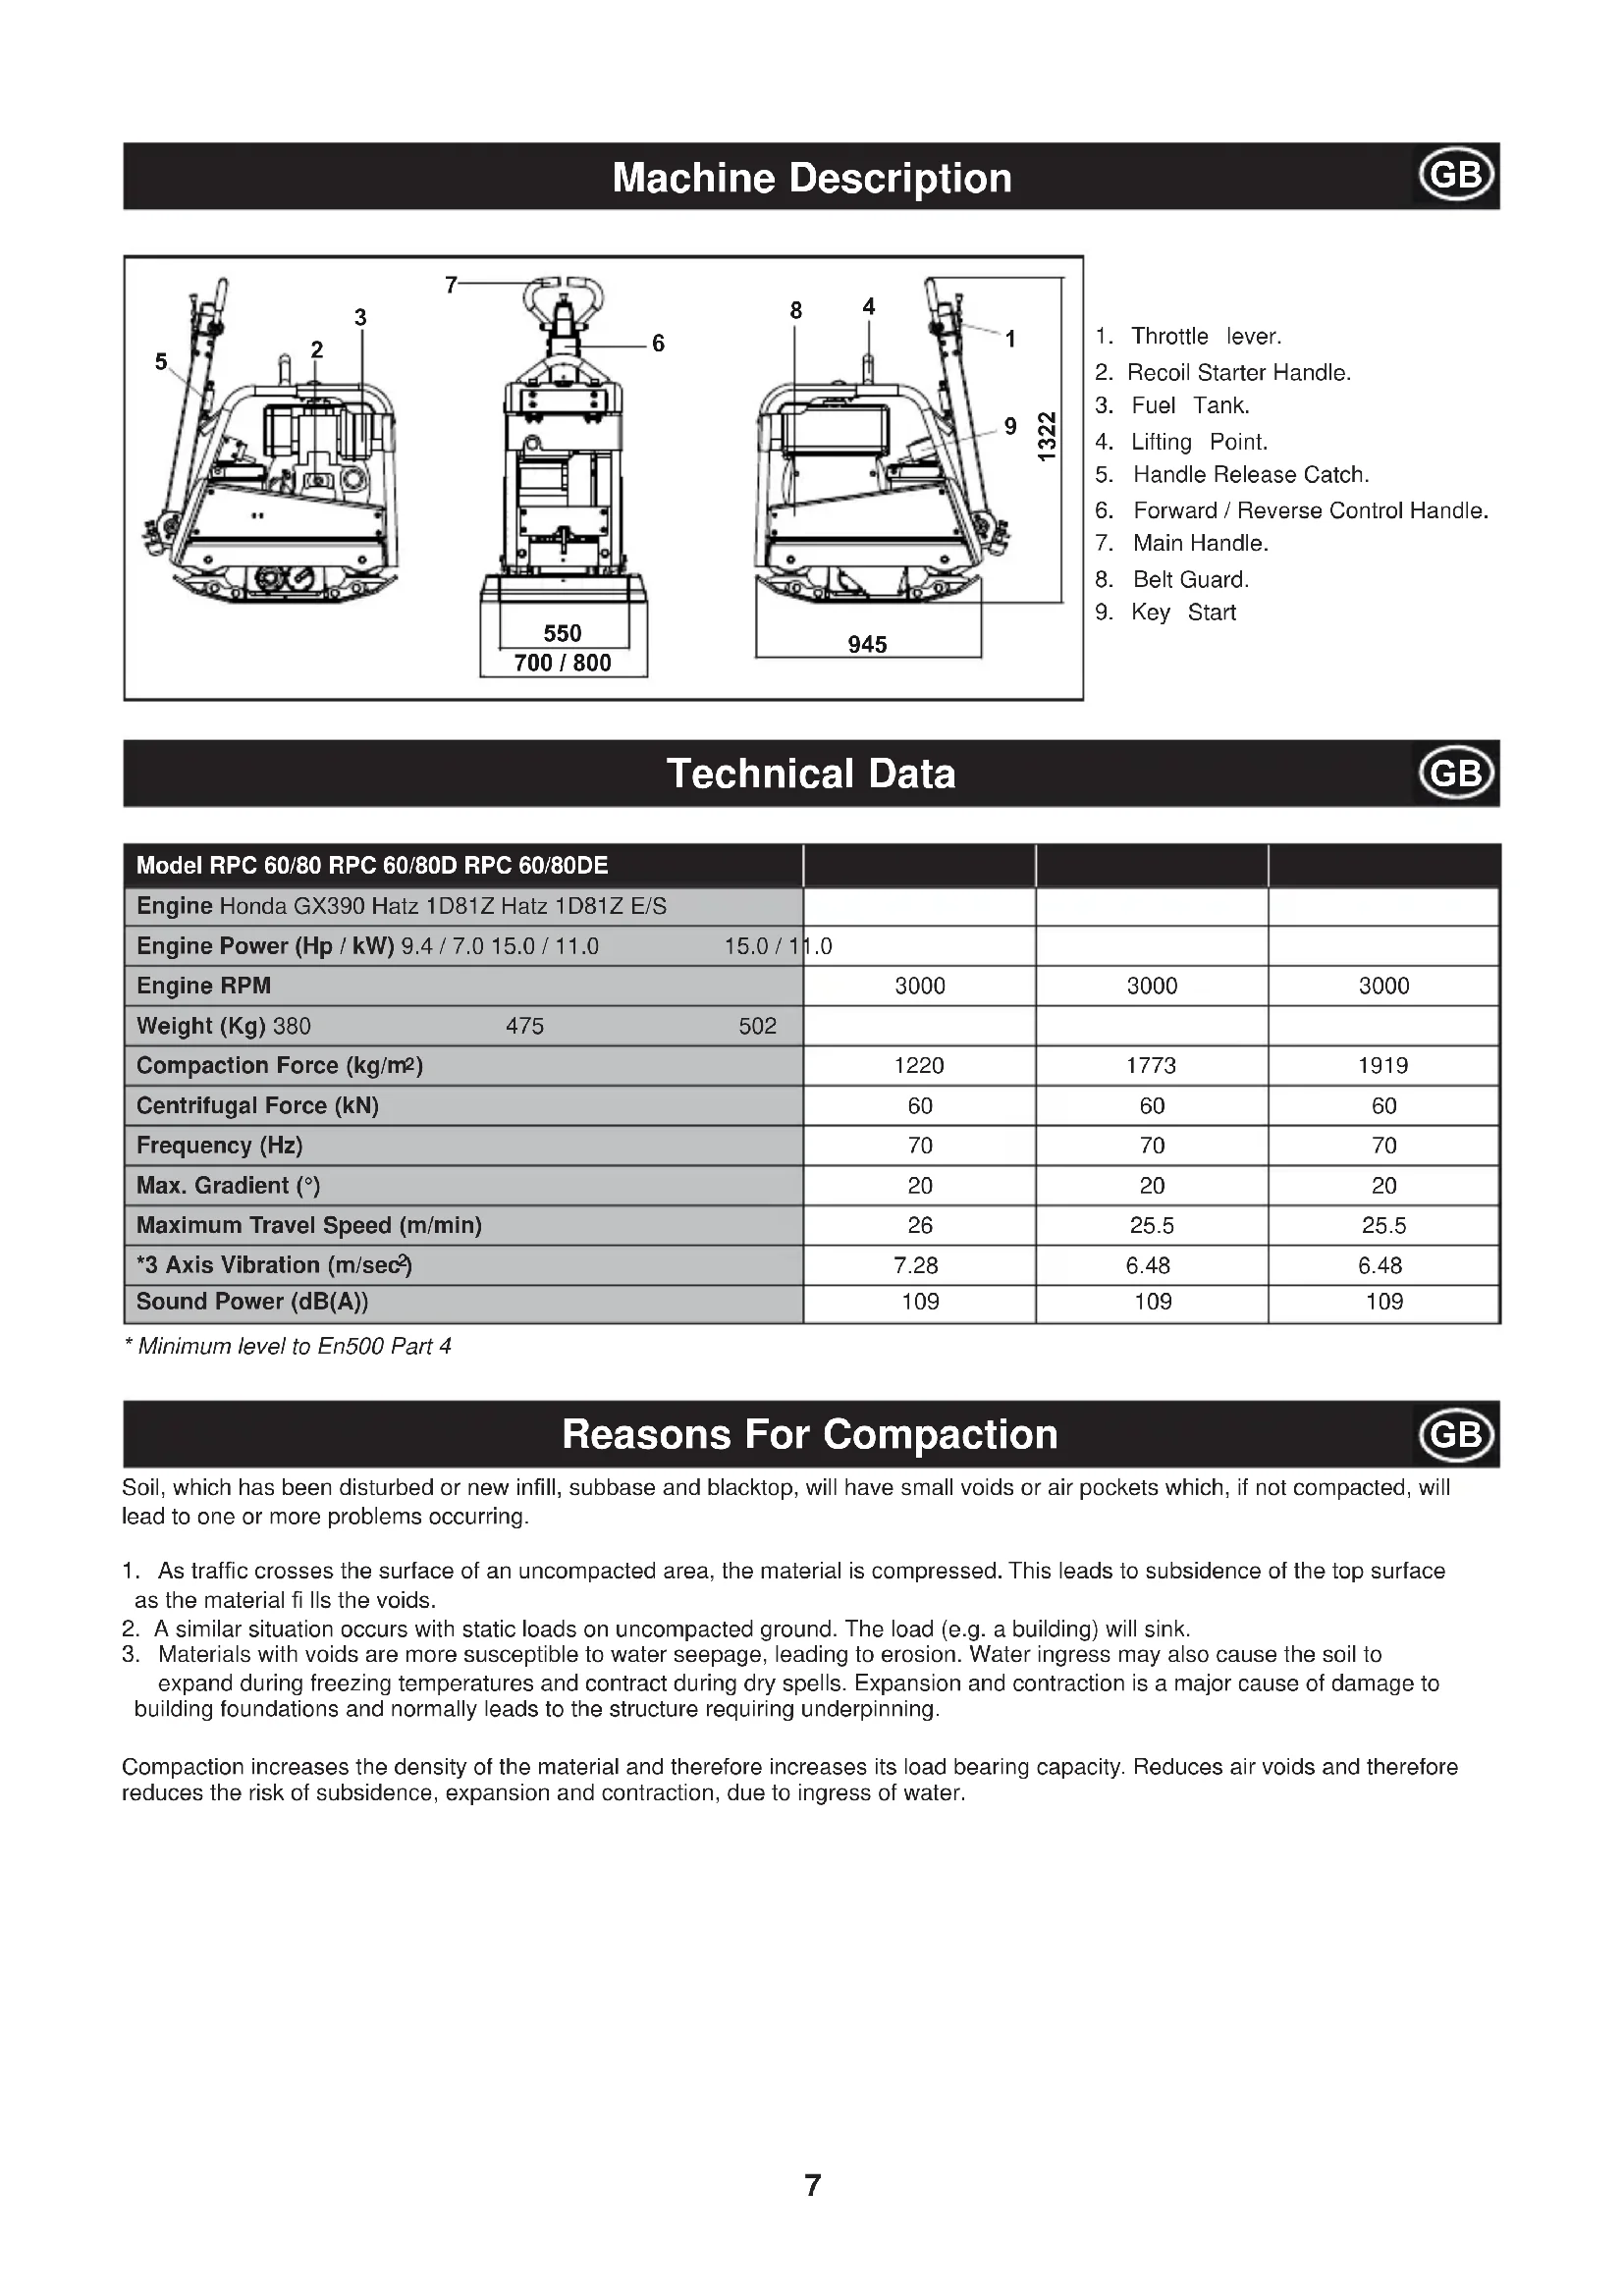
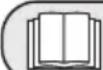
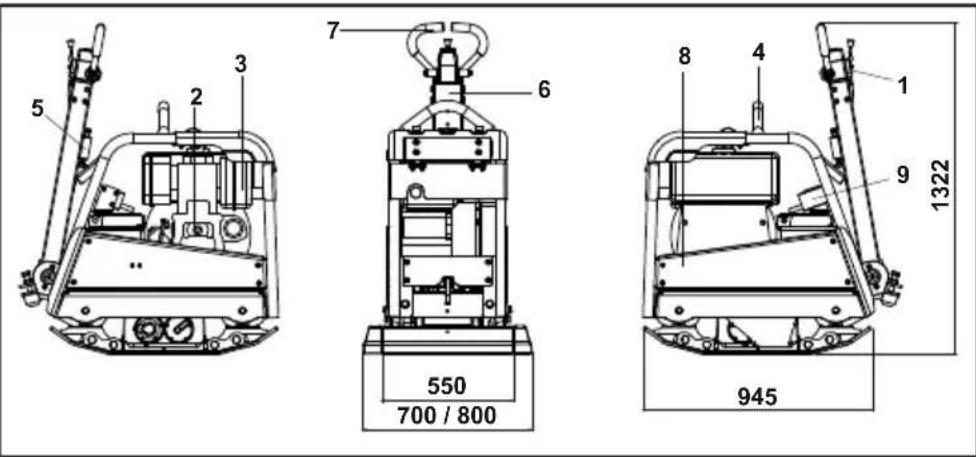
Machine Description
text_image
5 2 3 7 6 8 4 1 9 1322 550 700 / 800 945- Throttle lever.
- Recoil Starter Handle.
- Fuel Tank.
- Lifting Point.
- Handle Release Catch.
- Forward / Reverse Control Handle.
- Main Handle.
- Belt Guard.
- Key Start
Technical Data

| Model RPC 60/80 RPC 60/80D RPC 60/80DE | |||
| Engine Honda GX390 Hatz 1D81Z Hatz 1D81Z E/S | |||
| Engine Power (Hp / kW) 9.4 / 7.0 15.0 / 11.0 15.0 / 11.0 | |||
| Engine RPM | 3000 | 3000 | 3000 |
| Weight (Kg) 380 475 502 | |||
| Compaction Force (kg/m2) | 1220 | 1773 | 1919 |
| Centrifugal Force (kN) | 60 | 60 | 60 |
| Frequency (Hz) | 70 | 70 | 70 |
| Max. Gradient (°) | 20 | 20 | 20 |
| Maximum Travel Speed (m/min) | 26 | 25.5 | 25.5 |
| *3 Axis Vibration (m/sec ^2 ) | 7.28 | 6.48 | 6.48 |
| Sound Power (dB(A)) | 109 | 109 | 109 |
* Minimum level to En500 Part 4
Reasons For Compaction

Soil, which has been disturbed or new infill, subbase and blacktop, will have small voids or air pockets which, if not compacted, will lead to one or more problems occurring.
- As traffic crosses the surface of an uncompacted area, the material is compressed. This leads to subsidence of the top surface as the material fills the voids.
- A similar situation occurs with static loads on uncompacted ground. The load (e.g. a building) will sink.
- Materials with voids are more susceptible to water seepage, leading to erosion. Water ingress may also cause the soil to expand during freezing temperatures and contract during dry spells. Expansion and contraction is a major cause of damage to building foundations and normally leads to the structure requiring underpinning.
Compaction increases the density of the material and therefore increases its load bearing capacity. Reduces air voids and therefore reduces the risk of subsidence, expansion and contraction, due to ingress of water.
For your own personal protection and for the safety of those around you, please read and ensure you fully understand the following safety information. It is the responsibility of the operator to ensure that he/she fully understands how to operate this equipment safely. If you are unsure about the safe and correct use of the 'RPC', consult your supervisor or Altrad Belle.

CAUTION
Improper maintenance can be hazardous. Read and Understand this section before you perform any maintenance, service or repairs.
- This equipment is heavy and must not be lifted single-handedly, either GET HELP or use suitable lifting equipment.
- Cordon off the work area and keep members of the public and unauthorised personnel at a safe distance.
• Personal Protective Equipment (PPE) must be worn by the operator whenever this equipment is being used (see Health & Safety).
• Make sure you know how to safely switch this machine OFF before you switch it ON in case you get into difficulty.
• Always switch OFF the engine before transporting, moving it around the site or servicing it. - During use the engine becomes very hot, allow the engine to cool before touching it. Never leave the engine running and unattended.
- Never remove or tamper with any guards fitted, they are there for your protection. Always check guards for condition and security, if any are damaged or missing, DO NOT USE THE COMPACTOR until the guard has been replaced or repaired.
- Do not operate the Compactor when you are ill, feeling tired, or when under the influence of alcohol or drugs.

CAUTION
Fuel is flammable. It may cause injury and property damage. Shut down the engine, extinguish all open flames and do not smoke while filling the fuel tank. Always wipe up any spilled fuel.
Fuel Safety.
- Before refuelling, switch off the engine and allow it to cool.
- When refuelling, DO NOT smoke or allow naked flames in the area.
- Spilt fuel must be made safe immediately, using sand. If fuel is spilt on your clothes, change them.
- Store fuel in an approved, purpose made container away from heat and ignition sources.

Health & Safety
Vibration
Some vibration from the compaction operation is transmitted through the handle to the operator's hands. The Altrad Belle RPC range has been specifically designed to reduce hand/arm vibration levels. Refer to specifications & technical data for vibration levels and usage times (recommended maximum daily exposure time). DO NOT exceed the maximum usage times.
PPE (Personal Protective Equipment)
Suitable PPE must be worn when using this equipment i.e. Safety Goggles, Gloves, Ear Defenders, Dust Mask and Steel Toe capped footwear. Wear clothing suitable for the work you are doing. Tie back long hair and remove any jewellery which may catch in the equipment's moving parts. Always protect skin from contact with concrete.
Dust
The compacting process will occasionally produce dust, which may be hazardous to your health. Always wear a mask that is suited to the type of dust being produced.
Fuel
Do not ingest fuel or inhale fuel vapours and avoid contact with your skin. Wash fuel splashes immediately. If you get fuel in your eyes, irrigate with copious amounts of water and seek medical attention as soon as possible.
Exhaust Fumes
Do not operate the compactor indoors or in a confined space, make sure the work area is adequately ventilated.

WARNING
The exhaust fumes produced by this equipment are highly toxic and can kill!
Pre start-up inspection
The following Pre-start-up inspection must be performed before the start of each work session or after every four hours of use, whichever is first. Please refer to the service section for detailed guidance. If any fault is discovered, the compactor must not be used until the fault is rectified.
- Thoroughly inspect the compactor for signs of damage. Check components are present and secure. Pay special attention to the belt guard.
- Check the engine oil and hydraulic oil level and top up as necessary.
- Check the engine fuel level and top up as necessary.
- Check for fuel, oil and hydraulic leaks.
Start And Stop Procedure


WARNING
Before you operate or carry out any maintenance on this machine YOU MUST READ and STUDY this manual.
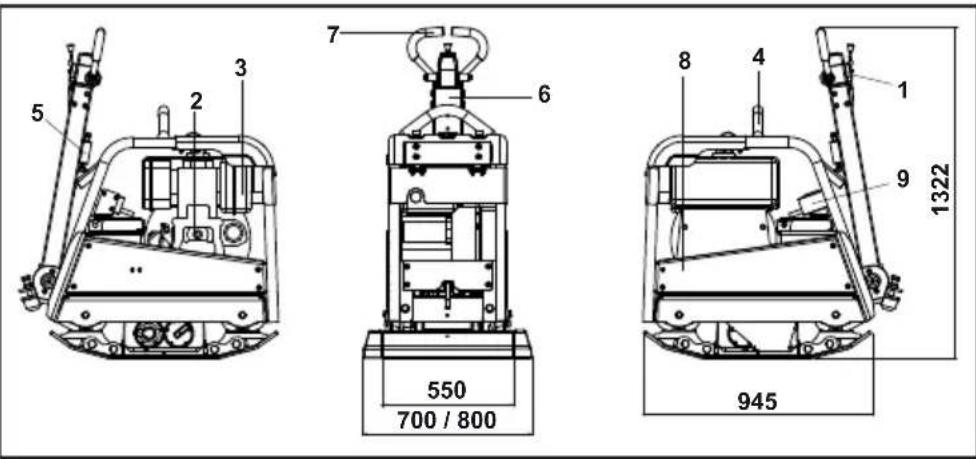
Honda GX390 Petrol Engine
- Open the fuel tap by moving the fuel ON / OFF lever fully to the right.
- If starting the engine from cold, set the choke ON by moving the choke lever fully to the left. If restarting a warm engine, the choke is usually not required, however, if the engine has cooled to a degree, partial choke may be required.
- Turn the engine ON / OFF switch clockwise to the 'I' position.
- Set the throttle to the idle position by moving the throttle lever fully to the right. Do not start the engine on full throttle, as the compactor will vibrate as soon as the engine starts.
-
Taking a firm hold of the control handle with one hand, grasp the recoil starter handle with the other. Pull the recoil starter until engine resistance is felt, then let starter return.
-
Taking care not to pull the starter's rope fully out, pull the starter handle briskly.
-
Repeat until the engine fi res.
-
Once the engine fires gradually set the choke lever to the OFF position by moving it to the right.
-
If the engine fails to fire after several attempts, follow the troubleshooting guide.
-
To stop the engine, set the throttle to idle and turn the engine ON / OFF switch anticlockwise to the '0' position.
-
Turn the fuel off.
text_image
Throttle Lever Choke Lever Fuel ON/OFF Lever.Hatz Diesel Engine (Crank Handle)
- If possible, disengage the engine from any driven equipment. The auxiliary equipment should always be placed in neutral.
- Set speed control lever to a position between START and max. START, according to requirements, Selecting a lower engine will reduce speed when starting.
- Make sure that the stop lever, if fitted, is in the operating position.
- Turn decompression lever until stop is reached. In this position automatic decompression is heard to engage and the engine can then be started.
- After the automatic decompression device has engaged at its stop limit, 5 turns of the handle are needed for the engine to build up compression and fire again.
- Take hold of the starting handle with both hands and turn it at increasing speed. The maximum speed of rotation must have been reached by the time the decompression lever has returned to the '0' position. As soon as the engine has started, pull the starting handle out of the guide sleeve.
- If the engine backfires because the handle was not turned firmly enough, release the crank handle immediately and stop the engine.
- To restart the engine, wait until it has come to a standstill, then repeat the starting preparations.
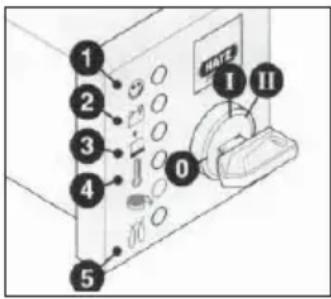
Hatz Diesel Engine (Electric Start)
- With the decompression lever in position '0', insert the key and turn to position 'I'
(Battery charge and oil pressure warning lights but light up) - Turn start key to position 'II'
- As soon as the engine runs, release the start key. It must return to position 'I' by itself and remain in this position during operation. The battery charge and oil pressure warning lights must go out immediately after starting. Indicator light '1' is on when the engine is in operation.
- If anything seems to be incorrect, stop the engine immediately and rectify the fault. (See the Troubleshooting Guide)
- The engine temperature display '4' (additional equipment) lights up if the temperature at the cylinder head is too high. Switch off the engine and trace the cause of the problem.
text_image
1 2 3 4 5 0 I II
CAUTION
Never operate the electric starter when the engine is running or coasting to a standstill. There is a risk of broken starter pinion or ring gear teeth.
Never stop the engine by moving the decopression lever. During breaks in work or at the end of the working period, keep the starting handle and starting key in a safe place, out of reach of unauthorised persons
- Always turn the start key back to position '0' before re-starting the engine. The repeat lock prevents the starter motor from engaging and possibly being damaged whilst the engine is still running.
- Move speed control lever to '1' back to the STOP position.
- On engines with the lower engine speeds not accessible, move speed control lever '1' back, then move stop lever '2' in the STOP direction. Hold it there until the engine has stopped.
- Release the stop lever '2' when the engine has stopped, making sure that the lever returns to its normal position. (The charge and oil pressure lights will come on)
- Turn the key to the 0 position and pull it out. The lights must then go out.

Operating Instructions
• Take the compactor to where it is required.
Where it is necessary to use lifting equipment to position the compactor, make sure the lifting equipment has a WLL (Working Load Limit) suitable for the compactors weight (see Technical Data section or the machine serial plate). Attach suitable chains or slings ONLY to the lifting point on the top of the compactor.
- Having carried out the checks listed in the 'Pre start' section, you may start the engine.
The Altrad Belle 'RPC' range of compactors are fitted with a centrifugal clutch, this allows the engine to run at idle without driving the gearbox.
As the engine speed is increased the clutch will engage and will drive the gearbox. For correct operation, the engine speed should be set to maximum.
- Set the throttle to maximum and use the control handle for direction and to steer or turn the compactor.
The control handle has been designed so that when it is being used in reverse and the operator lets go for any reason, the handle automatically moves into forward mode. This is a significant safety feature of the machine.
During normal operation you should not have to push the compactor but allow it to travel at its own pace.
The speed of travel will be determined by the condition of the surface being compacted.
Caution must be used when operating the compactor in reverse. Ensure that there are no obstructions or trip hazards when operating in reverse.
If the surface to be compacted is on a slope, great care must be taken when controlling the compactor's direction of travel. If necessary, use a suitable rope attached to the compactor at a low point on the chassis, to allow a helper to take part of the compactor's weight. Work up and down a slope not across.
• Work the compactor over the surface in an organised pattern until the required compaction has been achieved.
Where there are a number of different layers to be compacted on top of each other, compact each layer individually.
• To stop the compactor vibrating, set the throttle to idle. To stop the engine refer to the relevant start / stop procedure.
Environment
Safe Disposal.

Instructions for the protection of the environment. The machine contains valuable materials. Take the discarded apparatus and accessories to the relevant recycling facilities.
| Component | Material |
| Handle | Steel |
| Front cover | HDPE |
| Main frame | Steel |
| Baseplate | Steel |
| Hand Grips | Polyurethane Foam |
| Engine | Aluminium |
| Flexible Mounts | Steel and Rubber |
| Various Parts | Steel and Aluminium |
Trouble Shooting Guide

| Problem Cause Remedy | ||
| Engine will not start. | No fuel. | Open fuel tap. |
| Fill fuel tank. | ||
| Engine switched off. Switch engine on. | ||
| Spark plug fouled. Clean and reset plug gap. | ||
| Engine cold. Close choke. | ||
| Engine flooded. | Honda, open choke, fully open throttle, pull recoil starter until engine fires. | |
| Hatz, move speed control to stop, pull recoil starter 5 times then repeat start procedure. | ||
| Engine still will not start. | Major Fault. Contact Agent or Altrad Belle. | |
| Unit will not move. | Engine speed too slow. Set engine speed control to fast. | |
| Drive belt tension loose. Adjust belt tension | ||
| Air filter blocked. | Clean or renew air filter. | |
| Worn or Damaged Clutch. Repair or Replace as necessary. | ||
| Drive failure. Contact Agent or Altrad Belle. | ||
| Gearbox failure. | Contact Agent or Altrad Belle. | |
| Forward speed too slow. | Too much oil in hydraulic head. | Reduce oil level. |
| Wrong adjustment of control system | Contact Agent or Altrad Belle. | |
| Reverse speed too slow. | Not enough oil in hydraulic head. | Fill and bleed system. |
| Air in control system. | Bleed control system. | |
| Wrong adjustment of control system | Contact Agent or Altrad Belle. | |
| Loss of Hydraulic Oil. | Connectors leaking. | Reseal connectors. |
| Defective hydraulic hose. | Replace hose. | |
| Piston seal in gearbox defective. | Contact Agent or Altrad Belle. | |
| Machine operates erratically. | Shock mounts damaged. | Replace all four mounts. |
The Altrad Belle 'RPC' range of Reversible Plate Compactors are designed to give many years of trouble free operation. It is, however, important that the simple regular maintenance listed in this section is carried out. It is recommended that an approved Altrad Belle dealer carries out all major maintenance and repairs. Always use genuine Altrad Belle replacement parts, the use of spurious parts may void your warranty.
Before any maintenance is carried out on the machine, switch off the engine. If working on a diesel engine, make sure that the stop switch is in the stop position.
Always set the compactor on level ground to ensure any fluid levels will be correctly read. Only use recommended oils (see chart on following page).
Running In Period
When the compactor is first used from new, the engine oil must be changed after the initial running in period (see engine manufacturer's manual for full detail). The belt tension should be checked after 4 hours use.
Drive Belt
Remove the belt guard then check the belt tension by placing light finger pressure on the top of the belt, as near central between the engine drive and gearbox pulley. The belt should deflect by approx. 10 to 15mm. If the belt tension requires adjustment, loosen the setscrew on the Belt Tensioning device and slide to the right. Once set, retighten the setscrew and check belt tension a second time. Finally, replace the belt guard ensuring it is correctly and securely fitted.
| Routine Maintenance | Every 8 Hours | First Month / 50 Hours | 150 Hours | 250 Hours | 500 Hours | |
| Engine Oil | Check Level | √ | ||||
| Change | √ | √ | ||||
| Air Filter | Check Condition / Clean | √ | ||||
| Replace when necessary / Every 12 months | ||||||
| Drive Belt Tension | √ | √ | ||||
Oil / Fuel Type & Quantity - Spark Plug Type
| Oil Type | Quantity (Litre) | Fuel Type | Capacity (Litre) | Spark Plug Type | Electrode Gap (mm) | |
| Petrol Honda GX390 S.A.E. 10 | W 30 1.1 Unleaded | 6.4 | BM6ES or BPR6ES | 0.6 - 0.7 | ||
| Diesel Hatz 1D81Z | S.A.E. 10W 30 | 1.8 | Diesel (BS2869) | 10 N/A | N/A |
Oil Type & Quantity
| Component Oil Type | Honda GX390 (Litres) | Hatz 1D81Z (Litres) | |
| Gearbox | S.A.E. 75W 90 | 1.2 | 1.2 |
| Hydraulic Control | Shell Tellus 32 | 0.2 | 0.2 |
| Fuchs Renolin MR520 | 0.2 | 0.2 |

CAUTION
WHILST RUNNING THIS MACHINE DURING THIS PROCEDURE, IT IS ADVISABLE TO PUT THE MACHINE ONTO A RUBBER MAT OR EQUIVALENT TO ABSORB SOME OF THE VIBRATION.
Bleeding the Hydraulic System
- Ensure the machine is in a stationary position, and situated on level ground.
- Remove the filler cap, and fill the control pump head with oil. Stop once you have reached the maximum level indicator, which is within the head.
- Slowly pump the control handle from the 'Forward Motion' position, to the 'Reverse Motion' position, until the oil level drops.
- Re-fill the control pump head up to the maximum level. Continue to pump the handle until resistance is felt, and the handle locks in the 'Reverse Motion' position.
- Again, re-fill the control pump head up to the maximum level.
- Re-fi t the Filler Bung, and test the machine.
Assembly of the Control Pump
- Carefully clean the housing with compressed air on the inside. Check for scratches on sliding bores for O Rings and there are no sharp edges.
- Press the Bushing in to Housing.
- Lubricate the Lip Seal with Hydraulic Oil and slip it on the Rack (open side away from the rack).
- Lubricate the Rack with Hydraulic Oil and slide it into the Housing until the Lip Seal is in the groove, making sure the teeth are in the right position. When the Lip Seal is in the Groove this represents forward motion.

CAUTION
In reverse motion the Control Handles run parallel with the Housing in the direction of the operator.
- After lubricating the Pinion (without O Rings), insert it into the Housing and Rack. Check the movement of the Rack from Forward to Reverse. (See CAUTION).
6 Take the Pinion out and fit the two O Rings, making sure they are not damaged. - Lubricate the Pinion and O Rings with hydraulic oil and carefully insert in to the Housing. Make sure the Rack is in the right position and this is easiest when in reverse motion.
- Fit the Shim and Retaining Ring. It may be necessary to push the Pinion from the opposite side to get them assembled.
- Place the Housing on the filler side and fit the O Rings to the bottom face. LOCTITE seal 518 is recommended.
- Assemble the Hydraulic Connector and Dowty Washer using LOCTITE 243.
- Assemble the Bracket and fix with 4 screws and washers using LOCTITE 243.
- Loosely fit the Plug Screw and Washer DO NOT TIGHTEN.
Warranty

Your new Altrad Belle 'RPC' plate compactor is warranted to the original purchaser for a period of one-year (12 months) from the original date of purchase.
The Altrad Belle warranty is against defects in design, materials and workmanship.
The following are not covered under the Altrad Belle warranty:
- Damage caused by abuse, misuse, dropping or other similar damage caused by or as a result of failure to follow assembly, operation or user maintenance instructions.
- Alterations, additions or repairs carried out by persons other than Altrad Belle or their recognised agents.
- Transportation or shipment costs to and from Altrad Belle or their recognised agents, for repair or assessment against a warranty claim, on any machine.
- Materials and/or labour costs to renew, repair or replace components due to fair wear and tear.
The following components are not covered by warranty.
- Drivebelt/s
- Engine Air Filter
- Engine Spark Plug
Altrad Belle and/or their recognised agents, directors, employees or insurers will not be held liable for consequential or other damages, losses or expenses in connection with or by reason of or the inability to use the machine for any purpose.
Warranty Claims
All warranty claims should firstly be directed to Altrad Belle, either by telephone, by Fax, by Email, or in writing.
For warranty claims:
Tel : +44 (0)1298 84606, Fax : +44 (0)1298 84073, Email : Warranty@belle-group.co.uk
or Write to:
Altrad Belle Warranty Department,
Sheen, No Buxton
Derbyshire
SK17 0EU
England
Warranty Registration:
In the bid for ALTRAD Belle to become greener and more eco friendly, we have now introduced online Warranty registration. To access the registration page of our website, please use the following address:
http://www.bellegroup.com/index.php?p=warranty\_registration
Alternatively, please scan the adjacent QR Code (Quick Response Code) using your smartphone to access the registration page.

This manual has been written to help you operate and service the 'RPC' safely. This manual is intended for dealers and operators of the 'RPC'.
Foreword
The 'Machine Description' section helps you to familiarise yourself with the machine's layout and controls.
The 'Environment' section gives instructions on how to handle the recycling of discarded apparatus in an environmentally friendly way.
The ‘General Safety’ and ‘Health and Safety’ sections explain how to use the machine to ensure your safety and the safety of the general public.
The 'Start and Stop Procedure' helps you with starting and stopping the machine.
The 'Trouble Shooting' guide helps you if you have a problem with your machine.
The 'Service & Maintenance' section is to help you with the general maintenance and servicing of your machine.
The 'Warranty' Section details the nature of the warranty cover and the claims procedure.
The ‘Declaration of conformity’ section shows the standards that the machine has been built to.
Directives with regard to the notations.
Text in this manual to which special attention must be paid are shown in the following way:

CAUTION
The product can be at risk. The machine or yourself can be damaged or injured if procedures are not carried out in the correct way.

WARNING
The life of the operator can be at risk.

WARNING

WARNING
Before you operate or carry out any maintenance on this machine YOU MUST READ and STUDY this manual.
KNOW how to safely use the unit's controls and what you must do for safe maintenance. (NB Be sure that you know how to switch the machine off before you switch on, in case you get into difficulty.)
ALWAYS wear or use the proper safety items required for your personal protection. If you have ANY QUESTIONS about the safe use or maintenance of this unit, ASK YOUR SUPERVISOR OR CONTACT: Altrad Belle (UK): +44 (0) 1298 84606

Contents
How To Use This Manual....14
Warning 14
Machine Description....15
Technical Data....15
Reasons For Compaction....15
General Safety 16
Health and Safety....16
Pre-Start Checks....17
Start and Stop Procedure....17 - 18
Operating Instructions....18
Environment 19
Trouble Shooting Guide 19
Service & Maintenance 20 - 21
Warranty 21
Declaration of conformity....2
text_image
5 2 3 7 6 8 4 1 9 1322 550 700 / 800 945- Throttle lever.
- Recoil Starter Handle.
- Fuel Tank.
- Lifting Point.
- Handle Release Catch.
- Forward / Reverse Control Handle.
- Main Handle.
- Belt Guard.
- Key Start
Technical Data

| Model RPC 60/80 RPC 60/80D RPC 60/80DE | |||
| Engine Honda GX390 Hatz 1D81Z Hatz 1D81Z E/S | |||
| Engine Power (Hp / kW) 9.4 / 7.0 15.0 / 11.0 15.0 / 11.0 | |||
| Engine RPM | 3000 | 3000 | 3000 |
| Weight (lbs) | 837.8 | 1047.2 | 1106.7 |
| Compaction Force (PSI) | 1.74 | 2.52 | 2.73 |
| Centrifugal Force (lbf) | 13488.5 | 13488.5 | 13488.5 |
| Frequency (Hz) | 70 | 70 | 70 |
| Max. Gradient (°) | 20 | 20 | 20 |
| Maximum Travel Speed (ft/min) | 85.3 | 83.6 | 83.6 |
| *3 Axis Vibration (m/sec ^2 ) | 7.28 | 6.48 | 6.48 |
| Sound Power (dB(A)) | 109 | 109 | 109 |
* Minimum level to En500 Part 4
Reasons For Compaction

Soil, which has been disturbed or new infill, subbase and blacktop, will have small voids or air pockets which, if not compacted, will lead to one or more problems occurring.
- As traffic crosses the surface of an uncompacted area, the material is compressed. This leads to subsidence of the top surface as the material fills the voids.
- A similar situation occurs with static loads on uncompacted ground. The load (e.g. a building) will sink.
- Materials with voids are more susceptible to water seepage, leading to erosion. Water ingress may also cause the soil to expand during freezing temperatures and contract during dry spells. Expansion and contraction is a major cause of damage to building foundations and normally leads to the structure requiring underpinning.
Compaction increases the density of the material and therefore increases its load bearing capacity. Reduces air voids and therefore reduces the risk of subsidence, expansion and contraction, due to ingress of water.
Safety Instructions
For your own personal protection and for the safety of those around you, please read and ensure you fully understand the following safety information. It is the responsibility of the operator to ensure that he/she fully understands how to operate this equipment safely. If you are unsure about the safe and correct use of the 'RPC', consult your supervisor or Altrad Belle.

CAUTION
Improper maintenance can be hazardous. Read and Understand this section before you perform any maintenance, service or repairs.
- This equipment is heavy and must not be lifted single-handedly, either GET HELP or use suitable lifting equipment.
• Cordon off the work area and keep members of the public and unauthorised personnel at a safe distance.
• Personal Protective Equipment (PPE) must be worn by the operator whenever this equipment is being used (see Health & Safety).
• Make sure you know how to safely switch this machine OFF before you switch it ON in case you get into difficulty.
• Always switch OFF the engine before transporting, moving it around the site or servicing it. - During use the engine becomes very hot, allow the engine to cool before touching it. Never leave the engine running and unattended.
- Never remove or tamper with any guards fitted, they are there for your protection. Always check guards for condition and security, if any are damaged or missing, DO NOT USE THE COMPACTOR until the guard has been replaced or repaired.
- Do not operate the Compactor when you are ill, feeling tired, or when under the influence of alcohol or drugs.

CAUTION
Fuel is flammable. It may cause injury and property damage. Shut down the engine, extinguish all open flames and do not smoke while filling the fuel tank. Always wipe up any spilled fuel.
Fuel Safety.
- Before refuelling, switch off the engine and allow it to cool.
- When refuelling, DO NOT smoke or allow naked flames in the area.
- Spilt fuel must be made safe immediately, using sand. If fuel is spilt on your clothes, change them.
- Store fuel in an approved, purpose made container away from heat and ignition sources.

Health & Safety
Vibration
Some vibration from the compaction operation is transmitted through the handle to the operator's hands. The Altrad Belle RPC range has been specifically designed to reduce hand/arm vibration levels. Refer to specifications & technical data for vibration levels and usage times (recommended maximum daily exposure time). DO NOT exceed the maximum usage times.
PPE (Personal Protective Equipment)
Suitable PPE must be worn when using this equipment i.e. Safety Goggles, Gloves, Ear Defenders, Dust Mask and Steel Toe capped footwear. Wear clothing suitable for the work you are doing. Tie back long hair and remove any jewellery which may catch in the equipment's moving parts. Always protect skin from contact with concrete.
Dust
The compacting process will occasionally produce dust, which may be hazardous to your health. Always wear a mask that is suited to the type of dust being produced.
Fuel
Do not ingest fuel or inhale fuel vapours and avoid contact with your skin. Wash fuel splashes immediately. If you get fuel in your eyes, irrigate with copious amounts of water and seek medical attention as soon as possible.
Exhaust Fumes
Do not operate the compactor indoors or in a confined space, make sure the work area is adequately ventilated.

WARNING
The exhaust fumes produced by this equipment are highly toxic and can kill!
Pre start-up inspection
The following Pre-start-up inspection must be performed before the start of each work session or after every four hours of use, whichever is first. Please refer to the service section for detailed guidance. If any fault is discovered, the compactor must not be used until the fault is rectified.
- Thoroughly inspect the compactor for signs of damage. Check components are present and secure. Pay special attention to the belt guard.
- Check the engine oil and hydraulic oil level and top up as necessary.
- Check the engine fuel level and top up as necessary.
- Check for fuel, oil and hydraulic leaks.
Start And Stop Procedure


WARNING
Before you operate or carry out any maintenance on this machine YOU MUST READ and STUDY this manual.
Honda GX390 Petrol Engine
- Open the fuel tap by moving the fuel ON / OFF lever fully to the right.
- If starting the engine from cold, set the choke ON by moving the choke lever fully to the left. If restarting a warm engine, the choke is usually not required, however, if the engine has cooled to a degree, partial choke may be required.
- Turn the engine ON / OFF switch clockwise to the 'I' position.
- Set the throttle to the idle position by moving the throttle lever fully to the right. Do not start the engine on full throttle, as the compactor will vibrate as soon as the engine starts.
-
Taking a firm hold of the control handle with one hand, grasp the recoil starter handle with the other. Pull the recoil starter until engine resistance is felt, then let starter return.
-
Taking care not to pull the starter's rope fully out, pull the starter handle briskly.
-
Repeat until the engine fi res.
-
Once the engine fires gradually set the choke lever to the OFF position by moving it to the right.
-
If the engine fails to fire after several attempts, follow the troubleshooting guide.
-
To stop the engine, set the throttle to idle and turn the engine ON / OFF switch anticlockwise to the '0' position.
-
Turn the fuel off.

text_image
Throttle Lever Choke Lever Fuel ON/OFF Lever.Hatz Diesel Engine (Crank Handle)
- If possible, disengage the engine from any driven equipment. The auxiliary equipment should always be placed in neutral.
- Set speed control lever to a position between START and max. START, according to requirements, Selecting a lower engine will reduce speed when starting.
- Make sure that the stop lever, if fitted, is in the operating position.
- Turn decompression lever until stop is reached. In this position automatic decompression is heard to engage and the engine can then be started.
- After the automatic decompression device has engaged at its stop limit, 5 turns of the handle are needed for the engine to build up compression and fire again.
- Take hold of the starting handle with both hands and turn it at increasing speed. The maximum speed of rotation must have been reached by the time the decompression lever has returned to the '0' position. As soon as the engine has started, pull the starting handle out of the guide sleeve.
- If the engine backfires because the handle was not turned firmly enough, release the crank handle immediately and stop the engine.
- To restart the engine, wait until it has come to a standstill, then repeat the starting preparations.
Hatz Diesel Engine (Electric Start)
- With the decompression lever in position '0', insert the key and turn to position 'I'
(Battery charge and oil pressure warning lights but light up) - Turn start key to position 'II'
- As soon as the engine runs, release the start key. It must return to position 'I' by itself and remain in this position during operation. The battery charge and oil pressure warning lights must go out immediately after starting. Indicator light '1' is on when the engine is in operation.
- If anything seems to be incorrect, stop the engine immediately and rectify the fault. (See the Troubleshooting Guide)
- The engine temperature display '4' (additional equipment) lights up if the temperature at the cylinder head is too high. Switch off the engine and trace the cause of the problem.

text_image
1 2 3 4 5 0 I II
CAUTION
Never operate the electric starter when the engine is running or coasting to a standstill. There is a risk of broken starter pinion or ring gear teeth.
Never stop the engine by moving the decopression lever. During breaks in work or at the end of the working period, keep the starting handle and starting key in a safe place, out of reach of unauthorised persons
- Always turn the start key back to position '0' before re-starting the engine. The repeat lock prevents the starter motor from engaging and possibly being damaged whilst the engine is still running.
- Move speed control lever to '1' back to the STOP position.
- On engines with the lower engine speeds not accessible, move speed control lever '1' back, then move stop lever '2' in the STOP direction. Hold it there until the engine has stopped.
- Release the stop lever '2' when the engine has stopped, making sure that the lever returns to its normal position. (The charge and oil pressure lights will come on)
- Turn the key to the 0 position and pull it out. The lights must then go out.

Operating Instructions
• Take the compactor to where it is required.
Where it is necessary to use lifting equipment to position the compactor, make sure the lifting equipment has a WLL (Working Load Limit) suitable for the compactors weight (see Technical Data section or the machine serial plate). Attach suitable chains or slings ONLY to the lifting point on the top of the compactor.
- Having carried out the checks listed in the 'Pre start' section, you may start the engine.
The Altrad Belle 'RPC' range of compactors are fitted with a centrifugal clutch, this allows the engine to run at idle without driving the gearbox.
As the engine speed is increased the clutch will engage and will drive the gearbox. For correct operation, the engine speed should be set to maximum.
- Set the throttle to maximum and use the control handle for direction and to steer or turn the compactor.
The control handle has been designed so that when it is being used in reverse and the operator lets go for any reason, the handle automatically moves into forward mode. This is a significant safety feature of the machine.
During normal operation you should not have to push the compactor but allow it to travel at its own pace.
The speed of travel will be determined by the condition of the surface being compacted.
Caution must be used when operating the compactor in reverse. Ensure that there are no obstructions or trip hazards when operating in reverse.
If the surface to be compacted is on a slope, great care must be taken when controlling the compactor's direction of travel. If necessary, use a suitable rope attached to the compactor at a low point on the chassis, to allow a helper to take part of the compactor's weight. Work up and down a slope not across.
• Work the compactor over the surface in an organised pattern until the required compaction has been achieved.
Where there are a number of different layers to be compacted on top of each other, compact each layer individually.
• To stop the compactor vibrating, set the throttle to idle. To stop the engine refer to the relevant start / stop procedure.
Environment
Safe Disposal.

Instructions for the protection of the environment. The machine contains valuable materials. Take the discarded apparatus and accessories to the relevant recycling facilities.
| Component | Material |
| Handle | Steel |
| Front cover | HDPE |
| Main frame | Steel |
| Baseplate Steel | |
| Hand Grips | Polyurethane Foam |
| Engine | Aluminium |
| Flexible Mounts | Steel and Rubber |
| Various Parts | Steel and Aluminium |
Trouble Shooting Guide

| Problem Cause Remedy | ||
| Engine will not start. | No fuel. | Open fuel tap. |
| Fill fuel tank. | ||
| Engine switched off. Switch engine on. | ||
| Spark plug fouled. Clean and reset plug gap. | ||
| Engine cold. Close choke. | ||
| Engine fl ooded. | Honda, open choke, fully open throttle, pull recoil starter until engine fi res. | |
| Hatz, move speed control to stop, pull recoil starter 5 times then repeat start procedure. | ||
| Engine still will not start. | Major Fault. Contact Agent or Altrad Belle. | |
| Unit will not move. | Engine speed too slow. Set engine speed control to fast. | |
| Drive belt tension loose. Adjust belt tension | ||
| Air filter blocked. | Clean or renew air filter. | |
| Worn or Damaged Clutch. Repair or Replace as necessary. | ||
| Drive failure. Contact Agent or Altrad Belle. | ||
| Gearbox failure. Contact Agent or Altrad Belle. | ||
| Forward speed too slow. | Too much oil in hydraulic head. | Reduce oil level. |
| Wrong adjustment of control system | Contact Agent or Altrad Belle. | |
| Reverse speed too slow. | Not enough oil in hydraulic head. | Fill and bleed system. |
| Air in control system. | Bleed control system. | |
| Wrong adjustment of control system | Contact Agent or Altrad Belle. | |
| Loss of Hydraulic Oil. | Connectors leaking. | Reseal connectors. |
| Defective hydraulic hose. | Replace hose. | |
| Piston seal in gearbox defective. | Contact Agent or Altrad Belle. | |
| Machine operates erratically. | Shock mounts damaged. | Replace all four mounts. |
Service & Maintenance
The Altrad Belle 'RPC' range of Reversible Plate Compactors are designed to give many years of trouble free operation. It is, however, important that the simple regular maintenance listed in this section is carried out. It is recommended that an approved Altrad Belle dealer carries out all major maintenance and repairs. Always use genuine Altrad Belle replacement parts, the use of spurious parts may void your warranty.
Before any maintenance is carried out on the machine, switch off the engine. If working on a diesel engine, make sure that the stop switch is in the stop position.
Always set the compactor on level ground to ensure any fluid levels will be correctly read. Only use recommended oils (see chart on following page).
Running In Period
When the compactor is first used from new, the engine oil must be changed after the initial running in period (see engine manufacturer's manual for full detail). The belt tension should be checked after 4 hours use.
Drive Belt
Remove the belt guard then check the belt tension by placing light finger pressure on the top of the belt, as near central between the engine drive and gearbox pulley. The belt should deflect by approx. 10 to 15mm. If the belt tension requires adjustment, loosen the setscrew on the Belt Tensioning device and slide to the right. Once set, retighten the setscrew and check belt tension a second time. Finally, replace the belt guard ensuring it is correctly and securely fitted.
| Routine Maintenance | Every 8 Hours | First Month / 50 Hours | 150 Hours | 250 Hours | 500 Hours | |
| Engine Oil | Check Level | √ | ||||
| Change | √ | √ | ||||
| Air Filter | Check Condition / Clean | √ | ||||
| Replace when necessary / Every 12 months | ||||||
| Drive Belt Tension | √ | √ | ||||
Oil / Fuel Type & Quantity - Spark Plug Type
| Oil Type | Quantity (Gals) | Fuel Type | Capacity (Gals) | Spark Plug Type | Electrode Gap (mm) | |
| Petrol Honda GX390 S.A.E. 10 | W 30 0.13 Unleaded 0.69 | BM6ES or BPR6ES | 0.6 - 0.7 | |||
| Diesel Hatz 1D81Z | S.A.E. 10W 30 0.48 | Diesel (BS2869) | 2.64 N/A | N/A |
Oil Type & Quantity
| Component Oil Type | Honda GX390 (Gals) | Hatz 1D81Z (Gals) | |
| Gearbox S.A.E. 75W 90 0.3 0.3 | |||
| Hydraulic Control | Shell Tellus 32 | 0.05 | 0.05 |
| Fuchs Renolin MR520 | 0.05 | 0.05 |

CAUTION
WHILST RUNNING THIS MACHINE DURING THIS PROCEDURE, IT IS ADVISABLE TO PUT THE MACHINE ONTO A RUBBER MAT OR EQUIVALENT TO ABSORB SOME OF THE VIBRATION.
Bleeding the Hydraulic System
- Ensure the machine is in a stationary position, and situated on level ground.
- Remove the filler cap, and fill the control pump head with oil. Stop once you have reached the maximum level indicator, which is within the head.
- Slowly pump the control handle from the 'Forward Motion' position, to the 'Reverse Motion' position, until the oil level drops.
- Re-fill the control pump head upto the maximum level. Continue to pump the handle until resistance is felt, and the handle locks in the 'Reverse Motion' position.
- Again, re-fill the control pump head up to the maximum level.
- Re-fi t the Filler Bung, and test the machine.
Assembly of the Control Pump
- Carefully clean the housing with compressed air on the inside. Check for scratches on sliding bores for O Rings and there are no sharp edges.
- Press the Bushing in to Housing.
- Lubricate the Lip Seal with Hydraulic Oil and slip it on the Rack (open side away from the rack).
- Lubricate the Rack with Hydraulic Oil and slide it into the Housing until the Lip Seal is in the groove, making sure the teeth are in the right position. When the Lip Seal is in the Groove this represents forward motion.

CAUTION
In reverse motion the Control Handles run parallel with the Housing in the direction of the operator.
- After lubricating the Pinion (without O Rings), insert it into the Housing and Rack. Check the movement of the Rack from Forward to Reverse. (See CAUTION).
6 Take the Pinion out and fit the two O Rings, making sure they are not damaged. - Lubricate the Pinion and O Rings with hydraulic oil and carefully insert in to the Housing. Make sure the Rack is in the right position and this is easiest when in reverse motion.
- Fit the Shim and Retaining Ring. It may be necessary to push the Pinion from the opposite side to get them assembled.
- Place the Housing on the filler side and fit the O Rings to the bottom face. LOCTITE seal 518 is recommended.
- Assemble the Hydraulic Connector and Dowty Washer using LOCTITE 243.
- Assemble the Bracket and fix with 4 screws and washers using LOCTITE 243.
- Loosely fit the Plug Screw and Washer DO NOT TIGHTEN.
Warranty

Your new Altrad Belle 'RPC' plate compactor is warranted to the original purchaser for a period of one-year (12 months) from the original date of purchase.
The Altrad Belle warranty is against defects in design, materials and workmanship.
The following are not covered under the Altrad Belle warranty:
- Damage caused by abuse, misuse, dropping or other similar damage caused by or as a result of failure to follow assembly, operation or user maintenance instructions.
- Alterations, additions or repairs carried out by persons other than Altrad Belle or their recognised agents.
- Transportation or shipment costs to and from Altrad Belle or their recognised agents, for repair or assessment against a warranty claim, on any machine.
- Materials and/or labour costs to renew, repair or replace components due to fair wear and tear.
The following components are not covered by warranty.
- Drivebelt/s
- Engine Air Filter
- Engine Spark Plug
Altrad Belle and/or their recognised agents, directors, employees or insurers will not be held liable for consequential or other damages, losses or expenses in connection with or by reason of or the inability to use the machine for any purpose.
Warranty Claims
All warranty claims should firstly be directed to Altrad Belle, either by telephone, by Fax, by Email, or in writing.
For warranty claims:
Tel:-(+) 1 866 540 5090 Fax:-(+) 1 866 540 5091 Email:- sales@bellegroup.net
or Write to:
Altrad Belle Inc
PO Box 13225
Roanoke
VA 24032
USA
Warranty Registration:
In the bid for ALTRAD Belle to become greener and more eco friendly, we have now introduced online Warranty registration. To access the registration page of our website, please use the following address:-
http://www.bellegroup.com/index.php?p=warranty\_registration
Alternatively, please scan the adjacent QR Code (Quick Response Code) using your smartphone to access the registration page.

text_image
1 2 3 4 5 0 I II
ATTENTION
Altrad Belle Warranty Department, Sheen, Nr. Buxton,
Derbyshire, SK17 0EU, England
text_image
1 2 3 4 5 0 I II RATE
PRECAUCIÓN
Altrad Belle Warranty Department, Sheen, Nr. Buxton
Derbyshire SK17 0EU Inglaterra
Registro de Garantia :
http://www.bellegroup.com/index.php?p=warranty\_registration
text_image
1 2 3 4 5 0 I II
CUIDADO
http://www.bellegroup.com/index.php?p=warranty\_registration
text_image
QR code image containing encoded data, no visible human-readable texttext_image
1 2 3 4 5 0 I II
VOORZICHTIG
Altrad Belle Warranty Department,
Sheen, Nr. Buxton
Derbyshire
SK17 0EU
England
text_image
QR code image containing encoded data, no visible human-readable texttext_image
1 2 3 4 5 0 I II
FORSIGTIG
ALTRAD Belle Warranty Department,
Sheen, No Buxton
Derbyshire
SK17 0EU
England
Garantiregistrering:
text_image
QR code image containing encoded data, no visible human-readable texttext_image
1 2 3 4 5 0 I II
WARNEN
Altrad Belle Warranty Department,
Sheen, Nr. BuxtonDerbyshire SK17 0EU England
text_image
QR code image containing encoded data, no visible human-readable textI
text_image
1 2 3 4 5 0 I II
ATTENZIONE
ALTRAD Belle Warranty Department,
Sheen, No Buxton
Derbyshire
SK17 0EU
England
text_image
QR code image containing encoded data, no visible human-readable texttext_image
Diagram of a refrigerator interior with numbered labels pointing to various compartments and parts.
SE UPP
Altrad Belle Warranty Department,
Sheen, No Buxton
Derbyshire
SK17 0EU
England
Garantiregistrering:
text_image
QR code image containing encoded data, no visible human-readable texttext_image
1 2 3 4 5 0 I II RATE
OBS
Tel: +44(0)1298 84606 Fax: +44(0)1298 84073 E-post: Warranty@belle-group.co.uk
Postadresse:
Garantiavdelingen i Altrad Belle
Sheen, Nr. Buxton
Derbyshire
SK17 0EU
England
Garantiregistrering:
http://www.bellegroup.com/index.php?p=warranty\_registration.
text_image
QR code image containing encoded data, no visible human-readable texttext_image
Technical diagram of a mechanical device with numbered components labeled 2, 3, and 5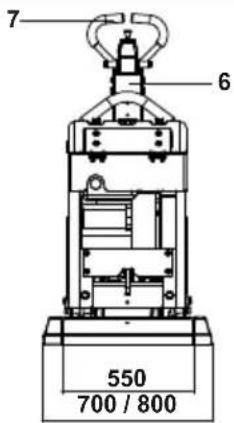
text_image
7 6 550 700 / 800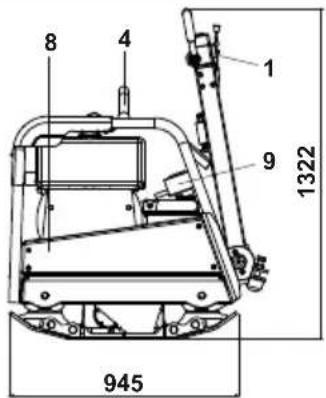
text_image
8 4 1 9 1322 945text_image
Diagram of a refrigerator interior with numbered labels pointing to various compartments and parts
VAARA
Altrad Belle Warranty Department,
Sheen, No Buxton
Derbyshire
SK17 0EU
England
text_image
QR code image containing encoded data, no visible human-readable textProcedura Start i Stop

text_image
Diagram of a refrigerator interior with numbered labels pointing to various compartments and parts
UWAGA
Altrad Belle Warranty Department
Sheen, Nr. Buxton,
Derbyshire,
SK17 0EU
England.
text_image
QR code image containing encoded data, no visible human-readable texttext_image
Technical diagram of a mechanical device with numbered components labeled 2, 3, and 5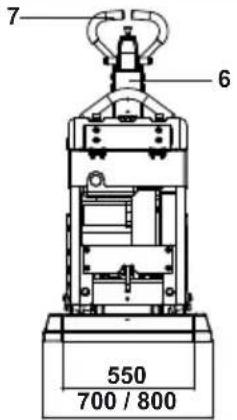
text_image
7 6 550 700 / 800
text_image
8 4 1 9 1322 945text_image
1 2 3 4 5 0 I II RATE
ВНИМАНИЕ
Altrad Belle Warranty Department
Sheen, Nr. Buxton Derbyshire
SK17 0EU England
text_image
QR code image containing encoded data, no visible human-readable texttext_image
Technical diagram of a mechanical device with numbered components labeled 1 through 5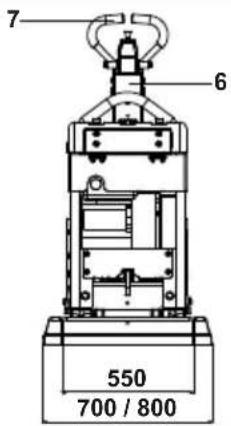
text_image
7 6 550 700 / 800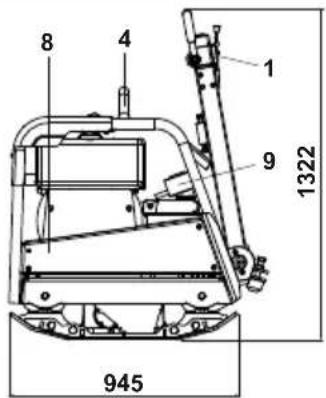
text_image
8 4 1 9 1322 945text_image
1 2 3 4 5 0 I II RATE
ETTEVAATUST
Altrad Belle Warranty Department,
Sheen, Nr. Buxton
Derbyshire
SK17 0EU
England
Garantii Registreerimine
text_image
QR code image containing encoded data, no visible human-readable texttext_image
Technical diagram of a mechanical device with numbered components labeled 2, 3, and 5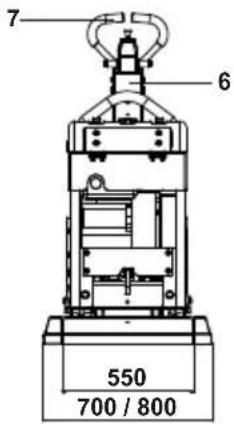
text_image
7 6 550 700 / 800
text_image
8 4 1 9 1322 945- Drosele svira.
- Atsitiena startera rokturis.
- Degvielas tvertne
- Pacelšanas punkts.
- Roktura atlaišanas aizbīdnis.
- Kontroles svira kustibai uz priekšu/atpakaj.
- Galvenais rokturis.
- Siksnas aizsargs.
Tehniskie dati

natural_image
Technical line drawing of a mechanical component with internal cavities and mounting features (no text or symbols)Degvielas droseles svira
Gaisa droseles svira
Degvielas padeves svira
text_image
1 2 3 4 5 0 I II
UZMANIBU
E-pasts: Warranty@belle-group.co.uk
Rakstiski
Altrad Belle Warranty Department,
Sheen, Nr. Buxton
Derbyshire
SK17 0EU
England
http://www.bellegroup.com/index.php?p=warranty\_registration
text_image
QR code image containing encoded data, no visible human-readable texttext_image
Diagram of a refrigerator interior with numbered labels pointing to various compartments and parts
ATSARGIAI
el. paštas: Warranty@belle-group.co.uk
Rašykite:
Altrad Belle Warranty Department,
Sheen, Nr. Buxton
Derbyshire
SK17 0EU
England.
http://www.bellegroup.com/index.php?p=warranty\_registration
text_image
QR code image containing encoded data, no visible human-readable texttext_image
1 2 3 4 5 0 I II
ВНИМАНИЕ
Email : warranty@belle-group.co.uk
Пишете на адрес:
Altrad Belle Warranty Department,
Sheen, Nr. Buxton, Derbyshire,
SK17 0EU England.
http://www.bellegroup.com/index.php?p=warranty\_registration
text_image
QR code image containing encoded data, no visible human-readable texttext_image
Diagram of a refrigerator interior with numbered labels pointing to various compartments and parts
NEBEZPEČÍ
Altrad Belle Warranty Department,
Sheen, Nr. Buxton,
Derbyshire,
SK17 0EU
England
Registrace Záruky:
text_image
QR code image containing encoded data, no visible human-readable texttext_image
1 2 3 4 5 0 I II RATE
VIGYÁZAT
Altrad Belle Warranty Department,
Sheen, Nr. Buxton
Derbyshire
SK17 0EU
England.
text_image
QR code image containing encoded data, no visible human-readable texttext_image
Gas Čok Gorivo ON/OFFHatz dizel motor (Start okretaljkom - kurblom)
- Ako je moguće, odvojite motor od bilo koje opreme za vožnju. Pomoćnu opremu treba uvijek staviti na neutralan položaj.
- Postavite ručicu kontrole brzine u položaj između START i maksimuma. Startajte prema uvjetima, odabirom manje brzine smanjiti će se i brzina kod startanja.
- Budite sigurni da je ručica za zautstavljanje, ako je ugrađena, u radnom položaju.
- Okrenite ručicu za dekompresiju sve dok se ne zaustavi. U tom položaju čuje se zvuk da se automatska dekompresija uključila i tada se motor može upaliti.
- Nakon što je uređaj za automatsku dekompresiju uključen u krajnjem položaju, potrebno je 5 okretaja drške da bi se u motoru stvorila kompresija i da bi ponovno upalio.
- Primate okretaljku sa obje ruke i okrečite ju uz povećavanje brzine.. Najveća brzina okretanja mora biti ostignuta u trenutku kada se ručica dekompresije vrati u položaj '0'. Čim se motor upalio, izvucite okretaljku iz ležišta.
- Ako se motor ponovno ugasi zato što okretaljka nije dovoljno brzo okretana, odmah izvadite okretaljku van iz ležišta i ugasite motor.
- Za ponovno startanje motora, čekajte dok se motor ne smiri, a zatim ponovite pripreme za startanje.
Hatz dizel motor (Elektro start)
- Sa ručicom za dekompresiju u položaju '0', utaknite ključ i okrenite u položaj 'I' (Kontrolne lampice akumulatora i pritiska ulja će se upaliti)
- Okrenite ključ za startanje u položaj 'II'
- Čim se motor upali, otpustite ključ za startanje. Mora se vratiti u položaj 'I' sam od sebe i ostati u tom položaju za vrijeme rada. Kontrolne lampice akumulatora i pritiska ulja moraju se ugasiti odmah nakon startanja. Lampica indikatora '1' je stalno upaljena kada motor radi.
- Ako Vam se čini da nešto nije u redu, ugasite motor i odmah ispravite grešku. (Vidi odjeljak Vodič za rješavanje problema)
- Displej temperature motora '4' (dodatna oprema) se pali ako je temperatura glave cilindra previ soka. Ugasite motor i pronađite uzrok problema.
text_image
Diagram of a refrigerator interior with numbered labels pointing to various compartments and parts
PAŽNJA
Nikada ne pokrećite elektostarter kada motor radi ili se gasi. Postoji rizik da se osovina startera ili zupčanik prijenosa slomi.
Altrad Belle Warranty Department,
Sheen, Nr. Buxton,
Derbyshire,
SK17 0EU
England.
Registracija Jamstva:
U nastojanju da ALTRAD Belle postane zeleniji i ekološki osvješteniji, uveli smo registraciju jamstva putem interenta. Kako biste pristupili našoj internetskoj stranici za registraciju, koristite sljedeću poveznicu:
http://www.bellegroup.com/index.php?p=warranty_registration.
text_image
QR code image containing encoded data, no visible human-readable text
text_image
1-01 4 3 6 7 8 5 11 14 15 16 17 13 12 16 15 22 15 18 19 20 21 20 17 10 9Hatz Baseplate Assembly, Hatz Plaque d'embase, Hatz Cto. Placa base, Hatz Conj. da Placa de Base
11/06/2007
| 1 | 161/06200 | Baseplate | Plaque d'embase | Placa de base | Placa de Base | →1022107 | 1 |
| 1 | 161/11000 | Baseplate | Plaque d'embase | Placa de base | Placa de Base | →022108 | 1 |
| 2 | 161/06300 | Baseplate - Extension | Plaque d'embase - Extension | Placa de base - Extension | Placa de base - Extensão | 75mm | 2 |
| 2 | 161/06500 | Baseplate - Extension | Plaque d'embase - Extension | Placa de base - Extension | Placa de base - Extensão | 125mm | 2 |
| 3 | 21/0139 | Anti-Vibration Mount | Tampon antivibratoire | Montura antivibratoria | Bloco Anti-vibração | 4 | |
| 4 | 9/16008 | Bolt | Boulon | Perno | Perno | M16 x 30 | 4 |
| 5 | 8/16005 | Nut | Ecrou | Tuerca | Porca | M16 | 4 |
| 6 | 4/1601 | Washer | Rondelle | Arandela | Anilha | M16 | 4 |
| 7 | 7/10018 | Screw | Vis | Tornillo | Parafuso | M10 x 16 | 1 |
| 8 | 4/1008 | Washer | Rondelle | Arandela | Anilha | M10 | 1 |
| 9 | 8/20003 | Nut | Ecrou | Tuerca | Porca | M20 | 8 |
| 10 | 9/20002 | Screw | Vis | Tornillo | Parafuso | M20 x 50 | 8 |
| 11 | 161/04600 | Bedplate | Plaque d'assise | Placa de base | Placa de Apoio | 1 | |
| 12 | 161/05500 | Belt Guard | Capot de courroie | Protector de la correa | Guarda da Cinta | 1 | |
| 13 | 161/25500 | Bracket - Right | Vis - Droit | Tornillo - Derecha | Parafuso - Lado Direito | 1 | |
| 14 | 161/25500 | Bracket - Left | Vis - Gauche | Tornillo - Iqzuierda | Parafuso - Lado Esquerdo | 1 | |
| 15 | 4/1003 | Washer | Rondelle | Arandela | Anilha | M10 | 12 |
| 16 | 4/1005 | Washer | Rondelle | Arandela | Anilha | M10 | 12 |
| 17 | 7/10009 | Screw | Vis | Tornillo | Parafuso | M10 x 40 | 5 |
| 18 | 00.0.043 | Bolt | Boulon | Perno | Perno | M10 x 100 | 4 |
| 19 | 161/99595 | Handle | Poignee | Manillar | Punho | 1 | |
| 20 | 4/1004 | Washer | Rondelle | Arandela | Anilha | M10 | 8 |
| 21 | 8/10006 | Nut | Ecrou | Tuerca | Porca | M10 | 4 |
| 22 | 7/10005 | Screw | Vis | Tornillo | Parafuso | M10 x 25 | 4 |
text_image
1-01 4 3 6 7 8 5 11 14 15 16 17 13 12 16 15 22 15 18 19 20 21 20 17 20 9 10 2| Hatz Vloerplaat, Hatz Ruttelplatten -Zsb.,Hatz Bundplade, Hatz Gruppo Piastra di Base | → 11/06/2007 |
| 1 | 161/06200 | Vloerplaat | Rüttelplatten | Bundplade | Piastra di Base | →1022107 | 1 |
| 1 | 161/11000 | Vloerplaat | Rüttelplatten | Bundplade | Piastra di Base | →022108 | 1 |
| 2 | 161/06300 | Bundplade - Tiltagende | Grundplatte - Verlängerung | Vloerplaat - Achtervoegsel | Piastra base - Estensione | 75mm | 2 |
| 2 | 161/06500 | Bundplade - Tiltagende | Grundplatte - Verlängerung | Vloerplaat - Achtervoegsel | Piastra base - Estensione | 125mm | 2 |
| 3 | 21/0139 | Anti-trilbevestiging | Schwingungsdämpfer | Antivibrationsophæng | Supporto antivibrazioni | 4 | |
| 4 | 9/16008 | Bout | Bolzen | Skrue | Bullone | M16 x 30 | 4 |
| 5 | 8/16005 | Moer | Mutter | Motrik | Dado | M16 | 4 |
| 6 | 4/1601 | Afdichtring | Scheibe | Spændeskive | Rondella | M16 | 4 |
| 7 | 7/10018 | Schroef | Schraube | Skrue | Vite | M10 x 16 | 1 |
| 8 | 4/1008 | Afdichtring | Scheibe | Spændeskive | Rondella | M10 | 1 |
| 9 | 8/20003 | Moer | Mutter | Motrik | Dado | M20 | 8 |
| 10 | 9/20002 | Schroef | Schraube | Skrue | Vite | M20 x 50 | 8 |
| 11 | 161/04600 | Grondplaat | Sohlplatte | Fundamentplade | Piastra di base | 1 | |
| 12 | 161/05500 | Riembeschermkap | Treibriemen-Schutzabdeckung | Rembeskyttelse | Protezione della cinghia | 1 | |
| 13 | 161/25500 | Steuin - Rechts | Halterung - Rechts | Beslag - Højre | Staffa - Lato destro | 1 | |
| 14 | 161/25500 | Steuin - Links | Halterung - Links | Beslag- Venstre | Staffa - Lato sinistro | 1 | |
| 15 | 4/1003 | Afdichtring | Scheibe | Spændeskive | Rondella | M10 | 12 |
| 16 | 4/1005 | Afdichtring | Scheibe | Spændeskive | Rondella | M10 | 12 |
| 17 | 7/10009 | Schroef | Schraube | Skrue | Vite | M10 x 40 | 5 |
| 18 | 00.0.043 | Bout | Bolzen | Skrue | Bullone | M10 x 100 | 4 |
| 19 | 161/99595 | Hendel | Griff | Händtagsenhed | Impugnatura | 1 | |
| 20 | 4/1004 | Afdichtring | Scheibe | Spændeskive | Rondella | M10 | 8 |
| 21 | 8/10006 | Moer | Mutter | Motrik | Dado | M10 | 4 |
| 22 | 7/10005 | Schroef | Schraube | Skrue | Vite | M10 x 25 | 4 |
text_image
1-02 19 20 21 3 4 6 7 8 5 1 11 12 13 14 15 16 17 18 19 20 21 22 23 24 25 26 27 28 29 30 31 32 33 34 35 36 37 38 39 40 41 42 43 44 45 46 47 48 49 50 51 52 53 54 55 56 57 58 59 60 61 62 63 64 65 66 67 68 69 70 71 72 73 74 75 76 77 78 79 80Hatz Baseplate Assembly, Hatz Plaque d'embase, Hatz Cto. Placa base, Hatz Conj. da Placa de Base
11/06/2007 91/12/2008
| 1 | 161/11000 | Baseplate | Plaque d'embase | Placa de base | Placa de Base | 1 |
| 2 | 161/06300 | Baseplate - Extension | Plaque d'embase - Extension | Placa de base - Extensión | Placa de base - Extensão | 2 |
| 2 | 161/06500 | Baseplate - Extension | Plaque d'embase - Extension | Placa de base - Extensión | Placa de base - Extensão | 2 |
| 3 | 21/0139 | Anti-Vibration Mount | Tampon antivibratoire | Montura antivibratoria | Bloco Anti-vibração | 4 |
| 4 | 9/16008 | Bolt | Boulon | Perno | Perno | M16 x 30 |
| 5 | 8/16005 | Nut | Ecrou | Tuerca | Porca | M16 |
| 6 | 4/1601 | Washer | Rondelle | Arandela | Anilha | M16 |
| 7 | 7/10018 | Screw | Vis | Tornillo | Parafuso | M10 x 16 |
| 8 | 4/1008 | Washer | Rondelle | Arandela | Anilha | M10 |
| 9 | 8/20003 | Nut | Ecrou | Tuerca | Porca | M20 |
| 1 | 0 9/20002 | Screw | Vis | Tornillo | Parafuso | M20 x 50 |
| 11 | 161/23000 | Bedplate | Plaque d'assise | Placa de base | Placa de Apoio | 1 |
| 12 | 161/18000 | Belt Guard | Capot de courroie | Protector de la correa | Guarda da Cinta | 1 |
| 13 | 161/25500 | Bracket - Right | Vis - Droit | Tornillo - Derecha | Parafuso - Lado Direito | 1 |
| 14 | 161/25500 | Bracket - Left | Vis - Gauche | Tornillo - Iqzuierda | Parafuso - Lado Esquerdo | 1 |
| 15 | 4/1003 | Washer | Rondelle | Arandela | Anilha | M10 |
| 16 | 4/1005 | Washer | Rondelle | Arandela | Anilha | M10 |
| 17 | 7/10009 | Screw | Vis | Tornillo | Parafuso | M10 x 40 |
| 18 | 00.0.043 | Bolt | Boulon | Perno | Perno | M10 x 100 |
| 19 | 161/99595 | Handle | Poignee | Manillar | Punho | 1 |
| 20 | 4/1004 | Washer | Rondelle | Arandela | Anilha | M10 |
| 21 | 8/10006 | Nut | Ecrou | Tuerca | Porca | M10 |
| 22 | 7/10005 | Screw | Vis | Tornillo | Parafuso | M10 x 25 |
| 23 | 161/25500 | Plate | Plaque | Placa | Placa | 1 |

text_image
1-02 19 20 21 3 4 6 7 8 5 1 11 12 13 14 15 16 17 18 19 20 21 22 23 24 25 26 27 28 29 30 31 32 33 34 35 36 37 38 39 40 41 42 43 44 45 46 47 48 49 50 51 52 53 54 55 56 57 58 59 60 61 62 63 64 65 66 67 68 69 70 71 72 73 74 75 76 77 78 79 80| 1 | 161/11000 .....Vloerplaat ..... | Rüttelplatten ..... | Bundplade ..... | Piastra di Base ..... | 1 |
| 2 | 161/06300 .....Bundplade - Tiltagende .... | Grundplatte - Verlängerung .... | Vloerplaat - Achtervoegsel... | Piastra base - Estensione .....75mm ..... | 2 |
| 2 | 161/06500 .....Bundplade - Tiltagende .... | Grundplatte - Verlängerung .... | Vloerplaat - Achtervoegsel... | Piastra base - Estensione .....125mm ..... | 2 |
| 3 | 21/0139 .....Anti-trilbevestiging ..... | Schwingungsdämpfer ..... | Antivibrationsophæng ..... | Supporto antivibrazioni ..... | 4 |
| 4 | 9/16008 .....Bout ..... | Bolzen ..... | Skrue ..... | Bullone .....M16 x 30 ..... | 4 |
| 5 | 8/16005 .....Moer ..... | Mutter ..... | Møtrik ..... | Dado .....M16 ..... | 4 |
| 6 | 4/1601 .....Afdichtring ..... | Scheibe ..... | Spændeskive ..... | Rondella .....M16 ..... | 4 |
| 7 | 7/10018 .....Schroef ..... | Schraube ..... | Skrue ..... | Vite .....M10 x 16 ..... | 1 |
| 8 | 4/1008 .....Afdichtring ..... | Scheibe ..... | Spændeskive ..... | Rondella .....M10 ..... | 1 |
| 9 | 8/20003 .....Moer ..... | Mutter ..... | Møtrik ..... | Dado .....M20 ..... | 8 |
| 10 | 9/20002 .....Schroef ..... | Schraube ..... | Skrue ..... | Vite .....M20 x 50 ..... | 8 |
| 11 | 161/23000 .....Grondplaat ..... | Sohlplatte ..... | Fundamentplade ..... | Piastra di base ..... | 1 |
| 12 | 161/18000 .....Riembeschermkap ..... | Treibriemen-Schutzabdeckung ..... | Rembeskyttelse ..... | Protezione della cinghia ..... | 1 |
| 13 | 161/25500 .....Steun - Rechts ..... | Halterung - Rechts ..... | Beslag - Højre ..... | Staffa - Lato destro ..... | 1 |
| 14 | 161/25500 .....Steun - Links ..... | Halterung - Links ..... | Beslag- Venstre ..... | Staffa - Lato sinistro ..... | 1 |
| 15 | 4/1003 .....Afdichtring ..... | Scheibe ..... | Spændeskive ..... | Rondella .....M10 ..... | 14 |
| 16 | 4/1005 .....Afdichtring ..... | Scheibe ..... | Spændeskive ..... | Rondella .....M10 ..... | 14 |
| 17 | 7/10009 .....Schroef ..... | Schraube ..... | Skrue ..... | Vite .....M10 x 40 ..... | 5 |
| 18 | 00.0.043 .....Bout ..... | Bolzen ..... | Skrue ..... | Bullone .....M10 x 100 ..... | 4 |
| 19 | 161/99595 .....Hendel ..... | Griff ..... | Håndtagsenhed ..... | Impugnatura ..... | 1 |
| 20 | 4/1004 .....Afdichtring ..... | Scheibe ..... | Spændeskive ..... | Rondella .....M10 ..... | 8 |
| 21 | 8/10006 .....Moer ..... | Mutter ..... | Møtrik ..... | Dado .....M10 ..... | 4 |
| 22 | 7/10005 .....Schroef ..... | Schraube ..... | Skrue ..... | Vite .....M10 x 25 ..... | 6 |
| 23 | 161/25500 .....Plaat ..... | Platte ..... | Plade ..... | Piastra ..... | 1 |
text_image
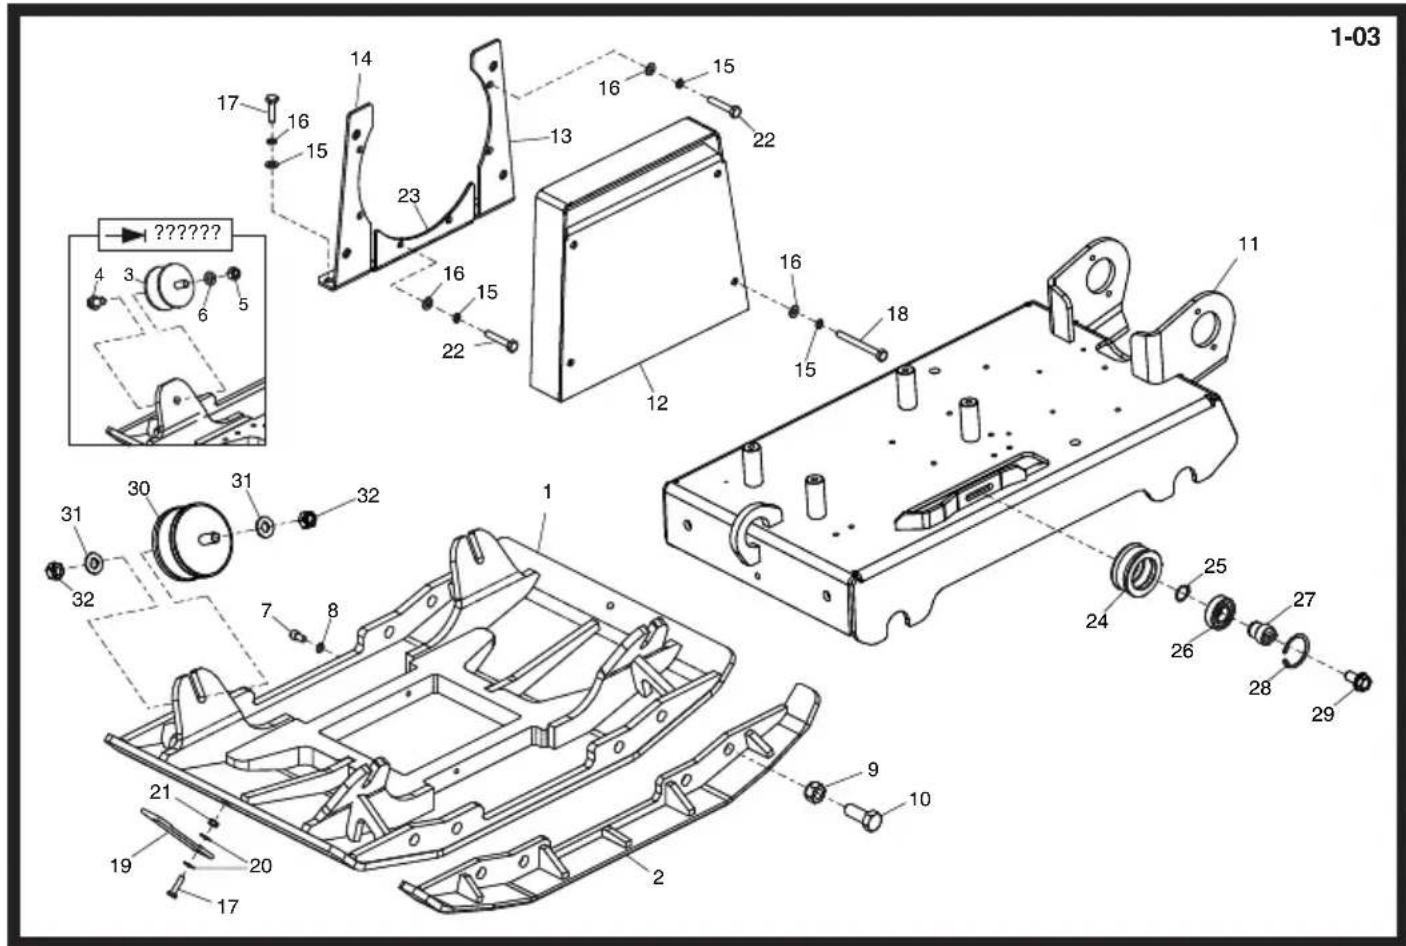
1-03 14 16 15 23 13 16 15 22 17 16 15 16 15 22 12 11 ????? 4 3 6 5 30 31 32 1 31 32 7 8 21 19 20 17 2 9 10 24 25 26 27 28 29Hatz Baseplate Assembly, Hatz Plaque d'embase, Hatz Cto. Placa base, Hatz Conj. da Placa de Base
01/01/2009
| 1 | 161/11000 | Baseplate | Plaque d'embase | Placa de base | Placa de Base | 1 |
| 2 | 161/06300 | Baseplate - Extension | Plaque d'embase - Extension | Placa de base - Extensión | Placa de base - Extensão | 2 |
| 2 | 161/06500 | Baseplate - Extension | Plaque d'embase - Extension | Placa de base - Extensión | Placa de base - Extensão | 2 |
| 3 | 21/0139 | Anti-Vibration Mount | Tampon antivibratoire | Montura antivibratoria | Bloco Anti-vibração | 4 |
| 4 | 9/16008 | Bolt | Boulon | Perno | Perno | M16 x 30 |
| 5 | 8/16005 | Nut | Ecrou | Tuerca | Porca | M16 |
| 6 | 4/1601 | Washer | Rondelle | Arandela | Anilha | M16 |
| 7 | 7/10018 | Screw | Vis | Tornillo | Parafuso | M10 x 16 |
| 8 | 4/1008 | Washer | Rondelle | Arandela | Anilha | M10 |
| 9 | 8/20003 | Nut | Ecrou | Tuerca | Porca | M20 |
| 10 | 9/20002 | Screw | Vis | Tornillo | Parafuso | M20 x 50 |
| 11 | 161/23000 | Bedplate | Plaque d'assise | Placa de base | Placa de Apoio | 1 |
| 12 | 161/18000 | Belt Guard | Capot de courroie | Protector de la correa | Guarda da Cinta | 1 |
| 13 | 161/25500 | Bracket - Right | Vis - Droit | Tornillo - Derecha | Parafuso - Lado Direito | 1 |
| 14 | 161/25500 | Bracket - Left | Vis - Gauche | Tornillo - Iqzulierda | Parafuso - Lado Esquerdo | 1 |
| 15 | 4/1003 | Washer | Rondelle | Arandela | Anilha | M10 |
| 16 | 4/1005 | Washer | Rondelle | Arandela | Anilha | M10 |
| 17 | 7/10009 | Screw | Vis | Tornillo | Parafuso | M10 x 40 |
| 18 | 00.0.043 | Bolt | Boulon | Perno | Perno | M10 x 100 |
| 19 | 161/99595 | Handle | Poignee | Manillar | Punho | 1 |
| 20 | 4/1004 | Washer | Rondelle | Arandela | Anilha | M10 |
| 21 | 8/10006 | Nut | Ecrou | Tuerca | Porca | M10 |
| 22 | 7/10005 | Screw | Vis | Tornillo | Parafuso | M10 x 25 |
| 23 | 161/25500 | Plate | Plaque | Placa | Placa | 1 |
| 24 | 161/99747 | Pulley | Poulie | Polia | Polia | 1 |
| 25 | 3/9003 | Circlip | Circlip | Resorte circular | Grampo circular | 1 |
| 26 | 53/0016 | Bearing | Roulement | Cojinete | Rolamanto | 1 |
| 27 | 161/99750 | Pin | Goupille | Pasador | Pino | 1 |
| 28 | MS22 | Circlip | Circlip | Resorte circular | Grampo circular | 1 |
| 29 | 7/10039 | Screw | Vis | Tornillo | Parafuso | M10 x 20 |
| 30 | 21/0298 | Anti-Vibration Mount | Tampon antivibratoire | Montura antivibratoria | Bloco Anti-vibração | 4 |
| 31 | 4/1609 | Washer | Rondelle | Arandela | Anilha | M16 |
| 32 | 8/16003 | Nut | Ecrou | Tuerca | Porca | M16 |

text_image
1-03 14 16 15 23 13 16 15 22 17 16 15 16 15 22 12 11 ????? 4 3 6 5 30 31 32 1 31 32 7 8 21 19 20 17 2 9 10 24 25 26 27 28 29Hatz Vloerplaat, Hatz Ruttelplatten -Zsb., Hatz Bundplade, Hatz Gruppo Piastra di Base
01/01/2009
| 1 | 161/11000 | Vloerplaat | Rüttelplatten | Bundplade | Piastra di Base | 1 |
| 2 | 161/06300 | Bundplade - Tiltagende | Grundplatte - Verlängerung | Vloerplaat - Achtervoegsel | Piastra base - Estensione | 2 |
| 2 | 161/06500 | Bundplade - Tiltagende | Grundplatte - Verlängerung | Vloerplaat - Achtervoegsel | Piastra base - Estensione | 2 |
| 3 | 21/0139 | Anti-trilbevestiging | Schwingungsdämpfer | Antivibrationsophæng | Supporto antivibrazioni | 4 |
| 4 | 9/16008 | Bout | Bolzen | Skrue | Bullone | M16 x 30 |
| 5 | 8/16005 | Moer | Mutter | Møtrik | Dado | M16 |
| 6 | 4/1601 | Afdichtring | Scheibe | Spændeskive | Rondella | M16 |
| 7 | 7/10018 | Schroef | Schraube | Skrue | Vite | M10 x 16 |
| 8 | 4/1008 | Afdichtring | Scheibe | Spændeskive | Rondella | M10 |
| 9 | 8/20003 | Moer | Mutter | Møtrik | Dado | M20 |
| 10 | 9/20002 | Schroef | Schraube | Skrue | Vite | M20 x 50 |
| 11 | 161/23000 | Grondplaat | Sohlplatte | Fundamentplade | Piastra di base | 1 |
| 12 | 161/18000 | Riembeschermkap | Treibriemen-Schutzabdeckung | Rembeskyttelse | Protezione della cinghia | 1 |
| 13 | 161/25500 | Steun - Rechts | Halterung - Rechts | Beslag - Hojre | Staffa - Lato destro | 1 |
| 14 | 161/25500 | Steun - Links | Halterung - Links | Beslag- Venstre | Staffa - Lato sinistro | 1 |
| 15 | 4/1003 | Afdichtring | Scheibe | Spændeskive | Rondella | M10 |
| 16 | 4/1005 | Afdichtring | Scheibe | Spændeskive | Rondella | M10 |
| 17 | 7/10009 | Schroef | Schraube | Skrue | Vite | M10 x 40 |
| 18 | 00.0.043 | Bout | Bolzen | Skrue | Bullone | M10 x 100 |
| 19 | 161/99595 | Hendel | Griff | Håndtagsenhed | Impugnatura | 1 |
| 20 | 4/1004 | Afdichtring | Scheibe | Spændeskive | Rondella | M10 |
| 21 | 8/10006 | Moer | Mutter | Møtrik | Dado | M10 |
| 22 | 7/10005 | Schroef | Schraube | Skrue | Vite | M10 x 25 |
| 23 | 161/25500 | Plaat | Platte | Plade | Piastra | 1 |
| 24 | 161/99747 | Poelie | Riemenscheibe | Remskive | Puleggia | 1 |
| 25 | 3/9003 | Borgveer | Sprengring | Låsering | Anello Elastico | 1 |
| 26 | 53/0016 | Lager | Lager | Leje | Cuscinetto | 1 |
| 27 | 161/99750 | Pen | Zapfen | Stift | Perno | 1 |
| 28 | MS22 | Borgveer | Sprengring | Låsering | Anello Elastico | 1 |
| 29 | 7/10039 | Schroef | Schraube | Skrue | Vite | M10 x 20 |
| 30 | 21/0298 | Anti-trilbevestiging | Schwingungsdämpfer | Antivibrationsophæng | Supporto antivibrazioni | 4 |
| 31 | 4/1609 | Afdichtring | Scheibe | Spændeskive | Rondella | M16 |
| 32 | 8/16003 | Moer | Mutter | Møtrik | Dado | M16 |

text_image
1-04 5 6 12 11 36 35 3 34 33 4 31 30 31 32 1 7 8 32 21 19 20 17 2 9 10 24 25 26 27 28 29 13Honda Baseplate Assembly, Honda Plaque d'embase, Honda Cto. Placa base, Honda Conj. da Placa de Base
| 1 | 161/11000 | Baseplate | Plaque d'embase | Placa de base | Placa de Base | 1 |
| 2 | 161/06300 | Baseplate - Extension | Plaque d'embase - Extension | Placa de base - Extensión | Placa de base - Extensão | 2 |
| 2 | 161/06500 | Baseplate - Extension | Plaque d'embase - Extension | Placa de base - Extensión | Placa de base - Extensão | 2 |
| 3 | 161/33500 | Plate | Plaque | Placa | Placa | 1 |
| 4 | 161/33400 | Guard | Capot | Protector | Guarda | 1 |
| 5 | 161/33600 | Guard | Capot | Protector | Guarda | 1 |
| 6 | 7/12034 | Screw | Vis | Tornillo | Parafuso | M12 x 30 |
| 7 | 7/10018 | Screw | Vis | Tornillo | Parafuso | M10 x 16 |
| 8 | 4/1008 | Washer | Rondelle | Arandela | Anilha | M10 |
| 9 | 8/20003 | Nut | Ecrou | Tuerca | Porca | M20 |
| 10 | 9/20002 | Screw | Vis | Tornillo | Parafuso | M20 x 50 |
| 11 | 161/23000 | Bedplate | Plaque d'assise | Placa de base | Placa de Apoio | 1 |
| 12 | 161/33700 | Deck | Plate-Forme | Cubierta | Plataforma | 1 |
| 13 | 7/3818 | Screw | Vis | Tornillo | Parafuso | 4 |
| 14 | 7/10067 | Screw | Vis | Tornillo | Parafuso | M10 x 75 |
| 17 | 7/10009 | Screw | Vis | Tornillo | Parafuso | M10 x 40 |
| 19 | 161/99595 | Handle | Poignee | Manillar | Punho | 1 |
| 20 | 4/1004 | Washer | Rondelle | Arandela | Anilha | M10 |
| 21 | 8/10006 | Nut | Ecrou | Tuerca | Porca | M10 |
| 24 | 161/99747 | Pulley | Poulie | Polia | Polia | 1 |
| 25 | 3/9003 | Circlip | Circlip | Resorte circular | Grampo circular | 1 |
| 26 | 53/0016 | Bearing | Roulement | Cojinete | Rolamanto | 1 |
| 27 | 161/99750 | Pin | Goupille | Pasador | Pino | 1 |
| 28 | MS22 | Circlip | Circlip | Resorte circular | Grampo circular | 1 |
| 29 | 7/10039 | Screw | Vis | Tornillo | Parafuso | M10 x 20 |
| 30 | 21/0298 | Anti-Vibration Mount | Tampon antivibratoire | Montura antivibratoria | Bloco Anti-vibração | 4 |
| 31 | 4/1609 | Washer | Rondelle | Arandela | Anilha | M16 |
| 32 | 8/16003 | Nut | Ecrou | Tuerca | Porca | M16 |
| 33 | 7/12036 | Screw | Vis | Tornillo | Parafuso | M12 x 70 |
| 34 | 161/99933 | Boss | Bossage | Resalte | Cubo | 1 |
| 35 | 4/1204 | Washer | Rondelle | Arandela | Anilha | 1 |
| 36 | 8/12006 | Nut | Ecrou | Tuerca | Porca | M12 |

text_image
1-04 5 6 12 11 36 35 3 34 33 4 31 30 31 32 1 7 8 32 21 19 20 17 2 9 10 24 25 26 27 28 29 13Honda Vloerplaat, Honda Ruttelplatten -Zsb., Honda Bundplade, Honda Gruppo Piastra di Base
| 1 | 161/11000 | Vloerplaat | Rüttelplatten | Bundplade | Piastra di Base | 1 |
| 2 | 161/06300 | Bundplade - Tiltagende | Grundplatte - Verlängerung | Vloerplaat - Achtervoegsel | Piastra base - Estensione | 2 |
| 2 | 161/06500 | Bundplade - Tiltagende | Grundplatte - Verlängerung | Vloerplaat - Achtervoegsel | Piastra base - Estensione | 2 |
| 3 | 161/33500 | Plaat | Platte | Plade | Piastra | 1 |
| 4 | 161/33400 | Beschermkap | Schutzabdeckung | Beskyttelse | Protezione | 1 |
| 5 | 161/33600 | Beschermkap | Schutzabdeckung | Beskyttelse | Protezione | 1 |
| 6 | 7/12034 | Schroef | Schraube | Skrue | Vite | M12 x 30 |
| 7 | 7/10018 | Schroef | Schraube | Skrue | Vite | M10 x 16 |
| 8 | 4/1008 | Afdichtring | Scheibe | Spændeskive | Rondella | M10 |
| 9 | 8/20003 | Moer | Mutter | Møtrik | Dado | M20 |
| 10 | 9/20002 | Schroef | Schraube | Skrue | Vite | M20 x 50 |
| 11 | 161/23000 | Grondplaat | Sohlplatte | Fundamentplade | Piastra di base | 1 |
| 12 | 161/33700 | Kap | Deck | Dækket | Piattaforma | 1 |
| 13 | 7/3818 | Schroef | Schraube | Skrue | Vite | M10 x 75 |
| 14 | 7/10067 | Schroef | Schraube | Skrue | Vite | M10 x 40 |
| 17 | 7/10009 | Schroef | Schraube | Skrue | Vite | M10 x 40 |
| 19 | 161/99595 | Hendel | Griff | Håndtagsenhed | Impugnatura | 1 |
| 20 | 4/1004 | Afdichtring | Scheibe | Spændeskive | Rondella | M10 |
| 21 | 8/10006 | Moer | Mutter | Møtrik | Dado | M10 |
| 24 | 161/99747 | Poelie | Riemenscheibe | Remskive | Puleggia | 1 |
| 25 | 3/9003 | Borgveer | Sprengring | Låsering | Anello Elastico | 1 |
| 26 | 53/0016 | Lager | Lager | Leje | Cuscinetto | 1 |
| 27 | 161/99750 | Pen | Zapfen | Stift | Perno | 1 |
| 28 | MS22 | Borgveer | Sprengring | Låsering | Anello Elastico | 1 |
| 29 | 7/10039 | Schroef | Schraube | Skrue | Vite | M10 x 20 |
| 30 | 21/0298 | Anti-trilbevestiging | Schwingungsdämpfer | Antivibrationsophaeng | Supporto antivibrazioni | 4 |
| 31 | 4/1609 | Afdichtring | Scheibe | Spændeskive | Rondella | M16 |
| 32 | 8/16003 | Moer | Mutter | Møtrik | Dado | M16 |
| 33 | 7/12036 | Schroef | Schraube | Skrue | Vite | M12 x 70 |
| 34 | 161/99933 | Naaf | Knauf | Studs | Borchia | 1 |
| 35 | 4/1204 | Afdichtring | Scheibe | Spændeskive | Rondella | 1 |
| 36 | 8/12006 | Moer | Mutter | Møtrik | Dado | M12 |
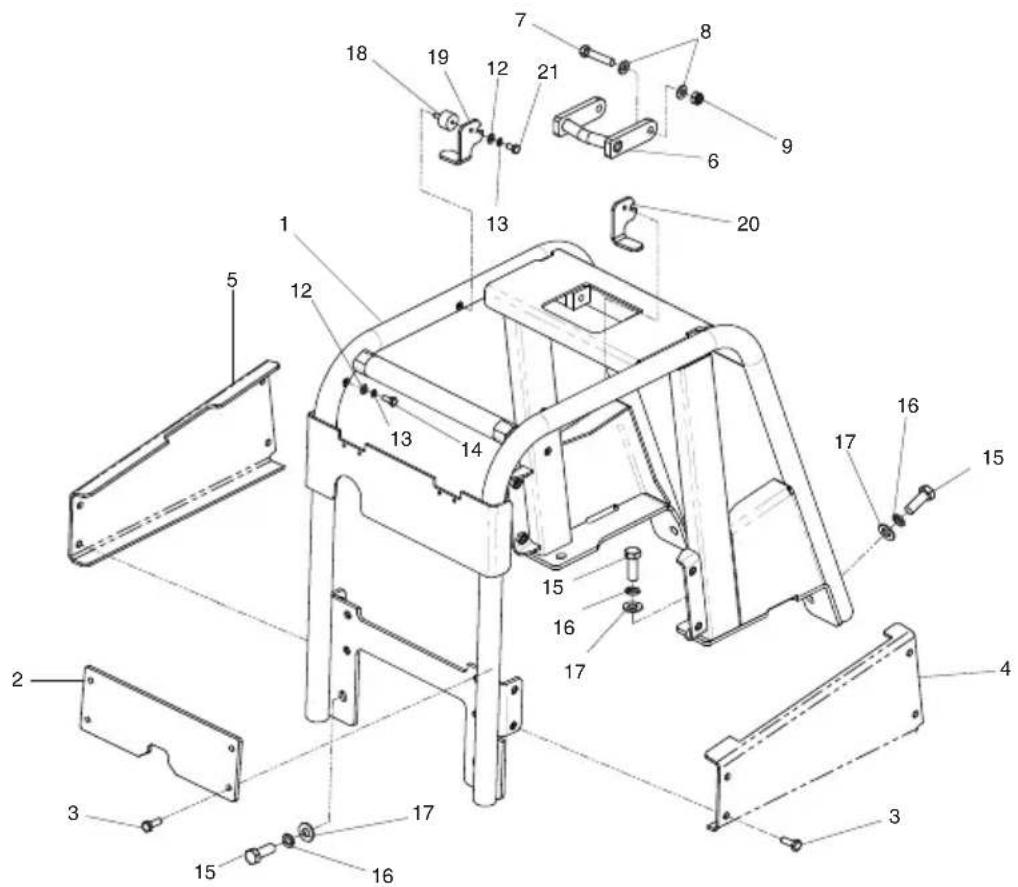
text_image
Technical diagram of a mechanical assembly with numbered components for identification2-01
Frame Assembly, Ensemble Châssis, Conjunto de Estructura, Conjunto da Estrutura
043179
| 1 | 161/06600....Frame.... | Châssis.... | Estructura.... | Estrutura.... | →031373.... | 1 |
| 1 | 161/23300....Frame.... | Châssis.... | Estructura.... | Estrutura.... | →031374.... | 1 |
| 2 | 161/99685S....Front Cover - Orange.... | Capot Avant - Orange.... | Cubierta Delantera - Naranja.... | Tampa Frontal - Laranja.... | 1 | |
| 2 | 161/99685G....Front Cover - Green.... | Capot Avant - Vert.... | Cubierta Delantera - Verde.... | Tampa Frontal - Verde.... | 1 | |
| 2 | 161/99685Y....Front Cover - Yellow.... | Capot Avant - Jaune.... | Cubierta Delantera - Amarillo.... | Tampa Frontal - Amarelo.... | 1 | |
| 2 | 161/99685B....Front Cover - Blue.... | Capot Avant - Bleu.... | Cubierta Delantera - Azúl.... | Tampa Frontal - Azul.... | 1 | |
| 2 | 161/99685R....Front Cover - Red.... | Capot Avant - Rouge.... | Cubierta Delantera - Roja.... | Tampa Frontal - Vermelho.... | 1 | |
| 2 | 161/99685W....Front Cover - White.... | Capot Avant - Blanc.... | Cubierta Delantera - Blanco.... | Tampa Frontal - Branco.... | 1 | |
| 3 | 7/10024....Screw.... | Vis.... | Tornillo.... | Parafuse.... | M10 x 30.... | 12 |
| 4 | 161/99686S....Cover - Orange (Left).... | Couvercle -Orange (Gauche).... | Cubierta - Naranja (Iqzuierda)... | Tampa - Laranja (Lado Esquerdo).... | 1 | |
| 4 | 161/99686G....Cover - Green (Left).... | Couvercle - Grun (Gauche)... | Cubierta - Verde (Iqzuierda)... | Tampa - Verde (Lado Esquerdo).... | 1 | |
| 4 | 161/99686Y....Cover - Yellow (Left).... | Couvercle - Jaune (Gauche)... | Cubierta - Amarillo (Iqzuierda)... | Tampa - Amarelo (Lado Esquerdo).... | 1 | |
| 4 | 161/99686B....Cover - Blue (Left).... | Couvercle - Bleu (Gauche)... | Cubierta - Azúl (Iqzuierda)... | Tampa - Azul (Lado Esquerdo).... | 1 | |
| 4 | 161/99686R....Cover - Red (Left).... | Couvercle - Rouge (Gauche). | Cubierta - Roja (Iqzuierda)... | Tampa - Vermelho (Lado Esquerdo).... | 1 | |
| 4 | 161/99686W....Cover - White (Left).... | Couvercle - Blanc (Gauche)... | Cubierta - Blanco (Iqzuierda)... | Tampa - Branco (Lado Esquerdo).... | 1 | |
| 5 | 161/99687S....Cover - Orange (Right)... | Couvercle - Orange (Droit)... | Cubierta - Naranja (Derecha)... | Tampa - Laranja (Lado Direito).... | 1 | |
| 5 | 161/99687G....Cover - Green (Right)... | Couvercle - Grun (Droit)... | Cubierta - Verde (Derecha)... | Tampa - Verde (Lado Direito).... | 1 | |
| 5 | 161/99687Y....Cover - Yellow (Right)... | Couvercle - Jaune (Droit)... | Cubierta - Amarillo (Derecha)... | Tampa - Amarelo (Lado Direito).... | 1 | |
| 5 | 161/99687B....Cover - Blue (Right)... | Couvercle - Bleu (Droit)... | Cubierta - Azúl (Derecha)... | Tampa - Azul (Lado Direito).... | 1 | |
| 5 | 161/99687R....Cover - Red (Right)... | Couvercle - Rouge (Droit)... | Cubierta - Roja (Derecha)... | Tampa - Vermelho (Lado Direito).... | 1 | |
| 5 | 161/99687W....Cover - White (Right)... | Couvercle - Blanc (Droit)... | Cubierta - Blanco (Derecha)... | Tampa - Branco (Lado Direito).... | 1 | |
| 6 | 161/06700....Hook.... | Crochet.... | Gancho.... | Gancho.... | 1 | |
| 7 | 00.0.050....Screw.... | Vis.... | Tornillo.... | Parafuse.... | M12 x 60.... | 2 |
| 8 | 4/1204....Washer.... | Rondelle.... | Arandela.... | Anilha.... | M12.... | 4 |
| 9 | 8/12006....Nut.... | Ecrou.... | Tuerca.... | Porca.... | M12.... | 2 |
| 12 | 4/8006....Washer.... | Rondelle.... | Arandela.... | Anilha.... | M8.... | 3 |
| 13 | 4/8003....Washer.... | Rondelle.... | Arandela.... | Anilha.... | M8.... | 3 |
| 14 | 7/8011....Bolt.... | Boulon.... | Perno.... | Perno.... | M8 x 20.... | 1 |
| 15 | 02.0.062....Screw.... | Vis.... | Tornillo.... | Parafuse.... | M16 x 45.... | 6 |
| 16 | 05.1.009....Washer.... | Rondelle.... | Arandela.... | Anilha.... | M16.... | 6 |
| 17 | 4/1609....Washer.... | Rondelle.... | Arandela.... | Anilha.... | M16.... | 6 |
| 18 | 21/0141....Anti-Vibration Mount... | Tampon antivibratoire.... | Montura antivibratoria.... | Bloco Anti-vibração.... | 2 | |
| 19 | 161/99581....Latch.... | Verrou.... | Cerrojo.... | Trinco.... | 1 | |
| 20 | 161/99582....Latch.... | Verrou.... | Cerrojo.... | Trinco.... | 1 | |
| 21 | 7/8008....Screw.... | Vis.... | Tornillo.... | Parafuse.... | M8 x 16.... | 2 |
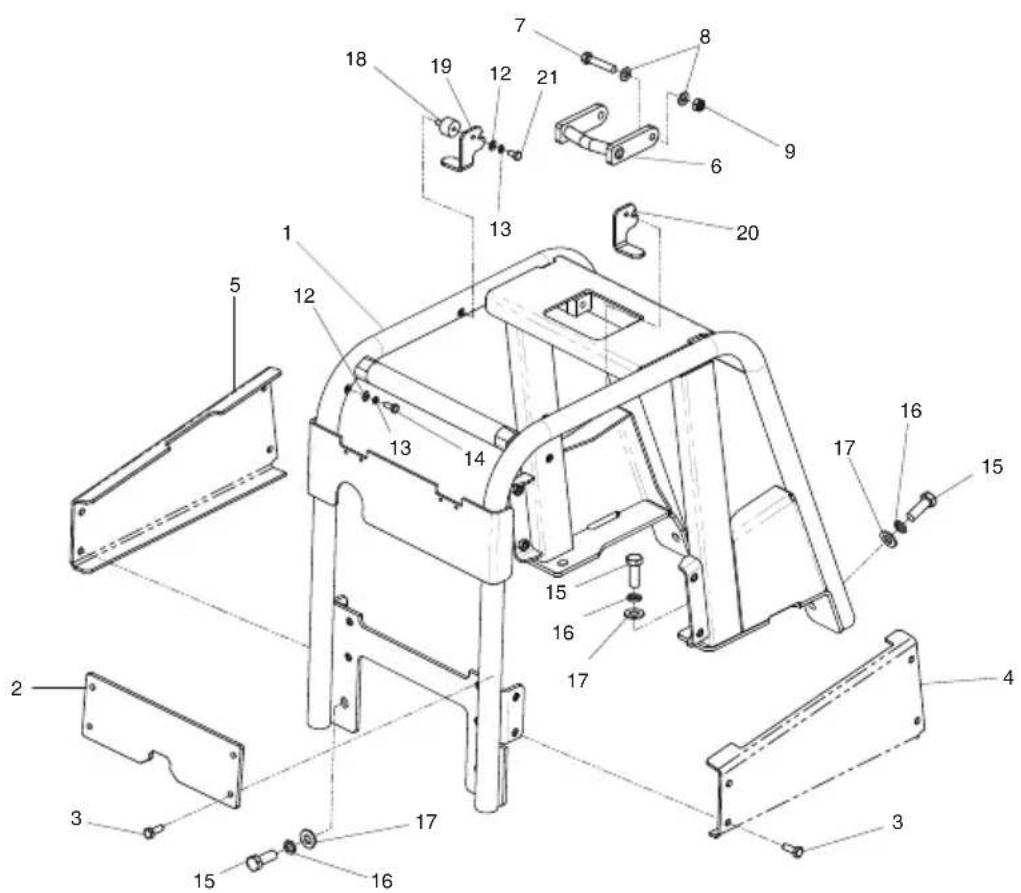
text_image
Technical diagram of a mechanical assembly with numbered components for identification2-01
text_image
Serial No. 094631Frame Assembly, Ensemble Châssis, Conjunto de Estructura, Conjunto da Estrutura
043180
| 1 | 161/23300......Frame...... | Châssis...... | Estructura...... | Estrutura...... | →094631...... | 1 |
| 1 | 161/25300......Frame...... | Châssis...... | Estructura...... | Estrutura...... | →094632...... | 1 |
| 2 | 161/99685S......Front Cover - Orange...... | Capot Avant - Orange...... | Cubierta Delantera - Naranja...... | Tampa Frontal - Laranja...... | 1 | |
| 2 | 161/99685G......Front Cover - Green...... | Capot Avant - Vert...... | Cubierta Delantera - Verde...... | Tampa Frontal - Verde...... | 1 | |
| 2 | 161/99685Y......Front Cover - Yellow...... | Capot Avant - Jaune...... | Cubierta Delantera - Amarillo...... | Tampa Frontal - Amarelo...... | 1 | |
| 2 | 161/99685B......Front Cover - Blue...... | Capot Avant - Bleu...... | Cubierta Delantera - Azúl...... | Tampa Frontal - Azul...... | 1 | |
| 2 | 161/99685R......Front Cover - Red...... | Capot Avant - Rouge...... | Cubierta Delantera - Roja...... | Tampa Frontal - Vermelho...... | 1 | |
| 2 | 161/99685W......Front Cover - White...... | Capot Avant - Blanc...... | Cubierta Delantera - Blanco...... | Tampa Frontal - Branco...... | 1 | |
| 3 | 7/10024......Screw...... | Vis...... | Tornillo...... | Parafuse...... | M10 x 30...... | 12 |
| 4 | 161/99686S......Cover - Orange (Left)...... | Couvercle - Orange (Gauche) Cubierta - Naranja (Iqzuierda)...... | Tampa - Laranja (Lado Esquerdo)...... | →094631...... | 1 | |
| 4 | 161/99686G......Cover - Green (Left)...... | Couvercle - Grun (Gauche) ... Cubierta - Verde (Iqzuierda)...... | Tampa - Verde (Lado Esquerdo)...... | →094631...... | 1 | |
| 4 | 161/99686Y......Cover - Yellow (Left)...... | Couvercle - Jaune (Gauche)... Cubierta - Amarillo (Iqzuierda)...... | Tampa - Amarelo (Lado Esquerdo)...... | →094631...... | 1 | |
| 4 | 161/99686B......Cover - Blue (Left)...... | Couvercle - Bleu (Gauche) Cubierta - Azúl (Iqzuierda)...... | Tampa - Azul (Lado Esquerdo)...... | →094631...... | 1 | |
| 4 | 161/99686R......Cover - Red (Left)...... | Couvercle - Rouge (Gauche). Cubierta - Roja (Iqzuierda)...... | Tampa - Vermelho (Lado Esquerdo)...... | →094631...... | 1 | |
| 4 | 161/99686W......Cover - White (Left)...... | Couvercle - Blanc (Gauche)... Cubierta - Blanco (Iqzuierda)...... | Tampa - Branco (Lado Esquerdo)...... | →094631...... | 1 | |
| 4 | 161/99753S......Cover - Orange (Left)...... | Couvercle - Orange (Gauche) Cubierta - Naranja (Iqzuierda)...... | Tampa - Laranja (Lado Esquerdo)...... | →094632...... | 1 | |
| 4 | 161/99753G......Cover - Green (Left)...... | Couvercle - Grun (Gauche) Cubierta - Verde (Iqzuierda)...... | Tampa - Verde (Lado Esquerdo)...... | →094632...... | 1 | |
| 4 | 161/99753Y......Cover - Yellow (Left)...... | Couvercle - Jaune (Gauche)... Cubierta - Amarillo (Iqzuierda)...... | Tampa - Amarelo (Lado Esquerdo)...... | →094632...... | 1 | |
| 4 | 161/99753B......Cover - Blue (Left)...... | Couvercle - Bleu (Gauche) Cubierta - Azúl (Iqzuierda)...... | Tampa - Azul (Lado Esquerdo)...... | →094632...... | 1 | |
| 4 | 161/99753R......Cover - Red (Left)...... | Couvercle - Rouge (Gauche). Cubierta - Roja (Iqzuierda)...... | Tampa - Vermelho (Lado Esquerdo)...... | →094632...... | 1 | |
| 4 | 161/99753W......Cover - White (Left)...... | Couvercle - Blanc (Gauche)... Cubierta - Blanco (Iqzuierda)...... | Tampa - Branco (Lado Esquerdo)...... | →094632...... | 1 | |
| 5 | 161/99687S......Cover - Orange (Right)...... | Couvercle - Orange (Droit) Cubierta - Naranja (Derecha)...... | Tampa - Laranja (Lado Direito)...... | →094631...... | 1 | |
| 5 | 161/99687G......Cover - Green (Right)...... | Couvercle - Grun (Droit) Cubierta - Verde (Derecha)...... | Tampa - Verde (Lado Direito)...... | →094631...... | 1 | |
| 5 | 161/99687Y......Cover - Yellow (Right)...... | Couvercle - Jaune (Droit) Cubierta - Amarillo (Derecha)...... | Tampa - Amarelo (Lado Direito)...... | →094631...... | 1 | |
| 5 | 161/99687B......Cover - Blue (Right)...... | Couvercle - Bleu (Droit) Cubierta - Azúl (Derecha)...... | Tampa - Azul (Lado Direito)...... | →094631...... | 1 | |
| 5 | 161/99687R......Cover - Red (Right)...... | Couvercle - Rouge (Droit) Cubierta - Roja (Derecha)...... | Tampa - Vermelho (Lado Direito)...... | →094631...... | 1 | |
| 5 | 161/99687W......Cover - White (Right)...... | Couvercle - Blanc (Droit) Cubierta - Blanco (Derecha)...... | Tampa - Branco (Lado Direito)...... | →094631...... | 1 | |
| 5 | 161/99752S......Cover - Orange (Right)...... | Couvercle - Orange (Droit) Cubierta - Naranja (Derecha)...... | Tampa - Laranja (Lado Direito)...... | →094632...... | 1 | |
| 5 | 161/99752G......Cover - Green (Right)...... | Couvercle - Grun (Droit) Cubierta - Verde (Derecha)...... | Tampa - Verde (Lado Direito)...... | →094632...... | 1 | |
| 5 | 161/99752Y......Cover - Yellow (Right)...... | Couvercle - Jaune (Droit) Cubierta - Amarillo (Derecha)...... | Tampa - Amarelo (Lado Direito)...... | →094632...... | 1 | |
| 5 | 161/99752B......Cover - Blue (Right)...... | Couvercle - Bleu (Droit) Cubierta - Azúl (Derecha)...... | Tampa - Azul (Lado Direito)...... | →094632...... | 1 | |
| 5 | 161/99752R......Cover - Red (Right)...... | Couvercle - Rouge (Droit) Cubierta - Roja (Derecha)...... | Tampa - Vermelho (Lado Direito)...... | →094632...... | 1 | |
| 5 | 161/99752W......Cover - White (Right)...... | Couvercle - Blanc (Droit) Cubierta - Blanco (Derecha)...... | Tampa - Branco (Lado Direito)...... | →094632...... | 1 | |
| 6 | 72/0003......Socket...... | Prise...... | Enchufe...... | Tomada...... | 1 | |
| 7 | 7/6003......Screw...... | Vis...... | Tornillo...... | Parafuse...... | M6 x 20...... | 2 |
| 8 | 4/6007......Washer...... | Rondelle...... | Arandela...... | Anilha...... | M6...... | 2 |
| 9 | 8/6007......Nut...... | Ecrou...... | Tuerca...... | Porca...... | M6...... | 2 |
| 10 | 4/8006......Washer...... | Rondelle...... | Arandela...... | Anilha...... | M8...... | 3 |
| 11 | 4/8003......Washer...... | Rondelle...... | Arandela...... | Anilha...... | M8...... | 3 |
| 12 | 7/8011......Bolt...... | Boulon...... | Perno...... | Perno...... | M8 x 20...... | 1 |
| 13 | 02.0.062......Screw...... | Vis...... | Tornillo...... | Parafuse...... | M16 x 45...... | 6 |
| 14 | 05.1.009......Washer...... | Rondelle...... | Arandela...... | Anilha...... | M16...... | 6 |
| 15 | 4/1609......Washer...... | Rondelle...... | Arandela...... | Anilha...... | M16...... | 6 |
2-02
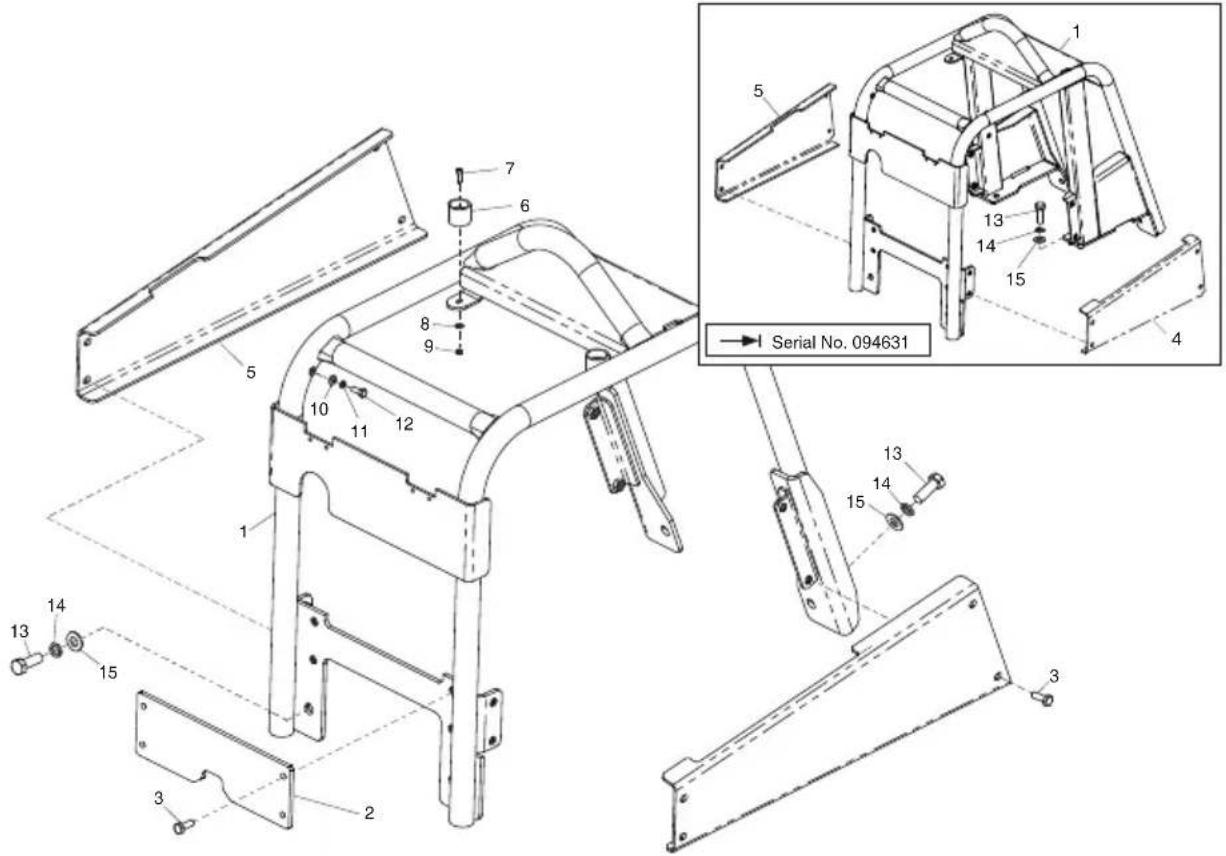
text_image
Serial No. 094631Frame, Rahmen kpl.,
text_image
Exploded view diagram of a mechanical assembly with numbered parts for identification5-01
Gearbox Assembly, Ensemble Boîte de Vitesses, Conjunto de Caja de Engranajes, Conjunto da Caixa de Engrenagens
| 1 | 161/99527....Gearbox Casing....Carter de boîte de vitesses....Envoltura de la transmisión....Estojo da caixa de engrenagens....→022107....1 |
| 1 | 161/99675....Gearbox Casing....Carter de boîte de vitesses....Envoltura de la transmisión....Estojo da caixa de engrenagens....→022108....1 |
| 2 | 15.0.102....Washer....Rondelle....Arandela....Anilha....1/4"....1 |
| 3 | 14.0.108....Plug....Bougie....Tapón....Bujão....1/4"....1 |
| 4 | 7/12010....Screw....Vis....Tornillo....Parafuse....→022107....2 |
| 4 | 7/14015....Screw....Vis....Tornillo....Parafuse....→022108....2 |
| 5 | 7/12025....Screw....Vis....Tornillo....Parafuse....→022107....3 |
| 5 | 7/14013....Screw....Vis....Tornillo....Parafuse....→022108....3 |
| 6 | 161/99532....End Cover....Carter d'extrémité....Tapa de fondo....Tampa de extremidade....1 |
| 7 | 161/99513....Screw....Vis....Tornillo....Parafuse....M10 x 20....1 |
| 8 | 4/6005....Washer....Rondelle....Arandela....Anilha....M6....10 |
| 9 | 7/6040....Screw....Vis....Tornillo....Parafuse....M6 x 20....5 |
| 10 | 53/0017....Bearing....Roulement....Cojinete....Rolamanto....1 |
| 11 | 161/99525....End Cover....Carter d'extrémité....Tapa de fondo....Tampa de extremidade....1 |
| 12 | 7/6042....Screw....Vis....Tornillo....Parafuse....M6 x 30....5 |
| 13 | 161/99652....Weight 60....Poids 60....Peso 60....Peso 60....2 |
| 14 | 161/99654....Weight 60....Poids 60....Peso 60....Peso 60....1 |
| 15 | 7/16015....Screw....Vis....Tornillo....Parafuse....M16 x 55....1 |
| 16 | 05.3.069....Washer....Rondelle....Arandela....Anilha....M16....3 |
| 17 | 3/9012....Circlip....Circlip....Resorte circular....Grampo circular....2 |
| 18 | 161/99521....Gear....Pignon....Engranaje....Engrenagen....1 |
| 19 | 161/99523....Key....Clavette....Chaveta....Chave....M10 x 8 x 18....1 |
| 20 | 161/99530....Shaft....Axe....Eje....Veio....1 |
| 21 | 7/16014....Screw....Vis....Tornillo....Parafuse....M16 x 40....2 |
| 22 | 7/12026....Screw....Vis....Tornillo....Parafuse....→022107....3 |
| 22 | 7/14014....Screw....Vis....Tornillo....Parafuse....→022108....3 |
| 23 | 161.3.073SP....Gearbox Assembly....Ensemble boîte de vitesses....Conjunto de caja de engranajes...Conjunto da Caixa de Engrenagens....→022108....1 |
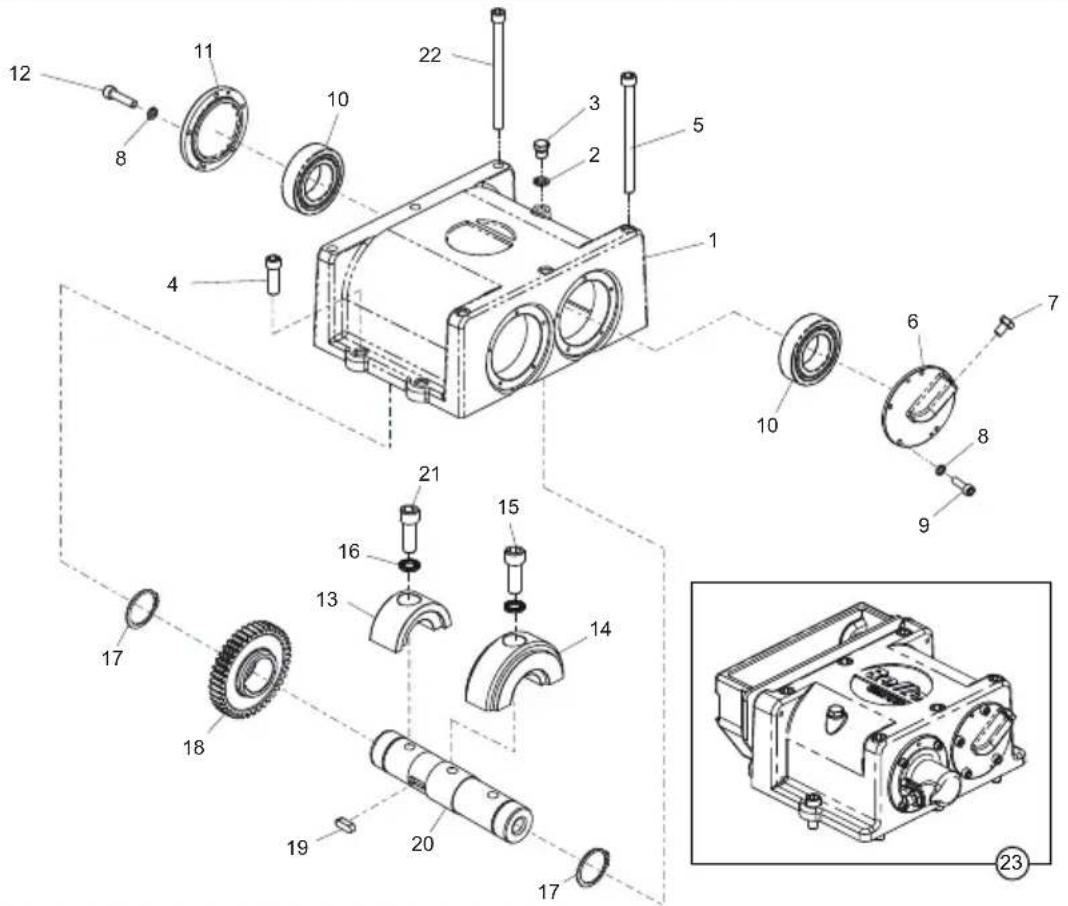
text_image
Exploded view diagram of a mechanical assembly with numbered parts for identification5-01
text_image
Exploded view diagram of a mechanical assembly with numbered parts for identificationGearbox Assembly, Ensemble Boîte de Vitesses,
11.06.2007
text_image
Exploded view diagram of a mechanical assembly with numbered parts for identificationtext_image
Technical diagram of an electric motor assembly with numbered parts and component layouts, including exploded views and part numbers.Hatz Engine and Drive Kit, Hatz Moteur et Kit d'Entrainement, Hatz Motor y Kit Transmission, Hatz Motor e Kit de Transmissão
| 1 | 6/0202 | Adaptor | Adapteur | Adaptador | Adaptador | 1 |
| 2 | 14.0.108 | Plug | Bougie | Tapón | Bujão | 1 |
| 3 | 20/0071 | Engine - Electric | Moteur - Electricque | Motor - Electricidad | Motor - Eléctrico | Non EPA Only |
| 3 | 20/0117 | Engine - Electric | Moteur - Electricque | Motor - Electricidad | Motor - Eléctrico | EPA Only |
| 3 | 20/0072 | Engine - Crank Handle | Moteur - Manivelle | Motor - Por Manivela | Motor - Por Manivela | Non EPA Only |
| 3 | 20/0118 | Engine - Crank Handle | Moteur - Manivelle | Motor - Por Manivela | Motor - Por Manivela | EPA Only |
| 4 | 7/12004 | Screw | Vis | Tornillo | Parafuso | M12 x 25 |
| 5 | 4/1202 | Washer | Rondelle | Arandela | Anilha | M12 |
| 6 | 05.1.002 | Washer | Rondelle | Arandela | Anilha | M4 |
| 7 | 7/4002 | Screw | Vis | Tornillo | Parafuso | M4 x 12 |
| 8 | 21.0.336 | Clip | Chape | Presilla | Grampo | M5 x 20 |
| 9 | 161/11600 | Kit | Kit | Kit | Kit | →001930 |
| 9 | 161/99692 | Shaft | Axe | Eje | Veio | →001931 |
| 10 | 161/11600 | Kit | Kit | Kit | Kit | →001930 |
| 10 | 161/27500 | Kit | Kit | Kit | Kit | →001931 093506 |
| 10 | 21/0393 | Clutch | Embrayage | Embrague | Embraiagem | →093507 |
| 11 | 4/8003 | Washer | Rondelle | Arandela | Anilha | M8 |
| 12 | 7/8012 | Bolt | Boulon | Perno | Perno | M8 x 25 |
| 13 | 4/1201 | Washer | Rondelle | Arandela | Anilha | M12 |
| 14 | 9/12038 | Bolt | Boulon | Perno | Perno | M12 x 50 |
| 15 | 30/0081 | Hose | Durit | Flexible | Tubagem | 1 |
| 16 | 53/0016 | Bearing | Roulement | Cojinete | Rolamanto | 1 |
| 17 | MS22 | Circlip | Circlip | Resorte circular | Grampo circular | 1 |
| 18 | 161/26100 | Pin | Goupille | Pasador | Pino | 1 |
| 19 | 3/9003 | Circlip | Circlip | Resorte circular | Grampo circular | 1 |
| 20 | 161/26100 | Pulley | Poulie | Polia | Polia | 1 |
| 21 | 7/10010 | Screw | Vis | Tornillo | Parafuso | M10 x 30 |
| 22 | 21/0170 | Belt | Courroie | Correa | Cinta | 1 |
| 23 | 161/99650 | Pulley | Poulie | Polia | Polia | 1 |
| 24 | 21/0230 | Handle | Poignee | Manillar | Punho | M8 x 20 |
| 25 | 7/8037 | Screw | Vis | Tornillo | Parafuso | M8 x 20 |
| 26 | 21/0144 | Clip | Chape | Presilla | Grampo | 2 |
| 27 | 161/99619 | Bracket | Patte du Montage | Escuadra | Suporte | 2 |
| 28 | 8/6002 | Nut | Ecrou | Tuerca | Porca | M6 |
| 29 | 21/0231 | Ignition | Ignition | Ignición | Ignição | 1 |
| 30 | 21/0229 | Key | Clavette | Chaveta | Chave | 1 |
| 31 | 7/6025 | Screw | Vis | Tornillo | Parafuso | M6 x 20 |
| 32 | 161/99574 | Plate | Plaque | Placa | Placa | 1 |
| 33 | 4/8006 | Washer | Rondelle | Arandela | Anilha | M8 |
| 34 | 7/8011 | Screw | Vis | Tornillo | Parafuso | M8 x 20 |
| 35 | 4/1003 | Washer | Rondelle | Arandela | Anilha | M10 |
| 36 | 4/1005 | Washer | Rondelle | Arandela | Anilha | M10 |
| 37 | 161/99763 | Pulley | Poulie | Polia | Polia | 1 |
| 38 | 161/99764 | Pulley | Poulie | Polia | Polia | 1 |
| 39 | 161/99715 | Pin | Goupille | Pasador | Pino | 1 |
| 40 | 7/8077 | Screw | Vis | Tornillo | Parafuso | M8 x 20 |
| 41 | 21/0362 | Spring | Ressort | Resorte | Mola | 2 |
| 42 | 21/0367 | Clutch Lining | Doublure embrayage | Guarnición de embrague | Iona de embreagem | 2 |
| 43 | 21/0368KIT | Clutch Kit | Kit d'embrayage | Kit de embrague | Kit de embraiagem | 1 |
6-01
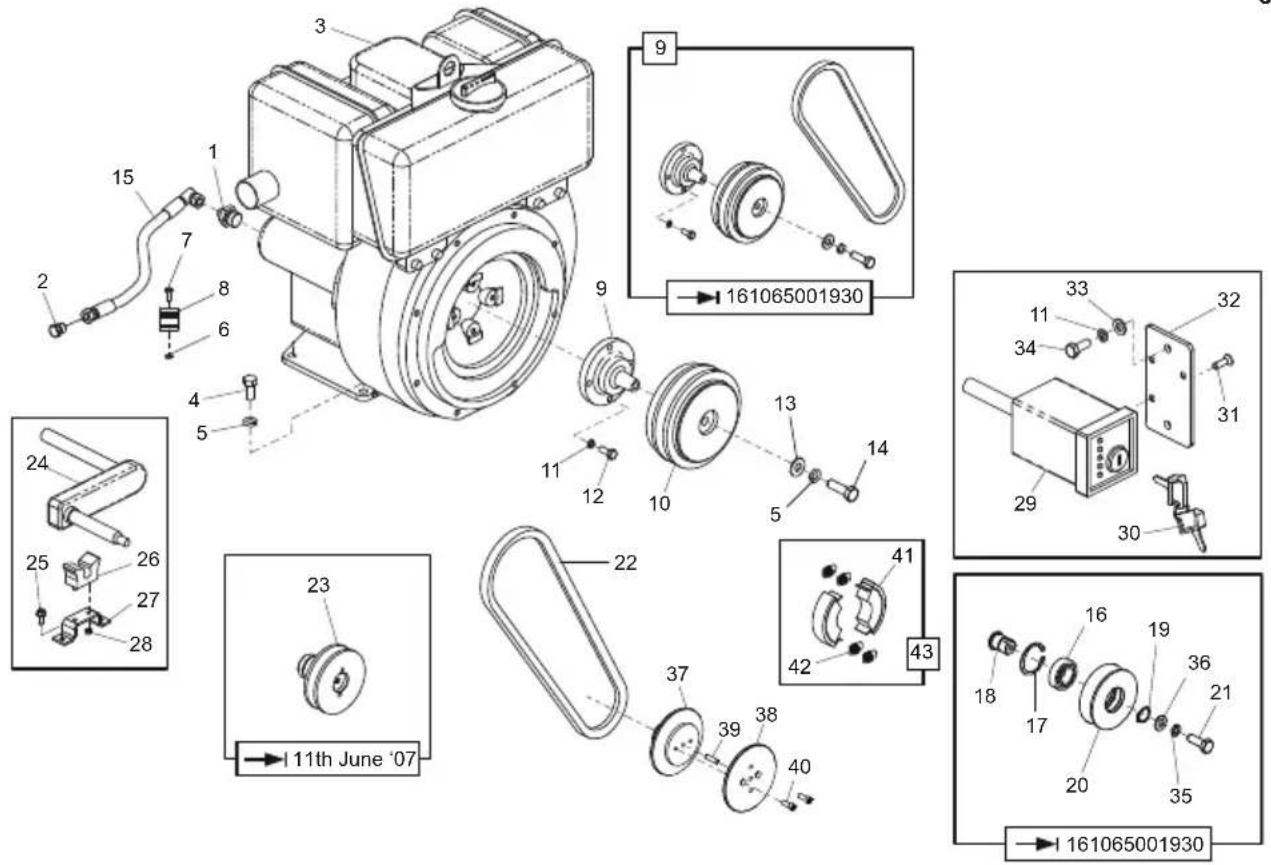
text_image
Technical diagram of an electric motor with numbered components and assembly details, including part numbers and assembly dates.text_image
Technical diagram of a mechanical device with numbered components and labeled partsThrottle Cable, Cable d'Accélérateur, Cable de Aceleración, Cabo do Estrangulador
| 1 | 161/99665 | Lever | Manette | Palanca | Alavanca | 1 |
| 2 | 8/6007 | Nut | Ecrou | Tuerca | Porca | M6 |
| 3 | 7/6004 | Screw | Vis | Tornillo | Parafuso | M6 x 16 |
| 4 | 3/5044 | Adaptor | Adapteur | Adaptador | Adaptador | 1 |
| 5 | 8/8001 | Nut | Ecrou | Tuerca | Porca | M8 |
| 6 | 3/5044 | Adaptor | Adapteur | Adaptador | Adaptador | 1 |
| 7 | 4/6007 | Washer | Rondelle | Arandela | Anilha | M6 |
| 8 | 161/99666 | Bracket | Patte du Montage | Escuadra | Suporte | 1 |
| 9 | 161/08101 | Throttle Cable | Câble d'accélérateur | Cable de aceleración | Cabo do estrangulador | Non EPA/Tier 4 Only |
| 10 | 7/6012 | Screw | Vis | Tornillo | Parafuso | Non EPA/Tier 4 Only |
| 10 | 7/6039 | Screw | Vis | Tornillo | Parafuso | EPA/Tier 4 Only |
| 11 | 161/08102 | Throttle Lever | Manette d'accélérateur | Palanca de aceleración | Alavanca do estrangulador | Non EPA/Tier 4 Only |
| 12 | 161/08100 | Throttle Lever & Cable | Manette des gaz et le câble | Palanca del acelerador y el cable | Alavanca do acelerador e cabo | Non EPA/Tier 4 Only |
| 12 | 21/0355 | Throttle Lever & Cable | Manette des gaz et le câble | Palanca del acelerador y el cable | Alavanca do acelerador e cabo | EPA/Tier 4 Only |
| 13 | 8/5002 | Nut | Ecrou | Tuerca | Porca | M5 |
| 14 | 161/99662 | Spacer | Entretoise | Espaciador | Espaçador | 2 |
| 15 | 07.0.140 | Screw | Vis | Tornillo | Parafuso | M5 x 20 |
| 16 | 161/08300 | Throttle Lever | Manette d'accélérateur | Palanca de aceleración | Alavanca do estrangulador | 1 |
| 17 | 4/6005 | Washer | Rondelle | Arandela | Anilha | EPA/Tier 4 Only |
| 18 | 4/6001 | Washer | Rondelle | Arandela | Anilha | EPA/Tier 4 Only |
| 19 | 7/6051 | Screw | Vis | Tornillo | Parafuso | EPA/Tier 4 Only |
| 20 | 8/6001 | Nut | Ecrou | Tuerca | Porca | EPA/Tier 4 Only |
| 21 | 161/99418 | Bracket | Patte du Montage | Escuadra | Suporte | EPA/Tier 4 Only |
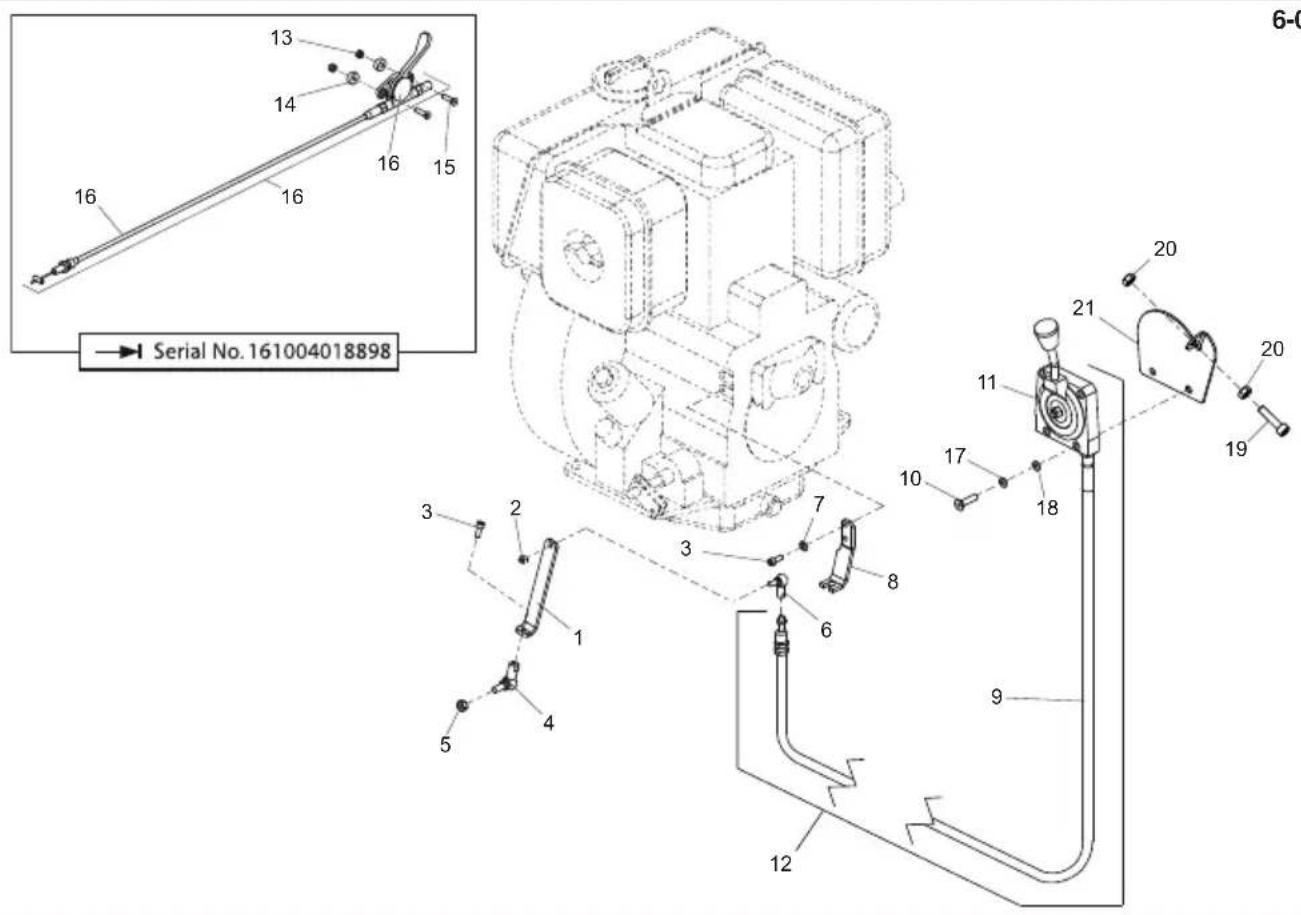
text_image
Serial No. 161004018898 6-0Gaskabel, Drossellklappenkabel, Gashändtagskabel, Cavo dell'Acceletatore
| 1 | 161/99665 | Hendel | Hebel | Arm | Leva | 1 |
| 2 | 8/6007 | Moer | Mutter | Motrik | Dado | M6 |
| 3 | 7/6004 | Schroef | Schraube | Skrue | Vite | M6 x 16 |
| 4 | 3/5044 | Adaptor | Adaptor | Adaptor | Adattatore | 1 |
| 5 | 8/8001 | Moer | Mutter | Motrik | Dado | M8 |
| 6 | 3/5044 | Adaptor | Adaptor | Adaptor | Adattatore | 1 |
| 7 | 4/6007 | Afdichtring | Scheibe | Spændeskive | Cuscinetto | M6 |
| 8 | 161/99666 | Steu | Halterung | Beslag | Staffa | 1 |
| 9 | 161/08101 | Gaskabel | Drossellklappenkabel | Gashåndtagskabel | Cavo dell'acceleratore | Non EPA/Tier 4 Only |
| 10 | 7/6012 | Schroef | Schraube | Skrue | Vite | Non EPA/Tier 4 Only |
| 10 | 7/6039 | Schroef | Schraube | Skrue | Vite | EPA/Tier 4 Only |
| 11 | 161/08102 | Gashendel | Drosselklappenhebel | Gashåndtag | Leva dell'acceleratore | Non EPA/Tier 4 Only |
| 12 | 161/08100 | Gashendel en kabel | Gashebel und Kabel | Gashåndtaget og kabel | Leva dell'acceleratore e il cavo | Non EPA/Tier 4 Only |
| 12 | 21/0355 | Gashendel en kabel | Gashebel und Kabel | Gashåndtaget og kabel | Leva dell'acceleratore e il cavo | EPA/Tier 4 Only |
| 13 | 8/5002 | Moer | Mutter | Motrik | Dado | M5 |
| 14 | 161/99662 | Afstandsstuk | Distanzstück | Afstandsstykke | Distanziale | 2 |
| 15 | 07.0.140 | Schroef | Schraube | Skrue | Vite | M5 x 20 |
| 16 | 161/08300 | Gashendel | Drosselklappenhebel | Gashåndtag | Leva dell'acceleratore | 1 |
| 17 | 4/6005 | Afdichtring | Scheibe | Spændeskive | Cuscinetto | EPA/Tier 4 Only |
| 18 | 4/6001 | Afdichtring | Scheibe | Spændeskive | Cuscinetto | EPA/Tier 4 Only |
| 19 | 7/6051 | Schroef | Schraube | Skrue | Vite | EPA/Tier 4 Only |
| 20 | 8/6001 | Moer | Mutter | Motrik | Dado | EPA/Tier 4 Only |
| 21 | 161/99418 | Steu | Halterung | Beslag | Staffa | EPA/Tier 4 Only |
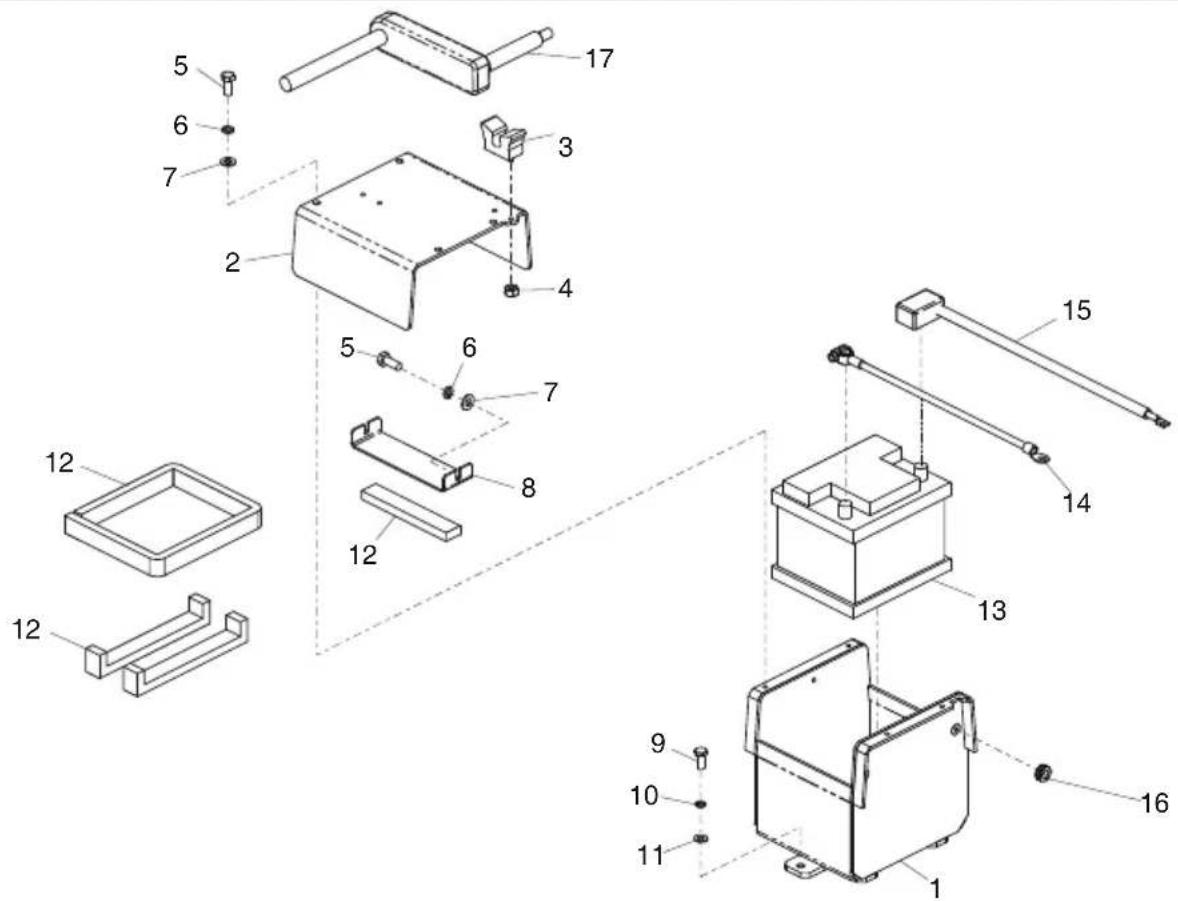
text_image
Exploded view diagram of a mechanical assembly with numbered components for identificationBattery Holder, Support de Batterie Soporte de Bateria, Suporte de Bateria
| 1 | 161/02400 | Battery Holder | Support de Batterie | Soporte de Bateria | Suporte de Bateria | 1 |
| 2 | 161/99577 | Cover | Couvercle | Cubierta | Tampa | 1 |
| 3 | 21/0144 | Clip | Chape | Presilla | Grampo | 2 |
| 4 | 8/6002 | Nut | Ecrou | Tuerca | Porca | M6 |
| 5 | 7/8011 | Bolt | Boulon | Perno | Perno | M8 x 20 |
| 6 | 4/8003 | Washer | Rondelle | Arandela | Anilha | M8 |
| 7 | 4/8006 | Washer | Rondelle | Arandela | Anilha | M8 |
| 8 | 161/99578 | Clamp | Blocage | Mordaza | Grampo | 1 |
| 9 | 7/10005 | Screw | Vis | Tornillo | Parafuso | M10 x 25 |
| 10 | 4/1003 | Washer | Rondelle | Arandela | Anilha | M10 |
| 11 | 4/1005 | Washer | Rondelle | Arandela | Anilha | M10 |
| 12 | 3/4110 | Edging Strip | Gaine Protection | Banda Protectora | Fita de rebordo | X |
| 13 | 70/0217 | Battery | Batterie | Bateria | Bateria | 1 |
| 14 | 70/0232 | Cable | Cable | Cable | Cable | 1 |
| 15 | 140/05500 | Cable | Cable | Cable | Cable | 1 |
| 16 | 3/4036 | Grommet | Passe-fil | Anillo | Anel Isolante | 1 |
| 17 | 21/0230 | Handle | Poignée | Manillar | Punho | 1 |
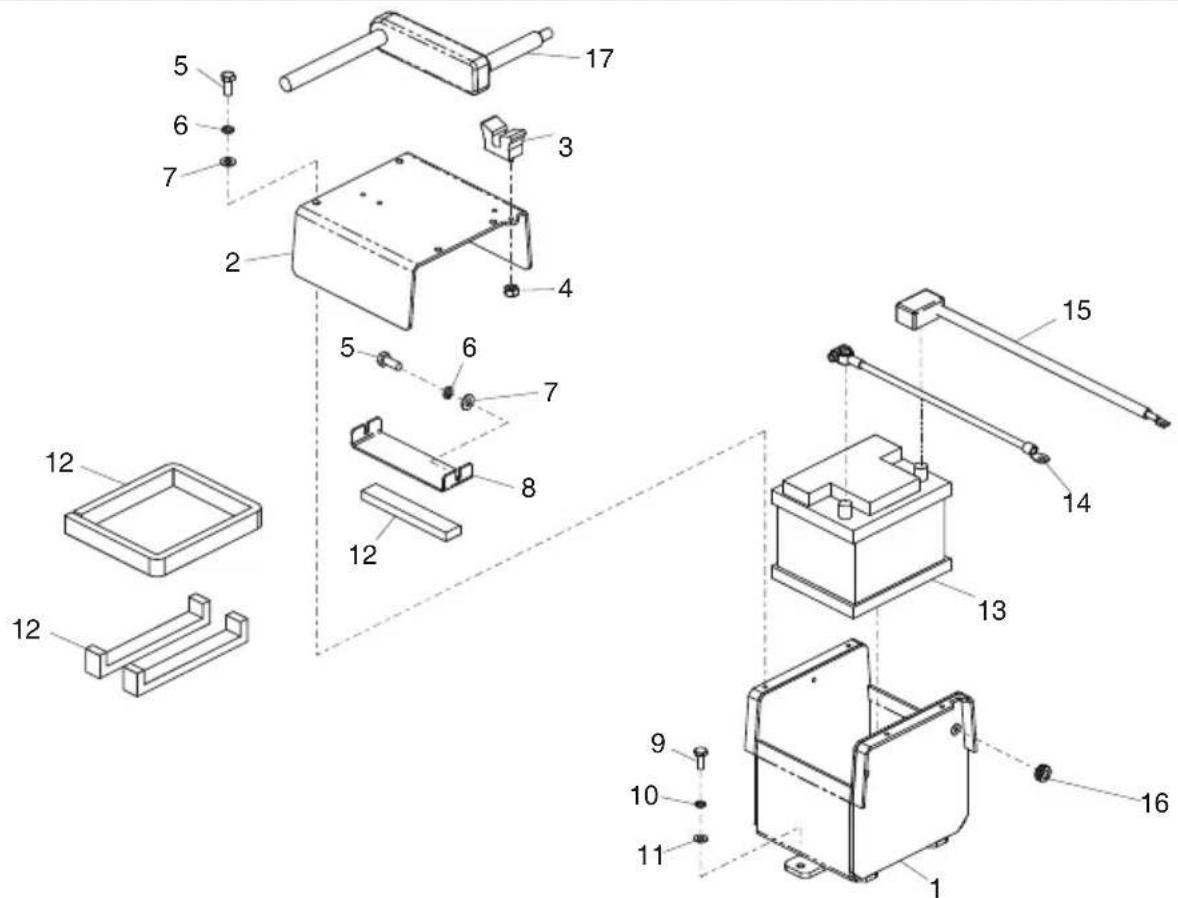
text_image
Exploded view diagram of a mechanical assembly with numbered components for identificationAccu Houder, Batterie Halter, Batteri Beslag, Contenitore Batteria
| 1 | 161/02400 | Accu Houder | Batterie Halter | Batteri Beslag | Contenitore batteria | 1 |
| 2 | 161/99577 | Deksel | Abdeckung | Dæk | Coperchio | 1 |
| 3 | 21/0144 | Klem | Clip | Klemme | Fermaglio | 2 |
| 4 | 8/6002 | Moer | Mutter | Motrik | Dado | 2 |
| 5 | 7/8011 | Bouten | Bolzen | Skruebolt | Bulloni | 5 |
| 6 | 4/8003 | Afdichtring | Scheibe | Spændeskive | Cuscinetto | 5 |
| 7 | 4/8006 | Afdichtring | Scheibe | Spændeskive | Cuscinetto | 5 |
| 8 | 161/99578 | Klem | Schelle | Klemme | Morsetto | 1 |
| 9 | 7/10005 | Schroef | Schraube | Skrue | Vite | 2 |
| 10 | 4/1003 | Afdichtring | Scheibe | Spændeskive | Cuscinetto | 2 |
| 11 | 4/1005 | Afdichtring | Scheibe | Spændeskive | Cuscinetto | 3 |
| 12 | 3/4110 | Kantstrip | Kantenschutz | Käntband | Gaina Protettiv | X |
| 13 | 70/0217 | Accu | Batterie | Batteri | Batteria | 1 |
| 14 | 70/0232 | Kabel | Kabel | Kabel | Cavo | 1 |
| 15 | 140/05500 | Kabel | Kabel | Kabel | Cavo | 1 |
| 16 | 3/4036 | Pakkingring | Auge | Kordelstrop | Anello in gomma | 1 |
| 17 | 21/0230 | Hendel | Griff | Håndtag | Impugnatura | 1 |
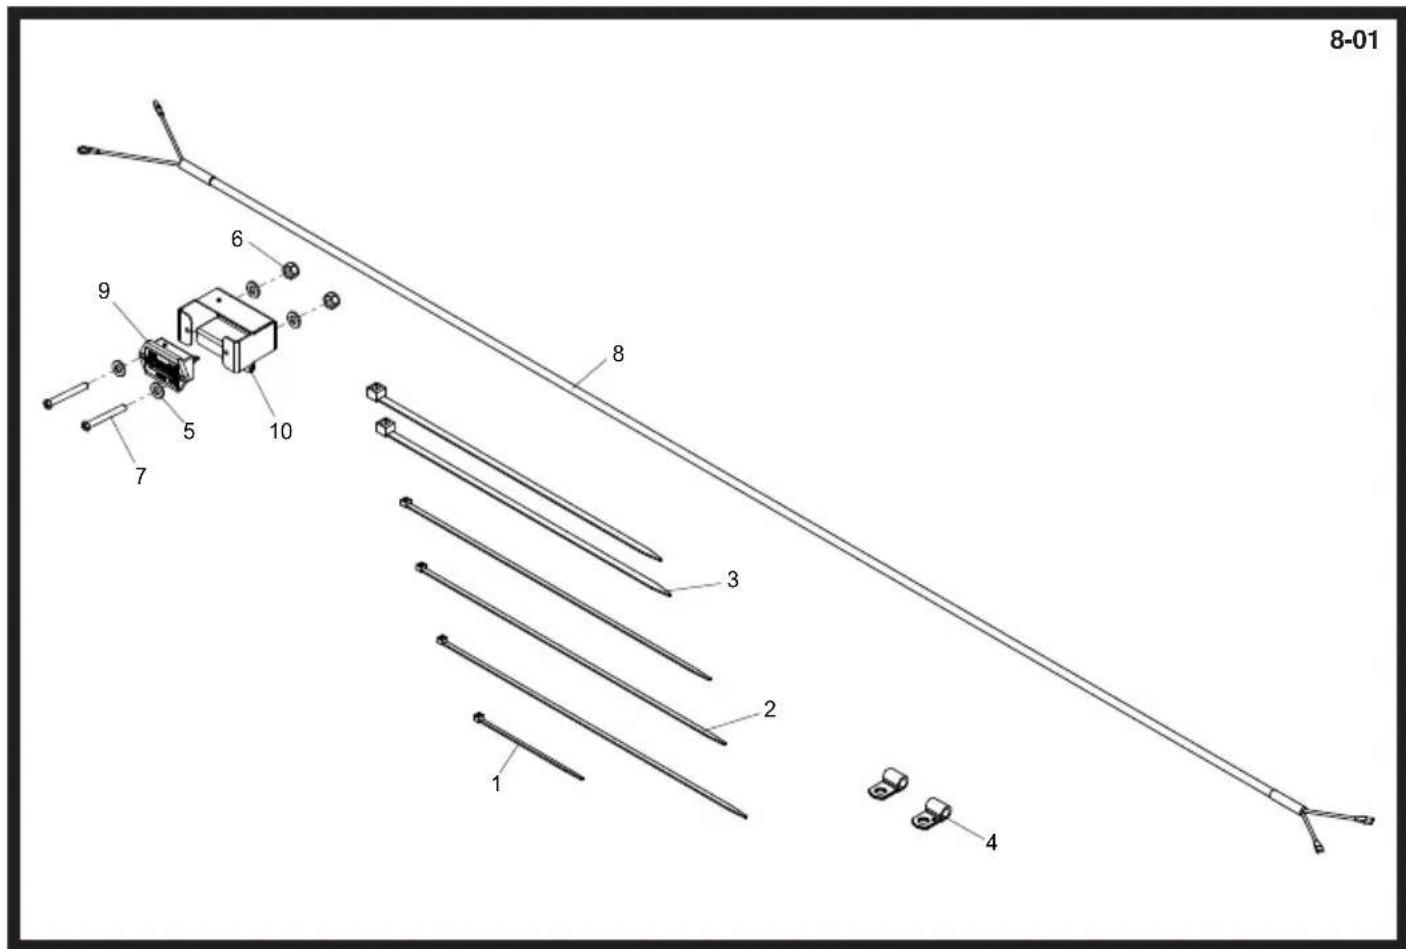
text_image
8-01 6 9 5 10 7 8 3 2 1 4Decals, Autocollant, Rótulo, Decalque
| 1 | 161/99547 | Decal | Autocollant | Rótulo | Decalque | RPC 60/80 | 1 |
| 2 | 161/99547 | Decal | Autocollant | Rótulo | Decalque | RPC 60/80 | 1 |
| 3 | 161.0.293 | Decal - Control | Autocollant - Controller | Rótulo - Control | Decalque - Controle | 1 | |
| 4 | 800/99782 | Decal - Noise | Autocollant - Bruits | Rótulo - Ruidos | Decalque - Ruído | 109dBA | 1 |
| 5 | 161.0.293 | Decal - Warning | Autocollant - Avertissement | Rótulo - Aviso | Decalque - Aviso | 1 | |
| 6 | 161.0.293 | Decal - Throttle | Autocollant - Accélérateur | Rótulo - Acelerador | Decalque - Estrangulador | Non EPA Only | 1 |
| 6 | 800/99506 | Decal - Throttle | Autocollant - Accélérateur | Rótulo - Acelerador | Decalque - Estrangulador | EPA Only | 1 |
| 7 | 161.0.293 | Decal | Autocollant | Rótulo | Decalque | 1 |
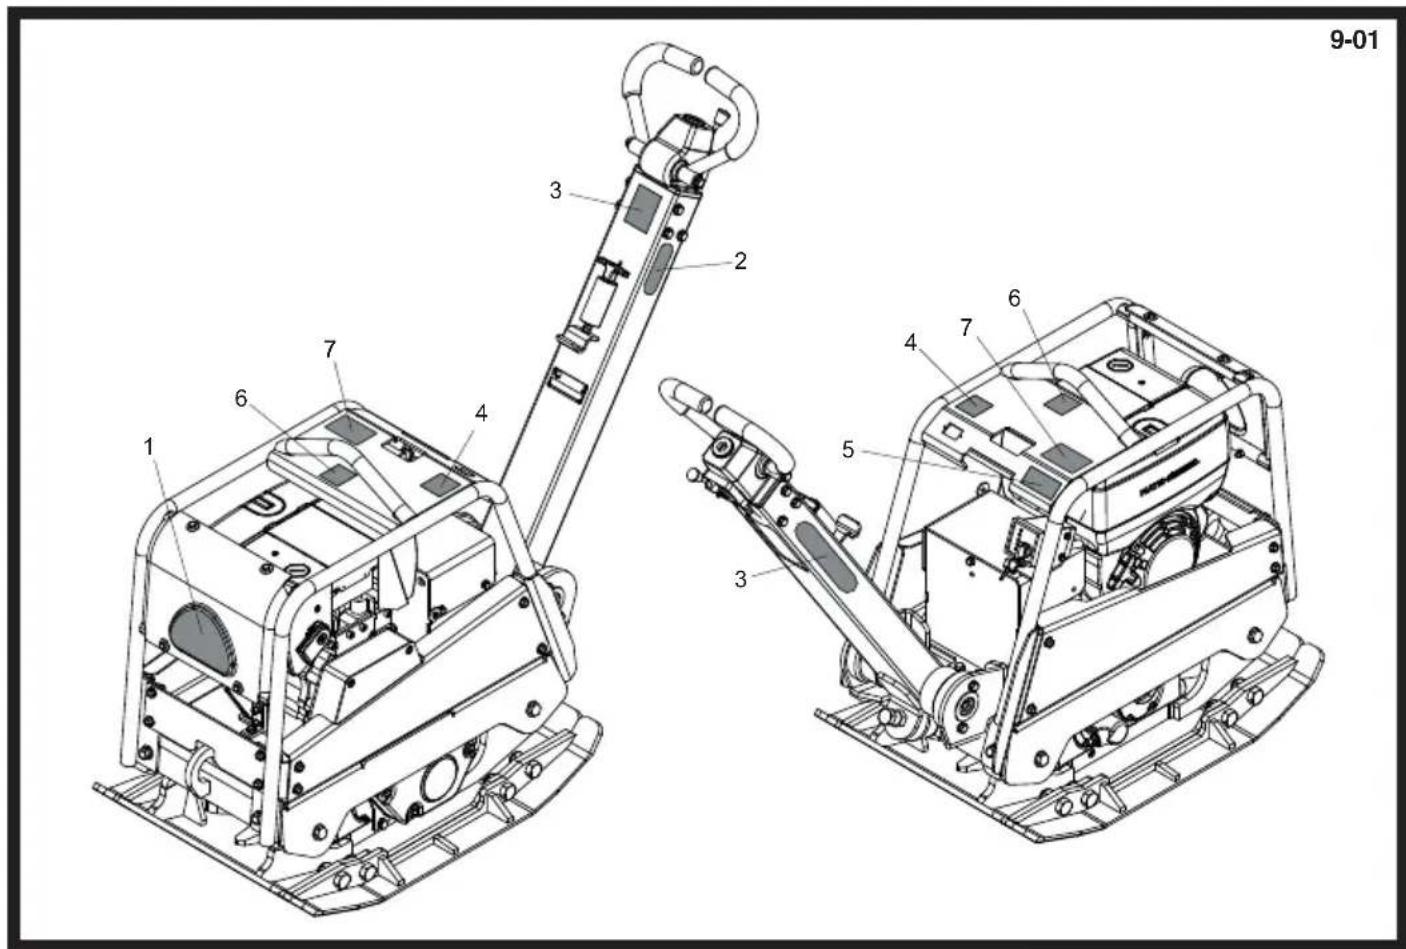
text_image
9-01 1 2 3 4 5 6 7 8 9-01Label, Abziehbild, Skilt, Decalcomanie
| 1 | 161.0.429......Label ......Abziehbild ...... Skilt ......Decalcomania.... RPC 60/80....1 |
| 2 | 161.0.429......Label ......Abziehbild ...... Skilt ......Decalcomania.... RPC 60/80....1 |
| 3 | 161.0.293......Label - Heerschappij......Abziehbild - Bowden...... Skilt - Regere ...... Decalcomania - Controle....1 |
| 4 | 800/99782......Label - Guluid ......Abziehbild - Geräuschpegelschild. Skilt - Skilt Støj ...... Decalcomania - Sulla rumorosità.... 109dBA....1 |
| 5 | 161.0.293......Label - Waarschuwing.. Abziehbild - Warnung ...... Skilt - Advarsel ...... Decalcomania - Avvertenza....1 |
| 6 | 161.0.293......Label - Gashendel......Abziehbild - Drossel...... Skilt - Gashändtags ...... Decalcomania - Acceleratore.... Non EPA Only....1 |
| 6 | 800/99506......Label - Gashendel......Abziehbild - Drossel...... Skilt - Gashändtags ...... Decalcomania - Acceleratore.... EPA Only....1 |
| 7 | 161.0.429......Label ......Abziehbild ...... Skilt ...... Decalcomania....1 |