
AMW43EU - Mouse TARGUS - Free user manual and instructions
Find the device manual for free AMW43EU TARGUS in PDF.
| Brand | Targus |
| Model | AMW43EU |
| Product Type | Wireless Mouse |
| Connection Technology | RF 2.4 GHz |
| Wireless Range | Up to 10 meters (33 feet) |
| Power Supply | 2 AA batteries (included) |
| Low Battery Indicator | Yes, flashing red LED on the scroll button |
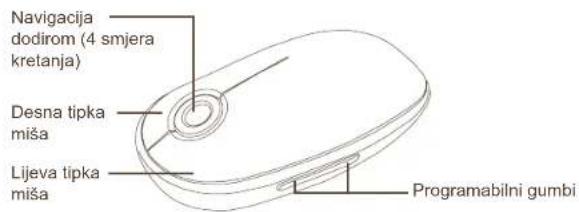
| Scroll Button | 4 directions with fast scroll function |
| Programmable Buttons | Yes, via Targus Device Controller software |
| System Compatibility | Mac OS X 10.4 or later; USB port required |
| Receiver | Mini USB receiver, stored in battery compartment |
| Configuration Software | Downloadable from Targus official website (Model AMW43) |
| Cleaning and Maintenance | Clean with a soft, dry cloth; do not use abrasive products |
| Safety Precautions | Do not expose to moisture; keep batteries away from children |
| Batteries Supplied | 2 AA batteries |
Frequently Asked Questions - AMW43EU TARGUS
User questions about AMW43EU TARGUS
0 question about this device. Answer the ones you know or ask your own.
Ask a new question about this device
Download the instructions for your Mouse in PDF format for free! Find your manual AMW43EU - TARGUS and take your electronic device back in hand. On this page are published all the documents necessary for the use of your device. AMW43EU by TARGUS.
USER MANUAL AMW43EU TARGUS
www.targ us.com/uk/forM ac
- Manufacture or imported by Tampa, Tampa Bay, U.S., Houston, MO address, TXM 002-365. All rights reserved. Tampa is other registered trademarks of landmark & Tampa Group in America and its other countries. Features and specifications are subject to change in the material properties of the United States. The full name of registrant is: Dallas, Texas, New York City, New York City, Dallas, New York City, Dallas, New York City, Dallas, New York City, Dallas, New York City, Dallas, New York City, Dallas, New York City, Dallas, New York City, Dallas, New York City, Dallas, New York City, Dallas, New York City, Dallas, New York City, Dallas, New York City, Dallas, New York City, Dallas, New York City, Dallas, New York City, Dallas, New York City, Dallas, New YorkCity, Dallas, Dallas, Dallas, Dallas, Dallas, Dallas, Dallas, Dallas, Dallas, Dallas, Dallas, Dallas, Dallas, Dallas, Dallas, Dallas, Dallas, Dallas, Dallas, Dallas, Dallas, Dallas, Dallas, Dallas, Dallas, Dallas, Dallas, Dallas, Dallas, Dallas, Dallas, Dallas, Dallas, Dallas, Dallas, Dallas, Dallas, Dallas, Dallas, Dallas, Dallas, Dallas, Dallas, Dallas, Dallas, Dallas, Dallas, Dallas, Dallas, Dallas, D.C.
TWO YEAR LIMITED WARRANTY
Targus®
USER GUIDE
Wireless Mouse
for Mac ^®
Wireless Mouse Wireless Mouse
Table of Contents
GB – English
Targus Wireless Mouse 5
Wireless Mouse Wireless Mouse
NL - Nederlands
Targus Draadloze Muis 155
NO - Norsk
Targus Wireless Mouse
Introduction
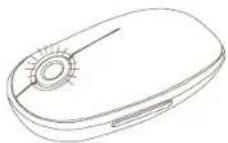
Congratulations on your purchase of the Targus Wireless Mouse. This wireless mouse uses 2.4GHz RF technology which provides a seamless connection up to 33 ft (10 m) away.
System Requirements
Hardware
- USB port
Operating System
• Mac OS® X 10.4 or later
Wireless Mouse
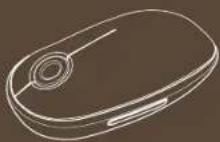
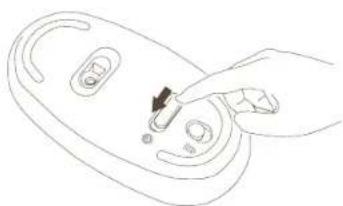
Installing the Batteries
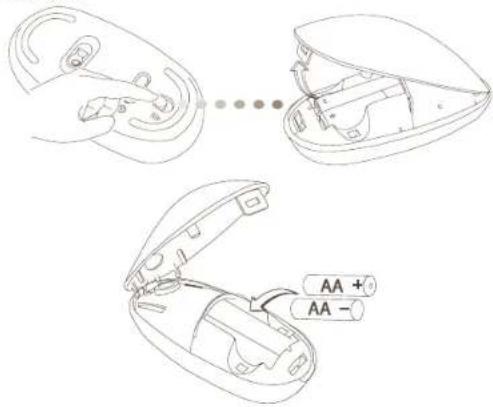
- Please use the two AA batteries that are included.
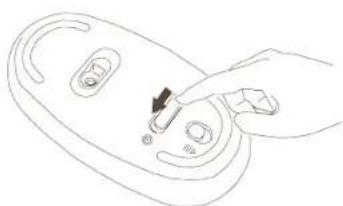
- Remove the battery cover by sliding the release button on the bottom of the mouse. Once the battery cover releases, simply lift it up from the back of the mouse.
- Insert the batteries, making sure that the positive (+) and negative (-) ends of each battery match the polarity indicators inside the battery compartment.
Wireless Mouse
- Once the batteries are installed. Close the battery compartment by first re-inserting the front of the cover and then pressing down the back until it locks into position.
natural_image
Technical line drawing of a mechanical component with no visible text or symbols- Turn on the mouse by sliding the on/off switch on the bottom to the "on" position.
natural_image
Line drawing of a hand pressing a button on a device (no text or symbols)Wireless Mouse
Low Battery Power Indicator

NOTE: WHEN THE BATTERY POWER IS LOW, THE TOUCH SCROLL WILL FLASH RED. PLEASE REPLACE THE BATTERIES.
When 60 minutes of power remains, a red indicator light will glow for 8 seconds.
When only 30 minutes of power remains, the red indicator light will blink continuously.
Using the Mouse
Wireless Mouse
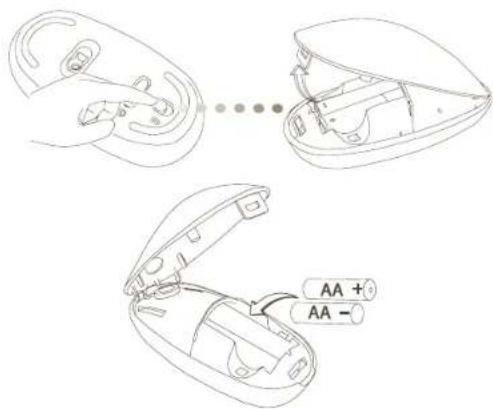
Establishing the Connection
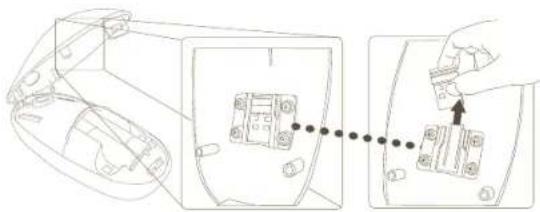
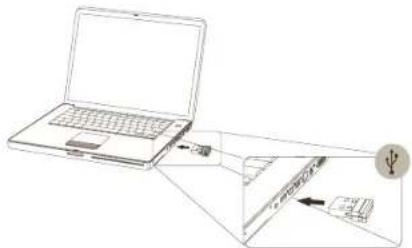
- Remove the mini USB receiver from the bottom of the mouse cover.
natural_image
Diagram showing a hand inserting electronic components into a device housing (no text or symbols present)- Plug the USB receiver into an available USB port on your computer
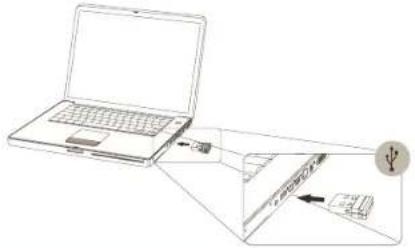
natural_image
Line drawing of a laptop and a file with an arrow indicating a physical setup (no text or symbols present)- You are ready to use the mouse.
Wireless Mouse
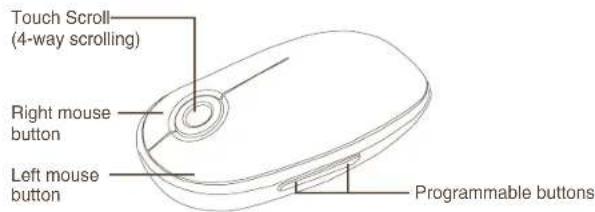
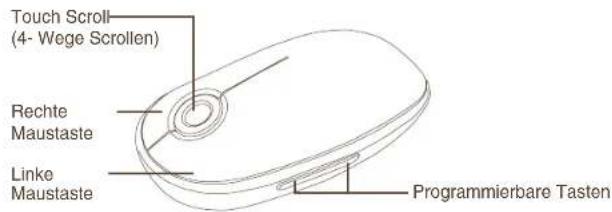
Using the Touch Scroll
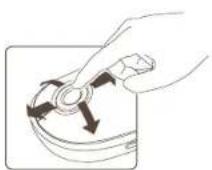
- Slide your finger over the Touch Scroll sensing area to use the 4-way scrolling function.
- Quickly slide your finger (either up or down) over the Touch Scroll to activate the quick scrolling function.
- Press any button to disable the quick scrolling function.

NOTE: PLEASE REMOVE THE PROTECTIVE PLASTIC FILM ON THE TOUCH SCROLL BEFORE USING THE DEVICE.
Installing Software for Programmable Buttons
Installing the software enables configuration of the programmable buttons.
The latest software (Model # AMW43) can be downloaded from the official Targus web site: http://www.targus.com/uk/Downloads/AMW43EU.dmg
Double click the setup icon to launch the installation software.
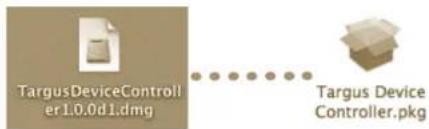
Wireless Mouse
Follow the on-screen instructions to complete the installation.
![Welcome to the Project Manager (Project Manager) My Computer is also to help you use this project in your application. This project is completed by: [ ] Please click the project manager's name and password. [ ] Please click the project manager's name and password. [ ] Please click the project manager's name and password. [ ] Please click the project manager's name and password. [ ] Please click the project manager's name and password. [ ] Please click the project manager's name and password. [ ] Please click the project manager's name and password. [ ] Please click the project manager's name and password. [ ] Please click the project manager’s name and password. [ ] Please click the project manager’s name and password. [ ] Please click the project manager’s name and password. [ ] Please click the project manager’s name and password. [ ] Please click the project manager’s name and password. [ ] Please click the project manager’s name and password. [ ] Please click the project manager’s name and password. [ ] Please click the project manager’s name and password. [ ] Please call to an application to install a project manager. [ ] Please call to an application to install a project manager. [ ] Please call to an application to install a project manager. [ ] Please call to an application to install a project manager. [ ] Please call to an application to install a project manager. [ ] Please call to an application to install a project manager. [ ] Please call to an application to install a project manager. [ ] Please call to an application to install a project manager. This image is not a chart or any data series.](/content/2026/03/567176/images/a205fbca979f574f782f964da4cdd847ac873def047486ca18f6c7c84986550c.jpg)
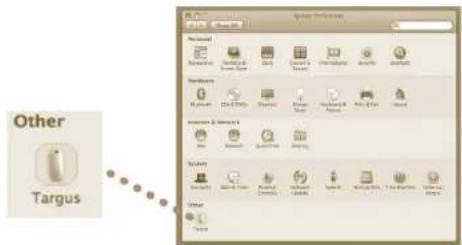
After the software is successfully installed, restart your computer to finish installing the software.
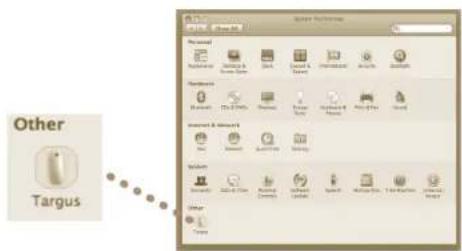
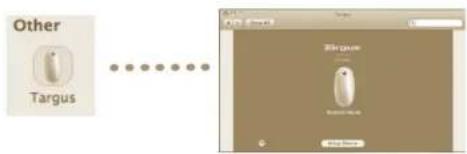
A Targus icon will appear in the System Preferences window.
Wireless Mouse
Programming the Buttons
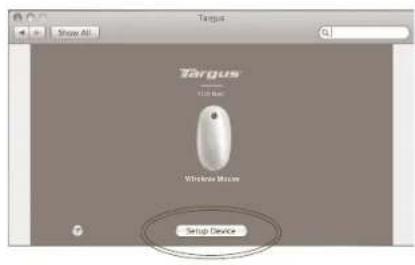
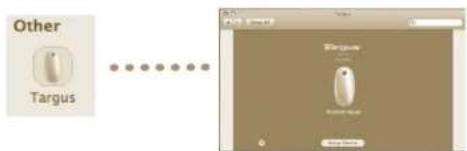
Click on the Targus logo to launch the device application.

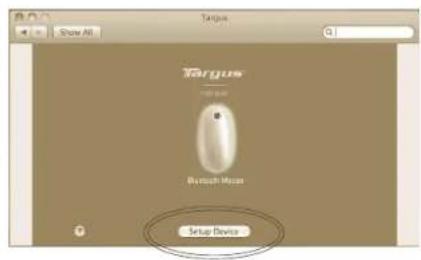
Click to highlight the image of the device and then press "Setup Device" to launch the configuration software.
Wireless Mouse
Click the arrows on the right-side of the drop down lists to configure each button.
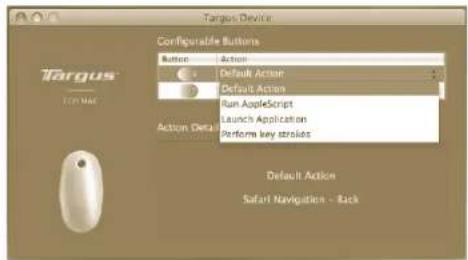
Each button can be programmed to any of the following types of functions:
| Default Action Set the buttons to a specific function. | |
| Run AppleScript Set the buttons to load an AppleScript | |
| Launch Application | Set the buttons to launch specific application installed in the computer. |
| Perform key strokes Set the button to recall key strokes. | |
| Predefined functions Set the button to map pre-set actions | |
Close the application window to apply the changes.
Wireless Mouse
Troubleshooting
The mouse is not working.
- Make sure the batteries are installed correctly. The positive (+) and negative (-) ends of each battery must match the positive (+) and negative (-) connections in the battery compartment.
- Make sure the batteries are charged. Replace if necessary.
- Verify that the computer's USB port is functioning.
- Try plugging the USB receiver into another USB port.
Receiver Information:
FCC ID: FSUKM009
IC: 3760A-00016
Rating: 5V --- 25mA
Wireless Mouse
Безжична мишка Targus
Въведение
natural_image
Technical line drawing of a mechanical component with no visible text or symbolsnatural_image
Line drawing of a hand pressing a button on a device (no text or symbols)Wireless Mouse
natural_image
Diagram showing a hand inserting electronic components into a device casing, with no visible text or symbols.natural_image
Line drawing of a laptop and a device with an arrow indicating direction (no text or symbols)Wireless Mouse
natural_image
Technical line drawing of a car interior with no visible text or symbolsnatural_image
Line drawing of a hand pressing a button on a device (no text or symbols)Wireless Mouse
natural_image
Diagram showing a hand inserting electronic components into a device housing (no text or symbols present)natural_image
Line drawing of a laptop connected to a device with an arrow indicating direction (no text or symbols present)Wireless Mouse
natural_image
Technical line drawing of a mechanical component with no visible text or symbolsnatural_image
Line drawing of a hand pressing a button on a device (no text or symbols)Wireless Mouse
When 60 minutes of power remains, a red indicator light will glow for 8 seconds.
When only 30 minutes of power remains, the red indicator light will blink continuously.

Verwendung der Maus
Wireless Mouse
Verbindungsaufbau
natural_image
Line drawing of a laptop connected to a device with an arrow indicating direction (no text or symbols present)Wireless Mouse
Wireless Mouse
natural_image
Technical line drawing of a car interior with hand tools and structural components (no text or symbols)natural_image
Line drawing of a hand pressing a button on a device (no text or symbols)Wireless Mouse
natural_image
Diagram showing a device's internal components being connected to a terminal block, with no visible text or symbols.natural_image
Line drawing of a laptop connected to a device with an arrow indicating direction (no text or symbols present)Når softwaren er installeret, skal du genstarte din computer for at afslutte softwareinstallationen.
Wireless Mouse
natural_image
Technical line drawing of a car interior showing dashboard and steering wheel (no text or symbols)natural_image
Line drawing of a hand pressing a button on a device (no text or symbols)Wireless Mouse
natural_image
Diagram showing a hand inserting electronic components into a device casing, with no visible text or symbols.natural_image
Line drawing of a laptop and a computer monitor with an arrow indicating the next screen (no text or symbols present)• Veenduge, et arvuti USB pesa funktssioneerib.
Wireless Mouse
Wireless Mouse
Nuppude programmeerimine
Wireless Mouse
natural_image
Technical line drawing of a car interior with hand tools and structural components (no text or symbols)natural_image
Line drawing of a hand pressing a button on a device (no text or symbols)Wireless Mouse
natural_image
Line drawing of a device's internal components with an arrow indicating a step, no text or symbols presentnatural_image
Line drawing of a laptop connected to a device with an arrow indicating direction (no text or symbols present)Wireless Mouse
Wireless Mouse
natural_image
Technical line drawing of a car interior with no visible text or symbolsnatural_image
Line drawing of a hand inserting a small component into a device (no text or symbols)Wireless Mouse
natural_image
Diagram showing a device's internal components connected to a terminal block, with no visible text or symbols.natural_image
Line drawing of a laptop and its internal components, showing a close-up of the device (no text or symbols present)Wireless Mouse
Wireless Mouse
natural_image
Technical line drawing of a mechanical component with no visible text or symbolsnatural_image
Line drawing of a hand pressing a button on a device (no text or symbols)Wireless Mouse
natural_image
Diagram showing a hand inserting a component into a device panel, with no visible text or symbols.natural_image
Line drawing of a laptop connected to a device with an arrow indicating direction (no text or symbols)Wireless Mouse
Wireless Mouse
natural_image
Technical line drawing of a mechanical component with no visible text or symbolsnatural_image
Line drawing of a hand pressing a button on a device (no text or symbols)Wireless Mouse
natural_image
Line drawing of a laptop connected to a device with an arrow indicating direction (no text or symbols present)Wireless Mouse
Wireless Mouse
• Mac OS ^® X 10.4 or later
Wireless Mouse
Instalacija baterija
- Molimo koristite dvije AA baterije priložene u paketu.
- Skinite poklopac spremnika za baterije tako da pritisnete dugme za oslobađanje koje se nalazi s donje strane miša i pogurnete poklopac prema naprijed. Kad se poklopac oslobodi, odvojite ga jednostavnim podizanjem prema gore.
- Umetnite baterije pazeći da se pozitivni (+) i negativni (-) polovi svake baterije poklapaju s indikatorima polova u spremniku za baterije.
Wireless Mouse
natural_image
Technical line drawing of a mechanical component with no visible text or symbolsnatural_image
Line drawing of a hand pressing a button on a device (no text or symbols)Wireless Mouse
Indikator prazne baterije

NAPOMENA: KAD JE BATERIJA PRAZNA, PODLOGA ZA NAVIGACIJU OSJETLJIVA NA DODIR SVIJETLIT ČE CRVENO. MOLIMO ZAMIJENITE BATERIJE.
60 minuta prije potpunog pražnjenja baterija, lampica oko tipke će zasvijetliti crveno u trajanju od 8 sekundi.
30 minuta prije potpunog pražnjenja baterija, lampica će početi treperiti crveno.
Uporaba miša
Wireless Mouse
Povezivanje miša
natural_image
Diagram showing a hand inserting a component into an electronic device panel, with no visible text or symbols.natural_image
Line drawing of a laptop and a computer monitor with an arrow indicating the next screen (no text or symbols present)- Spremni ste za korištenje vašeg miša.
Wireless Mouse
Uporaba navigacije dodirom
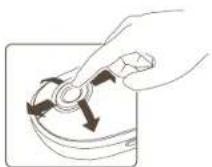
- Za kretanje u jednom od četiri smjera, prstom prijeđite preko podloge osjetljive na dodir u željenom smjeru.
- Za aktiviranje brze navigacije, brzo prstom prijedite preko podloge (prema gore ili prema dolje).
- Za kraj brze navigacije, pritisnite bilo koji gumb.

NAPOMENA: PRIJE UPOTREBE UREDAJA MOLIMO SKINITE ZAŠTITNU PLASTIČNU FOLIJU S PODLOGE ZA NAVIGACIJU.
Instalacija kontrolnog softvera
Instalacija ovog softvera omogućuje konfiguriranje programabilnih gumba.
Nakon što ste uspješno instalirali softver, za dovršetak procesa instalacije ponovno pokrenite računalo.
Targus ikona će se pojaviti u prozoru System Preferences.
Wireless Mouse
Programiranje gumba
natural_image
Technical line drawing of a mechanical component with no visible text or symbolsnatural_image
Line drawing of a hand inserting a small component into a device (no text or symbols)Wireless Mouse
natural_image
Diagram showing a hand inserting electronic components into a device housing (no text or symbols present)natural_image
Line drawing of a laptop and a device with an arrow indicating direction (no text or symbols)Wireless Mouse
Wireless Mouse
natural_image
Technical line drawing of a mechanical component with no visible text or symbolsnatural_image
Line drawing of a hand inserting a small component into a device (no text or symbols)Wireless Mouse
natural_image
Diagram showing a hand inserting a component into a device housing, with no visible text or symbols.natural_image
Line drawing of a laptop connected to a device with an arrow indicating the next component (no text or symbols present)Wireless Mouse
Programmare i tasti.
Wireless Mouse
natural_image
Technical line drawing of a car interior with no visible text or symbolsnatural_image
Line drawing of a hand pressing a button on a device (no text or symbols)Wireless Mouse
natural_image
Diagram showing a hand inserting electronic components into a device casing, with no visible text or symbols.natural_image
Line drawing of a laptop and a device with an arrow indicating direction (no text or symbols)• Dabar galite naudoti pele.
Wireless Mouse
Sékmingai jdiegus programine jranga, kad baigtumete diegti programine jranga, perkraukite savo kompiuterį.
Wireless Mouse
natural_image
Technical line drawing of a mechanical component with no visible text or symbolsnatural_image
Line drawing of a hand pressing a button on a device (no text or symbols)Wireless Mouse
natural_image
Diagram showing a hand inserting electronic components into a device casing, with no visible text or symbols.natural_image
Line drawing of a laptop and a printer with an arrow indicating the printer's internal structure (no text or symbols present)Wireless Mouse
Pogu programmēšana
natural_image
Technical line drawing of a mechanical component with no visible text or symbolsnatural_image
Line drawing of a hand pressing a button on a device (no text or symbols)Wireless Mouse
natural_image
Diagram showing a hand inserting a component into an electronic device panel (no text or symbols present)natural_image
Line drawing of a laptop connected to a device with an arrow indicating direction (no text or symbols present)Wireless Mouse
Wireless Mouse
natural_image
Technical line drawing of a car interior with structural components and a close-up view of the dashboard (no text or symbols)natural_image
Line drawing of a hand pressing a button on a device (no text or symbols)Wireless Mouse
Advarsel om lavt batteri

MERK: NÅR DET ER LITE STRÖM IGJEN I BATTERIET, VIL RULLEHJULET BLINKE RÖDT. ERSTATT BATTERIENE.
natural_image
Diagram showing two views of a device with an open panel and a hand inserting a button (no text or symbols present)- Plugg USB-mottakeren inn i en tilgjengelig USB-port på datamaskinen.
natural_image
Line drawing of a laptop and a computer monitor with an arrow indicating the next screen (no text or symbols present)Wireless Mouse
Programmere knappene
• Mac OS ^® X 10.4 or later
Wireless Mouse
Zakładanie baterii
natural_image
Technical line drawing of a car interior with a close-up inset showing the exterior view (no text or symbols)natural_image
Line drawing of a hand pressing a button on a device (no text or symbols)Wireless Mouse
natural_image
Diagram showing a hand inserting electronic components into a device housing (no text or symbols present)natural_image
Line drawing of a laptop and its internal components, showing a device with an arrow indicating assembly or connection (no text or symbols present)Wireless Mouse
natural_image
Technical line drawing of a car interior with no visible text or symbolsnatural_image
Line drawing of a hand pressing a button on a device (no text or symbols)Wireless Mouse
Indicador de Carga Fraca das Pilhas

NOTA: QUANDO A CARGA DAS PILHAS ESTIVER FRACA, A RODA DE TOQUE IRÁ PISCAR EM VERMELHO. SUBSTITUA AS PILHAS.
natural_image
Diagram showing a car interior with two panels, one being adjusted and the other holding an electrical switch (no text or symbols present)natural_image
Line drawing of a laptop connected to a device with an arrow indicating the next component (no text or symbols present)Wireless Mouse
Wireless Mouse
Mouse Wireless Targus
Introducere
natural_image
Technical line drawing of a mechanical component with no visible text or symbolsnatural_image
Line drawing of a hand inserting a small component into a device (no text or symbols)Wireless Mouse
natural_image
Diagram showing a hand inserting a component into an electronic device panel, with no visible text or symbols.natural_image
Line drawing of a laptop and a device with an arrow indicating direction (no text or symbols)Wireless Mouse
Programarea butoanelor
natural_image
Technical line drawing of a mechanical component with no visible text or symbolsnatural_image
Line drawing of a hand pressing a button on a device (no text or symbols)Wireless Mouse
natural_image
Diagram showing a hand inserting a component into an electronic device, with no visible text or symbols.natural_image
Line drawing of a laptop and a computer monitor with an arrow indicating the next screen (no text or symbols present)Wireless Mouse
Wireless Mouse
natural_image
Technical line drawing of a mechanical component with no visible text or symbolsnatural_image
Line drawing of a hand pressing a button on a device (no text or symbols)Wireless Mouse
Svag batteriindikator

OBS: NÄR BATTERIET ÄR SVAGT, KOMMER RÖRELSESENSORN ATT BLINKA RÖTT. BYT DÅ UT BATTERIERNA.
natural_image
Line drawing of a device's internal components with an arrow indicating a step, showing no text or symbols.natural_image
Line drawing of a laptop and a USB drive device (no text or symbols)Wireless Mouse
Programmera knapparna
- Vstavite bateriji in pazite, da sta pozitivni (+) in negativni (-) pol vsake baterije vstavljena kot je označeno v notranjosti prostora za bateriji.
Wireless Mouse
natural_image
Technical line drawing of a mechanical component with no visible text or symbols- Miško vklopite tako, da preklopite on/off stikalo na spodnji strani v položaj "on".
natural_image
Line drawing of a hand pressing a button on a device (no text or symbols)Wireless Mouse
natural_image
Diagram showing a hand inserting a component into a device panel, with no visible text or symbols.natural_image
Line drawing of a laptop and a device with an arrow indicating direction (no text or symbols)Wireless Mouse
Programiranje tipk
Za zagon aplikacije kliknite logotip Targusa.
S klikom izberite sliko naprave in pritisnite "Setup Device" za zagon nastavitvenega programa.
Wireless Mouse
- Vložte batérie. Ubezpečte sa, že batérie vložíte podľa značiek (+) a (-) polarity v priehradke na batérie.
Wireless Mouse
natural_image
Technical line drawing of a car interior showing dashboard and steering wheel (no text or symbols)natural_image
Line drawing of a hand pressing a button on a device (no text or symbols)Wireless Mouse
natural_image
Diagram showing a car interior with two panels, one being adjusted and the other holding an electrical switch (no text or symbols present)natural_image
Line drawing of a laptop connected to a device with an arrow indicating direction (no text or symbols present)Wireless Mouse
Programovanie tlačidiel
Spustite aplikáciu k zariadeniu kliknutím na logo Targus.
natural_image
Technical line drawing of a car interior with hand tools and a close-up view of the dashboard (no text or symbols)natural_image
Line drawing of a hand inserting a small component into a device (no text or symbols)Wireless Mouse
natural_image
Diagram showing a hand inserting a component into an electronic device panel, with no visible text or symbols.natural_image
Line drawing of a laptop and its internal device with an arrow indicating a connection (no text or symbols present)Wireless Mouse
Wireless Mouse

- Targus®
- Wireless Mouse Wireless Mouse
- Table of Contents
- GB – English
- NL - Nederlands
- NO - Norsk
- Targus Wireless Mouse
- Introduction
- System Requirements
- Installing the Batteries
- Wireless Mouse
- Low Battery Power Indicator
- Using the Mouse
- Establishing the Connection
- Using the Touch Scroll
- Installing Software for Programmable Buttons
- Programming the Buttons
- Troubleshooting
- The mouse is not working.
- Безжична мишка Targus
- Въведение
- Verwendung der Maus
- Verbindungsaufbau
- Nuppude programmeerimine
- Instalacija baterija
- Indikator prazne baterije
- Uporaba miša
- Povezivanje miša
- Uporaba navigacije dodirom
- Instalacija kontrolnog softvera
- Programiranje gumba
- Programmare i tasti.
- Pogu programmēšana
- Advarsel om lavt batteri
- Programmere knappene
- Zakładanie baterii
- Indicador de Carga Fraca das Pilhas
- Mouse Wireless Targus
- Introducere
- Programarea butoanelor
- Svag batteriindikator
- Programmera knapparna
- Programiranje tipk
- Programovanie tlačidiel
Brand : TARGUS
Model : AMW43EU
Category : Mouse