Caldo Duo - Heating OLIMPIA SPLENDID - Free user manual and instructions
Find the device manual for free Caldo Duo OLIMPIA SPLENDID in PDF.
| Product type | Electric heating |
| Brand | Olimpia Splendid |
| Model | Caldo Duo |
| Installation | Wall-mounted (wall fixing) or mobile (floor-standing) |
| Power supply | 220-240 V ~ 50 Hz |
| Maximum power | 2000 W (estimated) |
| Operating modes | Heating (H0/H1/H2), Comfort, Eco, Anti-freeze, Ventilation only |
| Weekly programming | Yes (customizable programs P1, P2, P3) |
| Timer | Adjustable auto-off (2h, 4h, 8h) |
| Open window detection | Yes (F0 mode, automatic shutdown if temperature drop) |
| Remote control | Infrared, button cell battery not included |
| Overheat protection | Yes, automatic shutdown in case of overheating |
| Anti-tip protection | Yes, safety switch cutting off the device |
| Maintenance and cleaning | Clean with a dry cloth or vacuum on the grilles; do not immerse |
| Storage | Store in a cool, dry place away from humidity |
| Display | Screen with temperature and settings, LED indicators |
| Included accessories | Remote control, screws and wall plugs for wall mounting |
| Repairability | Do not disassemble yourself; contact after-sales service |
Frequently Asked Questions - Caldo Duo OLIMPIA SPLENDID
User questions about Caldo Duo OLIMPIA SPLENDID
0 question about this device. Answer the ones you know or ask your own.
Ask a new question about this device
Download the instructions for your Heating in PDF format for free! Find your manual Caldo Duo - OLIMPIA SPLENDID and take your electronic device back in hand. On this page are published all the documents necessary for the use of your device. Caldo Duo by OLIMPIA SPLENDID.
USER MANUAL Caldo Duo OLIMPIA SPLENDID
INSTRUÇÉS PARA O USO E MANUTENÇÃO
PT
3 - USE OF THE APPLIANCE 10
3.1 - CONTROL PANEL AND REMOTE CONTROL 10
3.2 - USE OF THE REMOTE CONTROL ....10
3.3.a - Insertion of batteries 11
3.2.b - Replacement of batteries 11
3.2.c - Location of the remote control 12
3.3 - USE OF THE APPLIANCE 12
3.3.a - Preliminary operations 12
3.4 - INSTRUCTIONS FOR OPERATION....12
3.4.a - Switching on. 12
3.4.b - Selecting the operating mode 13
3.4.c - "TIMER" mode 14
3.4.d - "Open window" mode 14
3.4.e - Programming 14
4-OVERHEAT PROTECTION 15
5 - SAFETY CONTROL (anti-overturning switch) 15
6 - MAINTENANCE AND CLEANING 16
7 - PRESERVATION OF THE APPLIANCE......16
8 - TECHNICAL DATA 16
ILLUSTRATIONS
The illustrations are grouped on the initial pages of the manual

0 - WARNINGS
0.1 - GENERAL INFORMATION
First of all, we would like to thank you for choosing our appliance.
0.2 - SYMBOLS
The pictograms in the next chapter provide the necessary information for correct, safe use of the machine in a rapid, unmistakable way.
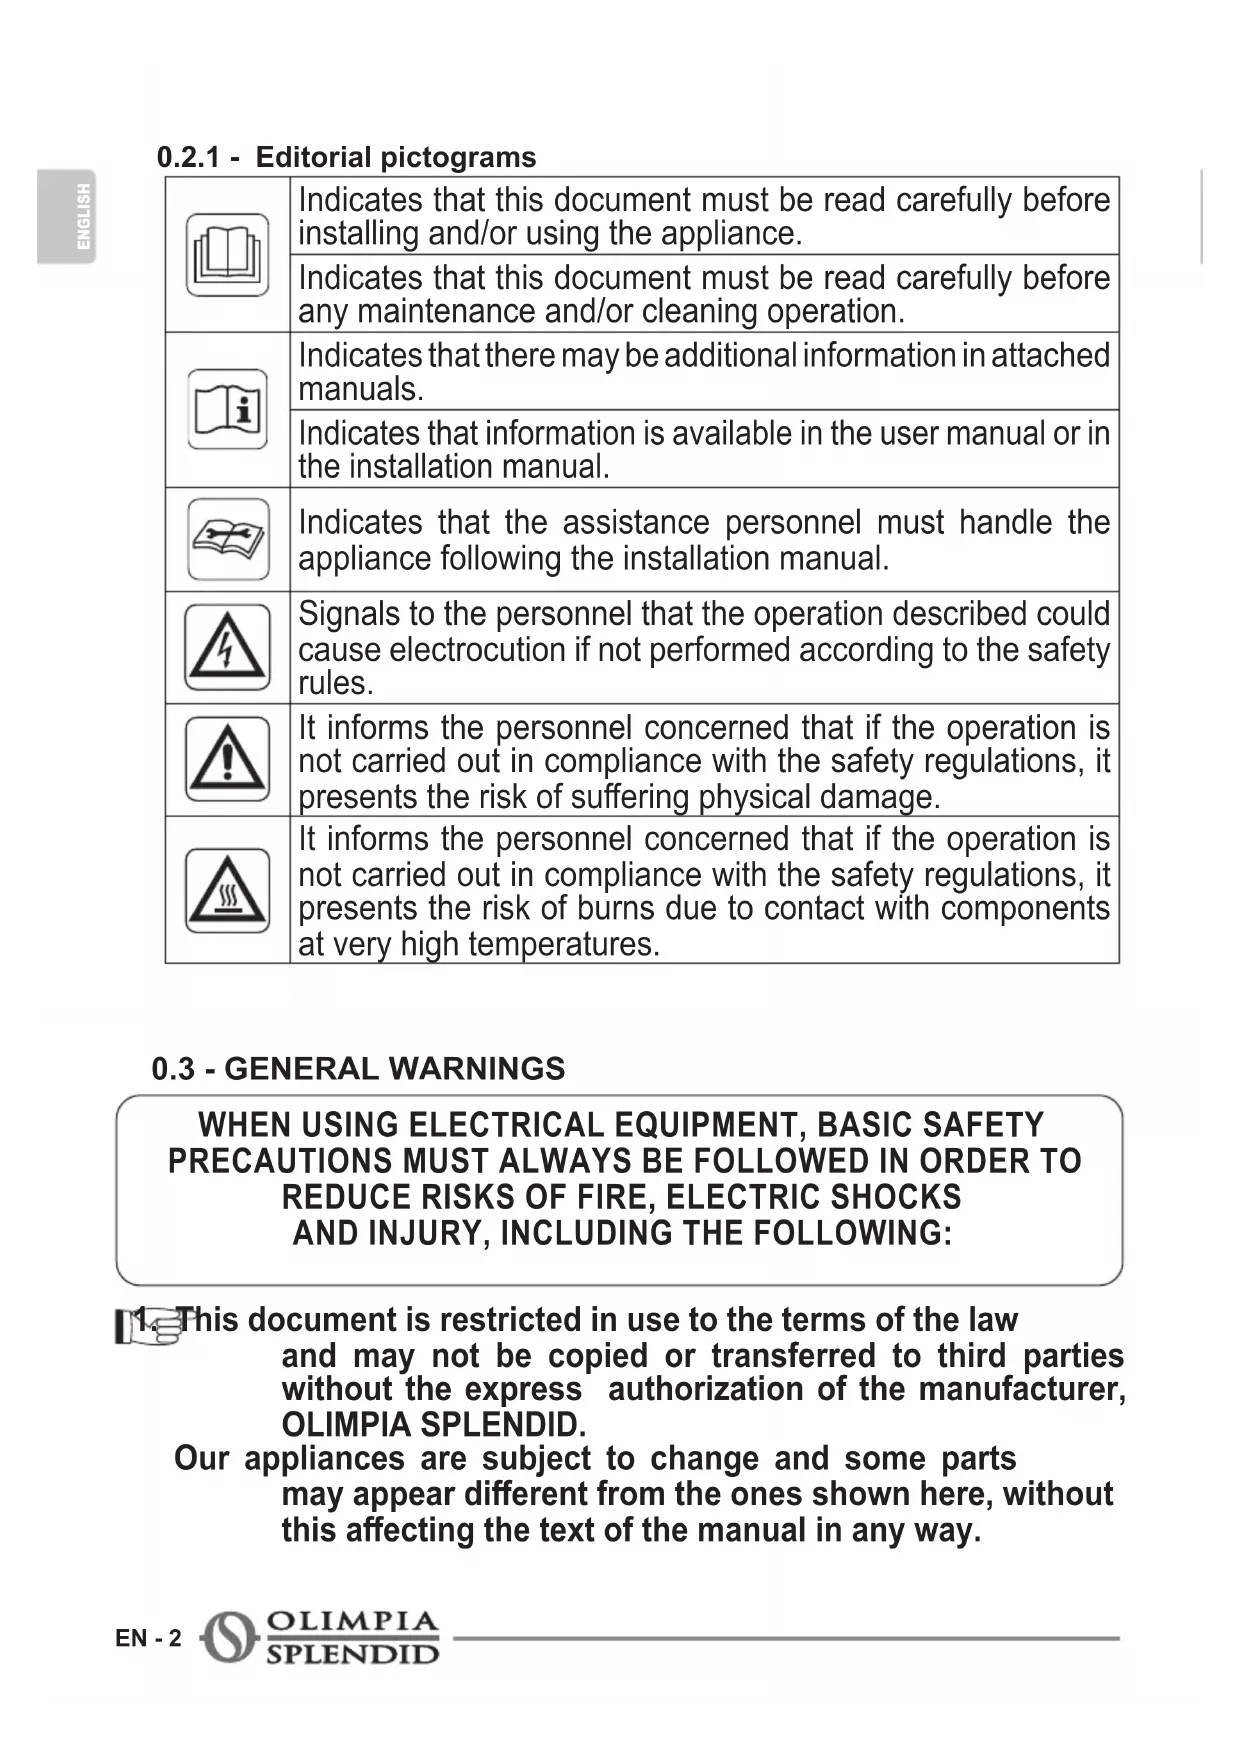
0.2.1 - Editorial pictograms
| Indicates that this document must be read carefully before installing and/or using the appliance. | |
| Indicates that this document must be read carefully before any maintenance and/or cleaning operation. | |
| Indicates that there may be additional information in attached manuals. | |
| Indicates that information is available in the user manual or in the installation manual. | |
| Indicates that the assistance personnel must handle the appliance following the installation manual. | |
| Signals to the personnel that the operation described could cause electrocution if not performed according to the safety rules. | |
| It informs the personnel concerned that if the operation is not carried out in compliance with the safety regulations, it presents the risk of suffering physical damage. | |
| It informs the personnel concerned that if the operation is not carried out in compliance with the safety regulations, it presents the risk of burns due to contact with components at very high temperatures. |
0.3 - GENERAL WARNINGS
WHEN USING ELECTRICAL EQUIPMENT, BASIC SAFETY PRECAUTIONS MUST ALWAYS BE FOLLOWED IN ORDER TO REDUCE RISKS OF FIRE, ELECTRIC SHOCKS AND INJURY, INCLUDING THE FOLLOWING:

This document is restricted in use to the terms of the law and may not be copied or transferred to third parties without the express authorization of the manufacturer, OLIMPIA SPLENDID.
Our appliances are subject to change and some parts may appear different from the ones shown here, without this affecting the text of the manual in any way.
- Read this manual carefully before performing any operation (installation, maintenance, use) and follow the instructions contained in each chapter.
- Keep the manual carefully for future reference.
-
After removing the packaging, check that the appliance is in perfect condition. The packaging materials must not be left within reach of children as they can be dangerous.
-
THE MANUFACTURER IS NOT RESPONSIBLE FOR DAMAGES TO PERSONS OR PROPERTY CAUSED BY FAILURE TO FOLLOW THE INSTRUCTIONS IN THIS MANUAL.
-
The manufacturer reserves the right to make any changes it deems advisable to its models, although the essential features described in this manual remain the same.
Before connecting, make sure that the plate data corresponds with the mains electrical supply.
The data plate is located on the appliance.

- Install it according to the manufacturer's instructions An incorrect installation can cause damage to people, animals or property for which the manufacturer accepts no responsibility.

- Select whether to install the device in the fixed or mobile configuration and follow the procedure indicated by the manufacturer.
9a. To install the device in wall-mounted mode, position it vertically in a suitable environment, taking care to respect the minimum distances indicated in this manual (fig.1).
9b. To install the device without wall-mounting it, position it horizontally, in a suitable environment on a stable, level surface.
- Always unreel the cable completely during use.
- The appliance is equipped with a power cord with plug (Y-type connection). If the power cord is damaged, it must be replaced by the manufacturer, his technical service or a similarly qualified person in order to eliminate all possible risks.

-
Install it in such a way that the switches and other controls cannot be reached by persons using the bath or shower.
-
Do not use extensions, if not with particular care.
- Keep the appliance at a distance of at least 1m from other objects (fig. 1).
14a. To avoid the risk of fire, keep the outlets and air intakes of the appliance at a distance of at least 1m from any object, curtains, tissues or flammable materials.
- Do not place appliance close to a radiant heat source.
- Do not use the appliance to dry clothes.

- Do not insert or allow foreign objects to enter any ventilation or exhaust opening, as this may cause an electric shock, fire or damage to the appliance.
- Do not allow cord to come in contact with heated surfaces during operation.
- Do not run cord under carpeting, throw rugs or runners etc. Arrange cord away from traffic areas so that it will not be tripped over.
- Do not twist, kink or wrap the cord around the appliance, as this may cause the insulation to weaken and split.
- Do not store appliance while it is still hot.

- Do not use this appliance outdoors, or on wet surfaces.
o not use this heater with programmer, timer or any other device that switches the heater on automatically since a fire risk exists if the heater is covered or positioned incorrectly.
-
The device has been designed to be operated either free-standing or wall-mounted; in either case it is important to follow the instructions provided in this manual.
-
Do not operate the heater near curtains, as the material could be sucked into the air vents. (fig. 3).
-
Avoid spilling liquid on the appliance.
- Children must not play with equipment.

- The appliance may be used by children over 8 years of age and by persons with reduced physical, sensory or mental capacities, or without the required experience or knowledge, provided they are supervised or have been instructed in the safe use of the appliance and understand the hazards involved.

- Children must not be allowed to clean the appliance or perform user maintenance without proper supervision.

- Children of less than 3 years should be kept away unless continuously supervised.

- Children aged from 3 years and less than 8 years shall only switch on/off the appliance provided that it has been placed or installed in its intended normal operating position and they have been given supervision or instruction concerning the use of the appliance in a safe way and understand the hazards involved.

- Children aged from 3 years and less than 8 years shall not plug in, regulate and clean the appliance or perform user maintenance.

- Do not use this heater in the immediate surroundings of a bath, a shower or a swimming pool.

-
Some parts of this product may become very hot and could cause burns. Be very careful when children or vulnerable adults are nearby.
-
Always remove plug from the mains supply before cleaning.
-
For correct use of the appliance NEVER:
a. Place it immediately underneath a mains wall socket.
b. Pull the power cable or the appliance itself to remove the plug from the mains socket.
c. Leave it expose to atmospheric agents (rain, sun, etc.).
d. Leave it plugged in when not in use.
e. Touch it with wet or damp hands.
- Use this appliance only as described in this manual. Any other use is not recommended by the manufacturer and may cause fire, electric shock or injury.

-
The most common cause of overheating is deposits of dust or fluff in the appliance. Ensure these deposits are removed regularly by unplugging the appliance and vacuum cleaning air vents and grilles.
-
Do not use abrasive cleaning products on this appliance. Clean with a damp cloth (not wet) rinsed in hot soapy water only.
-
Do not connect the appliance to the mains voltage until completely assembled and adjusted.
-
Switch the device off and allow it to cool down for a few minutes before moving it.
- Do not immerse the appliance in water or in other liquids. Short circuits or fires may occur.

Do not let the appliance work in enclosed areas such as a cabinet since it could cause a fire.
If the appliance's plug is incompatible with the socket, have the socket replaced with a suitable one by a qualified technician, who must ascertain that the section of the socket cables is compatible with the power absorbed by the appliance. We do not recommend using adaptors and/or extension cables. If they cannot be avoided, however, they must comply with current safety regulations and their ampacity (A) must not be below the maximum ampacity of the appliance.
- Do not use the appliance in case of malfunctioning or faults, if the cord or plug are damaged, or if it has been dropped or damaged in any manner. Turn the appliance off, disconnect the plug from the socket and let it be checked by professionally qualified personnel.
- Disassembly, repair or reconversion performed by an unauthorized person could cause heavy damages and will cancel the manufacturer warranty.
-
Neither disassemble nor modify the appliance.
-
Repairing the appliance by yourself is extremely dangerous.
- In the presence of gas leaks from other equipment, ventilate the room well before activating the appliance.
-
Do not remove plug from power socket until the appliance has been switched off.
-
If you no longer wish to use this appliance, it must be made inoperative by cutting the power supply cable after removing the plug from the power socket.
52.

WARNING - In order to avoid overheating, do not cover the heater (fig. 4).
-
Hazardous parts of the appliance must be rendered harmless, especially as there is a risk of children playing with it.
-
At first use and after a long period of inactivity of the appliance, a slight noise may be heard and a slight odour may be smelled. It is a normal phenomenon which will disappear after a few minutes of operation.
0.4 - PROPER USE
- The appliance should be used for the exclusive purpose of producing hot air for the sole purpose of obtaining a comfortable temperature in the room.
- This appliance is only designed for domestic use or similar, not for commercial or industrial use.
- An improper use of the appliance with possible damages caused to people, things or animals releases OLIMPIA SPLENDID from any responsibility.
- The appliance is equipped with a special function, activated by the user as required, which allows to detect the possible opening of a window and force the functioning in Anti frost mode to limit waste of energy.
This product is CE marked to denote compliance with Directives 2014/35/UE (Low Voltage) and 2014/30/UE (Electromagnetic Compatibility).
- Do not use the appliance in areas in which are used or stored petrol, varnishes or other flammable liquids or in environments with the presence of flammable or explosive gases.
- Do not use the appliance if insecticide gas has just been sprayed in the room or in the presence of burning incenses, chemical vapours or oily residues.
- Do not use this appliance in small rooms occupied by persons which are not able to leave it autonomously unless constant supervision is supplied.
This product must be used exclusively according to the specifications indicated in this manual. Use different to that specified, could cause serious injuries. THE MANUFACTURER IS NOT LIABLE FOR INJURY/Damage TO PERSONS/OBJECTS DERIVING FROM FAILURE TO COMPLY WITH THE REGULATIONS CONTAINED IN THIS MANUAL.
1 - DESCRIPTION OF THE APPLIANCE AND OF THE COMMANDS
- Appliance body
- Air outlet grid
- Screws and dowels
- Air inlet grid
- Power cord
- Remote control
- Control panel
- Plug
- ON/OFF switch (0/1)
- Use and maintenance booklet

2 - INSTALLATION
- After removing the packaging, check that the appliance is in perfect condition; in case of doubts do not use it and refer to professionally qualified personnel.
- Entirely straighten the power cord.
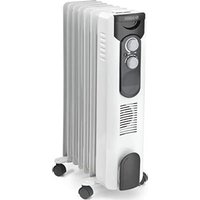
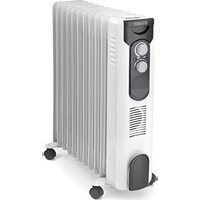
- The unit may be wall-mounted or used as a mobile device.
3.1 - WALL-MOUNTED
- The appliance must be installed on a masonry or made of heat resistant material wall (not wooden or made of easily overheatable synthetic material).

The appliance must be installed:
-
in such a way as to prevent the ON/OFF switch and the buttons from being touched by who is standing in the bathtub or in the shower.
-
At a distance of at least 350 ~mm from walls.
-
At a distance of at least 1000 ~mm from flammable materials (curtains, textiles etc.) (figure 2).
-
DO NOT install the appliance beneath power outlets.
- Prepare a power outlet in the vicinity of the appliance making sure it's not too far in relation to the power cord length.
- To install the appliance in a high position, keep a distance of at least 1,8m from the floor.
a. Locate the area where the appliance is going to be installed.
b. Create two due 8mm holes with a centres distance of 170mm (figure 4).

-
The holes must be at least 1800mm away from the floor 350mm from the ceiling (figure 1).
-
When piercing the wall, make sure that no electrical channels or water hoses are present.
c. Insert the wall plugs in the holes and then fasten the supplied screws.
d. Do not fasten the screws entirely; leave them approximately 5-7 mm away from the wall (figure 4).

Make sure that the screws are well steady in the wall.
e. Place the slots (X) on the rear part of the appliance on the screws pushing the appliance itself against the wall (figure 4 - phase 1).
f. Push the appliance 5mm towards the left (figure 4 - phase 2) then push it about 3÷ 5mm downwards (figure 4 - phase 3).
g. Lastly, check that the appliance is steady and well attached to the wall.
3.2 - MOBILE INSTALLATION
- Place the appliance in an appropriate environment and on a stable and flat surface.
- Make sure that curtains or other objects do not obstruct the air flow (fig. 3).
- Leave at least 1m of free space on the sides, behind the appliance and above it (fig. 1).
- Make sure the ON/OFF switch (9) is set to "O".
- Connect the plug to the power socket.

-
Make sure the mains data correspond to what is described on the data plate of the appliance.
-
Arrange cord away from traffic areas so that it will not be tripped over.
3 - USE OF THE APPLIANCE
The reception of the selected function is confirmed by the emission of a "beep" by the buzzer.
3.1 - CONTROL PANEL AND REMOTE CONTROL
$$ \mathrm {H} 0 \Rightarrow \mathrm {H} 1 \Rightarrow \mathrm {H} 2 \Rightarrow $$
D1: Temperature/parameter settings display
S1: "ON/OFF" LED;
S2: "Heating" mode LED;
S3: "Comfort" mode LED;
S4: "ECO" mode LED;
SW1: Running / Stand-by;
SW2: Press to select mode/power
SW3: Timer/Temperature set increase;
SW4: Timer/Temperature set decrease;
SW5: "TIMER" mode;
T1: Running / Stand-by;
T2: Working mode selection
T3: Temperature set increase;
T4: Temperature set decrease;
T5: "TIMER" mode;
T6: Press to select operating program.

3.2 - USE OF THE REMOTE CONTROL
The remote control supplied with the appliance is the instrument that will allow you to use the appliance in the most comfortable way possible. It should be handled with care and in particular:
- Keep it dry (do not clean it with water or leave it outdoors in bad weather).
- Avoid dropping or bumping it.
- Keep it out of direct sunlight.

- Do not use old and new batteries together or different brands of batteries.
- Do not leave batteries in the remote control if the device is not going to be used for more than 2 months.

-
Direct sunlight may interfere with the operation of the infrared receiver. path between remote control and appliance must be free.
-
If the signal coming from the remote control seems to interfere with another appliance, move this appliance to a different position or contact customer service.
-
Electronic and fluorescent lamps may interfere with the transmission between remote control and conditioner.
-
Pull out the power batteries if the remote control is not going to be used for a long time.
-
Remove the battery disconnection pull tab from the remote control so that it is operational.

3.3.a - Insertion of batteries
The battery is NOT included in the supply.
To insert the batteries correctly (fig.5):
a. Press the lateral pull tab and extract the battery support from the remote control body.
b. Place the battery in the support with symbol “+” facing upwards.
c. Correctly insert the battery support in the specific slot by pushing it all the way in.

Check the polarity indicated on the bottom of the compartment.
3.2.b - Replacement of batteries
Replace the batteries when you no longer hear a beep from the appliance when pressing any key on the remote control.

When replacing batteries, replace both and dispose of the dead batteries in the appropriate collection centres and as required by law.

-
Do not dispose of batteries with the normal household waste. Refer to local regulations for proper disposal of batteries.
A chemical substance symbol may be present at the bottom of the battery disposal icon. This symbol means that the battery contains a heavy metal that exceeds a specific concentration. For example Pb: Lead (>0.004%).
Used appliances and batteries must be treated in appropriate plants for re recycling and recovery. Ensuring proper disposal of batteries, the user will contribute to prevent any negative consequences for the environment and human health. -
If the remote control is not used for several weeks or longer, remove the batteries.
Any leaks from the batteries could damage the remote control.

Do not re-charge or disassemble the batteries. Do not throw the batteries into the fire. They can burn and explode.

If the battery liquid falls onto the skin or clothes, wash well with clean water. Do not use the remote control with batteries that have leaked.
The chemical products contained in the batteries can cause burns or other risks to health.

SWALLOWING HAZARD:
Device contains a button or coin battery cell.


KEEP OUT OF REACH OF CHILDREN; if you suspect that the battery may have been swallowed or inserted in any other part of the body, seek immediate medical assistance.


If the battery is swallowed, it may cause chemical burns, perforation of soft tissues and even death. Severe burns may ensue within 2 hours of ingestion. Seek immediate medical assistance if you suspect that a battery may have been swallowed or inserted in any other part of the body.
3.2.c - Location of the remote control
Keep the remote control in a position from which the signal can reach the receiver of the appliance (maximum distance is approx. 3 metres - with charged batteries) (fig.6). The presence of obstacles (furniture, curtains, walls, etc.) between the remote control and the appliance reduces the remote control range.
3.3 - USE OF THE APPLIANCE
3.3.a - Preliminary operations

-
After installing the appliance as described in the previous paragraphs, make sure the mains data correspond to what is indicated on the appliance nameplate.
-
Insert the plug into the power socket and position the switch (9) to "I".
3.4 - INSTRUCTIONS FOR OPERATION
3.4.a - Switching on
Make sure the switch is set to "1" (ON) (9); press the ON/OFF key (SW1) or (T1): the appliance emits a "Beep" and switches on.
Press the ON/OFF key (SW1) or (T1) again to switch off the appliance.

The fan continues to run for approximately 1 minute after the device is switched off, so as to cool the components, after which it stops automatically.
The first time the device is switched on, it is necessary to set-up the time and date. To do this, proceed as follows:
- Press the Timer button (SW5) or (T5) for approximately 3 seconds.
- When the device displays the letter "d", select the day of the week by pressing the (SW3 - SW4) or (T3 - T4) buttons.
(1 = Monday / 2 = Tuesday / 3 = Wednesday / 4 = Thursday / 5 = Friday / 6 =
$$ \text {S a t u r d a y} / 7 = \text {S u n d a y}) $$
After selecting the day, press the Mode button (SW5) or (T5).
- When the device displays the letter "m", select the time in hours (from 00 to 23) by pressing the (SW3 - SW4) or (T3 - T4) buttons.
After selecting the hour, press the Mode button (SW5) or (T5).
- When the device displays the letter "n", select the time in minutes (00 to 59) by pressing the (SW3 - SW4) or (T3 - T4) buttons.
After selecting the minutes, press the Mode button (SW5) or (T5).
Set the switch to "0" (ON) (9) to switch off the appliance.

If the device is disconnected from the power socket or the user presses the ON/OFF button (9) when it is switched on again it is necessary to reset the time and date.
3.4.b - Selecting the operating mode
Press the Mode button (SW2) or (T2) until the LED corresponding to the desired operating mode lights up.
Heating mode
When the user selects this operating mode and a temperature setting that is warmer than the current room temperature, the LED (S2) lights up on the display and the device operates at the desired power setting:
- To select the desired power setting, press the Mode button (SW2) or (T2 or T6) for approximately 3 seconds.
- Press the key (T6) several time to be able to select the desired power according to the following sequence:
H0 (fan only) --- > H1 (minimum power alternating with fan) ---> H2 (maximum power alternating with fan) ---> H0 ...
- Press the (SW3 - SW4) or (T3 - T4) buttons to increase or reduce the desired power setting according to the following sequence:
H0 (fan only) --- > H1 (minimum power alternating with fan) ---> H2 (maximum power alternating with fan) ---> H0 ...
Comfort mode
When the user selects this operating mode, the LED (S3) lights up on the display and the device operates depending on the selected temperature (10 - 35^) :
- Press the keys (SW3 - SW4) or (T3 - T4) to increase or decrease the desired temperature.
ECO mode
When the user selects this operating mode, the LED (S4) lights up on the display and the device operates depending on the selected temperature (6 - 31^) :
- Press the keys (SW3 - SW4) or (T3 - T4) to increase or decrease the desired temperature.
Programming mode
When the user selects this operating mode, the device displays P1/P2/P3, depending on the program to be activated.
Refer to the following paragraph for the program settings.
"Anti-frost" mode
When the user selects this operating mode, the device displays "Fr".
If the device detects a room temperature above 7 degrees, the function is deactivated automatically.
When this mode is active, the temperature selection function is disabled.
3.4.c - "TIMER" mode
Select this mode to activate a timer that switches the device off automatically.
a. With the appliance turned on, press key SW5 or T5 and choose the desired time value
$$ (0 h (T i m e r o f f) \dots > 2 h \dots > 4 h \dots > 8 h \dots >.. 0 h (T i m e r o f f) \dots > ..). $$
b. The device will switch off automatically when it reaches the previously set time.
3.4.d - "Open window" mode
When the user selects this mode, the device detects when a window is opened and switches to "Anti-frost" mode to limit wasted energy.
When the appliance is operating and detects a drop in temperature of 2 degrees within 2 minutes, the appliance stops operating and the message "F0" blinks on the display.
3.4.e - Programming
It is possible to select one of the pre-defined weekly programs, or create a customised program.
Program "P1":
- Pre-set cycle, that runs from Monday to Sunday, to alternate between comfort and ECO mode, according to the following sequence:

Program "P2":
- Pre-set cycle, that runs from Monday to Friday, to alternate between comfort and ECO mode, according to the following sequence:
- Pre-set cycle, that runs from Saturday to Sunday, to alternate between comfort and ECO mode, according to the following sequence:


Program "P3":
- The user may also set-up a customised program for each day and hour of the week, to increase or decrease the values, press the keys (SW3 - SW4) or (T3 - T4).
- When this operating mode is selected, press the Mode button (SW2) or (T2) for approximately 3 seconds so that the device displays "d1".
- Select the day (from d1 to d7) and press the Mode button (SW2) or (T2) to confirm.
- The device displays "00"; Select the hour (from 00 to 23) and press the Mode button (SW2) or (T2) to confirm.
- Press the Mode button (SW2) or (T2) and select the operating mode (Comfort, Eco or Anti-frost).
- Press on (SW3) or (T3) to set the operating mode for the next hour.
- After setting heating mode at the hour 23, press (SW3) or (T3) to return to the day setting. When the display shows "d7" press (SW3) or (T3) to complete the customized programming.
4 - OVERHEAT PROTECTION
-
This heater is protected with overheat protection that switches off the appliance automatically in case of severe overheating. In this case:
-
unplug the appliance;
- wait about 30 minutes for it to cool;
- remove any possible cause of overheating, eg. something covering the heater;
- check for damage to the appliance, the cord and the plug.
If there is no damage:
- plug the unit back in;
- switch it on as described above.
If the heater still does not turn on, please contact Customer Service for assistance.
5 - SAFETY CONTROL (anti-overturning switch)
-
If the appliance falls or overturns, the anti-overturning switch is activated and automatically turns it off.
-
It is necessary to place the appliance in vertical position to resume normal operation.
6 - MAINTENANCE AND CLEANING

Before carrying out any cleaning or maintenance operation on the appliance, switch it off by setting the ON/OFF switch (9) to "O". Disconnect the plug from the socket and wait for the fan to stop.

- Use a dry cloth to clean the appliance.
- If the appliance is very dirty, it is possible to use a cloth dampened with warm water (max 50^ ) and a mild detergent to clean its external parts. Dry with a dry cloth.
- Use a vacuum cleaner to remove dust from the air inlet/outlet grids (fig. 8).

-
Make sure the appliance is completely dry before reconnecting the plug to the power socket.
-
Do not use a chemically treated or antistatic cloth to clean the appliance.
- Do not use petrol, solvents, polishing pastes or similar. These products could break or deform the plastic surface.
- Do not use oils, chemical substances or abrasive products to clean the appliance.
- Neither wash nor immerse the appliance with/in water.

- In case of an appliance malfunction, do not try to disassemble it but instead refer to the retailer or to the technical assistance service.
7 - PRESERVATION OF THE APPLIANCE
- If you do not intend to use the appliance for a particularly long period of time or if operations which could produce a lot of dust must be performed, it is advised to store the appliance as follows:
- Switch the appliance off and disconnect the plug from the power socket.
- Store in a fresh and dry place away from humidity.
8 - TECHNICAL DATA
See the table in the following page.
0-MISES EN GARDE 1
0.1 - INFORMATIONS GÉNÉRALES......1
0.2 - SYMBOLES 1
0.3 - MISES EN GARDE GENÉRALES......2
0.2.1 - Pictogrammes 2
0.4 - USAGE PREVU 7
0.5 - USAGE NON PREVU ET POTENTIELLEMENT DANGEREUX.....7
1 - DESCRIPTION DE L'APPAREIL
ET COMMANDES 8
2- INSTALLATION. 8
3.1 - INSTALLATION AU MUR. 8
3.2 - INSTALLATION MOBILE 9
3 - UTILISATION DE L'APPAREIL 10
3.1 - PANNEAU DE COMMANDE ET TÉLÉCOMMANDE 10
3.2 - UTILISATION DE LA TÉLÉCOMMANDE 10
3.2.a - Introduction des piles 11
3.2.b - Remplacement des piles.. 11
8-TEKNISET TIEDOT. 16
KUVAT
6 - VEDLIKEHOLD OG RENGJØRING

IInoctpaui 3i6paHHa nepuH Ta ocTaHHi CTOpIHkax IHcTpyKci

0 - NOPEДЖЕHHЯ
0.1 - 3AΓΑΙβHA IHΦOPMALIЯ
Iepu 3a BCE XOyemo NOJkyBaTu Bam 3a Te, IIO BN BnPiunn BiDnTn IpeBa ry npnaNy HaWoTO Bnpo6HnTba.
0.2 - CINMBOJN
CnmboJIH,HaBeIeHI y cboMy pO3dIIny,do3BOJIaIbTb WbNIdKO i OJHO3NaHHO HadaTn IHOpMaciIO,Heo6xIDHy IJa npaBnIbHOro BnKOpNCtAHnI npiJaDy B 6e3peuHnx yMOBaX.
0.2.1 - 3actocobahi niktorpamn
| Bka3y€ Ha Te, Σ0 ζeД дOKумент сiД увaxно почиати пered установкою Тa/aбо ВИКористаням рпладу. | |
| Вазу€ Ha Te, Σ0 ζeД дOKумент сiД увaxно почиати пered обслуrogуваня Тa/aбо очшених рпладу. | |
| Вазу€ Ha Te, Σ0 B надунх ддаткх може містпся ддаткова Incформаця. | |
| Вазу€ Ha Te, Σ0 Incформаця ддатунь в Incstрукцii користувача або Incstрукцia 3 установки. | |
| Вазу€ Ha Te, Σ0обслуrogуючий персонл поинен працюbatи 3 прладом вidnobidiэдno do Incstрукцii 3 установки. | |
| Вазу€ BiД nobIDHomу персону Ha Te, Σ0 onscaHa onepaця СТАНБИТь рИЗИК уразжения лесгри hum СтруМOM, якso BOHA He ВИКонуевSCЯ 3doesprIMaHHam павил Тхни КбeЗпеки. | |
| Вазу€ BiД nobIDHomу персону Ha Te, Σ0 onscaHa onepaця СТАНБИТь рИЗИК оримаHHЯ ФiЗИнoi ShKOДи, якso BOHA He ВИКонуевSCЯ 3doesprIMaHHam павил Тхни КбeЗпеки. | |
| Вазу€ BiД nobIDHomу персону Ha Te, Σ0 onscaHa Опера StAHOBИТь рИЗИК оримаHHя onikibПри КонтakTi 3 ВИСКOTeMператугим KOMПОЕHTами, якso BOHA He ВИКонуевSCЯ 3doesprIMaHHam павил Тхни КбeЗпеки. |
0.3 - 3AΓΑΙβHA IHΦOPMAζΙγ
ПИД YAC BUKOPUCTAHЯЕКTPNUHOrO OBJAДHAHHЯ 3ABJDN CIIД NOTPUMYBATNcR OCHOBnX 3AXODIB BE3NEKN, IOB 3MEHsHTN PN3NK IOKEXK, YPAKEHЯ EJEKTPuHm CTPYMOM TA TPABM, 3OKPEMA:

OKymeHT 3axnueHo BiDIOBIDHO Do 3aKOHy i3 3a6OpOHO
Ha BiD TBOpENHЯ abo nepeauy TpeTIM oc6am 6e3 YBHorO Do3BOny komnai OLIMPIA SPLENDID. PpnilaDi moKyTB OHOBJIIOBaTnCS, TOMy DeaKi DeTani BiDpi3HraIOTbCra Bi D NOKa3aHnx, 6e3 WKOAn dJa IONcHeh, 0o MicTAYbCra B ciei IHCTpyKciI.

aXHo npOHTaIe IIO iHCTpyKciIO, nepsh HIX npNCTyNaTn Do 6yDb-IAKOI ONEpaQii (yCTaHOBKn, o6ClyrOByBaHHa, BnKOpNCtAHHa) i cyBopo DOTpIMyITeCb TOrO, 0o ONuCaHO B OkpeMnx po3dIinaX.

TeNbHO 36epiraIte cIO 6poWpy dIy IoJaIbIHX KOHCyIbTaciI.
4.Письи Видалени уразковци,празковатся в синocті пиаду; elementу уразковки He moхна 3aIIuwaTN B DOCTynHOMy Дя Di-Tei Micci, Ockilbkn BOHN cnoteHcHmN dxepeJamn He6e3neKn.
5. BINObHK HE HECE BiINOBIAJIbHOCTI 3A 3BNTKN, 3ABDAHI OCObAM ABO PEyAM, IIO BHNKAIOTB B PE3YJbTATI HEOTPIMAHNЯ INPABNJ, IIO MICTA TcR Y LIEIHCTPYKcII.
- Виробнк 3алшас 3a собю праBO B 6удь-якн уac BHOcTN 3mIH y cBOI moJIeI 6e3 KapdINHaJIbHnx 3mIH xapaKTePnCTNK, ONncAHNX B zuic iHcTpykciII.

Ipeed nikoueHnmpnaDy do XNBHeHnpekoHaTncs, 0doHnHa Ta6nuci BiNobIdaHTb daHm eJekTpnuHOi Mepexi. IpanctnHa 3 xapakTepcntkamn po3miueHa ha npniladi.

- YctaHOBTn npilaB BiINOBiIDHO do iHcTpyKciBbPO6HnKa. HenpaBnIbHa yCTaHOBka MoKe 3aBdaTN uKOJ NIOJAM, TBapnHAM a6o peyam, 3a 10 BInPO6HnK He Hece BiINOBiJaIbHoCTi.

- Bn6epitb ctaiohapny a6o nepehochy yctaHOBky npnilady i doTpmyTecsb iHcTpyKcii Bnpo6Hnka.
9a.Якwo Bn ПlaHyeTe BcTaHOBHTn npJaHa cTHi, po3MicTiB noRo y BepTKKaIbHomy nOIoXeHHi, y BiINOBiIDHomy Micci Ta 3 DoTpMaHHm MinImaJIbHnx BiDCTaHei, onncAHnx y cIbOMy noci6Hnky (pnc.1).
9b.Якwo Bn 36npaTeC8 BnKOpncTOByBaTn npnaD, He BCTaHOBJIIOHOn Ioro Ha CTiHy,po3MiCTiTb Ioro BV TropN3OHTaJIbHOMy NpOJKeHHi,y BiIDNoBIDHomy Micci Ha CTiIKi,piBHi NOBepxHi.
10.Пдчасвкористаняприладузавждpo3прмлгВecьшур.
11. Пилад постацься 3 Шуром кИВлення 3 ВИКою (Тип Y). У рazi现如今 Кабелю кИВлення, Иlorо Heo6xIDHO 3amInTu, 3BepHyBшись до ВИрОБнka abO aВТOPиЗOBaHo- ro ZeHTpy obcIyROvBaHHЯ чno OC6n 3 NOДI6HOn KBAJI- φikaцicHo, уб yнкHyтNi рИЗнKn He6e3neuHnx cnTyaцi.

-
BctaHOBHTn npinad TaKIM YHOM, 0o6 BmNKaCi Ta iHwi KhoNk n paHeJI KepyBaHHra 6yI IN HeDocxHMMn dIg THX, XTO npInMaC BaHHy uI dUw.
-
He BnKOpNCToBvBaTn NOIOBxkyBaui Chn BnKOpNCToBvBaTu iX duJke o6epeXHo.
- Po3miuBAtn npnilaHa BicTaHi He MeHwe 1 M BiD iHux npedmetiB (Pnc. 1).
14a. Дял залобiraнся ризку пож经у утпмуВаTN BiДстань пинайни 1 M mix OTbopamn Дя BnxOdy/BxOdy NOBITРЯ 3 пиладу та 6ydь-якIM iHшm пpeДmetOM, StTopamN, TkaHHamN Ch nerko3aMnCTHMn MaTepiJAmN.
- He po3miuBAtn npnaD nop4d 3 dxepeJamr Tepna.
- He BnKOpncToBvBaTn npnilad dIy cyuKn OJrIy.

- He BboiHTn CTOpOHHi IpeDMeTn B pewiTKn BXOy Ta BNXOy NOBITpR, OckiNbKn icHyc pn3NK ypaXeHHa eJeKTPnuHm CTrpymOM, noXeKi a6o noWkoJKeHHa npnaNy.
- Пд час роботи зановати контakтib mixshypom xNBleHЯ Ta rapaUMN NOBepxHЯMN.
- He po3miyBaTu shHyp KINBHeHH naKINMkaMu, KOBpaMu a6o HnPaBnaOuHmN. Po3miyuBaTu ka6eJb daJeKO BiD npoxoDiB, 06 yHnKHyTn cNOTnKaHHa.
- He haKpyuBaTu Chn nepeKpyuBaTu uHyp HaBkoJIo npNuJaY, 6o ce MoKe npN3BeCTn Do noWkoJxEHHra i3OJaIi.
- He npnbaptn npnilad nokn BIn rapaun.

- He BnKOpncToBvBaTn npnlaad Ha BiDkPntomy nobiTpi a6o Ha BOJOrnx NOBepxHax.
- He BnKOpncToBvBaTn npnaD pa30M 3 3acobamn dIa
3anporpamOBaHOro BMnKaHHBmKKaHH, TaMepamN iHsMMn akcecyapamN dIy aBTOMaTHUHO BMnKaHHdIy 3anobirAHn pN3NKy noXeKi kIoo npnilad hakpnto abo po3MiueHo He KopeKTHO.
- Пплад пиз nauseй дя пidloroboro abo hactiHoro BCTaHOBJIeHHa, y KoxHOMy BnpaIky Heo6xIDNo doTpmyBaTnca 3anO6IXHHx 3axOdiB, onncahnx y cIbomy noci6Hnky.
-
He BnKOpncToBvBaTn npnaIad 6iIa WtOp, ockIbKn MaTepiAn MoKe nOtpaNTn B OTBOpn dJa BxOdy nobITpy (Pnc. 3).
-
YHnKaTn po3JIbBaHHra pIDHH Ha npJaIaI.
27.ДiTи He noBHHi rpaTncs3 npJiaDom.

- OuHHe Ta TexHicHe 06cIyROByBaHHa, aKi MaHOb 3iINCHIOBAtn KopNCTyBaay, He NobHHI BnKOHyBaTnCra DiTbMn 6e3 HaJPy.

- DITN BIKOM Do 3 pOKiB He MOxTyb Ha6JnxKATnC8 Do npNJaDy, JkIoo 3a HmMn He MaE NOCTiHOrO dOrJaDy.

1.ДiTn BIKOM BiD 3do8 pOKiB MOxTyb JIuSe BMNKaTN/BMINKaTN npJaad 3 KopeKTHmP03MiUeHHaM, JaKIo 3a HmNc DoTJrA, a TAKoX BOHn OTPMaII nHCTpyKciI zoDo 6e3neuHoro BHKOpNCtAHn Ta PO3yMIOTb NoteHciHi pn3nKn.

2.ДiTи BIKOM BiD 3do8 pOKiB He MoKyTb BCTaBnTn BnIky Bpo3eTKy,perynIOBaTH a6o OunuYBaTH npJnAd,a TaKoX BnKOHyBaTH onepaui 3TexHicHoro o6cnyroByBaHHra,aki MaC BnKOHyBaTH KOpNCTyBaU.

- He BnKOpncToBvBaTn npIaD y 6e3nocepEaHiN 6n3bKocTi BID BaHHN, dUy a6o 6aceHy.

-
YBAGA! Dejki eJemeHTn npnJaMy MoKyTb cnIbHo HarpiBaTncr Ta npn3BeCTn Do onikIB. Heo6xIDHO yBaXHo cNoctepiratn, kso no6n3y npnAdy npncTyHi dITn Ta iHBaIiDn.
-
Перед очшеним 3abЖди ВIMNKaTN BnIky eJekTpHoro KINBJIeHHa.
-
Дя коргтог Викорисанн рпладу HE MOЖHA: a. po3miuByaTu nOro nopyu 3 φikcoBaHOU po3eTKOu b. TargHTn 3a shyp a6o cam npnilad zuo6 BnHrTn BnIky 3 po3eTKu c. 3aIIwataN npilad niBnVBOM aTMocΦepHnx φakTopiB (douy, coHcy Too) d. 3aIIwataN noRo npauOIOUM 6e3 notpe6n e. TopkaTncMOKpIMn abo BOIOrmN pykamn.
-
BnKOpncTOBbATn npnilad IInwe 3rIiHO 3 HaiaHmN iHcTpykciyMn. Bnpo6Hnk He peKomeHdye BnKOpncTOBbATn npnilad IHsIM YHHOM, 60 ue moKe npn3BeCTn Do ypaXeHb eJeKtpnUHM cTpyMOM, noXeX a6O TpaBM.
-
Haimoipeniio npuHIO neperpiBy c HaKOpHEnnHa nny a6o BopciB y npuadi. PeryIrpHo BuaJrTu ci HaKOpHcHHe, BmNkaOuN npuad 3 po3eTKn Ta ouNsaUOu pewiTk i OTBOPn nnlococom.

- He ВикорисовыразабразиВни миючia 3acobn. OчицуваTN BOJOrOIO (He MOKpoI) cepBETKOIO, npomntoU y TeNJI BODI 3 MUNOM.
- He πιδκλίουατη πρυλάν ὁ eλεκTpρηHOrO ΜχιΒληEHЯ ὁ TOrO, λκ BīN 6ynde ποBhicTó 3iδpaHn Ta BīdpeγιMbObaHn.
- Перш 키пегемиати прлад, Вимкгть яого i поекайткльka XBИПИН, NOKN BiH OXОЛоHe.
- He mntu Ta He 3aHypIOBaTu npuaD y Body qu iHwi piINn. Moxe npu3BeCTu do KOpOTKOrO 3amNkaHHa oO noKe

e BnKOpncToBvBaTu npuJa y 3aKpntomy npocTopi, HapnKlaad ycepeDHHi waФn, ockilbKn ue MoKe cnpuHHTn noJxExy.
-
Y pa3i Hecymichocti mix po3eTKO Ta BnIKOIO npnaNy, 3MiHHTn po3eKHa ha iHsy BiIDNOBIDHO Tnny 3a DonomoroH npopeciHNo KBaIqIKOBaHOrO nepcoHaJy, kN nepekoHaCTbca, 10 cekzra Ka6eHIO po3eTKn BiIDNOBIDAe NOTyXHocTi, kky CnoxNBac npnaad. 3araIOM, He pekomeHdyETbcra BV-KopncTATn nepexiDnki Ta/a6o noobKyBaui; kxio ix BVKnOpCTaHHc CYTTcBnM, BOHN NOBHHI BiIDNOBIdaTu HHNM CTahdaptam 6e3neKn, aix notyxhictb ctpmy (A) He nobnHa 6yTN MeHWO HIX MaKcImMaJIbHa nOtyxHicTb npnaady.
-
He BnKOpncToBvBaTn npJa y pa3i HecnpaBHoCTi a6o HecnpaBHOcTi, kKIO Ka6eIb qN BnIka NowKOJKeH, JaKIO npJa BnAB qN 6yB NOsKOJKeH N6yDb-IAKIM YINHom. BnMkHyTN npJa, BnDaIHTN BnIKy 3 PO3eTKu Ta BiDaTn Ioro Ha nepeBipKy npOphiCInHO KBaJIΦiKOBaHOMy nepcoHany.
46.ДемоNTаж,ремот abo nepeo6laHaHHЯ HeaBToPn3OBA-HOHO OcO6OIO MOKe Ipn3BeCTN Do cepNo3Hnx NOxKOJxHeb. - He po36npatn Ta He 3miHOBaTn npnaad.
- CamocTiHOppeMOHTyBaTn npJnaHad3BnuaHNo He6e3neuHo.
- 3a haBhoCTi Bntoky ra3y 3 iHwOro o6laHaHHaDo6pe npoBiTpNTn npMiiSeHHa nepeD BnKOpncTaHHaM npnJaNy.
- He BndaIaTI N BuJIKN 3 PO3eTKN, JaKIo npIJaI aIe BKnIOue HnI.
-
Y pa3i BnpiweHHa 6ilbwe He BnKOpncTOBvBaTu npnaTakoro Tnny, peKomeHdyEmo BnBeCTn Ioro 3 naNy, nepepi3aBwn ShHyp XnBJIeHHa, nonepedHbO BnHraBwn BnIky 3 po3eTKN.
-
yBAtA! IЯ 3anobirHnI neperpiBy npnaIy, He NaKpNBaTNIoro (Pnc. 4).
-
TaKoJ peKOMeHdyE7bc8 3HeuKOaHTn Ti qacTINn npNlaNy, kI MoKyTb cTaHOBHTn He6e3neky, oOcblNo DnA dTei, 60
BOH N MOxTyB BnKOpNCToByBaTn HecnpaBnI npJaId IJIy BlaChnx irop.
- Пд час по Викорисань аб оicсяdoBroi nay3n icЯ уВIMKHeHЯ може 3'ЯВИТСя sym a6o 3anax. ZeHopMaJIbHniФeHOMeH,ЯКи 3нИКHenicя DeKeIbKOx XBJIINH po6OTn npilaу.
0.4 - ПЕДБАЧУBAHE ВИКОПСТАн?
- Пплад сдд викорисовытн виклioчно дя HARpiBaHHЯ NOВITРЯ 3 сdнHOМeTOHcTbOpeHHЯ KOMФopTHoi TeMnepa-typn cepeodBnua nepe6yBaHHra.
- Рей полад поз nauseю лише Дд домашьоу abo aha-noriguro BnKOpncTaHHЯ, НOrO He moxHa BnKOpncTOByBaTu y komepuziHnxЧИ npomncNoBuxцлax.
- HehaJeXHe BnKOpncTaHn npnlaNy 3 6yDb-ЯКIMN NOxKO-DxKeHHaMn IIOdei, peey a6o TBapnH 3BilbHЯc OLIMPIA SPLENDID BiD 6yDb-яKOi BiINObIaJbHocTi.
- Пплад мас сецьну Функцию, по akтубязя 3a 6a-жаннам Користувача, ра ДОЗВОЛЯС ВИЗHAЧТУ НаяВHICTь BiДКрNTnx BiOKOH/ДВерей Та 3мUCNTN пплад працюВати В ржимi розморожьвань, по 3meнштNiВТРаTy eHEprii. Zeй плад мас маркувань СЕ, яke поЗразс BДПОВID-HICTьHopmaTиВam 2014/35/UE (нзьka habpyra), 2014/30/UE (eNEKtpomarHITha cymichicTB диpeKTnBi zuo do paiaoo6-ладнань).
0.5 - HENPN3HAUHE TA NOTEHcIiHO HE6E3NEyHE BnKOpNCTAHHЯ
- He BMNKaTN npnilad y npnmiueHHx, De BnKOpNCTOByeTb- cya 36epiraCTbc8eH3HN Ta iHwi Ierko3aMncti piDHH, a TAKOX B npnmiueHHx 3 HaABHicTIO JeRKO3aMnCTNX Ta BN- 6yXOBHX ra3iB.
- He BnKOpncToBvIe npnaIad, kIoo KIMHaTy HeoDaBHO 6pO6Hn ra3OBm IHcEKNuIOM a6o B npncyTHocTi 3aaneHnx naxouiB, ximiuHx napib a6o macJHnx 3aIIuKIB.
- He BnKOpncToBvBaTn npIaD y MaJIeHbKnx npIMiUeHHx B npIcCyTHOcTi JIOdeN, rKi He MoKyTb aBTOHOMHO IORo NOKnHyTN, a6o B TaKOMy pa3i Heo6XiIDHo 3a6e3PeHTn NOCTiHN dOrIaD.
Ley Bnpi6 cnid BnKOpncToBvBaTn Inse BiDnOBiDnO do cneuΦikaui, 3a3Na-ueHnx y ciE iNcTpkykci. Bydb-jaKe BnKOpncTaHHra, BiDMInHe BiD 3a3NaueHoro, Moxe npn3BeCTn Do cepno3Hnx TpaBM. BNPObHK HE HECE BiDIOBIAJIb-HOCTI 3A 3BNTKn, 3ABDAHI OCObAM ABO PEyAM, 10 BnHnKAIoTB PB3yJbTATI HEDOTPMAHHr PPABIN, 10 MICTaTcY LcEIHCTPyKlII.
Ha BicTaHHe MeHwe 350 MM BiD CTiH
Ha BiDCTaHI He MeHwe 1000 MM BiI JERKO3aMnCTnx MaTepiJIb (WTOp, TKAHNH, TToO...) (Pnc. 2).
HE BCTaHOBJIIOBaTn npIpaI nd po3eTkamn.
-Пид rotybaTN po3eTky 6iЯ npnlaу,pepekoHaBwncb,zo BOHa 3HaxOuNTbcra Ha BiDcTaHi, nponopciIHOI Do DOBXHH Na6eJIIO XNBJIeHHa.
BCTaHOBJOuH npJaHa BnCOkOMy Micci, DOTpIMyITecb BiDcTahi He MeHwe 1,8 M BiD niIDnOrn.
a. Bn3NaHTmicue dIy BCtAHOBHeHH npIpaIy.
b. 3po6ntn Dba OTBOpn diametpom 8 MM Ha BiicTaHi 170 MM (Pnc. 4).

OTBOPN MaIOb 3NaXoIHTnCra Ha BiIDcTaHi npHaMHi 1800 MM BiD NiIOrn Ta npHaMHi 350 MM BiD cTeJI (Pnc. 1).
Yac CBePdInHn CTiHn nepeKoHaTncs y BiDcyTHOCTI eNeKtpuHnx a6o BODonpoBIDHNx Tpy6.
c. BCTaBnTn IIO6eJI Do OTbOpIB Ta 3akpyTnHaJaHi TBnHTN.
d. He 3akpyuByaTu rBnHTn NOBHicTIO rBnHTu Ta 3aNnUHTu ix Ha BiDCTaHi npHaMHi 5-7 MM BiD CTiHn (Pnc.4).

Ipekohamuc, 0o 2uHmu MiHo 3akpInJIe Hi cmiHi.
e. BCTABNTI rBHTN B OTBOPN (X), po3miuehi 33aHy Ha npnlaDi, Ta HATNCHTN Ha npnlaD y HaprMky CTiHn (Pnc. 4 - 1 kpk).
f. Пocунлд Влбио пи6и3Ho Ha 5 MM (Pnc. 4 - 2 крok), a notim nocyHTn Ioro Bn3 пи6и3Ho Ha 3÷5 MM (Pnc. 4 - 3 крok).
g. IpepeBipuTn ctabinbHicTB Ta miunHicTB pfikcaii npnnaDy do CTiHn.
3.2 - έPEHOCHE BCTAHOBJIENHЯ
- Po3mictn npnilad Ha pibni Ta ctiikn nobepxhi y BiDIOBIDHomy npmiueHHI.
- Perekohatncs, 00 stopn uHwippedmetn He 6nokyotb nobitpr (Pnc. 3).
3aIIuHTn npHaMHi 1 M BInbHoro npocTopy 3 60KiB, 33aNy Ta HaI npuaam (Pnc. 1).
-ПеревірітNi,цoБ вімікач «ON/OFF» (9) 3нaxоДиВся у положенHi «O».
BCTaBHTN BnIky do po3eTKn.

- IpebeipuTn BiDnoBicHicTb xapaKTePncTnK eJeKtpnuHOi MepeXi Ta xapaKTePncTnK, Bka3aHnx Ha PnaCTnHi Ha npniladi.
3miiybaTn ka6eIb daIeKO BiD npoxoIb, 06 yHnKHyTN CNOTnKaHHJ.
3.4 - IHCTPYKlI 3 POBOTN
3.4.a - BkJIoueHHa
IpeBipuTn, uo6 nepeMkauch 6yB y noJoxeHHi «I» (ON) (9); hATncHyTu KhoNky ON/OFF (SW1) a6o (T1), 3 npuadny npolyhae akcTnHn cnHan «Beep» i BIn BKIOHTbcra. HATncHyTu 3HOB KhoNky ON/OFF (SW1) a6o (T1) dJa BVKnIOUeHHa npuady.

Iicra eumkHeHH npunaody bemunamop npauoamme ue 6n3ko 1 XeunuHy, oob oxolodmu kOmoHmu, nomim npunaad aomamuHno 3ynunmbcra.
HaTnCKaIte KhoNky Mode (SW2) a6o (T2), 0kN He 3arOpntbcra CbiTIOiHdkaTOp, 00 BiNoBidae Notpi6Homy pexmmy.
PexkM «HarpiBaHHa
Якwo obpaHO ue pexm po6OTn i 3aHaHO Tempepatpy Bnue kIMHaTHoi, Ha dinCnnei 3aogopetbcra CbitIOinikatop (S2), i npuIad npauOe BiINOBiDnO do Heo6xIDHOI noTUXKHOCTi:
- Hatachitb KhoNky Mode (SW2) afo (T2) npn6n3no Ha 3 cekyHn, uo6 Bn6paTn notpi6Hy notyxKHiCTb.
- Hatachitb KhoNky (T6) kInbka pa3iB, 06 matn moKInBicTB Bn6paTn notpi6Hy notyXHicTh y TaKOMy npAdky:
H0(tiIbKnBeHTnlaiz)>H1(miImaIbHa notyXhictb,oO yepryc3 BeHTnlaic)---->H2(maKcImaIbHa notyXhictb,oO yepryctbca 3 BeHTnlaic)--->HO...
- HatackaiTe KhoNk (SW3 - SW4) a6o (T3 - T4) dny 36iNbweHnA 60 meHneHHa 6baxHOI NOTyXHocTi B TaKOMy npRdky:
Bn moxete Bn6patn 3a3daeneriB BCTaHOBneHi TnxHeBi nporpaMn a6o CTbOpHTN BlaChy nporpamy.
Поррама «P1»:
BnKOpncTOByc nonepedHbO BCTaHOBJIeHNI ZIKN 3 NOHeiINKa No HeiIcamocTiHNO peryIIOUCh peXm «KomΦoPT» a6o «Eko» BiIDNoBIDHO do ciEICXM:

Поррам«P2»:
BnKOpNCObYe nonepeHbO BCTaHOBJIeHnIzIK3 NOHeiIka No n'YTHNIO,camoctiHo peyIIOU npexm «KomΦoPT» a60 «Eko» BiINOBiIDHO do ueic CXemn:
BnKOpNCTOBye nonepeHbO BcTaHOBneHn zNKJI i3 cy60TN no HeiIO, camoCtiHNO peryIIOUOn pexm «KomΦopt» a6o «Eko» BiINOBiINO do ciEi cxemn:


Поррама «P3»:
- Moxha BCTaHOBHTI iHdNbIDyajbHy nporpaMy dIra Koxhoro dHra i yacy Tuxhna 36iNbHTn a6o 3MeHHTn 3HaueHHra MoxHa HaTnCKaHHaM KHONK (SW3 - SW4) a6o (T3 - T4).
KoI npiJaB nepe6yBaC B cIbOMy peXIMi, HATNCHITb i IYTPMMyTe KHOkky Mode (SW2) a60 (T2) npi6JIu3Ho 3 cekyHn, Na dIscPnei BiIO6pa3ntbcra «d1».
Bn6epitb deneb (d1 - d7) i haTncHtB KhoNky Mode (SW2) a6o (T2) nIiTBepeJxehn.
Ha dincnnei BiO6pa3ntbcra 00);Bn6epitb yac (BiD 00 do 23) i HATncHITb KhoNky Mode (SW2) a6o (T2) nIaTBePdxKeHHa. - Hatachitb Ha Mode (SW2) a6o (T2), 0o6 Bn6paTn peKm po6oTn (KomΦopT, Eko a6o PtoT 3aMep3aHn).
HaTnchItb Ha KhoNky (SW3) a6o (T3), 06 BCTaHOBNTu peKIM po6OTn Ha HactyInHy rOdInHy.
-Пися Всановлени рекиму harpiBaHHЯ Ha lac 23 roDHHи habuChiTb (SW3) a60 (T3), lo6 noBepHyTnCdo HaIaWtYBaHHЯ dHЯ. Koln Ha ekpaHI BiO6pa3ntbcr «d7», haTnCHiTb (SW3) a6o (T3), lo6 3aBepShInKopncTyBaUbcKe nporpaMyBaHHЯ.
4-3AXNCT BID INPEPERIBAHNRA
- Zei npnilad Mae 3axnct BiD neperpiBaHHa, kKn aBTOMaTHUHO BUMKae NOro Ha p TpBbIoro neperpiBaHHa. Y cboMy pa3i:
BnHrTN BnIKy 3 PO3eTKN;
- 3auekaTn npin6n3Ho 30 xBnInH dIy oxoJIoJKeHH npiJaNy;
- 3HaHTN MOxJIbBy npuHny neperpiBaHHa (HaNPKJa; npeMeT, kNk 6NoKye OxJODXeHNr npnAdy);
- nepebipntn haarBhictb MOxJINBHX NOWKOJKeHb npuIaNy, Ka6eJIIO XNBJeHH Ta BUNK.
KIOHemaNOWKOJKeHB:
- BCTABNTN BUNKy DO PO3ETKN;
- 3HOB yBIMKHyTN npNJa.
KIO npiaH He BMkaetbca 3B'raTnC3 aBTOpN3OBaHm ceHTpOM o6cnyroByBaHHa.
This symbol on the product or its packaging indicates that the appliance cannot be treated as normal domestic trash, but must be handed in at a collection point for recycling electric and electronic appliances. Your contribution to the correct disposal of this product protects the environment and the health of your fellow men. Health and the environment are endangered by incorrect disposal. Further information about the recycling of this product can be obtained from your local town hall, your refuse collection service, or in the store at which you bought the product. This regulation is valid only in EU member states.