
FIXETTO 1840 S - Electric stapler EINHELL - Free user manual and instructions
Find the device manual for free FIXETTO 1840 S EINHELL in PDF.
| Product Type | Cordless Electric Stapler |
| Brand | Einhell |
| Model | FIXETTO 1840 S |
| Weight | 2.1 kg |
| Power Supply | Lithium-ion Battery 18 V d.c. |
| Staple Width | 5.5 – 6.1 mm |
| Staple Length | 10 – 40 mm |
| Staple Thickness | 1.25 mm |
| Max Operations per Minute | 60 |
| Sound Pressure Level | 84 dB(A) (K=3 dB) |
| Sound Power Level | 95 dB(A) (K=3 dB) |
| Vibration Emission Value | 4.89 m/s² (K=1.5 m/s²) |
| Operating Mode | Single Shot and Continuous Shot |
| Depth Adjustment | Yes, via adjustment ring |
| LED Light | Yes, work area illumination |
| Belt Clip | Yes, for convenient transport |
| Safety | Trigger safety mechanism, anti-accidental firing protection |
| Maintenance | Clean with a damp cloth and mild soap; do not use harsh chemicals; avoid water entering the interior |
| Warranty | 2 years (according to conditions) |
| After-Sales Service | Einhell France SAS, ZAC Paris Nord, 22 Avenue des Nations – Le Rabelais, BP 59018 – 93420 Villepinte |
Frequently Asked Questions - FIXETTO 1840 S EINHELL
User questions about FIXETTO 1840 S EINHELL
0 question about this device. Answer the ones you know or ask your own.
Ask a new question about this device
Download the instructions for your Electric stapler in PDF format for free! Find your manual FIXETTO 1840 S - EINHELL and take your electronic device back in hand. On this page are published all the documents necessary for the use of your device. FIXETTO 1840 S by EINHELL.
USER MANUAL FIXETTO 1840 S EINHELL
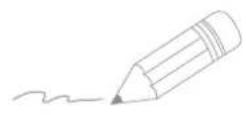
GB Original operating instructions Cordless stapler
When using the equipment, a few safety precautions must be observed to avoid injuries and damage. Please read the complete operating instructions and safety regulations with due care. Keep this manual in a safe place, so that the information is available at all times. If you give the equipment to any other person, hand over these operating instructions and safety regulations as well. We cannot accept any liability for damage or accidents which arise due to a failure to follow these instructions and the safety instructions.
Explanation of the symbols used (see Fig. 12)
- Danger! - Read the operating instructions to reduce the risk of injury.
- Caution! Wear ear-muffs. The impact of noise can cause damage to hearing.
- Caution! Wear safety goggles. Sparks generated during working or splinters, chips and dust emitted by the device can cause loss of sight.
1. Safety regulations
The corresponding safety information can be found in the enclosed booklet.
Warning!
Read all the safety information, instructions, illustrations and technical data provided on
or with this power tool. Failure to adhere to the following instructions may result in electric shock, fire and/or serious injury.
Keep all the safety information and instructions in a safe place for future use.
2. Layout and items supplied
2.1 Layout (Figs. 1)
- Trigger
- Magazine release
- Magazine cover
- Magazine
- Filling level indicator
- Stapler head and trigger catch
- Cover plate (outside)
- Cover plate (inside)
- Depth setting
- Belt clip
- Selector switch for single shot / repeat shot
- LED lamp
- Replacement cap
2.2 Items supplied
Please check that the article is complete as specified in the scope of delivery. If parts are missing, please contact our service center or the sales outlet where you made your purchase at the latest within 5 working days after purchasing the product and upon presentation of a valid bill of purchase. Also, refer to the warranty table in the service information at the end of the operating instructions.
- Open the packaging and take out the equipment with care.
- Remove the packaging material and any packaging and/or transportation braces (if available).
Check to see if all items are supplied. - Inspect the equipment and accessories for transport damage.
If possible, please keep the packaging until the end of the guarantee period.
Danger!
The equipment and packaging material are not toys. Do not let children play with plastic bags, foils or small parts. There is a danger of swallowing or suffocating!
- Cordless stapler
- Replacement cap
3 mm hexagon key
40 mm staples (500 pcs) - Original operating instructions
- Safetyinstructions
3. Proper use
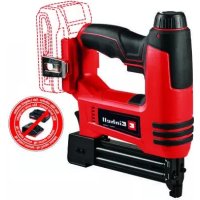
The cordless stapler is designed for driving staples into wood and similar materials. You are allowed to use only staples of the type described in section 4 "Technical data". Never use any other staples.
Similarly this tool must never be used on any hard materials such as stone, metal, etc.
The equipment is to be used only for its prescribed purpose. Any other use is deemed to be a case of misuse. The user / operator and not the manufacturer will be liable for any damage or injuries of any kind caused as a result of this.
GB
4. Technical data
Motor power supply: 18 V DC
Maximum number of operations per minute: .. 60
Staple width: 5.5-6.1 mm
Staple length: 10-40 mm
Staple thickness: 1.25 mm
Weight: 2.1 kg
Danger!
Sound and vibration
Sound and vibration values were measured in accordance with EN 60745.
L_pA sound pressure level 84 dB(A)
K_pA uncertainty 3 dB
Lsound power level 95 dB(A)
K_WA uncertainty 3 dB
Wear ear-muff s.
The impact of noise can cause damage to hearing.
Total vibration values (vector sum of three directions) determined in accordance with EN 60745.
Vibration emission value a_n = 4.89~m / s^2 K uncertainty = 1.5m / s^2
The stated vibration emission levels and stated noise emission values were measured in accordance with a set of standardized criteria and can be used to compare one power tool with another.
The stated vibration emission levels and stated noise emission values can also be used to make an initial assessment of exposure.
Warning:
The vibration and noise emission levels may vary from the level specified during actual use, depending on the way in which the power tool is used, especially the type of workpiece it is used for.
Keep the noise emissions and vibrations to a minimum.
- Only use appliances which are in perfect working order.
Service and clean the appliance regularly.
Adapt your working style to suit the appliance.
Do not overload the appliance.
Have the appliance serviced whenever ne
cessary.
- Switch the appliance off when it is not in use.
Caution!
Residual risks
Even if you use this electric power tool in accordance with instructions, certain residual risks cannot be rules out. The following hazards may arise in connection with the equipment's construction and layout:
- Lung damage if no suitable protective dust mask is used.
- Damage to hearing if no suitable ear protection is used.
- Health damage caused by hand-arm vibrations if the equipment is used over a prolonged period or is not properly guided and maintained.
Danger!
The electric power tool generates an electromagnetic fi eld during operation. Under certain circumstances this fi eld may actively or passively impede medical implants. To reduce the risk of serious or fatal injuries, we recommend persons with medical implants to consult their doctor and the manufacturer of the medical implant prior to using the equipment.
5. Before using the equipment
Warning!
Always remove the rechargeable battery before starting any inspection or adjusting work.
Warning:
Wear the necessary protective clothing, in particular safety goggles, when working with the cordless stapler.
Pay attention to the safety regulations.
Each time before starting work, check that the magazine cover is securely fastened (Fig. 1/ Item 3). Clean the equipment thoroughly and immediately each time after it has been used.
Each time before starting work, check that the trigger catch functions perfectly and that all screws are securely fastened.
- Never tamper with the stapler.
- Never dismantle or block any parts of the stapler such as e.g. a trigger catch.
- Never carry out any "emergency repairs" with
GB
unsuitable means.
- Proper stapler maintenance is required at regular intervals in accordance with the information supplied by the manufacturer.
Take precautions to prevent anything which would weaken or damage the equipment, e.g. from
a) striking or engraving,
b) modifi cations which are prohibited by the man- nufacturer,
c) guiding on templates made of hard material, e.g. steel,
d) pushing across the floor,
e) using as a hammer,
f) any kinds of acts of violence.
5.1 Checking the trigger catch (Fig. 1)
Warning!
Remove the battery.
Check the trigger catch (6) each time before use. The trigger catch must move freely without jamming. The spring on the stapler head and trigger catch must return the trigger catch to the released initial position again. Never use the equipment if the trigger catch is not working.
- Remove the battery from the tool.
- Remove the staples from the magazine (Fig. 3/Item 4).
- Check that the trigger catch (6) can move up and down freely.
- Reinsert the battery in the tool.
- Press the stapler head/trigger catch (6) against the workpiece without pressing the trigger (1). The tool is not allowed to operate. Never use the tool if it operates without the trigger (1) being pressed. Risk of injury!
- Remove the tool from the workpiece. The trigger catch (6) must return to its released starting position. Press the trigger (1). The tool is not allowed to operate. Do not use the tool if it operates. Risk of injury!
- Press the stapler head and trigger catch (6) against the workpiece and press the trigger (1); the tool will operate.
5.2 Loading staples (Fig. 2-4/Item 4)
Warning!
Remove the battery.
- When you fill the magazine (4), make sure that you hold the equipment in such a way
that the muzzle is pointed neither at yourself nor at anyone else.
To fill the magazine, press the magazine release (2) and slide back the magazine cover (3) as far as it will go (see Fig. 3).
Staples: Insert the staples (a) into the magazine (4) from below as shown in Fig. 4.
Important!
It must be possible to move the magazine slide without applying much force. Watch out for jammed staples!
5.3 Charging the Li battery pack (Fig. 5-6)
- Remove the battery pack (a) from the handle, pressing the pushlock button (b) downwards to do so.
- Check that your mains voltage is the same as that marked on the rating plate of the battery charger. Insert the power plug of the charger (c) into the socket outlet. The green LED will then begin to blink.
- Push the battery pack onto the battery charger.
In section 10 (Charger indicator) you will find a table with an explanation of the LED indicator on the charger.
If the battery pack fails to charge, check for the following:
- voltage at the power socket
whether there is good contact at the charging contacts of the charging unit
If the battery pack still fails to charge, send
thecharger
and the battery pack
to our customer service center.
To ensure that items are properly packaged and delivered when you send them to us, please contact our customer service or the point of sale at which the equipment was purchased.
When shipping or disposing of batteries and cordless tools, always ensure that they are packed individually in plastic bags to prevent short circuits and fi res.
To ensure that the battery pack provides long service, you should take care to recharge it promptly. You must recharge the battery pack when you
GB
notice that the performance of the device drops. Never allow the battery pack to become fully discharged. This will cause it to develop a defect.
5.4 Battery capacity indicator (Fig. 7)
Press the button for the battery capacity indicator (d). The battery capacity indicator (e) shows the charge status of the battery using 3 LEDs.
All 3 LEDs are lit:
The battery is fully charged.
2 or 1 LED(s) are lit:
The battery has an adequate remaining charge.
1 LED flashes:
The battery is empty, recharge the battery.
All LEDs blink:
The battery temperature is too high. Remove the battery from the equipment, keep it at room temperature for one day. If the fault reoccurs, this means that the rechargeable battery has undergone exhaustive discharge and is defective. Remove the battery from the equipment. Never use or charge a defective battery.
6. Operation
6.1 Operation (Fig. 2)
Each time before starting to work, use the fi lling level indicator (5) to check if the magazine contains any staples and make sure that the magazine cover (3) is properly closed.
Important!
Determine the required and optimum depth of penetration of the staples by first using a test workpiece which is similar in structure and material thickness to the workpieces you want to join.
6.2 Triggering shots (Fig. 1)
The built-in trigger catches prevent the cordless stapler from being triggered accidentally. As the result a shot can be triggered only when you press the stapler head (6) of the cordless stapler against the material and actuate the trigger (1).
Single shot
Set the selector switch for single shot / repeat shot (11) to single shot.
Place the stapler head (6) of the cordless stapler against the workpiece ready for stapling. Pull the trigger (1) once and let it go again after each shot.
Repeat shot
Set the selector switch for single shot / repeat shot (11) to repeat shot.
Pull and hold the trigger (1). Each time you now place the trigger catch (6) against the workpiece the cordless stapler will shoot repeatedly until you release the trigger (1).
If the staple goes in too far or if it does not go in far enough you can adjust the depth of penetration with the depth adjuster (Fig. 1/Item 9) (see section 6.4).
Important!
To prevent the cordless stapler from overheating, you must take a break of 20 minutes after approx. 500 shots in repeat mode.
6.3 Jammed staples (Fig. 10-11)
If a staple becomes jammed in the tool, proceed as follows:
- Remove the battery from the tool.
Open the magazine cover (3). - Undo the four screws for the cover plate (7) as shown in Fig. 10.
- Remove the cover plate (7).
- Remove the jammed staples.
- Refit the cover plate. Take care to fit in the right direction and order.
- Screw the cover plate (7) securely back in place.
6.4 Adjusting the depth (Fig. 9)
The tool has a depth adjuster (Fig. 9 / Item 9) in the form of a rotary knob. If you screw it in the direction (+), the staples will be shot in deeper. If you want to reduce the depth that the staples are shot in, you have to screw the rotary knob in the direction (-).
Important!
Use some test pieces.
GB
7. Cleaning, maintenance and ordering of spare parts
Danger!
Always pull out the battery pack before starting any cleaning work.
7.1 Cleaning
- Keep all safety devices, air vents and the motor housing free of dirt and dust as far as possible. Wipe the equipment with a clean cloth or blow it with compressed air at low pressure.
We recommend that you clean the device immediately each time you have finished using it.
Clean the equipment regularly with a moist cloth and some soft soap. Do not use cleaning agents or solvents; these could attack the plastic parts of the equipment. Ensure that no water can seep into the device. The ingress of water into an electric tool increases the risk of an electric shock.
7.2 Ordering replacement parts:
Please quote the following data when ordering replacement parts:
Type of machine
Article number of the machine
Identification number of the machine
- Replacement part number of the part required
For our latest prices and information please go to www.Einhell-Service.com
10. Charger indicator
| Indicator status Explanations and actions | ||
| Red LED Green LED | ||
| Off | Flashing | Ready for use The charger is connected to the mains and is ready for use; there is no battery pack in the charger |
| On Off Charging | The charger is charging the battery pack in quick charge mode. The charging times are shown directly on the charger. Important! The actual charging times may vary slightly from the stated charging times depending on the existing battery charge. | |
| Off | On | The battery is charged and ready for use. (READY TO GO) The unit then changes over to gentle charging mode until the battery is fully charged. To do this, leave the rechargeable battery on the charger for approx. 15 minutes longer. Action: Take the battery pack out of the charger. Disconnect the charger from the mains supply. |
| Flashing Off | Adapted charging | |
| The charger is in gentle charging mode. For safety reasons the charging is performed less quickly and takes more time. The reasons can be: - The rechargeable battery has not been used for a very long time. - The battery temperature is outside the ideal range. Action: Wait for the charging to be completed; you can still continue to charge the battery pack. | ||
| Flashing Flashing Fault | Charging is no longer possible. The battery pack is defective. Action: Never charge a defective battery pack. Take the battery pack out of the charger. | |
| On On Temperature fault | The battery pack is too hot (e.g. due to direct sunshine) or too cold (below 0°C). Action: Remove the battery pack and keep it at room temperature (approx. 20°C) for one day. | |
GB
Disposal

Power tools, rechargeable batteries, accessories and packaging should be sorted for environmental-friendly recycling.
Do not dispose of power tools and batteries/rechargeable batteries into household waste!
Only for EU countries:
According to the Directive 2012/19/EU on waste electrical and electronic equipment and its transposition into national law, power tools that are no longer usable, and, according to the Directive 2006/66/EC, defective or drained batteries must be collected separately and disposed of in an environmentally correct manner.
If disposed incorrectly, waste electrical and electronic equipment may have harmful effects on the environment and human health, due to the potential presence of hazardous substances.
Only for United Kingdom:
According to The Waste Electrical and Electronic Equipment Regulations 2013 (SI 2013/3113) (as amended) and the Waste Batteries and Accumulators Regulations 2009 (SI 2009/890) (as amended), products that are no longer usable must be collected separately and disposed of in an environmentally friendly manner.
The reprinting or reproduction by any other means, in whole or in part, of documentation and papers accompanying products is permitted only with the express consent of the Einhell Germany AG.
Subject to technical changes
GB
Service information
We have competent service partners in all countries named on the guarantee certificate whose contact details can also be found on the guarantee certificate. These partners will help you with all service requests such as repairs, spare and wearing part orders or the purchase of consumables.
Please note that the following parts of this product are subject to normal or natural wear and that the following parts are therefore also required for use as consumables.
| Category Example | |
| Wear parts* Rechargeable battery | |
| Consumables* Staples | |
| Missing parts |
- Not necessarily included in the scope of delivery!
In the effect of defects or faults, please register the problem on the internet at www.Einhell-Service.com. Please ensure that you provide a precise description of the problem and answer the following questions in all cases:
Did the equipment work at all or was it defective from the beginning?
Did you notice anything (symptom or defect) prior to the failure?
What malfunction does the equipment have in your opinion (main symptom)?
Describe this malfunction.
GB
Warranty certificate
Dear Customer,
All of our products undergo strict quality checks to ensure that they reach you in perfect condition. In the unlikely event that this equipment develops a fault, please contact our service department at the address shown on this guarantee card. You can also contact us by telephone using the service number shown. Please note the following terms under which guarantee claims can be made:
-
These guarantee terms apply solely to consumers, i.e. natural persons, who do not want to use this product in connection with either their commercial or other self-employed activities. These guarantee terms regulate additional guarantee services which the undermentioned manufacturer promises to buyers of its new products in addition to their statutory rights of guarantee. Your statutory rights of guarantee are not affected by this guarantee. Our guarantee is free of charge to you.
-
The guarantee services cover only defects due to material or manufacturing faults on the new product which you have bought in the European Union from the undermentioned manufacturer and are limited to either the rectification of said defects or the replacement of the product, whichever we prefer. Please note that only equipment under the brand name "Professional" has been designed for use in commercial, trade or professional applications. For all other products the guarantee is invalidated if the equipment is used within the guarantee period in commercial, trade or industrial applications or for other equivalent activities.
-
Our guarantee does not cover:
-
Damage to the equipment caused by failure to comply with the installation/assembly instructions or by unprofessional installation; damage caused by failure to comply with the operating instructions (e.g. connection to the wrong mains voltage or current type); damage caused by failure to comply with the maintenance and safety regulations; damage caused by exposing the equipment to abnormal environmental conditions; damage resulting from poor care and maintenance.
- Damage to the equipment caused by misuse or incorrect applications (e.g. overloading the equipment or using non-approved attachments or accessories); damage caused by foreign bodies (e.g. sand, stones, dust, ...) getting inside the equipment. Damage in transit; damage caused by force or external influences (e.g. by dropping the equipment).
-
Damage to the equipment or parts of the equipment which is owed to use-related, normal or otherwise natural wear. For example, batteries and battery packs are manufactured with a cycle limit for design-related reasons. Wear is negatively influenced in particular by load demands and charging speeds as well as exposure to heat, cold, vibration and impact.
-
The guarantee is valid for a period of 2 years starting from the purchase date of the equipment. Guarantee claims must be submitted before the end of the guarantee period and within two weeks of the defect being noticed. No guarantee claims will be accepted after the end of the guarantee period. The original guarantee period remains applicable to the equipment even if repairs are carried out or parts are replaced. In such cases, the work performed or parts fitted will not result in an extension of the guarantee period, and no new guarantee will become active for the work performed or for any replacement parts fitted. This also applies if on-site service is used.
-
To assert your guarantee claim, register the defective equipment at: www.Einhell-Service.com. You will need to provide proof of purchase of the new item of equipment. Equipment returned without such proof or without a rating plate are excluded from the guarantee services because of the lack of traceability. If the defect is covered by our guarantee, then either the item in question will be repaired immediately and returned to you or we will send you a new replacement.
- If you have taken the equipment with you to a different EU country than where you bought it, we will arrange for a local service partner to provide the guarantee services. If you take the equipment outside the EU, the guarantee will not apply.
Of course, we are also happy to offer a chargeable repair service for any defects which are not covered or no longer covered by the scope of this guarantee. To take advantage of this service, please send the equipment to our service address. We draw attention to the restrictions of this guarantee concerning wear parts, consumables and missing parts as presented in the service information included in this operating manual.
Warrantor/Service:
Einhell UK Ltd, Unit 10, 1st Floor, Champion's Business Park, Arrowe Brook Road, Upton, Wirral, CH49 0AB
F
Danger!
Retireez I'accumulateur.
Chere cliente, cher client.
Akumulator je plne nability.
2nebo1LEDsvitf
Akumulator je uplne nability.
Spanning motor: 18 V DC
6.2 Schotactivering (afb.1)
Svetita 2 ali 1 lucka LED
Stimata clienta, stimate client.
Moyo yia xwpeC tnc EE:
ZuΦwva Te Nv Eupwnaiokn obnyia 2012/19/EE oxetik aE tic naiec nAeKtpkec kai nAeKtpovikc oukeuckai Tn eTAPOPa Tc onylaac autnc oE thko6 bilao ta axnpota nAeKtpka epyaia kai ouoWpaVMe Tn Eupwnaiokn obnyia 2006/66/EK oi xaalouvec n XpOauonIouvecs matapeic npenei va uallayoyvta Exwpiota, yia va avakukawouv me tpoio pfiko npoc to pepiaalov. Ze peipintwnm nEvdeltaeyevnc anoupocn oI nAeKtpkec kai nAeKtpovikc ocAoeuec loyw evsexouevnc napouciac etikivuvwov ouoiw vnapovv enuBaaei c erntwoec otro nepiabalov kai otNvavPwnivnyea.
H avatunwn n oioaobhnoote aannc mopnnc avanapaywyn ts Tekpnwo n aanawv
deltaoyntikw vou avafepovtal ota npoiovta, akoun kal anoataiká, entpentai mvo ptn onuykataeom tnC Einhell Germany AG.
Me eiuulaaen texvikwtponnonoewv
GR
Evnpwon yia to epbic
5. Pre puštanja u pigeon
Upozorenje!
Izvadite akumulator pre svih radova kontrole i podesavanja.
Upozorenje:
Prilikom izvodenja radova akumulatorskom heftalicom nosite potrebnu zašitnu odecu, posebno zašitne načare.
6.1 Isletim (Sekil 2)
Subject to change without notice
1GRI Confisio napr. 4 Agroflutance sens n-1 Grrattatation hemaen - DKNN Akeu Hkmeasnes - B Baternntn Hbtpn : CZ Akumulatior sponkovsk . SK Akumulatior sponkovsk . Nt Asck-tacker: 4 Grappazon do batoria FIM Anxuaanin - SLO Akumulatior spoavna : H Aekus-tiogp . Cp Ascator cu acumular . GR Kapokmojumapor . P Agstorson som fo HRBNM Akumulatior peto zsaapanj . RS Akumulatiora hetalica PL Zaryzak acumulatioray TR Akita zimbu RUS Aegynywnuyu kuzhentre , EE Akuga Kambidny . LysKabikdny . BVKsVkoBn . LT Kasuta kalim pooleos OGR Ayswnaynem ancrion e naupop . UKR Ayswnaynpotri cneep . Mw Anap sa xeipranne ha peep

Declaration of conformity
We, Einhell UK Ltd
Champions Business Park, First Floor Unit 10, Arrowe Brook Rd, Upton, Wirral CH49 0AB, United Kingdom
declare the conformity to UK standards and legislation was assessed for:
Cordless Tacker FIXETTO 18/40 S (Einhell)
UK legislation
Simple Pressure Vessels (Safety) Regulation
Electrical Equipment (Safety) Regulation
Radio Equipment Regulation
Personal Protective Equipment Regulation
The Ecodesign for Energy-Related Products and Energy Information Regulation
The Restriction of the Use of Certain Hazardous Substances in Electrical and Electronic Equipment Regulation
Nolse Emisslon in the Environment by Equipment for use Outdoors Regulation
Annex V
Annex VI
Noise:measuredL ww = dB (A);guaranteed Lw = dB (A)
P = kW; L/0 = cm
UK Approved Body:
Supply of Machinery (Safety) Regulation
Annex IV
UK Approved Body:
UKTE Certificate No.:
Standards: BS EN 60745-1; BS EN 60745-2-16; BS EN IEC 55014-1; BS EN IEC 55014-2
Wirral, 2024.03.11

Tom Chambers, Managing Director Einhall UK Ltd
Archive-File/Record: NAPR032345
Article Number: 42.577.85 I-No.: 21034
Subject to change without notice Wiesenweg 22, 94405 Landau/Isar, Germany
Documents registrar: Egginger Christoph
EH 04/2024 (01)


- Explanation of the symbols used (see Fig. 12)
- Safety regulations
- Warning!
- Layout and items supplied
- Layout (Figs. 1)
- Items supplied
- Danger!
- Proper use
- GB
- Technical data
- Sound and vibration
- Wear ear-muff s.
- Warning:
- Keep the noise emissions and vibrations to a minimum.
- Caution!
- Residual risks
- Before using the equipment
- Checking the trigger catch (Fig. 1)
- Loading staples (Fig. 2-4/Item 4)
- Important!
- Charging the Li battery pack (Fig. 5-6)
- Battery capacity indicator (Fig. 7)
- All 3 LEDs are lit:
- or 1 LED(s) are lit:
- LED flashes:
- All LEDs blink:
- Operation
- Operation (Fig. 2)
- Triggering shots (Fig. 1)
- Single shot
- Repeat shot
- Jammed staples (Fig. 10-11)
- Adjusting the depth (Fig. 9)
- Cleaning, maintenance and ordering of spare parts
- Cleaning
- Ordering replacement parts:
- Charger indicator
- Disposal
- Only for EU countries:
- Only for United Kingdom:
- Service information
- Warranty certificate
- Dear Customer,
- F
- 2nebo1LEDsvitf
- Schotactivering (afb.1)
- Svetita 2 ali 1 lucka LED
- Moyo yia xwpeC tnc EE:
- GR
- Evnpwon yia to epbic
- Pre puštanja u pigeon
- Upozorenje!
- Upozorenje:
- Isletim (Sekil 2)
- Declaration of conformity
- Cordless Tacker FIXETTO 18/40 S (Einhell)
- UK legislation
Brand : EINHELL
Model : FIXETTO 1840 S
Category : Electric stapler