
SatisFry 2768056 - Deep fryer RUSSELL HOBBS - Free user manual and instructions
Find the device manual for free SatisFry 2768056 RUSSELL HOBBS in PDF.
| Product type | Hot air fryer |
| Brand | Russell Hobbs |
| Model | SatisFry 2768056 |
| Screen | Digital touch |
| Number of baskets | 2 |
| Control type | Touch keys |
| Cooking modes | Single basket, double (Match and Sync) |
| Presets | Fries, steak, chicken, fish, pizza, dehydrate, bake, vegetables, reheat |
| Keep warm function | Yes (temperature 60-70°C, duration 1-60 min) |
| Delayed cooking function | Yes (timer from 10 to 900 minutes) |
| Stir reminder | Yes (depending on preset) |
| Included parts | 2 baskets, 2 crispy trays, 2 handles |
| Basket maintenance | Hand wash recommended (dishwasher not recommended) |
| Exterior cleaning | Damp cloth, careful drying |
| Safety | Automatic shut-off when basket removed, do not immerse, hot surfaces |
| Usage | Household only |
| Power supply | 220-240 V ~ 50/60 Hz |
| Power | 1700 W |
Frequently Asked Questions - SatisFry 2768056 RUSSELL HOBBS
User questions about SatisFry 2768056 RUSSELL HOBBS
0 question about this device. Answer the ones you know or ask your own.
Ask a new question about this device
Download the instructions for your Deep fryer in PDF format for free! Find your manual SatisFry 2768056 - RUSSELL HOBBS and take your electronic device back in hand. On this page are published all the documents necessary for the use of your device. SatisFry 2768056 by RUSSELL HOBBS.
USER MANUAL SatisFry 2768056 RUSSELL HOBBS

Russell Hobbs
A BRITISH ICON SINCE 1952
27680-56
www.russellhobbs.com
natural_image
Line drawing of a hand opening a microwave oven into a drawer (no text or symbols)Read the instructions, keep them safe, pass them on if you pass the appliance on. Remove all packaging before use.

IMPORTANT SAFEGUARDS
Follow basic safety precautions, including:
This appliance can be used by children aged from 8 years and above and persons with reduced physical, sensory or mental capabilities or lack of experience and knowledge if they have been supervised/instructed and understand the hazards involved.
Children must not play with the appliance. Cleaning and user maintenance must not be done by children unless they are older than 8 and supervised. Keep the appliance and cable out of reach of children under 8 years.
Don't connect the appliance via a timer or remote control system. Don't use the appliance near or below combustible materials (e.g. curtains).
The surfaces of the appliance will get hot.
Do not immerse in any liquid.
If the cable is damaged, return the appliance, to avoid hazard.
- Don't use accessories or attachments other than those we supply.
- Don't use the appliance for any purpose other than those described in these instructions.
- Don't operate the appliance if it's damaged or malfunctions.
- Don't use anything metal or sharp, you'll damage the non-stick surfaces.
- Keep clear of the vent at the rear of the appliance – hot air will come from it.
HOUSEHOLD USE ONLY
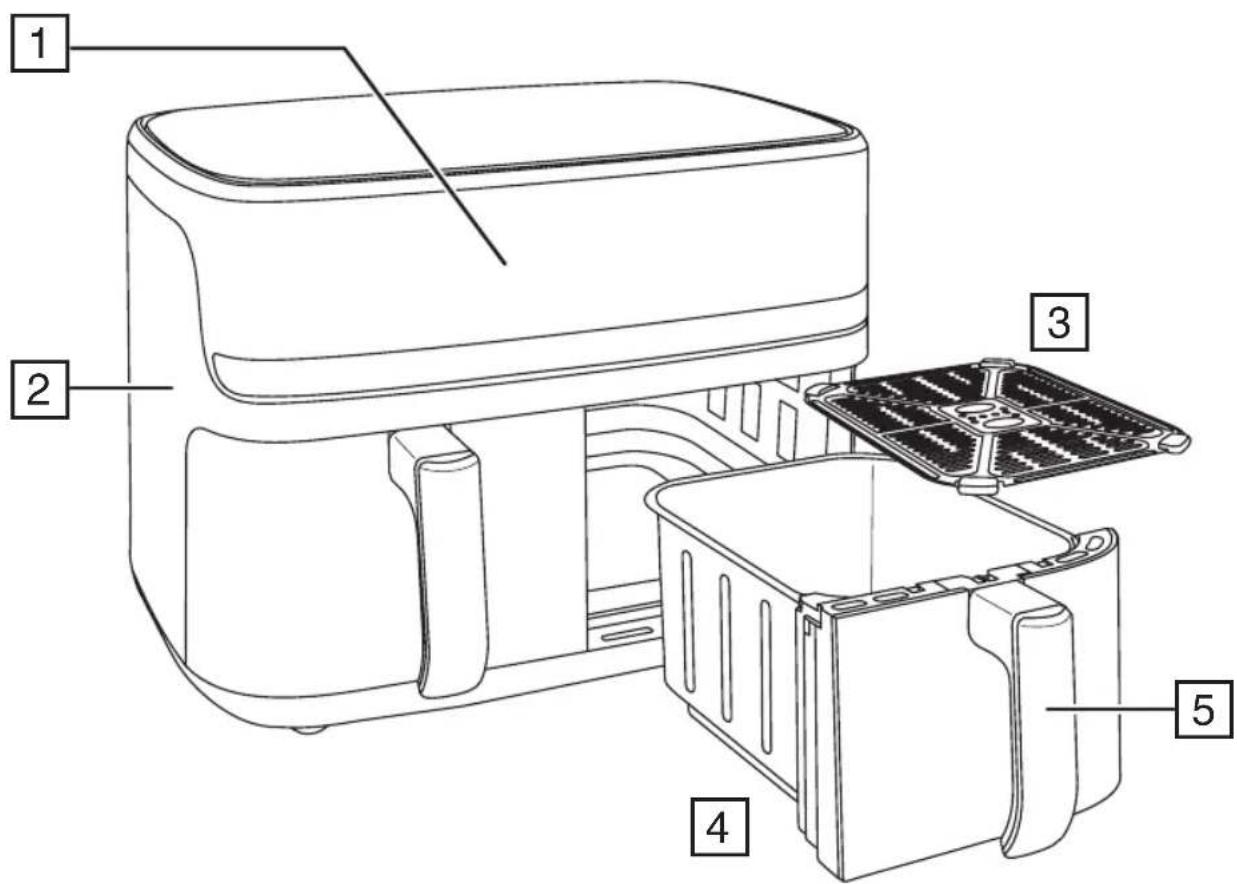
PARTS
- Touch controls and display
- Body
-
Crisping plate (x 2)
-
Basket (x2)
- Handle (x2)
BEFORE USING FOR THE FIRST TIME
- Handwash the removable parts, rinse, and dry.
- When using your air fryer for the first time, you may notice smoke or a slight odour for the first few minutes of cooking. This is normal. Ensure the room is well ventilated.
PREPARATION
- Sit the appliance on a stable, level, heat-resistant surface.
- Leave a space of at least 50mm all-round the appliance.
- Have oven gloves (or a tea towel) on hand, use heat resistant plastic tongs and a heat-resistant mat or dinner plate to rest the basket on.
- Note: Do not use metal tongs as it may scratch the coating. We recommend using only heat resistant plastic or silicon coated tongs.
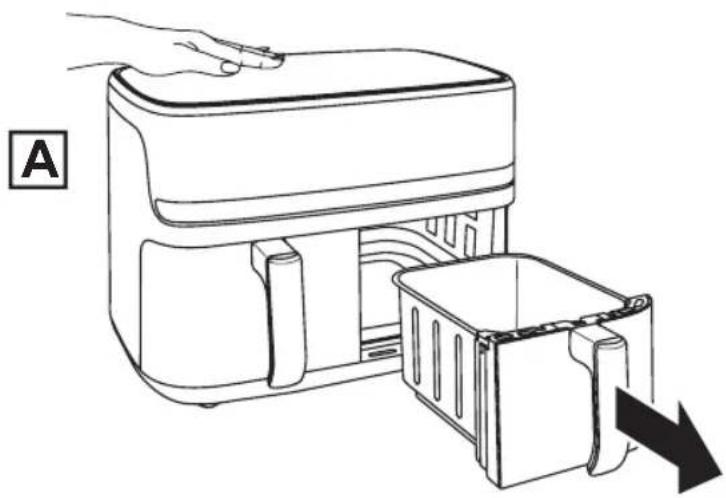
To remove a basket from the body
- Hold the top of the body (Fig. A).
- Grip the basket handle with the other hand.
- Slide the basket out of the body.
- Rest the basket on a heat-resistant mat.
DIGITAL TOUCHSCREEN
| ICON DESCRIPTION | |
| Power button | |
| Start/Stop | |
| Preset functions | |
| Menu button. Used to cycle through the presets | |
| Delay button. Used to set a delay time before cooking starts | |
| Keep Warm button. Used to select the keep warm mode | |
| Match button. Matches basket 2 settings to those selected for basket 1 | |
| Sync button. Synchronises the cooking times to ensure that both baskets finish at the same time | |
| Selects basket 1 or 2 | |
| Used to select and adjust the cooking temperature | |
| Used to select and adjust the cooking time | |
| Time/Temperature Display |
PRESET FUNCTIONS
Your air fryer has the following cooking functions. You can adjust the default cooking times and temperatures as desired.
| Function | Default Cooking Time (mins) | Default Temperature (°C) | Shake Reminder | |
| Fries | 22 200 Yes | |||
| Steak | 12 200 Yes | |||
| Chicken | 25 190 Yes | |||
| Fish | 15 195 Yes | |||
| Pizza | 8 190 No | |||
| Dehydrate | 120 60 No | |||
| Bake | 30 160 No | |||
| Vegetables | 12 190 Yes | |||
| Reheat | 12 175 Yes | |||

COOKING MODES
Your air fryer uses hot air and radiant heat for cooking and can be used several ways:
- Single basket mode
- Dual basket mode cooking at the same times and temperatures - Match Mode
- Dual basket mode cooking at different times and temperatures - Sync Mode
It also has features such as delay start and keep warm modes.
ADJUSTING THE COOKING TIME OR THE TEMPERATURE
- Select which basket you want to adjust the time and temperature for by pressing ① or ②.
- To adjust the temperature, use the () and () icons next to the temperature icon (⑧) to increase or decrease the cooking temperature as desired.
- To adjust the cooking time, use the () and () icons next to the time icon () to increase or decrease the cooking time as desired.
- Short presses will change the settings slowly, while long presses will change the settings quickly.
SINGLE BASKET MODE
- Fit the crisping plate inside the basket if required.
- Place desired food into the cooking basket. Do not overfill the basket, to leave space for the hot air to circulate between pieces of food.
- Slide the basket back into the air fryer body, ensuring it clicks into place and sits flush within your air fryer body. Your air fryer will not work unless both baskets are properly inserted.
- Plug in your air fryer and press ⏻. It will beep and 📞️ 🐵️ 🐵️ 🐵️ will illuminate. ①② will start to flash.
- Press ① to select basket 1. The button will flash and the preset functions will light up.
- Make any adjustments to the cooking time or temperature as required (see Adjusting the cooking time or the temperature).
- Alternatively, select the desired preset function by pressing the Menu ⏻ button until the desired preset icon is flashing.
- Make any adjustments to the preset cooking time or temperature if required.
- Press ☑ to start cooking.
• To pause cooking at any time tap the (®) icon. Cooking will restart when you tap the icon again.
- Once the cooking time has elapsed, the timer will beep and the unit will switch off.
- Slide the basket out of the body and check that the food is cooked.
- Place the basket on an insulated mat.
Notes
- To adjust the temperature or time midway through the cooking process, press the number of the basket required. The time and temperature buttons will light and the display will flash. Make any adjustments to the cooking time or temperature as required (see Adjusting the cooking time or the temperature).
-
You can remove either basket at any time during cooking (to stir, rearrange or shake food as desired). Cooking will pause and then resume once the basket is replaced.
-
To remove food from the basket, we recommend using tongs. We do not recommend tipping the basket upside down as oil residue will drip out.
- CAUTION: Hot oil from the ingredients may gather at the bottom of the basket. Be careful when removing the crisping plate from the basket.
- Unplug the appliance, once all cooking is complete.
- Your air fryer will switch off when you remove the basket.
- Your air fryer will switch back on when you replace the basket in to the body and will automatically resume the cooking cycle from where it stopped.
Shake Reminder
To ensure even cooking, some foods require shaking or turning during cooking. Some of the built in presets include a reminder. Your air fryer will beep and the SHAKE indicator will light up. You can either remove and shake the basket (or rearrange the ingredients), or ignore the reminder and your air fryer will continue its cooking cycle. Carefully remove the basket and gently shake it, or use tongs to turn the food. Replace the basket to continue cooking.
DUAL BASKET MODES
Match Mode
The match mode allows you to use both baskets to cook items that use the same preset, or the same timings and temperatures. The function copies the settings you make to basket 1 to basket 2.
- Prepare and fill the baskets.
- Follow the steps for Single Basket Mode.
- After selecting the preset function or manually setting the cooking time and temperature, press the Match ⊖ button. Both baskets will be set to the same preset function.
- Press ⬆ to start cooking.
Sync Mode
The sync mode allows you to set each basket to a different preset function, or to a different time and temperature. Sync mode ensures that both baskets will finish cooking at the same time.
- Prepare and fill the baskets.
- Press ① to select basket 1. It will flash and the preset functions will light up.
- Select the desired preset function by pressing the Menu ⬤ button until the desired preset icon is flashing. Alternatively, manually adjust the time and temperature for basket 1.
- Press ② to select basket 2.
- Select the desired preset function by pressing the Menu ☺ button until the desired preset icon is flashing. Alternatively, manually adjust the time and temperature for basket 2.
- Press the Sync ⏻ button. The sync button will flash.
- Press Ⓜ to start cooking. The sync button will remain flashing to show that you are using the Sync mode.
- The basket with the longest cooking time set will start first. Your air fryer will beep when the next basket starts to cook. Both baskets will finish cooking at the same time.
DELAY COOKING
The delay function allows you to set a timer which will delay the start of cooking. Each basket can have a different delay time set. You can program the delay from 10 to 900 minutes by 10 minute steps.
- Set up and program basket 1 as previously described.
- After selecting the preset or manually setting the time and temperature, press the Delay ⬤ button. The delay button will flash and the default delay of 90 minutes will be selected.
- Use the () and () icons next to the time icon (①) to change the delay time. Short presses will increase the time in 10 minute steps. Longer presses will increase the time in 30 minute steps.
- If you are only using one basket, press the start/stop button to start cooking.
- If you are using both baskets, follow steps 1, 2 and 3 to set the delay time for that basket.
- Press the start/stop button to start cooking.
KEEP WARM FUNCTION
The keep warm function can be used to keep your food warm after cooking has finished. The temperature can be selected from 60 to 70°C and the time can be adjusted from 1 to 60 minutes.
After cooking has finished, select the keep warm function for each basket as follows:
- Press ① to select basket 1.
- Press the keep warm ⏱ button. The button will flash.
- The default keep warm setting of 65^ C for 15 minutes will be selected.
- Use the () and () icons next to the time icon (①) to change the keep warm time.
- Use the () and () icons next to the temperature icon (⑧) to change the keep warm temperature.
- Repeat the above steps for the second basket (if using) by pressing ② to select basket 2.
COOKING TIMES AND FOOD SAFETY
• To be used purely as a guide
- Check food is cooked through before serving. If in doubt, cook it a bit more.
- Cook meat, poultry, and any derivatives (mince, burgers, etc.) till the juices run clear.
- Cook fish till the flesh is opaque throughout.
- When cooking pre-packed foods, follow any guidelines on the package or label.
| Food | Temperature °C | Time (min) | Remarks |
| Chips 200 25 Rinse, dry, | toss in salt, pepper, | and oil | |
| Potato wedges | 200 | 15-20 | Rinse, dry, toss in salt, pepper, and oil |
| Sweet potato wedges | 200 | 15-20 | Rinse, dry, toss in salt, pepper, and oil |
| Jacket potato | 180 | 30-40 | For a crispy jacket, brush with oil |
| Roast potatoes 180 | 25-35 | Rinse, dry, toss in salt, pepper, crushed rosemary (optional) and oil | |
| Mixed Mediterranean vegetables | 180 | 6-10 | All cut to similar sizes, approx. 1-2cm pieces, toss in oil and season |
| Chicken Breast | 180 | 15-20 | |
| Chicken Thighs | 180 | 25-30 | Cooking time depends on size. Brush with oil, season |
| Chicken wings | 180 | 23-28 | Cooking time depends on size. Brush with oil, season |
| Burgers | 180 | 8-12 | Cooking time depends on size. Brush with oil, season |
| Sausages | 180 | 8-12 | |
| Pork chop | 180 | 22 | Brush with oil, season |
| Salmon fillet | 180 | 8-12 | Brush with oil, season |
| White fish fillet | 180 | 8-12 | Brush with oil, season |
| Sausage Roll | 200 | 13-15 | Brush with oil, season |
| Spring Roll | 200 | 8-10 | |
| Muffins | 180 | 15-18 | |
| Frozen Food | Temperature °C | Time (min) | Remarks |
| Chips 200 25 | |||
| Potato wedges 200 | 15-20 | ||
| French fries 200 12-20 | |||
| Chicken Nuggets 200 6-10 | |||
| Fish fillets 200 10-12 | |||
| Fish Fingers 180 6-10 | |||
| Onion Rings 180 10-15 | |||
| Scampi 180 15 |
NOTE: High fat foods (e.g. pork) may create smoke. This is normal as oil residue is cooked at a high temperature. Reducing temperature may decrease the effect of smoke.
CARE AND MAINTENANCE
• Unplug the appliance.
• Leave everything to cool down.
Baskets and crisping plates
- Once the air-fryer has cooled, remove the baskets from the air-fryer body for cleaning.
- Wipe the interior of the body to remove any crumb or residue, but DO NOT wipe the heating elements located at the top.
- Remove the crisping plates from the baskets.
- Dispose of food residue and oils, and wipe both the crisping plate and basket with a damp cloth before hand washing them in warm to hot soapy water. Dry thoroughly before placing back in the air fryer body.
Note: Although the baskets and crisping plates can be washed in a dishwasher, we advise against it and recommend that they are hand washed as described above.
Exterior Surfaces
• Clean the exterior with a damp cloth or sponge. Dry thoroughly.
RECYCLING
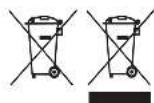
To avoid environmental and health problems due to hazardous substances, appliances and rechargeable and non-rechargeable batteries marked with one of these symbols must not be disposed of with unsorted municipal waste. Always dispose of electrical and electronic products and, where applicable, rechargeable and non-rechargeable batteries, at an appropriate official recycling/collection point.
APENAS PARA USO DOMÉSTICO
COMPONENTES
- Controlos táteis e visor
- Corpo
-
Prato tostador (x2)
-
Cesto (x2)
-
Pega (x2)
DIGITAL BER∅RINGSSKJERM
BEHANDLING OG VEDLIKEHOLD
VALMIIKSI ASETETUT TOIMINNOT
CYFROWY EKRAN DOTYKOWY

- Russell Hobbs
- IMPORTANT SAFEGUARDS
- HOUSEHOLD USE ONLY
- PARTS
- BEFORE USING FOR THE FIRST TIME
- PREPARATION
- To remove a basket from the body
- PRESET FUNCTIONS
- COOKING MODES
- ADJUSTING THE COOKING TIME OR THE TEMPERATURE
- SINGLE BASKET MODE
- Notes
- Shake Reminder
- DUAL BASKET MODES
- Match Mode
- Sync Mode
- DELAY COOKING
- KEEP WARM FUNCTION
- COOKING TIMES AND FOOD SAFETY
- CARE AND MAINTENANCE
- Baskets and crisping plates
- Exterior Surfaces
- RECYCLING
- APENAS PARA USO DOMÉSTICO
- COMPONENTES
- BEHANDLING OG VEDLIKEHOLD
- VALMIIKSI ASETETUT TOIMINNOT
Brand : RUSSELL HOBBS
Model : SatisFry 2768056
Category : Deep fryer