GEAW 1144 SMART - Surface pump EINHELL - Free user manual and instructions
Find the device manual for free GEAW 1144 SMART EINHELL in PDF.

| Product type | Surface pump |
| Brand | Einhell |
| Model | GEAW 1144 SMART |
| Power consumption | 1100 W |
| Supply voltage | 220-240 V ~ 50 Hz |
| Maximum flow rate | 4400 l/h |
| Maximum delivery head | 48 m |
| Maximum delivery pressure | 0.48 MPa (4.8 bar) |
| Maximum suction head | 8 m |
| Maximum water temperature | 35 °C |
| Protection rating | IPX4 |
| Guaranteed sound power level | 78 dB(A) |
| Suction connection | approx. 42 mm (R1 ¼ external thread) |
| Pressure connection | approx. 33.3 mm (R1 internal thread) |
| Control functions | Manual, remote control via app, timer, SMART mode |
| Connectivity | Mobile network (integrated SIM), 5 years included |
| Display | Status LED and network LED |
| Dry run protection | Yes, with automatic shut-off and restart attempt |
| Overheat protection | Yes, integrated temperature controller |
| Pre-filter | Yes, removable and cleanable |
| Maintenance | Regular cleaning of pre-filter, software update via USB |
| Wear parts | Pre-filter, filter cartridge |
Frequently Asked Questions - GEAW 1144 SMART EINHELL
User questions about GEAW 1144 SMART EINHELL
0 question about this device. Answer the ones you know or ask your own.
Ask a new question about this device
Download the instructions for your Surface pump in PDF format for free! Find your manual GEAW 1144 SMART - EINHELL and take your electronic device back in hand. On this page are published all the documents necessary for the use of your device. GEAW 1144 SMART by EINHELL.
USER MANUAL GEAW 1144 SMART EINHELL
GB Original operating instructions Automatic domestic water system
natural_image
Simple line drawing of an open book with no text or symbols on the pagesD
Gefahr!
When using the equipment, a few safety precautions must be observed to avoid injuries and damage. Please read the complete operating instructions and safety regulations with due care. Keep this manual in a safe place, so that the information is available at all times. If you give the equipment to any other person, hand over these operating instructions and safety regulations as well. We cannot accept any liability for damage or accidents which arise due to a failure to follow these instructions and the safety instructions.
Explanation of the symbols used (see Fig. 6)
- Danger! - Read the operating instructions to reduce the risk of injury.
1. Safety regulations
The corresponding safety information can be found in the enclosed booklet.
WARNING!
Read all safety warnings, instructions, illustrations and specifications provided with this power tool. Failure to follow all instructions listed below may result in electric shock, fi re and/or serious injury.
Save all warnings and instructions for future reference.
This equipment can be used by children of 8 years and older and by people with limited physical, sensory or mental capacities or those with no experience and knowledge if they are supervised or have received instruction in how to use the equipment safely and understand the dangers which result from such use. Children are not allowed to play with the equipment. Unless supervised, children are not allowed to clean the equipment and carry out user-level maintenance work.
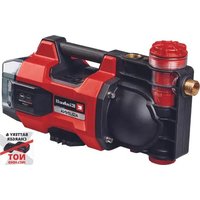
2. Layout and items supplied
2.1 Layout (Fig. 1-4)
- Water drain screw
- Intake connection
- Coarse filter cap
- Ventilation screw
- Discharge connection
- Carry-handle
-
Control panel with LED display
-
Connection adapter approx. 33.3 mm (R1 male thread)
-
Key for coarse filter cap
-
Additional antenna
- Connection for additional antenna
- USB connection
- Coarse fi Iter
2.2 Items supplied
Please check that the article is complete as specified in the scope of delivery. If parts are missing, please contact our service center or the sales outlet where you made your purchase at the latest within 5 working days after purchasing the product and upon presentation of a valid bill of purchase. Also, refer to the warranty table in the service information at the end of the operating instructions.
- Open the packaging and take out the equipment with care.
- Remove the packaging material and any packaging and/or transportation braces (if available).
- Check to see if all items are supplied.
- Inspect the equipment and accessories for transport damage.
- If possible, please keep the packaging until the end of the guarantee period.
Danger!
The equipment and packaging material are not toys. Do not let children play with plastic bags, foils or small parts. There is a danger of swallowing or suffocating!
• Automatic domestic water system
• Connection adapter approx. 33.3 mm (R1 male thread)
• Additional antenna
• Key for coarse filter cap
• Original operating instructions
• Safety information
3. Proper use
Range of applications:
- For irrigating and watering landscaped areas, vegetable beds and gardens.
• For operating lawn sprinklers. - With coarse filter for drawing water from ponds, streams, rainwater butts, rainwater cisterns and wells.
• For supplying service water.
GB
Pumped media:
- For the pumping of clear water (freshwater), rainwater or mild suds/service water.
- The maximum temperature of the pumped medium must not exceed +35 °C when the equipment is operated continuously.
- Do not use the equipment to pump inflammable, gassing or explosive liquids.
- The pumping of aggressive liquids (acids, alkalis, silo seepage etc.) as well as liquids containing abrasive substances (sand) must also be avoided.
- This equipment is not designed to pump drinking water.
The equipment is to be used only for its prescribed purpose. Any other use is deemed to be a case of misuse. The user / operator and not the manufacturer will be liable for any damage or injuries of any kind caused as a result of this.
Please note that our equipment has not been designed for use in commercial, trade or industrial applications. Our warranty will be voided if the machine is used in commercial, trade or industrial businesses or for equivalent purposes.
4. Technical data
| Mains connection | 220-240 V ~ 50 Hz |
| Power rating | 1100 W |
| Delivery rate | 4400 l/h |
| Delivery head max. | 48 m |
| Delivery pressure max. | 0.48 MPa (4.8 bar) |
| Intake height max. | 8 m |
| Discharge connection | |
| approx. 33.3 mm (R1 female thread) | |
| Intake connection | |
| approx. 42 mm (R1 14 male thread) | |
| Water temperature max. | 35 °C |
| Measured sound power level L_WA | 76.3 dB(A) |
| Uncertainty K_WA | 2.01 dB |
| Guaranteed sound power level L_WA | 78 dB(A) |
| Protection | IPX4 |
5. Before starting the equipment
Before you connect the equipment to the power supply make sure that the data on the rating plate is the same as the mains data.
5.1 Connecting the intake line
- Fasten the intake hose (plastic hose of at least approx. 19 mm (3¼") with spiral reinforcement) to the equipment's intake connection of approx. 42 mm (R1½ male thread) either directly or via a threaded nipple.
- Use the connection adapter (8) to reduce the thread of the intake connection to approx. 33.3 mm (R1 male thread).
- Position the intake line so that it rises from the water withdrawal point to the equipment. Avoid positioning the intake line higher than the pump as this would delay the escape of air bubbles from the intake line and impede the priming process.
- Install the intake and discharge lines in such a way that they do not exert any mechanical pressure on the equipment.
- The intake valve should be low enough in the water to ensure that if the water level falls, the equipment will not run dry.
- A leaking intake line will draw in air and therefore not draw in any water.
- Prevent the intake of foreign bodies (sand etc.). If necessary, install a coarse filter for this purpose.
5.2 Connecting the discharge line
- The discharge line (at least approx. 19 mm ( 34 ")) must be connected to the equipment's discharge line connection of approx. 33.3 mm (R1 female thread) either directly or via a threaded nipple.
- Of course you can also use a discharge hose of approx. 13 mm (½") with the relevant couplings. The delivery rate is reduced when using the smaller discharge line.
- During the priming process, the shut-off devices (spray nozzles, valves etc.) present in the discharge line must be fully open so that the air in the intake line can escape freely.
- When the pump is being used in automatic mode, make sure that the discharge hose does not become kinked. If the hose is connected directly to the delivery side, we recommend using an angle piece of approx. 33.3 mm (R1 male thread).
GB
5.3 Preparing the pump (Fig. 3)
- Open the ventilation screw (4) so that air can escape when the pump housing is being filled.
- Use the supplied wrench (9) to unscrew the coarse filter cap (3) and then remove the coarse filter (13). Now you can fill the pump housing with water via the coarse filter cap (3). Filling the intake line will accelerate the priming process.
• Assemble in reverse order.
5.4 Electrical connection
- The electrical connection needs a shook-proof socket for 220-240 V\~50 Hz. Minimum 10-amp fuse required.
- The motor is protected from overload or blockage by a built-in temperature monitor. The temperature monitor will switch off the pump automatically if overheating occurs, and it will switch on the equipment again automatically when it has cooled down again.
5.5 Connection of the additional antenna
The pump comes with an integrated antenna. In most cases the wireless signal of the integrated antenna is strong enough for automatic operation. To boost the wireless signal you can use the additional antenna which is included in delivery. This might be required, for example, if the pump is installed in a basement behind thick walls or in a shed lined with metal sheeting. The antenna is best positioned outside the space with the shielding effect. Insert the end of the supplied additional antenna (10) into the pump's antenna connection (11) and screw the union nut in place until it is hand-tight (Fig. 4). The pump will now use the external additional antenna.
5.6 Controlling the pump using the app
You can use the app to call up numerous setting options for your pump and to view its performance data. Manual remote control is possible on the basis of a defined work period or in SMART mode. The app presents you with error messages and warnings during operation.
5.6.1 Downloading the app
First download the Einhell app for your pump onto your smart-phone. The Einhell app is available via the following link and QR code:
iOS: http://qr.einhell.com/12e103ce

Android: http://qr.einhell.com/176c0443

5.6.2 Registering the pump
The pump comes with an IoT function (IoT = Internet of Things). It uses an integrated SIM chip to connect to the available mobile network, making it independent of Bluetooth or WLAN. In the first 5 years you will not be charged anything for using the pump in the mobile network; these costs are covered by the purchase price. Information about the remaining period of use and the possibility of an extension can be consulted in the app. In the factory default state the function is deactivated; the pump will try to connect to the network, indicated by the network LED blinking blue (Fig. 5/Item C). To activate your pump, follow the instructions in the app.
After successful registration and connection with the network, the network LED will light up blue (Fig. 5/Item C) and the app's diverse setting options and functions will be available for you to use. Make sure that both the pump and your smartphone have a secure internet connection once you have made any settings in the app. For the pump to be operated automatically within a programmed work period, the only requirement is for the pump to be connected with the internet.
GB
5.6.3 Resetting the registration
If the blue LED (Fig. 5/Item C) lights up continuously when your pump is started for the first time, this is because the pump has been registered already. The pump must be reset and registered with your data. Make sure you have your pump's purchase receipt and serial number ready to hand and get in touch with our customer service center.
6. Operation
6.1 LED indicator (Fig. 5)
6.1.1 Status LEDs
The current operating status is signaled via the LED indicator (Fig. 5/Item B).
Yellow is lit:
The pump is connected to the power supply.
Yellow and green are lit:
The pump is in operation and starts up as soon as a consumer is opened for drawing off pumped medium.
Yellow is blinking:
The pump is building up pressure (e.g. a water tap is closed) and then switches off automatically.
Yellow, green and red are lit:
The pump is running dry without any pumped medium. The pump will make 3 attempts to eliminate the dry running before the dry running guard finally trips.
Yellow and red are lit:
The dry running guard has tripped; it is no longer possible to draw in the pumped medium. Use the troubleshooting instructions to find the cause of the fault (e.g. a leaking intake line) and rectify it. Then press the RESTART button (Fig. 5/Item A) to reactivate the pump.
6.1.2 Network LED
The pump uses the network LED (Fig. 5/Item C) to signal its network status.
Blue is blinking:
The pump is searching for a connection to the network.
Blue is lit:
The pump is connected to the network.
6.2 Operating the pump
The pump has numerous operating modes, which means that you can put the pump into operation in different ways. You can use the app to call up numerous setting options for your pump and to view its performance data. The app also presents you with error messages and warnings during operation.
You can operate the pump manually at its control panel as well as by using the app. When the pump is started independently of the operating mode, the pump will be set to an automatic domestic water system mode. Regardless of the mode being used, the pump will always switch on when the discharge side is open, and it will switch off again automatically when no pumped medium is discharged.
The current operating status is signaled via the LED indicator (Fig. 5/Item B) (see the chapter "LED indicator").
The flow and discharge switch cannot be adjusted or activated, it is fully automatic.
Priming process
The pump is started in one of the operating modes and immediately begins to run. The pump will make 3 attempts to eliminate the dry running before the dry running guard fi nally trips. During operation the pump will build up pressure and will switch off automatically when the discharge line is closed. When the pressure in the discharge line drops, e.g. because a shut-off mechanism is opened, the pump will switch on again.
6.2.1 Manual operation
The pump can be switched on and off manually at any time using the RESTART button (Fig. 5/Item A). This does not require the pump to be registered. There is no way of setting the maximum running time of the pump in this mode.
6.2.2 Remote control using the app
The pump can be switched on and off manually by means of the app and your smart-phone. A start or stop command is then sent to the pump via the network.
GB
6.2.3 Time schedule using the app
You can use the app to operate your pump on the basis of a set work period. The pump then receives a start or stop command for the set work period via the network. Make sure that the pump has a reliable network connection.
If the network connection is interrupted, the pump will continue to run until it shuts down automatically after a selected maximum running time.
6.2.4 SMART mode using the app
The pump's SMART mode enables automatic watering. The use of SMART mode requires a number of specific data.
For the pump to be able to determine how much pumped medium is generally required within a specific length of time you must first run the pump manually or by means of a time schedule on the app. The general requirement is based on the pump's flow rate.
Also needed are location-specific weather data in order to determine the optimum watering time. Proceed by entering the pump's location in the app.
Once you have entered the data in the app, SMART mode will show a progress indicator telling you how much data still needs to be collected. As soon as the pump has collected enough data, it will be ready to take over responsibility for the watering itself.
6.3 Maximum running time
The maximum running time begins when the pump receives a start command. The start command must be given manually or automatically via the app. It is irrelevant whether the pump is actually pumping or not. If the user does not issue a stop command, the pump will switch off automatically at the end of the set running time.
Important! – If the pump is started manually at the pump by pressing the RESTART button (Fig. 5/Item A), the maximum running time setting will not apply. As long as no stop command is issued, the pump will run continuously.
Important! – The currently expired running time will be reset with each start command via the app. This can be done manually or automatically via the app.
6.4 Temperature monitoring
The pump monitors the temperature of the pumped medium; this function is active independently of the operating mode. If the temperature monitoring function triggers, the LED indicator (Fig. 5/Item B) will blink red and the pump will switch off. The temperature of the pumped medium was too low or too high. Wait for the pumped medium to reach the permissible operating temperature. You can restart the pump by means of the RESTART button (Fig. 5/Item A) or via the app.
The maximum temperature of the pumped medium must not exceed +35 °C when the equipment is operated permanently.
6.5 Error messages and warnings
Check the app at regular intervals for error messages and warnings. You will receive error messages, warnings and push notifications on your smart-phone. This can be stopped by altering the notification settings in the app. Make sure that the background data of the Einhell app are activated on your smart-phone and that your smart-phone has an active internet connection. You can locate and eliminate the error (e.g. a leak in the intake line) by consulting the operating manual and the troubleshooting instructions. Then press the RESTART button (Fig. 5/Item A) or acknowledge the error message in the app in order to restart the pump.
7. Replacing the power cable
Danger!
If the power cable for this equipment is damaged, it must be replaced by the manufacturer or its after-sales service or similarly trained personnel to avoid danger.
GB
8. Cleaning, maintenance and ordering spare parts
The equipment is largely maintenance-free. However, we recommend regular checks and product care in order to ensure a long service life.
Danger!
The equipment must be disconnected from the power supply (pull the power plug) prior to performing any maintenance.
Make sure that all the connected lines are depressurized.
8.1 Maintenance
- If the equipment becomes clogged, connect the discharge line to the water line and disconnect the intake pipe. Open the water line. Switch on the equipment several times for approx. two seconds. This should resolve the majority of clog-related problems.
- To enable the pump to work correctly, check the coarse filter (13) and the non-return valve for dirt at regular intervals. Clean the coarse filter under flowing water.
- There are no other parts inside the equipment which require maintenance.
8.2 Software update
If you want to update the software for your pump, copy the new software to an empty USB stick (format the USB stick first if necessary). Have the app notify you automatically about new software updates or, if you prefer, consult our website for information.
- Prior to performing a software update you must disconnect the equipment from the power supply by pulling the pump's power plug out of the power socket.
- Open the protective cap and connect the USB stick to the USB connection (12) (Fig. 4).
- Connect the pump's power cable.
- Updating will start immediately and the LED indicator (Fig. 5/Item B) will blink.
- When the LED indicator (Fig. 5/Item B) is lit steadily, the update has ended.
- Pull out the USB stick and close the protective cap.
8.3 Cleaning the coarse fi iter insert
- Clean the coarse filter insert at regular intervals, and replace it if necessary.
- Remove the coarse filter cap (3) and the coarse filter (13) (Fig. 3).
- Clean the coarse filter by tapping it on a flat surface.
- Wash the coarse filter under flowing, clear water.
- In cases of stubborn dirt, first wash with soapy water, then rinse with clear water and leave to dry in the air.
- Do not use abrasive cleaning agents or petrol to clean the coarse filter.
• Assemble in reverse order.
8.4 Ordering replacement parts:
Please quote the following data when ordering replacement parts:
• Type of machine
• Article number of the machine
• Identification number of the machine
- Replacement part number of the part required For our latest prices and information please go to www.Einhell-Service.com
9. Disposal and recycling
The equipment is supplied in packaging to prevent it from being damaged in transit. The raw materials in this packaging can be reused or recycled. The equipment and its accessories are made of various types of material, such as metal and plastic. Never place defective equipment in your household refuse. The equipment should be taken to a suitable collection center for proper disposal. If you do not know the whereabouts of such a collection point, you should ask in your local council offices.
GB
10. Storage
- Store the equipment and its accessories in a dark, dry and frost-free place. The ideal storage temperature is between 5 and 30 °C. Store the equipment in its original packaging.
- Rinse the pump thoroughly, empty it completely and store it in a dry place before lengthy periods of non-use or winter storage
- The equipment must be completely drained if there is a risk of frost.
- After long periods of non-use, switch the equipment on and off briefly to check whether the rotor is turning properly.

For EU countries only
Never place any electric power tools in your household refuse.
To comply with European Directive 2012/19/EC concerning old electric and electronic equipment and its implementation in national laws, old electric power tools have to be separated from other waste and disposed of in an environment-friendly fashion, e.g. by taking to a recycling depot.
Recycling alternative to the return request: As an alternative to returning the equipment to the manufacturer, the owner of the electrical equipment must make sure that the equipment is properly disposed of if he no longer wants to keep the equipment. The old equipment can be returned to a suitable collection point that will dispose of the equipment in accordance with the national recycling and waste disposal regulations. This does not apply to any accessories or aids without electrical components supplied with the old equipment.
The reprinting or reproduction by any other means, in whole or in part, of documentation and papers accompanying products is permitted only with the express consent of the Einhell Germany AG.
Subject to technical changes
GB
11. Troubleshooting guide
| Faults Possible cause Remedy | ||
| Pump fails to prime | The intake line has a leak or is damaged | Check the following points for leaks:- Intake line- Water fi lling screw / water drain screw / ventilation screw / coarse fi Iter cap- Connection points of the intake line |
| Priming takes a very long time | - Check the intake height- Priming can take up to 5 minutes- Always position the intake line so that it rises / is horizontal | |
| Clogging in the intake line Check and clean the following points:- Intake line- Priming area- Intake cage (incl. non-return valve)- Coarse fi Iter (incl. non-return valve)Fit the following to protect the pump:- Intake cage- Coarse fi Iter | ||
| Pump housing with no pum-ped medium. | Fill the pump housing with pumped medium. | |
| Intake cage not in water. Dip the intake cage into water. Make sure that the immersion depth / quantity of water is suffi cient for the level not to drop below the intake cage when water is drawn off . | ||
| Air cannot escape - Open the corresponding shut-off devices (spray nozzles, valves etc.) in the discharge line. Begin with the shut-off devices closest to the pump.- When the pump is being fi led, open the ventila-tion screw so that air can escape from the pump housing. | ||
GB
| Faults Possible cause Remedy | ||
| Insuffi client pumping rate | The intake line has a leak or is damaged | Check the following points for leaks:- Intake line- Water fi lling screw / water drain screw / ventilation screw / coarse fi lter cap- Connection points of the intake line |
| Intake height too high. Check the intake height. | ||
| The intake cage (incl. the non-return valve) is soiled. | Clean the intake cage (incl. the non-return valve). | |
| The coarse fi lter (incl. the non-return valve) is soiled. | Clean the coarse fi lter (incl. the non-return valve). | |
| The hose on the discharge side is kinked. | Remove any kinks in the hose. | |
| The cross-section on the discharge side becomes narrower. | Avoid narrow points. | |
| The pump's delivery rate depends on the delivery head and on the connected peripherals. | Take account of the maximum delivery head, change the hose diameter or hose length if necessary. | |
| The motor does not start | No power available. Check the fuses and the electrical connection. | |
| The impeller is blocked. Use a screwdriver to turn the motor shaft through the fan hood (release the stuck mechanical seal). | ||
| The thermostat switches off the pump | Overheating / overloading of the pump | Let the equipment cool down! |
| The temperature of the pumped medium or the environment is too high. | Take account of the permitted temperature of the pumped medium.Ensure that the pump is provided with adequate cooling. | |
| Dry-running of the pump. Eliminate the cause of the dry-running.Note the points under “Pump fails to prime”.Prevent dry-running. | ||
GB
Service information
We have competent service partners in all countries named on the guarantee certificate whose contact details can also be found on the guarantee certificate. These partners will help you with all service requests such as repairs, spare and wearing part orders or the purchase of consumables.
Please note that the following parts of this product are subject to normal or natural wear and that the following parts are therefore also required for use as consumables.
| Category Example | |
| Wear parts* | Coarse filter, filter cartridge |
| Consumables* | |
| Missing parts |
* Not necessarily included in the scope of delivery!
In the effect of defects or faults, please register the problem on the internet at www.Einhell-Service.com. Please ensure that you provide a precise description of the problem and answer the following questions in all cases:
• Did the equipment work at all or was it defective from the beginning?
• Did you notice anything (symptom or defect) prior to the failure?
• What malfunction does the equipment have in your opinion (main symptom)?
Describe this malfunction.
GB
Warranty certifi cate
Dear Customer,
All of our products undergo strict quality checks to ensure that they reach you in perfect condition. In the unlikely event that your device develops a fault, please contact our service department at the address shown on this guarantee card. You can also contact us by telephone using the service number shown. Please note the following terms under which guarantee claims can be made:
- These guarantee terms apply to consumers only, i.e. natural persons intending to use this product neither for their commercial activities nor for any other self-employed activities. These warranty terms regulate additional warranty services, which the manufacturer mentioned below promises to buyers of its new products in addition to their statutory rights of guarantee. Your statutory guarantee claims are not affected by this guarantee. Our guarantee is free of charge to you.
- The warranty services cover only defects due to material or manufacturing faults on a product which you have bought from the manufacturer mentioned below and are limited to either the rectification of said defects on the product or the replacement of the product, whichever we prefer. Please note that our devices are not designed for use in commercial, trade or professional applications. A guarantee contract will not be created if the device has been used by commercial, trade or industrial business or has been exposed to similar stresses during the guarantee period.
-
The following are not covered by our guarantee:
-
Damage to the device caused by a failure to follow the assembly instructions or due to incorrect installation, a failure to follow the operating instructions (for example connecting it to an incorrect mains voltage or current type) or a failure to follow the maintenance and safety instructions or by exposing the device to abnormal environmental conditions or by lack of care and maintenance.
- Damage to the device caused by abuse or incorrect use (for example overloading the device or the use or unapproved tools or accessories), ingress of foreign bodies into the device (such as sand, stones or dust, transport damage), the use of force or damage caused by external forces (for example by dropping it).
-
Damage to the device or parts of the device caused by normal or natural wear or tear or by normal use of the device.
-
The guarantee is valid for a period of 24 months starting from the purchase date of the device. Guarantee claims should be submitted before the end of the guarantee period within two weeks of the defect being noticed. No guarantee claims will be accepted after the end of the guarantee period. The original guarantee period remains applicable to the device even if repairs are carried out or parts are replaced. In such cases, the work performed or parts fitted will not result in an extension of the guarantee period, and no new guarantee will become active for the work performed or parts fitted. This also applies if an on-site service is used.
-
To make a claim under the guarantee, please register the defective device at: www.Einhell-Service.com. Please keep your bill of purchase or other proof of purchase for the new device. Devices that are returned without proof of purchase or without a rating plate shall not be covered by the guarantee, because appropriate identification will not be possible. If the defect is covered by our guarantee, then the item in question will either be repaired immediately and returned to you or we will send you a new replacement.
Of course, we are also happy offer a chargeable repair service for any defects which are not covered by the scope of this guarantee or for units which are no longer covered. To take advantage of this service, please send the device to our service address.
Also refer to the restrictions of this warranty concerning wear parts, consumables and missing parts as set out in the service information in these operating instructions.
F
Danger!
6.1 Wskazania diod LED (rys. 5)
X 2006/42/EC
□ Annex IV
Notified Body:
Reg. No.:
X 2000/14/EC_2005/88/EC
X Annex V
□ Annex VI
Noise: measured L_WA = 76,3 dB (A); guaranteed L_V/A = 78 dB (A)
P = kW; L/∅ = cm
Notified Body:
2012/46/EU_(EU)2016/1628 Emission No.:
Standard references: EN 60335-1; EN 60335-2-41; EN 62233; EN IEC 55014-1; EN IEC 55014-2; EN IEC 61000-3-2; EN 61000-3-3; EN 301 908-1; EN 301 908-13; EN 301 511; EN 301 489-1; EN 301 489-52; EN 62311
Mark Wang MarkWang/Product-ManagementAndreas We
First CE: 2021
Art.-No.: 41.803.80 I.-No.: 21010
Subject to change without notice
Archive-File/Record: NAPR021774
Documents registrar: Thomas Fischer
Wiesenweg 22, D-94405 Landau/Isar
- SB Automatic domestic water system - P Systems automatic de-su a emplo domestique - Centralina idrica automatisa - DKN Vendeautomat - SPTP eutermatom - CZ Automatická domaki vodenama - SK Domad vody norm - NL Automatische watervocasioniningsinstallista - S Sistema automatic de bomboe de agua - FIN Kottaloussesautomat - SLT Oromat za nitiiv vovodov - NH Aztir vormii automata - PO Historor automata - GR Agricatri omokoul perovos deveine giropec - P Bomba de rega automatica - NRAB Automat za kašn vodove - RS Automat za kašn vodove - PL Automats yustimab - R J Miostrum - PR Ustomab - PR Ustomab - PR Ustomab - PR Ustomab - PR Ustomab - PR Ustomab - PR Ustomab - PR Ustomab - PR Ustomab - PR Ustomab - PR Ustomab - PR Ustomab - PR Ustomab - PR Ustomab - PR Ustomab - PR Ustomab - PR Ustomab - PR Usot

Declaration of conformity
We, Einhell UK Ltd
Champions Business Park, First Floor Unit 10, Arrowe Brook Rd, Upton, Wirral CH49 0AB, United Kingdom
declare the conformity to UK standards and legislation was assessed for:
Automatic Water Works GE-AW 1144 SMART (Einhell)
UK legislation
□ Simple Pressure Vessels (Safety) Regulation
□ Electrical Equipment (Safety) Regulation
X Radio Equipment Regulation
□ Personal Protective Equipment Regulation
☐ The Ecodesign for Energy-Related Products and Energy Information Regulation
X The Restriction of the Use of Certain Hazardous Substances in Electrical and Electronic Equipment Regulation
X Noise Emission in the Environment by Equipment for use Outdoors Regulation
Noise:measuredL ww = 76.3 dB (A); guaranteed L ww = 78 dB (A)
X Supply of Machinery (Safety) Regulation
X Electromagnetic Compatibility Regulation
□ Measuring Instruments Regulation
□ Pressure Equipment (Safety) Regulation
Annex IV
UK Approved Body:
UKTE Certifi cate No.:
Standards: BS 60335-1; BS 60335-2-41; BS 62233; BS 55014-1; BS 55014-2;
BS 61000-3-2; BS 61000-3-3; BS 301 908-1; BS 301 908-13; BS 301 511; BS 301 489-1;
BS 301 489-52; BS 62311
Wirral, 2021.10.07
Tom Chambers, Managing Director Einhell UK Ltd.
Archive-File/Record: NAPR021774
Article Number: 41.803.80 I.-No.: 21010
Subject to change without notice Wiesenweg 22, 94405 Landau/Isar, Germany
Documents registrar: Thomas Fischer
EH 01/2022 (01)