BRC 3015 C - Steam cleaner Kärcher - Free user manual and instructions
Find the device manual for free BRC 3015 C Kärcher in PDF.

| Product type | Injection/extraction carpet cleaner |
| Brand | Kärcher |
| Model | BRC 3015 C |
| Dimensions (L × W × H) | 920 × 360 × 750 mm |
| Operating weight | 52 kg |
| Electrical supply | 220–240 V ~ 50/60 Hz |
| Total power consumption | 1300 W |
| Suction motor power | 1130 W |
| Brush motor power | 76 W |
| Clean water tank capacity | 15 L |
| Dirty water tank capacity | 17 L |
| Working width | 260 mm |
| Brush diameter | 65 mm |
| Brush speed | 1650 rpm |
| Cleaning pump pressure | 0.4 MPa |
| Detergent pump flow rate | 1.4 L/min |
| Max. water temperature | 60 °C |
| Air flow (suction) | 46 L/s |
| Vacuum (suction) | 30.2 kPa |
| Theoretical cleaning area | 100 m²/h |
| Sound pressure level | 77 dB(A) |
| Vibrations (ISO 5349) | 1.7 m/s² |
| Protection rating | IPX4 |
| Use | Professional |
| Safety instructions | Read manual before use; use approved detergents; disconnect before maintenance |
| Routine maintenance | Clean filters, rinse tanks, check hoses and seals every 25 h |
| Spare parts | Available from Kärcher; use original parts |
Frequently Asked Questions - BRC 3015 C Kärcher
User questions about BRC 3015 C Kärcher
0 question about this device. Answer the ones you know or ask your own.
Ask a new question about this device
Download the instructions for your Steam cleaner in PDF format for free! Find your manual BRC 3015 C - Kärcher and take your electronic device back in hand. On this page are published all the documents necessary for the use of your device. BRC 3015 C by Kärcher.
USER MANUAL BRC 3015 C Kärcher
natural_image
Line drawing of a manual lawn mower device (no text or symbols)Deutsch 2
English 9
Français 16
Italiano 24
Nederlands 32
Español 39
Português 46
Dansk 53
Norsk 60
Svenska 67
Suomi 74
Ελληνικά 81
Türkçe 89
Русский 96
Magyar 104
Čeština 111
Slovenščina 118
Polski 125
Românește 132
Slovenčina 139
Hrvatski 146
Srpski 153
Български 160
Eesti 168
Latviešu 175
Lietuviškai 182
Українська 189

natural_image
Technical illustration of a mechanical assembly with threaded pipe and connector, showing a directional arrow (no text or symbols)Chairman of the Board of Management

S. Reiser
Director Regulatory Affairs & Certification
71364 Winnenden (Germany)
Tel.: +49 7195 14-0
Fax: +49 7195 14-2212
Winnenden, 2019/04/01
Ersatzteile
Please read and comply with these original instructions prior
to the initial operation of your appliance and store them for later use or subsequent owners.
Contents
Environmental protection .. EN ...1
Safety instructions ..... EN ...1
Proper use ..... EN ...1
Function.... EN...1
Control elements ..... EN ...2
Start up..... EN...2
Operation....EN...3
Shutting down ..... EN ...4
Transport ..... EN ...4
Storage..... EN...4
Care and maintenance.... EN...4
Troubleshooting ..... EN ...5
Technical specifications . . . EN . . . 6
EU Declaration of Conformity EN . . .7
Spare parts..... EN ...7
Warranty..... EN...7
Environmental protection

The packaging material can be recycled. Please do not place the packaging into the ordinary refuse for disposal, but arrange for the proper recycling.

Old appliances contain valuable materials that can be recycled. Please arrange for the proper recycling of old appliances. Please dispose your old appliances using appropriate collection systems.
Notes about the ingredients (REACH)
You will find current information about the ingredients at:
www.kaercher.com/REACH
Safety instructions
Before initial start-up it is definitely necessary to read the safety information no. 5.956-251.0!
Symbols in the operating instructions
⚠️DANGER
Immediate danger that can cause severe injury or even death.
⚠ WARNING
Possible hazardous situation that could lead to severe injury or even death.
CAUTION
Possible hazardous situation that could lead to mild injury to persons or damage to property.
Proper use
This appliance is intended for commercial use as a wet cleaning appliance for carpets as depicted in these operating instructions as well as in the descriptions and safety notes in the enclosed brochure "Safety indications for brush cleaning appliances and spray extraction appliances".
Function
The appliance sprays cleaning solution from the fresh water tank onto the carpet to be cleaned, works the detergent into the carpet with a brush roller and vacuums the dirt and used detergent into the waste water reservoir.
If required, an accessorz (such as a hand nozzle) can be attached..
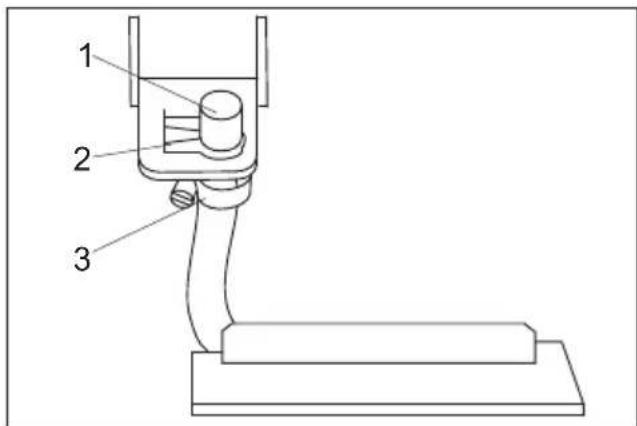
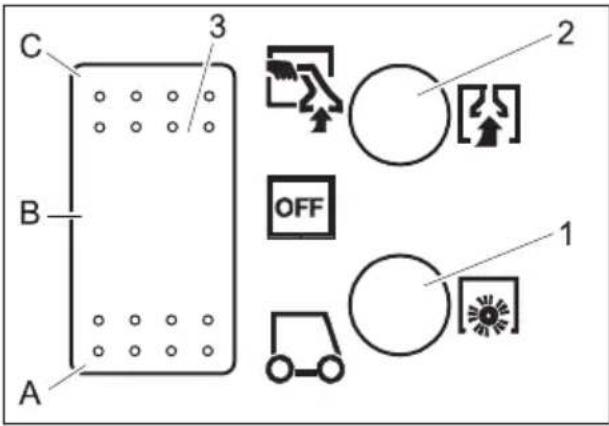
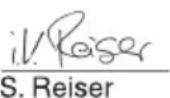
Control elements
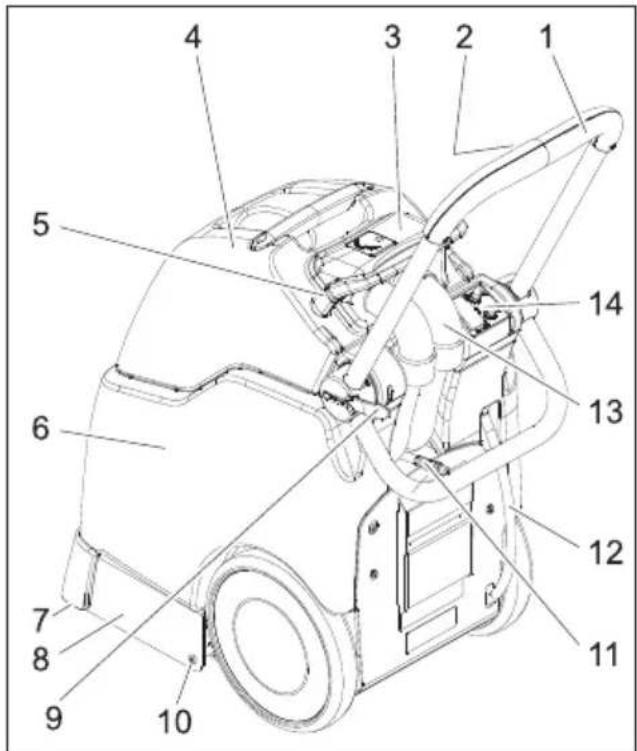
1 Push handle
2 Key detergent solution
3 Dome
4 waste water tank
5 Dome lock.
6 Fresh water tank
7 Vacuum bar
8 Cleaning head
9 Lock of pushing handle
10 Cleaning head screw
11 Detergent hose coupling
12 Drainage hose for fresh water
13 Suction hose
14 Operating field
Operating field

1 Fuse for brush drive
2 Fuse for suction turbine
3 Power switch
A Normal operation
B OFF - Appliance is switched off.
C Operation with hand nozzle
Start up
→ Swivel the domelock to the front.
→ Lift up the waste water tank and put it aside.
→ Fill the fresh water tank with hot water (max. 60°C, capacity 15 liters).
→ Pour in detergent.
| Carpet cleaning RM 764 | liquid |
| Defoaming RM 761 |
If you require further information please request the product information sheet and the DIN safety data sheet for the respective cleaning agent.
⚠ WARNING
Health risk, risk of damage. Observe all indications on the detergent used.
For considerate treatment of the environment use detergent economically.
→ Insert the waste water tank back onto the appliance.
→ Replace the lid of the waste water tank and align it.
→ Swivel the dome lock to the rear.
Operation
→ Vacuum loose dirt with a vacuum cleaner prior to cleaning.
→ Swivel the pushing handle lock to the outside, set the desired pushing handle height and close the lock.
→ Insert the mains plug into the socket.
CAUTION
Risk of damage. Check the object to be cleaned prior to using the appliance in an inconspicuous place for colour fastness and water resistance.
⚠️DANGER
Risk of electric shock.
Do not let the mains cable come in contact with the rotating brushes or rotating pads.
→ Set the appliance switch to normal operation - start the suction turbine and the brush drive.
→ Use the detergent solution key on the push bow to spray on detergent solution.
→ Run across the surface to be cleaned in overlapping paths. Pull the appliance backwards during this procedure (do not push).
Emptying the waste Water tank
→ If the waste water tank is filled to 3/4 of its capacity, switch the appliance switch to "OFF".
→ Swivel the domelock to the front.
→ Lift the waste water tank off the appliance and empty it.
⚠ WARNING
Please observe the local provisions regarding the wastewater treatment.
NOTICE
If the waste water tank is full, dirty water will flow back onto the carpet, as soon as the appliance is switched off.
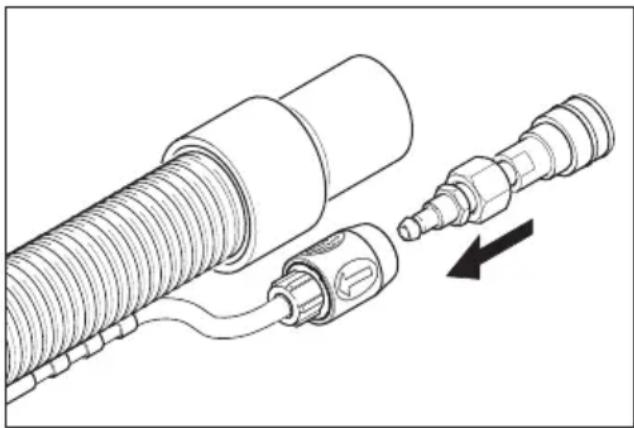
Operation with accessory tools
Only use accessories and spare parts which have been approved by the manufacturer. The exclusive use of original accessories and original spare parts ensures that the appliance can be operated safely and trouble free.
natural_image
Technical illustration of a mechanical assembly with threaded components and a separate connector, showing no text or symbols.→ Connect the provided adapter to the detergent hose of the accessory tools.
→ Pull the suction hose out of the dome.
→ Insert the suction hose of the accessory tool into the dome instead of the suction hose.
→ Connect the coupling of the detergent hose on the appliance to the detergent hose of the accessory tool.
→ Set the appliance switch to operation with manual nozzle - the suction turbine will start.
→ Use the lever on the accessory tool to spray on detergent solution.
Important
When unplugging the accessory tools, the adapter must be removed from the appliance, so that the water output on the appliance is closed.
Recommendation: Leave the adapter on the hose of the accessory tool.
Cleaning tips
– Highly soiled spots should be presoaked and the detergent solution should soak 5 to 10 minutes.
- Always work from the light to the shade (from the window to the door).
- Always work from the cleaned to the un-cleaned surface.
- The more sensitive the surface (oriental rugs, berbers, upholstery material) the lower the cleaning solution concentration should be.
– Rugs with jute backing can shrink if too much water is used and can bleed colours.
- Brush high-fiber rugs in the direction of the weave after cleaning (using a fiber brush or a scrubber).
- Do not step on cleaned surfaces until they have dried and do not place furniture on them to avoid pressure spots or rust stains.
- When cleaning previously shampooed carpets, foam will be generated in the dirt water reservoir. In such a case add Foam ex RM 761 to the dirt water reservoir.
Shutting down
→ Set the appliance switch to "OFF".
→ Empty the dirt water reservoir.
→ Pull the drain hose for the fresh water off the hose nipple an drain the detergent solution.
Cleaning the device
→ Fill the fresh water tank with approx. 2 liters of hot water (max. 60°C) and flush the spray system by pressing the detergent solution key.
→ Disconnect the mains plug from the socket.
→ Pull the drain hose for the fresh water off the hose nipple an drain the detergent solution.
→ Clean the sieves on the fresh water tank and inside the dome.
→ Rinse the waste water tank with clear water.
→ Tilt the appliance backwards and clean the cleaning head and the vacuum bar..
Frost protection
In case of danger of frost:
→ Empty the fresh and dirt water reservoirs.
→ Store the appliance in a frost-protected room.
Transport
CAUTION
Risk of injury and damage! Observe the weight of the appliance when you transport it.
→ Use the pushing handle to push the appliance.
→ When transporting in vehicles, secure the appliance according to the guidelines from slipping and tipping over.
Storage
CAUTION
Risk of injury and damage! Note the weight of the appliance in case of storage.
This appliance must only be stored in interior rooms.
Care and maintenance
⚠️DANGER
Danger of injury by electric shock.
First pull out the plug from the mains before carrying out any tasks on the machine.
Maintenance intervals
Daily before use
→ Check high power cable, extension cables and hoses for damage every time before use.
→ Check spray pattern of the nozzle.
CAUTION
Risk of damage. Never use a wire or a needle to clear plugged nozzles, but rinse them with hot water (see "Troubleshooting").
Every 25 operating hours
→ Check hoses and seals to see if there are damages. Have defective parts replaced by Customer Service.
→ Check the brushes for wear, replace if required.
The brushes are considered worn, if the bristles have the same length as the yellow indicator bristles.
Maintenance Works
Replace the nozzle
→ Empty the fresh water tank and waste water tank.
→ Tilt the appliance backward and store it on the pushing handle.
→ Unscrew and remove the left and right screws on the cleaning head.
→ Remove the cleaning head.
1 Nozzle
2 Fastening clip
3 Hose clip
→ Pull the fastener clip off to the side.
→ Pull the nozzle backwards out of the support plate.
→ Open the hose clip and pull the nozzle off the hose.
→ Insert the new nozzle into the hose.
→ Assemble it back in the reverse sequence.
NOTICE
When inserting the nozzle into the support plate, watch for the correct alignment of the nozzle.
Exchanging the brush
→ Empty the fresh water tank and waste water tank.
→ Tilt the appliance backward and store it on the pushing handle.
→ Unscrew and remove the left and right screws on the cleaning head.
→ Remove the cleaning head.
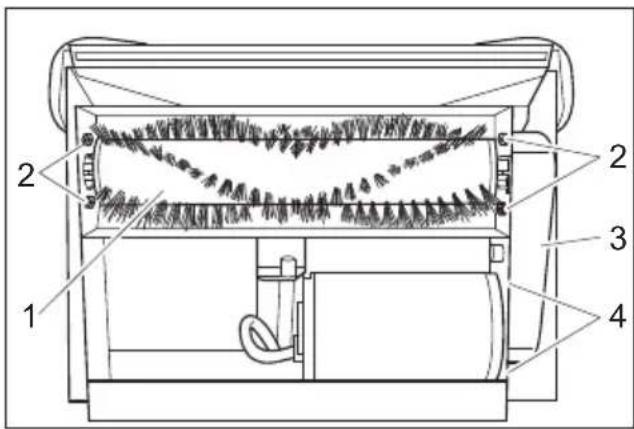
1 Brush roller
2 Brush storage screws
3 Toothed belt cover
4 Motor attachment nuts
→ Loosen the screw on the toothed belt cover screw and remove the cover.
→ Unscrew the nuts on the motor attachment and slide the motor to the brush.
→ Remove the toothed belt.
→ Loosen the threaded pin of the toothed gear pulley on the brush and remove the toothed gear belt.
→ Unscrew the screws of the brush bearings and pull the bearings from the brush shaft.
→ Lift the drive end of the brush roller out of the housing and pull the opposite side out of the bearing.
→ Install the new brush in reverse order.
Troubleshooting
⚠️DANGER
Danger of injury by electric shock. First pull out the plug from the mains before carrying out any tasks on the machine.
Get the electrical components checked and repaired only by authorised customer service persons.
Contact an authorised customer service person in case of problems not mentioned in this chapter or if you are in doubt or when you have been explicitly asked to do so.
Appliance is not working
→ Plug in the mains plug.
→ Check facility fuse.
Suction turbine does not run
→ Reset the suction turbine fuse on the control panel.
Insufficient vacuum performance
→ Clean the vacuum bar.
→ Check, clean or replace the seal on the dome.
→ Empty the waste water tank.
→ Insert the suction hose properly on the dome.
→ Check the suction hose for damages.
No water exiting from nozzle
→ Set the appliance switch to normal operation.
→ Fill the fresh water tank with hot water (max. 60°C) and rinse the nozzle. Replace the nozzle as applicable (see "Maintenance task/replace nozzle").
→ Fill up fresh water reservoir.
→ Clean the sieve in the fresh water reservoir.
Brush does not turn
→ Set the appliance switch to normal operation.
→ Reset the brush drive fuse on the control panel.
→ Check the drive belt, replace if required.
Carpet gets too wet
→ Replace the worn nozzle with a new one (see "Maintenance task/replace nozzle").
Technical specifications
| Power | ||
| Nominal voltage V/Hz | 220...240 | / 1~50/60 |
| Type of protection IPX4 | ||
| Average power con-sumption | W 130 | 0 |
| Suction engine out-put | W 113 | 0 |
| Brush engine output W | 76 | |
| Cleaning brushes | ||
| Working width mm 260 | ||
| Brush diameter mm 65 | ||
| Brush speed 1/min 1650 | ||
| Detergent pump pressure | MPa 0,4 | |
| Detergent pump flow rate | l/min 1,4 | |
| Max. water tempera-ture | °C 60 | |
| Vacuuming | ||
| Cleaning power, air quantity | l/s | 46 |
| Cleaning power, neg-ative pressure | kPa | 30,2 |
| Dimensions and weights | ||
| Theoretical surface cleaning perform-ance | m2/h | 100 |
| Fresh/waste water tank volume | l | 15/17 |
| Length | mm 92 | 0 |
| Width | mm 36 | 0 |
| Height | mm 75 | 0 |
| Typical operating weight | kg | 52 |
| Noise emission | ||
| Sound pressure level (EN 60704-1) | dB(A) | 77 |
| Machine vibrations | ||
| Vibration total value (ISO 5349) | m/s2 1,7 | |
EU Declaration of Conformity
We hereby declare that the machine described below complies with the relevant basic safety and health requirements of the EU Directives, both in its basic design and construction as well as in the version put into circulation by us. This declaration shall cease to be valid if the machine is modified without our prior approval.
Product: Spray extraction device
Type: 1.008-xxx
Relevant EU Directives
2006/42/EC (+2009/127/EC)
2014/30/EU
Applied harmonized standards
EN 55014-1: 2006+A1: 2009+A2: 2011
EN 55014-2: 2015
EN 60335-1
EN 60335-2-68
EN 61000-3-2: 2014
EN 61000-3-3: 2013
Applied national standards
The signatories act on behalf of and with the authority of the company management.

H. Jenner
Chairman of the Board of Management

S. Reiser
Director Regulatory Affairs & Certification
Documentation supervisor:
S. Reiser
Alfred Kärcher SE & Co. KG
71364 Winnenden (Germany)
Tel.: +49 7195 14-0
Fax: +49 7195 14-2212
Winnenden, 2019/04/01
Spare parts
- Only use accessories and spare parts which have been approved by the manufacturer. The exclusive use of original accessories and original spare parts ensures that the appliance can be operated safely and trouble free.
- At the end of the operating instructions you will find a selected list of spare parts that are often required.
- For additional information about spare parts, please go to the Service section at www.kaercher.com.
Warranty
The warranty terms published by the relevant sales company are applicable in each country. We will repair potential failures of your appliance within the warranty period free of charge, provided that such failure is caused by faulty material or defects in manufacturing. In the event of a warranty claim please contact your dealer or the nearest authorized Customer Service centre. Please submit the proof of purchase.

Entreposage.....FR...4
www.kaercher.com/REACH
natural_image
Technical illustration of a mechanical assembly with threaded pipe and connector, showing a close-up of a connector being inserted (no text or symbols present)2006/42/CE (+2009/127/CE)
2014/30/UE
H. Jenner
Chairman of the Board of Management
S. Reiser
Director Regulatory Affairs & Certification
Responsable de la documentation : S. Reiser
Alfred Kärcher SE & Co. KG
71364 Winnenden (Germany)
Tel.: +49 7195 14-0
Fax: +49 7195 14-2212
Winnenden, 2019/04/01
Pièces de rechange
www.kaercher.com/REACH
Norme di sicurezza
natural_image
Technical illustration of a mechanical assembly with threaded components and a connector, showing a directional arrow (no text or symbols)2006/42/CE (+2009/127/CE)
2014/30/UE
Chairman of the Board of Management
S. Reiser
Director Regulatory Affairs & Certification
71364 Winnenden (Germany)
Tel.: +49 7195 14-0
Fax: +49 7195 14-2212
Winnenden, 2019/04/01
Ricambi
www.kaercher.com/REACH
1 Schuifbeugel
2 Toets Reinigingsoplossing
3 Koepel
4 Vuilwaterreservoir
5 Vergrendeling koepel
6 Schoonwaterreservoir
7 Zuigbalk
8 Reinigingskop
9 Vergrendeling duwbeugel
10 Schroef reinigingskop
11 Koppeling reinigingsmiddelslang
12 Aftapslang schoon water
13 Zuigslang
14 Bedieningsveld
Bedieningsveld

natural_image
Technical illustration of a mechanical assembly with threaded components and a connector, showing a directional arrow (no text or symbols)1 Borstelrol
2 Schroeven borstellagers
3 Afdekking tandriem
4 Moeren motorbevestiging
Chairman of the Board of Management

S. Reiser
Director Regulatory Affairs & Certification
71364 Winnenden (Germany)
Tel.: +49 7195 14-0
Fax: +49 7195 14-2212
Winnenden, 2019/04/01
Reserveonderdelen
www.kaercher.com/REACH
natural_image
Technical illustration of a mechanical assembly with threaded pipe and connector, showing a close-up of a connector being inserted (no text or symbols present)2006/42/CE (+2009/127/CE)
2014/30/UE
Chairman of the Board of Management

S. Reiser
Director Regulatory Affairs & Certification
71364 Winnenden (Germany)
Tel.: +49 7195 14-0
Fax: +49 7195 14-2212
Winnenden, 2019/04/01
Piezas de repuesto
www.kaercher.com/REACH
Avisos de segurança
natural_image
Technical illustration of a mechanical assembly with threaded pipe and connector, showing a close-up of a connector being inserted (no text or symbols present)2006/42/CE (+2009/127/CE)
2014/30/UE

Chairman of the Board of Management
S. Reiser
Director Regulatory Affairs & Certification
71364 Winnenden (Germany)
Tel.: +49 7195 14-0
Fax: +49 7195 14-2212
Winnenden, 2019/04/01
Reservedele ..... DA ...7
Garanti DA...7
Miljøbeskyttelse

www.kaercher.com/REACH
1 Bøjle
2 Knap rensemiddelopløsning
3 Kuppel
4 Snavsevandsbeholder
5 Låsemekanisme kuppel
6 Ferskvandtank
7 Sugebjælke
8 Rensehoved
9 Låsemekanisme skubbebøjle
10 Skrue rensehoved
11 Kobling rensemiddelslange
12 Afledningsslange for friskvand
13 Sugeslange
14 Betjeningsfelt
Betjeningsfelt

1 Sikring børstedrev
2 Sikring sugeturbine
3 Afbryder
natural_image
Technical illustration of a mechanical assembly with threaded components and a separate connector, showing no text or symbols.2006/42/EF (+2009/127/EF)
2014/30/EU

Chairman of the Board of Management

S. Reiser
Director Regulatory Affairs & Certification
71364 Winnenden (Germany)
Tel.: +49 7195 14-0
Fax: +49 7195 14-2212
Winnenden, 2019/04/01
Reservedele
www.kaercher.com/REACH
natural_image
Technical illustration of a mechanical assembly with threaded components and a close-up of connected connectors (no text or symbols)1 Børstevalse
2 Skruer børstelager
3 Deksel tannreim
4 Muttere motorfeste
2006/42/EF (+2009/127/EF)
2014/30/EU
Chairman of the Board of Management
S. Reiser
Director Regulatory Affairs & Certification
71364 Winnenden (Germany)
Tel.: +49 7195 14-0
Fax: +49 7195 14-2212
Winnenden, 2019/04/01
Reservedeler
www.kaercher.com/REACH
natural_image
Technical illustration of a mechanical assembly with threaded components and a connector, showing a directional arrow (no text or symbols)1 Borstvals
2 Skruvar Borstlagring
3 Kåpa Kuggrem
4 Muttrar Motorfäste

Chairman of the Board of Management
S. Reiser
Director Regulatory Affairs & Certification
71364 Winnenden (Germany)
Tel.: +49 7195 14-0
Fax: +49 7195 14-2212
Winnenden, 2019/04/01
Reservdelar
www.kaercher.com/REACH
Turvaohjeet
natural_image
Technical illustration of a mechanical assembly with threaded components and a close-up of connected connectors (no text or symbols)
Chairman of the Board of Management
S. Reiser
Director Regulatory Affairs & Certification
71364 Winnenden (Germany)
Tel.: +49 7195 14-0
Fax: +49 7195 14-2212
Winnenden, 2019/04/01
Varaosat
www.kaercher.com/REACH
natural_image
Technical illustration of a mechanical assembly with threaded components and a connector, showing a directional arrow (no text or symbols)
H. Jenner
Chairman of the Board of Management

S. Reiser
Director Regulatory Affairs & Certification
71364 Winnenden (Germany)
Tel.: +49 7195 14-0
Fax: +49 7195 14-2212
Winnenden, 2019/04/01
Ανταλλακτικά
www.kaercher.com/REACH
Güvenlik uyarıları
natural_image
Technical illustration of a mechanical assembly with threaded components and a close-up of connected connectors (no text or symbols)Chairman of the Board of Management

S. Reiser
Director Regulatory Affairs & Certification
71364 Winnenden (Germany)
Tel.: +49 7195 14-0
Fax: +49 7195 14-2212
Winnenden, 2019/04/01
Yedek parçalar
www.kaercher.com/REACH
natural_image
Technical illustration of a mechanical assembly with threaded components and a connector, showing a directional arrow (no text or symbols)
Chairman of the Board of Management
S. Reiser
Director Regulatory Affairs & Certification
71364 Winnenden (Germany)
Tel.: +49 7195 14-0
Fax: +49 7195 14-2212
Winnenden, 2019/04/01
Запасные части
www.kaercher.com/REACH
Biztonsági tanácsok
natural_image
Technical illustration of a mechanical assembly with threaded pipe and connector, showing a directional arrow (no text or symbols)Chairman of the Board of Management

S. Reiser
Director Regulatory Affairs & Certification
71364 Winnenden (Germany)
Tel.: +49 7195 14-0
Fax: +49 7195 14-2212
Winnenden, 2019/04/01
Alkatrészek
www.kaercher.com/REACH
Bezpečnostní pokyny
natural_image
Technical illustration of a mechanical assembly with threaded components and a close-up of connected connectors (no text or symbols)2006/42/ES (+2009/127/ES)
2014/30/EU
Chairman of the Board of Management

S. Reiser
Director Regulatory Affairs & Certification
71364 Winnenden (Germany)
Tel.: +49 7195 14-0
Fax: +49 7195 14-2212
Winnenden, 2019/04/01
Náhradní díly
www.kaercher.com/REACH
Varnostna navodila
Pred prvim zagonom obvezno preberite varnostna navodila št. 5.956-251.0!
Simboli v navodilu za obratovanje
⚠️ NEVARNOST
1 Potisno streme
2 Tipka za čistilno raztopino
3 Pokrov rezervoarja
4 Rezervoar za umazano vodo
5 Zapah pokrova rezervoarja
6 Rezervoar za svežo vodo
7 Sesalni nosilec
8 Čistilna glava
9 Fiksirnik potisnega stremena
10 Vijak čistilne glave
11 Spoj gibke cevi za čistilo
12 Gibka izpustna cev za svežo vodo
13 Gibka sesalna cev
14 Upravljalno polje
Upravljalno polje
1 Varovalka za krtačni pogon
2 Varovalka za sesalno turbino
3 Stikalo naprave
natural_image
Technical illustration of a mechanical assembly with threaded components and a close-up of connected connectors (no text or symbols)1 Krtačni valj
2 Vijaki uležajenja krtač
3 Pokrov zobatega jermena
2006/42/ES (+2009/127/ES)
2014/30/EU
Chairman of the Board of Management
Director Regulatory Affairs & Certification
71364 Winnenden (Germany)
Tel.: +49 7195 14-0
Fax: +49 7195 14-2212
Winnenden, 2019/04/01
Nadomestni deli
www.kaercher.com/REACH
natural_image
Technical illustration of a mechanical assembly with threaded pipe and connector, showing a directional arrow (no text or symbols)2006/42/WE (+2009/127/WE)
2014/30/UE
Chairman of the Board of Management

S. Reiser
Director Regulatory Affairs & Certification
71364 Winnenden (Germany)
Tel.: +49 7195 14-0
Fax: +49 7195 14-2212
Winnenden, 2019/04/01
Części zamienne
www.kaercher.com/REACH
Măsuri de siguranță
natural_image
Technical illustration of a mechanical assembly with threaded pipe and connector, showing a directional arrow (no text or symbols)Directive UE respectate:
2006/42/CE (+2009/127/CE)
2014/30/UE
Norme armonizate utilize:
EN 55014-1: 2006+A1: 2009+A2: 2011
EN 55014-2: 2015
EN 60335-1
EN 60335-2-68
EN 61000-3-2: 2014
EN 61000-3-3: 2013
Chairman of the Board of Management

S. Reiser
Director Regulatory Affairs & Certification
71364 Winnenden (Germany)
Tel.: +49 7195 14-0
Fax: +49 7195 14-2212
Winnenden, 2019/04/01
Piese de schimb
www.kaercher.com/REACH
Bezpečnostné pokyny
natural_image
Technical illustration of a mechanical assembly with threaded pipe and connector, showing a close-up of a connector being inserted (no text or symbols present)2006/42/ES (+2009/127/ES)
2014/30/EÚ
Uplatňované harmonizované normy:
EN 55014-1: 2006+A1: 2009+A2: 2011
EN 55014-2: 2015
EN 60335-1
EN 60335-2-68
EN 61000-3-2: 2014
EN 61000-3-3: 2013
Chairman of the Board of Management

S. Reiser
Director Regulatory Affairs & Certification
71364 Winnenden (Germany)
Tel.: +49 7195 14-0
Fax: +49 7195 14-2212
Winnenden, 2019/04/01
Náhradné diely
Transport.... HR...4
www.kaercher.com/REACH
Sigurnosni napuci
natural_image
Technical illustration of a mechanical assembly with threaded components and a close-up of connected connectors (no text or symbols)→ Spojite priloženi prilagodnik na crijevo sredstva za pranje alatnog pribora.
→ Izvucite usisno crijevo iz kupole.
→ Usisno crijevo alatnog pribora utaknite u kupolu umjesto izvučenog usisnog crijeva.
→ Sastavite spojku crijeva sredstva za pranje na uređaju sa crijevom sredstva za pranje alatnog pribora.
→ Sklopku uređaja postavite na rad s ručnim nastavkom - usisna turbina se pokreće.
→ Za nanošenje otopine sredstva za pranje pomaknite polugu na alatnom priboru.
Važno
Prilikom izvlačenja alatnog pribora prila-godnike se mora maknuti s uređaja, kako bi se zatvorio izlaz za vodu uređaja.
Preporuka: Ostavite prilagodnik na crijevu alatnog pribora.
Savjeti za čišćenje
1 Valjkasta četka
2 Vijci na uležištenju četke
3 Oplata zupčastog remena
4 Matice na postolju motora
→ Odvijte vijak s oplate zupčastog remena pa skinite oplatu.
→ Odvijte matice s postolja motora pa po-
maknite motor prema četki.
→ Skinite zupčasti remen.
→ Otpustite zatik s navojem krunastog zupčanika na četki pa skinite krunasti zupčanik.
→ Odvijte vijke uležištenja četke pa skinite ležaj s vratila za četke.
→ Podignite pogonski kraj valjkaste četke iz kućišta pa nasuprotnu stranu izvucite iz ležaja.
→ Novu četku ugradite obrnutim redoslije-
dom.
Pomoć u slučaju smetnji
⚠ OPASNOST
2006/42/EZ (+2009/127/EZ)
2014/30/EU
Chairman of the Board of Management

S. Reiser
Director Regulatory Affairs & Certification
71364 Winnenden (Germany)
Tel.: +49 7195 14-0
Fax: +49 7195 14-2212
Winnenden, 2019/04/01
Pričuvni dijelovi
Transport .... SR ... 4
www.kaercher.com/REACH
Sigurnosne napomene
Pre prvog puštanja u rad obavezno pročitajte sigurnosne napomene br. 5.956-251.0!
Simboli u uputstvu za rad
⚠ OPASNOST
Ukazuje na neposredno preteću opasnost koja dovodi do teških telesnih povreda ili smrti.
⚠UPOZORENJE
Ukazuje na eventualno opasnu situaciju koja može dovesti do teških telesnih povreda ili smrti.
OPREZ
Ukazuje na eventualno opasnu situaciju koja može dovesti do lakših telesnih povreda ili izazvati materijalnu štetu.
Namensko korišćenje
Ovaj uređaj je namenjen profesionalnoj upotrebi kao uređaj za mokro pranje tepiha u skladu sa opisima i sigurnosnim napomenama navedenim u ovom uputstvu za rukovanje kao i u priloženoj brošuri "Sigurnosne napomene za uređaje za čišćenje četkanjem i ekstraktore".
Funkcija
1 Potisna ručica
2 Taster za rastvor deterdženta
3 Kupola
4 Rezervoar prljave vode
5 Bravica kupole
6 Rezervoar za svežu vodu
7 Usisna konzola
8 Blok čistača
9 Učvršćivač potisne ručke
10 Zavrtanj bloka čistača
11 Spojnica creva za deterdžent
12 Crevo za ispuštanje sveže vode
13 Usisno crevo
14 Komandno polje
Komandno polje
1 Osigurač pogona četki
2 Osigurač usisne turbine
3 Prekidač uređaja
A Normalan rad
B OFF – uređaj je isključen.
C Rad sa ručnom mlaznicom
Stavljanje u pogon
→ Nagnite bravicu kupole prema napred.
→ Podignite rezervoar za prljavu vodu i sklonite ga na stranu.
→ Rezervoar sveže vode (zapremina 15 litara) napunite vrućom vodom (najviše 60°C).
→ Dodajte deterdžent.
| Čišćenje tepiha Tečni RM 764 | |
| Uklanjanje pene RM 761 | |
natural_image
Technical illustration of a mechanical assembly with threaded components and a close-up of connected connectors (no text or symbols)→ Priloženi adapter spojite sa crevom za deterdžent alatnog pribora.
→ Izvucite usisno crevo iz kupole.
→ Usisno crevo alatnog pribora utaknite u kupolu umesto izvučenog usisnog creva.
→ Sastavite spojnicu creva deterdženta na uređaju sa crevom deterdženta alatnog pribora.
→ Prekidač uređaja postavite na rad sa ručnom mlaznicom - usisna turbina se pokreće.
→ Za nanošenje rastvora deterdženta pomerite polugu na alatnom priboru.
Važno
Prilikom izvlačenja alatnog pribora adapter mora da se ukloni sa uređaja, čime se zatvara izlaz za vodu na uređaju.
Preporuka: Ostavite adapter na crevu alatnog pribora.
Saveti za čišćenje
– Jako prljava mjesta prethodno poprskajte i pustite da rastvor deterdženta deluje 5 do 10 minuta.
– Uvek radite od svetla ka senci (od prozora ka vratima).
– Uvek radite od očišćene ka neočišćenoj površini.
– Što je podna obloga osetljivija (orijentalne staze, berber, materijal za tapaciranje nameštaja), to Vam je potrebna manja koncentracija deterdženta.
- Tepisi sa poledinom od jute se pri mokrom čišćenju mogu skupiti i pustiti boju.
– Nakon čišćenja, dok su još mokri, iščetkajte debele tepihe u smeru tkanja (na primer četkom za tkaninu ili četkom za ribanje).
- Za izbegavanje ulegnuća i mrlja od rđe, na očišćenu površinu možete stati ili postaviti nameštaj tek nakon što se osuši.
– Pri čišćenju prethodno šamponiranih tepiha u rezervoaru prljave vode se stvara pena. U tom slučaju u rezervoar prljave vode dodajte sredstvo za sprečavanje pene RM 761.
Nakon upotrebe
→ Prekidač uređaja postavite na "OFF".
→ Ispraznite rezervoar prljave vode.
→ Crevo za ispuštanje sveže vode izvucite iz crevnog priključka i ispustite rastvor deterdženta.
Čišćenje uređaja
→ Rezervoar sveže vode napunite sa oko 2 litra vruće vode (najviše 60°C) pa isperite sistem za prskanje pritiskom na taster za rastvor deterdženta.
→ Strujni utikač izvucite iz utičnice.
→ Crevo za ispuštanje sveže vode izvucite iz crevnog priključka i ispustite rastvor deterdženta.
→ Očistite mrežicu na rezervoaru sveže vode i u kupoli.
→ Rezervoar prljave vode isperite čistom vodom.
→ Uređaj magnite unazad pa očistite blok čistača i usisnu konzolu.
2006/42/EZ (+2009/127/EZ)
2014/30/EU

Chairman of the Board of Management

S. Reiser
Director Regulatory Affairs & Certification
71364 Winnenden (Germany)
Tel.: +49 7195 14-0
Fax: +49 7195 14-2212
Winnenden, 2019/04/01
Rezervni delovi
www.kaercher.com/REACH
natural_image
Technical illustration of a mechanical assembly showing a threaded pipe connected to a connector with an arrow indicating direction (no text or symbols present)Chairman of the Board of Management
Director Regulatory Affairs & Certification
71364 Winnenden (Germany)
Tel.: +49 7195 14-0
Fax: +49 7195 14-2212
Winnenden, 2019/04/01
Резервни части
www.kaercher.com/REACH
natural_image
Technical illustration of a mechanical assembly with threaded components and a close-up of connected connectors (no text or symbols)1 Harjavalts
2 Harjalaagri kruvid
3 Hammasrihma kate
4 Mootori kinnituse mutrid
Chairman of the Board of Management

S. Reiser
Director Regulatory Affairs & Certification
71364 Winnenden (Germany)
Tel.: +49 7195 14-0
Fax: +49 7195 14-2212
Winnenden, 2019/04/01
Varuosad
www.kaercher.com/REACH
Drošības norādījumi
natural_image
Technical illustration of a mechanical assembly with threaded components and a separate connector, showing no text or symbols.Chairman of the Board of Management
S. Reiser
Director Regulatory Affairs & Certification
71364 Winnenden (Germany)
Tel.: +49 7195 14-0
Fax: +49 7195 14-2212
Winnenden, 2019/04/01
Rezerves daļas
www.kaercher.com/REACH
Saugos reikalavimai
natural_image
Technical illustration of a mechanical assembly with threaded pipe and connector, showing a close-up of a connector being inserted (no text or symbols present)Chairman of the Board of Management

S. Reiser
Director Regulatory Affairs & Certification
71364 Winnenden (Germany)
Tel.: +49 7195 14-0
Fax: +49 7195 14-2212
Winnenden, 2019/04/01
Atsarginès dalys
www.kaercher.com/REACH
Правила безпеки
natural_image
Technical illustration of a mechanical assembly with threaded pipe and connector, showing a close-up of a connector being inserted (no text or symbols present)
Chairman of the Board of Management

S. Reiser
Director Regulatory Affairs & Certification
71364 Winnenden (Germany)
Tel.: +49 7195 14-0
Fax: +49 7195 14-2212
Winnenden, 2019/04/01
Запасні частини
natural_image
Icon of a gear and wrench inside a square frame (no text or symbols)http://www.kaercher.com/dealersearch