
IVRL 65202 Tc - Vacuum Cleaner Kärcher - Free user manual and instructions
Find the device manual for free IVRL 65202 Tc Kärcher in PDF.
User questions about IVRL 65202 Tc Kärcher
0 question about this device. Answer the ones you know or ask your own.
Ask a new question about this device
Download the instructions for your Vacuum Cleaner in PDF format for free! Find your manual IVRL 65202 Tc - Kärcher and take your electronic device back in hand. On this page are published all the documents necessary for the use of your device. IVRL 65202 Tc by Kärcher.
USER MANUAL IVRL 65202 Tc Kärcher
73550 Waldstetten (Germany)
Tel.: +49 7171 94888-0
Fax: +49 7171 94888-528
Waldstetten, 2024/04/01
Contents
General notes. 12
Intended use 12
Environmental protection 13
Accessories and spare parts. 13
Scope of delivery. 13
Safety devices. 13
Device description. 14
Start-up 14
Operation 14
Finishing operation. 16
Transport 16
Storage. 16
Care and service. 16
Troubleshooting guide. 16
Warranty. 17
Technical data 17
Declaration of Conformity 18
General notes
Read these original operating instructions and the enclosed safety instructions before using the device for the first time. Proceed accordingly.
Keep both books for future reference or for future owners.
Intended use
WARNING
Inhalation of dusts posing a health hazard
Health hazard
Never use the appliance to vacuum up dusts which pose a health hazard.
ATTENTION
Short-circuit due to high levels of humidity
Damage to the device
Only use the device indoors.
The device is intended for:
- the vacuuming of liquids containing oil, cooling lubricants and chippings.
- the vacuuming of flammable liquids (flash point above 55^ ).
- the vacuuming of non-explosive substances.
- the vacuuming of dusts and coarse dirt.
-
the industrial use, e.g. in storage and production areas.
-
the commercial use, e.g. in hotels, schools, hospitals, factories, shops, offices, and rental companies.
The device is not intended for:
the vacuuming of fine dust.
- the vacuuming of flammable liquids (flammable, easily flammable, highly flammable according to Dangerous Substances Directive 67/548/EEC) (flash point below 55^ ) and mixtures of flammable dusts and liquids.
Any other use will be regarded as improper use.
Environmental protection

The packing materials can be recycled. Please dispose of packaging in accordance with the environmental regulations.

Electrical and electronic devices contain valuable, recyclable materials and often components such as batteries,
rechargeable batteries or oil, which - if handled or disposed of incorrectly - can pose a potential danger to human health and the environment. However, these components are required for the correct operation of the device. Devices marked by this symbol are not allowed to be disposed of together with the household rubbish.
Notes on the content materials (REACH)
Current information on content materials can be found at: www.kaercher.de/REACH
Accessories and spare parts
Only use original accessories and original spare parts. They ensure that the appliance will run fault-free and safely.
Information on accessories and spare parts can be found at www.kaercher.com.
Scope of delivery
Check the contents for completeness when unpacking. If any accessories are missing or in the event of any shipping damage, please notify your dealer.
Safety devices
Hazard levels
△DANGER
- Indication of an imminent threat of danger that will lead to severe injuries or even death.
WARNING
- Indication of a potentially dangerous situation that may lead to severe injuries or even death.
CAUTION
- Indication of a potentially dangerous situation that may lead to minor injuries.
ATTENTION
- Indication of a potentially dangerous situation that may lead to damage to property.
Safety instructions
WARNING
The device is not suitable for vacuuming up dusts that are harmful to human health.
- Protect the device from rain. Do not store the device outdoors.
- Every time before use, check whether the equipotential bonding conductors (earthing conductors) are connected.
CAUTION
- Switch off the device after each use and remove the mains plug.
ATTENTION
- Only use the device indoors.
- Risk of crushing! Wear gloves when removing or installing the suction head, filter inlay or collection container.
- Risk of damage! Never vacuum without a filter or with a damaged filter.
- Wear safety shoes when operating the device.
- Only move the device at walking speed, and to move down a decline, have two workers steady the device as necessary.
- Be careful to ensure that there is no dust spillage when replacing accessories.
Device with tilting chassis (Tc)
ATTENTION
Risk of injury
Risk of crushing due to the liquid container tipping
Allow the lock to latch after tipping.
Behaviour in the event of an emergency
△DANGER
Risk of injury and material damage when vacuuming inflammable materials, or in the case of a short-circuit or other electrical faults
Danger of inhalation of gases hazardous to health, danger of electric shock, danger of burns.
In the event of an emergency, switch off the device and unplug the mains plug.
Electrical connection
The device may only be connected to an electrical connection which has been set up by a qualified electrician as per IEC 60364.
For the connection values see Technical data and type plate. Use of an extension cable is prohibited.
△DANGER
Danger of electric shock
Danger of death
Avoid damaging the power cables by driving over them or otherwise crushing them, or by jerking them.
Protect the cables from heat, oil and sharp edges.
Check the mains connection of the device for damage every time before operation.
Do not operate the device using a damaged cable. Have any damaged cables replaced by a qualified electrician.
Symbols on the device
Marking the maximum permissible fluid level
See chapter Checking the filling level display.
Flüssigkeits-
Füllstand
MAXIMAL
ATTENTION
Risk of damage to the device
Leaking water due to the maximum fluid level being exceeded.
Drain the device before the maximum fluid level is reached.
Device description
See graphics page for illustrations Illustration A
① Steering rollers with parking brake
② Maximum filling level mark
③ Drain hose
Liquid container
⑤Push handle
6Deflector plate
⑦Small deflector plate
8Filter
Suction head
⑩ Suction hose connection
1)Power switch
② Suction head lock
③ Mains cable
Liquid container crane grommet
⑤Tilting chassis
16 Accessory holder
⑦ Unlocking lever
Start-up
See graphics page for illustrations
- Bring the device into the working position.
- If necessary, secure the device using the parking brake.
- Ensure that the suction head is fitted correctly.
- Insert the suction hose into the suction hose connection.
Illustration B
- Plug the desired accessory onto the suction hose.
Operation
For the figures, please refer to the graphics pages
- Plug the mains plug into the socket.
- Switch on the device at the trigger.
Illustration C
Device with a motor (IVR-L...-1)
Illustration D
Device with two motors (IVR-L...-2)
ATTENTION
Operation with a motor
Risk of damage to the drive motor
Switch between the level settings quickly. The switch has multiple level settings:
0 The device is off.
1 Motor 1 is switched on.
2 Motors 1 and 2 are switched on.
3. Switch on the device at the trigger.
Illustration D
ATTENTION
Operation with a motor
Risk of damage to the drive motor
Switch between the level settings quickly.
The switch has multiple level settings:
0 The device is off.
1 Motor 1 is switched on.
2 Motors 1 and 2 are switched on.
- Start vacuuming.

Suction process
Note
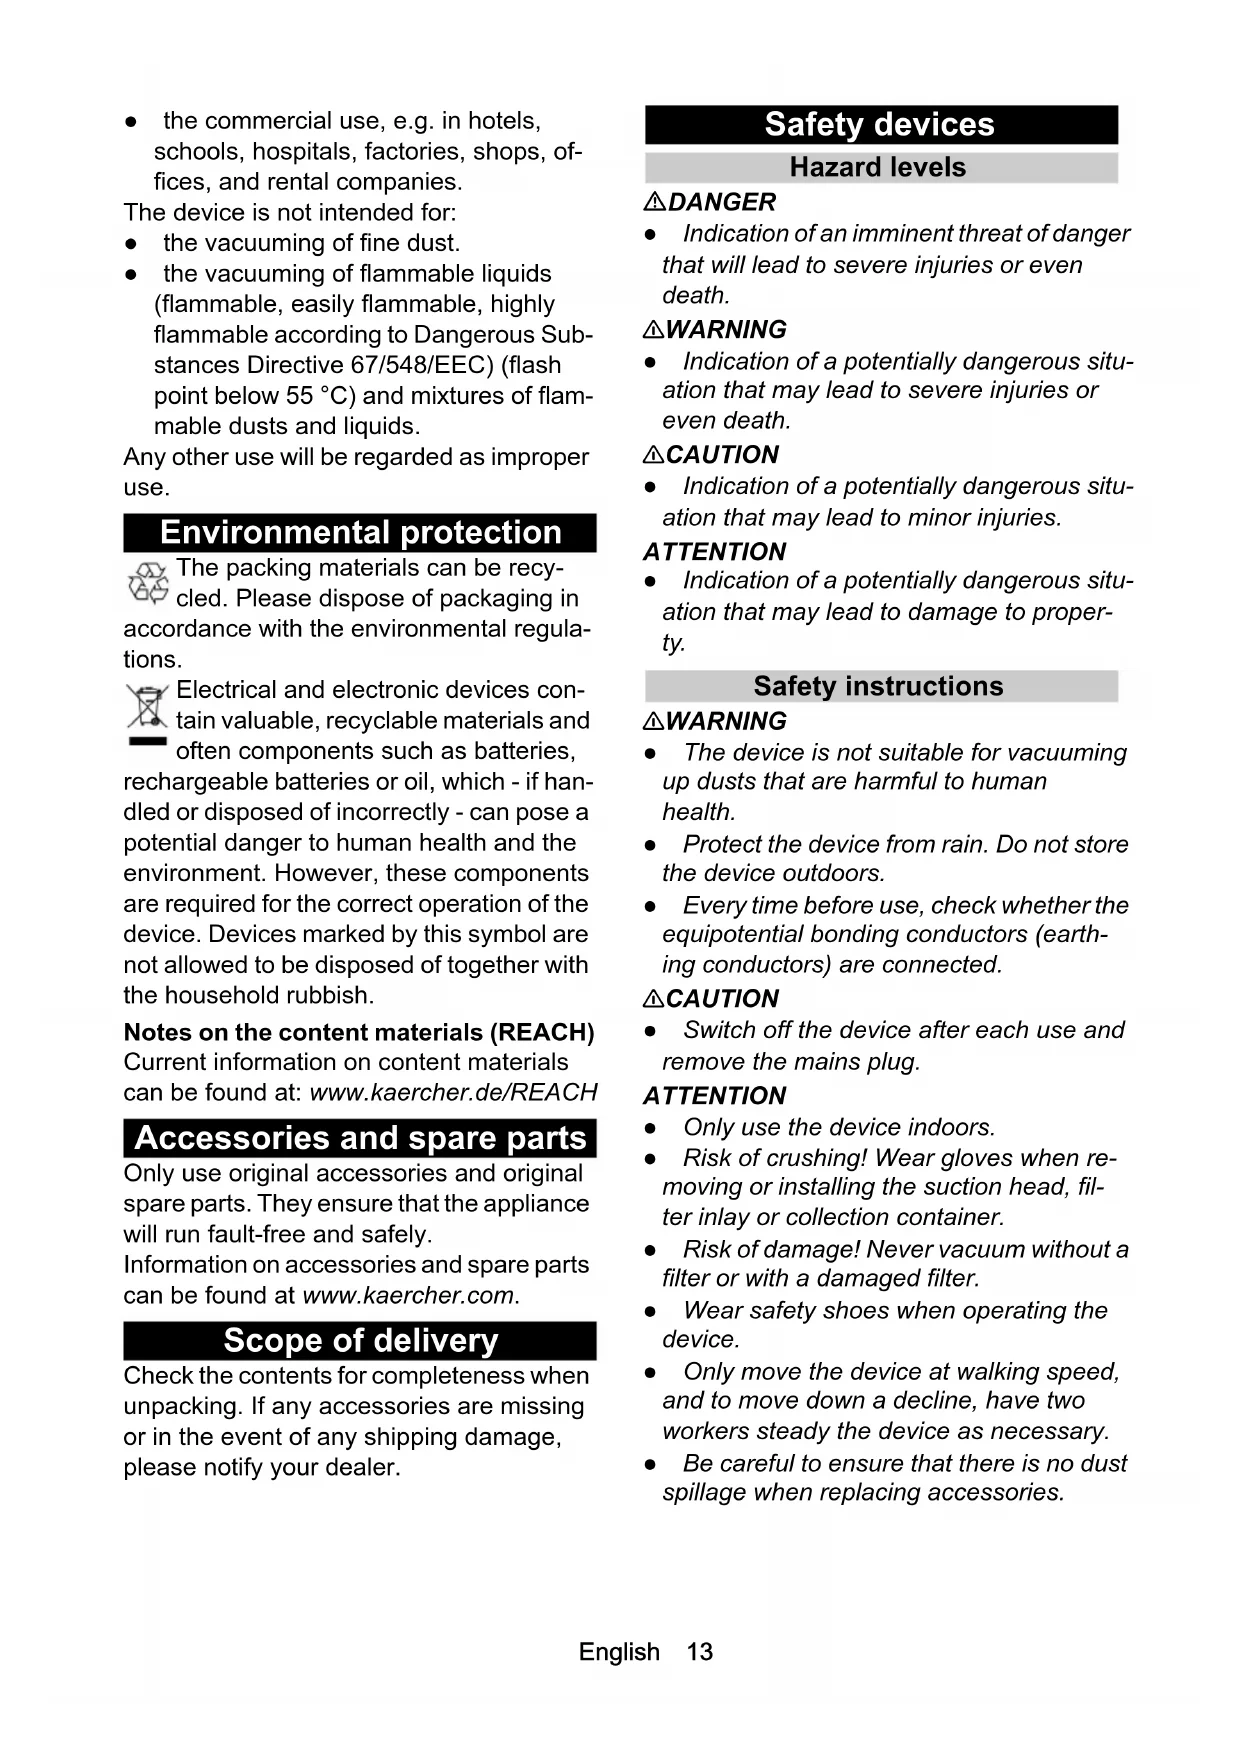
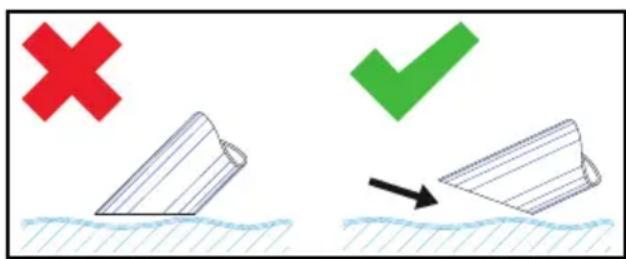
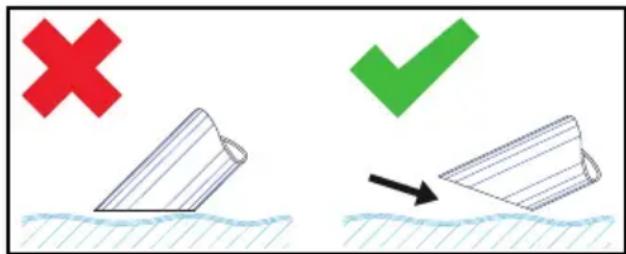
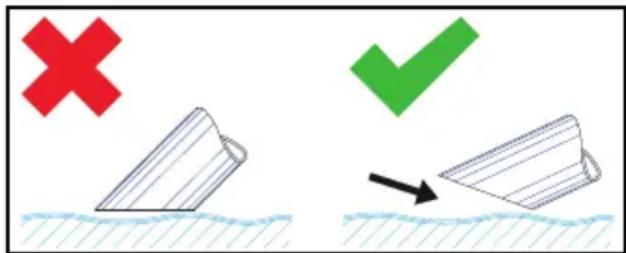
Only immerse the accessory halfway when vacuuming liquids to encourage sufficient air.
Checking the filling level display
See graphics pages for illustration Illustration E
Note
The red marking on the drain hose shows the maximum permissible filling level.
ATTENTION
Risk of damage to the device
The liquid container will overflow within a few seconds of filling.
Constantly check the filling level in the liquid container when filling large quantities of liquid.
Emptying the liquid container
For the figures, please refer to the graphics pages
- Switch the device off and disconnect it from the power supply.
- Move the device to the waste water tank.
- Empty the liquid container:
a Connect the drain hose to the upper hose coupling.
Illustration F
b Hold the drain hose over a suitable collecting container and drain the contents.
- Dispose of or reuse the contents in accordance with statutory regulations.
Emptying the liquid container by tilting
See graphics page for illustrations
- Switch the device off and disconnect it from the power supply.
- Move the device to the waste water tank.
- Remove the suction head, (see chapter Removing the suction head).
- Remove all accessory parts.
-
Prepare the liquid container for emptying:
-
By means of tilting the device Tc (device with tilting device Tc)
a Open the lock of the liquid container.
Illustration G
- Using the crane grommet (device without tilting device Tc)
a Lift the device by the crane grommets (see chapter Device description) using suitable lifting gear.
△DANGER
Failure to observe the weight
Risk of injury from falling device
Observe the applicable accident prevention guidelines and safety instructions.
Every time before lifting, check to ensure correct functioning of the lifting device.
Only lift the device via the provided crane grommet.
Ensure that there will be no unintentional unhooking of the lifted load.
The crane may exclusively be operated by qualified staff.
No people may be located within the hazard zone of the crane.
Do not leave the device hanging unattended on the crane.
6. Tip the container with the push handle. Illustration H
7. Dispose of or reuse the contents in accordance with statutory regulations.
8. Fit and lock the suction head.
Cleaning the liquid container
For the figures, please refer to the graphics pages
Note
Bacterial contamination may occur through the use of water-based cooling lubricants.
Wear suitable protective clothing when removing deposits.
- Empty the container.
- Remove deposits in the container.
- Dispose of the deposits in accordance with the applicable regulations.
- Remove chippings and deposits from the support plates. Illustration I
Removing the suction head
See graphics page for illustrations
- Switch off the device and disconnect from the power supply.
- Open the lock for the suction head. Illustration J
- Remove the suction head and put to one side.
Finishing operation
- Switch off the device using the on/off switch
- Empty and clean the liquid container.
- Remove the accessories and clean and dry them as necessary.
Note
Empty the vacuum cleaner after every use.
Allow the vacuum cleaner to dry with the container open.
Transport
CAUTION
Failure to observe the weight
Risk of injury and damage
Be aware of the weight of the device during transport and storage.
- When transporting in vehicles, secure the device against slipping and tipping over according to the applicable guidelines.
Storage
CAUTION
Failure to observe the weight
Risk of injury and damage
Be aware of the weight of the device during transport and storage.
- Store the device indoors only.
Care and service
- Rinse off the device and accessories at regular intervals using a suitable liquid and allow to dry.
- To prevent contamination, do not leave fluids in the device.
- For longer breaks in operation, open the cover to allow the residual moisture to evaporate.
- Replace the filter if damaged.
Replacing the filter
See graphics page for illustrations Illustration K
- Remove the suction head (see chapter Removing the suction head).
- Loosen the screws of the tensioning rings.
- Remove the small deflector plate.
- Remove and replace the filter.
- Insert the new filter. Ensure that the filter is inserted correctly during installation.
- Fit the tensioning rings and screw them on.
Troubleshooting guide
△DANGER
Risk of injury
Danger of the device unintentionally starting and danger of electric shock
Switch off the device and unplug the mains plug before performing any work on the device.
Have all checks and work on electrical parts performed by an qualified technician.
The motor (suction turbine) does not start up
No electrical voltage present
- Check the socket and the power supply fuse.
- Check the mains cable and the mains plug of the device.
The suction power decreases
Nozzle, suction hose or suction pipe clogged.
- Check the nozzle, the suction hose and the suction pipe and clean if necessary. The filter is dirty.
Clean the filter.
Emptying the liquid container takes a long time
The drain hose is kinked or blocked.
- Check and, if necessary, clean the drain hose.
Customer Service department
If the malfunction cannot be corrected, the device must be checked by the Customer Service department.
Warranty
The warranty conditions issued by our relevant sales company apply in all countries. We shall remedy possible malfunctions on your appliance within the warranty period free of cost, provided that a material or manufacturing flaw is the cause. In a warranty case, please contact your dealer (with the purchase receipt) or the next authorised customer service site. (See overleaf for the address)
Further warranty information (if available) can be found in the service area of your local Kärcher website under "Downloads".
Technical data
| IVR-L 40/12-1 | IVR-L 65/12-1 Tc | IVR-L 65/20-2 Tc | ||
| Electrical connection | ||||
| Mains voltage V 220-240 220-240 220-240 | ||||
| P h a s e | ~ | |||
| Power frequency Hz 50-60 50-60 50-60 | ||||
| Degree of protection IPX4 IPX4 IPX4 | ||||
| Protection class | I | I | I | |
| Nominal power | W | 1200 | 1200 | 2000 |
| Power protection (slow-blowing) | A | 16 | 16 | 16 |
| Dimensions and weights | ||||
| Typical operating weight | kg | 33 | 40 | 46 |
| Length x width x height | mm | 710 x 510 x 1180 | 730 x 570 x 1330 | 730 x 570 x 1330 |
| Ambient conditions | ||||
| Ambient temperature | °C | +40 | +40 | +40 |
| Device performance data | ||||
| Tank content | I | 40 | 65 | 65 |
| Air quantity | l/s | 59 | 59 | 2x50 |
| Vacuum | kPa (mbar) | 23 (230) | 23 (230) | 22 (220) |
| Nominal width of the suction hose | DN50 DN50 DN50 | |||
| IVR-L 40/12- | IVR-L 65/12- | IVR-L 65/20- | ||
| 1 | 1 Tc | 2 Tc | ||
| Determined values in acc. with EN 60335-2-69 | ||||
| Hand-arm vibration value m/s | 2 | < 2.5 < 2.5 < 2.5 | ||
| Uncertainty K m/s | 2 | 0.2 | 0.2 | 0.2 |
| Sound pressure level LpA | d | B | ( | A |
| Uncertainty KpA | d | B | ( | A |
| Mains cable | ||||
| Mains cable H07BQ-F mm | 2 | 3 x 1.5 | 3 x 1.5 | 3 x 1.5 |
| Part number (EU) 9.979-874.0 9.979-874.0 9.979-874.0 | ||||
| Cable length | m | 6 | 6 | 6 |
Subject to technical modifications.
Declaration of Conformity
EU Declaration of Conformity
We hereby declare that the machine described below complies with the relevant basic safety and health requirements in the EU Directives, both in its basic design and construction as well as in the version placed in circulation by us. This declaration is invalidated by any changes made to the machine that are not approved by us.
Product: Dry vacuum cleaner
Product: Wet/dry vacuum cleaner
Type: 9.986-xxx
Type: 9.989-xxx
Currently applicable EU Directives
2006/42/EC (+2009/127/EC)
2014/30/EU
2011/65/EU
Harmonised standards used
EN 55014-2: 2015
EN 55014-1:2017 + A11:2020
EN 60335-1
EN 60335-2-69
EN IEC 61000-3-2: 2019
EN 61000-3-3:2013 + A1:2019
EN 61000-3-11: 2000
EN 62233: 2008
EN IEC 63000:2018
The signatories act on behalf of and with the authority of the Executive Board.

T. Wahl
Managing Director

A. Haag
Director R&D
Documentation supervisor:
A. Haag
Kärcher Industrial Vacuuming GmbH
73550 Waldstetten (Germany)
Ph.: +49 7171 94888-0
Fax: +49 7171 94888-528
Waldstetten, 2024/04/01
Declaration of Conformity (UK)
We hereby declare that the product described below complies with the relevant provisions of the following UK Regulations, both in its basic design and construction as well as in the version put into circulation by us. This declaration shall cease to be valid if the product is modified without our prior approval.
Product: Dry vacuum cleaner
Product: Wet/dry vacuum cleaner
Type: 9.986-xxx
Type: 9.989-xxx
Currently applicable UK Regulations
S.I. 2008/1597 (as amended)
S.I. 2016/1091 (as amended)
S.I. 2012/3032 (as amended)
Designated standards used
EN 55014-2: 2015
EN 55014-1:2017 + A11:2020
EN 60335-1
EN 60335-2-69
EN IEC 61000-3-2: 2019
EN 61000-3-3: 2013 + A1: 2019
EN 61000-3-11:2000
EN 62233: 2008
EN IEC 63000:2018
The signatories act on behalf of and with the authority of the Executive Board.

T. Wahl
Managing Director

A. Haag
Director R&D
Documentation supervisor:
A. Haag
Kärcher Industrial Vacuuming GmbH
73550 Waldstetten (Germany)
Ph.: +49 7171 94888-0
Fax: +49 7171 94888-528
Waldstetten, 2024/04/01
Contenu
Remarques generales. 19
2006/42/CE (+2009/127/CE)
2014/30/UE
2011/65/UE
73550 Waldstetten (Germany)
Tel.: +49 7171 94888-0
Télécopie: +49 7171 94888528
Waldstetten, 2024/04/01
Indice
73550 Waldstetten (Germany)
Tel.: +49 7171 94888-0
Fax: +49 7171 94888-528
Waldstetten, 2024/04/01
Índice de Contents
Avisogenerales. 32
Uso previsto 32
2006/42/CE (+2009/127/CE)
2014/30/UE
2011/65/UE

T. Wahl
Managing Director

A. Haag
Director R&D
Responsible de documentacion:
A. Haag
Kärcher Industrial Vacuuming GmbH
- Colocar e enroscar as braçadeiras.
73550 Waldstetten (Germany)
Tel.: +49 7171 94888-0
Fax: +49 7171 94888-528
Waldstetten, 2024/04/01
Içindekiler
Genel uyarilar. 52
2006/42/AT (+2009/127/AT)
2014/30/AB
2011/65/AB
73550 Waldstetten (Germany)
Tel.: +49 7171 94888-0
Faks: +49 7171 94888-528
Waldstetten, 2024/04/01
Innehåll
Allman information 59
73550 Waldstetten (Germany)
73550 Waldstetten (Germany)
2006/42/EF (+2009/127/EF)
2014/30/EU
2011/65/EU
73550 Waldstetten (Germany)
73550 Waldstetten (Germany)
Tel: +49 7171 94888-0
Faks: +49 7171 94888-528
Waldstetten, 2024/04/01
Satures
Visparigas norades 89

T. Wahl
Managing Director

A. Haag
Director R&D
Pilnvarotais sagatavot dokumentaciju: A. Haag
Kärcher Industrial Vacuuming GmbH
2006/42/WE (+2009/127/WE)
2014/30/UE
2011/65/UE
2006/42/ES (+2009/127/ES)
2014/30/EU
2011/65/EU

T. Wahl
Managing Director

A. Haag
Director R&D
2006/42/ES (+2009/127/ES)
2014/30/EU
2011/65/EU
73550 Waldstetten (Germany)
Tel.: +49 7171 94888-0
Fax: +49 7171 94888-528
Waldstetten, 2024/04/01
Kazalo
Splošna navodila 127
Namenska uporaba 128
Zaščita okolja 128
Pribor in nadomestni deli. 128
Obsegdobave 128
Varnostne naprave 128
Opis naprave. 129
Zagon 129
Obratovanje 130
Directive UE relevante
2006/42/UE (+2009/127/UE)
2014/30/UE
2011/65/UE
Norme armonizate aplicate
EN 55014-2: 2015
EN 55014-1:2017 + A11:2020
EN 60335-1
EN 60335-2-69
EN IEC 61000-3-2: 2019
EN 61000-3-3: 2013 + A1: 2019
EN 61000-3-11: 2000
EN 62233: 2008
EN IEC 63000:2018
Semnatarii actioneaza in numele si prin imputernicirea conducerii intreprinderii.

T. Wahl Managing Director

A. Haag
Director R&D
2006/42/EZ (+2009/127/EZ)
2014/30/EU
2011/65/EU
Primijenjene uskladene norme
EN 55014-2: 2015
EN 55014-1: 2017 + A11: 2020
EN 60335-1
EN 60335-2-69
EN IEC 61000-3-2: 2019
EN 61000-3-3: 2013 + A1: 2019
EN 61000-3-11:2000
EN 62233: 2008
EN IEC 63000:2018
73550 Waldstetten (Germany)
Tel.: +49 7171 94888-0
Telefaks: +49 7171 94888-528
Waldstetten, 2024/04/01
Sadržaj
Opste napomene 147
Namenska upotreba. 147
Zašitaživotne sredine 147
Priborirezervni delovi 147
Obim isporuke 147
Sigurnosni ureadi 148
Opis uredaja. 149
Pušanje u pogon 149
Rad 149
Zavrsetak rada 150
Transport. 151
Skladištenje 151
2006/42/EZ (+2009/127/EZ)
2014/30/EU
2011/65/EU
Primenjene harmonizovane norme
EN 55014-2: 2015
EN 55014-1:2017 + A11:2020
EN 60335-1
EN 60335-2-69
EN IEC 61000-3-2: 2019
EN 61000-3-3: 2013 + A1: 2019
EN 61000-3-11:2000
EN 62233: 2008
EN IEC 63000:2018
Potpisnici deluju u ime i uz punomoc rukovodstva.

T. Wahl Managing Director

A.Haag Director R&D
Lice ovlaśćeno za dokument⁺iju:
A. Haag
Kärcher Industrijsko usisavanje GmbH
YIIOEIGN TIAWOS EIKIVDUVNS KAATAOONS, NOIOIA MTOPEVA OBNYNOSE I OAIKES ZNIIECS.
73550 Waldstetten (Germany)
Tnλ: +49 7171 94888-0
: +49717194888-528
Waldstetten, 2024/04/01
CopepkaHne
O6uhe yka3aHn 160
IcnoJb3ObaHnE no Ha3HaueHnIO .... 160
3aunTaOkpykaUoSei cpebl. 161
PpHaIeXHocTn 3aIacHbIe Yactn 161
KomnneKT noctabkn 161
IpeoXpaHnTeNbHbIe ycTpoiCTBa..... 161
OncaHne yctpoiCTBa 163
BBoD B 3KcPnyaTaUIO 163
3Kcnpnyatauia 163
3aBepueHne pa6oTbI 165
TpaHcnpOpBbKa 165
XpaHeHne 165
YxOД n TexHnueckoe o6cIyKuBaHne.. 165
POMOUI npH HcnpaBHOCTX 165
TapaHTnA 166
TexHnueckne XapaKTepeNCTnKn 166
Дeкларачи O COOTBETCTBUN CTaHdapTaM EC 167
06uyeka3aHnna
IpeepnepBbIM npImMeHneM yctpoiCTBa 03HaKOMITbcra C
daHHoOpnHaJIbHOHnHCTpyKUneiNo 3KcPnyatauNn npIlaeraMbIMu yKa3aHnMaNn NO TexHnke 6e3OnacHoCTn.
DcHCTBOBAtb B COOTBETCTBUN C HUMN.
CoxpaTb o6e 6poUOpbl nlaIaJIbHeIWeO nOJIb3OBaHn IJI nIa cNeDuOuEro BnaDeIbua.
PnHaJIeXHoCTN 3aNaChbIe YactN
IcnoJb3OBAtB ToJIbKO opnHnHaJIbHbIe npHaJdLeXHoCTN n 3aNaChbIe YacTn. ToJIbKO OHI rapaHTnpyIOT 6e3OpacHyIO n 6ecpe6oHnyo pa6Otu ycTpoiCTBa. IJa noJyueHnIHΦopMauIN o npHaJdLeXHoCTx N 3aNuaCTAx CM. www.kaercher.com.
KoMnJIeKT nOcTaBKn
Pn paCnaKOBKe yCTpoiCTBa npOBepntb KOMnIeKaTauHIO. Pn O6hApJxHn HEOCTaHOuNX npHaIeJXHOCTeN IIN NOBpeJDeHn, NOpUeHHbIX BO BpeM TpaHCnOPTnPOBKn, CJIeDyET YBeIDOMNTb TOPROByIO opraHn3aUHIO, npOdaBShyU OCTpOietBO.
IpeoXpaHnteJbHbIe yCTpoiCTBa
CTeneHb onachoctn
ONACHOCTb
- Yka3aHue omHocumelbHo HenocpeDcmeHNo 2po3aue onachocmu, Komopar npubodum K mxeblm mpaemam unu K cmepmu.
△PENEYNPEXDEHNE
- Yka3aHue omHocumelbHo 603MOxHOJ nomeHuaJIbHO onaHou cumyaquu, Komopar MoXem npueecmu K mXeJIbIM mpaam unu K cMepmu.
△OCTOPOXHO
- Yka3aHue Ha nomehuaJIbHO onachyUcmyauu, Komopar MoKem npueecmu K nOnyeHuO neKux mpaM.
BHUMAHNE
- Yka3aHue omHocumelbHo 603MOxHOJ nomeHuaJIbHO onacHO cumyaquu, Komopra MoXem noeey 3a cobou MamepuAbHbI yuep6.
Yka3aHnno TExHnKe 6e3oNaChOCTn
△PENEYNPEXDEHNE
- Ycmpoucme He npedHa3NaeHo dna c6opa epeHo dna 3doopoBb nblu.
- Obecneumb 3auumy ycmpoucmea om doxra. He xpaHmb ycmpoucmeo nod omKpbimbIM He6om.
- Pered kaxdbim 6b0d0m 6 3kcnnyamauHIO npo8epmbl, nodcoeduneHbI NU Ka6eNu ypa8HuBaHua nomehuanaOB (npo6obbl 3a3emneHua).
OCTOPOXHO
Bbiknoyamb ycmpoucmeo nocne kaskdozo ucnonb30aHua u u3ekeamb umencenbHyu eunky u3 po3emku.
BHIMAHNE
- IcnoIb3o8amb ycmpoucmeo moIbko 8 nOmeueHuaX.
Onachocmb 3aueemnenu! NcnoB30amb nepyamku npu cbeMe unu ycmahoe 2oNoeKu nbinecoca, 6noka pfunbmpa uu cbohpou emkocmu. - Onachocmb noBpeKdeHua! He npoeodumb y6opky 6e3 pfunbmpa unu c uCnoJb306aHuem noBpeKdeHHO2O pfunbmpa
- IcnoIb3oBamb 3auumHyu o6yEB npu pa6ome c ycmpoucmeom.
- Peremenu ycmpoucmeo monko co ckopocmbxodbbl, a Ha cnyckax -edboem, ecnu 3mo Heo6xodumo.
He donyckamb bibpoca nbu npu 3amehe npuHaadJexKhocmeu.
UcTpoIcTBa c ONpOKnIbIbAIOuSeiC TelenKoN (Tc)
BHUMAHNE
OnachocmbmpaMupoeaHua
Onachocmb 3aueemnenu npu onpokudbbaehuu baka c kudkocmbio 3aueekhymb fuKcamop nocne onpokudbbaHua.
0 YCTPOIUCTBO BBIKJIHOeHO.
1ДВИгагель 1ВКЛЮчЕн.
2ДВИraTeIи 1и 2ВКЛЮЧЕнbl.
- BkIIOuHTb yCTPOINCTBO C NOMOUIBbIKIOUaTeJIy CTPOINCTBa.PncyHOK D
BHUMAHNE
Pa6oma c odHm deUzameJem
Onachocmb noepekdeHua npubodho2o dbuzamena
Ipeeknoyamb cmyneHu ebiknoyameJ nnabHo.
BbIKIOUaTeIb IMeET HeCKoJIbKO CTyneHcBKnIOUeHnA:
0 YcTpoIcTBOBbIKJIIOHeHO.
1ДВИгаTeNB1ВКЛЮчЕн.
2ДВИraTeIи12ВКЛIOueHbI.
- Hauatb npocecc y6opkn nbInecoom.
Ppoecc BcacbBaHna
Ппмецане
IIpn BCacbIBaHHJXHIOKCTeI NOrpyKaTb IIpHnHaJIeXHOCTb TOJIbKO HAnIOJIOBHy, YTO6bl OBeCneuHTb IOCTaTOUHoe KOJIInueCTBO BO3dYxa.
a OToeHHTb CInHBHOI IHaHr OT BepxHeI IHaHROBOI MyfTbI. PnCyHOK F
b YdepKnBaCJIHBHOI IlaHr HaI COOTBeTCTByIOiEe EMKOCTbIO, CInTb CoJePKMoe.
- YTHIN3HPOBaTb COeepKHMoe COrJaacHO DeHCTByIOIIM IpeIINcAHnM HIN HCIOJIb3OBA Tb IOBTOpHO.
OIIopOKHeHne 6aKa IJIa JKNIOCTN IyTEM OINPOKnIbIBaHnIa
PncyHKn CM. Ha cTpaHHuaX C pHcyHKaMn
- BbIKJIIOHTb yCTpO'CTBO H OTCOeINHITb erO OT NCTOuHNKa IINTaHHJ.
-
IepemecNTb yCTpoIcTBO K KaHaJIH3aIIHOHHoI CnCTeMe IJIa CJIHBa KnIKOCTN.
-
ChTb roIOBky IIIEcOca (CM. IaBy CbeM roIOBKn IIIEcOca).
- CHTb BCE IIpHnHaJIeXHoCTH.
5.ПоДгOTOBHTb 6aKДЯЖИДКОCTN K OПОРЖHEHNO:
C IIOMOUbIO OINPOKnIbIBaHOuIeROMexAHN3Ma Tc (yCTpOHTBO CONPOKNDbIBaHOUIM MExAHN3MOM Tc)
a OTKpbITb 0HKcaTOp 6aKa IJIa KNDKoCTN. PnCyHOK G
C NIOMOUHO NOBEmHOIPOUYHbI (yCTpOcTBO 6e3ONpOKNDbIBaHOJero MexaHH3Ma Tc)
a IIOHNMTye yCTPOINCTBO C IIOMOIbIO IOxOJaIeTO IOJbEMHO O6OpUIOBaHnI N IOJBemHBIX IpouHH (cm. TJIaBy OIIncAHne yCTPOINCTBA).
ONACHOCTb
HecobIHOeHHe Beca
ОпаCHOCTb TpaBMnPoBaHnЯ ПадaIOUHM yCTPOICTBOM
Co6IIOaTb DeHCTByIOUe IpeIINcaHH
IIO IpeIOBpAueHIO HeCuaCTHBIX
ClyuaeB H yKa3aHHI IO TexHNke
6e3OHaCHOCTH.
IpeK KaKdbIM IOpIbEMOM IpoBeprTb IOpIbEMHoe IprncIOcO6JIeHne C rpy30IOJbEMHbIM ycTPOJCTBOM Ha IpeJMeT 6e3yIpeuHoi pa6oTbI.
ПОДнмать устpoиCTBO TOЛько 3a
cпeцальбуню ПОдьемнун Ирουшниу.
ФИКсИРовать ПОдьемнoe
ПИСПОСБЛЕNHе OT HeПpeДнамерEHНOrO
OTCOeДИнEH纳 Гузa.
KpaHOM pa3peIaETCy IppaBJIrTb TOJbKO KBaJIINΦHnPObAHHomY nepcoHaJy.
Постоюним 3апpeшени Нхоитбя В опасно 3Оне Крана.
He octabIaTb yCTpoIcTBO IOIBeIeHHbIM K IIOIbEMHOMy IpiNCIOco6JIeHHIO 6e3 IIpiHCMOtpa.
6.ОпpoКИнHyТьбakЗаpyчКу.PисунokH
7. YTHIN3HPOBaT coIDEpXHMoe COJIaCHO DeIcTBYIOUIM IpeIINCAHNM HIN HCIOJIb3OBA Tb IOBTOPHO.
- YCTaHOBHTb H 3aΦHKCnpoBaTb TOrIOBky IIbJIeOcCa.
OuNCTka 6aka JIJI KIIOKoCTH
PncyHOK cm. Ha cTpaHnIax C pncyHKamn
PiPmeuHaHe
Cma3OuHO-OXlaJaaHIOJIne KnIkoCTn Ha BOIHOH OCHOBE MOrYT BbI3BaTb
6aKTepeHaJIbHoe 3arpy3HeHne.Bo BpeM ydaJIeHnO TIOJKeHn HcIIOJIb3OBaTb COOTBeTCTByIOUyO 3aIHTHyO OdEJdy.
- OnopoxHHtb 6aK.
- YdaJIHTb OTIOKeHHaH 36aKa.
- YTHINH3NPOBaTb OTIOJKeHN B COOTBeTCTBHH C DeIcTBYIOJIIMN IpaBnlaMn.
- OuHCTHTb CHTa OT CTpyKeK H OTJIOKeHN. PnCyHOK I
CbeM rOIOBKN IIJIeOcA
PncyHOK cm. Ha cTpaHHuaX C pncyHKaMn
- BbIKJIIOHTb yCTPOINCTBO N OTCOeINHNTb erOOT 3JIeKTPoCeTN.
- OTKpbITb HKCaTOP TIOBKN IIIEcOca. PnCyHOK J
-
ChTb TIOBky IIIEcOca N OTIOKHTb B CTOpOHy.
-
BbIKJIIOHHTb yCTPOINCTBO BbIKJIIOUaTeJIeM.
- OnopoxHHt b ouHCTHTb 6aK JJIa KNDKOCTH.
- CnTb npHaJIeKHOCTb, npn Heo6XoHMOCTN ONUCTHTb H BbICyIHTb.
Примейсане
OnopoxHnTb IIIEcOC IocJIe KaJIOHO HIOJIb3OBaHH. IpocuHTb IIIEcOC npn OTKpbITOM 6ake.
OCTOPOXHO
HecobIIOJeHne Beca
H3BJIeYb IITeIcEJIbHyIO BnIKy H3 p03eTKN.
Bce npOBepKn npa60TbIC 3JIeKTPnueCKHM NaCTaMn DOJXHBIO CyUeCTBIAITbC CNEHaJIHCTOM.
ДВигаTeЛь (ВсаСыВаЮшая ТурБИнHa) He BKJIIOUHaeTcR
OcyTCTByET 3eKtpnueckoe HapjKeHne
36 npaHH pyi6Horo nny;
36npaHHrTopuHxpiINH(3aMnCTnx, IerKo3aMnCTnx,BkpaBOrHeHe63neuHx BiNObiDHO DoIInpeKtNB3 He63neuHx peObH 67/548/EC) (Tempepatypa cnaJaxy Hxue 55^) ,a TAKOXcmyeI rOpUOro Nnly 3 rOpUChmPiINHAM. Bydb-yniHni Cnoci6 3actocyBaHH npNCPTPO BBaKaETbcn HeBiIDNOIBHM.
Oxopoha IOBkijnla
NakyBaJIbHi MaTepiAIn npIaTHi Do BTOpHHOI nepepo6Kn. YnaKOBky Heo6XiIDHO yTnI3yBaTN 6e3 WKOAn DnA DOBkiJIIa.

EneKtpnHi Ta eNeKtpoHHi npncTpoi MicTb ciHHi MaTepiAIn, rki npndaTHi Do BTOPHHOI nepepo6Kn, i qacTo
KOMNoHENTn, k-OT 6aTapei, akymyIaTopn
YMaCTnIO, kI y pa3i HenpaBnIbHorO
NOBoJxEHn3 HmN a6o HnpaBnIbHOi
YtNiI3aui MoKyTB CTBOpHTn NoteHciHy
He6e3neky dJa 3doPoB' JIoDHN Ta
DoBkInn. Ondak ci KOMNoHENTn Heo6XiHi
dJa HaJeXHOi EKcNlyatauii npucTroIO.
PiNcTpoI, n03NaueHi ZMM CmMBONom,
3a6OpOnYeTBcR yTuNi3yBaTN pa3OM i3
No6yTOBUM CMITTM.
Bka3iBkn 0doKoMnoHeHTiB (REACH)
AkyaIbHi BiOmoCTi npo KOMnoHeHTn HabeHeni Ha caTti: www.kaercher.de/ REACH
PpnilaT Ta 3anachi deTani
CniD BnKOpNCToBvBaTn JIiSe opNirHaJIbHe npJnAaJaTa opNirHaJIbHi 3anachi
yactHn, TOMy IIOcame BOHN rapaHTyOtB
6e3neHy Ta 6e3nepe6iHy ekcnnyataio
npncTroIO.
InΦopMaciJy IooI npJnAaJaTa 3anachnx
yactHn MICTITbcra Ha caiT
www.kaercher.com.
KoMnJIeKT NOCTaBKn
He nepeixoxamu, He 3amuckamu i He po3mayyeamu eIekmpuHi 3'cdHybaJIbHi Ka6eni, uO6 He nowkodmu ix.
3axuamu kaebb eid bucokux meMnepamyp, macmuna ma zocmpux kpaie.
Ipeod noyamkom pobomu 3 npucmpoem nepeepummu mepxeeuekabenb. He ekcnnyamyamu npucmpi3 nowkoxdxehum kabelem. Dopyumu 3amHy nowkoxdxeho2o kabeio Kbailiqikoehomy eJeKmpuky.
CnmboHnHa npncTpoi
No3HaUka MaKcMaJIbHo DoNyCTUMOROpiBn pIDHn
IINB. rnaBy Ipeepka iHoukaui piHn 3aNo8HeHHa.
Bumka ma KjIbKa CTyneHIB
IpepeMkaHnra:
0 Pnpctpi BmKHeHO.
1ДВИгун 1уВIMКHEHo.
2ДВИгун1i2yBIMKHeHO.
- Po3noaTn npoec npi6npaHna.
Празец 3биранья
Bka3ieka
Iid yac 3bupaHn piDUn npunaodra 3aHypuoBam luwe HanoNoBuHy, uo6 nodaBanasb docmamn KInbKicmb noeimpr.
IpeBipka iHdkaui pIBn 3aIOBHeHH
PncyHok nB. Ha cTopiHKaX 3 pncyHKaMn MaHIOHOK E
Bka3ieka
YepeoHa No3HaKa Ha 3nueHomy uHaHy Eka3ye Ha MaKcumAbHo npunycmMuu pieHeb 3aNoeHeHHa.
YBAGA
He6e3neka nowkoedxHn npucmpoK
IepenobHeHHaKy dny piuHu bHacniiodo3anobHeHH npomzom deKilbkoX ckyHo.
IocmiHo KOhmpoJIoeamu pieHb 3aNoBHeHH y 6aky dny piDuHu y pa3i 36upaHHaBeLUKOi KINbKocmi piDuHu.
CnpoxHeHHa 6aka IJIpaIHHN
PncyHOK nVB. Na cToPiHKaX 3 pncyHkaMn
- Bumkhytn npucptpi Ta BiD'EdHaTn Ioro BiD dXepeNa XINBneHHra.
2.ПеремICTHTnpicTpIdo KaHaJI3aICIiHOI CnCTeMn IJIy pIDHH. - CnpoxHHTn 6ak dny pIDHH:
a BiD'εdHaTn 3nVBnH mHaHr BiD BepxHbOi IJnAHOBoI MyfTn.
MaJIHOHOK F
b YtpmyuOuN 3nBnHn IaHr HaB BiIOBIDHO EMHICTU, 3NTNBMICT.
- Ytui3yBaTu a6o NOBTOpHo BnKOpNCaTu BMICT BiINOBiIDHO Do UHHNX NIOJKeHb.
CnopoxHeHHa 6aka IJIpaIiHn IJXOM nepeKnDaHHa
PncyHKn DnB. Ha cToPiHKaX 3 pncyHkamN
- Bumkhytn npncpti Ta BiD'edHaTu Noro BiD dKepeNa KINBneHHra.
2.ПеремicTu npucTpiДо KaHaJI3aIiHOi CnCTeMn DЯ 3NBy piDHH. - 3HЯТи BCMOKToYBaJIbHy rOIOBky (IINB. rnaBy 3HimaHHa 2oNoBku nUncocca).
- 3HЯТи BCE npuJaIaIaI.
5.Пдготуватибakдя рдннdo cnopoxHeHHa:
3a donomoroI nepekndaIbHoromexaH3My Tc (npncpti3nepeKndaIbHIM MexaH3MOM Tc)
a BiikpnTuΦikcatOp 6aka dna pIDHn. ManhoHok G
3a donomoroKpoka 3 Byukom (npictpi6e3 nepekndaIbHoro mexahi3my Tc)
aПiДнЯТи npистpii 3a KpIOK 3 ByшКOM (ДИВ.гАВуОпс npucmpoio) 3a ДОПOMOrIo BIDNoBIDHOrO ПIDИOMHOROMexaHI3Ma.
△HEBE3NEKA
HedompumHa eae
Hebe3neka mpaemybaHnaYepe3 naiHHn npucmpoio
Dompumyeamucb yuHux npaBun mexhiku 6e3neku i 6ka3iBOK 3 mexhiku 6e3neku.
Ipeod koxhum niouomom nepebipamu nidiumbhe npucmocybaHHa 3 nidiumbHM mexaH3MOM Ha npedMem 6e3do2aHHOi pobomu.
PiD himamu npucmpiu minbku 3a cneuaIbHe eyuko.
Φikcyamu nidiuMaIbHe npucmocybaHnB eID HeHaemUco 8iD'edHaHnBaHmaKy. KpaHom do3eOnaEmbcra Kepyeamu minbku KaaniΦikObaHomy nepcoHany.
CmopOHim 3abOpOHeNo nepe6yBaMu e He6e3neuHi 30Hi KpaHa.
He 3anuamu npucmpiu nideiueumdo nidiunbHO2o npucmocyeaHnae3 ha2nay.
6.Перекинутбakзapuyky. Maniohok H
7. Ytni3yBaTu a6o noBtOpHo BnKOpNCaTu BMICT BiNoBiDHO Do Dioux NIOJKeHb.
8. BcTaHOBnTi i 3aΦikCyBaTn BCMOKTyBaJIbHy rOJOBky.
OuHHeHHpe3epByapaIpaipiHH
PncyHOK nVB. Ha cToPiHKaX 3 pncyHKaMn
Bka3ieka
Yepe3 MacmunbHO-oxoJooKyBaJIbHi piDuHu Ha oChoi bOdu MoKe BuHukamu 6aKmepiAthe 3a6pydHeHHa. Iid yac
ycyHeHnBaiknaDeHb buKOpucMoByeamu bioiDHu 3axChu ora.
- CnopoXHHNTn 6aK.
- YcyHytn BiKnaeHn3 6aKa.
- Ytunis3yBaTn BiKnaeHnB iDnOBiDnHO Do YHHnx npnnncB.
- OuHCTHTN CNTa BiD CTpyKk Ta BiKlAeHb.
MaJIHOHOKI
3HimaHHraTOLOBKNINIOOCOCA
PncyHOK nVB. Ha cTopiHKaX 3 pncyHKaMn
- Bumkhny npucptpi Ta BiD'edHaTu BiEneKtpomepeXi.
- Biikpntu qikcaTop roNobKn nIIOcoca. ManhoK J
- 3HЯТи rOIOBky nIIIOOCoc Ta nOKnaCTn B6ik.
3aBepWeHnpo6oTn
- BmKHyTn npucptpi 3a donomoroBIMKaHa.
- CnpoxHnti oynctntn 6ak Jpinnn.
- 3nTnpnaDja, 3a Heo6xidHocTi OuchNTn i Bucywn.
Bka3ieka
Cnpoknmu nucocnicKoxho2o bukopucmanHa. Ipocyuumu nuococ 3a bikpumzo 6aka.
TpaHcnpTyBaHHa
OBEPEXHO
HedompumHaBau
Hebe3neka mpaMByaHnma nowkoJxehb
Dorjra TaTexHicHe 06cnyroByBaHHa
- PeryjraHNO npomBaTu npucTpi Ta npnilaIpaI npuaTHOIO pIDHOIO Ta BnCyUyBaTu.
- Κόδ yнкнуtn 6akTepialbHoro 3a6pydHeHH, He 3aJIuWATn piDInHy B npicntpoi.
- Y pa3i TpnbAinx nepeB y po6oTi cIiD 3aIIuataN KpnKy BiIDkpntOIO dJyCyHeHHa 3aIIuKOB0I BOJOrn.
- 3amHHTn NOsKOJxHeHn fInbTp.
3aminaΦinbtpa
PncyHOK dNb. Ha cTOpIHkax 3 pncyHKamM ManHOHok K
- 3HЯТи rOJOBky nINOCoca (ДИВ. rIaBy 3HIMaHHa 2OJOBku nUInOCoca).
- Po3'eHaTn Hapi3He 3'eHaHnHa 3aTNCKHnX KIneIb.
- 3HЯтmaIy neperopokky.
- 3HЯТи i 3amIHHTn φiNbTp.
- BCTaBtN HOBn iNbTp.
Iid yac BCTaHOBneHn 3BepHyTn yBaY Ha Te, uo6 iNbTp 6yB npaBnIbHo BCTaBJIeHn. - BctaHOBtI i npKpyTITn 3aTnCKHi KJIbca.
ДономoraВрази HecрpaBHOCTe'
△HE6E3NEKA
He6e3neka mpa8MyBaHnHa
He6e3neKa HeHaBmucHO2 3aNycky npucmpoio I He6e3neKa ypaXeHHa eKeKmpuHUM cmpymom Npeod npoeedeHNm 6yob-kaux po6im Ha npucmpoi Bumkhymu npucmpi i BumraMu wmenceIbHy bUNky 3 po3emku. Yci nepeepku ma po6omu 3 eKeKmpuHmu Yacmu npuna dy MaIomb bukohyeamuc4 axieem.
3actocobvbahi rapMOHI3ObaHICTaHdapTN
EN 55014-2: 2015
EN 55014-1:2017 + A11:2020
EN 60335-1
EN 60335-2-69
EN IEC 61000-3-2: 2019
EN 61000-3-3: 2013 + A1: 2019
EN 61000-3-11:2000
EN 62233: 2008
EN IEC 63000:2018
Oco6n, 90 HxKye nIaNcaJnncra, dIOt b 3a DOpUeHnM i 3a DoBipeHicTIO KepiBnTBA.

T. Wahl
Managing Director

A. Haag
Director R&D
Oco6a, BiINOBiIaNbHa 3a BeeHnHa DOKyMeHTaui:
A. Far (A. Haag)
Kärcher Industrial Vacuuming GmbH
Akaynap Ke3iHderi KEmek 180
Kenilik. 181
TexHnKaIbIK cInaTtAmaIapbl 181
EO cTaNapTapbHa cənkectiri
TypaIbI deKnapauia 182
KannbI Hycaynap
KypbIiFbHbI aJFaW pet
KoJdaH6ac 6ypbH,ocbl
naɪdaɪaHу кэнɪdəri TynHcKa HycKaynbɪk neh 6epɪn'ren Kayinci3ɪk kəнɪdəri HycaynapdbI OKbɪn ŠbɪfblHbɪ3. Onapra caɪ āpeket etɪni3.
Eki kitanshaHbI da epi kaPai naJaIaIHy Hemece KeIeci neci yuIH caKTan KOblHbI3.
MaKcaTbɪHa cəɪkec KoɪdaH
ECKEPTY
JeHcayIbIKKa 3uH 6oIraH waHdbI Xymy
DcayIbIka 3uH KeImpy
KypbInfbHbI deHcayNbikKa 3uH 6oNfaH waHObI copy ywiin naDaanH6aHbI3.
HA3AP AYdAPbIHbI
blrardbiHxorapb6onybHa
6aJnAhbCmbI Kbickawa myubikmany
KypbInfbHbIH 3aKbIMdaHybl
KypbIrfbIHbI mek yu iwiHde naudanaHbHbI3.
Kypblfbl apHaJFaH:
MaIJIbICyMbIKTbIKTapDbI, caIKbIHDaTKblMainapDbI JxHe cbHaIapDbI ciHipy.
- KaHfbIcYbIKbIKTapDbI ciHipy (KaHy temnepaTpaCbl 55^ Kofapbl).
Kapbiny kayni xok 3aTTapDbI copy. - MaH MeH yIKeH KipDi copy.
- Θhepkocintik, Mbicalbl, caKTay XeHe eHidipic aIMaKTapbHa naJaIaNHy.
KOMMepuIbIK,MbICaJIbI,KOHaKYJnep, MeKTeTep,emXaHaIanap,fa6pNkaIap, dyKeHdep,KeHCeIep MeH JkaIFa aIbIHfAHfMaPaTTapda naJaIaHy.
Kypblfbl apHaJFaH:
Maɪda ɪənʌbɪ copy.
- XaHfbIcYbIKTbIKTapDbI (TyTaHfbI, Te3 TyTaHfbI, Kayinti 3aTtap TypaIbI 67/548/EEC DnpeKtNbAcbiHa cKeC Te3 TyTaHfbI) (KaHy TemepaTypacbl 55^ TEmeH), coHaA-aK XaHfbIw ShaHdApDbIH XaHfbIcYbIKTbIKTapMeH KocnaJapBn HwaHCOPfBiUneH Ta3anay.
Ke3 KeIreH 6aKa naIdaIaHy dypbic emec 60nbIn Ta6bIJaIbI.
KopwaFAH opTaHbI KOPFay

OpaybIIMaTePnaJdapbIH yTnIN3aUyNaayfa 6oJaBl.
OpaybIHTapdbI KOpShaHaH optara Kayinci3 TypDe yTnIn3aunnaHbI3.

3JIeKTpIik XHe 3JIeKTpOHNbIK 6yHbIMdApDbIH KypaMbIHda KaTe KOJaHy Hemece yTINn3aunay
HETNKeCiHDe aam DeHcayIbIFbHa JxHe KOpwaFAn opTaFa Kayin TEHdipyI bIKTmAn, KyNbI KaIa eHdJIMeI MaTePnAanap XHe 6atapeJnap, aKKymyJTopnap HemeMa cnaKtbl 6eJWeKtep Kni Ke3deci. Aana, ataMbIw 6eJWeKtep 6yIMdbTInciHwe naJaIaNHy ywiH Kaxet 6oJaIb. OcbI TaHbAmEn 6eJIrInHeRn KypblfBlnapDbI yKoKbICTapbImeH 6ipre Tactayfa 6oJMaJdbI.
Kypamdafl 3aTTap 6oBbHwa HycKaynap (REACH)
БуныMHын KypаMbIHДaftbI 3aTTap TypaJIbI COHfbl MəЛIMeTTEpdi MbHa MeKeHxaɪ 6оиьИшa tabyfa 6oJaDbI: www.kaercher.de/REACH
KepeK-kaPak XHe KocaJIkbl 6eJIweKTeP
Tek TynHycaIbI KepeK-JapaK Hemece KocalkbI 6JIWeKTePdi NaJaHaHaHbIHb3, ce6e6i on KypaIdbIH Kayinci3 KHe anatcbI3 Kymbcic icteyine Hen KocalkbI 6JIWeKTeP TypaIbI aKnapat www.kaercher.com Be6caIbTHda KOJKeTIMdi.
XeTki3iIm XnblHTbIfbl
Kypblfbl KaTtAmacbIH aWKaH Ke3de
XHHaKTbIH TOJIbIKTBIFbIH TeKcepIN aJIbIHbI3.
KepeK-kaPakTap JeTicnerEn HEmece
TacbIManay Ke3IHne 3aKbIMdap TnreH
XaRdaJa, dInapePi3re xa6apnaCbIHbI3.
Kopfahbic KypaJxaba6dbikTapbl
Kayin Dehnreinepi
KAYIN
- Aybip japaakammahyra Hemece enimae anapbn corambih mikeneu kayin boibHwa Hycay.
△ECKEPTY
- Ayibip japaakammahyra Hemece enimae anapbIn corybi MymkiH kayinmi karaa bouhwa hcyay.
△AEBAHbI3
- Kein japaakammyra anapbin corybl bikmuman kayinmi kardau boibhwa Hycay.
HA3AP AYdAPbIHbI
- Mamepuanobik 3uHra anapbIn corybl bikmuman kayinmi kardau boBuHwa HycKay.
Kayinci3ik Hycayapbl
△ECKEPTY
- KypbInfbl deHcaynbikka 3uHaHdbI waHdbl copyra apHaJMaFaH.
- KypbIINfBiHbI XaHbIpdaH KopraHbI3.
KypbIINfBiHbI aUwIK ayada caKaMaMaHbI3. - Θρδip icode κόcy andbɪndə nomenuənɒbɪ mehecmipy keiinepiH (KepneHɒdipywi emki3ziuimepiH) KocblɪraHbɪn mekcepiHɪz.
△ABAHJIAHb13
- Φp KɔndaHraHHaH KeuIH KypbIITbIHbI eWipin, Kyam awacbH po3emKaadaH anbIHbI3.
HA3AP AYdAPbIHbI
KypbIINrBihmek yu iwiHde naudanaHbHb3.
- Kbicbnkany Kayni 6ap! Coprblw bacmuekei, cy3ai 6eniaiH HeMece XuHayra apHaJraH KOhmeuHepdi uekeHde Hemece 6ekimKeHde KonFaN KuHi3.
3aKbIMday moyekeni! EwkaWah cy32ici3 Hemece 3aKbIMdaTraH wAhCopfbiWneH copMaHbl3.
- KypbIrfbHbI naUdaNaHy Ke3iHde KopraHbIC aRK KuIMiH KuiHi3.
KypbInfbHbImekXayxypy XbindamdbfBImeH XaHeKaXem6oJca, eHicXoJda eki adaMMeH KbINXbIMbIHbI3.
KepeK-kaapakmapbIaybcmbipraH Ke3de waH wbiNay ywiH a6aui 60nbHb13.
AydapbIaTbIH Tiperi 6ap Kypblfblnap (Tc)
HA3AP AYdAPbIHbI
Kapakam any kayni
CyubikmbiKa apHaJraH 6aK aydapblbn Kemce, Kbcbbln KaNy Kayni 6ap AydapblbN KemKeHHen KeuH KyIbnMbI 6ekimye MymkiHdiK 6epiHi3.
TeHeJe KaFdai Ke3iHderi MiHe3-KyIbIK
KAYIN
Tymahfbiu Mamepuandapdbi copy Ke3iHdezi, Kbickawa myubikmany Hemece 6aca 3Jekmp akaynapbi Ke3iHdezi kapaam any JxHe 3aKbIMdaHy kayni
DeHcaynbikka 3uHbI a3dapdbI kmy Kayni, 3neKmp moBbIH cory Kayni, KyuiN kaNy kayni.
TemeHwe KaTdau Ke3iHde KypbIITbIHbI eWipin, Kyam awacbIH po3emKaadaH anbIHbI3.
3neKtp Kenicine Kocy
KypblfblbI IEC 60364 cTaHdapTbHa caikec ektpMOHTaXdaysbI opbiHa
KyaT Ke3iHe XaJrayFa 6oJaIbI. Kocblny MEnHeepin 3ayblTbIK TexHukanblc cunammmamapblXHe maKaMaWadaHkapaHbI3. Y3apTKblc sbIMdbI naJaDanaHyfa Kon 6epimneDi.
KAYIN
3neKmp mozBihh cofy kayni
Ompe meHaeH Kayin
3neKmp KocblbIM cbIdapbiH
3aKbIMdaMaHbI3, Mbicnbl, bacn KaIy,
kbCy HemeC mapmy apkblbl.
Ka6enbdi Kbi3y, MaJ XHe oMkip XueKmep
acepiHc H Kopfay KepeK.
3p6ip naDanaHy andbHa DkaPbInrBihH
kyam Ka6enIH meKcepH3. KypblbHbl
3akbImdAnraH Ka6JIbMeH KOndaH6aHbl3.
3aKbIMdaIraH Ka6enbdi aybcmbipydb
6iikmi 3neKmpukke KaandbipHbI3.
KypbIJIfblIaftbI TaH6anap
CynbIKtbIKtbIH MaKcMaJdbI pyKcat etinreH deHreH 6enriney
ToimbypeHaeuiHH KcpemKiuiH meKcepiH36enIMiH kapaHbI3.
Bip K03FaTTKbIIbI 6ap KYPbIFbIaP (IVR-L...-1)
Cyper D
Eki Ko3FaTbIbI 6ap KypbIFbIaP (IVR-L...-2)
HA3AP AYJAPbIHbI
Bip Ko3FaJIKbIINHeN XyMbIC icTeY
XeTeKti K03FaJIJKbIIIBIbIH 3aKbIMJaHy Kayni
KocKbIII DeHreJlepi HkbIJaMaaybICTbIPbIHbI3.
KOMMyTaunnaIbIK annapaTbIH 6ipHeiie aybcy Ke3eHepi 6ap:
0 KpybIIFbl ΘuipiIreH.
1Ko3FaJITKbII 1 KocyIbI.
21K3e 2 K03FaTTKbITapbl KocyJIbI.
- KypbIFbIKOCKbIIbIH NaJaHaHbIN KypbIFbIHbIKOcbIHbI3.
Cyper D
HA3AP AYДAPbIbI
Bip K03FaJIrKbIINHeN XyMbIC icTeY
KeTeKti K03FaJIJKbIIIBIbIH, 3aKbIMdaHy Kayni
Kockbii DeHreJlepi HkbIJaMa aybICTbIPbIHbI3.
KOMMyTaunJaBik annapaTbIH 6ipHeiie aybcy Ke3eHepi 6ap:
0 KpypbIIFbl ΘuipiIreH.
1Ko3FaJIaTKbIII 1 KocyJIbI.
21K3He 2 K03FaJIITKbIITapbl KocyJIbI.
- IIIaH copy npoueciH 6actaHbI3.
Copy ppoeci
Hvckay
CvIbIKTbIKTapDbIHcOpFbHIneH copFaH Ke3Je,KeTkiIKTi aya 6Oly yuHKepeKxapaKTapDbI TeK JapTBICbHa JeiH 6aTbIPbHbI3.
ToIbpy deHreinH KOpceTkiin H TeKcepH3
Cypertepi cypertepi 6ap 6etepen KaapaHb3
Cyper E
HycKay
TerytytirinderiKbI3bl6eJIri eHxoFapby pKcat etiren ToITbipy DeHrein Hkepcte.i.
HA3AP AYJAPbIHbI
KpybIiFbIHbIH 3aKbIMdaHy KayPi
CyIbIKTbIKKa apHaJIFaH 6aK 6ipHeIIe ceKyH iHIhTe TOITbIPbIJaHDbIKTaH TOJIbII KeTei.
CvIbIKTbIKTbIH KEN MJIWepiH aJFaH Ke3Je pKaIIaH CvIbIKTbIKKa apHaJIFaH 6aKtbiH ToITbipy DeHrein H TeKcepHi3.
CvIbIKTbIKKa aPhaJFaH 6aKTbI 60CaTbIHbI3
Cypertepi cypertepi 6ap 6etertpeH KapaHbI3
-
KypbIIFbIHbI Θiipin, OHbI Kyat K3iHeH aXbIPaTbIHbI3.
-
KypbIINfbIHbI cyNbIKTBk TereTih Xepre XeTKi3iH3.
- CyibIKtbIKA apHaJIfAH 6aKTbI 6ocatblHbI3:
a Kofapfbl JlnaHrnen 6aJnaHbickaH Tery TyTirih axbipatbIHbI3. Cypet F
b Tery TyTiriH KOnaIbI 6oJIFaH XnHay KOHTeINHepiH yCTiHeN yCTan, iwiHdericIH Terin TactaHbI3.
- Ma3MyHbIH 3aHdbI epExeJepre caikec Kdere Japaty Hemece KaTa naDanaHy.
Aydapy apKbIbI cybIKtbIKKa apHaJIraH 6aKTbI 6ocatbIHbI3
CypetTepdi cypetTepi 6ap 6eTTepdEn KapaHbI3
- KypblfnbHbl eWipin, OHbl KyaT Ke3iHeHaXbIpaTbIHbl3.
- KypbIINfbIHbI cyNbIKTBk ToreTih Xepre XeTKi3iH3.
- CopaTbIH 6acTbI aJIbIHbI3 (copaTbIH 6ac CopambIH 6acbIH aJIbIHbI3 6eNIMiH kapaHbI3).
- Bapnbik Kepek-kaapakTapdbI aIbIn TaCTaHbI3.
- CynbIKtbIgKa apHaJIraH 6aKTbI 6ocatYFa daNbIHDaHbI3:
Tc optawa aydapy Kypblfbcbl (Tc aydapy Kypblfbcbl 6ap Kypblfbl)
a CynbIKtbIKbIKKa apHaJIfAH 6aKTbIH iImeriH aUbIHbI3. Cypet G
- Inmekti naaandahy (Tc ayapfbibjXOK Kypblfbl)
a KypblfblbI KOJaJIbI KeTepriwi 6ap iIMek apKbIbI KeTepiH3 ( KypblfblbIH cunammaMacbl Tapaybln KapaHbI3).
KAYIN CanmaKmbin caKmamaybi
KypbIINfbIHbIH KyNaybl caNDapbIHaH
XapaKaam any Kayni
KondaHbICmaBfJ Ka3amauBIM
OKuranapDbH anDbH any epexeJIepiH
KeHe kayinci3diK HycKaynapbIH
OpbIHdaHbI3.
p i p Kemepy npoueciH andbihda Kemepy KypbIINfbICbIHdypbcJKMbIC
icmen mypraHbHa Ke3 Kemki3y ywiH
Komepy Ka6dbfbl 6ap Komepy
KypbInfbcblH meKcepHi3.
KypbIrfbHbI meK 6epinzeH Kemepy KyNaKaWacbIH KMeaImeH KemepiHi3. Kemepaiu imekmi kymi bauKaycbI3da arbimbybHaH Kopran 6ekimiHi3.
KpaHdbI mek 6iikmi MaMaH backapa ana dbI.
KpaHHbIH kayinmi aumarbiHda bonyra ewkimze pykcam emimmeudi.
KypbIINfbIHbIKemepaiu imMeKme KapaycbI3 KaIdbipMaHbI3.
- KonTeHepDi nTepriu TytKaMeH aydapbIHbI3. Cypet H
- Ma3MyHbIH 3aHdbI epexeepre caikec Kədere Jkapaty Hemece Kaɪta naɪdaɪaHy.
- CopaTbIH 6acbIH opHaTy XeHHe 6ekity.
CynbIKtbIKKa apHaJFaH 6aKTbI Ta3anay
CypetTepdi cypetTepi 6ap 6eTTepdien KapaHbI3
Hycay
Cy Hei3HDezi canKbHdAmKbiu MaJnap 6aKmepuaIbIK nacmaHydbI mydbipybl MyMKIn. KaDbikmapdbI anBn macmay Ke3HDe muicmi KopraHbc KuiMIn KuiHi3.
- KoHTeINHePdi 6ocatbHb3.
- KoHTeHepderi KaIbIKTapDbI aIbIN TaCTaHbI3.
- Kɔŋdaɪhɒbɪctarfɒepeɡeɪnepre cənkec KaɪdɒbɪKTapɒdɒj KɔŋbɪHɒbɪʒ.
4.БeKitkiu TaKtaIapdAn KeciInreH 3aTTap MeH KaIbIKTapDbI aIbIN TaCTaHbI3. Cypet I
CopaTbIH 6acbIH aJIbIHbl3
CypeTepdi cpeTTepi 6ap 6eTTepdEn KapaHbI3
- KypblfblHbl eWipin, OHbl Kyat Ke3iHeHaXbIpaTbIHbl3.
- CopaTbIH 6acTbIH iImerIH aUbIHbI3. Cypet J
- CopaTbIH 6acTbI aIbIn, OHbl XafblHa KOIBlHbI3.
XymbICTbIH aKtaybl
- Kocy /əwipy KockbIbH naJaIaHaBIn KypblfblbI eWipiH3
- CynbIKtbIka apHaJIraH 6aKTbI 6ocatbIHbI3 XeHe Ta3aJnAHbI3.
- Kepek-kaapaTapdbI aIbIn TaCTaHbI3, KaKeT 6oJca, Ta3aJaan, KypFaTbIHbI3.
Hycay
p i p KoJdaHraHHaH KeuiH WaHCopfbIumbI 6ocambIHbI3.
UaHcopfbiWmbi KOhmeuHep awbIK Kyude Keinnipyze MymkiHdiK bepiHi3.
TacbImaJnday
△ABAHJIAHbI3
CaMaKmbiH caKaMaJMybI
Kapakam any XeHe KypbINfbiHbl 3aKbIMday Kayni
TacbImaIay XeHe KxKmey Ke3iHde KypblfblHbIH caJMaFbIH eCKepiH3.
- Keiik KypaIapbIHda TaCbIMaJIaHfAHa, KypblfblHbI KOJIaHbICTarbl HcKaynapra caikec CbIPfbIN-KbIFyDaH KopfaHbI3.
CaK Tay
△ABAHJIAHbI3
CaMaKmbiH caKmaJMybI
Kapaam any XaHe KypbINfblHbI 3aKbIMday Kayni
TacbImaIay XaHe KxKmey Ke3iHde KypbIFbIHbIH CaJMaFbIH eCKepiHi3.
- KypbIINfbHbI TEK yI iwiHde caKaTahbI3.
Kytim XeHe TeXHnKaJIbIK KbI3MeT KepceTy
- KypblfMeH KepeK-kaPaTapDbI 6enriri bip yaKbIT apaNbIFbIHda caiKeec cyMbIKTBkHeH waBbIN, KeNTipiHi3.
- JIacTaHydbI 6oJNbIpMay yWiH KypbIINfblda CyNblKTbIK KaIbIpMaHbI3.
- Kymbic 6apbcihdaftby3ak y3iNicTepe3iHde KaIdbIK bINFaIbIH WbIFybl YwIH KaKNaKTblaBbIHbI3.
- 3aKbIMdaJraH 6oNca, cy3riHi ayblCTbIPbIHbl3.
Cy3rinepdi aybICTbIPbIHbI3
Cypertepdi cypertepi 6ap 6eTTepdien KapaHbI3
CypeT K
- CopaTbIH 6acTbI aJIbIHbI3 ( CopamblH 6acblH aJIbIHbI3 TapayblH KapaHbI3).
- Kbickbiw caKHaIapDbH 6ypaHdaIbI KOcbIbIMbIH 6OcTaIbIbI3.
- KiukeHTa KaKNaTbI aJIbHbI3.
- Cy3riHi aIbIHb3 XeHe aybIcTbIpbHb3.
- KaHa cy3riHi caIbIhbl3. OPhaTKaH Ke3de cy3rHi H dypbic caJIbIHFaHbHa Ke3 JeTki3iHi3.
- Kbickbiw caKHaIapDbI Kni, oIapDbI 6ip-6ipHe 6ypaHbI3.
Akaynap Ke3iHderi KomeK
KAYIN
Kapakam any kayni
KypbIINfbIHbIH Ke3deUcOK icKe Kocblny Kayni
XeHe 3neKmp moBihbIH cory Kayni
KypbIINfbIda KaHdau da bip Kymbic
Xacamac 6ypbIH, OHBI eWipin, Kyam
awacbIH anbIHbI3.
Bapnbik mekcepyep MeH 3neKmp
6eikmepiHdezi KymbicmapdbI MaMaH
Kyp2i3ciH.
Ko3raNTkbiw (Copfbiw Typ6nHa) xymbic ictemei
3neKtp KepHeyi Jok
KyaT Ke3iHiH po3eTkacbH XHe caKaTaHdbIpfbIWBH TeKcepiH3.
KypbInfbldaflxeni Ka6eni MeH Kyat aWacbIH TeKcepy.
Copy Kyyi a3aIbI
CanTama, TIK Ky6bip Hemece copfbliu TyTikTepeFraTTanFaH.
CanTamaHbI, TIK Ky6bIpDbI XaHe copfbIu TytiKTI Tekcepin, KaXeT 6oNfAH KaFdaJa Ta3aHaHbI3.
Cy3ri nac.
Cy3riHi Ta3anaHbI3.
CynbIKtbIka apHaIraH 6aKtbl 6ocaty Kn yaKblTbI anaDbI
Tery Tytiri KbcicbinaH Hemece 6itein KaIfAH.
Tery tytiriH tekcepin, kaxet 6onca Ta3aHaHbI3.
TyTbHybblapFa Kbl3MeT KepceTy
Akay KojbImaraH 60Jca, WaHcOpfbIUtbl cepBnCTIK KbI3MeTTe TeKcepy KepeK.
Kenildk
Ope ende xeprilikti dinctpn6bOTnpap
6epren Keiinik wapTTapbl KOJaHbIaIbI.
BybIMda mATEpnaIbIK Hemece eHdpictik
akaynap aHbIKtaIraH XaFdaIa, bIKTmaml
akaynapbl KeiINik MEP3imi iwiHne
akbcbl3 XeHdEmi3.KeiINik MEP3imHe
Hapa3blkTAPbIHbI3 60nca, 6yibIMbl
catkaH cayda MekeMecine Hemece
XaKbIHdaFbl ekInetTI KbI3MeT Kepcety
OpbHa Ty6ipTeKi Kepcetin
xa6aplacbl3.
(MekeHkaBIMbl3 apTkbl 6eTte)
Keniiik TypaIbI KocbIMwa aKnapaTbI (6ap 6oIca) XeprinikTi Karcher Be6caiTbIHbH «KyKteuJep» 6eImiHderi KbI3MeT KepeTy 6eImiHde Ta6yFa 6oJabl.
IbIrapy KyHiΦnPmAlbIK TaKtaiWada MM/YYYY
niuimInde KepcetineDi, MyHda MM - eHdpic abl,
YYYY- sbIfapblnfaH XblbI Hemece KoDTanraH Typde.
Keke caHaapdbH MarbHaacbl Kenecideh 6oana:
Mbicalb:30290
3 ΘHdpinreH Xblbl
0 ΘHdpinreH facbpbl
2 ΘHdpinreH OHkbIaBk
9 ΘHdpinreH aiBihN ekHwi caHbl
0 ΘHdpinreH aiBihN biPiHsi caHbl
CoHbIme6yMbCaJa 30290 KOnbl 09 /(2)023
EHdpinreH KyHH 6iDipedi.
TexHnKaJIbIK CnnaTtAmaJaPbI
KoIdaHbIInaTbIH 6ipi3deHdipiInreH cTaHdapTTap
EN 55014-2: 2015
EN 55014-1:2017 + A11:2020
EN 60335-1
EN 60335-2-69
EN IEC 61000-3-2: 2019
EN 61000-3-3: 2013 + A1: 2019
EN 61000-3-11:2000
EN 62233: 2008
EN IEC 63000:2018
TemeHne kon Konfahdap KOMnHaHna
6ackapmacbIbIH, aTbIHaH XeHe
Tancbipmacbi 60bIHwa epekeTeedi.


KykaattamaHbI Kypri3eTih yekinetti Tynfa:
A. Raar
Kärcher Industrial Vacuuming GmbH
Po6ept-BoW-LLTpacce 4-8
73550 Waldstetten (Германя)
Ten.: +49 7171 94888-0
ΦaKc: +49 7171 94888-528
Waldstetten, 2024/04/01
CbDbpxaHne
O6u yka3aHna 182
IpeHa3NaueHne 183
3aunTa Ha OKoJHaTa cpe Da 183
Akecoapn npeepBn Yactn. 183
KomnneKHa DocTaBkata. 183
PpeDnA3Hn yctpoiCTBa 183
OnncanHeHa ypea 185
EneKtpnuecko CBbP3BaHe
UpeT MoKe Da Ce CBp3Ba CaMo KbM eIeKtpueeKn n3BOD, KOITo e 6nI n3IbJIHeH OT eIeKtpOMHTaXHHK cblacHO IEC 60364. PincBeHNHTeHN CTOnHOCTN - Bk. TexHuYeCKu daHnu munobama ma6eKa. Ynotpe6ata Ha ydbJxnteJeH Ka6eH He e pa3peWeHa.
ONACHOCT
Onachocm om eJekmpuuecku ydap
Onachocm 3a Xueoma
He nopejdaume enekmpuueckume npucbeunumenu kabenu hap.ype3 npemuhaahe bpxymx, npumuckaHe uUOnbbaHe.
Ipeo3eaume ka6eunme om monnuHa, maclo u ocmpu pb6oe.
Ipedu 6raKa ynompe6a npoeepraume
mpexko8ra 3axpaHbauKabenHa ypeDa. He
nyckaumee beknloamauzypeod c
nopedeH Kaben. Bb3noxeme cMaHama
Ha nopeDeHua Kaben Ha
eJeKmpomexHuk.
CnmboN Bbpxy ypeda
MapknpoBka 3a MaKcMaJIHo
DONYCTMOTO HNBO Ha HaNbJIbaHe Ha TeuHocTTa
BnKTe rIaba IpoeepKa Ha uHdukaucma 3a Hueo Ha HanbIbeAHe.
CbaJHHe Ha BCMykaTeJHaTa rJaBa
Bx. n3o6paXeHnYTa Ha cTpaHnUte C rpaФnKn
1.ИЗклочete урета ng ro pa3deneTe ot eJektpuyeckaTAt Mpeka.
2. OTbOpTe 6nOKnPOBkata 3a BCMyKaTeJIHaTa INaBa. Urgpa J
3. CbaIeTe BcMykaTeHHaTa rIaBa nЯ octaBeTe HAcTpaHn.
找:www.kaercher.com/REACH
附件和备件
(baill ajjg) jzall g
aui 5 auiu g >g U
JyIyIyIyIyIyIyIyIyIyIyIy
1
jgeJl JwLg aS WJ Ls a>
Lx bawll oog jolzil
bawll gbrgbl bawll ggl aagall
.0292
U|p|1|lggaggagagagagg.3
J
- p/2xw/5 12 ailg// amisal g
gl//209 go 2> aillg//auiisai
Jai
a.
jg//olc/ooic
JU JUJI JUJU
jge// jg oclj no jx//g Ja// sic dlc
.89JJI Jieuui jiaogai jiabgal baq
J
jgllljzoo jbl.0gall
1...uooJ
- | g_1| = | j|
a>la o90 C
) 1gJUJrJUJI UjEJUIVR-L...-1(
a>la ojD
)UIVR-L...-2(
4
1>19 1>2a Juaill
gV11 20 6 125
.
J 1
- 29g_e >
1JJJ1.J
J2g1J2
- j J 1,2
a>la] ojogD
4
1>1g J2a Jzaiill
g/11 20 a1 b2
acmuy ciea//o>Jyduy a
:JyJcJcJcJIg
- 29g j = 7
1J>J1.J
.2g1J>Jl2
4.1
baill alac
J
aio 1alla/iai /j/gwll baw ic
10g/100 25, lo Jai bao
cJall sssu oo no
jglall jolbl.ogall
a1 > | a2| a_3 > 0
J
11111111110gbsjsc1a2ll aoll
a 2gauai/5 JaI Sguai J
jgeJl oIJI aIgSII alog/1 J5 no gao
laui jgeJI Jzauu paU. Jzauw ulac J5 Jg
Jygs abw/gy cI// JSLI Jauw/.JLsIJ
Jgo
jgeJl jgJrJl 1 Jo sgsaJ a JgaaJll JdJI aolc JlJlJl
Flüssigkeits- MAXIMAL Fällstand
aui jglj1j0j0j2s sguaal 12// jgl yow olal w Jlu// cJ0 sguaal 12// Jgog// Jgj//
jglgJl
Jg 120000000000000000000000000000000000000000000
aalaojgajll ① JJISSGAAJU ②
3
1JlWl a gI 4
G
5
6
o ⑦
8
9
10
11
12
JlIa gl> gcr 14
JILOU OCLJI J5
LJALJol> 16
Jewllc
Jgall Jgol .1
Jalgl gog jlgjll bai 2
alolgol alwJgJlJgU pJl 2
.
.3
.4
.5
aolllll
i 1
. a/ll jall jll baij jgU
. jgl U jall no jlgU la> U
. J
.
.
.
.
.
.
.
.
.
.
.
.
.
.
.
J11/11 19 J20g jge// J20w c9g/ .p12w/5 12 w
a.
.
.
.
.
.
.
.
.
.
.
.
.
.
.
.
.
.
.
) aIooJIaI JKJUITc( aIooJIbI JIgI aIooJI bI JIgI aIooJI bI JIgI aIooJI bI
sIglll lgl 1
JbS A
aI/12111111111111111111111111111111111111111111111111111
S/2009/08/08/08/08/08/08/08/08/08/08/08/08/08/08/08/08/08/08/08/08/08/08/08/08/08/08/08/08/08/08/08/08/08/08
aIgS alog
Lg y aIy aIy aIy U| jgJU JgJU U
JI g
Zauu U. g/9 dui/11 Ll S
Jus Jls pduwly
Jbs A
Ailgs aeoo oJds
Jbs
Ola// 1c Jbs
Jsw Ic, aIyS// alog// U
Jia// Jia>lu
Jx>gl
Jg/Jg C// JgJG// JgJG// JgJG// JgJG// JgJG// JgJG// JgJG// JgJG// JgJG// JgJG// JgJG// JgJG// JgJG// JgJG// JgJG// JgJG// JgJG// JgJG// JgJG//
gJgJgUddJgUd 67/548EWG OJgUgUgU gJgU UgU (p° 55 JgUgU gUgU UgU gUgU gUgU gUgU gUgU gUgU gUgU gUgU gUgU gUgU gUgU gUgU gUgU gUgU gUgU gUgU gUgU gUgU gUgU gUgU gUgU gUgU gUgU gUgU gUgU gUgU gUl gUl gUl gUl gUl
aui

oal lgl aol gaoa oal algall 10000000000000000000000000000000000000000000

Jc aaggglg aalil oge U ggs
ggtg; lo lglcg gdlldlaUaLg qgd
lalaIallg aglllalnngksg Lg A
gocg b Jks d g jllg ag
jks Jolalll allg f aalllnnsu
aibla Ogg yol algl p glg
gjzll Jzssyoggall o
jaaall oge U .aaLw
.ajlll aai ll
(REACH) ALL g>JLdA| J:GgGgJLg>JLg>JLggeJLg
Jgagg gagaaal
Jg jg jg jg jg jg jg jg jg jg jg jg jg jg jg jg jg jg jg jg jg jg jg jg jg jg jg jg jg jg jg jg jg jg jg jg jg jg jg jg jg jg jg jg jg jg jg jg jg jg jg
pulwiSgi>0
g 150
aollwJ
1
bs A 10g jgJ//clw g wlo jI /oJw/ .olg//j//g/ aJyA.2wJ cJw/
y2 1
//s2g:19gblall aax;19 c9go / oIw/ .olg//llg/ aell ysw> Clo/
4g 1
//s2g,29g jblzall aax;19 a9go J oJ lW/ abuuy cIol
//s2g,19g,bla/ aax;19 c9go 0jw/ .a5oJw/o
Lg
196 aolea
196 1
196
196
196 1
196 1
197
197
198
199
199 JJI
199
199 aJg aie
199 Jbcil 0J> oclwll
200
200
aolc|dawr
Jg Jj jj Jj Jj Jj Jj Jj Jj Jj Jj Jj Jj Jj Jj Jj Jj Jj Jj Jj Jj Jj Jj Jj Jj Jj Jj Jj Jj Jj Jj Jj Jj Jj Jj Jj Jj Jj Jj Jj Jj Jj Jj Jj Jj Jj Jj Jj Jj Jj Jj Jj Jj
aJlU JyIbU|p|swU|
j2
a/ALL jll j1// gluiw/
a/LL JcJ/
a/ALL jll j1// bai// jg// lio psiu//
./y/
a/lll aob// wlo jgl//
.Boj//
:J o
ooJU
J5.(
.
.
Jia
GdJI
.
jIaIg glaalg aIaIaIaIg wJdallg .OJg all llalgl kallg Jaaoo
.

http://www.kaercher.com/dealersearch

2-2-HC-A5-GS-awx2508


