EOB8S39X - Electric oven ELECTROLUX - Free user manual and instructions
Find the device manual for free EOB8S39X ELECTROLUX in PDF.
| Product type | Built-in electric oven |
| Brand | Electrolux |
| Model | EOB8S39X |
| Interior volume | 70 L |
| Energy class | A++ |
| Energy consumption (conventional mode) | 1.09 kWh/cycle |
| Energy consumption (fan-forced) | 0.52 kWh/cycle |
| Dimensions (H × W × D) | 594 × 595 × 567 mm |
| Built-in dimensions (H × W × D) | 590 × 560 × 550 mm |
| Net weight | 36.0 kg |
| Power supply | 230 V / 50 Hz |
| Maximum power | Approximately 3,500 W (estimate) |
| Cooking modes | Fan-forced, Top/bottom heat, Grill, Turbo grill, Pizza, Bottom heat, Steamify (steam), Assisted cooking, Special programs (sterilization, dehydration, etc.) |
| Steam functions | Steamify (100% steam, braise, brown, roast), Steam rehydration, Bread baking, Dough proofing, Intense steam, High/low humidity |
| Cooking probe | Yes, with core temperature measurement |
| Cleaning | Steam cleaning (30 min), Steam cleaning Plus (75 min), Descaling, Rinse, Drying |
| Included accessories | Wire rack, Baking tray, Roasting pan, Cooking probe, Water tank, Steam kit (2 containers), Telescopic rails |
| Child safety | Yes (key lock and code) |
| Automatic shut-off | Yes (based on temperature) |
| Interior lighting | Replaceable halogen bulb (300 °C) |
| After-sales service | Original spare parts, contact www.electrolux.com/support |
Frequently Asked Questions - EOB8S39X ELECTROLUX
User questions about EOB8S39X ELECTROLUX
0 question about this device. Answer the ones you know or ask your own.
Ask a new question about this device
Download the instructions for your Electric oven in PDF format for free! Find your manual EOB8S39X - ELECTROLUX and take your electronic device back in hand. On this page are published all the documents necessary for the use of your device. EOB8S39X by ELECTROLUX.
USER MANUAL EOB8S39X ELECTROLUX
OBCJNYKBAHE HA KJINEHTN
BnHaHn n3noJ3BaIe opuHaJIHn pe3epBHN qactn.
Korato ce cBb3BaTe c Haunia OToPn3upan OTJeI,ObcnyXBaHe",Tp6Ba Da NMaTe nOd pKa cnEHaTa HOpMaunr: MoJeI, PNC, cepneH Homep.
HOpmaTAtMOKe Da 6bDe OTkpuTa Ha Ta6Jkata C OCHOBn daHHN
IpeDynpexJeHne/BnMaHne-IVHOpMaun 3a6e3oNaChOCT
① O67a INΦopMaζη N CbBETN
HOpMaun3aOKoJHaTa cpea
3ana3BaMe cn npaBOTO Ha n3MeHeHn.
CbДьРЖAHNE
- INHΦOPMALÇIŋA 3A BE3ONACHOCT......3
1.1 Be3onacHocT 3a Deca n Xopa B HepaBHOCTOIO NOLOXKeHne... 4
1.2 067a 6e3onacnoct. 4
- INHCTPYKUN 3A BE3ONACHOCT....5
2.1 HcTanaa.. 5
2.2 EneKtpnuecko Cbbp3BaHe 6
2.3 N3noJ3BaHe 7
2.4 Prnka n nouchTbaHe 8
2.5 FOrBeHe Ha napa.. 8
2.6BbtpeHNOOCBeTneHne 8
2.7 O6cnyXBaHe.. 9
2.8 IV3xBbPpIaHe 9
- ONICAHNE HA YPEDA 9
3.1 O6u nperepei 9
3.2 Akcecoapu 10
- KAK DA BKNIOUBATE N N3KNIIOUBATE YPEDA 11
4.1 KoHTpOJIeH nAHeJ 11
4.2 EkpaH 12
- INPEДИ ПьРВА YNOTPEБА... 13
5.1Пьрвонаалноочтвае.....13
5.2 PpBO Cbbp3BaHe 13
5.3 Hauanno npedBapnteHno 3aToPnHe 13
5.4 KaKa Da HacTpOnTe: TbBpOcT Ha BODaTa... 14
- BCEKNIDHEBHA YNOTPEBA 15
6.1 KaKa Da HacTpOnTe:Функци HarpyBaHe... 15
6.2 KaKa Da Na HacTpOnTe: Steamify -ФункцЯ Ha 3aToPnIHe c napa...16
6.3 KaKa Da HacTpOnTe: POMoU npn roTBeHe 17
6.4ФyHKcun3a3atOnnnaHe 18
6.5 BeIeKKn OTHOCHO: NeueHe c BnaxHocT 21
7.ФУнкцииHA YACOBHnKA 21
7.1 OncaHne Ha yHKunTe Ha YacOBnKa... 21
7.2 KaДа HacTpOnte:ФункUn Ha
YacOBHnka... 22
8. KAKДАСЕИЗПОЛ3BA ПИНHAДЛЕЖHOCTN 24
8.1 NocTabrHe Ha akcecoapn..24
8.2 TepmocoHa 25
9.ДОПьЛНЕЛНИФУHKЦИ...27
9.1 KaKa Da 3ana3nte: PpeDnoHTaHn..27
9.23akIIOUbaHeHaФyHKu.. 27
9.3 ABTomaTnHOn N3KJIIOUBaHe.....28
9.4 OxnaKdau BeHTnlaTop 28
10. INPENOPbKN N CbBETN 28
10.1 Ppenopbkn 3a roTbeHe.. 28
10.2 Neuehe c BJIaXHOcT. 29
10.3Пechе c BlaJxHocT - npenopbUHTeHHn akcecoapn..29
10.4 Ta6n3a roTBeHe 3a n3nITBaunHCTNTyu.. 30
MaxheTe BCnUKN ONaKOBKn.
He montupaIte n He n3noJ3BaIte noBpeJeH ypeJ.
CneDbaiTe uHCTpyKunTe 3a uHCTaInpaHe, npuioKeHN KbM ypeDa.
BnHaN BnHmAbaTe, Korato MeCTnte ypeDa, Tb' KaTo e TeKbK. BnHaR n3NoJ3BaIe npedna3Hn pbKaBnU n 3aTBoPeHn o6yBKn.
- He nbpnaite ypea 3a npkka.
- MoNTupaIte ypeDa Ha 6e3ONaCHO I NOxOJaIcMoCTO, KOEtO OTROBapr Ha MOHTaXHnTe N3NCKBaHn.
- Tp6Ba Da cna3BaTe MHHImaHnHO To pa3CTOHNHe Do npyU ypeu n uYcTpoNCTBa.
- Ppei da MOHTnpate ypeia, npOBepTe daIbBpaTata My ce OTbapr 6e3npo6nemHO.
- YpeT e o6OpUdbaH c eNEKtpuYecka cnCTema 3a oxJaXdaHe. Tp6Ba da ce n3noJ3Ba c eNEKtpo3axpaHbAHeto.
Brrpaenr ypei Tp8bda otrobaep Ha n3nckBaHneta 3a cta6nJHocT Ha DIN 68930.
TOrBeHe C N3KJIIOUeHa JIaMnNvKa
I3KlHoyete IamnUkata no BpeMe Ha roTbeHe. BknUyBaIteЯ camo, kOrato mate Hxka ot Hea.
NeueHe c BnaXHOCT
Функия, pa3pa6toHa 3a necteHa ha eHepnno BpeMe Ha rotBeHe.
Korato n3non3BaTe Ta3n yHKun, lamnata aBtOMaTHUHO ce n3KJIuOvBa cnei 30 cekyHnn.
Mоже да BKПЮЧИТЕ ЛAMПИЧКАТА OTHОВО, HO TOBA ДeйСТВЕ ΜEнмалу OчakBaHOTO eHeprocneCTЯBaHe.
14. CTPYKTPA HA MEHOTO
14.1 MeHIO
HaTnCHeTe 3a Da OTBOpHTe MeHIO.
- SVAKODNEVNA UPORABA 62
6.1 Kako postaviti: Funkcije pećnice....62
6.2 Kako podesiti: Steamify - Parnu fungkiju pećnice 63
6.3 Kako postaviti: Pomic
pri kuhanju. 65
6.4 Funkcije pecnice.. 65
6.5 Napomene o: Vlažno pečenje......68
7. FUNKCIJE SATA 68
7.1 Opis funkcija sata. 68
7.2 Kako postaviti: Funkcije sata.... 69
8. NACIN KORISTENJA: PRIBOR....70
8.1 Umetanje dodatne opreme 70
8.2 Senzor za hranu 71
9. DODATNE FUNKCIJE 73
9.1 Kako ustedjeti: Favoriti 73
9.2 Blokiranje tipki. 74
9.3 Automatsko iskljucivanje..74
9.4 Ventilator za hladenje 74
10.SAVJETI. 75
10.1 Preporuke za kuhanje....75
10.2 Vlažno pečenje 75
10.3 Vlažno pečenje - preporuceni dodaci 76
10.4 Tablice pečenja za ispitne ustanove 76
11. ČiśćENJE I ODRžAVANJE....79
11.1 Napomene za ciscenje.. 79
11.2 Kako ukloniti: Nosači police ....80
11.3 Kako koristiti: Parno ciscenje.....80
11.4 Podsjetnik Za Cijscenje 81
11.5 Način upotrebe:
Uklanjanje kamenca 81
11.6 Podsjetnik za uklanjanje vodenog kamenca 82
11.7 Način upotrebe: Ispiranje......82
11.8 Podsjetnik za sušenje.... 83
11.9 Način korištenja: Sušenje 83
11.10 Način upotrebe: Pražnjenje spremnika 83
11.11 Kako ukloniti i postaviti: Vrata....84
11.12 Kako zamijeniti: Žarulju. 85
12. RJESAVANJE PROBLEMA....86
12.1 Sto učiniti ako 87
12.2 Kako upravljati: Sifre pogreski.... 87
12.3 Podaci o servisu 88
13. ENERGETSKA UČINKOVITOST 88
13.1 Informacije o proizvodu i obrazac s informacijama o proizvodu. 88
13.2 Usteda energije.. 89
14. STRUKTURA IZBORNIKA 90
14.1 Izbornik 90
14.2 Podizbornik za: Cijscenje 90
14.3 Podizbornik za: OpciJE....91
14.4 Podizbornik za: Postavljanje....91
14.5 Podizbornik za: Servis 92
15. LAKO JE! 92
16.PRECAC! 94
17. BRIGA ZA OKOLIS 95
1. INFORMACije O SIGURNOSTI
6. SVAKODNEVNA UPORABA

UPOZORENJE!
- BESCHRIJVING VAN HET PRODUCT...149
12.PROBLEEMOPLOSING. 179
Rauw of Minder
Medium
- Gaar of Meer
12. PROBLEEMOPLOSSING

WAARSCHUWING!
WE'RE THINKING OF YOU
Thank you for purchasing an Electrolux appliance. You've chosen a product that brings with it decades of professional experience and innovation. Ingenious and stylish, it has been designed with you in mind. So whenever you use it, you can be safe in the knowledge that you'll get great results every time.
Welcome to Electrolux.
Visit our website to:

Get usage advice, brochures, trouble shooter, service and repair information:
www.electrolux.com/support

Register your product for better service:
www.registerelectrolux.com

Buy Accessories, Consumables and Original spare parts for your appliance:
www.electrolux.com/shop
CUSTOMER CARE AND SERVICE
Always use original spare parts.
When contacting our Authorised Service Centre, ensure that you have the following data available: Model, PNC, Serial Number.
The information can be found on the rating plate.

Warning / Caution-Safety information

General information and tips

Environmental information
Subject to change without notice.
CONTENTS
1.SAFETY INFORMATION. 190
1.1 Children and vulnerable people safety 190
1.2 General Safety. 191
2.SAFETYINSTRUCTIONS. 192
2.1 Installation 192
2.2 Electrical connection 193
2.3 Use 194
2.4 Care and cleaning.. 194
2.5 Steam Cooking 195
2.6 Internal lighting 195
2.7 Service 195
2.8 Disposal 195
3.PRODUCT DESCRIPTION. 196
3.1 General overview.. 196
3.2 Accessories 196
4. HOW TO TURN APPLIANCE ON AND
OFF 197
4.1 Control panel. 197
4.2 Display 198
- BEFORE FIRST USE. 199
5.1 Initial Cleaning 199
5.2 First connection 200
5.3 Initial preheating 200
5.4 How to set: Water hardness 200
6.DAILYUSE 201
6.1 How to set: Heating functions....201
6.2 How to set: Steamify - Steam heating function 202
6.3 How to set: Assisted Cooking....203
6.4 Heating functions 204
6.5 Notes on: Moist Fan Baking 206
7. CLOCK FUNCTIONS 207
7.1 Clock functions description.. 207
7.2 How to set: Clock functions.. 207
8. HOW TO USE: ACCESSORIES 209
8.1 Inserting accessories.. 209
8.2 Food Sensor 210
9. ADDITIONAL FUNCTIONS 212
9.1 How to save: Favourites 212
9.2 Function lock.. 212
9.3 Automatic switch-off 212
9.4 Cooling fan 213
10. HINTS AND TIPS 213
10.1 Cooking recommendations..213
10.2 Moist Fan Baking 213
10.3 Moist Fan Baking - recommended accessories.. 214
10.4 Cooking tables for test institutes214
11. CARE AND CLEANING 217
11.1 Notes on cleaning 217
11.2 How to remove: Shelf supports .218
11.3 How to use: Steam Cleaning.... 218
11.4 Cleaning Reminder 219
11.5 How to use: Dscaling 219
11.6 Descaling reminder 220
11.7 How to use: Rinsing 221
11.8 Drying reminder 221
11.9 How to use: Drying 221
11.10 How to use: Tank emptying.... 221
11.11 How to remove and install: Door.....222
11.12 How to replace: Lamp. 223
12.TROUBLESHOOTING. 224
12.1 What to do if 224
12.2 How to manage: Error codes....225
12.3 Service data 226
13. ENERGY EFFICIENCY 226
13.1 Product Information and Product Information Sheet 226
13.2 Energy saving 227
14.MENU STRUCTURE. 228
14.1 Menu 228
14.2 Submenu for: Cleaning.. 228
14.3 Submenu for: Options.. 229
14.4 Submenu for: Setup 229
14.5 Submenu for: Service 230
15. IT'S EASY! 230
16. TAKE A SHORTCUT! 232
17. ENVIRONMENTAL CONCERNS. 233
1. SAFETY INFORMATION
Before the installation and use of the appliance, carefully read the supplied instructions. The manufacturer is not responsible for any injuries or damage that are the result of incorrect installation or usage. Always keep the instructions in a safe and accessible location for future reference.
1.1 Children and vulnerable people safety
- This appliance can be used by children aged from 8 years and above and persons with reduced physical, sensory or mental capabilities or lack of experience and knowledge if they have been given supervision or instruction concerning the use of the appliance in a safe way and understand the
hazards involved. Children of less than 8 years of age and persons with very extensive and complex disabilities shall be kept away from the appliance unless continuously supervised.
- Children should be supervised to ensure that they do not play with the appliance.
- Keep all packaging away from children and dispose of it appropriately.
- WARNING: The appliance and its accessible parts become hot during use. Keep children and pets away from the appliance when in use and when cooling down.
- If the appliance has a child safety device, it should be activated.
- Children shall not carry out cleaning and user maintenance of the appliance without supervision.
1.2 General Safety
- This appliance is for cooking purposes only.
- This appliance is designed for single household domestic use in an indoor environment.
- This appliance may be used in, offices, hotel guest rooms, bed & breakfast guest rooms, farm guest houses and other similar accommodation where such use does not exceed (average) domestic usage levels.
- Only a qualified person must install this appliance and replace the cable.
- Do not use the appliance before installing it in the built-in structure.
- Disconnect the appliance from the power supply before carrying out any maintenance.
-
If the mains power supply cable is damaged, it must be replaced by the manufacturer, its Authorised Service Centre or similarly qualified persons to avoid an electrical hazard.
-
WARNING: Ensure that the appliance is switched off before replacing the lamp to avoid the possibility of electric shock.
- WARNING: The appliance and its accessible parts become hot during use. Care should be taken to avoid touching heating elements or the surface of the appliance cavity.
- Always use oven gloves to remove or insert accessories or ovenware.
- Use only the food sensor (core temperature sensor) recommended for this appliance.
- To remove the shelf supports first pull the front of the shelf support and then the rear end away from the side walls. Install the shelf supports in the opposite sequence.
- Do not use a steam cleaner to clean the appliance.
- Do not use harsh abrasive cleaners or sharp metal scrapers to clean the glass door since they can scratch the surface, which may result in shattering of the glass.
2. SAFETY INSTRUCTIONS
2.1 Installation

WARNING!
Only a qualified person must install this appliance.
- Remove all the packaging.
- Do not install or use a damaged appliance.
- Follow the installation instructions supplied with the appliance.
- Always take care when moving the appliance as it is heavy. Always use safety gloves and enclosed footwear.
- Do not pull the appliance by the handle.
- Install the appliance in a safe and suitable place that meets installation requirements.
- Keep the minimum distance from other appliances and units.
- Before mounting the appliance, check if the appliance door opens without restraint.
- The appliance is equipped with an electric cooling system. It must be operated with the electric power supply.
- The built-in unit must meet the stability requirements of DIN 68930.
| Cabinet minimum height (Cabinet under the work-top minimum height) | 578 (600) mm |
| Cabinet width 560 mm | |
| Cabinet depth 550 (550) mm | |
| Height of the front of the appliance 594 mm | |
| Height of the back of the appliance 576 mm | |
| Width of the front of the appliance 595 mm | |
| Width of the back of the appliance 559 mm | |
| Depth of the appliance 567 mm | |
| Built in depth of the appliance 546 mm | |
| Depth with open door 1027 mm | |
| Ventilation opening minimum size. Opening placed on the bottom rear side | 560x20 mm |
| Mains supply cable length. Cable is placed in the right corner of the back side | 1500 mm |
| Mounting screws 4x25 mm |
2.2 Electrical connection

WARNING!
Risk of fire and electric shock.
- All electrical connections should be made by a qualified electrician.
- The appliance must be earthed.
- Make sure that the parameters on the rating plate are compatible with the electrical ratings of the mains power supply.
- Always use a correctly installed shockproof socket.
- Do not use multi-plug adapters and extension cables.
- Make sure not to cause damage to the mains plug and to the mains cable. Should the mains cable need to be replaced, this must be carried out by our Authorised Service Centre.
- Do not let mains cables touch or come near the appliance door or the niche below the appliance, especially when it operates or the door is hot.
- The shock protection of live and insulated parts must be fastened in such a way that it cannot be removed without tools.
- Connect the mains plug to the mains socket only at the end of the installation. Make sure that there is access to the mains plug after the installation.
- If the mains socket is loose, do not connect the mains plug.
- Do not pull the mains cable to disconnect the appliance. Always pull the mains plug.
-
Use only correct isolation devices: line protecting cut-outs, fuses (screw type fuses removed from the holder), earth leakage trips and contactors.
-
The electrical installation must have an isolation device which lets you disconnect the appliance from the mains at all poles. The isolation device must have a contact opening width of minimum 3 mm.
- This appliance is supplied with a main plug and a main cable.
2.3 Use

WARNING!
Risk of injury, burns and electric shock or explosion.
- Do not change the specification of this appliance.
- Make sure that the ventilation openings are not blocked.
- Do not let the appliance stay unattended during operation.
- Deactivate the appliance after each use.
- Be careful when you open the appliance door while the appliance is in operation. Hot air can release.
- Do not operate the appliance with wet hands or when it has contact with water.
- Do not apply pressure on the open door.
- Do not use the appliance as a work surface or as a storage surface.
- Open the appliance door carefully. The use of ingredients with alcohol can cause a mixture of alcohol and air.
- Do not let sparks or open flames to come in contact with the appliance when you open the door.
- Do not put flammable products or items that are wet with flammable products in, near or on the appliance.

WARNING!
Risk of damage to the appliance.
-
To prevent damage or discoloration to the enamel:
-
do not put ovenware or other objects in the appliance directly on the bottom.
- do not put aluminium foil directly on the bottom of cavity of the appliance.
- do not put water directly into the hot appliance.
- do not keep moist dishes and food in the appliance after you finish the cooking.
-
be careful when you remove or install the accessories.
-
Discoloration of the enamel or stainless steel has no effect on the performance of the appliance.
- Use a deep pan for moist cakes. Fruit juices cause stains that can be permanent.
- Always cook with the appliance door closed.
- If the appliance is installed behind a furniture panel (e.g. a door) make sure the door is never closed when the appliance operates. Heat and moisture can build up behind a closed furniture panel and cause subsequent damage to the appliance, the housing unit or the floor. Do not close the furniture panel until the appliance has cooled down completely after use.
2.4 Care and cleaning

WARNING!
Risk of injury, fire, or damage to the appliance.
- Before maintenance, deactivate the appliance and disconnect the mains plug from the mains socket.
-
Make sure the appliance is cold. There is the risk that the glass panels can break.
-
Replace immediately the door glass panels when they are damaged. Contact the Authorised Service Centre.
- Be careful when you remove the door from the appliance. The door is heavy!
- Clean regularly the appliance to prevent the deterioration of the surface material.
- Clean the appliance with a moist soft cloth. Use only neutral detergents. Do not use abrasive products, abrasive cleaning pads, solvents or metal objects.
- If you use an oven spray, follow the safety instructions on its packaging.
2.5 Steam Cooking

WARNING!
Risk of burns and damage to the appliance.
-
Released Steam can cause burns:
-
Be careful when you open the appliance door when the function is activated. Steam can release.
- Open the appliance door with care after the steam cooking operation.
2.6 Internal lighting

WARNING!
Risk of electric shock.
- Concerning the lamp(s) inside this product and spare part lamps sold separately: These lamps are intended to withstand extreme physical conditions in household appliances, such as temperature, vibration, humidity, or are intended to signal information about the operational status of the appliance. They are not intended to be used in other applications and are not suitable for household room illumination.
- This product contains a light source of energy efficiency class G.
- Use only lamps with the same specifications.
2.7 Service
- To repair the appliance contact the Authorised Service Centre.
- Use original spare parts only.
2.8 Disposal

WARNING!
Risk of injury or suffocation.
- Contact your municipal authority for information on how to dispose of the appliance.
- Disconnect the appliance from the mains supply.
- Cut off the mains electrical cable close to the appliance and dispose of it.
- Remove the door catch to prevent children or pets from becoming trapped in the appliance.
3.PRODUCT DESCRIPTION
3.1 General overview

Control panel
Display
Water drawer
Socket for the food sensor
Heating element
Lamp
Fan
D escaling pipe outlet
Shelf support, removable
Shelf positions
3.2 Accessories
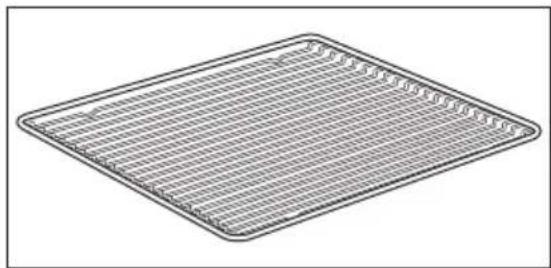
Wire shelf
For cookware, cake tins, roasts.
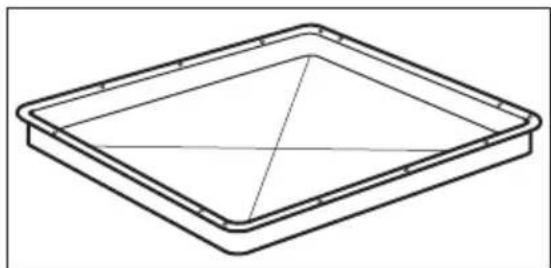
Baking tray
For cakes and biscuits.
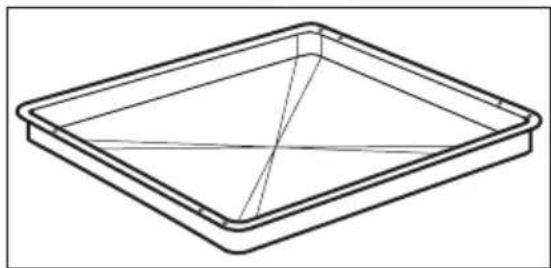
Grill-/Roasting pan
To bake and roast or as a pan to collect fat.
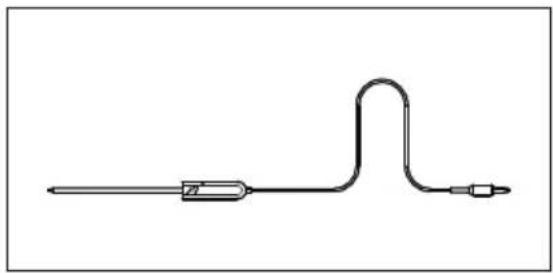
Food sensor
To measure the temperature inside food.
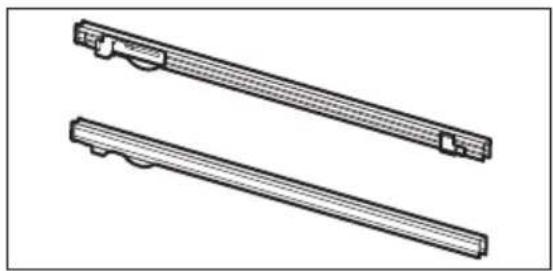
Telescopic runners
For inserting and removing trays and wireshelf more easily.
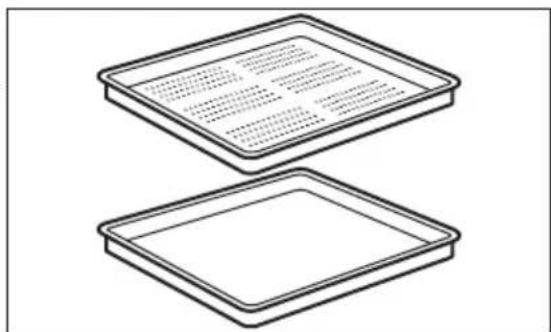
Steam set
One unperforated and one perforated food container.
The steam set drains the condensing water away from the food during steam cooking. Use it to prepare vegetables, fish, chicken breast. The set is not suitable for food that needs to soak in the water e.g. rice, polenta, pasta.

4. HOW TO TURN APPLIANCE ON AND OFF
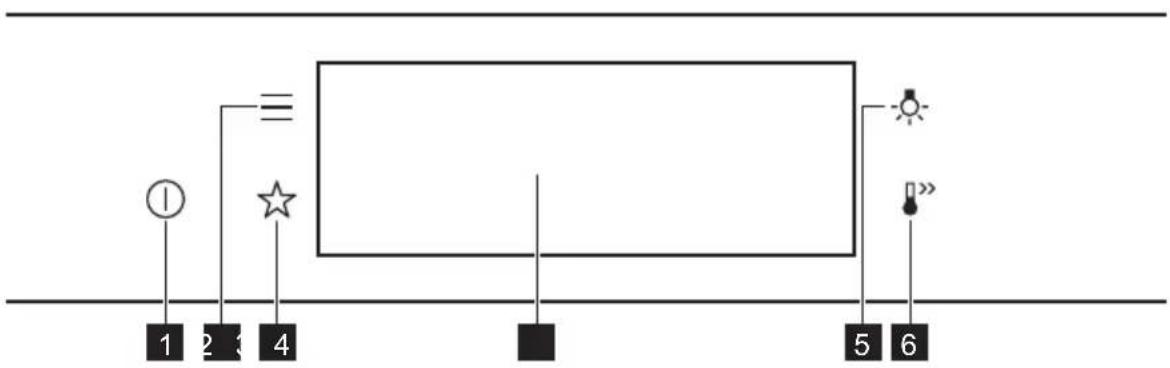
4.1 Control panel
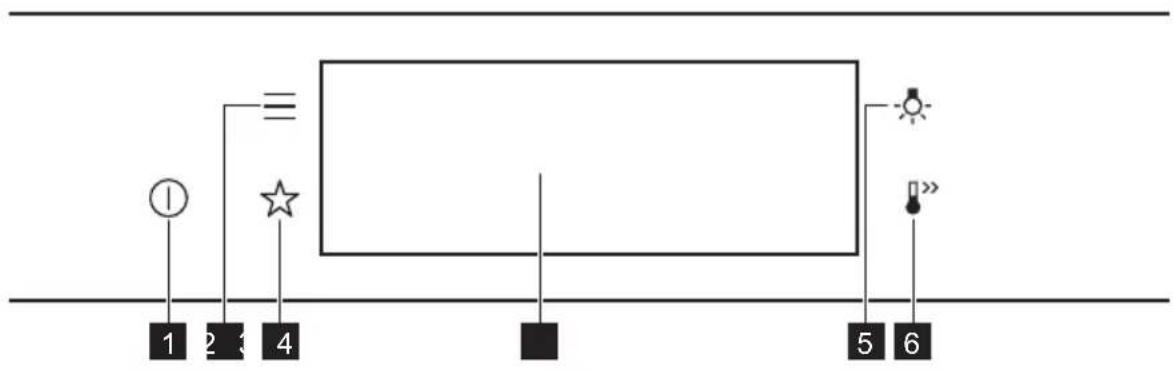
| 1 | ON / OFF Press and hold to turn the appliance on and off. |
| 2 | Menu Lists the appliance functions. |
| 3 | Favourites Lists the favourite settings. |
| 4 | Display Shows the current settings of the appliance. |
| 5 | Lamp switch To turn the lamp on and off. |
| 6 | Fast Heat Up To turn on and off the function: Fast Heat Up. |
| Press Move | ←→ | Press and hold |
| Touch the surface with finger-tip. | Slide fingertip over the surface. | Touch the surface for 3 seconds. |
4.2 Display
| 12:301 150°C STARTS | After turning on, the display shows the main screen with the heating function and the default temperature. |
| 12:34 | If you do not use the appliance for 2 minutes, the display switches to standby. |
| 12:301 150°C 11min • STOP | When you cook, the display shows the set functions and other available options. |
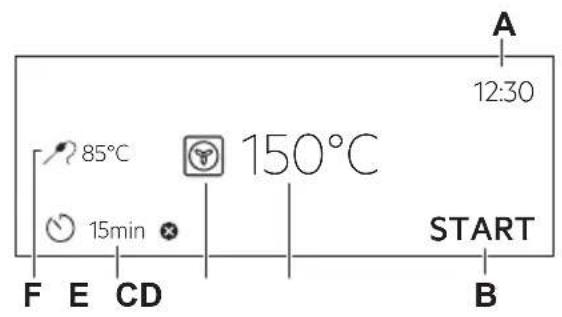
Display with key functions set.
A. Time of day
B. START/STOP
C. Temperature
D. Heating functions
E. Timer
F. Food sensor (selected models only)
Display indicators
Basic indicators - to navigate on the display.
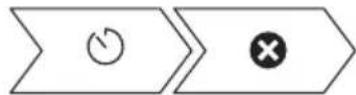
OK
To confirm the selection / setting.

To go one level back in the menu.

To undo the last action.

To turn the options on and off.
Sound alarm function indicators - when the set time of cooking ends, the signal sounds.

The function is on.

The function is on. Cooking stops automatically.

Sound alarm is off.
Timer indicators

To set the function: Delayed start.

To cancel the setting.
5. BEFORE FIRST USE

WARNING!
Refer to Safety chapters.
5.1 Initial Cleaning
Step 1 Step 2 Step 3

| Remove all accessories and removable shelf supports from the appliance. | Clean the appliance and the accessories only with a micro-fibre cloth, warm water and a mild detergent. | Place the accessories and the removable shelf supports in the appliance. |
5.2 First connection
The display shows welcome message after the first connection.
You have to set: Language, Display brightness, Key tones, Buzzer volume, Water hardness, Time of day.
5.3 Initial preheating
| Preheat the empty oven before the first use. | |
| Step 1 Remove all accessories and removable shelf supports from the oven. | |
| Step 2 | Set the maximum temperature for the function: Let the oven operate for 1 h. |
| Step 3 | Set the maximum temperature for the function: Let the oven operate for 15 min. |
| i The oven can emit an odour and smoke during preheating. Make sure that the room is ventilated. | |
5.4 How to set: Water hardness
When you connect the oven to the mains you have to set the water hardness level.
Use the test paper supplied with the steam set.
| Step 1 Step 2 Step 3 Step 4 | Shake the test paper to remove the excess of water. | After 1 min, check water hardness with the table below. | Set the water hardness level: Menu / Settings / Setup / Water hardness. |
| The colours of the test paper continue to change. Do not check water hardness later than 1 min after test. | |||
You can change the water hardness level in the menu: Settings / Setup / Water hardness.
The table shows water hardness range (dH) with the corresponding level of Calcium deposit and the water classification. Adjust the water hardness level according to the table.
| Water hardness Test | paper Calcium de-posit (mmol/l) | Calcium de-posit (mg/l) | Water classi-fication | |
| Level dH | ||||
| 10 - 7 | 0 - 1.3 0 - 50 soft | |||
| 28 - 14 | 1.4 - 2.5 51 - 100 rately | hard | ||
| 315 - 21 | 21 2.6 - 3.8 101 - | 15hrec | ||
| 4 ≥22 ≥ | ≥3.9 | very hard | ||
When the tap water hardness level is 4, fill the water drawer with still bottled water.
6. DAILY USE

WARNING!
Refer to Safety chapters.
6.1 How to set: Heating functions
| Step 1 | Turn on the oven. The display shows the default heating function. |
| Step 2 | Press the symbol of the heating function to enter the submenu. |
| Step 3 | Select the heating function and press: OK. The display shows: temperature. |
| Step 4 | Set: temperature. Press: OK. |
| Step 5 | Press: START. Food Sensor - you can plug the sensor at any time before or during cooking. |
| STOP - press to turn off the heating function. | |
| Step 6 | Turn off the oven. |
Take a shortcut!

6.2 How to set: Steamify - Steam heating function
| Step 1 Turn on the oven. Select the symbol of the heating function and press it to enter the submenu. | |
| Step 2 | Press Set the steam heating function. |
| Step 3 | Press: OK the display shows the temperature settings. |
| Step 4 Set the temperature. Type of the steam heating function depends on the set tempera-ture. | |
| Steam for Steaming 50 - 100 °C | For steaming vegetables, grains, legumes, seafood, terrines and spoon desserts. |
| Steam for Stewing 105 - 130 °C | For cooking stewed and braised meat or fish, bread and poultry, as well as cheeses and casseroles. |
| Steam for Gentle Crisping 135 - 150 °C | For meat, casseroles, stuffed vegetables, fish and gratin. Owing to the combination of steam and heat the meat gets a juicy and tender texture along with a crusty surface. If you set the timer, grill function turns on automat-ally in the last minutes of the cooking process to give dish a gentle gratin. |
| Steam for Baking and Roasting 155 - 230 °C | For roasted and baked dishes meat, fish, poultry, fil-led puff pastry, tarts, muffins, gratin, vegetables and bakery dishes. If you set the timer and put the food on the first level, bottom heat function turns on automatically in the last minutes of the cooking process to give dish a crispy bottom. |
| Step 5 | Press OK |
| Step 6 Press the cover of the water drawer to open it. | |
| Step 7 Fill | the water drawer with cold water to the maximum level (around 950 ml) until the signal sounds or the display shows the message. The water supply is sufficient for approximately 50 min. Do not fill the water drawer over its maximum capacity. There is a risk of water leakage, overflow and furniture damage. |
| WARNING! Use only cold tap water. Do not use filtered (demineralised) or distilled water. Do not use other liquids. Do not pour flammable or alcoholic liquids into the water drawer. | |
| Step 8 Push | the water drawer to its initial position. |
| Step 9 | Press: START Steam appears after approximately 2 min. When the oven reaches the set temperature, the signal sounds. |
| Step 10 | When the water drawer runs out of water, the signal sounds. Refill the water drawer. |
| Step 11 | Turn off the oven. |
| Step 12 | Empty the water drawer after cooking ends. Refer to "Care and Cleaning" chapter, Tank emptying. |
| Step 13 | Residual water can condensate in the cavity. After cooking, carefully open the oven door. When the oven is cold, dry the cavity with a soft cloth. |
Take a shortcut!

6.3 How to set: Assisted Cooking
Every dish in this submenu has a recommended function and temperature. You can adjust the time and the temperature.
For some of the dishes you can also cook with:
Weight Automatic
Food Sensor
The degree to which a dish is cooked:
Rare or Less
Medium
Well done or More
Step 1 Turn on the oven.
Take a shortcut!
| Step 2 | Press: |
| Step 3 | Press: Enter: Assisted Cooking. |
| Step 4 Choose a dish or a food type. | |
| Step 5 | Press: START |

6.4 Heating functions
STANDARD
| Heating function Application | |
| Grill | To grill thin pieces of food and to toast bread. |
| Turbo Grilling | To roast large meat joints or poultry with bones on one shelf position. To make gratins and to brown. |
| True Fan Cooking | To bake on up to three shelf positions at the same time and to dry food. Set the temperature 20 - 40 °C lower than for Conventional Cooking. |
| Frozen Foods | To make convenience food (e.g., french fries, potato wedges or spring rolls) crispy. |
| Conventional Cooking | To bake and roast food on one shelf position. |
SPECIALS
| Heating function Application |
| Pizza Function To bake pizza. To make intensive browning and a crispy bottom. |
| Bottom Heat To bake cakes with crispy bottom and to preserve food. |
| Heating function Application | |
| Preserving | To preserve vegetables (e.g., pickles). |
| Dehydrating | To dry sliced fruit, vegetables and mushrooms. |
| Plate Warming | To preheat plates for serving. |
| Defrost | To defrost food (vegetables and fruit). The defrosting time depends on the amount and size of the frozen food. |
| Au Gratin | For dishes such as lasagna or potato gratin. To make gratins and to brown. |
| Slow Cooking | To prepare tender, succulent roasts. |
| Keep Warm | To keep food warm. |
STEAM
| Heating function Application | |
| Moist Fan Baking | This function is designed to save energy during cooking. When you use this function, the temperature in the cavity may differ from the set temperature. The residual heat is used. The heating power may be reduced. For more information refer to "Daily Use" chapter, Notes on: Moist Fan Bak-ing. |
| Heating function Application | |
| Steamify | Use steam for steaming, stewing, gentle crisping, baking and roasting. |
| Steam Regenerat-ing | Food reheating with steam prevents surface drying. Heat is distributed in a gentle and even way, which allows to recover taste and aroma of food as just prepared. This function can be used to reheat food directly on a plate. You can reheat more than one plate at the same time, using different shelf positions. |
| Bread Baking | Use this function to prepare bread and bread rolls with a very good professional-like result in terms of crispiness, colour and crust gloss. |
| Dough Proving | To speed up the rising of the yeast dough. It prevents dough surface from drying and keeps the dough elastic. |
| FULL Full Steam | For steaming vegetables, side dishes, fish |
| HIGH Humidity High | The function is suitable for cooking delicate dishes like custards, flans, terrines and fish. |
| LOW Humidity Low | The function is suitable for meat, poultry, oven dishes and casseroles. Thanks to the combination of steam and heat, meat gets a tender and juj-cy texture along with a crusty surface. |
6.5 Notes on: Moist Fan Baking
This function was used to comply with the energy efficiency class and ecodesign requirements (according to EU 65/2014 and EU 66/2014). Tests according to:
IEC/EN 60350-1
The oven door should be closed during cooking so that the function is not interrupted and the oven operates with the highest energy efficiency possible.
When you use this function the lamp automatically turns off after 30 sec.
For the cooking instructions refer to "Hints and tips" chapter, Moist Fan Baking. For general energy saving recommendations refer to "Energy Efficiency" chapter, Energy Saving.
7. CLOCK FUNCTIONS
7.1 Clock functions description
| Clock function Application | |
| Cooking time To set the length of cooking. Maximum is 23 h 59 min. | |
| End action To set what happens when the timer ends counting. | |
| Delayed start To postpone the start and / or end of cooking. | |
| Time extension To extend cooking time. | |
| Reminder To set a count down. Maximum is 23 h 59 min. This function has no effect on the operation of the appliance. | |
| Uptimer Monitors how long the function operates. Uptimer - you can turn it on and off. |
7.2 How to set: Clock functions
| How to set the clock | |
| Step 1 Press: Time of day. | |
| Step 2 | Set the time. Press: OK |
| How to set cooking time | |
| Step 1 Chose the heating function and set the temperature. | |
| Step 2 | Press: ⋒ |
| Step 3 | Set the time. Press: OK |
Take a shortcut!
| □… | °C | ○ | START |
| How to choose end option | |
| Step 1 Choose the heating function and set the temperature. | |
| Step 2 | Press: |
| Step 3 Set the cooking time. | |
| Step 4 | Press: • • • |
| Step 5 Press: End action. | |
| Step 6 Choose the preferred: End action. | |
| Step 7 | Press: OK Repeat the action until the display shows the main screen. |
| How to delay start of cooking | |
| Step 1 Set the heating function and the temperature. | |
| Step 2 | Press: |
| Step 3 Set the cooking time. | |
| Step 4 | Press: • • • |
| Step 5 Press: Delayed start. | |
| Step 6 Choose the value. | |
| Step 7 | Press: OK Repeat the action until the display shows the main screen. |
| How to extend cooking time |
| When 10% of cooking time is left and the food seems not to be ready, you can extend cooking time. You can also change the heating function. |
| Press +1min to extend the cooking time. |
| How to change timer settings | |
| Step 1 | Press: |
| Step 2 Set the timer value. | |
| Step 3 | Press: OK |
| You can change the set time during cooking at any time. | |
8. HOW TO USE: ACCESSORIES
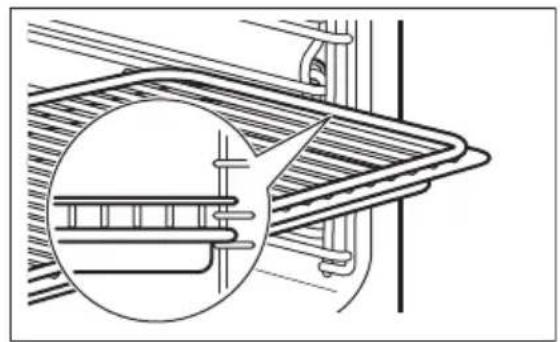
8.1 Inserting accessories
A small indentation at the top increases safety. The indentations are also anti-tip devices. The high rim around the shelf prevents cookware from slipping of the shelf.
| Wire shelf: Push the shelf between the guide bars of the shelf support. | |
| Baking tray / Deep pan: Push the tray between the guide bars of the shelf support. |
Wire shelf, Baking tray / Deep pan:
Push the tray between the guide bars of the shelf support and the wire shelf on the guide bars above.
8.2 Food Sensor
Food Sensor-measures the temperature inside the food. You can use it with every heating function.
| There are two temperatures to be set: | |
| °C The oven temperature: minimum 120 °C. | °C The core temperature. |
| For the best cooking results: | ||
| Ingredients should be at room temperature. | Do not use it for liquid dishes. | During cooking it must remain in the dish. |
The oven calculates an approximate end of cooking time. It depends on the quantity of food, the set oven function and the temperature.
How to use: Food Sensor
| Step 1 Turn on the oven. | |
| Step 2 Set a heating function and, if necessary, the oven temperature. | |
| Step 3 Insert: Food Sensor. | |
| Meat, poultry and fish Casserole | |
| Insert the tip of Food Sensor into the centre of meat, fish, in the thickest part if possible. Make sure that at least 3/4 of Food Sensor is inside of the dish. | Insert the tip of Food Sensor exactly in the centre of the casserole. Food Sensor should be stabilized in one place during baking. Use a solid ingredient to achieve that. Use the rim of the baking dish to support the silicone handle of Food Sensor. The tip of Food Sensor should not touch the bottom of a baking dish. |
Take a shortcut!
| Step 4 Plug Food Sensor into the socket at the front of the oven. The display shows the current temperature of: Food Sensor. | ||
| Step 5 | - press to set the core temperature of the sensor. | |
| Step 6 | ● ● ● - press to set the preferred option: ·Sound alarm - when food reaches the core temperature, the signal sounds. ·Sound alarm and stop cooking - when food reaches the core temperature, the sig-nal sounds and the oven stops. | |
| Step 7 | Select the option and repeatedly press: OK go to main screen. | |
| Step 8 | Press: START When food reaches the set temperature, the signal sounds. You can choose to stop or to continue cooking to make sure the food is well done. | |
| Step 9 Remove Food Sensor plug from the socket and remove the dish from the oven. | ||
| WARNING! There is a risk of burns as Food Sensor becomes hot. Be careful when you unplug it and remove it from the food. | ||

9. ADDITIONAL FUNCTIONS
9.1 How to save: Favourites
You can save your favourite settings, such as the heating function, the cooking time, the temperature or the cleaning function. You can save 3 favourite settings.
| Step 1 Turn on the appliance. |
| Step 2 Select the preferred setting. |
| Step 3 Press: Select: Favourites. |
| Step 4 Select: Save current settings. |
| Step 5 Press + to add the setting to the list of: Favourites. Press OK |
| - press to reset the setting. - press to cancel the setting. |
9.2 Function lock
This function prevents an accidental change of the heating function.
| Step 1 Turn on the appliance. |
| Step 2 Set a heating function. |
| Step 3 ☆,press at the same time to turn on the function. |
| To turn off the function repeat step 3. |
9.3 Automatic switch-off
For safety reasons the oven turns off after some time, if a heating function works and you do not change any settings.
| (℃) (h) | 1 |
| 30 - 115 12.5 | |
| 120 - 195 8.5 | |
| 200 - 230 5.5 |
The Automatic switch-off does not work with the functions: Light, Food sensor, End time, Slow Cooking.
9.4 Cooling fan
When the appliance operates, the cooling fan turns on automatically to keep the surfaces of the appliance cool. If you turn off the appliance, the cooling fan can continue to operate until the appliance cools down.
10. HINTS AND TIPS
10.1 Cooking recommendations
①
The temperature and cooking times in the tables are guidelines only. They depend on the recipes and the quality and quantity of the ingredients used.
Your appliance may bake or roast differently to the appliance you had before. The hints below show recommended settings for temperature, cooking time and shelf position for specific types of the food.
If you cannot find the settings for a special recipe, look for the similar one.
For more cooking recommendations refer to cooking tables on our website. To find the Cooking Hints check the PNC number on the rating plate on the front frame of the appliance cavity.
10.2 Moist Fan Baking
For the best results follow suggestions listed in the table below.
| (℃) (min) | ||||
| Sweet rolls, 16 pieces | baking tray or dripping pan | 180 2 25 - 35 | ||
| Swiss Roll baking tray or dripping pan | 180 2 15 - 25 | |||
| Whole fish, 0.2 kg | baking tray or dripping pan | 180 3 15 - 25 | ||
| Cookies, 16 pieces | baking tray or dripping pan | 180 2 20 - 30 | ||
| Macaroons, 24 pieces | baking tray or dripping pan | 160 2 25 - 35 | ||
| Muffins, 12 pieces | baking tray or dripping pan | 180 2 20 - 30 | ||
| Savory pastry, 20 pieces | baking tray or dripping pan | 180 2 20 - 30 | ||
| Short crust biscuits, 20 pieces | baking tray or dripping pan | 140 2 15 - 25 | ||
| Tartlets, 8 pieces | baking tray or dripping pan | 180 2 15 - 25 |
10.3 Moist Fan Baking - recommended accessories
Use the dark and non-reflective tins and containers. They have better heat absorption than the light colour and reflective dishes.
| Pizza pan | Baking dish | Ramekins | Flan base tin |
| Dark, non-reflective 28 cm diameter | Dark, non-reflective 26 cm diameter | Ceramic 8 cm diameter, 5 cm height | Dark, non-reflective 28 cm diameter |
10.4 Cooking tables for test institutes
Information for test institutes
Tests according to: EN 60350, IEC 60350.
| BAKING ON ONE LEVEL. Baking in tins | ||||
| (℃) (min) | ||||
| Fatless sponge cake True | Fan Cooking 140 - 150 | 35 - 50 2 | ||
| Fatless sponge cake Conventional Cooking | 160 35 - 50 2 | |||
| Apple pie, 2 tins Ø20 cm True | True Fan Cooking 160 60 | - 90 2 | ||
| Apple pie, 2 tins Ø20 cm | Conventional Cooking | 180 70 - 90 1 | ||
| BAKING ON ONE LEVEL. Biscuits | |||
| Use the third shelf position. | |||
| (℃) (min) | |||
| Short bread / Pastry strips True | Fan Cooking 140 25 - 40 | ||
| Short bread / Pastry strips, preheat the empty oven | Conventional Cooking 160 | 20 - 30 | |
| Small cakes, 20 per tray, preheat the empty oven | True Fan Cooking 150 20 - | 35 | |
| Small cakes, 20 per tray, preheat the empty oven | Conventional Cooking 170 | 20 - 30 | |
| MULTILEVEL BAKING. Biscuits | ||||
| (℃) (min) | ||||
| Short bread / Pastry strips | True Fan Cooking 140 25 - 45 1 / 4 | |||
| Small cakes, 20 per tray, preheat the empty oven | True Fan Cooking 150 23 - 40 1 / 4 | |||
| Fatless sponge cake True | Fan Cooking 160 35 - 50 1 / 4 | |||
| GRILL | |||
| Preheat the empty oven for 5 minutes. | |||
| Grill with the maximum temperature setting. | |||
| (min) | |||
| Toast Grill 1 - 3 5 | |||
| Beef steak, turn halfway through | Grill 24 - 30 4 | ||
Information for test institutes
Tests for the function: Full Steam.
Tests according to IEC 60350.
| Set the temperature to 100 °C. | |||||
| Container (Gastro-norm) | (kg) | (min) | i | ||
| Broccoli, pre-heat the empy oven | 1 x 2/3 perfo-rated | 0.3 3 8 - 9 Put the baking | tray on the first shelf position. | ||
| Broccoli, pre-heat the empy oven | 1 x 2/3 perfo-rated | max. 3 10 - 11 Put the baking | tray on the first shelf position. | ||
| Peas, frozen 2 x | 2/3 perfo-rated | 2 x 1.5 2 and 4 | Until the | temperature in the coldest spot rea-ches 85 °C. | Put the baking tray on the first shelf position. |
11. CARE AND CLEANING

WARNING!
Refer to Safety chapters.
11.1 Notes on cleaning
| Cleaning Agents | Clean the front of the appliance only with a microfibre cloth with warm water and a mild detergent. |
| Use a cleaning solution to clean metal surfaces. | |
| Clean stains with a mild detergent. |
Everyday Use
Clean the cavity after each use. Fat accumulation or other residue may cause fire.
Do not store the food in the appliance for longer than 20 minutes. Dry the cavity only with a microfibre cloth after each use.

Accessories
Clean all accessories after each use and let them dry. Use only a microfibre cloth with warm water and a mild detergent. Do not clean the accessories in a dishwasher.
Do not clean the non-stick accessories using abrasive cleaner or sharp-edged objects.
11.2 How to remove: Shelf supports
Remove the shelf supports to clean the oven.
| Step 1 Turn off the oven and wait until it is cold. | ||
| Step 2 Carefully pull the shelf supports up and out of the front catch. | ||
| Step 3 Pull the front end of the shelf support away from the side wall. | ||
| Step 4 Pull the supports out of the rear catch. | ||
| Install the shelf supports in the opposite sequence. | ||
11.3 How to use: Steam Cleaning
| Before you start: | |||
| Turn off the oven and wait until it is cold. | Remove all accessories and removable shelf supports. | Clean the bottom of the cavity and the inner door glass with a soft cloth with warm water and a mild detergent. | |
| Step 1 Fill | the water drawer to the maximum level until the signal sounds or the display shows the message. | ||
| Step 2 Select: Menu / Cleaning. | |||
| Function Description | Duration | ||
| Steam Cleaning Light | cleaning 30 min | ||
| Steam Cleaning Plus Normal cleaning Spray the cavity with a detergent. | 75 min | ||
| Step 3 | Press START the instruction on the display. The signal sounds when the cleaning ends. | ||
| Step 4 Press any symbol to turn off the signal. | |||
| When this function works, the lamp is off. | |||
| When the cleaning ends: | ||
| Turn off the oven. When the oven is cold, dry the cavity with a soft cloth. | Leave the oven door open and wait until the cavity is dry. | |
11.4 Cleaning Reminder
When the reminder appears, cleaning is recommended.
Use the function: Steam Cleaning Plus.
11.5 How to use: Dscaling
| Before you start: | ||
| Turn off the oven and wait until it is cold. | Remove all accessories. Make sure that the water drawer is empty. | |
| Duration of the first part: around 100 min | |
| Step 1 Place the deep pan on the first shelf position. | |
| Step 2 Pour 250 ml of the descending agent in the water drawer. | |
| Step 3 Fill | the remaining part of the water drawer with water to the maximum level until the signal sounds or the display shows the message. |
| Step 4 Select: Menu / Cleaning. | |
| Step 5 Turn on the function and follow the instruction on the display. The first part of descending starts. | |
| Step 6 | After the first part is over, empty the deep pan and put it back on the first shelf position. |
| Duration of the second part: around 35 min | |
| Step 7 Fill | the remaining part of the water drawer with water to the maximum level until the signal sounds or the display shows the message. |
| Step 8 When the function ends, remove the deep pan. | |
| ① When this function works, the lamp is off. | |
| When descending ends: | ||
| Turn off the oven. When the oven is cold, dry the cavity with a soft cloth. | Leave the oven door open and wait until the cavity is dry. | |
| ① If some limestone residue remains in the oven after descending, the display prompts to repeat the procedure. | ||
11.6 Descaling reminder
There are two reminders which prompt you to descale the oven. You cannot disable the descending reminder.
| Type Description | |
| Soft reminder Recommends you to descale the oven. | |
| Hard reminder Obligates you to descale the oven. If you do not descale the oven when the hard reminder is on, the steam functions are disabled. | |
11.7 How to use: Rinsing
| Before you start: | |
| Turn off the oven and wait until it is cold. Remove all accessories. |
| Step 1 Place | Place the deep pan on the first shelf position. |
| Step 2 Fill | the water drawer with water to the maximum level until the signal sounds or the display shows the message. |
| Step 3 Select: Menu / Cleaning / Rinsing.Duration: around 30 min | |
| Step 4 Turn | turn on the function and follow the instruction on the display. |
| Step 5 When | When the function ends, remove the deep pan. |
| ① When this function works, the lamp is off. | |
11.8 Drying reminder
After cooking with a steam heating function the display prompts to dry the oven. Press YES to dry the oven.
11.9 How to use: Drying
Use it after cooking with a steam heating function or steam cleaning to dry the cavity.
| Step 1 Make sure the oven is cold. |
| Step 2 Remove all accessories. |
| Step 3 Select the menu: Cleaning / Drying. |
| Step 4 Follow the instructions on the screen. |
11.10 How to use: Tank emptying
Use it after cooking with steam heating function to remove the residual water from the water drawer.
| Before you start: | |
| Turn off the oven and wait until it is cold. Remove all accessories. | |
| Step 1 Place the deep pan on the first shelf position. | |
| Step 2 Select: Menu / Cleaning / Tank emptying. Duration: 6 min | |
| Step 3 Turn on the function and follow the instruction on the display. | |
| Step 4 When the function ends, remove the deep pan. | |
| ① When this function works, the lamp is off. |
11.11 How to remove and install: Door
You can remove the door and the internal glass panels to clean it. The number of glass panels is different for different models.

WARNING!
The door is heavy.

CAUTION!
Carefully handle the glass, especially around the edges of the front panel. The glass can break.
| Step 1 Fully open the door. | A A A |
| Step 2 Lift and press the clamping levers (A) on the two door hinges. | |
| Step 3 Close the oven door to the first opening position (approximately 45° angle). Hold the door with one hand on each side and pull it away from the oven at an upwards angle. Put the door with the outer side down on a soft cloth on a stable surface. | 45° |
| Step 4 Hold the door trim (B) on the top edge of the door at the two sides and push inwards to release the clip seal. | 2 B 1 |
| Step 5 Pull the door trim to the front to remove it. | |
| Step 6 Hold the door glass panels on their top edge one by one and pull them up out of the guide. | |
| Step 7 Clean the glass panel with water and soap. Dry the glass panel carefully. Do not clean the glass panels in the dishwasher. | |
| Step 8 After cleaning, do the above steps in the opposite sequence. | |
| Step 9 Install the smaller panel first, then the larger and the door. Make sure that the glasses are inserted in the correct position otherwise the surface of the door may overheat. | |
11.12 How to replace: Lamp

WARNING!
Risk of electric shock.
The lamp can be hot.
| Before you replace the lamp: | ||
| Step 1 Step 2 Step | 3 | |
| Turn off the oven. Wait until the oven is cold. | Disconnect the oven from the mains. | Put a cloth on the bottom of the cavity. |
Top lamp
| Step 1 Turn the glass cover to remove it. | |
| Step 2 Remove the metal ring and clean the glass cover. | |
| Step 3 Replace the lamp with a suitable 300 °C heat-resistant lamp. | |
| Step 4 Attach the metal ring to the glass cover and install it. | |
Side lamp
| Step 1 Remove the left shelf support to get access to the lamp. |
| Step 2 Use a Torx 20 screwdriver to remove the cover. |
| Step 3 Remove and clean the metal frame and the seal. |
| Step 4 Replace the lamp with a suitable 300 °C heat-resistant lamp. |
| Step 5 Install the metal frame and the seal. Tighten the screws. |
| Step 6 Install the left shelf support. |
12. TROUBLESHOOTING

WARNING!
Refer to Safety chapters.
12.1 What to do if...
| The appliance does not turn on or does not heat up | |
| Possible cause | Remedy |
| The appliance is not connected to an electrical supply or it is connected incorrectly. | Check if the appliance is correctly connected to the electrical supply. |
| ?Possible cause | Remedy |
| The clock is not set. Set the clock, for details refer to Clock functions chapter, How to set: Clock functions. | |
| The door is not closed correctly. Fully close the door. | |
| The fuse is blown. Make sure the fuse is the cause of the problem. If the problem recurs, contact a qualified electrician. | |
| The appliance Child Lock is on. Refer to "Menu" chapter, Submenu for: Options. | |
| Components | |
| ?Description | Remedy |
| The lamp is burnt out. Replace the lamp, for details refer to "Care and Cleaning" chapter, How to replace: Lamp. | |
Power cut always stops cleaning. Repeat cleaning if it's interrupted by power failure.
12.2 How to manage: Error codes
When the software error occurs, the display shows error message.
In this section, you will find the list of the problems that you can handle on your own.
| Code and description Remedy | |
| F111 - Food sensor is not correctly inserted in-to the socket. | Fully plug Food sensor into the socket. |
| F240, F439 - the touch fields on the display do not work properly. | Clean the surface of the display. Make sure there is no dirt on the touch fields. |
| F908 - the appliance system cannot connect with the control panel. | Turn the appliance off and on. |
12.3 Service data
If you cannot find a solution to the problem yourself, contact your dealer or an Authorised Service Centre.
The necessary data for the service centre is on the rating plate. The rating plate is on the front frame of the appliance cavity. Do not remove the rating plate from the appliance cavity.
| We recommend that you write the data here: | |
| Model (MOD.) | |
| Product number (PNC) | |
| Serial number (S.N.) | |
13. ENERGY EFFICIENCY
13.1 Product Information and Product Information Sheet
| Supplier's name Electrolux | |
| Model identification | COB8S39Z 944032076 EOB8S39X 944032073 EOB8S39Z 944032075 KOBBS39X 944032072 LOB8S39Z 944032098 |
| Energy Efficiency Index 61.9 | |
| Energy efficiency class A++ | |
| Energy consumption with a standard load, conventional mode | 1.09 kWh/cycle |
| Energy consumption with a standard load, fan-forced mode | 0.52 kWh/cycle |
| Number of cavities 1 | |
| Heat source Electricity | |
| Volume 70 l | |
| Type of oven Built-In Oven | |
| Mass | COB8S39Z 36.0 kg |
| EOB8S39X 36.0 kg | |
| EOB8S39Z 36.0 kg | |
| KOBBS39X 36.0 kg | |
| LOB8S39Z 36.0 kg |
IEC/EN 60350-1 - Household electric cooking appliances - Part 1: Ranges, ovens, steam ovens and grills - Methods for measuring performance.
13.2 Energy saving

The appliance has features which help you save energy during everyday cooking.
Make sure that the appliance door is closed when the appliance operates. Do not open the appliance door too often during cooking. Keep the door gasket clean and make sure it is well fixed in its position.
Use metal cookware to improve energy saving.
When possible, do not preheat the appliance before cooking.
Keep breaks between baking as short as possible when you prepare a few dishes at one time.
Cooking with fan
When possible, use the cooking functions with fan to save energy.
Residual heat
If a programme with the Duration or End Time selection is activated and the cooking time is longer than 30min , the heating elements automatically turn off earlier in some appliance functions.
The fan and lamp continue to operate. When you turn off the appliance, the display shows the residual heat. You can use that heat to keep the food warm.
When the cooking duration is longer than 30min , reduce the appliance temperature to minimum 3 - 10 min before the end of cooking. The residual heat inside the appliance will continue to cook.
Use the residual heat to warm up other dishes.
Keep food warm
Choose the lowest possible temperature setting to use residual heat and keep a meal warm.
The residual heat indicator or temperature appears on the display.
Cooking with the lamp off
Turn off the lamp during cooking. Turn it on only when you need it.
Moist Fan Baking
Function designed to save energy during cooking.
When you use this function the lamp automatically turns off after 30 sec. You may turn on the lamp again but this action will reduce the expected energy savings.
14. MENU STRUCTURE
14.1 Menu
Press open Menu.
| Menu item Application | ||
| Assisted Cooking Lists automatic programmes. | ||
| Cleaning Lists cleaning programmes. | ||
| Favourites Lists the favourite settings. | ||
| Options To set the appliance configuration. | ||
| Settings Setup To set the appliance configuration. | ||
| Service Shows the software version and configuration. | ||
14.2 Submenu for: Cleaning
| Submenu Application | |
| Drying Procedure for drying the cavity | from the condensation re- maining after a use of the steam functions. |
| Tank emptying Procedure for removing the residual water from the water drawer after use of the steam functions. | |
| Steam Cleaning Light cleaning. | |
| Steam Cleaning Plus Thorough cleaning. | |
| Descaling Cleaning of the steam gen- eration circuit from residual lime- stone. | |
| Rinsing Procedure for rinsing and cleaning the steam generation circuit after frequent use of the steam functions. |
14.3 Submenu for: Options
| Submenu Application | |
| Light Turns the lamp on and off. | |
| Child Lock Prevents accidental activation of the appliance. When the option is on, the text Child Lock appears in the display when you turn on the appliance. To enable the appliance use, choose the code letters in the alphabetical order. Access to the timer, the remote operation and the lamp is available with the option on. | |
| Fast Heat Up Shortens heat up time. | It is available only for some of the appliance functions. |
| Cleaning Reminder Turns the reminder on and off. | |
| Time indication Turns the clock on and off. | |
| Digital clock style Changes the format of the displayed time indication. | |
14.4 Submenu for: Setup
| Submenu Description | |
| Language Sets the appliance language. | |
| Display brightness Sets the display brightness. | |
| Key tones Turns the tone of the touch fields on and off. It is not possi-ble to mute the tone for:① | |
| Buzzer volume Sets the volume of key tones and signals. | |
| Water hardness Sets the water hardness. | |
| Time of day Sets the current time and date. | |
14.5 Submenu for: Service
| Submenu Description | |
| Demo mode Activation / deactivation | code: 2468 |
| Software version Information about software version. | |
| Reset all settings Restores factory settings. | |
15. IT'S EASY!
| Before the first use you have to set: | |||||
| Language | Display brightness | Key tones | Buzzer volume | Water hardness | Time of day |
| Familiarize yourself with the basic icons on the control panel and the display: | |||||
| ①ON / OFF Menu Favourites | 三 | ☆ | ○ | Food sensor | START / STOP |
| Start using the appliance | ||||
| Quick start Turn on the appliance and start cooking with the default temperature and time of the function. | Step 1 Step 2 Step 3 | |||
| Press and hold: ☐. | ☐... - select the preferred function. | Press: START | ||
| Quick Off Turn off the appliance, any screen or message at any time. | ☐ - press and hold until the appliance turns off. | |||
| Start cooking | ||||
| Step 1 Step 2 | Step 3 Step 4 Step 5 | |||
| Start cooking | ||||||
| ① - press to turn on the appli- ance. | □... - select the heat- ing function. | °C - set the temper- ature. | OK - press to con- firm. | START - press to start cooking. | ||
| Steam cooking - Steamify | ||||||
| Set the temperature. Type of the steam heating function depends on the set temperature. | ||||||
| Steam for Steaming | Steam for Stewing | Steam for Gentle Crisping | Steam for Baking and Roasting | |||
| 50 - 100 °C 105 - | 130 °C 135 - 150 °C 155 - | 230 °C | ||||
| Get to know how to cook quickly | ||||||
| Use the automatic programmes to prepare a dish quickly with the default settings: | ||||||
| Assisted Cooking | Step 1 Step 2 Step | 3 Step 4 | ||||
| Press: Press: . Press: | Press: As | sisted Cooking. | Choose the dish. | |||
| Use quick functions to set the cooking time | ||||||
| 10% Finish assist Use 10% Finish assist to add extra time when 10% of the cooking time is left. | To extend the cooking time press +1min. | |||||
| Clean the appliance with Steam cleaning | ||||||
| Step 1 Press: | Step 2 Press: | Step 3 Choose the mode: | ||||
| Steam Cleaning For light cleaning. | ||||||
| Steam Cleaning Plus For thorough cleaning. | ||||||
| Descaling For cleaning the steam | generation circuit from residual lime- stone. | |||||
| Clean the appliance with Steam cleaning | |
| Rinsing For rinsing and cleaning | the steam generation circuit after frequent use of the steam functions. |
16. TAKE A SHORTCUT!
Here you can see all the useful shortcuts. You can also find them in the dedicated chapters in the user manual.
How to set: Heating functions

How to set: Steamify - Cooking with a steam heating function

How to set: Assisted cooking

How to set: Cooking time

How to delay: Start and end of cooking

How to cancel: Set Timer
How to use: Food Sensor

17. ENVIRONMENTAL CONCERNS
Recycle materials with the symbol. Put the packaging in relevant containers to recycle it. Help protect the environment and human health by recycling waste of electrical and electronic appliances. Do not dispose of appliances marked with the symbol with the household waste. Return the product to your local recycling facility or contact your municipal office.
MÖTLEME TEILE
8. TPONOs XPHES: AEEYOYAP
8.1 Eioaywyn αεσouáp
Mia kpn ykottn oTo Tavw mepoc auavei tvv aopalaia. OI eKoTcL eIToupyouv ETIaC Ws aopalec avatpoTTc. To utepuwoevo Iaiio yupw an to n oxapa anotpeTt iTv oiaon Tuv maeyipikov okeuwv ano autny.
1.1 Be3oNaChocTb DeTei N IInC OrgaHnueHHbIMN BO3MOxHOCTaMn
- ΘTOTПрибор может Исплььотьсддьмн CTapш
ВOCьМЛETИЛицамСОралчehнblIMNФИЗЧЕСКIMN,
CEHCOPHbIMNИЛУМCTBEHHbIMN CNOco6HocTЯМN IN C
HeIOCTaTOUHbIM ONbITOM IJIIN 3HaHnAМN TOJbKO Пи
UCIOBn HAXOJdeHnY NOД PrINCMOTpOM LIIa,
OTBeuaIooero 3a INX 6e3OpanachocTb, IJIIN NOcJIe NOlyueHnY
COOTBETCTBYUoX INHCTpyKcI, NO3BOJIAOuX IM
6e3OpaCHO eKcPnyaTupOBaTb IN3dEJIne IN DAIOuX IM
П畴CTaBLeHne O6 OnaCHocTn, CBraHHoN C erO
3KcPnyaTaUne. DeTЯm MnaDwe 8 leT INЛицam CярК
ВыРаЖeHHbIMN IN KOMПLEKCHbIMN HApUWeHnЯMn 3ДОpoVBьЯ
3aIpeuzaetcHaxODHTbcR prdOM C prInbOpom 6e3
ПОCTOЯHHOrO PrINCMOTpa.
-Дети ДолжнынхODNTbCS IOД ппсмOTpOM ДЯ HeDOnyшеня Игс с ппборom.
XpaHnte BCE ynaKOBOHbI MaTePnAJIbI BHe DoCraEMOCTN deteN yTnIN3npyTe INx NaIeKaaMm 6pa3OM.
BHIMAHHE! Pn6op n erO OTKpbIbIe 3JIeMeHbI cINbHO HaPpeBaOTcB BO BpeMg 3KcNpyaTcuN. He noDnyckaIte DeTei I DOMaShHx XnB0THbIX K np6Opy BO BpeMg erO INCNoJb3OBaHnA, a TaKKe KOrda Pn6Op eUe He ycpeJ OCTbITb. - Ecnn npnbop ochaueh yctpoiCTBOM 3auntbI dete, erocJeNyET BKJIouHTb.
OuNTka n DoCTyHoe NOIb3OBaTeJIIO TexHnueCKoe 6cnyKNaHne np6opa He dOJIxHbIBBbINOJHrTbCra DeTbMn 6e3 npncmOTpa.
Bce 139KTHPNEKCHNE POKKIOHNIH JDOOKHNIPOKHOITCS KAIIMPHIEPOKBAHM
- Pp460p dONKEN 6bTb 3a3eM1H.
YIbHIHTTE,NOI PAMAPITM,YYA3AHNHA HAI TAHNIKCETXHNECKHM DAHHMM COOTHECTBYO XAPAKTEPHGMOXIKTOPOCEN.
BIXHIOIHTEIPHOBTOIbBIBINBOYCTAHOBENHYO3AEKTHNECKYIOPOETKYCOKKTAKTOM3AEBMHN.
He nolbayntcB rpoHnKAMn H yDnHOHTeBHn.
Cnne 3a Tm, OTOBHe NOBPJIbR BILKy cetero I hypa n cetero KabeB, B cyuuee HooNIOCTH ZEMHa Cetero Hhpy opaTREc. b HAIANTAPHOAANH cepINCHI HENTp.
He npnaykite konKTAKA ceterbax kabeBEN Hx pRbHKeHHN K dApBeHpOBa Hn Hnnne pRbOBpOM, oOeBHN cEmEpaHcUHnHepRTa.
- DtaH, aahuaouhnc TOKOBcduyHn Hn hnohpobAHbIe cactn np60pa, dokkbl 6ht
PABATRNTBNNNNTBNNNNNNNNNNNNNNNNNNNNNNNNNNNNNNNNNNNNNNNNNNNNNNNNNNNNNNNNNNNNNNNNNNNNNNNNNNNNNNNNNNNNNNNNNNNNNNNNNNNNNNNNNN
Y6bJdTeC, qTO NOCTE YCTAOBKNI PnH6Oa K HNIke CETeBOTo IHHya eCT, CNOBHOHAD DUcTH.
He noqiknouai npH6Op K Do3eKTE AektpaHTAH, eGn OHa IIOX 3akpeha U
-Прибор дожен 6ыт bпдкюун Kэнкtpocetчеpe3 устpoиctBO dЯ n3Ояци, NOЗВОЯЮцee OTоeДИHЯТь OT cETN BCE KOHTaKtbl. YcTpoиctBO dЯ n3Ояци DoJIXHO obecneuBaTb 3a3Op MEXd y pa3OMKHyTBIMN KOHTaKtAmH He MeHee 3 MM.
-Даньи рибор поставлгетс с сетевим унуром И ВИКОЛ.
2.3 Исторьанne

BHIMAHHE!
CyueCTByeT pNCK TpaBMbl, OXORA N nopajKeHnA 3JIeKTpnuCeKIM TOKOM INB3pbIBa.
He BHOCTe 3MeHEnB KOHCtpyKUIO daHHoro np6opa.
- Y6eIITecb, yTO BeHTnIaIcHbIe OTBepCTnHe 3a6JokpObaHbI.
He octablante np6op 6e3 npncMoTpa BO Bpema erpa6oTbI.
BbIKIouaIte npnbop nocne kaxdoro nCNoJIb3OBAHnA.
- CobnoidaTe ocToPoxHocTb npn OTkpbIbAHm nBepcbl npnbopa Bo BpeM ero pa60tbl. MoKet npOn3oTu Bb6poc ropqero Bo3dyxa.
- Пи Испосьовни пибopa He kacaitec b ero mokpbim pykam. He kacaitec b пибopa, ecn Ha Hero nonaja Boda.
HeHaIaBnBaIte Ha OTKpbIyIO DBepu.
He nCnoJb3yIe np6op kaK cToJeuHnU y IIN NOcTaBky dJa KaKx-Jn6o npEdMeTOB.
- OtkpbIbAte DBepu np6opa, co6IIOaOCTOpoxHocTb. IcNoJIb3OBaHne CnnpTOcoepkaux INHpeJeHToB MoKet PpNBecTN K O6pa3OBaHIO CnnpTObIX NapOB B BO3dyXe.
He donyckaTe KOHTaKTa NcKp IIN OTKpbIToro PnAmeHn C npnbopom npn OTKpbIBaHn DBepbl.
He cTaBbTe Ha npIbOp IIN pAOM C Hm JERKOBocPJIaMeHJeIOUeCg MaTePnAbl IIN npoNTaHHbI NMI npeDMeTbl.

BHIMAHNE!
CyueCTByeT pucK nobpeXdHn npu6opa.
- I py npdynpexkdeHn NOBpeKDeHn n N3MeHeHn cBaTa 3MaII.
-He KnaIte B npIbOp nocyu I pyrIe npeIMeTbI HEnocpeIcTBeHNO Ha dHO.
-He KnaIte HEnocpeDCTBeHNO Ha IHO npi6opa aniOMHHeByIO foJIbry. - He 3aJIbBaIte BOdy HEnocpeIcTBeHNO B rOpAHy np6Op.
-He xpaHnte BIIaXHyIO nocdy u eMy B npIbope nocJe OKOHuaHn nprirotobJeHHN.
-CobnoaTe octopoxHoCTb npn cHrTn nn yCTaHOBe akceccyapOB. - Изменения цета за малини пося стол не влиягтувость работы пубopa.
-Дя npriroTOBHeHЯ KOHdITepCKnX n3dennI N BbIneUKN, codepxauNX 60nbJIOe KOnuYeCTBO BnAgr, INcNoJIb3yIte rIy6okn 3MaJInpOBAHHbI npOTnBEH.ФpyKToBbIe COKN OCTaBnIOT PAnHa, KOTOpbie CNOxHO ydaIHTb.
Bcerda roTOBbTe npn 3aKpbIToi DBepe npnbopa.
B cnyae yctaHOBKn np6bopa 3a Me6eNbHO nanebIO (hanpimep, DBepe) no3a6oTbTeCb O TOM, YTObI BO BPEMa pa60tbi np6bopa DBepua HN B KOem cnyae He OKa3bIBaIacb 3akpytoi. TeNo i Bnara, obpa3yUoIeecr 3a 3akpyToI DBepcE nn Me6eNbHO naneHbIoo, MOryt npNBecTI K NocLeDyOuIeMy NobpeXdEHNIO np6bopa, MeCTa erO yCTaHOBKn nn IOnla. He 3akpyBaIte DBepuy Me6eN Do nONHO OCTbIBAHn np6bopa nocne nCPOJb3OBAHnra.
2.4 yxod n qnctka

BHIMAHHE!
CuyectbyeT pNCK TpaMbbl, noKapa nn noBpeJdeHn npibopa.
- Pered BbINOJIHeHem Oepaun No OunchKe u XOdy BbIKIOHTe np6op n3BNEKNTe BnIKy ceTeBOrO Ka6eIa n3 po3ETkn.
- Y6eIITecb, yTo npi6op ocTbI. B npoTnBHom cnyae cTeKnaHHbIe naHeJI MOryT TpeChyTb.
- Повржденистеклаянны паени сеует 3amehят b He3aMeIITeIbHo. O6paTntecbВ abTOpN3OBaHHbI cepBnCHbI ueHtp.
CobIouaIte octopoxHocTB npn cTn nBepcic npnbopa. DBepa - Taejna!
-Bo n36eKanHe NOBpeKdEHHa NOKpbITnepnObAIOTe erOperynApHyO ouNCTky.
OuHauTe np6op MrgkOB BnaxHO TpAIOKo. HcnoB3yIe ToIbKO HeITpaIbHbIe MOUne cpeCTBa. He nCnoB3yIte abpa3NHBIe cpeCTBa, zapanaIOUne ry6Kn, pactBOpNTEN INM MeTAPNIueCKNe npEIMeTbl.
B cnuyae nCnoIb3OBAHnA cnpe InI OUnCTKn CneDyIe NHCtpyKcNn No 6e30NaChocTn Haero ynaKOBke.
2.5 Пригоровленne на napу

BHIMAHNE!
CyueCTByeT pNCK noJyehn OXoROB IN NOBpeKdEHN np6opa.
- BbICBO6OJaEMbI nap MoKet npINBeCTn K NOJyHeHIO OXOROB:
Co6nHdaIte octopoxKHOCTb,OTKpbIBaI DBepuy npu6opa npn BkHoueHHoYyHKU. MoKeT npon3OHTN BbICBO6OXdHne napa.
- Co6IIOJaTe octopoxHOCTb npn OTKpbBaHm DBePcbl npnbopa nocne npriroTOBHeHna napy.
2.6 BnyTpeneHHe ocBeueHne

BHIMAHHE!
CyueCTByeT onachoctb nopaxeHn 3JeKtpnueCKm TOKOM.
O lammax Bnytpn npnbopa n lammax, npodaBaembix OTdIbHO B KaueCTBe 3aNaChbix qacte: daHHbIe lambli paccunTaHbI Ha pa60Ty B 6bITOBbIX np6opax B NCKIIOHTeJIbHO CNOXbIX TempepaTyhIX, B6paCUNOHbIX IN BnaXHOCTbIX ycNoBnx ININ PpeHa3HaYeHbI DnA nepeDaun IHOpmaun O pa6oem COcToAHm n np6opa. OHn He npedHa3HaYeHbI DnA NCNoJb3OBaHnB V dpYrNx np6opax N He NOXODT dJa OCBeUeHn8 6bITOBbIX NOMeHn.
-Данньиnpodук tcodepKNT nCTOuHnCBeTa KJIacca 3Hepeo3ΦΦeKTNBHOCTn G.
- Icnojbl3ynte TOnbKO JAmNbl ToJ Xe CneuKauu.
2.7 CepBnC
3MaIInpoBaHHbI nPoTnBeHb
Ha6op npotnbne Jn npiroTOBneHna napy
OdH KOHTeHep dIpyKTOB 6e3 OTBepCTn I OOH KOHTeHep C OTBepCTnAMN.
Ha6op npotNBHe IJn npiroTOBHeHn Ha napy nCnoIb3yeTcA dJa c6opa KOHdeHCnpyUoSeiCra BObl n3 npOyKToB BO BpEm npiroTOBHeHn Ha napy. POnxOHT dJa npiroTOBHeHn OBOuEe, pbIbI, KypHNoI rpyKn. DaHHbI Ha6op He NpOxDOT dJa npOyKToB, KOTOpBle rTOBATcC Do6aBHeHm BoDbl, HApnPmEp pNCA, NOENTbl, MaKapOHbIX n3DeJIIn.
4. BKJIIOUeyHne N BbIKJIOUeyHne IPNBOPA
4.1 Панель упавлия
IcnoIb3yTe HndkaTopHyo noLocky n3 Ha6opa npotnBHei dIpa npiroToBneHna napy.
8.1 YcTaHOBKa npHaJexKHOCTeI
He6oIbIoiBbIcTynHabepxny NobbiIaet 6e3onacnocTb. BbIcTynbI TaKke cnykaT 3aunToi OT onpOKnDbIBaHn. BbICOKn o6oDok no nepuMeTp ypeTeKn cnyknt dIy npEDoTBpaueHn COCKaJIb3bIBaHn nocydI C peSeTKn.
10.1 PeKoMeHdaaun no npnroTOBJIeHHIO
①
PnBedeHbIe B Ta6nucax 3NaueHn TemnepaTypb I BpeMeH npiroTOBneHn ABJIOCTcOpHeHTnpoBOUHbIM. OHn 3aBncrT OT peCenTa, a TAKKe OT KaueCTBa N KOJIuYeCTBa INCNOJIb3yEmbIX INHrpEIneHTOB.
Bau np6op mokeT OTnuaTbcxapaKTePOM npiroTOBneHn BbineuN XkapkoOr ot npedby- zuero. B pekomehdaunx Hnke npIBoJrTcpekomhdyemble HaCTpoKn TemnepaTybl, BpeMeHn npiroTOBHeHn I NOLOKeHn IpOTNBHe DnA ONpeDeNeHHbIX BIDOB PpOyKTOB.
Ecnn HauTn yctaHOBKn dIy KOHKpeTHoro peeNTa He ydaETc, nonuTe noxokn peeNT.
Bonee noopnbie pekomehdaunno npiroTOBneHIO BbHaJeTe B Tabnucax npiroTOBHeNna HnHa HaeM Be6caIte. Jra BbIbopa KHNr pecenTob npOBepbTe KoJ n3denn Ha Ta6nUKe C TexHnueckm DaHHbIMn Ha nepeDnePamKe BHyTpEHHeKamepbl np6opa.
10.2 BnaXnay KOHBeKzna
ДяdoctижehноNTIMaJIbHbIXpe3yIbTaTOBBOcNoJIb3yIteCbpeKOMeHdaCnIaMn, npUBeDEHHbIMN B Ta6JInce HNXe.
10.4 Ta6nucbl npuroToBleHnaI TeCTnpyoUx opraHn3aun.
HOpMaunI TecTpyuOx OprHaN3aun
IcnbitaHn corlacho EN 60350, IEC 60350.
PpN BO3MOXHOCTn He npOn3BOJnte npedBapNTbHb pa3OrpeB np6opa nepeD npuroTOBJIeHNEM.
Bo Bpemr npirotoBneHn HeckoIbKx 6JIoD 3a pa3 CBOIte nepepbIBbl MeJdy BblneKo/ XapKO K MUNHMMy.
PnroToBJIeHne c nCNoJb3OBAHHem BeHTnIaTopa
IIO BO3MOXHOCTN BbIbpaIte yHKUIN pIuROTOBHeHnA, B KOToPbIX NcNoJIb3yETcR BeHTNIJrTOp, UTo6bl c6epeY bJIeKTPo3HeprnIO.
Octatouhoe Tenno
B pynde cyHKn np6opa npn nCnoIb3OBaHnn nporpaMM, nJRA KOToPbIX 6blna BblpaHa onuia
«PpOdoJIKnteJIbHocTb» nIII «OkOHuaHne», a BpeMra pa6oTbI 60onee 30 mHyT,
HarpeBaTeJIbHbIe 3IeMeHTbI abTomatUyeCKN BblIOUaOTc HEMHO r paHbIe.
BeHTnIaTOp n lamna ocBeueHn npoJnxAOT paOtaTb. Nocne BbIKNoyeHn np6opa Ha dinCnnee oTo6paxKaetc oCTaTOUHoe TeNIO. 3To TEnIO MoXHO NCNoB3OBaTb dIpy noDepxKahn 6nD B TeNlOM COCTOAHn.
Ecn n dntelbnoctb npiroTOBneHn npebbiaaet 30 mHyT, yMehblnte TeemnpaTy np6opa do MmHaBHO 3a 3-10 mHyT do OKOHuaHn npiroTOBneHn. PpOdoJXHTc npiroTOBneHne OCTaToCHoro TepNa BHyTpN np6opa.
IcnoJb3yIte octaToHoe TeNIO dny pa3orpeBa pyrx 6nO.
CoxpaHHe NnB TeNlOM COCTOHN
Дя И спльзовая OCTаTOчHOrO Teпla ДЯ COхpaHЕнЯ ПИСиВ TЕПOM COCTОHIN Bыбраite Мakсимально Hn3Koe 3HaueHne Tempepatypbl N coxpaHЯITE 6ЛЮdoВ TENJIe. HanCpnee 6ydt OTo6paKaTbca INHdNkaцnia OCTaTOHOrO Teпla INI TEkyuaЯ Tempepatya.
PnroTOBJeHne C BbIKJIIOeHHoJ lamnoi
Bbiknouhte lamny ha Bpem npirotoBleHna. BkIouaHTe ee ToIbko npn Heo6xoDmOCTn.
BlaXnHa KOHBeKuY
OTmeha yctaHOBneHHoro TaMepa
Птумени:Терmoцун

17. OXPAHA OKPYKAIOJIEN CPEIbI
MaTePnAblc CmBOnom eNeDyET cDaBaTb Ha nepepa60Ky. IonoKnte ynaKOBky B COOTBeTCTByUOuIne KOHTeHepbI dnn c6opabTOpNHO rO cbipb. PpHIMaYacTne B Nepepa60tke CTaporo 3neKtpo6b1TOBOrO 6obpyoDBAHn, Bbl nomoraete 3aunTntb OKpykaHouyU cpeDu n 3doOpBbe yeNoBeka. He Bbl6paCbIBaIte BMeCTe C 6b1TOBBIM OTxOdaMn 6b1TOBYu TEXnky, NOMEueHHyO CmBOnOM Pnp6op CneDyET DOCTaBNTb B MeCTO pa3dJIbHO rakoJIeHnI r c6opaa OTxODOB NOTpe6JIeHnI INB NYKT c6opaa NCIOJb3OBaHHo8 6b1TOBOrTexnKn dnn noCneDeUoIe yTuIN3aun.
MNCJIIMO HA BAC
Xbana sto cte kynnnn Electrolux ypehaj. 3a6paHn cte npon3BOD koJ ca cobom doHocn DeueHne ctpyHor pada n HOBauJa. FehNJanah je, eneraHTan n OcMnJbeH mAjHy BvDy BaWe notpe6e. Bynte yBepen da he tnp CBAKOM KOpuHHeBy doBHTn N3BaHpeDHe pe3yIITate.
Добpo дошиу Electrolux.
IocTeHaawcajTda:

Ipi6abte caBeTe 3a KopuheHe, bpoUype n HOpMaunje 3a peuaBaHe npo6Jema, cepBn u nonpaKy:
www.electrolux.com/support
PerectpyjTe npon3BOD paD 6oJbe ycIyre:
www.registerelectrolux.com

KyuNTe np6op, noTPOuHN MaTepnjAn i OpuRHaHne pe3epBHe deNoBe 3a CBojypehaj:
www.electrolux.com/shop
KOPINCHNCHKA NOIDPSKA IN CEPBNC
YBek KopnCTnte opunHaJIne pe3epBHe JeIOBE.
KaDa KOnTaKtIpaTe OBnawheHn cepBnCHn ceHTap, BoNTe paUyHa da KoI ce6e IMaTe cNeDeHe noDatke: Moden, 6poj npOn3BoVa, cepNJcKn 6poj.
IopauMory da ce npohahy Ha nnouHc ca TexHNyKm KapaKTepnCTNkaMa.
Yno3opehe/onpe3- nHΦopMaunje o 6e36eHocTn
OnuTe HOpMaunje n caBeTu
HnΦopMaunje O XNBOTHOJ cpeINH
3aDpxaHo npaBO n3MeHa.
CAДРЖAJ
- INHΦOPMALUJE O BEEHOCHTN.....757
1.1 Be36eHocT Deue n ocetJBnBnx
oc06a. 758
1.2 OniTe Mepe 6e36eHocTn.....758
- B6E6HOCHA YIyTCTBA 759
2.1 MoHTaxa. 759
2.2 PpNKJbUyeHbe Ha eJeKTpNHy Mpexy 760
2.3 YnoTe6a. 761
2.4 Hera n uuhebe 762
2.5 KyBaHe Ha napn 762
2.6 YHyTpawHbe ocBETbeHe 762
2.7 CepBncnpaHbe 763
2.8 Ondarabe 763
- ONIC PON3BODA 763
3.1 OnuTn npka3 763
3.2 Pnp6op 763
- KAKO YukbuyHTN N NCKJbuyNTU YPEBJAJ. 764
4.1 KomaHdHa Ta6na 764
4.2 Dicnpej 765
- INPE INPBE YNOTPEBE 767
5.1 PpBo uHHebe 767
5.2 IpBO npKJbUyBaHbe... 767
5.3 HnucjnaJHo npedrpeBaHe.... 767
5.4 KaKo Da noDecuTe: TbpOha BoJe... 767
6.CBAKOДHEBHA YNOTPEBA.768
6.1 KaKo Da noDeCnTe: FyHKuJne 3aRpeBaHa... .769
6.2 KaKo Da noDecuTe: Steamify - cyHKuJe 3arpeBaHa ha napu..769
6.3 KaKo Da noDecuTe: IOTnOMorHyTa npnPema. 771
6.4Функиjee 3arpeBaHa...771
6.5 Hanomehe y Be3n ca: BnaJHo neeHe y3 BeHTnlaTop.. 774
7.ФУнкIJE CATA. 775
7.1 Onnc cyHKunja cata. 775
7.2 KaKo Da nOdecHTe: FyHKuJne cata. 775
8. KAKO DA KOPNCTNTE: PNPBOP 777
8.1 y6aunBaHe npnbopa.. 777
8.2 TempepaTpyn ceH3op.. 778
9.ДОДАТHEФУнкIJE. 780
9.1 Kako da cayuBaTe: OmnBeHo.....780
9.2 KoHTpOHa 6paBa....780
9.3 Aytomatcko NCKJbYuNbBaHe..... 780
9.4 BeHTnIaTOp 3a xHaHebe....781
10.KOPINCHN CABETN. 781
10.1 Ppenopyke y Be3n ca neuehem.. 781
10.2 BnaJHo neYeBe y3 BeHTnlaTOp... .781
10.3 BnaJHo neuebe y3 BeHTnlaTOp - npenopyuHn npibop... 782
10.4 Tabèle KyaBaHa 3a INHCTNITyTe 3a TectnpaBe. 783
11.HERA N YIWTHEHe 786
11.1 Hanomehe y Be3n ca
yuHHeBem 786
11.2 KaKo Da N3BaInte: Hocau npweTke 787
11.3 KaKo Da KopnCTIe: YuShHebe napom 787
11.4 PocTeTHNK 3a YnshHebe....788
11.5 KaKo Da KopnCTNe: YknaBaBe KaMeHca. 788
11.6Подсетнк3aукnaьаьe kameнцa. 789
11.7 KaKo Da KopnCTIte:
UcnnpaBe 789
11.8 POncTeTHNK 3a cyuhe...790
11.9 Kako da KopnCTnTe: CyuHe... 790
11.10 KaKo Da KopnCTIe: IpaXHbeHepe3epBoapa. 790
11.11 KaKo Da yKnOHNTe mOHTnPaTe:Bpata... 791
11.12 Kako da 3aMeHnte: lamnua.. 792
12.PELJABAHBEIPOBJIEMA. 793
12.1 794
12.2 KaO da noctynate y clyuajy:
Uncpe rpeke...794
12.3 POnaun o cepBncnpaHbY.....795
13.EHEPRETCKA EΦUKACHOCT. 795
13.1 HOpmaJe O npOn3BDoU nIInCT ca HOpmaJamaO npOn3BDoU.....795
13.2 UwTea eHepnje.. 796
14. CTPYKTYPA MEHNUA 797
14.1 MeHn. 797
14.2 POnMeHn 3a: YnshHe...797
14.3 POnMeHn 3a: OnuJe.. 798
14.4 POnMeHn 3a: KOnΦnIpyauJa...798
14.5 POnMeHn 3a: CepBncnpaHe.....799
15. JIAKO JE! 799
16. NOBITE INPEUICOM! 801
17. EKONOUSA KIITAHbA 802
1. INHΦOPMAUJIJE O B6E3BEdHOCTN
Ipe nHcTalaunje n Kopnshheha ypehaja, naKbNBO npouHTajTe npINOxKeHO ynyTCTBO. Ipon3Bohau Hnje odroBopan 3a 6nlo KaKBe NOBpeDe nll wTeTy Koje cy pe3yIITat HeNCnpaBHe nHcTalaunje nll ynoTpeBe. CyBaJTe
ynyTCTBO 3a ynoTpe6y Ha 6e36eHOM I npnCTypanuHOM MeCTy 3a 6dyhe Kopnshe.
1.1Бe36eHocTdeueNOCeTJBnBnxOCo6a
Obaj ypehaj mory da kopncte deca ctapna od 8 roiHa n ocobe ca cmaheHIM qn3nKIM, yJHMm IJI MENTaHIM cnocobnoCTMa, kao ocobe kojima Heoctaju NCKyCTBO n 3HaHe, ykoNko im ce obe36eHN HAD3Op IINI m Ce daju ynyTCTBa y Be3n ca ynoTpebom ypehaja Ha 6e36eDaH naHH uKOJIko CXBaTajy moryhne onacnoCTn. Deuy mlaHa od 8 rOiHa, kao n ocobe ca Beoma TeWKIM n CIOXKeHIM INBaIINTeTom, Tpe6a dpkata NaBe od ypehaja, Ocim aKO cy PoD CTaJIHIM HAd3OpOM.
-Дeцу Треба КонтPORINCSATи Кадо се He 6и Играла ca ypeнajem.
Држinte сby am6aJaKy daJIbe od deue n odnoxnte je ha odroBapajyHn HauHn.
- UTO3OPEHbE: Ypehaj n HBeROBn DoCTyPnHn DeJIOBn MOry 6ntu BpeiN Tokom KopuShHeBa. Dpxnte deCy u KyHne Jby6mUe daJIbe od ypehaja KaDa ypehaj paDi n KaDa ce XlaIaI.
- Ako obaj anapatima ypehaj 3a 6e36eHocT deue, Tpeba ra akTNBnpaTn.
-Дeца He cmejy da obabajy uinshhe n KOpncnucko odpkaBaHe ypehaja 6e3 na3opa.
1.2 Onstemepe 6e36eHoctn
ObajypehajjeHameHeHcMo3a KyBaHbe.
Obaj ypehaj je Hamehen 3a ynoTpeby y jeHOM domaHnHCTBy y 3aTBOpEHm npocTopma.
- Upehaj ce moxe kopnCTHTN y kaHcneJapnJaMa, XOTeJIcknM CO6aMa, MOTeJIma, NaHCNOHMa, CEOCKIM TpynCTnKm DOMaHnHCTBnMa n CInuHm Objektima 3a CMeUtaj rDe yNoTpe6a He 6n IpeBa3nla3nla (npoceuH) HnBO NOTPOShBe NO DomaHnHCTBy.
- Camo KBaIIINΦnKOBaHa ocO6a MoKe da MOHTnpa OBaj ypehaj n 3aMeHn Ka6JI.
He KopnCTnte obaj ypehaj npe Hero wTo ra yrpadnte.
-ИсъучITE ypehaj n3струje пе бино kaKBor odpxaBaHa.
-Уколико je ka6л 3a HanajaHe oшTeн, Нera мopaда 3амен npo3Bohaj, odroBapajyHn OBlaшн сервсни цHTAP Или Лиca спчHe KBaIIФИКациje, кaco Би ce ИЗбета eNeKtpuHa onachOCT.
-УПОЗЕБЕ: Увете са ѳ щрел щьуен пера Heroшто заментесида щалпу касо бистецн могуностда ддон doе eлктуногшoka.
-УПОЗЕРБЕ: Урегaj И Берови дocупнделови могу ьтч врели тokom коршени. Тpeба Bodитч рачна за се Изberг He Ддирваные грейнх eлемената плу hyТрашьnx NOВршina anapata. - Kaia BaInte npnbop nnn nocyhe n3 pepHe nn nx CTaBbate y pepy, yBeK Hocnte 3aHTTHe pyKaBnCe.
KopinCTte cmo TemnepaTyprHn ceH3Op (ceH3Op TemnepaType y cpeDInn neueHor meca) koJn je npenOpyuEn 3a OBaj ypehaj.
-Да бисту уклонллшине koje држе peшетke,прво NOBYUITE npedн Deo shHa, a 3aTm 3aHbI Deo da 6nCTe nx OndBojnln od bochnx 3nOba. Пocтавьанe shHa 3a NOdprkky pewetke Bpshn ce obphytm peodocneDom. - HemojTe KopnCTiTn napoynctau 3a nuwhebe ypehaja.
- HeMoJTe KOpNCTnTn rpy6a abpa3nBHa cpeIcTBA 3a ChuShHeBe nII N OStpe MeTaJIHe cyHHepe 3a ChuShHeBe CTAkJIeHIX BpATA jep OHI MOrY n3rpe6aTn NOBpShInHy 360r Yera MoKe DoHn Do paCnPcKaBaHbA CTAkJa.
2.БE3БЕДHOCHAУNYTCTBA
2.1 MoHTaxa

yN03OPEHbE!
Camo KBaJInDfNkoBaHa oO6a MoKe da HnctaJnpa OBJ ypehaj.
-
YKNOHInTe KOMnIeTHy am6aJaxy.
-
Hemojte da nHctanipate nn KOpuctte oWtehen ypehaj.
- Pnpdpkaabajece ynytctaba 3a MOHTipahe koje cTe do6nny3ypehaj.
- YBek BoDInTe paUHa npuJInKOM nomepaHa ypehaja 3aTo 1To je TeXak. YBeK KopnCTnte 3aHTNTHe pyKaBnCe n 3aTBopeHy o6yhy.
He ByuTe ypehaj 3a puynu. - Инсташираве урегaj на сигуруно и ппкладно место koje Исpenьава 3axteBE 3a Инсташию.
HeonxoHNo je npuDpXaBaTn ce MInHmAnHOr pactoJaHa oN dpynx ypehaja n KuxNbcknx elemehaTa. - Ппе мontахе урehaja, поверпгдд ли сь вратуршке.
Obaj ypehaj je onpembeH cncTeMOM 3a eJektpnHxnahe. Mopa ce ynoTpe6babaTn ca n3BOPOM eJekTpnuHor HanajaHa. - YrpaheHa jeiHnua Mopa da 3aIOBObN 3axTeBe cTa6uHocTn npema DIN 68930.
| Минимална висиа кухиьског[elementaria (Minna-Majima висиа[elementaria Испов радно пioчe) | 578 (600) mm |
| ШирINA кухиьског[elementaria 560 mm] | |
| ДубINA кухиьског[elementaria 550 (550) mm] | |
| ВисINA пedingе стране уроча 594 mm | |
| ВисINA заюе стране уроча 576 mm | |
| ШирINA пedingе стране уроча 595 mm | |
| ШирINA заюе стране уроча 559 mm | |
| ДубINA уроча 567 mm | |
| ДубINA уграhalor уроча 546 mm | |
| ДубINA са OTворень IM Вразима 1027 mm | |
| Минимална венина вентilatedонor OTbopa.Отвор поставъен наdoesьог заюп страви | 560x20 mm |
| ДухINA кабla за habалаяе. Кабл je поставъен уdeсном углу са заюп страве | 1500 mm |
| Мontaxни завtrightы 4x25 mm |
2.2Пркьуе HeHa eIeKtpnHy mpeky

YN03OPEHBe!
Pn3nk oJ nojapa n ctpyjHor ydapa.
Cba npKbUyHbHa cTpyje Tpe6a da oabu KbauNΦnKOBaH eJeKtpuap.
- Ypehaj mopa da 6ynde y3embEN.
- YBepnte ce da cy napametpn Ha nlouicn ca TexHnUcKm kapaKTepcntkama KOMnTaNbHnCa odroBaapajyhm npaMeTpma eNeKtpnuhe Mpeke 3a Hanajahe.
- YBek Kopructe npoNcH O yrpaJehy yTuHnU cy 3aHTuTOM oD cTpjuHOr ydapa.
- Hemojte da kopncntte aanTepe ca Bnwe yTuHnua n npOdyKne Ka6NoBe.
- Поберп Te Да НICTe OHTeTINI rnaBHO HanajaHbe I Ka6I 3a HanajaJIbe. YKoJIko cTpyJHn Ka6I Tpe6a Da ce 3aMeHn, To Tpe6a Da obabN haw OBnaWHeHn cepBnCn ueHTap.
He 03BONITE da Ka6n 3a Hanajahe DoDpyje nn Dohj 6n3y BpaTMA ypehaja nn HnHnncno ypehaja, HapouHTo kaia ypehaj paN nn Kaada cy Bpata Bpena.
3aHTa Oyapa DeIOBa NOD HanoHOM IN3OIOBAHIX DeIOBa Mopa da ce npuBpCTN Tako Da He Moke da ce yKNOH 6e3 anata.
- ПикьчITE галовни кабл за Hanajaые на 3ину утунуTek на Краю Инстациje. Вдпte рачуна за постojи пистул мржном утkaчу наков Инстациje.
- Ako je 3iɪdHa yTnUHnɪza naɪbɑba, HemojTe da npɪkʌbʊyjyeTe mpekʌn yTnɪka.
He ByuTe Ka6n 3a HanajaBe KaKo 6nCTe NCKbUynu ypehaj. Ka6n NCKbUynte Tako ITo hete n3ByhnyTnKauch n3 yTuHnue.
- KopnCTHte cmo nCnpaBHe paCTaBHe npekndaue: 3aHTNTHe npekndaue, ocngypaue (ocngypaue ca hABojem Tpe6a cKHyTu ca Hocaua), ayTomatcKe 3aHTNTHe npekndaue n KOHTaKTope.
- Y eNEKtpnHoj nHCTaJauJn Mopa nocToJATn pAcTaBHN npeKnJaU KoJn Bam omOryhaba da NCKbYuHTe CBe pa3e HanajaHa ypehaja. Pa3MaK n3MeHy KOHTaKaTa Ha pacTaBHOM npeKnJaU Mopa Da n3Hocn HajMaHe 3 mm.
- Ypehaj ce ncnopuyje ca ctpyjHm yTuKaeH m ctpyjHm Ka6JlOM.
2.3 Ynotpe6a

YN03OPEHbE!
Ioctoj np3nk oD nobpehJnBaHa, oneKOTnHa n ctpyHOr yda pa nn ekcnno3nje.
- Hemojte da Mehate cneuФkaunjy Obor ypehaja.
Bodntepaunha da OTbOpn 3a BeHTnnaucjy He 6ydy 3anyuHeH.
He octabjbjte ypehaj 6e3 Ha30pa TOKOM paJa. - Ypehaj Tpe6a NCKbYuHTn HakoH CBAke yIIOTepe6e.
- Bydnte onpe3n Kaad OTbapate Bpata ypehaja dok OH paan. Moke ce decntn da n3ahe Bpeo Ba3dyx.
- Hemojte pykoBatn ypehajem ka da cy Bam MOKpe pyke nnn Ka da je OH y KOHTaKty ca BODom.
- Hemojte n3JIaratn OTBopeHa BpaTa BeINKOM ONTepehBy.
- Hemojte kopunctu typehaj kao paHy noBpHHy nI npocTOp 3a oDnarahe.
- Палово OTвори Te Bpata ypehaja. Kopniшенbe cactojaka kojn caapxe aKoxon moke doBecn Do nCnapaBaHa aKoxOHa n MeShaHa ba Ca Ba3dYxom.
Bapnue nn OTBOpEn nPameH He Cmejy da 6ydy y 6n3nH ypehaja kaJa OTbapaTe Bpata.
3anaBnBe MaTePnje nn npeDMeTe HatoNbeHe 3anaJbNBIM MaTepnjama HeMoJTe CTaBbaTn yHyTap n nopE dypehaja nn Ha hera.

YN03OPEHbE!
4. KAKO YukbuyHTN N NCKbuyNTN YPEBJAJ
4.1 Komaнда табILA
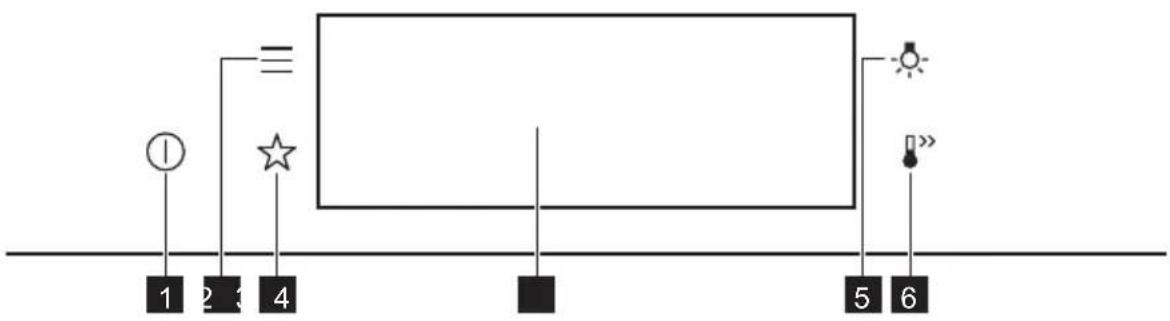
9.3 Aytomatcko nckjbyuBahe
I3 6e36eHocnix pa3lora neHnua ce nckbuyje haKOH HeKOr BpeMeHa aKO fynkunja 3aRpeBaBa paN, a BN He npomeHnte noDeuBaHa.
| (℃) (4) | 1 |
| 30 - 115 12.5 | |
| 120 - 195 8.5 | |
| 200 - 230 5.5 |
AyTomatcko NCKbYnBaHe He paHc a cyHKunjama: CBeTIO, TempepaTypHc eH3Op, Kpaj, Cnpo neeHe.
9.4 BeHTnlaTOp 3a xnahebe
KaDa anapat paDi, BeHTnIaTOp 3a xnahebe ce ayTomatcKn yKbByyje kaKo 6n XnaDIO NOBpHHe anapata. Ako nckbYuHte anapat, BeHTnIaTOp 3a xnahebe moKe da HacTabN da paDi dOK ce anapat He OXlaDi.
10. KOPINCHN CABETN
11.12 Comoonian: Bombilla

ADVERTENCIA!
- IHCTPYKl3 3 TEXHIK B3NEKN.992
2.1 BctaHOBHeHHra 992
2.2Пд'едннdo eilekTpomepeksi..993
2.3 KopncTyBaHHra 993
2.4 Dorign i uHueHH 994
2.5 PnirroTyBaHHHa napi.. 995
2.6 Bnytpiunn iicBitka... 995
2.7 Cepbic. 995
2.8 Ytuniana 995
- ONIC BINOBU. 996
3.1 3araIbHn orIaI .996
3.2 Akcescyapu 996
- NOPYOK YBIMKHEHHA TABIMKHEHHI PUNADY 997
4.1 Panaelb KepyBaHHra 997
4.2 Ducnnei 998
IinCnJIe i3 BCTaHOBJIeHIMM OCHOBHMN yHKuJIMN.
A. Yac do6n
B. NOUATOK/3YUNHKA
C. Temnepaotypa
D. ΦyHKιI HarpiBy
E. Taïmep
F. Tepmoyn (nne dnn deeknx moedene)
INdkaTopn dncnpe
Ba3oBi iHdkaTopn - nra Habiraqii Ha dncnne!.
OK
3ByKOBn CnHaI iHdNkATOpn FyHKcii — nicra 3akihueHHBCTaHOBJeHOrO yacy roTyBaHHn HaCnHaI.

ФункцIO BBIMKHeHO.

STOP
DyHKUIO BBIMKHeHO.
TGYBaHHn npnnHReTbcraBtOMaTHNO.

3ByKOBn CnHAn BUMKHeHO.
INdkaTopn TaMepa

Uo6 yctahOBHTnФyHKciIO: BiKlaJeHn 3anyck.

CkacybaHHHaJauTsyBaHH.
5. ПЕPED ПЕШим ВИКОРNUCTAHнЯМ

NONEPEDKEHHRA!
IINB. po3diin 3 iHopmaucieIO zuoTo texhikn 6e3neKn.