SHBR 560 B1 - Vacuum Cleaner SILVERCREST - Free user manual and instructions
Find the device manual for free SHBR 560 B1 SILVERCREST in PDF.
User questions about SHBR 560 B1 SILVERCREST
0 question about this device. Answer the ones you know or ask your own.
Ask a new question about this device
Download the instructions for your Vacuum Cleaner in PDF format for free! Find your manual SHBR 560 B1 - SILVERCREST and take your electronic device back in hand. On this page are published all the documents necessary for the use of your device. SHBR 560 B1 by SILVERCREST.
USER MANUAL SHBR 560 B1 SILVERCREST
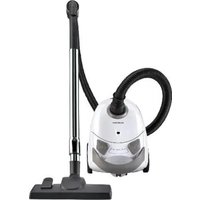
3-IN-1 FLOOR CLEANER / 3-IN-1 BODENREINIGER NETTOYEUR DE SOL 3 EN 1 SHBR 560 B1
GB IE
3-IN-1 FLOOR CLEANER
Operating instructions
FR BE
NETTOYEUR DE SOL 3 EN 1
Mode d'emploi
CZ
PODLAHOVÁ MYČKA, 3 V 1
Návod k obsluze
SK
PODLAHOVY CISTIC 3 V 1
Návod na obsluhu
DK
311 GULVRENsER
Information about these operating instructions 2
Copyright 2
Proper use 2
Safety information 3
Description of the appliance 6
Package contents and transport inspection 7
Use 7
Assembling the appliance 7
Filling the fresh water tank 9
Handling and operation 11
Continuous spray function 11
Cleaning hard floors 1 1
Cleaning carpets 13
Cleaning and maintenance 14
Cleaning the waste water tank 15
Self-cleaning function 18
Manual cleaning 18
Replacing the dirt filter 21
Ordering replacement parts 21
Storage 21
Troubleshooting 23
Disposal 25
Disposal of the appliance 25
Disposal of packaging 25
Technical data 26
Kompernass Handels GmbH warranty 26
Service 28
Importer 28
Introduction
Information about these operating instructions

Congratulations on the purchase of your new appliance.
You have selected a high-quality product.
The operating instructions are part of this product. They contain important information about safety, usage and disposal.
Before using the product, please familiarise yourself with all operating and safety instructions. Use the product only as described and for the range of applications specified. Please also pass these operating instructions on to any future owner.
Copyright
This documentation is protected by copyright.
Any copying or reproduction, including in the form of extracts, or any reproduction of images (even in a modified state), is permitted only with the written authorisation of the manufacturer.
Proper use
This appliance is designed exclusively for cleaning indoor floors and carpets. It is not intended for any other purpose nor for use beyond the scope described. The appliance is not intended for use in commercial or industrial environments.
The manufacturer accepts no responsibility for damage caused by failure to observe these instructions, improper use or repairs, unauthorised modifications or the use of unapproved replacement parts. The operator bears sole liability.
Safety information

RISK OF ELECTRICAL SHOCK!
- Connect the appliance only to a properly installed mains power socket supplying a mains power voltage of 220 - 240V ,50 - 60Hz
Always pull on the plug to disconnect the appliance from the mains. Do not pull on the cable itself. - Do not kink or crush the power cable, and route the cable so that it cannot be stepped on or tripped over.
- To avoid risks, arrange for defective plugs and/or power cables to be replaced at once by qualified technicians or our Customer Service Department.
- Ensure that the power cable does not become wet or damp during use. Route the cable in such a way that it cannot be crushed or damaged.
- Do not drive the appliance over the power cable.
In case of a malfunction, remove the plug from the socket. - Remove the mains plug from the mains socket before filling the appliance with water, changing accessories or cleaning it.
- To prevent risks, stop using the appliance immediately if it is damaged.
- Operate the appliance only with dry hands and never without shoes (i.e. not barefoot). This will help reduce the effect of an electric shock in the event of a malfunction.

Use the appliance only in indoor areas, not outdoors.

RISK OF ELECTRICAL SHOCK!
- Never immerse the appliance in water or other liquids.
- Never aim the appliance at moisture-sensitive objects, floors or surfaces.
- This appliance may be used by children aged 8 years and above and by persons with limited physical, sensory or mental capabilities or lack of experience and knowledge, provided that they are under supervision or have been told how to use the appliance safely and are aware of the potential risks.
Do not allow children to use the appliance as a toy.
- Cleaning and user maintenance tasks may not be carried out by children unless they are supervised.

WARNING! RISK OF INJURY!
- Use only the original accessory parts recommended by the manufacturer for this appliance.
- Only use the appliance when it is properly and completely assembled.
The appliance may not be used if it has been dropped, if there are any obvious signs of physical damage or if it is leaking.
Always pull the plug out of the power socket during each break in use, as well as after use and before any cleaning. - Be particularly careful while using the appliance on steps or stairs.
- Do not use the appliance to vacuum up chemicals, poisonous materials or inflammable liquids.

ATTENTION! PROPERTY DAMAGE!
Always comply with the cleaning instructions of the carpet manufacturer. Before cleaning, check also whether the carpet is suitable for cleaning with the appliance.
- Do not leave the appliance standing on wooden floors for any length of time when it is switched on. The wood could swell.
- Do not operate the appliance with an empty water tank. Otherwise, the pump could run empty and overheat.
- Do not insert any objects into the openings of the appliance.
- Do not use the appliance if the openings are blocked. Keep the openings free of dirt, fluff, hairs or anything that could impede the air circulation.
- Make sure that you do not vacuum up hard, pointed or sharp objects (e.g. glass, nails, screws, coins, etc.) with the appliance.
- Ensure that the appliance, the power cable and the plug do not come into contact with heat sources such as hotplates or naked flames.
- Use only the type and quantity of liquids listed in these operating instructions when operating the appliance.
Never leave the appliance unattended during operation.
Description of the appliance
(See fold-out page for illustrations)
Figure A:
1 Hand element with handle
Waste water tank
3 Foot section with brush chamber
Storage tray
5 Rotary brush holder
6 Rotary brush
Splash guard
8 Float
9 Lid of the waste water tank
10 Dirt filter
1 Fresh water tank
12 Cleaning solution display
13 Carpet switch (with LED)
14 Hard floor switch with LED)
Figure B:
15 Cleaning solution switch
Upper cable retainer
17 Power cable with mains plug
18 Carrying handle
Self-cleaning switch
20 Lower cable retainer
Package contents and transport inspection
Remove all parts of the appliance and the operating instructions from the carton.
Remove all packaging materials and any films and labels.
Check the contents of the package. The package contents include the following components (see fold-out page for illustrations):
- Floor cleaner
- Hand element
Storage tray - Rotary brush holder
- Operating instructions
NOTE
- Check the package for completeness and signs of visible damage.
If the delivery is incomplete or damage has occurred as a result of defective packaging or during transport, contact the Service hotline (see section Service).
Use
Assembling the appliance
Slide the hand element 1 into the opening on the top of the appliance until the hand element 1 clicks into the opening (see fig. 1).


Fig. 1 Fig. 2
NOTE
If you want to remove the hand element 1 from the appliance, you must first remove the fresh water tank 1 from the appliance to reach the catch of the hand element 1 (see section Filling the fresh water tank). Once you have removed the fresh water tank 1, press the catch on the hand element 1 out of the catch opening with a pointed object. You can then pull the hand element 1 back out of the appliance (see fig. 2).
Wind the power cable completely around the upper and lower cable retainers 16/20 (see fig. 3).

Fig. 3
The parking and cleaning station consists of a storage tray 4 and a rotary brush holder 5 (see fig. 4). To assemble the parking and cleaning station, slide the rotary brush holder 5 sideways into the opening on the storage tray 4. Slide the rotary brush holder 5 downwards into the opening until it sits firmly in place on the side of the storage tray 4 (see fig. 5).


Fig. 4 Fig. 5
Filling the fresh water tank
ATTENTION! PROPERTY DAMAGE!


Fill the fresh water tank 1 only with cold to warm tap water (up to max. 60^ ) or distilled water. Do not use boiling water.
Never operate the appliance without water in the fresh water tan1.
- Use only standard commercial, non-foaming floor cleaners as cleaning agents.
Grasp the fresh water tan by the gripping grooves on the side and pull it upwards out of the appliance (see fig. 6).
Flip the fresh water tan over and unscrew the lid. (see fig. 7).


Fig. 6 Fig. 7
For small areas (up to 25m^2 ), fill the fresh water tank with tap water or distilled water up to the first fill level marking (see fig. 8).
For small areas (up to 25m^2) , fill the fresh water tank with cleaning solution up to the second fill level marking (see fig. 8).
For large areas (up to 55m^2 ), fill the fresh water tank with tap water or distilled water up to the third fill level marking (see fig. 9).
For large areas (up to 55 m^2) , fill the fresh water tank with cleaning solution up to the fourth fill level marking (see fig. 9).


Fig. 8 Fig. 9
Close the lid of the fresh water tan (see fig. 10).
Flip the fresh water tank over and slide it back into the opening at the top on the front of the appliance (see fig. 11).
Push the fresh water tank down along the grooves in the opening until the fresh water tank audibly snaps into place and sits firmly in the appliance.


Fig. 10 Fig. 11
Handling and operation
ATTENTION! PROPERTY DAMAGE!
- While working with the appliance, make sure that the rotary brush does not get blocked by loose objects lying around on the floor or by carpet edges. These can damage the rotary brush and stop it from working properly.
NOTE
Before finishing the cleaning process, use the appliance approx. 15 seconds without adding cleaning solution. This prevents larger amounts of water residue being left behind and gives you a better cleaning result.
A small amount of water may remain on the floor after cleaning for functional reasons. In this case, remove the remaining water from the floor with a cloth.
Continuous spray function
The appliance has a continuous spray function that allows you to continuously apply cleaning solution to the rotary brush 6 without having to hold down the cleaning solution switch 15:
Press the cleaning solution switch twice briefly to activate the continuous spray function.
Press the cleaning solution switch twice briefly again to deactivate the continuous spray function.
Cleaning hard floors
Once the appliance is assembled and the fresh water tank is filled with water and cleaning solution:
Unwind the power cable completely from the upper and lower cable retainers 16/20. To unwind the power cable 17 quickly from the cable retainers 16/20, pull the upper cable retainer 16 out a little way and turn it downwards (see fig. 12).
Insert the plug into the mains power socket.
Press the hard floor switch 14 to switch the appliance on (see fig. 13). The LED on the hard floor switch 14 lights up blue.


Fig. 12 Fig. 13
Before each use, press the cleaning solution switch twice briefly to activate the continuous spray function and add cleaning solution to the rotary brush so that it is ready for operation (see fig. 14). The cleaning solution display flashes alternately blue when the continuous spray function is activated or the cleaning solution switch is being held down (see fig. 15).


Fig. 14 Fig. 15
Activate the continuous spray functioning cleaning with both forward and backward movements with the appliance. This way, the cleaning solution is evenly applied to the hard floor via the rotary brush 6.
Press the cleaning solution switch twice briefly again to deactivate the continuous spray function.
NOTE
For stubborn soiling, move the appliance over the soiled areas several times and activate the continuous spray function.
Press the hard floor switch again to switch the appliance off (see fig. 13).
Cleaning carpets
NOTE
Before using the appliance to clean a carpet, test the appliance on an inconspicuous area of the carpet.
Before cleaning, check the carpet manufacturer's label for special care instructions. The appliance is not suitable for sensitive carpets (e.g. silk, leather, flokati etc.).
Once the appliance is assembled and the fresh water tank 1 is filled with water and cleaning solution:
Unwind the power cable completely from the upper and lower cable retainers 16/20. To unwind the power cable 17 quickly from the cable retainers 16/20, pull the upper cable retainer 16 out a little way and turn it downwards (see fig. 16).
Insert the plug into the mains power socket.
Press the carpet switch to switch the appliance on (see fig. 17). The LED on the carpet switch lights up blue.


Fig. 16 Fig. 17
Before each use, press the cleaning solution switch twice briefly to add cleaning solution to the rotary brush so that it is ready for use (see fig. 18). The cleaning solution display flashes alternately blue when continuous spray function is activated or the cleaning solution switch is being held down (see fig. 19).


Fig. 18 Fig. 19
Activate the continuous spray functioning cleaning with both forward and backward movements with the appliance. This way, the cleaning solution is evenly applied to the hard floor via the rotary brush 6
Press the cleaning solution switch twice briefly again to deactivate the continuous spray function.
NOTE
- When cleaning carpets, if you activate the cleaning solution switch 5, twice as much cleaning solution is applied to the rotary brush 6 as during hard floor cleaning.
- To allow carpets to dry more quickly after cleaning, move the appliance several times over the carpet. Do not activate the continuous spray function while doing so and do not hold down the cleaning solution switch 15.
Press the carpet switch again to switch the appliance off (see fig. 17).
Cleaning and maintenance

RISK OF ELECTRICAL SHOCK!
- Switch the appliance off and pull out the mains plug before cleaning the appliance!

ENTION! PROPERTY DAMAGE!
- Do not use caustic, abrasive or solvent-based cleaning materials. These can damage the surfaces of the appliance.
NOTE
Empty the waste water tan after every use.
Clean the dirt filter after each use and let it dry completely before putting it back into the waste water tank.
NOTE
After every use, carry out a self-cleaning of the appliance (see section Self-cleaning function).
Clean the appliance with a moist cloth or rag. For stubborn soiling use a mild detergent on the cloth.
Cleaning the waste water tank
NOTE
- Empty the waste water tan2 after every use and as soon as the dirty water has reached the MAX marking.
- When emptying the waste water tank 2 make sure that the drain (e.g. the wash basin) is not blocked by hair or coarse dirt.
Once the waste water tan2 is full, the float 8 causes the suction motor to switch off automatically.
Proceed as follows to empty the waste water tank 2:
- Press the knob at the top of the waste water tank ② downwards (see fig. 20). Hold the handle of the waste water tank ② while pressing the knob downwards.
- Pull the waste water tank ② forwards out of the appliance (see fig. 20).
Pull the lid of the waste water tan ⑨ upwards out of the waste water tank 2 (see fig. 21).


Fig. 20 Fig. 21
Tip out the dirty water and dirt (see fig. 22).
Rinse the waste water tan in hot running water (see fig. 23).


Fig. 22 Fig. 23
Remove the dirt filter 1 from the waste water tank 2 by pulling on the side of the seal on the dirt filter 10 with your fingers. Pull the dirt filter 10 upwards out of the lid of the waste water tank 9 (see Fig. 24).
Clean the dirt filter, the float 8 and the lid of the waste water tank 9 in hot running water (see fig. 25). If necessary, use a mild detergent.


Fig. 24 Fig. 25
If necessary, clean the opening in which the waste water tank 2 is located on the appliance with a damp cloth or rag (see fig. 26).

Fig. 26
Allow the dirt filter 10, the waste water tank 2 and the lid of the waste water tank 9 to dry completely (see fig. 27).
Once the parts are fully dry, replace the dirt filter back in the lid of the waste water tank (see fig. 28).


Fig. 27 Fig. 28
Place the lid of the waste water tan back onto the waste water tank (see fig. 29).
Fit the waste water tan back onto the appliance by inserting the bottom of the waste water tank first. Then push the waste water tank into the appliance until the waste water tank 2 audibly clicks into place (see fig. 30).


Fig. 29 Fig. 30
Self-cleaning function
The appliance has a self-cleaning function that allows you to automatically clean the rotary brush , the brush chamber in the foot section and the suction channel after use.
Place the switched-off appliance on the storage tray 4 of the parking and cleaning station (see fig. 31).
Press the self-cleaning switch (see fig. 32).


Fig. 31 Fig. 32
The following cleaning programme is started:
- The rotary brush 6 is started for approx. 20 seconds and cleaning solution is applied to the rotary brush 6.
- The rotary brush ⑥ turns and the vacuum function remains active for approx. 30 seconds while cleaning solution is applied to the rotary brush ⑥ .
- The appliance will switch off automatically when the cleaning programme completes.
Manual cleaning
For heavier soiling, it is necessary to manually clean the rotary brush 6, the splash guard 7 and the brush chamber in the foot section 3 of the appliance. If this occurs, do the following:
Make sure that the appliance is not plugged in.
Take hold of the top of the splash guar by the edge of the handle (PULL) and pull it forward to remove it from the foot section (see fig. 33).
Take hold of the bracket on the left side of the rotary brush 6 and pull it upwards to remove the rotary brush from the foot section 3 (see fig. 34).


Fig. 33 Fig. 34
Clean the splash guar and the rotary brush 6 in hot running water (see fig. 35).
If the brush chamber is dirty, wipe it out with a damp cloth or rag (see fig. 36).


Fig. 35 Fig. 36
Allow the rotary brus ⑥ and the splash guard ⑦ to dry completely before fitting them back onto the appliance (see fig. 37).
You can also place the rotary brus upright in the rotary brush holder on the parking and cleaning station for drying (see Figure 38).


Fig. 37 Fig. 38
Fit the rotary brus ⑥ and the splash guard ⑦ back onto the appliance by first pushing the rotary brush ⑥ onto the fitting on the right side of the foot section ③ (see fig. 39).
Then push the bracket on the left end of the rotary brush 6 into the opening on the left side of the foot section 3 until the rotary brush 6 audibly clicks into place (see fig. 40).


Fig. 39 Fig. 40
Replace the splash guar by first aligning it with the bracket on the foot section 3 (see fig. 41).
Then push the splash guar into position until it audibly clicks into place on the foot section (see fig. 42).


Fig. 41 Fig. 42
Replacing the dirt filter
After 12-18 months, or approximately 100 cleaning cycles (one cycle corresponds to one water tank filling), you will need to change the dirt filter 10. Information on ordering replacement dirt filters can be found in the following section: Ordering replacement parts.

RISK OF ELECTRICAL SHOCK!
Before changing the dirt filter 10, disconnect the power plug from the mains power socket!
To change the dirt filter 10, proceed as described in the section Cleaning the waste water tank.
Ordering replacement parts
You can order replacement parts for this product on the Internet at www.kompernass.com.

Scan the QR code with your smartphone/tablet.
You can use this QR code to go directly to our website (www.kompernass.com) to view and order the available spare parts.
NOTE
If you have problems with your online order, you can contact our service centre by phone or e-mail.
- Please always quote the article number (e.g. 402446_2204) when ordering. You can find it on the title page of these operating instructions.
- Please note that online ordering of replacement parts is not possible for all countries.
Storage
NOTE
For storage, place the appliance on the storage tray provided for this purpose. This must not be placed on absorbent or swelling surfaces such as carpets or parquet flooring.
- Empty the fresh water tank ① if you are not going to use the appliance for a long period.
Always clean the appliance before storage. Observe the instructions in the section Cleaning and maintenance.
Move the hand element ① of the appliance into an upright position until it clicks audibly into place. This parking position prevents the appliance from tipping over.
NOTE
To release the appliance from the parking position, hold the foot section 3 of the appliance in place with one foot and then move the hand unit 1 backwards.
Pull the upper cable retaine out a little and turn it back upwards (see fig. 43).
Wind the power cable completely around both the upper and lower cable retainers 16/20 (see fig. 44).


Fig. 43 Fig. 44
Carry the appliance by the carrying handle only.
For storage, place the appliance on the storage tray of the parking and cleaning station (see fig. 45).

Fig. 45
Store the appliance in a dry and dust-free location out of direct sunlight.
Troubleshooting
The following table will help you to identify and rectify minor malfunctions. If the solutions presented below do not resolve the problem, please contact Customer Service (see section Service).
| Fault Cause Remedy | ||
| The appliance will not switch on. | The appliance is not switched on. | Make sure that the appliance is properly connected to the power supply. Press the hard floor switch 14 or the carpet switch 13 to switch the appliance on. |
| The plug is not plugged in. | Insert the plug into the mains power socket. | |
| The mains socket is not supplying any power. | Check the house mains fuse. | |
| The waste water tank 2 is full. | Empty the waste water tank 2 (see section Cleaning the waste water tank). | |
| The appliance is defective. | Switch the appliance off and pull out the mains plug. Contact Customer Service (see section Service). | |
| The suction power is too weak. | The fresh and waste water tanks 11/2 are not properly fitted. | Attach the fresh and waste water tanks 11/2 properly to the appliance (see sections Filling the fresh water tank and Cleaning the waste water tank). |
| The waste water tank 2 is full. | Empty the waste water tank 2 (see section Cleaning the waste water tank). | |
| The splash guard 7 is not fitted properly. | Fit the splash guard 7 properly onto the foot section 3 (see section Manual cleaning). | |
| The suction channel is blocked. | Clean the suction channel and remove the blockage (see sections Self-cleaning function and Manual cleaning). | |
| The dirt filter 10 is blocked. | Remove the dirt filter 10 and clean it (see section Cleaning the waste water tank). | |
| The appliance does not dispensing enough cleaning solution. | The fresh water tank 11 is empty. | Fill up the fresh water tank 11 (see section Filling the fresh water tank). |
| The fresh water tank 11 is not closed properly. | Take the fresh water tank 11 out of the appliance and tighten the lid (see section Filling the fresh water tank). | |
| The appliance is not completely ready for use. | Before each use, press and hold the cleaning solution switch 15 for about 10 seconds to add cleaning solution to the rotary brush 6 so that it is ready for use. | |
| The continuous spray function is not activated. | Press the cleaning solution switch 15 twice briefly to activate the continuous spray function and continuously apply cleaning solution to the brush roll 6. | |
| The splash guard 7 is not fitted properly. | Fit the splash guard 7 properly (see section Manual cleaning). | |
| The rotary brush 6 is not turning. | The rotary brush 6 is not fitted properly. | Switch the appliance off and pull out the mains plug. Fit the rotary brush 6 properly onto the foot section 3 (see section Manual cleaning). |
| The rotary brush 6 is blocked. | Remove the plug from the mains power socket. Remove the splash guard 7 and the rotary brush 6 to clear the blockage. Fit the rotary brush 6 and the splash guard 7 back onto the appliance (see section Manual cleaning). Insert the plug into a mains power socket and switch on the appliance. | |
| Water is leaking from the appliance. | The fresh water tank 11 is not closed properly. | Take the fresh water tank 11 out of the appliance and tighten the lid (see section Filling the fresh water tank). |
Disposal
Disposal of the appliance

The adjacent symbol of a crossed-out dustbin means that this appliance is subject to Directive 2012/19/EU. This directive states that this appliance may not be disposed of in the normal household waste at the end of its useful life, but must be taken to specially set-up collection locations, recycling depots or disposal companies.
The disposal is free of charge for the user. Protect the environment and dispose of this appliance properly.

Your local community or municipal authorities can provide information on how to dispose of the worn-out product.


The product and its packaging are recyclable. They are subject to an extended manufacturer responsibility and will be collected separately.
Disposal of packaging

The packaging materials have been selected for their environmental friendliness and ease of disposal and are therefore recyclable.
Dispose of packaging materials that are no longer needed in accordance with applicable local regulations.

Dispose of the packaging in an environmentally friendly manner.
Note the labelling on the packaging and separate the packaging material components for disposal if necessary. The packaging material is labelled with abbreviations (a) and numbers (b) with the following meanings:
1-7: plastics,
20-22: paper and cardboard,
80-98: composites.
Technical data
| Power supply 220-240 V ~ (AC), 50-60 Hz | |
| Power consumption 480-560 W | |
| Protection type | IPX4 (protected against water splashes from any direction) |
| Protective grounding | # |
This appliance has a 3-year warranty valid from the date of purchase. If this product has any faults, you, the buyer, have certain statutory rights. Your statutory rights are not restricted in any way by the warranty described below.
Warranty conditions
The warranty period starts on the date of purchase. Please keep your receipt in a safe place. This will be required as proof of purchase.
If any material or manufacturing fault occurs within three years of the date of purchase of the product, we will either repair or replace the product for you or refund the purchase price (at our discretion). This warranty service requires that you present the defective appliance and the proof of purchase (receipt) within the three-year warranty period, along with a brief written description of the fault and of when it occurred.
If the defect is covered by the warranty, your product will either be repaired or replaced by us. The repair or replacement of a product does not signify the beginning of a new warranty period.
Warranty period and statutory claims for defects
The warranty period is not prolonged by repairs effected under the warranty. This also applies to replaced and repaired components. Any damage and defects present at the time of purchase must be reported immediately after unpacking. Repairs carried out after expiry of the warranty period shall be subject to a fee.
Scope of the warranty
This appliance has been manufactured in accordance with strict quality guidelines and inspected meticulously prior to delivery.
The warranty covers material faults or production faults. The warranty does not extend to product parts subject to normal wear and tear or to fragile parts which could be considered as consumable parts such as switches, batteries or parts made of glass.
The warranty does not apply if the product has been damaged, improperly used or improperly maintained. The directions in the operating instructions for the product regarding proper use of the product are to be strictly followed. Uses and actions that are discouraged in the operating instructions or which are warned against must be avoided.
This product is intended solely for private use and not for commercial purposes. The warranty shall be deemed void in cases of misuse or improper handling, use of force and modifications / repairs which have not been carried out by one of our authorised Service centres.
Warranty claim procedure
To ensure quick processing of your case, please observe the following instructions:
Please have the till receipt and the item number (IAN) 402446_2204 available as proof of purchase.
■ You will find the item number on the type plate on the product, an engraving on the product, on the front page of the operating instructions (below left) or on the sticker on the rear or bottom of the product.
If functional or other defects occur, please contact the service department listed either by telephone or by e-mail.
You can return a defective product to us free of charge to the service address that will be provided to you. Ensure that you enclose the proof of purchase (till receipt) and information about what the defect is and when it occurred.

You can download these instructions along with many other manuals, product videos and installation software at www.lidl-service.com.
This QR code will take you directly to the Lidl service page (www.lidl-service.com) where you can open your operating instructions by entering the item number (IAN) 402446_2204.
Service
GB Service Great Britain
Tel.: 0800 404 7657
E-Mail: kompernass@lidl.co.uk
IE Servicelreland
Tel.: 1800 101010
E-Mail: kompernass@lidl.ie
IAN402446_2204
Importer
Please note that the following address is not the service address. Please use the service address provided in the operating instructions.
KOMPERNASS HANDELS GMBH
BURGSTRASSE 21
44867 BOCHUM
GERMANY
www.kompernass.com
Inhaltsverzeichnis
Einführung 30
KOMPERNASS HANDELS GMBH
BURGSTRASSE 21
44867 BOCHUM
DEUTSCHLAND
www.kompernass.com
Table des matieres
Introduction 58
Chere cliente, cher client,
Chere cliente, cher client,
KOMPERNASS HANDELS GMBH
BURGSTRASSE 21
44867 BOCHUM
ALLEMAGNE
www.kompernass.com
Inhoud
Inleiding. 88
WAARSCHUWING! LETSELGEVAAR!
KOMPERNASS HANDELS GMBH
BURGSTRASSE 21
44867 BOCHUM
DUITSLAND
www.kompernass.com
Obsah
Uvod. 116
Informace k tomuto navodu k obsluze 1 1 6
Autorske pravo 116
Pouziti v souladu s urcenim 1 16
POZOR! HMOTNÉ ŠKODY!
POZORI HMOTNÉ SKODYI


Do nadrze na cerstvou vodu 1 plhte pouze studenou a z teplou vodu z vodovodu (do max. 60^) nebo destilovanou vodu. Nepouziveje vrouci vodu.
POZORI HMOTNÉ SKODY!
KOMPERNASS HANDELS GMBH
BURGSTRASSE 21
44867 BOCHUM
NEMECKO
www.kompernass.com
Spis tresci
Wstep 144
KOMPERNASS HANDELS GMBH
BURGSTRASSE 21
44867 BOCHUM
NIEMCY
www.kompernass.com
Obsah
Uvod. 172
KOMPERNASS HANDELS GMBH
BURGSTRASSE 21
44867 BOCHUM
NEMECKO
www.kompernass.com
Indice
Introduccion. 200
Characteristicas techniques
KOMPERNASS HANDELS GMBH
BURGSTRASSE 21
44867 BOCHUM
ALEMANIA
www.kompernass.com
Indholdsfortegnelse
Introduktion 228
Rengoring of taeppegulve 239
Shift of snavsfilter 247
Bestilling af reservedele 247
Opbevaring 247
Afhjaelpning of feil 249
Bortskaffelse 251
Bortskaffelse of Produktet 251
Bortskaffelse of emballage 251
Tekniske data 252
Garanti for Kompernass Handels GmbH 252
Service 253
Importor 254
Introduction
Shift of snavsfilter
KOMPERNASS HANDELS GMBH
BURGSTRASSE 21
44867 BOCHUM
TYSKLAND
www.kompernass.com
Indice
Introduzione 256
KOMPERNASS HANDELS GMBH
BURGSTRASSE 21
44867 BOCHUM
GERMANIA
www.kompernass.com
Tartalomjegyzék
Bevezetó 284
KOMPERNASS HANDELS GMBH
BURGSTRASSE 21
44867 BOCHUM
NÉMETORSZÁG
www.kompernass.com
Kazalo
Uvod. 312
Informaciono teh navodilih za uporabo. 312
KOMPERNASS HANDELS GMBH
BURGSTRASSE 21
44867 BOCHUM
NEMCJIA
www.kompernass.com
Pooblaščeni serviser
SI ServisSlovenija
Tel.: 080 080 917
E-Mail: kompernass@lidl.si
IAN 402446_2204
Garancijski list
KOMPERNASS HANDELS GMBH
BURGSTRASSE 21
44867 BOCHUM
NJEMAČKA
www.kompernass.com
Cuprins
Introducere 366
Informati privind aceste instruanti deutilizare. 366
Dreptul de autor 366
KOMPERNASS HANDELS GMBH
BURGSTRASSE 21
44867 BOCHUM
GERMANIA
www.kompernass.com
CbДьрЖанne
BbVeJeHne 394
HOpMaun OTHOHO TOBa pBkoBOJCTBO 3a Notpe6nten. 394
AbTopcko npaBO 394
Ynptpe6a no npedHa3haueHne 394
YkaaHna 3a 6e3onachOCT 395
OnncanHe Ha ypea 398
OKOMNJIeKTOBka Ha doCTaBkata N HcneKzna cIe TpaHcnpTnpaHe . . 399
Pnyckahe B ekcnnoatau . 399
MOnTnpaHe Ha ypeHa 399
Yka3aHna 3a 6e3oNaCHOCT

ONACHOCT OT TOKOB YДAP!
BknoubaTe ypea cAmo KbM nHCTaHpaH cnopei HnCTpyKunTe KOHTAKT C HanpeXeHne Ha MpeXata 220-240 V\~,50-60 Hz.
BHHaHn H3KJIIOUbaIte MpeXOBnKa6eI, KATO H3DbpNaTe ⅢeNcEJa OT KOHTaKtA. He IbpaIte camna MpeXOB Ka6eI.
He orbbaite n He npitnckaite Mpexobna Ka6eI. Ipoka paite ro taKa, Ye HNKoJa He Moxe Da Ro HacTbnn nn Ja Ce CnBHe B Hero.
Повреedingи сении илкавелпгбва He3a6abHо дacce smehrt OT otopn3npaHn cneuaJIHCTN nHn cepBn3HaTaCnyk6a, 3a da ce n36erhat onachoctn.
Повама Te Ka6eT He He Me MOKn HABJXHBA. POKaTe ro TaKa, Ye Na He MoKe Da 6bIe npITNCAT nN NOBpeH.
He npokapBaIte ypea Bbpxy MpexOBnKa6eI.
- При Ненинно Функционираиме ИЗКИювайт ecenca ot KOHTAKTA.
- Прени наньнITE урета с вда, ду поочипешни Смени пинадлесхов,在ьрв Икючete усencela OT KOHTAKT.
Ako ypeBte noBpeDeH, He ro n3noJ3BaIte noBeue, 3a da n36eHete onacHOCTn.
H3noJI3BaIe ypea cAmO cbc cyxn pbue n C o6yBKn (He Ha 6oc KpaK). ITo3n HauHH HamaJIaBATE npOTuHaHTo HA ONACHN TOKOBe ppe3 TAnOTO B CnyaH Ha NOBpeDa.

I3noJI3BaIte ypeIa cAmO B 3aTBoPeHn NOMEuEHH, He Ha OTKpHTO.

ONACHOCT OT TOKOB yДAPI!
He notanayte ypea BbB BOa nn TeuHOCTn.
Hnkora He HacouBaIte ypea KbM YyBCTBHTeHN Ha BOda npedmetn, noIOBe nnn IOBbpxHOCTn.
To3n ypei Moxe da ce n3no13Ba ot deca Ha Bb3pact Ha 8 roHH, KaKTO H OT IuCa C OrpaHnueHn Fn3nueckn, CetHBn Hnn YmCTBeHN cNoCo6HoCTn Hnn 6e3 ONHT N 3HaHnA, aKO ca PnD Ha6JIHOJeHne Hnn Ca INHcTpyKTHnpaHn PO OTHOWeHne Ha 6e3OJaCHata ynotpe6a Ha ypea n pa3bnpat onacHoCTHe, npOn3Tuau n ot pa6otata c Hero. He donyckaYte Deua da nrgpar T cypea.
NocHTBaHTo H noDpBxKata O T cTpaHa Ha nOtpe6nteH He Tp8Ba Da Ce H3BbPWBat OT Deca 6e3 Ha6IIOJeHne.

ПРЕДУПЕЖДЕHNE! ONACHOCT OT HAPAHЯBAHE!
H3noJ3BaIte cAmO npenOpbuaHnte OT npOn3BOIDTeJI opnHaJIHn npHaIeXHoCTn 3a To3n ypeI.
H3noI3BaIte cAmo HndJeXHo n H3qNo MoHTnpaH ypeI.
YpeIbT He Tp6Ba Da ce H3noJ3Ba, aKO e nJaI, npOnycka BOda Hn Ca HAnue BnIMn NOBpeI.
H3dbpBbAte 7eCepa OT KOHTa TApN BCaKO npeKbcBaHe, KAKTO H cIeI npNKIOUbaHe Ha ynoTpe6a N npEiN BCaKO IOuNCtBaHe.
BbTe Oco6eHO BnMaTeJHn, KOrato H3NoJ3BaTe ypeJa Ha CtbI6n nn CTbnaJa.
He n3noJI3BaIte ypeJa 3a H3cMyKBAHe Ha XHmNueCKn Hn OTPOBHN MaTePnaJIH nn Bb3PiAmEHmN/TopmN TeUHOCTn.

BHIMAHNE! MATEPNAJIHN UETN!
BHHaHn B3eMaIte NOi BHNMaHne YKa3aHnra 3a NouchTbaHe Ha npOn3BOAnTeHa KInMa. IpeN Da 3aNoChTe no-ocHTBaHTo, npOBepTe DoNbHnTeHNO DaII NkJIIMbTe rOJeH 3a NouchTbaHe C ypeDa.
He octabraye ypea da cTOn BkHouen bIro BpeMe Bbpy IbpBeHN NOIOBE. PpBOTO MOKe da ce pa3dye.
He n3noJI3BaIte ypeJa c npa3eH pe3epBoAp 3a BOJa. B npotInBeH cnUayn nomnata ue pa6OTn Ha npa3eH xoJn MoKe Ja nperpee.
He noctabyte npedmetn B OTbOpnte Ha ypeia.
He n3no3BaIte ypea c 6noknapHn OTBOpn. NocCTBaIte OTBOPHTe OT 3aMbpcraBAHna, MbXyeta, KOCMn H BCNUKO, KOETO MOKe Da Bb3npenTCTBa Bb3DyUHATA uRPKyIauHna.
BHHMaBaIe Ja He 3acMyKBaTe TBbpH, OCTpn HnpeXeH npEiMeTH (HaNP. CbKJa, rBO3JeH, BnHTOBe, MOHeTH n Ip.) cypeDa.
YBepete ce, ye ypeT, MpeXOBnT Ka6eI nn Ie nCenbT He Bn3aT B CbnpNKOCHOBeHne C N3TOUHN Hq TOnnHa KATO KOTIOHN IIN OTKpTN IIaMbun.
3a pa6ota c ypeda n3noJ3BaIte cAmO TeuHocHTe, nocouEHn IO BnI N KOJIyEcTBO B TOBa pBKOBoDcTBO 3a Notpe6nte-
IopBpeMeHa pa6ota HnKOra He octabYpeJa 6e3 Ha6JIIOJENHe.
Описане на урEDA
(Bx. hrypnte Ha pa3bBaaata ce ctpaHua)
AnrypaA:
Tnno Ha ypea c pbkoxbatka
KoHTeHep 3a Mpbcha BOda
3 Donha yact c kamepa 3a yetkata
BaanuKa
5 Ibpxa3a poKOBata yeTKa
6 PonkoBa yetka
3aunta ot npbckn
Nonnabbk
Kanak Ha KOHTeHepa 3a Mpbcha BOna
10 ①HNTbp3a3AmbpcBAHH
10 KoHTeHep 3a uHCTa BOda
12 HndnkaTOp 3a nouchTBau pa3TBOP
13 PpeBknHouBaTeJ 3a KInnM Cbc CBeToIOHO
14 PpeBknIOyBaTeJ 3a TBbpI NOI (cbc CBeToIDNoI)
15 PpeBknOuBaTeI 3a noHCTBaU pa3TBOp
16 Topennbpxka3a ka6ena
17 MpexkoB ka6en c uencen
18 Ⅱpbska3aHOceHe
19 PpeBknIOyBaTeI 3a CAMOnOuHCTBaHe
20 DOnen Hbpxka3a ka6ena
OKOMПЛЕKTOBKa Ha DoCTABKATA N INHCпкця сеД Транс不动产анe
13BaTe BcHKn qactn Ha ypea n pkoBocTBoto 3a notpe6nteTOn oakOBkata.
OtrpaHETe BCnKOnaKaOBbUHN MaTePnAnN eBHeTyrAnHn fOJNa n CTnKePn.
PpOBepTe OKOMnNEKTOBkata Ha IOCTABkata. OKOMnNEKTOBkata Ha IOCTABkata ce cbctOH OT cneHNTE KOMNOHEHTN (BX. HpyrHte Ha pa3rbBaata ce ctpaHua):
- IOIOUHCTaUka
TAYHOHa ypeda
BQHHK
-ДьржачзapokobataЧETka
pBKOBOCTBO3aNOTpe6nteTn
YKABAHVE
PPOBepeteIOCTABkata 3a KOMnneKTHOCT N BIDMN NOBpeH.
Pn HnBnHa DoCTABKa nn NoBpeHn NopaHn Noa OnaKOBKa nn nIeH, nOlyueHn np TpaHCnOpTa, ce OsbpHete KbM ropeuata nn Hn Ha cepBn3a (Bx. InaBa CepBn3).
3a n3KIOUHTe ypeia, HATNCHETe NOBTOPO NoBTOPO NoBTOPO NoBTOPO NoBTOPO NoBTOPO NoBTOPO NoBTOPO NoBTOPO NoBTOPO NoBTOPO NoBTOPO NoBTOPO NoBTOPO NoBTOPO NoBTOPO NoBTOPO NoBTOPO NoBTOPO NoBTOPO NoBTOPO NoBTOPO NoBTOPO NoBTOPO NoBTOPO NoBTOPO
Zapwote autov tov KwaQA QR e to smartphone n to tablet oac.
KOMPERNASS HANDELS GMBH
BURGSTRASSE 21
44867 BOCHUM
TEPMANIA
www.kompernass.com

KOMPERNASS HANDELS GMBH
BURGSTRASSE 21
44867 BOCHUM
GERMANY
www.kompernass.com
Last Information Update · Stand der Informationen · Version des informations · Stand van de informatie · Stav informaci
Stan informaci · Stav informacié · Estado de las informaciones · Tilstand of information · Versione delle informazioni
Informaciok allasa · Stanje informacij · Stanje informacija · Versiunea informatiilor · Aktyannoct Ha INHOpmauneta
Ekoon wv mnpofoipw: 06/2022-Ident-No.: SHBR560B1-052022-1
IAN 402446_2204