
MGR09M - Grill plate MPM - Free user manual and instructions
Find the device manual for free MGR09M MPM in PDF.
| Brand | MPM |
| Model | MGR09M |
| Product type | Electric grill plate |
| Power supply | 220-240 V ~ 50/60 Hz |
| Rated power | 2000 W |
| Standby power consumption | 0.2 W |
| Power consumption in off mode | 0.01 W |
| Power cord length | 0.75 m |
| Plate material | Non-stick coating |
| Control type | Rotary thermostat |
| Temperature ranges | Light (gentle) to Dark (high) |
| Indicator lights | Power indicator and thermostat indicator |
| Operating configurations | Closed (double-sided) or open (double surface) |
| Fat collection system | Drainage gutter with 2 removable containers |
| Carrying handle | Integrated into lid |
| Safety lock | Lid locking slider |
| Non-slip feet | Yes |
| Cleaning plates | Damp cloth, non-abrasive |
| Cleaning grease containers | Hand wash, not dishwasher |
| Intended use | Household use only |
| Recycling | Compliant with WEEE (Waste Electrical and Electronic Equipment) |
Frequently Asked Questions - MGR09M MPM
User questions about MGR09M MPM
0 question about this device. Answer the ones you know or ask your own.
Ask a new question about this device
Download the instructions for your Grill plate in PDF format for free! Find your manual MGR09M - MPM and take your electronic device back in hand. On this page are published all the documents necessary for the use of your device. MGR09M by MPM.
USER MANUAL MGR09M MPM
C2 Peune verme, fe s poudvian mae.
Fevor bokrbi, buokrki spockni a zvemc.
Vas k zemnanti si a srokou nabokiu
produktu jafjmy MPM
DE WIRANSCHEN IINN ZUBICKNORI
bei der Derivate unsere Produkte und
wer ernuntet. Sie das erzeugelte
Handelsanlage ber der Immie MPM zu
dutter.
Mere soov, on the naeuotne roe tocote kasaanrste soaovite fau kustada mea gaauutukku kaubanoitukku kau kumr MP
1.2.3.4.5.6.7.8.9.10.11.12.13.14.15.16.17.18.19.20.21.22.23.24.25.26.27.28.29.30.31.32.33.34.35.36.37.38.39.40.41.42.43.44.45.46.47.48.49.50.51.52.53.54.55.56.57.58.59.60.61.62.63.64.65.66.67.68.69.70.71.72.73.74.75.76.77.78.79.80.81.82.83.84.85.86.87.88.89.90.91.92.93.94.95.96.97.98.99.100
EN/We wish you satisfactor from using the product and invite you to check a wide range of other MPM appliances.
Es el去除os satisfacion con el use de notre producto y le envitamos a apreciarce la amora oliva commercial de notre employe MPM
Fouc you soutivlss selution au lifetation de notre produet et vus invite a profite de Iore commercie slande du lore entreprene MEM
HU Pemeljuk, temeljuk hamsialivskii oblasted koz. 5 mezhikov hoja smoric. meg cekur sieves khereskoderni Kralatitel MPM
MPMagdSA
INSTRUCTIONS ASSOCIATED WITH USE SAFETY
Before use, thoroughly read the operation manual.
Extreme care is required in case of children presence in vicinity of the appliance!
- Do not use your device for any other purpose except of its assignment.
Do not immerse the appliance, its cord and plug in water or any other fluids!
- Do not leave the device without supervision in course of its operation.
Always pull out the plug from the socket unless the appliance is used or before its cleaning.
Do not use the device in case of its damage, also if its cord or plug is damaged – in such case the appliance should be handed over to an authorized service shop for repair.
The use of any accessories not recommended by the manufacturer may result in damage of the appliance, fire or injuries.
Do not use the device outdoors.
- Do not hang the cord on any sharp edges and prevent any contact with hot surfaces.
Do not stand the device in vicinity of electric and gas cookers, burners, ovens etc.
Do not touch any hot surfaces in course of roasting - open the device by means of holder designed for this purpose only.
Prior to commencing the cleaning, pull out the plug from the plug socket and allow the device to cool completely.
When opening the appliance in course of roasting, proceed carefully owing to hot damp from the area under the heating panels!!
The device should be connected into the socket with grounding pin!
This equipment may be used by children of at least 8 years of age and by persons of diminished physical, mental capacity and lack of experience and knowledge of the equipment if supervision or instruction is provided regarding the safe use of the equipment so that the hazards involved are understood. Cleaning and mainte nance must not be performed by children, unless they are over 8 years old and supervised by an adult. Unsupervised children can not perform cleaning and maintenance of the product.
Store the appliance and its cord out of reach of children under 8 years of age.
Children shall not play with the appliance
Use on a flat, stable surface.
The equipment is not designed to work with external schedulers or a separate control system.
Clean the device, in particular parts being in direct contact with food, before first use, immediately after finishing work and if the device has not been used for a long time. The procedure is described in details in the "CLEANING AND MAINTENANCE" section.

Warning! Hot surface! The symbol on appliance indicates that its components become hot during operation.
Do not pull the plug by holding the power cord.
Do not connect the power plug with wet hands.
The temperature of surfaces may be higher when the appliance is in use.
This appliance is intended for household use only.
-
To avoid the risk of fire, do not place the appliance near flammable objects, such as curtains, tablecloths, etc.
-
Keep your children safe: do not leave any parts of the packaging readily accessible (i.e. plastic bags, cardboard boxes, polystyrene inserts, etc.).
WARNING! Never let children play with plastic film or bags. Choking/ asphyxiation hazard! WARNING! Oils and fats may burn when overheated. Please be careful!
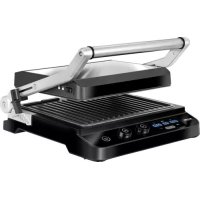
PRESS GRILL OVERVIEW
-
Press grill base
-
Thermostat knob
-
Top lid
-
Thermostat indicator lamp
-
Non-stick hot plates
-
Power indicator lamp
-
Top lid upright lock
-
Anti-slip feet
-
Top lid slider latch
-
Fat gutter
-
Top lid handle
-
Fat drip pan (2x)
Depending on the recipe and/or the grilled food product and/or its size or quantity, the press grill can be used in two configurations:
-
With the hot plates closed: the top and down sides of food products are grilled at the same time; the food products are processed fast and with a well-controlled, nearly uniform doneness on both sides.
-
With the hot plates open: this configuration is the next best thing to natural grilling on an open flame; the grilling surface is two times bigger than when the hot plates are closed.
BEFORE FIRST USE
- Unpack the press grill and remove all plastic bags, labelling stickers, filling materials and transport locks.
- Verify that the power ratings on the rating plate of the press grill match your power mains system.
- Slide the top lid slider latch (5) open (to the 'open padlock' mark) and lift the top lid (2) open. The top lid can be locked closed with the top lid slider latch at the 'closed padlock' mark.
- Clean the hot plates (3) and the fat drip pans (12) thoroughly with a wet cloth and wipe them dry.
- Before grilling for the first time, the hot plates must be properly conditioned by running them hot. Place the press grill on a firm, dry, level and smooth surface, plug the power cord to the mains, and set the thermostat knob (7) to 'Dark'. Leave it running for 5 minutes. Next, unplug the press grill from the mains and wait until it cools down completely. The hot plates may smoke slightly during this process. This is natural and will no recur during further use.
- Wipe the hot plates with a damp cloth and wipe them dry.
USING THE PRESS GRILL WITH CLOSED HOT PLATES
CAUTION! Before starting the press grill, make sure it is dry and that the room is well ventilated.
- Place the press grill on a firm, dry, level and smooth surface.
- Place one of the fat drip pans (12) under the mouth of the fat gutter (11).
- Unlock the top lid slider latch (5) and lift the top lid upright.
CAUTION! Lift the top lid (2) by the handle (6) only.
- Spread some cooking fat on the hot plates (3). Close the top lid.
-
Plug in the press grill to the mains. The power indicator lamp (9) will go on. The thermostat indicator lamp (8) will be on when the hot plates are heating up. Set the desired grilling temperature with the thermostat knob (7). The 'Light' setting is for slow grilling of heat-sensitive food products. The 'Dark' setting is for grilling meat. The thermostat indicator lamp (8) will go off once the set temperature is reached.
-
Lift the top lid, place the food products on the bottom hot plate, and close the top lid while gently pressing it down. If the food products to be grilled are fragile, lock the top lid ajar by moving the top lid slider latch (5) to the mark 'I' (wide ajar) or 'II' (narrow ajar). The grilling time will depend on the type of the food products to be processed. The press grill can be used to process meat, fish, shish kebabs, vegetables, etc.
- The thermostat indicator lamp (8) will go on and off during use. This means that the press grill is maintaining the set temperature.
- Hot steam may burst when opening and closing the top lid to check the doneness. This is a normal effect of processing food with heat. Adjust the grilling temperature with the thermostat knob according to the desired grilling effect.
- The fat melted out of the food will flow out of the fat gutter (11) to the fat drip pan (12). Empty the fat drip pan frequently to prevent overflow and spills.
CAUTION! Risk of burns! The fat flowing out to the fat drip pan is hot!
- Remove the processed food from the press grill with grilling tongs or utensils made of wood. Do not use metal utensils, they might damage the non-stick coating of the hot plates.
- When done grilling, you can either put another serving in the press grill, or turn off the press grill: turn the thermostat knob to 'O' and unplug the power cord from the mains.
- Leave the press grill to cool down and clean it as explained in Section "CLEANING AND MAINTENANCE".
USING THE GRILL WITH OPEN HOT PLATES
CAUTION! Before starting the press grill, make sure it is dry and that the room is well ventilated.
- Place the press grill on a firm, dry, level and smooth surface.
- Press and hold down the top lid upright lock (4) while lifting the top plate (2) all the way to the back until the handle (6) is resting on the surface. Both hot plates are now facing up (Fig. 1).

CAUTION! Do not open the press grill completely when hot.
- Place a fat drip pan (12) under the fat gutter (11) of each hot plate.
- Spread some cooking fat on the hot plates (3).
- Plug in the press grill to the mains. The power indicator lamp (9) will go on. The thermostat indicator lamp (8) will be on when the hot plates are heating up. Set the desired grilling temperature with the thermostat knob (7). The 'Light' setting is for slow grilling of heat-sensitive food products. The 'Dark' setting is for grilling meat. The thermostat indicator lamp (8) will go off once the set temperature is reached.
- Place the food to be grilled on both hot plates. The grilling type will depend on what food products you want to process. Flip the food over after some time to have it done even. Adjust the grilling temperature with the thermostat knob according to the desired grilling effect.
- The thermostat indicator lamp (8) will go on and off during use. This means that the press grill is maintaining the set temperature. The thermostat indicator lamp (7) will do this more frequently, since the hot plates are open wide, cool down faster and must be reheated more often.
- The fat melted out of the food will flow out of the fat gutters (11) to the fat drip pans (12). Empy tly the fat drip pans frequently to prevent overflow and spills.
CAUTION! Risk of burns! The fat flowing out to the fat drip pan is hot!
- Remove the processed food from the press grill with grilling tongs or utensils made of wood. Do not use metal utensils, they might damage the non-stick coating of the hot plates.
- When done grilling, you can either put another serving in the press grill, or turn off the press grill: turn the thermostat knob to 'O' and unplug the power cord from the mains.
- Leave the press grill to cool down and clean it as explained in Section "CLEANING AND MAINTENANCE".
CAUTION! Do not close the top lid until the press grill cools down completely. Risk of burns!
CLEANING AND MAINTENANCE
- Before attempting to clean the press grill (and when done grilling), unplug it from the mains and wait until it cools down.
CAUTION! Do not submerge the press grill in water or other liquids! Do not wipe the hot plates with rough scourers or sponges as you may damage the hot plates.
- Clean the hot plates of fat with paper tower. Next, wipe the hot plates gently with a slightly damp, soft cloth and finally wipe them dry. If the grime is persistent, spread some cooking oil to make it come off easier.
CAUTION! Do not let water penetrate underneath the hot plates when cleaning. This may damage the press grill with a risk of electrocution!
- Wash the fat drip pans with lukewarm water and a mild dishwashing detergent, rinse them clean, and leave to dry. The fat drip pans are NOT dishwasher safe.
- Clean the outer surfaces of the press grill with a damp cloth and wipe them dry.
TECHNICAL DATA
| Model MGR-09M | |
| Power supply 220-240V 50/60HZ | |
| Power 2000W | |
| Off and standby modes available available | |
| Standby power consumption 0,2W | |
| Power consumption in off-mode 0,01W | |
| Power consumption in network standby mode | - |
| Automatically enters standby mode after - | |
| Automatically enters shutdown mode after - | |
| Network standby mode if the device has an app connection function - | |
| Length of mains cable 0,75M |
CE
NOTE! MPM agd S.A. reserves the right to introduce technical modifications!
Proper disposal of the product (waste electrical and electronic equipment)

Marking on the product indicates that after the service-life of the product expires, it should not be disposed with other type of municipal waste. Used equipment may have a negative impact on the environment and health of people due to potentially containing hazardous substances, mixtures and components. Mixing electric waste with other types of waste or disassembling those in an unprofessional manner may cause a release of substances that are hazardous to the environment and health.
Used equipment should be handed-over to a point for collection of electric waste. In order to obtain detailed information regarding the electric waste collection points, the user should contact the municipal point of electric waste collection or used equipment processing department.
BESCHRIJVING VAN HET APPARAAT
He BeishaIte npOBoJa 3JIeKTpNueCKOrO nITaHnHa OCTpbIX rpaHx I He dOnyckaIte, UTObI OH KacalscrTopaUnx NobepxHocTei.
HeIb3aCTaBNTb yCTpO'cTBO B6JIIN 3N 3JIeKTPn-uecknx Ira3OBbIX PINT, rOpEJOK, dYXOBOK n T.I.
Bo Bpemr o6kapnBaHn r He npKacaiTecb K TropaM IOBepxHOCTaM UcTpoiCTBa dIa OTKpbIBaHn r Heo6XODmO pImMeHrToIbKO 3axBaT, PpeHa3HaueHHbI dIra 3Tnx ceJe.
Ipeed Tem, KaK Hauatb YnCTky UcTpoiCtBa, Heo6xOdIMO cHauaJa BbInHyTB WTeNceJIbHyIO BnIKy I3 p03eTKI 3JIeKTPocetN I NOdoXdaTb, POKa yCTpOiCTBO NOLHOCTbIO He OCTbIHET.
Pn OTKpbTn yCTpOcTbA BO BpeM 3aNe- KaHn Heo6xOndmo o6paatb oc6oe BnMaHne Ha BbIXoJusn TOpqn nap n3-NoI HarpeBaTeIbHbIX PnITOK!
VCTPOICTBO DOJXHO 6bITb NOIKJIoyeHO K THe3dY 3JIeKTPnueckoCetN, KOtOpoe NMeet 3a3eMJIIOUHNI WITbIPb.
Hactoee yctpoicTBO moKeT nCnoB30BaTbCn DeTbMn B Bo3pacte ot 8 let, nUaMn C OrgaHnueHHbIMn fN3nueckmN, yMCTBeHHbIMn cNoCo6HoCTaMn n IuCaMn C HeOcTaTkom OnbIta n 3HaHn o6 yctpoicTBe, eCIn oBecepeuen Haid3Op 3a HnMn nIe eCnn OHN 6bln npedBapntbHo npOHCTpykTnpoBa-
HbI OTHOCHTeJIbHO 6e3OaCHOrO nCNoJIb3OBaHNy UcTPOiCTBa N IOHMaIoT, B YeM COCTOnT ONaCHoCTb. Y6OpKa N O6cIyXnBaHne DoJxHbI PpOBODITbcr DaTbMn TOLbKO B BO3paCTe He MeHee 8 letn noi npncmOTpom. DeTu 6e3 npncmOTpa He DoJxHbI 3aHmAtbcra y6Opko/ 06cIyXnBaHnem.
KpaHnte yCTpoIcTBO n erO npOBoB B MeCTe, HeNoCTyINHom dIa deteN Do 8 neT.
D JeTN He DoJXHbI nrgaTb C yCTpO'CTBOM.
IcnoJb3yIte yCTpoIcTBO Ha rJaKoI n cTa-6nJIbHOI NOBepXHOCtN.
D6opudobAHne He npedHa3NaueHo IJpa- 60tbc npimHeHem BHeuHnx BpeMeHHbIX BblouateeNn OTeNbHOcCTeMbI peYnpOBKn.
Dunctky npnbopa, ocobenho ero yacte, HaxodnXcB HeNocpeCTBeHHOM KOHTaKe C nIe, cJeYeT npOBOntB nepei nepBbIM NcNoB3OBaHneM, cpa3y nocJIe NcNoB3OBaHnA nn eCNI np6Op He NcNoB3OBaJcB TeueHne dInTeNbHO BpemeH - npOceJypa OnpcaHa B rIabe «OUnCTKA N ObCLnyKINBAHNE».
BnMaHne! Topayan nobepxHoctb! CmB0J Ha np6ope yka3bIbaeT Ha To, YTO eroKOMNoHeNTbIMORYT HArpeBaTbC8 BO Bpempa60TbI.
TeMnepaTpya DoCTyHbIX NOBepxHocTei MoKet 6bITb BoIee BbICOKo, KoIda O6OpyDoBaHne BKJIIOUeHO.
- UcTpoIcTBo IpeiHa3HaueHo TOnbKO IJIa DoMaShHeRo yNoTpe6JIeHnra.
He yctaHaBnBaIte yCTpoiCtBO B6n3n IeKOBocPnAmEHaOuXxCaMaTePnaJIOB, TaKnx KaK StTOpbI, cKaTePTN n dpyrNe, 3TO MoKeT PpNBecTN K BO3rOpaHNo.
He BbITaCKnBaIte BnIky n3 po3eTKn PntaHn 3a shHyp.
He BCTaBJaITe BNJIky B PO3eTKy MOKpbIMn pykam.
Для 6e3oNaChocTn DeTei, noXaIyIcTa, He OCTaBЯIte CBObOdHNo DoCTyINHbIe yactN ynaKOBKn (ПлаCTNkoBbIe MeShKn, KapTOHHbIe Ko-рбkn, noJIncTnpoJ n T.d.).
DCTOPOXHO! He pa3pewaIte DeTAm nIrpTaB c PJIeHkoJ. ONaChocTb yDyShbJ! DCTOPOXHO! IpeperpeTbIe MacJa N JxNpbl MOrYT BOCPnIaMeHNtbcra. BydTe OCTopoXHbI!
ОпИСАнг ПИБОРА
- OchOBaHne rpiJra
- BepxHЯ KpbIuKa rpnJIa
- HarpeBaTeIbHbIe nlaCTnHbIC aHTINnpnrapHbIM NOKpbITnEM
- KhoNka 6IoknupOBkn paKnaIbIbA-Hnra rPnJIa DO OTKpbITOrO nIoJKeHnA
-
Полунок 6лokиювки верхен Крblшки
-
Puyka BepxHei KpbIuKn
- PeryjIaTOP TepMoCTata
- INHdNkaTOp TepMoCTata
- INHdNkaTOp NODKJIIOUeHnK CcTeN
- HeckoJIb3aIe HoxKn
- JKeNo6 dIa cTeKaHnJ KInpa
- POnDoH nIa CTeKaHnJ Xnpa (2 Wt.)
B 3aBnCmOCTn OT nOTpe6HocTeN, Tnna JapeHOn PnUu, ee pa3Mepa N KOJInuEcTBA, rPnIb MOxHO NcNoJb3OBaTb B DByX KOHfNpyaunx:
C3aKpbIToN KpbIuKoI - npOdyKTbIX OpoUo ONeKaOTcra CDbYX CTOpOH OndHOBpeMeHHO, npOceCC npnroTOBneHn npoxOnT cTporo KOHTpOInpyEmbIM O6pa3OM, BpeM JapKn KOpOTKoe, npOdyKTbI ONeKaOTcBA NOUTn TakoJ Xe CTenEH C ObexxCtOpOH
- C OTKpbIToH KpbIuKoH - XapKa Ha rpnHe Hau6OJee 6n3Ka K eCTeCTBeHHoH JxapKe Ha MeDJIeHHOM OrHe, OndHOBpeMeHHO BdBOe YBeJIuYBaETCa PLOUaDb rpnJa.
IPEEd IEPBbIM IcNoJIb3OBAHnEM
He BnKOpNCTOByIe npNcTpIe He 3a INoI O npN3Ha-ueHnA.
He 3aHypioTe npicTp, Ka6eIb Ta BnIky y Body cn iHsi pIDHH!
He 3aIIshaIte npicrtpii 6e3 haIy,doKn BIn npaioe.
BaBxIIN BNTaYBaTn BNkY 3 pO3eTKN, KOJI npJaHe BnKOpNCTOByETbcra.
He BnKOpNCTOBuYTe NOnKoJXeHn npNcTpi, 3OKpema, KOn KabeIb XnBLeHn a6o Wtencelb NOnKoJXeHi - y cIbOMy BnPaIky 3BepHITbcrdo ceptnphiKobahoro cepBicHoro zentpy dIra peMOHTy npNcTpoI.
BnKOpncTaHnA kcecyapib, He peKOMeHDoBaHnx Bnpo6HnKoM, MoKe np3BeCTn Do nOwKOJxEHHa PnCtpoI, noXeKi a6o TpaBM.
He BnKOpNCTOBuYTe npNcTpiH a BiDkPNTOMy noBiTpi.
He Biushaite shHyp Ha roctpi kpaia Ta He donyckaite KOHTaKTy 3 rapayMN IOBepxHЯMN.
He po3miuBAtn npncptpii no6n3y eJeKtpnHnx i r3OBHX nIHT, KOHOpOK, dYXOBOK TToIO.
IiD yac cmaxeHnHe TOpKaItecraPauX NOBepxOHb npnilady. IJIa BIDKpTTB BIKOPnCTOByTe IINSe pIn3HaueHy dIg zboTo pyky.
Ipeed ouhueHnM cnoaTKy BnIMiTb BNkY 3 po3eKn Ta 3auekaite, nOKn npncptiINOBHicTIO OXoJHOHe.
BidknpBaIoun npncpti nID yac cmaxeHHa, CTeKTe 3a BHXoDom rapyoi napn 3 6okiv HarpibaJIbHnx PNT!
BnKOpncToByte npncptiHa pIBHi i cTiKi noBepxHi.
Pnctpii noBHeH 6yTuPiKJIoueHn Do pO3eTKN 3 3a3emJenHЯM!
- Κим ппсстpoем можуь користуватся дiTи Віkom вid 8 рokiv, a takox ocobn 3 obmexkenmФi3nHIMn Ta po3yMOBIMN MOKJIINBOCTaMn,як iЛюн,якI He MaOTb DoCBiy Ta 3HaHb 7Odo NOBOdJxHЯ 3 ппстpoем,3a yMOBn,7O KOPNCTYBAHNByID6yBaTImetbcra nd Hargldom abo 6bye npOBedeHo iHCTpykTajx 7Odo 6e3neuHoro BnKOpNCTaHnR pIcSTPOU,7Ob BOHn YCBiDOMnI Nob'3aHi 3 cIm pr3nKn.ПрбираннЯ Ta texhichNe O6cnyroByBaHnHe IOBHHI BnKOHyBaTncs DaTbMn,ЯкIo IM He BnIOBnIoc8 pOKiv IBOnn He nepe6ybaOt b nId HarlaDom.ДiTn 6e3 HaIydy He NOBHHI BnKOHyBaTn pr6npaHn/6cIyROByBaHnY.
Pnctpi i Ka6eIb XnBHeHna 36epiratn y Micci, HeoCTynHomy dIra ITei BIKOM Do 8 pOKiB.
ДiTи He NOBHHi rpaTn 3 npNCtpoEm.
IpnctpiH He np3NaueHn dJa po6OTn 3 BnKOpncTahnM 3OBHIxHX TaMepiB a6o OkpeMoCnCTeMN DnCTaHcHOrO KepyBaHHra.
PnCtpiI np3NaueHo IiWe dIy DomaHbOTo BnKOpncTaHHra.
OuHsEHHa npnCTpoU, ocoblnBO deTalei, kI 6e3nocepedHbO KOHTaK TYOTb 3 iJKeU, cIiD npoBODNTn nepei nepShm BnKOpNCtAHNjam, BiDpa3y nicJa3akHueHn po60tn a6o JaKuo npncTpir He BnKOpNCTOByBaBCa TpNbAaHn Yac - npoceDypa onicaHa B po3diJI «OuHsEHHa TA DOΓIJa.
YBAG! Tapya noBepxHa! CnMBoJ Ha npiJaDi Bka3y€ Ha Te, 9o NOrO KOMNoHEnTm MoKytb HarpibatncrPi d qac po6OtN.
Tempepatpa doctynnx nobepxohb moke byn Bnso, kOn npictpi npaioe.
He po3miuye npncptpi no6n3y neKo3aMnctnx MaTePiaIiB, TaNX k 70pN, cKaTePTHn Ta iHsi, Ze MoXe np3BeCTn Do nOxexi.
He BnTraIte BnIky 3 pO3eTKN, TЯHyuN 3a Ka6eJIb.
He BCTaBJaIe BNlKy B pO3ETKy MOKpIMN pyKaMn.
BaДЯ 6e3neKn DiTeH He 3aIIuShaIte YacTnH ypaKOBKn y BiIbHOMy DoCTyni (NoJIeTnJIeHOBi NaKeTn, KapToHHi Kopo6Kn, NiHOnJaCT TToIo).
ПОЕРДЖЕHHЯ He do3BOJn dIyam rpaTncra niiBkoio. He6e3neka 3aDyxn!
Legible signature of the buyer

- INSTRUCTIONS ASSOCIATED WITH USE SAFETY
- Warning! Hot surface! The symbol on appliance indicates that its components become hot during operation.
- PRESS GRILL OVERVIEW
- BEFORE FIRST USE
- USING THE PRESS GRILL WITH CLOSED HOT PLATES
- CAUTION! Before starting the press grill, make sure it is dry and that the room is well ventilated.
- CAUTION! Lift the top lid (2) by the handle (6) only.
- CAUTION! Risk of burns! The fat flowing out to the fat drip pan is hot!
- USING THE GRILL WITH OPEN HOT PLATES
- CAUTION! Do not open the press grill completely when hot.
- CLEANING AND MAINTENANCE
- Proper disposal of the product (waste electrical and electronic equipment)
- BESCHRIJVING VAN HET APPARAAT
- DCTOPOXHO! He pa3pewaIte DeTAm nIrpTaB c PJIeHkoJ. ONaChocTb yDyShbJ! DCTOPOXHO! IpeperpeTbIe MacJa N JxNpbl MOrYT BOCPnIaMeHNtbcra. BydTe OCTopoXHbI!
- ОпИСАнг ПИБОРА
- IPEEd IEPBbIM IcNoJIb3OBAHnEM
Brand : MPM
Model : MGR09M
Category : Grill plate