
Kusan GXT 180 - Mouse TRUST - Free user manual and instructions
Find the device manual for free Kusan GXT 180 TRUST in PDF.



User questions about Kusan GXT 180 TRUST
0 question about this device. Answer the ones you know or ask your own.
Ask a new question about this device
Download the instructions for your Mouse in PDF format for free! Find your manual Kusan GXT 180 - TRUST and take your electronic device back in hand. On this page are published all the documents necessary for the use of your device. Kusan GXT 180 by TRUST.
USER MANUAL Kusan GXT 180 TRUST
Frequently asked questions: www.trust.com/22401/FAQ
Trust
Trust
natural_image
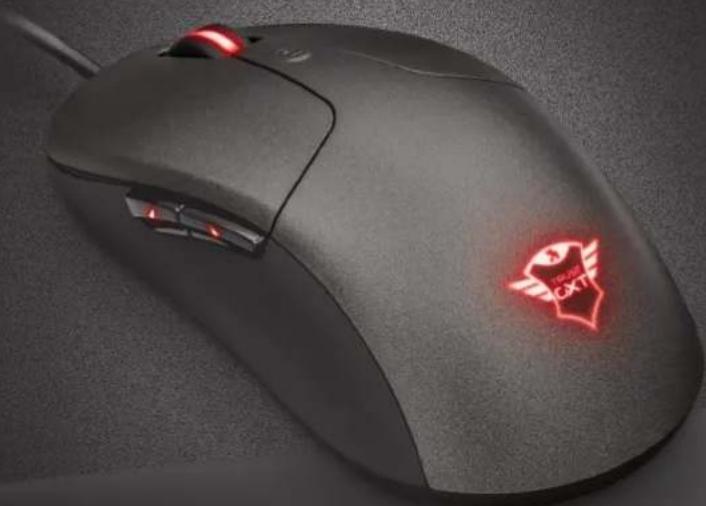
Close-up of a black computer mouse with red LED highlights on the side, showing no visible text or symbols.
text_image
TRUST GXTKUSAN
Gaming Mouse
text_image
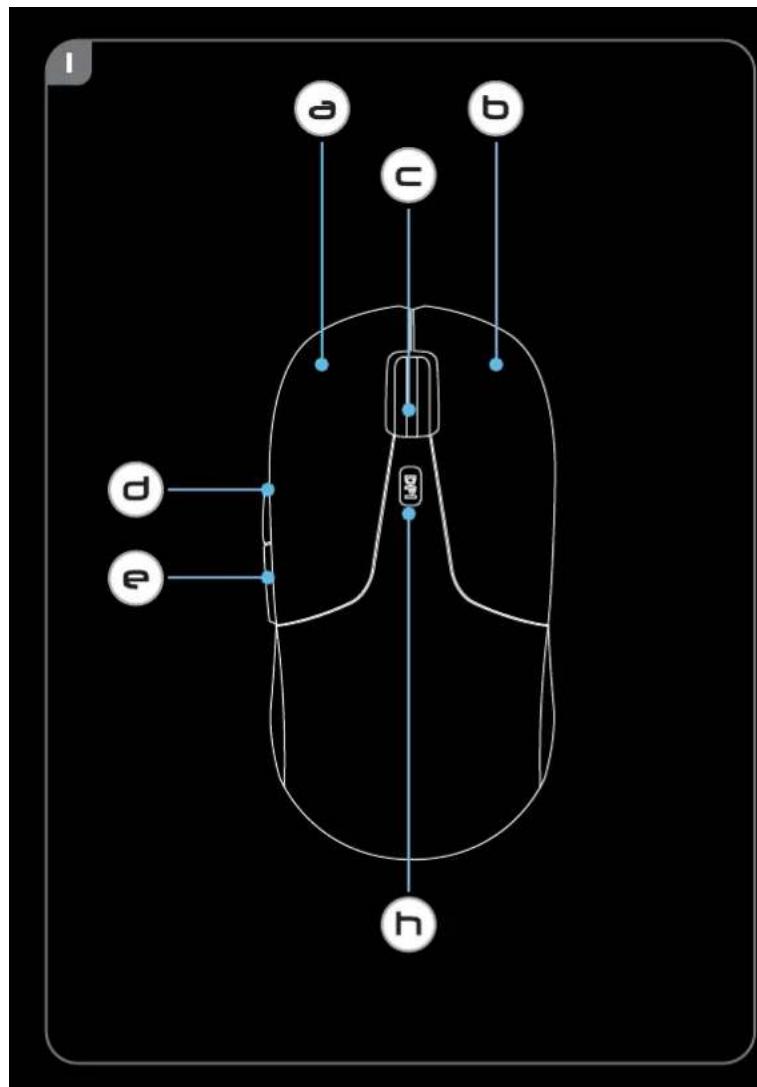
a b c d e h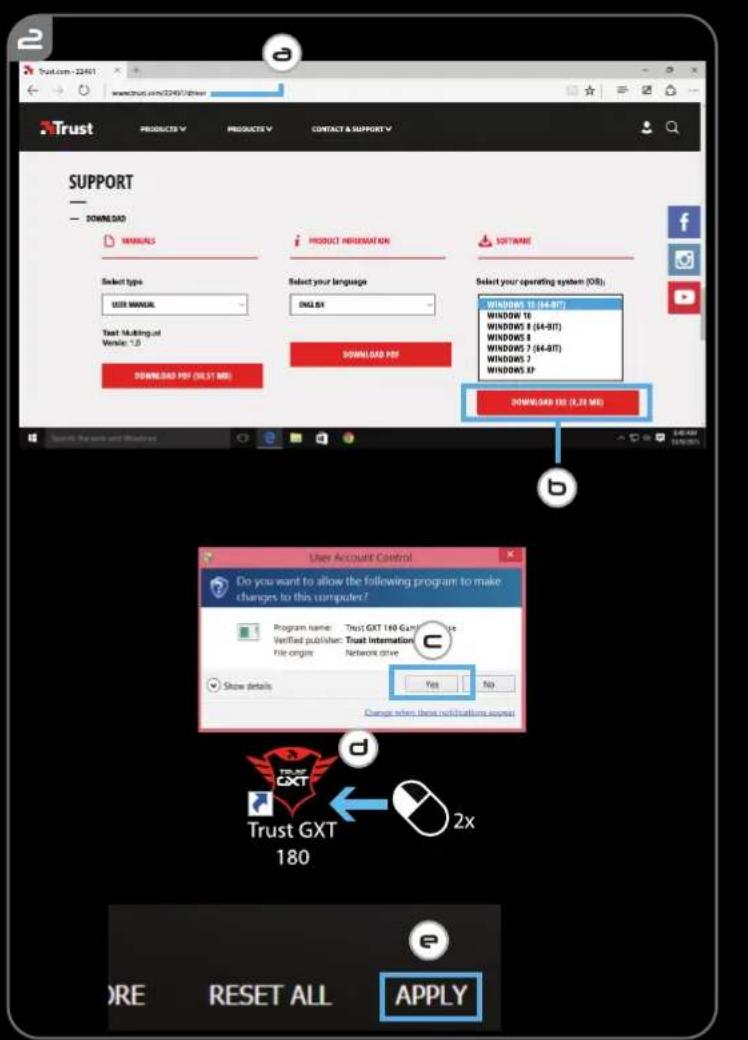
text_image
Trust.com - 22651 www.trust.com/22651/driver SUPPORT — DOWNLOAD MANUALS SELECT TYPE USER MANUAL Text Marketing.at Venue: 1.0 DOWNLOAD PDF (36.37 MB) PRODUCT INFORMATION SELECT YOUR LANGUAGE ENGLISH DOWNLOAD PDF SOFTWARE Select your operating system (OSB): WINDOWS 10 (64-87) WINDOWS 16 (64-91) WINDOWS 8 (64-97) WINDOWS 7 (64-87) WINDOWS 7 WINDOWS 42 DOWNLOAD EX (3.28 MB) User Account Control Do you want to allow the following program to make changes to this computer? Program name: Trust GXT 180 GXT Verified publisher: Trust International File origin: Network drive Show details Yes No Cancel when their notifications appear TRUST GXT 180 d 2x e ORE RESET ALL APPLY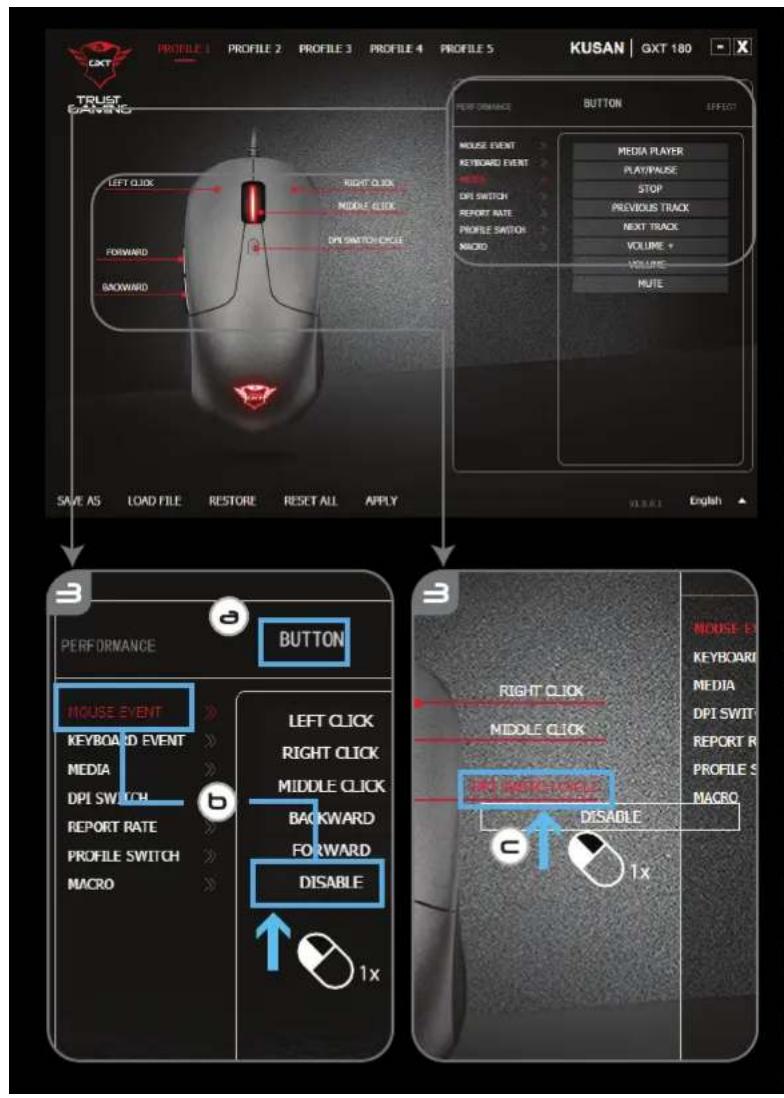
text_image
KUSAN | GXT 180 TPUUST EARNING LEFT CLICK FORWARD BACKWARD RIGHT CLICK MIDDLE CLICK DPI SWITCH/SPACE SAVE AS LOAD FILE RESTORE RESET ALL APPLY PERFORMANCE BUTTON EFFECT MOUSE EVENT MEDIA PLAYER KEYBOARD EVENT PLAY/Pause STOP DPI SWITCH PREVIOUS TRACK REPORT RATE NEXT TRACK PROFILE SWITCH VOLUME + MACRO MUTE VOLUME MUTE SELLER ENGLISH 3 PERFORMANCE BUTTON MOUSE EVENT RIGHT CLICK KEYBOARD EVENT MIDDLE CLICK MEDIA MIDDLE CLICK DPI SWITCH BACKWARD FORWARD DISABLE REPORT RATE REPORT R PROFILE SWITCH 1x MACRO 1x 3 PERFORMANCE RIGHT CLICK MIDDLE CLICK DPI SWITCH DISABLE NODES EX KEYBOARD MIDDLE CLICK MEDIA MEDIA DPI SWITCH PREVIOUS TRACK REPORT R PROFILE S MACRO 1x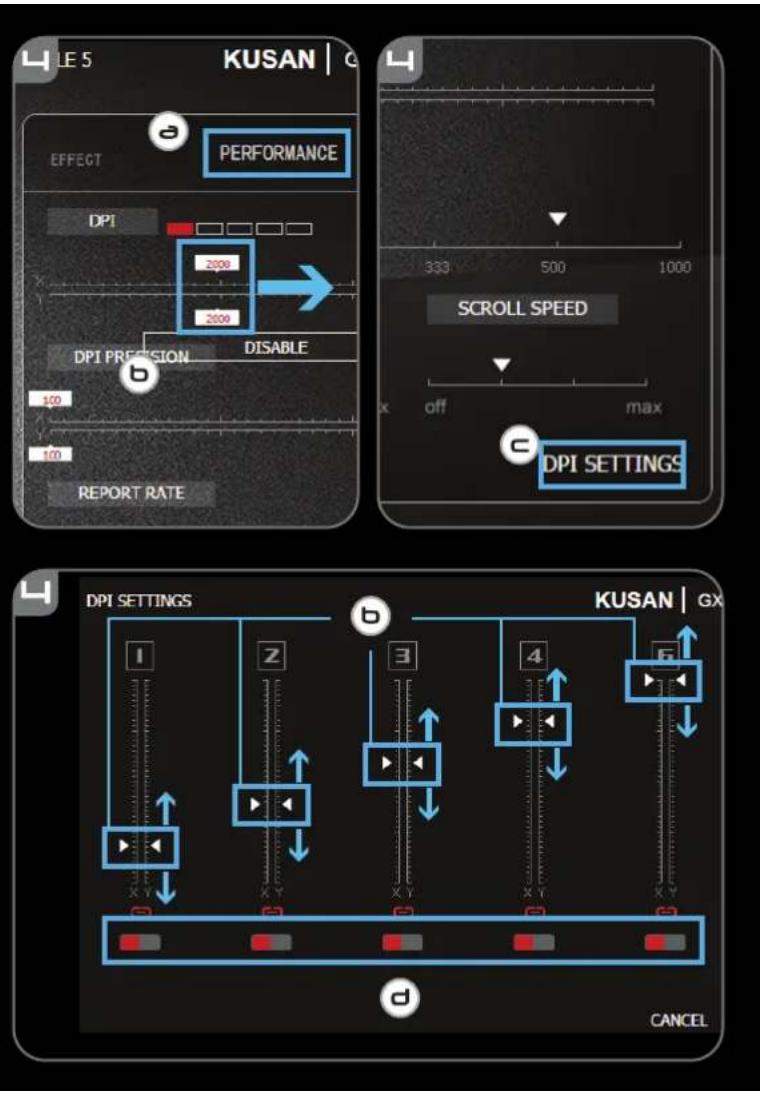
text_image
LE 5 KUSAN | G EFFECT PERFORMANCE DPI 2000 2000 DPI PRECISION DISABLE 100 100 REPORT RATE 333 500 1000 X off max c DPI SETTINGS DPI SETTINGS I Z b 3 4 6 KUSAN | GX X Y X Y X Y X Y X Y d CANCEL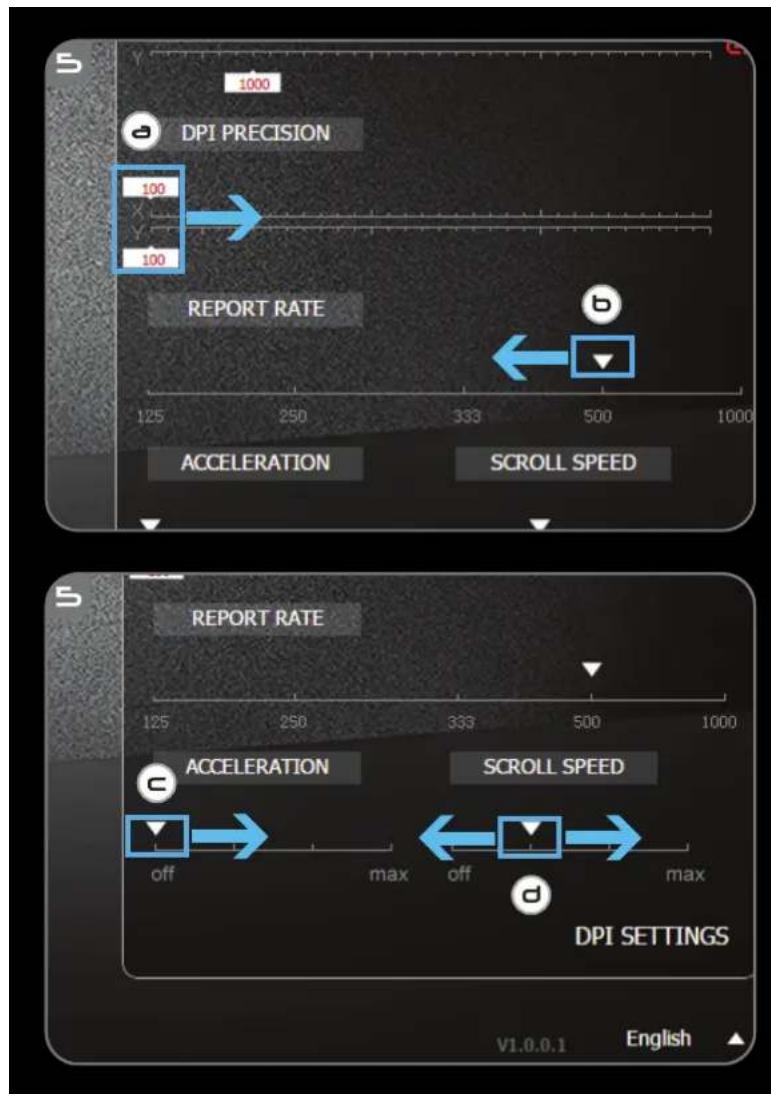
text_image
BUTTON EFFECT PERFORMANCE LIGHT EFFECT CONSTANT BREATHING COLOR SHIFT SWITCH OFF FLASH TEMPO SLOW MEDIUM FAST LIGHT BRIGHTNESS DIM MEDIUM BRIGHT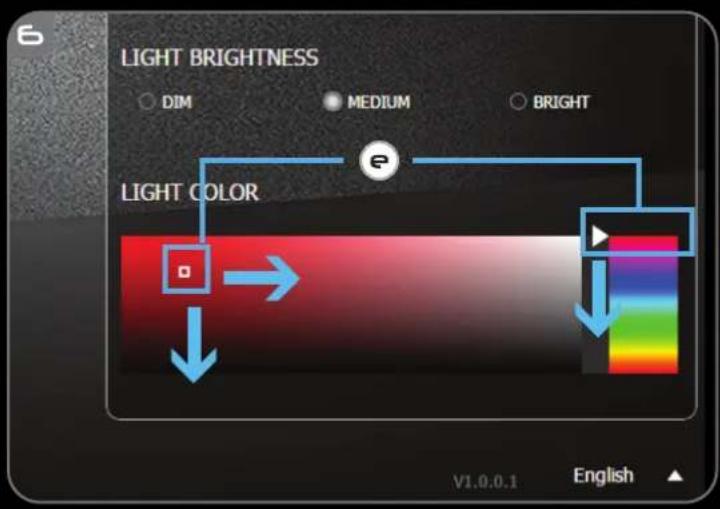
text_image
LIGHT BRIGHTNESS DIM MEDIUM BRIGHT LIGHT COLOR V1.0.0.1 English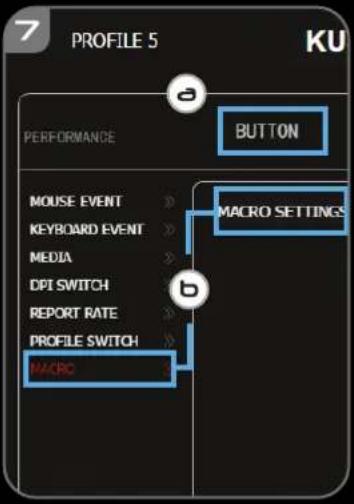
text_image
PROFILE 5 KU PERFORMANCE BUTTON MOUSE EVENT MEMS KEYBOARD EVENT MEDIA DPI SWITCH REPORT RATE PROFILE SWITCH MACRO MACRO SETTINGS a b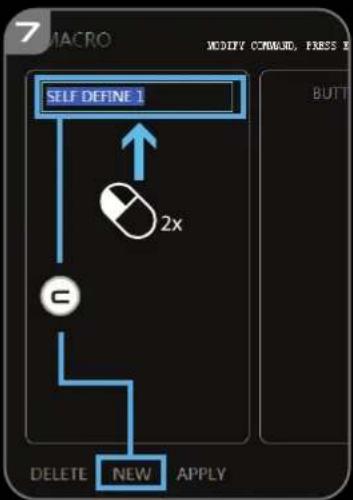
flowchart
graph TD
    A["SELF DEFINE 1"] --> B["2x multiplier"]
    B --> C["DELETE"]
    B --> D["NEW APPLY"]
    E["BUTT"] --> D
text_image
8 RIGHT CLICK MIDDLE CLICK FORWARD BACKWARD DISABLE PERFORMANCE BUTTON MOUSE EVENT KEYBOARD EVENT MEDIA DPI SWITCH REPORT RATE PROFILE SWITCH MACRO LOL - Katarina MACRO SETTINGS 1x 1x LOL - Katarina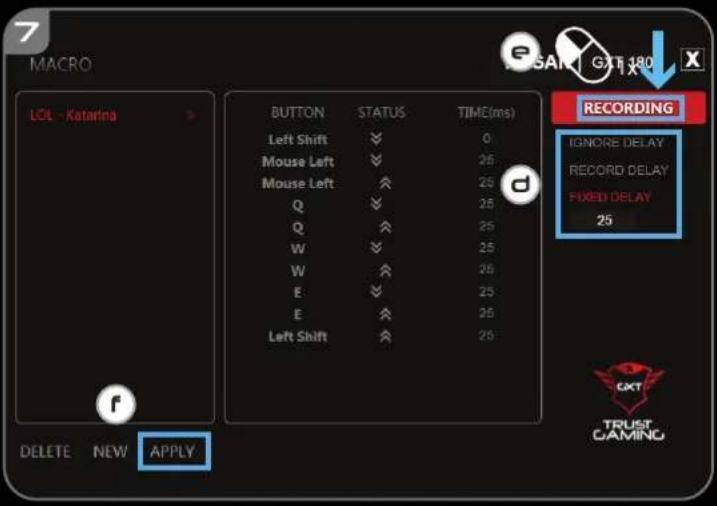
text_image
MACRO LOL - Katarina BUTTON STATUS TIME(ms) Left Shift ▼ 0 Mouse Left ▼ 25 Mouse Left ▼ 25 Q ▼ 25 Q ▼ 25 W ▼ 25 W ▼ 25 E ▼ 25 E ▼ 25 Left Shift ▼ 25 RECORDING IGNORE DELAY RECORD DELAY FIXED DELAY 25 CAXT TRUST CAMLING DELETE NEW APPLY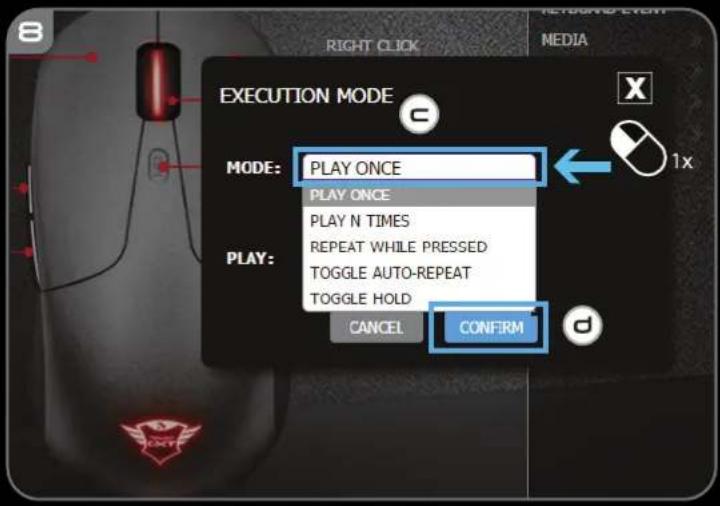
text_image
RIGHT CLICK MEDIA EXECUTION MODE MODE: PLAY ONCE PLAY ONCE PLAY N TIMES REPEAT WHILE PRESSED TOGGLE AUTO-REPEAT TOGGLE HOLD CANCEL CONFIRM 1x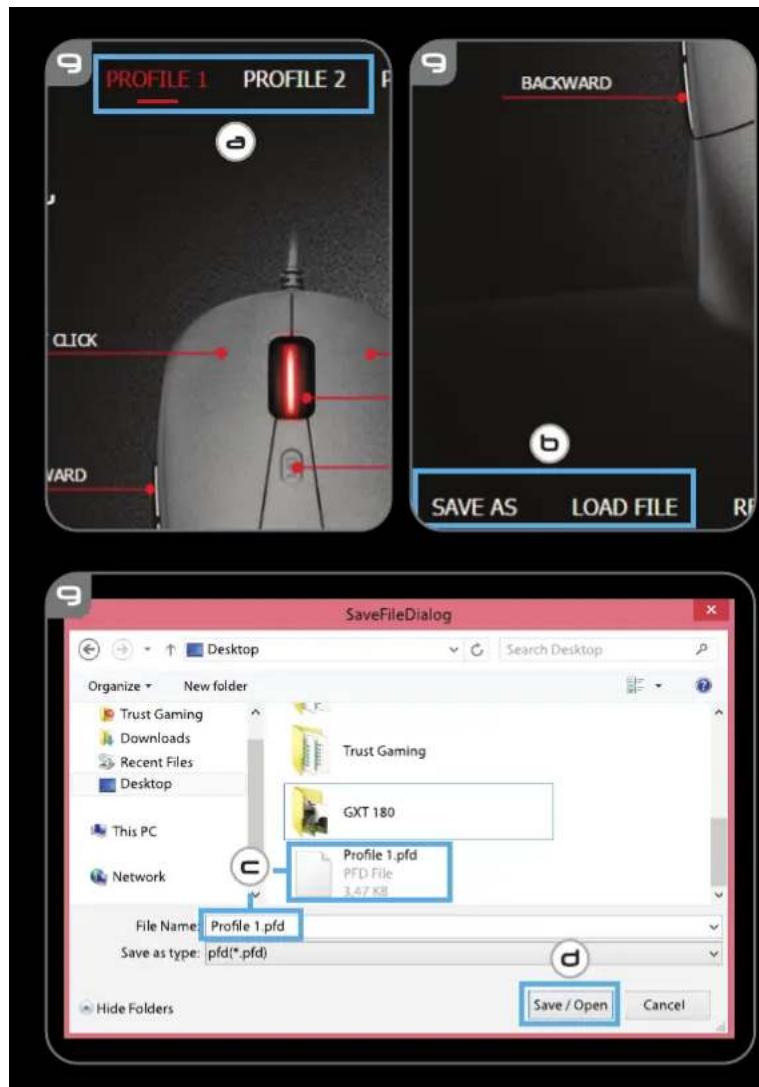
text_image
SAVE AS LOAD FILE RESTORE RESET ALL APPLY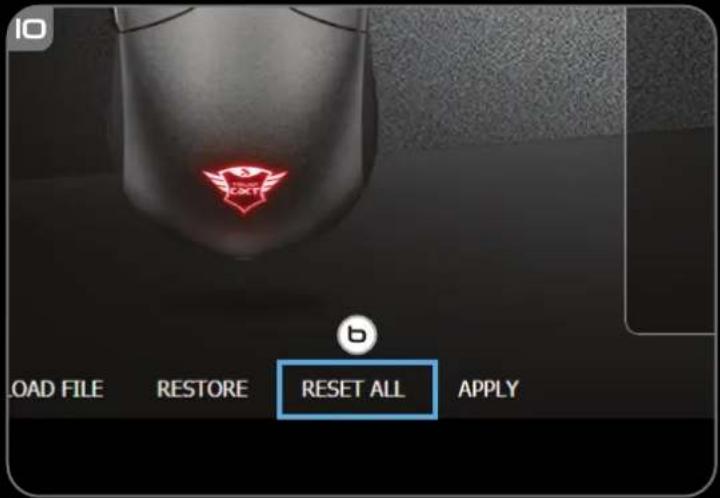
text_image
LOAD FILE RESTORE RESET ALL APPLY- Button layout
| a | - Button 1 (Default = Left mouse button) |
| b | - Button 2 (Default = Right mouse button) |
| c | - Button 3 (Default = Mid click) |
| d | - Button 4 (Default = Forward) |
| e | - Button 5 (Default = Backward) |
| f | - Button 6 (Default = Forward) |
| g | - Button 7 (Default = Backward) |
| h | - Button 8 (Default = DPI Cycle) |
2. Installation
a - Open the internet browser and go to www.trust.com/22401/driver.
b - Click the "Download EXE" button to download the software.
c - Click on the "Setup-GXT 180.exe" and follow the installation wizard.
d - Click on the "Trust GXT 180.exe" shortcut to start the software.
- You can now start to configure the mouse. Changes will be updated directly to your mouse.
Button Programming
3. Assign a function
a - Click on the 'BUTTON' tab.
b - Click on the function you want to assign.
c - Click on the button you want to re-assign
d - Choose how the function should be executed.
e - Click on 'CONFIRM'.
"Left Click" cannot be reassigned.
▶ Execution mode only appears on relevant functions.
Report rate & DPI settings
4. DPI setting
a - Click on the 'PERFORMANCE' tab.
b - Change the DPI settings by clicking the respective bar.
c - Click 'DPI SETTINGS' to enter advanced DPI settings.
d - Click the switch under the DPI number to enable or disable this DPI level.
e - Click on 'SAVE' to update the settings to your mouse.
▶ LED colours indicate which DPI level is currently These indication colours cannot be changed;
○ RED = Level 1
o GREEN = Level 2
○ BLUE = Level 3
o TURQOISE = Level 4
o PURPLE = Level 5
5. Other Settings
a - Change the DPI Precision rate by dragging the respective cursor. DPI precision can be found as function and can be assigned to a button (see Step 3.).
b - Change the Report Rate by dragging the respective cursor.
c - Change the Acceleration by dragging the respective cursor.
d - Change the scroll speed by dragging the respective cursor.
▶ After assigning the DPI Precision function to a button, press and hold that button to increase the precision to the selected DPI precision.
▶ DPI Precision is linked to the active DPI level.
Light Settings
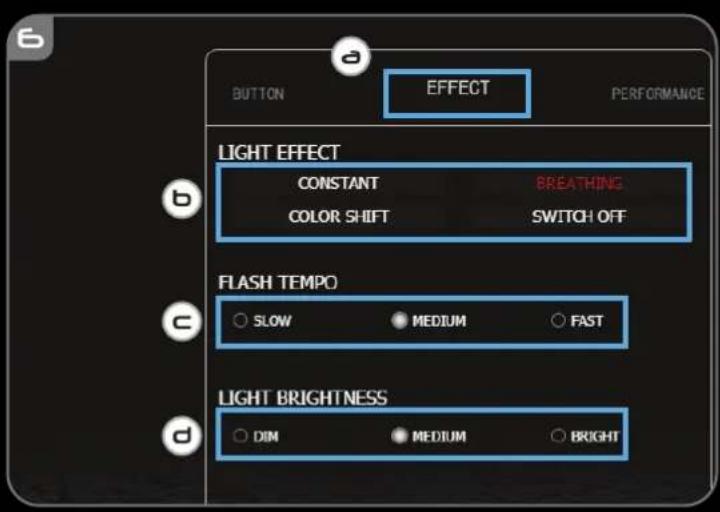
6. Change the Light Effect
a - Click on the 'EFFECT' tab.
b - Change the light mode.
c - Change the breathing speed.
d - Change the brightness level.
e - Select the desired LED color or pick a custom color by dragging the respective cursor.
Light modes;
o Constant = one solid colour
○ Breathing = one breathing colour
○ Colour shift = demo mode (brightness & colours not adjustable)
○ Switch off = disable LED
Macro Settings
- Create a Macro (Store a sequence of keys in the software)
a - Go to the 'BUTTON' tab.
b - Click on 'MACRO' and then on 'MACRO SETTINGS'.
c - Click on 'NEW' and double click on 'SELF DEFINE X' to rename the macro.
d - Set the delay time between each action.
e - Click 'RECORD' to start recording the macro. Now enter your preferred macro sequence. Click
'RECORD' again to stop recording the macro. (max. 34 actions)
f - Click on 'Apply' to save the macro.
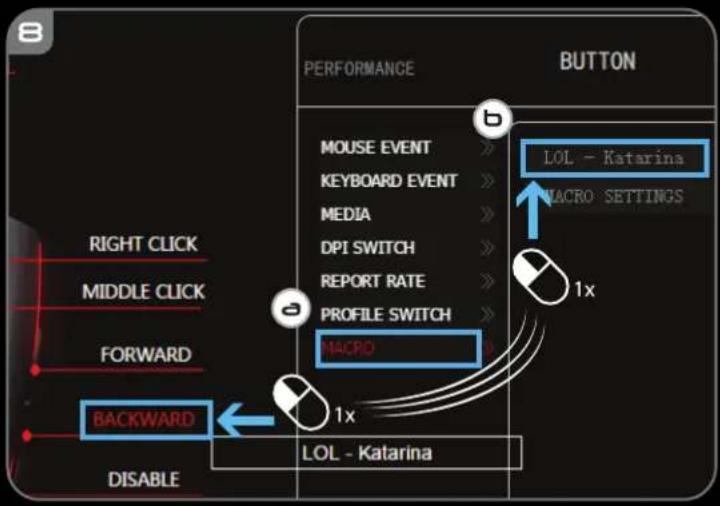
To assign a macro follow step 3 of this manual.
Profile Settings
- Select, Save or Load a profile
a - Select one of the 5 profiles by clicking on the preferred profile.
b - Click on 'SAVE AS' to save a setup, Click on 'LOAD FILE' to load a setup.
c - Enter a name for the mouse setup you want to save, or choose the preferred profile to load.
d - Click on 'Save' to save the setup, click on 'Open' to load the setup.
Click on 'Apply' → Your mouse setup is now saved or updated to your mouse.
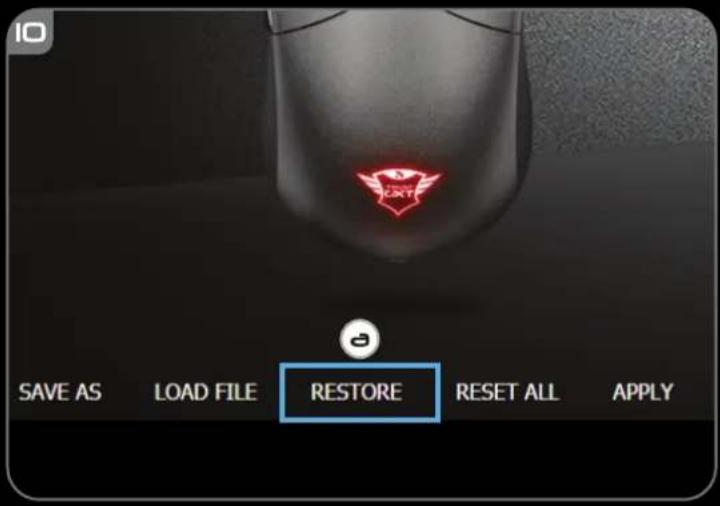
a - Click on 'RESTORE' to reset the current profile to factory default.
b - Click on 'RESET ALL' to reset all profiles to factory default.