MultiGrill 9 Pro CG9167 - Grill plate BRAUN - Free user manual and instructions
Find the device manual for free MultiGrill 9 Pro CG9167 BRAUN in PDF.
| Product Type | Electric grill plate |
| Brand | BRAUN |
| Model | MultiGrill 9 Pro CG9167 |
| Category | Grill plate |
| Power supply | 220-240 V ~ 50-60 Hz |
| Power consumption | 2200 W (grill and smooth plates), 1800 W (waffle) |
| Material | Stainless steel (base and lid), non-stick coating on plates |
| Cooking functions | Contact grill, open grill, grill oven, searing (SEAR), keep warm |
| Included plate types | Grill plate and smooth plate (waffle plates optional) |
| Removable plates | Yes, interchangeable |
| Dishwasher safe | Plates and drip tray dishwasher safe |
| Drip tray | Integrated and removable |
| Temperature probe | Included, for core cooking control |
| Automatic modes | Sandwich, Hamburger patty, Waffle (with optional plates) |
| Display and controls | Digital display, Start/Stop buttons, adjustable thermostats 60°C to 240°C, function keys |
| Safety | Automatic shut-off after 90 minutes, cool-touch handle, floating hinge, height lock |
| Additional accessories | Optional waffle plates (ref. CG9167), waffle measuring cup |
Frequently Asked Questions - MultiGrill 9 Pro CG9167 BRAUN
User questions about MultiGrill 9 Pro CG9167 BRAUN
0 question about this device. Answer the ones you know or ask your own.
Ask a new question about this device
Download the instructions for your Grill plate in PDF format for free! Find your manual MultiGrill 9 Pro CG9167 - BRAUN and take your electronic device back in hand. On this page are published all the documents necessary for the use of your device. MultiGrill 9 Pro CG9167 by BRAUN.
USER MANUAL MultiGrill 9 Pro CG9167 BRAUN
Failure to observe the warning may result in life threatening injury by electric shock.
- Before plugging the appliance into the mains, make sure that:
The voltage indicated on the appliance rating plate corresponds to your mains voltage;
The mains socket is earthed and has a minimum rating of 16A. - Professional or inappropriate use or failure to observe the safety instructions absolves the manufacturer of all liability.
- Make sure the power cord does not come into contact with parts of the appliance which become hot during use. If the power cord is damaged, it must be replaced by the manufacturer or the manufacturer's customer services in order to avoid all risk.
Before putting the appliance away, removing the cooking plates or performing cleaning and maintenance, turn the appliance off and unplug from the mains. Ensure that the appliance has completely cooled down. - Never use the appliance outdoors.
- Never immerse the appliance in water.
- The appliance must not be operated by an external timer or a separate remote control system.
- Use extension cords complying with current safety regulations and standards only. Ensure they are in proper working condition, with an adequate cross section.
- Never unplug from the mains socket by pulling on the cord.

Important!
Failure to observe the warning could result in injury or damage to the appliance.
- Clean the outside of the cooking plate with a soft sponge or cloth dampened with water and mild detergent.
-
This appliance is designed to cook food. It must never be used for other purposes, modified or tampered with in any way.
-
This is an household appliance only. It is not intended to be used in: staff kitchen areas in shops, offices and other working environments; farm houses; by clients in hotels, motels and other residential type environments; bed and breakfast type environments.
- This appliance can be used by children aged from 8 years and above and persons with reduced physical, sensory or mental capabilities or lack of experience and knowledge if they have been given supervision or instruction concerning use of the appliance in a safe way and understand the hazards involved. Children shall not play with the appliance.
- Cleaning and user maintenance shall not be made by children unless they are aged from 8 years and supervised.
Keep the appliance and its cord out of the reach of children aged 8 and younger.
- Do not leave the appliance within reach of children or unattended while in operation.
- Never use the appliance without the cooking plates.
- Wait until the appliance is completely cold before putting away.
- Do not move the appliance during use.

Danger of burns!!
Failure to observe the warning could result in burns or scalds.
-
When the appliance is in operation, the outside surfaces may become very hot. Always use the handgrip (2) or oven gloves if necessary.
-
Remove or change the cooking plates when the appliance has completely cooled down.
- Temperature probe can only be used to measure the temperature of the food. When inserting in the food, be careful not to touch the heating parts!

Please note:
This symbol indicates recommendations and important information for the user.
- To avoid the risk of fire, do not cook food wrapped in
plastic film or tinfoil or in plastic bags.
- After cleaning, the cooking plates must be dried before replacing them in the appliance.
This appliance conforms to EC Regulation 1935/2004 on materials and articles intended to come into contact with food.
Disposing of the appliance

The appliance must not be disposed of with household waste, but taken to an authorised waste separation and recycling centre.
DESCRIPTION
- Base and cover: solid stainless steel structure with self-adjusting cover.
- Handgrip: strong cast metal handgrip to adjust the upper plate/cover according to the thickness of the food.
- Plate release buttons: press to release and remove the plate.
- Grill plates lock/release device and Height adjustment lever: to lock the upper plate/cover at the required height, to prepare food that does not require pressing.
- Hinge release lever: enables the appliance to be fully opened to cook in the flat position.
- Height adjustment steps.
- ON light.
- Start/stop button.
- Lower plate thermostat dial: to adjust the temperature from 60^ to 240^ , or switch off the lower plate.
- Lower plate "SEAR" button.
- Sandwich function button.
- Hamburger function button.
- Keep warm function button.
- Time/ temperature probe button "-": to adjust the cooking time (decreasing) or the target temperature of probe.
- Time/ temperature probe button "+" to adjust the cooking time (increasing) or the target temperature of probe.
- Upper plate thermostat dial: to adjust the temperature from 60^ to 240^, or switch off the upper plate.
- Upper plate "SEAR" button.
- Temperature probe connector.
- Removable plates: non-stick, dishwasher safe, easy to clean. THE NUMBER AND THE TYPE OF PLATES CAN RANGE ACCORDING TO MODEL.
19a.Grill plate: perfect for grilling steak, hamburger, chicken and vegetables.
19b. Griddle plate: to prepare perfect pancakes, eggs, bacon and shellfish.
19c. Upper waffle plate: to prepare all kind of waffles (available with CG9167 or as a separate accessory).
19d. Lower waffle plate: to prepare all kind of waffles (available with CG9167 or as a separate accessory).
20. Grease tray: integrated with appliance and removable for easy cleaning.
21. Waffle dosing cup (only some models).
22. Temperature probe and case.
USING FOR THE FIRST TIME
Remove all packaging and labels from the plate. Before throwing the packing material away, make sure you have removed all parts of the new appliance.
We recommend you keep the box and packing to re-use in the future.

Please note: Before use, clean the base, cover
and dials with a damp cloth to remove dust accumulated during transport. Clean the cooking plates and grease tray thoroughly. The plates and grease tray are dishwasher safe.

Please note: The first time you use the appliance, it
may give off a slight odor and a little smoke. This is normal and common to all appliances with non-stick surfaces.

Please note: the removable cooking plates (grill and
griddle) are fully interchangeable on the appliance.
Inserting the cooking plates
- Place the appliance in the flat position (see figure 1). Insert one plate at a time.
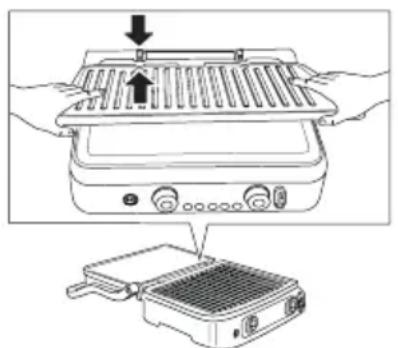
1
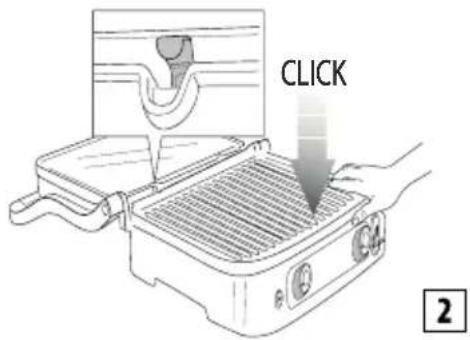
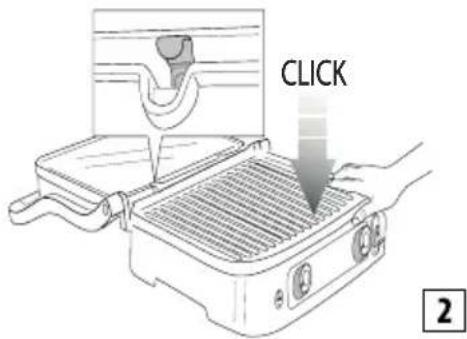
Each grill or griddle plates can be inserted in either the top or bottom housing (see figure 2), except waffle plates.
To remove the plates
Identify the plate release buttons (3) on the right side. Press the button decisively to eject the plate from the base. Hold the plate with both hands, slide it along the metal supports and remove it from the base. Press the other release button to remove the second plate, following the same operations.

Danger of burns!! Remove or change the cooking when the appliance has cooled down.
Positioning the grease tray
During cooking, the grease tray must be inserted in its housing on the back of the appliance. The grease coming from the food is drained towards the hole in the plate and gathered in the tray.

Please note: During cooking, check the grease tray n tly and pull out to avoid excess liquid grease.
After cooking, dispose of the grease collected appropriately. The grease tray is dishwasher safe.

Important! Pay attention during cooking.
To open the appliance, hold the handgrip which remains cold. The die-cast aluminum parts become very hot, avoid touching them during and immediately after cooking.
Before performing any operation on the appliance, leave to cool down for at least 30 minutes.
Cook only with the grease tray in place. Do not empty the grease tray until the appliance is completely cool. Take care when pulling out the grease tray in order to avoid spilling the liquid.
COOKING POSITIONS
Contact grill (closed position)
The upper plate rests on the lower plate. This is the starting position and also one of the cooking positions when the appliance is used as a contact grill. The cover automatically adjusts to the thickness of the food on the plate.
The food will thus be cooked evenly on both sides.
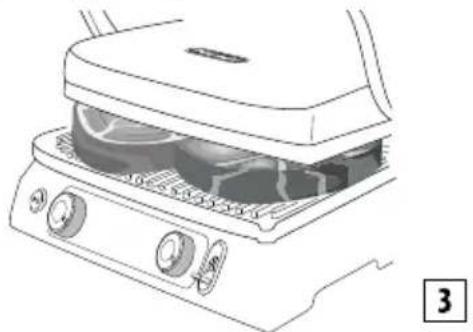
The contact grill is ideal for cooking hamburgers, deboned meat and thin meat slices, vegetables and sandwiches. The "contact" function is perfect to prepare food rapidly and healthily. When you use the contact grill, the food cooks quickly as it is in contact with the plates on both sides at once (see figure 3).
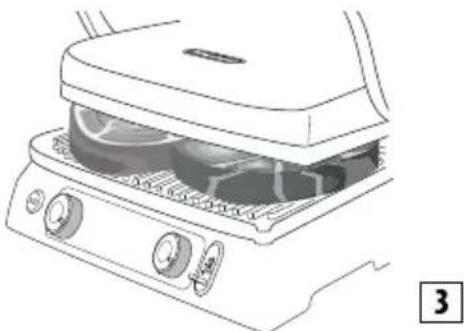
The grease from the food is drained and collected by the grooves on the plate and the hole at the back and is collected in the grease tray.
The appliance has a special handgrip and hinge allowing the upper plate to be adjusted according to the thickness of the food. If you want to cook a number of different types of food simultaneously using the contact grill, the various foods should have the same thickness to allow the cover to be closed evenly.
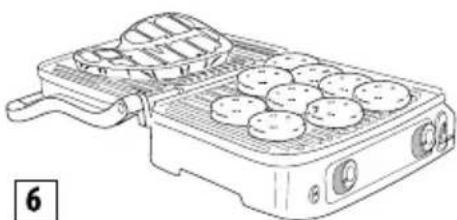
Open Grill
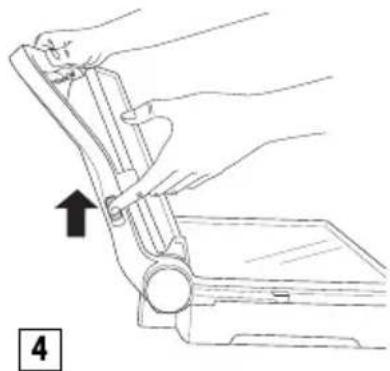
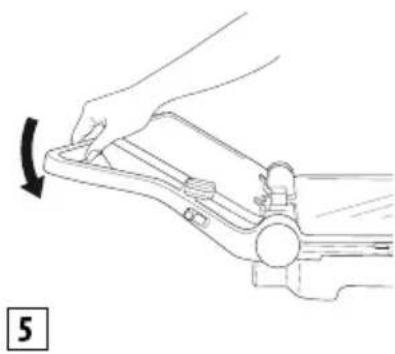
The upper plate is level with the lower plate. The lower and upper plates are both at the same level, forming a large cooking surface. In this position, the appliance can be used in barbecue mode with either the grill plate or the griddle plate. To place the appliance in this position, first identify the hinge release lever on the left. Hold the handgrip with the right hand and with the left, slide the release lever upwards (see figure 4).
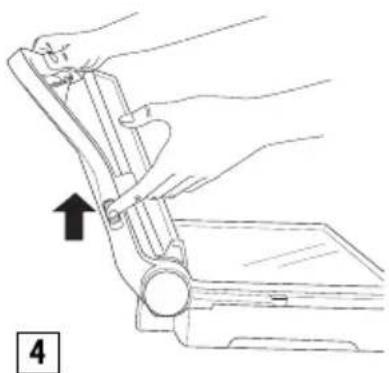
Push the handgrip backwards until the cover rests upside down in the flat position (see figure 5).
5
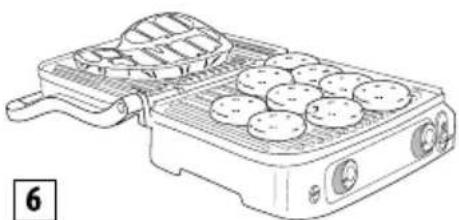
Lifting the handgrip slightly before pulling the release lever lightens pressure on the hinge and facilitates the operation. The appliance can be used as a grill/barbecue to prepare hamburgers, steak, chicken and fish. The grill/barbecue mode is the most versatile. The grill plates are in the open position, doubling the cooking surface (see figure 6).
You can prepare a number of different foods on the separate plates without mixing the flavors, or cook more of the same food.
The grill/barbecue position can be used to grill cuts of meat with different thicknesses, each with the preferred level of cooking. In this position, you need to turn the food during cooking.
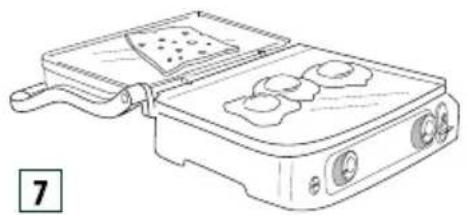
The appliance can also be used as a griddle/barbecue plate to prepare pancakes, eggs, cheese, fritters and bacon and sausages for breakfast (see figure 7).
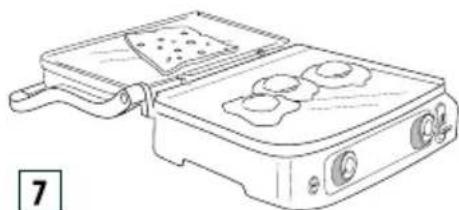
The large cooking surface enables a number of different foods to be prepared simultaneously, or to cook more of the same food.
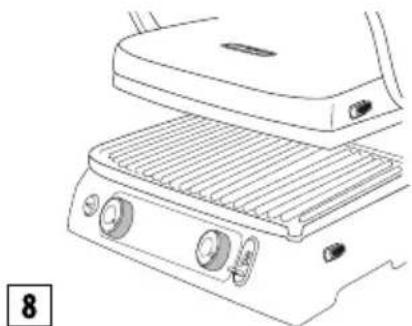
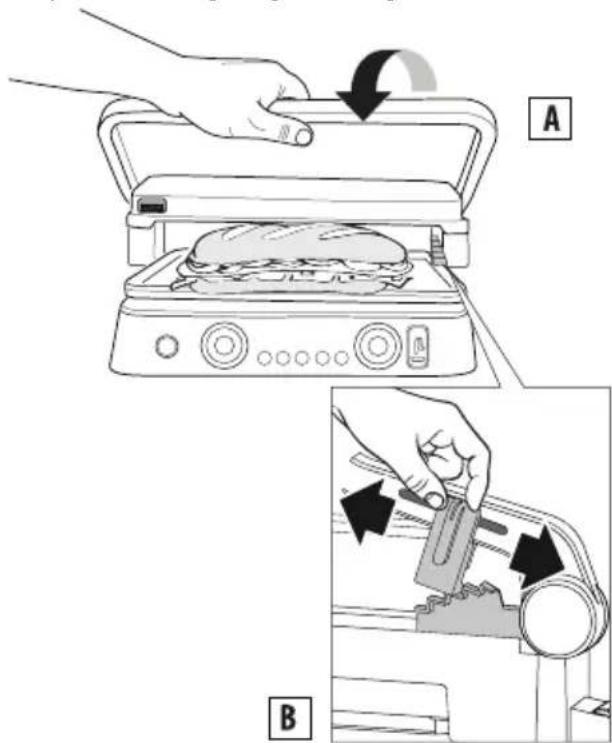
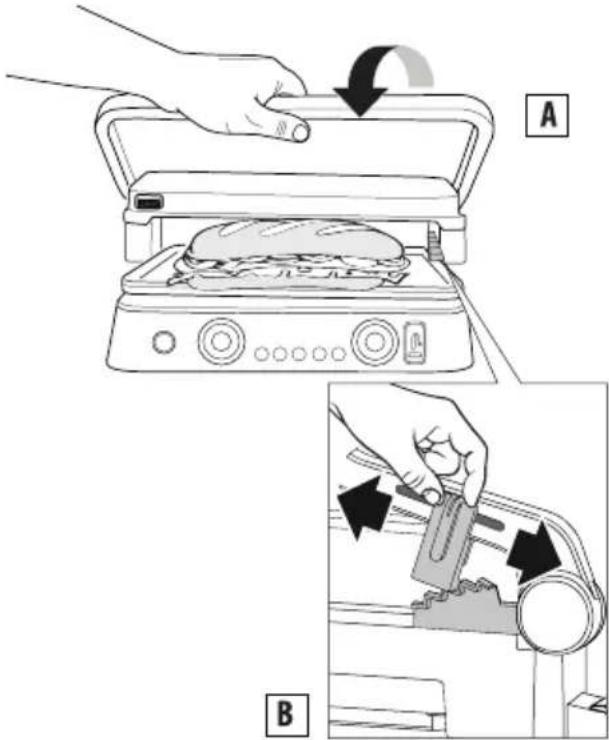
Oven Grill
This position (see figure 8) is suitable for grilling without contact thick foodstuffs that need to be roasted slowly and uniformly. It is ideal for preparing vegetables with high water content, so the water can evaporate.
You can also use this hot plate position to prepare soft
sandwiches and foods which do not require pressing.
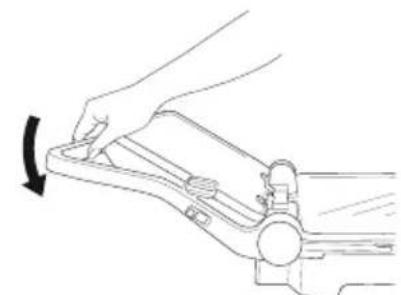
- Place the food on the lower plate.
- Bring the upper plate near the food, holding the handle (fig. A).
Put the grill plates lock/release and hight adjustment lever (4) to desired oven position by sliding the lever. - The upper plate is locked in position. There are 5 positions of height regulation (fig. B).
USE
MANUAL mode
When the appliance has been prepared correctly and you are ready to cook, you can set a temperature from 60^ to 240^ for each grill plate (upper and lower) independently (using the thermostat dials 9 and 16). Press the start/stop button and the ON light will come on. The appliance takes some minutes to heat up depending on the set temperature. When the thermostat reaches the required temperature, the appliance emits 3 beep, and is ready to use. "READY" appears on the display. The temperature can be changed at any time during cooking.
TIMER function
When "READy" appears on the display, select the cooking position (see the section "Cooking Position"), then place the food on the plates. The cooking time can be selected by pressing the timer/ temperature probe buttons (14 and 15); at the end of the cooking time "END" is displayed, the appliance emits 5 beeps, but the appliance remains on. When the food is cooked, switch the appliance off by pressing the start/stop button (8) or turn the thermostat dials (9 and 16) to the "●" position.

Please note: the appliance will turn off atically after 90 minutes of operation.
SEAR function
This feature heats the upper and/or lower plates to a higher temperature for a few minutes. It is ideal for quickly searing foods at the beginning of cooking (ideal for thick meat). Press the start/stop button, then preheat the plates by pressing the sear buttons (10 and 17).
During the preheating, the LEDs around the sear button blink. Once the plate reaches the required temperature, the appliance emits a beep, the LED stays on and fixed for one minute.
Put the food on the plates immediately; during this one minute, the appliance regulates the plate at the seat temperature. After that, the LED turns off, the display shows the temperature set by the thermostat dials and the appliance regulates the plate accordingly.

Please note: This function can be used once only
in every 30 minutes. After the cycle, if you press the sear function within 30 minutes, the LED around the sear button blink 5 times and the appliance will play 3 beeps. The operation cannot be set on the control.
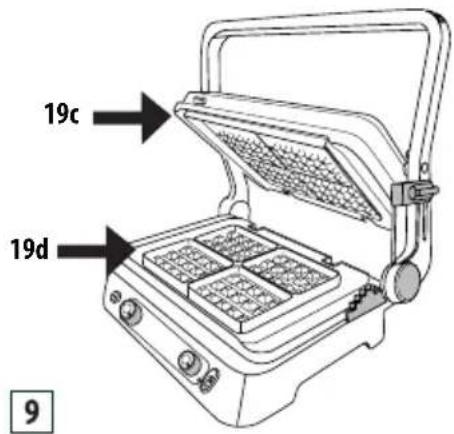
WAFFLE mode (some models only)
-
Insert the waffle plates (19c/19d) as show in fig.1. Please note that in this case the plates are not interchangeable and the position of each plate must be as shown in figure 9.
-
Once the lower plate is inserted in the appliance, OFF-1-2 or 3 appears on the display (depends on the position of the knobs). Turn the thermostat dials to the desired position (1 = light, 2 = medium, 3 = dark) and press the start/stop button.
-
The appliance starts the preheating phase. When the thermostat reaches the required temperature, the appliance emits a beep, and is ready to use. "READY"
appears on the display.

- Lightly grease the plates with melted butter
- Add one dosing cup for two waffle areas.
- Spread the batter slightly and close the appliance.
- Cook according to the time indicated in the recipes.
If you set the timer, three beeps will sound at the end of the cooking cycle, the timer will disappear and "END" will appear on the display; the appliance remains on. At the end of the last waffle press the "start/stop" button to switch off the appliance.
- To cook additional waffles, simply add batter to the lower waffle plate and follow the above steps.

Important! do not use metal tools when removing
the waffle from the waffle plates as they may scratch the non-stick surface.

Please note: This function has been optimized with
the appliance working in CLOSED position.
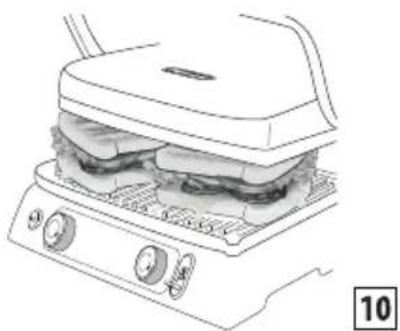
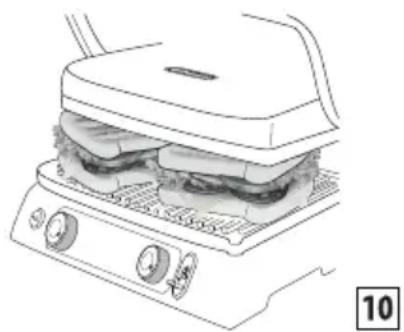
SANDWICH function
This function is ideal for toasting bread on the outside and heating the inside of the sandwich.
Press the SANDWICH button (11), the function LED lights up and the default time (05:00) appears on the display. The time can be changed at any time simply pressing buttons - (14) + (15); the temperature is already set, it cannot be changed because knobs are deactivated.
Press the START / STOP button and the ON light will come on (the time on the display will start flashing). The appliance starts the preheating phase.
When the thermostat reaches the temperature, the appliance emits 3 beep, and is ready to use. "READY" appears on the display. Place the sandwich on the lower plate as shown in figure 10, close with the upper one and press the SANDWICH button to start the countdown. At the end of cooking five beeps will sound and "---" will appear on the display. At the
end of the last sandwich press START / STOP button to switch off the appliance.
Important! do not use metal tools when removing the sandwich as they may scratch the non-stick surface.
Please note: starting from ready situation, if you do not press the sandwich button for the second time within 60 minutes, the appliance turn off. This function has been optimized with the appliance working in CLOSED position.
HAMBURGER function
This function is ideal for cooking hamburger. Press the HAMBURGER button (12), the function LED lights up and the default time (08:00) appears on the display. The time can be changed any time simply pressing buttons - (14) + (15) ; the temperature is already set, it cannot be changed because knobs are deactivated. Press the START / STOP button and the ON light will come on (the time on the display will start flashing). The appliance starts the preheating phase.
When the thermostat reaches the temperature, the appliance emits 3 beep, and is ready to use. "READY" appears on the display. Place the hamburger on the lower plate as shown in figure 11, close with the upper one and press the HAMBURGER button to start the countdown.
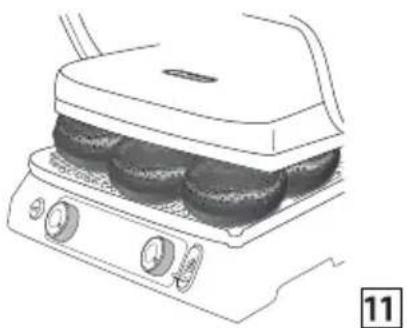
At the end of cooking, five beeps will sound and "---"will appear on the display. At the end of the last hamburger press START / STOP button to switch off the appliance.
Important! do not use metal tools when removing the hamburger as they may scratch the non-stick surface.
Please note: starting from ready situation, if you do not press the hamburger button for the second time within 60 minutes, the appliance turn off. This function has been optimized with the appliance working in CLOSED position.
KEEP WARM function
This function is ideal for keeping food warm at the end of cooking, before serving on the table. Press the KEEP WARM icon (13), the function LED lights up.
Once the function is activated, the temperatures of the plates will change automatically from previous setting to 60^ ; since the plates do not cool down immediately, we recommend cooking the food a few minutes less (it will finish cooking during the keep warm).
We do not recommend using this function for foods such as fillets and steaks because if they remain hot for long time they will tend to boil. Very suitable for fatty foods such as sausages, ribs or poultry, hamburgers, vegetables, polenta and some types of fish.
- If cooking time has not been set, by pressing the KEEP WARM button (13) the function will start immediatley (the time will appear on the display and 6 bars will flash instead of the temperatures).
- If the cooking time was set and press the KEEP WARM button (13), at the end of the set time the appliance will automatically switch to keep warm function.
To switch off the appliance, press Start/Stop button or, only in case of manual mode, set the 2 knobs in "●" position.
It is not possible to switch from the KEEP WARM function to cooking. Always first reset the function by switching off the appliance. The KEEP WARM function will automatically turn off after 60 minutes of use.
If you connect the probe and you select the KEEP WARM function before pressing the Start/Stop button, when the food temperature reaches the required temperature the appliance will automatically switch to KEEP WARM function.
Important! if use the keep warm function with hamburger or sandwich functions, both plates will remain on even if the knobs are in "●" position.
If use the keep warm function while cooking in manual mode (contact grill, oven grill, open grill), only the plates in operation will be on (if a knob is "●" during cooking, that plate will remain OFF even in the keep warm function).
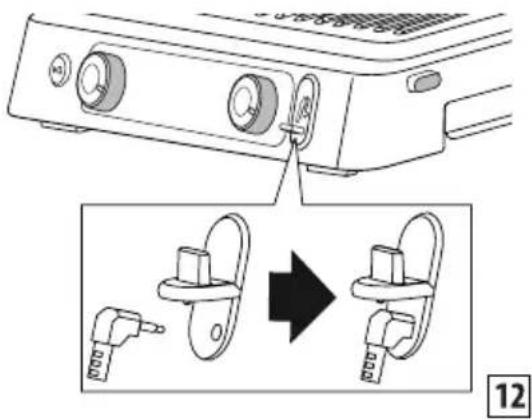
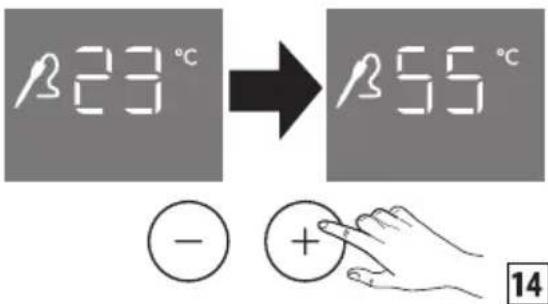
TEMPERATURE PROBE
This accessory is ideal for controlling the internal temperature of the food so it can be cooked at the desired temperature. Insert the probe (22) in its connector (18) as shown in figure 12, the display will automatically switch from timer mode to temperature of the probe as shown in figure 13.

13
The probe can be used in two different ways; the first simply to check the temperature of the food whenever you want. Check the temperature of the food by inserting and then removing the probe from the food. The second option is to leave it directly inside the food during cooking; in this case you can set the target temperature by pressing the timer/temperature probe buttons - (14) + (15) as shown in figure 14.
Once the set temperature has been reached, the appliance will emit 3 beeps (we always recommend checking the food in several points before removing from the cooking plate to be sure you have inserted the probe in the center of the food). The appliance will remain on. If a cooking time is set and then the probe is inserted, the numbers on the display are always those of the temperature of probe and it will be not possible to see the previous time set (to do this, remove the probe).
In this case, having set 2 controls (timer and target temperature), the appliance will continue to count down the time, at the end will emit 5 beeps while upon reaching the target temperature it will emit 3 beeps. In both cases the appliance will remain on. If I use the probe in the HAMBURGER function, the default target temperature is 80^ ; you can change it by pressing the timer/temperature probe buttons - (14) + (15) . The time in the automatic functions is always set even if it is not seen when the probe is inserted.
If use the probe in the sandwich function, the probe can only monitor the temperature and there is not a target temperature. The time in the automatic functions is always set even if it is not seen when the probe is inserted.
Important! the tip is pointed, be careful to handle it. Keep out of reach of children.
Danger of burns!! temperature probe can only be used to measure the temperature of the food. When inserting in the food, be careful not to touch the heating parts!
Please note: the probe can't be washed in the dishwasher or immersed in water, you are therefore recommended to clean the outside of the probe with a soft sponge or cloth dampened with water and mild detergent.
| RECOMMENDED TEMPERATURES | ||
| BEEF | ||
| fillet/ steak | (rare) | 52°C |
| (medium) | 58°C | |
| (well done) | 65°C | |
| ribs | 93°C | |
| hamburger | 72°C | |
| LAMB | ||
| cutlet | 65°C | |
| PORK | ||
| fillet | (medium) | 65°C |
| (well done) | 72°C | |
| chop | 72°C | |
| sausages | 80°C | |
| ribs | 88°C | |
| CHICKEN AND TURKEY | ||
| breast | 75°C | |
| wings | 80°C | |
| FISH | |
| whole | 63°C |
CLEANING AND MAINTENANCE
User maintenance
- Never use metal cleaning tools which could scratch the non-stick plates. Use wood or heat-resistant plastic tools.
- Between cooking one food and the next, remove food residues through the grease drain hole and collect them in the grease tray, then clean with kitchen paper and move on to the next cooking operation.
Before cleaning the appliance, always leave the appliance to cool down for at least 30 minutes.
Cleaning and care

Please note: Before cleaning the appliance, make
sure it has cooled down completely.
At the end of cooking, turn the appliance OFF and unplug from the mains. Leave the appliance to cool down for at least 30 minutes. Empty the grease tray. The grease tray can be washed by hand or in the dishwasher.
Press the plate release buttons (3) to remove the plates from the appliance. Before touching them, make sure they have cooled down completely. The cooking plates are dishwasher safe although frequent washing in a dishwasher could reduce the properties of the coating. You are therefore recommended to clean the outside of the cooking plate with a soft sponge or cloth dampened with water and mild detergent. Do not use metal tools to clean the plates.
TECHNICAL CHARACTERISTICS
Supply voltage 220-240 V 50-60Hz Absorbed power: -2200W (Grill and Griddle) -1800W (Waffle)
TROUBLESHOOTING
| Error message on display DESCRIPTION | TION PROBLEM SOLUTION | ||
| No temperature rise on one cooking plate. | The electronic control has detected that one cooking plate has not reached the target temperature. The grill plate is not correctly inserted in the appliance. The heating element inside the grill plate may be damaged. The heating element connection may be damaged. The electronic control may be damaged. | Unplug from wall outlet. Verify that the grill plate is correctly inserted in the appliance housing. If this does not resolve the problem, the appliance has probably malfunctioned. Contact De'Longhi Customer Service reporting the error type. | |
| Heating element ON time exceeded. | The electronic control has detected that the heating element was ON for an excessive length of time. | Unplug from wall outlet. Do not place oversize food or frozen food on the grill plates as this could overwork the heating elements. The control displays the error message and the appliance turns off. Let the appliance cool down before performing a new cooking cycle. | |
| Temperature probe malfunction. | The electronic control has detected a temperature probe malfunction. | Unplug from wall outlet. The temperature probe needs to be replaced. Contact De'Longhi Customer Service reporting the error type. | |
| Temperature probe malfunction. | The electronic control has detected a temperature probe malfunction. | Note the error word. Unplug from wall outlet. The temperature probe needs to be replaced. Contact De'Longhi Customer Service reporting the error type. | |
| The appliance does not come on. | Check the appliance is correctly plugged into the wall outlet. Plug the appliance into a different outlet. Verify the circuit breaker. If this does not resolve the problem, the appliance has probably malfunctioned. Contact De'Longhi Customer Service. | ||
| The appliance does not come on after pressing the START/ STOP button. | Both temperature knobs are in the "●" position and the upper and lower display show OFF. Turn the temperature knob to the desired temperature, then press START/STOP. | ||
| When the sear buttons are pressed, "SEAR" flashes on the display then the sear function goes off. | The sear function is available once in every 30 minutes of the cooking cycle. If you try to perform a second sear cycle before 30 minutes have elapsed, the operation will be refused.Wait 30 minutes before starting a new sear cycle. | ||
| AER | Thermoprobe error The | thermoprobe is too hot or the electronic control has detected a temperature probe malfunction | Unplug the thermo-probe and cool it before plugging again. If the ERR word still appear the thermoprobe needs to be replaced.Contact De'Longhi Customer Service. |
| The display does not switch from timer mode to temperature of the probe when the connector is inserted in the appliance | Temperature probe or connector needs to be replaced. Contact De'Longhi Customer Service. | ||
NOTE FOR MODEL CG9160: If you have this model (which has only one grill plate and one griddle plate) in the plate column, the type of plate is intended to be placed in the lower part, the other in the upper one.
| BEEF THICKNESS (cm) | No. PIECES | COOKING LEVEL | PLATE MODE PLATES | °C SEAR MIN. TIPS | ||||
| Steak | 0,5 - 1 | 2 | Well done | CONTACT GRILL | grill | 240 | √ | 2 - 3 |
| Steak 0,5 | - 14 Well done | OPEN GRILL grill 240 5 | - 6 oil the food | well, turn half-way through cooking | ||||
| Fillet | 3-4 | 4 | Rare | CONTACT GRILL | grill | 240 | √ | 4 - 5 |
| Fillet | 3-4 | 4 | Medium | CONTACT GRILL | grill | 240 | √ | 7 - 8 |
| Fillet | 3-4 | 4 | Well done | CONTACT GRILL | grill | 240 | √ | 10 - 11 |
| Rib steak | 2-3 | 2 | Medium | CONTACT GRILL | grill | 240 | 4 - 5 | |
| Rib steak | 2-3 | 2 | Well done | CONTACT GRILL | grill | 240 | 7 - 8 | |
| Rib steak | 2-3 | 4 | Medium | OPEN GRILL | grill | 240 | 10 - 12 | |
| Rib steak | 2-3 | 4 | Well done | OPEN GRILL | grill | 240 | 14 - 16 | |
| Kebab | 6 | Well done | CONTACT GRILL | grill | 240 | 13 - 15 | ||
| LAMB THICKNESS (cm) | No. PIECES | COOKING LEVEL | PLATE MODE PLATES | °C | MIN. | TIPS |
| Cutlet | 1.5-3 | 6 | Medium | CONTACT GRILL | grill | 240 |
| Cutlet | 1.5-3 | 6 | Well done | CONTACT GRILL | grill | 240 |
| PORK | THICKNESS (cm) | No. PIECES | PLATE MODE | PLATES | °C SEAR MIN. | TIPS | ||
| Steak | 1-2 | 4 | CONTACT GRILL | grill | 240 | ✓ | 7 - 9 | oil the food well |
| Steak | 1-2 | 8 | OPEN GRILL | grill | 240 | 14 - 16 | oil the food well, turn halfway through cooking | |
| Chop | <2,5 | 4 | CONTACT GRILL | grill | 240 | 9 - 11 | oil the food well, turn halfway through cooking | |
| Chop | <2,5 | 8 | OPEN GRILL | grill | 240 | 11 - 13 | oil the food well, turn halfway through cooking | |
| Spare rib | 6-8 | CONTACT GRILL | grill | 200 | 20 - 25 | turn two or three times | ||
| Bacon | 4 | CONTACT GRILL | grill | 240 | 1 - 2 | |||
| Sausage | 8 | CONTACT GRILL | grill | 200 | 16 - 18 | pierce the sausages with a fork | ||
| Kebab | 6 | CONTACT GRILL | grill | 240 | 14 - 16 | oil the food well, turn once or twice | ||
| Frankfurter | 6 | CONTACT GRILL | grill | 240 | 8 - 10 | |||
| CHICKEN AND TURKEY | THICKNESS (cm) | No. PIECES | PLATE MODE PLATES | °C SEAR MIN. TIPS | |||
| Breast <1 | 4 | CONTACT GRILL | grill 240 | √3-4 | oil the food well | ||
| Haunch 3 | CONTACT GRILL | grill 200 | 20-25 | turn once or twice during cooking | |||
| Wing 6 | CONTACT GRILL | grill 200 | 14-16 | turn once or twice during cooking | |||
| Kebab 6 | CONTACT GRILL | grill 240 | 11-13 | turn once or twice during cooking | |||
| Frankfurter | 6 | CONTACT GRILL | grill 240 | 6-8 | |||
| Flat grilled chicken | 1 | CONTACT GRILL | grill 200 | 40-45 | turn once or twice during cooking | ||
| BREAD | No. PIECES | PLATE MODE | PLATES | °C | MIN. | TIPS |
| Roll | 2 | CONTACT GRILL | grill | 240 | 2 - 3 | |
| Slices of bread | 4 | OPEN GRILL | griddle | 240 | 4 - 5 | turn halfway through cooking |
| VEGETABLES | No. PIECES | PLATE MODE | PLATES | °C | MIN. | TIPS |
| Sliced eggplant | 1 | CONTACT GRILL | grill | 240 | 4 - 6 oil | the food well |
| Sliced zucchini | 2 | CONTACT GRILL | grill | 240 | 6 - 8 oil | the food well |
| Quartered sweet pepper | 2 | CONTACT GRILL | grill | 240 8 - 10 | oil the | food well |
| Sliced tomato | 1 | OPEN GRILL | griddle | 240 | 5 - 7 | oil the food well, turn halfway through cooking |
| Sliced onion | 2 | CONTACT GRILL | griddle | 240 | 5 - 7 | oil the food well, mix often with a spatula |
| FISH QUANTITY No. | PIECES | PLATE MODE PLATES | °C MIN. TIPS | |||
| Whole 250g 1 | CONTACT GRILL | grill 200 | 8 - 10 oil | the food well | ||
| Fillet 500g 1 OVEN GRILL grill 240 | 25 - 30 oil the food, | position the | top plate so that it just brushes the food without touching it | |||
| slice | 450 g | 4 | CONTACT GRILL | grill | 200 | 8 - 10 oil the food well |
| Kebab 500g 6 OPEN GRILL grill 240 | 10 - 12 oil the food well; turn two | or three times | ||||
| Squid | 400 g | 1-2 | CONTACT GRILL | grill | 200 | 10 - 12 oil the food well |
| Prawns | 400 g | 10-12 | CONTACT GRILL | grill | 200 | 4 - 6 oil the food well |
| DESSERTS No. | PIECES | PLATE MODE PLATES | °C | MIN. | TIPS | |
| Pancakes | 4 | OPEN GRILL | griddle | 200 | 4 - 5 | butter the plates, turn halfway through cooking |
| Waffles | 4 | CONTACT GRILL | WAFFLES | 1 - 2 - 3 | 4 - 5 | butter the plates |
| Sliced pineapple | 4 | CONTACT GRILL | grill | 200 | 5 - 6 | butter the plates |
EGG SCRAMBLE, BACON AND TOAST
INGREDIENTS:
- eggs 2
- bacon 2 slices
- milk 10 ml
- salt and pepper to taste
- bread for toast 2 slices
PREPARATION:
Beat the eggs with the milk and salt until it forms a light frothy mixture. Insert the griddle plate at the lower and the grill one at the upper and position the grill in OPEN GRILL mode. Adjust the lower thermostat dial to 240^ and the upper dial to 240^ . Press the START/STOP button to preheat the grill. When READY is displayed, pour the egg mix onto a corner of the plate and cook for 2-3 min., mixing well with a wooden spatula to ensure it cooks evenly. In the meantime, on the same plate, cook the bacon slices for 3-4 min., turning about halfway through cooking; on the other griddle plate, toast the bread for 3-4 min., turning about halfway through cooking.Compose the dish and serve.
CROUTONS AND EGGPLANT CREAM INGREDIENTS:
- eggplant 1
- ricotta 100 g
powdered garlic to taste - parsley to taste
- olive oil 40ml
- salt to taste
pepper to taste
baguette 1
PREPARATION:
Wash the eggplants well, peel and cut into thick slices.
Insert the griddle plate at the lower and the grill one at the upper and position the grill in CONTACT GRILL mode. Adjust the lower thermostat dial to 240^ and the upper dial to 240^ . Press the START/STOP button to preheat the grill. When READY is displayed, place the eggplants on the lower grill and cook for about 8-10 min. until soft. Cut the eggplant slices coarsely and place in a mixer with the ricotta, garlic, chopped parsley, pinch of salt, pinch of pepper and oil. Mix to obtain a smooth fine mixture. Cut the bread into slices and oil with the olive oil, then cook at 240^ in CONTACT GRILL mode for 1-2 minutes until they are browned to taste.
Spread the eggplant cream onto the toasted bread, sprinkle with two dessert spoons of oil and serve.
MEAT, ARUGULA AND CHERRY TOMATO SALAD
INGREDIENTS:
-veal slices 2
- arugula 100 g
- cherry tomatoes 10-12
- grana cheese flakes 100g
- salt to taste
- olive oil to taste
PREPARATION:
Prepare the arugula and cherry tomato salad: wash the arugula, place on a clean cloth to dry and cut the cherry tomatoes into four. Insert the grill plate at the lower and the griddle one at the upper and position the grill in CONTACT GRILL mode. Adjust the lower thermostat dial to 240^ and the upper dial to 240^ . Press the START/STOP button to preheat the grill. When READY is displayed, position the previously oiled veal slices, press with the upper plate and cook for 2-3 min. to taste. Cut the meat into strips and arrange them on the bed of arugula and cherry tomatoes, salt to taste and add the flakes of grana cheese. Flavour with a little oil.
COFFEE FLAVoured RIB STEAKS INGREDIENTS:
rib steaks (2× 250g each)
- olive oil
FOR THE COFFEE MIXTURE:
- cumin seeds 2 tsp
- coffee beans 2 tsp
- sweet chilli pepper 2 tsp
- paprika 1 tsp
- coarse salt 1 tsp
pepper 1 tsp
PREPARATION:
Prepare the coffee mixture: pour the cumin seeds and coffee into a food processor and grind into a powder (not too fine). Pour the powder into a bowl, add the other ingredients and mix well. Oil the meat lightly and flavour with the spices, cover and leave at room temperature for about 30 min. Insert the grill plate at the lower and the griddle one at the upper and position the grill in CONTACT GRILL mode. Adjust the lower thermostat dial to 240^ and the upper dial to 240^ . Press the START/STOP button to preheat the grill and the SEAR button for both plates. When SEAR stops flashing on the display, place the meat on the lower plate, press with the upper plate and cook for 6-8 min. to taste. Serve hot.
BEEF FILLET WITH MUSHROOM SAUCE
INGREDIENTS:
- beef fillets 4
- salt to taste
- black peppercorns for grinding to taste
- garlic cloves 2
- Dijon mustard 20ml
- butter 60 g
- olive oil to taste
INGREDIENTS FOR THE MUSHROOM SAUCE:
- butter 30 g
gorgonzola 2 tsp - shallots 2
- mushrooms 300g
whisky 1/2 small glass - cream 200 g
- lemon juice to taste
- parsley to taste
PREPARATION:
Flavour the meat with the salt and pepper and leave at room temperature for about an hour.
Prepare the mushroom sauce: melt the butter in a pan, add the sliced shallots and cook for 2-3 min. Add the mushrooms and cook for a further 5 min. Add the whisky, cook for 1 min., add a glass of water and cook for about a minute more. Add the liquid cream, lemon juice, parsley and gorgonzola and bring to the boil.
Cook until the sauce thickens, adjust the salt and pepper and set aside.
In the meantime, prepare the flavouring to be brushed on the fillet during cooking: in a small pan, melt the butter, mustard and garlic. Cook over a low heat until the butter melts. Keep warm.
Insert the grill plate at the lower and the griddle one at the upper and position the grill in CONTACT GRILL mode. Adjust the lower thermostat dial to 240^ and the upper dial to 240^ .
Press the START/STOP button to preheat the grill and the SEAR button for both plates.
Brush the fillets with the flavouring on both sides, then when SEAR stops flashing on the display, place them on the lower plate and close the grill. Cook for 6-8 min. according to taste and the thickness of the fillets. When cooked, remove the fillets and serve covered with the mushroom sauce prepared previously.
HAMBURGER WITH TOASTED RYE BREAD
INGREDIENTS:
- rye bread 8 slices
top quality beef mince 500g - sliced Emmenthal 100g
- olive oil 20 ml
- sliced onions 2
- butter at room temperature as required
- Worcester sauce 2 tsp
- salt to taste
pepper to taste - sugar half a tsp
PREPARATION:
Prepare the hamburgers: mix the mince, Worcester sauce, salt and pepper thoroughly in a bowl. By hand, shape 4 hamburgers about 2cm thick. Position the grill in OPEN GRILL mode and insert the griddle plate at the lower and the grill plate at the top. Adjust the lower thermostat dial to 240^ and the upper dial to 240^
Press the START/STOP button to preheat the grill.
When READY is displayed, place the sliced onions flavoured with the olive oil and sugar on the lower plate and cook for about 5-6 min., mixing well with a spatula to ensure they cook evenly and are tender. At the same time, on the other plate, cook the hamburgers for about 12 min., turning after about 5-6 min. (the cooking time varies according to the thickness of the hamburger). As soon as the onions are cooked, remove from the plate and toast the buttered slices of bread on one side only for 1-2 min.
Place the slices of bread on a chopping board with the toasted side upwards, sprinkle with the onions, add the hamburgers and cover with the cheese. Close the sandwich with the slice of bread with the toasted side facing downwards, press the sandwich button; when ready is displayed insert the sandwiches and press well with the upper plate.
Cook for about 2-3 min. to taste.
ROSEMARY
INGREDIENTS:
- lamb cutlets 6
- chopped rosemary 10g
- chopped garlic 10g
- balsam vinegar 100ml
- sugar 15 g
- salt to taste
pepper to taste
PREPARATION:
Mix all the ingredients well in a sufficiently large recipient, cover and leave the lamb to marinate in the refrigerator for at least 1-2 hours. Insert the grill plate at the lower and the griddle one at the upper and position the grill in CONTACT GRILL mode. Adjust the lower thermostat dial to 240^ and the upper dial to 240^ . Press the START/STOP button to preheat the grill. When READY is displayed, place the cutlets on the lower plate. Cook for about 11-13 min. according to taste and the thickness of the cutlets (you are recommended to turn them halfway through cooking as the bone prevents the upper plate from touching the meat on the top). In the meantime, reduce the marinade in a pan and serve as a sauce on the grilled lamb cutlets.
CHICKEN KEBABS WITH HONEY AND LIME CREAM INGREDIENTS:
- chicken breast 500g
INGREDIENTS FOR THE MARINADE:
- chilli pepper 1 tsp
coriander 1 tsp - olive oil 10 cl
- spring onions 2
- garlic cloves 3
- grated ginger 2 tsp
- sugar 2 tsp
-lime juice 10ml - coarse salt 2 tsp
pepper to taste
INGREDIENTS FOR THE HONEY AND LIME CREAM:
- cooking cream 5 cl
- grated lime peel 1/2 tsp
- lime juice 10ml
- olive oil 10 ml
- honey 10ml
- salt to taste
PREPARATION:
Prepare the marinade: place all ingredients in a food processor and blend to obtain a smooth mixture. Place the chicken cut into 2cm wide cubes on a deep plate, add the marinade and cover all the chicken evenly. Cover with food film and marinate for 1-2 hours.
Prepare the cream by mixing all the ingredients in a bowl, cover with transparent film and keep in the refrigerator. Thread the chicken pieces onto the kebab skewers. Insert the grill plate at the lower and the griddle one at the upper and position the grill in CONTACT GRILL mode. Adjust the lower thermostat dial to 240^ and the upper dial to 240^ . Press the START/STOP button to preheat the grill. When READY is displayed, place the kebabs on the lower plate, press with the upper plate and cook for about 11-13 min., turning once or twice. Serve hot accompanied with the lime and honey cream.
PROVENCE STYLE CHICKEN LEGS
INGREDIENTS:
- chicken legs 3 (550 g)
INGREDIENTS FOR THE MARINADE:
- dry white wine 25 cl
- olive oil 40 ml
- mustard with seeds 30ml
- white wine vinegar 30ml
- Provence herbs 4 tsp
- chopped garlic 2 cloves
- coarse salt 2 tsp
Cayenne pepper 1 tsp
PREPARATION:
Prepare the marinade by mixing all the ingredients in a bowl. With a sharp knife, cut the fleshy part of the chicken legs at a number of points to open them slightly. Place the legs in the bowl with the marinade and turn them so that both sides are well covered; leave to marinate for 2-3 hours. Insert the grill plate at the lower and the griddle one at the upper and position the grill in CONTACT GRILL mode. Adjust the lower thermostat dial to 210^ and the upper dial to 210^ . Press the START/STOP button to preheat the grill. When READY is displayed, place the chicken legs on the lower plate, press with the upper plate and cook for about 20-25 min., turning 2-3 times. When cooked, place on a plate and serve.
GRILLED PRAWNS
INGREDIENTS:
- prawns 16/20
INGREDIENTS FOR THE MARINADE:
- parsley to taste
- lemons 2
- salt to taste
pepper to taste
garlic cloves 2
PREPARATION:
Prepare the marinade: chop the garlic and parsley finely, add the lemon juice, salt and a sprinkling of pepper.
Wash the prawns, dry well and leave to marinate for at least half an hour. Insert the grill plate at the lower and the griddle one at the upper and position the grill in CONTACT GRILL mode. Adjust the lower thermostat dial to 210^ and the upper dial to 210^ . Press the START/STOP button to preheat the grill.
When READY is displayed, place the drained prawns on the lower plate, press with the upper plate and cook for about 4-6 min. To serve, decorate the plate with lemon slices and green salad.
GRILLED SALMON WITH YOGHURT SAUCE
INGREDIENTS:
- salmon fillet 500g
- olive oil to taste
INGREDIENTS FOR THE SAUCE:
Greek yoghurt 250 g
- garlic clove 1
-salt 1 tsp
- sugar 1 pinch
- chives 20 g
- parsley 20 g
- white pepper to taste
PREPARATION:
Prepare the sauce: wash the parsley and chives and dry thoroughly, chop the garlic separately.
Pour the yoghurt into a bowl, add the herbs, garlic, salt, sugar and pepper and blend to a smooth cream. Place in the refrigerator and leave for at least 30 min.
Insert the griddle plate at the lower and the grill one at the upper and position the grill in OVEN GRILL mode. Adjust the lower thermostat dial to 240^ and the upper dial to 240^ . Press the START/STOP button to preheat the grill.
When READY is displayed, place the previously oiled fillet on the lower plate, close the upper plate in OVEN GRILL mode (as near as possible to the food without touching it) and cook for about 25 - 30min . (for best results, turn the salmon through 180^ about halfway through cooking as towards the back, the plate is nearer the food).
When cooked, place the salmon on a serving plate and serve with the yoghurt sauce.
GRILLED SQUID
INGREDIENTS:
- large squid 400g
- lemon 1
- parsley 1 sprig
- olive oil to taste
- oregano to taste
- salt to taste
- chilli pepper powder to taste
PREPARATION:
Prepare the squid by removing the intestines, head and bone, then rinse thoroughly.
Insert the grill plate at the lower and the griddle one at the upper and position the grill in CONTACT GRILL mode. Adjust the lower thermostat dial to 210^ and the upper dial to 210^ . Press the START/STOP button to preheat the grill. When READY is displayed, place the previously oiled squid on the lower plate, press with the upper plate and cook for about 10-12 min. In a bowl, prepare the flavouring by mixing the oil with the chopped parsley, lemon juice, a pinch of oregano, a pinch of salt and a pinch of chilli pepper.
When the squid is cooked, remove from the grill and flavour with the sauce. Compose the dish and serve.
BANANA PANCAKES
INGREDIENTS:
- banana 1
- eggs 2 (1 whole + 1 white)
- milk 150 ml
- plain flour 100 g
- butter 70 g
- salt to taste
- sugar 2 tsp
- baking powder 16 g
PREPARATION:
Peel the banana and mash well with a fork. Beat the whole egg and sugar in a bowl and add the milk slowly mixing all the time. Add 50g of melted butter, then add the flour sieved
with the baking powder and a pinch of salt a little at a time, followed by the mashed banana. Mix all the ingredients thoroughly and then place the mixture in the refrigerator for 10 min.
In the meantime, whip the egg white until firm.
Take the mixture from the refrigerator and blend in the whipped egg white with delicate movements from the lower towards the top. Insert the griddle plate at the lower and the grill one at the upper and position the grill in OPEN GRILL mode. Set the lower thermostat dial to 200^ and the upper dial to 200^ . Press the START/STOP button to preheat the grill. When READY is displayed, grease the plates with a little butter and pour on 1-2 dessert spoons of the pancake mixture, spreading it rapidly over the surface to obtain a circle. Leave to cook for about 2 minutes until you see bubbles all over the surface of the pancake, then turn and cook the other side for about 2 minutes. The pancakes can be served in numerous ways: chocolate cream, maple syrup, fresh bilberries, chocolate chips, honey, whipped cream and icing sugar.
GRILLED PINEAPPLE WITH ICE-CREAM
INGREDIENTS:
- pineapple 1
- honey as required
- cane sugar as required
- fresh mint as required
- icing sugar as required
- vanilla ice-cream as required
PREPARATION:
Take the pineapple, remove the leaves and peel. Cut into slices about 1 - 2cm thick and sprinkle each slice with cane sugar on both sides. Insert the grill plate at the lower and the griddle one at the upper and position the grill in CONTACT GRILL mode. Set the lower thermostat dial to 200^ and the upper dial to 200^ Press the START/STOP button to preheat the grill. When READY is displayed, brush the pineapple on both sides with honey and place on the grill. Close the grill and cook for 5-6 min.
Once cooked, place the slices on a serving plate, decorate with fresh mint leaves, dust with icing sugar and serve with balls of ice-cream.
ONLY IF YOU HAVE THE WAFFLE PLATES
(available as a separate accessory)
CLASSIC WAFFLES
MAKES:8-10 waffles
PREPARATION: 10min.
COOKING TIME: 15min.
INGREDIENTS:
- all purpose flour 315 g
salt 4g - baking powder 5 g
- Baking soda4 g
- eggs (whole) 100g
- milk 490 ml
Vegetables oil 80 ml
granulated sugar 30 g
PREPARATION:
Insert the waffle plates. Put all ingredients together in a bowl starting with the liquid ones. Beat 5 minutes until blended. Turn the thermostat dials to the desired position. Preheat the waffle iron.
When READY is displayed, coat the waffle iron with melted butter or non-stick cooking spray and pour on a dosing cup for two waffle areas, using a spoon if necessary. Spread with a spatula. Cook the waffles until golden and crisp (4-5 min.). Repeat until all the mixture is used.
Serve immediately.
BELGIAN WAFFLES
MAKES: 10-12 waffles
PREPARATION: 15 min.
COOKING TIME: 15 min.
INGREDIENTS:
- cake flour 460 g
- salt 1/2 tsp
- baking powder 5 g
- white sugar 30 g
eggs 4
warm milk 460 g - melted butter 70 g
- vanilla extract 1/2 tsp
PREPARATION:
Insert the waffle plates. In a large bowl, mix the flour, salt and baking powder together; set aside. In a separate bowl, beat the egg yolks and sugar until the sugar is completely dissolved. Add the vanilla extract, melted butter and milk to
the eggs and whisk to combine.
Combine the egg-milk mixture with the flour mixture and whisk until just blended. Do not over mix. In a third bowl, beat the egg whites with an electric mixer until soft peaks form, about 1-2 minutes. Using the rubber spatula, gently fold the egg whites into the waffle batter. Do not over mix.
Turn the thermostat dial to the desired position. Preheat the waffle iron. When READY is displayed, coat the waffle iron with melted butter or non-stick cooking spray and pour on a dosing cup for two waffle areas, using a spoon if necessary. Spread with a spatula. Cook the waffles until golden and crisp (4-5 min.). Repeat until all the mixture is used.
Serve immediately.
CHOCOLATE AND CINNAMON WAFFLES
MAKES:8-10waffles
PREPARATION: 10min.
COOKING TIME: 15 min.
INGREDIENTS:
- plain flour 460g
salt 1 tsp - baking powder 3 g
- white sugar 170 g
- eggs 2
warm milk 1345 ml - butter 80 g
- vanilla extract 1 tsp
dark chocolate 140 g - cocoa powder 60 g
- cinnamon 6 g
PREPARATION:
Insert the waffle plates. Place the chocolate and butter in a microwave safe bowl and beat on maximum power for 30 seconds. Stir and continue until the chocolate and butter have melted and the mixture is smooth, set aside to cool slightly. Whisk eggs, milk and vanilla together in a large bowl and stir through the cooled chocolate mixture until smooth.
Sift the flour, sugar, cocoa powder, cinnamon, baking powder and salt together in a large bowl. Add the flour mixture to the egg mixture and whisk until mostly smooth with just a few lumps. Turn the thermostat dial to the desired position. Preheat the waffle iron.
When READY is displayed, coat the waffle iron with melted butter or non-stick cooking spray and pour on a dosing cup for two waffle areas, using a spoon if necessary. Spread with a spatula. Cook the waffles until golden and crisp (5 min.).
Repeat until all the mixture is used. Serve immediately.
SAUMON AU GRILL AVEC SAUCE AU YAOURT
INGRÉDIENTS :
- 500 g de filet de saumon
- huiledolive
INGRÉDIENTS POUR LA SAUCE :
Para remover as placas
massima attenuation.
CHOCOLADE- EN KANEELWAFELS
DOSIS VOOR: 8-10 wafels
BEREIDING: 10 minuten
BEREIDINGSTJUD:15 minuten
INGREDIENTEN:
CROSTINI MED AUBERGINEMOS INGredienser:
- 1 aubergine
- 100 g ricotta
- hvidløgspulver after behov
- persille after behov
-4dlolivenolie
salt after behov - peber after behov
- 1 baguette
TILBEREDNING
OKSEFILETMED SVAMPESAUCE INGREDIenser:
-4oksefileter
salt after behov
- heleortepeberkornafterbehov,derhakkes
- 2 fed hvidløg
- 2 tsk. rijonsennep
- 60 g smør
- olivenolie after behov
INGREDIENSER TIL SVAMPESAUCEN:
- 30 g smør
-2 spsk. gorgonzola
-2 skalottelog - 300 g championoner
- 1/2 lille glas whisky
-200gflode - citronsaft after behov
- persille after behov
TILBEREDNING
- persille after behov
- 2 citroner
salt after behov
peber after behov - 2 fed hvidløg
TILBEREDNING
GRILLET LAKS MED YOGHURTDRESSING INGredienser:
- laksefilet, 500 g
- olivenolie after behov
INGREDIENSER TIL DRESSINGEN:
- 250 g graesk yoghurt
-1 hakket hvidløgsfed
-1 tsk.salt - 1 knivspids sukker
- 20g purlog
- 20 g persille
- hvid peber after behov
TILBEREDNING
- Blaekspritte, 400 g
- 1 citron
- 1 bundt persille
- olivenolie after behov
- oregano after behov
- salt after behov
- chilipulver after behov
TILBEREDNING
RENGJØRING OG VEDLIKEHOLD
CROSTINI MED AUBERGINESKUM INGredienser:
- 1 aubergine
- ricotta 100 g
- hvitlokspulver
- persille
- olivenolje 40 ml
salt
pepper - 1 baguette
FRAMGANGSMÄTE:
HAMBURGER MED RISTET RUGBRD
INGREDIenser:
-8skiverrugbrd
- 500 g førsteklasses kjøttdeig
- 100 g sveitserost i skiver
olivenolje 20ml
- 2 lokiskiver
-romtemperert smor
- 2 teskjeer worchestersaus
salt
pepper
-1 halv teskje sukker
FRAMGANGSMATE:
Lag hamburgere: Bland kjottdeigen, Worcestersausen, salt og pepper i en bland. Bland godt. Form 4 hamburgerere med hendene, cirka 2cm tykke. Konfigurer apparatet i modusen APEN GRILL og sett inn den glatte platen i det nedre festet og grillplaten i det Øvre festet. Still den nedre og Øvre termostaten inn pa 240^
Trykk pa tasten START / STOP for a forvarme grillen.
Når displayet viser meldingen "READY" legger du løskivene med olivenolje og sukker pa den nederste platen og steker i cirka 5-6 min mens du passer pa a blande ofte ved hjelp av en treslikkepott, sik at alt stekes jevnt til loken blir myk. Samtidig steker du hamburgerne pa den andre platen. Stek dem i cirka 12 min, snu etter cirka 5-6 min. (Steketen varierer avhengig av hvor tykke hamburger er). Når loken er ferdig tar du dem av platen og rister de smurte brødskivene pa den ene siden i 1-2 minutter.
GRILLET LAKS MED YOGHURTSAUS INGredienser:
- 500g laksefilet
olivenolje
INGREDIENSER TIL SAUSEN:
- 250g gresk yoghurt
- 1 fedd hvitl0k
-1 teskje salt - 1 klype sukker
- 20g gresslok
- 20 g persille
- hvit pepper
FRAMGANGSMÄTE:
LAMMKOTLETTER MED BALSAMVINAGER OCH
ROSMARIN
INGREDIenser:
- 6 lammkotletter
- 10 g hackad rosmarin
- 10 g hackad vitlök
- 100 ml balsamvinäger
- 15 g socker
-salt e.b.
peppare.e.b.
TILLREDNING:
GRILLAD LAX MED YOGHURTSAS INGREDIenser:
KYPSENNYSAIKA: 15min
AINESOSAT:
SZASZLYKI Z KURCZAKA W KREMOWYM SOSIE MIODOWO-LIMONKOWYM
SKLADNIKI:
- 500 g piersi z kurczaka
SKLADNIKINAMARYNATE:
SKLADNIKI NA KREMOWY SOS Z MIODU I ZIELONEJ LIMONKI:
SKLADNIKINAMARYNATE:
SKLADNIKINAMARYNATE:
LOSOSZ GRILLA Z SOSEM JOGURTOWYM
SKLADNIKI:
- 500 g filez lososia
- oliwa z oliwek wedlug uzmania
SKLADNIKINASOS:
STEAKY OCHUCENE KAVOU
SUROVINY:
- hovezísteaky (2 ks po 250 g)
- olivovy olej
NA KÁVOVOU SMÉS:
-2Izickykminu
- 2 lizicky kavovych zrn
- 2 lizicky sladkych feferonek
-1 Lizicka papriky
-1 lizicka hrubé soli
-1 lizicka pepre
PRIPRAVA:
SUROVINY NA MEDOVY A LIMETKOV KREM:
LOSOS NA GRILE S JOGURTOVOU OMÁČKOU SUROVINY:
- file lososa 500 g
- olivovy olej podla chuti
SUROVINY NA OMÁČKU:
- grécky jogurt 250 g
- cesnak 1 strucik
-sol'1 stipka
-cukor 1 stipka - pazitka 20 g
- petržlen 20 g
- biele korenie podla chuti
PRIPRAVA:
Pripravte omáčku: umyte a dobre osuste petržlen a pažitku, samostatne posekajte cesnak.
Do misky vlejte jogurt, pridajte bylinky, cesnak, sol', kukor a cierne korenie a miešajte, kým nezískate jemný krem. Odložte do chladničky a nechajte v nej aspon 30 minút.
Do spotrebica vlozte hladku spodnu a grilovaci hornu platnu a prepnite ho na rezim OTVORENY GRIL. Nastavte termostat spodnej a hornej platne na 240^
Stlacte tlaclidlo START/STOP,aby sa platne zahriali.
Ked' sa na displeji zobrazi hlasenie „READY", umiestnite predtym naolejované filé na spodnu platnu, znizte hornu platnu v režime RURA S GRILOM (v polohe co najblizsie k potravinám, ale tak, aby sa nedotykala potravín) a pěcte príblízne 25-30 minut (na dosiahnutie lepsieho vysledku obratte v polovici pečenia o 180^ , pretoze v zadnej Časti je platna blizsie ku potravinám).
Po upečeni uložte lososa na servírovaciu misu a podávajte s jogurtovou omáčkou.
GRILOVANY KALAMÁR
SUROVINY:
! Poooyi! Mny xnpouponoiite e taaaika epyaia
ya aqaipoeet ta hamburger, kaowc mnpov va kataotpeyouv tny avtikoanikn eevduon twaakw.
i Σnauvtikn onmuicwn: oynkataon eoiotntac nC ouokue, av dev nioeT yia deutepn opa to nAktpo hamburger evtoc 60 aeTTw, n ouokueo bnyeI. H aetoupyia aut npooipzetaia tn ouokueo oe KAEISTH eo.
Aetoupyia KEEP WARM (AtnpnTc 0epokpaoiac)
H i toupyia autn eivai katalnn yia va diatnpite zotata ta qaynta oTo tao cTou npoiatoC,piiv to oepbipua. Ieote to nKpto KEEP WARM (13):to led aetoupyiac avaei.
Evpyoioovtac n aeitoupyia, n eepokpaia twv naakw aalacetauotnynpoyouevnpoohonotouc 60^ EneiOn oIaakec dev kpuowovu aoeoc, apnoTe to qaynto va liya aenita liyotepo (n aeitoupyia diatnpnonc tnc ac tho k
Suviotata va unx npoiopoeite tn aeitoupyia autn yia
paaynta onwc ta pfiaeta kai oI npiciolc nou oknpaiouv
otav diatnpovtai zota ia eyaloxpovikodiaotma.
Avitheta, evai katalnnyia linapa paaynta, onwc
loukavika, naidakia, novepiká, hamburger, laxavika, nitec
kai opioeva idnpsiw.
-Av exi npoypaumatoe xpovocnoiatoC,
- KypbIINfblHbI p03eTKaFa Kocnac 6ypbIH, MbiHaHaH Ke3 XeTKi3iHi3:
KypblfblHbH TJIkykAT KaIcblpMaCbIHda KepcetilreH KepHeyi ynderi po3eTKaHbH, KepHeyine caike60nybi Kepe;
- po3eTKa Jepre TynbIKtanfah 6onybl Kepek XaHe OHda KemHde 16 A Kyat 6onybl Kepek.
Kacibn Hemece Dypbc emec KondaHy Hemece HycKaynapbOpbiHdAmay eHIM XacaywbicbH 6apblkXayankepwnikTepeHb6ocatabl.
- KypblfblbI naHaJahy 6apbcblHa Kyat CblMbI bICTblK 60nybl MyMKIn 6eJIkTepre Tnin KeTneciH. Erep Kyat CblMbI 3aKbIMdaHca, 6apblK Kayin KaTeprpdi XOHO YwiH OHbl OHiM XacayShbcbl HeMece OHiM XacayShbcblHbIH TyTbIHyblblK KbI3MeTTepi aybICTbIPyblKepeK.
KypblfbiHbI XINHAN KOIMAC 6ypbH, nicipy Ta6anapbIH aHbHbI3 Hemece Ta3aay XaHE Kytim Kepcety npoueDypanapbIH opBHdaHbI3, KypblfbiHbI eWipin, Ka6ebdi p03eTKaDaH cybIPbHbI3. KypblfbiHbIH TOblk caIKbIHdaFaHbHa Ke3 KeTki3iH3.
- KypbIINfbiHbI eWkaaHa cblpTTa naJaHaHa6Ahbl3.
- KpypbilfnbHbIe kwaaH cyfa 6aTbipMaHb3.
-Бул КрьлфынblcblTкbl TaIMepMeH HeMece 6eK KaMbIkTaH 6aCKapy KyeecimeHnauJaHaHbIMaybl KepeK.
-AfblMaBkiKayinci3dkepexepeine He HcTaHdapTTapbHa cai y3apTy cbIMdapbIH fHa naIdaIahbIbI3. Onap TnicTi KnbIbICy 6enirimEn dypbic KymbcIKyHInTeYpFaHbHa Ke3
Ketki3iH3.
- Po3eTKaHaN cbIMdbI TapTy apKbIbI axbipatNaHbI3.

MaHbi3Abi!
Mynai eceptydi enemey kapaKaTTaHyra Hemece KypblfbiHb3aKbIMdayra ce6en 60nyi MYMKIN.
- Nicipy Ta6acbIHbIH, CbipTbIH KYMCAK, KYfblW Kocna KocblFaH cyfa 6aTbIPbIFaH KYMCAK ry6kamen Hemece WyepekeNen Ta3aHaB13.
- Byl Kypblfbl TamaK nicipyre apHaIFaH. Ohbl eWkaaah 6acka MaKcaTTap ywiH naJaIaNHyfa, Ke3 KeJIrEe KypblbIMbIH 03repTyre Hemece JacaHdbI Typi JacaJMaBjKepek.
-БулTekУide naДанayFa apHaIfah Kypblfbl. DyKeHepderi,OfncTepeeri XaHe 6acKa XyMbIC oPTaIapblHdaFbl Kbl3MeTKepep TaMaK TaHaTbH opbIHapda; 费PmaIapda; KOHaKyIepei, MoJeBdepderi XaHe 6acKa KOHaK KyTy optaIapbIHdaFbl KJIneHTepe; TeceK XaHe TaHfbl ac 6epetih optaIapda.
-Бул Крьлфынbl 8жacтан ackan 6anaIapfa, Ko3fany, ce3y HeMece OиlaHy MymKINdiikTepi WeKTeIreH aandaIapfa HeMece Ocbi Крьлфыfa KaTbICTbl Тжирбeci HeMece 6ilimi ЖOK aandaIapfa Tek OIapfa bIKTImaI Kayin-KatepJIep MeH KрьlflbIHbI Kayinci3 ЖOLmEN NaIdaIahy Typalbl HvCKay 6epilreHde XaHe Олар 6akblaHaHda FaHa NaIdaIahyfa 6OlaIbl. BanaIapdbIn KрьlflbIMeH OиHamaybl KepeK.
- BaIIanap ceri3 kactah acnaraH 60nca KHe yHemI 6akblayda 6oImaca, Ta3aIaydbI KHe naiDalaHybI opbIHdAHTbIH TexHnKaJIbIK KyTIMdi 6aIIanap 8 kactah acnaca KHe 6akblayda 6oImaca opbIHdAmaynapbI KepeK.
KypbIrfbHbIXaHe OHbIH CbIMbIH 8 Xactah acnaraH 6anaIapHaaynaK YCTaHbI3.
-Kypblfbl6aanaapdbH KOndapbi XeTeTIN Xepde Hemece naJaIaNbIbn KaTkah Ke3Ke KapaycbI3 KaIDbIpMaHbI3. - KypbIINfbIhbl eWkaaHnicipy Ta6acbIH caMaia naJaHaHa6aHbI3.
- KypbIINfbHbIXHHaN KOiMaC 6ypbIH OHbIH TOJIbIK caJIbIHdaFaHbIH KyTIH3.
- KypbblfblHbI KOJaHy 6apbcihda XblXblTnHaBl3.

Kynin kany kayni 6ap!
Myndai eckeptyi enemey kynin kanyra aken coktbipadbl.
- KypbIfbl KOndaHbIn XaTkaH Ke3de, OHbIH CbIpTBi 6eTTepi OTe bICTbIK 6Olybl MymKIn. KaXeT 6oJca apKaUan TytKaHbl (2) Hemece ac nicipy KOJIfa6bIH naJaIaNbIHbI3.
- IicipyTa6anapbIH KypblfblTObnkcaNKbIHdaFaH Ke3ne faHa aIbHb3 HeMece aybcTbIPblHb3.
- TemnepaTpa 30HdbIH TEK TaMaKTbIH, TemnepaTypacbIH eIwey ywiH fHaanadanaHyfa 6oJadbl. TamaKTbI caJFaH Ke3de neWtiH bICTbIK 6eJIkTepiHe Kyin KaImaHbI3!

Eckepin3:
BvI TaH6a naJaIaNahywbifa apHaIrah YcblHbICTapdbj XHe MaHb3dbl aKnapaTbI 6iJipei.
- Θpt kayiniH andbiH any ywiH TamaKtbl noln3TnIeH ka6bikwamEh, KyKa foIbrameH Hemece noIaTnIeH KaItaIapMeH opan nicipmeHi3.
- Ta3aJaydaH KeiH KypblfblbI opHaTnac 6ypbH nicipy naHeIbdepi KeNTipinyi KepeK.

BykpybIfblTaFAM TneTIN MaTePnAnDap MeH
Kepek-KapaKaTapFa KaTbIcTbI EO-TbIH 1935/2004 epexeciHe cai.
CNIATTAMACbi
- Heri3ri 6oik XaHe XaKbIu: 03diirHeH petTeJeiTIN XaIKbIuB 6ap MbIKtbl TOT 6acNaTbIH 6oJattAH XacaIaNFaH KypblIM.
- TyTKa: XOFapFbI Ta6aHbI/XaNkbIiHTbI TaMaKTbIH KaJIbIHDbIbIFbHa caI petTeiTih KaTTbI KyIMa MeTaJIdAn JxacJFaH TyTKa.
- TabaHbI 6ocaty Tymenepi: TabaHbI 6ocaty XHe 6bIfapy ywiH 6acblb3.
- Tpnlb TabanapbH 6ekity/6ocaty Kypanbl Xhe 6niktikti pettey tyKacbl: Xofapfbl TabaHbl/ KaIKblTbI Tnicti 6niktikke 6ekityre, Kbcybl KaKeTeTneTIHTaraMbdaBbHdayraaphHaFaH.
- Toncahbi 6ocaty tetiri: KaIInak 6afblTTa TaMaK nicipy ywiH KypblfBiHbI TOJIbIK aWbIN KOHOfa MymkiHdkepei.
- Bniktki peTtey Kaamapbl.
- ON (Kocy) wambl.
- Bactay/ToKtaty TyMeci.
- TemeHri Ta6a TepMoCTaTbIHbI, TeTiri: TemnepatypaHbI 60^ TaH 240^ Ka DeiH petteyre Hemece TemeHri Ta6aHbI eipyre apHaIFaH.
- TemeHri Ta6aHbIH "SEAR" (KyuDipy) TyMeci.
11.CsHDbuHyHKUcBbHbH TYMeci. - Ram6yprep fhyHKnucbHbH Tymecci.
- KbIbI Kynde caKray yHKunrcbHbIH TyMeci.
- YakbIT/temnepaTypa daTunri Tymeci "-": TaMaK Nicipy yaKbITbIH (a3aHTy) HEmece DaTUnkTIHKe3dJeIreH TemnepaTypacbIH petteyre apHaJIraH.
- YaKbIT/ TemnepaTpy DaTunri Tymeci "+: TaMaK Nicipy yaKbITbIH (Ke6eHTy) HeMece DaTUnkTIH Ke3DeIreH TemnepaTypacbIHpeTteyre apHaJIFaH.
- Kofapfbl Ta6a TepMoCTaTbIHbIH Tetiri: TemnepaTypaHbI 60^ TaH 240^ Ka DeinHpeTeyre Hemece Kofapfbl Ta6aHbI eipyre apHaJFaH.
- Kofapfb Ta6aHbH "SEAR" (Kyuiipy) TyMeci.
- TemnepaTypa datunirihx kalfbblbl.
- Abl6anbl Ta6anap: TaMaK Xa6bicnauDbI, bIdbic-aK KxyfblTa KyyFa 60naDbI, OHaI Ta3anaHaDbI. TAbAIAp CAHbIMEH TYPI YJIIGE KAPAI P TYPJI BOLybl MYMKIH.
19a.PnIb Ta6acbl: cTeiKti,ram6yprepdi, TaybiK etIH XHe KekHicTepdi OTKa KaTayfa Te bIHraJbl.
19b.KaTnapbl Ta6a:MiHci3 KMyMaK, XyMbIpTKa, 6ekOH xOHe WaaHTeKTecTePdi niCipyre apHaNfA.
19c.Korapbl BaФn Ta6acbl: 6apbIK BaФn Typneipn 3zipnyre apHaIraH (CG9167
KypblfbcimEn 6ipre Keledi Hemece 6oJek catbn anyfa 6oJadbl).
19d.Tomehri Baan Ta6acbl: Baon Typnepin 3ipnyre aphanfah (CG9167 KypbIbnbcimeh 6ipre Keledi Hemece 6eK catbin anyfa 60ana).
20. Man XnHay Hayacbl: KypbIINfbIfa 6ipikTipinreH XaHe OHai Ta3anay ywiH anbiHaDbI.
21. BaФлнд мошерпгн Kece (Kei6ip yrrinep rHa).
22. TemnepaTypa 30HdbI JxHe Kopnyc.
BIPIHII PETIADALAHY
Ta6adaH 6apIbIK KaNTama MaTePnAJaApbl MeH XancbIpMaJapDbI aBIn TactaHbI3. KaNTama MaTePnAJaApblH TactaMac 6ypbIH, KaHa KypblfBiHbIH, 6apIbIK 6oJIkTepiH WbIFapFaHbIHbI3fa Ke3 XeTKi3H3. Bi3 Kopan neH opam MaTePnAJaApbl H 6oJaWakTa KaIra naJaIaNHy ywiH caKtan KOIObl YcBiHaMbI3.
Eckepi3: Pndaan6ac 6ypbH, Herizri 6eikTi, XaNKbIHTbl XHe TetIKTepdi DbIMKbl WsybepeKeHen TaCbIMaNday 6apbcBHaJa XnHaNfA HAnDbI any yuHnTa3anaHB3. Nicipy Ta6anapbl MeH MaJ XnHay Hayacbln MyKnT Ta3anaHB3. Ta6anap MeH MaJ XnHay Hayacbln bIDbc KyfbI7a Kyyfa 6oNaBl.
Eckepi3: KypblfblbI anFaaw pet naDanaHFAH Ke3de, OaH a3dAn XaFbIMCbI 1ic Hemece TyTih WbIFybl MymKIn. ByI KaJIbITbI HApce XHe Xa6blydAn KOpfay Ka6aTbI 6ap 6aplbIK Kypblfblnapda 60nbIn TpyabI.
Eckepi3: aIbH6aIbTaMaK Nicipy Ta6anapbl (rpnlb XaHe KaTnapbl) KypblfblDa TOnblfBIMeH aybICTbIPbn canyfa 60nA TbH HApceNep 60nbT abla.
Ticipy Ta6anapbH cany
KypblfblHbJxannak Kynde opHaJaCTbIpblHb3 (1-cypeTTi kapaHbI3).Bip yaKaITTa TEK 6ip Ta6aHbI caJIbIHbI3.

BaФлн Ta6anapbH KocnaraHda, ap6ip rPnlb Hemece KaTnapbl Ta6aHb Xofapfbl He TEmeHri KopnyctbH Ke3 KeIreHHe enHIzYe 60naDbI (2-cypETti KepiH3).
Ta6aIapdblyany
OhkaTaBt Ta6aHb 6ocaty TyMepei (3) 6inipei. Ta6aHb Heri3ri 6eikTeH wblraptbn any ywiH, ocbl tyMeHi ceHIMdi TypDe 6acblb3. Ta6anapDBe eki KOblHb36eH YCTAN, Metann TipeKTePdi, 6oBIme H cbIpfb1bHb3 XHe OHbl Heri3ri 6eikTeH anbln TactaHb3. Ekinwi Ta6aHb Wblraptbn any ywiH dAn OCbHdA apekETTI opbHdaon OTbIPbIn, 6acka 6ocaty TyMecih 6acblb3.
Kynin kany kayni 6ap! Nicipy Ta6anapbH TeK Kypblfbl caJIkblHaFaH Ke3de anblb13 Hemece aybICTblpblhbl3.
MaJ KInHay HayacbH opHaIaCTbIpy
TamaK nicipy 6apbcbHda MaJ XnHay Hayacbl KypblfblHbH apTbHdaFbl e3iH KOpnycbHa caJIbIHFaH 60nybl KepeK. TamaKaTH aFaTbH MaI Ta6aDaFbl Tecikke Kapai aFaDbI XHe HayaFA XnHaJaBl.
Eckepi3: Tamak nicipy 6apbcbHda MaJ XnHay HayacbIH Xn-i-Xni Tekcepin, TOnfah Ke3de apTbIK MaNDbI Tery yuIN WblFapbIn anbHbI3.
TamaK nicipreh coH, xHaHaH MaIdbI Tnicti KOJImeH KOKbICKa TaCTaHbI3.
MaJxHayHayacbIH bIDbc KyfbI MaunHaJa Kyyf a6oIaIbI.
MaHbI3dbl! Tamak nicipy ke3iHne Ha3ap aydpblhbl3.
KypblfblbI awy ywiH, caJIkbH Kynde KaIaNtblH TYTKaHbI YCTaHbI3. ANHomHN KMyMacblHaH XacaIFaH 6oJIkTeP KaTbI KbI3aDbI, TaMaK nicipy Ke3iHe OFaH TIn KETneHi3 XOHe TAmak Nicipin
6oJfah coH depey OHbl yCTayFa 6oJMaIdbI.
KypbIbIMeH Ke3 KeJIreH onepaunHbI opbIHdaMaC 6ypbH, OHbI KEMIHDe 30 MNHyTKa cyblbIN KOBIHbI3. TaMaKTbI TeK MaJ XnHay HayacblOpHbIHDa 6oJFaH Ke3de fHa NiCiPiH3. MaJ XnHay HayacblH Kypblfbl TOblk cyIFAHsa 6ocatnaHbI3. CyblkTbH TeriIn KeTyIHeH caKaTHy YwiH MaJ XnHay HayacblH any 6apbcihda a6aH 6OblHbI3.
TICIPY KYNJIPEI
Turi36e rpnb (ka6bik kynde)
Korapfbl Ta6a TomeHri Ta6afa KoibnAdbI. Byn - 6actankbky Hxhe KypbIfbl Tnir36e rpiNb Ta6acbl petiHne naDanaHbIFAH Ke3de TaMaK nicipyre 6oataBH KyinepdiH, bi. Kaikbiu Ta6adaftbTaMaKTbIH KaBihDbifbHa aBTOMaTTbl Typde 6eimdenei.
Ocblnna, TaMaKTBIn eKi XaFbI da 6ipKeNki 60bnin nicei.
Turi36e rpnb tabacbi - ram6yprepnepdi, cynekepi anbHfah etti, kya et tiiktepiH, kekohictepdi xhe cAnBvHTepdi nicipy eTe bHaJbI hApce. "Contact" (Turi3in nicipy) fyHKunrcbTaMaKtBi Xblam XHe naaIbn etin nicipy eTe bHaJbI. Turi36e rpnb tabacbi nauJaHaFAN KeiHizDe, TaMaK Te3ipek nicei, ce6eoi OHbIH eki XaFbI da TabaFa Tnin TypaDbI (3-cypETTI kapaHbI3).
TamaKaTH WbIKKaH Ma aFaDbI XaHe Ta6aDaFbl ObIKTap MeH apTKbl TecikTep apKbIbn Ma JHNay HayacbHa KyBlaJa.
KypbIrfbIa TaMaKTbIH KaIbIHdbIFbIHcAan XOFapfbl Tabahbl petteyre MymKiHik 6epeTin apHaBbl TyTkam Hen inrE K6oJaBl. Erep Turi36e rpnbl Tabacbl NaadanaHbIn TaMaKTbIH 6ipHeWe Typin 6ip yaKaBHtNaicpriH3 Keince, KaIKbIH ty3y Xablnybl ywiH aP TaMaKTbIH KaIbIHdbIFbl 6ipDen 6onyKepeK.
Ausbikrpnb
Korapfbl Ta6a TeMeHri Ta6aMeH DeHreNec KOnbIaBl. TeMeHri Ta6a MeH Xorapfbl Ta6a
6ip yIKeH nicipy TabacbH JacaH OTbIPbH, 6ip DeHReIe 6oIaBbl. Byn Kynde Kypblfbl rplnb TaabcIme Hemece KaTnpbl Ta6AmeH kayan nicipy KyinHe naDanaHbIaNbl. KypblfblHbIOcbI Kyre opHaIactbpy ywiH, anDbIMeH coN JkaTafbl inReKti bocaty TetiriH Ta6bHb3. TyTKaHbOH XHe con Kolmeh YCTan, bocaty TetiriH Xofapbl Kapai cbIpfbITbHb3 (4-cypETTI KepiH3).
TyTKaHbI XaNkbIw XaIINaK KyIre ToHKepiin KObIHaHwa apTKa Kapa nTePiH3 (5-cypetTi kapaHbI3).
Bocaty Teteirih TapTKaHa dein H TyKaHb a3dAn KTepey Iirekke Tycetih Kywi a3aTaDbI da,apeKeTTi OHaHnataDbI. ByN KypblfblHb rAm6yprepJep, cTeNK, TaybIK eti XeHe 6albIK nicipy ywiH rPnbl/Kayan nicipy KpaJIb petInde konlaHyfa 6oJaDbI. rPnlb/ koyan peKmI -eh Am6e6an pexm. ByN peKmDe rPnbl Ta6aIapbl aUbIK Kynde 6oJaDbI XeHe nicipy 6ETepiH KytTactbipBIn, 6ip nicipy 6EtH KpaAdbI (6-cypetti KapaHbI3).
p typni Hemece 6ip typi TaFamapdbin 6ipheweyin dAmdepih apanaactbipmai, 6neK ta6anapda nicipe
anaacbl3.
PnIb/Kayan Kyinap Tpyni KaIbIHbIKTaBfbl et 6bnweKTEpiH ap6ipeyH KanaFAN nicipy deHreInHde KaTay yuih naDanaHyfa 6oNaBbl. By npexmde TaMaK nicipren Ke3de, TamaKtbl aydapbl typy Kepek. CoHbIme KaTap, 6yn KypblfBiHbTAHfbl ac yuih KyMaKTap, XyMbIPTKaJap, cbip, pPNTep, beKOH xHe WxXbIKwJap nicipye apHaJFaH Ta6a/Kayan Kypalbl eHne de naDanaHyfa 6oNaBbl (7-cypETi KepiH3).
KeH TamaK Nicipy 6eTI ap TypIi TaFAMhbIH 6ipHeweyIH
Hemece 6ip TypIi TaFAMhbIH 6ipHeweyIH 6ip yaKbTTa
nicipyre MymkiHik 6epei.
Kabiknewteri rnilb
Bvyn (8-cyperti kapaHb3) 6aay xhe 6ipKeJIki KaTaNybl Kepek KaIbIH TaFamdapdb Tnir36einicipyre bHraJbI.

Bny KypambHda cybl KeN KOKeHicTepei daNbIHdayFa
eTe konaIbI, ce6eoi on cydbI 6ylnaHdbipbn
xipepi.
OcbI bICTbIK Ta6a KyiH KymCaK cHDbNHTep MeH KbcIydbI KaKeT eTneTIH TaFamdApDbI daBbIHday yuH naDaHaHyra da 6oJaBl.
-TamaKtbi TEmeHri Ta6afa KOnbIhbl3.
-Tytkadah yctan typbin, XOFapfbi Ta6aHbI TaMakka kakbih opHaanactbipbHb3 (A cypeTi).
- FrnPb Ta6anapbH 6eKity/6ocaty TTKacbH XaHe 6nIKtikTi peTtey TTKacbH (4) KblNkbTy apKbIbnI neWTe KaIarAH KyIre opHaJAcTbIpbIh3.
- Korapfbl Ta6a opbHa 6ekitinei. BnIKtikTi petteydiH 5 Kyi 6ap (B cypeti).
ПАДАЛAHY
MANUAL (Ko) pexumi
Kypblfbl dypbc daibihdaJfHaJa XaHe TaMaK, nicipyre daibih 6oJFaHbHb3Da, TeMnepaTypaHbI ap6ip rnilb Tabacbi (Xofapfbl XaHe TMeHri) yuiH 60^ -Tah 240^ Ka dein H 6eNek opHata anacbi (9 XaHe 16 Tepmoctat TetikTepeMeH).
Start/stop (BacTay/TOKTAty) TYMecin 6acbHb3, ON (Kocylbl) WAmbl XaHaDbI.
OphatbIrfan TemnepaTypaFa Kapai 6yI Kypblfbl 6ipaa yaklt iwiHne Kbl3aBl. TepmoCTa KaKeTTi TemnepaTypaF aKeTKeH Ke3Je, Kypblfbl 3 pet Dbl6bICTbl CnHAn llbIapbl, naJaIaNHyfa DaBbIH 6oIaBl. NcPneJe "READY" (DaBbH) xa6apbl naJa 6oIaBl.
Iicipy Ke3iHde TemnepaTypaHbI Ke3 KeJreH yaKbITTa e3reptyre 6oNaBbl.
TAYMEP yHKnucnacbl
Диспел徴е"REAOy"(ДаиьИ)ха3уbl naДа 60лган КeЗдe,nicipy KynIH TaHdAn ("Nicipy Kyi" 6eIMIn Кeperi3),TamaKtbl Ta6anapfa KoBihbI3. Nicipy yaKbITbIH TaMep/TeMnepaTypa DaTuHriH IN TyuMecIH 6acy apKbIbIbTaHdayfa 6oNaIbI (14xHe 15);nicipy yaKbITbIHbIH COHbIHda "ENG" (AaKTaIbIb)хa3ybl KepeHdi, KypblfbldAn 5 pet dIb6bICTbl cRHaII WbIFaBl, 6ipak Kypblfbl Kocynbl Kynde KaIaNbl. TamaK Nicken Ke3de, start/stop (6actay/toKtaty)
Tymecin (8) bacy Hemece Tepmoctat TetikTepiH (9 XaHe 16)" KyiHe 6ypay apKbIbI KypblfBihb EwipiH3.
Eckepi3: erep ew6ip yaKbIT TaHdaJMaFaH 6oJca, Kypblfbl 90 MNHyT Kymblc icTeReHHHeh Kein aBTOMATbI Typde oWeedi.
KYINIPYyHKnncbI
BvMymkiHik Xofapfbl XaHe/Hemece ToMeHri Ta6anapdbI Xofapbipak Temnepatypanapfa 6iphewe MNHyT Kb3Dbipadbl. BvN Nicipy anDbIHda KyiDipydi KaKet etetih TamaKtapdbI Nicipyre eTe KOnaNbI (KaNbIH et YwIH eTe bHraNbI). Start/stop (6actay/TOkTaTy) TyIMecin 6acbl, COcbH KyiDipy TyMelepH 6acy apkbbl Ta6anapdbI (10XaHe 17) Kb3DbipbHbI3.
AaIbH ana Kbi3dbipy KeiHde KyiDipy TyMecinH aHaIacbHdaFbI XapbIK dIOdTapbIXkbIIbIKTaNbbl. Ta6a KaKetTI TemnepaTypaFa XeTKeHDe, Kypblfbl DbIbICTbIK CNHaI bIfapadbl, INHdkATOp XaHbIN, 6ip MInHyT 6oBbl TpyakTbIXKaHbIN TpyaBl. TamakTapbl Tabanapra Depey calblbl; ocbl 6ip MInHyT iwiHde Kypblfbl Tabanapdbl H TemnepaTypacbH KyiDipy TemnepaTypacbHbIH, DeHreHHde YCTaBbl. OcbIaH KeiH INHdkATOp eWipinei, dinCnnei TepMoCTaTneH opHaTbIFAH TemnepaTypabI KopcTeDi XeHe Kypblfbl OHbl caikeciHwe pettei.
Eckepin3: BynФункцянbl 30 Mnyt iwiHde TeK 6ip pet naiDanaHyra 6oIaBl. Lnk aayKaTaNFaHHan KeiH Kyndipy Tymecin 30 MNyT iwiHde 6accaHbI, Kyndipy TymecinH aHaJACbIHDaFbI INHdkaTop 5 pet KblblkTaIbI, aN Kypblfbl 3 dbIbICTbIK CnHah IblfapaBl. Byn onepaunBackapy TaKTacbHda OPhaTbImaMdbI.
BAΦΠη pεχμι (kei6ip yπrinepe fana)
BaФлн Ta6anapbH (19c/19d) 1-cypTe KepcetIrrHeDey etin calbIHb3. MyHdai KaFdaJaTa6anapDbI aybICTbIPbIN caBbN OTbipy MymKIn 6oMaTbIHbH XaHe apKaaCbICbIHbIH OPhbl 9-cypTe KepcetIrrHeDey 6Olybl KepeKTirH eckepiH3.
TeMeHri Ta6a Kypblfblfa caIbIHfAHnH KeiH dncnne DE OFF-1-2 Hemece 3 TaH6acbl naJa 60NaBt (TytKaIapDbH opHaIacybHa 6aJnAhbICTbl). TepMoCTaTTbIH TyKanapbIH
KaKeTTi KyIe 6pyaHbI3 (1 = a3dAn, 2 = opta, 3 = KaTbI) XHe 6actay/TOKtaty Tymecin
6acblb3.
Kypblfbl andbih ana Kbl3dbipy Ke3eHH 6actaHbI. Tepmoctat KaXetti Temnepatypara JKeTKeH Ke3de, Kypblfbl db6bictbl CnHaI WbIfapbl, NaDalaHyfa DaBbIH 6oJaNbl. DncnneJe "READY" (DaBbH) xaabpl naJa 6oJaNbl.
- Tabanapdbi epitiren capb MaMMeH KyKanaMaJNaHbI3
Eki BaФи Nicipy aMaraBbHa 6ip MOnuep Kece Kyu bHbI3.
Capbl MaNbbl a3daan XaFbIn, KypblfblHbl Xa6blbl3.
Peentinepe Kepcetiren yaKbTKca nicihi3.
Taimepdi opHaTcaHbI3, nicipy uKniHcOHBiHa ydbioCTbl CNrHan 7bifaBbl TaMep KofanaDbI kHe nCnneJe "END" (AaKaTaNbl) Xabapbl KeipHei; Kypblfbl Kocybl Kynde KaIaNbl. CoHfbl Bafln Nicyre JkaKbIHdaFaH Ke3de KypblfblHbl eWipy ywiH "start/stop" (6actay/ToKtAty) Tymecin Hacblb3.
KocbIMwa BaΦnIepe nicipy ywiH TeMeHri BaΦn Ta6acbHa Ma Kocbl, XOFapbdaFbl KaamdapblOpblHaHb3.
MaHbI3a! BaФnDi Ta6aHaN any Ke3iHdMeTaN KypanDapBn NaIaIaHa6aHbI3,ce6eI onApKa6bCyDnKopFay Ka6aTbIH 3aKbIMdaybl MYMKIN.
Eckepinj3: Byn cyHKuny Kypblfbl CLOSED (Ka6bIK) KyuHne Kymbcic ICTen TpyraH Ke3de OHtaJnaHdbipbldbl.
SANDWICH (C3HDbu) yHKnracbi
Бул Функця Нанньи CBiPTbH KyiDipyre JxHe c3HDbNHTIH iWIn XbIbITyfa OTe bIHfaiJIbI. SANDWICH (C3HDbu) TyMecin (11) 6acblHbI3, fYHKZnRnHbIH Japblk DIObI JXaHbIN, DnCnIeJde (05:00) aENKI yaKbITbI KepiHei. YaKbITbI Ke3-KeIReH cTtI - (14) + (15) TyMeIepiH 6acy apKbIbI e3repTyre 6OlaDbI; TempepaTypa opHaTblnFaH coH, OHbl e3repTy MymKIn Emec, eHTkeHi TYTkAlap eWiipirren 6OlaDbI. START/STOP TyMecin 6acblHbI3, ON (KocylbI) INdNKatOpbl XaHaDbI (DncnIeJderi yaKbIT XbIbILkTaN 6actaNbI). Kypblfbi anDbIH ana KbIsdbpy Ke3ehi 6actaNbI. TepMoCTAT KaKet TempepaTypa JxETKeH Ke3De, Kypblfbi 3 pet dbl6bICTbl CNrHaN WbIFapbl, NaDaNaHyfa daBbH 6OlaDbI. DnCnIeJde "READY" (DaibH) xaBapbl naJa 6OlaDbI. C3HDbNUTI 10-cypTE KepcetinreHne TEmHri Ta6aF CaNbHbI3, KOFapFbI TabamEn Jxaybl, Kepi caHaKbTI 6actay ywiH SANDWICH (C3HDbu) TyMecin 6acblHbI3. Nicipy aKaTaJfAH Ke3De 6ec pet dbl6bICTbl CNrHaN WbIFabl JxHe nCnIeJde "---" KepiHei. CoHfbI c3HDbUy nicyre JxakBHaRaHan Ke3De KypblfblHbI eWipy ywiH START / STOP (Bactay/TOKtAty) TyMecin 6acblHbI3.
MaHbI3db! CnDbNtI sbIfapbn any Ke3iHde MeTann KypaIapDbI naDanaH6aHbI3,ce6e6i onap XabicyaH Kopray Ka6aTbIH 3aKbIMdaybl MymKIn.
EckepiH3: daBbHdbIK KyiHeH 6actan, erep ci3 60 MNHyT iWInDe c3HDbNt TYmecin ekHwi pet 6acnacaHbI3, Kypblfbl eWeDi. ByI yHKun Kypblfbl CLOSED (Xa6bIK) KyiHne JyMbic icten TyprAh Ke3de OHtaJHaHdbIpblNbI.
HAMBURGER (Ram6yprep) yHKnrcbI
Бул Функця сэндви Nicipyre ote bIHfaiIbI. HAMBURGER (Fam6byprep) Tymecin (12) 6acblb3, fYHKZHHJ KApblДNoDbl KaHbIN, DnCnneJe (08:00) aENKI yaKbITbl KeiHei. YaKbITbI Ke3-
KeIreH cTITi - (14) + (15) TyMeIepin 6acy apKbIbI e3repTyre 60aIbI; TemnepaTypa opHaTbINFaH COH, OHbl e3repTy MymKIn EMEc, EInTKeHi TYTkAJaAp eWipIJIreH 60aIbI. START/STOP tyMecIH 6acbIHbI, ON (Kocybl) INHdkaTopbl KaHaDbI (DncnJeideriyaKbIT XbInblkTaJ 6actaIdbI). Kypblfbl anDbIH aIa KbI3dbIpY Ke3EHIN 6actaIdbI.
TepmoCTaT KaKeT TemnepaTypaF KeTKeH Ke3De, Kypblfbl 3 pet DbIbICTbl CNrHaJ WbIFapbln, NaDanaHyFa daBbIH 6oJaBl. NcCnJeNe "READY" (DaBbH) xa6apbl naJa 6oJaBl. Tam6yprepdi 11-cypETTE KepcetilreHEn TMeHri Ta6ara caNbHb3, OHbl XOFapbl TabAmEH kaybl, Kepi cHaKaTbI 6actay ywiH HAMBURGER (Tam6yprep) TyMecin 6acblb3.
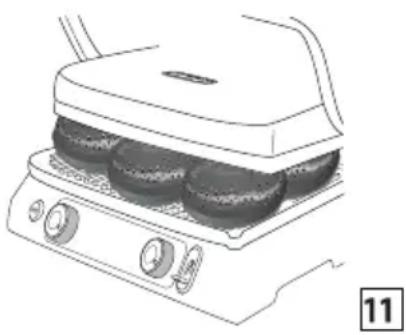
Iicipy aKaTaNfAH Ke3e 6ec pet DbIb6IcTbI CNrHaJI WbIraDbI XaHe DnCnneJe ** - KepiHedi. CoHfbI rAm6yprp NiCyre KaKbIHdaFAn Ke3e KypblfBihEwipy ywiH START / STOP (BacTay/ToKtaty) TyIMecIn 6acbl3.
MaHbI3a!rAm6yprepdi wblrapbn any Ke3iHde MeTann KypanDapbl naJdanaH6aHbI3,ce6eoi nap Ka6bICyDaH KopFay Ka6aTbIH 3aKbIMdAybl MYMKIN.
Eckepi3: DaibHdbIK KyiHeH 6actan, erep ci3 60 MNHyT iHne ram6yprep Tymecin ekHwi pet 6acnacaHbI3, Kypblfbl eWedi. ByI yHKuia Kypblfbl CLOSED (Xa6bIK) KyiHde XyMbic icten TyprAh Ke3De OHtaJHaHdbIpblDbI.
KEEP WARM (Ta3aay) yHKnrcbl
BvIyHKnTaaMaKTbI NicipReH COH daCTapXaHaF aCbIHbINFaHfA DeiH XblbYcTayfa eTe bIHraJIb. KEEP WARM (XblbCaKtay) 6enriuecin (13) 6acbl3, fyHKunHbIH, KApbIK dnobl XaHaDbI.
yHKqur icke KocblfAH coH Ta6anapdbH Temnepatypacbl 6yraH deiHRI mHHeH 60^ Ka deiH aTOMaTTb Tpyde e3repeDi; Ta6anap 6ipDeH caKbIHdaMaTbIHbIKTaH, TaMaK nicipy yaKbITbH 6ipa3 MInHyTKa a3bipak opHaTy YcBlbJaDbI (TaMaK
KbIbIcKaTayKeiHHe nicin yIrepeDi).
Bi3 6yI ΦyHKUHbI Cy6eJep MeH CTeKTEp CnKaTbI TaMaKTapFa KOnJaHyDbI YcB1H6aMbI3, eHTKeHi MyHdA TAmAKTap Y3aK YaKbIT 6ObI bICTbIK KyIe KaIca, Onap WAMadaH TbIC nicin KeTyI MymKiH. On WYXbIKTap, Ka6bIPrAnap Hemece Kyc eti, ram6yprepNep, KeKHeICTeP, nolenta XaHe KeN6ip 6aNbIK TypLepi CnKaTbIMaiNbI TaFamDapFa eTe KOnaJIbI.
- Erep nicipy yaKbIbI opHaTbImMaFah 60nca, KEEP WARM (XblbI caKtay) Tymecin (13) 6aKaH Ke3De 6vI ΦyHKuN depey icKe KocblaDbI (yaKbIT dncJIneIe KepiHei XHe TemnepaTypaHbIH opHbHa 6 KoJaK XblblbIKTaIdbI).
- Erep nicipy yaKbITbI opHaTbINca XaHe KEEP WARM (XbJIbI caKTay) TyIMeci (13) 6acblnca, opHaTbIJFaH yaKbITTah KeiH Kypblfbl aBtOMaTTbI TypDe XblNyDbI caKTay yHKcUraCbIH aYbICaDbl.
KypbIbHbIeWipy ywiin Start/Stop (Bactay/ToKaTaTy) TYIMecIH 6acblbI3 Hemece, TEK KOIpeXmI 6oJraH XaFdaIa, 2 TetIKTI "P NO3uNcRbHa opHaTbIHbI3. KEEP WARM (XbIbI caTay) cyHKnraHn iicipy peXmIhe aybcIy MyMKIn eMec. ByI cyHKnraHbI KaIta opHaTy ywiH anDbImeH KypbIbHbI eWipinKocy apKblb KaNNbHa KeNTipiH3. KEEP WARM (XbIbI caTay) cyHKnraCbI 60 MmHT KoJaHydAn COH ABTomATbI Tpyde eWeDi.
Erep ci3 30Hdtbl xanfan, Start/Stop (Bactay/ TOKtaty) Tymecin 6acnac 6ypbih KEEP WARM (XbIbI caTay) yHKuRcbiH TaHdaCaHbI3, TamaK TemnepaTypacbl KaKeTTi TemnpaTypara XeTeKeHde, Kypblfbl aBTOMaTTbl Typde KEEP WARM (XbIbI caTay) yHKuRcblHa aybicaDbI.
MaHbI3IbI!ErepKbIbIcaKtayyHKcunrcbIHram6yprep HeMece c3HDbWu yHKUncBIme naJaHaHcaHbI3,eKi Ta6a Da TeTikTepe"●" KyiHde 6oJca Da KocylbI Kynde KaJadbl.
ErepXbIbI caTay fYHKcuaCbIH KOJ pexMInHe (Tnri36e rPnlb, Xa6blK neWteri rPnlb) TAmak Nicipin XaTKAH Ke3de naDanaHcaHbI3, TEK XyMbIC icTeN TyprAh Tabanap fAna Kocylb 6oJaDbI (erep nicipy Ke3HDe TetIK " KyuiHDe 6oJCa, OcbI Ta6a Tiinti XbIbI caTay peXmInHe de OFF (Owipyni) Kynde KaJaDbI).
TEMNEPATYAP30HdbI
Бул КocалКы Kypalb TamaKtbiH iWKI TemnepaTypacbIH 6akblay ywiH oTe KOJaNbI, OhblapKaCbIHda TamaKtbl KaIarAH TemnepaTypada nicipyre 6oJadbl. 12-cypETe KepcetinReHdien, 3oHdTbl (22) XanfarbluHa eHri3ceH3 (18),Dncnnei 13-cypETe KepcetinReHdien TaMep pexmIneh 3oHdTbln TemnepaTypacbHa aBTOMaTTbl Typde aybicaDbI.
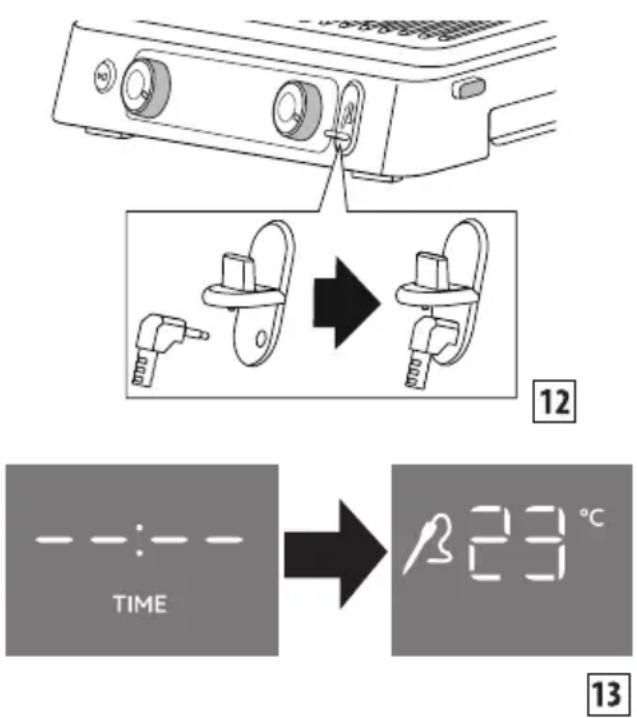
3oHtBekI Typni JoxlmEn KOndaHyfa 60nAbi;
6ipiHwici -Ke3-KeIReH bIHfaiJIbI yaKbITTa
TamaKTbIH TemnepaTypacbIH TeKcepy ywiH.
TamaKTbIH TemnepaTypacbIH TeKcepy ywiH 3oHdTbI
TamaKa TblFbIHbI3, COcBiH WbIFapbIN aNbIHbI3.
Ekinwici -Onbl TamaK Nicipy Ke3iHde TamaK iwiHde
ticKeJen KaIdbipy; 6yJ XaFdaJa cI3, 14-cypETe
KepcetinreHnei, TaMep/TeMnpaTypa 3oHdbHbIH
-(14) + (15) Tymelenepin 6acy apKblbI K3dJeRtn
TemnepaTypaHbI opHaTaNacB13.
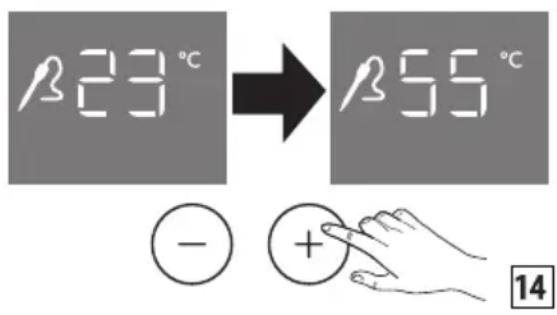
Ke3dienren TemnepaTypara KeTkeHHen KeiH Kypblfbl 3dbI6bICTbIK CNrHaI WbIFapaDbI
(TemnepaTpya 30HdbiH TafamhbIH, opTaCbHa
caIraHbIHbI3fa K3 XeTK3y yWih TaFamDbI neHTen
wbIFapap aIdbIHda 6ipHewe JepDeH apKaan
TeKcepydi YcbHAmbl). Kypblfbl Kocylbl Kynde
kanaDbI. Erepnicipy yaBtbl opHaTbIbIN, codah
KeHH 3OHd cIbIHcA, dinCJIeNderi caHAp aPDAbIM
3OHd TemnepaTypacbH KepCeTeDi JxHe 6yFaH deHIN
opHaTbIbFAH yaBtTBl Kepy MymKIn 6OImaNbI (oI
yWHH 3OHDbI WbIFapbIn any KepeK). ByJ KaFdaJa2
petteriTi (TaMep JxHe K3DJIeRrH TemnepaTpya)
opHaTbIN, Kypblfbl Kepi cHaKaTbI JxANfAcTbIPaDbI,
Ke3EH COhBiHa oJ 5 Dbl6bICTbIK CnHAn 8bIFapadbl,
an opHaTbIHFaH TemnepaTypa FxETKeHde, 3
dbI6bICTbIK CnIRHaIdbI 6peDi. Eki KaFdaJa
da Kypblfbl Kocylbl Kynde KaIaNbl. Erep MeH
30HdTbIH HAMBURGER (Tambyprp) fynKcIraCbIHda
KoJdaHCAM, aJeNKi TemnepaTypa 80°C 6OlaDbI; OHbl
30HdTbIH TaIMep/temnpa TymMeJIepin - (14) +
(15) bacy apkbIbI e3reptyre 6OlaDbI.
AByHKnIaFbI yaKbIT apKaWah, Ti nerep on 3oHd caIbIHFaH Ke3e KepiH6ce de OPhaTbIaIbI.
3OHtbl "C3HDbu" fYHKcIycbIHda KOJIaHfAH Ke3de 3OH TeK TempepatyaHb6aKbIaN aIaDbI, an Ke3JeIReH Tempepatya 6oMaIdbI. ABToMaTTbI fYHKcIyapdaftbyaKbIT apKaIaH, TiTI erep on 3OHd caIbIHFaH Ke3De KepiH6ce De opHaTbIaNbI.

MaHbI3a! 30HdTbIH yubl icTik 6oNa,Ohbl
KoJdaHfAH Ke3e a6aB 60JIbIbI3. BaIaIapDbIH KOnbl JKeTneTIH JepDe caKTaHbI3.

Kynin kany kayni 6ap! TemnepaTypa 30HdbIH
TEK TaMaKTbIH TeMnepaTypacbIH eJwey ywiH faHa naJaIaHaYfa 6oJaB1. TaMaKTbI caJFaH Ke3De neWTiH bICTbIK 6eJIkTepiHe KynI KaJMaHbI3!

Eckepi3: 3OHtblbIc KfYfblMaunHaJa
JyyfA Hemece cyfa 6aTbipyfa 60ImMaIdbI, COHdbIKTaH 3OHdTbIH CbIPtBIn JyMCAK JyFbIu Kocna MeH Cyfa dbIMKblDaHaFah ry6kameh Hemece Wy6epeKeNeh Ta3anay YcblbIaNabI.
| YcblbllfAH TEMPEPATYPALAP | |
| Сиыр ETI | |
| суbe/стeyk (шкiley) | 52°C |
| (ортаа) | 58°C |
| (nickен) | 65°C |
| кабыргалap | 93°C |
| rambyprep | 72°C |
| КОЗы ETI | |
| КOTлeT | 65°C |
| шошka ETI | |
| суbe (ортаа) | 65°C |
| (nickен) | 72°C |
| Жаншылfaнет | 72°C |
| шужыктар | 80°C |
| кабыргалap | 88°C |
| Тayык,ЖэHE KYPKETAYык ETI | |
| Т ec | 75°C |
| Канattар | 80°C |
| Балык | |
| бутih | 63°C |
TA3AJAY XKHE KYTIM KOPCETY
PaiDanahywbi KepceTeTIN KyTIm
- Ta6aIapdbi Ta3aIay ywiH OHbIH Ka6bicydAn KOpFay Ka6aTbIH 3aKbIMdaIbIH MeTaJI NkpalApbH eWkaWah naidanHa6aHbI3. AraH HeMece bICTbIKKa WbIdamDbI PnactMacca KypalapdbI naJaIaNbIHbI3.
Bip TaMaKTbI Nicipin 6oJraHHan KeiHri KeJIeCi TaMaKTbI Nicipyre DeiHri yaKbIT apaIbIFbIHda MaI aFy TeciriHderi TaMaKTbIH KaIdbIKTapBH aIbIN, OIapDbI MaN XnHay HayacbiHa XnHan caJIbIH3, OdAN KeiH ciHipriu ac 6eJIme KaFa3bIMe Ta3aIahBi3. KeJIeCi TaMaK nicipydi Tek OcbIaH KeiH 6actai 6epceH3 6oJaDbI.
KypblfblTa3anay aIbIHda KypblfblHbI kemihde 30 MNHTKa cybltbIN KOblh3.
Ta3anay KHe KyTy

Eckepinj3: KypblfbiHbI Ta3anaMac 6ypbl, TOJIbIK caJIbIHdaFaHbHa Ke3 XeTki3iH3.
TamaK nicipin 6oIraH coH, KypblfblHbI ΘUIPIN, po3eTKaHaJxkbipTaHbI3. KypblfblHbI KeMInDe 30 MHyTKa cyblTBn KOblHbI3. MaXnHay HayacBn 6ocatblHbI3. MaXnHay Ta6acBH KOlmEn Hemece bIDc Kyfbll KypblfblMeH Kyyfa 6oJaB1.
TabanapdbI KypblfbdH sbIfapbn any ywiH, TabahbI 6ocaty Tymelepin (3) 6acblb3. Onapbl Typtnec 6ypbH, Onapbl H TOblk cybifaHbHa Ke3 JeTki3iHi3. Iicipy TabanapbH bDlc XyblTa KyyFa 60aAbbl, dereHMeH, bDlc XyblTa Kni Kyy OHblh CbIPTkbl KaabtlbH, KacneTTepin HaawapnaTybl MymKiH.
CoHdbIkTaH Nicipy Ta6acblHbIH, CbIpTbIH KymCaK, KyfbIW Kocna KocblfAH Cyfa 6aTbipblfAH KymCaK, Ry6kamen Hemece Wy6epeKeH JyFAH Dypbc 6oJaNbl. Ta6anapbl Ta3anay ywiH Metann Kypanapbl naJaHaHa6aHbI3.
TEXHnKAlbIK CnIATTAMAJAPbl
Kipic Kephey 220-240 B ~50-60 T TутbiHылаТын КyaT: -2200 BT (гриль жэhe таба) -1800 BT (вафли)
AKAYIbIKTAPDbI XOIO
| Ди检п徴 di eri kat e tpyalb i xa6apnap | СИПATTAMACbl | ПЮБЛЕМА | SUELIMI |
| Bip nicipy Табасынbl temperatypacbl кетеримд. | З lektrohandbl басу лementsi Табаларbl бibeeyinih Кe3delenreH temperatypara денин Кызбafanbl аныктадbl. Гриль Табасbl Курсыflfa Дурblc ehriizimereH. Гриль Табасынbl iwinderi Кыздыр лementsi Зakblmдahfah бolybl Mymkih. Кыздblpy лementsi Зakblmдahfah бolybl Mymkih. элекtrpondbik басу лementsi Зakblmдahfah бolybl Mymkih. | Kabpradaftbl pozerka da na axbipatbhlb3. Гриль Табасbl Курсыflbl kopnycsbln da ypbic e nriizl rehi Tekcepini3. Erep 6yln п робlemны шешсяce, onda Курсыflbl da akaylsbl бolybl Mymkih. De' Long hi Tутbinglары Колдay Kby3metihe Kate Tpyalbl xa6aplaHb3. | |
| ---c ---c ---c ---c ---c ---c ---c ---c ---c ---c ---c ---c ---c ---c ---c ---c ---c ---c ---c ---c ---c ---c ---c ---c ---c ---c ---c ---c ---c ---c ---c ---c ---c ---c ---- | K bì 3 dì pу элем entihi KOCYbl yakbītbi шamadah acbln ketédi. | З lektroндьк басару оlementi К bì 3 dì pу элем entihi, tricti yakbītahn aptbik KOCYbl tpyfahtb aHbIKTadbl. | Ka bɪrfaɪd bɪ p osetka də n aЖbɪpaɪtɪbɪz. Грɪnl bɪ tabənapbɪha kəlěmi hemec caɪmáfl yamadah Tbɪc Taɪmɪrɪdbl H e M e c e M y 3 d a Tbl f a h T a f a M a r d bɪ Kоɪmaɪbɪz, ce6ebi Olaɪp Kaɪdɪpny элем entihi шamadah Tblc yakbɪt Jxymcaybln cesben 60lybl MуMKiH. Диспайde Kate typaɪbl xabap naɪda 60laɪdbl ЖэHe Kþrblfbl eweɪi. ЖаHa Niçípy цɪknīn opbɪndamac 6þrbl N kþrblfblnbl cbytbl n albɪhɪz. |
| 200° Err OP | Temperatupa З он дынbl aKaylbifbl. | З lektroндьк басару оlementi Т emel paratypa З он дынbl a Ka y l b fi bl aHbIKTadbl. | Ka bɪrfaɪd bɪ p osetka də n aЖbɪpaɪtɪbɪz. T emel paratypa З он ды a bɪ CTbl pbl lybl kepek. De'Longhi TуТыншылары Колдay Кызmetihe Катeɪн Tурɪn xaБaplaɪbɪz. |
| CL Err 180° | Temperatupa З он дынbl aKaylbifbl. | З lektroндьк басару оlementi Т emel paratypa З он дынbl a Ka y l b fi bl aHbIKTadbl. | Katel ce3iŋ Jxazbln albɪhɪz. Ka bɪrfaɪd bɪ p osetka də n aЖbɪpaɪtɪbɪz. T emel paratypa З он ды a bɪCTbl pbl lybl kepek. De'Longhi TуТыншылары Колдay Кызmetihe Катe Tур平方 xaБaplaɪbɪz. |
| Курсынсы ickets Косылмайд. | Курсы ль bи в розткага дурьс Коссы ль санын Tekserпiz. Курсынсы басka розткага косыл KERIH. Уйдин.autоматы Жы ра Т Кышын Tekserпiz. Еер бул п робли маны шемпесе, ода Курсы ль да akayльк,бolyы MUMKIN. De' Long hi Тусыншыларды К ол ду Кы зmetим хабарласылз. | ||
| START/STOP ТуIMесin басканда Курсынсы ickets Косылмайд. | Темпера typa тetiсторіи ekeyi дe "●" Кунд, Жогарсы Ха; Теменгі дис胼ide OFF (Оширу) хабарсы керінedi. Темпера typa тeti ratih Калafan Темпера typa 6урсы, START/ STOP ТуIMесin басылз. | ||
| Куйдир утейменер басылган кеading, дисplat'de "SEAR" (Kуйдир)хабары Жыллыктуйды да, Куйдир функцяссы ошеди. | Куйдир у функцяссы пicир утейд минутсы саын kon жетимdi балды.30 мину тетпейнше куйдир функцяссы н ekинши рет орын дayfa аразочаян бac тарылады. Жана Куйдир ц中超лін бactамас бухсын 30 мину кутінiz. | ||
| БЕТВ | Тер'mозэнд kateti | Темпегатура ЗОнды ТыIM ыICTык Немес электоронды К баскару 6логы ЗОн Д Тын ДурьсoxуMbIC ICTem'eэ'tihi aHbIKTaДы | Тем'mозэнды ТOKтан axырatableн, сыltын дынд да, кайтakocbyнд3. Еream ERR (Kate) cesi олд ду Онда тер'mозэнды баскасыни a bI c Tы ру kepek. De'Longhi Тутbingларды К олд aу Кызmetimeh хабарласынiz. |
| ЖальFlagыш КурьлFlagа ehriizileng Kezeide дисplat'de таймep реки'meн temпегатypасы ржи'mine aybicn'dы | Темпегатура ЗОндын Немес ЖальFlagышды a bI c Tы ру kaject. De'Longhi Тутbingларды К олд aу Кызmetimeh хабарласынiz. |
PICIPY KECTECI
CG9160 MODEJIHE KATbICTbl ECKEPTY: erep ci3e Ta6anap 6aHaHbIHda 6yI MoJeb 6oNca (TeK 6ip rPnIb Ta6acbl XaHe 6ip KaTnapbl Ta6acbl 6ap), Ta6aHbIH 6yI Typi TEmeHri XaKaKa, ekIHwici Xofapfbl XaKaKa opHaIaNCTbIPyFa apHaIraH 6oNabi.
| СиьIP ETI | К. Альbl-Дыflbl(CM) | №КЕ-CEK-TEP | ПИСIPУДENГЕЛ | ТАБАРЕЖIMI | ТАБА-лAP | °CΚΑΚΤAY МИH. | KEHECTEP | |
| Сиьк 0,5 | -1 2Жakсыл | nicipy | TιΓΙ3БΕΓρυMb | trpilb 240√2 | 3 tarfambl | жak- | сылал май- лahl3 | |
| Сиьк 0,5 | -1 4Жakсыл | nicipy | AШblК ΓρυMb | trpilb 240 | 5 -6 tamak | тblжak- сылал май- лahl3, пicapу барысында жарылай ay- дарынbl3 | ||
| Сибe | 3-4 | 4 | СиPEC | TιΓΙ3БΕΓρυMb | trpilb 240√4 | 5 tarfambl | жak- | сылал май- лahl3 |
| Сибe | 3-4 | 4 | Орраза | TιΓΙ3БΕΓρυMb | trpilb 240√7 | 8 tarfambl | жak- | сылал май- лahl3 |
| Сибe | 3-4 | 4Жakсыл nicipy | TιΓΙ3БΕΓρυMb | trpilb 240√10 | - | 11 | Таframblжak- сылал май- лahl3 | |
| Кабир央- дан дай- ындан- ын сеik | 2-3 | 2 | Орраза | TιΓΙ3БΕΓρυMb | trpilb 240 | 4 -5 tarfambl | ды жak- сылал май- лahl3 | |
| Кабир央- дан дай- ындан- ын сеik | 2-3 | 2Жakсыл nicipy | TιΓΙ3БΕΓρυMb | trpilb 240 | 7 -8 tarfambl | ды жak- сылал май- лahl3 | ||
| Кабир央- дан дай- ындан- ын сеik | 2-3 | 4 | Орраза | AШblК ΓρυMb | trpilb 240 | 10 -12 | Тамakтblжak- сылал май- лahl3, пicapу барысында жарылай ay- дарынbl3 |
| Кабыр fas- дан дай- ындан- ын сөн | 2-3 | 4 | Жakсылар nicipу | Аш bl K Гриль | гриль | 240 | 14 - 16 | Тамакты жak- сылар май- ланыз,NICIPY бары сblнда жарнызay- дарынbl3 | |
| Калan | 6 | Жakсылар nicipу | Тигl3БЕ Гriль | гriль | 240 | 13 - 15 | Тамакты жak- сылар май- ланыз, NICIPY бары сblнда жарнызay- дарынbl3 |
| К03bl ETI | КАлbl H-Дыflbl (см) | № KECEK-TEP | ПИСIPУ DEHГЕМI | ТABA PEXKIMI T | АБА - ЛAP | °C MIV | Н. KEHECTEP |
| Котлет 1,5-36 Optашa | I I I 3 | БЕ | ГРILь | грILь 24 | 0 10 - 12 | тамксы | Жжс-сылл май- ланыз, пису барысында КOTлетерді Жарылій ay- дарынbl3 |
| Кotлет | 1,5-3 | 6 | Жаçсылл пису | ТИ ПЗБЕ ГРILь | грILь 24 | 0 12 - 14 |
| Шошka ETI | Кашиblдыflbl (см) | № KE - C E - TEP | Таба Рекимi | Табалap | °C | КAKTAY | MIN. | KEHECTEP |
| Стейк | 1-2 | 4 | ТиглбЕ Гпль | грел | 240 | ✓ | 7-9 | Таframыжakсылам майаныз |
| Стейк | 1-2 | 8 | Аш bl K Гпль | грел 240 | 14-16 tamа | Ты жakсылам майаныз, пису ба-pьсында karтылам aydarpыныз | ||
| Жаш - шылдан et | <2,5 | 4 | ТиглбЕ Гпль | грел 240 | 9-11 | Тамakсылам майаныз, пису-ba-pьсында karтылам aydarpыныз | ||
| Жаш - шылдан et | <2,5 | 8 | Аш bl K Гпль | грел 240 | 11-13 tamа | Ты жakсылам майаныз, пису-ba-pьсында karтылам aydarpыныз | ||
| Кабира | 6-8 | ТиглбЕ Гпль | грел 200 | 20-25 eki Ne | чш рет ayda-pьныз | |||
| Бекон | 4 | ТИ ГΙЗБЕГRIДБ | гриль | 240 | 1 - 2 | |||
| Шужские | 8 | ТИ ГΙЗБЕГRIДБ | гriль | 200 | 16 - 18 | шухсыктарды sha-Nышко Men Tecihi3 | ||
| Калan | 6 | ТИ ГΙЗБЕГRIДБ | гriль | 240 | 14 - 16 | Та м akт bìжakс bīл an Майдаи bɪz, bīр не ekī pet aydāр bɪn bɪz | ||
| Сосисka | 6 | ТИ ГΙЗБЕГRIДБ | гriль | 240 | 8 - 10 |
| TAYbIK,ЖэHE KYPKETA-уbIK,ETI | КАлblH-,ДыIfbl (см) | №КЕ-CEK-TEP | ТаваPEЖИМI | Тава-ЛAP | °C | КAKTAY | MH. | KEHECTEP |
| Tec eti | <1> | 4 | ТAVI3BEТПЛь | гриль | 240 | ✓ | 3 - 4 | ТаframblжakсыламМайалныз |
| Жамбас | 3 | ТAVI3BEТПЛь | гriль | 200 | 20 - 25 | пicipy барысында 6ipHe eki peT aydarpында | ||
| Канат | 6 | ТAVI3BEТПЛь | гriль | 200 | 14 - 16 | пicipy барысында 6ipHe eki peT aydarpында | ||
| Кэун | 6 | ТAVI3BEТПЛь | гriль | 240 | 11 - 13 | пicipy барысында 6ipHe eki peT aydarpында | ||
| Сосиcka | 6 | ТAVI3BEТПЛь | гriль | 240 | 6 - 8 | |||
| Отka Каçталfasн Тayыктын,Жалпak,етi | 1 | ТAVI3BEТПЛь | гriль | 200 | 40 - 45 | пicipy барысында 6ipHe eki peT aydarpында |
BYKTbIPMA TY3dIK INHPRNEHTTEPI:
-25cn Kypfak ak wapan
-4decepKacbIK3aHTyH MaibI
-3decepTKacbIKTyKbIMbl6apKbIwa
-3decepKacbikakwapan cipke cybl
- 2 DecepT KacbIK npoBaHcTbIK wENTep
- 2 Tyinip TypaJFaH capbImcaK
-2wənKacbIKipiacTy3bl
-1 WAn KaCbIK KaHeH KbI3bl 6YpbIWBbl
DAHbIHDAY:
BvKtby T3dbfbih (MapnHa) 6apNbIK, HrpeHHTepi 6ip bIbICTa apanaCTbipy apkbl DaibHdaHb3. 0TKip nbIwaKaNeH TaYbIK, Xam6actapbIHbH eTTi 6eJIirH a3dAn KaKTan TiinH3. XAm6actapdbI 6yKtbIPMa TY3dbIK KybIJaH bIdcKa caIbIN, 6aplbIK JxafblHa JxafblaTbIHdA etin aydpabHbI3: 2-3 cAfTkA 6yKtbPbIN KObIHbI3. rPnlb Ta6acbH eHI3in, nicipy tetiriH CONTACT GRILL (Turi36e rPnlb) pexmIhe opHaTbHbI3. TeMeHri tepmoctat tetiriH 210°C-Ka, Kofapfbl TetikTi 210°C-Ka petteH3. rPnlb Ta6acbH anDbH ana KbI3Dbipy ywiH START/STOP TyMecIn 6acblb3. READY (DaibH) xa6apbl KeipHHen Ke3de, Tayblk CnpaKTapbiH TeMeHRI Ta6afa caIbIN, Xofapfbl Ta6aMeH KbICblB3 da, apacbHa 2-3 pet aydpbln, 20-25 MInHy 6oBl niicpiH3. Picken Ke3de Ta6aKa caIbIN, dAcTapXaHa KoBbHbI3.
OTKA KAKTAJFAH ACWARHДAP
NHPRDNEHTTEP:
- 16/20 acszaH
BYKtBIPMA TY3dIK INHPRNEHTTEPI:
-TaTfAmFa caMmIepeRiakKekKeH
-2JIMMOH
-TanFaCaMMeIWepeDeriT
-TanfamcaMmIwepderi6ypbiu
- 2 Tyinip capbimcaK
DAHbIHDAY:
BxTbpy T3dbfbH daaBHday: capbIMcaK neh aKeJIkeHdi yCaTan Typan, NMOMH sbipbIHbH, TY3 KocblbI3 da, Kapa 6ypbIe ce6iH3.
AcaaHdapbIn KBybIn, XaKcbIan KeNTipi3 De, KEMHe JxapTbI CaFAT 6yKtbpBn KObIHb3. TpNb Ta6acbH eHri3in, nicipy TetiriH CONTACT GRILL (Turi36e rPnb) pexmHe opHaTbHb3. TeMeHri TepMoCTat TetiriH 210^ - Ka, XoFapfBi TetikTi 210^- Ka petTeHi3. TpNb Ta6acbH anDbH ana KbI3dbpy ysiH START/STOP tyMecih 6acbHb3.
READY(Даиьн)хабары керihren Ke3de,KeNTipiIreH acшаяндapды TemeHri Ta6ara caIbIn,Оларды JxOFaPfbl T6aMeH KblcblHbI3 Da,4-6 MHyT 60bl nicipiH3.ДactapxahFa KoIO aIbIHda Ta6aHbI NIMOH TiikTepeImeH xHe Xacbl CanatneH cHdeH3.
IOTy3dbIfbI bAP OTKA KAKTAJFAH AJIbIPT BAJIbIK (IOOCb)
INHPEIENHTTEP:
- 500 r aJIb6IPT 6aJIbIK cy6eci
-Tanfamfa cai MeIuopeperi 3aHTyMaibl
TY3dblIK INHPRDNEHTTEPI:
-250 r rpek norgypTbI
-1Tynip capbimcaK
-1 Wən Ka cbɪk Ac Tɪy 3bl
-1 WbIMWBIM KaHT
-20waJfblHxya
-20raKkeKeH
-TanFamFa caMmIepeeriak6ypbiu
DAHbIHDAY:
Ty3dbIKTbI DaaiHday: akKeJKeH MeH WaIfbIH KyaHbIMKnRT KByIn-KeNTipiH3 De, capbIMCaKTbI 6oNEk TpyaHbI3.
IorypTbI 6JIeHep bIDbcbHa Kynbln, WENTepdi, capbIMcakTbI, TY3dbl, KaHTtbl XaHe 6YpbIITbl Kocbln, 6ipKeJIki Kpem 6oJFaHwa tapTBiHbI3. ToHa3blTKbIiKa caIbIH3 XaHe KEMInDe 30 Mm. KoBbIN KObIHbI3.
KaTnapbI Ta6aHbI eHri3in, nicipy teTiirn OVEN GRILL (Xa6bIK neWteri rpnlb) peXIMIne opHaTbIHbI3.
Temehri Tepmoctat tetiriH 240°C-ka, Kofapfbl tetikTi 240°C-ka petTeHi3.
Tpnlb Ta6acbH anDbH ana Kb13dbpy ywiH START/ STOP Tynmecin 6acbHbI3.
READY (Даиьи) xa6apbl KepiHReH Ke3de, anDbH aIa MaJ XaFbIINFaH cy6eHi TEmHri Ta6aRa Koibn, Xofapfbl Ta6aHbI OVEN GRILL (Xa6bIK neWteri rPnIb) peKIMHe KOybln, neWti Xa6bIHbI3 (TamaKa Turi36eB, 6ipak 6apblHa JkaKbH KyIre opHaIac7bIPbIHbI3) XaHe WAMAmEn 25-30 MInHyT niCiPiH3 (eH XaKcbl HATNXe any ywH niCipy
6apbcihda an6bip 6aJIbIKTb1 180^ -Ka, Ta6aHbIH TaFamFa KaKbIH KepiH aybICTbIPn caly ywiH waMaMeH KapTbIaN 6ypbl3).
Nicke Ke3e an6bIPT 6aIbIK Ta6aKka caIbIHbIN, Norgpt Tys3dbIfbIMeh bepinei.
OTKA KAKTAJFAH CERI3A8K
NHPRENHTTEP:
-400 ripi kajbmap
-1JIMMOH
-1 TaJ aKKeJKeH
-TanFaFcaMmIepeeri3aHTyMaibl
-TanfamcaMmIwepderioperahO
-TanFaFcaMMeIWepeDeriTy3
-TanfamcaenMnepderiunKb3bl6pblbl
DAHbIHDAY:
KanbMapdbi iwek-kaPbHbH, 6acbH xhe cynerin
aIbIN Tactan, MyKnT Jyy apKbIbn DaBbIHDaHbI3.
rPnb Ta6acbH enri3in, nicipy TetiriH CONTACT
GRILL (Tiris6e rPnb) pexmIne opHaTbHbI3.
TeMeHri TepmoCTat TetiriH 210^ -ka, xofapfbi
TeikTi 210^ -ka peTteH3. rPnb Ta6acbH aIbIH
ana Kbl3dbpy ywiN START/STOP tymecin 6acbHbI3.
READY (daBbH) xa6apbl Keipiren Ke3de, aIbIH
ana MaIaNFaH KaNbMapdbi TeMeHri Ta6aFa caIbIN,
Obl XofapFbI Ta6aMeH KbICbHbI3 da, 10-12 MNHT
6oBb Ni cipiH3. BHeHdep bIDCbIHda cyBbK MaIDbI
TypaIFAH akKeJIkeHMeh, IIMOH IbIPbIHbIMeH, 6ip
MbIMWBIM operaHOMeH, 6ip IbIMWBIM Ty36e HxHe
6ip MbIMWBIM KbIBIN 6ypbIHN apAActbIPbIN,
dMDeiyiDaiBHDAHbI3.
KaIbMap nicKeH Ke3e, OHbl rplnb Ta6acbHaH aIbIn, Ty3dbIKneH dAmdeHi3. OcbHbH 6apH cHdEn KocBn, YCTeJIre YcblHbHbI3.
BAHAH KIYIMAKTAPbl
HHFPEMNHTTEP:
-16aHaH
-2XyMbipTKa(1-eyiTOIbIFbIMeH+1-eyiH,TeKaKybl3bl)
-150MJcYT
-100r6ndayhbl
-70r capbIma
-TaTfAmFa caM MoIwepderi T¥3
-1decepKacbIKKaHT
-16rKaMbIPKONcbITKbIiWHTaK(pa3pbIXTNTeIb)
DAHbIHDAY:
BaHaHHbIH Ka6bIFbIH apWbIN, WaHbIWKbIMeH XaKcbIaI e3iH3. ByTIn XyMbIPTk a MeH KaHTtbl bIDbICTa WaiKaI, COhBaHa deiH apaJAcTbIpa OTbIpBn, cyTTi XaIIaIaN KocbHbI3. 50 repiIreH capbl MaNbI KocbI, KaMbp KONcBiTKbIu YHTaK KocbIFaH, eJeHReH YHdbI caJIbIbI3 da, CoHbIMeH KaTap 6ip WbIMWBIM T3DbI, cocbIH e3iRHe 6aHaHdbI KocbHbI3. BapNbIK INHPeDneHTTepDi MyKmT apaJAcTbIpBn, KocNaHbI TOHa3bITkbIwka 1O MNHyTKca calbIN KObIHbI3.
BipKaBbHaH KymbIpTKaHbIH aKyb3bIH 6deH KaTaNraHwa WaiKaHbI3.
KocnabtoHa3bITkbIHTaH aIbIN,waKaIFaH
akybl6en abaIaN kaHa actbIHan yCTHe Kapai
apanaactbipbIbI3.Katnapbl tabaIapdbE hri3in,
OPEN GRILL (AusbIK rPnlb) pexmIne opHaTbHbI3.
TeMeHri TepMoCTat Tetirin 200^ - ,XoFapfbl
tetikti 200^ - opHaTbHbI3.Γpnlb TabacBH
aIbH ana KaI3Dbpy ywiH START/STOP TYmeciH
bacbIbI3.CHADY (DaibH) xa6apbl KepiHren
Ke3de Ta6ara a3 fHa capbl MaJ Xaftbl, OHbl,
yctHe 1-2 DecepT KAcBfBIMeH KyMaK, KocnacBH
KuBn,weH6ep NiWiHn any ywiH Taba 6etHe Te3
XaBbIbI3.KyMaKTbH,ycti 6oBbIHda KcnipwIKTeP
KeipHHne 2 MHyTTaN nicpiH3 de,aydApbl,6acka
betih 2 MHyTTaN nicpiH3.KyMaKTap ap Typni
aDicnen 6epinei: WOKoJaTbI KpeMMeH,yeHki
Wap6aTbImeH,xac Kapa XnDeKTEpmEH, WOKoJaD
yririHdinepimeH,6aMMeH,waKaIaNfAH KaMaKnene
XaHE KaHT YHTaBImeH.
OTKA KAKTAJFAH, BAJMY3DAK
KOCbIJFAH AHAHAC
MHPRENHEHTTEP:
-1 aHaHac
- kaxketinhe 6an
KaMbIC KaHTbI KaXeTIHWE
JXacKaIb3KaKetIHWe
KaHTYHTaFlKaXeTIHwe
-BAHINbdi6aJMy3daKaKaxTeiHwe
DAHbIHDAY:
AhaHaactbI aIbIn, XaNbipafbIHah XaHe Ka6bIFbIHah Ta3aHaHbI3. WAmamEn 1-2 CM KaNbIHDbIKTaFbI TiikTepre KeciH3, ap6ip TiiKTH eKi XaFbHa KaMbIC KaHTbIH ce6H3. TpNt TabacbIH eHri3in, Nicipy Tetirih CONTACT GRILL (TuRi36e TpNb) pexmHe opHaTbIHbI3. TeMeHri TepMoCTat TetiriH 200^ - ka ,XoFapfbl TetIKTI 200^ - ka opHaTbIHbI3. TpNt Ta6acbIH aIdbIH ana KbI3dbIpy ywiH START/ STOP TYImecIH 6acbIHbI3. READY (JaNbIH) xa6apbl KepiHRe HKe3De, aHaHaCTbIH eKi XaFbIH aIeTKaMeH 6aJI XaFbIN, TpNt TabacbIH KaOBIHbI3. Ta6Ahbl XaybIN,5-6 MNHyT niCiPiH3.
Nicken coh ocbl tiiktepi Tabara calbin, kac
XaIbI3 XaIbIpaKaTapbIMeH cAHDeHi3, KaHT YHTaFbIH
ceyin, 6aMv3daK, WapnapbIMeH dAcTapxahFa
TapTbIHbI3.
ETEP TEK BAΦЛN TABAJAPbl BOJICA KJIACCnKAJIbIK BAΦJIHJIEP
JACAJybl:8-10BaФn
DAHbIHdAY:10MnH.
NICIPY YAKblTbl: 15 MNH.
INHPRDEMEHTTETP:
-315rKaimriYH
-4rty3
-5Kamblip KONcbITKbIIW YHTaK
-4raccodacbl
- Kymbiptkajap (6ytih) 100
-490MncyT
-80MЛeCimdkMaibl
-30rKymwekep
DAHbIHDAY:
BaФЛn Ta6aIapbIH caIbIHbI3.CyIbIKTbIKTapdaH 6actan,6apIbIK INHRpeINeHTepDi TOCTaFAHaFa caIbIbI3.ApaIaCKaHwa5 MNHyT WaIkaHbI3. TepMoCTat DeHReleKTePIH KaIaNfAH No3uNraFa 6ypaHbI3.BaФЛn Ta6acbIH aIbIH ana Kbl3dIpbIHbI3.READY(JaibH)xa6apbl KepiHReH Ke3de,BaФЛn Ta6acbIH a Capbl MaJ XaFbIHbI3 Hemece Xa6bICyfa Kapcbl CnpEiDj 6ypkiH3,eKi BaФЛn Nicipy aMafblHa KocnaHbIMJWePJIen KyNbIHbI3,KaKET 6oJCa KaCbIK NaIdaIaNbIHbI3. KaIaNKeH JaBbIHbI3.BaФЛnEpDI capbl JHe KbITbIPNaK 6oJFaHwa nicipiH3(4-5 MIn.) Kocna TaycblrFaHwa ocblaN KaITaIaNbI3. PicKeH coH depey 6epinyKepek.
BENbIgNJIbIK BAΦJIINJIEP
KACALYbl:10-12BaΦJn
DAHbIHdAY:15MnH.
NICIPY YAKblTbl: 15 MNH.
INHPRDEMEHTTETP:
-460rtokaokaaphaIHaFahYH
-1/2 wən Kacblk ac Ty3bl
-2wənKacbIK(5r)KaMbIPKONcbITKbIWHHTaK
-2wənKacbIK(30r)aKKaHT
-4KMyMbIPTKa
-460rXbInbCyT
-70 repireh capbMa
-1/2 WAn KaCbIK BaHn CblFbIHbICbl
DAHbIHDAY:
BaΦn Ta6anapbH caIbIH3. YIKeH bIDbcTa
YHdbI, T3dbI, KaMbIP KONcbITKbiU YHTaKTbI apalactbipin, 6eJIek KOra TypbHbI3. BeneK bIDbcKa JyMbIPTKCa capbyb13bi MeH KaHTTbI caNbIn, KaHT ToIbIK epireHwe waKaHaB13. BaHnCbIFbIHDbICbIN, epireh capbl MaDbI XHe CYTTi XyMbIPTKaIapFa Kocbl, apalactbipin WauKaHbI3. XyMbIPKa-cyt KocnacBih YHfA Kocbl, apalackaHa WauKaHa13. WAmadaH TbIC apalactbIPMaHbI3. YwiHwi bIDbICKa XyMbIPTKa aKyb13bH 3NeKtpNIk MmKcepMeH 1-2 MNHyT 6oNbl XyMcaK TeMneWikTeP KaNbINTACKaHa WauKaHa13. Pe3eHKe KaJaKTbl NaJaHa OTBipIN, XyMbIPTKa aKyb13bH BaΦln KaMbIPbHa XaJlAn opaHbI3. WAmadaH TbIC apalactbIPMaHa13.TepMOCTAT DOnHreIerIH KaJaFah N03uNraFa 6ypaHb13. BaΦIn Ta6acBn H aJbIH ana KbIdbIPbHb13. READY (DaBH) xaabpi KeipInRe H Ke3De, BaΦIn Ta6acbHa capbl Ma JxafBb13 Hemece Xa6bCyfa Kapcbl cnpeiDi 6ypkiH3, eki BaΦIn Nicipy aImaftbHa KocnabHbMIeIePien KMybHbI3, KaKet 6oLc KaCbIK PnaDalaHaBbI3. KaJaKnpe H xaBtBpNaK 6onFaHa nicipiH3 (4-5 MIn.). Kocna TaycbInFaHa oCbIaN KaTalaHa13. Picken coN Depey 6epiny kepek.
WOKOJIAD JXHE IAPUbIH BAΦJIINJIPEI
JACALIybl:8-10BaΦn
DAHbIHdAY:10 MNH.
NICIPY YAKbitbl: 15 MNH.
INHPRDNEHTTEP:
-460rKaadimriYH
-1waiKacblkacTy3bl
-1 WAn KacbIK (3 r) KaMbIP KOncbITKbIiYHTaK
-170raKaKaHT
-2XyMbiptKa
-345MJI XbIbI CyT
-80r capbIma
-1JnKaCbIK BaHn CblfBhlDbcbl
-140rkapawokonada
-60rKaKaoHTaFbl
-2wənKacbIKapWbH(6r)
DAHbIHdAy:
BaФл n Ta6aIapbH caIbIbI3. Wokolad neh capbl MaIdbI MInKpoTOLkbIHdbI neWKe JkapamdbI bIdicKa cIbIN, eH Kofapfbl KyatneH waMaMeH 30 cekyHd waiKaHbI3. Wokolad neh capbl MaIdbI apalactbydpI epireHwe, Kocna6ipKeNki 6oNfahwa
JxJaFactbipbHb3 Da, a3Dan calKbHday ywiH 6eIek KOr TypbHb3. XyMbipTkalapDbI, cytTt XaHe BaHnDi YIKeH bIDbICTa WaKan, calKbIHdaFaH WOKoJa KocnacBImen 6ipKeJIki 6onFaHa apanaCTbipbHb3.
YHdbI, KaHTTbI, KaKaO YHTaFbIH, DApWbIHDbI, KaMbip KONcbITKbIw YHTaKTbI XaHe TY3DbI YJKeH bIDbICTa apaIacTbIPbIHbI3. YH KocnacbIH JyMbipTKa KocnacbIH a KocBn, 6ipKeNk i XaHe OdaH 6eTeP KOIO 6oNfAHa WaaKaHbI3. TepMoCTa TdHreJIerIH KaIaNan H no3uqraFa 6ypaHbI3. BaJIn Ta6acbIH anDbH ana KbI3dbIpbIHbI3. READY (JaBH) xaabpI KeiHReH Ke3De, BaJIn Ta6acbIHcapbl MaJ XaFbIHbI3 HeMece Xa6bICYFa Kapcbl cnpeiDi 6ypkiH3, eKI BaJIn Nicipy aMaFbIHa KocnabI MEnWePlen KyNbIHbI3, KaKet 6oJca KaCbIK NaDalaHaHbI3. KaIakneH XaBbIHbI3. BaJInepdi capbl XaHe KbITbpNaK 6oNfAHa NiicipH3 (5MH.). Kocna TaaycbINFaHwa ocBlaa KaNTaHaHbI3. PicKeH coH depey 6epiny KepeK.
TEXHNIKAJIbIK CINATTAMAJAP
| Буйын Тур: | Еним deri Танбалayfa караныз |
| Yлгi: | " |
| Керney: | " |
| Жилік: | " |
| Куатbl: | " |
KbItaJa:
De'Longhi Appliances s.r.l. via L.Seitz, 47 - 31100 Treviso Italy De'Onn AnnnaHcns c.p.l. Bna JI.3eU,47 31100 TpeBnO ITaJIy ysiH XacaJFaH.
KeJeHdIK OdaKTap TepNTOpNcBInDa TyTbHybIaPf TaCbImaJday ywiH kayan KepwiniKti XeHe NMnopTeP:
"Дениг"ЖшК 127055 Pecen,Мockey K CyueBckaKa Keucesi,27-yi,3-fImapat TeI.:+7(495)781-26-76
BvI KpypbIbI naJaIaHy HcyckayIbIFbIHda
KepcetirreHdei KOJMeH naJaIaHaIbIaIbI.
OhimHi, Mep3iMi caTbIa IaBHfAH KyHHHeH
6actan 2 KblFa co3blIaIbI.
CaKray wapTTapbl:
blrfaIbIbIK aykbIMbi < 80% XaHe TeMnepaTypa aykbIMbi + 5^ XaHe + 45^ apalbIfbIHdafbI 6eJMeJep.
Буным 斯ыларынfaH KУнИ 6уным Корпсьдда Ха3ылfaH cepильб, Hemip Боиьша aHBiKtay MymkiH. (Cepильб, Hemipi: ASSCC, 6ун祛ерд А - eHIM XacalfaH XbIДын COHfbl caHbl, SS - eHIM XacalfaH anTa, CC - 6acbl nbIFapy KyHi, 1992 XbIДан 6actan abTOMaTTbl Tpyde ecenteJIeI. Mbicalbl: Cep.N° 30411, eHIM XacalfaH XbI - 2003, eHIM XacalfaH anTa - 4)
EAC
PpeynpekdeHn no texHke 6e3onacchoTn

Onachocmb!
HecobnOeHne npedynpeXeHnMoKet 6bItb nn CTaTb npuHnoopaxeHn 3IeKtpueckm Tokom, onaCHOrJxN3Hn.
-ДоТOrO KaK BCTaBtB BuNky Bpo3eTky əNeKTpOuNTaHnY, y6eDntecb,yTO:
Hapjxehne, yka3aHHoe Ha nacnopTHoTabnueyctpoNCTBa, COOTBeTCTByeH anpJxehnIO Bawe CEtn;
- Po3eTka əJIeKTpOpNTaHnI paCCuNTaHa Ha ToK 16 A m I Meet npoBOD 3a3eMJIeHnI.
IpoceccnoHaJIbHoe nnn HeHaJnxKaUc NcNoIb3OBaHHe nn HecO6JIHODeHne INCHpyKuIN NO TexHnke 6e3oNaCHOCTN CHImaET C npOn3BOdntEny BCaKyIO TBETCTBeHHOCTb.
y6eNTecb, yTo shHyp nHTaHnHe cOpnKacaetc C qactMn np6opap, KOtOpbIe CTaHOBATc rOpaymN BO BpeMa nCNoJIb3OBAHnA. Ecln shHyp nHTaHn NOBpeXKeH, OH dJoxKeH 6bITb 3aMeHen pOn3BOdnteMe mIero cepBnCHoTexHnuecko cnjX6oJ, 7TO n03BOJNT n36eKaTb IIO6oR opCKa.
- Do TOrO KaK y6paTb npn6Op, ChAryb nnITbI dIy npnroTOBHeHn npOdyKTOB, a TaKxE do BblNOHHeHn IIO6oI onepaunn no OuncTe n yXOy, BblKnHouTe npn6Op n OTKnIOuHTe ot cetn. Y6eDuTEcb, UTo npn6Op NOnHOCTbIO OCTbI.
-He nCnoJb3yIte npB6p BHe nOmeueHn.
-He norpykaTe npu6op B Body.
-Прибор Heьзя Bкючаты chepe3 BHeшнТаМерипуpe3 сnteMy CДИСТаHцINHHbIM ynpaBNeHnEМ.
- IcnoIb3yIte yIINHITeI, KOtOpIe COOTBETCTBYIOT DeICTByIOUIM HOpMaM 6e3ONaCHOCTN. Y6eIInTeCb, UTO OHN B XopoWEM COCTOAHNI N IMeIOT Tpe6yeemoe CeueHne npoBOda.
- Hn B koem cnyuae He BbHMaTe BUNky n3 pO3eTKn 3NeKTPoPntaHn, NotaHyB 3a UHyp.

Bhumahue!
Heco6nIOeHne 3Tnx npdeynpeXdHm MoKcTe CtaTb npuHHo TpaMbI uNIOBpeXdHn npi6opa.
OuHCTIe BHeUHIOI NOBepxHOCTb IINITbI DnI npHrTOBJIeHNA IpOdyKTOB MArKOJ r6KOJ NtTKaHbIO, CMoueHHoB BOIO C MArKIM MOUcIM cpeICTBOM.
- 3TOT npn60p npedha3HaueH dIy npuROTOBHeHn npoDKTOB. ETo Heb3a nCNoB3OBA Tb dIy pRnx cIeN, I3MeHrTb NnN POnDeNbIBa Tb KaKIM-Ni6o 6pa30m.
- 3TOT npnbop npedha3Haueh TOnbkoДЯ nCNoIb3OBAHnB DOMaShemXo3aICTBe. Oh He npedha3HauehДЯ nCNoIb3OBAHnB NepcoHaJOMMaRa3INHOB B 30He KuxHn, B OΦncaxN dpyrnx pa6OuNX NOMeUHenx,ROCTAMN OTeJeN, MOTeJeN IN pOouNXBnOB rOCTNHnHuBX npeDnpnAyn.
-Прибор pa3peшаetca
ИСПОЛБ3OBaTb DeTЯm c 8 leT И
ЛЮДМ C ПОИЖЕHHbIM ypoBHeM
ВOCПРЯТЯ N ПСNXOФиЗУчecKnx
ВОЗМоЖHOCTeI ИИС HeДОCTaTOUHbIM
ОпыITOM I 3HaHnYMaN, KOrДa
3a HIMN BHNMaTeJIbHo CпeДЯТ
ИПИ OНI OБчЕнbl 6e3ОпаСHOMy
ИСПОЛБ3OBaHnIO npi6Opa
OTBeuAIOUIM 3a Ix 6e3ОпаСHOCtbl
ЧЕLOBEКOM, a TAK JKe, KOrДa OHI
ОсОЗHAJOТ OпАСHOCtI, CBЯЗHHbIe C
ИСПОЛБ3OBaHnEM npi6Opa. ДeТЯМ
НЕьЗИrPaTb CпрИборom.
- OuNTka u yXoI He IOnJXHbI npOIN3BOUInbCra DeTbMM MnaIwe 8 let n 6e3 HAn30pa 3a HmM.
XpaHnTe npu6op u shyp ot Hero Bdann ot DeteMnaaie 8 neT.
He octablae np6op B6n3n ot deTei 6e3 npncmotpa, KOrda tot pa6otaet.
- HnB Koem cnyae He noIb3yITeCb npI6Opom 6e3 nnIT dIa npIroTOBJIeHna IpoIyKToB.
- Ipehenocnte npnbop B MeCTO xpaHEnrToIbKO TOrda, KOrDa OH NOnHOCtBIO OCTbIHET.
- He nepebdinraTe pa6oTaUoI npu6op.

Onachocmb oxkoza!!
Hecobnoidene 3Tnx npdynpeKdeHm MoKet npBecn K OxoraM.
- Korga np6op pa6oTaet, TemepaTypa BHeuHEn NOBepxHOCTM MoKcET 6bITb OueHb BbICOKo. Pn Heo6XoDMOCtN POnb3yITeCb pyKo (2) nn 3aunTHbIMn NepaTKamn Dnneu.
- ChmMaTe nn MeHnTe nntbI dI npuroTOBneHn npOyKToB, KOrDa np6Op nonHOCTbIO OCTbIHet.
- TemnepaTpyhbl DaTqHK MoXHo NcNoIb30BaTb TOnbKO IyN3MepenHra TeMnpaTpyb npOyKTob. BknaDbBaI npOyKtbl, 6yDbTe oCtOpOxHbl, YTO6bl He npKacatcbc K HArpeBaIOUoUMc qAChrM!

IpumeyaHue:
3TOT CnMBOJ yka3bIbaeT Ha COBeTbI INHΦOpMaIIO, BaXHbIe IJI NJIb30BaTeJI.
- YTo6bI N36eXaTb PnCKa NoXapa, He rTOBbTe npOdyKTbl, 3aBepHytBe B pIeHky n3 pIaCTuKa, aIIOMHnI NHn HaxoJruneC B IONN3TNJIeHOBbIX NaKeTaX.
- Pocne ouNCTKn pINTbI dIy npuROTOBHeHn IPOdyKTOB Heo6xOIMo IpocuHTb, npexJe Yem BCTaBnTb INX B npu6op.

3TOT npn6op cooTBetCTByeT PerlaMeHTy EC
1935/2004 o MaTePnAlnax n 3dEJIaX, npeHa3HaueHHbIX dIy KOHTaKTA c NIIuSeBbIMN pOdyKTaM.
ONUCAHNE
- OchoBaHne n KpbIshka: npOHybIKapKac N3 HepKaBeIOSei CTAJIc C amOperyNpyUoJeCn KpbIShKoJ.
- PPyka: npouHnay pyka n3 NIToro MeTanna dner peryu npOBKn BepxHei nnTbI/ KpbIuKN B 3aBucMocTN OT TOJIuHbI npOdyKTOB.
- Khonkn pa36noknpOBKn nnHtbl: pa36noknpBaTb nCHaTb nHTy, haxMnte Ha Hee.
- UcpoCTBO 6nOKnPOBKn/pa36nOKnpOBKn pnt rPnlb n pbUar perynuPobKn Bbcotbl: dIy 6nOKnPOBKn BEpxHei PnNTb/KeBxKn Ha HuxHO Bicote, IJI npuroTOBneHn IpOdyKTOB, He Tpe6yoUnx IpcecoBaHn.
- Pbyar pa36nokpOBKn wapHnpa: n03B0JAEt noHHocTbIO oTKpbITb npu6op, yTO6bl rTOBHTb B packPbITOM COCTOHN.
- Warr perynpoBKn BbICtbl.
7.ИнданаTopВКлоченя. - Khonkanycka/octaHOBKn.
- Puyka Tepmoctata HnXHHe nIITbI: peryIuPobKa temnepatypbl ot 60^ do 240^ nnn BbIKIOueHne
HIXKHeI PNTbI.
- KhoIka "SEAR" (noJxapuBaHne) Ha HxHHei PInTe.
- Khonka ΦyHKcHm CnHDbuHa.
- Khonka yHKunr Ram6yprepa.
- Khonka noDepkaHnTemnepaTypbl.
- Khonka DaTUnKa BpeMeHn / TemnepaTypbI "-": Дя рулровки ВpeMeHи пи�товен (умehьшен) ил занй ТмпераТуры дatУнka.
- Khonka daTnuKa BpeMeHH / TemnepaTypbI "-:": Дя рулровки BpeMeHH npHroTOBJIeHn (ybeHneHn) nnn 3aDaHHoN TemnpaTypbI daTnuKa.
- Puyka TepMoCTaTBePxHei nnTbI: perynpoBKa TemnepaTybl OT 60^ do 240^ nnn BbIKIOueHne BepxHei nnTbI.
- Khonka "SEAR" Дя Верхменпьтб.
- CoeinnHtJIb daTnIka TeMnepaTypbl.
- CbeMHbIe NNITbI: aHTUNpNarHbIe, MOxHO MbITb B NocydomoueHou MaunHe, JERKO YnCTNTb. KOINcTBO I TnI PINT MOrYT BAPbNPOBATcB B 3ABUCIMOCTU OT MOdENI.
19a.Плnta rриь: Идeально NOДХОДИТ ДЯпригOTOBЛЕNHЯ CTeIKOB,ram6yprepOB, KypuCiI OBOUeJ.
19b.Γnadka nnuta:ДЯ npuROTOBneHnI YealbHbIX 6nHOB,Яu,6ekHa n paKoo6pa3HbIX.
19c. BepxHra BaΦeHbHa nHTa: nIpyroTOBHeHn BceBO3MOxHbIX BaΦeHb (ndet c CG9167 nn kak OTdEhbl aKceccyap).
19d.HxHnBaΦeNbHa NHTa: nI npuroToBHeHn BceBO3MOxHbIX BaΦeNb (ndet c CG9167 nn KaK OTdeNbHbI akceccyap).
20.Подондясбopaхира:установьенВпрборИ CHIMMaTeСДЯобеспецнялergкочNTКI.
21.ДоЗатор ДЯ Baфель (ToIbKO ДЯ onpeDEneHHbIX MoDenei). - TemnepaTpyhbl daTUnK K Kopnyc.
IEPBOE McNoJIb30BAHNE
CnHmTe C nntbI BeCb ynaKOBoHbIM MaTePuaN I peKlAmHbIe HakLeiKn. Do TOrO KaK Bbl6paCbIBaTb ynaKOBoUHbIM MaTePuaN, y6eDntEcB, YTO Bbl N3BNeKIN BCE qACTN HOBOrO npu6opa. PekomeHdyETcA coXpaHNTb Kopo6Ky u naKOBoUHbIM MaTePuaN dJa nocJeDuOJero UcNoJIb30BaHn.

IpumeyaHue: Ipeep nCNoJIb3OBAHHeM OUHCTNTe
OCHOBAHHe, KpbIuKU npyKn ynpaBHeHn npn NMOOn BnaJHo TkaHn uDaJIte PbInb, PpOHKUyo BO BpeM
TpaHCnOpTnpOBKn. TuaTeNbHO OunchTe PnHTbI DnPnroTOBHeHn PpOyKTOB N POnDoH Dn C6opa Knpa.PnHTbI N POnDoH Dn C6opa MOryt 6bITb PpOMbITb B NocydomoeHn MaunHe.

Ipumeyane: Ipi nepbom nncnoj30baHnn np6op
MOXeT 3aNaX, BbI3BaHHbI ero HarpeBOM.
3To HopMaJIbHoe RAVeHne, npncyuee Bcem npnbopam, mHeUm aHTnnpurapHoe nokpbITne.

PpumeyueHue: cbeMHbIe PNTbI dIy npuroTOBHeHH
nii (rpnlb n rdka) noHocTbIO B3aM03aMeHReMbI Ha np6ope.
BCTaBka pIIT dI npriroTOBHeHn npOdyKToB
- YctaHOBNTe npu6op B pa3BepHyToe noJoxKeHne (CM. pnc. 1). BCTaBnIte nnITbI NO OJHOI.
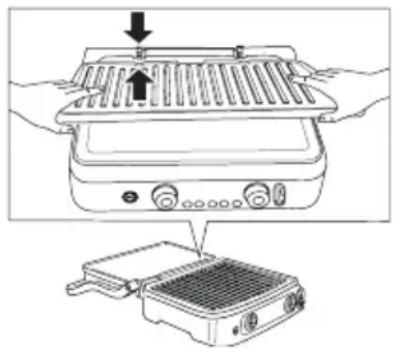
1
- KaJdyu nnIpy rpnIb n raIkyu nnIty MoXHO BCTaBnTb KaK B BepxHee, TaK u HnxHee noIoxKeHne (cm. pnc. 2), 3a NCKIIoueHneM BaΦeJIbHoI nnITbl.
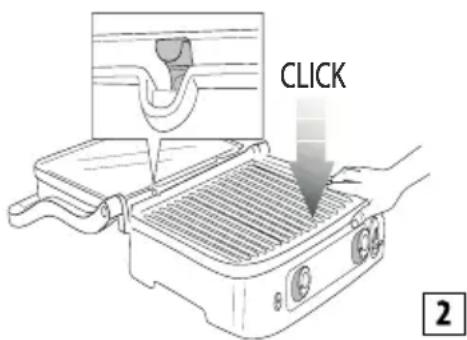
TTOOyTO6bI CHaTb nnNTbI
Haundte KhoNk np36nokupOBKn nIIT (3),pacnoNoXeHHbIe c npaBoi cTOpOhbl. C ycnIeM HaxMMTe KhoNky, nIITa BbiJeT n3 OCHOBAHy. Bo3bMITEcb 3a nnTy DBymry pyKaMn, CdbHbTe ee no MetaJIneCKM DePkaTeJMa M BbIHbTe n3 OCHOBAHy. HaKMTe DpyrYIO KhoNky pa36nokupOBKn, YTO6bl BbHyTb BTOpyo nnTy, BbINOHNB Te Jx Ce camble onepaun.

Onachocmb oxkoza!! CHMaMaTe Nn MeHraTe PnNTbI
Длгпри�OTOBнЯ npOdyKTOB, KOrДа npN6Op OCTbHET.
YctaHOBTeNoIOnIJIc6opaKnpa
Bo Bpem npiroTOBHeHn noDOn dIg c6opa Jnpa BCTabJIeTcA C 3aJHei CTOpHObl np6opa. Xup, BbTEKaIOUm I3 npOyKTOB, CNBaETcA cheE3 OTBepCTne B PInTe n CObpaETcB NoDoHe.

Ppumeyaue: Bo BpeM npuroToBnHn yacto
npOBepaTe coCToHne noDoHa dIra c6opa Jnpa N BbIHMaTe erO, YTO6bl N36eKaTb N36blTkA KnDKoro Jnpa.
Iocne npurotoBHeHna ydaHnTe BeCb co6paHbN JKnP.
IopdoH dna c6opa Jnpa MoKet 6bITb Ipombl B nocydomoeuHou MaunHe.

BhumHue! Bo Bpema npuroToBneHna 6yDbTe
OCMOTpnteHbI.
Дя toro yto6bl otKpbItb npn6op, 6epntecb 3a pyky, KOTOPaOCTaETcXoNoDHO. Yactu n3 npeccOBaHoro aIOMHHN OyeHb CnIbHo HArpeBaHTcra, n36eraTe n36eRaTe kacaTbcra IX BO BpeMn cpa3y xe nocne OKOHuaHn pnproTOBHeHn.
До Выноненя Лобов onepaun c npibopom daite emy octbIb B TeueHne He MeHee 30 MmHyT.
TOTOBbTe TONbKO C BCTaBHeHHbIM NOdOHom dJa c6opa Knpa. He OnpoXHnIe TNOdoN dJa c6opa Xnpa, NOKa npN6Op NOJIHOCTbIO He OCTbIHET. ByNbTe BHIMATEnbHbI, KOJa BbIHMaete NOdoN dJa c6opa Xnpa, YTO6bl N36ExKaTb PpOINBaHnJ XnIKoCTn.
PABOYNEIIOXKENIPIBOPA
KoHTaKTbIy rpnlb (3aKpbToe noIOXeHne)
Bepxna onnpaetca Ha HnXHIOI pNHTy. 3To n NaHauJIbHOe noLOXKeHne, nNoLOXKeHne Ia npuroTOBJeHn, KOrda np6op nCnoJb3yETc B KaueCTBe KOHTaKTHoro rPnI. Bepxna nIuta aBtOMaTnueckn aadAnTppyETc K ToIuHe npOdyKTOB, HaxoJaUnxCra Ha NInTe.
Takum 06pa30m npo4yKtbl OINHaKOBO rTOB8rC c 06eHX CTOpOH.
KoHTaKTbI rPnB - 3TO nDeaHbHbI cNoC06 dI npiroTOBHeHnra Ram6yprpoB, Mca 6e3 KcTeu Hape3aHHOrO TOHKIMN KycOyKaMn, OBOUe N ChDBruey. «KoHTaKTHa» fYHKUNI NO3BOJrE rTOBNTb IpeKpaCHbIe 6JIOna 6bICTpO n CcoXpAHEm E Nx NOE3HbIX CBOICTB. Pn MCNOlb3OBaHmN KOHTaKTHorO rPnI npOdykTbI rTOOBrTa 6bICTpO, TAK KAk OHN cOpnKacAOTc C IIITAMN
OJHOBpeMeHHo CObex CTOpOH (CM.pnc.3).
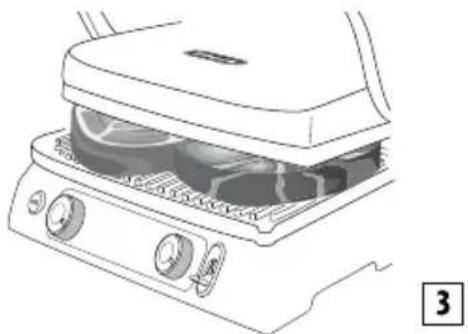
KaHabKHa HnIte N OTBepCTne C 3aHHe CTOpObI npi6opa n03BOJAIOT CInTB N CO6paTb B CneuaJIbHOM IOnDoHE BbIXoJauu XnP.
Ipi6op ochaueh cneuaalbho npyko n wapnipom, KOtOpBie no3BOJnOT peryuPObaTb BepxHIOO pNITy B 3aBncMocTH OT TOUINHb I npOdyKTob. EcnHa KOHTAKTHo H NITE Tpe6yETc ONDOBpEmeHNO npiroTOBNTb npOdyKtB HeCKoJIbKnx TINOB, 3TN pa3HbIE npOdyKTbl DOJXHbI IMetb ODiHaKOByO ToUINHy, YTO6bl KpbIshKa 6blna npuxkatapaBHomepHo.
OTkpbltbIrpnlb
BepxHn HaxoDnTc BPOBeHb C HnXHei nIITOn. HnXn H BepxHn HaxoDnTc B ODHn IIOCKOCTn, 06pa3y O6wnpHyo NOBepxHOCTb DnI npuROTOBJeHn npOyKToB. B 3OM NIOXeHN npu6Op MOxET 6blt bCnONb3OBaH, B pexmE 6ap6ekIO nn6o C nIHTOn rpnib, nn6o C rnaKn nnItoN.
Дя рулровки пибopa в�Tom noLoKeHn, npexde BCero, HeobxOIMo HauTn pbIar dЯ pa36NoKpOBKN shapHpa, haxOJaSicr cneBa. Bo3bMntecb 3a pyuKy npabOn pyko, a JbeOn haxMTe nepeDbInhBe pblar pa36NoKpOBKn BBepx. (cM. pnc.4).
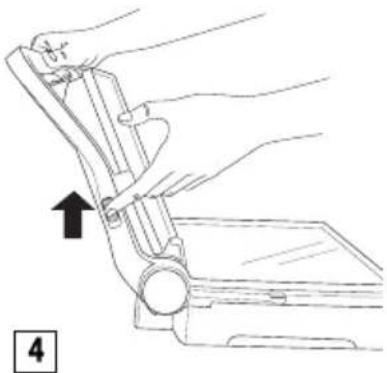
ДвигаитpeукуHa3aI,пokaКрblkaHe OkakketcВ ropu3oHTaIbHOM nONoXeHHN BBepxДHOM (m. pnc. 5).
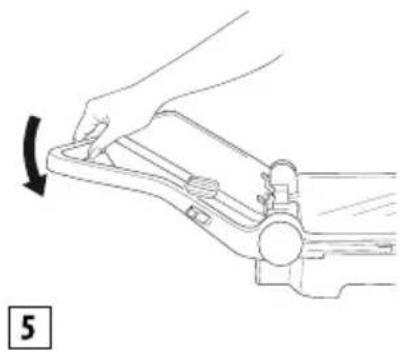
Ecnnyuoka noDHnMaetcdoToro, KaCdbHuy6boknpoBOHyb pyUar, yMeHbIte HaxKaTne Ha 7apHnpuO npaun OTKpytny 6yET npOn3BODntbcN erYe. Pp60p MoKcET 6bITb NCNoB3OBaH, KaRrplb/6ap6ekIO nI npuroBHeHraM6yprepOB, cTeIKOB, KpyuIb N pbl6bl. Pexm rplb/6ap6ekIO nO3BOJare NTcNoB3OBaTb np60bp ouehr ngko. Korda nnTb rpnna HaxOJaTcB OTKpbITOM noLOXKeHN, NOBepxHOCTb dIy npuroTOBHeHn npOdyKTOB yDbaNBaETc (cm.pnc.6).
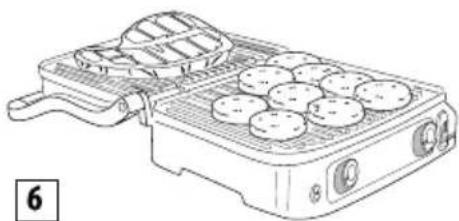
Ha pa3hbx nIITax MOxH0 rOToBnTb pa3NnUHbIe npOdyKtbl, He CMeuBaI IN BkyCa IINrOToBnTb 6oJIbIeep KOnIueCTBO OdHnx I Tex Xe npOdyKtOB.
IonoXeHne rpnb/6ap6ekIO no3BOJnEe XApNTb KycKn Mca pa3nHOro pa3Mepa NToJIuHbI, KaKDbI C npednoTtTeNbHbIM yPoBHe m npiroTOBHeHn. Ppi TaKOM IonoXeHn np6opBa BO BpeMa npiroTOBHeHn IpOdyKTb Heo6xOIMO nepeBopaauNBatb.
Ppnsbop TaKke MoXHo NcNoB30BaTb B KaueCTBe rAaKOI pNTbl/nnTbI dIg 6ap6ekIO Ira npiroTOBHeHn 6nHOB, AunHnCbI, cbipa, onaDn, 6eKoHa n COcNcOK Ha 3aBtpak (CM. pnc.7).
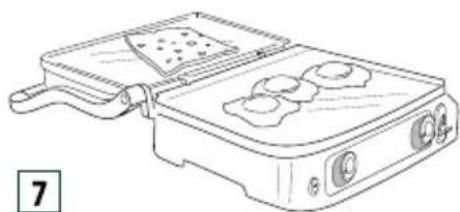
HnpoKan nobepxHOCTb dny npnroTOBneHn npOyKTOB n03BOJReT OndOBpeMeHHoro TOTOBt HeCKoJIbKO npOyKToB uN 60nbuee KOnueeCTBO ODHOro npOyKta.
DyXOBka rpnb
3To noIoxKeHne (cm. pnc. 8) noxOaNT dna 6eCKoHTaKTHORO npiroTOBHeHnHa rPunTe TOnCTbIX NnueBbIX npOdyKTOB, KOtOpble Heo6XoDmO noJXapNBaTb MedJeHHo paBHOMepHO.
OHO INeAIBHO IINI pNIOROBHeHNO OBOUe CIOBBIWeHHbIM COepeKaHnEM BObl, YTO6BI BODa MoTNa MCnapaTbcra.

3To nonoXHeHrOpye nnITbIMoXHO TaKxE NCnOJb30BaTb IaI npiroTOBHeHMyRkNxC HdBnue N IpOyKTOB, He Tpe6yUxnx PpeccOBAHna.
-Пометитп подкын НИХнIO 十NTY.
-ПоднecnteВерхиюпintуКпpoДуКтам,В3ЯВшсьза pyky(pnc.A).
Iepemecnte pbuarperynnpobkn BBICOTb6nokpobkn/pa36nokpobkn npnt rpnna (4) BKeenaemoe nooKeHne nHTbl,CdBNHVBpbuar.
-BepxHnIa 3a6IOKnpoBaHa B HuxHOM nOIOXeHN. CyueCTByeT 5 pa3NIuHbIX peryIINpOBok no BbcOte (Pc.C.B).
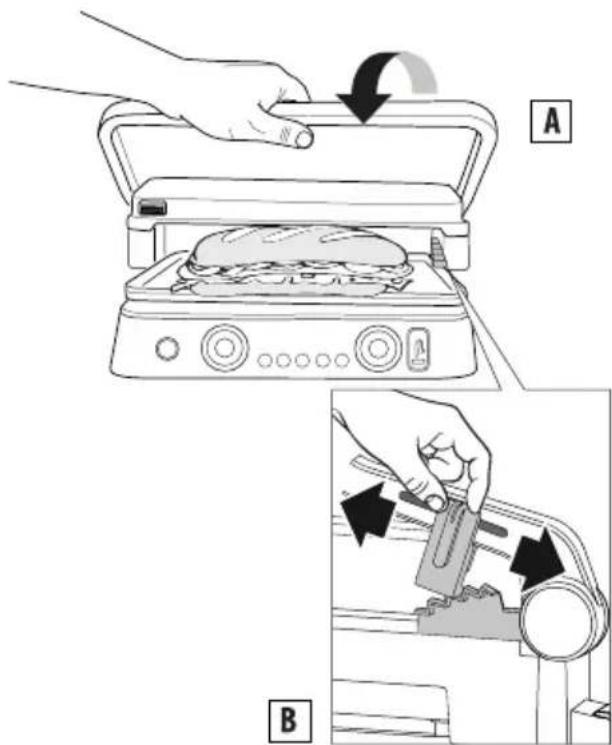
NCIOJIb3OBAHNE
PuyH0 peKm
Iocne toro kak np6op npabunbHO noDrotOBnH, u KOrda Bbl roTOBbl Haatb rOToBtB, yCTaHOBNTe TeMnepaTpy ot 60^ do 240^ He3aBNCmO dJa KaKDoN PnITb rPnla (BepxHei HnXHei), nCNoJIb3y pyuKn TepMoCTaTa 9 n 16. HAnMMTe KhoNkY pNyCa/OctaHOBKn, n 3aROpNTc INnDKaTOP BKIOUeyHn.
B 3aBnCmOCTn OT yCTaHOBJIeHHoN TeMnepaTpybI dJa HArpeBa np60pa MoKet nHOaObntbcr HeCKoJIbKO MmHyT. Korda TepMoCTat DoCTnraet Heo6XODIMoN TeMnepaTpybl, np60p n3daet 3BykoBbIX CnHaIOB, n OH rOtOB K pa6Ote. Ha dncnnee noaBnTc coo6ueneHem "READY".
TemnepaTyPo MoxHo N3MeHHTb B IIO60MOMeHT BO BpeMa npuroTOBHeHna.
ФУHKUЯТаМерра
Korda noBnTc co6eHne "REOy", BbI6epnte nOxHne dnn npuroTOBHeHna (cm. pa3dEn «NooxKeHne dnn npuroTOBHeHNA), a 3aTe m pa3MeNTte Ha nnTax npodykTbI. Bpem npuroTOBHeHna MoXHO BbI6paTb, Haxmam KhONKn TaMepa/tempepatpybI (14 u 15); no OKOHuaHn BpemHn npuroTOBHeHna OT6paXKaETc coo6eHne "ENO", np6op n3daet 5 3ByKObIX CnHaIOB, HO np6Op octaHETc BKNIOUeHHbIM. Korda npOyKTbI 6dyT rOToBbl, BbIKIOuHTe np6op, Haxab KhoNky Nyca/ OCTaHOBkn (8), nnn NoBepHnTe pyKu TepMoCTata (9 u 16) B NOLOXeHne "●".

IpumeyaHue: np6op aBTOMaTHueckn
BbIKIouTcyaepe3 90 MNHyT pa6oTbl.
ФУнКУЯ Sear
3TaФункинHarpeBaetBepxHIOuN/nnn HnKHNTOIINITbIdo 6Oone BbICOKoI TemnepatypI B TeueHne HeCKoJIbKnx MNHT. OHa NdeanbHO NOxOINT dN8 6bICTPOO6XapNBAHNA npOdyKTOB B Haayane pnproTOBHeHry (NdeanbHO dNra TOJcTOrO Mca).HaxMnte KhONky Nycka/OCTaHOBKn,3aTeM pa3orpeTe PNTbl, HaxMma KhoNkSear (10 n 17).
Bo Bpem npedBapntbHoro HarpBa Muaot CBeToIONoBb BOKpyr KhoNk sear. KaT OJIbKO PnNTa DOCTnraET Heo6xOIMo TEMnepaTypbl, npu6op n3daet 3BykoBO CNHaJ, CBeTOIOO OCTaTeCBKIOUeHHbIM N OIKCnpyetcB TeueHne OHOH MNHyTbI.
Cpa3y Je pa3nojnte npodykTBi Ha nnTb; B TeueHne 3Toi ODHo MNHyTBi np6op perynipyet nHTy Do TEMnepaTybI sear. Iocne 3TorO CBetoND raCHet, Ha DCnlee oTo6paxaetc TaemepaTypa, yCTaHOBnEHHa nepeKnouateMa TepMoCTata, n np6op
COOTBeTCTByIOUIM o6pa3OM peryInpyeT PNTy.
Ipumeyane: 3Ty cyHKnHO MOxHo NcNoB3OBaTb TOnbKO OINH pa3 B TeueHne 30 MInHy.T. Ecnn nocne uKna Bbl HaxMeTe cyHKnIO sear B TeueHne 30 MInHy, CBeToNDo BOKpyr KhoNk SEAR MInHer 5 pa3, IN pnp6Op n3dact 3 3BykoBbIX CmHana. 3Ty onepauu HEnb3y UCTAHOBtB Ha npIbTe ynpabHeHH.
BAΦΕJIbHbI pexμm (TολβκΟ B HeKoTobx MoeJax)
- BCTaBbTe BaΦeIbHbIe nIITbI (19c/19d), KaK nOKa3aHo Ha pnc. 1. 06paTInTe BHIMaHHe, qTO B 3TOM clyuae nIITbI He ABLJIOTcB3aIMo3aMeHReMbIMN, INOLOXeHHe KaJDoI nIITbI DoJXHO 6bItb TaKIM, KaK nOKa3aHo Ha pnc. 9.
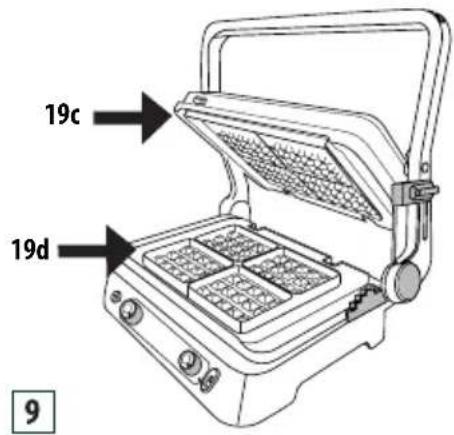
- Iocne TOrO KaK HxHxHnA PnIa BCTaBHeHa B np6Op, Ha DnCnnee noRbIeTc8 OFF-1-2 nnn 3 (B 3aBncMocTn ot noLoXeHHpyuek). UcTaHOBtpepyrJrTopbl TepMoCTata B XeJaEMoe noLoXeHHne (1= CBeTbI, 2= cpeHni, 3= TeMHbI) n HaxMMte KhoNky Nycka/ OCTaHOBKn.
-Пибор haunhaet pha3y pa3orpeBa. KOrda TepmoctatdoCTnraet Heo6xOdImoT TemnepaTypbI, npi6opH3daet 3BykoBoi CmHan, n OH r0ToB K pa6ote. HaDinCnlee noBntc coo6ueneHem "READY".
Cnerka cmaKbTe pntbI pactonneHHbIM MacnO
Bhumaue! chmra ra6byprep, He noIb3yItec6
MeTaNuecknMn INHCTpyMeHTaMn, TaK KaK OHN MOryT NOBpeNTb aHTuNPurapHoe nOKpbITne.

Ipumeyaue: ecn n3 COCTOHHI rTOBHOCTH He
HaxaTb BTOPO pa3 KHONky rAM6yprepaB TeueHne 60 MNHT, np6op BBKIOHTcA.3Ta yHKuia 6bila ONTMn3npoBaHa dIra6Obl np6opa B 3AKpblOM noLoKeHH.
y6eIITcB,HTO OH IIOHIOCTbIO OCTblI.
IIO OKOHaHn npiroTOBHeHn BbIKHOHTe np6Op n OTKIOHTe ot cTe. DaIte np6Opy octbITb He MeHee 30 MNHT. OnopoxHnTe noDoH dJa c6opa Knpa. IOndoHbI dJa c6opa Knpa MOry 6bITb Ipomblb BpyHyIO INN B NocydOMoeHNo MaHNHe.
HaxMnte KhoNpa36JOKpOBKn pNT (3),YTO6bI BbHyTb ux n3 np6opa. Do TOrO KaK npKacatbCk K pNTaM, y6eHTecb, YTO OH NOLHOCTbIO OCTbln. PINTbI DnI npRTOBLeHn IPOyKTOB MOxHO MbITB NOCyDOMoeyHO MaunHe, XOTy CaToe MblBe B NocyDOMoeyHO MaunHe MoXet yxydUnTB CBOINCTBa NOKpbITNA. OuchTe BHEUHIO IOBepxHOCTb PNTbl dNpRTOBLeHn IPOyKTOB MfKoI r6KOHNTKaHbIO, CMoueHHO BOID CMrKIMMOUcIM cpeCTBOM.
IЯ OuNCTKn PJIIT He NcNoB3yIe MetaJIINueCKne npEIMetbl.
TEXHNUECKHEXAPAKTEPNCTNKU
Hanpajxhe HntaHn 220-240B\~50-60Tc
IopTe6JIeMaJ MoUHocTb: -2200 Bt (rpnlb n rnaikka) -1800BT(Bafohba)
TEXHNUECKHEXAPAKTEPNCTNKN
| Тип Изdenя | сM. Маркирobky на Корпуce усточтва |
| Модель: | " |
| Наръжени: " | |
| Частota: | " |
| Мошноctrь: | " |
CenahOB Kntae pia:
De'Longhi Appliances s.r.l. via L.Seitz, 47 31100 Treviso Italy De'IoHnAnnnaHcns c.p.l. Bna I. 3eui, 47 31100 TpeBnO rTaIIa
I MnnpTeP u OTBeTCTBHeHHbI 3a npTeH3Mn Iotpe6nteNe Ha TeppHTopu TAmOxKeHHoro Co1o3a:
000 «Денигп»
127055 Pocca, r. MockBa, yI. CyuEBCka, d. 27, ctp. 3
TeN. +7 (495) 781-26-76
N3dene NcNoB3OBaTb No Ha3HaueHnIO B COOTBeTCTBnCpykoBDCTBOM NO 3KcNpyatauIN. CpOK cnyk6bl N3denncoCTABnEET2 rOdaC dAtpI npodaxn Notpe6ntenIO.
YcnoBnaXpaHenn:
В поMuEHHn npBnAaXHoCTu < 80% n TeMnepaType oT ^+ 5^ do +45^
Daty n3roTOBHeHnI 3dEInnMoXHo onpeJeINb IocepuHOMy Homepy, paCNOIOxKeHHOMy Ha KOpNcE N3dEInn (Cep. No ASSCC, rDe A - noCleHnA yuOePa rOda n3rTOBHeHn, SS - npOn3BOoCTBeHHaH HeJeH, CC - data neaTn, paccHTaHHaA bToMaTHueckn c 1992 r. Ppimep: Cep. No 30411, roJ n3rTOBHeHn - 2003, npOn3BOoCTBeHHaH HeJeH - 4)
EAC
AUYHUNCA, BEKOH NTOCTbl INHPEDNEHTbl:
-2a
- 2 JIOMTUKa 6ekoha
-10mmoJoka
- cOJIb I nepeu nO BkCyC
-2 JOMTnka Xle6a DnTTOCTOB
ПИГOTOBLEHNE:
B36eTe rma c MONOKOM n coIbIO Do 06pa3OBAHnnerKoN n nenctOn cmecn. BCTaBbTe pnockyIO pINTyB HnXHee pNOxKeHne, a pINTy rpnbl - B BepxHee,3aTeM yCTaHOBe Tnp6Op B pexm OTKpblTbI rPnlbl.YCTAHOBtpe pykny TepMOCTATA HnXHeN pINTbI Ha 240^, pykny TepMOCTATA BepxHeN pINTbI Ha 240^. HaxMITE KhONky NycKa/OCTaHOBKn Dnra pa3OrpeBa rpnIA. Korda Ha dncnlee NOBtca COo6UeHne READY, BblneTe RnHyTO CMEcb Ha yRrnnbl I rTOBbTe 2-3 MNHTbl, TzataNBHO nepemeunBaA depeBHHOJ nonATKO, YTO6bl o6ceuNTb paBHOMePHoe npiroTOBJIeHne. Tem BpemeHem Ha Toi JKe PInTE roTOBbTe IomTKIK 6ekOHa 3-4 MNHTbl, nepeBopauHBa PnpMePHo B cepdInhe npiroTOBJIeHn; Ha dpyrO nnocKoN pInTE nOdkapBaIte Xle6 3-4 MNHTbl, nepeBepHyB npImePHo B cepdInhe npiroTOBJIeHn. Bbloxnte Ha tapEnKy n OdaIte Ha CTon.
TPEHKN CIIAUITETOM N3 BAKJIAXAH NHTRPENHTbl:
-16aKnaKaH
-100rpuNKoTTbl
- YecHOK B nopoiKe No BKcy
- netpyuKa no BkcyC
-40MnOJINKBOKOROMacna
- cOJIb IIO BKyCy
- nepeu no Bkyc
- 1франузкн 6aaret
ПРИTOВLENHNE:
Xopoio npomoi Te 6aknaXaHbI, ouHCTnTe ux ot Koxypbln HapeKbTe TOJCTbIMN JOMTNKAAM.
BctaBbTe nIOCKyIO nnI TY B HnXHee noIOJKeHne, a nnI TY rPnIb — B BepxHee, 3aTeM yCTaHOBtpe np6Op B pexmOTKpblTbI rPnIb. YcTaHOBtpe pyky TepMOCTaHa HnXHei nnIb Ha 240^ ,pyky TepMOCTaHa BepxHey nnITbHa 240^ .HaxMMte KhoNkY nycka/OCTaHOBKn dJa paOrpeBa rPnIra.KorDa Ha DnCnIee NoBtca Coo6UeHne READY, BblOxNte 6aknaKaHbHa HnXHn TpInb n RotOBtBe 8-10 MNHyT noka OHn He cTAHy MArKmN. NopeXbTe JOMTNK
6aKlJaKaHa KpyNhbIMn Kyckamn n NOJoxKe Tnx B MmKcep BMeCTe C pIKOTTO, 3y6uNKOM YecHoka n Nopy6neHHo NEtpuSKo, uenotKO coIN n nepua, a Tak Xe MaCLOM. B3bVaIte Do noJuyehn CMEcN 6e3 KOMKOB n C KpyNbIMn 3epHAMn. IpopeXbTe xJIe6 JOMTuKAMn n CMOUHTe INB OINBkoBOM MacIe, 3aTEM rTObTe INx npn 240^ BpeKIme KOHTAKTHbl TpINb B TeueHne 1-2 MNHyT noka OHn He NOdpyMaHrTaNo BKycy.
HaMaXbTe Ha 06XapEnHbI XnE6 NaWTe, nOJIe Te erO dBYMa JIOKkAmu MaCna I N OJaTe Ha CTOn.
MЯCHOI CAJAT C PYKOLOI I NOMIDOPAMN UEPPI
INHPEDAENTbl:
-2KycockaTeTnHbI
-100rpykoJIbI
- 10-12 kpyrlbIX MeIKNIX NOMIDOPOB
- 100 r cbypa rpaHa naDaHo B KycOuKaX
- C0JIb IIO BKyCy
-ONIBKOBOEMacNo NO BkCyC
ПИГOTOBLENHNE:
PnroToobTe caat n3 pyKoIb i nomuOpOB ueppn: BblMOte pyKOly, BblOxNtE Ha uNCTyU TKaHb, UTO6bI OHa Blicoxla, n pa3peXkBe T NOMOpB I ueppn Ha ueTbIpe qactn. BctabTe nnity rpnB HnxHee noNoxKeHne, a NIOCKyo nnity — B BepxHee, 3aTeM yCTaHOBtpe np6op B pexmOTKPbITbI I PnJIb. YcTAHOBtpe pyKy TepMoCTaTa HNXHei nnTbI Ha 240^ ,pyKy TepMOCTaTa BepxHey nnTbI Ha 240^ .HaXMMTE KhoNky nuCKa/OCTaHOBKn dJa pa3orpeBa rpnJ. Korda Ha dinCnlee noRbntc coo6eHne READY, BblOxNtE npEdBapNTeJbHo Cma3aHHbIe MaCLOm NOMTNKt TeJATINHbI, pnIX MxBepxHey nnTOToI rTOOBtE 2-3 MNHyTbI NO BKcy. HapeXbTe Mco CoIOMKoN bblOxNt eero Ha cIoN n3 pyKoIb i nomuOpOB ueppn, nocOIte nO BKCy n do6aBbTe xlonbI cyIpa IraHa naDaHO. PnpnpABtTe He6OJIbIM KOInueCTBOM MaCla.
TOBAXH CTEK HA KOCTN CAPOMATOM KOQE INHPRDNEHTbl:
- 2 roBaxkbx CTeKa Ha KocTn, no 250 rKaXdbI
-0JNBKOBOE MaCIO
KOΦEHHA CMECb:
-2 yaHbIe loXKu TMHa
-2yaHbIeNoXKnKOΦeHbIX3epeH
- 2 yaHna loXka cnaKoro nepca
-1yainhaJIOKKa npnkn
-1 yaHbIe JoxKn KpyHNoi CoN
-1yainhaNojka nepca
ПРИTOВLENHNE:
IpiroTOBbTe KOeHHyIO CmEcB: BbICbINbTe TMHN KOeB KkyxOHbH KOM6aH N 3MeJIbUte B InpoWOk (He cInuKOM MeKn).IpeCbInbTe npoWok B MnCKy,do6aBbTe dpyrne HnRpeJeHTbI N XopoWIO nepemeMaTe. ClerKa cMaxbTe MRCOMN IpiPpABbTe CneZmaN,HaKpoTKe KpbIkoN OCTaBBte pni KOMHaTHo TEMnepaType npimepHO Ha 30 MNHT. BCTaBBte PnITy rpnB HnxHHee nnoXHee, a nnocKyIO nnITy — B BepxHee, 3aTEM yCTaHOBtE rplNB B PexkM KOHTAKTHblrPNlB.YCTAHOBtpe pyKy TepMOcTaTa HnXHei nnITbHa 240^ ,pyKy TepMOcTaTa BepxHeynnITbHa 240^ .HaxMITE KNONKY NYCKA/OCTAHOBKN dpa pa3orpeBa rpnI INKOnky SEAR dna oBeHX NNIT. Korda SEAR nepectaHET mIRATb Ha DnCIIe, BblNOXtE Mco Ha HnXHHIO nnITy, pnpKMTe erO BepxHeynnToI rTOOBbTe 6-8 MNHT NO BKcy. IpaDaBaIte Ha cTOn ropqum.
ФИЕ ГОВДИNHыВ ГИБHOM COYCE MHГРЕДИЕНтbl:
-4ΦnIeTOBaINHbI
- C0JIb IIO BKyCy
- CBexKemOnToBy UepHbI nepeu no BKycy
-23y6uKaYeChoka
-20mI dIxKoHcKoRopuCbI
-60rCnBouHOroMaCna
- OINBKOBoE MaCNo NO BKCy
INHPEJNEHTbIДЯ TPNBHORO COYCA:
-30rCnBouHOroMaCna
- 2 yaHbIe loKKn cbpa roPro30na
-2rnoBknnyka-wnot
-300rprn6OB
-1/2CTaKaHnKaBnCKn
-200rCNIBOK
JIIMMOHHbIKOKNBkyC
- netpyuKa no BKcy
ПИГOTOBLEHNE:
PpnpaBbTe Mco cno bIO n nepcem n ocTaBbTe npu KOMHaTHOH TeMnepaType npmepHO Ha qac.
IpiroTOBbTe rpo6Hou coyc: Ha cKObOPOe paCTOnNTe CnIBoOHoe MacNo, DoabBe Hape3aHHbI NyK-uaNt u roTOBbTe 2-3 MNHTbl. DObabTe rpo6bI u rotOBbTe eue 5 MNHT. DObabTe BnCKn, roTOBbTe 1 MNHTy, 3aJeTte CTaKaHOM BObl I rTOBbTe eue npIMepHO MNHTy. DObabTe XnIDKne CnIBKn, NIMMOHHbI COK, neTpuykU,
ToproH3OJy NdoBeDnte Do KInneHnA.
TOTOBbTe, noka coyc He 3arycTeet, do6aBbTe coIb I nepeu N OTCTaBbTe B CTOpOHy.
Tem BpemeHem npiroTOBbTe npnpaby K Mcy, KOtopo HuyxHO eO Cma3bIBaTb BO BpEM npiroTOBJIeHna: B He60JIbUyIO cKOBOpOdy NIOJXNTe MacNo, rOpNcIy I ueChok. TOrOBbTe Ha MeJleHOM OrHe, NOKa CNIBoOHoe MaCNO He pactaET. He daBaIte OCTbITb.
Bctabte nnty rpiB HnXHee noNoxHne, a nnockyo nnty — B bepxHee, 3aTeM yCTaHOBtpe np6op B peKIM KOHTAKTHbI IPIIb. UcTahOBtpe pykcy TepMoCTata HnXHei nntbHa 240 ^ C ,pykCy TepMOCTaTa BepxHey nntbHa 240 ^ C . HaXMMte KhONky PYCKA/OCTAHOBKN dna toro, YTO6bI pa3orpeTB rpiB, INKOnKy SEAR IJIA oBeHXnIT.
CmaXbTe fIne apOMaTH3aTOPOM c 06eHX CTOpOH, 3aTeM, KOrda SEAR nepeCTaHET MraTb Ha DnCnJIee, NOMEcTIte erO ha HIXHIIO PIIHTy n 3aKpOIne TprINb. TOTOBbTe 6-8 MNHyT NO BkCy u B 3aBNCIMOCTN OT ToJIuINHbI fIne. NocNe 3aBepUHeHn IpiRTOBJIeHn CHmMtE fIne n IpoDaBaIte Ha CToI, 3aJIb TprN6HbIM COYCOM, KOToPbI Bbl IpiRTOBNI paHbWe.
TAMBYPREP CTOCTAMN IN3 PKAHORO XJIEBA
INHPTbI:
- 8 JIOMTIKOB pKaHOrO xNe6a
-500rmachofoapaaBbicwero copTa - Hape3aHbI cbIp 3MMeHTanb100r
-20MnOINBKOBOOMACnA - 2 nope3aHHbIe roNoBKn lyKa
CINBOUHoe MaCIO npi KOMHaTHoI TempePataNo Bkycy - 2 yaHbIe loKKn BycTepcKOro coyca
C0JIb IIO BKCy - nepeu no Bkyc
- NOLOBUNa YauHOn JIOXKn caxapa
ПИГOTOBLENHNE:
IpiroTOBbTe rAm6yprepb: B MnCKe TuaTeNbHO nepemewaute apu,Byctepckn coyc,coNb n nepeu. BpynuO cdenaute 4 rAm6yprepa,ToJiunHo npImepHo 2 cm.YCTaHOBtE rPnIB B pexmOTKpblTbIMrPNlB u BCTaBBte rJaKDy oPiTu B HxHHe noLoXeHne,a PnITy rPnIb —B BepxHee. YCTaHOBtE pykTy TepMoCTaTa HxHHei PnITbHa 240^, pykTy TepMOCTaTa BepxHHei PnITbHa 240^.
Hajmte Khonky START/STOP nra toro, yto6bpa3orpeTb rpnlb.
KordaHaIinneeNoBntcCoo6eHneREADY,nonoxte Hape3aHHbI NyK, npnPpABHeHHbI OINBKOBBIM MacnOM
n Caxapom,Ha HnXHIOI NNTy I rTOOBtpe npIMepHO 5-6 MNHyT, XopoOo nepMeuBaa JOnaTKoJ, YTO6bI OHN rTOBUNcB paBHOMepHO n CTaIN MArKIMN. Tem Bpemehem Ha dpyor NITe rTOOBtpe ram6yprepbl npIMepHO 12 MNHyT, nepeBepHyB npIMepHO uee3 5-6 MNHyT (Bpema npiroTOBHeHNA 3abNCHT OT TOJIUnHbI rAM6yprepa). KaK TOnbKO Nyk 6yDet rTOB, CHMmTe erO c PINTbI n 06xapNBaIte Hama3aHHbIe MaclOM NOMTuK INxe6a TOnbKO c OndH CTOpOHbI 1-2 MNHyTbI.
BbINOxNte JOMTKn Xne6a Ha pa3dJeNoHyo DocKy NOJXapEnHoo CTOpHOB BBepx, NocbInbTe LyKOM, Do6abBte raM6yprpebl n npcsbIbTe cbIpom. 3akpoite CHNBNU JOMTKOM Xne6a NOJXapEnHoo CTOpHOB BHN3, HAXMNTe KONky CHNBnu; KOrda 6ydeT noka3aHo, YTO rOToBO, BCTaBBTe CHNBnu IN Xopo7o npNXMNTe BepxHei PINTOn. IOTOBtpe pImMePHO 2-3 MInHytbo NO BKcy.
PE6PbIiKn IrHEHKA IOd BAJIb3AMUeCKM YKCYCOM NPO3MAPHOM
INHPRDNEHTbl:
-6pe6pbblwekЯrhneHa
- 10 r moIOToro po3MaHaHa
- 10 r teptoro yechoka
- 100 mЛбаьзамуеского уксуca
- 15 r caxapa
- COnb nO BKcy
- nepeu no Bkyc
ПИГOTOBLEHNE:
IpeMeMaIe BCE INHrpEaHEnTbIB DOCTaTOUHO 60lbwoj EMKoCTn, HAKPOTe n MapuHyTe pe6pbIkwB XOIOAnJIbHNKe He MeHee 1-2 YacOB. BcTaBBte PnITy rPnIB B HxKHee NpOJKeHne, a NIOCKyO PnITy — B BepXHee, 3aTEM yCTAHOBITE np6Op B pexkIM KOHTAKThbI IPRNB. UCTAHOBITE pyky TepMOCTATA HxKHei PnITbHa 240°C, pyKy TepMOCTATA BEPxHei PnITbHa 240°C. HaxMnte KHOIKy PnCKA/OCTaHOBKn DnPa zorpeBa rPnIA. Korda Ha DnCnlee NoarBtCra Coo6UeHne READY, nomecnte pe6pbIkwNHa HxKHHIO PnITy. FroTOBbTe npImepHo 11-13 MInHyT NO BKcy N B 3aBNCUMOCTHn OTOnuHbIpe6pbIwek (peKOMEHdyETcnapeBOPaUBaTBnx B cepeDInHe npriTOBJIeHn, TaK KaK KoCTb He No3BOJNeT BepXHei PnITe KacatbCmCa, lekaUero Ha BepXHei PnITe). Tem BpeMeHem yMeHbWite MapuHa cKOBOpoe INoDaBaYte Ha CTOL B KaueCTBe coyca KxapeHbIM pe6pbIkwam IrHEHKa.
KUPHbI IaIbIK C KPEMOM N3 MEda N
3ENEHOFO JIMMOHA
INHPEDAENTbl:
-500rKypuHnO rpydkn
HHTNEHTblIJI MAPUNHADA:
- 1 yaHaa loXka ocTporo KpaCHoro nepa
-1yainhaJIOXKaKOpnaHpa
-100MЛОЛВКOBOROMACla
-2rnoBkn3eHnHOnyka
-3zy6uKauechoka
-2 yaHbIe IoxKIn TeptToI Um6upr - 2 yaHbIe loxKcaxapa
-10mncoka naMa
-2yaHbIeNoxKKnKpynHoCOn - nepeu no Bkyc
NHPTENHTblIJI KPEMA N3 MEA NJIMOHA:
-50MJI CINBOK
-1/2 yainhoi noxknteptoeepbnaMa
-10mncoka naMa
-10MnOINBKOBOOMACna
-10mImMeDa
C0JIbIO BKCyC
ПИГOTOBLEHNE:
IpiuroToBbTe MapHaD: nOIOXnTE Bce INHrpEaHeTb I KkyoHHbIKOM6aH N O6pa6aTbIBaHTe Do nOnyuHn ODHopOAnHO MaCbI. IOnOxnTe Ha dHo TapeKKn KypuCy, Pope3aHHyU Ho KBykN, UnpHNo 2 cm, DObaBBte MapHaD I paBHomepHo nOKpoTe KypuCy. 3akpoTe pIueBoi PJIeHKoI MauHnyTe 1-2 yaca.
PnroTOBbTe Kpem, npeMeMaB BMNCke Bce INHrpEaHeNTbl, 3akpoIe npO3paHNo IIneKoN I NOnoxNte BXOnOaNbHNK. HaNXbTe KycOcKn KypuCbHa IwnaxKn dIy IaWbIka. BCTaBbTe PnITy rpnB HnXHHee noNoXeHne, a IIOCKyo IIITy — B BepxHee, 3aTeM yctAHOBtE pnp6Op B pexmK KOHTAKTHbI IPNMb. UcTahOBtE pykU TepMOCTata HnXHei PnITbHa 240^ ,pykU TepMOCTata BepxHei PnITbHa 240^ .HaXMMte KhoNky Iycka/OCTaHOBKn dIy pa3OrpeBa rpnI. KorDa Ha Iucnlee IOnBtC coo6ueHne READY, BblONKe IaAslbIK Ha HxKHiO IINTy, pnIXMMte BepxHei PnIToN I roTOBbTe npImepHo 11-13 MInHyT, nepeBepHyB OdNH IIN DBA pa3a. IOnaBaIte ropayne IaAslbIK C KpeMOM I3 JIMMoHa N MeJa.
KUPHbIE OKOPOUKA NO-IPPOBAHCAJIbCKN
INHPEDAENTbl:
- 3 kypinbix okopoquka (550 r)
HHPEDNEHTblIJIa MAPUNHADA:
-250 mJ 6eIoro cyxoro BnHa
-40MnOJNBKOBOMaCJa
-30MЛrOpuicbIcCemeHaMn
-30Mnykcyca n36eNoRo BnHa
-4yaiHbIeJIOXKnIpoBaHcknxTpaB
-23y6uKaI3MeJIbYeHHOrO YeCHOKa
-2yainbIe IoxKk KpynHoi coi
- 1чаняложka kaинского nepca
ПИГOTOBLEHNE:
PnroToBbTe MapnHaI, nepeMeaB BCE nHrpEneHb B Mncke. Octpbim Hoxkom pa3peKbte MRCCTUO qactb Kypnbix OkopoukOB B HeCKoJIbKnx ToUKax, TTO6bl Cnerka npnoTKeBbIX. Nmecntte Okopouka B Mncky C MapnHaIOM m nepeBepHnte ux Tak, TTO6bl o6e CTOpOHbI XopoIo NOpy3uINCb B MapnHaI; OCTaBtB MaPinHOBaTbcra Ha 2-3 Yaca. BCTaBbTe PpNb B HnxKhee noLoXeHne, a NIOCKyIO pINTy - B BepxHee, 3aTeM yCTaHOBte np6Op B pexHM KOHTAKTHbIM TPNIB. UcTaHOBte pyKy TepMOCTata HNXHei PnITbHa 210°C, pyKy TepMOCTata BepxHei PnITbHa 210°C. HaxMITE KhoNKy Iycka/OCTaHOBKn dIpa3orpeBa rpiJr. Korda Ha dncnnee noRbNTc coo6ueHne READY, BblOxNte KypInbte Okopouka Ha HnxHHIO pINTy, PnpXMMTE BepxHei PnITOn I rTObTe npImepHo 20-25 MNHyT, nepeBepHyB 2-3 pa3a. Nocne npiroTOBNeHn BblOxNte Ha TaPeNky n OndaTe Ha cTol.
KPEBETKHA TPNJE
MHRPENHTbl:
- 16/20 KpeBeToK
HHPDEUNEHTblIJI MAPUNHADA:
- netpyuKa no BkCyC
-2JIMMOHa
C0nb I0 BkCy - nepeu no Bkyc
-23y6uKayeChoka
ПИГOTOBLEHNE:
PnroToBbTe MapHaad: N3MeIbUHTe YecHOK n NeTpuyKky, 06aBbTe IIMoHHbIcK, cOB n HEmHOrO nepca.
IpomOnTe KpeBETKn, TuaTeNbHO BbCyuWnte N MapnHyTe He MeHee noLyuaca. BCTaBBte nHTy rPnIB B HnxHee nIoXKeHne, a NIOCKyU nHTy — B BepxHee, 3aTeM
yctahOBte np6op B pexim KOHTAKTHbI I PnJIb. YcTaHOBtpepykTepeMoCTata HxKHe nnTbHa 210^, pykTepeMOCTATA BepXHe nnTbHa 210^. HaxMITE KhoNky nyska/OctaHOBKn IJa pa3OrpeBa rpnil.
Korda Ha dincnee noaBntc coo6eHne READY, Bblnoxnte npocyuene HbkeTn Ha HnXHHIOI pNIXMITE bepxne nTOI rTOBbTe npimephO 4-6 MIny.T. Ipeed nDaue Ha cToI yKpaCbTe TaPENKy DOnbKaAMN JIMMOHa n 3eJeHbIM CanaTOM.
IIOOCb HA IPNIE IOJ NOryPTOM
INHPEDAENTbl:
-500rΦnneJnococ
- OINBKOBoE MaCNo NO BKyCy
HHPDEJNEHTblIJIa COYCA:
- 250 r rpeueckoro myorypta
-13y6yHKYeCHOKa
-1yainhaJIOKKaC0JI
-1uzenotkacaxapa
-20r3eHoro lyka
-20rnetpyuKn - napeu no Bkyc
ПИГOTOBLEHNE:
PnroToBbTe coyc: npomOte n TuaTeNbHO BbCyuHnte neTpuykU n3eHehI nyK, n3MeIbYnTe yeCHOK.
BbIeTe NOrypT B Mncky, I06aBte PpHocTn, YecHOK, CoIb, caxap, nepeu n B36eTe Do NpUyeHn MaRKO rKpeMa. IonoXitE B xOLOdNbHnK He MeHee, Yem Ha 30 MNHyT.
BctaBbTe nIOCKyIO nnI TY B HnXHHee noIOKeHne, a nnI TY rPnIb — B BepxHee, 3aTeM yCTaHOBtE np6Op B pexMM DxyOBKA TPNJb. YCTaHOBtE pyKu TepMOCTaTaNHXHei nnITbHa 240 ^ C ,pyKu TepMOCTaTBepxHennITbHa 240 ^ C . HaXMMte KhoNkY START/STOP Ira toro, UTO6bl pa3OrpeTBrpnIb.
Korda Ha dincnlee noaBntc coo6eHne READY, noJoxnTe npedbapntelbHO cma3aHHe macnom fHe HnxNHO nnIuty, zakpoite BepxHIO nnIuty B peKmte DyXOBKA rINb (kak moxho 6nIXe K npOdyKTam, He kacarcb nx) n roTOBbTe npIMepHO 25-30 MNHyT (dna doCTNXeHnHaunyuWnx pe3ynbTaTOB npIMepHO B cepenHe npOceCa npiroTOBHeHn NOBepHne Iococn Ha 180^ , TaK kaCo cToPOhbl 3adHeuactn PnTA haxOHTcBnIXe K npOdyKTy). Nocne npiroTOBHeHn BblOxHtE Noococn Ha cepBnPoBOuyu TopeKny nnoDaBaIte Ha cTOn C noYrptOBbIM COycom.
KAJIbMAPbI HA IPNJIe
INHPEDAENTbI:
- Kpynhhe KaNbMapb400r
-1JIMMOH
-1BeToUka neTpUkN
-ONMBKOBOEMacNo NO BkCyC - operaho no Bkycy
- C0JIb IIO BKyCy
KpaacnB TeptbI nepeu no BkyC
ПИГOTOBLEHNE:
IodroTObTe KaIbMapOB, ydaIINB BHyTpEHHOCTn, roLOBy I XHTUNHOByIO pAACTHny, a 3aTEM TuaTeNbHO npOMoITe.
Bctabte pnty rpiB HnXHHe nnoJKeHne, a nOCKyo pnty — B BepxHee, 3aTeM yCTaHOBtpe np6Op B pexmK KOHTAKTHbI TPNlb. UcTahOBtpe pyKy TepMOCTata HnXHHe nnTbHa 210°C,pyKy TepMOCTata BepxHBe nnTbHa 210°C.HaxMMTE KhoNkY nuCKa/OCTAHOBKn Dna pa3oRpeBa rPnla. Korda Ha dncnlee noBtCra coo6uEne READY, Ha HnXHHIO pNTy BblOxHte PpeDbapNTeNbHO Cma3aHHbIX MaCLOM KaIbMapOB, npXMMTE BepXHe NnTOU INrTOBbTe 10-12 MIn. B MnCKe PpIROTobTe apomAtn3atop, CmeaAB MacNo C n3MeJIbYeHHo NTpyuKo, JIMMOHbIM COKOM, uenOTKO operaHO, uenOTKO cOnn u enOTKO kpaCHoro nepca.
Korda KaIbMapbl npuROBtCn CHMNTe nx C rPnla n npnPpAbte coycom. BblOxNte Ha tapEnky nnoaTe Ha CTOn.
BAHAHOBbIE BINHbI
INHPEDAENTbl:
-16aHaH
-2yina(1ceoe+16eok)
-150rmonoka
-100rmykn
-70rCnBouHOroMaCna
- C0JIb IIO BKyCy
-2yaiHbIeNoxKcaxapa
-16rpa3pbxlnTeTn
PNUROTOBNEHNE:
OuHCTte 6aHaH xOpoIoo pa3OMHTE BnIKoB. B36eITe B MNCke ueoe rayo n caxap IIO6aBBte MOKO, BCE BpeM MeJleHHo nepemewHBaA. IO6aBBte 50 r pactonJIeHHoro CInBOUHO Macna, 3aTeM IO6aBBte C pa3pbXIIeTEm H UeNTKy coN, a 3aTeM 6aHaHOBoe NIOpe. TuaTeNbHO nepemwaiTe BCE INHRpeDneHTbI IN POMecTHe CMEcb B XOJOINbHK Ha 10 MNH.
Tem Bpemeh B36nBaTe RnHbN 6eK Do TBepDoro
COCTOHHM.
Bo3bMITE CMEcN AKKypaTHO 3aMeWaNTE B HeN B36NTbI B6eJOK PnAIBHbIM NDbXKeHnAMn CHn3y-BBepx. BCTaBbTe PnOCKyIO PnINTy B HnXHee NpOKeHne, a PnINTy rPnJIb — B BepxHee, 3aTeM YcTaHOBtE Pnp6Op B pexm OTKpblTbI FPNJIb. UcTaHOBtE pykY TepMOCTATA HnXHei PnINTbHa 200 ^ ,pykY TepMOCTATA BepxHei PnINTbHa 200 ^ . HaxMITE KhONKY nyska/OctAHOBKn DnPa 03orpeBa rPnIA. Korda Ha dncnlee NoaBHTc coo6uHene READY, cmaxkbTe PnINTbI He6oNBsIM KOnUeCTBOM CInBOUHOro MaCna I noneute 1-2 DecepTHbIM NoxKaMn 6bnHoi CmecN, 6bICTPO paCnpedEnB ee NO nobEPXHOCTN, yTO6bI NonyuHcnKpyr. OCTaBBte rTOBntbcn PrpMEpHo Ha 2 MNHytbl, noka Ha NobepxHOCTN 6bnHa He NpOBaTcny3bIPbKN, 3aTeM NepeBepHnte INOTOBtE DpyTuO CTOPOH npImepHO 2 MNHytbl. BnHbMoXHO NODaBA Tb Ha CTOL No-pa3HOMy: C WOKoJaNDbIM KpemOM, KJIeHOBbIM CINpONOM, CBexKe YepHkoN, WOKoJaNDH ON TpyKkoN, MeDM, B36NTbIM CNVBKaMn IN CaxapHO NypDPOI.
AHAHAC HA TPNIE CMOPOXEHbIM INHPTEINHTbl:
-1aHaHac
-MeD nO BkyC
TPOCTHnKOBbl caxap no BkCy
- CBExaMaTAtNoBkyC
-caxapna npda no Bkycy
- BaHnJIbHOe MOpOKeHoe NO BKcy
ПИГOTOBLENHNE:
Bo3bMITE aHaHAc, ydaIte IInCTbI n OunchTe OT KOKypbI. HApexkBe TcKocKaIM ToIunHO npImepHO 1-2 cm n Nocblte KaXdbI KcOcEe TpOCTHnKObbIM caxapOM C o6eHX CTOpOH.BCTaBtE PnITy rPnIB B HIXKHee NIOJKeHne, a NIOCKyIO pINTy — B BepxHee, 3aTEM yCTaHOBtE np6Op B pexm KOHTAKTHbI rPnIB. YCTaHOBtE pyuKy TePMoCTata HIXKHei pNTbI Ha 200 ^ C ,pyuKy TePMoCTata BepxHei pNTbI Ha 200 ^ C . Haxmite KhoNky nyska/octaHOBkn dJa pa3orpeBa rPnIA. KorDa Ha nDCnlee NOBtCra COo6ueHne READY, cMaXkBe aHaHac C DByx CTOpOH MeDOM n BBINOKeHTE Ha rPnIB. 3akpoTe rPnIB n rotOBtE 5-6 MNHyT.
Iocne npuroToBHeHn BblOxNte IOMTuKn Ha cepBupoBOUHyIO TapeNky, yKpaCbTe CBexMM NICTbAMM MaTbI, nocBInbTe caxapHOI NyDpoI N oDaBaHTe Ha CTOn C shapNKamM MOpoxKeHOrO.
TOLbKO IPN HAIINH BAΦEJIbHbIXIIT
IPNIVTOBJEHVE:10MUN.
BPEMA IPNIOTOBJEHN:15MUN.
INHPTBtI:
-315myknO6zeroHa3haueHn
-4rco
-5rpa3pbbxnten
-4rnnueboo cobl
-100rann(uejnikom)
-490MOnJoka
-80 mnpactnttehoro macna
-30r caxaphoro necka
ПРИROTOВЛЕНЕ:
BCTaBbTe BafoJIbHbIe PnITbI. CnoXuTe Bce INHrpeDneHTbI B MnCKy, HauHHa C XnIKnx. B36NBAitc 5 MNHyT do NOnyuEHnOdHOpOHOH MaCbI.
YcTaHOBnTe pyky TepMoCTaTb Tpe6yeMoe noNoXeHne. Pa3OrpeTe BaΦeNbHyIO nnHTy.
KordaHa DnCnlee NOBuTcra COo6ueHne READY, CmaxbTe BafoBHyIO NNITy TOnNEHbIM MaClOM NnAHTnnpurapHbIM KUINHApHbIM CNpeEM I C NOMOsbIO Do3aTopa pa3neIte Ha dBa yAcTka DNBA BaoBb, pni Heo6xOmoCTN nCNoB3yra loKKy.
PacnpedeneIe IonaTko. TOTOBte BaΦn Do noJnyehn 30JNTcTO rO CBeTa n XpyctaueK KopouKn (4-5 MNHyT).
IobtopaTe, noka He nCnoB3yeTe BCIO Cmecb.
Cpa3y npdaBaIte Ha cTOn.
BENbHnCKNEBAΦN
BblXOJI:10-12baΦenb
IPNATOTOBJEHHE:15MUN.
BPEMA IPNIOTOBJEHN:15MUN.
INHPRDENEHTbl:
-460rKoHdntepckOmykN
-1/2 yauHoi noxKu cun
-5rpa3pbxnten
-30r caxaphoro necka
-4auna
-460rTeNOroMOJoka
-70rtonneHoroMacna
-1/2 yaHNoI J0KKn BaHnIbHOrO 3KCTpaKaTA
ПРИTOВЛЕNHUE:
BCTaBbTe BaΦeNbHbIe nnTbI. Bo BMeCTuTeNbHoMnCKe CMeMaIte MyKy, CoIb, pa3pbIXnITeNb I OTCaBbTe B CTOpOHy. B dpyroM nCKe B36eIte XeNTkn C caxapOM Do nONHOro pACTBOpEHncaXapa. D06abTe K rYam 3KCTpaKT BaHnInHa, paCIIaBJIeHHoe MaCNo N MOnIOKO n nepemeMaIte MyTOBkoN.
CoedHHTe RnHNO-MONOHyo CmEc b C MyHoi n B36NBaIte, POKa OHn HE CMeWAsOTcR. He nepemewuBaTe cNtHKOM cNbHO. B TpeTbeM NcKcE B36NBaIte aNHybIe 6eIKN 3NeKtpueckm Mnkcepom Do o6pa3OBaHn PBiHoH MaCbI, npImepHO 1-2 MNHyTbI. PpN pMOU Pe3HOBo IOnaTKn OCTopoxHo BBeNTe 6eIKN B TeTo dJa BaFeb. He nepemewuBaIte cNtHKOM cNbHO.
YctahOBHTe pyuKy TepMoCTaTb Tpe6yeMoe noLoKeHne. Pa3orpeTe BaFeIbHyIO nnTy. Korda Ha DnCnlee NOBtca Coo6UeHne READY, CmJxBe TaFeIbHyIO nnTy TOJIeHbIM MaCnOM nnAHTnPnIapHbIM KUYINHApHbIM CNpeEM n CnOmoBIO Do3aTopa pa3JeTe Ha nBa yuaCTKa DnRA BaFeIb, PnI Heo6XoDMocTn NcNoIb3yra NoKKy. PacpeDenITE IOnatkO. FOTobTe BaFNI Do noJyuEnHn 30JIoNTcTOrO zBETA n XpyCTaUe KOpouKn (4-5 MmHyT). NobTopraTe, noka He nCnoNb3yeTe BcIO cmecb.
Cpa3y npdaBaTe Ha cTOn.
BAΦЛС WOKOJIADOM IN KOPNUCEI
BblXOJI:8-10bafeinb
PPIFOTOBJIEHHE:10MUN.
BPEM IPIVTOBOHEHr: 15 MUN.
INHPRDNEHTbl:
-460mykn
-1yainhaJIOKKaCOnI
-3rpa3pbixnTeia
-170rcaxaphoro necka
-2a
- 1345 r tenloro mojoka
-80rCnBouHOroMaCna
-1yainha J0kKa BaHnIbHOrO 3KCTpaKaT
- 140 r temhoro wokonada
-60rkaKaO-nopouka
-6rKoPiZbl
ПРИTOВЛЕNHUE:
BCTaBbTe BaΦeNbHbIe PnNTbI. NomecTne WOKoJaN MaCIO B MCKy, KOTOpYIO MOxHO NcNoJIb3OBA Tb B MKNPOBOHOBOn Neu, HArpeBaHTe ee B Neu HaMaKcMmaJIbHo MoUHocTN B TeueHne 30 cekyHd. NepemeunBaTe n npoJOnKaIte, noka WOKoJaN MaCIO
He paCTaIOT, a CMEc b He cTaHET OndHOpOndHou, OTCTaBBTe B CTOpOHy, yTO6bI OHa HEMHOrO OCTbINA.
B36eTe RaUa, MoNOKo N BaHnIb B 60JIbWoM MnCKe N TuaTeJbHo nepemEwaTe OCTbIBuYIO WIOKOnaDHyO CmEcB Do NOLyHeHr ODNOpOHO MaCbl.
Yepe3 CnTO npocTe Bo BMeCTNTeJIbHyIO MNUCKy MyKy, caxap, NopoWOk KaKao-NopoWOk, KopuCy, pa3pbIXNITeB n caxap. IObaBBte MyHyO CMeCb K AnuHOcMecn B36NBaHTe Do NOnyuHnO OndOpoHNo Maccbl C HeckoNkIMn KOMouKaMn. UcTaHOBtpe pyuKy TepMOCTaT a B Tpe6yEmoe NoIooKeHne. Pa3OrpeTe BaΦeNbHyIO pIINTy.
Korda Ha DnCnlee NOBuTc coo6ueHne READY, CmaxbTe BafoBHyTOIHTy TOnJIeHbIM MaONOM nAn aHTINpIarHbIM KUINHApHbIM cPpeM I C NoMOuBIO Do3aTopa pa3neIte Ha dBa yAcTka dNra BafoB, npi Heo6xOmoCTn UcNoJb3yra loXkY. PacpeDenite JnonatKoI. FToOBbTe BafoN Do NOnyuEnHa 30IoTnCTOrO CBeta I xpyctAee KopouKn (5 MmHT).
NobtopaTe, noka He nCnoB3yeTe BcIO cMecb. Cpa3y noDaBaTe Ha CToI.