
MultiGrill 9 CG 9040 - Grill plate BRAUN - Free user manual and instructions
Find the device manual for free MultiGrill 9 CG 9040 BRAUN in PDF.
| Product type | Grill plate |
| Brand | Braun |
| Model | MultiGrill 9 CG 9040 |
| Power supply | 220-240 V ~ 50/60 Hz |
| Power | 2000 W |
| Adjustable temperature | 60 °C to 230 °C (per plate) |
| Cooking modes | Contact grill, flat position, oven grill |
| Sear function | Yes (quick searing of food) |
| Timer | Yes, adjustable with automatic shut-off |
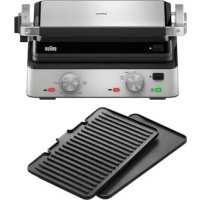
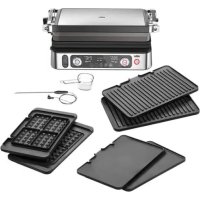
| Removable plates | 2 non-stick plates (grill and smooth), interchangeable, dishwasher safe |
| Grease tray | Integrated, removable, dishwasher safe |
| Cleaning utensil included | Yes |
| Handle | Die-cast metal, stays cool |
| Height adjustment of lid | 4 positions for contactless cooking |
| Display | Digital: temperature, time, messages (READY, SEAR) |
| Safety | Automatic shut-off (90 min), overheating protection, plate locking |
| Maintenance | Plates and tray dishwasher safe; exterior cleaned with damp cloth |
| Material | Base and lid from stainless steel |
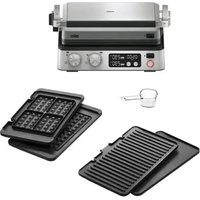
| Optional accessories | Waffle plate set (not included) |
Frequently Asked Questions - MultiGrill 9 CG 9040 BRAUN
User questions about MultiGrill 9 CG 9040 BRAUN
0 question about this device. Answer the ones you know or ask your own.
Ask a new question about this device
Download the instructions for your Grill plate in PDF format for free! Find your manual MultiGrill 9 CG 9040 - BRAUN and take your electronic device back in hand. On this page are published all the documents necessary for the use of your device. MultiGrill 9 CG 9040 by BRAUN.
USER MANUAL MultiGrill 9 CG 9040 BRAUN
natural_image
Modern stainless steel grating with digital display and control knobs (no visible text or symbols)
natural_image
Line drawing of a rectangular tray with evenly spaced slots, labeled '15a' at the bottom (no other text or symbols)
natural_image
Simple line drawing of a rectangular tray or container with no text or symbols
Sicherheitshinweise

Gefahr!
natural_image
Line drawing of a toaster oven with two evaporators on a grater (no text or symbols)natural_image
Line drawing of a mechanical component with an arrow indicating direction (no text or symbols)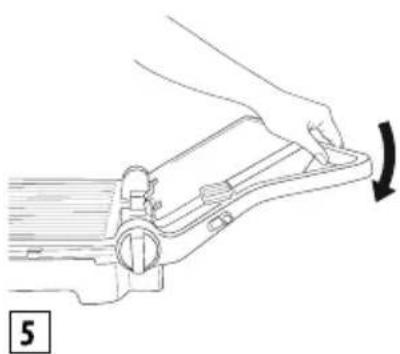
natural_image
Line drawing of a mechanical lever mechanism with a hand adjusting the handle (no text or symbols)natural_image
Line drawing of a grating machine with six round food items on top (no text or symbols)natural_image
Line drawing of a kitchen appliance with a grater and control panel (no text or symbols)natural_image
Line drawing of a hand pressing down on a grating with a bag, showing the process (no text or symbols)natural_image
Line drawing of a hand pressing down on a portable appliance with a curved arrow indicating rotation (no text or symbols)natural_image
Diagram of a computer monitor with an open lid and a black arrow indicating rotation (no text or symbols)Failure to observe the warning may result in life threatening injury by electric shock.
- Before plugging the appliance into the mains, make sure that:
- The voltage indicated on the appliance rating plate corresponds to your mains voltage;
- The mains socket is earthed and has a minimum rating of 16A.
- Professional or inappropriate use or failure to observe the safety instructions absolves the manufacturer of all liability.
- Make sure the power cord does not come into contact with parts of the appliance which become hot during use. If the power cord is damaged, it must be replaced by the manufacturer or the manufacturer's customer services in order to avoid all risk.
- Before putting the appliance away, removing the cooking plates or performing cleaning and maintenance, turn the appliance off and unplug from the mains. Ensure that the appliance has completely cooled down.
- Never use the appliance outdoors.
- Never immerse the appliance in water.
- The appliance must not be operated by a timer or a separate remote control system.
- Use extension cords complying with current safety regulations and standards only. Ensure they are in proper working condition, with an adequate cross section.
- Never unplug from the mains socket by pulling on the cord.

Important!
Failure to observe the warning could result in injury or damage to the appliance.
- This appliance is designed to cook food. It must never be used for other purposes, modified or tampered with in any way.
- This is an household appliance only.
It is not intended to be used in: staff kitchen areas in shops, offices and other working environments; farm houses; by clients in hotels, motels and other residential type environments; bed and breakfast type environments.
- This appliance can be used by children aged from 8 years and above and persons with reduced physical, sensory or mental capabilities or lack of experience and knowledge if they have been given supervision or instruction concerning use of the appliance in a safe way and understand the hazards involved. Children shall not play with the appliance.
- Cleaning and user maintenance shall not be made by children unless they are aged from 8 years and supervised.
Keep the appliance and its cord out of the reach of children aged 8 and younger.
- Do not leave the appliance within reach of children or unattended while in operation.
- Never use the appliance without the cooking plates.
- Wait until the appliance is completely cold before putting away.
- Do not move the appliance during use.

Danger of burns!!
Failure to observe the warning could result in burns or scalds.
- When the appliance is in operation, the outside surfaces may become very hot. Always use the handgrip (2) or oven gloves if necessary.
- Remove or change the cooking plates when the appliance has completely cooled down.

Please note:
This symbol indicates recommendations and important information for the user.
- To avoid the risk of fire, do not cook food wrapped in plastic film or tinfoil or in plastic bags.

This appliance conforms to EC Regulation 1935/2004
on materials and articles intended to come into contact with food.
Disposing of the appliance

The appliance must not be disposed of with household waste, but taken to an authorised waste separation and recycling centre.
DESCRIPTION
- Base and cover: solid stainless steel structure with self-adjusting cover.
- Handgrip: strong cast metal handgrip to adjust the upper plate/cover according to the thickness of the food.
- Plate release buttons: press to release and remove the plate.
- Grill plates lock/release device
- Hinge release lever: enables the appliance to be fully opened to cook in the flat position.
- Height adjustment knob: to lock the upper plate/cover at the required height, to prepare food that does not require pressing.
- ON light.
- Start/stop button.
- Time button ▼: to adjust the cooking time (decreasing).
- Time button ▲: to adjust the cooking time (increasing).
- Lower plate "sear" button.
- Lower plate thermostat dial: to adjust the temperature from 60^ C to 230^ C, or switch off the lower plate.
- Upper plate "sear" button.
- Upper plate thermostat dial: to adjust the temperature from 60^ C to 230^ C, or switch off the upper plate.
- Removable plates: non-stick, dishwasher safe, easy to clean. THE NUMBER AND THE TYPE OF PLATES CAN RANGE ACCORDING TO MODEL.
15a. Grill plates: perfect for grilling steak, hamburger, chicken and vegetables.
15b. Griddle plates: to prepare perfect pancakes, eggs, bacon and shellfish. - Grease tray: integrated with appliance and removable for easy cleaning.
- Cleaning tool: helps clean the plates after use.
- Waffle dosing cup (some models only).
USING FOR THE FIRST TIME
Remove all packaging and labels from the plate. Before throwing the packing material away, make sure you have removed all parts of the new appliance. We recommend you keep the box and packing to re-use in the future.

Please note: Before use, clean the base, cover and dials with a damp cloth to remove dust accumulated during transport. Clean the cooking plates, grease tray and cleaning tool thoroughly. The plates, grease tray and spatula are dishwasher safe.

Please note: The first time you use the appliance, it may give off a slight odor and a little smoke. This is normal and common to all appliances with non-stick surfaces. The appliance is supplied with a cleaning tool to clean the plates when the appliance has completely cooled down after use (after at least 30 minutes). The cleaning tool can be used during cooking for a few seconds to remove residual food and oil. If you use the tool for a long time on plates which are still hot, the plastic may melt.

Please note: the removable grill plates (grill and griddle) are fully interchangeable on the appliance.
Inserting the cooking plates
- Place the appliance in the flat position (see figure 1). Insert one plate at a time.
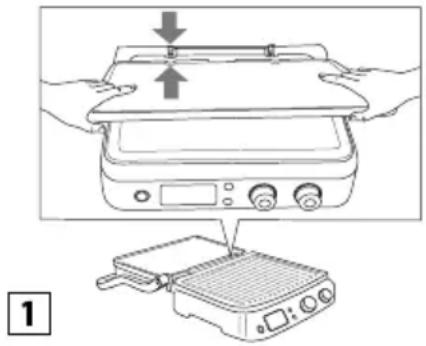
- Each plate can be inserted in either the top or bottom housing (see figure 2).
To remove the plates
Place the appliance in the flat position.
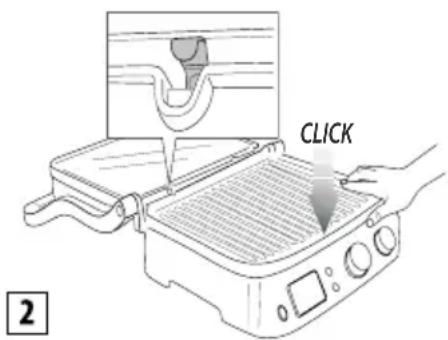
Identify the plate release buttons (3) on the right side. Press the button decisively to eject the plate from the base. Hold the plate with both hands, slide it along the metal supports and remove it from the base. Press the other release button to remove the second plate, following the same operations.

Danger of burns!! Remove or change the cooking plates when the appliance has cooled down.
Positioning the grease tray
During cooking, the grease tray must be inserted in its housing on the back of the appliance. The grease coming from the food is drained towards the hole in the plate and gathered in the tray.

Please note: During cooking, check the grease tray frequently and pull out to avoid excess liquid grease.
After cooking, dispose of the grease collected appropriately. The grease tray is dishwasher safe.

Important! Pay attention during cooking.
To open the appliance, hold the handgrip which remains cold. The die-cast aluminum parts become very hot, avoid touching them during and immediately after cooking.
Before performing any operation on the appliance, leave to cool down for at least 30 minutes.
Cook only with the grease tray in place. Do not empty the grease tray until the appliance is completely cool. Take care when pulling out the grease tray in order to avoid spilling the liquid.
COOKING POSITIONS
Contact grill (closed position)
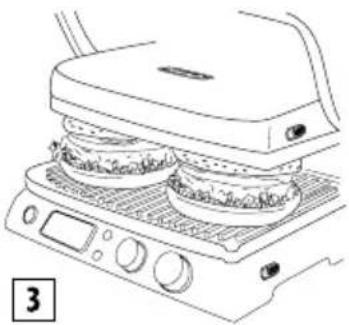
- The upper plate rests on the lower plate. This is the starting position and also one of the cooking positions when the appliance is used as a contact grill. The cover automatically adjusts to the thickness of the food on the plate.
The food will thus be cooked evenly on both sides.
The contact grill is ideal for cooking hamburgers, deboned meat and thin meat slices, vegetables and sandwiches. The "contact" function is perfect to prepare food rapidly and healthily. When you use the contact grill, the food cooks quickly as it is in contact with the plates on both sides at once (see figure 3).
natural_image
Line drawing of a portable stove with two dishes on a grater (no text or symbols)The grease from the food is drained and collected by the grooves on the plate and the hole at the back and is collected in the grease tray.
The appliance has a special handgrip and hinge allowing the upper plate to be adjusted according to the thickness of the food. If you want to cook a number of different types of food simultaneously using the contact grill, the various foods should have the same thickness to allow the cover to be closed evenly.
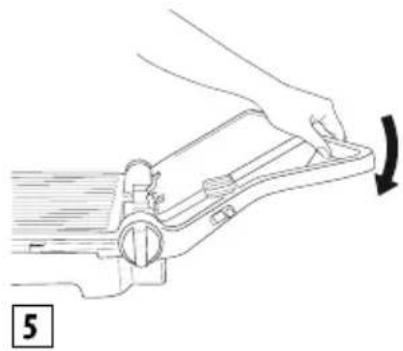
Open Grill
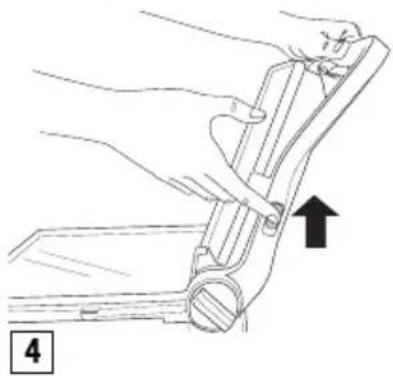
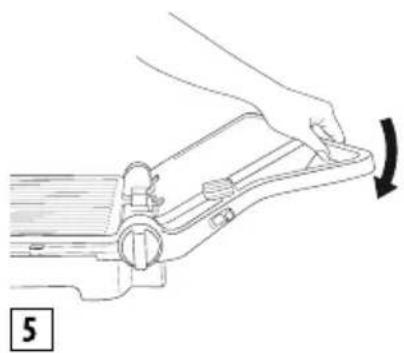
- The upper plate is level with the lower plate. The lower and upper plates are both at the same level, forming a large cooking surface. In this position, the appliance can be used in barbecue mode with either the grill plate or the griddle plate. To place the appliance in this position, first identify the hinge release lever on the right. Hold the handgrip with the left hand and with the right, slide the release lever upwards (see figure 4).
natural_image
Line drawing of a hand adjusting a mechanical component with an arrow indicating motion (no text or symbols)Push the handgrip backwards until the cover rests upside down in the flat position (see figure 5).
natural_image
Line drawing of a mechanical component with a hand adjusting a curved arrow (no text or symbols)Lifting the handgrip slightly before pulling the release lever lightens pressure on the hinge and facilitates the operation.
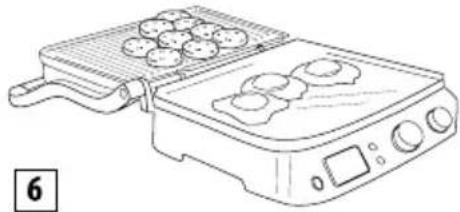
The appliance can be used as a grill/barbecue to prepare hamburgers, steak, chicken and fish. The grill/barbecue mode is the most versatile. The grill plates are in the open position, doubling the cooking surface.
You can prepare a number of different foods on the separate plates without mixing the flavors, or cook more of the same food.
The grill/barbecue position can be used to grill cuts of meat with different thicknesses, each with the preferred level of cooking. In this position, you need to turn the food during cooking.
- The appliance can also be used as a griddle/barbecue plate to prepare pancakes, eggs, cheese, fritters and bacon and sausages for breakfast (see figure 6).
natural_image
Line drawing of a grating machine with food items on top (no text or symbols)The large cooking surface enables a number of different foods to be prepared simultaneously, or to cook more of the same food.
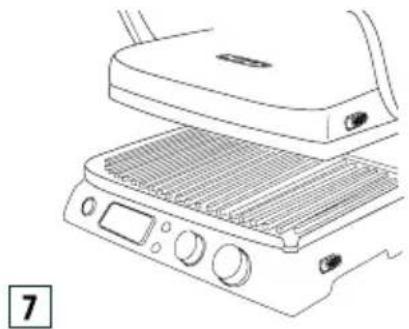
Oven Grill
This position (see figure 7) is suitable for grilling without contact thick foodstuffs that need to be roasted slowly and uniformly.
natural_image
Line drawing of a kitchen appliance with a grater and control panel (no text or symbols)It is ideal for preparing vegetables with high water content, so the water can evaporate.
You can also use this hot plate position to prepare soft sandwiches and foods which do not require pressing.
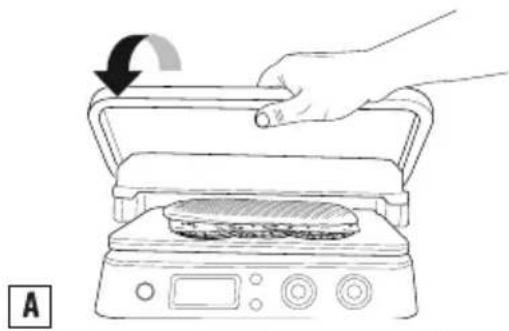
- Place the food on the lower plate.
- Bring the upper plate near the food, holding the handle (fig. A).
natural_image
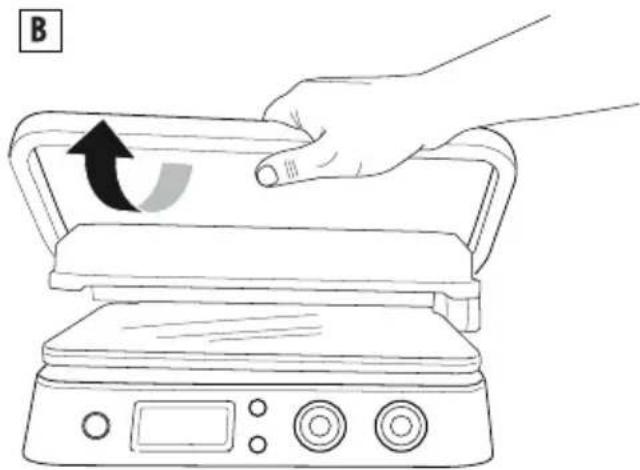
Line drawing of a hand pressing down on a grating with a rotating arrow indicating rotation (no text or symbols)- Turn the height adjustment knob (6) to (fig. B).
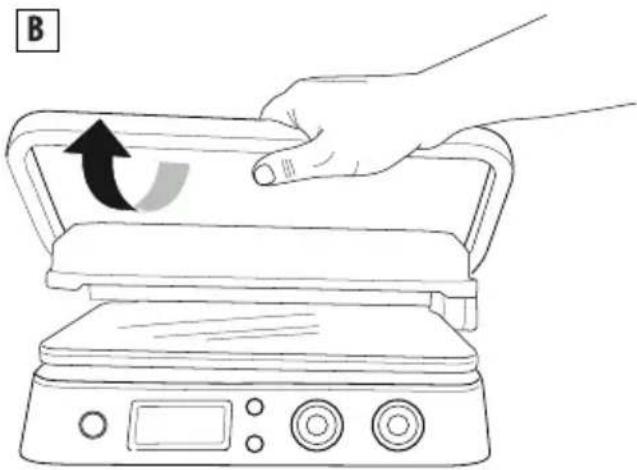
natural_image
Line drawing of a hand pressing down on a portable stove burner with a curved arrow indicating rotation (no text or symbols)- The upper plate is locked in position. There are 4 positions of height regulation.
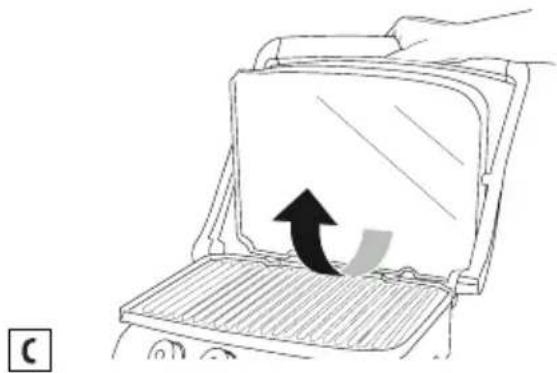
- Lifting the upper plate further will automatically release the regulation system (fig. C).
natural_image
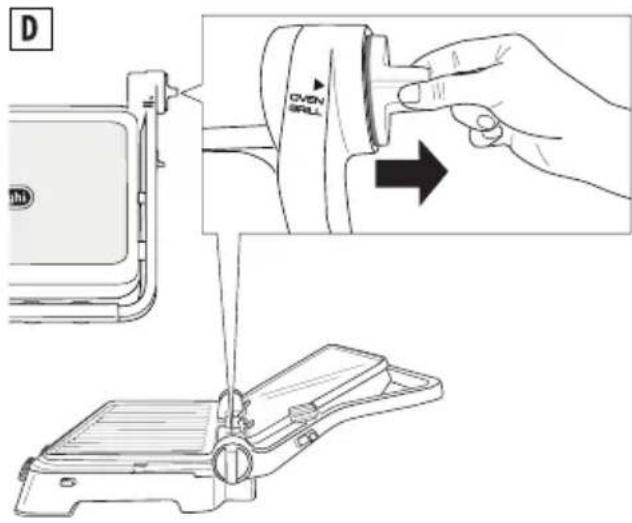
Diagram of a computer monitor with an arrow indicating rotation or movement (no text or symbols present)- Once the height is set, further adjustments are possible by pulling the knob out and setting a new position (fig. D).
USE
Operation
When the appliance has been prepared correctly and you are ready to cook, you can set a temperature from 60°C to 230°C for each grill plate (upper and lower) independently (using the thermostat dials 12 and 14).
Press the start/stop button and the ON light will come on.
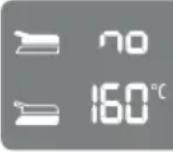
The appliance takes some minutes to heat up depending on the set temperature. When the thermostat reaches the required temperature, the appliance emits a beep, and is ready to use. "READY" appears on the display.
The temperature can be changed at any time during cooking, depending on the type of food being prepared.
Timer function
When "READY" appears on the display, select the cooking position (see the section "Cooking Position"), then place the food on the plates. The cooking time can be selected by pressing the timer buttons (9 and 10); in this case, at the end of the cooking time, the appliance switches off automatically and "END" is displayed. To switch the appliance on again, press the start/stop button (8). When the food is cooked, if you have not selected a cooking time, switch the appliance off by pressing the start/stop button or turn the thermostat dials (12 and 14) to the off position.

Please note: if no time is selected, the appliance will turn off automatically after 90 minutes of operation.
Sear function
This feature heats the upper and/or lower plates to a higher temperature for a few minutes. It is ideal for quickly searing foods at the beginning of cooking (ideal for thick meat). Press the start/stop button, then preheat the plates by pressing the sear buttons (11 and 13). While preheating,
"SEAR" flashes on the display. When the thermostat reaches the required temperature, the appliance emits a beep and "SEAR" appears on the display. Put the food on the plates immediately. The cycle is complete in a few minutes, and "SEAR" disappears from the display.

Please note: This function can be used once only in every 30 minutes. After the cycle, if you press the sear function within 30 minutes, "SEAR" will flash on the display, then go off. The operation cannot be set on the control.
Waffle mode (only if you have accessory waffle plates)
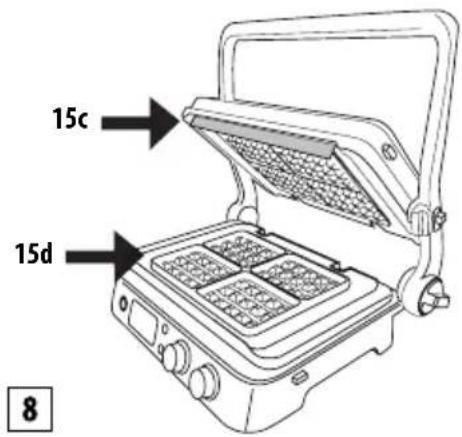
- Insert the waffle plates (15c/15d) as shown in fig.1. Please note that in this case the plates are not interchangeable and the position of each plate must be as shown in figure 8.
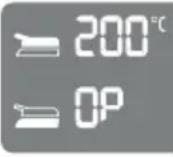
- Once the lower plate is inserted in the appliance, 000 appears on the display.
Turn the thermostat dials to the waffle setting and press the start/stop button.

- The appliance starts the preheating phase. When the thermostat reaches the required temperature, the appliance emits a beep, and is ready to use. "READY" appears on the display.
- Lightly grease the plates with melted butter
- Add one dosing cup for each waffle area.
- Spread the batter slightly and close the appliance.
- Cook according to the time indicated in the recipes.
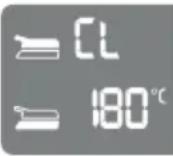
If you set the timer, three beeps will sound at the end of the cooking cycle, the timer will disappear and "END" will appear on the display; the appliance switches off automatically. If you do not select a time, at the end of the last waffle press the "start/stop" button to switch off the appliance.
- To cook additional waffles, simply add batter to the lower waffle plate and follow the above steps.

ortant! do not use metal tools when removing
the waffle from the waffle plates as they may scratch the non-stick surface.
CLEANING AND MAINTENANCE
User maintenance
- Never use metal cleaning tools which could scratch the non-stick plates. Use wood or heat-resistant plastic tools.
- Never leave plastic tools in contact with the hot plates, including the cleaning tool supplied.
- Between cooking one food and the next, remove food residues through the grease drain hole and collect them in the grease tray, then clean with kitchen paper and move on to the next cooking operation.
- Before cleaning the appliance, always leave the appliance to cool down for at least 30 minutes.
Cleaning and care

Please note: Before cleaning the appliance, make
sure it has cooled down completely.
At the end of cooking, turn the appliance OFF and unplug from the mains. Leave the appliance to cool down for at least 30 minutes. Use the special tool supplied to remove any food residues from the plates. The tool can be washed by hand or in the dishwasher. Empty the grease tray. The grease tray can be washed by hand or in the dishwasher.
Press the plate release buttons (3) to remove the plates from the appliance. Before touching them, make sure they have cooled down completely. The cooking plates are dishwasher safe although frequent washing in a dishwasher could reduce the properties of the coating. You are therefore recommended to clean the outside of the cooking plate with a soft sponge or cloth dampened with water and mild detergent.
Do not use metal tools to clean the plates.
TECHNICAL CHARACTERISTICS
Supply voltage
220/240 V - 50/60Hz
Absorbed power
2000W
| Error message on display DESCRIPTION PROBLEM SOLUTION | ||||
 |  | No temperature rise on one cooking plate. | The electronic control has detected that one cooking plate has not reached the target temperature.The grill plate is not correctly inserted in the appliance.The heating element inside the grill plate may be damaged.The heating element connection may be damaged.The electronic control may be damaged. | Unplug from wall outlet.Verify that the grill plate is correctly inserted in the appliance housing.If this does not resolve the problem, the appliance has probably malfunctioned.Contact De’Longhi Customer Service reporting the error type. |
 |  | Heating element ON time exceeded. | The electronic control has detected that the heating element was ON for an excessive length of time. | Unplug from wall outlet.Do not place oversize food or frozen food on the grill plates as this could overwork the heating elements.The control displays the error message for 5 seconds, then turns the appliance off.Let the appliance cool down before performing a new cooking cycle. |
 |  | Temperature probe malfunction. | The electronic control has detected a temperature probe malfunction. | Unplug from wall outlet.The temperature probe needs to be replaced.Contact De’Longhi Customer Service reporting the error type. |
 |  | Temperature probe malfunction. | The electronic control has detected a temperature probe malfunction. | Note the error number.Unplug from wall outlet.The temperature probe needs to be replaced.Contact De’Longhi Customer Service reporting the error type. |
| The appliance does not come on. | Check the appliance is correctly plugged into the wall outlet.Plug the appliance into a different outlet.Verify the circuit breaker.If this does not resolve the problem, the appliance has probably malfunctioned.Contact De'Longhi Customer Service. | ||
| The appliance does not come on after pressing the START/STOP button. | Both temperature knobs are in the 0 position and the upper and lower display show OFF. Turn the temperature knob to the desired temperature, then press START/STOP. | ||
| When the sear buttons are pressed, "SEAR" flashes on the display then the sear function goes off. | The sear function is available once in every 30 minutes of the cooking cycle. If you try to perform a second sear cycle before 30 minutes have elapsed, the operation will be refused.Wait 30 minutes before starting a new sear cycle. |
COOKING TABLE
| BEEF THICKNESS(cm) | No.PIECES | COOKINGLEVEL | MODE | PLATES | °C SEAR MIN. TIPS | ||||
| lower upper | |||||||||
| Steak 0,5-12 Well done | CONTACT | GRILL | ribbed smooth 230 | √2 - 3 oil the | food well | ||||
| Steak 0,5-14 Well done | O P E N | GRILL | ribbed smooth 230 | 5 - 6 oil the | f o o dwell, turnhalf wayth r o u g hcooking | ||||
| Fillet | 3-4 | 4 | Rare | CONTACTGRILL | ribbed smooth 230 | √4 - 5 oil the | food well | ||
| Fillet | 3-4 | 4 | Medium | CONTACTGRILL | ribbed smooth 230 | √7 - 8 oil the | food well | ||
| Fillet | 3-4 | 4 Well done | CONTACTGRILL | ribbed smooth 230 | 230 | √ | 10 - 11 | oil thefood well | |
| Rib steak | 2-3 | 2 | Medium | CONTACTGRILL | ribbed smooth 230 | 4 - 5 oil the | food well | ||
| Rib steak | 2-3 | 2 Well done | CONTACTGRILL | ribbed smooth 230 | 7 - 8 oil the | food well | |||
| Rib steak | 2-3 | 4 | Medium | O P E NGRILL | ribbed smooth 230 | 10 - 12 | oil thef o o dwell, turnhalf wayth r o u g hcooking | ||
| Rib steak | 2-3 | 4 Well done | O P E NGRILL | NGRILL | ribbed smooth 230 | 14 - 16 | oil thef o o dwell, turnhalf wayth r o u g hcooking | ||
| Hamburger | 2-3 | 6 Well done | CONTACTGRILL | NGRILL | ribbed smooth 230 | 8 - 10 oil the | |||
| Kebab | 6 Well done | CONTACTGRILL | NGRILL | ribbed smooth 230 | 230 | oil thef o o dwell, turnhalf wayth r o u g hcooking | |||
| LAMB | THICKNESS (cm) | No. PIECES | COOKING LEVEL | MODE PLATES | °C | MIN. | TIPS | ||
| lower | upper | ||||||||
| Cutlet | 1.5-3 | 6 | Medium | CONTACT GRILL | ribbed | smooth | 230 | 10 - 12 | oil the food well, turn the cutlets half-way through cooking |
| Cutlet | 1.5-3 | 6 | Well done | CONTACT GRILL | ribbed | smooth | 230 | 12 - 14 | |
| PORK THICKNESS(cm) | No.PIECES | MODE PLATES | °C SEAR MIN. TIPS | ||||||
| Steak 1-2 | 4 C O N T A C T | GRILL | ribbed smooth 230 √7 | -9 oil | the food | well | |||
| Steak | 1-2 | 8 | OPEN GRILL | ribbed | smooth | 230 | 14 - 16 | oil the food well, turn half-way through cooking | |
| Chop | <2,5 | 4 C O N T A C TGRILL | ribbed smooth 230 | 9 - 11 | oil the | food well, turn half-way through cooking | |||
| Chop | <2,5 | 8 | OPEN GRILL | ribbed | smooth | 230 | 11 - 13 | oil the food well, turn half-way through cooking | |
| Spare rib | 6-8 C O N T A C TGRILL | ribbed smooth 200 | 20 - 25 | turn two | or three times | ||||
| Bacon | 4 C O N T A C TGRILL | ribbed smooth 230 | 1 - 2 | ||||||
| Sausage | 8 C O N T A C TGRILL | ribbed smooth 200 | 16 - 18 | pierce | the sausages with a fork | ||||
| Kebab | 6 C O N T A C TGRILL | ribbed smooth 230 | 14 - 16 | oil the | food well, turn once or twice | ||||
| Frankfurter | 6 C O N T A C TGRILL | ribbed smooth 230 | 8 - 10 | ||||||
| CHICKEN AND TURKEY | THICKNESS (cm) | No. PIECES | MODE PLATES | °C | SEAR | MIN. TIPS | ||
| Breast | <1 | 4 | CONTACT GRILL | ribbed | smooth | 230 | √ | 3 - 4 |
| Haunch | 3 | CONTACT GRILL | ribbed | smooth | 200 | 20 - 25 | ||
| Wing | 6 | CONTACT GRILL | ribbed | smooth | 200 | 14 - 16 | ||
| Hamburger | 1.5-2 | 4 | CONTACT GRILL | ribbed | smooth | 230 | √ | 6-8 |
| Hamburger | 1.5-2 | 8 | O P E N GRILL | ribbed | smooth | 230 | √ | 14 - 16 |
| Kebab | 6 | CONTACT GRILL | ribbed | smooth | 230 | 11 - 13 | ||
| Frankfurter | 6 | CONTACT GRILL | ribbed | smooth | 230 | 6 - 8 | ||
| Flat grilled chicken | 1 | CONTACT GRILL | ribbed | smooth | 200 | 40 - 45 | ||
| BREAD No. | PIECES | MODE PLATES | °C MIN. | TIPS | ||
| lower upper | ||||||
| Toast/sandwich | 20 V | ENGRILL | smooth ribbed 230 3 - 5 | position the top plate so | that it touches the bread without crushing it | |
| Roll 2 | CONTACTGRILL | ribbed smooth 230 2 - 3 | ||||
| Slices ofbread | 40 P | ENGRILL | smooth ribbed 230 4 - 5 | turn halfway through | cooking | |
| VEGETABLES No. | PIECES | MODE | PLATES | °C | MIN. | TIPS | |
| lower | upper | ||||||
| Sliced eggplant | 1 | CONTACT GRILL | ribbed | smooth | 230 | 4 - 6 | oil the food well |
| Sliced zucchini | 2 | CONTACT GRILL | ribbed | smooth | 230 | 6 - 8 | oil the food well |
| Quartered sweet pepper | 2 | CONTACT GRILL | ribbed | smooth | 230 | 8 - 10 | oil the food well |
| Sliced tomato | 1 | OPEN GRILL | smooth | ribbed | 230 | 5 - 7 | oil the food well, turn halfway through cooking |
| Sliced onion | 2 | CONTACT GRILL | smooth | ribbed | 230 | 5 - 7 | oil the food well, mix often with a spatula |
| FISH QUANTITY NO. | PIECES | MODE PLATES | °C MIN. | TIPS | ||||
| Whole 250 g 1 | C O N T A C TGRILL | ribbed smooth 210 8 - 10 oil the food well | ||||||
| Fillet | 500 g | 1 | OVEN GRILL | smooth | ribbed | 230 | 25 - 30 | oil the food, position the top plate so that it just brushes the food without touching it |
| Slice | 450 g 4 C O N T A C TGRILL | ribbed smooth 200 8 - 10 oil the food well | ||||||
| Kebab | 500 g | 6 | OPEN GRILL | ribbed | smooth | 230 | 10 - 12 | oil the food well; turn two or three times |
| Squid | 400 g | 1-2 | C O N T A C TGRILL | ribbed smooth 200 | 10 - 12 | oil the food well | ||
| Prawns | 400 g | 10-12 | C O N T A C TGRILL | ribbed smooth 200 | 4 - 6 | oil the food well | ||
| DESSERTS No. | PIECES | MODE | PLATES | °C | MIN. TIPS | ||
| lower | upper | ||||||
| Pancakes | 4 | O P E N GRILL | smooth | ribbed | 200 | 4 - 5 | butter the plates, turn halfway through cooking |
| Waffles | 4 | CONTACT GRILL | WAFFLE |  | 4 - 5 | butter the plates | |
| Sliced pineapple | 4 | CONTACT GRILL | ribbed | smooth | 200 | 5 - 6 | butter the plates |
RECIPES
EGG SCRAMBLE, BACON AND TOAST INGREDIENTS:
- eggs 2
- bacon 2 slices
- milk 1 dsp
- salt and pepper to taste
- bread for toast 2 slices
PREPARATION:
Beat the eggs with the milk and salt until it forms a light frothy mixture. Insert the smooth plate in the lower housing and the ribbed one up, then position the grill in OPEN GRILL mode.
Adjust the bottom thermostat dial to 230^ C and the top dial to 230^ C. Press the START/STOP button to preheat the grill. When READY is displayed, pour the egg mix onto a corner of the plate and cook for 2-3 min., mixing well with a wooden spatula to ensure it cooks evenly. In the meantime, on the same plate, cook the bacon slices for 3-4 min., turning about halfway through cooking; on the other flat plate, toast the bread for 3-4 min., turning about halfway through cooking. Compose the dish and serve.
CROUTONS AND EGGPLANT CREAM INGREDIENTS:
- eggplant 1
- ricotta 100 g
- powdered garlic to taste
- parsley to taste
- olive oil 4 dsp
- salt to taste
- pepper to taste
- baguette 1
PREPARATION:
Wash the eggplants well, peel and cut into thick slices. Insert the smooth plate in the lower housing and the ribbed one up then put the grill in CONTACT GRILL mode. Adjust the bottom thermostat dial to 230°C and the top dial to 230°C. Press the START/STOP button to preheat the grill. When READY is displayed, place the eggplants on the bottom grill and cook for about 8-10 min. until soft.
Cut the eggplant slices coarsely and place in a mixer with the ricotta, garlic, chopped parsley, pinch of salt, pinch of pepper and oil. Mix to obtain a smooth fine mixture. Cut the bread into slices and oil with the olive oil, then cook at 230^ C with the plates in CONTACT GRILL mode for 1-2 minutes until they are browned to taste.
Spread the eggplant cream onto the toasted bread, sprinkle with two dessert spoons of oil and serve.
MEAT, ARUGULA AND CHERRY TOMATO SALAD INGREDIENTS:
- veal slices 2
- arugula 100 g
- cherry tomatoes 10-12
- grana cheese flakes 100 g
- salt to taste
- olive oil to taste
PREPARATION:
Prepare the arugula and cherry tomato salad: wash the arugula, place on a clean cloth to dry and cut the cherry tomatoes into four. Insert the ribbed plate in the lower housing and the smooth one up then put the grill in CONTACT GRILL mode.
Adjust the bottom thermostat dial to 230^ C and the top dial to 230^ C. Press the START/STOP button to preheat the grill. When READY is displayed, position the previously oiled veal slices, press with the top plate and cook for 2-3 min. to taste. Cut the meat into strips and arrange them on the bed of arugula and cherry tomatoes, salt to taste and add the flakes of grana cheese. Flavour with a little oil.
COFFEE FLAVOURED RIB STEAKS INGREDIENTS:
- rib steaks (2 x 250 g each)
- olive oil
FOR THE COFFEE MIXTURE:
- cumin seeds 2 tsp
- coffee beans 2 tsp
- sweet chilli pepper 1 dsp
- paprika 1 tsp
- coarse salt 1 tsp
- pepper 1 tsp
PREPARATION:
Prepare the coffee mixture: pour the cumin seeds and coffee into a food processor and grind into a powder (not too fine). Pour the powder into a bowl, add the other ingredients and mix well. Oil the meat lightly and flavour with the spices, cover and leave at room temperature for about 30 min. Insert the ribbed plate at the bottom and the smooth one at the top, then put the grill in CONTACT GRILL mode.
Adjust the bottom thermostat dial to 230^ C and the top dial to 230^ C. Press the START/STOP button to preheat the grill and the SEAR button for both plates.
When SEAR stops flashing on the display, place the meat on the bottom plate, press with the top plate and cook for 6-8 min. to taste. Serve hot.
BEEF FILLET WITH MUSHROOM SAUCE
INGREDIENTS:
- beef fillets 4
- salt to taste
- black peppercorns for grinding to taste
- garlic cloves 2
- Dijon mustard 2 dsp
- butter 60 g
- olive oil to taste
INGREDIENTS FOR THE MUSHROOM SAUCE:
- butter 30 g
- gorgonzola 1 dsp
- shallots 2
- mushrooms 300 g
- whisky 1/2 small glass
- cream 200 g
- lemon juice to taste
- parsley to taste
PREPARATION:
Flavour the meat with the salt and pepper and leave at room temperature for about an hour. Prepare the mushroom sauce: melt the butter in a pan, add the sliced shallots and cook for 2-3 min. Add the mushrooms and cook for a further 5 min. Add the whisky, cook for 1 min., add a glass of water and cook for about a minute more. Add the liquid cream, lemon juice, parsley and gorgonzola and bring to the boil.
Cook until the sauce thickens, adjust the salt and pepper and set aside. In the meantime, prepare the flavouring to be brushed on the fillet during cooking: in a small pan, melt the butter, mustard and garlic. Cook over a low heat until the butter melts. Keep warm. Insert the ribbed plate at the bottom and the smooth one at the top, then put the grill in CONTACT GRILL mode. Adjust the bottom thermostat dial to 230°C and the top dial to 230°C. Press the START/STOP button to preheat the grill and the SEAR button for both plates. Brush the fillets with the flavouring on both sides, then when SEAR stops flashing on the display, place them on the bottom plate and close the grill. Cook for 6-8 min.
according to taste and the thickness of the fillets. When cooked, remove the fillets and serve covered with the mushroom sauce prepared previously.
HAMBURGER WITH TOASTED RYE BREAD
INGREDIENTS:
- rye bread 8 slices
- top quality beef mince 500 g
- sliced Emmenthal 100 g
- olive oil 2 dsp
- sliced onions 2
- butter at room temperature as required
- Worcester sauce 2 tsp
- salt to taste
- pepper to taste
- sugar half a tsp
PREPARATION:
Prepare the hamburgers: mix the mince, Worcester sauce, salt and pepper thoroughly in a bowl. By hand, shape 4 hamburgers about 2 cm thick. Position the grill in OPEN GRILL mode and insert the smooth plate at the bottom and the ribbed one at the top. Adjust the bottom thermostat dial to 230°C and the top dial to 230°C. Press the START/STOP button to preheat the grill.
When READY is displayed, place the sliced onions flavoured with the olive oil and sugar on the bottom plate and cook for about 5-6 min., mixing well with a spatula to ensure they cook evenly and are tender. At the same time, on the other plate, cook the hamburgers for about 12 min., turning after about 5-6 min. (the cooking time varies according to the thickness of the hamburger). As soon as the onions are cooked, remove from the plate and toast the buttered slices of bread on one side only for 1-2 min.
Place the slices of bread on a chopping board with the toasted side upwards, sprinkle with the onions, add the hamburgers and cover with the cheese. Close the sandwich with the slice of bread with the toasted side facing downwards. Wait for the plate to be hot again, then insert the sandwiches and press well with the top plate.
Cook for about 2-3 min. to taste.
LAMB CUTLETS WITH BALSAM VINEGAR AND
ROSEMARY
INGREDIENTS:
- lamb cutlets 6
- chopped rosemary 10 g
- chopped garlic 10 g
- balsam vinegar 100 ml
- sugar 15 g
- salt to taste
- pepper to taste
PREPARATION:
Mix all the ingredients well in a sufficiently large recipient, cover and leave the lamb to marinate in the refrigerator for at least 1-2 hours. Insert the ribbed plate at the bottom and the smooth one at the top, then put the grill in CONTACT GRILL mode. Adjust the bottom thermostat dial to 230°C and the top dial to 230°C. Press the START/STOP button to preheat the grill. When READY is displayed, place the cutlets on the bottom plate. Cook for about 11-13 min. according to taste and the thickness of the cutlets (you are recommended to turn them halfway through cooking as the bone prevents the top plate from touching the meat on the top). In the meantime, reduce the marinade in a pan and serve as a sauce on the grilled lamb cutlets.
CHICKEN KEBABS WITH HONEY AND LIME CREAM INGREDIENTS:
- chicken breast 500 g
INGREDIENTS FOR THE MARINADE:
- chilli pepper 1 tsp
- coriander 1 tsp
- olive oil 10 cl
- spring onions 2
- garlic cloves 3
- grated ginger 1 dsp
- sugar 1 dsp
- lime juice 1 dsp
- coarse salt 1 dsp
- pepper to taste
INGREDIENTS FOR THE HONEY AND LIME CREAM:
- cooking cream 5 cl
- grated lime peel 1/2 tsp
- lime juice 1 dsp
- olive oil 1 dsp
- honey 1 dsp
- salt to taste
PREPARATION:
Prepare the marinade: place all ingredients in a food processor and blend to obtain a smooth mixture. Place the chicken cut into 2 cm wide cubes on a deep plate, add the marinade and cover all the chicken evenly. Cover with food film and marinate for 1-2 hours. Prepare the cream by mixing all the ingredients in a bowl, cover with transparent film and keep in the refrigerator. Thread the chicken pieces onto the kebab skewers. Insert the ribbed plate at the bottom and the smooth one at the top, then put the grill in CONTACT GRILL mode. Adjust the bottom thermostat dial to 230°C and the top dial to 230°C. Press the START/STOP button to preheat the grill. When READY is displayed, place the kebabs on the bottom plate, press with the top plate and cook for about 11-13 min., turning once or twice. Serve hot accompanied with the lime and honey cream.
PROVENCE STYLE CHICKEN LEGS INGREDIENTS:
- chicken legs 3 (550 g)
INGREDIENTS FOR THE MARINADE:
- dry white wine 25 cl
- olive oil 4 dsp
- mustard with seeds 3 dsp
- white wine vinegar 3 dsp
- Provence herbs 2 dsp
- chopped garlic 2 cloves
- coarse salt 2 tsp
- Cayenne pepper 1 tsp
PREPARATION:
Prepare the marinade by mixing all the ingredients in a bowl. With a sharp knife, cut the fleshy part of the chicken legs at a number of points to open them slightly. Place the legs in the bowl with the marinade and turn them so that both sides are well covered; leave to marinate for 2-3 hours. Insert the ribbed plate at the bottom and the smooth one at the top, then put the grill in CONTACT GRILL mode. Adjust the bottom thermostat dial to 210°C and the top dial to 210°C. Press the START/STOP button to preheat the grill. When READY is displayed, place the chicken legs on the bottom plate, press with the top plate and cook for about 20-25 min., turning 2-3 times. When cooked, place on a plate and serve.
GRILLED PRAWNS
INGREDIENTS:
- prawns 16/20
INGREDIENTS FOR THE MARINADE:
- parsley to taste
- lemons 2
- salt to taste
- pepper to taste
- garlic cloves 2
PREPARATION:
Prepare the marinade: chop the garlic and parsley finely, add the lemon juice, salt and a sprinkling of pepper.
Wash the prawns, dry well and leave to marinate for at least half an hour.
Insert the ribbed plate at the bottom and the smooth one at the top, then put the grill in CONTACT GRILL mode.
Adjust the bottom thermostat dial to 210°C and the top dial to 210°C. Press the START/STOP button to preheat the grill. When READY is displayed, place the drained prawns on the bottom plate, press with the top plate and cook for about 4-6 min. To serve, decorate the plate with lemon slices and green salad.
GRILLED SALMON WITH YOGHURT SAUCE
INGREDIENTS:
- salmon fillet 500 g
- olive oil to taste
INGREDIENTS FOR THE SAUCE:
- Greek yoghurt 250 g
- garlic clove 1
- salt 1 tsp
- sugar 1 pinch
- chives 20 g
- parsley 20 g
- white pepper to taste
PREPARATION:
Prepare the sauce: wash the parsley and chives and dry thoroughly, chop the garlic separately.
Pour the yoghurt into a bowl, add the herbs, garlic, salt, sugar and pepper and blend to a smooth cream. Place in the refrigerator and leave for at least 30 min. Insert the smooth plate at the bottom and the ribbed one at the top, then put the grill in OVEN GRILL mode. Adjust the bottom thermostat dial to 230°C and the top dial to 230°C. Press the START/STOP button to preheat the grill. When READY is displayed, place the previously oiled fillet on the bottom plate, close the top plate in OVEN GRILL mode (as near as possible to the food without touching it) and cook for about 25-30 min. (for best results, turn the salmon through 180° about halfway through cooking as towards the back, the plate is nearer the food). When cooked, place the salmon on a serving plate and serve with the yoghurt sauce.
GRILLED SQUID
INGREDIENTS:
- large squid 400 g
- lemon 1
- parsley 1 sprig
- olive oil to taste
- oregano to taste
- salt to taste
- chilli pepper powder to taste
PREPARATION:
Prepare the squid by removing the intestines, head and bone, then rinse thoroughly. Insert the ribbed plate at the bottom and the smooth one at the top, then put the grill in CONTACT GRILL mode. Adjust the bottom thermostat dial to 210°C and the top dial to 210°C. Press the START/STOP button to preheat the grill. When READY is displayed, place the previously oiled squid on the bottom plate, press with the top plate and cook for about 10-12 min. In a bowl, prepare the flavouring by mixing the oil with the chopped parsley, lemon juice, a pinch of oregano, a pinch of salt and a pinch of chilli pepper.
When the squid is cooked, remove from the grill and flavour with the sauce. Compose the dish and serve.
BANANA PANCAKES
INGREDIENTS:
- banana 1
- eggs 2 (1 whole + 1 white)
- milk 150 ml
- plain flour 100 g
- butter 70 g
- salt to taste
- sugar 1 dsp
- baking powder 16 g
PREPARATION:
Peel the banana and mash well with a fork. Beat the whole egg and sugar in a bowl and add the milk slowly mixing
all the time. Add 50 g of melted butter, then add the flour sieved with the baking powder and a pinch of salt a little at a time, followed by the mashed banana. Mix all the ingredients thoroughly and then place the mixture in the refrigerator for 10 min. In the meantime, whip the egg white until firm. Take the mixture from the refrigerator and blend in the whipped egg white with delicate movements from the bottom towards the top. Insert the smooth plate at the bottom and the ribbed one at the top, then position the grill in OPEN GRILL mode. Set the bottom thermostat dial to 200°C and the top dial to 200°C. Press the START/STOP button to preheat the grill. When READY is displayed, grease the plates with a little butter and pour on 1-2 dessert spoons of the pancake mixture, spreading it rapidly over the surface to obtain a circle. Leave to cook for about 2 minutes until you see bubbles all over the surface of the pancake, then turn and cook the other side for about 2 minutes. The pancakes can be served in numerous ways: chocolate cream, maple syrup, fresh bilberries, chocolate chips, honey, whipped cream and icing sugar.
GRILLED PINEAPPLE WITH ICE-CREAM INGREDIENTS:
- pineapple 1
- honey as required
- cane sugar as required
- fresh mint as required
- icing sugar as required
- vanilla ice-cream as required
PREPARATION:
Take the pineapple, remove the leaves and peel. Cut into slices about 1-2 cm thick and sprinkle each slice with cane sugar on both sides. Insert the ribbed plate at the bottom and the smooth one at the top, then put the grill in CONTACT GRILL mode. Set the bottom thermostat dial to 200°C and the top dial to 200°C. Press the START/STOP button to preheat the grill. When READY is displayed, brush the pineapple on both sides with honey and place on the grill. Close the grill and cook for 5-6 min. Once cooked, place the slices on a serving plate, decorate with fresh mint leaves, dust with icing sugar and serve with balls of ice-cream.
ONLY IF YOU HAVE ACCESSORY WAFFLE PLATES
CLASSIC WAFFLES
MAKES: 8 waffles
PREPARATION: 10min.
COOKING TIME: 10min.
INGREDIENTS:
- all purpose flour 2 cups (460 g)
- salt 1 tsp
- baking powder 4 tsp (10 g)
- white sugar 2 tsp (30 g)
- eggs 2
- warm milk 1 1/2 cup (345 ml)
- melted butter 1/3 cup (75 g)
- vanilla extract 1 tsp
PREPARATION:
In a large bowl, mix the flour, salt, baking powder and sugar together, then set aside. In a separate bowl, beat the eggs. Stir in the milk, butter and vanilla. Pour the flour mixture into the milk mixture and beat until blended. Preheat the waffle iron. When READY is displayed, coat the waffle iron with melted butter or non-stick cooking spray and pour on a dosing cup for each waffle area, using a spoon if necessary. Spread with a spatula. Cook the waffles until golden and crisp (5 min.).
Repeat until all the mixture is used.
Serve immediately.
BELGIAN WAFFLES
MAKES: 10-12 waffles
PREPARATION: 15 min.
COOKING TIME: 15 min.
INGREDIENTS:
- cake flour 2 cups (460 g)
- salt 1/2 tsp
- baking powder 2 tsp (5 g)
- white sugar 2 tsp (30 g)
- eggs 4
- warm milk 2 cups (460 g)
- melted butter 1/3 cup (70 g)
- vanilla extract 1/2 tsp
PREPARATION:
In a large bowl, mix the flour, salt and baking powder together; set aside. In a separate bowl, beat the egg yolks and sugar until the sugar is completely dissolved.
Add the vanilla extract, melted butter and milk to the eggs
and whisk to combine.
Combine the egg-milk mixture with the flour mixture and whisk until just blended. Do not over mix. In a third bowl, beat the egg whites with an electric mixer until soft peaks form, about 1-2 minutes. Using the rubber spatula, gently fold the egg whites into the waffle batter. Do not over mix.
Preheat the waffle iron.
When READY is displayed, coat the waffle iron with melted butter or non-stick cooking spray and pour on a dosing cup for each waffle area, using a spoon if necessary. Spread with a spatula. Cook the waffles until golden and crisp (5 min.).
Repeat until all the mixture is used.
Serve immediately.
CHOCOLATE AND CINNAMON WAFFLES
MAKES: 8 - 10 waffles
PREPARATION: 10min.
COOKING TIME: 15 min.
INGREDIENTS:
- plain flour 2 cups (460 g)
- salt 1 tsp
- baking powder 1 tsp (3 g)
- white sugar 3/4 cup (170 g)
- eggs 2
- warm milk 1 1/2 cup (345 ml)
- butter 80 g
- vanilla extract 1 tsp
- dark chocolate 140 g
- cocoa powder 1/4 cup (60 g)
- cinnamon 2 tsp (6 g)
PREPARATION:
Place the chocolate and butter in a microwave safe bowl and beat on maximum power for 30 seconds. Stir and continue until the chocolate and butter have melted and the mixture is smooth, set aside to cool slightly.
Whisk eggs, milk and vanilla together in a large bowl and stir through the cooled chocolate mixture until smooth.
Sift the flour, sugar, cocoa powder, cinnamon, baking powder and salt together in a large bowl. Add the flour mixture to the egg mixture and whisk until mostly smooth with just a few lumps. Preheat the waffle iron.
When READY is displayed, coat the waffle iron with melted butter or non-stick cooking spray and pour on a dosing cup for each waffle area, using a spoon if necessary. Spread with a spatula. Cook the waffles until golden and crisp (5 min.).
Repeat until all the mixture is used. Serve immediately.
natural_image
Line drawing of a portable electric stove with two dish holders on top (no text or symbols)natural_image
Line drawing of a mechanical assembly with hands and a directional arrow (no text or symbols)natural_image
Line drawing of a hand gripping a mechanical component with a curved arrow indicating rotation (no text or symbols)natural_image
Line drawing of a grating machine with multiple food items on top (no text or symbols)natural_image
Line drawing of a kitchen appliance with grating and control panel (no text or symbols)natural_image
Line drawing of a hand pressing down on a grating with a curved arrow indicating rotation (no text or symbols)natural_image
Line drawing of a hand pressing down on a portable appliance with a curved arrow indicating rotation (no text or symbols)natural_image
Diagram of a computer monitor with an arrow indicating rotation or change (no text or symbols present)CÔTELETTES D'AGNEAU AU VINAIGRE BALSAMIQUE ET AU ROMARIN
INGRÉDIENTS :
natural_image
Line drawing of a portable food appliance with two thermos on a grater (no text or symbols)natural_image
Line drawing of a mechanical assembly with hands and a directional arrow (no text or symbols)natural_image
Line drawing of a mechanical lever mechanism with a hand adjusting the shaft (no text or symbols)natural_image
Line drawing of a grating machine with multiple food items on top (no text or symbols)natural_image
Line drawing of a kitchen appliance with a grater and control panel (no text or symbols)natural_image
Line drawing of a hand pressing down on a grating with a rotating arrow indicating rotation (no text or symbols)natural_image
Line drawing of a hand pressing down on a portable stove burner with a curved arrow indicating rotation (no text or symbols)natural_image
Line drawing of a grater with an arrow indicating rotation or movement (no text or symbols)Para remover as placas
natural_image
Line drawing of a microwave oven setup with two dish holders on a grater (no text or symbols)natural_image
Line drawing of hands operating a mechanical device with an arrow indicating motion (no text or symbols)natural_image
Line drawing of a mechanical lever mechanism with a hand adjusting the shaft (no text or symbols)natural_image
Line drawing of a grating machine with multiple food items on top (no text or symbols)natural_image
Line drawing of a kitchen appliance with a grater and control panel (no text or symbols)natural_image
Line drawing of a hand pressing down on a grating with a rotating arrow indicating rotation (no text or symbols)natural_image
Line drawing of a hand pressing down on a portable stove burner with a curved arrow indicating rotation (no text or symbols)natural_image
Diagram of a refrigerator interior with a hand holding the lid, showing a black arrow indicating rotation (no text or symbols present)natural_image
Line drawing of a portable stove with two food containers on top (no text or symbols)natural_image
Line drawing of a mechanical assembly with hands and a directional arrow (no text or symbols)natural_image
Line drawing of a mechanical lever mechanism with a hand adjusting the pivot (no text or symbols)natural_image
Line drawing of a grating machine with multiple food items on top (no text or symbols)natural_image
Line drawing of a kitchen appliance with grating and control panel (no text or symbols)natural_image
Line drawing of a hand pressing down on a grating with a rotating arrow indicating rotation (no text or symbols)natural_image
Line drawing of a hand pressing down on a portable appliance with a curved arrow indicating rotation (no text or symbols)natural_image
Line drawing of a computer monitor with an arrow indicating rotation (no text or symbols)UTILIZZO
Funzionamento
SOLO SE IN POSSESSO DELL'ACCESSORIO SET PIASTRE WAFFEL
WAFFLE (CIALDE) CLASSICHE
DOSI PER: 8 cialde
PREPARAZIONE: 10min
natural_image
Line drawing of a two-tiered electric stove with a digital display and control panel (no text or symbols)natural_image
Line drawing of a mechanical assembly with a hand adjusting a bracket and an arrow indicating direction (no text or symbols)natural_image
Line drawing of a mechanical lever mechanism with a hand adjusting the pivot point (no text or symbols)natural_image
Line drawing of a grating machine with multiple food items on top (no text or symbols)natural_image
Line drawing of a microwave oven with grating and control panel (no text or symbols)natural_image
Line drawing of a hand pressing down on a grating with a rotating arrow indicating rotation (no text or symbols)natural_image
Line drawing of a hand pressing down on a portable stove burner with a curved arrow indicating rotation (no text or symbols)natural_image
Line drawing of a computer monitor with an arrow indicating rotation or change (no text or symbols)CHOCOLADE- EN KANEELWAFELS
DOSIS VOOR: 8-10 wafels
BEREIDING: 10 minuten
BEREIDINGSTIJD: 15 minuten
INGREDIËNTEN:
- 2 koppen/460 gram bloem
- 1 theelepel zout
- 1 theelepel/3 gram gist
- 170 gram suiker
- 2 eieren
- 1,5 kop/345 ml lauwe melk
- 80 gram boter
- 1 theelepel vanille-extract
- 140 gram donkere chocolade
- 60 gram cacaopoeder
- 6 gram kaneelpoeder
BEREIDING:
natural_image
Line drawing of a portable electric stove with two dish holders on top (no text or symbols)natural_image
Line drawing of a hand adjusting a mechanical component with an arrow indicating upward motion (no text or symbols)natural_image
Line drawing of a hand gripping a mechanical component with a curved arrow indicating rotation (no text or symbols)5
natural_image
Line drawing of a grating machine with six round food items on top (no text or symbols)natural_image
Line drawing of a kitchen appliance with grating and control panel (no text or symbols)natural_image
Line drawing of a hand pressing down on a grating with a rotating arrow indicating rotation (no text or symbols)natural_image
Line drawing of a hand pressing down on a portable stove with a curved arrow indicating rotation (no text or symbols)natural_image
Line drawing of a computer case with an arrow indicating rotation or movement (no text or symbols)GRILLET LAKS MED YOGHURTSALSA
INGREDIENSER:
APPARATETS STEKEPOSISJONER
natural_image
Line drawing of a portable electric stove with two dish holders on top (no text or symbols)natural_image
Line drawing of a mechanical clamp or bracket assembly with an arrow indicating direction (no text or symbols present)natural_image
Line drawing of a mechanical lever mechanism with a hand adjusting the pivot point (no text or symbols present)natural_image
Line drawing of a microwave oven with two plates and a grater (no text or symbols)natural_image
Line drawing of a kitchen appliance with grating and control panel (no text or symbols)natural_image
Line drawing of a hand pressing down on a grating with a rotating arrow indicating rotation (no text or symbols)natural_image
Line drawing of a hand pressing down on a portable stove burner with a black arrow indicating rotation (no text or symbols)natural_image
Line drawing of a refrigerator interior with a hand holding the lid and a black arrow indicating rotation (no text or symbols)TILBEREDNINGSTID: 10min
INGREDIENSER:
TILBEREDNINGSTID: 15min
INGREDIENSER:
- 2 kopper / 460g mel
- 1/2 teskje salt
- 2 teskjeer/5 g bakepulver
- 2 skjeer/30 g hvitt sukker
- 4 egg
- 2 kopper/460 g lunken melk
- 70 g smeltet smør
- 1/2 teskje vanlijeekstrakt
TILBEREDNING:
TILBEREDNINGSTID: 15min
INGREDIENSER:
- 2 kopper / 460g mel
- 1 teskje salt
- 1 teskje / 3g bakepulver
- 170 g sukker
- 2 egg
- 1 og 1/2 kopp / 345 ml lunken melk
- 80 g smør
- 1 teskje vanlijeekstrakt
- 140 g kokesjokolade
- 60 g kakaopulver
- 6 g kanel
TILBEREDNING:
Sett sjokoladen og smører i en bolle som tåler mikrobølgeovn og varm ved maksimal styrke i 30 sekunder. Bland til sjokoladen og smøret er helt smeltet og blandingen er glatt. La avkjøle litt. Bland eggene, melken og vaniljen med en visp i en stor bolle og bland dette godt inn i smøret og sjokoladen. Sikt mel, sukker, kakaopulver, kanel, bakepulver og salt sammen i en romslig bolle. Tilsett melblandingen og de andre ingrediensene i eggene og bland alt med en visp til blandingen er glatt nok. Forvarm platene for vafler.
Når meldingen ready dukker opp på displayet smører du platene eller bruker en smørespray, og heller deretter et mål røre i hver av formene i platen, bruk om nødvendig også en teskje, spre røren utover med en spatel. Stek vaflene til de er gylne og sprø. Fortsett til du har brukt opp røren. Server umiddelbart.
Pomembna opozorila
Varnostna opozorila

Nevarnost!
natural_image
Line drawing of a toaster oven with two dish holders on a grater (no text or symbols)natural_image
Line drawing of hands operating a mechanical device with an arrow indicating direction (no text or symbols)Oprijemalo potisnite nazaj in zgornjo ploščo do konca obrnite ter položite v ravni položaj (slika 5).
natural_image
Line drawing of a hand gripping a mechanical component with a curved arrow indicating rotation (no text or symbols)natural_image
Line drawing of a grating machine with multiple food items on top (no text or symbols)natural_image
Line drawing of a portable electric stove with control panel and grating (no text or symbols)natural_image
Line drawing of a hand pressing down on a grating with a rotating arrow indicating rotation (no text or symbols)- Zavrtite gumb za nastavitev višine (6) na (slika-B).
natural_image
Line drawing of a hand pressing down on a portable stove burner with a black arrow indicating rotation (no text or symbols)- Zgornja plošča se blokira v tem položaju. Na voljo so 4 nastavitve višine.
natural_image
Line drawing of a computer case with an arrow indicating rotation or movement (no text or symbols)KLASIČNI VAFLJI (OBLATE)
ODMERKI ZA: 8 oblat
PRIPRAVA: 10 minut
ČAS PEKE: 10 minut
SESTAVINE:
- moka 2 skodelici / 460 g
- 1 žlička soli
- kvas 4 žličke / 10 g
- 2 žlički belega sladkorja / 30 g
- 2 jajci
- 1 in 1/2 skodelice mlačnega mleka / 345 ml
- stopljeno maslo 75 g
- 1 žlička vaniljinega izvlečka
PRIPRAVA:
V večji skledi premešamo moko, sol, kvas in sladkor ter odstavimo. V drugi skledi stepemo jajca, dodamo mleko, maslo in vanilin. Moko in ostale sestavine vsujem v skledo z mlekom in jajci ter premešamo z metlico. Segrejemo ploščo za oblate. Ko se na zaslonu pojavi napis READY, ploščo namažemo z maslom ali obrizgamo s pršilom proti oprijemanju, nato v vsak model plošče vlijemo po eno merico, pri tem si pomagamo z žlico; maso razprostremo z lopatico. Oblate pečemo dokler niso lepo zapečeni ter hrustljavi (5 minut). Nadaljujemo, dokler ne porabimo vse mase. Postrežemo takoj.
BELGIJSKI OBLATI
ODMERKI ZA: 10-12 oblat
PRIPRAVA: 15 minut
ČAS PEKE: 15 minut
SESTAVINE:
- 2 skodelici moke za torte / 460 g
- 1/2 žličke soli
- 2 žlički kvasa / 5 g
- 2 žlički belega sladkorja / 30 g
- 4 jajca
- 2 skodelici mlačnega mleka / 460 g
- stopljeno maslo 70 g
- 1/2 žličke vaniljinega izvlečka
PRIPRAVA:
V večji skledi premešamo moko, sol in kvas ter odstavimo. V drugi skledi stepemo rumenjake in sladkor, da dobimo penasto kremo.
LAITTEEN KYPSENNYSASENNOT
natural_image
Line drawing of a portable electric stove with two dish holders on top (no text or symbols)natural_image
Line drawing of hands operating a mechanical device with an arrow indicating direction (no text or symbols)natural_image
Line drawing of a mechanical component with a hand adjusting a curved arrow (no text or symbols)natural_image
Line drawing of a grating machine with multiple food items on top (no text or symbols)natural_image
Line drawing of a kitchen appliance with grating and control panel (no text or symbols)natural_image
Line drawing of a hand pressing down on a flat-screen grater with a rotating arrow indicating rotation (no text or symbols)natural_image
Line drawing of a hand pressing down on a portable grating with a curved arrow indicating rotation (no text or symbols)natural_image
Line drawing of a computer monitor with an arrow indicating rotation or change (no text or symbols)KYPSENNYSAIKA: 15min
AINESOSAT:
KYPSENNYSAIKA: 15min
AINESOSAT:
natural_image
Line drawing of a portable electric stove with two evaporators on top (no text or symbols)natural_image
Line drawing of a hand adjusting a mechanical component with an arrow indicating motion (no text or symbols)natural_image
Line drawing of a hand operating a mechanical lever with a curved arrow indicating rotation (no text or symbols)natural_image
Line drawing of a microwave oven with grating and side monitors (no text or symbols)natural_image
Line drawing of a kitchen appliance with grating and control panel (no text or symbols)natural_image
Line drawing of a hand pressing down on a grating with a curved arrow indicating rotation (no text or symbols)natural_image
Line drawing of a hand pressing down on a portable appliance with a curved arrow indicating rotation (no text or symbols)natural_image
Line drawing of a grater with an arrow indicating rotation or movement (no text or symbols)
natural_image
Line drawing of a microwave oven setup with two dish holders on a grater (no text or symbols)natural_image
Line drawing of a mechanical component with an arrow indicating direction (no text or symbols)natural_image
Line drawing of a mechanical component with a hand adjusting a lever, showing a curved arrow indicating rotation (no text or symbols present)natural_image
Line drawing of a grating machine with multiple food items on top (no text or symbols)natural_image
Line drawing of a kitchen appliance with a grater and control panel (no text or symbols)natural_image
Line drawing of a hand pressing down on a grater with a curved arrow indicating rotation (no text or symbols)natural_image
Line drawing of a hand pressing down on a portable stove burner with a curved arrow indicating rotation (no text or symbols)natural_image
Line drawing of a grater with an arrow indicating rotation or movement (no text or symbols)HOVĚZÍ SVÍČKOVÁ S HOUBOVOU OMÁČKOU SUROVINY:
JEHNĚČÍ KOTLETKY S BALZAMIKOVÝM OCTEM A ROZMARÝNEM
SUROVINY:
VAFLE S ČOKOLÁDOU A SKOŘICÍ
DÁVKA NA: 8-10 vaflí
PŘÍPRAVA: 10 minut
DOBA PEČENÍ: 15 minut
SUROVINY:
natural_image
Line drawing of a toaster oven with two mounted egg dishes on a grater (no text or symbols)natural_image
Line drawing of a mechanical assembly with an arrow indicating direction (no text or symbols present)natural_image
Line drawing of a mechanical lever mechanism with a hand adjusting the pivot (no text or symbols)natural_image
Line drawing of a grating machine with multiple food items on top (no text or symbols)natural_image
Line drawing of a kitchen appliance with grating and control panel (no text or symbols)natural_image
Line drawing of a hand pressing down on a grating with a rotating arrow indicating rotation (no text or symbols)natural_image
Line drawing of a hand pressing down on a portable stove burner with a curved arrow indicating rotation (no text or symbols)natural_image
Line drawing of a computer monitor with an arrow indicating rotation or change (no text or symbols)LOSOS NA GRILE S JOGURTOVOU OMÁČKOU SUROVINY:
IBA AK MÁTE K DISPOZÍCII SÚPRAVU PLATNÍ NA OBLÁTKY
WAFFLE (OBLÁTKY) KLASICKÉ
DÁVKA NA: 8 oblátok
PRÍPRAVA: 10 min
DOBA PEČENIA: 10 min
SUROVINY:
- múka 2 šálky/ 460 g
- sol'1 lyžička
- prášok do pečiva 4 lyžičky/ 10 g
- biely cukor 2 lyžice/ 30 g
- vajíčka 2
- vlažné mlieko 1 a 1/2 šálky / 345 ml
- roztopené maslo 75 g
- vanilkový extrakt 1 lyžička
PRÍPRAVA:
Vo väčšej miske zmiešajte múku, sol', prášok do pečiva a cukor a odložte. V druhej miske vyšlahajte vajíčka, prilejte mlieko, pridajte maslo a vanilku. Vsypte múku a ostatné suroviny do misky s mliekom a vajíčkami a premiešajte metličkou. Zahrejte platne. Ked' sa na displeji zobrazí nápis ready, namažte platnu maslom alebo ju postriekajte sprejom na pečenie, potom vlejte do každej formičky odmerku cesta, podla potreby si pomôžte lyžicou. Lopatkou roztiahnite na celý povrch. Upečte oblátky, aby boli zlatisté a chrumkavé (5 min). Pokračujte, kým neminiete všetko cesto. Podávajte ihned' po príprave.
BELGICKÉ OBLÁTKY
natural_image
Line drawing of a microwave oven setup with two dishwashers on a grating base (no text or symbols)natural_image
Line drawing of a mechanical component with an arrow indicating direction (no text or symbols)natural_image
Line drawing of a mechanical lever mechanism with a hand adjusting the pivot point (no text or symbols present)natural_image
Line drawing of a grating machine with four round food items on top (no text or symbols)natural_image
Line drawing of a microwave oven with grating and control panel (no text or symbols)natural_image
Line drawing of a hand pressing down on a grating with a side panel, showing a circular arrow indicating rotation (no text or symbols)natural_image
Line drawing of a hand pressing down on a portable stove burner with a curved arrow indicating rotation (no text or symbols)natural_image
Line drawing of a computer monitor with an arrow indicating rotation or change (no text or symbols)natural_image
Line drawing of a portable stove with two dish holders on top (no text or symbols)natural_image
Line drawing of a mechanical component with an arrow indicating direction (no text or symbols)natural_image
Line drawing of a mechanical lever mechanism with a hand adjusting the pivot point (no text or symbols present)natural_image
Line drawing of a grating machine with three food items on top (no text or symbols)natural_image
Line drawing of a kitchen appliance with grating and control panel (no text or symbols)natural_image
Line drawing of a hand pressing down on a grating with a rotating arrow indicating rotation (no text or symbols)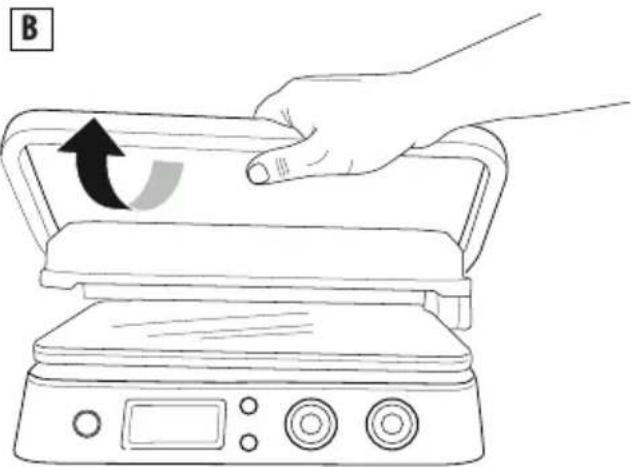
natural_image
Line drawing of a hand pressing down on a portable kitchen grater with a curved arrow indicating rotation (no text or symbols)natural_image
Line drawing of a computer monitor with an arrow indicating rotation or change (no text or symbols)KLASİK WAFFLE (KAĞIT HELVA)
PORSIYON: 8 waffle
natural_image
Line drawing of a portable electric stove with two dish holders on top (no text or symbols)natural_image
Line drawing of a mechanical assembly with a hand adjusting a component, showing an upward arrow (no text or symbols)natural_image
Line drawing of a mechanical lever mechanism with a hand adjusting the pivot point (no text or symbols)natural_image
Line drawing of a grating machine with food items on top (no text or symbols)natural_image
Line drawing of a grater with control panel and side-mounted dish (no text or symbols)natural_image
Line drawing of a hand pressing down on a grating with a rotating arrow indicating rotation (no text or symbols)natural_image
Line drawing of a hand pressing down on a portable appliance with a curved arrow indicating rotation (no text or symbols)natural_image
Line drawing of a computer monitor with an arrow indicating rotation (no text or symbols)natural_image
Line drawing of a portable electric stove with two dish holders on top (no text or symbols)natural_image
Line drawing of a mechanical component with an arrow indicating direction (no text or symbols)natural_image
Line drawing of a mechanical lever mechanism with a hand adjusting the pivot point (no text or symbols present)natural_image
Line drawing of a grating machine with multiple food items on top (no text or symbols)natural_image
Line drawing of a kitchen appliance with a grater and control panel (no text or symbols)natural_image
Line drawing of a hand pressing down on a grating with a rotating arrow indicating rotation (no text or symbols)natural_image
Line drawing of a hand pressing down on a portable stove burner with a curved arrow indicating rotation (no text or symbols)natural_image
Line drawing of a laptop with an arrow indicating rotation or change (no text or symbols)natural_image
Line drawing of a portable food heater with two dish containers on a grating (no text or symbols)natural_image
Line drawing of a mechanical assembly with a hand adjusting a lever, showing an upward arrow (no text or symbols present)natural_image
Line drawing of a hand gripping a mechanical component with a curved arrow indicating rotation (no text or symbols)natural_image
Line drawing of a grating machine with multiple food items on top (no text or symbols)natural_image
Line drawing of a kitchen appliance with grating and control knobs (no text or symbols)natural_image
Line drawing of a hand pressing down on a grater with a curved arrow indicating rotation (no text or symbols)natural_image
Line drawing of a hand pressing down on a portable stove burner with a curved arrow indicating rotation (no text or symbols)natural_image
Line drawing of a device with an arrow indicating rotation or movement (no text or symbols)C
natural_image
Line drawing of a portable electric stove with two evaporating dishes on a grater (no text or symbols)natural_image
Line drawing of a mechanical component with an arrow indicating direction (no text or symbols)natural_image
Line drawing of a mechanical lever mechanism with a hand adjusting the pivot point (no text or symbols present)natural_image
Line drawing of a grating machine with six round food items on top (no text or symbols)natural_image
Line drawing of a microwave oven with control panel and grating (no text or symbols)natural_image
Line drawing of a hand pressing down on a grater with a curved arrow indicating rotation (no text or symbols)natural_image
Line drawing of a hand pressing down on a portable stove burner with a curved arrow indicating rotation (no text or symbols)natural_image
Line drawing of a computer monitor with an arrow indicating the right-hand side (no text or symbols present)

- Sicherheitshinweise
- Gefahr!
- Important!
- Danger of burns!!
- Please note:
- Disposing of the appliance
- DESCRIPTION
- USING FOR THE FIRST TIME
- Inserting the cooking plates
- To remove the plates
- Positioning the grease tray
- COOKING POSITIONS
- Contact grill (closed position)
- Open Grill
- Oven Grill
- USE
- Operation
- Timer function
- Sear function
- Waffle mode (only if you have accessory waffle plates)
- CLEANING AND MAINTENANCE
- User maintenance
- Cleaning and care
- TECHNICAL CHARACTERISTICS
- RECIPES
- EGG SCRAMBLE, BACON AND TOAST INGREDIENTS:
- PREPARATION:
- CROUTONS AND EGGPLANT CREAM INGREDIENTS:
- MEAT, ARUGULA AND CHERRY TOMATO SALAD INGREDIENTS:
- COFFEE FLAVOURED RIB STEAKS INGREDIENTS:
- FOR THE COFFEE MIXTURE:
- BEEF FILLET WITH MUSHROOM SAUCE
- INGREDIENTS:
- INGREDIENTS FOR THE MUSHROOM SAUCE:
- HAMBURGER WITH TOASTED RYE BREAD
- LAMB CUTLETS WITH BALSAM VINEGAR AND
- ROSEMARY
- CHICKEN KEBABS WITH HONEY AND LIME CREAM INGREDIENTS:
- INGREDIENTS FOR THE MARINADE:
- INGREDIENTS FOR THE HONEY AND LIME CREAM:
- PROVENCE STYLE CHICKEN LEGS INGREDIENTS:
- GRILLED PRAWNS
- GRILLED SALMON WITH YOGHURT SAUCE
- INGREDIENTS FOR THE SAUCE:
- GRILLED SQUID
- BANANA PANCAKES
- GRILLED PINEAPPLE WITH ICE-CREAM INGREDIENTS:
- ONLY IF YOU HAVE ACCESSORY WAFFLE PLATES
- CLASSIC WAFFLES
- BELGIAN WAFFLES
- CHOCOLATE AND CINNAMON WAFFLES
- CÔTELETTES D'AGNEAU AU VINAIGRE BALSAMIQUE ET AU ROMARIN
- INGRÉDIENTS :
- Para remover as placas
- UTILIZZO
- Funzionamento
- SOLO SE IN POSSESSO DELL'ACCESSORIO SET PIASTRE WAFFEL
- WAFFLE (CIALDE) CLASSICHE
- CHOCOLADE- EN KANEELWAFELS
- INGREDIËNTEN:
- BEREIDING:
- GRILLET LAKS MED YOGHURTSALSA
- INGREDIENSER:
- APPARATETS STEKEPOSISJONER
- TILBEREDNING:
- Pomembna opozorila
- Varnostna opozorila
- Nevarnost!
- KLASIČNI VAFLJI (OBLATE)
- SESTAVINE:
- PRIPRAVA:
- BELGIJSKI OBLATI
- LAITTEEN KYPSENNYSASENNOT
- AINESOSAT:
- HOVĚZÍ SVÍČKOVÁ S HOUBOVOU OMÁČKOU SUROVINY:
- JEHNĚČÍ KOTLETKY S BALZAMIKOVÝM OCTEM A ROZMARÝNEM
- SUROVINY:
- VAFLE S ČOKOLÁDOU A SKOŘICÍ
- LOSOS NA GRILE S JOGURTOVOU OMÁČKOU SUROVINY:
- IBA AK MÁTE K DISPOZÍCII SÚPRAVU PLATNÍ NA OBLÁTKY
- WAFFLE (OBLÁTKY) KLASICKÉ
- PRÍPRAVA:
- BELGICKÉ OBLÁTKY
- KLASİK WAFFLE (KAĞIT HELVA)
Brand : BRAUN
Model : MultiGrill 9 CG 9040
Category : Grill plate