Veloce TC Lounge Modular - Child car seat PEG PEREGO - Free user manual and instructions
Find the device manual for free Veloce TC Lounge Modular PEG PEREGO in PDF.
| Product Type | Child car seat group 0+ (40-87 cm, up to 13 kg) |
| Brand | Peg Perego |
| Model | Veloce TC Lounge Modular |
| Seat weight | Approximately 5.5 kg (without base) |
| Dimensions (L x D x H) | Approximately 70 x 45 x 60 cm |
| Power supply | None (manual operation) |
| Safety standards | R129 (i-Size) and R129 (Belted), tested for side impacts |
| Fixing system | Isofix with i-Size base or 3-point safety belt |
| Harness | Integrated 3-point harness with shoulder pads and chest clip |
| Recline positions | 3 positions (reclining backrest usable with base) |
| Height adjustment | Headrest and harness adjustable simultaneously on 6 positions |
| Side protection | Extractable Kinetic Pods on door side, EPS shock absorbing |
| Airplane use | Approved for installation on airplane seat (without base) |
| Canopy | Removable, with zipper for extension |
| Dual Stage Cushion | Two independent cushions (headrest and seat) for newborns |
| Care | Machine washable cover at 30°C according to label, do not use solvents |
| Spare parts | Available from Peg Perego after-sales service |
| Compatible accessories | i-Size base, Peg Perego strollers and chassis |
Frequently Asked Questions - Veloce TC Lounge Modular PEG PEREGO
User questions about Veloce TC Lounge Modular PEG PEREGO
0 question about this device. Answer the ones you know or ask your own.
Ask a new question about this device
Download the instructions for your Child car seat in PDF format for free! Find your manual Veloce TC Lounge Modular - PEG PEREGO and take your electronic device back in hand. On this page are published all the documents necessary for the use of your device. Veloce TC Lounge Modular by PEG PEREGO.
USER MANUAL Veloce TC Lounge Modular PEG PEREGO
PRIMO VIAGGIO Lounge
IT Istruzioni d'uso
EN Instructions for use
FR Notice d'emploi
DE Gebrauchsanleitung
ES Instrucciones de uso
BR-PT Instruções para uso
NL Gebruiksaanwijzing
DK Brugsanvising
FI Käytöohjeet
CZ Navod na pouziti
SK Navod na použitie
HU Hasznalati utmutató
SL Navodila za uporabo
RU INHCTpyKUINI NO NOJIb3OBaHNIO
TR Kullanim kilavuzu
HR/SRB/MNE/BiH Upute za uporabu
PL Instrukcja obstug
UA IHCTpykia 3 BIKOPnctaHH
EL Odyieo xpoewo
pLsswxtLo:AR
oLaiw sLo JaoJgwo:FA
PegPerego
PRODUCT OVERVIEW

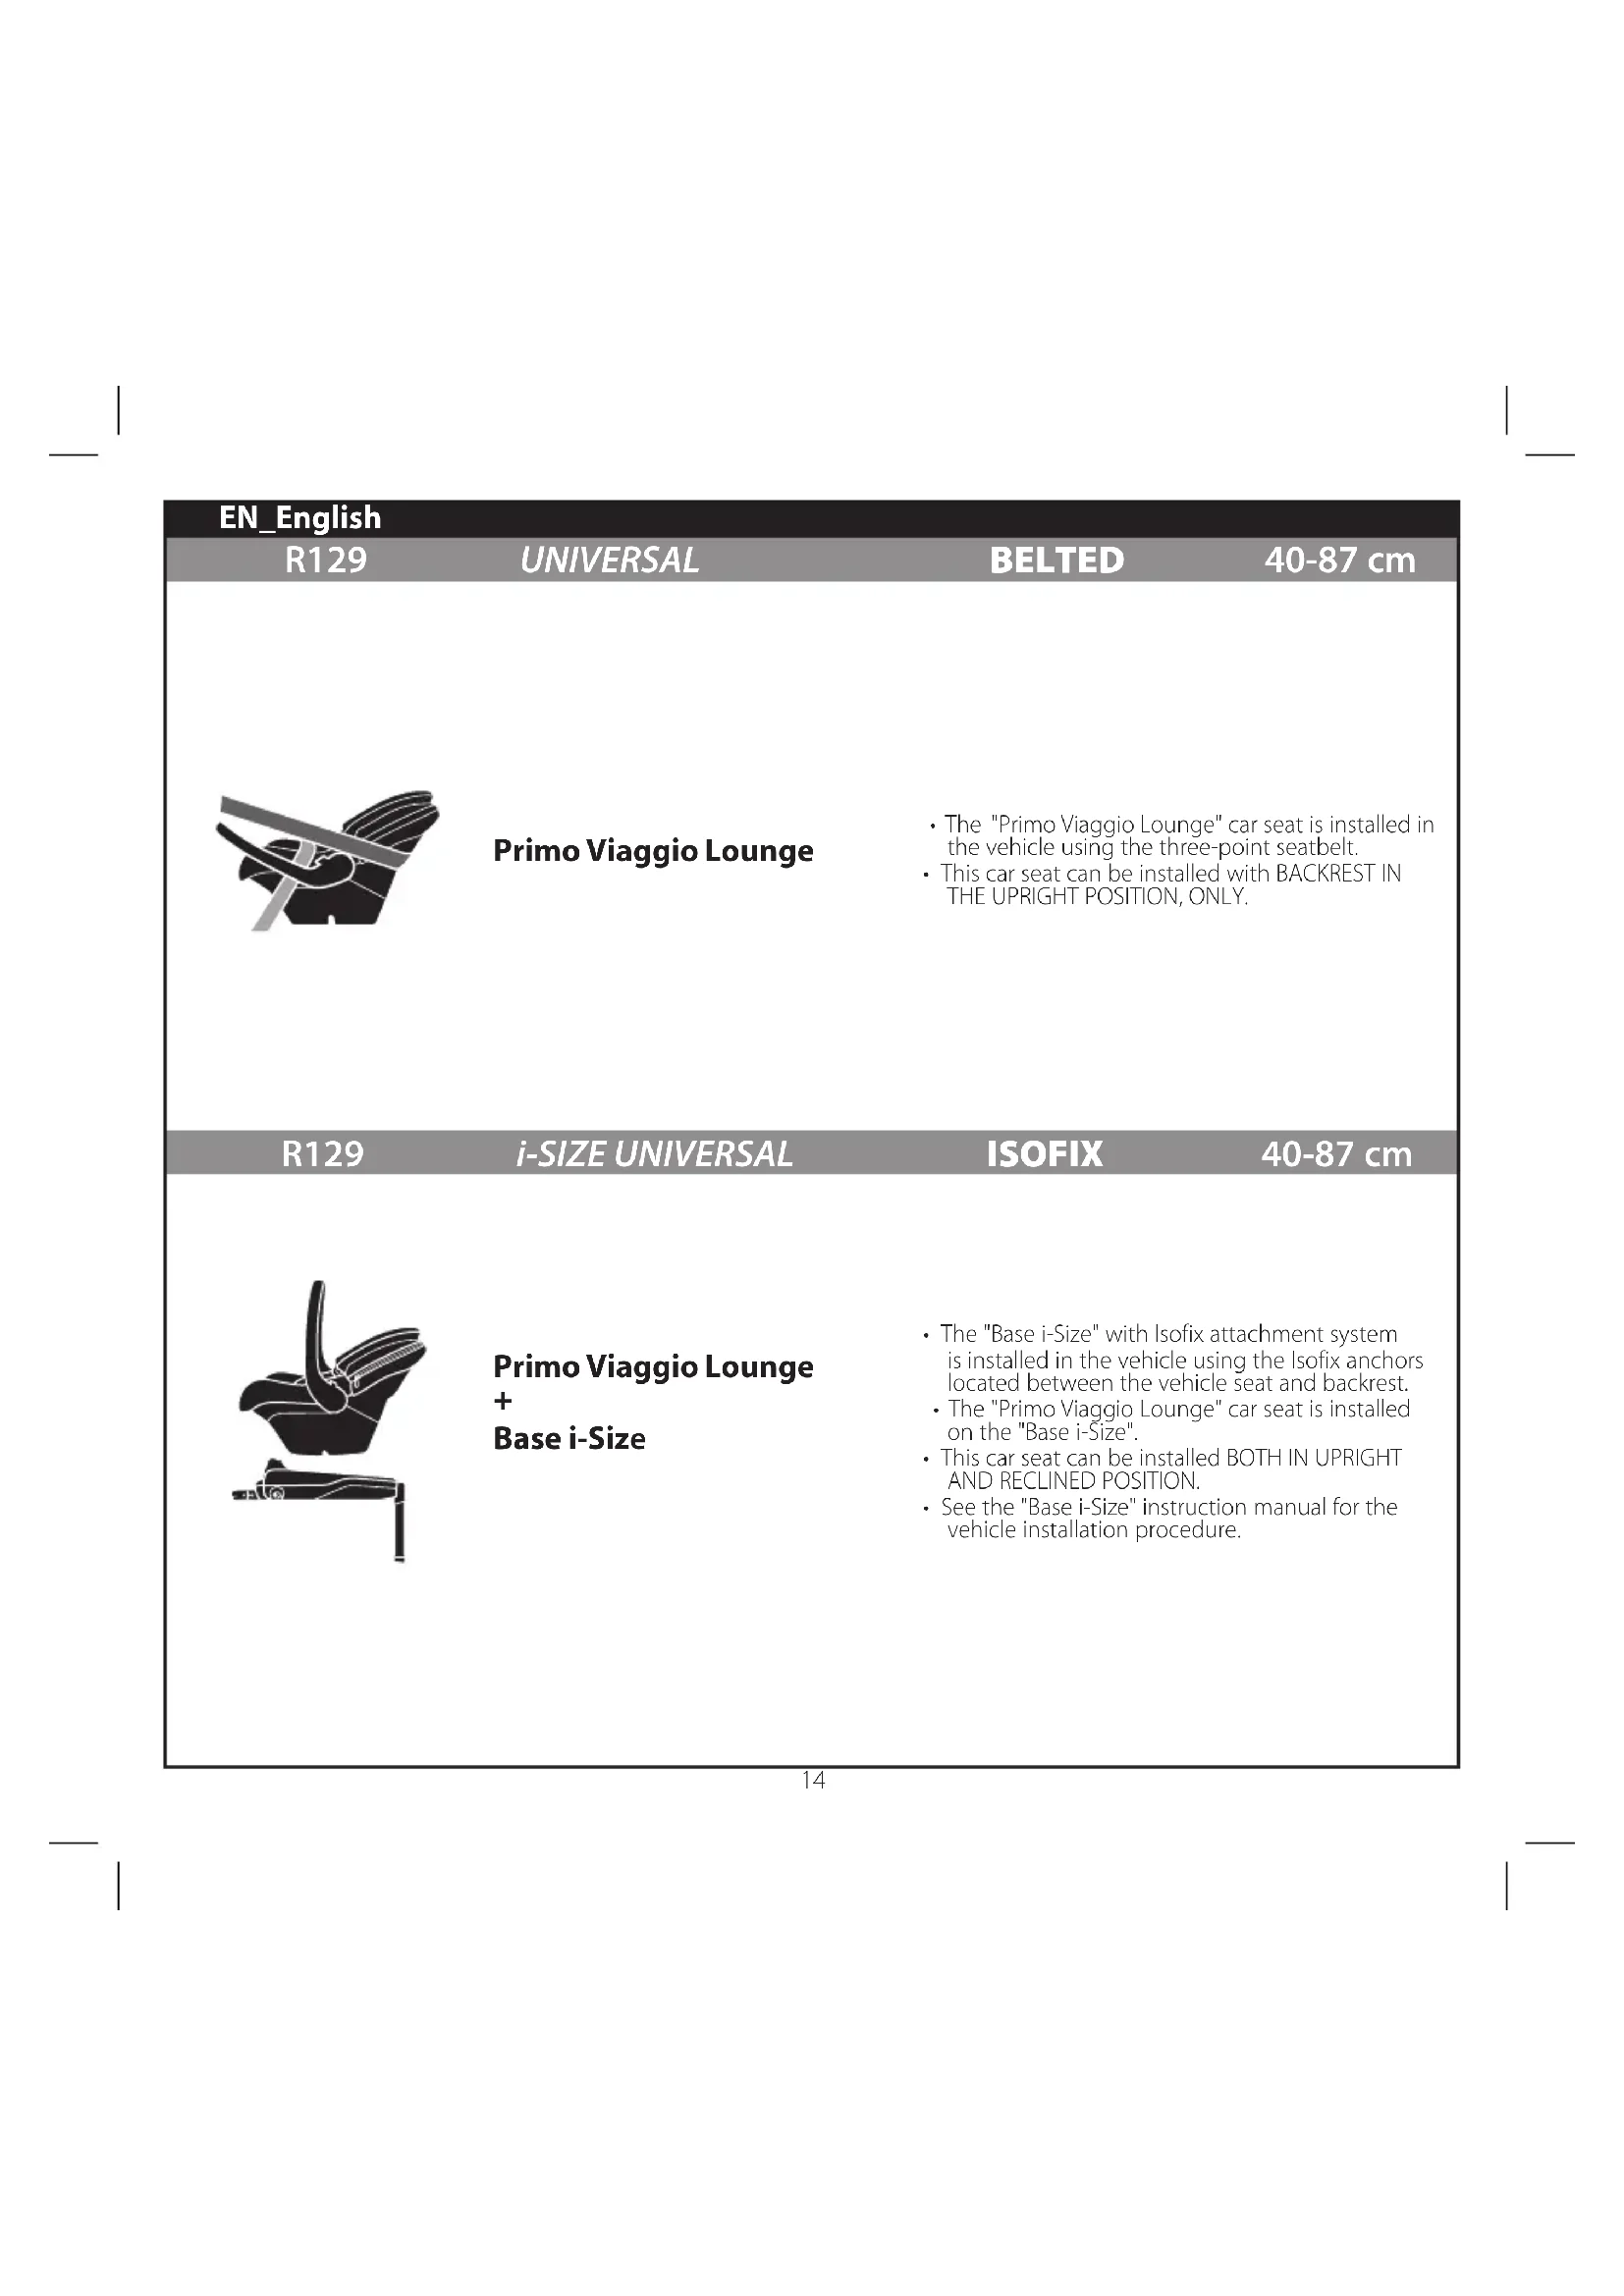
- The "Primo Viaggio Lounge" car seat is installed in the vehicle using the three-point seatbelt.
- This car seat can be installed with BACKREST IN THE UPRIGHT POSITION, ONLY.
R129
i-SIZE UNIVERSAL
ISOFIX
40-87 cm

-
Base i-Size
-
The "Base i-Size" with Isofix attachment system is installed in the vehicle using the Isofix anchors located between the vehicle seat and backrest.
- The "Primo Viaggio Lounge" car seat is installed on the "Base i-Size".
- This car seat can be installed BOTH IN UPRIGHT AND RECLINED POSITION.
- See the "Base i-Size" instruction manual for the vehicle installation procedure.
Thank you for choosing a Peg Perego product.
Product characteristics
- Suitable for children between 40 and 87~cm with a maximum weight of 13~kg .
- This is an Enhanced Infant Carrier Module to be used with an i-Size base approved in accordance with UN Regulation No. 129. Suitable for seats compatible with i-Size, as indicated by the car manufacturer in the use and maintenance booklet.
- Do not fit this car seat onto passenger seats which have active airbags. Deactivate the airbag before fitting the car seat. Using this car seat on seats with active airbags may cause serious injury or death in the event of an accident.
- The use of the car seat for premature infants born at less than 37 weeks could cause respiration problems for the newborn. It is advisable to seek medical advice before leaving the hospital.
- The car seat can only be used in approved vehicles, fitted with static or inertia-reel three-point seatbelts, approved under regulation UN No. 16 or equivalent standards. It must not be used with two-point or lap seatbelts.
- When used with Base i-Size, this restraining system can be fitted to vehicles with positions that have been approved as ISOFIX positions (for more details, please refer to the user manual), depending on the child seat category and the structure.
- Consult the list of car models and seats equipped with ISOFIX anchor systems (see inside) that have been approved by the restraining system manufacturer.
Contact the restraining device manufacturer or retailer if you have doubts or require further information on the fitting of the Base i-Size in specific cars.
For more information, please contact the Peg Perego Assistance Department at the address assistenza@pegperegoo.com
- This car seat comes with "Adjustable Side Impact Protection": improved protection against side impacts with the "simultaneous system" for headrest-harness adjustment.
- This car seat is approved for installation in the car without the base or with the Base i-Size.
WARNING
- Read the instructions carefully before use and keep them in the holder provided for future reference. Failure to closely follow the car seat installation instructions will put your child at risk.
The assembly and installation operations must be conducted by adults.
Always use a car seat when in the car. Never remove the
child from the car seat when the vehicle is in motion.
- Never leave a child alone and unsupervised in a car, not even for a short time. The temperature inside the vehicle can change rapidly and become dangerous for the child inside.
- Install this car seat facing the direction opposite to the direction of travel.
- Install this car seat only on seats facing the direction of travel. If the vehicle has rotating or repositionable seats, position them facing the direction of travel.
- Check that the child car seat is not blocked by a moving part of the seat or a door.
- Scrupulously follow installation instructions; do not use installation methods other than those recommended because they could cause detachment of the car seat.
Always use the harness when using this car seat.
- Adjust the height and tension of the shoulder straps ensuring that they are snug to the child's body without constricting him/her too much. Check that the harness is not twisted and that the child does not release it.
- To avoid the risk of falling, always use the car seat harness even for transport outside the vehicle.
- The car seat is not a substitute for a cot; if the child needs to sleep it is important to lie him/her down.
- Do not use the child car seat if it is broken or if there are missing parts, or if it has been subjected to heavy impacts as a result of accidents, as it may have suffered structural damage which is not visible but is extremely hazardous.
- Do not use the car seat without its fabric cover; this must not be replaced with one not approved by the manufacturer since it is an integral part of the car seat and the safety system.
- Do not remove the white polystyrene part under the cover and in the headrest as it is an integral part of the safety devices.
- Do not leave the car seat in the vehicle when exposed to the sun. Some parts might heat up and be harmful to the delicate skin of the child -check before placing the child in the seat.
- Do not modify the product.
- Do not remove the adhesive and stitched labels since this might make the product non compliant with legal requirements.
- For any repairs, replacement parts and information about the product, contact the after-sales assistance service. Contact information is provided on the last page of this manual.
- Do not use accessories not approved by the manufacturer or by the competent authorities.
- If using a second-hand product, make sure it is a recent model, comes with instructions, and is fully functional
in all parts. An obsolete product may not conform to safety standards, due to natural ageing of materials and updating of regulations. If you have any doubts, contact the manufacturer's customer service centre.
- Make sure there are no items of luggage or other unsecured items in the vehicle interior. They could injure the vehicle's occupants in the event of an accident.
- This product requires only minimal cleaning and maintenance. These operations must be performed by adults.
It is advisable to keep all the moving parts clean. - Clean plastic parts periodically with a damp cloth. Do not use solvents or similar substances.
- Do not clean the polystyrene shock absorbing device with solvents or other similar products.
- Brush fabric parts to remove dust. If you wash fabric parts, follow the washing instructions on the laundry label.
- Protect the product from atmospheric agents: humidity, rain or snow. Extended exposure to sunshine can cause colour changes in many materials.
- Store the product in a dry environment.
WARNING: FOR USE AS A RECLINED CRADLE.
- Do not use the reclined cradle once your child can sit unaided.
- This reclined cradle is not intended for prolonged periods of sleeping.
- It is dangerous to use this reclined cradle on an elevated surface, e.g. a table.
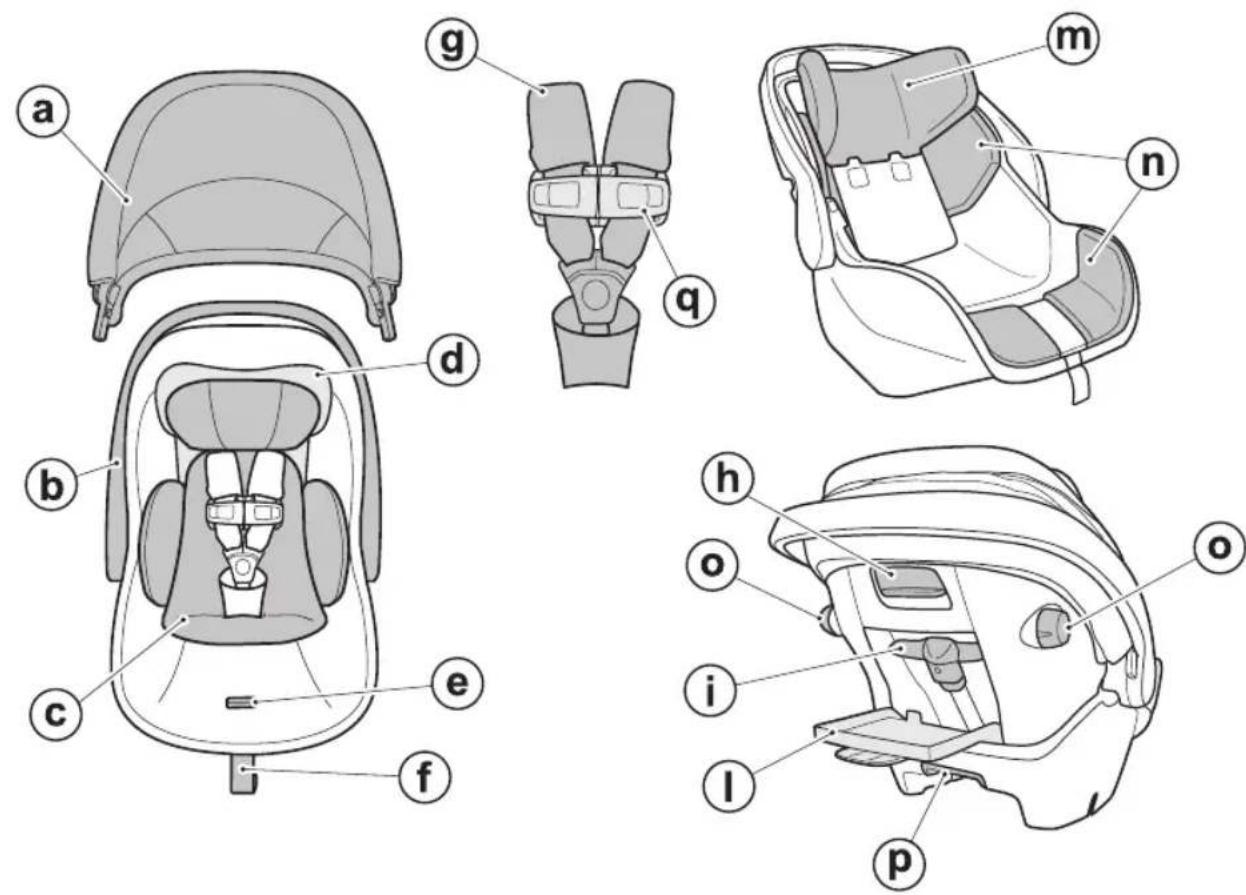
Components of the Product
Inspect the content of the package and contact Customer Care if any items are missing.
The child car seat includes:
a) Hood
b) Handlebar
c) Dual Stage Cushion
d) Headrest
e) Harness tension release button
f) Harness tension adjustment strap
g) 3-point safety harness with shoulder straps
h) Reclining lever
i) Headrest height adjustment button
I) Instruction manual compartment
m) Headrest lined with shock-absorbing expanded polystyrene (EPS)
n) Shock-absorbing expanded polystyrene (EPS) inserts
o) Kinetic Pods: side protections.
p) Lever for release from base
q) Chest Clip
The car seat is ready for use: no assembly required.
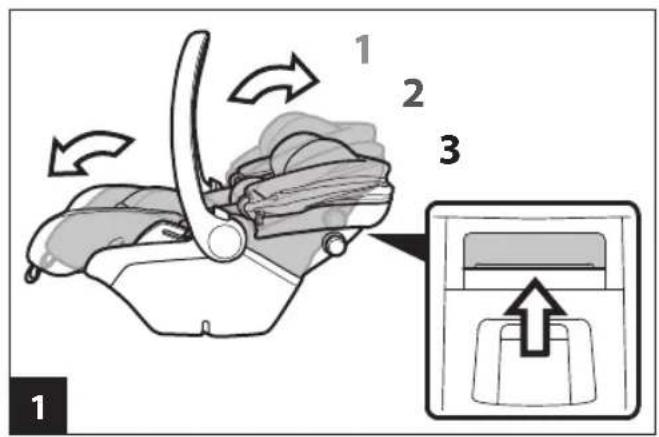
How to install the car seat with the base
Primo Viaggio Lounge features the Ganciomatic System for connection and release in the car with the Base i-Size.
When used with Base i-Size, you can use Primo Viaggio Lounge with a reclined backrest.
1 To recline the backrest in the 3 positions available, use the handlebar on the upper end of the backrest.
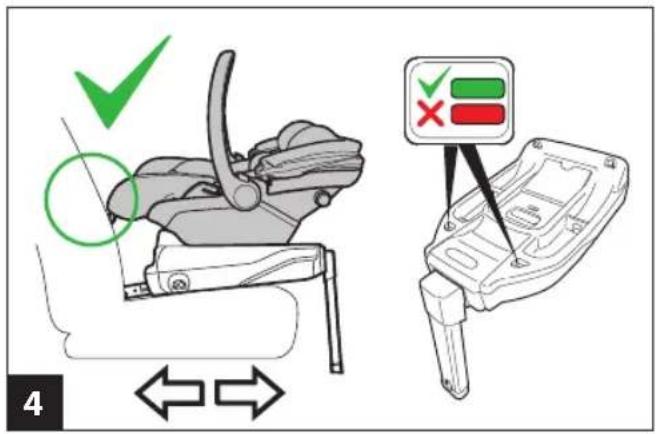
2 Attach the car seat to Base I-Size. Release the car seat by pulling the lever on the lower end of the backrest while lifting the car seat.
3 Adjust the base so that the car seat is neither distant from the vehicle seat's backrest nor against it preventing its correct attachment (as shown in the figure).
4 Pull the handlebar on the base and push it or move it away from the vehicle seat's backrest.
You can check whether the car seat is attached correctly to the base through the red and green indicators at the back of the base.
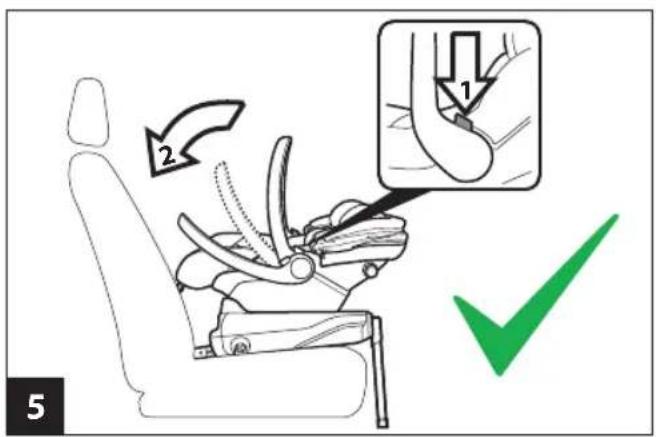
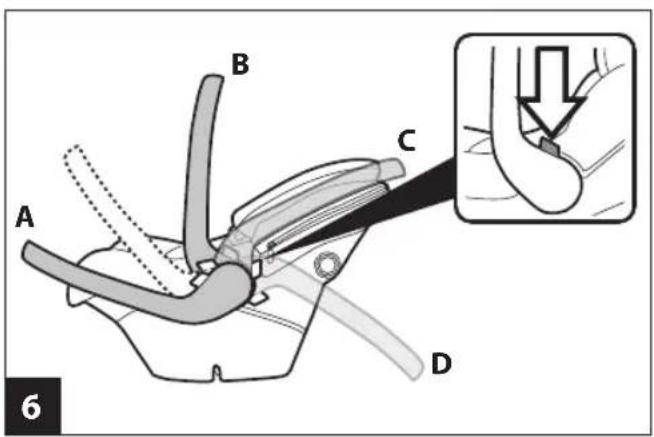
5 Press the two buttons on the handlebar, rotate it and position it in the direction of the vehicle seat. Installation is now complete.
6 The car seat handlebar has four fixed positions. To rotate it, press the two buttons on the handlebar and move this to the required angle. Ensure it clicks into position.
Position A: the in-vehicle position;
- Position B: the position for transport by hand and for installation on a base, stroller or chassis;
Position C: this is the resting position;
Position D: stops the car seat from rocking.
How to install the car seat without the base
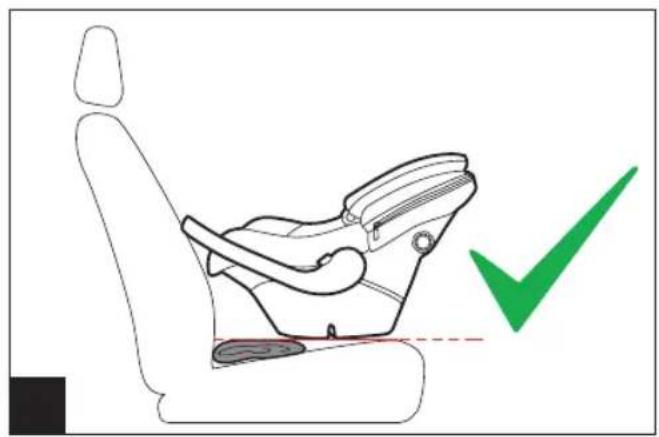
When used without Base i-Size, you can install Primo Viaggio Lounge with the BACKREST IN THE UPRIGHT POSITION, ONLY.
7 If the backrest is reclined, use the handlebar on the upper end of the backrest to bring it to the upright position.
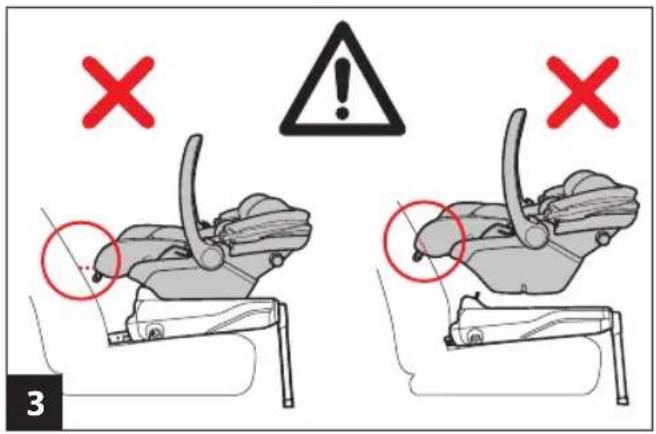
IMPORTANT! The car seat must be parallel to the ground. If necessary, you can place rolled-up towels or swimming pool float tubes in the folds of the vehicle's seats, as shown in the figure.
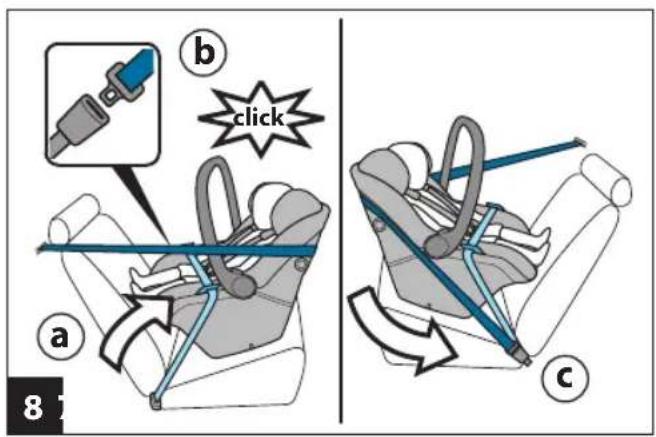
Fit the car seat with the child seated inside, remembering to secure the child with the harness.
8 Slide the lower part of the vehicle seatbelt into the two guides on the car seat (fig_a) and buckle it (fig_b), ensuring the seatbelt is taut, as shown in the figure.
Grasp the upper part of the vehicle seatbelt and pass it behind the car seat backrest (fig_c).
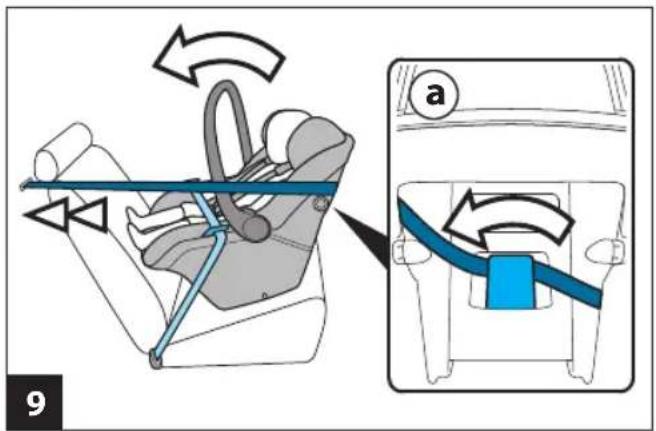
9 Insert the belt into the rear guide (fig_a). Tighten the vehicle seat belt. Turn the handlebar against the vehicle seat. For the handlebar functions, refer to fig 6 in this manual.
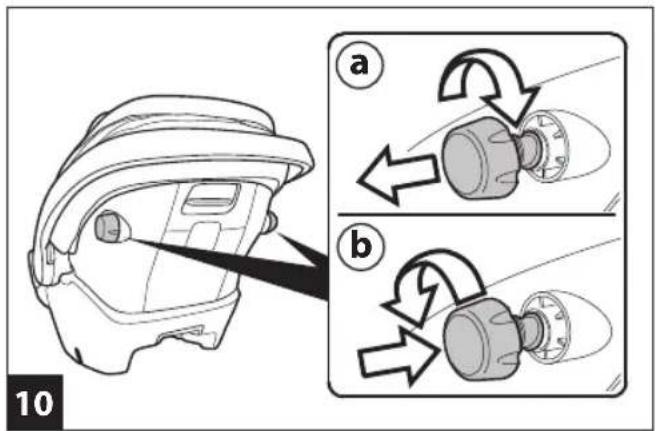
10 The seat is fitted with Kinetic Pods, to ensure greater safety in the event of a side impact. Once you have positioned the seat in the car, pull out COMPLETELY the Kinetic Pod situated on the side FACING THE CAR DOOR by turning it clockwise (fig_a). To return the Pod to its initial position, rotate it counter-clockwise (fig_b). IMPORTANT: Make sure the Kinetic Pod situated on the side facing the inside of the car is never pulled out. Installation is now complete.
How to use the car seat on the aircraft
This unit is certified for aircraft use.
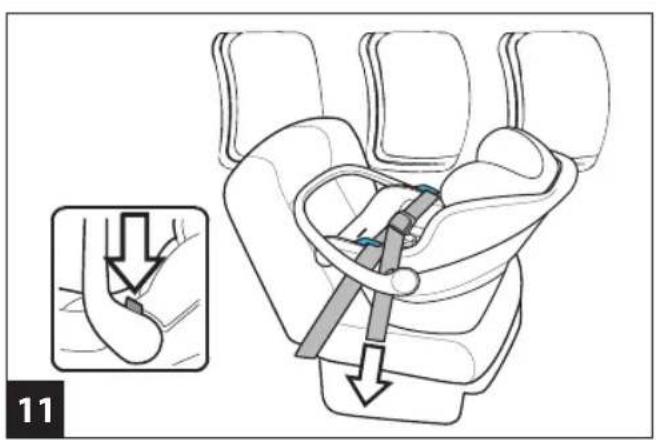
11 Position the car seat on the aircraft seat with the backrest in the most upright position.
Thread the lap belt through the slots in the shell and lock the latch plate into the buckle.
Pull the strap to tighten the seat belt.
Adjust the handle in the forward most position as shown.
IMPORTANT! Use only on forward facing seats. If the car seat can not be properly secured ask for flight attendant help.
IMPORTANT! Do not use the base to install the car seat on an aircraft seat.
How to strap your child
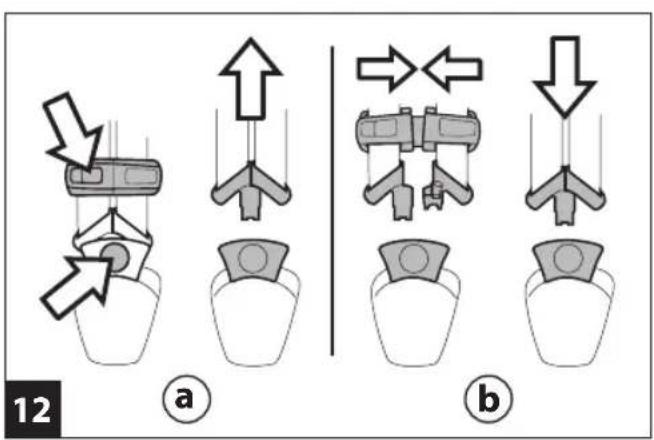
12 To release the harness, press the red button on the crotch strap buckle and open the chest clip by pressing the button (fig_a). To engage the harness, place the two shoulder strap tongues in position and insert them into the buckle of the crotch strap until they click into place (fig. b). Join the 2 parts to engage the chest clip.
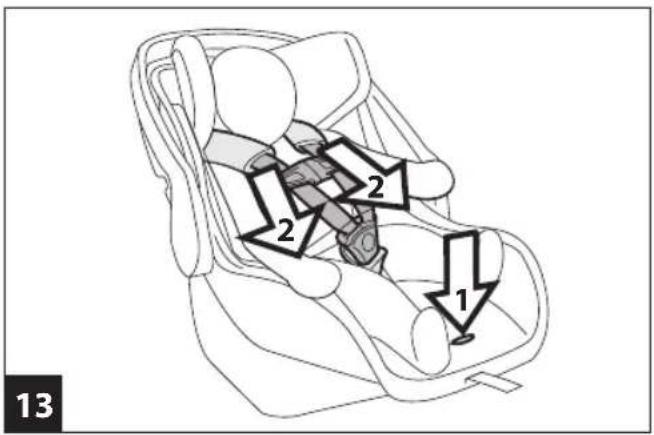
13 To slacken the harness, insert a finger through the seat opening (1), keep the metal button pressed, and with the other hand pull on the straps (2).
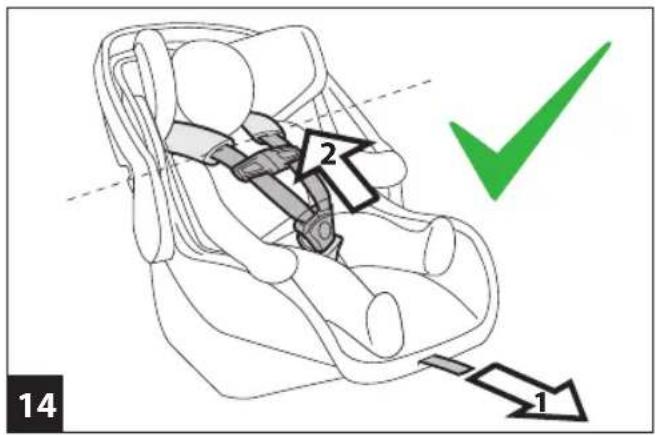
14 Tighten the straps by pulling the central adjustment strap (1) towards you, making sure that the straps are snug to the child's body in every point and that the chest clip is positioned on the child's sternum (2).
CAUTION: Do not over-tighten the straps, and ensure you leave minimum slack.
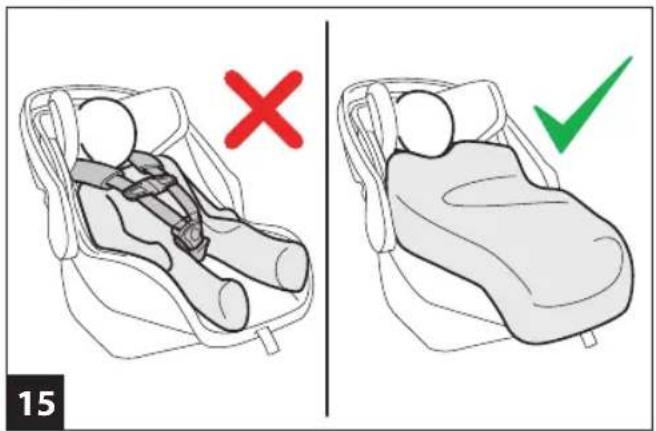
15 A IMPORTANT! In winter, make sure to never strap your child to the car seat wearing bulky clothing or placing blankets between the child's body and the harness. This could cause incorrect positioning of the safety harness, with serious consequences in the event of a collision.
Use a blanket or an approved Peg Perego accessory to protect your child from the weather.
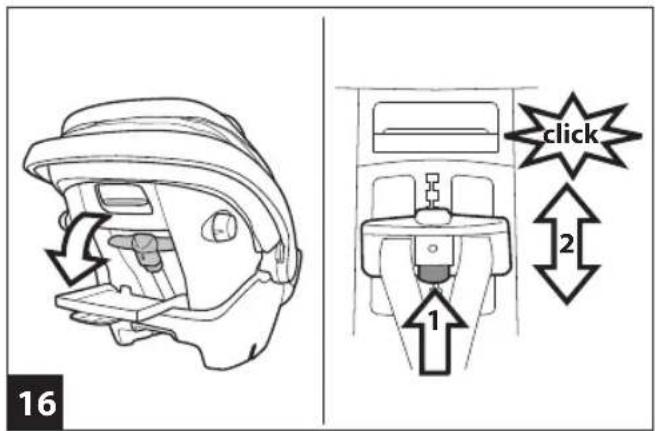
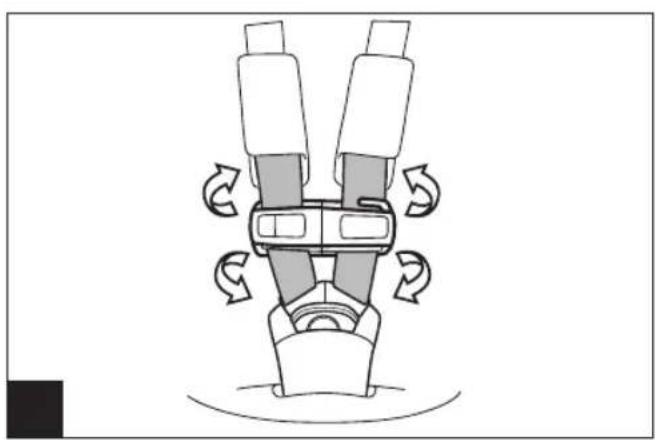
16 The harness and the headrest can be adjusted simultaneously to 6 different heights so as to follow the
growth of the child.
To adjust height, open the door to access the opening in the back of the seat, press the button on the back of the height adjuster (arrow 1) while raising or lowering the seat to the desired position, making it click into place (arrow 2). Slacken the straps before adjusting the height of the harness and headrest.
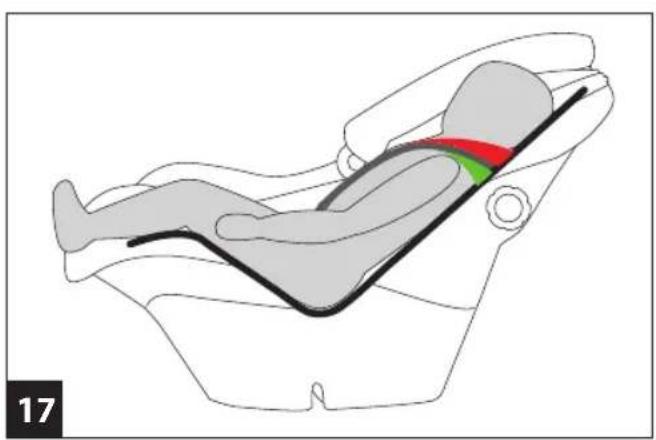
17 The safety harness is at the right height when the slots in the backrest are at shoulder height or just below (green area), as shown in the figure.
Make sure the straps are not in the red area.
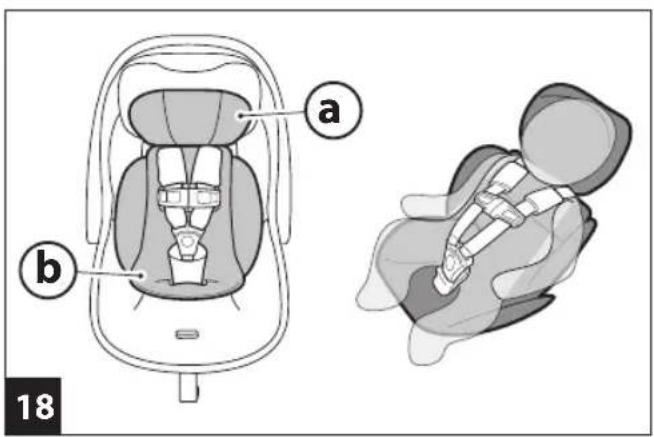
18 This car seat features the Dual Stage Cushion, a system composed of 2 separate cushions for even the smallest babies.
a: headrest reducer
b:seat reducer cushion
Do not use the headrest reducer with children weighing more than about 5kg
Do not use the Dual Stage Cushion with children weighing more than 9kg
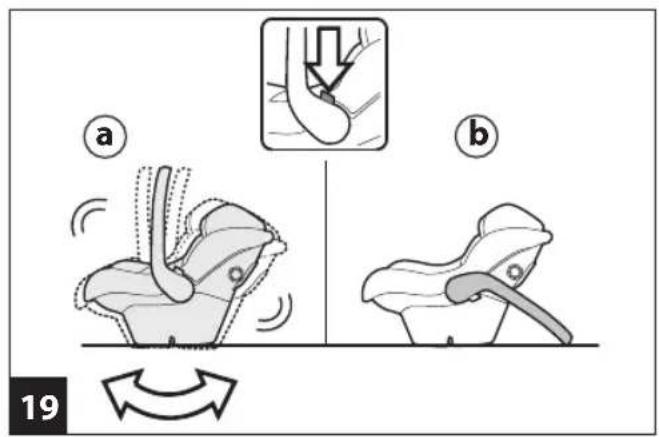
19 The special shell shape is designed to rock your child. To rock the child gently, put the handlebar in the carry position, as shown (fig_a).
To prevent oscillation and stop rocking, lock the handlebar behind the backrest (fig_b).
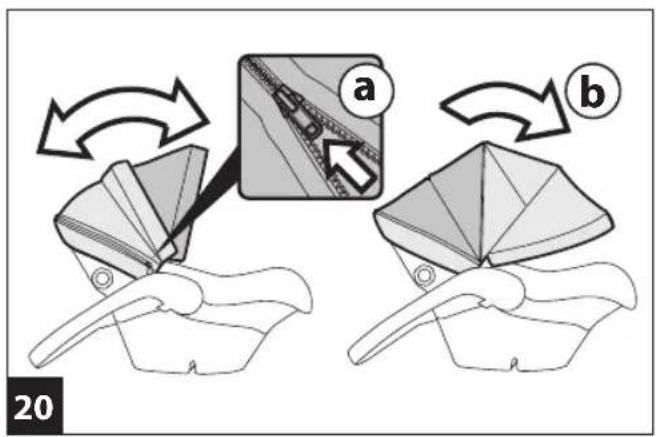
20 The hood provides your child with shade and shelter. Unzip and lower the hood to cover a greater area.
IMPORTANT: The hood must not be used to lift the car seat because it might detach.
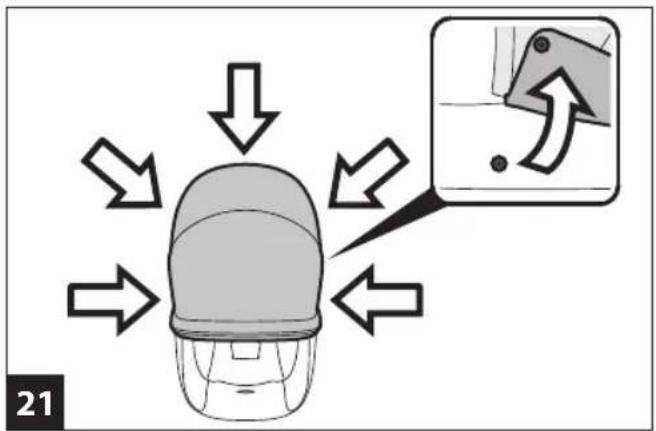
21 To remove the hood: unbutton the 5 buttons on the lower edge of the hood
22 Lift it and release it upwards.
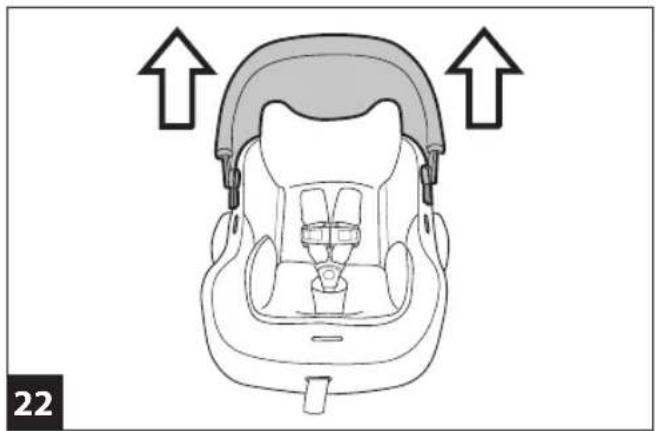
How to remove the car seat cover
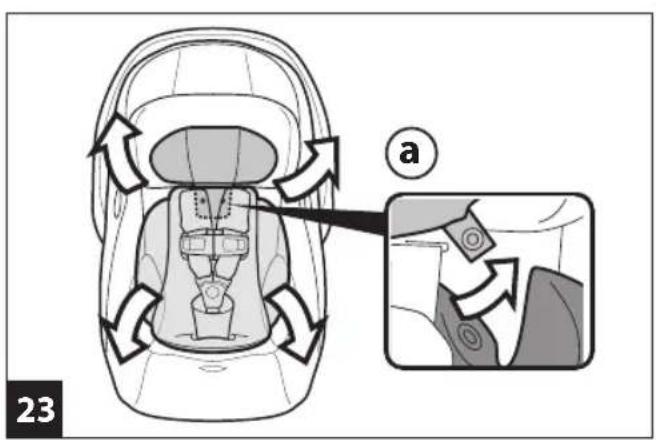
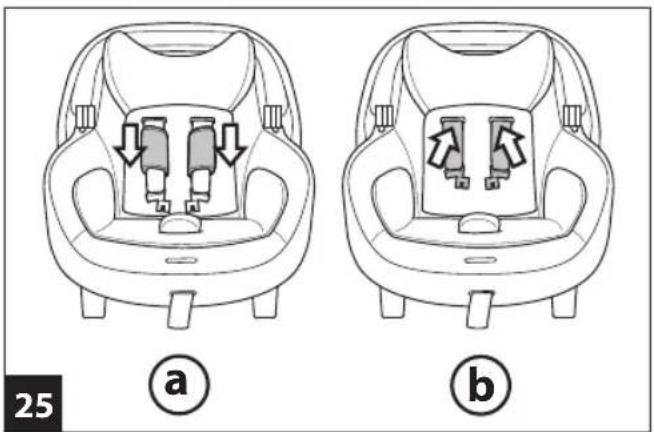
23 To remove the "Dual Stage Cushion": unbutton the two buttons (fig_a) anchoring the headrest reducer to the backrest reducer cushion and pull it off (fig_b). Unfasten the harness and chest clip and remove the reducer cushion by pulling it off from the crotch strap.
24 Remove the chest clip by pulling off the harness from the clip's 4 openings.
25 Remove the shoulder pads (fig_a); open the compartment on the back of the car seat and pull the straps out the front (fig_b).
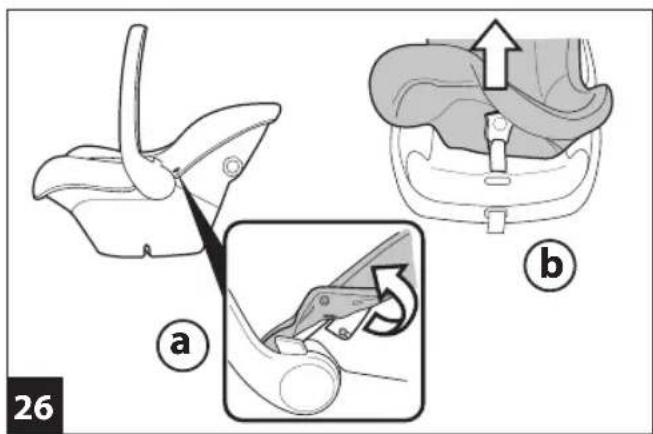
26 Remove the cover from the 2 side pins on the body of the car seat (fig_a), pull out the crotch strap (fig_b) and remove the entire cover.
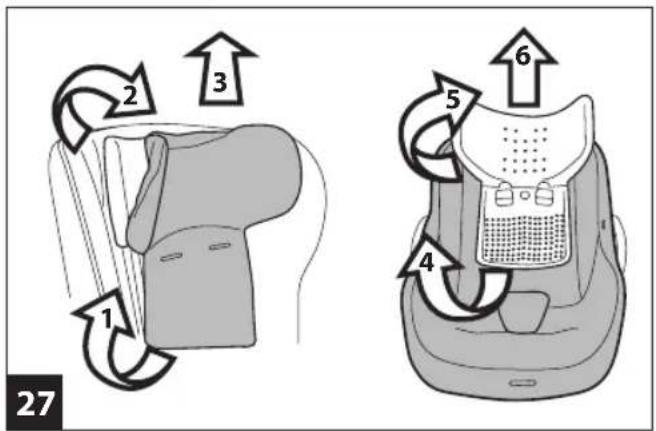
27 Slide off the headrest cover from the bottom first and then, carefully, over the two sides;
BE CAREFUL NOT TO BREAK POLYSTYRENE (EPS) PARTS. move the soft cover in sequence, as shown in the figure.
Maintenance of the padding
Brush the fabric parts to remove dust.
- When washing, closely follow the instructions stated on the label sewn into the cover.
- Do not use chlorine bleach.
- Do not iron.
- Do not dry clean.
Do not remove stains with solvents. - Do not tumble dry.
How to cover the car seat
- Proceed to perform the operations shown in figures 23 through 27 in reverse order.
The Original Accessory Peg Perego
Peg Perego accessories are designed as a useful, practical means of simplifying the lives of parents. Discover all your product's accessories on www.pegperego.com
Serial numbers
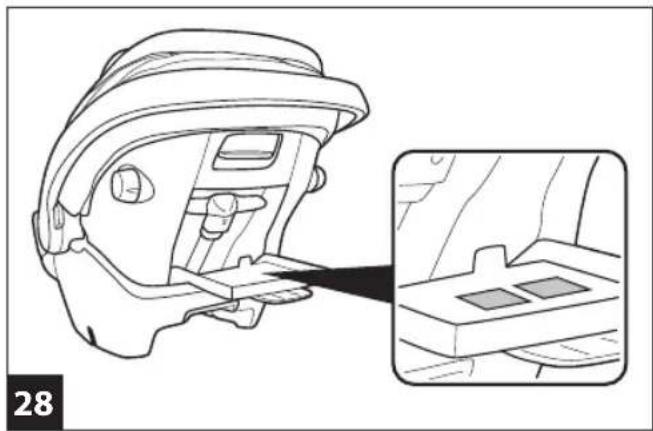
28 Inside the back compartment, you can find the approval label and the label with the following information: product name, production date and serial number.
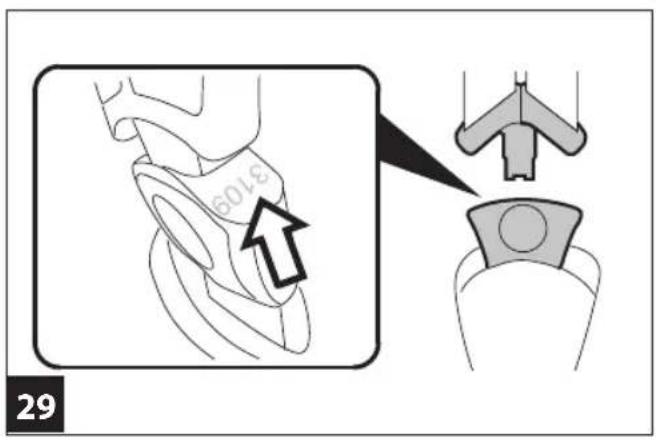
29 The date of production appears on the harness.
This information may be of use to customers in the event of problems with the product.
Product cleaning
- This product requires minimal maintenance. Cleaning and maintenance must only be carried out by adults.
It is advisable to keep all the moving parts clean. - Clean the plastic parts periodically with a damp cloth. Do not use solvents or similar substances.
- Brush the fabric parts to remove dust.
- Do not clean the polystyrene shock absorbing device with solvents or other similar products.
- Protect the product from atmospheric agents: humidity, rain or snow. Extended exposure to sunshine can cause colour changes in many materials.
- Store the product in a dry environment.
Peg Perego S.p.A.
Peg Perego S.p.A. adopts a quality management system certified by TUV Italia Srl in accordance with the ISO 9001 standard. Peg Perego can make changes at any time to the models described in this publication for technical or commercial reasons.
Peg Perego after-sales service
If any parts of the item get lost or damaged, only use genuine Peg Perego spare parts. For any repairs, replacements, information on the products and sales of genuine spare parts and accessories, contact the Peg Perego Assistance Service and state the serial number of the product, if present.
tel.0039/039/60.88.213
e-mail assistenza@pegperegco.com
website www.pegperego.com
All intellectual property rights on the contents of this manual are property of Peg Perego S.p.A. and are protected by the laws in force.
FR_Français
R129
UNIVERSAL
BELTED
40-87 cm

The Original Accessory Peg Pereg
The Original Accessory Peg Perego
Os accesorios Peg Perego foram concebidos como um auxilio pratico eutil para simplificar a vida dos pais. Descubra todos os accesorios especialicos para seu produit Peg Perego em www.pegperego.com.
Númos de série
WAARSCHUWING: VOOR GEBRUK ALS EEN LIGSTOEL
The Original Accessory Peg Pereg
The Original Accessory Peg Perego
The Original Accessory Peg Perego
The Original Accessory Peg Perego
The Original Accessory Peg Perego
The Original Accessory Peg Perego
IcnoB3yTe OeAno nnOo6peHHyo Peg Perego npHaJnHexHOCTb 1n3aunTb pe6Hka OT HENORObl.
16 PEmHn NpOraoBnK C 3aunTOIOT 6KOBOrO yada MoXHO OJHOBPemHNOpeYINPOBaTb NO BcICote B6 pa3NHybIX NOnOKeHHx B COOTBeTCBN C POCTOM Pe6eHaKa.
IpyrnpOBKn NO Bcote OTKpOte ABepb aBtOMoBnJI, 4TO6bl NOnyHnT DOCTyn K OTBepCTNIO B CnHKe CnDEhBa, HnKaMITE KHOKNy Ha 3aDHeN YACTn peryJrTopa BICOTb (CTpeKna1), ONDOBpeMeHHNOIDHMAR JIN6O ONyCKa R CnDEHNE B XeNaEMoe NonoXeHne, NPOO OHO CO IeYKOM He BCTAHET Ha MeTo (CTpeKna2).IpeXeJe yem perynipobTa BbCOTy pemHeN nNoDRONOBnHa, ocna6Be peMHN.
17 PemHn 6e3oNaChOCTn paCnoNoXeHb Ha npaBnIbHOB BbcOTc, eCNN OTBepCTnHa CnHKe, B KOTOpBe BXOJrP pemHn, paCNOXeHb Ha yPOBHe NIIepeBcHk NIN HEMHOro HNKe (3eNEHae 30Ha), KaK NOKa3aHo HA pucyHKe. YIOCTOBepbTECb, YTO pemHn He HaxOJrTCB KpaCHOn 30He.
18 TAO ABTOKPECNO OCAUeHO COCTOUIEN 2 OTDENBHX noodysek CnCTeMou DIAL Stage Cushion, KOtOpA Jenaer ERO npiroDHBIM DAXE DnRA CAMBX KPOUeHbIX MAnBlleuE.
a:ymeHbWnteNb NOIROBHNKa b:noyka-ymeHbWnteN DnA CnDEHH
He nCnOlb3yIte yMeHbWnteIb noDroNoBnKa dIaTeT BECOM 6oee 5 Kr.
He nCnoB3yIte cncTeMy Dual Stage Cushion nIa dTee ecom 6oJee 9Kr.
19 Cnelnabha opomKa KOpnyca NOMOXET ybaokatb Baillero pebeHka.ДлнжHorO ykaUnBaHnnopeBdTe pyKy B NOJooHenHe NepeHocKn, KAK NOKa3aHo (Pnc.a).
T06bI 36exaTb HAKNOHOB aBTOKpeCna I OCTaHOBNTb NOKaUNBaHne, 3aФNKcnpyTe pyky 3a CnIHKOJ aBTOKpeCna (pnc. b).
20 KaHIOOH CO3NaETeHb N yOT dN MaNbIa. PaCCTeHHTe MoNHIO ONyCTNE KaIOOH, YTO6bI 3aKpbITb 6oJIbUyO 6nlaCTb ABTOKpeCna.
A
BAKHO! 3anpeaaetcnoHMaTb aBtOKpecNo 3a. OoOH, TAK KAK OH MOXET OTCOEHNHTCB.
21 YTO6bI CHaTb KaIOHOH:OTCTeHTHe 5 KHOIOK NO HINKHemy KpaIO KaIOHOHa.
22 NpHMMTe KaIOOH n CHMMTE erO,NOTAHyB BBepx.
KaK ChTb MmRkyo 6nBky c KpeCna
23ДЯСТЯСТЯСТЯДUALStageCushionBbINOHNTaKaNE DeIcTBINOTCTERHTNE DBE KHOKNP(PC.a),KpeNPAUne yMeHBWHTENbNOrOLOBHNKA K NOyUKE yMeHBWHTENa CnHNK, N BYTBAHTNE ee.OTCTERHTNE pe3uHKn pacCTERHTe HarpyDnHbФKcatOp, YTO6bIy6paTb NOdyWKy-YMeHBWHTENb CHIMAR ee CpEMHMAxkyHOT.
24 CHIMNE HarpyHbI ΦIKcaTOP, BbTAYB pe3HKN I3 4 OTBepCTNIΦIKcTopa.
25 CHHMMITE pIeueBbIe HAKnAaIKN (pnc. a); OTKpoNTe OTCek Ha 3aHHeN NOBepXHOCTn ABTOKpeCna N BbITAHHTe peMHn BnpeP (pnc. b).
26 OTeHnTE 0bBky OT 260KOBbIX fNkCaTOpOB KOpnyca (pnc. a), BbITnHE peMeHb, pNOxOJaUN MExNy Hor (pnc. b), n CHIMME 0bBky NOnHOCTbIc.
27 CHNMTNEOBBkyIOJROJOBHnKa ChaHaJa cH3y,a 3aTeM aKKypaTHO C JByX CTOpOH. CO6JIIOAANTE OCTOPOXHOCTb, YTO6bl HE IOBPENTb DETAJIN I3 NOJINCTIPOJLA (EPS).
IocneIOBATEbHO CHMMTe MArKyIO O6NkKy, KaK NOKa3aHO Ha pncyHKe.
YxOa 3a noDkaIaKoN:
OHHaTeTKaHeBbE BCTaBKn OT bJIIN
PnCTNPKeTOHNOcIeNyTeMHCTpyKUaMHaETIKETKe, BWHTONBueXoN3DcNIA.
HeOT6eINBaIteB XJOpKe
-HeIaDbTeYTOROM
HeHCTHTeCyXIMCNOOCOMBXMHNCHTKe
He nCnOJIb3yIte paCTBOpNTenB dIa BbIEeHnI PATeH
He cyuHTe B cyuNKe dIa 6enb C BpaauoUMc8 6apa6aHOM.
HaedeBaHHe 6MBKn Ha aBtOKpeCJIo
BbIIOHHTe DeIcTBn, nOKa3aHHbIe Ha pncyHKax c 23 no 27 B o6paTHOM npRKe.
The Original Accessory Peg Perego
PnHaJNeXHocT Peg Perego pa3pa60TaHb KaK none3Hbe nIpAKTHHbIe CpeCTBa IIOBJeRHeN JxN3Hn poDITene. O3HaKoMbTeCb co BCEMn PnpHaJdEeXHcOCTAm K Baaemy N3DeMIO Ha Be6-caIe www.pegerego.com.
CepnHbIe Homepa
28 BHTpyOTcKaHa cHnHKe CNDEHnpaCnnoJKeHbI ceTnKAAIOHHa TaONuHka NeOgOnHa KaJIeKa,Ha KOTopoYka3Ha CNeDyUOaN HFOpMaJINr HA3BAHHeN3dEJIa DaTa PNOB3OJDCTBa N CePNIbHOMep.
29 Data npom3BODCTBA yka3aHa Ha pEmHx. B cnyae Bo3HKHOBeHn npo6m c n3dennem 3Tu CbeHn MOrTy NOHaO6NtBCnOKynMaTeJAM.
UcTka n3dennr
Baue n3deneHykaaetcB HecnoxHOM yxoJe. OepauuN uCTKN IyXOda DOnKbI BblONHrTb TOnbKO B3POCJIe.
- PekOMeHnyETcR COePkaTb B UInCTOTE BCE DnKyuueCAyACTN.
- NepnoDnueckn OunuAte TnactMaCCOBBie DeTaN BlaXHOI TpIKNO, He NoJIb3yUInTeB paCTBOpNTeHMN n CXOJHbIMN BcIeCTBaMn.
-NoHCTNTe TcEKoTKaHbIe HaCTn,HTO6bIy ydaJIITb Nblb.
He nntye yaponorouaouee yctpoiCTBO H3 NnCTnpoPa pactBOPyTeJMMN CxOdbIMC HMM BeseCTBaM
3aunntte n3dene OT aTMOCfephbxOcakOB - BODbl CHERA INI DOXy,IOCToHnHnNPOJONKTeNBnA NOBRepeKeHHOCTb COJIHeHBM LyuAM MOKeT Bb3BaTb UBETOBBe IMMEHEHN MHORINx MaTEDNAJOB.
XpaHHTe 3dEne B cyxOM MeCTe.
Peg Perego S.p.A.
B KOMnAHm Peg Perego S.p.A. BHepeHa CnCTema ynpaBneHn KaueCTbOM, ceptMfUmpoBaHHa TUV Italia Srl no cTnApty ISO 9001. KomnAHm Peg Perego nmeet npabo BHOCNTB B NIOOB MOMEHT N3MeHeHn B MOeN, OINCAHHble B HAcTOAWeM N3dAHn, NO pRNUHAM TEXHnecKOrO nnn KOMMEpueCKOrO XapaKTepa
Cnyx6a 06cnyxnbHn Peg Perego
B clyae yrepn nnn npn akceccyapOB, npmehnTe TOnbko fnpmeHHbte 3aacHbte qactn npo3BOcTBA KOMNaHn Peg Perego. Nn BbInonHeHnpeMOHTa, 3aMeHb 3aacHbix qacteN nnoyuHn HOpMaun o6 yctpoCTBe 06paauirecb B cnykby noCtenpodaJxHO O6CJyKHaHn Peg Perego, coo6uBn, npn erO HanuHn, cepnHbH homep npdykta:
Cpok cnxy6bI: 3 roda.
TapaHTnHbI cpoK:12 MecaueB
ten:0039/039/60.88.213
e-mail assistenza@pegperegco.com
caNTB uHTepHete: www.pegperego.com
CoOTBcTByeT Tpe6OBAHnM TexHnueckoro pernaMeHTa TP TC 007/2011
I3roToBntenb: Peg Perego S.p.A. (Iner Ipeero C.IA.); AApec: Via de Gasperi 50 - 20862 ARCORE (MB), Italy (Bna de Facnepn 50 - 20862 Apkope (MB), Itanna).
CtpaHa npOn3BODCTBa:ITaIIa.

The Original Accessory Peg Perego
The Original Accessory Peg Pereg
The Original Accessory Peg Perego
A KBCTaHOBHTN Kpicno 3 6a3o10
ABTOKpICIO Primo Viaggio Louge 6bJaHaHe CnCTeMoIO Ganciomatic System dIg KpinneHH i 3HimaHH B abTomo6ini 36a301 Base i-Size.
3 6a3o10 Base i-Size abTOKpicNo Primo Viaggio Lounge OKHa BnKOpNCTOByBaTu TAKOx i 3 onyueHOIO cINHKOIO.
1Uo6 onyCTnTn CnHky B 3MOxJIbNbx NonoJKeHHBnKOpNCTOByTe pyuKy,ra Ka 3HaXODITbCn Ha BepXHBomy KpaICNHKN.
2Пиячуо зakpinitb abTomobinbHe Kpicno Ha 6a3i Base i-Size.
Bid'cHaHne KpICNo BID KpINHeHH, NotrHyBn BaxInb Ha HNKBomy KpaIO CnHKn, BoHOuac NiHimaOuH aTOMo6InbHe KpICNo.
3 BiDperyIOIte 6a3y TaKIM YHOM, IO6 KpICNO 3hAXOINOCHe HaITo DaJIeKO BiJ CnIHKN CNIHH HHe BnIPaIOcB HbORO, 3aBaKaIOUc KpINNeHHIO (AK NOKa3aHO Ha MaIIIOHKy).
4 NotarHitb pyky Ha 6a3i, uo6 Habn3nTu II Do cnHKn cnHnHa abO BiDaunTu Bn Hei.
PpabunbHicb KpiinneHHa Kpicna Ha 6a3 MoXHa nepeBipuTn 3a YepBOHM/3eJIeHIM iHNKaTOPaMn B 3aHiYacTHHi 6a3N.
5 3abepunu yctahOBky, HATNCHTb DBI KHONKn Ha pyu KpiCna, NOBepHtby puyk i BCTaHOBIT b II B HAnpMky CnDINHA.
6 Pyka ABTOKpica Mae YoTnpi fikcoaHux noLoXeHH. IIO6 NOBepHyTu II, HATNCHTb DBI KHOKN Ha pyuizi BCTaHObit II niD NOTPI6HM KyTom. IpekeOHaIteCn, 10 BOHa 3aIKCyBaJACB NOTPI6HOMy noLoXeHHI.
- NonoXeHHA: NonoXeHHB aBTOMaUNHi.
IonoXeHHB:nonoXeHHdnypyHOrToTpaHcnpTyBaHHI DnYCTaHOBKnHa6a3iHaKONcui a6oHaWaci.
IIOJXeHHC:ueIOJXeHHOnOpn. IIOJXeHHD:nepeKoJxacroDaHHIO ABTOKpicna.
K BCTAHOBUTN KpICNo 6e3 6a3n Be3 6a3n Base i-Size aBtOMo6InbHe KpICNo Primo Viaggio Lounge Moze 6yTN BCTAHOBNeHO TINbKN 3I CINHKOIO B PIDHTOMY NIOJXEHHI.
7 RaKIO CnIHKA OnyuHa, BKNOpNCOTByIe pyUky Ha BepXbHbOMy KpaO CnIHKn, 0o6 NOBepHyT II B iNHTe NONOKeHHA.
BAKJNBO! ABtOKpICNo cnipoTaWoyBaTn napanenbHO 3emni.3a HeobxHocTi ckopncTae TropHTmPiyUnkAMn a60 Hydnni DnI nnabHa Hn B6acehi, NOKnABInix y KyTcnIHn ABTOMOBn iD ABTOKpICNO, RIK NOKa3HO HA MJIIOHVK.
BCTaHOBNIOHn ABTOKpICNO 3 DHTNHO B HbOMy, He 3a6yDbTe npIcTe6Hy nITnHy pEmeHAMn.
8 PpOynctiB HxHIO qactHy pEmeH 63neKn ABtOMoBInB Dbi HapnMI ABTOKpicna (MaI. a) i 3acte6hit Noro (MaI. b),pepeKoHaBncb,00 BIN HAraHTyTN,IK NOKa3aHO HaMaIOHky.
Bi3mbTbBepxHIOyactmHyABTOMO6IbHOro pemeHa 6e3neKn i npOTAHHTb 3a CnHHKOHO ABTOKpCna(mn,c).
9 BCTABTE pEMHb y 3aHIO HAnpMHy (MaI. a). 3aTIRHITb ABTOMO6INbHMn pEmHb 6e3neKn. IIOBepHITb pyKy ABTOKpiCnBa NOnOKeHHHaBnPoTH CuDInH. LIO CTOCYcTBcA FyHKUIOHAJIbHNX MOXINBOCTe pyKn, DnB. PNC. 6 UboTO noci6HnKa.
10 AToKpICNo 6OlaHnHe KIneTuHm3aNo6iKHMn 3uTkAmn Kinetic Pods nA KpaUoro 3axNCTy nIac 6oKOBnx 3itKHeh. Opa3y niCna BcTaHOBneHH ABOKpCiNa y ABTOMObIb IOBHICTO BnTARHITb uTOK Kinetic Pod, po3aUoBaHni I3 bOKY ABTOMOBJbHNX DBePcI, noBepHyBuN pyKy 3a roHHKOBOIO CTpiKIO (Ma.n.a). 106 nobepHytn uTOK Kinetic Pod y noaTkoBE nonoxehn, nobepHtB pyKy npOnr oDHHKOBoI CTpiKn (Ma.n.b). BAXJIIBO! CTeXTe, 106 po3aUoBaHni 3 6OKy cAnOhy ABTOMObIg uTOK Kinetic Pod 6yB 3abKn 3acyHytn Do kOpnyc KpCiNa.Tenep abTOKpicNo BCTaHOBneHO.
A KBCTaHOBTu aBTOKpicNo B caJOhi Jitaka
Je abtokpicno ceptnikobane nna BnKOpntaHHHa 60pty nita.
11 P03MCTb ABTOKpICNO (CINHKA B NIDHTOMy NOIOKeHHI) Ha CUHIHNI. IponyCTb peMHb 6e3neKNB OTBOPN KOPNcy Ta 3aTe6HtPB pMHb. NotarHtB 3a peMHb, 3o6 3aTn peMHb 6e3neKn.
IpebeBpIbpyKByNIOJoxeHHBnpeEdoynopy,IK NOKa3aHOHaMaJIHOHky.
BAXJINBO! BctaHOBIOIte aBtOKpICn TInbKHa
NocdkOBHX Micqx «O6nquyBnepeJ. RkIO Bam He BdaETCB npabINbHO BCTAHOBHTn aBTOKpICNO, nonpocitb 60PTNPoBIHnKa DOnOMOTn Bam.
BAKINBO! He BnKOpNCToBnyTe 6a3y npu yCTaHOBneHHi B canOHi nItaka.
AkpncTe6HyTuDHTnHy
12 06 po3ctHy npemihb63neKn, HATNCHtB Ha cepBOHy KONky H npaxoBoO pemeHa, i po3te6HtB harpyHn fikcatop, HATNCHYu KHONky (Ma.n.a). 06 3aTe6Hytn pemHHy CNTEmy, BCTAHOBiB R3NqKn DBOX nueobx pemeHb y notpiE hnoKeHH a BCTABTe IOn pRnKn Ha naXOBMy pemeHi, 06 BOHn He 3aue6Hynca 3 knaaHnM (Ma.n.b). 3acTe6HtB harpyHn fikcatop, 3eHNBuHN 2 qactnn.
13 Uo6 nocnaBn peMeHi, BCTaTe naneuB b OTbip cnHn (1), ytpmyoum metaneBy KhoNky, a iHuo pykoIOTarHITb peMeHi (2).
14 HataHHTb pemHi,NotaHHyBun ceHTpaBHN peryIIOBaHbHn pemHb(1)Ha ce6e; npu cBomy pemHi NOBHHI uJINbHO npuHrATn do TINA dttHn, a HappydHm fikcatop MaE 6ytu po3aowabHn Ha BNCOTI rpydei (2).
YB4A! He 3aTayyTe nack 3aHaTTo cInbHo, 06OB'3KOBO 3aNtTe HeBENKm BInbHn npocTip!
15 BAXJINBO!Y3MMky He cnid npnci6aTn BA TOKpiCNI
HNTNHy B 06'EMHomy BAKKOmy aO3i a6o KIACTN KOBpy
MIX TINOM DHTNHN I PemeHMN. Le MOKe npN3BcTn DO
HePpABINbHOrO NOnOKeHH PemeHIB 6e3NeKN i3 cepNo3HMN
HacnIKAMy y pasi abapii.
BukopNCTOByre KOBpy a6o CxBaJIeHNI Peg Perego
akceCyap nra 3axCTy DNTNHN BiD norOtn.
16 Pemehi Be3neKn i ndroniBnHk i 3 axHCTOM BID biHHx ydpabMoxhpeyIIOBAtN ODHoHAcHO 3a BNCOTIO y 6 pIHNX NOXKeHHRx BiINOBiHO DO 3OcTVuHH.
IpyrnoBHa 3a BncoToIO BiuHInb Dbepi abTomobin,
O6 OTPMATN DOCTyn DO OTBOPY BCINHc CNDIHHA HANTCHK KHONKY Ha 3aDHIyAChTHI perylntopa BNCOTN (ctpinka 1) OJHOACHO iDHHaOHNBOyCKaOH CNIDHHB NOTPIHE NOLOXeHHN KNO BOHO 3 KnaAHHM He BCTaHe HA MICue (ctpinka 2).PepHIK perykOBaTN BnCOTy peMeHBi nIgronBnKa, OcnabTe PemHI.
17 Pemehi 6e3neki po3taoBoaHi Ha npabunbHi Bucoti, kkuo OTBOPn B CnNtU, B KI BOH BXOJaTB, po3taoBoaHi Ha pIBHi nLeuey IITINH a60 TPOXn HxKue (3eJeHa o6NaCTb), Jk NOKa3aHO Ha MaJIOHky.
Ipeecbiitbcra, 0o pemeHI He B cepBOHII 3OH.
18 Lle aBtOKpICNo 6nlaHaHe CnCTeMoIO Dual Stage Cushion, kKaCKnaJaETbCa 3 2 OKpeMnx NOpIyIooK i pOoNbIb Ioro npNdaTHIMHABITb IIN HAKNPQxITHIuNx MaIIOKIB.
a:3MeHsyBaHnIgIOJIIBNka
b:noDyka-3MeHwBya dna cnDinHH
He BnKOpncToBnyTe 3MeHswyBau nIrdronibHnka dna dite BaroIO noHa5Kr.
He BnKOpNCToByTe CnCTemy Dual Stage Cushion nIa ditey BaroIO 6Inbwe 9Kr.
19 CneuiabHa fopMa KopnyCy donomoxe 3aKoJncatn dHTNHy.
Hn HIXHO 3aKoJNCyBaHHNepeCTABTe pyKv B NOJoxHeHH
Hn nepeHeceHH, kOKa3aHo Ha MaIOHky (MaI.a).
U6b yHNKHyTN KOJINaBb ABTOKpCIA n pINNIHTN
3aKoJNCyBaHH, 3aFikCyte pyKv 3a CnIHKOHO (MaI.b).
20 Kaiooh CTBOpIOe TiHb 3aTNIOK dna MaIOka. Po3Te6HITb 6NtCKABky i onyCTiTB KaIOoOH, 0o 3akpNT 6Inbuy yactHy aBTOKpicna.
BAKJIIBO!3a6oPOnHaETbCn iDhImaTn ABTOKpicNo 3a KaIIOOH, TAK AKB HIN MoKe BiE'EDHaTNC.
21 63Hn KaHOOH, BKOHAte TaKi Dii: BiCTe6HtB 5 KHONOK HA HIXKHBOMy BOJI KAHOHOHa.
22ПдимьkanIOOHI3HIMtB,NotarHyBbN Bropy.
Ak 3HrTu M'ky O66uBky 3 Kpicna
23ДИЗЗIMaHnHcNCTeMn Dual Stage Cushion BnKoHaIte Taki IIi: BiDcTe6HiT bdi KhoNKn (MaI. a), aki KpiinnaTb 3MeHsuBaY niRrOJIIBnKa DO NODuIKu 3MeHsuBaYca CnIHKn, i BNTaHIb II.
BicTe6HITb pe3nHKi I pO3Te6HITb Harpydn Hikcatop,io6 3HTI NODUkY-3MeHwBa3 naxOBOrpeMeHa.
24 3HIMITb HappydHm fikCaTOp, BHTaRHyBUn pe3nHKn 34 OTBOPiB fikCaTopa.
25 3HIMITb IIeOBI HaKlaIaIK (MaI.a); BIXKpNIte BiICiK Ha 3aIHIIOBepxHi ABTOKpicIa I BNTTHiB pemeHi Bnpeed (MaI.b).
26 BiDcTe6HITb 06NBky BID 2 6iHnx fikcatopib Kopnycy (Ma. a), BITaRHTb naxOBn peMiHb (Ma. b) i 3HIMITb 06NBky NOBHlCTIO.
27 3HIMITb 06NBky NiIroJIIBnIka CNoaTKy 3HN3y, a Notim akypaTHO 3 DBOX CTOpIH.
BvIbTe IyXe OBePEXHl, IO6 HE NIOWKoJNTN DETAJI 3 nonictupony (EPS).
NocinobHO,3HIMITbM'kyO6MBKY,KNOKa3aHOHaMaIOHKy.
UuHnHaPiKnlaaKn
- npn npaHHI TOUHO dOtpmmytecb IHCTpyKcH Ha eTtKeTci, 00 Bwnta B yoxoBnpo6y.
HeBingboHTeXnOpKoI;
HeIraBte npackoIO;
HeYnCTHTe CYXIM CNOCO6OM BXIMHNCU;
He BUKOPUCTOBYTE PO3UHHNK DIA BUBeDEHHA PNM;
He cyuitb Cyuapui DnB 6iIN3Hn 3 oBeptOBm 6apa6aHOM.
JaHaarTu 06uBky Ha aBtOKpicno
BukohaTe II, 3o6paXeHi Ha MaIIOHKax 3 23 do 27 y 3BOPOTOMy IopRky.
The Original Accessory Peg Perego
Akcecyapn Peg Perego 6yni po3p6neH I kocti Kopncho Ta npakTuHOI nITPMKU, IO6 cnpocTtN JNTTA 6aTbKIB. Perenhynt Bc i akcecyapn dna BaWo r npOdykTy Peg Perego Ha www.pegperego.com
CepiHi HomepI
28 Y BiDcky Ha cInHcI cINIHnHa 3hAxOaNTbcrCePTuΦikauiHa Ta6nUka i 1e OHa HaKNeiKa, Ha kIi BkA3aHa HAcTyuHa IHΦopMaJi:
Ha3Ba Bnpo6y, DaTa BnroTOBnHeHHa Ta cepiHn HOMep.
29 Data BuroTOBneHHa HapemeHx 6e3neKn.
LiaHOpMaui CtaHe y HaroDi KOpUcTyBaueBi y pa3i HnHKHeHH npo6Ie m3 Bnpo6om.
UuueHH Ta Dorgla
Bnpi6 Bmarae MHimaJIbHOrO oCnyroByBaHHa. HUeHHa Ta 06cnyroByBaHHa Bnpo6y MaIOb bNkoHvBaTc TINbKn DOpocnIM.
- PekomeHdoBaHO TpMaTH B UHCOTi BCI pyxomi chaTNIH.
- NepioiHNO OuHnyTe nactNKoBI detaI BONIOIO TkaHHIO, Hc BVKOpNCTOByTe po3HHNKIB uHINx NODHINx peOBHN.
KopntyTeCzIITKOIO DnBnDAnEHnNny 3TKaHHHnx qACTnH.
He ncttb npncpii nornHaHHa yapy 3 noicntpOpyo3HHKAMM uHIMM NOp6HMm peOBHaMa.
3axuatae BnipB Bd BnIny atmocepnix fakTopiB,BOIN, DOny Ta ChIpy; TpBaIne nepe6yBaHHHa COHJI MOKe npVBectN Do 3MIHN KONbOpy 8aRaTbx MaTePianIB.
36epiraTe Bupi6 y cyxomy Micui.
Peg Perego S.p.A.
B kompann Peg Perego S.p.A.Bhepeha CnCTema ynpabneHna KaeCTBOM, ceptnphiunpoaHHa TUV Italia Srl no CTahdpy ISO 9001. Peg Perego B 6ydb-aknn Yac Mocke BHOCHTN 3MiHN DO MOdeneB, Bka3aHnx B daHni HCTpykui, 3 TexhiHnx a6o KomepuinHx npuHH.
Peg Perego CEPBIC
Kxu npia6bHOro BAMn ToBapy Peg Perego NoiokDnncb abo 3arybnnncb Detani,3iinChouTe pemOnT aoo 3amHy nIe opunihhHMn 3anaCHmN qaTHAm Peg Perego. y pa3i Heo6xHIOCTi peomHTy, 3amiHn DeTaJe, OTpMaHHn IHOpmaui npo npOyKTn Ta akceCyapn, 6yNb NaCKa, 3B'kTiBC3 IokaBHM dInCTPn6'OTopOM Peg Perego B YkpaiH (3 cepiHMM HOMepm npOyKTy Ta rapaHINm TanoHom).
ten. +38 (050) 32-69-131, (050) 32-65-682, (044) 574-95-41
a k c: + 38044574 - 95 - 42
eJektpoHnHa nowTa info@amigotoys.com
a6o 3 cepbichoi cnyk6o10 Peg Perego B Itaii
tel. 0039/039/60.88.213
e-mail assistenza@pegperegco.com
internet www.pegperegco.com
Yci npaba iHTeneKtyaIbHOI BNACHOCTI, NOB'3aHI 3 BMICTOM zuoro noci6Hnka 3 eKnlyatau, HanekaTb KOMNaHII
Peg Perego S.p.A. i 3axuichiuyHHM 3aKoHOnaBCTBOM
EL_Eληνικα
R129
UNIVERSAL
BELTED
40-87 cm

The Original Accessory Peg Perego
NAIIAKA EIH BPEΦANANTYH KAI NAIXNIA
H E ywnan yia tov epyoataa k a elattwmuata tw npotovtw nC Peg Perego opicetai y diaattnuie uynuw an oynpeounvi ayopac. O katavalwntn penei va aneouve navt to attnua poc to wLn, and to vtoio exe tnv antoeicn ayopac n onoiognote aldo eyypaqoo
HapouoayeyunonoyoeooovipoyoiyoanjionoeitaiowotakaibaoeovxnoewcOkataokeuaotnckaloyetalevouyevatecTOsiaounoovtikaiwuaTouTKEVKOU
O kataokueaotnc dev unopei va eewphthei ueneuvoc epoov:
Ev Tnpouov i avayoleov ondyivec xnoeocu ToKahe npoiotovc, KaataoPapei Tuaxia to npoioy n npokAnbov BAbaec an To Kan
YnapeEi TeXvKn napeuBaon Eevou npoc Tny eatapeia mac texviokou npayua to oio anayopeetai kai anoteleki kivduvo yia tvn aoqaleia Tou
DuioIoyikn 0bpapnoia dev ennpaecltnyieoupyia tounpoiovtoc.
Aiatnpieite nvyunkai tic obnyiec xpnoeewkai yia meauovtikxponon.
EITYH2H
ONOMATEIΩNYMO AΓOPAΣTOY:
AIEYoyNtH:
THAEΦΩNO:
e-mail:
11 11:11, 11:10, 10:10, 9:10, 8:10, 7:10, 6:10, 5:10, 4:10, 3:10, 2:10, 1:10, 0:10
assistenza@pegperegco.com
aIle clll l 0 aie aie" pIa i sio Ie oI JiaIJI
iioiai i"gaii" 20 aaiil caiai
a0j-21-
Base gog aclj jg jlaa Jdaia jagio IaJyLwU JabJI aao
.i-Size

wio 10
S 5110 aie aie 2x ooc Laiu wll,
bLsOuU
Cuii1g 1111111111111111
a 1
0000 11110000
1 1
g:100L5uL5uL5uL5uL5uL5u
JusjLjohllc
a 1038 y 500 1031 jlaab21 aao
01321 8 a 2g 00 L, cLao Ic Jia 1ie Jla 81 2ao 5j jao
a aal oae aIal gai jagai IcLgai aIe aIe
J
gge g 0yLwU Jauo aS jLei o
aJ11 11
aJgGg:GgJ
Jabla 2020 aJIo! gic gill gilgill g
ocll jolabll 5jill a.5
Primo Viaggio Lounge Base i-Size dLg aolalini
Jiao gao yao ao yao yao yao yao yao yao yao yao yao yao yao yao yao yao yao yao yao yao yao yao yao yao yao yao yao yao yao yao yao yao yao yao yao yao yao yao yao yao yao yao yao yao yao yao yao yao yao yao yao yao yoo ayo ayo ayo ayo ayo ayo ayo ayo ayo ayo ayo ayo ayo ayo ayo ayo ayo ayo ayo ayo ayo ayo ayo ayo ayo ayo ayo ayo ayo ayo ayo ayo ayo ayo ayo ayo ayo ayo ayo ayo ayo ayo ayo ayo ayo ayo ayo ayo ayo ayo ay ooy oyo oyo oyo oyo oyo oyo oyo oyo oyo oyo oyo oyo oyo oyo oyo oyo oyo oyo oyo oyo oyo oyo oyo oyo oyo oyo oyo oyo oyo oyo oyo oyo oyo oyo oyo oyo oyo oyo oyo oyo oyo oyo oyo oyo oyo oyo oyo oyo oyo oyo ooyo oy oy oy oy oy oy oy oy oy oy oy oy oy oy oy oy oy oy oy oy oy oy oy oy oy oy oy oy oy oy oy oy oy oy oy oy oy oy oy oy oy oy oy oy oy oy oy oy oy oy oy oy oy oy oy oy oy oy oy oy oy oy oy oy oy oy oy oy oy oy oy oy oy oy oy oy oy oy oy oy oy oy oy oy oy oy oy oy oy oy oy oy oy oy oy oy oy oy oy oy.
jio jia jai jao sji
Jalll Jai aall lao 1e aolll c aal 11
Jallo pao sogoc Jcui ayihall ae oLc gohll siuoo 0o aall 11
Jallo plao bpaol 1 Jao baill wauw pao 1aill ciaie yac
Cagogogos Ls oao gao ll c ao all haoi
Jao pao gao agg21 ayilall ceao lc aall poaaipioa i
aao jao aclull 1b. 1k 1k 1k 1k 1k 1k 1k
Jalall aa 5j alla ge acell pasiw 8!po aai i
OjIb zo ic
S_ OBC = S_ COD + S_ BOC - S_ BOC
gao zilqieill p jy Jc 12 aJzll) jIc baiy jnll
jiai yagao gao Lgolig cuiu w jao l0jpl i
joo jno jao hao JyB (bJzll) ababao gao elw
(1) aoall axie geclao Jzoi oaiall aojx sls! Jy O
(2) aoall aojx uaiy gao jiu liLc baiial yao
jiaiy ai no sllig cay (1) gai Iaaiall pae yao jy
(2) aoall gaiwo gao yao jiaai jy labal po
ayai ciawl aluow ojiogai Jabai aoJy aoyi 8:23
11
02yue wglj Jabjjgbiu jyue Jll1 gaii
aaggljgill gaaas jllgll
aegbs Jcuiyio aaiilles gao zhaowgcl llliae
aLwJcLgS0
aouy jui yg kuy ggy aai yg agaggl ygagagll aegr lal o
gull lo pco
:oo ng sio ayuol Jall 10
elac
cluo
Dual Stage Cushion
wJl siu
aojol plc! yj3 j
aojol pls! buaa buaa
Lis po go baii dLi JolSc plz
amulj Ue
wJl siu elaj laus j
clajeil Ue oy
clouall yiaill (EPS) alll uyinuglu ly biieo wJl siu o
clouall yiaill (EPS) aaall nyinuglu ly co ctaLo
ayila ayas :Kinetic Pods
aicell no cuuill chg
Jeech Clip
clucac yI yI yI yI yI yI yI yI yI yI yI yI yI yI yI yI yI yI yI yI yI yI yI yI yI yI yI yI yI yI yI yI yI yI yI
aclal 20 Jalal neo s; a.5
Ganciomatic Primo Viaggio Lounge Base i-Size'g oJL Ll
Primo Viaggio plusi J. Base i-Size saLg o aolaii j
JIo gao gao LALoLall G Lounge
JbIy I yjagll jalil pssuaw, aoill lglal 1
JyIy I yjagll jalil pssuaw, aoill lglal 2
JyIy I yjagll jalil pssuaw, aoill lglal 3
JyIy I yjagll jalil pssuaw, aoill lglal 4
JyIy I yjagll jalil pssuaw, aoill lglal 5
JyIy I yjagll jalil pssuaw, aoill lglal 6
JyIy I yjagll jalil pssuaw, aoill lglal 7
JyIy I yjagll jalil pssuaw, aoill lglal 8
JyIy I yjagll jalil pssuaw, aoill lglal 9
154 Lw08
S LMQ = S QM + S_ QM
:(yLs).
:JLLsLdsLwgljabj8
aIgall aIgblwxl cI aagll ciSLo abwlgloLwgl 2
jw1 jbi 0g w5
c 23 J27 jgjgl
The Original Accessory
Asll sll jgao -aluo as -Peg Perego llit
glaJIgAaJyJg. 111
a a a a a a a a a a a a a a a a a a a a
Jg 1Jg Jg g aagg aagaaagaaagaaagaaagaaagaaagaaagaaagaaagaaagaaagaaagaaagaaagaaagaaagaaagaaagaaagaaagaaagaaagaaagaaagaaagaaagaaagaaagaaagaaagaaagaaagaa
pLai
Lao po aow gailb poaow ayol yai
.Peg Perego ydoia
16
gai 131 a jyagai Jj gao jia jia jia jia jia jia jia
jagg(1g)eLa2Jb0aogglalljjla
gulil gulil gulil gulil
Peg Pergao
Lcoggglglaie gScLoic ge aolloofoa o
Lo5 (c) 1 aaii1) Jaaai jaiy
15
sIaI aIbI I aIbI 10
Lw2 0000 Duaal Stage Cushion 18
"Dual Stage Cushion" 23
aJbL bJbLwglj wJl jnna jns Jnll (a-J<
Jasill 0Lwag jzjwl gaoog aojgai Lgawg gai
1111111111111111111
| R129 | UNIVERSAL | BELTED | 40-87 cm |
| Primo Viaggio Lounge | L' -Primo Viaggio Lounge" sensibilities of the natural world and its connection to life. | Jégos de la natura | |
| L' -Primo Viaggio Lounge" sensibilities of the natural world and its connection to life. | Jégos de la natura | ||
| L' -Primo Viaggio Lounge" sensibilities of the natural world and its connection to life. | Jégos de la natura | ||
| L' -Primo Viaggio Lounge" sensibilities of the natural world and its connection to life. | Jégos de la natura | Csgs | |
| R129 | i-SIZE UNIVERSAL | ISOFIX | 40-87 cm |
| Primo Viaggio Lounge + Base i-Size | Sensibilities of the natural world and its connection to life. L' "Base i-Size" ·Jégos de la natura | Jégos de la natura | |
| Sensibilities of the natural world and its connection to life. | Jégos de la natura | ||
| Sensibilities of the natural world and its connection to life. | Jégos de la natura | ||
| "Primo Viaggio Lounge" sensibilities of the natural world and its connection to life. | Jégos de la natura | ||
| "Primo Viaggio Lounge" sensibilities of the natural world and its connection to life. | Jégos de la natura |
j 10
Jgaoo Lusio
13 87 L 40 y jy Jy Lw 85
L W Enhanced Infant Carrier Module y Ss Jiau y
Jy I Size ay Ljy AN No. 129 y
L W C w L w L w L w L w L w L w L w L w L w L w L w L w L w L w L w L w L w L w L w L w L w L w L w L w L w L w L w L w L w L w L w L w L w L w L w L w L w L w L w L w L w L w L w L w L w L w L w L w L w L w W y
L W y S Jy I Size y As Cw y Aai Jy
L W y Aas y S Jy As Logy y Jaay y S Jy As y S Jy As y S Jy As y S Jy As y S Jy As y S Jy As y S Jy As y S Jy As y S Jy As y S Jy As y S Jy As y S Jy As y S Jy As y S Jy As y S Jy As y S Jy As y S Jy As y S Jy As y S Jy As y S Jy As y S Jy
L W y Jaay y Jaay y Jaay y Jaay y Jaay y Jaay y Jaay y Jaay y Jaay y Jaay y Jaay y Jaay y Jaay y Jaay y Jaay y Jaay y Jaay y Jaay y Jaay y Jaay y Jaay y Jaay y Jaay y Jaay y Jaay y Jaay y Jaay y Jaay y Jaay y Jaay y Jaay y Jaay y Jaay y Jaay Y
L W y Aas y S Jy As Aas Aas Aas Aas Aas Aas Aas Aas Aas Aas Aas Aas Aas Aas Aas Aas Aas Aas Aas Aas Aas Aas Aas Aas Aas Aas Aas Aas Aas Aas Aas Aas Aas Aas Aas Aas Aas Aas Aas Aas Aas Aas Aas Aas Aas Aas Aas Aas Aas Aas AAS
L W y Jaay y Jaay y Jaay y Jaay y Jaay y Jaay y Jaay y Jaay y Jaay y Jaay y Jaay y Jaay y Jaay y Jaay y Jaay y Jaay y Jaay y Jaay y Jaay y Jaay y Jaay y Jaay y Jaay y Jaay y Jaay y Jaay y Jaay y Jaay y Jaay y Jaay y Jaay y Jaay Y
LW g aAs aAs aAs aAs aAs aAs aAs aAs aAs aAs aAs aAs aAs aAs aAs aAs aAs aAs aAs aAs aAs aAs aAs aAs aAs aAs aAs aAs aAs aAs aAs aAs aAs aAs aAs aAs aAs aAs aAs aAs aAs aAs aAs aAs aAs aAs aAs aAs aAs aAs a As
L W g g g g g g g g g g g g g g g g g g g g g g g g g g g gg g g g g g g g g gg gg gg gg gg gg gg gg gg gg gg gg gg gg gg gg gg gg gg gg gg gg gg gg gg
#
Joo joo oo joo Joo Joo ooo Joo Joo ooo Joo Joo ooo Joo Joo ooo Joo Joo ooo Joo Joo ooo Joo Joo ooo Joo Joo ooo Joo Joo ooo Joo Joo ooo Joo Joo ooo Joo Joo ooo Joo Joo ooo Joo Joo ooo Joo Joo ooo Joo Joo ooo Joo Joo ooo Joo
50aL 500000000000000000000000000000000000000000000000000000000000000000000000000000000000000
J 10
Kinetic Pod ggs Jgds Jgds Jgds Jgds Jgds Jgds Jgds Jgds Jgds Jgds Jgds Jgds Jgds Jgds Jgds Jgds Jgds Jgds Jgds Jgds Jgds Jgds Jgds Jgds Jgds Jgds Jgds Jgds Jgds Jgds Jgds Jgds Jgds Jgds
ii (EPS) y w slo cws as iis
12j 1 j 10000000000000000000000000000000000000
aLwgl aLiJI aS
yLgA yLgA
J1s20aW dgso 5g0 aW sSLo JooIgwi ging ples
15c 1
siooLaiuugw
SsS SsS 10 JxL
a:laoljgoSs
92g 1joo
LgIwgeaJ27L23Jscd
Jg-
aJgss 1s sL JLwog jgic a g
Lw g jg Jgaaa aag
华
www.pegperegoo.com
JLswSLoLa
28
JLw oJg Jg aolu
29
Jgaa Jg Jg Jg Jg Jg Jg Jg Jg Jg
S OBC = S COD + S_ BOC
j0000000000000000000
g jj 12
pLJw jyjgaiu
a 1
LJ LjLj j. gjwJgjLjwn 1, jwJgJgJ
y 1 y
auii jaiy aia 100000000000000000000000000000000000000
joo
aJluIgO,3cLbU 1s
JgJg
s()
Peg Perego S.p.A golw
gIbO cIcIcIcIcIcIcIcIcIcIcIcIcIcIcIcIcIcIcIcIcIcIcIcIcIcIcIcIcIcIcIcIcIcIcIcIcIcIcIcIcIcIcIcIcIcIcIcIcIcIcI
g0s1yjz 20000000000000000000000000000000000000000000
LgSLSglwAsgagLaaaaslaugo
JLw 1,Lo aW (b.
Dual Stage Cushion 23
1g 1000000000000000000000000000000000000000000
g jL oioiols jjgl gj 1 aai iuiu gLoossjIg0
s
124
All of the intellectual property rights for the contents of this instruction manual belong to PEG PEREGO S.p.A. and are protected by the laws in force.
PegPerego