Vivace SLK Modular - Child car seat PEG PEREGO - Free user manual and instructions
Find the device manual for free Vivace SLK Modular PEG PEREGO in PDF.

User questions about Vivace SLK Modular PEG PEREGO
0 question about this device. Answer the ones you know or ask your own.
Ask a new question about this device
Download the instructions for your Child car seat in PDF format for free! Find your manual Vivace SLK Modular - PEG PEREGO and take your electronic device back in hand. On this page are published all the documents necessary for the use of your device. Vivace SLK Modular by PEG PEREGO.
USER MANUAL Vivace SLK Modular PEG PEREGO
EN Instructions for use
FR Notice d'emploi
natural_image
Line drawing of a car seat with a green checkmark indicating selection (no text or symbols present)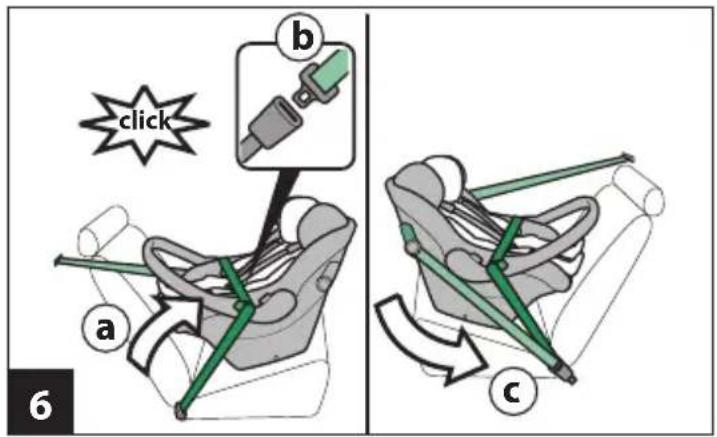


natural_image
Diagram of a car seat with highlighted seat area and color-coded zones (no text or symbols)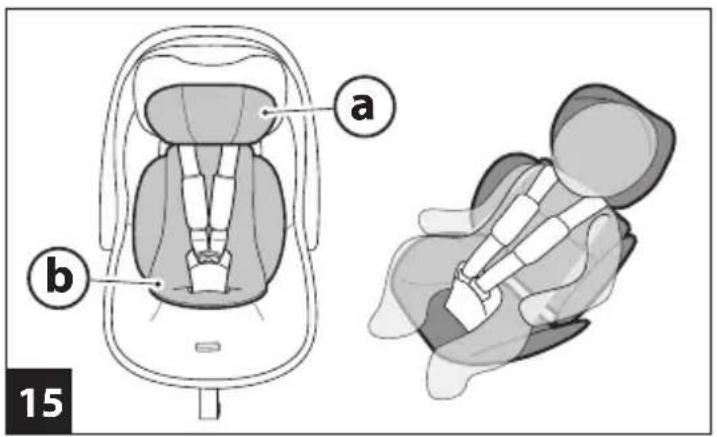
natural_image
Illustration of a mechanical component with directional arrows indicating motion (no text or symbols)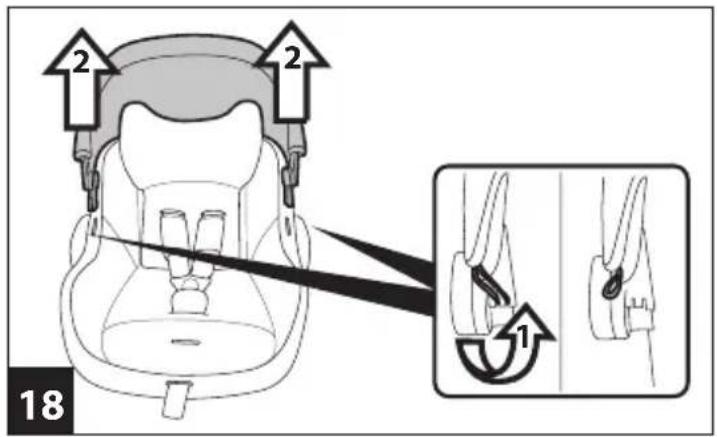
natural_image
Line drawing of a car seat with two side seats and a double-headed arrow indicating seatbelt (no text or symbols)
Primo Viaggio SLK
1) BCAASL00*
2) BSAASL00*
3) BPTSLK00*
4) BRISLK00*
5) BSPASL00*
6) ASPI0157NFGR
IT• Ricambi disponibili in più colori da specificare nella richiesta.
EN• Spare parts available in different colours to be specified when ordering.
FR• Pièces de rechange disponibles en plusieurs couleurs à spécifier dans la demande.
DE• Ersatzteile in mehr Farben vorhanden, die in der Anfrage spezifiziert werden müssen.
ES• Repuestos disponibles en otros colores que se especificarán en el pedido.
BR-PT• Peças de reposição disponíveis em cores alternativas a serem especificadas no pedido.
NL• Reserveonderdelen verkrijgbaar in meerdere kleuren, bij bestelling te specificeren.
RO• Piesele de schimb sunt disponibile în diferite culori, care trebuie specificate la comandă.
BG· Налични резервни части в различни цветове, които се уточняват при поръчка.
CZ. U náhradních dílů, které jsou k dispozici ve více barvách, je nutné na objednávce specifikovat příslušnou barvu.
SK• Pri náhradných dieloch, ktoré sú k dispozícii vo viacerých farbách, je potrebné pri objednámve špecifikovat želanů farbu.
HU• A tartalék alkatrészek különböző színekben elérhetők, melyeket rendeléskor kell kiválasztani.
SL• Rezervni deli so na voljo v več barvah, ki jih je treba navesti pri naročilu.
RU• Запчасти имеются различных цветов, необходимый указать в запросе.
TR• Siparişte belirtilen değişik renklerdeki yedek parçalari mevcuttur.
HR/SRB/MNE/BiH• Zamjenski dijelovi dostupni u više boja što je potrebno specificirati u narudžbi.
PL• Części zamienne gondolki są dostępne w różnej kolorystyce.
UA• Частини доступні в декількох кольорах, які будуть вказані в запит
EL• Ανταλλακτικά διαθέσιμα σε διάψορα χρώματα. Προσδιορίστε όταν παραγγείλετε.
The Original Accessory Peg Perego
| EN_English | |||
| R129 | UNIVERSAL | BELTED | 40-87 cm |
 | Primo Viaggio SLK | ·The "Primo Viaggio SLK" car seat is installed in the vehicle using the three-point seatbelt. | |
| R129 | i-SIZE UNIVERSAL | ISOFIX | 40-87 cm |
 | Primo Viaggio SLK+Base i-Size | ·The "Base i-Size" with Isofix attachment system is installed in the vehicle using the Isofix anchors located between the vehicle seat and backrest.·The "Primo Viaggio SLK" car seat is installed on the "Base i-Size".·See the "Base i-Size" instruction manual for the vehicle installation procedure. | |
Thank you for choosing a Peg Perego product.
Product characteristics
- Suitable for children between 40 and 87~cm with a maximum weight of 13kg .
- This is a Universal Belted Enhanced Child Restraint System. It is approved according to UN Regulation No. 129 for use primarily in Universal seating positions, as indicated by vehicle manufacturers in the vehicle user's manual.
- The use of the car seat for premature infants born at less than 37 weeks could cause respiration problems for the newborn. It is advisable to seek medical advice before leaving the hospital.
- This car seat is approved for installation in the car without the base or with the Base i-Size.
- When used with a Base I-Size, this car seat becomes an "i-Size" enhanced child restraint system. It is approved in accordance with UN Regulation No. 129 for use in i-Size-compatible vehicle seating positions, as indicated by vehicle manufacturers in the vehicle users' manual.
- The car seat can only be used in approved vehicles, fitted with static or inertia-reel three-point seatbelts, approved under regulation UN/ECE no. 16 or equivalent standards. It must not be used with two-point or lap seatbelts.
- Consult the list of car models and seats equipped with ISOFIX anchor systems (see inside) that have been approved by the restraining system manufacturer.
Contact the restraining device manufacturer or retailer if you have doubts or require further information on the fitting of the Base i-Size in specific cars.
For more information, please contact the Peg Perego Assistance Department at the address customer.service@pegperego.com
- This car seat comes with "Adjustable Side Impact Protection": improved protection against side impacts with the "simultaneous system" for headrest-harness adjustment.
WARNING
- Read the instructions carefully before use and keep them in the holder provided for future reference. Failure to closely follow the car seat installation instructions will put your child at risk.
- The assembly and installation operations must be conducted by adults.
• Always use a car seat when in the car. Never remove the child from the car seat when the vehicle is in motion.
- Never leave a child alone and unsupervised in a car, not even for a short time. The temperature inside the vehicle can change rapidly and become dangerous for the child inside.
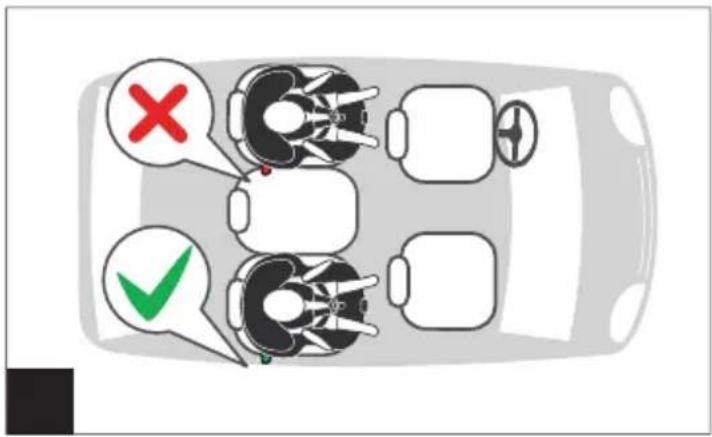
• Install this car seat facing the direction opposite to the direction of travel.
• Install this car seat only on seats facing the direction of travel. If the vehicle has rotating or repositionable seats,
position them facing the direction of travel.
- Do not fit this car seat onto passenger seats which have active airbags. Deactivate the airbag before fitting the car seat. Using this car seat on seats with active airbags may cause serious injury or death in the event of an accident.
- Check that the child car seat is not blocked by a moving part of the seat or a door.
- Scrupulously follow installation instructions; do not use installation methods other than those recommended because they could cause detachment of the car seat.
• Always use the harness when using this car seat. - Adjust the height and tension of the shoulder straps ensuring that they are snug to the child's body without constricting him/her too much. Check that the harness is not twisted and that the child does not release it.
• To avoid the risk of falling, always use the car seat harness even for transport outside the vehicle.
• The car seat is not a substitute for a cot; if the child needs to sleep it is important to lie him/her down. - Do not use the child car seat if it is broken or if there are missing parts, or if it has been subjected to heavy impacts as a result of accidents, as it may have suffered structural damage which is not visible but is extremely hazardous.
- Do not use the car seat without its fabric cover; this must not be replaced with one not approved by the manufacturer since it is an integral part of the car seat and the safety system.
- Do not remove or replace the white polystyrene part
under the seat, in the backrest and in the headrest, as it is essential for safety purposes.
- Do not leave the car seat in the vehicle when exposed to the sun. Some parts might heat up and be harmful to the delicate skin of the child -check before placing the child in the seat.
- Do not modify the product.
- Do not remove the adhesive and stitched labels since this might make the product non compliant with legal requirements.
- For any repairs, replacement parts and information about the product, contact the after-sales assistance service. Contact information is provided on the last page of this manual.
- Do not use accessories not approved by the manufacturer or by the competent authorities.
- If using a second-hand product, make sure it is a recent model, comes with instructions, and is fully functional in all parts. An obsolete product may not conform to safety standards, due to natural ageing of materials and updating of regulations. If you have any doubts, contact the manufacturer's customer service centre.
- Make sure there are no items of luggage or other unsecured items in the vehicle interior. They could injure the vehicle's occupants in the event of an accident.
- This product requires only minimal cleaning and maintenance. These operations must be performed by adults.
-
It is advisable to keep all the moving parts clean.
-
Clean plastic parts periodically with a damp cloth. Do not use solvents or similar substances.
- Do not clean the polystyrene shock absorbing device with solvents or other similar products.
- Brush fabric parts to remove dust. If you wash fabric parts, follow the washing instructions on the laundry label.
- Protect the product from atmospheric agents: humidity, rain or snow. Extended exposure to sunshine can cause colour changes in many materials.
- Store the product in a dry environment.

WARNING: FOR USE AS A CLINED CRADLE.
- Do not use the reclined cradle once your child can sit unaided.
- This reclined cradle is not intended for prolonged periods of sleeping.
- It is dangerous to use this reclined cradle on an elevated surface, e.g. a table.
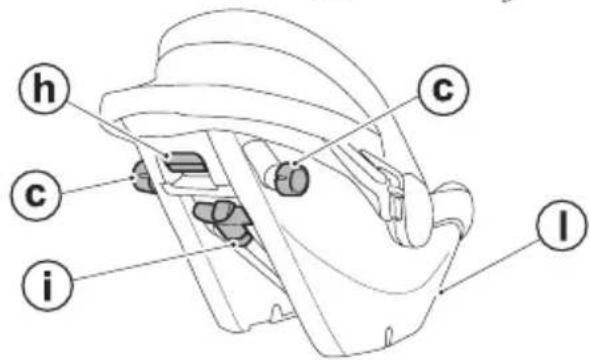
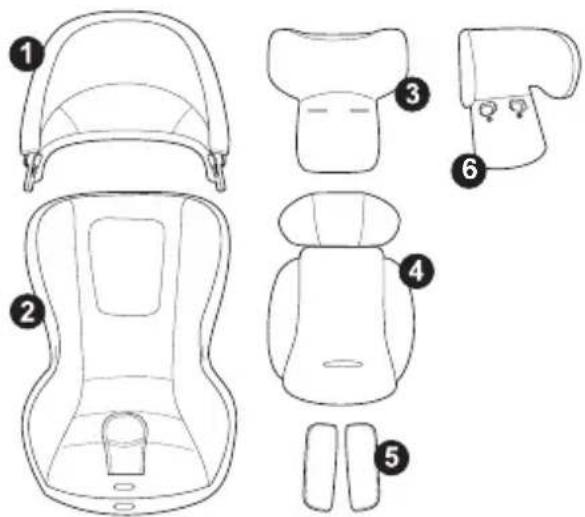
Components of the Product
Inspect the content of the package and contact Customer Care if any items are missing.
The child car seat includes:
a) Hood
b) Handlebar
c) Kinetic Pods: side protections
d) Headrest
e) Harness tension release button
f) Harness tension adjustment strap
g) 3-point safety harness with shoulder straps
h) Lever for release from base
i) Headrest height adjustment button
I) Instruction manual compartment
m) Headrest covered with shock-absorbing expanded polystyrene foam (EPS)
n) Shell covered with shock-absorbing expanded polystyrene foam (EPS)
o) Duál Stage Cushion
The car seat is ready for use: no assembly required.
Instructions for use with base
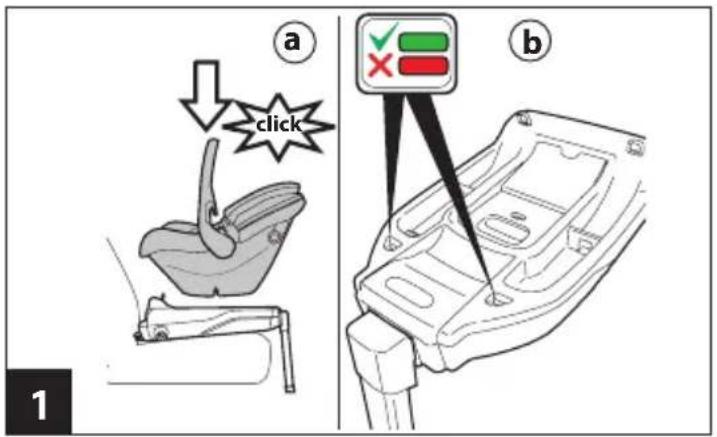
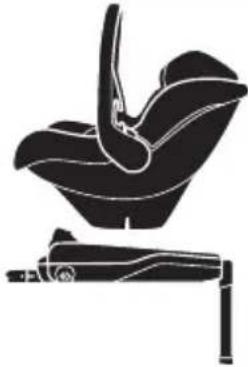
1 Primo Viaggio SLK features the Ganciomatic System for connection and release in the car with the Base i-Size.
To attach the Primo Viaggio SLK to the Base i-Size, align it with the connections and push it downwards until it clicks in place (fig_a). Make sure that the red/green indicators on the back of the base are in the green position (fig_b).
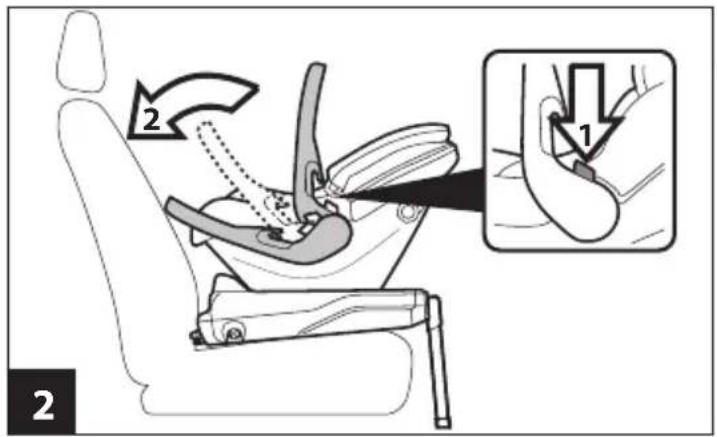
2 Press the two buttons on the handlebar, turn them and position against the vehicle seat.
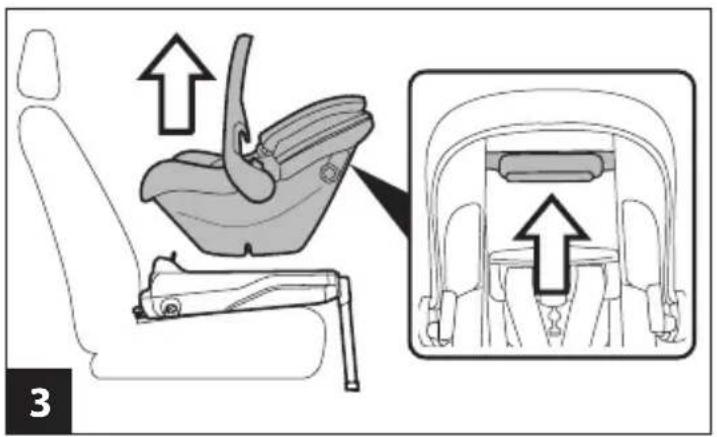
3 To release the Primo Viaggio SLK from the Base i-Size, put the handlebar in the carry position and pull the lever on the backrest upwards while simultaneously lifting the car seat.
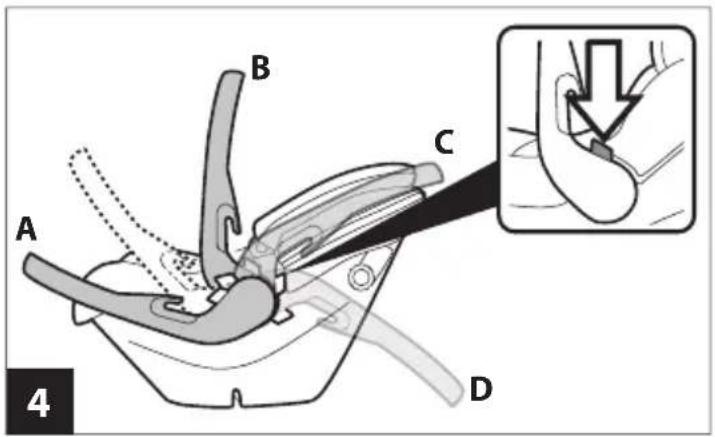
4 The car seat handlebar has four fixed positions. To rotate it, press the two buttons on the handlebar and
move this to the required angle. Ensure it clicks into position.
• Position A: the in-vehicle position;
- Position B: the position for transport by hand and for installation on a base, stroller or chassis;
• Position C: this is the resting position;
• Position D: stops the car seat from rocking.
Instructions for use without base
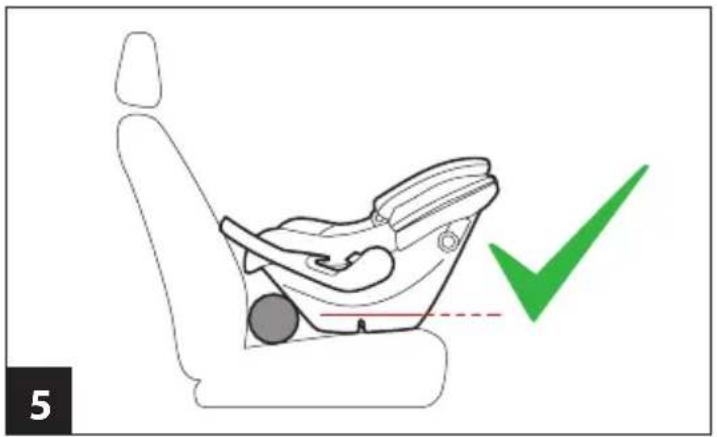
5 ANIMPORTANT! The car seat must be parallel to the ground. If necessary, use rolled-up towels or swimming pool float tubes under the car seat, in the folds of the vehicle's seats.
Fit the car seat with the child seated inside, remembering to secure the child with the harness. Fully lower the handlebar of the car seat (point 4 -position A).
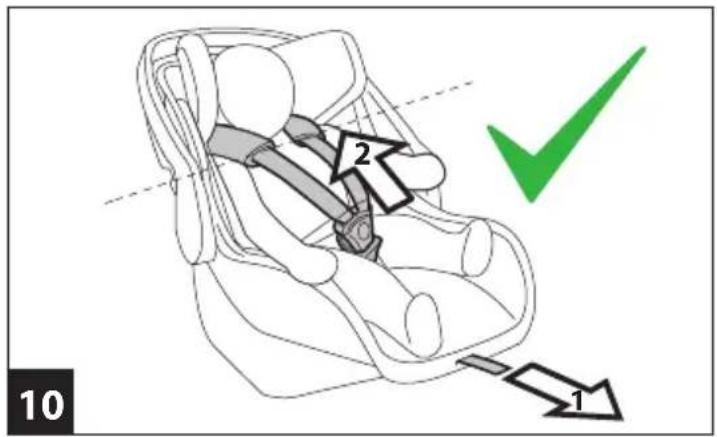
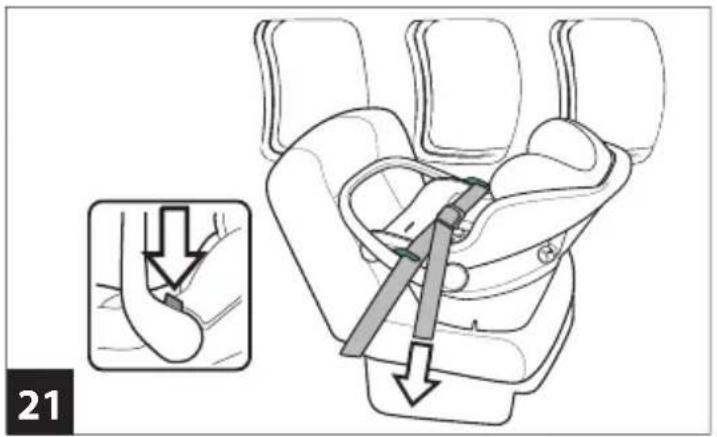
6 Slide the lower part of the vehicle seatbelt into the two guides on the car seat handlebar (fig_a) and buckle it (fig_b), ensuring the seatbelt is taut, as shown in the figure.
Grasp the upper part of the vehicle seatbelt and pass it behind the car seat backrest (fig_c).
7 Insert the belt into the rear guide (fig_a). Tighten the vehicle seat belt (fig_b). Installation is now complete.
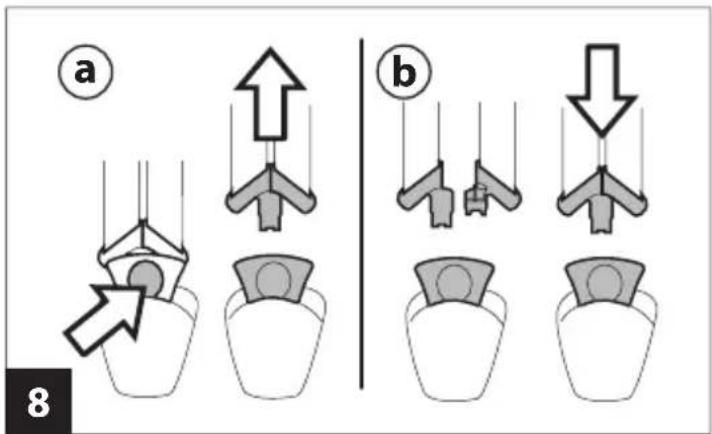
8 To release the harness, press the red button on the crotch strap buckle (fig. a) and remove the straps. To engage the harness, place the two shoulder strap tongues in position and insert them into the buckle of the crotch strap until they click into place (fig. b).
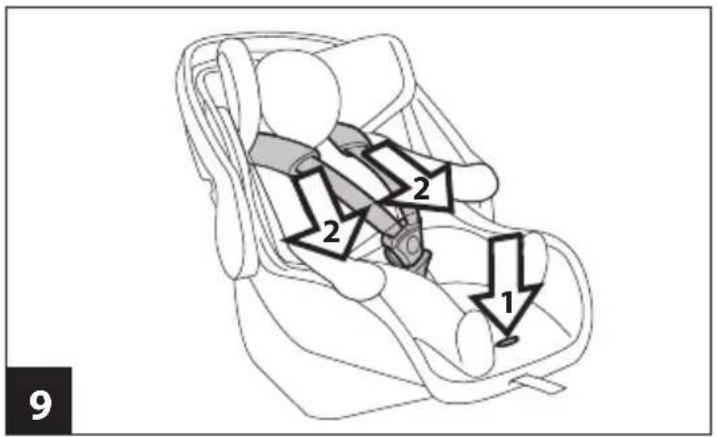
9 To slacken the harness, insert a finger through the seat opening (1), keep the metal button pressed, and with the other hand pull on the straps (2).
10 To tighten the straps until they are snug to the child's body, pull the central adjustment strap towards you.
CAUTION: Do not over-tighten the straps, and ensure you leave minimum slack.
11 IMPORTANT! In winter, do not strap the child into the car seat wearing bulky, heavy clothing, and do not place blankets between the child's body and the harness. This could cause incorrect positioning of the safety harness, with serious consequences in the event of a collision.
Use a blanket or an approved Peg Perego accessory to protect your child from the weather.
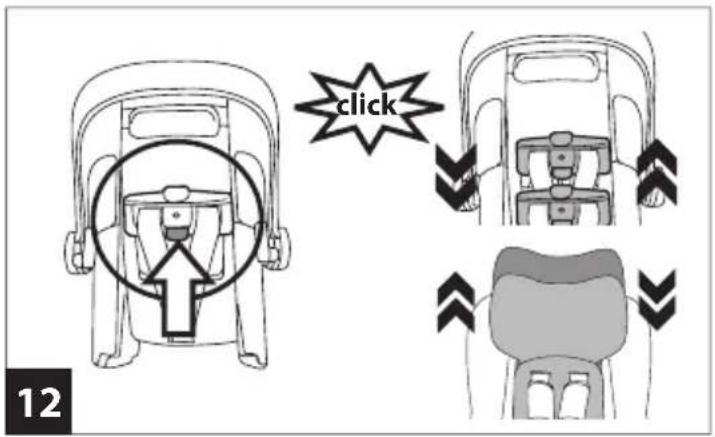
12 The harness and the "Side Impact Protection" headrest can be adjusted simultaneously to 6 different heights so as to follow the growth of the child.
To adjust the height, press the rear height adjustment button (on the car seat backrest) and at the same time raise or lower the straps and headrest to the required position, ensuring that they click into place. Slacken the shoulder straps before adjusting the height of the harness and headrest.
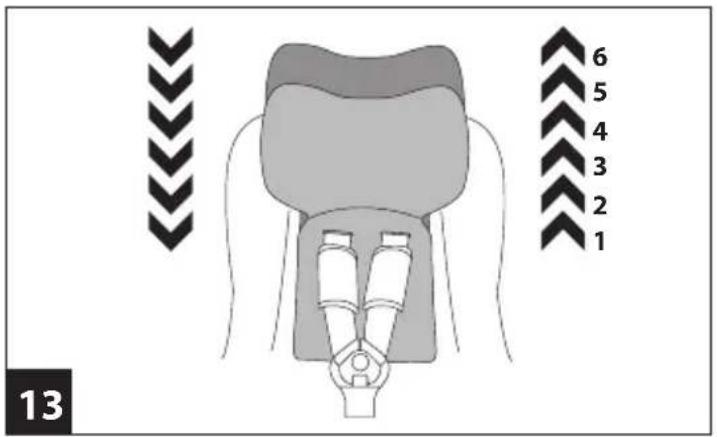
13 The headrest may be set in 6 different positions.
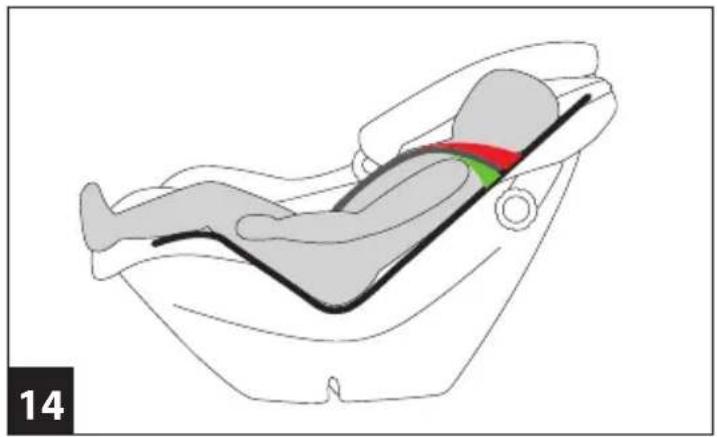
14 The safety harness is at the right height when the slots in the backrest are at shoulder height or just below (green area), as shown in the figure.
Make sure the straps are not in the red area.
15 This car seat features the Dual Stage Cushion, a system
composed of 2 separate cushions for even the smallest babies.
a: headrest reducer
b: seat reducer cushion
Do not use the Dual Stage Cushion with children over 61 cm in height and 9 kg in weight.
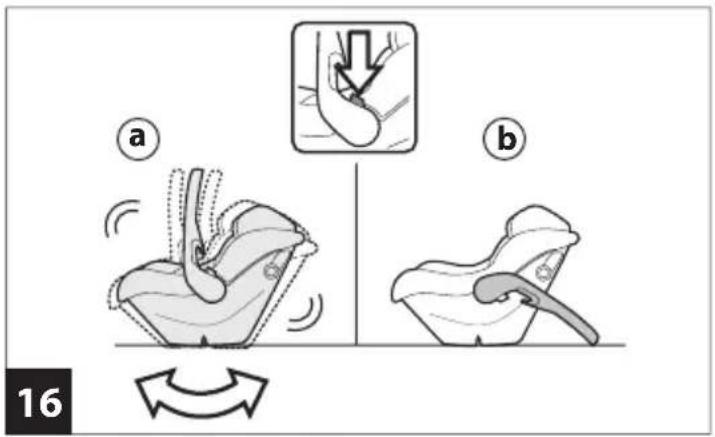
16 The special shell shape is designed to rock your child. To rock the child gently, put the handlebar in the carry position, as shown (fig_a).
To prevent oscillation and stop rocking, lock the handlebar behind the backrest (fig_b).
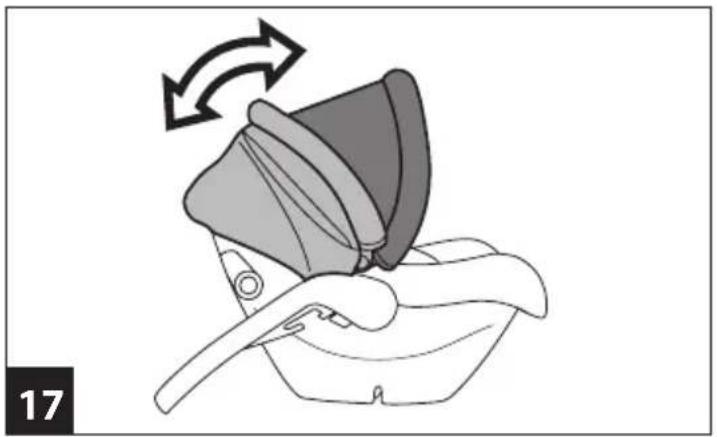
17 The hood provides your child with shade and shelter.
IMPORTANT: The hood must not be used to lift the car seat because it might detach.
18 To remove the hood, release the elastic bands behind the handlebar (1), lift it and release it upwards (2).
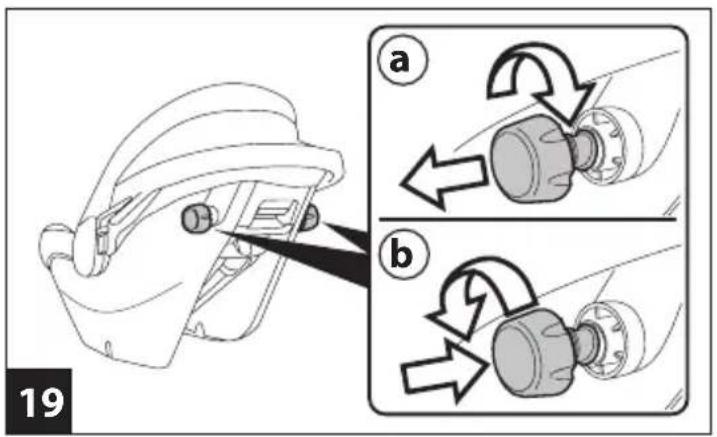
19 The seat is fitted with Kinetic Pods, to ensure greater safety in the event of a side impact.
FULLY open the Kinetic Pod by turning it clockwise (fig_a). To return the pod in the initial position, turn it anti-clockwise (fig_b).
20 ATTENTION: ONLY open vehicle door side Kinetic Pod.
IMPORTANT: Make sure the Kinetic Pod situated on the side facing the inside of the car is never pulled out.
How to use the car seat on the aircraft
This unit is certified for aircraft use.
21 Position the car seat on the aircraft seat with the
backrest in the most upright position. Adjust the handlebar in the forward most position as shown
Thread the lap belt through the slots in the handlebar and lock the latch plate into the buckle. Pull the strap to tighten the seat belt.
IMPORTANT! Use only on forward facing seats. If the car seat can not be properly secured ask for flight attendant help.
IMPORTANT! Do not use the base to install the car seat on an aircraft seat.
Removing the soft cover
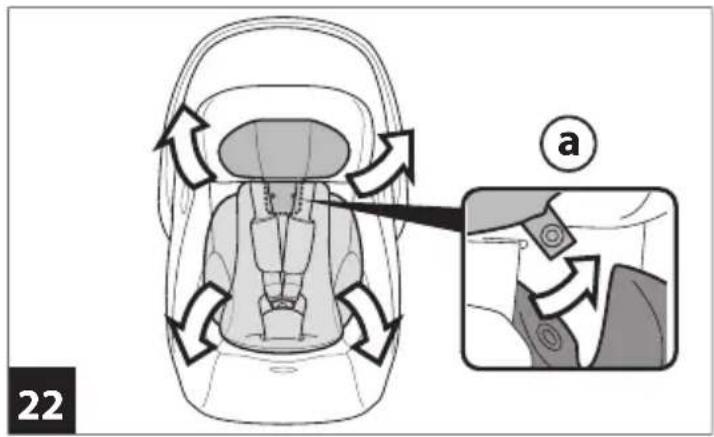
22 To remove the "Dual Stage Cushion": unbutton the two buttons (fig_a) anchoring the headrest reducer to the seat reducer cushion and pull it off.
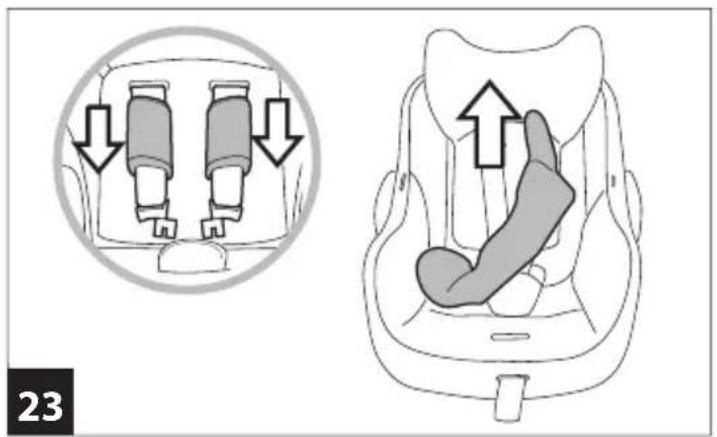
23 Open the harness and remove the shoulder straps. Remove the seat reducer cushion, sliding it off the crotch strap.
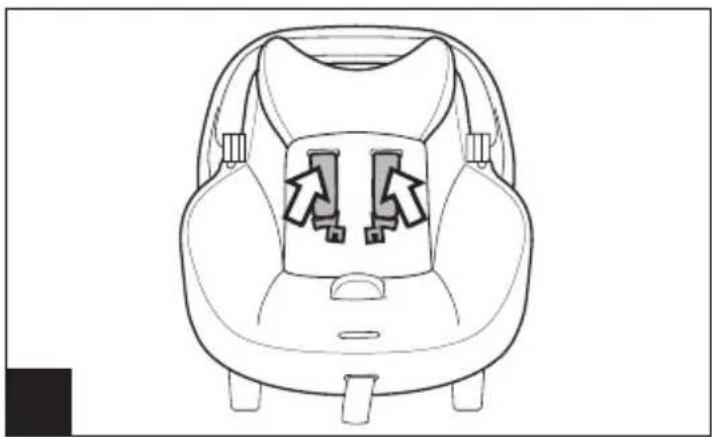
24 From the back of the car seat, pull the straps out the front.
25 Release the four elastic bands on the cover from underneath the handlebar (fig_a), pull out the crotch strap (fig_b) and remove the entire cover.
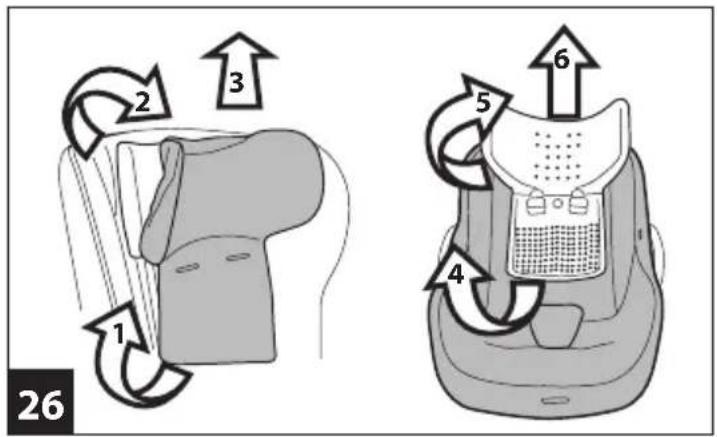
26 Slide off the headrest cover from the bottom first and then, carefully, over the two sides;
BE CAREFUL NOT TO BREAK POLYSTYRENE (EPS) PARTS.
Remove the soft cover in sequence, as shown in the figure.
Maintenance of the padding
Brush the fabric parts to remove dust.
- When washing, closely follow the instructions stated on the label sewn into the cover.
- Do not use chlorine bleach.
- Do not iron.
- Do not dry clean.
Do not remove stains with solvents. - Do not tumble dry.
How to cover the car seat
Proceed to perform the operations shown in figures 22 through 26 in reverse order.
The Original Accessory Peg Perego
Peg Perego accessories are designed as a useful, practical means of simplifying the lives of parents. Discover all your product's accessories on www.pegperego.com
Serial numbers
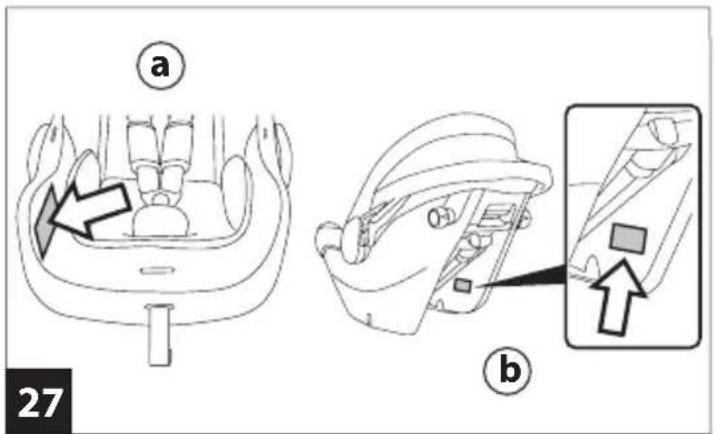
27 A label on the front lateral side, under the fabric, contains the following information: product name, production date and serial number (fig. a).
Underneath the side of the car seat you will find the approval label (fig. b).
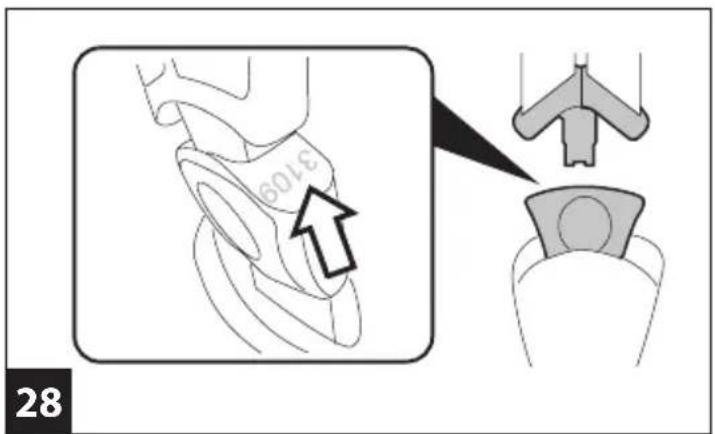
28 The date of production appears on the harness. This information may be of use to customers in the event of problems with the product.
Product cleaning
- This product requires minimal maintenance. Cleaning and maintenance must only be carried out by adults.
- It is advisable to keep all the moving parts clean.
- Clean the plastic parts periodically with a damp cloth. Do not use solvents or similar substances.
- Brush the fabric parts to remove dust.
- Do not clean the polystyrene shock absorbing device with solvents or other similar products.
- Protect the product from atmospheric agents: humidity, rain or snow. Extended exposure to sunshine can cause colour changes in many materials.
- Store the product in a dry environment.
Peg Perego S.p.A.
Peg Perego S.p.A. adopts a quality management system certified by TÜV Italia Srl in accordance with the ISO 9001 standard. Peg Perego can make changes at any time to the models described in this publication for technical or commercial reasons.
Peg Perego after-sales service
If any parts of the item get lost or damaged, only use genuine Peg Perego spare parts. For any repairs, replacements, information on the products and sales of genuine spare parts and accessories, contact the Peg Perego Assistance Service and state the serial number of the product, if present.
tel. 0039/039/60.88.213
e-mail customer.service@pegperego.com
website www.pegperego.com
All intellectual property rights on the contents of this manual are property of Peg Perego S.p.A. and are protected by the laws in force.
The Original Accessory Peg Perego
The Original Accessory Peg Perego
The Original Accessory Peg Perego
The Original Accessory Peg Perego
The Original Accessory Peg Perego
Scaunul auto include:
The Original Accessory Peg Perego
The Original Accessory Peg Perego
The Original Accessory Peg Perego
The Original Accessory Peg Perego
The Original Accessory Peg Perego
The Original Accessory Peg Perego
The Original Accessory Peg Perego
The Original Accessory Peg Perego
The Original Accessory Peg Perego
The Original Accessory Peg Perego
ΠΕΡΑΜΑΞ Α.Ε.
Dual Stage Cushion (o
The Original Accessory F
تم Try Çıçüm İkın Üğm Let kon ü n Ü ghe Ö oç m lüe Ü tisir Peg Perego
Dual Stage Cushion (o
All of the intellectual property rights for the contents of this instruction manual belong to PEG PEREGO S.p.A. and are protected by the laws in force.
PegPerego