Memo Clip - Car seat PEG PEREGO - Free user manual and instructions
Find the device manual for free Memo Clip PEG PEREGO in PDF.


| Product Type | Car Seat (Group 1/2/3) |
| Brand | Peg Perego |
| Model | Memo Clip |
| Weight Range | 9 - 36 kg (approx. 20 - 79 lbs) |
| Age Range | Approx. 9 months to 12 years |
| Dimensions (H x W x D) | 65 x 45 x 40 cm (approx.) |
| Weight of Seat | Approx. 6.5 kg |
| Installation Method | ISOFIX connectors and top tether or vehicle seat belt |
| Harness Type | 5-point harness for Group 1; vehicle seat belt for Groups 2/3 |
| Recline Positions | Multiple recline positions for comfort and proper installation |
| Side Protection | Side impact protection system (SIPS) |
| Certification | ECE R44/04 or UN R129 (i-Size) compliant |
| Expiration Date | 6 years from date of manufacture |
| Cleaning Instructions | Removable cover, machine washable at 30°C; frame wipe clean with damp cloth |
| Energy Absorption | Integrated energy-absorbing foam in headrest and seat base |
| Adjustable Headrest | Yes, height adjustable to accommodate growing child |
| Accessories Included | ISOFIX guides, instruction manual, harness pads |
| Maintenance | Periodic check of harness and connectors; replace after any crash |
| Country of Origin | Italy |
Frequently Asked Questions - Memo Clip PEG PEREGO
User questions about Memo Clip PEG PEREGO
0 question about this device. Answer the ones you know or ask your own.
Ask a new question about this device
Download the instructions for your Car seat in PDF format for free! Find your manual Memo Clip - PEG PEREGO and take your electronic device back in hand. On this page are published all the documents necessary for the use of your device. Memo Clip by PEG PEREGO.
USER MANUAL Memo Clip PEG PEREGO
PegPerego
memo.pegperego.com
ENGLISH – Instructions for use......22
1. Product information....22
1.1.General warnings....23
1.3. Declaration of conformity....25
1.4.Warranty....25
2. Installing Memo....26
2.1. Memo Pad....26
2.2. Memo Clip....27
3. Functions provided by the mobile App....29
3.1. Downloading the Android/iOS app....29
3.2. How to register for the service....29
3.3. Associating Memo Pad with your smartphone....30
3.4. Associating Memo Clip with your smartphone....32
3.5. Duration and Monitoring of Battery Level......37
3.6. Settings..... 38
-
Memo maintenance....39
-
Customersupport......39
ENGLISH Instructions for use
1. Product information
Memo is a device that can support parents/carers who are supervising children under the age of 4 years.
Memo must be placed in the seat of the car seat. It detects the presence of a child through its special sensors, and communicates with the specific app available from the App Store and Play Store.
Using only approved car seats that comply with the laws in force is recommended.
Read the car seat instructions before placing Memo on it.
Parents who leave the car with a child seated in the car seat are warned by the app through a sound alarm. If this first alarm level is not deactivated by the parent, a second alarm level is triggered, which consists in sending a text message to a number of contacts previously selected by the user.
The saved emergency contacts must be mobile phone numbers. The text message contains the geographical coordinates of the place the child was left in. Text messages are included in the product's cost and do not affect the user's phone credit, as they work through mobile data (internet) and they also work if text messages are not included in the cell phone plan.
Memo has been designed as a device to support parents and does not replace parental supervision.
Before every use, check Memo is working correctly.
Additionally, check that:
- Your smartphone's Bluetooth® is active;
- Memo is correctly associated with the smartphone;
- The smartphone's mobile data (internet) function is active and there is enough credit for it to work correctly;
- GPS and localisation services are active, in order to send the correct geographical coordinates.
Please be aware that if the smartphone is switched off, Memo cannot work correctly.
1.1. General warnings
- Memo Pad is compatible with all PegPerego car seats and bassinets. WARNING: when used with i-Size car seats, the seat size is reduced by 5 cm.
- Only use Memo Clip on PegPerego i-Size car seats.
- View the complete list of car seats Memo can be used on in the PegPerego website: memo.pegperego.com
- Do not use accessories which are not approved by the manufacturer.
- Packaging materials (plastic bags, cardboard boxes, etc.) must not be left within the reach of children because they are potential hazards.
- Before using Memo, check that all its elements are undamaged. If any are, do not use Memo and contact qualified staff or the retailer.
- To avoid over-heating, keep Memo away from sources of heat such as radiators, stoves, cookers, etc.
- Do not short circuit the power clamps.
1.2. Technical features
- System requirements for Android OS: compatibility with Android 5.0 and higher;
- System requirements for iOS: compatibility with OS 10.0 and higher;
You should first check if the device used is compatible with the available version of the App.
- Communication Technology: Bluetooth® Low Energy;
- Frequency band: 2.4 - 2.485GHz;
- Transmission power: 2.51 mW;
- Power source: CR 2430 battery, non-replaceable;
- Working temperature: -20°C +60°C .
- Protection rating: Memo Pad: IP67 Memo Clip: IP40
CE
THIS PRODUCT COMPLIESWITHDIRECTIVE 2012/19/EU.
The crossed-out wheelie bin on the device indicates that the product, at the end of its working life, cannot be disposed of as household waste. It must be taken to a specific collection point for waste electrical and electronic equipment or returned to the retailer when a new equivalent device is bought. The separate disposal of the batteries inside the product will be managed by the body that deals with WEEE disposal.
Users are responsible for delivering the device to the appropriate waste facilities at the end of the product's working life. Appropriate waste separation for recycling the old product, for environmentally friendly treatment and disposal, contributes to preventing possible negative effects on the environment and on health and helps recycle the materials the product is made of.
The illegal disposal of the product by the user will result in the application of the administrative fines listed in Lgs. D. no. 22/1997 (art. 50 and following of Lgs. D. 22/97).
For more detailed information on available collection systems, contact your local waste dealer or the shop you bought the device from.
COMPLIES WITH EU DIRECTIVE 2006/66/EC AND LATER AMENDMENTS.
The crossed-out wheelie bin on the batteries or on the product's packaging indicates that these items, at the end of their working life, cannot be disposed of as household waste. They must be taken to a specific collection point or returned to the retailer when new, equivalent rechargeable and non-rechargeable batteries are bought. The separate disposal of the batteries inside the product will be managed by the body that deals with WEEE disposal. In Italy, retailers that sell EEE in stores smaller than 400 m2 can (but are not legally required to do so, according to the "Uno contro Zero" Decree no. 121, 31 May 2016) collect small electrical devices
for disposal. The same applies to e-commerce stores.
The chemical symbol under the crossed-out wheelie bin (Hg, Cd, Pb) indicates the type of substance contained in the battery, Hg = Mercury, Cd = Cadmium, Pb = Lead. Users are responsible for delivering the batteries to the appropriate waste facilities at the end of the products' working life to help with recycling and disposal.
Appropriate waste separation for recycling used batteries, for environmentally friendly treatment and disposal, contributes to preventing possible negative effects on the environment and on human health and helps recycle the materials the batteries are made of. The illegal disposal of the product into the environment damages the environment and human health.
For more detailed information on available collection systems, contact your local waste dealer or the shop you bought the device from.
1.3. Declaration of conformity
PegPerego declares that Memo complies with the Ministerial Decree n.122 of 02/10/2019. It also complies with the essential requirements and the other relevant provisions set forth in Directive 2014/53/EU.
In compliance with the European Commission decision No. 2000/299/EC of 06/04/2000, the frequency band used by this product is harmonised in all EU states. This device is therefore a class 1 product and can be freely used in all the states of the European Union. PegPerego reserves the right to change the contents of this instructions manual at any time and without notice. The reproduction, transmission, transcription and translation into another language (including partially) of this manual are strictly prohibited without the prior written authorisation of PegPerego.
1.4. Warranty
The product is guaranteed against all conformity flaws in normal conditions of use, as envisaged in the instructions for use. The warranty therefore does not apply in the case of damage caused by incorrect use, wear-and-tear or accidental events. The duration of the warranty depends on the specific provisions of the applicable laws of the country the product is bought in, if there are any.
2 Installing Memo
2.1 Memo Pad
- Install Memo Pad on the car seat (as shown in Figure 1), slipping the buckle of the crotch strap through the horizontal slot in the Memo Pad (shown in Figure 2).
Make sure the Memo text is visible and placed facing upwards.
PLEASE NOTE:
If the car seat does not have crotch strap, Memo must be placed under the seat cover of the car seat.
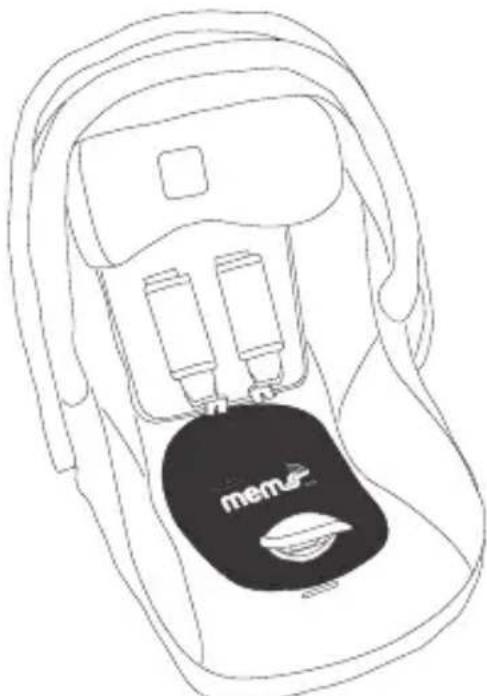
Figure 1. Correct installation of Memo Pad on the car seat.

Figure 2. Memo Pad horizontal slot.
2.2 Memo Clip
Install Memo Clip on the car seat's harness.
If it is already present (Figure 1)
remove the current chest clip (Figure 2) and install Memo Clip (Figure 3 and 4).
How to proceed:
- Remove the chest clip that came with the seat from the 4 four strap slots (Figure 2).
Open Memo Clip and place it on the car seat's harness.
Attach one element at the time.
- Slip the car seat's straps through the 4 openings in the Memo Clip (Figures 3 and 4).
- Correctly attached Memo Clip (Figure 5).
NOTES
Follow the instructions for the item to work properly. Close Memo Clip only when specified (page 33).
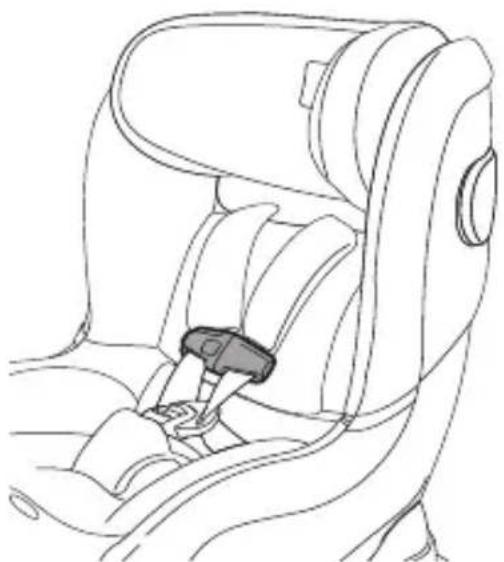
Figure 1. Chest clip Applied onto your car seat.
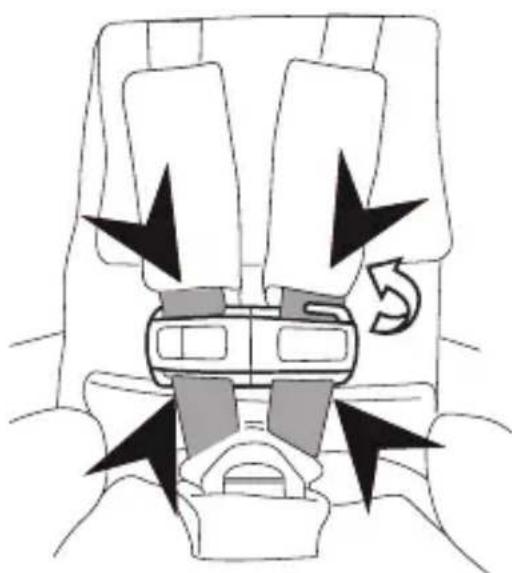
Figure 2. How to remove the chest clip that was supplied with the car seat.
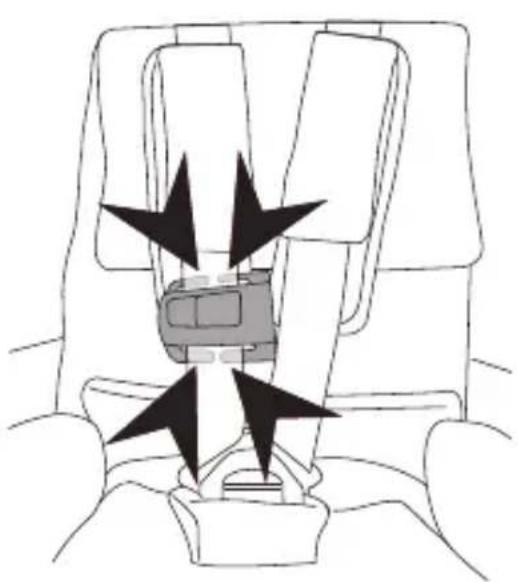
Figure 3. How to attach the left Memo Clip.
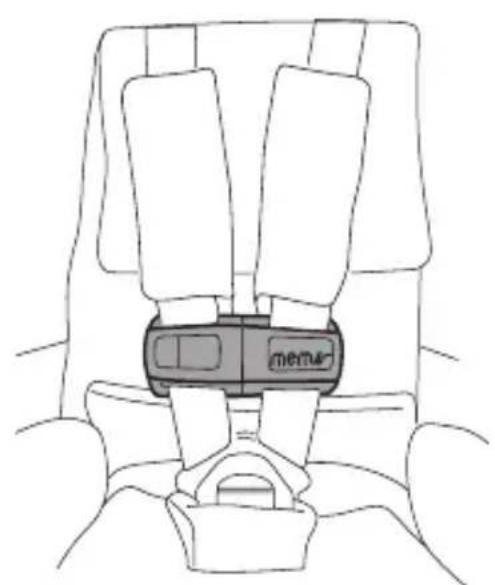
Figure 5. Correctly attached Memo Clip.
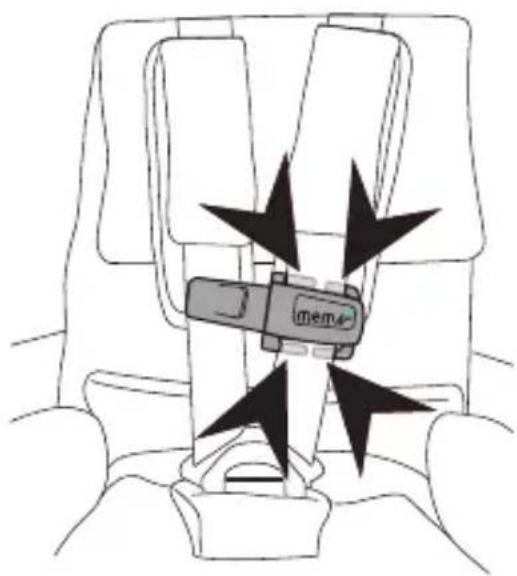
Figure 4. How to attach the right Memo Clip.
3. Functions provided by the mobile App
3.1. Downloading the Android/iOS app
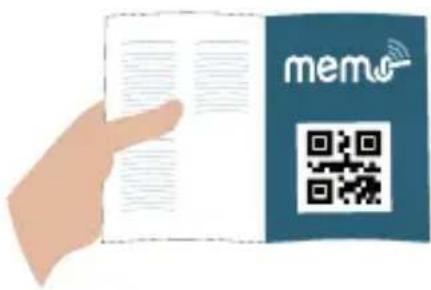
- The "Memo" app is available from App Store and Google Play Store. To download it, enter "Memo" in the store search box or scan the QR on the back of this manual.
3.2. How to register for the service
- To register for this service, click on "Register" and enter your details. Alternatively, login through a Facebook or Google account (Figure 1).
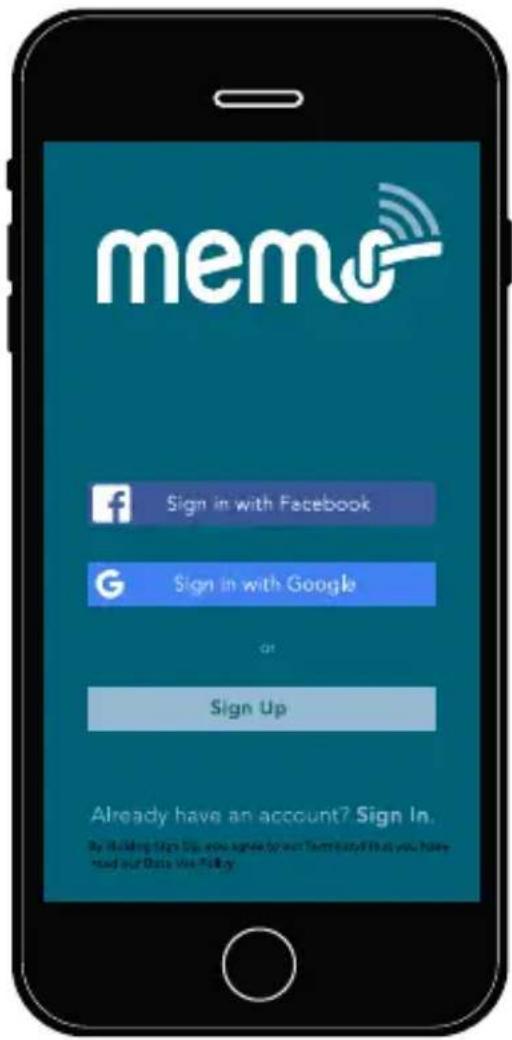
Figure 1. Registering for the service.
3.3. Associating Memo Pad with your smartphone
-
Upon opening, the app displays the first window (Figure 1). If the phone's Bluetooth is not active, the app will ask you to activate it. To associate Memo Pad with the smartphone, click on the symbol of the pad icon.
-
After clicking on the symbol, the association window will be displayed (Figure 2).
You can associate up to 4 devices with the app by repeating the association sequence.

Figure 1. First window.
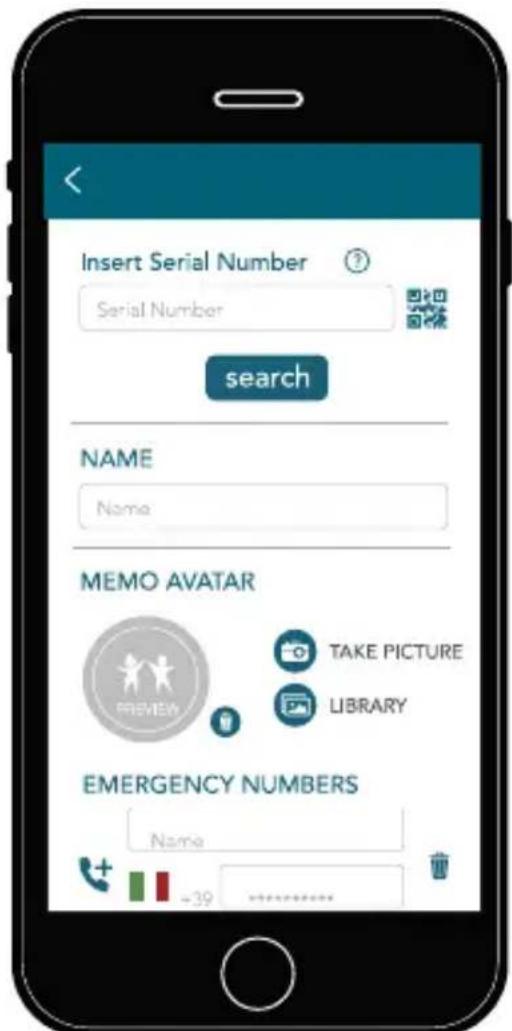
Figure 2. Association window.
After correctly installing Memo Pad on the car seat (as shown in the "Installing Memo Pad on the car seat" paragraph), press the central part of Memo Pad (Figure 3) and place the smartphone near it.
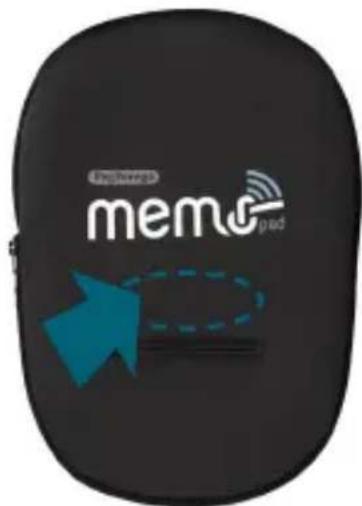
Figure 3. Central part of Memo Pad.
- After pressing the central part of Memo Pad, enter the Serial Number by scanning the QR code on the first page of this manual or inside the Memo Pad, opening the zip (Figure 4).
Alternatively, you can enter the serial number (written next to the QR code) manually and then click on the "Search" button. When the association is complete, the app will display a "Device associated" confirmation message.
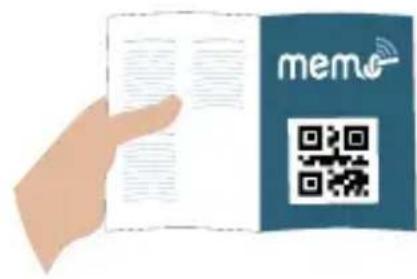

Figure 4. QR-code in the instruction manual. QR-code inside Memo Pad.
3.4. Associating Memo Clip with your smartphone
-
Upon opening, the app displays the first window (Figure 1). If the phone's Bluetooth is not active, the app will ask you to activate it. To associate Memo Clip with the smartphone, click on the symbol ⊕ of the clip icon.
-
After clicking on the ⊕ symbol, the association window will be displayed (Figure 2).
You can associate up to 4 devices with the app by repeating the association sequence.
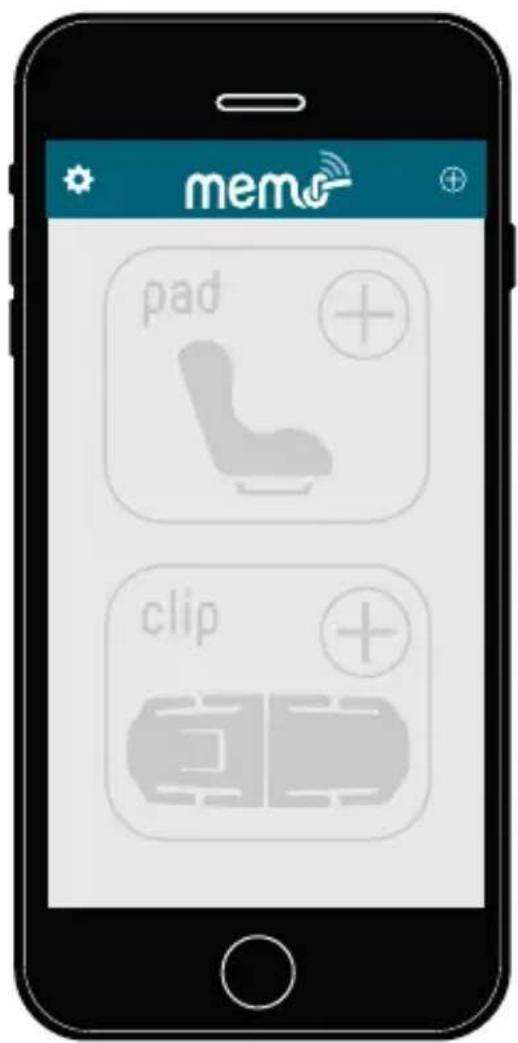
Figure 1. First window.
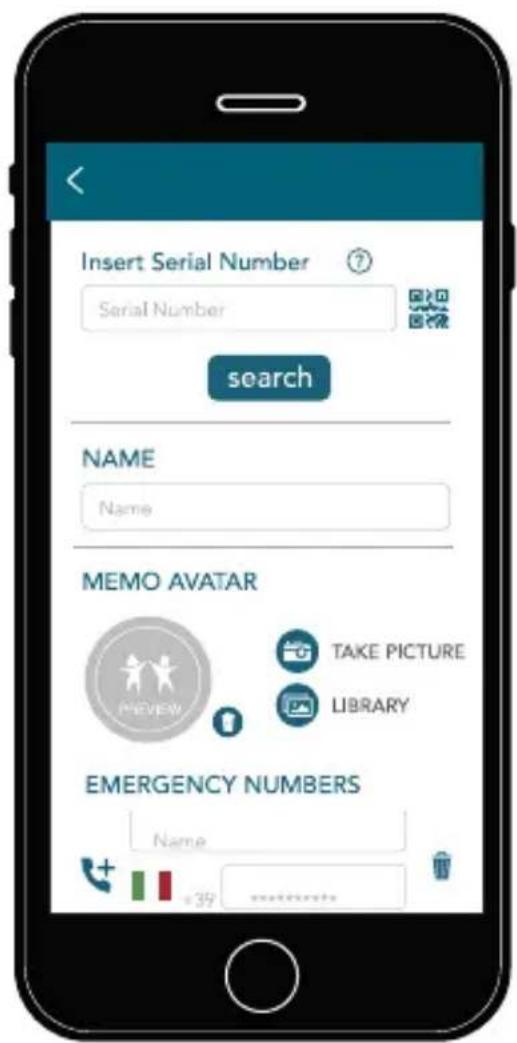
Figure 2. Association window.
After correctly installing Memo Clip on the car seat harness (as shown in the "Installing Memo Clip on the car seat" paragraph), fasten Memo Clip (Figure 3) and place the smartphone near it.
- After fastening Memo Clip, enter the Serial Number by scanning the QR code on the first page of this manual or on the back of Memo Clip (Figure 4). Alternatively, you can enter the serial number (written next to the QR code) manually and then click on the "Search" button. When the association is complete, the app will display a "Device associated" confirmation message.
![graph TD A["Top Left Car"] --> B["Top Right Car"] B --> C["Bottom Right Car with 'mem' logo"] style A fill:#f9f,stroke:#333 style B fill:#ccf,stroke:#333 style C fill:#cfc,stroke:#333](/content/2026/07/1527343/images/3b5b3d1a9ac4ad6c3f5de1922a821e36a644aa6873ded4cd8349df705b2ddd2f.jpg)
Figure 3. Fastening Memo Clip.
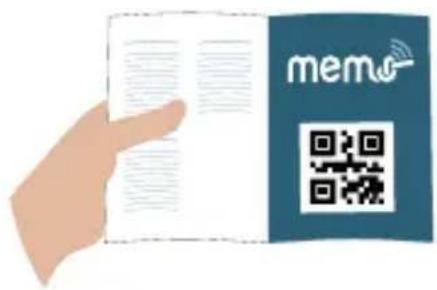
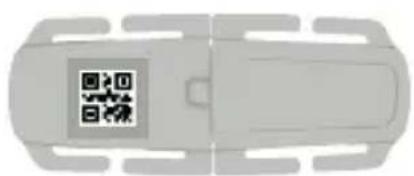
Figure 4. QR-code in the instruction manual. QR-code on the back of Memo Clip.
- After associating the device with the smartphone, enter the name of the child who sits in the car seat and the telephone contacts to whom the emergency text is sent to (Figure 5). At least 1 emergency contact is needed to use the device.

Figure 5. Association window - Entering profile data and emergency contacts.
- Save the data by clicking on "Save".
- Up to 4 Memo Pads or Memo Clips can be associated with one smartphone, or a combination of the two up to a maximum of 4.
- Figure 6 shows the first window of the app after the association of two Memo.
Please remember that the texts are included in the product's cost and do not affect the customer's telephone credit.

Figure 6. First window after the association of two associated Memo.
Each Memo can be in one of four statuses:
1) "Disconnected": the parent is moving away from Memo and the child is not sitting in the car seat.
2) "Connected": the parent is moving closer to Memo and the child is not sitting in the car seat.
E.g. The parent is in the car, near the car seat, which is empty.
3) "Connected with child sitting": the parent is close to Memo and the child is sitting in the car seat.
E.g. the parent is in the car, near the car seat on which the child is sitting.
4) "Disconnected with child sitting": the parent is not near Memo and the child is sitting in the car seat.
E.g. the parent has moved away from the car, leaving the child sitting in the car seat.
Once Memo has entered the "Disconnected with child sitting" status, an alarm sound is set off and a 40-second countdown is started. During this time interval, the parent can silence the alarm and prevent the texts from being sent (Figure 7).
The generation of the alarm message and sending the emergency texts are functions that remain active even when the applications are in the background.
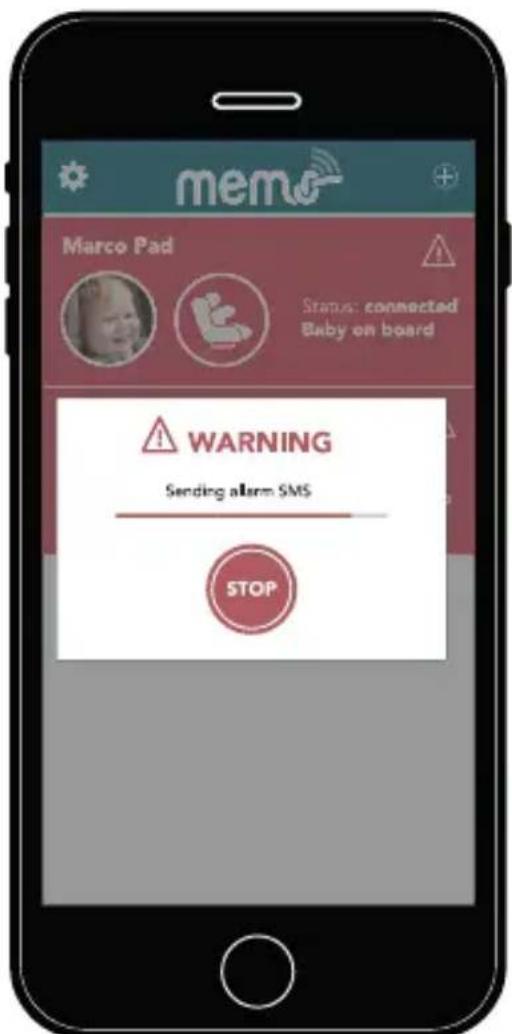
Figure 7. Alarm window.
3.5. Duration and Monitoring Battery Level
The estimated duration of the battery is 4 years, based on 2-hours' use per day.
Memo's battery level can be displayed in the app's main window, when Memo is "connected with child sitting".
If the battery's charge is low, the user will receive a message from the app (Figure 1), which will provide the instructions to follow.
The user must contact the retailer or customer service to have the product replaced.

Figure 1. Low battery power window.
3.6. Settings
Click on the first window symbol ⚙ (Figure 1) to access the app's settings.
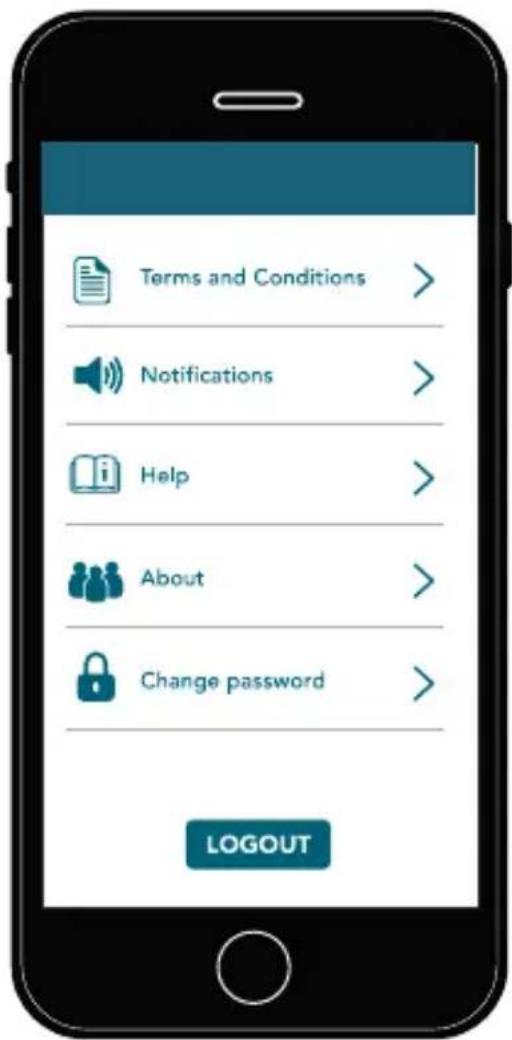
Figure 1. Settings window.
From this section you can:
- Change the alarm sound (click on "Notifications");
- Read the terms and conditions of use (click on "Terms and conditions of use");
Display an interactive guide for the use of Memo (click on "Help").
- To exit the app, click on "Logout". After logging out, the app will cease working and it will no longer be possible to detect the presence of the child in the car seat. To use Memo correctly, enter the app again.
PLEASE NOTE:
All iOS devices that have logged out must be associated with the previously registered Memo for the system to work correctly.
4. Maintenance
4.1. Memo Pad
The external cover can be removed and washed according to the instructions on the label.
Follow the instructions carefully to avoid damage.
- Open the zip and extract the inside, storing it in a clean, dry place while it has no cover.
- After washing, put the inside back in, positioning the weight sensor facing the side of the cover with "Memo Pad" written on it.
- Do not tamper with the inside or take it apart. Do not remove the weight sensor.
4.2. Memo Clip
Do not wet with water or detergents to avoid technical damage to the product.
Clean with a dry cloth.
5. Customer Support
For information and assistance, please write to: assistenza@pegperego.com
All of the intellectual property rights for the contents of this instruction manual belong to PegPerego S.p.A. and are protected by the laws in force.
memo
Scansiona il QR code per scansionare l'App Memo Scan the QR code to download the Memo App




- ENGLISH – INSTRUCTIONS FOR USE......22
- PRODUCT INFORMATION....22
- INSTALLING MEMO....26
- FUNCTIONS PROVIDED BY THE MOBILE APP....29
- ENGLISH INSTRUCTIONS FOR USE
- PRODUCT INFORMATION
- GENERAL WARNINGS
- TECHNICAL FEATURES
- CE
- DECLARATION OF CONFORMITY
- WARRANTY
- 2 INSTALLING MEMO
- 2.1 MEMO PAD
- PLEASE NOTE
- 2.2 MEMO CLIP
- NOTES
- FUNCTIONS PROVIDED BY THE MOBILE APP
- DOWNLOADING THE ANDROID/IOS APP
- HOW TO REGISTER FOR THE SERVICE
- ASSOCIATING MEMO PAD WITH YOUR SMARTPHONE
- ASSOCIATING MEMO CLIP WITH YOUR SMARTPHONE
- DURATION AND MONITORING BATTERY LEVEL
- SETTINGS
- MAINTENANCE
- MEMO PAD
- MEMO CLIP
- CUSTOMER SUPPORT
- MEMO
Brand : PEG PEREGO
Model : Memo Clip
Category : Car seat