
418EL - Saw HUSQVARNA - Free user manual and instructions
Find the device manual for free 418EL HUSQVARNA in PDF.
| Product type | Electric saw (electric chainsaw) |
| Brand | Husqvarna |
| Model | 418EL |
| Supply voltage | 230-240 V |
| Power | 1800 W |
| Motor type | AC series motor |
| Lubrication system | Automatic |
| Oil tank capacity | 0.20 L |
| Weight (without bar and chain) | 4.7 kg |
| Recommended bar length | 14 inches (35 cm) or 16 inches (40 cm) |
| Chain pitch | 3/8 inch |
| Bar groove width | 1.3 mm |
| Number of drive sprocket teeth | 6 |
| Guaranteed sound power level | 103 dB(A) |
| Sound pressure level at ear | 90.8 dB(A) |
| Vibrations (front handle) | 5.2 m/s² |
| Vibrations (rear handle) | 3.9 m/s² |
| Double insulation | Yes |
| Chain brake | Yes, with protective guard |
| Trigger lock | Yes |
| Chain catcher | Yes |
| Felling spike | Yes |
| Protective scabbard included | Yes |
| Oil autonomy | Approximately 15 minutes of continuous use |
Frequently Asked Questions - 418EL HUSQVARNA
User questions about 418EL HUSQVARNA
0 question about this device. Answer the ones you know or ask your own.
Ask a new question about this device
Download the instructions for your Saw in PDF format for free! Find your manual 418EL - HUSQVARNA and take your electronic device back in hand. On this page are published all the documents necessary for the use of your device. 418EL by HUSQVARNA.
USER MANUAL 418EL HUSQVARNA
DK Brugsanvising, 29-52
NO Bruksanvisning, 53-74
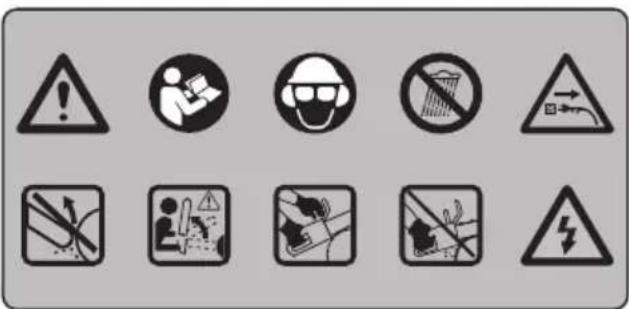
Symbols on the machine:
Translation of the original Swedish operating instruction.
WARNING! Chain saws can be dangerous! Careless or incorrect use can result in serious or fatal injury to the operator or others.

Please read the operator's manual carefully and make sure you understand the instructions before using the machine.

Always wear:
Approved protective helmet
Hearing protection
- Protective goggles or a visor
This product is in accordance with applicable EC directives.
Noise emission to the environment according to the European Community's Directive. The machine's emission is specified in the Technical data chapter and on the label.
Both of the operator's hands must be used to operate the chain saw.
Never operate a chain saw holding it with one hand only.
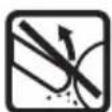
Never let the guide bar tip come in contact with any object.
WARNING! Kickback may occur when the nose or tip of the guide bar touches an object, and cause a lightning fast reverse reaction, kicking the guide bar up and towards the operator. May cause serious personal injury.
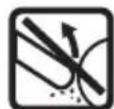
Direction of rotation of the saw chain and maximum length of the guide bar.
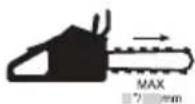
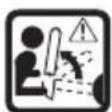
Keep bystanders away.


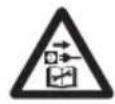
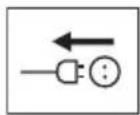
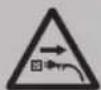
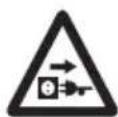
Disconnect the plug before adjusting or cleaning.
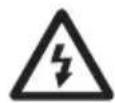
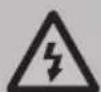
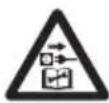
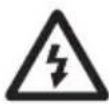
Risk of electric shock.
Remove plug from power supply immediately if the cable is damaged or cut.
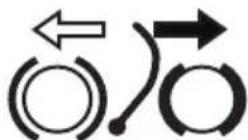
Chain brake, activated (right)
Chain brake, not activated (left)
Chain oil fill.
Environmental marking. Symbols on the product or its packaging indicate that this product cannot be handled as domestic waste. It must instead be submitted to an appropriate recycling station for the recovery of electrical and electronic equipment.
Do not expose to rain.
Double insulation
Other symbols/decals on the machine refer to special certification requirements for certain markets.


Symbols in the operator's manual:
Always unplug the product from the power supply when assembling, checking and/or performing maintenance.
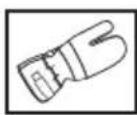
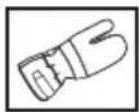
Always wear approved protective gloves.
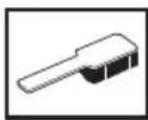
Regular cleaning is required.
Visual check.
The chain brake must be engaged when the chain saw is started.
WARNING! Kickback may occur when the nose or tip of the guide bar touches an object, and cause a lightning fast reverse reaction, kicking the guide bar up and towards the operator. May cause serious personal injury.
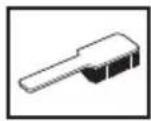
Carton contents:
Chainsaw
Saw chain
Guide bar
Operator's manual
Guide-bar cover


You will find the following decals on your machine.

Model PNC 1420-06700564
418EL 967208814
230-240V-1800W
230-240V 1600W
Year/Month
20
Serial No.
20
HUSQVARNAAB,SE-56182 HUSKVARNA,SWEDEN

E
图2
12x - 1 > 3 - 52x
USKVARI

m = 311
147股同意0股反对0股弃权


Made in China 852V68-6

420E 967305716
200L 907203Wet Rated Box
230-240V~,2000W
2006年1月1日
0
20
Serial No.
20
HUSQVARNAAB,SE-56182 HUSKVARNA,SWEDEN


Made in China 852/69-


m = 311
A
CONTENTS
Contents
KEY TO SYMBOLS
Symbols on the machine: 99
Symbols in the operator's manual: 100
Carton contents: 100
CONTENTS
Contents 101
INTRODUCTION
Dear Customer, 102
WHAT IS WHAT?
What is what on the chain saw? 102
GENERAL SAFETY PRECAUTIONS
General power tool safety warnings 103
Before using a new chain saw 105
Important 106
Always use common sense 106
Personal protective equipment 106
Machine's safety equipment 106
Chain brake and front hand guard 107
Cutting equipment 108
ASSEMBLY
Fitting the bar and chain 112
STARTING AND STOPPING
Starting and stopping 113
WORKING TECHNIQUES
Before use: 114
General working instructions 114
How to avoid kickback 117
MAINTENANCE
General 118
Checking, maintaining and servicing chain saw
safety equipment 118
Lubricating the bar tip sprocket 118
Cooling system 118
Maintenance schedule 119
TECHNICAL DATA
Technical data 120
Guide bar and saw chain combinations 121
Saw chain filing and file gauges 121
EC Declaration of Conformity 121
Dear Customer,
Congratulations on your choice to buy a Husqvarna product! Husqvarna is based on a tradition that dates back to 1689, when the Swedish King Karl XI ordered the construction of a factory on the banks of the Husqvarna River, for production of muskets. The location was logical, since water power was harnessed from the Huskvarna River to create the water-powered plant. During the more than 300 years in existence, the Husqvarna factory has produced a lot of different products, from wood stoves to modern kitchen appliances, sewing machines, bicycles, motorcycles etc. In 1956, the first motor driven lawn mowers appeared, followed by chain saws in 1959, and it is within this area Husqvarna is working today.
Today Husqvarna is one of the leading manufacturers in the world of forest and garden products, with quality as our highest priority. The business concept is to develop, manufacture and market motor-driven products for forestry and gardening, as well as for the building and construction industry. Husqvarna's aim is also to be at the front edge for ergonomics, usability, security and environmental protection. That is the reason why we have developed many different features to add to our products within these areas.
We are convinced that you will appreciate with great satisfaction the quality and performance of our product for a very long time to come. The purchase of one of our products gives you access to professional help with repairs and service whenever this may be necessary. If the retailer who sells your machine is not one of our authorized dealers, ask for the address of your nearest service workshop.
It is our wish that you will be satisfied with your product and that it will be your companion for a long time. Think of this operator's manual as a valuable document. By following its content (usage, service, maintenance, etc), the life span and the second-hand value of the machine can be extended. If you sell this machine, make sure that the operator's manual is passed on to the buyer.
Thank you for using a Husqvarna product.
Husqvarna AB has a policy of continuous product development and therefore reserves the right to modify the design and appearance of products without prior notice.
What is what on the chain saw? (1)
1 Rear handle
2 Power trigger
3 Front handle
4 Front hand guard
5 Guide bar
6 Saw chain
7 Knob
8 Adjusting screw/dial
9 Drive spocket cover
10 Rear hand guard
11 Spiked bumper
12 Oil level sight
13 Oil filler cap
14 Trigger lockout button
15 Chain catcher
16 Adjusting screw for oil pump
17 Guide-bar cover
18 Operator's manual
General power tool safety warnings

WARNING! Read all safety warnings and all instructions. Failure to follow the warnings and instructions may result in electric shock, fire and/or serious injury.
IMPORTANT! Save all warnings and instructions for future reference. The term "power tool" in the warnings refers to your mains-operated (corded) power tool or battery-operated (cordless) power tool.
Work area safety
- Keep work area clean and well lit. Cluttered or dark areas invite accidents.
- Do not operate power tools in explosive atmospheres, such as in the presence of flammable liquids, gases or dust. Power tools create sparks which may ignite the dust or fumes.
- Keep children and bystanders away while operating a power tool. Distractions can cause you to lose control.
Electrical safety
- Power tool plugs must match the outlet. Never modify the plug in any way. Do not use any adapter plugs with earthed (grounded) power tools. Unmodified plugs and matching outlets will reduce the risk of electric shock.
- Avoid body contact with earthed or grounded surfaces, such as pipes, radiators, ranges and refrigerators. There is an increased risk of electric shock if your body is earthed or grounded.
- Do not expose power tools to rain or wet conditions. Water entering a power tool will increase the risk of electric shock.
- Do not abuse the cord. Never use the cord for carrying, pulling or unplugging the power tool. Keep cord away from heat, oil, sharp edges or moving parts. Damaged or entangled cords increase the risk of electric shock.
- When operating a power tool outdoors, use an extension cord suitable for outdoor use. Use of a cord suitable for outdoor use reduces the risk of electric shock.
- If operating a power tool in a damp location is unavoidable, use a residual current device (RCD) protected supply. Use of an RCD reduces the risk of electric shock.
Personal safety
- Stay alert, watch what you are doing and use common sense when operating a power tool. Do not use a power tool while you are tired or under
the influence of drugs, alcohol or medication. A moment of inattention while operating power tools may result in serious personal injury.
- Use personal protective equipment. Always wear eye protection. Protective equipment such as dust mask, non-skid safety shoes, hard hat, or hearing protection used for appropriate conditions will reduce personal injuries.
- Prevent unintentional starting. Ensure the switch is in the OFF-position before connecting to power source and/or battery pack, picking up or carrying the tool. Carrying power tools with your finger on the switch or energising power tools that have the switch on invites accidents.
- Remove any adjusting key or wrench before turning the power tool on. A wrench or a key left attached to a rotating part of the power tool may result in personal injury.
- Do not overreach. Keep proper footing and balance at all times. This enables better control of the power tool in unexpected situations.
- Dress properly. Do not wear loose clothing or jewellery. Keep your hair, clothing and gloves away from moving parts. Loose clothes, jewellery or long hair can be caught in moving parts.
- If devices are provided for the connection of dust extraction and collection facilities, ensure these are connected and properly used. Use of dust collection can reduce dust-related hazards.
Power tool use and care
- Do not force the power tool. Use the correct power tool for your application. The correct power tool will do the job better and safer at the rate for which it was designed.
- Do not use the power tool if the switch does not turn it on and off. Any power tool that cannot be controlled with the switch is dangerous and must be repaired.
- Disconnect the plug from the power source and/or the battery pack from the power tool before making any adjustments, changing accessories, or storing power tools. Such preventive safety measures reduce the risk of starting the power tool accidentally.
- Store idle power tools out of the reach of children and do not allow persons unfamiliar with the power tool or these instructions to operate the power tool. Power tools are dangerous in the hands of untrained users.
-
Maintain power tools. Check for misalignment or binding of moving parts, breakage of parts and any other condition that may affect the power tool's operation. If damaged, have the power tool repaired before use. Many accidents are caused by poorly maintained power tools.
-
Keep cutting tools sharp and clean. Properly maintained cutting tools with sharp cutting edges are less likely to bind and are easier to control.
- Use the power tool, accessories and tool bits etc. in accordance with these instructions, taking into account the working conditions and the work to be performed. Use of the power tool for operations different from those intended could result in a hazardous situation.
Service
- Have your power tool serviced by a qualified repair person using only identical replacement parts. This will ensure that the safety of the power tool is maintained.
Chain saw safety warnings
- Keep all parts of the body away from the saw chain when the chain saw is operating. Before you start the chain saw, make sure the saw chain is not contacting anything. A moment of inattention while operating chain saws may cause entanglement of you clothing or body with the saw chain.
- Always hold the chain saw with your right hand on the rear handle and your left hand on the front handle. Holding the chain saw with a reversed hand configuration increases the risk of personal injury and should never be done.
- Hold the power tool by insulated gripping surface only, because the saw chain may contact hidden wiring or its own cord. Saw chain contacting a "live" wire may make exposed metal parts of the power tool "live" and could give the operator an electric shock.
- Wear safety glasses and hearing protection. Further protective equipment for head, hands, legs and feet is recommended. Adequate protective clothing will reduce personal injury by flying debris or accidental contact with the saw chain.
- Do not operate a chain saw in a tree. Operation of chain saw while up a tree may result in personal injury.
- Always keep proper footing and operate the chain saw only when standing on fixed, secure and level surface. Slippery or unstable surfaces such as ladders may cause a loss of balance or control of the chain saw.
- When cutting a limb that is under tension be alert for spring back. When the tension in the wood fibres is released the spring loaded limb may strike the operator and/or throw the chain saw out of control.
- Use extreme caution when cutting brush and saplings. The slender material may catch the saw chain and be whipped forward toward you or pull you off balance.
- Carry the chain saw by the front handle with the chain saw switched off and away from your body. When transporting or storing the chain saw always fit the guide bar cover. Proper handling of
the chain saw will reduce the likelihood of accidental contact with the moving saw chain.
- Follow instruction for lubricating, chain tensioning and changing accessories. Improperly tensioned or lubricated saw chain may either brake or increase the chance of kickback.
- Keep handles dry, clean and free from oil and grease. Greasy, oily handles are slippery causing loss of control.
- Cut wood only. Do not use chain saw for purposes not intended. For example: do not use chain saw for cutting plastic, masonry or nonwood building materials. Use of the chain saw for operations different than intended could result in a hazardous situation.
- We strongly recommend that first time users practice sawing logs on a saw horse or cradle.
Causes and operator prevention of kickback
- Kickback may occur when the nose or tip of the guide bar touches an object, or when the wood closes in and pinches the saw chain in the cut. Tip contact in some cases may cause a sudden reverse reaction, kicking the guide bar up and back towards the operator. Pinching the saw chain along the top of the guide bar may push the guide bar rapidly back towards the operator. Either of these reactions may cause you to lose control of the saw which could result in serious personal injury. Do not rely exclusively upon the safety devises built into your saw. As a chain saw user, you should take several steps to keep your cutting jobs free from accident or injury. Kickback is a result of tool misuse and/or incorrect operating procedures or conditions and can be avoided by taking proper precautions as given below:
- Maintain a firm grip, with thumbs and fingers encircling the chain saw handles, with both hands on the saw and position your body and arm to allow you to resist kickback forces. Kickback forces can be controlled by the operator, if proper precautions are taken. Do not let go of the chain saw.
- Do not overreach and do not cut above shoulder height. This helps prevent unintended tip contact and enables better control of the chain saw in unexpected situations.
- Only use replacement bars and chains specified by the manufacturer. Incorrect replacement bars and chains may cause chain breakage and/or kickback.
- Follow the manufacturer's sharpening and maintenance instructions for the saw chain. Decreasing the depth gauge height can lead to increased kickback.
Electrical safety
- It is recommended that you use a Residual Current Device (RCD) with a tripping current of not more than 30mA . Even with a RCD installed 100% safety cannot be guaranteed and safe working practice must be followed at all times. Check your RCD every time you use it.
- Before use, examine the cable for signs of damage or ageing. If the cable is found to be defective, take the product to an Authorized Service Center and have the cable replaced.
- Do not use the product if the electric cables are damaged or worn.
- Immediately disconnect from the mains electricity supply if the cable is cut, or the insulation is damaged. Do not touch the electric cable until the electrical supply has been disconnected. Do not repair a cut or damaged cable. Take the product to an Authorised Service Centre and have the cable replaced with a genuine spare cable.
- Always make sure that the cable/extension cord is kept behind the user, ensuring that it does not create a source of danger for the user or for other persons, and check that it cannot be damaged (by heat, sharp objects, sharp edges, oil, etc);
- Position the cable so that it will not be caught on branches and the like, during cutting.
- Always switch off at the mains before disconnecting any plug, cable connector or extension cable.
- Switch off, remove plug from the mains and examine electric cable for damage or ageing before winding cable for storage. Do not repair a damaged cable. Take the product to an Authorised Service Centre and have the cable replaced.
- Remove the plug from the mains before leaving the product unattended for any period.
Always wind cable carefully, avoiding kinking. - Use only on AC mains voltage shown on the product rating label.
The chainsaw is double insulated to EN60745-1 & 2-13. - Make sure your extension cord is in good condition. Inspect extension cord before use and replace if damaged. Do not use a damaged cord. Cord insulation must be intact with no cracks or deterioration. Plug connectors must be undamaged. Damaged extension cords increase the risk of electric shock.
- Residual Current Device (RCD) protection should be provided on circuit or outlet to be used. Receptacles are available having built-in RCD protection and may be used for this measure of safety. Inspect chain saw cords periodically and if damaged, have repaired by an authorized service dealer.
Cables
- Extension cables are available from your local Approved Service Centre.
- Only use approved extension cables.
- Extension cables and leads should only be used if they are designed for outdoor use and comply with H07 RN-F or IEC 60245 designation 66.
Before using a new chain saw
- Please read this manual carefully.
- Fill with chain oil. See instructions under the heading Filling with chain oil.
- Do not use the chain saw until sufficient chain oil has reached the chain. See instructions under the heading Lubricating cutting equipment.
- Check that the cutting equipment is correctly fitted and adjusted. See instructions under the heading Assembly.
- Long-term exposure to noise can result in permanent hearing impairment. So always use approved hearing protection.
- This saw is intended for use between the temperatures of -20^ (-4^) and +40^ (104^) .

WARNING! Under no circumstances may the design of the machine be modified without the permission of the manufacturer. Always use original accessories. Non-authorized modifications and/or accessories can result in serious personal injury or the death of the operator or others.

WARNING! A chain saw is a dangerous tool if used carelessly or incorrectly and can cause serious, even fatal injuries. It is very important that you read and understand the contents of this operator's manual.

WARNING! This machine produces an electromagnetic field during operation. This field may under some circumstances interfere with active or passive medical implants. To reduce the risk of serious or fatal injury, we recommend persons with medical implants to consult their physician and the medical implant manufacturer before operating this machine.

WARNING! Long term inhalation of chain oil mist and dust from sawdust can represent a health risk.
Important
IMPORTANT!
This chain saw for tree service is designed for pruning and dismantling standing tree crowns.
You should only use the saw with the bar and chain combinations we recommend in the chapter Technical data.
Never use the machine if you are fatigued, while under the influence of alcohol or drugs, medication or anything that could affect your vision, alertness, coordination or judgement.
Wear personal protective equipment. See instructions under the "Personal protective equipment" heading.
Do not modify this product or use it if it appears to have been modified by others.
Never use a machine, battery or battery charger that is faulty. Carry out the checks, maintenance and service instructions described in this manual. Some maintenance and service measures must be carried out by trained and qualified specialists. See instructions under the heading Maintenance.
Never use any accessories other than those recommended in this manual. See instructions under the headings Cutting equipment and Technical data.
CAUTION! Always wear protective glasses or a face visor to reduce the risk of injury from thrown objects. A chain saw is capable of throwing objects, such as wood chips, small pieces of wood, etc, at great force. This can result in serious injury, especially to the eyes.

WARNING! Faulty cutting equipment or the wrong combination of bar and saw chain increases the risk of kickback! Only use the bar/saw chain combinations we recommend, and follow the filing instructions. See instructions under the heading Technical data.
Always use common sense
It is not possible to cover every conceivable situation you can face when using a chain saw. Always exercise care and use your common sense. Avoid all situations which you consider to be beyond your capability. (2) If you still feel uncertain about operating procedures after reading these instructions, you should consult an expert before continuing. Do not hesitate to contact your dealer or us if you have any questions about the use of the chain saw. We will willingly be of service and provide you with advice as well as help you to use your chain saw both efficiently and safely. Attend a training course in chain saw usage if possible. Your dealer, forestry school or your library can provide information about which training materials and courses are available.
Work is constantly in progress to improve the design and technology - improvements that increase your safety and efficiency. Visit your dealer regularly to see whether you can benefit from new features that have been introduced.
Personal protective equipment

WARNING! Most chain saw accidents happen when the chain touches the operator. You must use approved personal protective equipment whenever you use the machine. Personal protective equipment cannot eliminate the risk of injury but it will reduce the degree of injury if an accident does happen. Ask your dealer for help in choosing the right equipment.
Always wear:
Approved protective helmet
Hearing protection
- Protective goggles or a visor
Gloves with saw protection
- Trousers with saw protection
- Use appropriate protections for arm.
- Boots with saw protection, steel toe-cap and non-slip sole
- Always have a first aid kit nearby.
- Fire Extinguisher and Shovel
Generally clothes should be close-fitting without restricting your freedom of movement.
IMPORTANT! Sparks can come from the bar and chain or other sources. Always have fire extinguishing tools available if you should need them. Help prevent forest fires.

WARNING! Working in a tree requires the use of special cutting and working techniques which must be observed in order to reduce the increased risk of personal injury.
Machine's safety equipment
In this section the machine's safety features and their function are explained. For inspection and maintenance see instructions under the heading Checking, maintaining and servicing chain saw safety equipment. See instructions under the heading, What is what?, to find where these parts are located on your machine.
The life span of the machine can be reduced and the risk of accidents can increase if machine maintenance is not carried out correctly and if service and/or repairs are not
carried out professionally. If you need further information please contact your nearest service workshop.

WARNING! Never use a machine with defective safety components. Safety equipment must be inspected and maintained. See instructions under the heading Checking, maintaining and servicing chain saw safety equipment. If your machine does not pass all the checks, take the saw to a servicing dealer for repair.
Chain brake and front hand guard
Your chain saw is equipped with a chain brake that is designed to stop the chain if you get a kickback. The chain brake reduces the risk of accidents, but only you can prevent them. (3)
Take care when using your saw and make sure the kickback zone of the bar never touches any object. (4)
- The chain brake can be activated manually (by your left hand).
- The brake is applied when the front hand guard is pushed forward.
- This movement activates a spring-loaded mechanism that stops the drive sprocket.
- The front hand guard is not designed solely to activate the chain brake. Another important feature is that it reduces the risk of your left hand hitting the chain if you lose grip of the front handle.
- To release the chain brake pull the front hand guard backwards, towards the front handle.
- The chain brake must be engaged when the chain saw is started.
- Use the chain brake as a "parking brake" when starting and when moving over short distances, to reduce the risk of moving chain accidentally hitting your leg or anyone or anything close by. (5)
- Kickback can be very sudden and violent. Most kickbacks are minor and do not always activate the chain brake. If this happens you should hold the chain saw firmly and not let go.
- The way the chain brake is activated manually depends on the force of the kickback and the position of the chain saw in relation to the object that the kickback zone of the bar strikes.
- If the kickback is less violent or the kickback zone of the bar is closer to you the chain brake will be activated manually by the movement of your left hand. (6)
- In the felling position the left hand is in a position that makes manual activation of the chain brake impossible. With this type of grip, that is when the left hand is placed so that it cannot affect the movement of the front hand guard, the chain brake can only be activated by the inertia action. (7)
Will my hand always activate the chain brake during a kickback?
No. It takes a certain force to move the hand guard forward. If your hand only lightly touches the front guard or slips over it, the force may not be enough to trigger the chain brake. You should also maintain a firm grip of the chain saw handles while working. If you do and experience a kickback, your hand may never leave the front handle and will not activate the chain brake, or the chain brake will only activate after the saw has swung around a considerable distance. In such instances, the chain brake might not have enough time to stop the saw chain before it touches you.
There are also certain positions in which your hand cannot reach the front hand guard to activate the chain brake; for example, when the saw chain is held in felling position.
Will my inertia activated chain brake always activate during kickback in the event of a kickback?
No. First your brake must be in working order. Second the kickback must be strong enough to activate the chain brake. If the chain brake is too sensitive it would activate all the time which would be a nuisance.
Will my chain brake always protect me from injury in the event of a kickback?
No. First, the chain brake must be in working order to provide the intended protection. Second, it must be activated during the kickback as described above to stop the saw chain. Third, the chain brake may be activated but if the bar is too close to you the brake might not have enough time to slow down and stop the chain before the chain saw hits you.
Only you and proper working technique can eliminate kickback and its danger.
Power trigger lockout
The power trigger lockout is designed to prevent accidental operation of the power trigger. When you press the power trigger lockout (A) (i.e when you grasp the handle) it releases the power trigger (B). When you release the handle the power trigger and the power trigger lockout both move back to their original positions. (8)
Chain catcher
The chain catcher is designed to catch the chain if it snaps or jumps off. This should not happen if the chain is properly tensioned (see instructions under the heading Assembly) and if the bar and chain are properly serviced and maintained (see instructions under the heading General working instructions). (9)
Right hand guard
Apart from protecting your hand if the chain jumps or snaps, the right hand guard stops branches and twigs from interfering with your grip on the rear handle. (10)
Vibrations
Cutting hardwoods (most broadleaf trees) creates more vibration than cutting softwoods (most conifers). Cutting with cutting equipment that is blunt or faulty (wrong type or badly sharpened) will increase the vibration level.

WARNING! Under no circumstances may the design of the machine be modified without the permission of the manufacturer. Always use original accessories. Non-authorized modifications and/or accessories can result in serious personal injury or the death of the operator or others.

WARNING! Overexposure to vibration can lead to circulatory damage or nerve damage in people who have impaired circulation. Contact your doctor if you experience symptoms of overexposure to vibration. Such symptoms include numbness, loss of feeling, tingling, pricking, pain, loss of strength, changes in skin colour or condition. These symptoms normally appear in the fingers, hands or wrists. These symptoms may be increased in cold temperatures.
Cutting equipment
This section describes how to choose and maintain your cutting equipment in order to:
- Reduce the risk of kickback.
- Reduce the risk of the saw chain breaking or jumping off the bar.
- Obtain optimal cutting performance.
- Extend the life of cutting equipment.
- Avoid increasing vibration levels.
General rules
- Only use cutting equipment recommended by us! See instructions under the heading Technical data.
- Keep the chain's cutting teeth properly sharpened! Follow our instructions and use the recommended file gauge. A damaged or badly sharpened chain increases the risk of accidents.
-
Maintain the correct depth gauge setting! Follow our instructions and use the recommended depth gauge clearance. Too large a clearance increases the risk of kickback. (18)
-
Keep the chain properly tensioned! If the chain is slack it is more likely to jump off and lead to increased wear on the bar, chain and drive sprocket. (23)
- Keep cutting equipment well lubricated and properly maintained! A poorly lubricated chain is more likely to break and lead to increased wear on the bar, chain and drive sprocket.
Cutting equipment designed to reduce kickback

WARNING! Faulty cutting equipment or the wrong combination of bar and saw chain increases the risk of kickback! Only use the bar/saw chain combinations we recommend, and follow the filing instructions. See instructions under the heading Technical data.
The only way to avoid kickback is to make sure that the kickback zone of the bar never touches anything.
By using cutting equipment with "built-in" kickback reduction and keeping the chain sharp and well-maintained you can reduce the effects of kickback.
Guide bar
The smaller the tip radius the lower the chance of kickback.
Saw chain
A chain is made up of a number of links, which are available in standard and low-kickback versions.
IMPORTANT! No saw chain design eliminates the danger of kickback.

WARNING! Any contact with a rotating saw chain can cause extremely serious injuries.
Some terms that describe the bar and chain
To maintain the safety features of the cutting equipment, you should replace a worn or damaged bar or chain with a bar and chain combinations recommended by Husqvarna. See instructions under the heading Technical Data for a list of replacement bar and chain combinations we recommend.
Guide bar
Length (inches/cm) (12)
Number of teeth on bar tip sprocket (T). (11)
- Chain pitch (inches). The spacing between the drive links of the chain must match the spacing of the teeth on the bar tip sprocket and drive sprocket. (13)
- Number of drive links. The number of drive links is determined by the length of the bar, the chain pitch and the number of teeth on the bar tip sprocket. (15)
- Bar groove width (inches/mm). The groove in the bar must match the width of the chain drive links.
- Chain oil hole and hole for chain tensioner. The bar must be matched to the chain saw design. (14)
Saw chain
- Chain pitch (inches) (13)
- Drive link width (mm/inches) (16)
Number of drive links. (15)
Sharpening your chain and adjusting depth gauge setting

WARNING! Always wear gloves, when working with the chain.
General information on sharpening cutting teeth
- Never use a blunt chain. When the chain is blunt you have to exert more pressure to force the bar through the wood and the chips will be very small. If the chain is very blunt it will produce wood powder and no chips or shavings.
- A sharp chain eats its way through the wood and produces long, thick chips or shavings. (17)
The cutting part of the chain is called the cutter and consists of a cutting tooth (A) and the depth gauge (B). The cutters cutting depth is determined by the difference in height between the two (depth gauge setting). (18)
When you sharpen a cutting tooth there are four important factors to remember.
1 Filing angle (19)
2 Cutting angle (20)
3 File position (21)
4 Round file diameter (22)
It is very difficult to sharpen a chain correctly without the right equipment. We recommend that you use our file gauge. This will help you obtain the maximum kickback reduction and cutting performance from your chain.
See instructions under the heading Technical data for information about sharpening your chain.

WARNING! Departure from the sharpening instructions considerably increases the risk of kickback.
Sharpening cutting teeth
To sharpen cutting teeth you will need a round file and a file gauge. See instructions under the heading Technical data for information on the size of file and gauge that are recommended for the chain fitted to your chain saw.
-
Check that the chain is correctly tensioned. A slack chain will move sideways, making it more difficult to sharpen correctly. (23)
-
Always file cutting teeth from the inside face. Reduce the pressure on the return stroke. File all the teeth on one side first, then turn the chain saw over and file the teeth on the other side. (19)
- File all the teeth to the same length. When the length of the cutting teeth is reduced to 4mm (5 / 32^ ) the chain is worn out and should be replaced.
General advice on adjusting depth gauge setting
When you sharpen the cutting tooth the depth gauge setting will decrease. To maintain optimal cutting performance the depth gauge has to be filed down to achieve the recommended depth gauge setting. See instructions under the heading Technical data to find the correct depth gauge setting for your particular chain. (24)

WARNING! The risk of kickback is increased if the depth gauge setting is too large!
Adjustment of depth gauge setting
- The cutting teeth should be newly sharpened before adjusting the depth gauge setting. We recommend that you adjust the depth gauge setting every third time you sharpen the cutting teeth. NOTE! This recommendation assumes that the length of the cutting teeth is not reduced excessively.
- You will need a flat file and a depth gauge tool. We recommend that you use our depth gauge tool to achieve the correct depth gauge setting and bevel for the depth gauge.
- Place the depth gauge tool over the chain. Detailed information regarding the use of the depth gauge tool, will be found on the package for the depth gauge tool. Use the flat file to file off the tip of the depth gauge that protrudes through the depth gauge tool. The depth gauge setting is correct when you no longer feel resistance as you draw the file along the depth gauge tool. (25)
Tensioning the chain

WARNING! A slack chain may jump off and cause serious or even fatal injury.

WARNING! Always unplug the product from the power supply when assembling, checking and/or performing maintenance.
The more you use a chain the longer it becomes. It is therefore important to adjust the chain regularly to take up the slack.
Check the chain tension every time you refill with saw chain oil. NOTE! A new chain has a running-in period during which you should check the tension more frequently.
GENERAL SAFETY PRECAUTIONS
Tension the chain as tightly as possible, but not so tight that you cannot pull it round freely by hand. (26)
- Release the knob by folding it out until it snaps open.
- Turn the knob anti clockwise to loosen the drive sprocket cover.
- Adjust the tension on the chain by turning the chain tensioner wheel down (+) for tighter tension and up (-) to loosen the tension. (A-B)
- Tighten the bar clutch by turning the knob clockwise.
- Fold the knob back in to lock the tensioning.
Lubricating cutting equipment

WARNING! Poor lubrication of cutting equipment may cause the chain to snap, which could lead to serious, even fatal injuries.
Chain oil
Chain oil must demonstrate good adhesion to the chain and also maintain its flow characteristics regardless of whether it is warm summer or cold winter weather.
Never use waste oil! Using waste oil can be dangerous to you and damage the machine and environment.
Filling with chain oil
- All our chain saws have an automatic chain lubrication system. On some models the oil flow is also adjustable. (27)
- A full reservoir is sufficient for 15 minutes of steady use.
- Never use waste oil. This results in damage to the oil pump, the bar and the chain.
- It is important to use oil of the right grade (suitable viscosity range) to suit the air temperature.
- In temperatures below 0^ ( 32^ ) some oils become too viscous. This can overload the oil pump and result in damage to the oil pump components.
- Contact your service agent when choosing chain oil.
Checking chain lubrication
Aim the tip of the bar at a light coloured surface about 20 cm (8 inches) away. After 1 minute running at full throttle you should see a distinct line of oil on the light surface. (28)
If the chain lubrication is not working:
- Check that the oil channel in the bar is not obstructed. Clean if necessary. (29)
- Check that the groove in the edge of the bar is clean. Clean if necessary. (30)
- Check that the bar tip sprocket turns freely and that the lubricating hole in the tip sprocket is not blocked. Clean and lubricate if necessary. (31)
If the chain lubrication system is still not working after carrying out the above checks and associated measures you should contact your service agent.
Chain drive sprocket
The drive system is fitted with a drive sprocket. (32)
Regularly check the degree of wear on the drive sprocket. Replace if wear is excessive.
Checking wear on cutting equipment
Check the chain daily for:
Visible cracks in rivets and links.
- Whether the chain is stiff.
- Whether rivets and links are badly worn.
Replace the saw chain if it exhibits any of the points above.
We recommend you compare the existing chain with a new chain to decide how badly the existing chain is worn.
When the length of the cutting teeth has worn down to only 4mm the chain must be replaced.
Guide bar
Check regularly:
- Whether there are burrs on the edges of the bar. Remove these with a file if necessary. (33)
- Whether the groove in the bar has become badly worn. Replace the bar if necessary.
- Whether the tip of the bar is uneven or badly worn. If a hollow forms on the underside of the bar tip this is due to running with a slack chain. (34)
To prolong the life of the bar you should turn it over daily. (35)

WARNING! Most chain saw accidents happen when the chain touches the operator.
Wear personal protective equipment. See instructions under the "Personal protective equipment" heading.
Do not tackle any job that you feel you are not adequately trained for. See instructions under the headings Personal protective equipment, How to avoid kickback, Cutting equipment and General working instructions.
Avoid situations where there is a risk of kickback. See instructions under the heading Machine's safety equipment.
Use the recommended protective equipment and check its condition. See instructions under the headings Technical data and General safety precautions.
Check that all the chain saw safety features are working. See instructions under the headings General working instructions and General safety precautions.
Never use a chain saw by holding it with one hand. A chain saw is not safely controlled with one hand. Always have a secure, firm grip around the handles with both hands.
Fitting the bar and chain


WARNING! Always wear gloves, when working with the chain.
- Check that the chain brake is in disengaged position by moving the front hand guard towards the front handle. (36)
- Remove the knob and remove the clutch cover (chain brake). Take off the transportation ring.
- Fit the bar over the bar bolt. Place the bar in its rearmost position. Place the chain over the drive sprocket and in the groove on the bar. Begin on the top side of the bar.
Make sure that the edges of the cutting links are facing forward on the top edge of the bar. Mount the clutch cover and remember to fit the chain adjuster pin in the hole in the bar. Check that the drive links of the chain fit correctly over the drive sprocket and that the chain is correctly located in the groove in the bar. - Tension the chain by turning the wheel down (+). The chain should be tensioned until it does not sag from the underside of the bar.
- The chain is correctly tensioned when it does not sag from the underside of the bar, but can still be turned easily by hand. Hold up the bar tip and tighten the bar knob by turning the knob clockwise.
- When fitting a new chain, the chain tension has to be checked frequently until the chain is run-in. Check the chain tension regularly. A correctly tensioned chain ensures good cutting performance and long life. (37)
Starting and stopping

WARNING! Note the following before starting:
Never start a chain saw unless the bar, chain and all covers are fitted correctly. Otherwise the drive sprocket can come loose and cause personal injuries.
Make sure you have a secure footing and that the chain cannot touch anything.
Keep people and animals well away from the working area.
- Always check to see that the power trigger actuates properly and returns to the "OFF" position when released. To prevent the power trigger from being accidentally pulled, a power trigger lockout is provided. (38)
- Never start a chain saw unless the bar, chain and all covers are fitted correctly. (39) See instructions under the heading Assembly.
- Observe your surroundings and make sure that there is no risk of people or animals coming into contact with the cutting equipment. (40)
- Always hold the saw with both hands. The right hand should be on the rear handle, and the left hand on the front handle. All people, whether right or left handed, should use this grip. Use a firm grip with thumbs and fingers encircling the chain saw handles. (41)
Starting
- Grip the front handle with the left hand.
- Grip the rear handle with your right hand.
- Press and hold the power trigger lockout button with the inside of your hand and squeeze the power trigger with your index finger. (38)
Stopping
- Stop the saw by releasing the power trigger. If the saw does not stop, trip the chain brake and disconnect the power cable.
Before use:
(42)
1 Check that the chain brake works correctly and is not damaged.
2 Check that the rear right hand guard is not damaged.
3 Check that the power trigger lockout works correctly and is not damaged.
4 Check that all handles are free from oil.
5 Check that all parts of the chain saw are tightened correctly and that they are not damaged or missing.
6 Check that the chain catcher is in place and not damaged.
7 Check the chain tension.
8 Check that the saw chain stops moving when the power trigger is released.
General working instructions
IMPORTANT!
This section describes basic safety rules for using a chain saw. This information is never a substitute for professional skills and experience. If you get into a situation where you feel unsafe, stop and seek expert advice. Contact your chain saw dealer, service agent or an experienced chain saw user. Do not attempt any task that you feel unsure of!
Before using a chain saw you must understand the effects of kickback and how to avoid them. See instructions under the heading How to avoid kickback. Before using a chain saw you must understand the difference between cutting with the top and bottom edges of the bar. See instructions under the headings How to avoid kickback and Machine's safety equipment.
Wear personal protective equipment. See instructions under the "Personal protective equipment" heading.
Basic safety rules
1 Look around you:
To ensure that people, animals or other things cannot affect your control of the machine.
- To make sure that none of the above might come within reach of your saw or be injured by falling trees.
- If wearing hearing protection, beware of persons approaching during use of saw.
CAUTION! Follow the instructions above, but do not use a chain saw in a situation where you cannot call for help in case of an accident.
2 Do not use the machine in bad weather, such as dense fog, heavy rain, strong wind, intense cold, etc. Working in bad weather is tiring and often brings added risks, such as icy ground, lightning, unpredictable felling direction, etc.
3 If working in hot condition be aware of dehydration and drink fluids.
4 Take great care when removing small branches and avoid cutting bushes (i.e. cutting many small branches at the same time). Small branches can be grabbed by the chain and thrown back at you, causing serious injury.
5 Make sure you can move and stand safely. Check the area around you for possible obstacles (roots, rocks, branches, ditches, etc.) in case you have to move suddenly. Take great care when working on sloping ground.
6 Take great care when cutting a tree that is in tension. A tree that is in tension may spring back to its normal position before or after being cut. If you position yourself incorrectly or make the cut in the wrong place the tree may hit you or the machine and cause you to lose control. Both situations can cause serious personal injury. (43)
7 Before moving your chain saw deactivate it and lock the saw chain using the chain brake. Carry the chain saw with the bar and chain pointing backwards. Fit a guard to the bar before transporting the chain saw or carrying it for any distance.
8 When you put the chain saw on the ground, lock the saw chain using the chain brake and ensure you have a constant view of the machine. Switch the engine off before leaving your chain saw for any length of time.

WARNING! Sometimes chips get stuck in the drive system causing the saw chain to jam. Always deactivate the machine and unplug from the power supply before any cleaning.
General rules
1 If you understand what kickback is and how it happens then you can reduce or eliminate the element of surprise. By being prepared you reduce the risk. Kickback is usually quite mild, but it can sometimes be very sudden and violent.
2 Always hold the chain saw firmly with your right hand on the rear handle and your left hand on the front handle. Wrap your fingers and thumbs around the handles. You should use this grip whether you are right-handed or left-handed. This grip minimises the effect of kickback and lets you keep the chain saw under control. Do not let go of the handles! (44)
3 Most kickback accidents happen during limbing. Make sure you are standing firmly and that there is nothing in the way that might make you trip or lose your balance.
Lack of concentration can lead to kickback if the kickback zone of the bar accidentally touches a branch, nearby tree or some other object.
Have control over the workpiece. If the pieces you intend to cut are small and light, they can jam in the
saw chain and be thrown towards you. Even if this does not need to be a danger, you may be surprised and lose control of the saw. Never saw stacked logs or branches without first separating them. Only saw one log or one piece at a time. Remove the cut pieces to keep your working area safe. (52)
4 Never use the chain saw above shoulder height and try not to cut with the tip of the bar. Never use the chain saw one-handed! (45)
5 You must have a steady stance in order to have full control over the chain saw. Never work standing on a ladder, in a tree or where you do not have firm ground to stand on. (46)
6 Always use a fast cutting speed, i.e. full throttle.
7 Take great care when you cut with the top edge of the bar, i.e. when cutting from the underside of the object. This is known as cutting on the push stroke. The chain tries to push the chain saw back towards the user. If the saw chain is jamming, the saw may be pushed back at you. (47)
8 Unless the user resists this pushing force there is a risk that the chain saw will move so far backwards that only the kickback zone of the bar is in contact with the tree, which will lead to a kickback. (48)
Cutting with the bottom edge of the bar, i.e. from the top of the object downwards, is known as cutting on the pull stroke. In this case the chain saw pulls itself towards the tree and the front edge of the chain saw body rests naturally on the trunk when cutting. Cutting on the pull stroke gives the operator better control over the chain saw and the position of the kickback zone. (49)
9 Follow the instructions on sharpening and maintaining your bar and chain. When you replace the bar and chain use only combinations that are recommended by us. See instructions under the headings Cutting equipment and Technical data.
Basic cutting technique

WARNING! Never use a chain saw by holding it with one hand. A chain saw is not safely controlled with one hand. Always have a secure, firm grip around the handles with both hands.
General
Always use full throttle when cutting!
- Let go of the power trigger after every cut (running the motor for too long at full power without any load, i.e. without any resistance from the chain during cutting, can lead to serious damage to the motor).
- Cutting from above = Cutting on the pull stroke.
- Cutting from below = Cutting on the push stroke.
Cutting on the push stroke increases the risk of kickback. See instructions under the heading How to avoid kickback.
Terms
Limbing = Cutting branches off a felled tree.
Splitting = When the object you are cutting breaks off before the cut is complete.
There are five important factors you should consider before making a cut:
1 Make sure the cutting equipment will not jam in the cut. (50)
2 Make sure the object you are cutting will not split. (50)
3 Make sure the chain will not strike the ground or any other object during or after cutting. (51)
4 Is there a risk of kickback? (4)
5 Do the conditions and surrounding terrain affect how safely you can stand and move about?
Two factors decide whether the chain will jam or the object that you are cutting will split: the first is how the object is supported before and after cutting, and the second is whether it is in tension.
In most cases you can avoid these problems by cutting in two stages; from the top and from the bottom. You need to support the object so that it will not trap the chain or split during cutting.

WARNING! If the chain jams in the cut: stop the engine! Don't try to pull the chain saw free. If you do you may be injured by the chain when the chain saw suddenly breaks free. Use a lever to open up the cut and free the chain saw.
The following instructions describe how to handle the commonest situations you are likely to encounter when using a chain saw.
Cutting

WARNING! Never attempt to cut logs while they are in a pile or when a couple of logs are lying together. Such procedures drastically increase the risk of kickback which can result in a serious or fatal injury.
If you have a pile of logs, each log you attempt to cut should be removed from the pile, placed on a saw horse or runners and cut individually.
Remove the cut pieces from the cutting area. By leaving them in the cutting area, you increase the risk for inadvertently getting a kickback, as well as increasing the risk of losing your balance while working. (52)
The log is lying on the ground. There is little risk of the chain jamming or the object splitting. However there is a risk that the chain will touch the ground when you finish the cut.
Cut all the way through the log from above. Avoid letting the chain touch the ground as you finish the cut. Maintain full throttle but be prepared for what might happen.
If it is possible (can you turn the log?) stop cutting about 2/3 of the way through the log.
Turn the log and finish the cut from the opposite side. (53)
The log is supported at one end. There is a high risk that it will split.
Start by cutting from below (about 1/3 of the way through).
Finish by cutting from above so that the two cuts meet. (53)
The log is supported at both ends. There is a high risk that the chain will jam.
Start by cutting from above (about 1/3 of the way through).
Finish by cutting from below so that the two cuts meet. (54)
Tree felling technique
IMPORTANT! It takes a lot of experience to fell a tree. Inexperienced users of chain saws should not fell trees. Do not attempt any task that you feel unsure of!
Safe distance
The safe distance between a tree that is to be felled and anyone else working nearby is at least 2 1/2 tree lengths. Make sure that no-one else is in this "risk zone" before or during felling. (55)
Felling direction
The aim is to fell the tree in a position where you can limb and cross-cut the log as easily as possible. You want it to fall in a location where you can stand and move about safely.
Once you have decided which way you want the tree to fall, you must judge which way the tree would fall naturally.
Several factors affect this:
- Lean of the tree
Bend
Wind direction - Arrangement of branches
Weight of snow - Obstacles within the reach of the tree: for example, other trees, power lines, roads and buildings.
- Look for signs of damage and rot in the stem, this makes it more probably that the tree will break and start to fall before you expect it to.
You may find you are forced to let the tree fall in its natural direction because it is impossible or dangerous to try to make it fall in the direction you first intended.
Another very important factor, which does not affect the felling direction but does affect your safety, is to make sure the tree has no damaged or dead branches that might break off and hit you during felling.
The main point to avoid is letting the tree fall onto another tree. It is very dangerous to remove a trapped tree and there is high accident risk. See instructions under the heading Freeing a tree that has fallen badly.
IMPORTANT! During critical felling operations, hearing protectors should be lifted immediately when sawing is completed so that sounds and warning signals can be heard.
Clearing the trunk and preparing your retreat
Delimb the stem up to shoulder height. It is safer to work from the top down and to have the tree between you and the saw. (56)
Remove any undergrowth from the base of the tree and check the area for obstacles (stones, branches, holes, etc.) so that you have a clear path of retreat when the tree starts to fall. Your path of retreat should be roughly 135 degrees away from the intended felling direction. (57)
1 Danger zone
2 Retreat path
3 Felling direction
Felling

WARNING! Unless you have special training we advise you not to fell trees with a diameter larger than the bar length of your saw!
Felling is done using three cuts. First you make the directional cuts, which consist of the top cut and the bottom cut, then you finish with the felling cut. By placing these cuts correctly you can control the felling direction very accurately.
Directional cuts
To make the directional cut you begin with the top cut. Aim using to the saw's felling direction mark (1) toward a goal further forward in the terrain, where you would like the tree to fall (2). Stand on the right-hand side of the tree, behind the saw, and cut with a pull stroke.
Next make the bottom cut so that it finishes exactly at the end of the top cut. (58)
The directional cuts should run 1/4 of the diameter through the trunk and the angle between the top cut and bottom cut should be 45^ .
The line where the two cuts meet is called the directional cut line. This line should be perfectly horizontal and at right angles (90^) to the chosen felling direction. (59)
Felling cut
The felling cut is made from the opposite side of the tree and it must be perfectly horizontal. Stand on the left side of the tree and cut on the pull stroke.
Make the felling cut about 3 - 5cm (1.5-2 inches) above the bottom directional cut. (60)
Set the spiked bumper (if one is fitted) just behind the felling hinge. Use full throttle and advance the chain/bar slowly into the tree. Make sure the tree does not start to move in the opposite direction to your intended felling direction. Drive a wedge or breaking bar into the cut as soon as it is deep enough. (61)
Finish the felling cut parallel with the directional cut line so that the distance between them is at least 1/10 of the trunk diameter. The uncut section of the trunk is called the felling hinge.
The felling hinge controls the direction that the tree falls in. (62)
All control over the felling direction is lost if the felling hinge is too narrow or non-existent, or if the directional cuts and felling cut are badly placed. (63)
When the felling cut and directional cut are complete the tree should start to fall by itself or with the aid of a felling wedge or breaking bar. (64)
We recommend that you use a bar that is longer than the diameter of the tree, so that you can make the felling cut and directional cuts with single cutting strokes. See instructions under the heading Technical data section to find out which lengths of bar are recommended for your saw. (65)
There are methods for felling trees with a diameter larger than the bar length. However these methods involve a much greater risk that the kickback zone of the bar will come into contact with the tree. (4)
Freeing a tree that has fallen badly
Freeing a "trapped tree"
It is very dangerous to remove a trapped tree and there is high accident risk.
Never try to fell the tree that is trapped.
Never work in the risk zone of the hanging trapped tree. (66)
The safest method is to use a winch.
- Tractor-mounted (67)
- Portable (70)
Cutting trees and branches that are in tension
Preparations: Work out which side is in tension and where the point of maximum tension is (i.e. where it would break if it was bent even more).
Decide which is the safest way to release the tension and whether you are able to do it safely. In complicated situations the only safe method is to put aside your chain saw and use a winch.
General advice:
Position yourself so that you will be clear of the tree or branch when the tension is released. (71)
Make one or more cuts at or near the point of maximum tension. Make as many cuts of sufficient depth as necessary to reduce the tension and make the tree or branch break at the point of maximum tension. (69)
Never cut straight through a tree or branch that is in tension!
If you must cut across tree/limb, make two to three cuts, one inch apart, one to two inches deep. (72)
Continue to cut deeper until tree/limb bends and tension is released. (73)
Cut tree/limb from outside the bend, after tension has been released.
How to avoid kickback

WARNING! Kickback can happen very suddenly and violently; kicking the chain saw, bar and chain back at the user. If this happens when the chain is moving it can cause very serious, even fatal injuries. It is vital you understand what causes kickback and that you can avoid it by taking care and using the right working technique.
What is kickback?
The word kickback is used to describe the sudden reaction that causes the chain saw and bar to jump off an object when the upper quadrant of the tip of the bar, known as the kickback zone, touches an object. (48)
Kickback always occurs in the cutting plane of the bar. Normally the chain saw and bar are thrown backwards and upwards towards the user. However, the chain saw may move in a different direction depending on the way it was being used when the kickback zone of the bar touched the object.
Kickback only occurs if the kickback zone of the bar touches an object. (4)
Limbing

WARNING! A majority of kickback accidents occur during limbing. Do not use the kickback zone of the guide bar. Be extremely cautious and avoid contacting the log, other limbs or objects with the nose of the guide bar. Be extremely cautious of limbs under tension. They can spring back toward you and cause loss of control resulting in injury.
Make sure that you can stand and move about safely. Work on the left side of the trunk. Work as close as possible to the chain saw for maximum control. If possible, let the weight of the chain saw rest on the trunk. (74)
- Keep the trunk between you and the chain saw as you move along the trunk.
Cutting the trunk into logs
See instructions under the heading Basic cutting technique.
MAINTENANCE
General
The user must only carry out the maintenance and service work described in this Operator's Manual. More extensive work must be carried out by an authorized service workshop.
Checking, maintaining and servicing chain saw safety equipment

WARNING! Always unplug the chainsaw from the power supply before any assembly, maintenance and/or checking is done on the machine.
Note! All service and repair work on the machine demands special training. This is especially true of the machine's safety equipment. If your machine fails any of the checks described below we recommend that you take it to your service workshop.
Chain brake and front hand guard
Checking the front hand guard
- Make sure the front hand guard is not damaged and that there are no visible defects such as cracks. (75)
- Move the front hand guard forwards and back to make sure it moves freely and that it is securely anchored to the machine. (76)
Checking the inertia brake release
- Place the chain saw, deactivated, above a stump or other stable surface. Release the front handle and let the chain saw fall by its own weight, rotating around the rear handle towards the stump.
When the bar hits the stump the brake should be activated. (77)
Checking the brake trigger
- Activate the chain saw. Make sure the saw chain does not touch the ground or any other object. See instructions under the heading Starting and stopping.
- Grasp the chain saw firmly, wrapping your fingers and thumbs around the handles. (44)
- Apply full power and activate the chain brake by tilting your left wrist forward onto the front hand guard. Do not let go of the front handle. The chain should stop immediately. (78)
Power trigger lockout
- Make sure that the power trigger is locked at the idle setting when the power trigger lockout is released. (79)
-
Press the power trigger lockout and make sure it returns to its original position when released. (80)
-
Check that the power trigger and power trigger lockout move freely and that the return springs work properly. (81)
- Activate the chain saw and apply full power. Release the power trigger and check that the saw chain stops and remains stationary.
Chain catcher
- Check that the chain catcher is not damaged and is firmly attached to the body of the chain saw. (82)
Cooling system
To keep the working temperature as low as possible the machine is equipped with a cooling system.
The cooling system consists of:
1 Air intake (under the power trigger).
2 A fan on the motor.
- Clean the cooling system with a brush once a week, more often in demanding conditions. A dirty or blocked cooling system results in overheating which causes damage to the machine.
MAINTENANCE
Maintenance schedule
The following is a list of the maintenance steps that must be performed on the machine. Most of the items are described in the Maintenance section.
| Each use Frequent Occasional | ||
| Clean the outside of the machine. | File off any burrs from the edges of the bar. | |
| Check that the components of the power trigger work safely. (Power trigger lockout and power trigger.) | Empty the oil tank and clean the inside. | |
| Clean the chain brake and check that it operates safely. Make sure that the chain catcher is undamaged, and replace it if necessary. | Blow through the product and battery cooling slots gently with compressed air. | |
| The bar should be turned daily for more even wear. Check the lubrication hole in the bar, to be sure it is not clogged. Clean the bar groove. | ||
| Check that the bar and chain are getting sufficient oil. | ||
| Check the saw chain with regard to visible cracks in the rivets and links, whether the saw chain is stiff or whether the rivets and links are abnormally worn. Replace if necessary. | ||
| Sharpen the chain and check its tension and condition. Check the drive sprocket for excessive wear and replace if necessary. | ||
| Clean the machine's air inlet. | ||
| Check that nuts and screws are tight. |
TECHNICAL DATA
Technical data
| 418EL 420EL | ||
| Electric motor | ||
| Type Series AC Motor Series AC Motor | ||
| Power 1800W 2000W | ||
| Voltage range 230-240V 230-240V | ||
| Lubrication system | ||
| Type of oil pump Automatic Automatic | ||
| Oil tank capacity, litre 0,20 0,20 | ||
| Weight | ||
| Chainsaw without bar and chain, empty chain oil tank, kg 4.7 4 | 7 | |
| Noise emissions (see note 1) | ||
| Sound power level, measured dB (A) | 101,9 | 101,9 |
| Sound power level, guaranteed LWA dB (A) | 103 | 103 |
| Sound levels (see note 2) | ||
| Equivalent sound pressure level at the operator's ear, dB(A) | 90,8 90,8 | |
| Equivalent vibration levels, a h (see note 3) | ||
| Front handle, m/s2 | 5,2 5,2 | |
| Rear handle, m/s2 | 3,9 3,9 | |
| Respective uncertainty K, m/s2 | 1,5 1,5 | |
| Chain/bar | ||
| Recommended bar lengths, inch/cm | 14/35 | 16/40 |
| Usable cutting length, inch/cm | 12.5/32 | 14/35.5 |
| Type of drive sprocket/number of teeth | Spur/6 Spur/6 | |
| Maximum chain speed, m/s | 14.5 14.5 | |
Note 1: Noise emissions in the environment measured as sound power L_WA in conformity with EC directive 2000/14/EC Annex V.
Note 2: Equivalent sound pressure level, according to ISO 22868, is calculated as the time-weighted energy total for different sound pressure levels under various working conditions. Typical statistical dispersion for equivalent sound pressure level is a standard deviation of 2,5 dB (A).
Note 3: Vibration level, according to EN 60745-2-13. Reported data for vibration level has a typical statistical dispersion (standard deviation) of 1,5m / s^2 . Declared vibration data from measurements when the machine is fitted with a bar length and recommended chain type.

Warning! The vibration emission during actual use of the power tool can differ from the declared total value depending on the ways in which the tool is used. Operators should identify safety measures to protect themselves that are based on an estimation of exposure in the actual conditions of use (taking account of all parts of the operating cycle such as the times when the tool is switched off and when it is running idle in addition to the trigger).
Guide bar and saw chain combinations
The following cutting attachments are approved for the models Husqvarna 418 EL and 420 EL.
| Model | Guide bar Saw chain | |||||
| Length, cm/inch | Pitch, inch Gauge, mm | Max. nose radius | Type | Length, drive links (no.) | ||
| 418 EL 1 | 4 (35) | 3/8 1,3 7T Husquarna H37 | 52 | |||
| 420 EL 1 | 6 (40) 56 | |||||
Saw chain filing and file gauges
| xx inch/mm inc h/mm | ||||||
| 37 | 5/32 / 4,080 | ° | 30° | 0° | 0.025 / 0,65 | 5796536-01 |
EC Declaration of Conformity
(Appplies to Europe only)
Husqvarna AB, SE-561 82 Huskvarna, Sweden, tel: +46-36-146500, declares under sole responsibility that the corded electric chainsaws 418 EL and 420 EL from 2016's serial numbers and onwards (the year is clearly stated in plain text on the type plate with subsequent serial number), are in conformity with the requirements of the COUNCIL'S DIRECTIVES:
- of May 17, 2006 "relating to machinery" 2006/42/EC.
- of February 26, 2014 "relating to electromagnetic compatibility" 2014/30/EU.
- of May 8, 2000 "relating to the noise emissions in the environment" 2000/14/EC.
- of June 8, 2011 on the "restriction of use of certain hazardous substances" 2011/65/EU.
The following standards have been applied:
EN 60745-1:2009 + A11:2010, EN 60745-2-13:2009 + A1:2010, EN 55014-1:2006 + A1:2009 + A2:2011, EN 55014-2:2015, EN 61000-3-2:2014, EN 61000-3-3:2013
Notified body:
NB2140, DEKRA Testing and Certification GmbH, Enderstraße 92b, 01277 Dresden, Germany, has carried out EC type examination in accordance with the machinery directive's (2006/42/EC) article 12, point 3b. The certificates for EC type examination in accordance with annex IX, have the numbers: 4815039.16001-1
For information relating to noise emissions, see the Technical data chapter.
The supplied chain saw conforms to the example that underwent EC type examination.
Huskvarna 1 September 2016

Lars Roos, Development manager
(Authorized representative for Husqvarna AB and responsible for technical documentation.)
SYMBOLERKLÄRUNG
Symbole am Gerät:
Huskvarna, den 1. September 2016

Made in China B52V68-6
E

Mean PNC 420E 967305716
1000000000000000000000000000000000000000000000000
320-340V-3000W
0
20
Serial No.
20
HUSQVARNAAB,SE-561B2 HUSKVARNA,SWEDEN


in China 852V69-4

Índice
EXPLICACAO DOS SIMBOLOs
Simbolos naquina: 221
Made in China B52V68-6
<
Husqvarna
Model PNC
420EL 967205716
Volt Rated Power
230-240V~,2000W
Year/Month
20
Sarted No.
20
HUSQVARNAAB,SE-561B2 HUSKVARNA,SWEDEN


Made in China 852V69-4

TURINYS
Turinys
SUTARTINIAI ZENKLAI
Simboliai ant irengino: 293
Simboliaia naudojimos instrukcijoe: 294
Dezesturinys: 294
TURINYS
Turinys 295
IVADAS
Made in China B52V68-6
<
Husqvarna
Model PNC
420EL 967205716
Vok Rated Power
230-240V~ 2000W
Year/Month
20
Serial No.
20
HUSQVARNAAB,SE-561B2 HUSKVARNA,SWEDEN


Made in China 852V69-4
SATURS
Sats
SIMBOLU NOZIME
Simboli uz masinas: 315
Simboli pamacibā: 316
lepakojuma sats 316
SATURS
Saturs 317
IEVADS
Godajamais kIient! 318
KAS IR KAS?
Kasirkasmotorzagim? 318
VISPAREJAS DROSBAS INSTRUKCIJAS
Visparigi speka agregatu droibas bridinajumi 319
Pasakumi pirms jaunamotorzaga lietoanas 321
Svarigi 322
Rikojieties saprataigi 322
Individualais drosibas aprikojums 322
Masinas droibas aprikojums 322
Kedesbremzarearaisargupret ravieniem 323
Griesanasaprikojums 324
MONTAZA
Sliedes un kedes monta 327
IEDARBINA SANA UN APSTADINA SANA
ledarbinasana un apstadinasana 328
DARBA TEHNIKA
Pirms katras lietosanas reizes: 329
Visparejas darba instrukcijas 329
Izvairisanas no ravieniem 332
APKOPE
Vispareji 333
Motorzaga drošibas apríkojuma pábaude, apkalpe un serviss 333
Made in China BS2V68-6
Husqvarna
Model PNC
420EL 967205716
Volt Rated Power
230-240V~,2000W
Year/Month
21
20
20
HUSQVARNAAB,SE-56182 HUSKVARNA,SWEDEN


LwA

Made in China 852V69-4

Obsah
VYSVETLENI SYMBOLU
Lars Roos, Development manager
Rashladni system 448
HnkOrda He noJIb3yTecb MoTopHoI nnlo, depha ee ToIbKO OdHoI pyKoI.
HnkOrda He donyckaIte, yTo6bI HOCOK nIbHoI uHb IBXoINJ B KOHTaKT c KaKIM Jn60 npedMetom.
PPEyPPEHHE!OTdaaMoKeT BO3NkHyTb KOrda HocOK NJIbHOI WnHb BXoJNT B KOHTaKT C KaKIM JIN6o PpeMeTom N Bbl3bBaet peAKUIO OTdau, KOToPAO aT6paCbBAeT uHny NJIbBBePx Ha3aHa onepaTopa.3To MoHe T npNBecTu K cepbe3HbIM TpaBMam IIOJe.
HaPpAeHHe BpaueHnIeNn I MaKcMaJIbHa IINHa WInHbI.


He onyckaIte npn6JnHexHnnoctopOHnX JnU.
CneIyET BcerIa BbHIMaTb WTeKep I3 po3eTKn nepeI BbINOJIHeHEm peYInpOBKn IIN OChCTKN.
PnCK npaHeHn 3JIeKTpnuYeCKnM TOkOM.
B cIyuae noBpeKdEHHn IIN o6pbBa Ka6eIcJeDyET He3aMeIINTeJIbHO BblepHyTb WTeKep N3 NCTouHnKa nITaHn.
TopMo3 cENn aKTbBnpoBaH (cnpaBa) TopMo3 cENn He aKTbBnpoBaH (cJeBa)

MacNo3aINBHa rOpIOBnHa LcENI.

06o3HaueHn, KacaOuIeNcOxpaHb
OKpyHaIOUeI cpeBc.CmBOJIbHa
H3JeINn IIn60 Ha ynaKOBKe
06o3HauaOT, YTO DaHHoe n3JeJIe
He DoJHXoYTNIN3nPOBaTbcB
KaueCTBe 6bITOBbIX OTXoIDOB.BmecTo
3TOrO DOnJIHNO 6bITb NepeDaHO B
COOTBeTCTByIOUnnyHKT dJa nepepa6oTK
3JIeKTPnueckOrn aJIeKTPoHHoro 6OpoyDoBaHn.

He ocTbIaTb IOd IOHdEm.

Двовая ИЗOLЯЦА

yyyywwxxxxxx
PacnopTHa Ta6JnUka c yKa3aHHeM cepuHoro HOMepa. yyy 03Haayet roI npOn3BOdCTBa, ww - npOn3BOdCTBeHHyU HeJeIO.
DpyrncnMBOJb/HaKNeiKaHaMaunHe oTHocTcK CneLNaJbHbIM Tpe6oBaHnA m cepTnOuKaUHa onpeJeHHbIX pbHKax.
CnMBoJIb B INHcTppyKcN:
Ipeed c6opKoN, npOBepKoN n/nnnpOBeHnEM Texo6cLyHbAHnB 06a3aTeJbHom nopAKe BbIHMaIte uTKeP N3deJIINr N3NCTOCHKa PNTAHn.

NoIb3yI Tecb cneuaJIbHbIMn 3aunTHbIMn nepuATKaMn.
Tpe6yeT peryIaPno nCTkn.
MecTo Bn3yaJbHo npoBepKn.

TopMo3 ZenI DoJIkeH npn 3anyKe MoTOpHoN nIbI 6blb BkJIOUeH.

PNEUYPENHEE!OTdaua MoHET BO3HNKHyTb KOrda HOCOK NJIbHOI XINHBXOJNTB KOHTaKTc KaKIM JN60 npedMeTom U
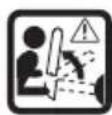
Bb3bBaeT peaKUIO OToaUN, KoTopa
O6pacbBaet uHy NnIbI BBePx HHa3aI Ha
onepaTopa. 3To MoHeT npNBecTN K cepbe3HbIM
TpabMaM JIOJeI.
CoeepHmoe ynaKOBKn:
Cenna nna
Пиьнайцени
NJIbHoe NOJIOTHO
PykoBoIDCTBO no 3KcnLyatau
3aHTbIy cEXoJI NJIbHorO noJIOTha
Ha yctpoNCTBe NMeIOToC cJeNyOuIe HaKJNeIK.
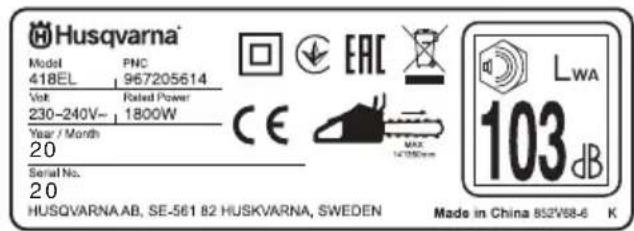

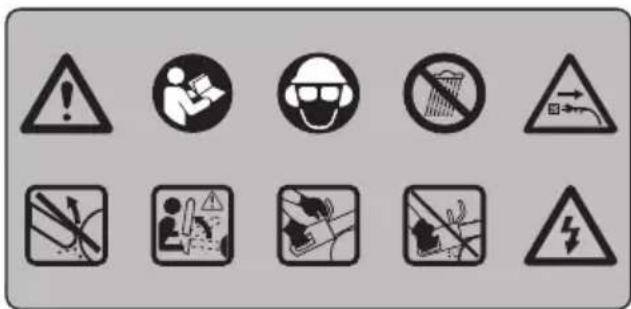
CoepeHHne
IORCHEHNE CIMBOJIOB
YcNoBhIe 06o3HaueHnHa MaunHe:474
CNMBOJIbB INHcTpkyLIMN:475
CoepHHMOe ynaKOBKn: 475
CODEPJAHNE
CoepnHaHne 476
BBEDEHNE
YBaHaemblnokyntb!477
YTO ECTb YTO?
UTo ecTb UTo Ha MoTopHoi nJIe? 477
OBUINE PEPINICAHNIO
BE3ONACHOCTN
O6Ie MeBpI npEOctOpOHocT npn pa6oTe c 3JIeKTPoINHcTpMyMeHTOM 478
DienCTBn, KOToPbIe Heo6xoDnMo
PpeIppnHЯTbpePeIncNoJIb3OBAHNHeM
HOBOI MoToPHoN nIbI 481
BaxnHa INHΦopMaζη 482
Bcerda pyKOBoIDCTByItecb 3IpaBbIM CmblcIOM 483
CpeIcTBA 3aunTb onepaTopa 483
YcTpoNCTBa 6e0nacHocTN MaHHb4 483
TopMo3 cenH npKoTKa oxpaHbI npOTNB oTdaue 484
Peyuueo6opydoBaHne 485
CBOPKA
POpraK MoTtHa PnIbHOro NoIoTHa N UeN 490
3ANYCKIOCTAHOBKA
3anyck N ocTaHoBka 491
METOДРABOTbI
IpeepKaHdbm noJb3oBaHneM:492
O6uIpepa6oUneHnCtpyKUn 492
KaK n36eXaTb oTdaun 496
TEXHINUECKOE OBCJYKBAHNE
06nne cBeJeHn4 498
OcmToP,yxoIIO6cJyHnBaHne
3auntbix npncnoco6JeHm MOtopHoI NJIbl 498
Cma3ka 3Be3doQKn NnJbHOro noLoTHa. 498
CnCTema oxlannden 498
TpaΦnK TexHnueckoTo 06cLyHnBaHnA 499
TEXHINUECKNE DAHHBIE
TexHnueckne daHHbIe 500
CoBmecTmocTb MoeJeI NIIbHOro noJIoTHa IcENI 501
3aTaUBaHHe ue cenn nIbI n 7a6IOHb IJIa 3aTaUBaHnI 501
DEKJIAPAUH COOTBETCTBNA EC 502
BBEДЕΗΝΕ
- PeKoMeHdyetcNcNoJIb30BaTb ycTpoIcTBo 3aUHTHO OTKJIIOueHnY (Y3O) c ToKOM oTKJIIOueHnY He 6oJee 30 mA. DaJe npi
HaInuyn ycTpoNCTBa 3aunTHoro oTKJIOueHn (Y3O) HeBO3MOHHo rapaHTnpoBaTb 100%-Hyo 3aunTy, noTOMy Heo6XoIMo Bcerda co6IIOaTb npaBnla TeXnKn 6e3onacHocTn. CJeNyET npOBepaTb Y3O KaHdbi pa3 npn IcnoJIb3OBAHN.
-Перд Наим Окслуataци следует\
поверят b Ka6eЛb Ha NaHnUчne npn3HaKOB\
nobpejdeHn IIn nI3Hoca. Прн HauNHy\
nobpejdeHn Ka6eJIЯ OTBe3nTe n3dEJIne B\
aBTopn3ObaHbI cepBnchbI ueHTpДлЯ\
ЗамeHbI Ka6eJIЯ.
3anpeaetcnaOpb3oBaTb n3deJe,ecJn 3JIeKTpnuYeCKne Ka6eJIn nobpeHDeHb nn H3HOseHbl.
BcIyue noBpeHdeHna Ka6eJIa nn H3OJauCn cJeDyeT He3aMeIITeJIbHO oTKIouHTb n3JeJIne O T cETn 3JeKTpOnNTaHn. He KacaItecB 3JeKtpnuecknx Ka6eJIe, noka He 6yTeOTKJIuOeHO 3JeKTpOnNTaHn. He BbIOJIHnTe peMOHT o6OpBaHHoro nn noBpeHdeHHoro Ka6eJIa. OTBe3nte nn3JeJIne B aBTOpN3oBAHHbl cepBnCHbl ueHTp dJIa 3aMeHb Ka6eJIa opnHaJIbHbIM 3aNaChbIM Ka6eJIem.
CneHnTe 3a TeM, TTo6b Ka6eJIb/ yIINHTeBHyI WHyp BceIa HaxoIIncna No3aI INoJIb3OBATeJIa, TTo6bIOH He co3JaBaIOnaCHocTb IJIa NOJIb3OBATeJIa INI dpyrNIXIIu. CJeHnTe 3a TeM, TTo6b Ka6eJIb/Ishyp He MoR 6bITb NOBpeHJDeH (BO3deIcTBHeM TeJIa, OCTpbIM npeJMeTAM, OCTpbIM KpaAM, MacJOM I.T.D.);
PacnoIaraiTe Ka6eIb TaKIM o6pa3oM, yTo6bl OH He MoR 3aCenITbcra 3a BeTBN NIN NOXOHne npedMeTb BO Bpem pa60Tb.
Bcerda otKJIOUaJIte nITaHne nepei oTcoeINHeHnEM IIO6Oro WTeKepa, Ka6eJIbHoro pa3beMa NIIy yDNInHNTeJI.
OTKJIOUHTe NITaHHe,OTCOEINHITe WTeKeP OTCENOCMOPTPe 3JIeKTPnuecKn Ka6JIb HaHaJIuHne npn3HaKOB NOBpeKdEHN IIN N3Hoca,npenDe Yem CBepHyTb Ka6JIb IJIxpaHeHHa.He BbINOJHrTe peMoHT noBpeKdEHHoroKa6JIra.OTBe3NTe n3JeJIne BAABTOPN3OBAHHbIcEPBNCbHUI CEHTp DJIa 3AmEHbI Ka6JIa.
- OToeINHInTe WTeKepeo CeTn, npEHe YeM ocTaBnTB n3JeNne 6e3 npncMoTpa Ha JIO6oe Bpemr.
Bcerda npoABJIte octopoHocTb npn cMaTbIbAHNI Ka6eJIa, CJIeIITe 3a OTCyTCTBHe m neperN6OB.
- HanpЯнHe cTe npeMeHHOro ToKa DoJIHcOooTBeTcTBaBt yKa3aHHOMy Ha nacnopTHoTa6JnUKe n3deJInr.
- Κηнай пла ос��ена Довйн Изоляцей в cootВeТСТВи c EN60745-1 n 2-13.
- Y6eHITcB,TO yJINHITeHBHbI WHyp He noBpeHdEN. IpOBepbTe yJINHITeHBHbI WHyp nepei HauaIOM 3KcNlyaTaUuN 3AmEHnTe erO B cLyuae noBpeHdENH. He nCnoJIb3yIte noBpeHdENHbI WHyp. N3OJIaUaWHypa DOJIHXa 6bITbcIIO, 6e3 TpeuH IN CLeEOB IN3HocA. ITeKePbHe coeHNHTeYIOJIHXbI 6bITb 6e3 noBpeHdENH. 3KcNlyaTaUuN NOBpeHdENHbX yJINHITeHBbIX WHypOB yBeJIuHBAET pNCK npapaeHHra 3JIeKTPnueckm TOKOM.
CneJeT npIMHeYb ycTpoCtBO 3aunTHoro oTKIIOueHnra (Y3O) B nCnoJb3yeMoOn 3JIeKTPnuecko CENn nnpo3eTke. DocTynhbl rHe3Da co BCtpoEHHO 3aunToy Y3O, KoTopbIe MOHHo NcNoJIb3OBA Tb IJa OBeCneHnra 3TNX MEP 6e30nacHocTn. UHpyBn cENHO nnbl Heo6xOIMO peYJrpHo npOBepaTb n npn HaJIuNn IOBpeKdEHN BblNOJHrTa peMOHThble pa6oTbI y aBTOpn3oBaHHoro cepBnCHOro dInlepa.
Ka6eJIi
- YДЛИНИТЕЛь можно прпобPECТиВ 6ЛИнkaишем abTOPиЗOBaHHOM cepBиСHOM ueHTpe.
-Исплььтуг Te Tоль Ко одбрнныуДЛИNHITeJIbHbIe Ka6eJIN. - YДЛИНТЕЛИ И пpoBoJa cIeДуeT ИСПОЛБ3OBAТь,TOЛБКо ecЛи OHI пpeДнaЗHAчЕнblДЯ пIMeHeHЯ BHe nomeшени И COOTBeTcTByIOT H07 RN-F Ил IEC 60245,чacMb66.
Дeиства,КOTopbie Heo6xOДИМо пpeДпрнЯТь NepeД ИСПОЛьЗВаHиЕМ HOBOI MOTOPHOI ПЛы
-BHIMMaTeJIbHo npOuHTaIe HcTpkyKUIO.
3aJeTe MacJo IJRA CMA3KN cENN.CM. yKa3AHnB pa3IeJIe "3aJIINbKa MaJNa IJNA cENN".
He noIb3oBaTbcMOTOpHoi nIIOI noka Ha IeNb He nonaTeT IOCTaTOUHOe KOINueCTBO Macna.CM.yka3AHnBpa3JeIe Cma3Ka peKyuero o6OpydoBaHnI.
-ПюВерпьКорpeкTHOCтpeгулpoВok.CM.уkaань в раделе C6opka.
-ПроДОЛHнTeЛьhoe Bo3deIcTBne WуMa Iaet HeN3JIeUHMoe yxuIseHnE cIyxa. Bcerda noJb3yITecb, no3ToMy, cNeUHaJIbHbIMN HayuHnKamN.
-Даннайплалпpeнна3нayehа Дя
Испьзовая пи Тмпратуо -20°C
(-4°F)do +40°C (104°F).

IPEyIPEJDEHNE! Hn npKaKx
06ToaTeJIbCTBax He dOnycKaeTcra
BHeceHne N3MeHeHn B
NepBOHaayJIbHyIO KOHCTpyKUIO
MaunHb 6e3 pa3peSeHnA
N3rOToBHTeJI. Nolb3yITecb ToJIbKO
OpuHNaJIbHbIM 3aNCACTaMn.
BHeceHne Hepa3peWeHHbIX N3MeHeHn
N/IIIN cNoJIb3OBaHne Hepa3peWeHHbIX
Pncnoc6JeHn MoKeT PnBeCTn K
cepBe3HO TpaBMe IIN DaJke K
CMePeJIbHoMy IcxOdy IJa onepaTopa
NIn dpynx JnU.

PNEyPENHEHNE!Pn
He npaBnBHom nIe He6peHHOM
NCNoJIb3OBAHm MoTOpHOI NJIbI, OHa
MOKeT 6bTb OnaChbIM INcTpymeHTOM,
KOTOpbIM MoKeT pINBeCTN K
cepbe3HbIM, I DaKe K OnaChbIM dJa
HN3Hn TpaBMam. Po3ToMy Heo6xoDIMO
BHnMaTeJIbHo npOuHTaTb I NoJIHoCTbIO
NOHrTa DAHHUo INcTpkyLIO.

PNEyIPEHJEHNE!BoBpempa6oTb ycTpoCtBOco3daeT 3JeKTpomarHHThoe noJe.B onpeJenHHbIXo6cToaTeJIbCTBax 3To NOJe MoHeT co3aBaTa bNoMExnДЯ naCCNBbIXnAKTNBbIXMeNCHCKNX mNPlaHTaTOB.Bo n36eHaHne pncKa cepBe3HO nn CMePeTbHO TpaBMbl NlCaM C MeNcHCKMn NmJaHTaTM peKOMeHNdyETc npOKOHcyJIbTIPOBaTbcra BpaOUMn N3rOToBNTeJEM MmJIaHTaTa, npEKeJde ueMpCTyNaTB K kCNlyaTaun DaHHoro ycTpoCtBA.

PNEyIPEKJEHNE!
PpoJnHITeJIbHoeBdbXaHne napOB
MacJa dJa Cma3Kn cenN nDpeBecHO
nbJInOnaCHO dJa 3OpOBbJ.
BaxnHa nHΦopMaζη
BAHKHO!
3Ta MoTopHaI NIIa IpeIHa3HaYeHa IJIa 6pe3KN IΦOpMnpoBaHnKpOH pacTyux X DepeBBeB.
Iolb3yTecb TOnbKO TeMn CoeTaHnMaM INlbHOINHb/ZeN, KOToPbI Mbl peKoMeHnyEm B rIabe TexHnueckne daHHble.
HnkOrda He pa6oTaIe C MaunHo, ecn BbycTaN, BblNl aJkoRojb, nI npHmaeTe JeKapctBa, KoTOpBle MOyT OKa3bBaTb BInrHne Ha 3peHne, peakuio NIN KoopDnHaCNUO.
NoIb3yI Tecb cpeIcTBaMn INHINBnIyaJIbHOJ 3aIHTb. CM. pa3JeI 'CpeIcTba 3aIITbI noJIb3OBATeJIa'.
HnkOrda He MoiNphiUpyTe MaunHy HacToIbKO, YTo6bl ee KOHcTpkyKUra 60JIbWe He COOTBeTcTBoBaJa opnHaJIbHOMy IcNoJIHeHIO, HHe OcyuEcTBJrTe ee 3KcnLyatauio, ecJIb Bbl noOzpeBaTe, YTo OHa 6bla MoiNphiUnpoBaHa dpyrIM JInCtOM.
KaTeOpnueckn 3anpeuaeTcNcnoJb3oBaTb nIy, aKKyMyJIaTOp IIN 3aprIHoe ycTpOcTBO, ecNI OHn HaxoTcB HeNCnpaBHOM COCToHIn. PpoBoNDte peryIpaHbe oCMoTpbl, yXoN i 06cLyHHBaHne B COOTBeTcTBnC DaHHbIM pyKoBOndTBom. HeKToOpbl eonepaun no yXoDy n 06cLyHHBaHIO BbINOJIHApTcTOJIbKO nOdToTOBHeHbIMn CneUHaJIncTaMn. CM. yKa3aHnB pa3deJe "TexHnueckoe 06cLyHHBaHne".
HnkOrda He npmHeYTe DoNoJIHTeIbHoe 6OpdyoBaHne OTnHyHoe OT peKoMeHIOBaHHoro B daHHom pykoBoDCTBe.CM.Pa3JePexyuee 6OpdyoBaHne n Texnueckne xapaKTepcntKn.
BHIMAHHE!NoIb3yItecB BcERda 3aunTHbIMN OuchAMn NJI MaCKo, YTo6bl yMeHbWNTb pNCK TpaBMbl OT6pacbIBaEMbIMn PpeDMeTAMN. MoTopna NIIa MoKeT OT6pacbIBaTB TaKne npEdMeTb, KaONJIKN, MaJeHbKNe YaCTNUcbI DepeBa N.T.D. C 6OJIbWM ycJIInem. 3To MoKeT npNBecTI K cepBe3HbIM TpaBMam, oco6eHHo rla3.

PPEyIPEJDEHNE! HenpaBnIbHoe peJyuee 6opuyoBaHne IJIH He npaBnIbHOe coyeTaHne nIbHoJ uHb/ucen yBeJIuYBaET pNCK OTdau! IOpb3yTeCb ToIbKO coUeTaHne mIbHOJ uHb/ucen, KOTope Mbl peKOMeHdyeM, N BblOJHnTeyKa3aHnI NHCTpyKcN. Cm. yKa3aHnI no3a0JIOBkOM TexHnueckne daHHble.
Bcerda pykoBooDCTByntecb 3dpaBbIM CmblcJOM
HeBo3MoHNO npEeBnDcTb BCE Bo3MoHhIe CNTyaUIN, B KOToPbIX Bbl MoKeTe OKa3aTbcra, NOJIb3yAcB MoTOpHO nnIO. ByDbTe Bcerda octopoHHb I pyKOBOcTBByTEcB 3dpaBBIM cmbclom. N36eaiTe cHTyaUIN, dJIa KOTopbIX no BaWemy MHeHIO, yPoBeHb BaWe KBAJInKuKaUIN HeOCTaTOueH. (2) EcNl Bbl, npoHTab 3to pyKOBOcTB0, Bc eEe ChyBCTByeTe ce6ra HeyBepHHbIMN BOTHoWEHN MeToDa pa6oTb, 6oPaTIteCb 3a COBeTOM K cneuaJIncTy, npexHe, Yem Bbl 6yTe npoOnHaTa pa6oTy. O6paauTEcb Bcer Da K BaWey DnJIepy UInK HAM ecIn y Bac ectb Bonpcb no o6paueHIO C MOTOPHO nnIO. MbI BCERda 6yDet paDb nomOy b DaTb Bam cobetno Tomy, kak Bbl MoHete nolb3oBaTbcra BaWe MoTOpHO nnIO JyUe H 6eONacHee. MbI COBETyEm Bam npoHTn NOrTOBnTEJIbHBI Kypc no NoJIb3oBaHIO MOTOPHO nnIO. Bam dInLep, shKoJa no yxOdy 3a IecOM INI 6n6JINoTeKa MorY T npedIoHNb Bam MaTePnaI To KaKne ectb dJa 3tOrO KycpbI. NocToAHNO npoBOHITcra p6oTa no yLyUeHIO KOHCtpyKUIN IN TexHoIorIN - yLyUeHIN, KOToPbIEyBeJInuHBaIOT 6eONacHocTb IN 3fFekTnBnHocTb. NocceauTe BaWero DNJIepa peryJIapHO, 7TO6BbBl 6bln B Kypce DeJa, KaKyIO noJIb3y Bbl MoHeTe n3BLeueb n3 HOBbIX fYHKUIN, BBOIDMbIX B npoIN3BOIDCTBO.
CpeicTba 3aunTbI onepaTopa

IPEyIPEHKDEHNE! BoJbshnHCTBo HecuactThbix cLyuaeB cZenHO nnloi npOcxoINT npn COnpNKocHOBeHN yelOBeka c DvnKyuuecra CenbIO. Bo BpeMpa60tbcMaunHOBbldoJIHHbI NCNoJIb3OBA Tb CneUaJIbHbI e ODo6peHHbI cpeDCTBa 3aUnTb.I CpeDCTBa JnuHOb 3aUnTb He MoYr NOJIHoCTbIO NCKLIQUHTb PnCK NOJUyeHNA TpaBMbl, HO npn HecuactHom CJlyae OHn CHNkaOT TaJHexCb TpaBMbl. O6paauTecb 3a NOMouk K dInLepy npn NoD6ope cpeDCTB 3aUnTb.
Bcerda nCloNb3yIte:
CneuHaBb3aHTbIe
3aunThbHe HayuHnKIn
- 3auntThbIe OUKN NIM MacKy
CneuaJIbHBe nepaTKn c 3aunToI ot nope3a
-БюксзаuntToIOTnope3aNilnoI
- NcnoJIb3yIe COOTBeTCTByIOuO 3auNTy IJIpyK.
CanorncnpedoxpaeHemOTnope3aueboc MeTaJIInueckoBCTaBkoNHeCKOJIb3auei NoDooBOI.
BcerdaHMeTe npCe6e anTeUky JIA OKa3aHnepBOmMeuHcKo nOMOu.
OrHeTuHtIeJIb c IonoTaOn
B 06uem cnyae oedna doJIHHa 6bITb nIOTHOIOOrHaHa N TO He BpeMa He CTeCHrTa CBO6OdbI DBNHeHn.
BAJHIO!IiHa, cenb nIIN dpyRne qacTn NJIbMoTy CTAb NCTOuHnikom NcKp. Bcerda IMeTeNoD pyKoI cpeIcTBa noHapO TyWeHn, KoTOpBleMOrTy NoHaIObITbcB JIO60m MoMeHT. TemCaMbIM Bbl 6yDeTe coDeIcTBoBaTbIpeDoTbpaueHnJeChbIX noHapOB.

PPEyIeHHe! Pa6oTa c noBemom Ha DepeBo Tpe6yeT oc6bX HaBbIKOB 3HaHnTeXnKn nJIeHn, co6IOJeHne KoTopoi 6o3aTeJbHo Bo n36eHnE noBbIeHn pNcKa IuHoi 6eOtonacHocTu.
YcTpoIcTb6e30NaChOCTMauHHbl
B 3TOM pa3JeI NOJCHIETC, YTO OTHOCITcK yCTpoiCTBAM 6e3oNacHocTn MaunHb I Nx
fYHKU. Ya3aHnNo npOBepKe n 06cLyHHBaHIO npNBedeHb B pa3JeI PpOBepKa, o6cLyHHBaHne n cepBVC ycTpoiCTB 6e3oNacHocTn MOtopHo nnbl. CM.yka3aHnB B pa3JeI YeTo ecTb YTo?, rDe Bbl HainTe paCNOJIOHeHne 3Tnx yCTpoiCTB Ha MaunHe.
Cpok cIy6bMaunHbMoKeT 6bTb yKopoyeH npCK abapn yBeJIuYeH,ecJN o6cLyHBaHHe MaunHb He BblnoJIHReTc npaBnIbHbM o6pa3oM n ecJN cepBn C/IN peMOHT He 6bln BblnoJIHeHb npOeCCNoHaJIbHo. Ecln Bam Tpe6yeTc DOIOJIHNTeJIbHa NΦOpMaUa, o6paTNTeCb B 6LHHaWyo MacTepcKyU No 06cLyHBaHIO.

PNEyIPEHDEHNE! HkOrda He noJIb3yITeCb MaunHOc NOBpeXeHHbIM ycTpoiCTBOM 6eOanacHocTN. YcTpoiCTBO 6eOanacHocTN cJeDyeT npOBepaTBn 06cLyHbATb.CM.yKa3aHnB pa3dJe IpoBepKa, o6cLyHbAHne n cepBnC ycTpoiCTBa 6eOanacHocTN MoTOpHOJ nnbl. Ecln BaHa MaunHa He B cocToaHN NbldeepHaTb BCE npOBepKn, 6paauTEcb BMactepckkyo Jnil peMOHTa.
Topm03 Zeenn pyKoTka oxpaHbI npOTnB OTdaue
Bawa MoTOpHa NIIa OChaSeHa TopMo3OM cENI, CKoHcTpynpOBAHHbIM dIra ocTaHOBKn cENI NJIbI npn OTdAue. TopMo3 cENI cHnKae T pNCK HeCuaCThblx ClyuAeB, Ho npeIoTbpaTHTb IN MOHeTe ToIbKO Bbl, KaK noJIb3ObaTeJIb. (3)
БудъЕВиMuMaTeЛьньИ npn pa6Ote n cIeДИТe, YTO6bI 30Ha OТДaЧИ ПИЛьHOrO NOJIOTHa He KacaJaIcB HNKaKInx 06BeKToB. (4)
- TopMo3 ζεΠ MɔHHo aKTbBnPoBaTb BpyHyIO (JIeBOi pyKoI).
TopMo3 cpa6aTbIBae T npn CMeueHn nepeHrero uNTKa dJa pyK Bnepe.
-3To aKTHBnpyeT noDnpyHHHeHHb MExaHn3M, KOToPbI ocTaHaBnBaET BeDyUyO 3Be3DoUky.
PykoTka oxpaHb npoTnB oTdaYe npedHa3HaueHa He ToIbKO dJI npINBeDeHnB DeIcTBHe TOpMo3a cEN. pyroe ee BaHHoe CBOIcTBO 3aKJIIOyaeTcB TOM, YTO OHa He DonycKaeT nonaDaHnJ leBoi pyKn Ha cenb npi cocKaJIb3bBaHN c nepeDHepyKN.
Дя pa36IokOBK TOpMo3a CdBnHbTe oxpaHy npOTIB OTdaYe Ha3a,I, NO HappaBJIeHIO K nepeDHe pyKe.
TopMo3 ZENI DoJIHeH npn 3anyCe MoTOpHo nnbl6bTB BKJIOUeH.
-ПользунТecb Topmo30m ZeHn KaK "СToянчыm Topmo30m" npn 3anycke n npn MaIbIx nepexoJax c OdHoro MecTa HaДpyrOe, UTo6bl N36eHaTb HecuacThbIX cIyuaeB, KOrIa noJIb3OBATeJIb IJI IN KaKoI-JIb6o npedMeT B OKpyHeHn MoHET OKa3aTbcra C DBrNHyUeHcra ZelbIO nIIbI. (5)
ToJyOK npn otdaue MoHeT 6bITb MOJIHHeHOCHbIM N OueHcNJIbHbIM.B 6OJIbIINcTBe cIyuaEB OTdaua MaJIeHbKaI TOpMo3 cENI cpa6aTbBaET He Bcerda.EcJI N 3TO IPONCXODNT, BblOJIHHbI KpeNKo DEpHaTb MOTOPHyIOIIy IN He DaTb eN BBIPBaTbcraN3 pyK.
Cnoc6 cpa6aTbHaHn TopMo3a Lenn BpyHy0 3aBNCNT OT CNJIbI OTdauN IN NOJIOKeHnue HnHO NJIbI OTHOCHTeJIbHo npeDMeta, KOToPOrO KOChyJaCb WnHa CBOe 3oHoi OTdaH. - EcIy yIap oTdaHn He oueHb cnIbHbI n/Inn 3OHa oTdaHn noIoTHa HeJaIeKo O T Bac, TopMo3 cENi cpa6aTbIBaEeT BpyHyIO DINHeHem JeBoI pyKn. (6)
-Пи падени, Левая рука НхдNTсьВ нложени, Когда оHa He B COCTОHIN ВКЛЮЧТь TopMоЗ сeп. 3ТOT TИN 3aXBaTа, T.e. Когда Левая рука НхдNTсь B NOLOJOHeHIn, Когда оHa He B COCTОHIN OKa3aTb BЛЯнHne Ha ДВИЖЕ NHе ΜИТа OТДaЧ, TopMоЗ сeп
MOHET6bITb BKJIOueH TOJIbKO NOI BO3DeiCTBnEM INHePUN.(7)
BkIouaet JIM MoJ pyKa TOpMo3 cenN Bcerda npn otdaue?
HeT.ДЯ nepemeHnIa OToaN Bpepe, Heo6xoIMo onpeJeHHeOy cInIe.EcIi BaWApyKa 6yTe TnMb CJIeKc KaCAtbCg IITaOTdauNIIcCOKOB3HeHa HrO,TO yCNIIe MoHET 6bITb HeIOCTaTOUHO CNbHbIM dJIY BkLIQUeHnTOpM03a NIIb.BbdoJHHbI depHaTb MOtOpHyIO NlNy YcTouHBbIM 3axBaTOM BO BpeMa pa6Otbl. EcIi Bbl 6yTe aTo DeJaTb n npOn3oJDeT OTdaCy, Bbl CKopee Bcero HNKOrDa He OTnyCTnTe pyKy c nepeHne pyuKn H He BKIOuHTe TopMo3 nINbI, INI,TopMo3 nINbI 6yTe BkIOUyeH NIIb Korda NNla ycNeet NoBepHyTBcHa DoctaTOUHoe pacCToRnHe. B TaKo ciTyauN TOpMo3 ceni BO3MOxHo He ycNeet OCTaHOBNTb cEnb Do TORO, KOrDa OHa npIKoCHecrK Bam.
BcTpeuAOToTc TaKHe pa6OueNoIooHeHn, B KoTOpbX Ba7a pyKa 6yJeT He B coCToHn DoCTaTb Do uNTa OTdaU, UTO6bI BKJIOUHTb TopMo3 cEN; HApPmep, KOrDa nIIa yDepHNBaETc B NoIoHeHn BaIKN.
PpOncxOaNT JN BkJIoueHne TopMo3a ceNN INHePcNeBceIa npn OTdaue?
HeT.Bo-nepBbix BaW TopMo3doJHKeH
fYHKUHOHPOBaTb.Bo-BTopbIX,OTdauAoJHXHa
6bITbDcTaTOUHO CINbHOIJIaBKJIIOUeHnIa
CTOHOHOrTo TOPMo3a.EcJIN TopMo3IeN 6bl
Upe3MepHo CyBCTBNTeJIbHbIM,TO OH BKJIIOUaJIcra
6blBCerda,HTo He IaBAJIO 6bl BO3MOHHOCTn
pa60TaTb.
B cocToHn JI TopMo3 cenN Bcerda 3aHTb MeHa OT TpaBMbl npi ot daue?
HeT.Bo-nepBbIX,TopMo3doJHHe
yHKUHOHPoBaTb,yTo6bI OH 6bl B COCTOHN
npEOCTaBnTB Heo6xOAnMyIO 3aunTy.Bo-BTopbIX, OH DoJIHeh BKJIooHaTbCra TaK,KaK 3TO ONICAHO
BbIe,HTo6bI OH CMOr oCTaHOBnTB Uenb NJIbI npn OTdaue.B-TeBnx,TopMo3 Uen MoKeT 6bl N BkJIooHe,HcEJI WInHa NJIbI HaxOOnTCr OueHb
6JIN3KO K Bam,TO TopMo3 Bo3MOHHo He ycneet
3aTopMo3NTb IocTaHOBnTB Uen b DO TOR,KaK OHa
K Bam npNKoCHeTcR.
ToIbKO Bb camn npaBnHbH MeToD pa6oTb MoHET NCKJIIOUHTb OTdauN 3TN pNUCKN.
CTonop nepekeKIOUaTeJIa
CTonop nepeKJIOuataJI npedHa3HaueHДЯTORO, UTo6bI n36eHaTb HepeDHaMepeHHORO BKIOUeHn. Pn HaKaTHn Ha cTONOp nepeKJIOuataJIa(A) (T.e. pni CImMaHN pyKU) nepeKJIOuataJIb (B) otnyckaetc. Pn
OTnyckaHn pyuKn nepeKJIIOUaTeIb n erO cTOnop Bo3BpaauoTcB INCXoIDHOe noIoKeHne. (8)
YIOBNTeJIbIeENI
YIOBNTeJIb cENI npeHa3NaueH IJIyJNAIBINBAHNI
cENI npi ee 06pbIbe NJIu COCKAKINBAHN. UTo6bl
3TOrO He npoN3oWNo, B 6OJIbWnHCTBe CJyuaEB,
DocTaToUHO npaBnJIbHO OTpereYInpOBA Tb
HaTJHeHne cENI (CM.yKa3AHNBA pa3DeJe
MoHTaH), a TaKHe npaBnJIbHO npoN3BOIDtB yXoD IN
Texo6cJyHXINBaHne WInHb NJIbI NZeNi (CM.
yKa3AHNBA noDpa3DeJe O6Une pa6Oue
nHCTpyKcUN). (9)
3aunTaIJa npaBoi pyKn
KpOme 3aunTb Baue npaBoN pyKn npn
cocKaJIb3bIbAHm Nlln 6pbIbe cenN, 3aunTHoe
npncnoc6JeHne npeDoXpaHReT pyKy, cHIMaIOyUo
3aHIOpyuKy, oT cLyuAaHOro nonaHaHnBeTOK n cyBeB. (10)
Bn6paun
NIIJIeHHe TBePbIx npoJd DepeBa 60JIbUHHCTBO
WIpOKoJIncTBeHHbIX DepeBBeB Bbl3bIaE T 6OJIee
CINbHyIO BN6paUIO YEM NIIJIeHHe MArKnx npoD
6OJIbShnHcTBQ XBOHbIX DepeBBeB. Pa6oTa c
3aTyINBWeJcA INI HeICnpaBHOn UenbIO
HenpaBInbHaY INI nloXa 3aToUKa npIBoDHT K
NOBbIeHNIO yPoBnRA Bn6paUIN.

IPEJYIPENHE!Hn npKaKnx
06CToTeJIbCTBax He IOnyckaeTcra
BHeceHne N3MeHeH N
nepBoHaayJIbHyIO KOHCTpyKcuHIO
MaunHb 6e3 pa3peSeHna
N3rOToBnTeJI. PoJIb3yInTeCb ToJIbKO
OpRnHaJIbHbIM 3aNpAcTAMN.
BHeceHne Hepa3peWeHHbIX N3MeHeHNI
n/IIIN cNoJIb3OBaHne Hepa3peWeHHbIX
npncnoc6JeHNI MoHe T npNBecTN K
cepBe3HOJ TpaME nIi DaNe K
CMePeJIbHOMy NCxOy dJIa OepaTopa
nIIN dpYnX JnU.

IPEДУПЕХIDEHNE!ДЛNTeJIbHoe BO3dEicTBnE Bn6paCnOka3bIBaET BpeJHOe BJIINHHe Ha KPOBeHOCHbIE COcYdbIMoHcETBb3BaTb
pacCTpoiCTBA HepBHOcCTEmbl y IIOJe C HApUWeHHbM KpOBoo6paUeHNEM.BcLnyae NOBJIeHnCmNTOMOB BpeJHOr OBLINHn Bn6paCnHaOpraHn3M, cLeNyTe 6bpaTbCnK BpaCy. IPrimePom TaNX CmNTOMOB MOryT 6blbOTcyTcTBnE CyBCTBnTEJbHoCTN, "3yd", "NOKaJIbBaHne", 60JIb, Notepa INy UMeHbSeHne O6bUHOn Cnbl, IN3MeHEHne LBeTa N IOBepXHOcT N KOHN.O6bUHNo NOO6HbE CmNTOMbl npoRbJIyIOtCn Ha NaJIbCuax, pyKax INN 3aAncTbNx. 3TN CmNTOMbl YBeJIuNVBAIoTCn Pn XOJOIoHOI Tempeatype.
Pechyüee o6opyuObaHne
B HacToaem pa3eIe onucaHo To, KaK Bbl, 6laorapnpaBnIbHomy o6cLyHHBaHIO nNcNoJIb3OBAHIO npaBnIbHOro peKyuIero 06OpydoBaHry:
- CHN3nTb pnck oTdaun MaunHbl.
-36eHaTb cIyuae B BixOda n O6pbBa ceHn.
-ПоДдержИВаТьЦeпь Всeгда праВиЛьно 3aToчЕнHoI. - PpOДЛNTb cpoK cIyK6bl nIbI nIJIbHOro annapata.
He donyckaTb yBeJIneHnI ypoBnB Bu6paun.
O6nne npaBnla
-ПовьуТecьТолько peKOMeHnyeMbIMHaMпяжуIMOBopyДОВанeM!См.yka3aHnЯ noIЗаг罗ЛobkOMTexHueckne daHHbIe.
CJeIInTe 3a TeM, UTo6bI 3y6bI NnIbHOu CenI 6bln npabnlbHo 3aToueHb!! Co6IIOaIte HauIN INcTpyKUIN INCNoJIb3yIITe peKoMeHDoBaHHbI HAMn 7a6IoN. IOBpeXdEHHa INI NlOxo 3aToueHHa Uenb NOBbiIaET pNCK HeCuaCTHO rO cIyua.
BbIepKnBaTe npaBnJIbHoe cHKeHne orpaHnHTe! BbINOJHraTe Haun HcTpkyuNn I noJIb3yITecb peKoMeHdyeMbIMn Hamn 7a6IoHaMn dJa ycTaHOBKn cHKeHn orpaHnHTe. OueHb 6OJIbwoe cHKeHne orrrpaHnHTeJyBeJInuHBaeT pUCK OTdauN. (18)
- ΚeNB nIbI doJHHa 6bITb xopoWo HaTaNHyTo!HeIoCTaTOUHoe HaTaNHeHne cENyBeJIuNBAeT pNcK BblOda cENn Nn3Hoc nIbHO rnoToHa, cENn nIbI n BeDySei 3Be3doUKn. (23)
CneiTe 3a Tem yTo6bI nIbHbI annapaT xopoOo Cma3bIbAclc I NOIdepHXIBaIcB COOTBeTCTByIOSeM pa6OeM coCToHn Ipn IIOXoI CMA3Ke cENb MoHe TJeKo O6OpBaTbcN I6bIcTpeu N3HaUINBaeTcA, a TaKHe ycKOpReTcN I3Hoc NoIoTHa N 3Be3doYeK.
PezyueoobopyoBaHne cnoHHHeHHo oTdauei

PPEyIPEJDEHNE! HenpaBnIbHoe peJyuee 6opuyoBaHne nn He npaBnIbHOe coyeTaHne nIbHOu IINb/ucen yBeJIuNBAeT pNCK OTdaU! POnb3yI Tecb ToIbKO coyeTaHne m NlBHOI uHHb/ucen, KOToPoE Mbl peKoMeHdyeM, IN BblOJIHnTe yKa3aHnI NHCTpykCm. CM. yKa3aHnI no 3arOJIOBkom TexHnueckne daHHbe.
EINHCTBeHHa BO3MOHHocTb N36eHaTb OTdaHy, 3TO NOCToHHbIKoHTpoJb 3a TEM YTo6bI 30Ha OTdaHy INJIbHO IIOIoTHa Hn C YeM He copnKacaJacb.
Bbl MoHeTe cHn3NTb pNcK OTdaCy, NcNoJIb3yraNNbHbI annapaT, IMeOUsIKoHCTpyKTNBhIe 3JeMeHTbI, NOHHaIOUne BepoTHocTb OTdaCy, npaBNbHO 3aTaUNBa Yenb I BBINOJHra HaJIeKaun yXoI.
NJIbHoe noIIOTHO
YeMeHbpe paAnyc HocOBOn 3Be3IOUKN,Te MeHbSe 6yJeT BepoTHOCTb OTdauN.
Пиьнайцени
Cenb nIbI co6paHa n3 Ha6opa 3BeHbeB, KoTOble MOryT 6bTb BbINOJIHeHb IB CTaHApTHOM IN CnHHaIOSeM BepoA THOCtB OTDaU BapNaHTe.
BAHHO! HnKaKne nIbHbIe cENn He NcKJIouaOT noJIHoCTbIO pNCK OToaH.

PNEyPENDEHNE!IIO6oKOHTcBpaauouecyuNbMOHeT npVBecTNK OueH cepbe3HbIM TpaBMam.
HekoTopbIe TepMNHbI NNoHrTn IcNoJIb3YeMbIe npOnncAHN NJIbHO rnoIOTHa NIIbHOu CEHN
Для coхpaheHЯ Функшь BCex DeTaJIe CnCTeMb3aIHTb Ha peHyUeM O6OpyIDOBAHIN, Bam cJeDyeT npOn3BOdNTb 3aMeHy N3HoWeHHbIX N IOBpeHJDeHHbIX NIIbHbIX UHN I ZeHnHa peKoMeHdyEmbIe FInpMoH Husqvarna. CM. yKa3aHnB pa3deIe TexHnueckne daHhIe IJa noJyHeHn INΦopMaUIn O peKoMeHdyEmbIX HAM NIIbHbIX uHNax NZeJx.
NJIbHoe noJIoTHO
-ДиИнHa(ДюМ/СM)(12)
·KolnuecTBo 3y6beBHaHocOBoi 3Be3doUKe (T). (11)
- Warпьногици (Дюмы). Koheуня
3Be3doчкИ Вedyшаг 3Be3doчкИцу
Должны COOTBeTcTBoBaTbpacCTOryHIO MeJy
3BeHЯMUцу. (13)
KoJI-BO npINBOdNbIX 3BeHbeB (Wt.) YIcJIo npINBOdNbIX 3BeHbeB onpeJeTcR dJIiHOI NJIbHOrO noLoTHa, WaROM cENn KOLInueCTBOM 3y6BeB Ha HocOBoi 3Be3doUKe noLoTHa. (15)
- WnpHa n3a nnIbHoro noLoTHa (HouM/MM). Pa3 noIoTHa DOJIKeH COBnAdaTb c WnpHOn npuBOdHbIX 3BeHeBcEeN.
OTBepCTneIgCMA3KNZeENIOTBepCTneIJIa 1eIKNHaTJHKITeJIa cENII. NlNbHoe NOIoTHO 1oJIHHo COOTBeTcTBoBaTb KOHCTpyKUIN MoTopHOIINbI.(14)
Пиьнайцени
-ⅢaπnIbHoIeN(IOHMBi)(13)
-ⅢnpinaBvnyuero3BeHa(MM/ДюIMOB)(16)
·KolnueCTBO BeDyux 3BeHbeB (U7.) (15)
3aTaUBaHne n cHHeHne orpaHnHTeI nnBHoJ cenn.

PNEyPENEXHNE!PnBcepa6oTe cIeBIO Bcerda ODeBaTte 3aunTHbIe nepuATKn.
06uie cBeDeHn oTHOCHTeJIbHo 3aTaUHaHn peHuJero 3y6a
- HNkorda He nJIITE 3aTyNBWeeCnIbHOI cIeIbIO. PnI3HaKOM TOrO, yTO cIeNb 3aTyNNJaCb, IyJIaeTcH Heo6XoIMocTb DaBNTb Ha Hee npi nnJeHN N OueHb MeJKNe ONJIKN. PnCNIbHO 3aTyNBWeeCn CENN BOo6Ie He 6yTe ONINOK. Byet OCTaBaTbcr ToIbKO dpeBeCnaR nbIb.
Xopoio 3aToeHHa nnIbHa n cama Bpe3aETcB IepeBO n daet JINHHbIe N 6oJIbWne OnNJIKN. (17)
Пиляшчacьюцениявлгетсpeнуши 3В�о, KOTOpoe coCTOIT n3 peHyUeRo 3y6a (A) n orpaHnHTeJI rIy6InbI bpe3aHnB (B).Pa3HnCa MEXdY HmN NO BbICoTe onpeDeJIeT TOJiHy cpe3aEMoI CTpyKKn. (18)
Pn 3aTaunBaHmpeKyIeO 3y6a, cJeDyET yuHTbBaTb YeTbipe npaMeTpTa.
1 YroJ 3aToUKN BepxHn peHuSeK KpOMKn. (19)
2YroJpe3aHn(20)
3 YroJ HaKIoHa HanInbHnka (21)
4ДиamEtкpyrлoro HanNbHnka (22)
BcnoMoraTeHbHO nHCTpyMeHTa 3aToHTb NbHyU cIb oueH b CIOKHO. Mbl, noTOMy, peKoMeHdyem NOb3OBA TbCBsA6JIoHOM dJIa 3aTockn. OH rapaHTnpuyET To, YTO nIbHa rCenb 3aToueHa ONTMaJIbHO JIA MaKCmAbHo Ipon3BOIDNTeJIbHOCTN NIIeHnI MNHMaJIbHO pNcKa OTdaHn.
Cm.yka3aHnBpa3eJeTexHueckne daHbIe, oTHocHTeJIbHO npaMeTpOB 3aToUcKn BaWei nnblHoI ceni.

IPEJYIPPEJDEHNE! Hec6JIIOJeHne yKa3aHn INHCTpyKcN 3HaUNTeJIbHO yBeJIuINBaET pNCK oTdaN nJIbl.
3aToUkapeKyuIero 3y6a
Для 3aToUckn peHcyuero 3y6a, Heo6xOДmO ImMeTb KpyrIbI HAnIbHNK Iua6LoH IЯ 3aToUckN. Cm. yKa3aHnI OTHocNTeMbHO dIaMTePa KpyrIloRo HAnIbHnKa IpeKOMeHdyEmo Ia6LoHa IЯ BaWeI nIIbHoI ceni B pa3DeJe TexHnueckne daHHble.
- PpOBePbTe, UTo6bI cEnb Nnblb 6blJa HaTaHyTa. Cna6oe HataJHHe He 3aTpPydHReT npaBnIbHyIO 3aToUky. (23)
BcerIpaon3BoOnTe 3aToUky c BHyTppeHHei cTopoHb peHuJyero 3y6a Hapuyy. O6JIerCuHTe HeMHOrO DaBJeHne Ha HanNJIbHNK npn o6paTHOM dBHXeHn. ChauJa 3aToUHTe 3y6bAc OdHOc TOpOHbI 3aTeM nepeBepHNTe MoTOpHyIO NIIy I 3aToUHTe 3y6bAc DpyroI cTopoHbI.(19)
-ПоинБОДИТЕ 3ATOуКУТAK,UTO6ыВCE 3y6ь 6ыл n OДиНаКОВОйДиНь.Кorда 6удET OCTaВaTbСЯЛшь 4 MM(5/32ДIOIMa)ДЛINHы 3y6a,цeNBсLEДуET Bbl6pocNTb,TAK KaK OHa yKe N3HOWeHa.
06uie cBeJeHnO oTHocnteJIbHO CHHeHnOrpaHnUHTeJI rIy6nHb Bpe3aHn.
Pn 3aToUKe peKuXx 3y6BeB BcerdapeRyInpOBka orpaHnHTeJraLy6NBb 6yJeTCHNHaTbc. JIy BbINOJIHeHNa KauEcTBeHHoPe3Kn CLeNyEt cTOuHTb orpaHnHTeJrLy6NBbDO peKoMeHdyEmoro 3HaueHnC.M.yKa3aHnBa pa3DeJe TexHnueckne daHHbIe oTHocnteJbHOBeJIuHNb CHnHeHnO rpaHnHTeJraLy6NBbBpe3aHn Baew nIIbHo ceN.(24)

PNEyPENHEHNE!Upe3MepHo 6oJIbwoe orpaHnueHne rIy6nHbI Bpe3aHn yBeJIuHbAeT pNCK OTdauH nJIbHOI ceni!
PerynpoBkaBeJInHbCHINHeHnOrganHnHTeJI rny6nHbBpe3AHN
- Pn peryI npOBKe nOaU, peHyUne 3y6bA D0JIHHb6bTb 3aHOBO 3aToueHb.Mbl
peKOMeHnyem peRyIIpOBaTb BeJIuCyHcy HxHHeNnO rpaHnUHTeJ IocJIe TpEx 3aToueK 3y6beB nIIbHOJ cEN. O6paTnte BHNMaHne! DaHHa peKOMeHdaunI npEiNoJaeraT, yTO dInHa peKyuXx 3y6beB He 6bla cToyeHa cLIshKOM MHOrO.
-ДяperулрOBKNCHINHnErOpaHnHTeJIa Heo6xOIMOn IMTeb NLOCKn HAnIbHNK IN 7a6LoH perylnpOBKn BeINuHbI CHINHeHnOrpaHnHTeJIa.Mbl peKomeHdyem NOIb30BaTbcraHaNIM 7a6LoHOMДЯpeRyInpoBKn BeINuHbI CHINHeHnOrpaHnHTeJIa, YTO6bICHINHeHne IMeJo Heo6xOIMbI pa3Mep a orpaHnHTeJIb npaBnIbHbI yroJ 3aToQKn.
HaJIOKHTe 7a6Ioh Ha nIbHyu cenb. HOpMaun no IcnoJIb3oBaHnIO 7a6LoHa npBeDeHa Ha ynaKOBKe. Nlb3yITecb nlockn HAINbHKOM dJa CTAuHBaHn BbCTyNaIOSe YacTn OpaHnUTeJI rLy6BnBbpe3aHn.CNHKeHne OpaHnUTeJI cHTaeTc npaBNbHM, KOrDa He 6yJeT cyBCTBoBaTbcr HkAKoro cnpOTNBJeHn, KorDa Bbl npoBOJTte HaNlBHKOM no 7a6IoHy.(25)
HaTaeHneIeN

PNEyPENHEHNE!HeocTaToUHO HaTMyTaIeNb NIIbI Bbl3bIBaET cochKaKnBaHne LcEN, YTO MoKeT npNBecTN K onacHbIM I DaJe K CMepeJIbHbIM TpaBMam.

PNEyPENHEHNE! Npec6opKo, npOBepKO u/uI npOBeJeHEm Texo6ClyuHBaHbB 06raTeJbHOM nopAKe BbHMaTe WTeKep N3deJIINr N3NCTOCHKa nITAHNA.
Yem 60JIbWe Bb noJIb3yeTecb NnIbHOJ cENbIO, TeM 60JIbWe OHa pactrIgBaetc. BaHNo, YTO6bI nocJe 3TOrO u3MeHeHnN NnIbHbI annapaT 6bl OTpeRyIuPoBaH.
PpOBepaTe HaTJHeHne cenn KaJbI pa3 npn HaHeceHN MacJaHa cenb. OBPATNTE BHIMAHHE! Hoba nnbHa cenb Imeet HeKoTopoe BpeMa npnpa60TK, B TeueHne KoToporo CJeNyEt YaSe Yem o6blHo npOBepaTb HaTJHeHne cenn.
Cenb cIeJeT HaTgNBaTb DoCTaTOUHO Tyro, Ho He IOnyckA nepeTARBaHn, Korda ee HeBO3MOKHO npoBepHyTb pyKoI. (26)
- CHIMITE pyKoTky, BbITaHInTe ee Do oTKpbTna.
-ПовернTepyк npOTnB yacoBoN cTpeJKN,уTo6blocna6nTB KpenJIeHne KpbIuKn BeDyuee3Be3doUKN.
OBUNE INPEIINCAHNAIO B3OAPCHOCTN
- OTPeryIpyIteHaTJHeHneZeenn, nobepHyB KOJIeCo HaTJHITeJI BHN3 (+) IJIyYBEJIuYeHnHaTJHeHnI NJI BBepX (-) IJIy ocJa6JeHnHaTJHeHnI. (A-B)
-3aTHe cUeJIeHHe HnpaBIAIOse, NOBopaYBa pyKoAryNo yacOBOn CTpeJIke.
Onyctnte pyky, yTo6bI fNkCnpoBaTb HaTaeHne.
Cma3Ka nIbHoro annapaTa

PPEyPENEHEIJIoxa cma3ka nIbHOro annapaTa MoHeT Bb3BaTb 3aKInHbAHne LcEN I npNBecTN K cepbe3HbIM N daKe K CmepTeJbHbIM TpaBMam.
MacoIaJIaIeHNIJIbI
MaJIo IJIa CMa3Kn LcENI DoJIHHo yIepHHBaTbcra Ha cENi N B To He BpeM CoXpaHrTb CBOIO TeKyuEcTb KaK B TEnJIyIO norOdy JeTOM, TaK N B 3UMHn XOJIoD.
HnkOrda He nCnoJb3yIe MacNo, 6BIBee B ynoTpe6JIeHN! 3To onacHo IJa Bac, IJa MaunHbI N dJa OKpyKaIOSeI cpebl.
3anpaBkaMacJiom
Bce BbIyckAeMbIe HAMMOJeIN MoTOpHbIX NIMeIO T aBTOMaTnuecKyIO CnCTeMy cMa3Kn. B HeKOToPbIX MoJeJx TaKHe npeDycMoTppeHa peRyJInpoBkA npOn3BOJNTeJIbHOCTN MacJIoHaococa. (27)
-ПОЛНОЕМКОТи XBATAET Ha 15 MInHyT HenpepbIBHOrO NcNoJIb30BaHnI.
HnKOrJaHe npMMeHЯTe Otpa6oTaHHoe MacJIo. 3To npBBeTe K nobpeHJeHIO MacJIaHOrO HacocA, NJIbHOrO NOIOTHa I NJIbHoI CEII.
- OueH BaHHo npIMeHbT npaBnHoe MacNo, COOTBeTcTByUOuNe TeMnepaType OKpyHaIOSeBO3Dyxa (npaBnHna B3KoCTb).
Ipn TemnepaType HnHe 0° HeKOTopbIe MacJa CTaHOBraTcMeHee B3KNM. 3To MoKeT Bb3BaTb neperpy3Ky MacJHaHOro HaCocaN npNBecTN K BbIXOy n3 CToP erO KOMNoHErTOB.
-ДлЯ ВьбopaценHoro Macla cIeNyet 6paTntbcaK BaWemy dInnepy.
PpOBepKa cMa3Kn UenN
HaipaBbTe HaKoHEnHK uHHbHa CBeTJyIO nOBepxHocTb Ha pacctOaHn np6JI. 20 cm (8 JIOIMOB). PocIe 1 MIn. pa6Otbl NINbC noJHOCTbO OTKpbITbIM DpOcSeJIeM Bbl yBvIInTe Ha nOBepxHocTn YeTKyIO MacJraHyIO noJocy. (28)
EcIn cncTeMa cma3Kn He pa6oTaeT:
- PpOBepbTe, yTo6bI MaCLJIbHb KaHaJI B NJIbHOM NOJIoTHe 6bl OTKpbIT. PpH Heo6xoDmOCTn npOuNCTnTe. (29)
- PpoBepbTe, He 3a6nIcra IIN na3 nIbHoro noIOTHa. Ppi Heo6xoIIMocTn npOuNCTnte. (30)
-Проверът,свобноги Вьраацетс 3ВeЗДочКа Ha Hocke ПИльНого NOЛоТHa,И He 3a6NTo Л cMa3OчHoe OTBepcTne.Пр ИEO6xOДИМocTи erO cIeДуeТ пpoЧNTиb n Cma3aTb.(31)
EcIn nocJe BbINOJIHeHnBcex yKa3aHHbIX Mep pa6oTa cncTeMbI CMa3KN He BoCtAHOBnIacb, cNeJyEt o6paTntbcra K cneUnaIncTy no 06cLyHnBaHnIO.
Beyua3Bc0ka
CnCTema npNBoJa cenn OcHaeHa BeNyuei 3Be3doUkoi. (32)
CneIyET peryIpyHOn npoBepaTb cTepeHb N3HocA 3Be3doUKN npINBOda. 3aMeHraTb npn CInbHom n3HOce.
PpOBepKa n3HocanNJIbHOrO MExaHN3Ma
CneJeT npoBoNTb eHeHBeBHyIOcMoTp LenI:
- Het JIN BnIMbIX TpeuINB MeCTax coUJIeHeHIn N 3BeHbX Uen.
-He cTaJa JIu Cenb TyroHnHa n3rN6.
CINbHOJIN3HOWeHbICOUHeHHHeHnI 3BeHbA LcENI.
EcIn 6yDyT 3aMeYeHbOdIN HIN HeckoJbKO n3 nepeuNCJIeHHbIX nyHKTOB.
Дя onpeДeJIeHЯ CTeNEHи n3Hoca cenN Mbl peKOMeHnyeM npoBOДNTb Bn3yaJIbHoe cpaBHeHne C HOBOI LcIbIO.
Pn cTauBaHn peHuux 3y6beB IO JInHbI 4 MM Uenb N3HOeHa H ee CJeDyeT 3aMeHNTb.
NJIbHoe noJIoTHo
PpOBoAnTepeRyIaRHyIO npOBepKy:
- Het Jn Ha pe6pax noIoTHa 3ayceHeU. Ppi Heo6xoIIMocTn INx CJIeIyEt JIKBnIInpoBaTb HanNJbHNIKOM. (33)
CnIbHo JINn3HoWeH na3 noIoTHa. Ppi Heo6xoJIMOCtN NOIoTHO CJeJeT 3aMeHHTb.
HackoIbKO cNJIbHO n3HOweHa nIN HerJIaTKa 6eRoa IopOHHKa nIIbHOro noIoTHa. "BnaHn" Ha oDNHO CTOpOHe noIoTHa BO3MOHHa BCJeDCTBVe NIOXOro HaTaeHnue nn.(34)
-Для npoДиЕня croka cIyK6bl noIToHa erO cIeIyET eKeHbEBO nepeBopaUBA Tb. (35)

PNEyIPEHDEHNE! BoJIbIINcTBo HecuactThbIX cIyuaeB C cenHOI nIOJ npOCxoIDIT npC oPnKoCHOBENI YeLoBeKa C dBNkUyueiCra cenbIO.
NoIb3ayTeCb cpeIcTBaMn HINIBNUYaJIbHOJ 3aUNTbI. CM.pa3JeI 'CpeIcTba 3aUNTbIOJIb3OBAteJIa'.
He npncTynaTe K pa6oTe 6e3 noHnoyBepenHocTn.Cm.pa3JeI 3aunTHoeobopydoBaHne,Kak n36eHaTb oTdauN,PeHHyuee obopydoBaHne N O6unepa6Oue NHcTpkyKUn.
I36eaiTe cntyaun C nobbiueHHbIM pncOM oTdaun. CM.pa3deJ 3aunTHoe 06opydobaHne.
PnmeHnepeKomeHnyemble 3aHTbIe npncoc6JeHnI ne pyyraHpo npoBepaTeHX cocToHnE CM.yKa3aHnB pa3deJe TexHueckne xapaKtepcntuN O6uNe yKa3aHnA noTexHnke6e3onacHocTn.
PpOBepbTe yHKcNn deTaJIeN 3aunTHoro o6OpydoBaHn. Cm. yKa3aHnB pa3JeNe O6uNe pa6OuNe nHcTpyKcNn N O6uNe yKa3aHn no TexHKe 6e3oNaChocTN.
HnkOrda He noJIb3yITeCb MoTOpHo nIO,epKa eToJbKO OdHOpyKo. Bbl He MoHeTe 6eOnacHo ynpaBnTb MoTOpHo nIO ToJbKO OdHOpyKo. 3axBaT pyKn DoJIHeH 6bl Tb BcERda yBepeHHbIM n o6eIMn pyKaMn.
Iopraok MOHTaHa pNJIbHOro INoJIoTHa nCeNN
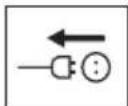
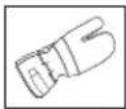

PNEUYIPENKDEHNE!PnBcepa6oTe cLcnbIO Bcerda ODeBaITe 3aunTHbIe nepyATKn.
-ПpoBepbTe, HaxoINTcJI TopMo3 cenN B BbIKJIueHHOM NOJIIOHeHIN,ДЯ 3TOrO cDINHbTe pyKy TopMo3a cENI B HanpaBJeHIn nepeHne pyKn Do KacaHna. (36)
- CHIMITE pyky I KojnaK cIeJIeHn (TopMo3 LcEN). CHIMITE TpaHcnOpTnpOBoUHoe KoJIbCuO.
CMoHTnpuIte uHny nIbHa cneuaJIbHo npEHa3HaueHHOM 60JTe.YcTaHOBnTE uHny nIbI B caMoE 3aHee noLoHeHHe. OJeHbTe Uenb Ha BeDyUyIO uecTepHIO uBCTaBbTe ee XBOcTOBnKINBa3 uHNbII NJIbl. 3Ty oNepaLIO CJeDuYET HauaTb C BepxHei CTopoHbI uHbI nJIbl.
-86eINTEcB,HTo KpOMKn peHuyux 3BeHbeB HappaBJIeHHbI BnepeHa BepxHei cTopoHe NJIbHOrO NOJOTHa.
YcTaHOBnTe KpbIkwky CzenJIeHn; He 3a6yDbTe BCTaBnTb WtblpeK HaTAAHNTeJr LcENN B OTBepCTne Ha cTeHHe. Y6eINTEcb, YTo npINBOHbIe 3BeHbIe IeN PoBHO JOnHaTcRa Ha BeDyUee KoIecO, a Cenb npaBnblHo pa3MeueHa BKeJIO6Ke cTeHHn.
HaTHeIb, nobOpauBaKoJIeCo Bn3 (+). LcNb cJeNyET HaTgRNaBtB Do Tex nop, noka OHa He nepeTaHr npOBuCaTb CHn3y.
- Cenb Hata npabNtHo, ecn OHa He npOBucaeT noHnPaBJIOUe, Ho ee MoHHo CBO6OJHO npOBepHyTBbpyHy. PnpEepHHBaH HocByu qactb HapabJIIOUe, 3aTHTe ee cCenJIeHHe, nobopauHBa pyky no YacBOB CTpeJIke.
- Pn yctaHOBKn HOBOI cENcJeDyET qacto npOBepaTbe ee HATJHHeN, noka cenb He npupa60Taetc. PeryIpaHPO npOBepaTe HaTJHHe NcII. PeryIpaHPO npOBepaTe HaTJHHe NcII. PpaBnIbHo HATJHyTa TcENb 0e3neuBaet Blicokoe KaueCTBO NJIeHnI ndoJIbWe cLyHNT. (37)
3anyck n ocTaHOBka

PNEyPENHEHNE!Npe3anyckom npocJeNTe 3a cJeNyUOIM:
Kateropnueckn 3anpeaaetcnaynckTaBcHny NnLy Do Tex nop, noka He 6ydy TycTaHOBJIeHbI uHa, cenb N Bce 3aunTHbIe KOnxN. BnpOTNBOM CJIyae BeDyua3Be3IOUka MoKeT BbcBO6OuNTbCn npuHNHT TpaBMY.
PpOBepe, YTo6bI cenb HnueRo He KacaJacb.
I03a6oTbTecb, yTo6bI B pa6ouee 3OHe He HaxoOnIOcB IIOJe N HNBOThbIX.
-ПреничemВставлгыakKуМЛЯТОp, Heo6xOДIMO yDocToBepnTbCryTO nepeKJIouaTeIb pa6oTaet npabINlbHo I BO3BpaUaTeCBy B BblKJIIOueHHOe noJIoHeHne "OFF" npO tnyckAHn.Bo n36eHHane cIyuAHIrO nepeMeuHnI nepeKJIouaTeJIa OH ochaSeH cTOnOpom. (38)
Hikorda He 3anyckaTMe MoToPHyo nIy 6e3 HnHbI nnJIbI, cENI nnJIbI INBCEX KOJNaKOB npaBnIbHo yCtTaHOBJeHHbIX. (39) CM. yKa3aHnB B pa3dJe C6Opka.
-ПпeДЗаусКOMиИblnpoВepbTe,чTOБырДOM He6bILOJIIOdEINIIINJHBOThbIX,KOTOpBIEMOrYT 6bITbnoDBeprHyTbIOnaChOcTN.(40)
Bcerda ydepnHbAte MoToPHyIO nIy o6eHMn pyKaMn. DepHNTe npaByIO pyKy Ha 3aJHei pyKe, a IeByIO -Ha nepeIHei. TaKIM 3axBaTOM DOJIHHb IOJIb3OBAtbcr Bce, He3aBNCIMo OT TORO JEBsA Bbl nIIN npabwa. YdepHbBaTe Kpenko 3axBaT, UTo6bl 60JIbWne i Dpyrne naJIbCuI OXBtBbIAJn pyUky MoToPHOI nIbIb. (41)
3anyck
- YXBaTnTe nepeHIOI pyUKy JIeBOI pyKoI.
- YXBaTnTe npaBoi pyKo3aHIOIpyKy.
HaMMTe u ydeepHnBaIe KHonky 6JIOKnpOBKn nepeKJIouaTeJI BHyTpEHHe CToPOHOpyKN I nepeDINbTe nepeKJIouaTeJIyKa3aTeJIbHbIM naJIbUcEM. (38)
OctaHOBKa
- OctaHOBnTe nIy, OTnycTnB nepeKJIouCaTeJb. EcIe nIa He ocTaHaBnBaEtcra, AKTNBpyuTe TopMo3 cENn I OTCoeDnHInTe Ka6eJb NITaHnA.
Ipeed KaJdbIM noJb30BaHHeM:
(42)
1 PpOBePbTe, UTo6bI TopMo3 cen npaBnJIbHo yHKnUHOHPOBaII uYTo6bl OH He 6bl nOBpeJxHcH.
2 PpOBePbTe, UTo6bI 3aHnHa 3aunTa npaBoi pyKn He 6bla noBpeXeHa.
3Проверпгарьнсь pa6otb orpaHnHTeJЯ nepeKJIQUaTeJЯ nOTcyTCTBne Ha HEM NOBpeKdEHH.
4 PpOBepeBTe Bce pyuK, uTo6bI OHn He 6bln B MacJe.
5 PpOBeBpTe, UTo6bI Bce DeTaJI MToOpHoi NIIbI 6blN 3aTAYbI UTo6bIOHn He 6blNI NOBpeXdEhbl IIN OTCyTCTBOBaJI.
6 POBeBpTe, YTo6b3axBaT cenn 6bl Ha MeCTe Hc 6bl nOBpeHdEh.
7IpoBepaTeHaTKeHneIeN.
8Y6eNTecb,TOUenbnnIpecTaET BpaataBc npn OtnyueHHOM nepeKJIouaTeJe.
O6upepa6oue nHcTpyKcnn
BAHHO!
B daHHom pa3JeIe onncbIBaHOc OCHOBHe npabnla 6e3oNaChOH pa6oTbIC MoTOPHoN nNoI. OdaKo DaHHa INHOpMaUry HNKoRa He MoKeT 3aMeHHTb noDrTOBKN I npaKTNUYeCKOrO onbTa npoFeccnHaJIbHoro noJb30BaTeJIy. Ecln Bv B KaKo-JIn6o CNTyaUIN NoUYCTByeTe Ce6y HeyBepeHNO, 6paTITecb 3a CoBETOM K cneuaJIncTy. 6paTITecb B BaW mara3HN no npoJaHe MoTOPbIX NII, B cepBnCHyIO MaCTepCKYIO NII K ONbITHOMy NOJIb30BaTeJIy MOtopHOn nNoI. N36eai Te noJIb30BaHry dJIy KOToPoRo BBy He cHTaete Ce6y DocTaToUHO nOdrTOBLeHHbIM!
IpeH Naayampa60TbIC MOTOPHOIJIIOI cJeNyETnoHATb, yTO TaKoe 3eEKT OTdaun KaK erO MoHHo n36eHaTb. Cm. pa3dJI KaK n36eHaTb OTdaun.
PpeHJe CEm npCtynTb K pa6oTe C MoTopHoN nnlo, cIeNyET noHAre Tpa3HnUy B npOecce nnHeBepxHeu HnHex He KpOMKo nnJlaeero nOToHa.Cm.ykaaHnB pa3deJe DeiCTBnNo npDeIOTBpaueHIO oTdaun N O6OpydoBaHne 6eONacHocTu MaHNbI.
NoIb3yItec b cpeIcTBaMn INHINBnIyaJIbHOJ 3aunTb. Cm. pa3JeI 'CpeIcTBA 3aunTb I noJIb3OBATeJIa'.
OchOBHbI npaBnla 6e3oNaChocTn
1OrJHnTecbBokpyr:
-Проверъ,чTo6bl no6bln3ocTn He 6blnoIIOdeJ,ЖИВОТьx Илpyrnx O6bekTOB,KOToPbIe MoryT NOBnIaRbHa BaWsy pa6Oty.
-Поверпг,чTo6bI HnUero n3 BblweyKa3aHHoro He nonaJIO B 3OHy DeiCTBnI NJIbI,IIH He nocTpaJaLo npN naJeHNn DepeBa.
-Пи Испльзовин СрдСТВ 3aштБ opraHOB cIyxa cIeДNTe 3a пИбЛнЖАЮШМССЯ JIOДБМN BO Врм pa60Ты ПИЛы.
BHIMAHHE! Co6IIOaIte BbIeepnBeIeHHbI npaBnla, Ho B ToKe BpeM He pa6oTaIe T BycNoBnIx, KOrDa Bbl He CMOKeTe No3BaTb Ha nomOuB npH HeCuaCTHom cLyue.
2 He ekcnIyataHpyuTe MaunHy B nIoxnx NOrOdHbIX ycIOBnAx, TaKHX, KaK rycToTymaH, cnIbHbI DoXDb, nopBbNcTbI BeTep, cnIbHbI XoJIoN I T.D. Pa6oTa B nIooxyo nOroDy cnIbHo yTomJIeT N Bbl3bBaeT DonoJIHHTeJbHbI pNCK, HanpIMep oT cKOJIb3KOrO rpyHTa, yJaapa MoHNH, HenpeDCKa3yeMoRo HappaBHeHnaJeHnA DepeBa N T. d.
3Ipn pa6oTe B HapKnx ycNoBnX N36eRaTe 06e3BOHnBaHn I neTc 6OJIbWe HnIKocTN.
4БyIbTe oO6eHNO BHNMaTeJIbHb npn 06pe3Ke MeJKNX BeTBeN nCTapaNTecb N36eRaTb NIIeHnKycTapHnKa (T.e. 6oJIbWoRo KOJInuEcTbMeJKNx BeTBeN OINHOpeMeHNo). MeJKNe BeTKN MoYr 6bITb 3axBaYeHb LcENbIO n OTo6poWeHb B BaWeM HappaBJeHn, Bbl3BaB cepbe3Hbte TpaBMbl.
5 Y6eIITecb, yTO BaM BO3MOHHO cTOrTb Cta6nJIbHo. IpoBepbTe, HeT JIN BOKpyr Bac BO3MOHHbIX NOMEX IN ppeYrTcTBn (KOpHei, KaMHei, BeToK, JM T.I.) ecJIN BaM Bdpyr 6yJeT HUHHo 6bICTpo nepemecHTbcr. BybTe Oco6eHHO BHIMaTeJIbHbI npu pa6oTe B CKIOHe.
6 Co6JIOaIte MaKcMaJIbHyIO OCTOpOHOCb npn NIIeHn HAprrHeHHbIX CTBOJIOB. HanpRaeHHbI CTBOJ MOKeT BHe3aHNO cnpyxHHTb, BepHyBwncb B nepBoHaJaHoe noLoJeHne Do nIN NoCJIe NIIeHn. EcIn Bbl CTOnTe C HePpaBUNbHO CTopoHbI INn HaunHaeTe NIIeHne B HePpaBUNbHOM MeCTe, DepeBO MoJcET ydapNTb Bac nIN MaunHy TaK, UTO Bbl NOtepReTe ynpaBLeHne. O6e cNtYaUIM MOry T npNBecTN K cepBezHO TpaMe. (43)
7 PpeI nepeHOCOM cenHOI NJIb BbIKIOUHTe DBnIaTeJIb n 3a6IOKpyIte cENb TOpMO3OM cenn. IpeHocNTe cENHyO nIyC o6paueHHbIMn Ha3ad WInHOI n cienbIO. PepeI nepeHocKO IIJIbHa JIO6oe paccToHne HaJeHbTe Ha NoIoTHo 3aUHTbI yexOI.
8 KorДа Bы CTaBnTe MoTOpHyI NIIy Ha 3eMЛIO, 3a6JOKnpyIe IeNb NIIbI cIeNHBIM TopMO3OM He ocTaNJIte MaunHy 6e3 npICMoTpa.Пр 6oJee IInTeJbHoi "napKOBKe", cIeIyET BBkJIIOuA Tb DBINrATeJIb.

PNEyPENJDEHNE! HOrda B cnCTemy npBODa cenn nonadaet CtpyHKa, n cenb 3aklnnHbaeT. NpeD OocNTKO B 06ra3aTeJbHOM nopRKe BBKJIouaTe yCTpOcTBO N BblHMaiTe uTeKep n3 nCToHnKa nHTAHN.
O6nne npaBnla
1 EcJIN Bbl noHMaTe, qTo TaKoe oTdaa N KaOHa npONCXoJNT, Bbl MoHe Te yMeHbWHTb NJI INoJIHOCTbIO NCKJIIOUHTb 3JIeMeHT HeOHNDAHHOCTN pN ee BO3HNKHOBeHNN. BydyuN NOIroTOBJeHHbIM, Bbl Tem cambIM CHNJaTe pNCk. O6bUHO 3ΦΦeKT OTdauN DoCTaTOUHO MrgKn, HO INHOrDa OH 6bIBaET pe3KIM N HeOHNdaHHbIM.
2BcerdaKpenko depHnTe MoTOpHyo nIy npabOpyko 3a 3aHIOPO pyky NJeBOy 3a nepeHIO. IIOTHO 06XBaTBiBAiTepyKn nIbBy BcEJnaOHBIO. TaKo 06xBaT HyHXO nCNOJB30BaTb He3aBNCIMO OT TORO, npaBwa Bbl NNJIeBwA. DaHHbI 06xBaT no3BOJareT CHN3NTb 3ΦeKT OTdauN, INepKaTb MoTOpHyo nIly noD nocToHHbIM KOHTpOJeM. He daIte nIIe BblBaTbcra n3 pyk! (44)
3 Yaue Bcero oTdaay npoCxoNT npn 06pe3ke cybeB. Bcerda cIeJeY T haoDHTbcra By ycToHyBOM noLoHeHN n ppeDycmOTpeTB, UTo6bI He Bo3NkJIO npuHn, KoTopbIe 3acTabNJ 6b I Bac noWATHyTbcra NIn NoTePrtb paBHOBecne.
HeBHMaTeJIbHocTb MoKeT npNBecTu K OToDaYe, ecJn 3OHa OTdaUH noJIoTHa KoCHeTCa BeTBei, 6JInJaIWeRo DepeBa nn DpyrOro npedMeta.
depnnte 3arotobky noKoHTpoJe.McBn Bn NNIInTe IerKne IMaJIbIe 3arOTOBKn, OH MOryT 3acTpeBaTb B cENn nIbI nOT6paCbBaTbcra Ha Bac. XOTa 3TO MoHET n He 6bITb ONaCHO, Ho 3To MoHET 3AcTaB Bac BpacNIOX n Bb nOtepeTe KOHTpoJIb Hau nIIOH. HIKoRda He nIIInTe cLoHeHHbIe npyHa npyRa 6peBHa nIb BeTKn, He pa3deINB INB hauaJIe. NIIInTe ToJIbKO oNo 6peBHO nIIN ONDHy 3arOTOBKy 3a OOnH pa3. Y6npaIte OTnIneHHbIe qactn, yTO6bl BaWe pa60uee MeTo 6blIO 6eONaChbIM. (52)
4 HnKoTda He NoDnHMaJTe npa6OTe MoToPHyu NlNy BbIe yPoBHa nJeU, n He nnInTe KOHNKOM nNlbHO rnoToHa. HnKoTaHe pa6oTaIe MoToPHoN nNoOn oHOn pyKo! (45)
5ДлЯ NOJHOrO KOHTpOJa 3a MoTOpHoi NINOJ BbI DOJIHKHbI yCTOnuNBO cTOrTb. HNKoRda He pa6oTaIe cToJHa JecTHnUe, Ha DepeBe IIN TaM, rJe y Bac HeT yCToHBoO OCHOBaHnJ, Ha KOTopOM Bbl MoJIn 6bl cTOrTb. (46)
6 Bcerda pa6oTaIe c MaKcMaJIbHoi CKOpocTbIO NJIeHnI, T.e. Ha NoJIHOM rase.
7 ByIbTe Oco6eHNO BHNMaTeJbHb npn pe3aHnBepxHeN KpOMKo NINbHOrO NoLoTHa, T.e. npn NInJeHn C HnXHeN CTOpOHb IpEaMeTa. TaKo MeToD Ha3bBaetc NInJeHne c npToTrom.B TaKnx CJyuaX BO3MOHHo BO3HKnHOBeHnTOJIka,B 3TOT MOMeHT cEnb CTpeMNTbcBbTOJIKHytb MOTOPHyIO NINy B HAnpaBJeHn pa6oery. EcIn cenb NINbl 6ydt 3aHaTa, To MoKeT npOn30HTn OTdaHa MoTOpHoi NINbl Ha3aD Ha Bac.(47)
8 EcJnB aTOT MOMeHT He npNKJaIbIbAtbDocTaTOUHOro npOTNBOJeICTByIOSeFoycNJIA, To BO3HNKaeT pNcK TOrO, YTo MoTOpHa NJIa npOdBINHeTcRa HazAdHacToJbKO, YTo DepeBa 6yDeT KacaTbCaToJbKO 30Ha OTdauN noIoTHa, B aTOT MOMeHT MoJcTe npOn3oITn OTdaYa. (48)
Pe3Ka HnHHei KpOMKoM NOIoTHa, T.e.OT
NoBepxHocTN 6bKeTaN HnHHeMy KpaIO
N3BecTHa KaK NJIeHne C HaHIMOM. B aTom
cJyuae MToPHaia Nla cMa Hae3HaeT Ha
DepeBO I nepeDHN KpaI MoToPHOIIbI
cooTBeTCTByeT eCTeCTBeHHOM NoIoHeHIO
npi pe3Ke. NJIeHne C HauHMOM o6ecneuBaET
JyuWNI KoHTpoJIb NaI MoTOpHOI NIOLOI IN
pacnoLoJeHMe O6JaCTn OTdaUH. (49)
9 Pn 3aToUKe n yxoJe 3a nnBbHbIM noJIoTHOM n CenbIO cIeI dye T BblIOJIHraTb Tpe6oBaHn IHCtpyKcII. Pn 3aMeHe nnIbXOro noJIoTHa N CENN NCNoJIb3yIe ToJIbKO peKoMeHIOBaHHbIe HAMN BapNaHTb. CM. Pa3JeI PeKyuJee o6OpyIDOBaHne n TexHnueckne xapaKTePncTNI.
HanpaBJIeHnI naJeHnI
ДяВаJиДepeBa HxHObBb6paTb HanpaBHeHne, Han6Olee ydo6Hoe IЯ nocJeDyIooi o6pe3Kn
cuybeB npa3eJIKn. HyHNO cpaBHTeJIbHO 6e3oNaCHO nepeDHNHyTb.
EcNn Bbl Bb6paHnPaBHeHne, B KOTopom HynHo nOBaNTb DepeBO, Bbl DOnHHbI npEpycMoTpeTb, KaK 6yTeT npOncxoAnITb naDeHne eCTeCTBeHHbIM nyTem.
ΦaKTopb, BJIINIOUne Ha 3ToT acNeKT:
- NaKnoH
ИСКРИВЛЕНЕ - HanpaBJIeHne BeTpa
KoHcEHTpaUaYBaTeOK
-Bo3MOHHbI Bc cHea
-ПpenЯТСТВЯн ha yuacTke BOKpyr DepeBa, HanpIMeP:dpyrne DepeBbY,JIHnN nepeJaU, DOpOri N cTpoEHnY. - PpOBePnTe, TTo6bHa CToBJe He 6blnoNoBpeHHeHn HnI rHnI, 3To npNBOuNT K ToMy, YTO DepeBO MoHeT HaaTa b paHHe, Yem Bbl 3ToTOro OHHaTe.
MoKeT Oka3aTbcra, YTo BbI BbHyKdEhbl BaJIHTb DepeBOB HAnpaBHeHn erO ecTeCTBeHHoro naDeHnra, T.K. HanpaBNTb DepeBO IJRA naDeHnBa B bI6paHHom Bamn HapabHeHn HeBo3MOxHo nJIn onaCHO.
ДруюВаньийФаКТО,HeВлЯюшиНа HanpaВЛeHne NaDEHNY,HO KToTobMожЕ NOBJIЯТbHaBaUy6e3onacHocTb-3TO NOBpeXdEHNJaDepeBaИЛn"MePTBbie"cUyBЯ, KToTOpbIeMOrYTBoBpMaNaDEHNYO6JOMNTbCry uДapNTbBac.
OchOBHOn 3aJauey RBLaTeTc Hr DOnycTNTb
naJeHnA DepeBa Ha dpyrHe DepeBb. OueHb
onacHo ydaJIaTb 3axBaueHHoe DepeBO, oueHb
BbICOK pNCK HeCuaCTHO ClyuA. ObpaTNTecK
HNCtpyKUm B pa3JeIe Ocb6oJdHne
HeyDaUHO NOBaJIeHHOrO DepeBa.
BAJHO!BoBpemrOtBeTcTbeHHbIXpa6oT no BaJIkeIeCaHeo6xOIMOpnpnoDnHATb npncnoc6JeHneIJIra3aunTBcLyxa cpa3y,KaK TOLbKO NIIeHne 3aKOHueHoCTeM,UTo6bl CJIbIaTb 3ByKn InpdUnpeKdaIOUne KOMaHDbI.
OuNTKa CTBoJa I noIroTOBKa nyTu K OTxOdy
OuNTte IepeBO OTCyKOB IO yPOBnIJIeU.
Be3onacHe Bcero pa6oTaTB CbepxBy BnH3, UTO6bl CTBOJ 6bl MeJdy Bamn MoTOpHoN nIIOJ. (56)
Y6epnte BcIO nopocJIb y KopHeI DepeBa n pacHnCTnTe MecTo OTo NOMex (KaMHN, BeTKN, Hopbl N T.D.), YTO6bl y Bac 6bla BO3MOHHOCtB 6ecnpenTcTBehHO oTxOJa, Korda DepeBo Nauchet naTaTb. HanpaBLeHne BaWero OTcTyPnIeHnI DOJHKHO coCTaBJIaTb npIM.135 rpaDycOB OTHocHTeJIbHO npednoJaraemOro HanpaBLeHnI naDeHnI. (57)
130Ha npscKa
23BaKaYaauHnHbI npoxoJ
3 HanpaBJIeHne naDeHHa
Panaenne

PNEyIPEHJEHNE!MbpeKoMeHnyeM He npncTyNaTb K NOBaJIke DepeBBeB C DnAmTePOM,6OJIbUIM JINHBpeKyUeRo noIoTHa,6e3 cneUaJIbHoN noIDrTOBKN!
ДяВалки DeJaToTc Tpr npOnnla.пржde BcerO HAnpaBnaIooN noDnN, cocToaNm N3 BepxHero N HHHero npOnnOB. NocJIe 3ToR O deJaTeC "ochOBHO nOdN".PpaBnIbHo BblnoJHra 3TN npOnnIb, Bbl MoXeTe DoCTaTOUHO ToUHO KOHTpoJInpoBaTb HAnpaBJIeHne naDeHnA.
HanpaBlaioi noDnil
Korda DeJaTcHnPaBJIooJ npOnJ, nepBbIM DeJaTcBepxHn npOnJ. HanpaBJIte oTMeTKy BaKN DepeBa Ha nIe (1) Ha ceJIb, KoTopaR HaxoNTcDaJIbWe BnepeJn Ha yAcTKe BaJIkn, Kyda Bbl xOTeJN 6bl HnPaBHTb naDeHne DepeBa (2). CToJIte cnpBa oT depeBa no3aJn nJIbl, n CdeJaTc npOnJn cBepxBHN3 NOd yrLOM.
Iocne 3TOrO deJaTeC HHHHnn npOnn TaK, UTo6bOH coWeJc c KOHcOM BepxHero npOnnla. (58)
HanpaBIAIOI npoINI DeJaeTcHa rIy6Hy 1/4 CTBOJa I yroJ MeKdy BepxHM N HNKHIM npoINlOM DoJIKeH 6bITb He MeHbWe qem 45 rpaDycob.
JIINHnHa KOTOpO CXODaTcB DbA 3TNX npOnnla, Ha3bIBaeTcHnPaBnaIooJe JInHeN. 3Ta JInHn DOJIHXa 6bITb CTpO rOpNtOHTaJIbHOu n CoCTaBJIaTb npMOn yroJb (90 rpaDycOB) K npEeNoJaRaemomy HnPaBLeHIO naDeHnY. (59)
OchOBHoi npoII
OchOBHOn npoNl DeJaTc npoTnBOnoJIOHHo CTOpHOI DepeBa NdoJIKeH 6bITb CToPoR oPn30HTaNbHbIM. BcTaHbTe c JbeOi CToPOHbI OT DepeBa NcdeJaTte npoNl HnKHei KpOMKoi NNbHOrO NoJIoTHa.
CdeJaTe oChOBHn npoNHa 3-5 cm (1.5-2
IIOMa) BbIe nIOCKOCn HAnpaBJIooero npoNla. (60)
BcTaBbTe 3y6uAtbI ynop (ecJn ycTaHOBJeH)
c3aIi HaPe3a. Pa6oTaIe Ha noJHOM ra3y I
BBODITe NJIbHoe NOJIoTHO B CTBOJ DepeBa
NoCTeNEHIO, PJIaBbIM DBNHeHMe. CJeDITe 3a
Tem, YTo6bl DepeBO He HauaJIo nepeMeuaTbcB E
HaPaBJeHNI, IpOTNbONJIOHHOM
npEINoJlraeMOMy HAnpaBJeHIO naDeHIn. KaK
ToJIbKO npOnII cTAHeT DocTaTOUHO rJy60KIM,
3aOrHNTe B Hero KJIN HIN BarY. (61)
3aKOHHTb OCHOBHn npoNn HnyHNO napaJIeJIbHo JINHN HnpaBnaIooero npoNnTaK, YTo6bl paCCTOHaHE MeKdY HmN coCTaBnlo OKoJIO 1/10 dNaMeTpa CTBoJa. HepacnneHbI yAcTOK CTBOJa Ha3bIbaETcnoIoc pa3JOMa (HeDoNl).
Ioploca pa3JlOma DeiCCTByeT KaK peTbHbI
Iupn,p,3aJaIOuHnPaBJeHne naDeHnA depeBa. (62)
Bo3MoHHocTb BnHnHa HnPaBHeHne naDeHn 6yDet noHocTbIO yTpaYeHa,ecnNoIoca pa3JOMa CnIshKoM y3Ka nI npOnIIOBaHa HnPaBJIooN n OCHOBHO npOnIbI nIoXO pa3MeueHb.(63)
IocJe TOrO, KaK BbInoJIHeHbI OCHOBHOI HAnpaBIAIOUII npOnNIIbI, DepeBO HaChEeT naDaTb NOI DeIcTBnEM Co6CTBeHHoro Beca IIN C noMoou HApBaBIAIOUeO KInHa IN BarN. (64)
Mb peKOMeHdyem noIb30BaTbcra HnHO nNbl, dNHa KoTopo6bl npBbIaJa DnaMeTp cTBOJa, yTo6bl BaJIaun HnPaBIAIOUcne Cpe3bl MoJN BblNOJHrTbc T.H."ODINapHbIM cpe3om".CM. yKa3aHnB pa3deJe TexHnueckne daHHble, OTHOCHTeJIbHO peKOMeHdyeMOJ dINHbI IINHbI nNbl dJIa BaWe moJe nn MoTOpHo nNbl. (65)
CyueCTByIOrMeToIbBaJIKNIpeBBeBC
noIoTHOM,MeHbIMMДnAmEtpa cTBoJa.ODHaKO
3TN MeToIbIocTaTOUHOOnacHb,T.K.O6NaCTb
OTdauNIOJIOTHaBXoIITB KOHTaKT C npEiMeTOM.
(4)
Ocbo6oJHHeHnpaBnIbHo nOBaJIeHHOrO DepeBa
Ocbo60kJdHne"3axBaueHHoroIepeBa"
OueHb onaHo ydaJaTb 3axBaYeHHoe DepeBo, oueHb BbICo pNcK HecuactHO rClyyra.
Hikorda He nbTaTecb nIInTb IpeBO,Ha KToTopoe ynaIOn dpyroe IpeBO.
HnkOrJa He pa6oTaIe B 30He pncKa BnCyaux N 3aCtpBuxN DepeBbeB. (66)
Han6oJee 6e3onachbMyToD - npmHeHneJe6eKn.
- TpaKtopHa (67)
-Перенья (70)
06pe3ka BeToK n cyUbeB, HaxoJaIuxxCra B HanpJHeHn
IoiToTOBKa: PpoMaTe nyTb, no KoTopomy IepeBO nnCyk CmecTnTc npn OCBo6OHeHn OT Harpy3Kn, nIge HaxoNTcT ToUka pa3JlOMa (T.e. MeTo, rIe MoKET npOn30nTu pa3JlOM npn yBeJIuYeHN Harpy3Kn).
Nonpo6yTe HaHTn cambI 6e30nachbIMeToD JIa CHTIN HArpU3Kn, IN CnOcO6Hb IIN Bbl eTO cDeJATb 6e3 yuepe6a IJIa ce6B. B cNoHHbIX cNtYaLnx eINHCTBeHHbI 6e30nachbIMeToD -OTCTaBNTb NIny B CTOpOHy INCNOlb3oBaTb Je6eKy.
O6upepeKoMeHdaLn:
Bb6epnte IJIa Ce6a MecTo TaK, UTo6bI npn cHArTIN Harpy3Kn DepeBo NIn cyUb He 3aJeN 6b Bac. (71)
CdeJaTe OINH INI HeCKoJIbKO npOnJIIOB B 06Jactn ToUKn pa3JOMa.CdeJaTe cToJIbKO npOnJIIOB Ha HxHHyO rLy6uHy, cKoJIbKO Heo6XoIMMo IJIa ChrTna Harpy3KN I"pa3JOMa" DepeBa B ToUKe pa3JOMa. (69)
HnKOrIa noJIHoCTbIO He nIIInTe IepeBo nn cyK, HaxoJaunscB HanpJHeH!
EcInBaMHeo6xOIOMo nepenNtB DepeBo/BeTkCy, cJeIaTe DbA uIN TpN pa3pe3a Ha pacCToHnB 3 cm nIy6uHoi B 3-5 cm. (72)
IpoJIoJIaHae TnJIHTb rJy6He, noka He ocBo6oJntcra 3rN6 n HapRJaHHe DepeBa/BeTKn. (73)
ПиЛNTe DepeBo/BeTky C npOToBonoLoHHoCToPoHbI, nocJIe TORO, KaK HapPHeHneOCBo6oOnITcra.
Kak n36eHaTb OTdaUH

PPEyPENHEHNE!OTdaaMoHeT 6bTB NCKIOHTeIbHO 6bICTpO, HeoHuaHHoN CINbHO, N MoHeT OT6pocHTb MOToHyu Nnly, NoIoTHo N cenb Ha onepaTopa.Ecnn TaKoe npocXoNT npn DnBnKyueCnCeN, 3TO MoHe T Bb3BaTb Cepbe3HBe, HnOrDa CmepTeIbHBe TpaBMbl. PoToMy Hn3HeHNO Heo6xOIMo noHMMaTb, qTo TaKoe 3ΦeKT OJaU KAK erO MoHHo N36eKaTb, PnIMeHЯ MepbI pEioCTOpOHocTN n npabNlbHe MeToDb pa60Tb.
UTo TaKoe OToa?
NoHrTne OToaunncnoJIb3yeTcIJaOnuCaHnHa HeoHuaHHoroOTCKOKaMOTOpHoNIIJIbHa3aI, KOrDaBepXHraYeTBepTb HocKa NINbHOro NoLoTHa (N3BeCTHa KaK 30Ha OTdaH) KacaetcKaKoro-JIn6o npedMeta.(48)
OTdauBcerIa npoicxoIIT B nIOcKocTn pe3AHN
NIbI.ObuHNo npn OTdaue MoToPHyO NnLy
OT6paBbAeT Ha3aI N BBepx B HApBaJIeHN
pa6oJero.Tem He MeHee MoToPHaYra NIIa B MOMeHT
OTdaU MoKeT DBNrTaTbcR B pa3LIuHbIX
HaNPaBLeHnX B 3aBNCIMOCtN OT MeToJa pe3KN,
KoTOpbI npMHeHJcR B MOMeHT KacaHnra 30Hbl
OTdaU NoJIoTHa N O6BeKta.
OTdau npoucxoINT ToIbKO B MOMeHT KacaHna 30hO Tdaun no6beKta. (4)
06pe3ka cy4beB

PNEyPENHEHNE!Uaue Bcero OTaAua npocxOuNT npn 06pe3Ke BeTOK.HNKoRda He NJIInTe B 30He pNcKa OTdauHa uHHe NINbI. ByDbTe NCKJIOUHTeJbHO OCTOpOHHbI N36eRaTe KOHTaKTA KOHNka uHbI NINbIC6peBHom, C dpyrMMBeTKaMn NINpEdmetam. BydbTe NCKJIOUHTeJbHO OCTOpOHHbIC BeTKaMn, KOTOpbl HaxoJrTcB NpyHnHJeM cocToHNN. OHMOrYTOtnpyHnHITb o6paTHo Ha Bac n npNBecTN K Tomy, yTo Bbl noTepeTe KOHTpoNb HAd NINOn, yTo npNBedeT K TpaBMe.
PpOBepbTe, UTo6b BbI Cta6nJIbHO NII IN CTOrJIH. BoBpeMpa6oTbI CToIe Tc JIeBOJ CToPOHb IpeBa.ДЯ MaKcIMaJIbHOrO KoHTpoJI NaLy cJeDyeT DepHaTb KaK MoHHo 6JIInHe. Po BO3MOHHocTN BeCb BeC NIIbl CJIeDyeT HApPaBtB Ha CTBoJ. (74)
IIO Mepe npoBnHeHn BdoJIb CTBoJa DepeHnte nnny TaK, UTo6bl DepeBO HaxoDnloCb MeJdy BaMn nNIOJ.
PacnJIka CTBoJa B 6peBHa
Cm. pa3eJ Ba3oBaTexHnKa nIJIeHnJ.
O6uine cBeJeHnIa
NoB3OBATeJIb MoKET BbINOJHrTb ToIbKO TaKHe pa60Tb IIO 06cLyHHBaHNIO H cepBnCy, KoTopbie onNcaHb I DaHHOM pyKOBoDCTBe. 06cLyHHBaHne 60MbWero OXBaTa DOJIHHo BbINOJHrTbcra ABTOPIN3OBAHHo cepBnCHO MaCTepCKoI.
OcmoTp, yxoI N o6cJyHnBaHne 3aunTHbIX npncnoc06JeHn MOtOpHOIJIbl

PNEyIPEKJDEHNE!Pepe npoBeHnem c6opKn, Texo6cLyHnBaHnN/Inn npoBepKn ycTpoiCTBa Heo6xoIMMo Bcerda BbIHMaTb 7TeKeP ZenHOI NJIb I3 nCTOuHnKa NITaHn.
06paTnte BHMaHne! CepBnIpeMOHT MaunHbI Tpe6yOT cneuJaNbHO noIroTOBKN. 3To B Ooc6eHHoI CTeneHIOTHOCNTcK 06OpyIDoBaHIO 6e3onacHocTN MaunHbI. EcJIM MaunHa He OTBeueaETpe6oBaHnM ONiCaHbIX HnKe npoBepok, Mbl peKomeHdyem Bam o6paTntbcB CneUaJIIN3npoBaHHyIO MacTepcKyIO.
TopMo3 ceni npKoTka oxpaHbI npOTnB OTdaue
PpOBeRka pyUkN TopMo3a
-Проверъ,чTo6bIpykaTOpMo3a He 6blana nobpeHdHa nчTo6bI He 6blIO BnIMbIX DeΦeKToB, TaKnx, KaTpeuHbI. (75)
Cdbnhte nepdHee orpaHdHne IJIa 3aHTbI pyK Bnpei HHa3a,IyTo6bl yIOcTOBepNTbcra, YTO OHO nepemEuaetc CBO6oJHO IN HaJeHHO npNKpenNeHo K MaunHe. (76)
PpOBepKa aBtOMaTnueckKOro TOpMo3a
-Дернгte LENHyI NIIy B BbIKJIOUeHHOM coCTOHNHaI 6peBHom IIN HaI dpyrIM yToHbIM npedMeTOM. OTnycTNTe nepeHIO pyKu I daITe cENHOI nJIe onyCTNbCn IOI co6cTBeHHbIM BecOM. PnI 3TOM NIIa DoJIHXa BbINOJHNTb BpaueHne BOKpyr OcN, npoxoJaIeI uepe3 3aJHO pUky, B cTOpOHy 6peBHa.
PpN npNKoCBOHeHn NJIbHOrO NOJIoTHa K nHIO DoJIHe H cpa6oTaTb TopMo3. (77)
PpOBepKa yHKUuT OtpMo3a
BkIIOUHTe cHHyIO nIy. Y6eIITecb, yTO cENb nIbI He Kacaetc rpyHTa nnI IIO6o rDpyrO O6BeKTA. BInOJIHnTe yKa3AHnB pa3JeIe 3anyck N ocTaHOBA.
TBePIO Bo3bMnte MoToPHyIuNJIy, 06XBaTINB pyKIN BcEN IaONHbIO. (44)
-ДаиTe noJIhIbI rα3 И npINBeIITe B DeIcTBnE TopMo3 ZeH,HaHab JIeByIO KNCtBIO Ha pyUKy TopMo3a. He nycKaIte npexHHIO pyUky. LcENb npN 3TOMdoJIHHa HEmdJIeHHO OCTaHOBNITbcra. (78)
CTonop nepeKJIouaTeJЯ
- Y6eIITecb,чTo npn OTNyckaHn cTOnopa nepeKJIouaTeJЯ,camnepeKJIouaTeJb 6JIOknpyetycB nOLOxeHn XoIoCTOro xOJa. (79)
-HaHMMTe Ha cTOnop nepeKJIouaTeIy I npOBepbTe, BO3BpaauaTcra Jn OH B INCXoIDHOe noJIOHeHne npN OTNycKaHIn. (80) - Y6eHITecb, cTo nepeKJIouaTeJIb n erO cTOnop nepeMeIaOTcB06oIDHO, a BO3BpaTHbIe npyHHb pa6oTaIO TncpabHO. (81)
BKnHHTe cHny HnNy Ha noHny MoHocTb. OtnyCTnte nepeKIOUaTeJb n npoBepbTe, UTo Cenb ocTaHOBNlac N ocTaeTcHenoDBHHOH.
yIIOBHTeJIb cenn
-Поверпь,уTo6bHa yIIOBnTeJIe cEN He 6bIIO nobpeHdEHN,ИУTo6bI OH 6bl HaJeHHO 3aKpenJIeH Ha Kopnyce MoTopHoI nJIbl. (82)
Cnctema oxlaaJdHna
Дя obecneueHЯ KaK MoHHo 6OJIe Hn3Koi pa6oey TempepaTpyb MaunHa o6OpydoBaHa cnCTemOxJaHDeHЯ.
CocTab cncTeMbI oxJaHdeHnA:
1 Bo3dyxOBoD (no npeeknouaTeJeM).
2 BeHTnJIaTOp Ha DnBraTeJe.
-ПОНЗВОДИТЕ OЧИСТКУ СИСТЕМБI OXЛАнDEHINЯ
ШЕТКОВ pa3 B HeDEJILO ИЛN YaUSH, ecN 3TOrO
ТребуOT yCлOBиЯ pa6OТь. 3aRpy3HEne ИЛN
ЗаcopeHne CnCTeMbl OXЛАнDEHINЯ MoHET
привесТи K ПергpeBy I NOcJIeDyUOшЕм
НовраздeHиMoшInHы.
TpaΦnk texHnueckoro 06cnyKINBaHHa
Hnke npBedeH nepeueHb 06cnyHbAHnH, KOToPoE Heo6xOIMo BbIIOJIHTb Ha MaunHe. BoJbUnHCTBO nHKTOB onncahbl B pa3dJe O6cnyHbAHnE.
(ToIbko IJIa EBponbl)
Husqvarna AB, SE-561 82 Huskvarna, Μενεηρο; +46-36-146500, c noJHoi OTBeTCTBHeHocTbIO 3aABJIeT,чTo npOBdHbIe ΜεJekTpueckne ΚeHbIe nJIbI 418 EL n 420 EL c cepNHyIMn HomepaMn 2016 rOda n dAlee (roD npOn3BOcTBA yEeKo yKaazAH Na nacnpTHoN Ta6JIuYKe pRdOM c cepNHyIM HomepOM) COOTBeTCTByOT Tpe6ObaHmM INPEKTNB COBETA:
-ot 17 Ma8 2006 roDa, 'O MaunHax mexaHn3Max' 2006/42/EC.
- ot 26 ΦεΒραῦ 2014 Μοῦ, "οδ ἄληκτροΜαγΗπιθου ΧΟβμετιμόστη" 2014/30/EU.
-ot 8 mja 2000 roda 'o6 3mccnn yma B okpyhaouyocpeny" 2000/14/EC.
-ot 8 nioHa 2011 roa'o6 orpaHueHn no nCnoJIb3OBAHnIO onpeJeIeHHbIX onaChbIX BeueCTB' 2011/65/EU.
BbIINcnoJIb3OBAHbCneIyUuIeCTaHApTbI:
EN 60745-1:2009 + A11:2010, EN 60745-2-13:2009 + A1:2010, EN 55014-1:2006 + A1:2009 + A2:2011, EN 55014-2:2015, EN 61000-3-2:2014, EN 61000-3-3:2013
3apeHcTpnpoBaHHa opraHn3aun:
NB2140, DEKRA Testing and Certification GmbH, Enderstrale 92b, 01277 Dresden, Германя, 6bl npoBeJeH TInnoBoi KoHTpoJIb EC B COOTBeTcTBnC iDpeKToBoi no o6OpyDoBaHnO (2006/42/EC), cTaTbI 12, nyHKT 3b. CepTnΦnKaTam TInnoBOrO KoHTpoJIaE COrJaLacHo npinloHeHIO IX npincBoeH Homep: 4815039.16001-1
IOnoJIHnTeJIbHaN HOpMaLNo 3MnccnM Wyma npNBeHeBa pa3JeTexHnueTexHnueXapaKTepcNTKn.
IocTabHeHHa MoTopHa Nla COOTBeTcTByeT 3K3eMnIpy, npoEduMo npoBepKy Ha COOTBeTcTBne HopMaM EC.
XyckBapHa, 1 ceHTa6p8 2016 r.

Lars Roos, HauaJIbHnK oTdIeJa pa3BNTna (ynoJIHOMoYeHHb IpeIcTaBnteJIb Husqvarna AB, OTBeCTBeHHb 3a TexHnueCKyIO DOkUMeHTaUIO.)
141400, MockoBcKa a 6JI., r. XIMKn, yJI. JeHnHrpadcKaa, BlaeHne 39, cTpoEHe 6, 3daHne II, 3TaJx 4, 8-800-200-1689
OBRCHEHNE HA YCJIOBHNTE OBO3HAUEHNIA
YcIobHn 06o3HaueHnHa MaunHaTa:
IpeBoD Ha opnHaJIHNTe IWeIDCKN INHCTpyKUIN 3a ekCnNoatau.
PPEyPPEKDEHNE! BcNuknBepHHn TpnoH MoRaT Da 6bDat onacn! He6peXHo Nn HEnpaBnHO MaHnyIpaHe C TEx MoKe Da npEIN3BnKa cepNo3Hn I DOpn CmbpHapaHaBaHna Ha OnepaTopa Nn Dpy

Ipei Da 3anoHeTe pa6oTa c MaunHaTa npOeTeTe BnMaTeJIHo pBkoBoDcTBTo 3a ekCnloaTaUra I ce y6eTe, Ye ro pa3bnpaTe npabNlHO.
Heo6xoIIMO e BnHaN da n3noJ3BaTe:
- Odo6peH wJem
-AHTUΦOHN
-3aunTHnOuJnaNJMaKa
Tasn npoDyT OTOBapnHa n3NCKBaHnTa Ha BaJIuHnTe EO dIpeKTHNB.
UymoBNeEMncnBOKOJIHaTa Cpea
cBrlacHO DnpeKtNbata Ha
Ebponeckata O6hocT.
EmncnraOT MaunHata e
noocyeHa B pa3JeI TexHueckn
xapaKTepNCTKN IN Bbpxy
JeneHKata.
OnepaTopbT Tp86Ba da e cBnKHaI da 6opabN C BepHHN TpnoH n C DBeTe cn p'ue.
Hrkora He pa6oTeTc BepHHn TpnoH, KaTo ro DbprHnTe cAmO c eHa pKa.
HnKora He no3BoJraBte Bbpxa Ha
HnHaTa Da BIn3a B KOHTaKT C
KaKBnTo N da 6nlo npeImTeN.
PNEUYPENKDEHNE! KoraTo KpaTHa uHaTa BLe3e B KOHTaKT C HkaKBnpeiMet ToBa MoHe Da IOBeIe Do OTKaT, KoTo Da OTXBpJIn uHaHaTa Ha3aN HaRope KbM nOte6ntela. Toba MoKe da DOBeIe Do cepNo3Ho TeJecho HapaHbAHe.


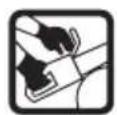
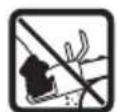

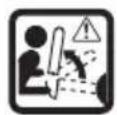
IocokaHaBbptHeHa Bepurata3aMOTopeHtpnoH mAKcImaJIHaDJIKNHa Ha HanpaBlaBaauTaWHa.
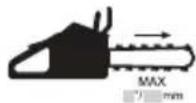
He onyckaIte Ha6Jn3o cTpaHnUHH Ha6JIOdaTeJI.

OTkaueTe npoBoHnKa, npeDn dapeylnpaTe nn nouCTBaTe.
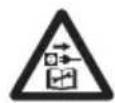
OnachocToeJeKtpnuecknyap.
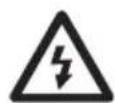
Ako Ka6eBt e noBpeHnI npoBoDnKa oT 3axpaHbHeTo.

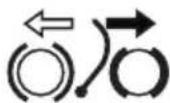
BepnHa cnpaKa, aKTbVpaHa (JaCHo) BepnHa cnpaKa, HeaKTHbVaHa (JABO)
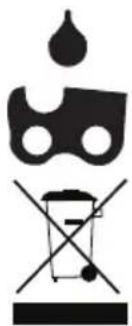
PbKOBOCTBO3aekcnloaTaun
KaJIbΦHaIINHaTa
CbDbPkaHne
OBRCHEHNE HA YCIOBHNTE
OBO3HAUEHNIA
YcNoBn 06o3HaueHn Ha MaunHaTa: 503
YcNoBn 0603NaueHnB pKoBOJCTOTO
3a ekcnIooatau: 504
CbIbPkaHHe Ha KyTuTa: 504
C'bD'bPXAHNE
CbDbpxHHe 505
B'BEDEHNE
YBaHaemnoTpe6nTeJIO!506
KAKBO-KbDE?
KaKBo-KbIe Ha BepHHHn TpnoH? 506
OBUHHTPYKUIN3ABE3OJNACHA
PABOTA
O6n npdynpckdHna 3a 6e3onacHocT
3a cnIOBn HcTpyMeHTn 507
Heo6xoJOMM MepKn npEn N3noJ3BaHe Ha
HOB BepnKeH TpNoH 510
3aONMeTe 512
BnHaN ce ocJaHЯTe Ha 3dpaBna
CMNcbl 512
JInuHa 3aunTHa eKnHnpBka 512
3aunTHoTo o6OpyDbaHe Ha MaunHaTa 513
BepnHa cnpaKa n aBapneH IocT 513
Pekheo o6opyDbaHe 515
MOHTIPAHE
MOnTnpaHe Ha uHaTa n BepuRaTa 519
CTAPTIPAHE N N3KJIIOUBAHE
CTapTnpaHne nI3KJIIOUBaHe 520
HAUYIH HA PABOTA
PpeiBcKa ynoTpe6a:521
OchOBHyka3aHna 3apa6oTa521
Mepkn 3a n36yBaHe Ha o6paTeH TlaCbK 526
IIOIDPbHKA
OCHOBH npHHcHn 527
IperJIeI, noIdpbHKa n cepBn3 Ha
3aunTHoTo o6OpyDbaHe Ha BepnHHNIA
TpnoH 527
Cma3BaHe Ha yeJIHOTo KOJIeJIO Ha IHHaTa 527
OxlaIeHa cncTeMa 527
TexHnuecko 06cLyHbAHe 528
Hnkora He n3noJ3BaIte MaunHaTa aKo cTe yMopeHN, aKO cTe yNoTpe6yBaJIaIKOXOJIuN aKO B3eMaTe MeINKaMeHTN, KOITOBb3JeCTBaT Ha 3peHHeTo BN, ppeEKeHkTa BN NLI KoOpDnHaCnTa BN.
I3noJI3BaIe IInuHaTa 3aunTHa eKINIpOBKa. BnK yKa3aHnra Ta bpa3JeIInuHa 3aunTHa eknnipOBka.
Hrkora He npoMeHnTe Ta3MaunHa no HaunH, KoTo He cboTBeTcTbHa Ha opnHaJIHaTa KoHcTpkyu, Hr Ja n3noJ3BaIe KoraTo ce BnJa, ye e 6nla npoMeHnHa oT HraKoI dpyr.
Hikora He n3noJ3BaIe MaunHa, 6aTepeyraNJI 3apAHO yCTpoiCTBO, KOINTo Ca HeN3npaBHn. N3BpWbAite OINcaHITe B TOBa pKoBOdCTBO 3a ekCnloataupeDobHn npOBepKN, NOdpbKa IN cepBN3. OnpeJeHn onepaUN no NO dpbKaTa IN cepBN3a Ce n3BpWBaT eINHCTBeHo OT KBAIIHcNUPAH CneUaJIncTn. BJK. HNCTpyKUnTE BrIaBa rNoDpBHKa".
3a6paHeO e n3noJ3yBaHeTo Ha KaKBnTo N dae cNoMaTeJIHn npncnoc06JeHn,OCBeH npenopbUaHnTe B TOBa pBkoBoCTBO 3a ekCnloaTaun. BnK yKa3aHnraTb pa3deJInte Pexeio o6OpyDbaHe n Texnueckn xapakTepnCTnKn.
BHIMAHHE! BnHarH HocTe 3aunTHN OuJNA JIJI
JIuCeBa MaCKa, 3a Da HaMaJIInTe PnCKa OT
HapaHbAHe OT N3XBbPcJAI NpeDMeTNI.
MToOpHnT TpNoE cNoC6eH dApuHnBa
N3XBbPcAbaHe Ha npeDMeTNI, TaKbA KaTo
napYeTa DbPBeCnHa, MaJKN KbcYeTa DbPBeCnHa
N dp., C roJaMa cNla. ToBa MoKe Da DoBede Do
cepNo3Hn HapaHbAHHa, Oco6eHo Ha oUHTe.

IPEyIPEHHENIE!NoBpeHTo peHeo6OpUdBaHe HnNnOprEHa KOM6NauO TnHa NTrnoHOBa Bepura yBeJInuaBaT PnCKa OT OKaT! N3noJIbAaTe cAmo KOM6NauO t nHa/TrnoHOBa Bepra, KOITOn npenopbUBaMe, NcJeDBAuTe pa6oTHnTE INcTpyKuIN. BnHTe INcTpyKuInTe B pa3JeJa cbc 3arJabNe TexHueeKn DaHHN.
BnHaRn ce ocJaHЯITe Ha
3dpaBnA CMNcbl
Korato 60bapBte c MoTopeH TpnoH He BnHa n e Bb3MOHHo Da ce PpeDyraDN BCRA MNCJIMa CNTyaLna, C KOaT O E Bb3MOHHO Da ce C6JIbCKaTe. BnHa r pa6oTe c nobuWeHO BnMaHne N ce ocIaHnIe Ha 3dpaBnCn CMncbl. N36rBaIte BCNUcN CNTyaLnn, 3a KOnTO CHTaTe, Ye Hma da moHe Ta Ce CnpaBnTe. (2) Ako BCE oue ce cyBCTBaTe HecnHyprH N3 pa6oTHnTE pOceDypn CJeI npouHTaHeTo Ha Te3N INHCTpykUIN, BVE Tp8Ba Da ce KOHCyTTnpaTe C HAKo ekCnepT npEn Da npOdbLnHnTe pa6oTa. He ce KoJIe6aIte Da ce CBbpHeTe C DnIbpa CN NIn C Hac aKO ImaTe Bbnpocn OTHOCHO 3NoJ3BaHeTo Ha MOTOpHn TpnoH. Hne BnHa n C roTOBnOcT Ue Ce OT3OBaBame N Ie Bu OCNYpRbAME CbBet N NOMoU KAK da N3NOJ3BaTe eEeKtNBHO N 6e3onacHO MOTOpHnC TpnoH. Iocetete Daen H Kycn Ha o6yuHne 3a pa6oTa c MoTopeH TpnoH, aKO e Bb3MoHHo. BaWnT DnIbP, yuNIIuSe no DbpBOo6pa6oTBAHe NIn 6N6JIIOTeKaTa BN MoRaT Da BN OCNyyprT C INHOpMaun OTHocHO KaBn KycPoBe Ha o6yuHne N yue6HN MaTePnaJInCe npedJaarat.
Hne pa6oTm nocToHHo, 3a da noDo6pBaMe KOHCTpyKUraTa n TexHoJIoRnTa - noDo6peHnA, KOnTO noBnShaBaT 6e3oNaChOcTTa n eKAcHocTTa Bn. NoceuaBaTe peDobHO Baunr dIbP, 3a da BNITe DaJI MOnHeTe Da n3BLeueTe n3roDa oT HOBtE fYHKUIn, KOnTO CMe BBBeJI N npOdyKTa cn.
JInuHa 3auntHa eKnnpOBka

PNEyPENHEHNE! NoBceTo 3IIONoJyKn C BepHHN TpnoH N Bb3HKNBaT npn DOnnHa Ha onepaTopa Do BepnTa. Pnp pa6oTa c MaunHaTa Tp8Ba BNar Da noJ3BaTe LNHa 3aUnTHa eKnInpOBKa ODo6peHa oT cbOTBeTHO To BeOMCTBO. NUnHaTa 3aUnTHa eKnInpOBKa He n3KJIuOyBa pNCK OT TpaBMn, Ho HAmJaBa cepNo3HOCTTa Ha TpaBMaTa npn 3IIONoLyka. NOMoJIeTe CBoI dNcTpNi6TyOp 3a NmOoi npn n360pa Ha nOxDJa7a eKnInpOBKa.
Heo6xoJIMOeBnHaNdaH3noJ3BaTe:
-Одобреншелм
-AHTNΦOHN
3aunTHOuJNaNJMaKa
PbKaBnCcBc3aunTa npotnb paape3
-ПанталонисьзашиТа срениТрнона
-Ⅲanol3BaIe Te noDxOJa7a 3aunTa 3a pBcTe.
-BoTyuNb cBc 3auNTa npoTnB pa3pe3, CTOMaHeHb 6om6eTa n HexJIb3raa ce noDMeTKa.
AnTeKaTa 3a nbpBn omoi, Tp6Ba BnHarn da e noi pka.
-Понарогаситплonaраза
O6JekIto KaTo cJeBa da e npHnenHaIo Do TaITo, 6e3 ToBa da orpaHnUaBa DnHexHnTa.
3AIONOMHETE!OTuHaTaN TpNoHa NnIpyr H3ToUHMK MoaT Da N3CKoUaT NcKpn.BiHaRn DpbXTe noJaporacNTeNHOTo 6OpyDBAHe 6n30 nno pKa B clyua,ye BN noTpra6Ba.Toba O3HaayBa,ye BVE MOxHe Ta NOMOrHe Te 3a npedotBpaTbAHe Ha rOpcknte noJaApn.

PNEyPENHEHNE!Pa6oTaTaB DbPBO N3NcKBa N3NoJ3BaHeTo Ha CneuHaNH TexHKn Ha p3aHe Ha pa6oTa, KOHT P86Ba Da ce cna3BaT, 3a Da ce HaMaJI npCKbT OT TeLeecHa noBpeJa.
3auntto 60pydBaHe Ha MaunHaTa
B To3n pa3dJeI ce 6oJcHbAaXapakTepcNTKNTe Ha 6e3onacHa pa6oTa c MaunHaTa n T8xHaTa yHKU .OTHOcHo OrLeJa NnoDpBHKaTa, BnHTe INcTpyKuNTe noI 3ar NaBHeTo HnCneKTnpaHe, NoDpBHKa N o6cLyHbHe Ha 06OpyDbHaeTo 3a 6e3onacHa pa6oTa c MoTopeH TpNoH. BnHTe INcTpyKuNTe B pa3deJa Koe KaKBo e? 3a Ja OTKpInTe KbJe no MaunHaTa BN Ce HAMpaT Te3N KOMNOHeHTN.
EkCnIIOaTaUHOHHrT cPOK Ha MaunHaTa MoKe Ja 6bJe HamaJIeH, a pNcKbT OT HeuactHn ClyuAn yBeJIuYe, aKO TexHueCKOTO o6cJyXBaHe Ha MaunHaTa He ce npOBeHJa npabUNHO n aKO 06cJyXBaHeTo n/INpemOHHTnTe DeHocTnHe Ce n3bJIHBaT npOecNoHaJIHo. Ako ImaTe HyJaOT OSe INHOpMaUry, MoJIa, 06bPHeTe ce KbM Ha- 6JIIN3KIn cepBn3.

IPEJYIPPEHDEHNE! HNKORA He
H3noJ3BaIte MaunHa c DeeKTHN
KOMNoHEHT O6e3oNaCBAUTo
O6OpyDbaHe. O6e3oNaCBAUTo
O6OpyDbaHe Tp8bTa Da ce npOBepRa N
NoDlbPbHa. BnKeTnHCTpyKcNInTe B
pa3DeJa HnCneKTnpaHe, noDpBHKa N
O6cLyKBaHe Ha o6OpyDbaHeTo 3a
6e3oNaChpa60Ta C MOTopeH TpNOH.
Ako MaunHaTa BN He MInHe BCNUKN
npOBepKn, OTHeCeTe Jdo
O6cLyKBaUnceBn3 a peMOHT.
BepnHa cnpaKa n aBapneH JocT
BaunrMoTopeH TpnoH e 6OpuyBaHc bC cnpaKa 3a TpNoHa, npeHa3HaueHa Da cnpe TpNoHa pRn Bb3HKnBaHe Ha OTKaT. CnpaKaTa 3a TpNoHa HamaJIyBa PnCKa OTHneacTHN CnyuAn, Ho camo aKO BnE He rI DonyckaTe. (3)
IpoaBaaTe npEa3NBOcT npn pa6oTa n y6eTe ce, ye pncKOBaT cekTop 3a o6paTeH TLacbKa Ha uHaTa, HNKora He ce dOnnpa Do npedMeT. (4)
BepnHaTa cnpaKa MoHe Ja 6bJe BkIIOeHa pBuHO (c Baata Ta JRA ba pKa).
CnnpaKaTa ce 3aDeIcTBA,KoRaTo abapnHnT loCT 6bJe HaTnChaT Hanpei.
ToBa DnBHeHne aKTnBnpa npyHHHeMexaHN3bM, KoITo cnpa 3aDnBnBaunr BeHeU.
- AbapHHaT Ioc t He caMo npEHa3HaueH 3a BKJIIOUyBaHe Ha BepHHaTa cnpaquKa. Dpyro HeROBO BaJHO npEHa3HaueHne e Da npEJa3Ba JIABaTa BN pKa oT DonnC Beprata, aKo pKaTa ce N3nB3He oT npEHaTa pkoXBaTKa.
BepnHaTa cnpaKa ce ocBo6oHaaba KaTo abapnHnT IocTe n3IpbNbHa3aI no nocKa Ha npEdHaTa pKoXBaTKa.
BepHHHaTa cnHpaKa Tpr6Ba da e 3aJeicTbHa, KOraTo ce cTapTnpa BepHHnT TpNoH.
-ИЗнOLI3ВаITE cNIPAчКATA 3a TpNoHa KaTO "cNIPAчKa 3a napKInpaHe" KOraTo cTapTnpaTe IN KOraTo ce DBHHTe Ha KbCn pa3cToHnA, 3a Da npdeIoTBpaTBAte HeuacTHN cLyuAn aKO CbIecTByBa pNCK TpNoHbT cLyuAaHOn Da yJapn HЯKOrO IJI N Heo H6JIIn30. (5)
- O6paTHnT TlaBk MoHe da 6bDe Bhe3aneH nCIneH. B nobueTe cnyaH TlaCbKbTe He3HaunTeJeH Hne pEdu3BnKBa BnHarn 3aDbNnBaHe Ha BepHHaTa CnpaKa. Pnnoo6eHTlaCbK BepHHnT TpNoH Tp86Ba Da ce Dbprn 3dpaBO n Da He ce OTnycka.
- HauHbT Ha pBcHNo BkJIIOUBaHe Ha BepHHaTa cnnpaKa 3aBnCn OT cNlaTa Ha OTKaTa Ha SHHaTa, KaKTo NOT noJIOKeHHeTo Ha BepHHNa TpnoH cnpraMo npEiMeTa, nonaIHaJI B 3oHaTa Ha OTKaT Ha SHHaTa.
-Пи no-cla6ТласькИиаКОпскOBиТ ceKToP Ha TlacbKaHa 斯HаTe He HAMnpaNo6IIN3Odo onepaTopa,ВерннHaTa cnpaquKa ce BKJIIOUBya p'BUHOcЯBaTa p'ka.(6)
·Korato onepaTopbTe 3acTaHaJ B noIooHeHHe Ha pra3aHe JIABaTa My pKa e B noIooHeHHe, KOeTo npaBN HeBb3MOHXo PbUHO ToaEnCTBaHe Ha cnpaqKaTa Ha TpNoHa. Ipn To3n Tn3axBaT, ToecT KOraTo JIABaTa pKa e nomecTeHa TaKa, Ye Da He MoKe Da BJIure Ha
ДВИЗЕНЕТОHaПпeДнHaTа3aиNTa3a p'bIeTe, cnIPAчКaТаHa TpnoHa MOneJa ce 3aJeCtBa camoЧрз cNlataHa ИHepuЯТa. (7)
B cIyuaH Ha oTKaT p'kaTa MN BnHaRn IIN 3aIeNCTBa cnpaKaTa Ha TpnoHa?
He. 3a npiDvBnHbHeTo Ha 3aunTata cpeu y otKaT HapPe i HuyHa CneUaHa CnJa. Ako pKaTa BN caMo DOKoCHe JeKO 3aunTaTa cpeu OTKaT NnIcMo Ce nIb3He BbpxH He, MoKe Da ce Cnyu TaKa, Ye Ta3n CnJa Da He e DocTaTb4Ha, 3a da OCBo6OAn CnpaKaTa Ha TpNoHa. Bne Tpr6Ba CbIo TaKa Da CTncKaTe 3dpaBO pKoxBaTKaTa Ha MOTOPHnI TpNoH npi pa60Ta. Ako ro HapPaBnte I ce noJyN oTKaT, MoKe 6n He ue ycneete da NyChTe PkKaTa Cn OT npedHaTa pKoxBaTKaN HMa Da 3aJeIcTBaTe CnpaKaTa Ha TpNoHa, INI MoKe 6n CnpaKaTa ige ce 3aJeIcTBa eEdBa KOrato TpNOhBT e ycIJa Da ce n3BbpTN MHoro Ha3a. IpNi TaKaBA cNTyaUma MoKe Da ce noJyN TaKa, Ye CnpaKaTa Ha TpNoHa Da He ycnee da cPte TpNoHa npeDi Da BVapn.
Ipn HAKoN pa60THN noJIOHeHna TЯJIoTO MoHe Da ce cLyu TaKa, Ye p'bKaTa Bn Da He MoKe Da DocTnRHe 3aUHTaTa CpeSy oTKaT, 3a Da 3aJeNCtBa cnpuAkuKaTa 3a TpNoHa; HanpImep, KOraTo TpNOhBT Ce d'bpHn B noJIOHeHne Ha Pra3aHe.
Ie ycnBa JIN BnHaCnJaTa Ha INepuJa 3aJeNcTba CnpaKaTa Ha TpnoHa B cJyauHa oTKaT?
He.Пьрв,спракаТВИТРЯбWAДpa6OTN. BToPo,OTkaTbT Tpr6BaДa e ДocTaTbUHMoIeH, 3aДa 3aIeIcTBa CnIpaKaTHa TpNoHa.Ako cIpaKaTHa TpNoHa e 6nla npeKaJIeHo UyBCTBInTeJHa,TЯicle ce 3aIeIcTBa NocToHNo, KoETo 6n DoBeNo Do npo6JIemN.
CnnpaKaTa Ha TpnoHa BnHaN JI N Ie Me npedna3Ba oT HapaHbAHe aKO ce noJyuN oTKaT?
He. IpeDu BCnU Ko CnpaKaTa Bn Tp6Ba Da pa6To, 3a Da ocNpyn HnHaTa 3aUnTa. BToPo, Ta Tp6Ba Da ce 3aDeiC7Ba KaKTo e oNcaHo no-rope, 3a Da cPte MOtOpHn TaIOH B CInuay Ha OTKaT. TpeTo, CnpaKaTa Ha TpNoHa MoJe Da ce 3aDeiC7Ba, Ho aKO iINHaTa e npeKaJIeHO 6JIn3KO Do Bac MOne Da Ce NOJyN TaKa, Ye CnpaKaTa Da He ycnee Da 3abv N Cnpe TpNoHa pPeDn Da BV ydApN.
EduHCTBeHO BnE I onpeJeHa npaBnHa pa6oTHa TexNka MoHe Da eJIIMNHnPaT Bb3MOHHocTTa 3a Bb3HnKBaHe Ha OTKaT N CBbp3aHnTe C Hero pNcKOBe.
Блokировka Ha 3axpaHbaaun cnycbK
Блкрвкata Ha 3axpaHbAsnCnycbk e npoeKtupaHa da npeIoTbpaTЯBa ClyuayHoTo My 3aJeCTbaHe. Korato HaTncHeTe 6LokpOBkata Ha 3axpaHbAsn Cnycbk (A) (T.e. Korato XbaHeTe pkoXbTkata), TЯ OCbo60JdaBa 3axpaHbAsn Cnycbk (B). Korato OTnycHeTe pkoXBAtKaTa, 3axpaHbAsnT cnycbk N 6LokpOBkata My ce BpbuAT B INxOJHOTo CN noLoHeHne. (8)
YIOBNTeJHaBepurata
YIOBNTeTnHaBeprTa e npeHa3HaueH Da yDbpxn BeprTa, aKo Tc ce pa3Kbca nIiN ce otKaun. B noBeYeTo cnyau ToBa MoHe da ce n36erHe, aKO BeprTa e npaBnHOn oBnHaTa (BnK yKa3aHnTa Bpa3JeL MoHTnpaHe) n Ako uHaTa n BeprTa ce noDlbpKaTn noJaRaT peOBoHo Ha cepBn3 (BnK yKa3aHnTa B pa3JeL OChOBn yKa3aHn 3a pa60Ta). (9)
PpeIa3nTeI 3a IaChTa p'bKa
OcBeH Ye npEJaNa3nTeJrT 3a JAcHaTa pBKa npEJa3Ba B CJIyuaH Ha OTKaUaHe IJN pa3KbCBAHe Ha BepIraTa, ToH He DaBa B'3MoJHHocT Ha KIoHYeTa N TpecKn Da nobJnaRrT pBKaTa Ha 3aDHaTa pBkoxBaTkA. (10)
Bn6paun
Pn ceYeHa TBbpaД bPBeHnHa (noBceTo BnIOBE WnpoKoJIncTHN dbpBeTa) BN6paIyraTe e no-cnlaHa,OTKOJIkoTO npn p3aHe Ha MeKa IbPBeHnHa (noBceTo BnIOBE nILOJIncTHN IbPBeTa).P3aHeTo c n3TbneHa nIi Heu3npaBaHa BeprA (nOprseWeH TIN nII IN HeNPaBnIHNo HatoyeHa BeprA) BOIN DO NOBnBaHa He paBnIeTo Ha BN6paIyraTa.

IPEyIPEJDEHNE!Pn HnKaKbN
06ToTaeTbHa He 6nBa Da ce BnacrT
n3MeHeHnB NbpBoHaayaHaTa
KoHcTpkyuHa MaunHaTa 6e3
pa3peHne Ha npOn3BOiTeJI.
Pi3yBaIe camo opnHaJHi
npncnoc6JeHn. Hepa3peHn
n3MeHeHn n/In npncnoc6JeHn
6nxAmorJa npedn3BkAT cepno3Hn
TpaBMn mCbPTn CnyaHa
onepaTopa nn DpyrN LNuca.

IPEJYIPPEHDEHNE! IpekaJeHoTo
HaBn6paunMoHe da
doBeDe Do yBpeKdAne Ha
KpbBOHOChaTa CnCTema Nn
yBpeKaJaHe Ha HepBnTe npx Xopa C
BLOWeHa KpbBHa CnPKUaCn.
CbpxHe ce c Jekapra cn aKO
n3nTbATE CNMTOMN OT npeKaJeHo
HaBn6paun. Te3n
CNMTOMN BkLIOuBaT n3TpBnBaHe,
3ary6a Ha yceuaHe, 6oLkaHe, 6oJka,
3ary6a Ha cnla, npomeHn B CBeTa Ha
KoJata nn CbCTOaHneTo. Te3n
CNMTOMN Ce npoRBAvT o6NKHObeHn
npCTtne, pbcTe nn KNTKNe. Te3n
CNMTOMN Moat Da ce BLoWAT npn
CTydeHn TEmpeaTypn.
Pexeio o6opyDbaHe
To3n pa3deJ onncBa KaK ype3 npaBnHa noDbPka H npaBnHe H36Op Ha peKeIoTo 06opydBaHe ce nocTnRa cJeHTo:
- HamaJIaBa ce BepoTHoCTTa oT 6paTeH TlaCbK Ha MaUnHaTa.
- HaMaJIeTe pIcKa oT cUynBaHe IJI NIOdCKaUaHe HAMOTOpHnA TpNoH.
-ПиДбиIte MaKcHMaJIHo MaIcTOpCTBO npi pR3aHe. - PpOdbJIHbAbe eKcNlOaTaUNoHHaT npOdbJIHHTeJIHocT Ha peKeIooTo o6OpyDbAhe.
- N36raTe n3laHaTeTo Ha cnJIHn HnBa Ha Bn6paU.
OchOBHn npaBnla
-ИЗнлэуВаite eДиHCTBeHo peKeIeToO6bopydBaHe npenopbuaHo OT Hac! BnHTeHhCtpyKUInTe B pa3deJa cbc 3aRJaBneTexHnueckn DaHHN.
- Y6eTeCe, Ye peKeHeuIte 3b6n Ha Bepurata ca HaToueH npabnIHO! Cna3BaIte HauHTE nHCTpyKcHm N3NoJ3yBaIte npenOpbuaHn Ia6LoH 3a NiJaTa. Pa6Ota c nobpeDeHa nn looHaToueHa Bepira NobuBaPaNcKa oT 3JIONoJyKn.
-Подьрнaite npaBnHaTa xJa6nHa npn orpaHnHTeJHa noJaBaHeTo! CJeDbaiTe HhCTpyKcHnTe HN N3NoJ3BaITe npenOpbYBaHaTa KaJIb6pOBKa Ha orpaHnHTeJHa noJaBaHeTo. IpeKaJIeHo roJMaTa xJa6nHa nobuShaBa pUcKa ot OTKaT. (18)
-Подьрнай Te Heo6xOДМоTo 06TЯнe Ha BepnraTa! ПpoBиСнaja Bepnra yBeIичaBa pNcKa OTo OTKaUaHe N ДОпИнacя 3a no-6bP30 ИЗHOCBaHe Ha IINHaTa, BepnraTa n 3aДВиЖВаIoTO KoJIeNo. (23)
Cma3BaItepeIOBHOpeHeOToobOpyDbAHe nI3BbPbBaITe npabINHaNoIDpBHKa!IoWo Cma3aHaTaBeprA yBeJIuHAbPaNcKaOT pa3KbCBAHe,KaTo eHOBpeMeHHO yckopraBa I3HOCBaHETo Ha UINHaTa,BeprAta N 3aDINHBaIoTO KOJIeJIo.
PeeTo o6OpuBaHe e KOHcTpynpaHo c JI MmHmN3npaHe Ha otKaTa

IPEJUYPENEHNE! NOBpeJeHOTo peKeJoO6OpyDbaHe NnN NoRpeHa KOM6NaUaOnr O T uHa N TpNoHOBa BepuRa yBeJInuAbaT pncKa oT oTKaT! N3noJ3BaTe cAmo KOM6NaUaUu O T uHa/TPNOHOBA BepuRa, KOnto npenopbUcBame, n CLeJDaBte pa60THnTe HnCtpyKUn. BnXTe INHCTpyKUnTe B pa3DeJa cbc 3arJaBne TexHueckn DaHHN.
EduHCTBeHHaHuH da H36eHTe o6paTeH TLacbK e BnHaN da npoBepBaTe pNcKOBnT ceKTopa Ha uHaTa HkOra da He dOnIPA do KaKbBTo N da e npeDMeT.
EeKbT OTo 6paTeH TlacbK MoHe Da ce HaMaJIupe3 N3noJ3yBaHeTo Ha peHeo obOpyDBeHc "BrgaHe" 3aNTa cpeUy TlacbK Upe3 npaBnIHO noDbPHaHe HHaTOUbaHe Ha BeprTa.
KoJIKOTo e no-MaJIbK paDnUca Ha 3aKpbIeHHeTo npN BbpxA, ToJkoBa e no-MaJIbK pNcKbT oT oTKaT.
Bepnra
Bepurata cce bcton, KaKTo BCTaHapTHNA TaKa N BB BapnAHTc HamaJIeH 6paTeH TlaCbK, OT onpeJeH 6poi pa3JNUHn 3BeHa.
3AIONOMHETE! Hama MoToPn TpNoHn, npKoTOn n3aJIO da e eJIIMMHupaH pNCKbT OT OTKaT.

PNEyPENDEHNE! BceKN KOHTaKT C BbpTAA, ce MOTopeH TpNOH MoHe Da npuHHN N3KJIQUHTeJHo cepNo3Hn HapaHbAHNA.
Ako ycTaHOBITe, Ye BepnTaTa He ce cMa3Ba:
-Провере Te Дал He e 3aДрьСTeH MacJIeHЯТ KaHaJ Ha WInHata. ПочиСTeTe npn Heo6xOДИМocT. (29)
- Y6eTeCe, Ye HJIe6bT Ha ⅢHaTa e YnCT. NocTe npn Heo6xoDnMoCt. (30)
- Y6eTe ce, Ye YeJHoTo KOJeLo Ha uHaHaTa ce Bbptn CBo6oDHO N Ye OTBbpcTneTo 3a cMa3OuHo MacJo Ha YeJHoTo KOJeLo He e 3aIpbcTeHo. NocCTe TcMaaHe Te npH Heo6xoDImocT. (31)
AkoBepnraTa He MoHe Da ce CMaHe, cJeI KaTo cTe N3BbpHJIr HopHITe npoBepKIn CTe N3bJIHNI BcUKNipenOpbKn, Tp6Ba Da ce 06bpeKe KbM cepBn3a cn.
3aDbNkBaOTo KoJeNo Ha BepnraTa
3aBnBbAaTa cncTeMa e o6OpyIbHa cbc 3aBnBbAa, BeHeu. (32)
Heo6xoIIMO epeIOBHO da ce npoBepBa cTeeHTa Ha n3HocBaHeTo Ha 3aDbNnBaUTo KOJIeJIo Ha BepuTa. Ppi npekomepHo n3HocBaHe To Tpr6Ba Da ce CMeH.
PpOBePkHa H3HocBaHeTo HapeKeIooTO 6OpUdBaHe
IIO OTHOWeHHe Ha BeprTa Tpr6Ba eHeiHeBHo Da ce npOBepraBa cJeIDHOTo:
BnIMNnyKHaTHH B HHTOBe N 3BeHaTa.
- TБьрдост Ha Веригат.
CNIHO H3HOeHn HHTOBe n 3BeHa.
IOnMeHnTe TpnoHOBaTa BepuRa, aKoT TaDeMoHcTpnpa KOnTo N Da e OTo NyHKToBeTe, nocoueHn No-rope.
IpenopbUbaMe BN da n3BbpWbTe cpaBHeHne c HOBa Bepnra, 3a da onpeJeNTe cTeneHTa Ha n3HocBaHe.
KoratoIbJIHHHaTaHapeHeuTe3b6nCeHocn 1o4MM,BepiRaTaTp8BaDa6bJeN3XBbPneHa.
山Ha
PpOBepaBaiTepeoBHO 3a:
-
OctpHnO T BbHnHaTa CtpaHa Ha pB6oBeTe Ha HnHa. N3nnBaIe npn Heo6xOuMocT. (33)
CnIHo n3HocBaHe Ha KJIe6a Ha ⅢHaTa. PnI Heo6xoDMOCt noDMeHeHTe ⅢHaTa. -
HepaBHOCTN UJIN CNJHNO 3NHO CBAHe Ha BbpxbT Ha uHaTa. Ako no Bbpxa Ha uHaTa ce e o6pa3yBaJa "BdJIb6HaTHHa" ToBa O3HaUaBa, Yc cTe pa60TuN C HeIOCTaTBuHo OnBuHaTa Bepira. (34)
-3a da ce npoIbJIHn HINBOTbT Ha IHHaTa T TaPra6Ba BceKn DeH da ce o6pbua. (35)

ПЕДУПЕХДECHИ!ПОБ ueTo 3Лоюлkyк CBepннТрони Bb3нКВaT npДопир Ha onepaTopa Do BepnraTa.
I3noJIbAaTe JInuHaTa 3aunTHa eKINnPobKa.BNK yKa3aHnra Ta B pa3deJnUHa 3aunTHa eKINnPobKa.
I36yBaTe BCnUKN BnOBe onepaun, 3a KOnTO ce CmTaTe HeDocTaTbUHO KBaNnHnupaHn. BnK yKa3aHnra Ta B pa3DeJIte JnUHa 3aUnTHa eKnnpOBKa, MepKn 3a N36yBaHe Ha o6paTe TlacbK, Peneo 06OpyDbHe n OchOBn yKa3aHn 3a pa6oTaTa.
I36yBaTe cTuayuC pNCK O T o6paTeH TLacbK. BnK yKa3aHnraTb pa3Je 3aunTHo 06OpyDbaHe Ha MaunHaTa.
I3noJI3BaIe npenopbUaHaTa 3aunTHa eKnInpOBKa n npoBepraBte cbcToHHeTo Ha cblaaTa. BnK yKa3aHnTa B pa3JeJIuTe TexHnueckn xapaKTePncTnKn N OChOBn npedna3Hm MepKn no TexHnKaTa 3a 6e0nacHOCT.
Y6eTe ce, Ye BCNUKn 3aunTHn npncno6JeHnHa BepHHn TpnoH caBn3npabHocT. BnK yKa3aHnra Ta B pa3deJInte OCHOBn yKa3aHn 3a pa6Ota N OCHOBn npeJna3Hm MepKn no TexHKaTa 3a 6e3onachocT.
HnKora He n3noJ3BaIte MoTOpHnIa TpNOH, KaTo ro d'bpXHTe cAmO c eHa pKa. MoTOpHnIa TpNoH He MoHe da ce ynpabJIbRa no 6e3oJaceH aHnAko ro d'bpXHTe cAmO c eHa pKa. BnHarN dpXHTe 3dpaBO pKoXBaTKITe KaTo n3noJ3BaTe n DBeTe cn pLce.
Mонтуране НашинаТа И ВеригаТа

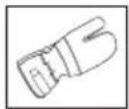

PNEyPENHEHNE!Pnpa6oTa C BepnraTa Tpr6Ba BNHaN Da Hocnte pBkAByu.
-6eTe ce, Ye BepnKaTa cnnpaKa e n3KJIoueHa, KaTo npemecTITe npedna3nteJra 3a JcHaTa pKa KbM npedHaTa pkoXBaTKa. (36)
CbaIeTe pBcKaTa n cBaIeTe KanaKa Ha cBeINHITeJIa (cnIPAkaKaTa Ha TpNoHa). OTCpaHeTe TpaHCnOpTnpaun npbcTeH.
IocTaBeTe uHaTa Ha HeHn6oJr. PnDnBHeTe uHaTa B KpaH0 3aHNoJIOKeHHe.IocTaBeTe BepuTaHa 3aDbNBAuBaHeuB HJe6a Ha uHaTa. 3anoHHeTe OT rOpHaTa cTpHa Ha uHaTa.
- Y6eTeCe,Ye p6oBeTe Ha peKeiTe 3BeHaB rOpHaTa cTpaHa Ha uHaTa ca o6bphTu Hanpei.
MOnTnpaIe Kanaka Ha CbeHnHTeJIy n He 3a6paBnTe Da cNoHnTepeRyJnPaUuHa WnOHT Ha BeprAta B OTBopa B uHaTa. PpOBepTe daJIu 3BeHaTa Ha BeprAta Ca JERHaJIu Do6pe Ha 3aDnBaNJa BeHeuC n DaJIu BeprAta e npaBnHO npOKapaHa B XJIe6a Ha uHaTa.
HaterHeTe TpnoHa ype3 3aBbPtaHeTo Ha KOJIeITo HaIoJy (+). TpNoHbT Tpr6Ba da ce o6Tgra Dotoraba,doKaTo npeTaHe da npOBnCbA OT BbTpseHaTa CTpaHa Ha uHaTa.
- TpnoHbTe npabNlHo o6TerHaT toraba, KOraTo He npOBncBa OT BbTpewHaTa cTpaHa Ha uHHata, Ho BCE OSe MoKe Da ce BbTpN JleCHO CpKa. XbaHeTe n CTnChete Kpa Ha uHHata N 3aTeRHeTe uHHnra CbeDnHnTeJ, KaTO 3aBbPHTe pBukTa no NoCOKa Ha DBNHeHneTo Ha yacOBnKOBaTa cTpeJIka.
-Пи HOBA BepnA Tp6Ba YecTo Da ce npOBepnBa HAraHeTo N,doKaTo BepnTa nache.OnbHbT Ha BepnRaTa Tp6Ba Da ce npOBepnBa peIOBHO. IpaBnHo HaTeHaTaTa Bepnra npITeHaBA Do6pnpeHneu xapakTepcntKIn NdbIbF HINBOT. (37)
CTapTnpaHe n N3KJIIOUyBaHe

PNEyIPEXJENHE! PpeiN CTapTnpaHe 06bPHeTe BnMaHne Ha CJeIHOTo:
Hnkora He cTapTnpaTe BepHHn Tpnoh 6e3 uHaTa, Beprata Ha TpnoHa BCNUK Kanau Da ca MOHTnpaHn npaBnIHO. B npoTnBeH CnyaJ 3aDnBnBaunT BeHeU MoHe Da ce OTKaUN Ia DoBede Do TeJecha nobpeda.
Y6eTe ce, Ye IMaTe ycToiYBa onopa nYe Bepurata He ce IOnnpa Do Hnio.
B3oHaTa Ha pa6oTa He 6nBa Da mA BbHnH Xopa.
-ПпддпocTaBnTe 6aTepnTaВ MaunHaTa, BnHarI npOBepBaIte,3aДа BnIteДaJI N 3axpaHbAsnT cnycbK ce 3aDnBbBA npABnJHo n Ce BpSha Ha no3nUra rOFF" (N3KJIuOeHo), KOraTo ce ocBo6oDi. 3aДа npDoTBpaTnte aBTOMaTHUHOTo D'bpNaHe Ha 3axpaHbAsncreNcYcbK, e ocInypeHa 6loKnpoBka Ha 3axpaHbAsncreNcYcbK. (38)
- HnKora He cTapTnpaTe BepHHn TpnoH 6e3 WnHaTa, BepnRaTa Ha TpNoHa N BCnUKN KanaLJa da ca MoNTupaHn npabuJHo. (39) BnK yKa3aHnra Ta B pa3JeN MoNTpaHe
- Y6eTeCe, Ye Ha6JIn3o HMa Xopa INHINBOTHN, KOINTO MoTa Ia BJIa3aT B DoINp CpeXeIoo6OpyDbaHe. (40)
BnHaHn DpBHTe MoTOpHnA TpNoH C DBe pBLe. DpBHTe DaChaTa cn pBKa Bbpxy 3aHaTa pBkoXBaTKa, a JIABaTa pBka Bbpx y npedHaTa pBkoXBaTKa. BcNkN noTpe6nteJi, 6e3 3NaueHHe JaJI6opABrT c IacHa NJI JIba pBka, Tpr6Ba Da n3noJ3BaT To3n 3axBaT. DpBHTe pBkoXBaTKaTa 3dpaBO, TaKa Ye BaWnte npbCTn Da ce 06BnBaT OKoJo pBkoXBaTKaTa Ha MoToPnHr TpNoH. (41)
CTapTnpaHe
XbaHete npeHaTa pBkoXBaTKa c JraBaTa pKa.
- XBaHete 3aHaTa p'koXBaTKa C IЯchata cn p'ka.
HaTnCHeTe 3aApbKTe 6yToHa 3a 6JIOKnOpBKa Ha 3axpaHBauncaNcNcBc BbTpewHaTa YacT Ha pKaTa cN i CTnCHeTe 3axpaHBauncaNcNcBc Ka Baunra noka3aJIeU. (38)
I3KJIIOUbaHe
CnpTe TpNoHa, KaTo nycHeTe 3axpaHbAunn cnycbk. AKO TpNoHbT He cnpe, BKJIouYeTe BepHHaTa cnIPAqKa Nn3BaJeTe 3axpaHbAunn Ka6eJ.
PpeiBcya ynoTpe6a:
(42)
1 Y6eTeCe, Ye BepHHaTa cnpaKa JeicCTBa npabNlHO n He e NOBpeHa.
2Y6eTeCe,Ye3aHnT npeDnA3nTeJ 3a DcHaTa pKa e B N3npaBHOCT.
3Y6eTeCe,YeΦHKcaTOpbT 3axpaHbAun cnycbk DeiCTBa npaBnHo n He e nobpeJeH.
4Y6eTe ce,Ye pBkoXBaTKIte He ca N3LanaHn C MacNo.
5 Y6eTeCe, Ye BCNUKn DeTaJIn Ha BepHHNr TpnoH 3a 3aTeHaTn N Ye He ca NoBpeDeHN JINJ INNCBaT.
6 YeTeCe, YeNoBtJIaT Ha BepuTa eHa MrcToTO cN IHe e NOBpeH.
7 PpOBepeTe HaTgAHeTo Ha BepnTaTa.
8 IpoBepete DaJIH BepnraTa 3a MoTopeH TpNoH cnnpa Da ce DmNn npn ocBo6oHaBaHe Ha 3axpaHbAun CnycbK.
OchOBHn yKa3aHn8 3a pa6oTa
3ANOMHETE!
BTo3n pa3deI ca onncaHOn OCHOBHTe npaBnla HaTexNkata 3a 6e3onacHocT npn pa6oTa C BepHHHeH ypnoH. Ta3n INΦOpMaLJr He Mohe Da 3aMeHN pOΦecNoHaJIHaTa KBaJIbΦNKaLJr N ONHT Ha eHN cNeuJaNCT. Ako ce OKaHeTe B CNTyaU, B KOrTO CyVBCTByBaTe HeyBepHOCT, npeycTaHOBeTe pa6oTa n ce nocbBeTBaJIte cbc CneuaJIncT. ObbpHeTe ce KbM Baunr MaarAn H 3a BepHHH TpNOH, cepBn3a CN IIN HApKo, KOITo NMA ONT npn 6opabHeTo C BepHHeH TpNOH. N36yBaJIte pa6oTa, 3a KOrTO CMrTaTe, ye He cTe DOCTaTbUHO KBaJIbΦNcIpaH!
Ipei Da 3anoHete pa6oTa Tp6Ba da pa36epeTe YBHeHneTo 06paTeH TlacbK N KaK Da ro n36aRBeTe. BnK yKa3aHnraTa B pa3JeI MepKn 3a n36aRBAHe Ha 06paTeH TlacbK.
Ipei n da 3anoHHe pa6oTa Tp6Ba da
pa36epete pa3JnKaTama MeHy py3aHe c rOpHnN IdoHnPa6Ha uHa. BnHTe HcTpkyuNTe B
pa3deJa Ka Da u36raBate oTKaTa N
O6opydBaHe 3a 6e3onacHa pa6oTa C MaunHaTa.
I3noJ3BaIte JnuHaTa 3aUnTHa eKInnpOBka.
BnK yKa3aHnTa B pa3JeI JnuHa 3aUnTHa
eknnipOBka.
OchOBHn npaBnla 3a 6e3onacHocT
1OrJpeaTece:
-
Y6eTeCe, Ye Ha6JIn3O HЯMa Xopa, HINBOTHN INIpyrO6eKTu, KOINTo MoTa Da nonpeuAT Ha pa6oTaTbN.
-
Y6eTeCe, Ye HnMa HnKo, KOTo 6n MoBJI Da ce Donpe Do Bepurata Nn Da 6bJe KOHTy3EHOT ndaunTE nbpBeta.
- Ako Hocnte aHTnfoH, BHIMaBaIte 3a Xopa, KOnTo ce npu6JIHHaBAt, DOKaTo pa6OTnte c TpnoHa.
BHIMAHHE! Cna3BaIe nocoyHnTe no-rope HNcTpyKuIN, Ho He pa6oTeTe c BepnKeH TpNoH, 6e3 Bb3MoJHOCr Da nobVKaTe nomOuB cLyuHa Ha 3lonoJyKa.
2 He pa6oTeTe npn lown KJIMMaTHUH yCIOBna. HanpImep npn IJIbTHa MbrJa, cnJeH dIbHd, cnJeH BArTbp, cnJeH cTyd N T.H. Pa6oTaTa B Ioo BoPeMe e n3MOpHTeJIHa H MoKe da DoBeDe Do onacn CNTyaUHN, KaTo HanpImep XJIb3raBOcT, ocBeTJIeHne, noBJIraBaHe nocOKaTa Ha naDaHe Ha D'bpBOTo N T.H.
3 Ako pa6oTnTe B ropeu TEmnpaTypHn ycIOBnA, BHNMaBaIe 3a IexnDpaTaunr N nInTe TeUHocTu.
4БbTe npEJa3JINB npn npEmaxBaHeTo Ha dpe6HNI KIOHKN N368BaTepa3aHeTo Ha xpacTN (T.e. eHOBpeMeHHo p3aHe Ha rOJAM 6pOJ dp6HN H3bHKN). Dpe6HNTe N3dbHKN MoTaT Da ce 3aApbCTAT BbB BepuTaT, Da BV yapraT n c ToBa Da npEiN3BVKaT cepNo3Ha TpaBMa.
5IopnpHeTe ce da MoKeTe Da cToNTe N da ce npEaBnBaTe 6e3oNaCho. IpOBepeTe 3a eBeHTyaJIHn npenTcTBn npH HeoayKaBaHo npEaBnBaHe (KopeH, KaMbHn, xpaTn, KaHaBKn T.H).5bJeTe MHOro npedna3JnBn npn pa6oTe B HepaBeH TepeH.
6БbTeI3KJIIOUHTeJIHO npEJa3JINBn npi cp3BaHe Ha HanperHaTu CTb6Ja. HanperHaToTO CTb6JIO MoHe, KaTo npEiN, TaKa N cIeI KaTo rO cpeHTe, BHe3aHNo Da oTcKOuN I da Ce BbpHe BecTeCTBeHOTo Cn NOLOHeHne. Ako cTOnTe OTKbM HenpaBUNHaTa CtpaHa NN Cp3BaTe Ha HEnpaBUNHO MAcTo, CTb6JIoTO MoHe Da yApn Bac Nm MaunHaTa Taka, Ye Da 3ary6nte KOHTpO.I N dBeTe O6cToTepTBA Morat Da IOBeDaT Do cepNo3Ha TeJeCha noBpeDa. (43)
7IpeiIa npemecTne BepHHn TpnoH, n3KIOUcTe rO n 3aKIOUcTe Beprata, KaTo nAnoJ3BaTe BepHHaTa cnpaUka. HocTe BepHHNr TpnoH CobpHaTu Ha3aD uHa N Bepira. Pn npEhaRe Ha no-roJMy pa3cToHne I TpaHCnOpT cJeDa da ce nocTaBn KaJIbΦ Ha uHaTa.
8 KoraTo nocTaBraTe MoTOpHnI TpnoH Bbpxy 3eMaTa 3aKJIIOuBaIte Ro, KaTo N3NoJ3BaTe cnIPAqKaTa 3a TpnoHa n Cn OcNpyraBaIte noCToRHeH HaI3Op Bbpxy MaINHaTa.
N3KJIIOUyBaIe TdBnIaTeJn npEiN Da ocTaBATE MOTOPHNA TpnoH 3a KaKBOTo N da e BpeMe.

PPEyPENDEHNE!NoHkoRa 3aADBnBaaata CNTema 3acraT CTbproTNn 3aApbCTBaT BepnraTa Ha TpnoHa.BnHarN De3aKTBnpaTe MaunHaTa Nn3KJIouBaHTe OT 3axpaHbAHeto PpeNi NoocTbaHe.
OchOBHn npaBnla
1 Ako cTe pa36paJI Na KaKBo e o6paTeH TlaBk N KaK Bb3HNKBA ToI, BHe MoHeTe Da HaMaJIInTe NJI Da N3KJIIOUHTe MOMeHTa Ha N3HeHaJa. N3HeHaJaTa yBeJIInuBa NsCKa OT 3JIoNOLyKa. B NOBeYeTo CnyaM O6NKHOBeHo O6paTHnT TlaCbK e Cna6, Ho ToI MoHe Da 6bJe NTbbpDe BHe3aneH nCINHe.
2BnHaN DbPHTe 3dpaBO BepHHNtprnoH c JraChTa pKa Bbpyx 3aHaTa pKoXBaTKa, a JraBaTa BbpynpedHaTa pKoXBaTKa. O6XbaHeTe dpkKNTc npctn.Bne Tp6Ba da DbpHnTe pKoXBaTKnte TaKa dOpn aKO cTe JeBaK.To3n Haun Ha DbpeHe CBeJda do MInHMym eEeKTa OT o6paTHnTlacbK N BN no3BOJRABa Da KoHTpoJIpaTe BepHHNtprnoH. He otnyckaiTe pKoXBaTKnte! (44)
3 3JIoNoJyKnOTo o6paTeH TJaCbK Bb3HNKBaT Ha-VecTo npi KacTpeHe Ha KNoH. Y6eTeCe, Ye cTe CtbnIIN 3dpaBO H Ye OKoJIO Bac HMa npeDMeTN, B KOITo 6nxTe MoJI Na ce CbHeTe Nn 6nxa BN HaKaapaJI Na 3aRy6nte paBHOBeCne.
HeBnMaTeJIHocT MoHe Da npEiN3BnKa o6paTeH TLacbK, aKO pUcKOBnCeKTop Ha uHaTa cIyuaHNo DoKoCHe KIOHue, CbceDHO DbpBO NII HRAKaKB dpyr 06eKT.
YnpaHnBaIe KOHTpoN Bbpxy 6pa6oTbaHnKbc DbpBecnHa.AKO napyeTaTA,KoNTOBb3HaMepraBaTe Da peKeTe,caDpe6HnJIeKN,Te MoarTa Da ce 3aTlaayat B MToOpHN TaIOH Ida N3XBpCuAT CpeuY Bac. DOpu N TOBaJa He npedCTaBnBa 3aDbJHnTEJHo ONaChocT,BneMOHe Da Ce N3HeHaDaTe N da N3ry6nte KOHTpoN Bbpyx MOtOpHN TpnoH.HNKora HpeKeTe HapeDeHn Ha KynHnHa DbHepn JInKLOH6e3PiPBO Da rna Pa3deJInTe.PeKeTe caMoNo eDHN DbHep NnNo eDHH KNoH.OTcTaPaHnBaIte Hapra3aHnTe napYeTaDbPBeCnHa,3a Da na3nTe pa6oTHaTa cn nloUchcta.(52)
4 HnKora He npbXTe BepHHNr TpNOH NO-BnCOKO oT paMoTo cn n36yBaIe ceyeHe c Bbpxa Ha 1nHaTa. HnKora He npbXTe BepHHNr TpNoH caMo c eHa pKa! (45)
5 3aДаИмATEпьлЕн KOHTpoJI BbpyxВepHHNcI TpnoH e Heo6xoДIMO Da cTe 3acTaHaJIyycToiYuBO.HIKORA He pa6oTe 3acTaHaJI Na
CTbJI6a, noKaueHn HaIbpBO NlN KOraTo He cTe 3acTaHaJIn Ha yctOuYBa onopa. (46)
6 CkopocTtHa npaHaTo BnHaHr Tpr6Ba Da 6bDe BncoKa, T.e. npi noJaDeH nbJHa ra3.
7БьдeTe MNoRo BHNMaTeJIHn npi pr3aHe c rOpHaTa CtpaHa Ha WInHaTa, T.e. npi pr3aHe oTKbM DoJHaTa CtpaHa Ha 06eKta. ToBa ce HApUHa pr3aHe C TlackaIxOД. BeprAraT n3TJaCKBa BepHHNr TpnoH Ha3aI KbM onepaTopa.AKO BeprAraTa ce 3aTlauN, MOTOPHnRT TpNOH MoHe Ia 6bJe OTXBbpJIeH KbM Bac.(47)
8 Ako onepaTopbT He ycToHa ToBa TJaacKaIo DnHeHne,IMa OnaChocT BepHHNHT TpNoH Da 6bDe N3TJaacKaH ToJKOba Ha3a,Ye eINHCTBeHo pNcKOBnCeKTop Ha WnHaTa da ocTaHe B Donnp C DbpBOTo, KoeTo BoDn Do 06paTeH TJaCbk. (48)
PraHaTo cdoJHaTa cTpaHa Ha uHa Ta, T.e.OT
rOpHaTa cTpaHa Ha o6eKta HAdOly, ce HapuHa
p3aHe c TerLeu xoJ. B To3n Cnyau
BepHHNrp TpnoH Ce HacOuyBa KbM D'bpBOTo N
npedHnrt p6b Ha Kopnyca Ha BepHHNry TpnoH
CTaba eCTecBeHa onopa npri p3aHeTo.
PraHaTo cTerIeU xoJ o6JeKyaBa KoHTpoJa
B'bpXy BepHHNry TpnoH nNoLoHeHneTo Ha
pncKOBnra ceKTop Ha uHaHaTa. (49)
9 CnauTe HcTpyKuNTe 3a HaToUbaHe n noDpBkaHa uHaHbTa u BepurTa. Pn cMaHa Ha uBepurTa u3noJ3BaTe caMo KOM6uHaun npenopbuaHn ot Hac. BnK yKa3aHnraTa B pa3JeJIte PeKeIoo o6OpyDbAHe n TexHuYeCKn xapaKTepcntkN.
OCHOBHnHaunHnHa p3aHe

IPEyIPENHE!Hikora He
H3no3BaTe MoToPnHa TpNoH, KaTo
rO dbpHnTe cAmo ceHa pKa.
MToOpHnT TpNoH He MoHe Da ce
ynpaBnBa No 6e3oNaceH NaHn Ako rO
dbpHnTe cAmo C eHa pKa.BnHaru
dpbXte 3dpaBO pKoXBaTKite KaTo
H3no3BaTe N DBeTe CN PbCe.
OchOBHnpINHCINN
- Pekte BnHar npNoJaHa nblHa ra3!
CneBcraKo cpaBaHe 3axpaHbAunrT cnycbk Tp6Ba Da ce OTnycka (npOdbJIHXTeJHa nBJHa ra3,6e3 MOTOpBT Da e HATOBapeH, T.e. 6e3 DBnRaTeJrT Da N3NITBa CbIpOTnBa O T BepnTa KaKTo npn pR3aHe, MoKe Da npedn3BnKa cepNo3Hn NOBpeDn B MOTopa).
-PraHe OTrope cBoTBeTcTByBa Ha pra3aHe C "TerIeua" mHa.
-PaHe OToJy cBoTBeTcByBa Ha p3aHe C "Tlacka" uHa.
PraaHeTo C "Tlacka" Bepura yBeJnUaBa onachocCTTa oT 6paTeH TlacbK. BnK yKa3aHnra Ta B pa3JeI MepKn 3a n36rBaHe Ha 6paTeH TlacbK.
HaimeHoBaHnIa
KacTppeHe PpeMaxBaHe Ha KIoHnTe oT NaHaJIoTo DbPBo.
KbpweHe = CnyaH, KOraTo NbPBoTo, KoTe pexeTe, ce npeUynBa npedn da cTe 3aBbPwn pa3pe3a.
CbueCTByBaT neT oCHOBn foKToPa, KOnTo Tp6Ba Da ce B3eMaT noD BHIMaHne npEi Da ce npuCTbN KbM p3aHe:
1 PeHHeITo 06OpUdBaHe He 6nBa Da ce 3aKJIeIu B cpe3a. (50)
2CTb6JIoTo He 6Nba da ce npeKbpun. (50)
3BepnraTa He 6nBa no BpeMe Ha, nIeN cIeN oTcUaHe da ce dOppe do 3eMaTa IIN npyr npedMeT. (51)
4 CbuecTByBa Jn onacHocToT o6paTeHTlaCbk? (4)
5 Morat NI TepeHbT N OKoJHaTa cpeJa da NOBIIaR T 6e3OanacHocTTa BN, KOraTo CToNTe Ha MrcTo NN Ce IpeDnKBaTe?
Bb3MOHHocT Ta 3a 3akJleuBaHe Ha BepnraTa NnI npekbpwbaHe Ha cTb6JIoTo ce onpeJeIra OT DbA fakTopa: OnopaTa Ha cTb6JIoTo n HeroBaTa HanperHaTocT.
B noBeyeTo cIyuaN Te3n npo6JIeMn MoaT da 6bDaT n36ErHaTu, KaTo p3aHeTo ce n3BbPbBa Ha DaBa eTana, KaTo otrope TaKa nOTdoJy. CTaba Dyma Da ce npedotBpaTu CTb6IoTO Da 3akJeu Bepurata NII Da ce npekbprn.

IPEyIPENHEHNE! N3KJIIOUeTe DnIRaTeJRAKO BepINrTaCe 3aKJIeUH B cpea! He ce ONITBAuTE da N3DbpNaTe BepHHNr TPOH. Pn IN3DbPbNAHeTO MOKeTe Ja NOBpeJNTe BepINrTa, KOraTO BepHHNrT TPOH BHe3aHNoCe OCBO6OuN. N3noJ3yBaHTe JocT 3a OCBO6OxJaBAHe Ha BepHHNr TPOH.
B cIeIbauNTe HNcTpyKuNe e onucaHo KaK Da ce NoCTbHn B Han-YeCTo CpeUaHTe CNTyAuN, C KOnTO MoKeTe Da Ce C6JIbCKaTe npN N3NoJ3BaHe Ha BepINHe TpNOH.
Pra3aHe

PNEyPENHEHNE! HNKoRa He ce ONTBaIte Da peXeTe DbHepn KOraTo ca Ha KUnuHa NIn KOrATo DBa DbHepa IeKaT 6JIn30 eINH Do npyr. To3n TnnpOeDpya DpaMaTuHNo yBeJIuHaBa pNcKa OT OKaT, KOITo MoHe da IOBede Do cepNo3Ho NIn fataJHo HapaHBAHe.
Korato nMaTe noDpeHn Ha KynuHa nBHeep, BceKn DbHep, KOITo Bb3HaMePraBaTe Da HapeKeTe, Tpa6Ba da 6bDe n3MbKHat OT KynuHaTa, NocTaBeH Ha DbpBeHo Maape IJIOnopa N Hapra3aH OTdeJIHo.
OTcTpaHbAaTe Hap3aHnTe napeTa ot pa6oTHaTa nlou. Ako rN ocTabrTe Bbpxy pa6oTHaTa nlou Bne yBelenuBaTe pncKa OT OKaT n 3ary6a Ha paBHOBecne npn pa6oTa. (52)
CTb6ItoJeHnHa3eMaTa.BepoTHocTtaO npNTuCKaHe Ha BepiRaTa NII ppeKbpBaHe Ha CTb6Ito e MaJa. CbuecTByBa oBaue onacHocT BepiRata DaBLe3e BdoNp cbc 3eMaTa cJeD KaTo 3aBbPHTe p3aHeTo.
PraHeTo ce N3BbPWBa, KaTo ce 3anoUHe oT
RopHata CtpaHa. NocTapaIte ce da He DoKocBaTe
3eMaTa KbM Kpa Ha OTCuHaHETo. Pa6oTe Te npi
NoJaDeHa NbJHa ra3, Ho 6bJeTe npeJna3JInBu.
Ako mMaTe Bb3MoHHocT (=MOHe Jn da ce npeo6bpHe cTB6NoTo?) Tpr6Ba Ja npeKpaTnte p3aHeTo Ha 2/3 cpr3aHo cTB6No.
Ppeo6bpeTe cTb6IoTo n 3aBbpeTe pra3aHTo OT npotnBOIOnIOHHaTa cTpHa. (53)
CTb6Ito ce onnpa Bbpxy 3emrTa oT eINHnCn Kpa. CbueCTByBa roJlma BepoarTHoc T da ce npeKbpwn.
PraaHeTo Tp6Ba Da 3anOuHe OToJy (okoJIo 1/3 OT DnAmTeBp Ha CTb6JIoTO).
PraaHeTo Tp6Ba Ia 3aBbpyoTROpe TaKa,Ye DBaTa Cpe3a Da CbBnaDHaT. (53)
CTb6ItoJeHNBbpxy onopa BnBaTa cn Kpa. CbueCTByBa roJlma BepoTHOCT Bepurata da ce 3akJeun.
PraaHeTo Tp6Ba Da 3anOuHe oTrope (KaTo ce cpeHc 6n3o 1/3 ot de6eHHaTa).
PraaHTo Tp6Ba Da 6bJe 3aBbPseHo TaKa OTdoNy, ye BaTa Cpe3a Da CbBnaHaT. (54)
TexHnKa Ha noBaJlAHe Ha I'bPBeTa
3AIONOMHETE! NObaJIHeTo Ha IbPBeTa n3NcKBa rOJIaM onNT. HeoNtTHnT pa6oTHNK He 6NBa da nobaJIa NbPBeTa. N36raBaiTe Da n3BbPWBaTe onepaun, 3a KOnto ce CMrTaTe HeIOCTaTBHQ KBaJIuΦnIupaH!
БezonaHpa3cToaHne
Be30nacHTo pa3cTOnHHe MeJHy dIbPBoTo n HaJI6JIIN3KOTO pa6OTHO MAcTo Tp8Ba Da e HaJ-MaJIKO 21/2 IbJIHHnHa IbPBoTo. IpeDn NIn B npOceca Ha NOBaJIaHETo Tp8Ba Da ce y6eDnTe, Ye B Ta3N "pNCKoBa 30Ha" HMa HNKOrO. (55)
Nocoka Ha noBaJnHeTo
LeI Ta e DbPBoTo Da ce noBaJI Na TaKa, Ye To da nonaHHe B HAI-N3rOJHO NOJIOKeHHe 3a NoHaTaTbWHoTo KAcTpeHc NpaKpOraBaHe. Bne MoKeTe 6e3oNaChO Da ce DBHHnTe.
HenocpeTeHo cIeKaTo cTe onpeJeJnJn noCokTa, B KoTo eNoBaJIaTe DbPBoTo, Tpa6Ba Da onpeJeJIte ecTecTBeHaTa noCOKa Ha naJaHe Ha IbBOTo.
Bbpxy ToBa BnIaT HkoJIo KaTOpN:
HaKJIOHbT
N3KpNBBAHNA
-ПосokаТаНВЯТьра
- Pa3noJIoHeHHeTo Ha KNoHHTe
-EBeHTyaJIHo cHeKHaTa TeXeCT
-ПpenЯТСВИВпpeДeЛNTeHaДьрВОTo: HanpIMep,ДpyrNДьpBeTa,eJIeKTpOpPoBOuN, nTnuaI crpaDN.
-「IeJaTe 3a npn3HaU 3a yBpeKdAnHn I rHe He BCTe6JIoTO,HaJIuYNeTo Ha TaKbBa npn3HaU yBeJIuYabA BepoTTHocTTa OT npEeKbPbBaHe Ha D'bpBOTo N NOJIiTaNHeTo My KbM 3emTa npei Da cTe ro OuaKaBJI.
Bne mohe da CTnHHeTe do n3BOda, ye cTe npHydeHn da no3BOJInTe Ha IbPBoTo da naHe B eCTeCTBeHaTa 3a HeRo NocOKa, TbN KaTo e HeBb3MOHNO IOnaHO da ce ONITBaTe da Ro NOBaJIte BVn36paHaTa OT Bac nocOKa.
Дрг Ванен ФаКТО, КОТо He BЛиRe Ha NocOKaTа Ha NaDAHETO, HO BЛиRe Ha BaWaTa JINUHa 6e3OnaCHOCt, e KOHTpoJIbTДaJIH HaДьPBoTO ИMa NoBpeDEHnИЛ "МьTpTB" KJOHn, KОТо MOraT Дa ce ПпeКьрWAТ И DA BИ HapaHЯ Рпи NaDAHe.
IpeiN BCnUKO Tp86Ba Da ce n36eHne naaTo ObPBo Da ce onpe Ha npyro DbPBo. Tpydno N OnaCHO eDa n3TeRnDbPBOTo OT TOBa noJIOHeHne; IMa rOJIaM pNCK oT 3lonoLyka.BH.YkaazHnraB
pa3eI Ocbo6oHJaBaHe Ha HnPaBnHnHaNo nIbPBO.
3AIONOMHETE!NoBpeMeHaPnCKOBMOMeHTN npnnoBaJIaHe HaIbPBeTa e Heo6xOJIMo Da dpbnHeTe aHTnfoHITe BeIHara 3aBbPwHTe p3aHeTo,3aDa MoKeTe Da Bb3npHeMaTe 3ByuN npedynpeNTeHN cINHaJI.
NouctBaHe Ha CTb6Ito N OTCbNaHe
I3p3BaIe BCnKn pa3KNoHeHn no CTe6IoTo do BncoUHaTa Ha paMoTo BN. No-6e3oNaCHO e da pa6oTnte oTROpe HAnOJy n IbPBoTo Da e MeHdY Bac n TprnoHa. (56)
I3peKeTe n3dBHKnTe B OCHoBaTa Ha DbPBoTo IN npoBepeTe 3a eBeHTyaJIH N ppenTcTBn (KaMbH, KLoH, yMn T.H.), 3a Da cn Ocnrypnte CBO6ODeH nbT 3a OTcTbNLeHne, KOraTo DbPBoTO 3anOuHe da naHa. PbTnHa OTcTbNleHne Tpr6Ba Da nMa nocoka npn6n3nTeJHo 135o 3ad Ha6eJra3aHaTa nocoka Ha noBaJnHeTo. (57)
13oHaHa npck
2IbT3aOTTeJrHe
3 Nocoka Ha noBaJrHeTo
PobaJIaHe

PNEyPENHEHNE!AKe He cTeDocTaTbUHO KBaINHcnpaH BNcbBETBaMe Da He NOBaJIaTe IbPBeTa CdNaMeTbp, npeBnBaAs, NbJHHaHaTaHaShHaTa!
IobaJIaHeTo ce OcBSeCTBraBa cN3NoJI3yBaHeTo Ha Tprn Cpe3a. IbpoBe ce npaBN HappaBlaBaUcpe3, BKJIOuBaUr opeH Cpe3 NdoJeH Cpe3 NcIeT ToBa ce 3aBbPbUBa IOBaJIaHETo c NOBaJIaUcpe3. Upe3 npaBUNHO pa3noJIoHeHne Ha TpNTe Cpe3a MoKe MHO TOUHO Da CE KOHTPOJIIPA NocOKaTa Ha NobaJIaHeTO.
HanpaBnaBaau cpe3
3aДаИЗВБРшТЕ HACOчВац cpe3, Ви ТрябВа Да ночETe C rОрЕн cpe3. ZeЛТа BИ TрЯбВа Дa 6bДe Дa ИЗПОЛЗВATE МарКЕРа 3a NOCOKaTа Ha OCHOBHЯ cpe3 HA TprNoHA (1) KbM UeJI NO-HaTaTBK Ha TepeHa, KbДeTO 6nXTe NCKaJI N da NaДHe D'bPBoTO (2). 3acTaHete OTДЯСHO Ha D'bPBoTO, 3aД TprNoHa, И рeжETe C IbPnaц XoI.
CJIeT OBa ce I3BbPbBA DoJHnYr Cpe3, TaKaYe ToI Da 3aBbPbBA B KpaHa rOpHnA cpe3. (58)
HanpaBlaBaunrT cpe3 Tpr6Ba Da c DnAmEtbp, paBeH Ha okoJIO 1/4 OT dNaMeTbpa Ha CTb6IoTo, a bTbMT MeHdy rOpHnI NdoJIHnA cpe3 Tpr6Ba da e Han-MaIKo 45o.
JIINHnraTa, no KOrTo ce cBeiINHbAaT BaTa cpe3a, ce HapNua JINHnHa Ha HapBaIbAaIy Cpe3. Ta3N JINHn Tp8Ba Da 6bDe cTporo XOpN3oHTaJHa N Da
e noi npab bIbJ (90o) cnpraMo n36paHaTa nocoka Ha nobaJIaHeTo. (59)
Pobalnycpe3
IobajnT Cpe3 ce n3bJHnBa OT npOTNB0NoJIOHHata cTpaHa Ha dbpBOTo N Tp8Ba da 6bDe cTporo Xopn3OHTaJIeN. 3acTaHete OT JBAtA cTpaHa Ha dbpBOTo N 3aOnuHHe Ta peKeTe c TerLeHa.
Поваялшяпсpe3 trp6BaДа e npi6ЛиЗnteЛHo 3-5 cm(1,5-2Дюм)HaIxOpn3OHTaJaHa HanpaВlaBaшяпсpe3.(60)
IocTaBeTe aMopTu3aTopa (aKo TaKbB e MoHTnpaH) 3aI npedna3HaTa NBUca. Pa6oTe Te npi noJaDeHa nJHa ra3 N 6aBHO BkapBaIe TnHaTa N Bepurata B dtpBOTo. Y6eJeTe ce, ye DpBOTo He e 3anoHAnO da naDa B nocoka, npOTNBONIOxHa Ha HabeJ3aHATA OT Bac nocoka Ha nobAJIHe. BeHara oom KaTo cpe3bT 6bIe OocTaTbUHO dbl60K, B Hero Tp86Ba Da ce 3a6ne KlnHnn IocT. (61)
IobaJIaIyraTcpe3 Tpr6Ba Da 3aBbpyu ycnopeiHo Ha IINHnTa Ha HnPaBnBaIyraN Cpe3, KaTo pa3cToarHHeTo nOmeHdy IM Tpr6Ba Da 6bJe HaMamko 1/10 ot dNaMeTbpa Ha CTb6JIoTo. Hecp3aHaTa YacT Ha D'bpBOTo ce HapUa npedna3Ha INBua.
IpeIa3HaTa IbUca e CBoeO6pa3eH IapHnp, KOHTpoJIpaIu, IocOkaTa Ha noBaJrHe Ha IbPBO. (62)
LJIaT KOHTpOJ Bbpy NocKaTa Ha nobaJIaHHeTo ce ry6n, aKo npEJaHaTa INBnca e MHOrTO TcHa IIN HapBaJIaBaIaNt I NOBaJIaIaNrT Cpe3 ca pa3NoLoKeHN HeNPabUNHo. (63)
Cne3aBbPwBaHeHa nobAJIyIcpe3HnnpabIbBAuNcpe3DbPBoTo Tp86Ba Da 3anoHcda naIa nOi Bb3JeICTBNeTO Ha co6CTBeHaTa cTTeJecNT NlncnOMoUTa Ha KInH NIn JIOCT. (64)
IpenopbUBaMe BN Da n3noJ3BaTe WnHa, KOrTo e no-DbJIra OT dNaMeTbpa Ha DbpBOTo, TaKa Ye da MoHeTe Da npaBnTE OCHOBnRA Cpe3 N HacOuyBaIuTE Cpe3OBe C "eDInHnHy peHexu IdbHHeHNA". BnKTe INcTpyKlunTE B pa3JeLa Cbc 3aRJaBneTo TexHnueckN daHHn OTHOCHO KOn IbJHKnHn Ha WnHaTa ce npenOpbUBaT 3a BaShn MoDeJ MoTopeH TpNoH. (65)
CbIeCTByBaT NaHnHa NoBaJIaHe Ha IbPBeTa,
YnITo DnAmTeBp IpEbnuBaA DaIbJHHaTa Ha
ShHaTa.Ho Te3n HaunHc Ca CBbp3aHc Cbc
3NaHTeJIHa onaCHOCT 3oHaTa Ha O6paTHN
TJaCbK Ha ShHaTa Da BJe3e B KOHTaKT C IbPBoTO. (4)
Ocbo60JaBaHe Ha HenpaBnHOn PnaHaJIo D'bpBO
CbaJIaHe Ha "3axBaHaJIO ce IbPoBO"
Tpydno onacHo e da n3TeRn IbpbTOOTOBa noLoHeHne;IMa rOJAM pNCKOT3lonoNyKa.
Hnkora He ce onntBaIte dapeKeTe IbpyBO,Bbpxy KoTo mMa naHaNo dpyro IbpyBO.
Hnkora He pa6oTeTe B 30HaTa Ha pNcK npN yBnchAIO nIIN npNTncHaTo D'bpBO. (66)
Ha-6e3oNaCeH aUHH e n3noJ3yBaHeTo HaJIe6eKa.
-MoHTnpaHa Ha TpaKTop (67)
- NopTaTnBHa (70)
PraHa Ha HanperHaTN DbPBeTa N KJIoHn
PnIroToBHeHn: Da ce onpeJeIN B KaKBa nocoKa
Ie Ce IIBNHN D'bpBOTo NJI NKIoHbT CJIeD
OCBo6oHNaBAHeTo N K'BeCe HaMnpa
ecTeCTBeHaTa ToUka Ha npEuynBaHe (T.e.
MaCToTO, KbDeTo ige ce npEeKbpWn, aKO 6bJe
HanperHaTo oSe noBeYe).
OnpeJeTe Ha-6e3onacHnHaunH 3a
ocBo6oJaBaHe Ha HanpeKeHneTo n DaJIncCTe B
cbctOJHne Da HappaBnte ToBa. B cNoHH
cHTyaUIn eDINHCtBeHnT 6e3onaceHnauH e da ce
OTKaHeTe OT n3NoJ3yBaHe Ha BepNKnIa TpNOH n
da n3noJ3yBaTe Ha Je6eKnA.
Hai-06so BaHH cIeHNOTo:
3aTaHeTe TaKa, Ye Na HMa onaHocT Da 6bJeTeT 3acerHaT OT NbPBoTo/KloHa, KOraTo HanpeHHeHneTo ce ocbo6o. (71)
HanpaBeTe eINH INHRAKOcpe3a B ToKcTaHa
npeyNBaHeTo INI 6N3O Do Hea. HanpaBeTe
ToIKoBa cpe3Obc Heo6xOIMata Dbl6OuHa,
KOLKOTo Ce HxHH, 3a Da ce HaMaJIi
HanpeXeHNTo IN d'bpTO IN KJIOHbT Da ce
"npeynT B ToKcTa Ha npeynBaHe. (69)
Hnkora He peKeHe Te IOKpaI DbPBO NIN KNoH, HAMipaUc Ce B HanperHaTo CbCToHHe!
Korato Tp86Ba da peHHe Te npes 1bPBo/KJIOH, HanpaBete Da bNt Pn Cpe3a Ha pa3cToHne 3cm eINHOTdpyrNCbl6OuHaOT3-5CM. (72)
PpOdbJIbHaBaIeJapeKeTeIOKaToOrBbaHeTo HAnpeHHeHEnToBdbPBoTo/KJIoHaN3ue3HaT. (73)
CpeHeTe IbPoTo/KIHOa OT npoTnBOOnoHHaTa CtpaHa cNeI KaTo HanpeKeHHeTo N3ue3He.
Mepkn 3a n36yRbaHe Ha o6paTeH TlaCbK

IPEyIPEJDEHNE!O6paTHnT TlaBk MoHe Da 6bDe BHe3aEn H CInJeH, KaTo yApbT OT BepHHNr TpNoH, uHaTa N BepUratae HaCoueH KbM onepaTopa. Ako Bepuratae B DInHeHne, Ta MoHe Da npEdu3BnKa MHOrO cepno3HN iDopn CmBpTOHOCHn TpaBMn. Heo6xoImo e da pa36peTe npuHHte 3a Bb3HKnBaHe Ha o6paTeH TlaCbK n Da ro U36raBaTe, KaTo npoRBBaTe npedna3JIINBOCT N npiIarate npabIne HauHH Ha pa60Ta.
KaKBo npedctablaBa o6paTHnT TnaCbK?
TepMHbT 6oPaTeH TJaCbK ce N3noJ3yBa 3a onNCBaHe Ha BHe3aHaTa peaKcIy, npN KoTTo BepHHnT TpNoH N WnHaTa oTcKaUaT, KOraTo rOpHaTa YacT Ha BbPxbT Ha WnHaTa, T.H. pNcKOB ceKTop 3a TJaCbK, BJe3e B DoInp C HraKaKbB npEdMeT. (48)
O6paTHnT TJaCk E BnHaRn B nocKa Ha uHaTa. O6NKHOBeHo BepHHNrT TpnoH uHaHaTa ce oTXBbPnT Ha3aI HArOpE, no nocKa Ha onepaTopa.Ho BepHHNrT TpnoH MoHe Da OTCKOuN B DpyrN NocOKu B 3aBNCMocT OT NOJIOxHeHTo CN B MOMeHTa, KOrato PNCKOBnT CeKTop Ha uHaHaTa Ce dOnpe Do HraKaKbB PpeDMeT.
06paTeH TlaBk MoHe Da ce noJyUe eINHCTBeHo, KOraTo pNcKOBnT ceKTop ce Donpe Do HraKaKbB npEdMeT. (4)
KactppeHa KIOHInTe

IPEyIPENHE! NObeueTo
HeaactHn Cnyan npn OTKaT ce
NoLyuBaT npn KAcTppeHTo Ha
KIOHHTeOTDbpBOTo. He n3noJ3BaHTe
3oHaTa Ha OTKaT Ha uHaTa.
YnpaHHaBte N3KJIouHTeJIHO
BHIMaHne H He DOnyckaTe KpaT Ha
UHHaTa Da BIn3a B KOHTaKT C DbHepa,
DpyrN KLOH NIN PpeDMETN.
YnpaHHaBte N3KJIouHTeJIHO
BHIMaHne Prn 6opabeHeTO C KIOHn,
KoNTo Ca B HanperHaTo cbCTOHN. Te
MoRaT Da OTCKOuat KbM Bac N Da BN
PnHydA T Da N3ry6nte KOHTPOl,
KoEtO MoJe Da DoBeJe Do
HapaHbAHna.
Y6eTeCe, Ye MoXHeTe 6e3oNaChO Da cTOnTe Ha MЯcTo N da ce npeBnBbAte. Pa6oTeTe oT JIbBaTa cTpaHa Ha cTb6NoTo. DlbpHKeTe TpNoHa 6JIn3o Do ce6e cn, 3a Da MoXHeTe MaKcImaJIHo Da rO
KoHTpoJInpate. No Bb3MOHnOCT npeHeceTe TeHeecTtHa TpNoHa Bbpxy CTb6IoTo. (74)
Pn DnHHeHne nokpa CTb6NoTo, To Tp86Ba da ce HaMnpa MeKdy Bac N BepHHNr TaIOH.
Pa3KpOBAHe Ha cTb6JIoTo
BnK yKa3aHnra Ta B pa3eJ OcHOBn HaunnHa p3aHe.
OcHOBHn npHHuPiN
NoTpe6nTeJrT Tp86Ba Da n3nBnHra CaMo pa6oTaT a No noDprbKkata N 06cnyXBaHeTo, onncAH B ToaHapbYnK Ha onepaTopa. KpynHTe peMOHTn Tp86Ba Da ce n3nBnHraBaT oT OtopuHaCepBn3.
IpeRJIeI,poIdpbHKaN cepBn3 Ha 3aIHTHOTo O6OpyDbAHe Ha BepHHnTpNoH

PNEyIPEKJDEHNE!BnHaNn3KJIIOUcBaITe BepHHNtPNOHOT3axpaHbAHeTo,npEiDa N3BbPbBaTeKaKBoTo n da e crNo6BaHe,poDpBHKa N/INn npoBepKa HaMaunHaTa.
3A5EJIENKKA! BcNk npoTHn onepaun no
noDpBHKKaTa n peMOHTa Ha MaUNHaTa N3NCKBaT
cneuaJHo obyeHne. ToBa ce OTHacr oc6eHo
do o6OpyDbAHeTo 3a 6e3onacHa pa6Ota c
MaINHaTa. Ako MaINHaTa BN He oTROBapr Ha
n3NCKBaHnra Ta npn npOBepKeTe, ONncAHn no-
doNy, Hne BN npenopbYBaMe Da r oTHeceTe B
06cIyBaunr BN cepBn3.
BepnHa cnpaKa n aBapneH loCT
Поберка На abapиня loct
-ПроверетаавионялостзаВИДИМINOBpeNi,КaToHaNPIMep NyKHATINHBMATEpnaJa.(75)
- Pa3dBnHexe abapinHnna loct Hnpei Ha3a, 3a Da npOBepnte daJIn ce DnHN CBO6oNHO e HaJeHHO 3akpenen KbMaunHaTa. (76)
PpOBepKa Ha aBtOMaTnUHaTa cnIpaKa
- NocTaBeTe n3KJIIOUeHnBepINHeHTpNOHnADIbHep INnHa Ipyra Cta6nIHnHOOBbpxHocT.OcBO6oDeTe npEiHaTa IpbHKa nOCTaBeTeBepHHNr TpnoH Da Ce n3XJy3n PoCo6CTBeHaTa CN TeHexC, BbpTeeKN ce OKOJ03aHaTa pkoXBaTKa KbM dHepa.
Korato Bbpxa Ha uHnHaTa naIHe Bbpy nBHa, cnpaKaTa Tp6Ba da ce BKJIOuN. (77)
PpOBepKaHa cnpaHTo DeiCTBne
BkIIOueTe BepHHn Ta TpnoH. YBepeTe ce, Ye BepnraTa Ha TpnoHa He BIn3a B Donnp C noYBaTa NnC npEMeT. BnH HhCTpyKuINTe B pa3JeI CTapTnpaHe n N3KJIIOUBAHe.
B3eMeTe TpnoHa B pIe, KaTo 06XbAHeTe DpbHKITc npbcTn. (44)
-Подайтельлна ra3иВКЛЮче Вернн haTа cnрачka, KaTO 3aBbPtaTe ЛЯВATA KNTKaTa KaM abapnHnЯ loCT. He otnyckaIte npedHaTa pBkoXbaTka. Bepurata Tpr6Ba da cnpe He3a6abHo. (78)
Блokиювka Ha 3axpaHbaunia cnycbK
- YBepTe ce, Ye 3axpaHbAunrT cnycbk e ФИКсиран B NO3nIgna Ha npa3eH XoI, KOraTo 6JIoKInpoBkAta Ha 3axpaHbAunr Cnycbk e cBo6OdHa. (79)
- HaTnscHeTe 6JIOKnpOBKaTa Ha 3axpaHbAun cnYcBk I ce yBepeTe, Ye Ce BpTa B HaayHaHaTa cn no3uN, KOraTo r OTnycHeTe. (80)
-Провере TeДали 3axpaHbauNTcnycblKИ 6лokирOBkaTMyceДВиKaT cB6o6dHoИДали Bb3BpaTHaTa npyKHa eBn3npaBHoCT.(81) - AKTNIBnpaTte BepHHN TpNoH nOdaTneBJIHa MoUHocT. OTnycHeTe 3axpaHBaUNcnycbK n npOBePeTe daJIb BepnraTa Ha TpNoHa cnnpa N ocTaBA HenoDbHHHa.
YIOBNTeIHaBepurata
- Y6eTeCe, Ye yIIOBnTeJIaT Ha BepnraTa He e noBpeJeHneHaJeHHo 3aKpeNeH KbM Kopnyca Ha BepHHNr TpnoH. (82)
OxlaInteJHa cncTeMa
3a noJyUaBaHe Ha KOJkoTo e Bb3MoJHo no-Hncka pa6oTHa TeMnepaTypa MaunHaTa e cHa6JeHa c oxJaNTeJIHa cnCTeMa.
OxlaInteHaTa CnCTeMa ce CbCTOn OTo:
1 CmyKaTeJIeH Bb3dIyXOpBoD (noI 3axpaHBaunCnycbK).
2 BeHTnlaTop Ha MoTopa.
-ПоочТВаиTe OXладптELHаТСИСТЕма
eHeceДМИЧОс YeTKa И no-YeСТо, aKO
obCTOЯТЕЛСТВАТ ИЗИСКВАТTOBA.
3amБрсЕнATA ИЛN 6ЛokИраHA OXладИтELHа
CnCTema ПpeДИЗВИКВа ПрERрЯВаHe Ha
MaшINHaTа, KoETO BOД Ndo NOВpeЖДаНe Ha
MaшINHаТa.
TexHnuecko 06cIyJbAHe
CneBa cncbK c onepaunnte no noDpBHKKaTa, KOnto Tp6Ba da ce n3nblHbAt no MaunHaTa. NobeyeTo ot no3uNTe ca onncAH B pa3deJa NoDpBKKa.
cMepTeIbHe IopaHeHHa KOpNcTyBaayiHix oci6.
IpeedeknlyaTaUciIO KyIbTnBaTopa yBaHNO npouHTaTe ue KepiBHuTBo Ta nepekoHaTecb, 0o Bam Bce 3pozymilo.

06OB'ЯЗКОВВДЯгайт:
- 03BoJeHn 3axnCHn 1OJOM
3axNciHaByuHKNi - IpeBipeHi 3axnChi okyJapn a6o npo3opn uNTOK
IeBnpi6 BiinobiJaE HaJeHHM BmOram EC.

UWMoBI BIKnDy HaBKOJINHcpeIOBNIe BiINOBiDAIOb HopMaMEC. DeTaNbHIpy IHOpMaIIO npOuMoBI BKNIDN IHCTpyMeHTynoDaHO y po3di "TexHiHi DaHi" TaHa 6ipci.

Pnpo60Ti 3 JaHIOROBOIO NIOIO onepaTop MaE TpIMaTN II O6Oma pyKaMn.
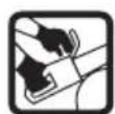
3a6opohReTbca npaIOBaTu 3 NaHIOROBOO NIOLO, TpMaOuN II TiIbKn OOnHeIO pyKOIO.

HikoJI He Do3BOJnTe, 06 KInuK HanpaBnaIoooi uHH TOpKaBc8yJaKoro 06'ekTy.

YBAI! BiДaаВинkae KoJINH HocOK KInHcN HAnpaBJIIOOi UHH TopKaetbca 6yDb-ЯKOrO 06'ekTy Ta cnpuHIOe MOMeHTaJIbHy 3BOpOTHy peakciio, BiKnJaOnu HAnpaBJIIOUy uHy HaRopy N y6ik KopNCtBuA. MoHe cnpuHHTn cepNo3Hi npaHeHHra.

Hanpymo6epTaHHJaHcUor a nnIK Ta MaKcMaJIbHa IOBHNHa NJIbHOI WnH.

He niiynyckaTe cToPOHHix oci6.

Ipepe pyyHOBaHHaM a6o yHHeHHa3aBKnBn BnMaTe BNkky 3po3eTKn.

He6e3neKa ypaXeHH eJIeKTpHnM cTpyMOM.
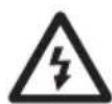
KIO npit nowkoHHeH a6o Mae npi3n, Heo6xIDHo HeraHbNHTBnKy 3 po3eTKn.
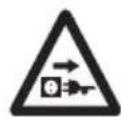
Talbmo LaHciora aKTKBOBaHo (npabopyu); NaHcioroBe raIbMo HeakTNBOBaHe (JIbopyu)
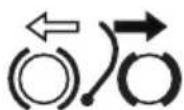
MacNo3aJIbHbI rOpIOBnHa 3MaUyBaHHJaHlKoRa.

EkoIorUHe MapKyBaHH.CIMBOJN Ha Bnpo6i a6o Noro ynaKyBaHHi noka3yOToB, 0o 3 cIM M Bnpo6OM He MoHNa NOBOIDNTcB k i3 nobyTOBm BiXoDAM.NoTpe6a 3daBAtuY BiINOBiDNH NyHKT BnMaHHHa nepepO6ky dJa BnMaHHeJeKTPnHOro Ta eJeKTPoHHOro yCTaTKyBaHH.

3axnauTeBIDnouy.

PoiBinHa i3oJiai
IHni no3HaueHHa iHcTpymeHTi BiIOBiaOTb BIMOram cneuaJIbHnx cepTnphiKaTIB JIA neBHnx pNHkIB.
CnMBoJN B noci6Hnky KopncTyBaaya:
Cni3aBnBiEHyBaTn npncpiiBiDnHepeJaHnBHeHHHa ac 36npaHH, nepeBipK Ta/yn TexHiuHOrO 06cIyroByBaHH.
3aBnOJaTBeBIDNoBIdHi 3axnchi pykabu.
Heo6xio hOppeyIepHo uHCTnTIN HcTpymeHT.
Bi3yaJIbHn orJIA.
JaHOrOBe raIbMo Mae 6yTN 3acTocBaHo, KOJI NaHUroBa nIIKa 3anyCkaTeBcra.
YBAI! BiDnaua BnHnKae KoJN HocOK KInuK HanpaBnIooi WnHn TopKaeTbC8 6yDb-RAKOo 06'ekTy Ta cnpuHIOe MOMHTaJIbHy 3BopoTHy peakUio, BiKNJaIoUH HanpaBnIooU y WnHy HaOpy N y6iK KopNCtYaCa. MoHe cnpuHnHTn cepNo3Hi npaHHeHH.
BmictynaKOBKn:
JaHcIgOBA nnJIka
JaHcIOr
HanpaBJIaIoua IINHa
IhctpyKzij KopncTyBaHa
HanpaBnaIoua uHa IJIaNcIgra


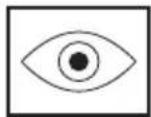
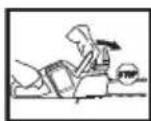
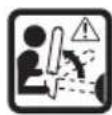
HaIhctpyMeHT npnKpInJIeHo HAcTynHi NaKeiKn.
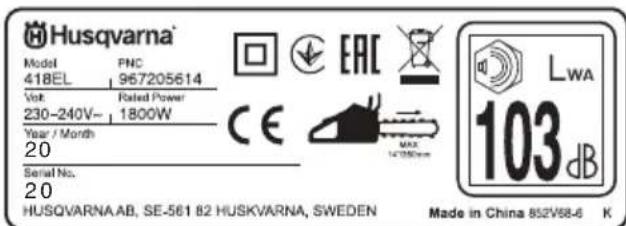


3Mict
YMOBHI NO3HAUHHe
CIMBOJINHa iHCTpyMeHTi:532
CIMBOJINB noci6nky KopncTyBaay:533
Bmictynakobkn:533
3MICT
3MiCT 534
BCTyn
UaHOBnKOpncTyBaCy,535
山 O 山 O ?
Ioo ha Haaniorobin nui? 535
Ipeed BnKOpncTaHHm HOBoi
JauHIOIroBoi nnIkn 539
BaJIbBo 540
3aBnKopncTyTec8 3dopoBm
Iy3dO M 540
Oco6nTe 3axnche cnpaHHeHH.540
CnpaJxHnH Jn86e3neuHOi po6oTu 541
JaHIOroBe ralbMo Ta KoHy IJIa
pepeHboi pykn 541
Pinye cnpaHHeHH 542
3БИРАHHI
YcTaHOBka HappaBJIyOoi IHHI Ta IaHIOra 547
NYCKTABBIMNKAHH
Nyck Ta BIMnKaHHa 548
TEXHIKA POBOTN
IpeepBnKOpncTaHHaM:549
3araIbHi Bka3iBkn IJy po60tn 549
yK yHnKHyTn BiD.aui 553
TEXHUIHE OBCJYTOBYBAHH
3araJIbHe 554
Ipebeipka,IOgIaT a 06cIyroByBaHn3axncHoro cnpaIHeHHaHcIroBoi nnKn. 554
3Ma7yBaHHa6ap6aHy HnpaBnaIoooi 554
CnTeMa oxoJIoDHeHHr 554
Ipaqik npoBeHnHnTexHiuHorO
06cnyroByBaHH 555
TEXHIYHI XAPAKTEPNUCTIKN
Texhiu hi dahi 556
KoMaHaJIi HnpaBJIyOoi WnHn Ta IaHIOra 557
HaroctpioBaHHaHcIgOrBoiNnKnTa Hannkn 557
Дeкларuaь BiINOBiHocTi CTaHdapTaM
EbponecboKoro Coio3y 557
UaHOBHn KOpncTyBauy,
No3dopOBJRAMo, 0u Bn BnpiHnI KynNTn npOyKT Husqvarna! TpaNcII Husqvarna noUHaIObTbc3 1689 poky, kOnI WBeDCbKni KopoJIb KapXI HaKa3aB cnpuydtN fapny Ha 6eperax pIKn Husqvarna IJI Bnpo6HnCTBa MykTeiB. Take po3MiueHHa 6ylo IogUHm, TOM y 0rIpaBliHn eHepri Uie pIKN BnKOpNCTOByBaIacn dJIa CTBOpEHn NIDpNMeCtBA, 0o npAIOBaTMHe Ha Hi n iHaJI. IpotYrom 6JIbW HIX 300 pOKIB icHyBaHHa fAp6nka Husqvarna 3pO6nla 6araTo piHNX BInpO6i: BiD npOB'JHnx neey Do cyuacHO rkyxOHoro ycTaTKyBaHH, WBeHNX MaunH, BeLoCInneiB, MToUKNKlIB ToIO. Y 1956 poci 3'ABINscnepwi Ra3OHOKocapKn, 0o npBIOJrTBcB Bpyx DnRyHom, Notim y 1959 pozi 3'ABINscn LaHOrOBI nIJKN, y ciI raLy3i Husqvarna npauoe i cborodHi.
CboorDiH Husqvarna - oINH i3 npoBidnHex
Bnpo6NkIB npOdyKUII IJIaIicBnCTBa I
caiBnHTBa, kicTB JKOi E HaWM BnIMM
npiopnteTom. KoHcENpia 6i3HeCy cKlaJaTeBcB
po3pO6ci, Bnpo6HnCTBi I ToprIbI IHcTpMyeTAMN,
IO npNbOBoTbcB pyx DBvHyOM, IJIa NlcBnCTBa
ncadBnCTBa, a TaKOH 6ydiBeJIbHOI
npomncJIoBOcTi. MeToIO Husqvarna e TaKOH 6yTu
nonepedy Bcx CTocOBHo eproHomIKI,
3acTOcoBHocTi, 6e3neKn 3axNCTy
HabkoJIuShbOrO cepedobuHa. 'Ce i e npuHa,
Omy Mn po3pO6NJ CtJIbKn p3Hnx oc6JIbBOcTei
dJIra HauNX Bnpo6iY uXx rAly3Ax.
Mn BneBHeHi, 0o Bn 6yndeTe 3aOBoJIeHi JkicTTO Ta
po6oToIO HaWOro BInpO6y BnpoIoBx 6araTbO
pokIB. PnpI6aHnnr HaWOro BInpO6y HnAae Bam npabo
Ha OtpmAmHH npOfeciHoi IOnOMrN 3 peMOHTy Ta
06cLyroBaHNN, KOJIy UCbOMy BNHNKHe Ntpe6a.
Jkso npOdaBeU, y JKO r Bo npnd6aJI
InCTpyMeHT, He e OdHM i3 Haunx yNoBHOBaHexHnx
npedCTaBnIKiB, dI3HaNTecra aDpccy Hau6JIHHQOI
MaicTePHi 3 06cLyroBaHNN.
Mn 6aHaemo, uo6 Bn 6yJIn 3aOBoJIeHi cIIM Bnpo6om i uo6 BiH NaOBro CTab BaIIM NOMiHuNKOM. NocTaBTEcRdo Uboro noci6NkA KOpNC TyBaUa RaK Do LiHHOro DOKymENTy. DToPmMyuChCb BIKJaDeHINx Y HbOMy Bka3iBOK (uOIO KopNC TyBaHHra, o6ClyrOByBaHHra, OOrJaNy TaIH.). Bn npOobHnTe TepMin Cnyh6n IHCTpyMeHTy Ta 3MOHeTe 3ROOM BnIdHiue NOro npOaTn B pasi Notpe6n. JaKuo Bn npOdaCTe IHCTpyMeHT, o6OB'3KObO nepeJaTe NOKynCeBi i UeNoci6HKn KOpNC TyBaUa.
Bn noBnHi BnKOpncToByBaTn NnIky TijbKn 3 KOM6HaLcIaMn HAnpaBnIyOoi SiHn Ta JaHucIora, Ioo peKoMeHDoBaHi y po3diJI 'TexHiHi daHI'.
B JIOHOMy pa3i He KOpNCTyIeTecIHCtpymeHTOM, Raio Bn BTomJIeHi, BHHBaJIIN CnnpTHi Hanoi, npimMaTe JIKN a6o 0-He6yDb, 0o MoKe HeratNBHO BnInHyTu Ha Baw 3ip, peakuio, KoopDnHaCIO pyxIB cbiOmicTb.
KopncTyTecr oocntm 3axnchm cnopraHHeHHM. IHcTpkyIINBiTBcR y po3diI ni3 3arOJIOBkOM "Oocnte 3axnche cnopraHHeHH."
He BHoNTb 3MiN Do UbOro Bnpo6y uH BnKOpNCToBvIe NOro, kUo BnAIBTbcra, Uo Do HbOro 6yJIi BHeceHi 3MiHn iHsMMn oc6aMn.
3a6oponeHO BnKOpncTOByBaTu HecnpabHi
iHCTpyMeHT, aKymyIaTOpHy 6aTapeIO a6o
3apAHH npicTpii. DoTpmyTecraHCTpyKci3
nepeBipKn, DOrJaTy Ta o6cLyroByBaHH, Io
HaBeJeHi y cboMy noci6HNY. DeKa 3axOOn 3
DorJaTy Ta o6cLyroByBaHH noBHHi
3diChIOBaTcra CneuaJIbHo niIroTOBLeHIMN
faxIBzM.NiVB. iHCTpyKcii nd 3arOJIOBkOM
《Texhiue O6cLyroByBaHHa}.
HikoJI He BnKOpncToByTe 6yDb-ЯKi iHsi akcecCyapn, HIX Ti, IIO peKoMeHDoBaHi y CbOMy noci6NHy. IHcTpyKuII DnBiTbcr y po3diJax niD 3arOJOBkAmn 'Pixyue cnpaIKeHHra' Ta 'TexHiHi daHI'.
YBAI! 3aBKnHocntb 3axnChi okyJrpna60
IHTOK IJIyO6IIuUyA JJIrTOG,IO6 3MeHUnTI
PnIK TpaBMn PpeImeTaMn,IO BiICKaKyIoTB. BID
JaHcIroBOi NIKN 3 BeJIHKoIO WBnKicTIO
MOHyTB BiCKaKyBaTu pi3Hi O6'ekTN, Taki JK
TpICKN, MaJIeNbKi IIMaToUKN DepeBa Ta iHwe. LcE
MoHe pIn3BeCTNu Do cepNo3HoI TpaBMn,OCo6JIbBO
dJIra Ouei.

YBA!I NowkoJHe pIKyue cnopdHHeHH Hn HnnpaBnIbHa KOM6HaJI Ha npabJIyOoi WnHn Ta IaHcIgra nIILK 36IbWye pn3NK BiIaui! BnKOpncTOByTe TlBKn Ti KOM6HaJI HnnpaBJIyOoi WnHn/ IaHcIgra nIILK, 0peKoMeHDoBaHi HAu, Ta DoTpIMyIteCci IHCTpyKU3 HaocTpIOBaHH. IHCTpyKU2 DiNBItbcn iid 3arOJIOBkOM 'TexHi DaHI'.
3aBnKopntyTec 3DopOBmIy3dOM
He MoHHa nepeI6aHTn KOHHy cIITyaUIO, i3 JKOIO Bn MoHeTe 3ycTpIcNcR, KopNCTyOuNcB IaHIOROBOIO NIIKIO. 3aBKnI 6yDbTe 06epeHHi Ta BnKOpNCToByTe Bau 3dopOBn rIy3d. He HamaraiTeC8 3pObNTn Te, 0o 3daTbc8 Bam no3a MeKaAMn Baunx MoJInBocTei. (2) JaKIO Bn HeBneBHeHi CTOCOBHO pO3ymHn npabNJ KOpNC TyBaHN HicJIra TOrO, knpouNTaJIu Ci IHCTpyKcii, Bam notpi6Ho 3BepHyTBc8do ekCpeT a. 3B'JHKITbc8 i3 npOaBcE M n HAMn, kKIO y Bac D 6ydb-akniNTaHHa CTOCOBHO KopNC TyBaHN HaHIOROBOIO NIIKIO. Mn 6yDEmo paDN 6yTN KOpNCHMn Ta HadaTn Bam npaDu, a TaKOH DonOMOTn BnKOpNCTOByBaTN Bau Ya LaHIOROBy NIIKy efeKTNBHO Ta 6e3neuHO. BiDiJaIte Kypc i3 HABuaHHa KOpNC TyBaHHIO LaHIOROBOIO NIIKIO, kKIO MOHJIbBO. Bam npOaBeUc, licoTexHiuHm TexHiKum a6o 6i6JIoTEKa moXt b HaDaTn IHΦopMaio Ipo Te, kKi HABuaJIbHI MaTeplAJIu Ta Kypc nDocTyHHi.
NocTInHo npoBOuNTbcpo6OtaIINpOKpaueHnKaOHcTpkyKUII TaTexHOJorii -NoiInweHHaIK36IbSyIOTb Bawy 6e3neKy ta efeKTnBHCtB npaCi.PeryIaRHO BiDbiYte CBOr npoDaUca Ila TOrO,0o6Di3HaTncnpo HOBi KopNCHi oco6JIbBOcTi,io6yIn 3anpoBaJxHeHi.
Oco6nCTe 3axncHe cnopJxHnHa.

YBAI! BiIbIcIb HeIacHINBUNaIKIB npn KopncTyBaHHI NaHIOROBOI nIIKOIO BUNHKae ToDi, KOJI NlaHIOr TopKaeTbcg KOpNCTyBaHa. KoHHoro pa3 npn pO60i 3 IHcTpymENTm Heo6XiHO KOpNCTyBaTnCByIIOBIHNM Oco6NCTUM 3axNCHM cnopJdHeHHM. Oco6NcTe 3axnche cnopJdHeHHr He MoKe NOBHCIOJIkBiDyBaTHn He6e3NeKy TpaBMyBaHHa, aJe npn HeUacHOMy BUNaIKY BOHO 3HN3NTb CTynIHb BAHKocTI TpaBMN. 3BepHiTbCdo npDaBcNo DoONOMORY BVb6opi npabNbHorO cnpaJdHeHHa.
06OB'ЯЗКОВВДягайтЕ:
-ДоЗвелен 3axисншолOM
3axnchiHaBvHnKIn
-Пелеверши захочи okулари abo npozopni UNTOK
-PyKaBnCiIJIa3axNcTy npi nIIaHHi
- ΒтандялэхиctуnpnнлянHi
-BVKOpncToByuTe BiINoBiHn 3axncT Jny pyK.
B3yTTJ 3axnCTy npn nHHi 3i cTaJIeBIM HOCKOM Ta HeCJN3bKOIO niOoBOIO
-3aBHHn TpHMaHTe anTeUky niD pyKoIO.
- BorHerachnikiJonaTka
Y3araJI OJrI NOBHeH ⅢJIbHO 06JaTaN TiNo, aJe He 06MeHyBaTn CBO6Ody pyxy.
BAHJIIBO! Bi, nIbHOi WnHn, IaHIOra YI iHxN DeTaeJ nnKm MoHyTB BiLiTaTN icKpn. KaO e noTpe6a B 3ac06ax racinHn noHeHH, ix CliD o6OB'ra3KOBo MaTu. He dOnyckaIte BnHnKHeHHn Jicobnx noXeH.

YBAI! Po6oTa Ha BncoTi KpoHn
depeBa Bmarae BnKOpncTahHn
cneiaJbHnx MeToiB NIIaHH Ta
IHnx Texhik po6oTu, kNx cIiD
IoTpmyBaTncy, 06 yHnKHyTu
niDbNlSeHOro pN3NKy TpaBMyBaHH.
CnpaJxHnHaIJIa6e3neuHoi p060Tu
B zuomy po3diOnncyOtbc o06nIbocsti 3axnCHoro cnopdHexHH iHCTpyMeHTa Taix yHKu. CTocOBHO nepeBipKn dOrJy DNBIbCn IHCTpyKu y po3diN iN 3arolOBkom 'PepeBipKa, DORJa Ta 06cnyroByBaHH 3axnCHoro cnopdHexHH IaHIOROBoi NIKN'. DInBiTcN IHCTpyKu nn 3aroLOBKom 'Io e Io?', 0o6 3HaNTN, De ci yacTHHN po3Taawobani Ha Bawomy IHCTpyMeHTi.
TpBnIicTb cny6n iHcTpmy MoHe 3MeHnITncs, a He6e3neKa HeaacnX BnnaKIB 3pocTn, kNo Ioro o6cLyroByBaHH npoBoNTn HnpaBnIbHo, a6o kNo 06cLyroByBaHH Ta peMOHT BnKOHyBaTMyTbcr He faxiBzMn. KNo Bn notpe6yeTe doaTkOoiHfOpMaui, 3BepHiTbcr, 6yNb Jnacka, dno HaN6nnHqOro ceHTpy 06cLyroByBaHH.

YBAI! Hikoln He KopncTyTecr
iHCTpyMeHTOM i3 HecnpaBHIM
3axnCHm cnpaJHeHHm. Tpe6a
nepeBiprTa dOgIaTaN 3a
3axnCHm cnpaJHeHHm. NbiTBcR
iHCTpyKuII nD 3arOJOBkOM 'PepeBipKa,
DOJI Ta o6CnyROByBaHHra
3axnCHoro cnpaJHeHHaHIOROBoi
nIKn'. RaIo Baw iHCTpyMeHT He
npoxoINTb Bci nepeBipKn, BiINpaBTe
Ioro Do ceHTpy o6CnyROByBaHHa IJIpeMOHTy.
JaHcIyOrOBe ralbMo Ta KOnHyX IJIa nepeDnBoi pyKn
Ba7a LaHcIOrOBA nINKa 06laHaHa LaHcIOrOBIM raIbMOM, IKe npI3HaueHe IJy 3ynHKn LaHcIOray BInpaNky BiJaChi. LaHcIOrOBe raJIbMo 3MeHwye
pN3NK HeuacnX BnnaKIB, aJIe TJIbKn Bu MoHeTe 3ano6irTuix. (3)
БудTe 6epeHHi, BnKOpncTOBvOuN BaWy nIKNy, Ta BnEBHInTeCb B Tomy, 0o 3oHa BiIaChi HanpaBJIauOoi WnHn He TopKHeTbcra 6yDb-ЯKOrO 06'ekTy. (4)
JaHIOROBe rAJIbMo MoHe aKTHyBaTnCBApyHy (JIbOIO pyKOIO).
-ΓaIbMo noUHae npaUOBaTH npn HaTnCKaHHi nepeHbOro 3axnCHOro uNTKa Bnepe.
-Pyx aKTHBye MexaH3M, 0o nI dieOpnyHHN 3ynHRe BeDyue 3y6AcTe KoJecO.
KoHux IJIa nepeHbOI pyKN He npn3HaueHn cneiaJbHo IJIa AKTNaBaui JaHIOROBO raIbMa. IHIO BAJIbBOIO oO6JIbICTO e Te, IO BIn 3MeHwye pN3IK yApy NaHIOrOM Baoi JIBOI pyKN, kIO Bn BNynCTnTe nepeHHe pyKIB'
-ДЯВIMKHeHHЯHcIgOrOro raIbMa notaHiTb KoJyX IJIЯ nepeHbOi pyKn Ha3aJ y HanpMydo nepeHbOro pyKIB'
JaHcIgOrOBe rJIbMo Ma6yTN 3acTocBaHo, KOJI NaHcIgOrOBA NIIka 3anyckAeTbcra.
BnKOpncToByIe IaHIOROBe raIbMo npn 3anycKy Ta KoJI IN nepexoINTe 3 MicrHa MicCe IJRA 3MeHHeHHraP3NkY TpaBMn IaHIOROM, IO pyXaTbcR, HOrn a60 6yDb-Koro YN 6yDb-YOro nopyu i3 Bamn. (5)
·BiДачma MoHe 6yTu panTobOTo Ta duYe cnIbHIO. Y 6iIbwoocTi BnnaKIB BiIdaHa He3HaHa N LaHcIroBe rAlbMo He 3aBxDi n aKTINByeTbcr. RaKoUe TpanNTbcr, Bam Tpe6a MiCHo TpIMaTI NaHcIuroBy nIIky Ta He BInyckatn II.
Xi pyuHoi akTnBaui IaHIOROBOIraJIbMa 3aJIeKHTb BiD cINi BiIaui Ta noIooHeHHa IaHIOROBoI nIIKn BiIDHOcHo 06'ekTA,Ha JIKI Dii 3oHa BiIdaui WHH.
-Якwoи BiДача He nyhe cnIbHa YI 3OHa BiIaHi HanpaBnIyooi WInH6JIHHe BCboRo Do Bac,To IaHIOROBe raIbMo 6ynde aKTHBOBaHo BpyHy pyxom JIBoI pyKn. (6)
- Y noJIOHeHHI 3pi3yBaHHNJIIBa pyka 3HaxOJNTbcraB No3nui, KOJIN pyHa aKTNbauia JAnHcIgOrBOrO rAInbMa HEmoKJInBa. Ipn TaKOMy 3axBaTi, To6To KOJIN JIBa pyKa po3TaioBaHa TaK, IO BOHa He MoJne pyxATN KOHX dJa nepeDnBoipyKn, JaHcIgOrBe rAInbMo MoJne 6yTNIkbKn aKTNbOBaHe iHepciie. (7)
UH3aBKnMo pyKa aKTiByBaTnMe JaHcIroBe raJbMo npN BiJaqi?
Hi.Heo6xinda DeJa cnila dIy TorO,063pywnTn KOJyXdJInepeHbOi pyKu BpeE. Jkso Baawa pyKa TjBKn JLERKO TopKaetbCra KoJyxa dJI nepeHbOi pyKu YN cKOB3ae NO HbOMy,CJIN MoKe 6yTN HeDocTaTHbO dJIa TpInepa JaHcIoroBOro
raIbMa.Bn TaKoH noBHHi MiHcHo TpIMaTn
laHIOROBy NIKy KOIN npaIOeTe. JIIO Bn
npaIOeTe Ta BiIDyBaTe BiIDaCy, BaSa pyKa MoHe i daJI TpIMaTn nepeHne pyKi'B' Ta He aKTbBye
laHIOROBe raIbMo, a60 laHIOROBe aKTbByeTbcr
TIbKn NicJrTOr, k LaHIOBOBa NIKKa
KaUHeTbCn Ha 3HaChy BiIDcTaHb. Y TaKx BnJaKax
laHIOROBOMy RaIbMy MoHe He BnCTaHTn Yacy
3yNInHTn laHIOROBy NIKy, 06 BOHa He
TopKHyIacb Bac.
IChyIOb TaKOH DeKiJIbKa no3nui, y aKnx BaWa pyKa He 3MoHe DoC8rTu KOHyxa IJa nepeDnBoi pyKn, uo6 akTnByBaTu NaHcIgOrBe raJbMo; HanpIKJaD, KOJI NaHcIgOrBa nIIKa 3HaXoDnTbcra y noLoKeHHi 3pi3yBaHHa.
Yn 3aBKn iHepui aKTHuBaTnMe IaHIOROBe raIbMo npN BiJaqi?
Hi. No-nepwe, Baawe raIbMo noBHHo 6yTu B cnpaBHOMy cTaHi. No-dpyre, BiJaDaHa noBHHa 6yTu DocTaTHbo CnIbHO IJIra TOrO, Uo6 aKTbByBaTu LaHIOROBe raIbMo. RaUo H JaHcIroBOe raJIbMo 3aHaTTo uYrJIVe, BOHO 6yDe aKTbByBaTncr DyHe qAcTo, 0o 6yDe He3pyuHm.
Yn 3aBHNMOe JauHIOROBe RaJbMo 3axNCTNTb MeHe BiTpaBMn y BInnaKy BiJaayi?
Hi. No-nephe, JauHIOROBE raJIbMo NOBHHO 6yTu B cnpaBHOMy cTahi dIJI TORO, 0o6 HaaTn nepei6aueHm 3axnCT. No-dpyre, BOHO Mae 6yTu aKTHBOBaHe npN BiJaay KOncaHo BVuE, 0o6 3ynHHTn LaHIOrOBy NIKy. No-TpeTe, JauHIOROBe raJbMo MoHe 6yTu aKTNUBOHaE, aJe kIoo HapabJraUOa IINHa Dnyke 6ln3bKO Do Bac, Bawomy raJIbMy MoHe He BnCTaUnrY acy, 0o6 cNoBIbHHTn Ta 3ynHHTn JaHcIg Do TORO, Jk JauHIOROBa NIIka TopKHeTbcBac.
TilbKn Bn Ta HaJeHHa TexHoIorig po6oTu MoHe 3MeHUnTI BiJaCuY Ta II He6e3neKy.
3ano6iHHNK
3an06HHK yHemOHJNBLIOe HeHaBMnCHe
HaTnCKaHHHa KypOK-BMnKAu. HaTnCKaHHHa
3an06HHK (A) (HapnkJa, KoJIi BN 6epTe
iHCTpyMeHT 3a pyKi'B' ) 3Himae 6IokyBaHHK KypKaBmHKaaya (B). KoJIi BN BiIynckaepe pykIB', KypOKBmHKaTu Ta 3an06HHK nobepTaIObCra Do CBOIX
noaATKOBHX noIoHeHb. (8)
YJIOBJIIOBaU NaHcIOra
YIOBJIIOBaU NaHcIora npn3NaYeHm IJrTOr, 0o6 He daBaTn pyXaTncra NaHcIory daji, JaKIo BIn po3pNBAeTbcra YI 3HImaeTbcra. Take He BiID6yIeTbcra, Jkso NaHcIor HaleHHo HaTaRHyTu (INbITbc IHCTpyKcii y po3di ni3 3arOJIOBkoM 'MoHTaK') Ta npn HaJeHHOMy o6CJyROByBaHHi Ta DOrJaDi 3a HanpaBJIauOio uHHoTo Ta NaHcIqorom
(ДиВiTbCЯИСТPyKUy y po3ДлNiID 3aR0JIOBkOM '3araIbHi IInCTpyKUII JIЯ po6OToN'). (9)
KoJyX IJI npaBoI pyKn
Okpim 3axncty Baowoi pykny Tomy BnnaKy, KoJIn IaHcIg po3pmbaetbca 3hiMaetbce, KOxyn IJIpaBoi pyKni 3axnuae BiI KOHTaKTy 3 MaJIMn Ta BeJIKMN rIikamn BaWy pyky Ha 3aAdNbomy pyKIB". (10)
Bi6paUii
Ipn 3pi3yBaHHi DepeB i3 TBepdoIO DepeBnHOIO (6iNbWicTb WnpOKoJncTnx DepeB) Bi6pauiy 6iNbwe, yIM npn 3pi3yBaHHi DepeB i3 M'RAKOIO DepeBnHOIO (6iNbWicTb XBoHnX DepeB). 3pi3yBaHHraPiKuHM cnopraJKeHHaM, JaKe Tyne YN noWKoJKeHo (He npabNtBHorO TIny YN noraHo 3arocTpeHo), 36iNbWntb pBeHb Bi6paui.

YBAI! 3a HoDnX o6cTaBnH He 3mHIOIe KOHCTpyKuII IHCTpyMeHTy 6e3 Do3BOJy BnO6HnKa. 3aBKn KOpNCTuTecr OpNIGHaJIbHIMM 3anUacTHnAmu Ta npNlaDЯM. 3acTOcyBaHHr Heo3BOJeHx MoiΦiKaui Ta/a60 npNlaDЯ MOnHe npN3BeCTn Do cepNo3HoI cMepTeJIbHOiTpaBMn KopNCTyBaHa qn iHnx oci6.

YBAI! Y JIOe, RKi MaOToB
noripweHn KpOBo06ir, HAdMipHa
Bi6paJr MoHe yUkOJNTn HepBOBy
cNCTeMy a6o cNCTeMy KpOBo06iRy.
JaKIOy BAc npoRAJIOTbCra CmNTOMn
BpaJHnB Bi6paJciEo, 3BepHiTbCra Do
JIkapA. Do TaKnx CmNTOMiB
HaJeHaTb: OHIMHH, BTpata
CyTJINBOCTi, NOnuNyBaHH,
NOKOLIOBaHH, BTPaTa CInN, 3MiHn
KOJIbOpy a6o cTahy WkIpN. RaPabNJIo,
Li CmNTOMn npoRAJIOTbCra y
naJIbCx, pyKax Ta 3an'AcTkax. Li
CmNTOMn MoHyt b 6yTu
YCKJaADHIOBaTNCr npn Hn3bKnX
Tempepatpax.
Pikyu cnpaJKeHnA
UbMy po3diI noRcHeHo, Rk BN6paTn Ta IOrJaTaN 3a piHcyHM cnopJdHeHHM, 06:
- 3MeHsuIte pN3NK BiJa.
3MeHnyTe pN3NK po3pNBy qN 3icKaYBaHHaHaHcIgra NJIJKN 3 HapabJIyOyoI uHH. - DocraTe onTImaJIbHOro pe3yJbTaTy y po60ti.
- npoOBHHTn TepmiH cIyHK6n pIXyOro npJnaJa.
- YHnKaIe 36iJIbSeHHpaBHa BiPaUII.
3aŋbHn paBnla
KopnteyTea JIe pinyuHm CnpAHeHHAM, 0pekomeHDoBaHe HAM! Ihctpykuii DnBiTbcn iD 3arolOBkom 'TexHiHaHaI'.
Piyuyi 3y6zi IaHIOra noBHHI 6ytN HaJIeHXo HarocTpeHI! DoTpmyTEcra HauX iHcTpyKci Ta BnKOpncTOByTe HAnIOK peKOMeHDoBaHO rO p03mipy. HenpaBnJIbHo HarocTpeHr Nn OoKOJKeHn JauHcIg 36IbSyE He6e3neKy HeuaChNX BnnaDkIB.
CTeHTe 3a npaBnIbHOIO rIIN6HIOHO HaroCtpoBaHH! DoTpmyTecsHaNX iHcTpyKci Ta BnKOpncToByiTe peKOMeHIOBaHy rIIN6HNY HaRoCtpoBaHH 3y6ciB. 3aHaJTO BeJIHKN 3a3op 36IJIbWye pn3NK BiJaqi.(18)
CTeTe 3a HaJeHHM HaTgOM LaHOra! RaKoIaHOr npOBnchHyB, BiH 3icKOHTb Ta Ce npN3BeDe K 36iJIbSeHHO 3Hocy HapBaJIHOoI uHN, JaHOrTa ta 6apa6aHa npINBoy. (23)
CTeHTaTMM,io6piKyuCnopJHHeHH6yI0 Do6pe 3MaSeHo Ta HaJeHHo IOrJaTaTe 3a Hm! PoraHO 3MaSeHn LaHcUor MoKe po3ipBaTtca Ta ue npu3BeDe K 36JIbWeHHIO 3Hocy HanpaBJIauOoi WHN, JaHcUra Ta 6apabHa npINBOdy.
Pikyu cnpaJxHn npn3HaueHe IJI 3MeHsEHn BiJa

YBAI! NpokoJHe pinye cnopdHHeHHa Hn HnpaBnBHa KOM6iHaCiHa nHaPaBnAoyoi WnHn Ta IaHcOra nnKn 36ilbWye pn3NK BiDnai! BnKOpncToByTe TlBKn Ti KOM6iHaCII HnPaBnAoyoi WnH/ NaHcOra nnK, 0 peKoMeHDoBaHi Ham, Ta DoTpIMyTEcR iHCTpyKu3 HarocTpOBaHH. IHCTpyKU2 DnBiTbcr niD zaroJIOBkOM 'Texhui DaHI'.
EduHM 3ac06om yHnKHeHH BiiJaCi cTeHeHHa 3a Tm, 5o6 3oHa BiJaChi He TopKaJlac8yDb-Quro.
BnKopncTOByOu npHcye cnpaHHeHHa 3 "B6yIOBaHm"3MeHSeHHaM BiJaui CJIkyBaHHa 3a TIm, 0o6 LaHcIg 6yB 3aBHNrOCTpIM, Ta HaJeHHN DOJIA 3a HIM MoKe 3MeHHTN eΦeKTN BiJaai.
HanpaBJIyOua ⅢHa
YIM MeHwpe paDiyc KInuKa HanpaBlaIooi uHH, TMMeHwa mOBipHicTb BiJa.
JaHcIg
JaHcKJaJaTaBc3 neBHOi KjBkoCTi JaHoK, icHyOt b CtaHapTHi BapiaHTn Ta BapiaHTn 3i 3MeHseHOIO BiDaueIo.
BAHJIIBO! He icHye TaKoi KoHcTpkyiIaHIOROoI nnIKN, 0o BnKJIouyae He6e3neKy Bi,dayi.

YBAI! Byb-RAKNI KOHTaKT i3 NaHIOrOM NINIKN, 10 o6epTaEcTbcra, MoHe npn3BcTeN Do DyHe cepno3HNX TpaBM.
TePmH, 0o onncyOHTb HnpaBnaouy uHy Ta NaHcIor
ДяЗ6e3neHЯ 6e3neKpiHyoro cnopdHeHH Heo6xIDHO 3aMHOBaTN 3HoWeHy cy noKoJHeH HnpaBnaOuy uHy a6o JaHIOr TiIbKN KOM6HaCiMn HnpaBnaOoyoi uHN Ta IaHOra, opeKoMeHDoBaHi Husqvarna. IHcTpyKu i DnBiTbcN iD 3arONoBkOM'TexHiYi daHi' cTocOBHO cnNcKy KOM6HaCIHnPaBnaOyoI uHN Ta IaHOra, opeKoMeHDoBaHi HAM.
HanpaBnIyua nnHa
-IOBHHHa(HOMM/CM)(12)
KijbkicTb 3y6iHa 6apa6aHi HanpaBlaHoyoi uHHn (T). (11)
Kpok IaHIOra (IIOIMN) BiicTaHb MiH NaHKAMn npINBOy IaHIOra MaC cnIBnaATN 3 BiIC TaHHIO mK 3y6amn Ha 6apa6aHi HanpaBJIaOoi WInHn Ta 6apa6aHi npINBOy. (13)
Kilbkicb IaHOK npBDOy. KIbKicTB IaHOK npBDOy Bn3HaayeTbcra DOBHHHO HapabJIauOoi WnHi, KpOKom IaHcUora Ta KJIbKicTIO 3y6IB Ha 6apa6aHi HanpaBIAuOoi WnHi. (15)
- 於HnHaKanBaBnHa npaBJIyOoi ⅢHn(IIOHMN/ MM).KaHaBka Ha HnPaBJIyOuYi IINHi Mae cnIBnaDAtNi i3 ⅢHnpHNO JIAHOK npNbOdy JNaHcUra.
- OTBipДлmaMactnlaДлЯJaHcIoraTa o TBipДлЯ HATryBaayaJaHcIora.HanpaBlyooyaShHaMae BiNoBiAtN KoHcTpyKciJaHcIyOrOBoI NlKN. (14)
JaHcIOT
Kpok JanaHua (13)
-ⅢnpHaJaHKn npNBoNy (MM/DIOHMN) (16)
- KijbKicTb naHOK npBOny. (15)
HaroctpeHHaHcHora Ta peryIIOBaHHra IINbHn BiicTaHi MiX 3y6amN

YBAI! 3aBHHKopncTyntecpyKaBnCmnpno6To3 JaHcIOrom.
3araIbHa iHΦopMaIg Ioo HArOCTpeHHpaHyuX 3y6iB
HikoJn He KopncTyIeTcA Tynnm JaHcIyOrom. KoJn JauHcIg TynN, Bam noTpI6Ho YHHNTu 6JIbSe TnCKy IJa TOrO, 0o6 HapBaJIyOua 7Ha npoxOJna Kpi3b DepeBO Ta TpICKu 6yDyTb DyHe MaJIIMn. RaKIo JauHcIg DyKe TynN, BIn 6yDe cTBOpIOBaTN DepeBHN nIN 6e3 TpICOK Ta cTpYHK.
- Tocn Hauon npopy6yeTbcKpi3b DepeBo Ta cTBOpioe DoBri, TOBcTi Tpickn a6o cTpyHKN. (17)
Pikyuca yacntHaJaHcIgora Ha3NbAeTbcra fpe3oTu TaCKlaaTeBcra 3 pikyuix 3y6uB (A) Ta oTBopib MiHNMI (B). Pikyuca rIn6nHa fpe3n Bn3HauaeTbcra kpi3HnCiMiX BnCOToIO DBox 3y6uB (rIn6nHa npOHKnHeHHa pikyuoro IhctpyMeHTy). (18)
Pn roctpiHhi pinyo 3y6a Tpe6a nam'raTn npo YoTnpu BaHJIbI foAKTopn.
1 KyT npn roctpiHi (19)
2 KyT pi3aHHn (20)
3NoJnoHn npri roocpiHHi (21)
4ДiAmeTp KpyrIoro Hannka (22)
DyHe BaJko HaroocTpntuHaHcIOr npaBnIbHo 6e3 npaBnIbHoro cnpaJKeHHa. Mu peKoMeHdyeMo Bam KopncTyBaTncsHaHm KpyrIm HaHnIKOM. LcdoNOMoHe Bam MaKcMaJIbHO 3MeHUnTI pN3NK BnHKHeHH BiJaTa oTpMaTu HaKpaui pe3yIbTaTu y po60ti.
Ihctpykuii nBtbcn iD 3aroJIOBkom 'TexHiH daHI CTOCOBHO HOpMaII npo HarocTeHHaHcUora.

YBAI! BiDxHHeHH BID IHCTpyKciu ⅢOIO HArOcTpEHH 3HaUHO 36JIbWye pN3NK BHNKHeHH BiDiayi.
TocpiHH pixyuoro 3y64
Для HaroctpenHЯ piHyoro 3y6Za Bam Heo6xidHi KpyrI HAnJIOK Ta npncTocyBaHHra IJIy
O6MeHexHЯ rIi6Hn npOHKnHeHHa piHyoro
IHcTpymeHTy. IHcTpkyu II INBtbc niD 3arOJOBkOM
'TexhiHi daHI' cTocBHO iHOpMaii npo po3Mip HanIIka Ta npicTocyBaHHa Ila o6MeKeHHra IIN6HH npOHKnHeHH pIKyOro IHcTpymeHTy, OpeKoMeHDoBaHe Ila naHcIora BaWoI nnKN.
-NepeBipTe,06 LaHcIor 6yB npaBnIbHo HaTgHyTNI. NoraHO HATrHyTNI LaHcIor 6yJe
pyxatncy6ik Ta ue ycklaHHTb npaBnJIbHe HaroctpoBaHHra. (23)
3aBHHn HaroctpoIte pinyi 3y6eUb i3 BHyTpihboi noBepxHi. 3MeHunTb TnCK npi 3BopOTHomy pci. Haroctpnte cnoatky Bci piHuyi 3y6u i 0dHoCTopoHN, notimpeBepHiTb IaHcTOBOv IIJky Ta Haroctpnte 3y6u i Inwoi cToPOH. (19)
HaroctpionTe Bci 3y6ci oHaKoBO.KoJIN DOBHHa pIKyUro 3y6cI 3MeHHTbcr Do 4 MM (5/32"),JaHcIcr CTae 3HOWeHm Ta Ioro Tpe6a 3amIHITn.
3araIbHa npopa cTocBHOpeyIIOBaHHraHnHnHarocTeHH
KoJn Bu HaroctpIoTe piny 3y6eIb rIi6HnHa HaroctpeHHa 3MeHuyIbIc. IJa onTImaJIbHOro 3pi3yBaHHa HaroCTpeHHa MaI 6yTu 06po6JIeHa IJa IocrHeHHa peKOMeHIOBaHoro 3HaueHHa HaroCTpOBaHHa. IHcTpkyIi DnBiTbcraPi d 3arOIOBkom 'TexHiDiHa' cTOcoBHO npabNlBHOI rIi6HHa HaroCTpeHHa BaWOr oIahUora. (24)

YBAI! Pn3nk BiDaui 36ilbyeTbcra, kio rnnHa HaroCTpeHHaHaTo BeNka!
PeryIIOBaHHraIINH HaroCTpeHHa
Piyuyn3y6eB Ma6 6Tu3aHOBo HaocTpeHn nepeJ peYIIOBaHHaM rIi6HN HArOcTpeHHa. Mn peKoMeHnyeMo Bam peryIIOBaTN rIi6NHy HarocTpeHH npKoXHomy TpeTbOMy HarocTpioBaHH pinyuNX 3y6uiB.3BEPHTb YBA!U peKoMeHdaui Donycka, zo DoBHHa piXyoro 3y6u He 3MeHseHa HaIdMipHo.
Bam 6ydyb Heo6xHnI pIaCKn HAnIOK Ta npNCTOCyBaHHa IJIa O6MeHeHHraIINHn HaOcTpUbaHH. Mn peKomeHdyEmo Bam KopNCtYBaTcnaHaIIM npNCTocyBaHHaIJIa O6MeHeHHraIINHn HaOcTpUbaHHaJIa DoCraHHeHH naPaBnIbHoI rIn6uHn Ta qackn HaOcTpeHHa.
-Покладыпсntocувань Ддя оменинглбинн HaroctpoBaHn Ha LaHcIog.Детаьн ha iHopMaiz ydo BnKOpncTaHn npcTocyBaHHДл o6MeJehn rIi6uHn HaroctpobAHn 3HaxOuNbCra Ha Kopo6ciДл npcTocyBaHHДл o6MeJehn rIi6uHn npoHkHeHH pIKyUro IHCTpyMeHTy. BnKOpncToByte nJaCKn HAnlOk npiroctpiHni 3a DonOMorIO npcTocvBaHHДл o6MeJehn rIi6uHn HArocTpOBaHH,ЯК npoxoNTbYepe3 HboRo.ΓIi6Ha HArocTpOBaHHe npaBnIbHoIO,ЯKso Bn He BiDyBaTe HiRAKO npOTuDi, KoIN HanlNoK npoxoNTb Yepe3 npcTocyBaHHДл o6MeJehn rIi6uHn HarocTpOBaHH.(25)
HaTg IaHcIora

YBAI! IoraHo HaTaryHtyn JaHcIOr MoHe 3iCKoUHT Ta npN3BecTN Do cepNo3HOrO Yn CmepTeJbHOro TpaBMyBaHH.

YBAI!CJIi3aBKnBiEHyBaTn npncTpi BIDJHepeJa KINBLeHHHa Ha ac 3bnpaHH, nepeBipKu Ta/Un TexHiyHoro o6cLyroByBaHH.
YIM 6Ibwe Bn KopncTyEcB JaHcIgOM, TmIDOBwe BIn Ctae. Tomy BaKJIbO peryJApHOHaTAYBaTN JaHcIg, 06 BiH He npOBuCAB.
Iopaa npn doJIbHaHi MaCTnla JnaHcIora nepeBipraTe Ioro HaTЯ. YBAFA! U HoBOi nIIKne nepioD npnPpauCbOByBaHH, npoTAROM AKOHOHaTAR cnId nepeBipraTu cactiwe.
HaTgHnTb NaHcIg TaM cNlBHo, JK MoHJIbBO, aJe He TAK, 06 He MoKHa 6yNo Ioro npOBepHyTu pyKoHO. (26)
-ПослбTe pyuKy,po3rOphByBwHII Ha3OBHi,IOKN BOHa He po3KpNeTbCЯ i3 KlaUaHHaM.
-NoBepHiTb pyuKny npoTu rOAnHHNKoBOi CTpiIKN, 06 3BiIbHNTn KpUkky npuBoDHo ipoUKN.
-BiDperyIIOHeHaTgJaHIOra,NoBepTaOuHnHaTJXHe KOleco JaHIOrA BHN3 (+) ,0636JIbHINTnHaTAR,a6oBropy(-),063MeHHTnHaTAR.(A-B)
HaTnHItb 3uenHeHH Ha npaBnaIoooi HnH, NOBepHyBwn fikcyuoy roJibky 3a RoDINHHNKOBIO cTpJIkoio.
BctaHObitbHaMicuephiKcyOuy roJIBky IJI 6IokyBaHHHaTary.
3MaCyBaHHpaixyOcnpaXeHH

YBAI! NoraHe 3MaUyBaHHpaHpyo cnopJxHnMoKe cnpuHHTn POaPbJaHcUra, Jo MoKe npN3BecTn Do cepNo3HOi Hn HabITb CmepTeJIbHOI TpaBMn.
MactnoIJIaHaHcUora
MaTnIo IaIaHIOra NobINHO IO6pe 3MaUyBaTn IaHIOr Ta TaKoX 36epiraTu CBoI BLnactNBOcTi He3aJIeJHo BiD TorO, TenJa NiTHry XOJIoHa 3IMoBa nOgDa 3apa3.
HikoJNe He KopncTyTecr BiDnpaCboBaHm MacTnIOM! BnkOpncTaHnB BiDnpaCboBaHo r MaCtnJa MoHe 6yTu He6e3neuHO IJLa Bac Ta HaHocNTn ShKOdy IHcTppyMeHTy Ta HABKOJIINHbOMy cepeDoBVnUy.
3anpaBJIeHHMaCTNIJOMIJIaHcIOra
YciHaiiHaIuIIOBIINJIKMaIObABToMaTuHy CnCTeMy3MaUyBaHHJaHcIora.HaJeKnx MoJeIax HaIXoJHeHH MaTtJLa TaKOH peryIioEbcra. (27)
-Повноpe3epeByapydoctaTHboДлЯ15 XBNINH cta6iNbHOpo60Tu.
HikoJn He KopncTyuTecBiDnpaBoBaHm MacTNlOM. Lepn3BeJe Do noIOMKn MaCTNJIbHOHaCocA, HAnpaBJIyOoI uHHn Ta JlaHcIora.
- BaHJIbBO BnKOpncToByBaTu MaCTNo npaBnIbHoro TeMnpaTypHOro peHHMy (i3 BiNobIDHM noKa3HkOM B'ra3KocTi), 0o BiNobIdae TeMnpaTypi nobITpJ.
- Pn TemnepaTypax HnKue 0°C (32°F) DeaKi MacTNJa cTaIOb DyHe B'3KIMN. Ce MoKe npn3BecTn Do nepeBaHTaHexHnMaCTNJbHOro Hacoca Ta noWKoDNTu Noro eJeMeHTN.
-3BepHiTbcraIIO cHTpy 06cIyroByBaHHn npinid6opi MaCTnla IJnaHaHcIora.
IpeBipKa 3MaUyBaHHNaHcIogra
CnpaMyTe HocNK uHH Ha nobepxHIO CBI TIOro KoIbOpy Ha BiDcTaHi npN6Ln3Ho 20 cm (8 IouMIB). 3a XBnInHy po6Ot N NobHicTIO BIDKpntO IoPoceJIbHO 3acLIHKOIO BV MaTe nO6aHTN LiHiO OJINBn Ha cBiTIi NOBepxHi. (28)
KuO 3MaUyBaHHaHcIgA He npaioe:
- NpeBipTe, 06 KaHaI Jnla MaCTnla Ha HnpaBJIyOuI uHHi He 6yB 3a6ntn. PpocTITb y pa3i noTp6n. (29)
-ПepeBipTe,иб KaHabKa Ha KpaUci HnpaBJIyOoi 6uHa YnCToH. PpOuNCTiY pa3i noTpe6n. (30) - IpeBipTe, 6apabah HnpaBJIyOoi WnHn o6epTabc BiIbHO Ta 0oOTbip JIa 3Ma7yBaHH Ha 6apa6aHi He 6yB 3a6ntu. PpocntiTa 3MaCTiTb y pasi notpe6n. (31)
KIO CNTema 3MaUyBaHH NaHIOrA BCE He npaioe nicna BnueBka3AHx nepeBipOK Ta iin, 3BepHiTbCn Do cHTpy o6cIyRObyBaHH.
Bapa6aH npNBOy JAnLOra
CnCTema npBOnyMiCTNTb npNBiDHe 3y6uAcTe KoIecO. (32)
PeryIaRHO nepeBiprTe cTyniHb 3Hocy 6apa6aHa npBOy. 3amHtby pa3i HaMipHoro 3Hocy.
IpeBipriTe 3Hoc pinyuOro o6laHaHHa
IooeHNo nepeBipraTe IaHucor Ha:
- HЯВисТь ВДИМИx TpiИн Ha 3aKJIeNКax Ta JanaHKax.
-4n He norahe 3rHaetbca JaHcIg.
- He cnJIbHo 3HOoWeHi 3aKJenKn Ta JIaN.
3aMHITb IaHcIg npn HaeBHocTi BnueBka3aHnx deekTIB.
Mn peKomeHnyeMo Bam nopibHrT ToJ NaHcIg, 0BnKOpNCToByeTbC8, 3 HOBIM LaHcIgOM, 06BnpiHTn HacKiJIbKn Baw NaHcIg 3HoWeHn.
KoJINIOBHHHa pIKyUO 3y6cA cTae 4 MM,JaHcIOTpe6a 3amHHTN.
HanpaBnIoua nnHa
PeryIpaHNo npeBipraIte:
- Yu Hemae HepiBHoCTe Ha KpaIkax HanpaBJIyOoi uHH. BuaJIiTb ix HanNikom y pa3i Heo6xHocTi. (33)
- Yu He cnJIbHo 3HOseHa KaHaBka HnPaBJaIOoI uHH. 3aMInHb HanpaBJaIOuY uNHy y paSi Heo6XiHocTi.
- He CTab HepiBnM a6o cnIbHo 3HoWeHm KInyHK HanpaBnaOoi uHH. JKIo yTBOpoeTbcn nopoxHeu Ha HnHi cTopoHi HanpaBnaOoi uHH, ue BnHkae BHaCniDOK noraHoro HaTary NaHcUra. (34)
- ⅢO6 npoOOBHnT TepMIn CJIyHb6n HAnpaBIAIOoI ⅢHH, Tpe6a nepeBepTaTn ii 0doHNo. (35)

YBAI! BiIbIcTb HeuacHIN BnAaKIB npN KopNCTyBaHHI NaHcIroBOIO nIKoB BuHnKae ToDi, KOJI NaHcIg TOpKaeTbcR KopNCTyBaHa.
KopncTyTecr oc6nctm 3axnchm cnopraHHeHHM. IHCtpykuI dNbiTbcy y po3diPi ni3 3arOJIOBkOM "Oco6ncte 3axnche cnopraHKeHHa."
He 6epitbcra 3a 6ydb-ky po60ty, kki Bn, kBBAHaeTe, He HABueHi HaneHHM YINOM. IHCtpykii DNBiTbc rni 3arOIOBkAmN'Oco6ncTe 3axnche cnopdHexHH', 'K yHNKHyTN BiDaaYi, PInyue cnpaJHennHa Ta 3araJIbHi IHCTpykuI dIpa po60Tu.
YHnKaTe cntYaui, KOJI icHye pn3NK BiDaui. IHcTpkyuII DnBiTbcy y po3diNi iI 3aIroJIOBkOM 'CnpaJxHeHHa IJa 6e3neuHOi pObToN'.
BnKOpncToByTe peKOMeHDoBaHe 3axnche cnopraJxHReHH Ta nepeBiprIte Ioro cTaH. IHCTpyKuii DnBiTbcra Ni3 3arOIOBkAmN'TexHiHi DaHi' Ta '3araJIbHi npaBnla 6e3neKn'.
IpeBipTe, yci eJemeHTn 6e3neKn LaHcIgOrBOoi nJIKN 6yJN cnpaBHIM. IHCTpyKcii nBiITbcn iD 3arOJIOBkAmn '3araJIbHi IHCTpyKcII nJa po60Tu Ta '3araJIbHi npabuJa 6e3neKn'.
HikoJI He BnKOpNCToByTe NIKy, TpIMaOuN ii Nlle oDHiEo pyKOIO. NaHcIOrOBy NIKy He6e3neUHO KOHTpOJIbOBAtn Nlle oDHiEo pyKOIO. 3aBHNiMiUHO TpIMaNTe pyKIB'o60Ma pyKaMn.
YcTaHOBKa HnpaBJIyOyoI ShHH Ta JnHciIgA
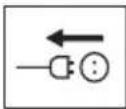

YBAI! 3aBxN KOpNC TyTecy KaBnCmnp np po6To 3 NaHcIOrom.
- IpeBipTe, 06 LaHOrOBe rAByMo He 6yNo B noLoHeHHi AKTnBaui, WToBXHyBwn KOHyx DJIa nepeHbOi pyKu y HaprMOK nepeHbOro pyKIB'。(36)
3HIMITb fikcyu rojibky, 0o KpiNTb Kpnuky 3eHNHeHHaHIOrOBe raIbmo).3HIMITb KJIbue Ira TpaHCnOpTyBaHHa.
HaJrHtB uHy Ha 6oHT. YcTaHOBiTb uHy B ocTaHHIO 3aHIO no3uIio. 3aYeIiTB IaHIO r3a BeDyUy 3ipOuy Ta BCTaBTe NOrO B na3 Ha uHi. POnuHaIte 3 BepxHboI yacTnHi uHNi. - YneBnHtbcra, 0o KpaKni piHyuX JaHoK rJaTb Haropy Ha BepxHi KpaLi HanpaBnIoooi HIN.
YcTaHOBIbHa MicCe KpnWky 3uenHeHH Ta He 3a6yDbTe BcTaBnTn WNTnFT peryIaTopa
JaHOra B OTBip y uHHi. NpeBipTe, o6 BeDuyi
JaHKn JaHOra npaBnIbHo 3aUenJIncb 3a
BeDuy 3ipoOky, i HaNtOr npaBnIbHo
po3MicTnBCB B Naay uHH.
HaTarrHtB JaHcIg, noBepHyBwn KoJIecy DoHN3y (+). HaTarrHtB JaHcIg, nOKn BiH He 6ynde npOBuCaTu 3i 3BOpToHo i CTOPOHn HappaBJaIOUOoi WHH.
JaHcIor npaBnIbHO HaTARHyTu, JaKIO Bin He npOBncae 3i 3BOpOTHOCTOPOHn HApabJauOoi uHH, aJe Ioro MoKHa JERKO npoBepHyTu pykoU. YTpmyuOnn HApabJauOuy uHHy, nIT TaRHiTb 3uenJeHHra, NOBepHyBwn HApabJauOuy roJIbKy 3a RoDINHHKOBOIO cTpiIKoU.
-Пися BCTaHOBJIeHHHO HOBOIЯчTo nepeBipIte Ioro HATrI, NOKI JAHIOIg 6kaTyEcIbC. PeryIaRPhO nepeBipIte HaTyr IaHcIgra. IpaBnIbHo HATrHyTuJ NaHcIg 3a6e3neUe Do6pi pe3yIbTaTu Bpo6Ot Ta cIyHNITme DoBwe.(37)
Пуск Та ВимикаHHЯ

YBA!IeKaI npaI nepeTm,IK noaTI:
3a60pOHeTbcE kCnIyAtyBaTu NIIky 6e npaBnJIbHo npNlaWToBaHx WInH, NaHcIora Ta Bcx KOnHyXiB. IHaKwe npNbiDHe 3y6AcTe KoIeco MoHe BiEHaTnci I 3aBdaTu TpaBMn.
YneBnTbcB A Tomy, 0o Bn TBePdo cToiTe Ha Horax Ta IaHIOr He MoHe TopKHyTnc6yNb-4oro.
CπiKnyTe 3a Tm, 06 JIOuN Ta TBapHn3HaxoJINcra DaJIeKO BiD po6oOi 30Hn.
-Перш Иж BCТаBJЯТN 6aTapeB O iHCTpyMeHT, 3aBнДи nepeBipЯTe npaBnIbHicTb po6OTN KypKa-BmNKaJaTa NOro noBepHeHHa Y nIoHOeHHra BmNKaHHa, KOJInNo rO BiDnyCtNTu. ДяЗaxIncTy bId HeHaBMnCHOrO HaTnCHeHHa KypKa nepeI6aueHni 3ano6iHHNK. (38)
HikoJn He 3anyckaTe JnaHcIy RIKy, KIHO HapabLya UHa, JaHcIg Ta Bci KpNikHe BCTaHOBJIeHi npabNlBHo. (39) IhctpyKUII DnBiTbc Ni 3arOIOBkOM MoHTaX'.
-ДИВITбяУBaHHо,и6 He BnHnKaINo HiKOro pN3NKy KOHTaKTy 3 piKyuM yTaTKyBaHHm ДлЯ ЛделчТВарин HabkoLo Bac. (40)
3aBnTpMaTe iNCTpyMeHT o6oMa pykAmn. IpaBa pyKa IOBnHa TpMaTa 3aHHe pyKIB' Ta IiBa nepeIHe pyKi'B'. Yci IIODi, IiBsi Ch Hi, IOBnHHi BnKOpncToByBaTi TaKn 3axBaT. MiHo CXBaTiB pyKi'B' JaHcUroBOoi NnKn. (41)
Nysck
-Bi3bMItbcra 3a nepeHIO pyKoTky JIBOIO pyKOIO.
-Bi3bmitbcra 3a 3aHIO pyKoTky npaBOIO pykoio.
HaTnCiHb Ta yTpmyTe KhoNky iKcai MExaHcHOrO nycKOBOr npNCtpoB BHyTpIHbOIO qacTHNOIO DOJIoHi Ta HaTnCiHb MExaHcHm NcKOBn npNCtpiB Bka3IBHM naJIbUeM. (38)
BIMKHeHH
3ynHITb nIky, BiDnycTnBm MexaHHynn yckOBn npncTpni. Kaio nIka He 3ynHReTbcn, npBBeiTb y dIO IaHcIroBe raJbMo Ta Bi'edHaNte Ka6eJIb HnBLeHH.
Ipeed BnKOpncTaHHaM:
(42)
1IpeBipTe,IO JAnHcIgOBe rJbMo npaLIOE npaBnJIbHO Ta He NOnKoDHeHo.
2IpebeipTe,IO KOJHyx IJIy npaBoi pyKn He NowkoDHeHn.
3IpeBipTe npaBnJIbHicTb po6Ot Ta ciJIicTb 3ano6iHHka Kypka.
4IpeBipTe,06Ha Bcix pyKIB'ax He 6yJno MacTnla.
5 IpeBipTe, 0o Bci eIeMeHTn JanaHIOrOBoi NIKK 3aKpinJIeHi npaBnJIbHo, He noWkoJKeHi Ta Bci Ha CBOEm My Micu.
6 IpepeBipTe, 0o yIIOBJIIOBaJ NaHIOra Ha CBOeMy Micci Ta He noWkoDKeHn.
7IpeBipTe HaTg IaHziora.
8IpeBipTe,Un3ynHReTbcraNaHcIOr,KoJIbBiDnyCkaHOb Kypok.
3aaraIbHi Bka3iBKn IJIpa06OTn
BAHJINBOI
Ley po3di onncye ochOBhi npaBnla 6e3neKn npi KopncTyBaHHI LaHIOROBOIO nIKoIO. Lj iHopMaui B HODHomy pa3i He 3amHtB npopeciHnx HaBnOk Ta DocBiy. KxO BuHnKHe cnTyaui, KoN Bi 6yDte He BneBHeHi, 3ynHnTbcra Ta 3BepHIbCra 3a nopaoIO do axibz. 3BepHiTbcra Do BaWo rnpoabucr, ceHTpy 06cLyroBaHHra N DoCBIDueHoR O KopncTyBaay LaHIOROBnx nILOK. He HamaraaiTeecra BnpiuHTn Iocb, kIo O Bn He BnEBHeHi!
IpeE BnKOpncTaHnMaHcUroOBoi nnIKn Bn nobHHi po3ymTi, 0o cnpuHHe BiDdaCy, Ta k yHnKHyTu II. IHCTpykui DnBITbcra nid 3arOJOBKOM 'AkyHnKHyTu BiDdaCy'.
Ipeed BnKopncTaanHm JaHcIgOrOoi nIKn Bn NOBHHi po3ymiTiPi3HNUo mix 3pi3yBaHHaM KInHukom Ta 6okOBmN Kpaikamn HaprabJIOOi uHN. Ihctpykuii DnBiTbc niD 3arOJIOBkAmn 'AkyHKHyTu BiDaui' Ta CnpaJHexHHaIy 6e3neuHOi po6OTn'.
KopncTyTecraoc6nCTm3axnCHm cnopdHeHHaM.IHcTpkyIINBtbcypo3diIi n3arOJIOBkom"Oco6nTe 3axnche cnpaKeHHa."
OchOBHi npaBnla 6e3neKIn
1PogJaIaIteIOBkoJa:
-
Ⅲo6 nepekoHaTnc, IO JIOI, TBapHn YI 6yNb-io IHse He nepekoJHaTmE B KepyBaHHi IHcTpymeHTom.
-
yneBnTbc, 10 HIXTo 3 BnueBka3aHnx He TopKHeTbcra Baooi nIJKn 6yJe TpaBMoHaH NpeBOM, 10 naJa.
BnKOpncToByouH3axnChi HabyuHnKn niJ qac po6Ot n 3 nnkoIO, ocTepiraItec oci6, kKi moKyTb niiInTu HeCnoiBaHo.
YBAI! DoTpmyTeCra BnueBkaaHx iHcTpkyi, aJe He BnKOpncToBy Te LaHcIyOBy NJIky, KOJn Bi He MoKeTe NOKJIkKaTu HiKOro Ha DonOMory y HeaachMy BnnaKy.
2 He kopncTyIeTcI hCTpyMeHTOM B noraHy nOrOdy - HapnKJa, B rycTm TymaH, cnJIbHni DoU, cnJIbHNI BiTeP, KoJN dyHe xoIoDHO Ta IH. Po6oTa B noraHy nOroDy BTOMIOe, a TaKoH cTBOpIOe DOdaTKoBy He6e3neKy, HapnKJa, oHeJeDb, Heneped6aCyBaHicTb HappMky naDiHHa 3pi3yBaHIn DepeB Toio.
3Пи робот iу cneКOTHMy cepeДOBuшi ocTepiraItecra 3HeBOdHObaHHa Ta nIITe 6Ibse BoDn.
4 ByNbTe DyHe 06epHHi, KOJIn 3pi3yeTe MaIi rIKN Ta yHnKaIte TocTpnx RIOK KyuB (HaNPKnaI, 3pi3yOuN 6aRaTO MaINx RIOK oDHOacHo). MaIi rIKN MoHyTb 6yTu 3axONJIeHI NaHcIOrom Ta BiIDKNHyTi y BaWy cTopoHy, IIO MoHe npN3BeCTN Do cepNo3HOI TpaBMn.
5 NepekoHaTec, 0o Bn MoHeTe 6e3neHcToa Tp yxaTnc. PepeBipTe, Hn HabKoNo HeMae MoJInBnx nepeWkoD (KopiHHa, KaMiHHa, rIKN, poBN Ta iH.) y BnAaKy, kIo Tpe6a 6ynde pi3KO nepemicTntncr. BybTe dyHe yBaHHi, npauOOn Ha cxIax.
6 ByIbTe dyHe yBaHHi, 3pi3yOuH haxnJIeHi DepeBa. HaxInJeHe DepeBO MoHe panToBO noBepHyTncrdo CBOrHOpMaJIbHOro noLoXHeHH, nepeD TmM a6o nicJr TorO, k Ioro 3piKytb. JkIo Bu 3aImMe He npabunbHe noLoXHeHH qn 3po6nte HaNpi3 y HnpabINbHOMy Micci, DepeBO MoHe 3aueNTn Bac a6o iHcTpymEnTI Bn BtpaTnTE KepyBaHHn Had Nm. O6nDi cHTyaCiMoKyTB npBeCTn Do cepNo3HOro TpaBMvBaHH. (43)
7Ipeep TpaHcnopTyBaHHm JaHcIgOBoi nJIKn cIid BIMKHyTn II Ta 3a6IOkyBaTN JaHcIg rAJBMOM. JAHcIgOBy NILKy CIId nepeHocNTu TakIM YINOM, IIOb NJIbHa WnHa Ta JaHcIg 6yIn HApBaJIeHi Ha3ad. Ipeep nepeHeceHHam JaHcIgOBoi NJIKN Yu TpaHCnopTyBaHHm II Ha 6yDb-ky BiDcTaHb BCtAoBJIouTe Ha nJIbHy sInHy 3ano6iHKN dJIra TpaHCnopTyBaHH.
8KoJn Bn KlaJeTe JAnuToOBy NnKy Ha 3emJIO, 3aikcyTe JnHcIor 3a DonomoroIO JnHcIOrBOr RaJbMa Ta BnBnHTbcra B Tomy, 0i HcTpmyeH 6yde 3haxoDntnc niD BaWIM
HarJydom.BmKHiTbDnRyHnepeTtM,JK 3aIiwaTuHaLcIyOByNikyHa6yb-IAkN Yac.

YBAI! IHOi cTpykka 3acTprae B npBoDi, BHacJIIOK QO Yo NaHcIg MoKe 3aKJIINHOBaTI. Nepu HIX NoUHaTu 6yDb-RA Ko6oTu 3 uNueHHa, 3aBKn CJIiB BMNKaTu iHCTpymeHT Ta BiE'EDHyBaTu NOro BiD JHepeJa KINBJeHHA.
3aRaJIbHi npaBnla
1 RaKo Bn po3ymeTe, 0Toake BiJa4a i KBOHa BUNKae, TOni II NMOBipHicTb 6yJe MeHua. RaKo BnNiIroTOBJIeHi Do TOrO, Ue 3MeHNHTb II pN3NK. RaN npaBnIO BIDdaHa He3HaUHa, aJe IHOdi BOHa MoHe 6yTN panTOBOIO Ta DyHe CINJbHOIO.
2 3aBHN MiHOn TpMaITe NaHIOrOBy nIKy npabOIO pyKOIO 3a 3aIDne pyKIB'ra Ta IIOIO 3a nepeINHe pyKIB'a. MiHO TpMaIte pyKIB'a. Bn NOBHHI BIKOpNCTOByBaTu cEi 3axBaT, He3aJIeHXo BiD Toro npabwa Bn YN liBwa. TaKII 3axBaT 3MeHwye eKeKT BiDaui Ta Do3BOJAE Bam TpMaTI NaHIOrOBy nIKy niD KOHTPOJeM. He BiDnyckaiTe pyKIB'! (44)
3 BiIbIicTb BnnaIaKIB BiIaIaHi BnHnKae npn o6pi ci cykib. YneBnITbcB TOMy, 0o Bu cToiT MeiHo Ta HeMaE HiOro Ha IJxMy, 0o MoHe 3aTpMaTu Bac uN 3pO6nTu TAK, 0o6 Bu BtpaTuPi pIBHOBary.
Ytpata KOHcHTpaQMOHe npn3BecTNo BiiDaui,ЯKIO 3OHa BiDaui HAnpaBIAUOoi WInH panTOBO TopKHyIacra IINK,HaN6JIINuOro DepeBa YI 6yDb-IAKO iHwOro 06'kTy.
YBaHHo CTeHTe 3a TnM, i3 YHM npaHoeTe. RaKTo, 10 Bu MaTe HAmip 3piAtN, DyHe MaJe TaIerKe, BOHO MoHe 3acTpaRTn B LaHcTOBoi nIIuTi Ta 6ytN BiDknHyTo y BaWy cTOpOHy. HabITb JaKIO He 6yDe He6e3neUHM, Ce MoHe BiDBepHyTu BaWy yBarv Ta Bn BTPaTnTe KOHTpoJIb 3a NIKKO. HiKOn He NJIiTb CKlaedehi KOLoDi Nn rIKn, He po3diJib ix CnoaTky. NJIiTb Nlne ONDy ONoDy uOdN Kycok 3a pa3. YbpaTne nopiaani KycKn, 106 BaWa po6oHa 3oHa 6yJa 6e3neHoIO. (52)
4ПиЗИЗИВAHИнIиКOLNHe nIDHIMaIte LaHIOROBy nIKy Bnue NLeuca Ta He HAmaraITeCЯ p3aTN KINKOM HanpaBJIYIOO IHH.NiHOKIN He KopucTnyTeCЯ NaHIOROBOIO nIKKO OdHOO pyko! (45)
5YBacMa66yTu n CTiKaNo3uZiA, 0o6 MaTu nOBHn KoHTpoJIb HaI NaHIOROBOIO NIKOIO. HikoJn He npaioTe Ha cxoJax, DepeBi Yn TaM, De Bn He MoKeTe CTiKO cTOnrN. (46)
6 3aBxHn npaIouTe 3 HauBnIOO uBnKicTIO, To6To npu MaKcImaJIbHnx o6epTx.
7БудteДунkeОбepENHи npn 3piayBaHHi BepxHbOIO KpaIKOIO HappAIBJIQUOoi WHNH,To6T0 pInHyN 3BHyTpIiHbOoi CTOpOHN O6'ekTa. Lc BiIDome kpi3aHHЯ NOtTOBxAMn. LaHICrH AmaraeTBcR BiDInxHyTu NaHcIOrOBy NIIKy y6ik KopncTyBaUa. Jkso JaHcIOrOBy NIIKy 3aklnHNo, NIIka MoHe 6yTu BiDKNHyTa y Bauy cTOpOny. (47)
8 RaKo TiIbKn KopncTyBaH He npoTnDie cnIn BiiDHTOBxvBaHHa, icHye pn3NK, 00 JaHIOrOba nnJa BiDcKOuHTb Ha3aJ TaK, 00 JNHe 30Ha BiiDaHi HnPaBJIyOoi uHn 6yDe KOHTaK TyBaTH 3 DepeBOM Ta Ue npn3BeJe Do BiiDaHi. (48)
3pi3yBaHHN HHHbOIO KpaIKoIO HanpaBJIIOOoi
WHN,To6To 3BepxO o6'ekTa BHN3,BiIOme JAK
TARoBe p3aHHN.Y CbOMy BNnAIDKy LaHcIIOROBa
IIINKa TgHe c6e B HAnpMky Do DepeBa i
IpeEHN Ka KaJnHcIIOBOOI NnIKn JeKo
CnIPAeTBcR Ha CToB6yp npi pi3aHHI. P3aHHN
TaKNM MeTODOM HaJaE KopNCTyBaCy
MOXJIINBicTb KpaIoro KOHTpoJIIO 3a
IaNHCIOBOIO NnIKOIO Ta NoJIoKeHHm 3OHNI
BiDnaui.(49)
9 DoTpmyTecI hCTpyKuI uOoHaRoCTpeHn Ta doTJy 3a HnpabJIyOIO uINHO Ta IaHJorom. Ppi 3amHi HnpabJIyOoi uHNi Ta IaHJorag BnKOpNCToBye Te TjBkN KOM6iHaU, Io peKoMeHDoBaHI HaM. IHCTpyKuII DnBiTbcr y po3dIax nIid 3arOIOBkAmn 'Pihye cnopraJeHH' Ta 'TexHiU hi'.
OchOBHn cnoci6 pi3aHHa

YBAI! HikoJn He BnKOpncToByuTe nIKy, TpIMaOuN II NIIe OndHIO pyKOIO. NaHIOROBy nIKy He6e3neuHO KOHTPOJIbOBaTN IINe OndHIO pyKOIO. 3aBxDi MiHO TpIMaTepykIB'o60Ma pyKaMn.
3araJIbHe
3aBnI npaIOHTe Ha MaKcIMMaJIbHi IWBnKocTI npn 3pi3yBaHHI!
-Псля Кон Horo po3pi3y BiDnyCakTe KypokBIMNKauch (po6Ota DBnHyHa npOTarom HaITDoBGrOу yacy npN nobHni NotyHocTi 6e3HabaHTaHeHH, To6To 6e3 onopy 3 60kyJaHcIOra, 00 BnHKae NiJd Yac NIIJIHH, MoKe npIN3BeCTN Do cepNo3HorO yWKoDHeHHnDBnHyHa).
- 3pi3yBaHHa3Bepxv = TaroBe piaaHHa.
- 3pi3yBaHHH 3Hn3y = Pi3aHHN noWToBxAMN.
PizaHn noTobxamn 36ilbwye pn3NK BnHKHeHHBiiI. Hctpykuii DnBiTbcra i, 3arOIOBkom 'K yHKnHyTN BiJaai.
yMOBn
O6pi3ka cykib = 3pi3yBaHHra iIOK Ha depeBi, zo BnaIIO.
PozenneHH = KOn 06'ekT, kNn Bn po3piyeTe, Jamaetbcn DO TORO, kPisAHH 3aKiHnIIOc.
IChyOtB n'YbBaHJnBnX fakTopiB, rki Tpe6a na'MrTaTNnepeNouaTKOM 3pi3yBaHH:
1 YneBnTbcra, 0o piXyue cnpaJxHeHHe 3aklnHnTb npn 3pi3yBaHHi. (50)
2 YneBnTbcra, 0o 6'ekr, kKn Bn 3piyeTe, He po3uennTbcra. (50)
3 YneBHnTbcra, 0o IaHIOr He TopKHeTbcra 3emJIy 6yNb-koIHOIwOro 06'ekTa nicJa 3aBepWeHHra 3pi3yBaHHra. (51)
4 Yu icHye pn3nk BiDauqi? (4)
5 Yu MoKe nJIoMaJaKa, Ha Jaki Bn CToiTe Yu pyXaTeCer, BnInHyTu Ha Bauy 6e3neKy?
Tpe6a BnpiHNT nBa nHTaHH: Yn He 3aKJInHtB IaHIOr Ta TaKoX Hn He po3eHNbC8 o6'kT, Aki Bn 3p3yeTe: BiDnOBiB Ha nepwe 3aJIeHHtB BiD TorO, Aki TpMMyE TbC8 o6'kT Do Ta nicJa 3p3yBaHHra Ta Ha Dpyre - Yn HaxIeHH BIn CH Hi.
Y 6iIbwocti BnnaKIB Bn MoKeTe yHnKHyTu Lnx npo6JeM, po3diINBUn 3pi3yBaHHa Ha DBa eTan; 3 BepxTa 3Hn3y. Bam Tpe6a niTpIMyBaTN o6'ekT TaK, 06 BiH He 3axonNB IaHcIg a6o pO3uENBcR npn 3pi3yBaHHi.

YBAI! RaJIo JAnHIOr 3aKJInHHTb npn 3pi3yBaHHi: 3ynHHt DBrHy! He HaMaraiTecra BNTrHyTu JAnHcIOrOBy nNk. RaJIo Bn 6yJeTe ue po6uTb, To MoHeTe OTrMaTu TpaBMy, KoJIn JAnHcIOrOba NjNka panTOBO BnCKoHTb. BnKOpNCToBy Te BaJIb, 0o6 po3KJInHHTn p03pI3 Ta BNTaFTn JAnHcIOrOBy nNkY.
Hactynhi iHctpykui onncyotb, k Tpe6a noBOintnca y 6iNbwoCTi cnTyaui, i3 kKmBn MOHeTe 3ycptPiNC npN KopncTyBaHHI JaHcIROBOIO NIKOHO.
Pozpi3yBaHHa

YBAI! He HamaraTecra po3pi3yBaTu KOLoN, JAKIo BOHJLeKaTb WtA6eJem Cn npa KOLoJ IeKHTb npuy. Taki ii cnIbHo 36iJIbWuOToB pN3IK BIdaqi, Io MoHe npn3BeCTn Do cepNo3HoI a6o CMepeTBJHOI TpaBMn.
JaKuo Y Bac e uTa6eJb KoJIo, Tpe6a Jnna po3pi3yBaHH y3aTN oHy KOJIoY 3 HbOro, nOKJaCTn II Ha K03JI Na Ta po3pi3yBaTn IHdNViDaJbHo.
Y6npaTe npiaHki KysKn 3po6ooyoI 30Hn.
3aIIIshaOuChi Bpo6oui 30Hi, Bn 36iJIbUyEte pIaIK panTOBO BiJaChi, a TaKOH pIaIK yTpATUN pIBHOBary npi po6oTI. (52)
KoIOnaJeHnTbHa3emJI IChYe HeBeJIHKn pN3NK TOrO,IO NaHcIg 3akJInHnTb YN O6'ekT po3eHNtbcr.OdHAc,IChYe pn3NK TorO,IO NaHcIg TopKHeTbcra3emJI no 3aBepWeHHIO po3piyBaHHa.
PikTe KOJIoNy 3Bepxu yHn3. YNkauTe TORo, 0o6 LaHcIor TOPKHyBCra 3emJI no 3aBepWeHHIO po3pi3yBaHHa. IpaTuKe Te Ha NobHi WBNdkocTi, aJe 6yNbTe roToBI do 6yDb-4oro.
KJIO MOHJIINBO (YMOHeTe Bn nepeBepHyTN KOIoNy?) 3yNHHb po3pi3yBaHH nicIa TOrO, Jk 3po6nIn po3pi3 Ha 2/3 ToBUnH N K0Io.
IpeBepHiTb KoIoNy Ta 3aKiHHTb po3pi3yBaHHa 3i 3BopoTHoiCTopoHN. (53)
KoIIOda niiTpmyeTbc8 3a OINH KHeUb.IChYe pN3NK, IIO BOHa po3uENITbc8.
NoHiTb po3pi3yBaHHa 3Hn3y (Ha 1/3 II ToBunHn).
3aikHHTb po3pi3yBaHHra 3 iHwOro 6OKy, IIO o6nDb a po3pi3 3iIuNnca. (53)
KoIOna niiTpmyeTbC3a 06nDa KInCi. IChye pN3NK, 10 NaHcUor 3aKJIINHHTb.
NoHITb po3pi3yBaHHa 3BepxHa 1/3 II ToBunHn).
3aKiHHTb po3pi3yBaHHra 3 iHwOro 60ky, IIO o6nDb a po3pi3 3iIuNcra. (54)
Texhika BaJIKN IpeB
BAJIINBO! Tpe6a 6araTo DocBiIy, 0o6 nobaiNTn DepeBo. HeocbiUeHi KopncTyBaCi JaHcIorOBuX nIOK He noBHHi BaJIHTn DepeBa. He HamaraiTeec BpiuHTn 0ocb, kIo Bn He BneBHeHi!
Be3neuHa BiDcTaHb
Bé3neuHa BiDcTaHb MIX DepeBOM, To6To 0o6 BoHo npn naiHHi He 3aueHnlo Hikoro nopyu, cTaHOBtB He MeHwe 21/2 DoBHnHn DepeBa. YneBHITbcra B TOMy, 10 HeMaE Hikoro B 30Hi pN3NKy nepeq nn npn naiHHi DepeBa. (55)
Hanpmaok naiHH
Heo6xio NOBaiNTu DepeBO TaK, 0o6 Noro 6ylo
Ierwe po3pi3yBaTu Ha KOIoOn Ta o6piaatu cyKn.
Heo6xio NOBaiNTu Ioro Tyu, De Bu MoKeTe
6e3neuHO cTou T apyxatncr.
IicJrTOrOaK BnBupiunu, KdyN Bn 6aHaae Te NOBaHTn DpeBO, Tpe6a Bn3HaHTn JaK DepeBO NOBaHTbcra.
Ha ue BnIiBae deKiIbKa foakTopiB:
Haxnil DepeBa
-KpNBn3Ha
- HanpЯMok BiTpу
- Po3aWbHn rInok
- Bara chiry
-П配电koДи 6iJa DepeBa: HAnpNKlaI, iHwi DepeBa, liHii eJNeKTponepeaui, IopOrn Ta 6yDInHKn.
- Wykaite cIiDnyuKoJHHeHH iRHTTCTOB6ypa,Toi imOBipHiue BCbOro DepeBO 6yeJaMaTnca i naTaPi paHie Hix Bn ouikyete.
MochinBo Bn no6aHTe, 0o KpaSe, 0o6 DepeBo BnAo B npnpOHOMy HAnpMky, Tomy RaK HeMOxJInBO QH He6e3neuHO np6yBaTn 3MycNTn Ioro ynaTn B HApRMky, B YKOmy Bn 6aHaJI NOBaIITN Ioro cNoaTky.
HINyHeBaKnBnΦaKTop,KnHe BnBnBaeHa
Ha npMOK naIHnA, aJe BnBnBae Ha BaSy 6e3neKy,
Le BnEBnTbCra B TOMy, 0o Ha DepeBi Hemae
NoWKoDHeHnx YcCyxNrIok, kKi MoHyTb
3JaMaTnc Ta ydapntn Bac npn naDiHi.
ToIOBHe, YeHnKHyTn naHnHa iHwe DepeBO. DyHe He6e3neuHo HaMaraTncra NOBaJIHTn TaKe DepeBO, Tomy kicHyE BeJIKN pN3NK BnHnKHeHHr HeIacHO BnApkY. IHcTpkyi DnBiTBc nD 3arOJIOBkOM 3BiJIbHeHHr DepeBa, no NobaJIIOsc H Do KINca'.
BAJIINBO!Pn onepaix i3 BaJIKN DepeBa 3axnciHaByuHnKn Tpe6a HeraiHo 3HrTn nicJia 3akInHuEHHPO3pi3yBaHn,06 CyTu Bci 3ByKn Ta nonepaJxuBaJIbHi ciHaJI.
OuNTKa cTOb6ypa Ta niiDrToBka K BiDxOy
3piTe rIKN Do pIBHa nIeua. Be3neuHiwe 3pi3yBaTu 3Bepxu Bn3, TaK Ioo6 DepeBo 6yIo MiK Bamu Ta nnIkoU. (56)
Y6epiTb 6yNb-akn niDpict 3-niDpeBa Ta nepeBipTe nloaadky Ha HAreBHicTb nepekoJ (KaMiHHra, rIKN, yMn Ta iH.), TaK uOb y Bac 6yB uNCTn wJnx npn BiXoDi, KOJI npeBo noUHe naTaTn. Baw IJnx dJa BixOdy MaE 6yTu npN6IImNo Ha 135 rpaDyciB BiD HanpymKy naDHHa depeBa. (57)
130Ha He6e3neKn
2IJIxIJIYBIDXOy
3 Hanpmaok naiHHA
PaiHH

YBAI! JaKIO TiJIbKn Bu He npoiJn cneuaJIbHi KypcN, MpaIIMo Bam He 3pi3yBaTn DepeBa 3 diametpom 6Ibwe, HIX DOBHNHa BaIoHanpaBIAJIOJuHIn!
3pi3yBaHH po6ntbcT Tpboma po3pi3am.
CnoaTky Bn po6nte HnpaBnaHouci Bnpi3n, kki CKlaIaIOb8c3 BepXhBoRo po3pi3y Ta HnHHboOro po3pi3y, a noTIm 3akInHyTe Bnpi3om IJRA 3pi3yBaHHra. 3po6nbix npabNlHo Bn MoHeTe ToUHO KOHTpOJIIOBaTHn HaprrMOK naDiHHra.
HanpaBnaIoui Bnpi3n
Ioo6 3po6nTu HnpaBnaHouy n po3pi, nouHiTb i3 BepxHbOro po3pi3y. BnKOpncToByuO uNo3HaUky HanpMkU naDinHnHa nnLi(1), cnpMyTe ii Do ciJI Ha dInHnCi, Kyu n NobHHo BnacTn DepeBo (2).
CTaHbTe npabopyu BiDpeBa, TpmaOuNnIky nepeo co6o, Ta noHITb TaroBe p3aHH.
TouHoHaKINiBepXhboro po3pi3y.(58)
HanpaBJIIOUcI Bnpi3n NOBHHI 6yTu 3po6JIeHi Ha rN6uHy 1/4 diametpa CToB6ypa Ta KyT MIn HINHHIM Ta BepxHIM p03pi3amn MaE 6yTu 45^
JIiHia,HaIkiI DBA po3pi3 3ucTpinyTbCra, Ha3nBaetbc JliHieIO HaprMky po3piy. LJIiHIA Mae 6ytncTporo ropnsOHTaJbHOIO nID nprrMM KyTom (90^) K HanpMrky naIHnA. (59)
Bpi3 3pi3yBaHHa
Bnpi3 3pi3yBaHHp06NTbc3i 3BOpOTHoi CTOpOHn DepeBa Ta nobHHeh 6ytnc TcpoRo rOpN3oHTaJIbHM. CtaHbTe JIBOPuy BiD DepeBa Ta noCHiTb TAreBo pi3aHHra.
3po6ntb Happi 3-5 cm (1,5-2 IIOIMN) BnueBepxHbOro HnpaBnaIoo poro3pi3y. (60)
YcTaHOBnTb 6nnuactn 6yfepe (Ako e) nepei
IupHipom naHnHn. IpaTuOte Ha nobHi nBnKocTi Ta noBilbHo ypiXTeCra NaHucorom/HanpaBnaIOoYO
WnHO B depeBO. YneBHnTbcra B TOMy, 0o DepeBO
He nouHae pyxatncra B HappMky, kNn
3BopOTnTomy, 0o Bn Bn6paNN dJa BaJIKn.
3a6nTe KInn dJa BaIKn DepeB cN nom y po3pi,
rK Tlkbn BiH CTab Docntb nn60kIM. (61)
3akiuTb po6nTu Bpi3 3pi3yBaHHra npaJIeJbHo liHnpanpMy po3pi3y, uo6 BiIcTaHb mK HMM 6ya He MeHs 1/10 diametpa cTob6ypa.
Hepo3pi3aHa yactnHa cTob6ypa Ha3nBaetbcpa po3pi naiHH.
Pozpi naiHnnaokayehanpymok,kyu6ynde naatnipebeo. (62)
KoHTpoJIb 3a HanpMkOM naIHHB Tpaayetbcra,
RAIO po3pi3 naIHHy dyHc By3bKn YN Iro He
MaE, a6o RAIO HanpaBnIoUc BiPi3u BnPi3
3pi3yBaHHH HenpaBnBHo po3TaioBaHi. (63)
KoJn Bnpi3 3pi3yBaHH Ta HnpaBJIIOuHn Bnpi3 cnIbnaJI, IepeBO NOBnHNO NoaTn NaaTaN CaMe nO co6i a60 3a IOnOMOrO KJIHa IJI BaJIKn DepeB YI nomA. (64)
Mn peKOMeHdyE mo Bam KopncTyBaTncs HnpaBJIIOUO uHOIO, DOBHNHa JKOi 6Ibwe diameTp apeBa,Tak o6 Bn MoRJN 3'EnHaTN Bnpi3 3p3yBaHHa Ta HnpaBJIIOUH Bnpi3 ODNHM po3pi3OM. IHcTpkyuII dNtBc8 B po3diNi iD 3arOJIOBkoM 'TexHiHi daHI' cTOcoBHO TORO, Ka DOBHNHa HnpaBJIIOUoI uHH NPeKOMeHDoBaHa IJa Baoi nnKn. (65)
IChyOtB DeKlBka MeToiB 3pi3yBaHnHa DepeB i3 diAmeTpom 6ilbwe, YIM DoBHHa HnPaBJIIOoI uHH. Ondak ci MeToiN 6ilbW pN3IKoBaHi, Tomy 0o 3OHa BiDaayi HnPaBJIIOoI uHH 6ynde KOHTaKTyBaTn 3 DepeBOM. (4)
3BilbHeHHa DepeBa, 0o nobaiNIOcH He Do KInzra
3BilbHeHHa DepeBa, 0o 3actpJIO
IyHe He6e3neuHo HaMaTaTcN oBaJIHTn TaKe IpeBo, Tomy IcHyE BeJIKNpI3NK BUNIKHeHHa HeaCHOro BNNaDky.
HikoJn He HamaraTecn NobaHTn DepeBO, 03acTpJNo.
HikoJI He npaioTe B He6e3neHi 3oHi DepeBa, 0o 3acTpI.No. (66)
Hai6e3neHiuM MeToD -Ce BnKOpncTaHHa Je6iKn.
- 3MOHToBaHa Ha TpaKTopi (67)
-Переньca(70)
3pi3yBaHHn DepeB Ta rIIOK nIh AxHJIOm
PiIroTOBKa: IpaioTe Ha Ti cToPoHi, Io HaxnJeHa Ta De 3HaxoDHTbcra ToyKa MaKcMmaNbHoro HanpyHeHHa (To6To, De BOHO 6 3JamaNoCra, RaKuo 6yNo 3irHyTe 6ilbwe).
BpiuHTb Jk Hai6e3neHIIe nocJa6nTu Tnck Ta Y MoHeTe Bn 3po6ntb Ce 6e3neUHo. Y cKnaHnx CNTyaLix X EINHH 6e3neUH MeToJ noJIraE B TOMy, Ioo6 BiKJactn BaUy IaHcIOrOBy NIKKy Ta BVKOpNCTOByBaTn Ie6iDky.
3aŋaJIbHa nopaJa:
3aMItb TaKe noLoHHeHH, 06 Bam 6yIo BnDHo DepeBo uI rNk Ky, KoiN TnCK ocNa6He. (71)
3po6ntb oDnH qN 6iJIbWe HaApIi3IB Ha a6o 6IJIa ToUKn MaKcImaJIbHOi HanpyrN. 3po6ntb CTIJIbKN HaApIi3IB DocTaTHBoI rIi6Hn, cKiJIbKN Heo6xIDHo IJIa TORO, 06 3MeHUnTIuCK, Ta 3po6ntb TaK, 06 DepeBO uN rIJa 3JaMaJIacb y ToUci MaKcImaJIbHOi HanpyrN. (69)
HnkoJn He npopy6yIe Kpi3b HaxiJeHe DepeBo Yr iiky!
Jaio Bam Tpe6a po3pi3aTn DepeBO / rIky, 3po6ntb Da-tpn Haip3n Ha BiCTaH iIOMa OINH BiO OHOro Ta rIi6HIO OINH - DBA IIOIMN. (72)
IpoIOBkyTe piaATn rIn6we do TOrO, nOKn DepeBO /rikKa He HaxNJNTbcra. (73)
PixTe DepeBO /rIky i3 3OBHiuHbOi CToPOHn 3JAmy nicTJ TORo, JK BOHO HaxNJNIOcJ.
yHKHyTn BiDauCi

YBAI! BiДaçaMoHe BnHnKHyTn panToBO Ta 6yTu DnyKe CnJbHoU; BiДaOuN LaHcIgOBy NnKy, HapabJIauOuy uHy Ta IaHcIgB CTOpOHy KopncTyBaCy. RaIooTaKe TpaNTbc KaON LaHcIg pyXaeTbcR, Ue MoHe npN3BeCtN Do cepNo3Hnx, HaBiTb CmepTeJbHx TpaBM. NyHe BaJIInBo, 06B BuPozymiN, 1o CnpNHHoe BiJaCy, Ta 10 Bu MoHeTe yHnKHyTI BhacIIOk O6epeHHocTi, 3aCTOCOBuOuN npaBnJbHy TexHOJorio po6OtN.
IooE BiiDnaueo?
CNoBo 'BiDdau' BnKOpncToByeTbcraIOnNcy panToBOi peakui, kA cnpuHHoe Te, 06 LaHcuroBa nnka Ta Hapablaioa uHa BiCKoyniB iD o6'eKTy, KOJI BepxHNI KBaPaHT KIny HapabLIOOoi uHHN, kIN BIDOMN JK 3oHa BiDaay, DoTopKaeTbcraDo o6'eKTy. (48)
Biddaa 3aBn BnHnKae Ha pkiyu noBepxHi HanpaBnaIooi uHH. Ra npabIno IaHcIroBa nIIKa Ta HaprablaOua uHa BiDcKaYIOb yBepx Ta y6ik KopncTyBaay. Ondak, JaHcIroBa IIka Mohe pyxaTncy B iHcy cToPOHy B 3aJIeXHocTi BiD Toro, Rk BoHa BnKOpNCToByBaJacb, KoJI NaHa BiDaqi HanpaBnaIooa uHa DoTopKHyJnacr o6'ekTy.
BiJaMoHe BnHKnHyTu TijbKn KOJN 3oHa BiJaHn HapabJIyOoi WnHn TopKaetbcra 6'ekTy. (4)
O6pi3ka cykib

YBAI! BiIbwiCtB BnnaKIB BiJaChi BnHkae npn 06pi3yBaHHi rIoK. He BIKOpNCTyByIe 3OHy BiJaChi HAnpaBJIIOOi SiHN NiJKN. BydTe Oco6JIbNO o6epeXHi Ta yNHKaIte KOHTaTKy HocKa HApBaBJIIOOi SiHN NiJKN 3 KOJIOU, IHsIMN rIKamu YO6'ekTAM. BydTe dyJHe o6epeXHi 3 HaxNJEnHMr IJKamu. BOH MoHyTB BiIDcKOHTTu Bawy CToPOHy Ta cPnUnHHTBpATy KoHTpoJIIO, Io npN3BeDe Do TpaBMn.
IpekeHaiTncaB Tomy, 0o Bn MoHeTe cToaTn Ta pyxatnc 6e3neuHo. PpaioNe Te 3 IiBoro 6oky CTOB6py. PpaioTe JkOMora 6Jnxue K LaHIOROBI NJIzI DIA MaKcImaJIbHO KOHTPOJIIO. RaKIO MOJIINBO, 3pObTb TaK, 0o6 JaHIOROBa nIIka TnCHyla CBOEO BarOHO Ha cTOB6yp. (74)
CJIikkyTe 3a cTob6ypom mix Bamn Ta IaHIOROBOI nIKOIO, KOJIpyxaεTEcay3doBx cTob6ypy.
Pozpi3aIe cToB6yp Ha KoIooN
Ihctpykuii DnBiTbcy y po3diNi niD 3arOIOBkOM 'OchOBHn cnoci6 pi3aHHJ'.
3aŋbHe
KopncTyBaH noBHeH BkoHyBaTn JIne Ti 3axoJN 3TexHiHOrO 06cLyroByBaHHaKi OnncaHo y Noci6Hky KopncTyBaHa. BiIbI cepno3Hi po6Ot nOBHHI BkoHyBaTnC npaICBHKaMn BiDnOBiDnX ceHTpIB 06cLyroByBaHHa.
IpeBipka, OOrJaTa 06cLyroByBaHHaXnCHoRO cOpraJHeHHaHucIOBOi NNIKN.

YBAI! Npei MoTahMe, TexHcHMM 06cLyroByBaHHaM cN nepeBipKoIO naHcIgOrOBoI nIKn o6OB'3KOBO BiD'EDHyTe II BiD HNBHeHH.
3BepHiTb yBar! 106 npoBOuHTn 06cLyroByBaHH Ta po6OToN 3peMoHTy, noTpio MaTu CneuaIbHy niIroTOBky. Lc o6blBO cTocyeTbcr cnopJHHeHH dJIa 6e3neuHOi po6ToN. RaKIO Baw IHCTpyMeNT He BiIDnoBIAe npHaIMHi OndHi i3 BIMor nepeBipKn MIn peKOMeHdyEmo 3BepHyTbcra Do HaIbHKUoi MaICTePHi 3 06cLyroByBaHH.
JaHcIyOrOBe ralbMo Ta KOnHyX IJIa nepeiHboi pyKn
IpeBipka konhyx yIJI nepeHbOi pyKn
- YneBHITbcI, 0KoKHyX IJIa nepeIHbOi pyKn He noWkoJxHeHn Ta Ha HbOMy HeMae TaKnx DeΦeKtIB Jk TpiuHn. (75)
- PenecyHbTe nepeHIO oropOny IJIa 3axnctTy pyK, 0o6 BneBHNtncy TOMy, 0o BOHa BiJbHO nepecyBaetbc i HaiiHNO npNKpInIeHa do IHcTpymeHTa. (76)
IpeBipKa po6oTu iHepziiHoro raJbMa
-Поклады ВИМКHeHy Ланцюгу плку напь a60 iHwy cTiKу nobepxHIO. BiDnycTiB nepeДнЮ рчКу та дайтЯнцюВилци onyckaTICnяпд ВlaCHO IO BarOIO, NOBepTaOuHn HabkoJIo 3aHIO рчКу B HaprMky nHЯ.
KoJIHnPaBJIyOuHaIHHaTOPKHeTbCnHraJIbMo noBnHHe cnpaIOBaTu. (77)
Ipebeipka TpIrepy ralbma
YbIMKHiTb IaHIOrOBy NnKy. Ppi Cbomy IaHIOr He noBHeH TopKaTncs 3eMJI Ta iHux npEiMeTiB.IHcTpkyuI DnBiTbcra nD 3arOJOBKOM 'Pyck Ta BmKHeHHa'.
MiHOb Bi3bMitb y pyKn JaHcIoroBy nNJKy, y3aBwn ii 3a pyKIB'.(44)
BiKnIte noBHCtIO npocJIb Ta aKTHByTe IaHcIgOBe rJbMo, HaxNJrOuN JIBOCToPOHHe
3an'acTBApePeIdoKohyxyIJIa nepeHbOi pyKn.He BiynycKaIte nepeHne pykIB.JaHcior NOBnHeH HeaHNo 3ynHHTncra. (78)
3ano6iHHNK
-ПepeBipTe,ч6лokуETbCЯ KypOK-BIMnKaU Ha xOJocTOMy xoDi, KoJIi BiДnycKaeTbCЯ 3ano6iHnK. (79)
HaTnCiHb Kypok-BmMka Ta nepeBipTe, YI noBepTaetbcB H y noaTKOBe NOJIOHeHHa, KOJI NOro BiDnyCTtNT. (80)
-ПepeBipTe,чи BiЛьно pyxaetbса 3an06iHnK Ta CHHaJIeHHM YINHom npaIIOJb noBopoTHi npyHnH. (81)
- YbIMKHiTb NaHIOrOBy NlKy Ha nobHy notyHHicTb. BiDnycTiB Kypok-BmNKaTu nepekoHaItec, 0o NaHIOr NlKIn 3ynHINBCra i 6iNbwe He pyxaetbcra.
yIIOBIOBaU naHcIogA
-ПepeKoHaTecB TOMy, lo ΦiKcaTop LaHcIora He noxkoJHeHn Ta MiUHO npIJIrae Do Kopnycs LaHcIgOBoi nIKn. (82)
CnCTema oxoJIOJxHeHHa
063an6irTnpeperpiBaHHIO dBnHyHa,ihcTpymeHT 06laHaHO CnCTeMoO OxJIoNDHeHH.
BoHa cKlaJaTeTbc3:
1 OTbip BCMOKToyBaHHn noBiTpra (ni, MexaHiHm nyckOBnM npucTpoem).
2 BeHTnIaTOp Ha IbIgHyHi.
CnCTemy oxoJOnHeHHcIiDyHCTNTpa3Ha TnHexb,aAkyoUbOBRMaTaIOb yMOBn - Yactiwe.Po60ta i3 3a6pydHeHO a6o 3a6ntoIO CnCTeMoO oxoJOnHeHHcnpuHHTb neperpiBaHHaDbNHyHa,io npu3BeDe do nowkoJOnHeHH iHCTpyMeHTa.
Kom6iHaui HnpaBnaoyoi uHn Ta IaHcIogra
HabeJeHi HnJype piaJIbHI HacaIK peKomeHIOBaHO IJIa BIKOpncTaHH 3 MoJeJMy Husqvarna 418 EL Ta 420 EL.
AoPala oTo xwpo Epyaia
AATepeTE To xwpo EpyaiaC Kaapo KAI e KaLo .OkaTaoTaOI n oKOTeIvoi Xwpoi EVEXOUV TOV KIVUVO aTuXeMaTov.
MeV xepiEeTE EEAETPIKA epyaia eekpKTIEc aTouoopaic, n.x. napouia euAeKTwU ypwv, aeipw n oomega iDiw oKovc. Ta eAektpka epyaia dmuoyouv onivnpec, o onoiEvextal va npokaloeouv Tev avaAeEe TOW oomega tioiw n twv kAnWv.
KaTaTo xEiPiOoEvoc EeKTPiKou EpyaEiou,Ev npEnTva Bpikovtai Kovta naiIdia n aaloi npaeupioKoEvOI. EvexTai va anooanauv Tev npoooxn oac,ue anotelEoMa va xaoteTov EeVxO.
Evikc oyniec epyaiac
ZHMANTIKO!
AutoTo KepaAio NepiExe Baikouc kavovec aopalaiaoc Epyaoicmu AluooPiovo.H ouykekpiEvn PAnpoopopia notEev avtkaoiota Tg yywoeic Tou enayveLmaia Tou npoexyovta ano eknaieun kai euneipia otny npaeN. Av oumbei va eiTE aBbaic yia to nwc tha ouvexioTe tn xpnoTou mnxavnatoc, va cntnoTe tn oumbouan evoc elikou.AneuovtheiT neuvantipoownia tou aluoonpivou, sto ouvepyio n e evav emepo xpnoTn auoonpivou. Anoepuyte onoiadnoTe xpnoYia tvn oioia aoabveote otI evexete katalnnec yywoei!
Pniv Tn xpnon Tou aauoopniovou npenie va kaTavonoeTe TOnmaivei KkWToNmu KaI nwc mnpoeite va to anopuyte.BA. tO odnyies oTo kepalaio Evpeyiec anopuync kkwToNmuatoc.Ba.tc odnyies oTo kepaalao Evpeyiec npolnns KwToNmuatoc.
Piv Tn xpnoTou aUooepiovou npenla va kaTavonntnTdeltaopa npovioaTOC mTnv naw n Tnv kAtw nnpa TcAuaac. BExe odnyie cKATW ano Tnv EpiEpaIbA Evpeic npoAnpnc KAwToMaTOC KAI EgonlIoOc aoPaeiaic nXavmaTOC.
Xpnoiopoioieite aotuikopooataeutiko EonlaioB. BL. tic oynie cto Kepaiao "Aotuikoc npootateutikoc Eonlaiooc"
