SmartHome Gateway HG100 - Smart Home ASUS - Free user manual and instructions
Find the device manual for free SmartHome Gateway HG100 ASUS in PDF.
| Product Type | Smart Home Gateway |
| Model | ASUS SmartHome Gateway HG100 |
| Dimensions | 152 x 67 x 167 mm |
| Weight | 256 g |
| Power Supply | AC 100-240V, 60 Hz adapter, output 5V / 2A (10W) |
| Wireless Protocols | WiFi 802.11b/g/n (2.4 GHz), ZigBee PRO, Bluetooth 4.0 |
| Memory | DRAM 1 GB, Flash NAND 8 GB |
| Ports | Power, Micro USB (reserved), HDMI, Ethernet |
| Main Functions | Home automation gateway, control via ASUS SmartHome app, connection of Zigbee sensors and devices, Miracast (1920x1080), ASUS Cloud service |
| LED Indicator | Solid blue (powered on/connection successful), flashing blue (connecting/device adding), red (connection failure/warning) |
| Security | Password protection (default 0000), router reset button, restart |
| Maintenance and Cleaning | Clean with a dry, soft cloth. Avoid moisture and abrasive products. |
| Spare Parts and Repairability | Not specified by the manufacturer. Contact ASUS support for assistance. |
| General Information | Compliant with CE and IC standards. Indoor use only. Input voltage: 100-240V AC. |
Frequently Asked Questions - SmartHome Gateway HG100 ASUS
User questions about SmartHome Gateway HG100 ASUS
0 question about this device. Answer the ones you know or ask your own.
Ask a new question about this device
Download the instructions for your Smart Home in PDF format for free! Find your manual SmartHome Gateway HG100 - ASUS and take your electronic device back in hand. On this page are published all the documents necessary for the use of your device. SmartHome Gateway HG100 by ASUS.
USER MANUAL SmartHome Gateway HG100 ASUS
natural_image
Technical line drawing of a circular mechanical component with no visible text or symbolsQ12200
Revised Edition V3
December 2016

Contents
English....3
繁體中文....12
简体中文....20
Русский....28
Deutsch 36
Italiano....44
Français....52
Dansk 60
Norsk 68
Suomi....76
Svenska....84
Español....92
Português....100
Polski 108
Čeština....116
日本語....124
عربي 132
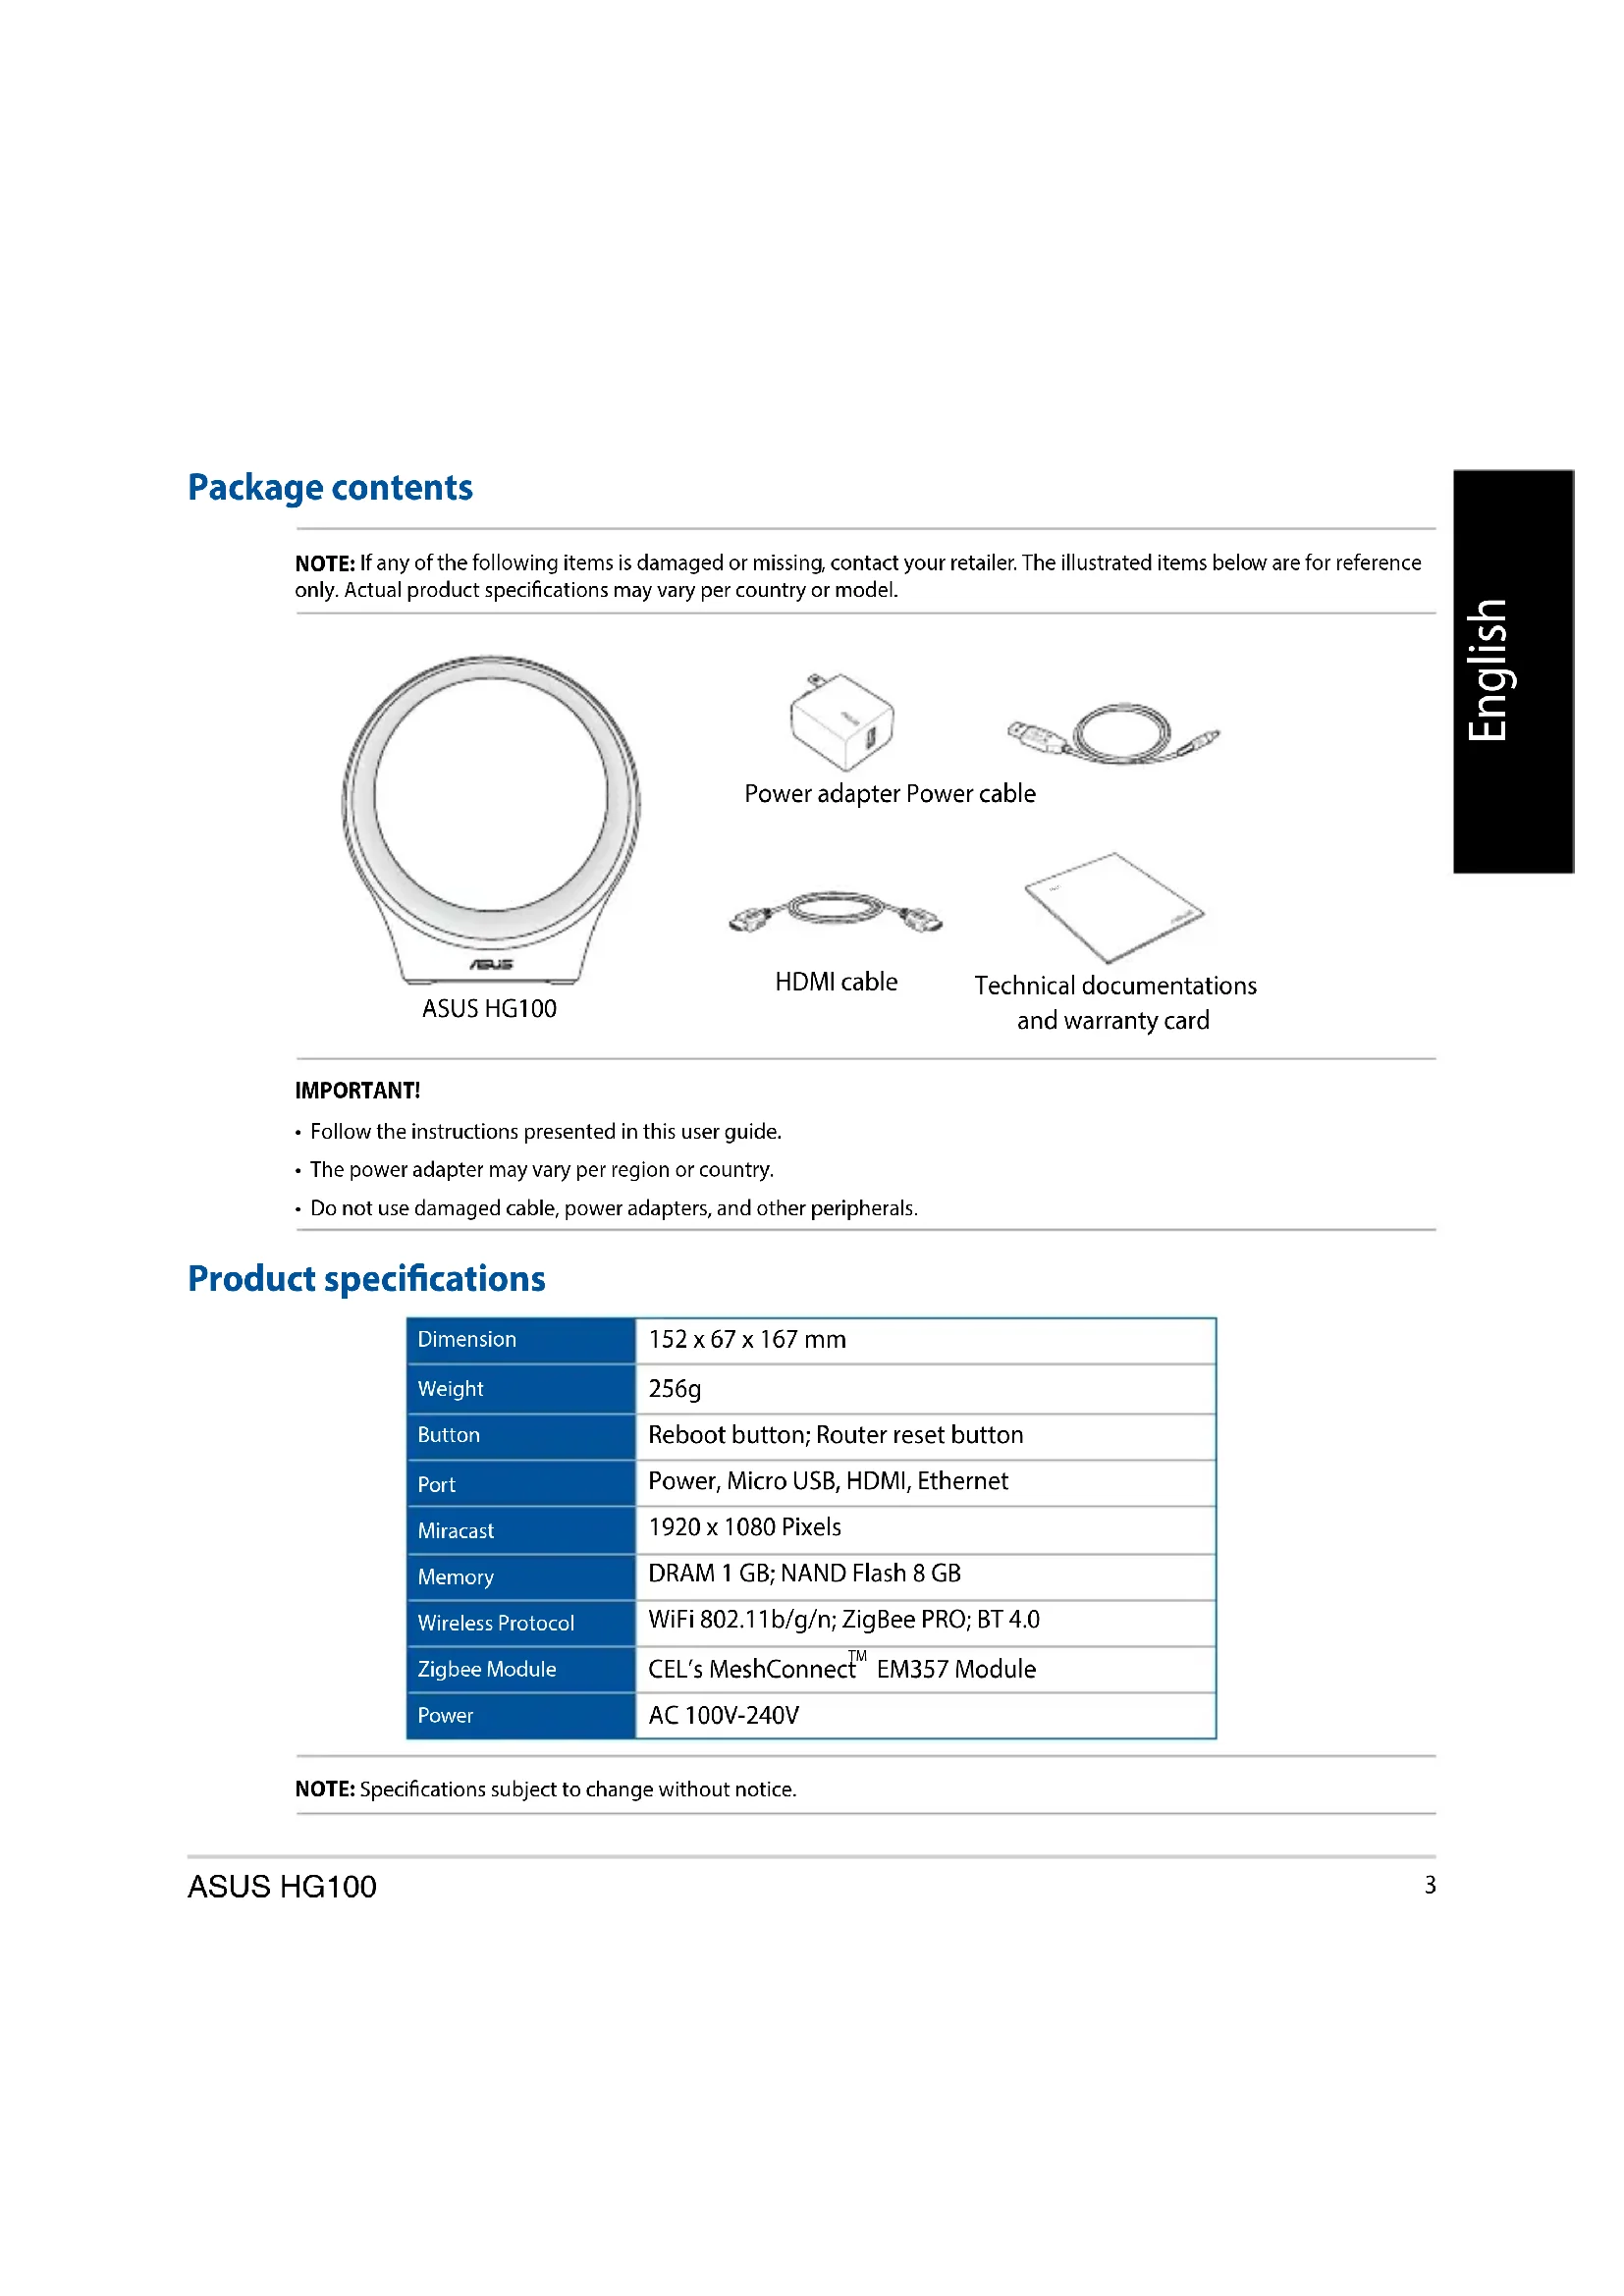
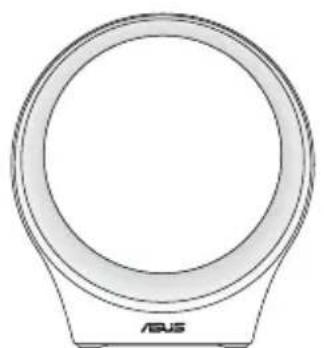
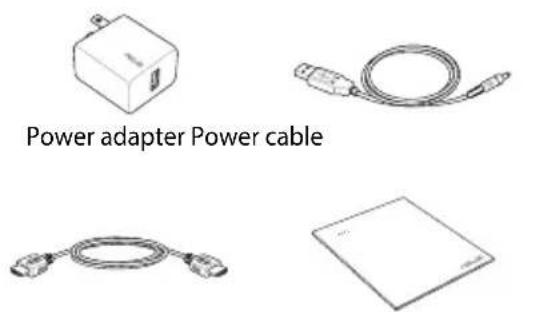
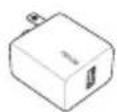
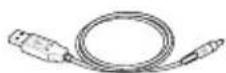
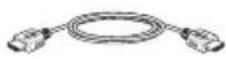
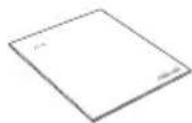
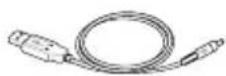
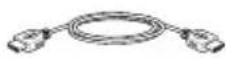
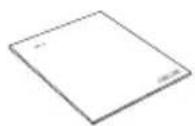
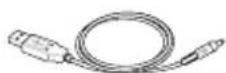
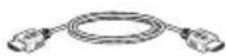
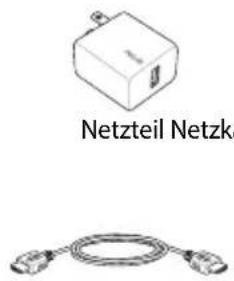
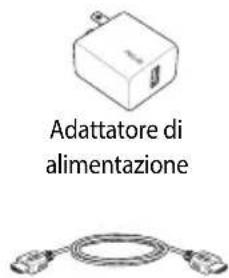
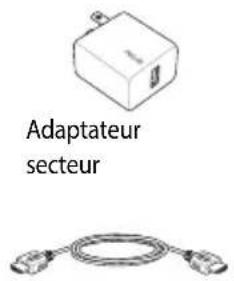
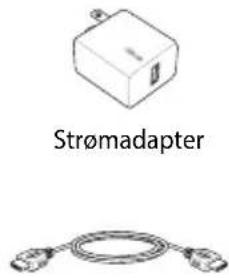
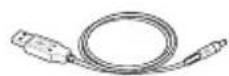
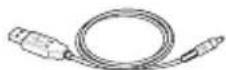
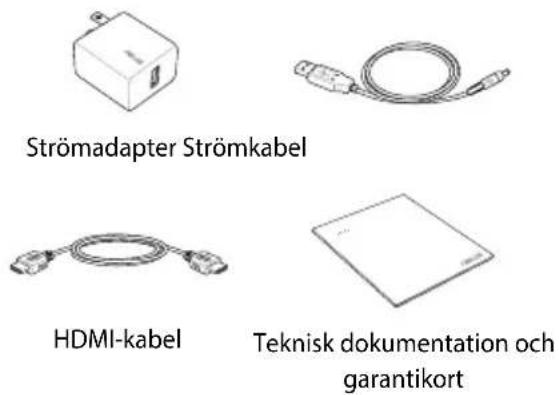
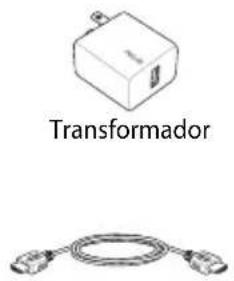
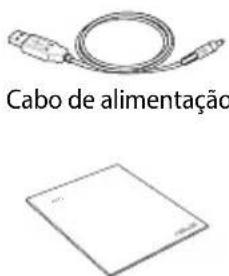
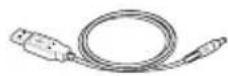
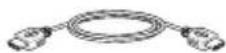
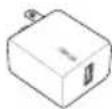
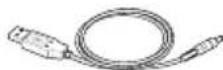
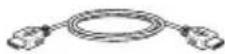
Package contents
NOTE: If any of the following items is damaged or missing, contact your retailer. The illustrated items below are for reference only. Actual product specifications may vary per country or model.
natural_image
Simple line drawing of a circular object with 'ASUS' branding at the base (no text or symbols on the object itself)ASUS HG100
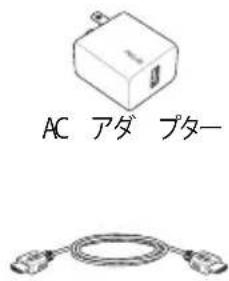
HDMI cable
Technical documentations and warranty card
IMPORTANT!
- Follow the instructions presented in this user guide.
- The power adapter may vary per region or country.
- Do not use damaged cable, power adapters, and other peripherals.
Product specifications
| Dimension | 152 x 67 x 167 mm |
| Weight | 256g |
| Button | Reboot button; Router reset button |
| Port | Power, Micro USB, HDMI, Ethernet |
| Miracast | 1920 x 1080 Pixels |
| Memory | DRAM 1 GB; NAND Flash 8 GB |
| Wireless Protocol | WiFi 802.11b/g/n; ZigBee PRO; BT 4.0 |
| Zigbee Module | CEL’s MeshConnectTM EM357 Module |
| Power | AC 100V-240V |
NOTE: Specifications subject to change without notice.
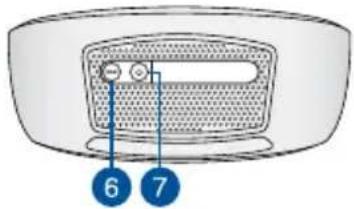
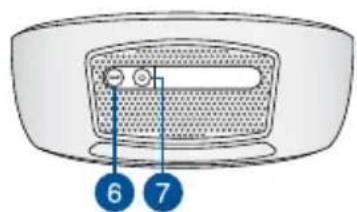
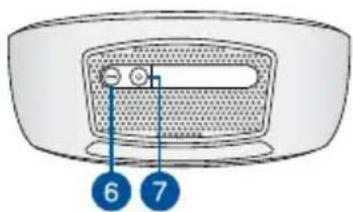
Product overview
Front View Back View Bottom View
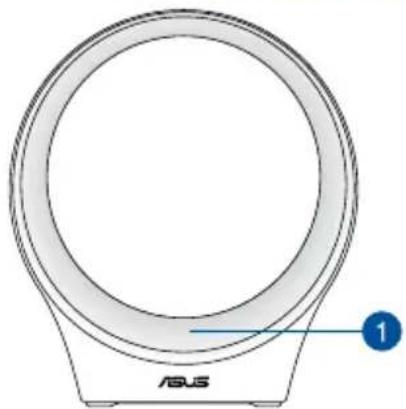
natural_image
Diagram of a circular device with labeled 'ASUS' and number '1' pointing to its side (no text or symbols on the device itself)
1 LED status indicator The LED status indicat
The LED status indicator helps identify the current status of your ASUS HG100. Refer to the following table for details:
| Color Status Description | ||
| Solid Blue | HG100 powering on Plug on or press and hold the Reboot button | |
| Connection to router successful Connection through companion app successful | ||
| Device added successfully/ unsuccessfully | Companion app displays the adding status | |
| Blinking Blue | Connecting to router | HG100 automatically connects to the router when power is connected for the first timeManual connection is performed by using the Router reset button |
| Allow device to be added | Connection through companion app after tapping Add Device | |
| Solid Red | Connection to router unsuccessful | HG100 automatically detects whether there is Internet connection |
| Device warning Triggered by sensor devices | ||
NOTE: You can turn off the LED status indicator through the companion app.
Power input port
Insert the bundled power adapter into this port to supply power and turn on your HG100.
3 Micro USB expansion port
This port is reserved for ASUS-authorized technicians and future expansions only.
HDMI port
This port is for a High-Definition Multimedia Interface (HDMI) connector. Connect the bundled HDMI cable to your TV to activate the Miracast function.
NOTE: Miracast function is only available on Miracast-compatible Android devices.
5 Ethernet port
You may use this port to connect your HG100 to your router when setting up for the first time.
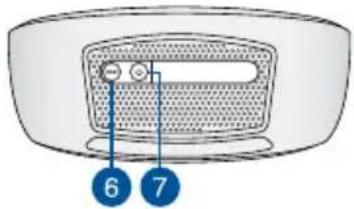
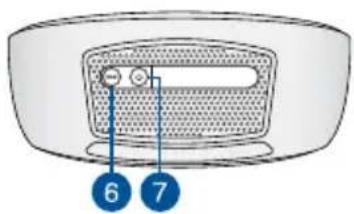
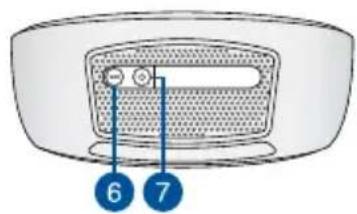
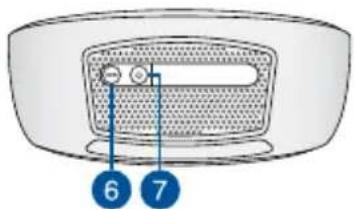
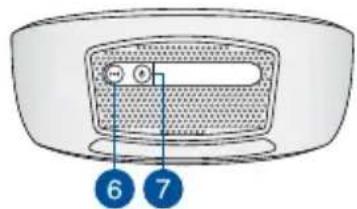
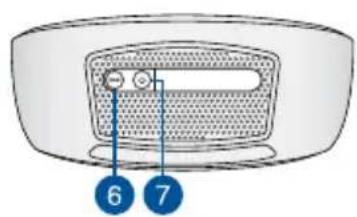
6 Router reset button
Press and hold for at least five (5) seconds to reset connection with the router.
7 Reboot button
Press and hold for about two (2) seconds to restart the HG100.
ASUS Cloud Service
ASUS Cloud Service will automatically memorize the users' setting, store and compute the measured data from the smart sensors and devices.
To use this service, you will need to approve to connect your data to the cloud of your own account.
NOTE: This physical cloud storage space is not available for users to access the data.
Using your HG100
Setting up hardware
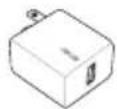
- Connect the bundled power cable to the power adapter.
- Plug the power adapter into a power source.
- Connect the power cable into your ASUS HG100's power input port.
- Your ASUS HG100 will automatically power on.
NOTE: The power adapter may vary per region or country.
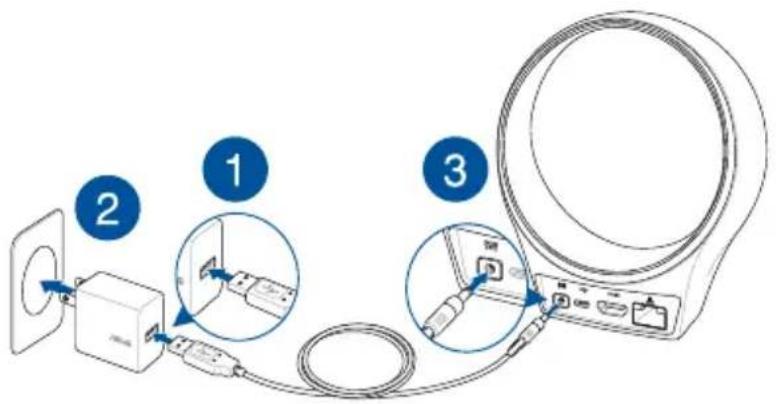
IMPORTANT! Power adapter information:
- Input voltage: 100-240Vac
- Input frequency: 60Hz
• Rating output current: 2A (10W)
• Rating output voltage: 5V
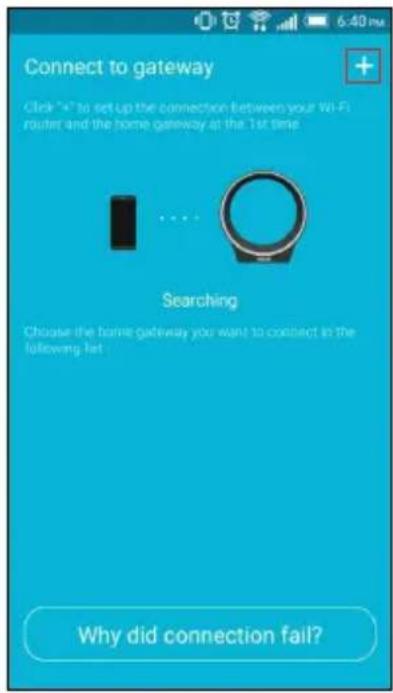
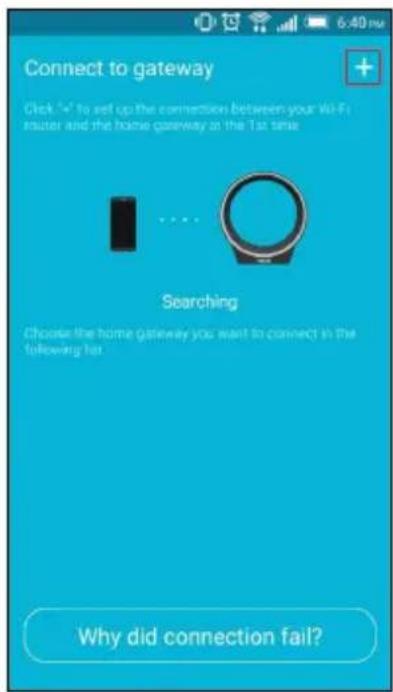
Installing the companion app
-
Connect your phone to the Internet, then log in or sign up for a Google account or Apple ID.
-
Launch Play Store or Apple Store.
-
Search for ASUS SmartHome, then install the companion app.
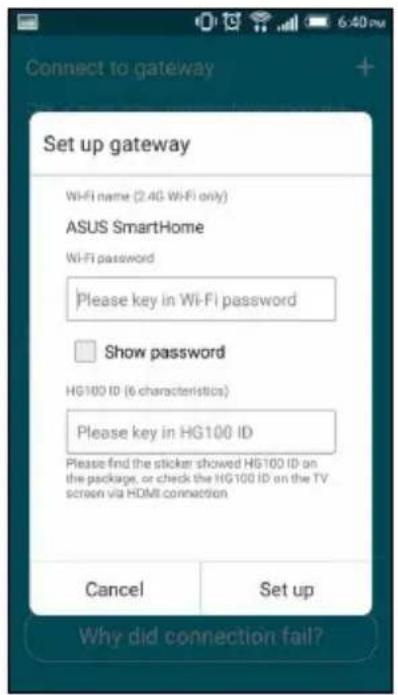
Setting up the companion app
Step 1 Step 2 Step 3
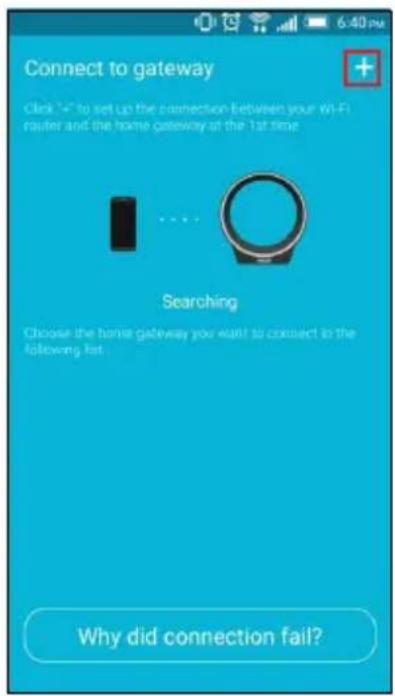
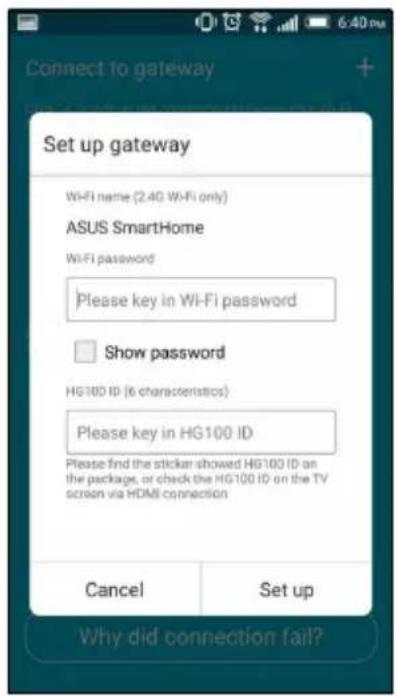
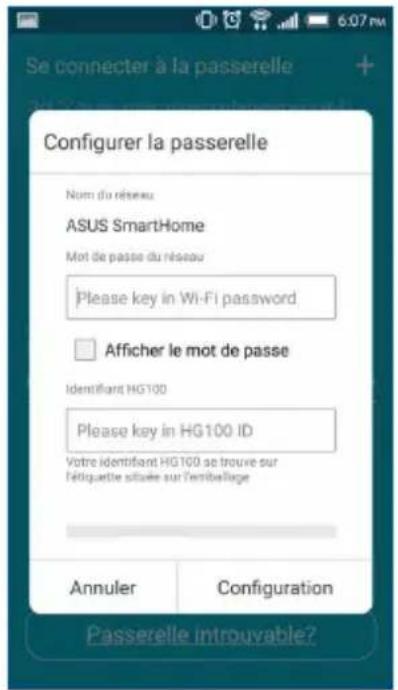
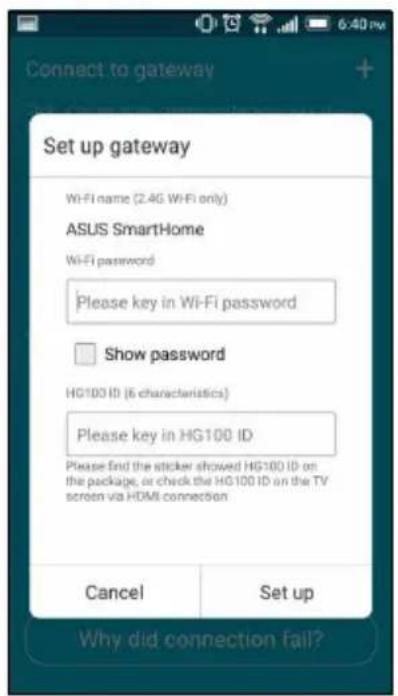
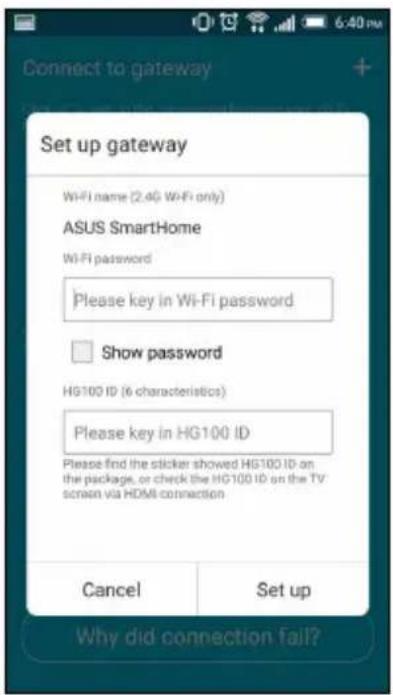
Launch the companion app, enter your Email and Password, then tap Log in. If you do not have an account yet, tap Create an account.
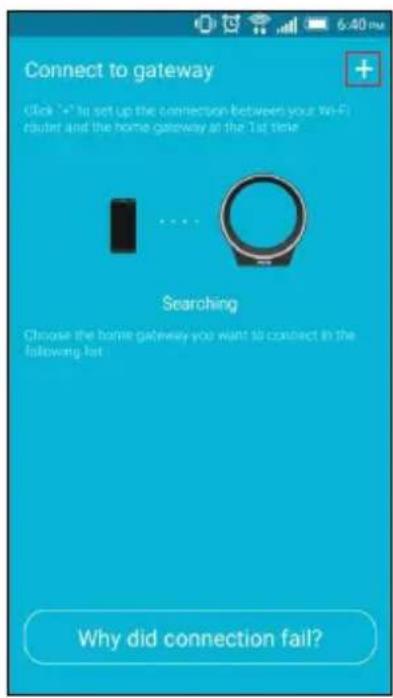
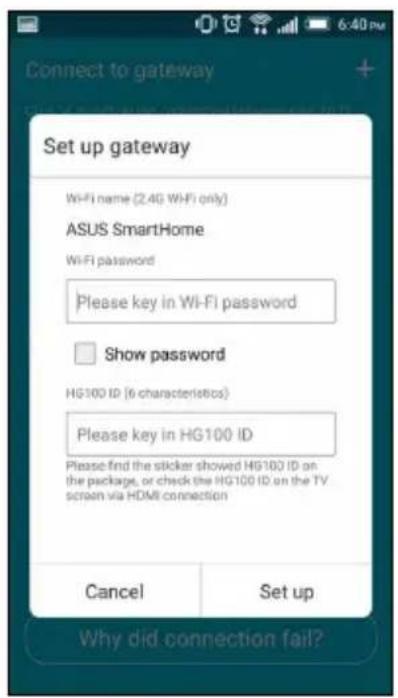
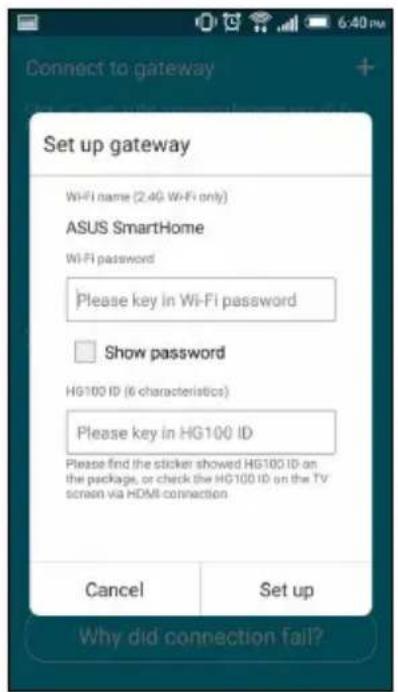
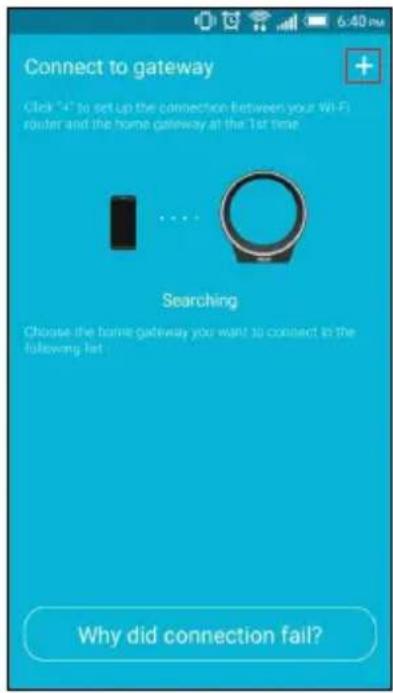
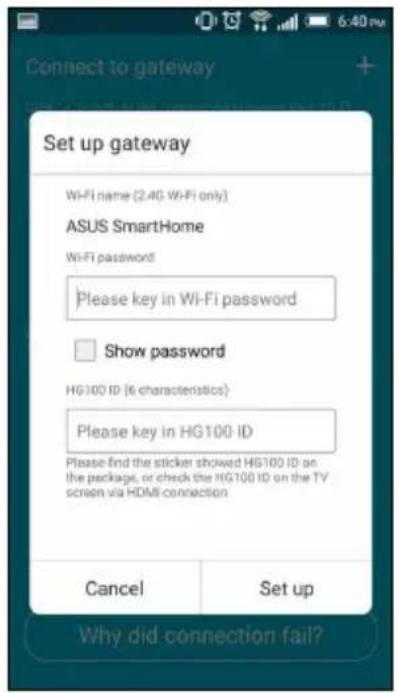
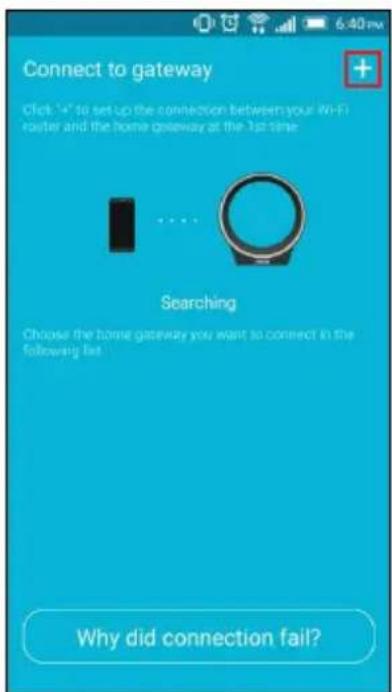
Tap and choose the gateway ID that matches the gateway ID on your package box, and follow the onscreen instructions.
Choose the Wi-Fi network (2.4G wifi only) you would like to connect as the home network and follow the onscreen instructions.

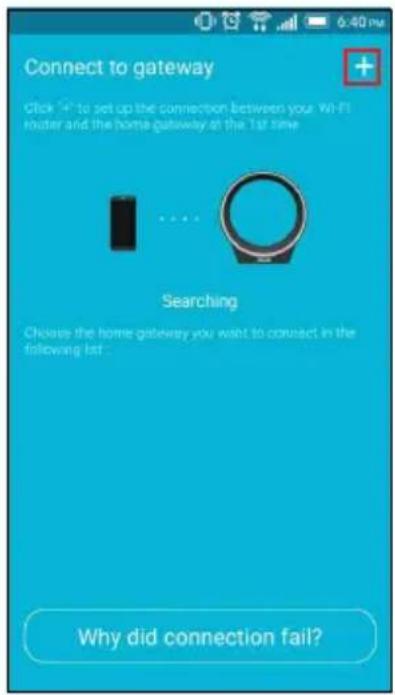
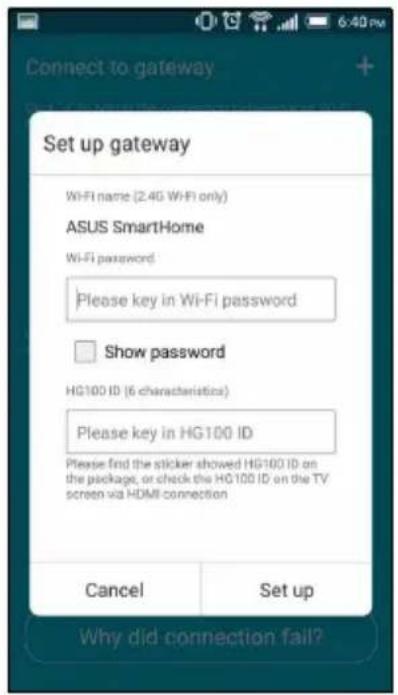
IMPORTANT! Ensure to use the same Wi-Fi network if you want to connect your mobile device to your HG100 wirelessly.
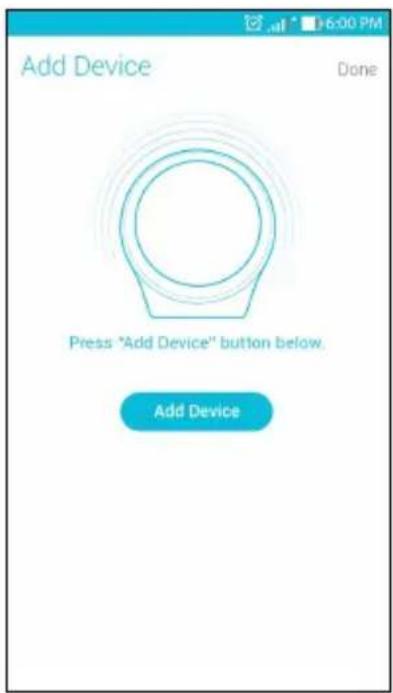
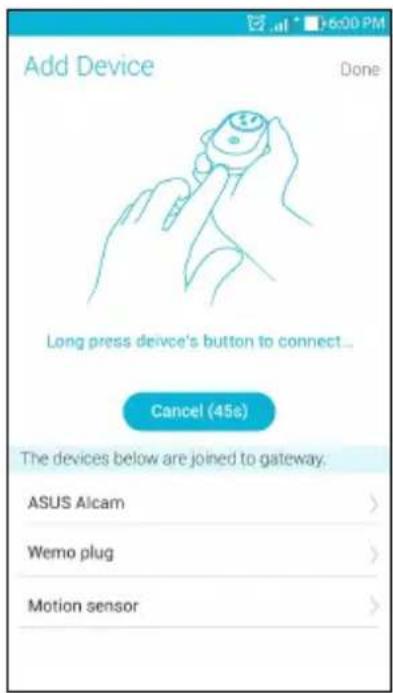
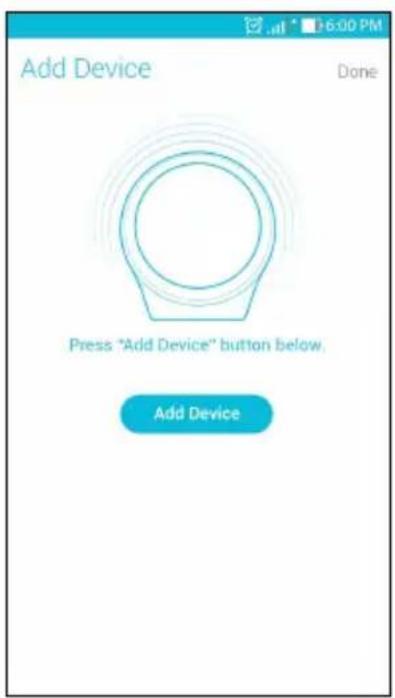
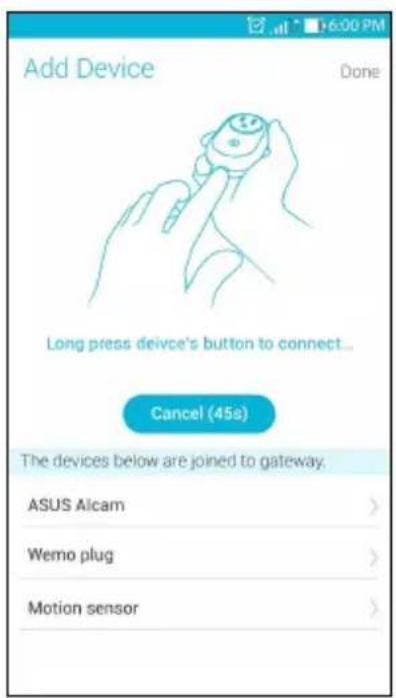
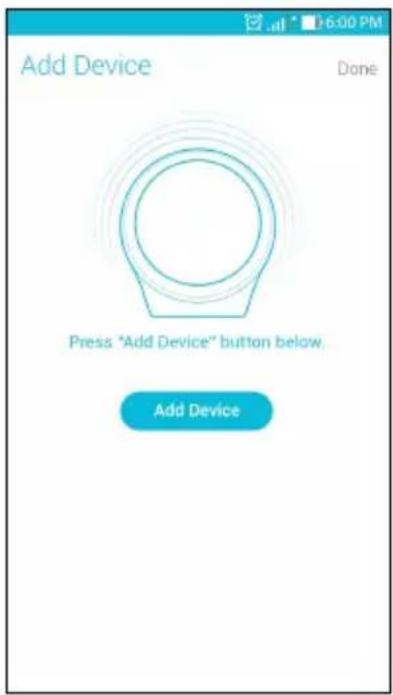
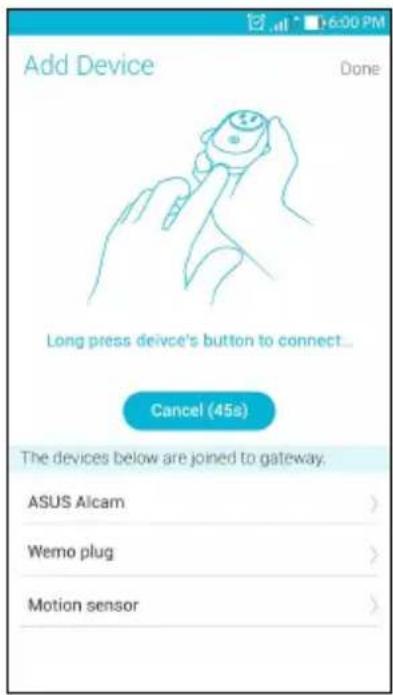
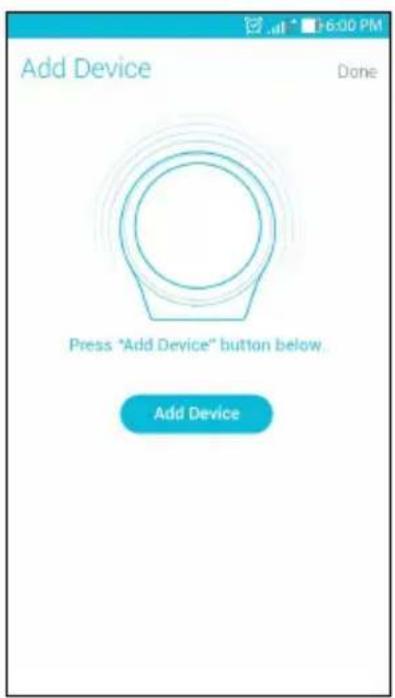
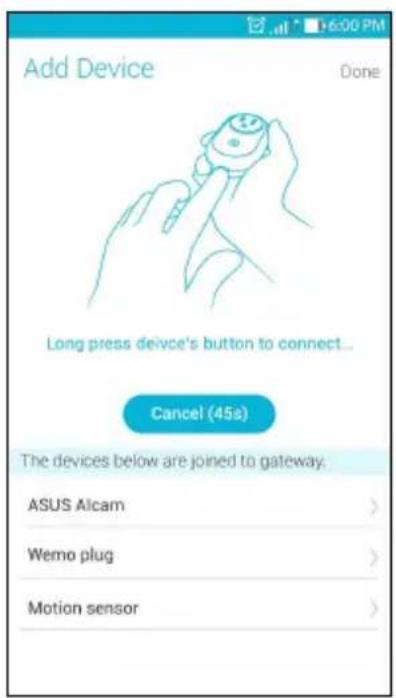
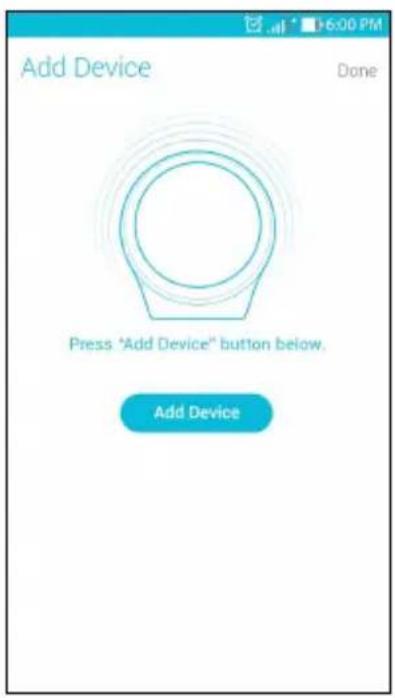
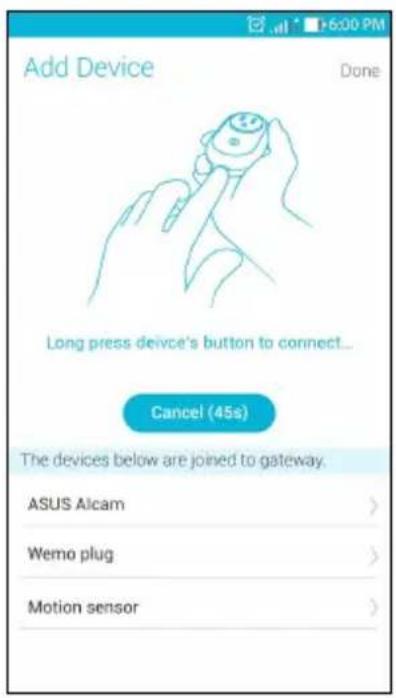
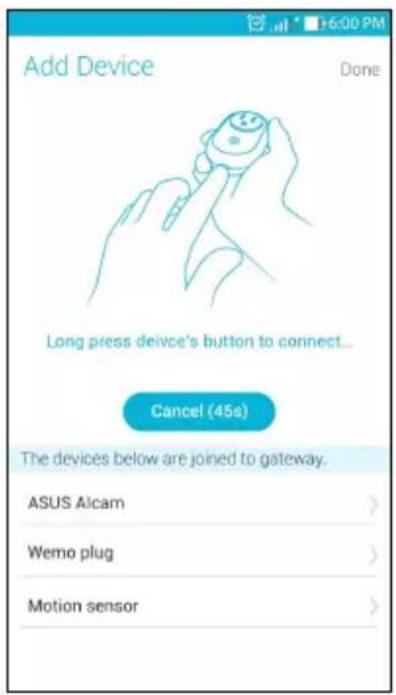
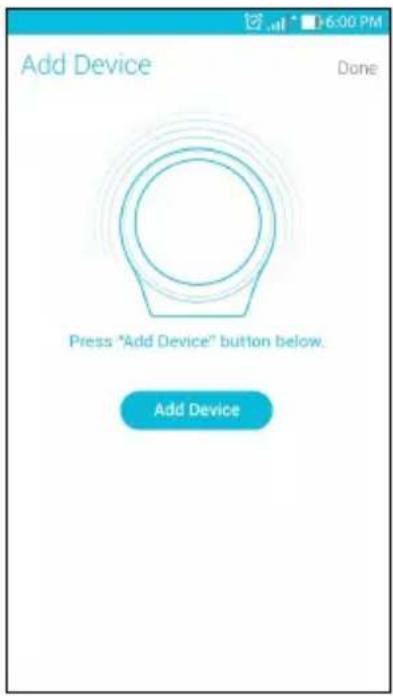
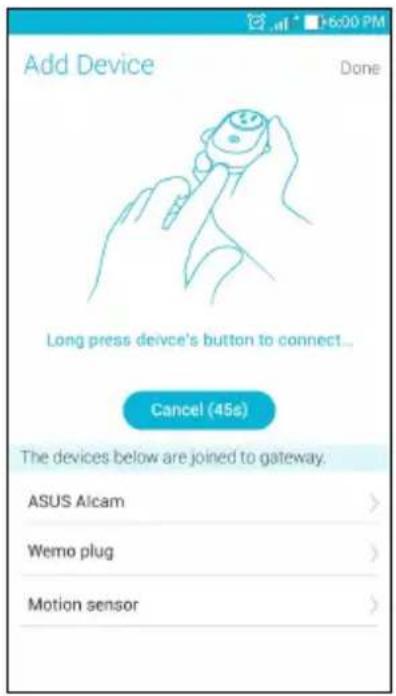
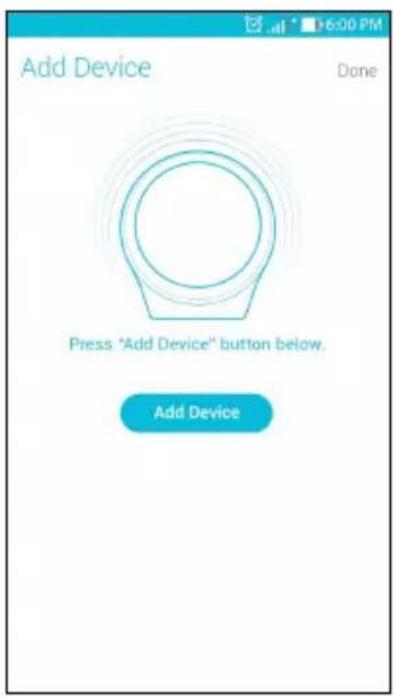
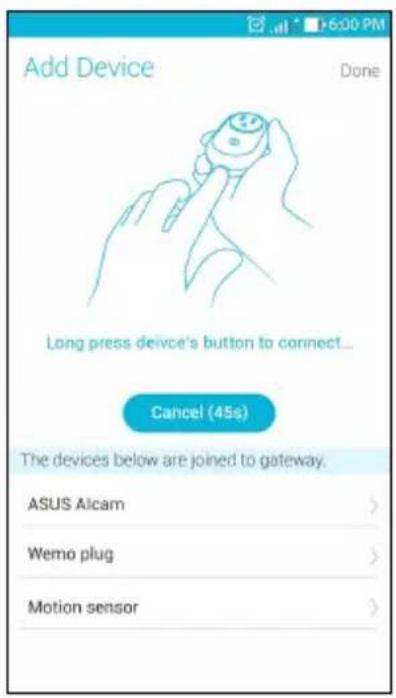
Adding devices
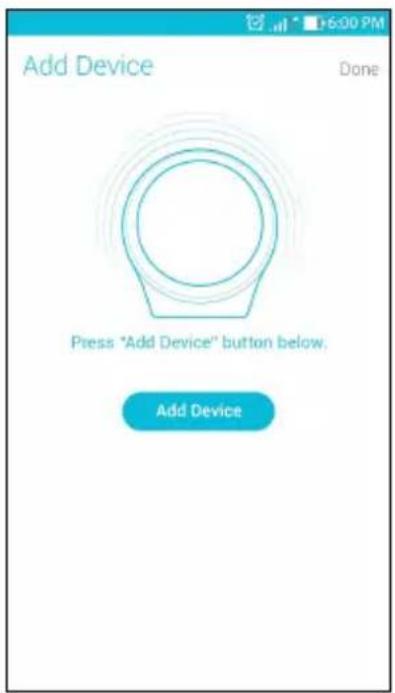
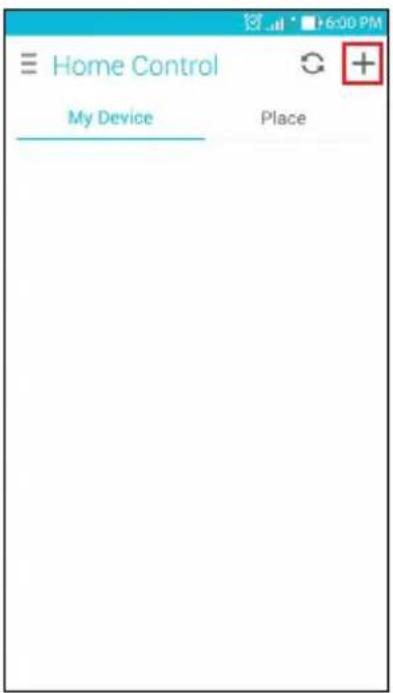
- Tap + on the main page of Home Control to add devices for the home gateway.
- Tap Add Device on your companion app.
NOTE: The LED status indicator on your HG100 will blink blue for sixty (60) seconds to indicate that devices can be added.
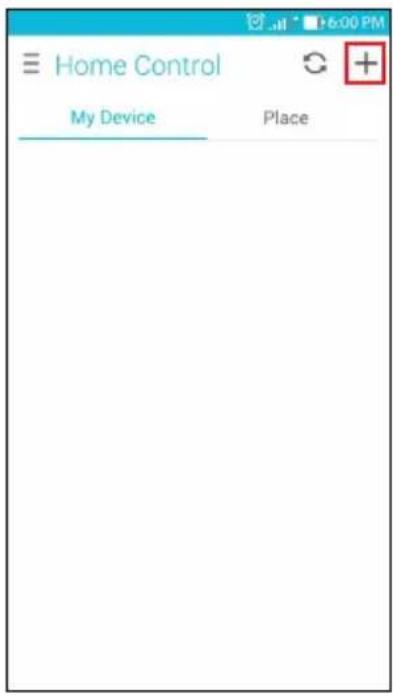
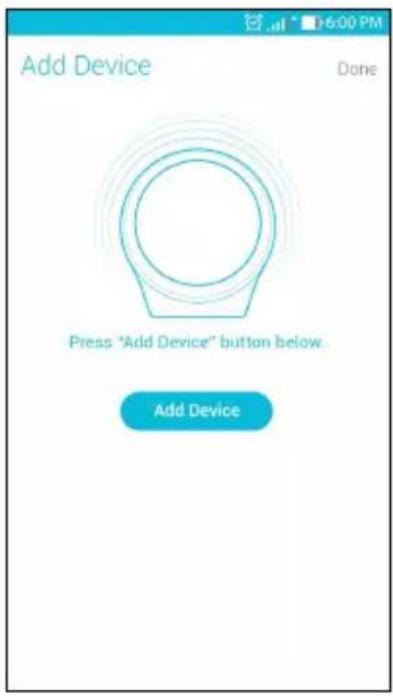
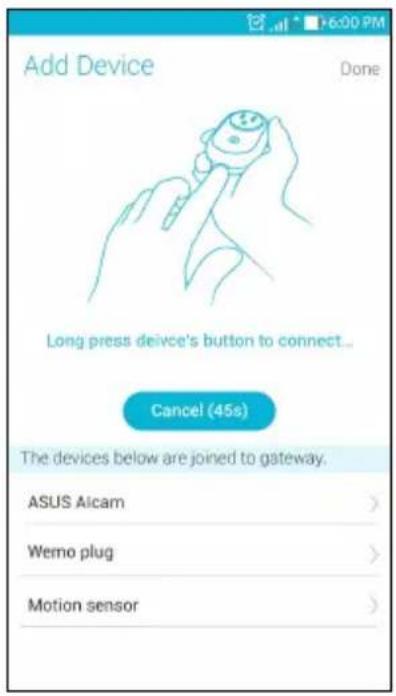
- Press the Zigbee join button on your ASUS Smart Home device to add the device.
Technical support
This manual is a guide for setting up your device for the first time only. Actual product content and app screen may vary per firmware and updates. Please refer to the ASUS support site for more information:
http://www.asus.com/microsite/asus-smart-home/

Working with the companion app
Home Control
The Home Control screen allows you to view your connected devices and home places. You can turn the connected devices ON or OFF, edit the device details, and sort the devices. You can also group your connected devices on the Home Control screen into places and scenes. Tap the icon next to the item you want to customize for more options.
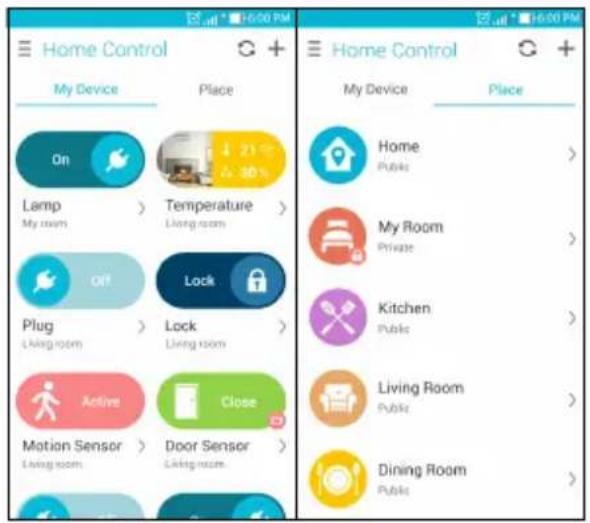
NOTE: Ensure to reset your ASUS Smart Home device and delete the device from the companion app to remove it completely.
Home Action
The Home Action screen allows you to view the actions you set to perform when a condition is triggered. You can also turn the actions ON or OFF on the Home Action screen.
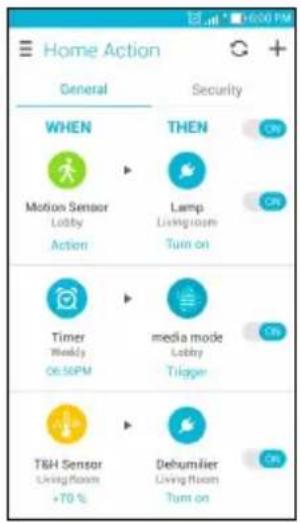
NOTE:
- A Notifier is set as a default action for THEN for security related devices, you can change the settings to preform other actions
- You can set a time to trigger the WHEN.
Settings
You can change various settings in this screen to better meet your daily needs.
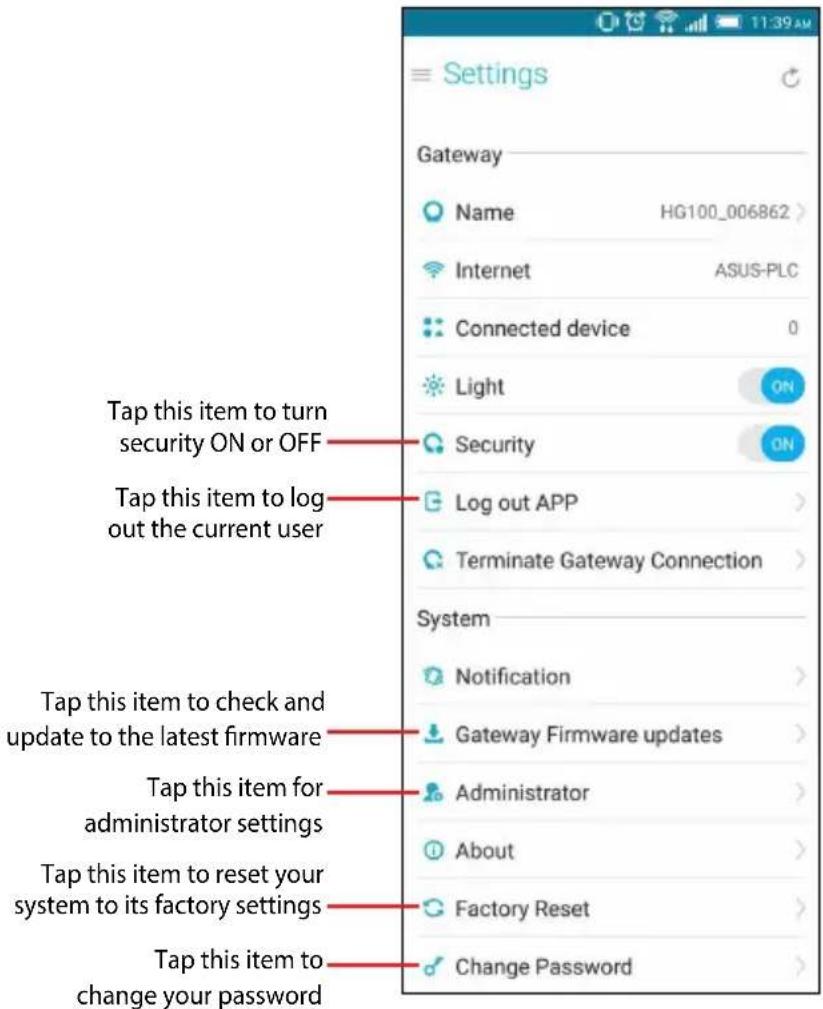
NOTE: The password is used for Security, Administrator, and Factory Reset.
Security
The HG100 comes with a security feature that requires a password (default 0000) when you connect to your HG100. To turn this feature ON or OFF, navigate to the Settings screen, then tap Security.
NOTE: To change your password, navigate to the Settings screen and tap Change Password.
Administrator
The Administrator menu allows you to change various options for the members and places.
To access the administrator menu:
- Navigate to the Settings screen, then tap Administrator.
- Enter your password (default 0000).
- Tap Place or Member to view the places or members connected to your HG100.
- Tap the item you want to customize for more options.
NOTE: To change your password, navigate to the Settings screen and tap Change Password.
包装内容物
natural_image
Line drawing of a circular object with a base labeled 'ASUS' (no other text or symbols)ASUS HG100
電源變壓器
電源線
HDMI 傳輸線
使用手册與保固卡
重要!
natural_image
Diagram of a circular device with labeled 'ASUS' and number '1' pointing to its side (no text or symbols on the device itself)
1 LED 狀態指示燈
重要!電源變壓器資訊:
• 輸入電壓:100-240Vac
- 輸入頻率:60Hz
- 輸出電流:2A (10W)
- 輸出電壓功率:5V
安裝專屬 app
更多 APP 功能
智慧控制
natural_image
Line drawing of a circular electronic device with a base labeled 'ASUS' (no additional text or symbols)ASUS HG100
电源变压器
电源线
HDMI 数据线
用户手册与保固卡
重要!
natural_image
Diagram of a circular device with labeled 'ASUS' and number '1' pointing to its side (no text or symbols on the device itself)

1 LED 状态指示灯
重要!电源变压器资讯:
更多 APP 功能
智慧控制
natural_image
Simple line drawing of a circular object with a base labeled 'ASUS' (no text or symbols on the object itself)ASUS HG100
Блок питания
питания
HDMI кабель
natural_image
Diagram of a circular device with labeled 'ASUS' and number '1' pointing to its side (no text or symbols on the device itself)


Индикатор
ПРИМЕЧАНИЕ:
natural_image
Line drawing of a circular electronic device with 'ASUS' branding at the base (no other text or symbols)ASUS HG100
natural_image
Diagram of a circular device with labeled 'ASUS' and number '1' pointing to its side (no text or symbols on the device itself)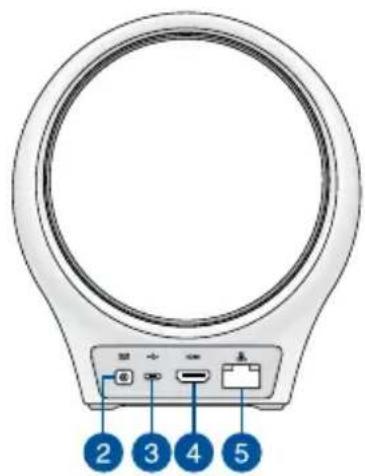
natural_image
Simple line drawing of a circular object with a base labeled 'ASUS' (no text or symbols on the object itself)ASUS HG100
natural_image
Diagram of a circular device with labeled 'ASUS' and number '1' pointing to its side (no other text or symbols)

natural_image
Line drawing of a circular object with a base labeled 'ASUS' (no other text or symbols)ASUS HG100
natural_image
Diagram of a circular device with labeled 'ASUS' and number '1' pointing to its side (no text or symbols on the device itself)

Utiliser l'application compagnon
Home Control
natural_image
Rear view of a circular electronic device with 'ASUS' branding at the base (no other text or symbols visible)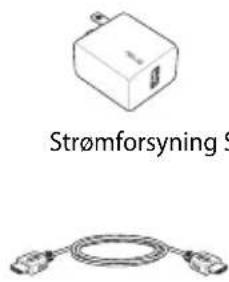
HDMI-kabel
natural_image
Diagram of a circular device with labeled 'ASUS' and number '1' pointing to its side (no text or symbols on the device itself)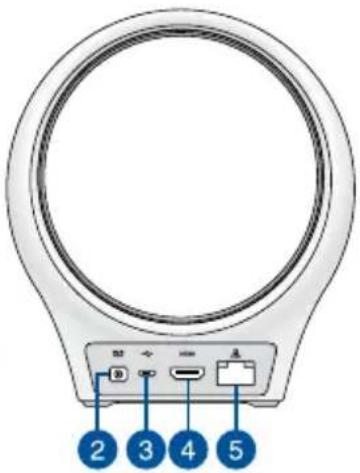
1 LED statusindikator
VIGTIGT! Oplysninger om strømforsyningen:

VIGTIGT! Sørg for at bruge det samme Wi-Fi-netværk, hvis du ønsker at forbinde din mobile enhed trådløst til din HG100.
Tilføje enheder
BEMÆRK:
natural_image
Simple line drawing of a circular object with 'ASUS' branding at the base (no text or symbols on the object itself)ASUS HG100
HDMI-kabel
natural_image
Diagram of a circular device with labeled 'ASUS' and number '1' pointing to its side (no other text or symbols)

1 LED-statusindikator
TIPS:
natural_image
Line drawing of a circular object with 'ASUS' branding at the base (no other text or symbols)ASUS HG100

Verkkolaite
Virtakaapeli

HDMI-kaapeli
natural_image
Diagram of a circular electronic device with a base labeled 'ASUS' and a blue arrow pointing to the top-right corner (no text or symbols on the device itself)


LED-tilamerkkivalo
HUOMAUTUS:
natural_image
Simple line drawing of a circular device with a base, no text or symbols present.ASUS HG100
VIKTIGT!
natural_image
Diagram of a circular electronic device with a labeled component (no text or symbols beyond 'ASUS' and number 1)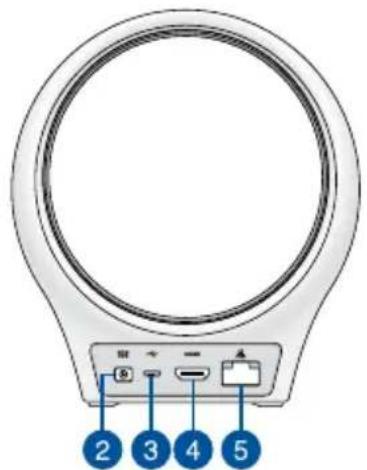

1 LED-statusindikator
VIKTIGT! Information om strömadaptern:

Arbeta med leverantörens app
Hemkontroll
OBS!
natural_image
Line drawing of a circular object with a base labeled 'ASUS' (no other text or symbols)ASUS HG100
natural_image
Diagram of a circular device with a base labeled 'ASUS' and a blue arrow pointing to the top-right corner (no text or symbols on the device itself)


NOTA:
natural_image
Circular object with a flat top and base, labeled 'ASUS' at the bottom (no other text or symbols)ASUS HG100
Cabo HDMI
natural_image
Diagram of a circular device with labeled 'ASUS' and number '1' pointing to its side (no text or symbols on the device itself)

NOTA:
natural_image
Line drawing of a circular object with 'ASUS' branding at the base (no other text or symbols)ASUS HG100
Zasilacz
Kabel zasilający
Kabel HDMI
natural_image
Diagram of a circular device with a base labeled 'ASUS' and a blue arrow pointing to the ring (no text or symbols beyond label)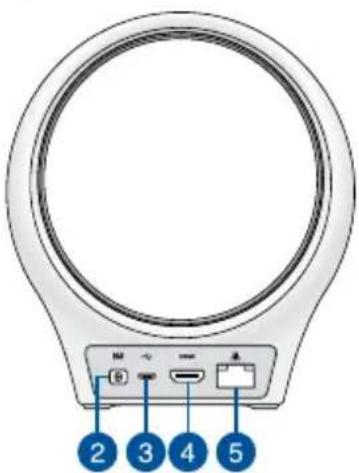
UWAGA:
natural_image
Line drawing of a circular object with a base labeled 'ASUS' (no other text or symbols)ASUS HG100
Napájecí adaptér
Napájecí kabel
Kabel HDMI
natural_image
Rear view of a circular electronic device with a blue indicator line and 'ASUS' label (no text or symbols on the device itself)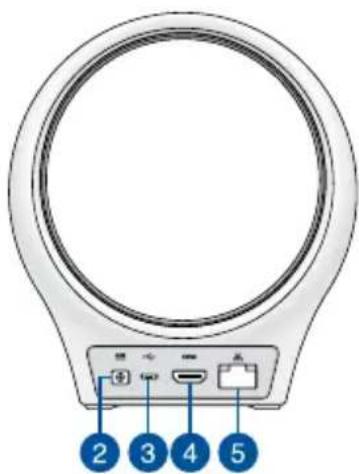
natural_image
Simple line drawing of a circular object with a base labeled 'ASUS' (no text or symbols on the object itself)ASUS HG100
natural_image
Diagram of a circular device with labeled 'ASUS' and number '1' pointing to its side (no other text or symbols)

対応アプリと使用する
ホームコントロール
natural_image
Simple line drawing of a circular object with 'ASUS' branding at the base (no text or symbols on the object itself)ASUS HG100

natural_image
Two technical illustrations: a cable with connector and a flat sheet of paper (no text or symbols)natural_image
Diagram of a circular device with labeled 'ASUS' and number '1' pointing to its side (no other text or symbols)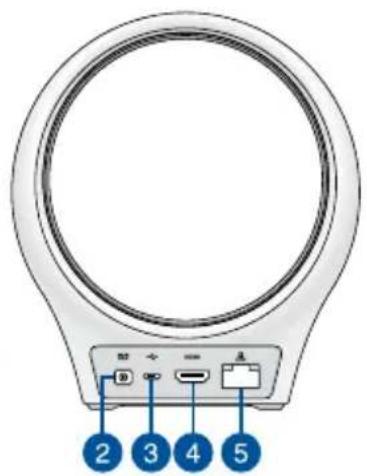
Yeuroch证监会
1

إضافة الجهاز. ASUS Smart Home (Zigbee) Zigbee join button 3. اض Compact

الدعم الفني
ملاحظة:
ت Connectivity Least Quantitative Management.
Federal Communications Commission Interference Statement
This equipment has been tested and found to comply with the limits for a Class B digital device, pursuant to part 15 of the FCC Rules. These limits are designed to provide reasonable protection against harmful interference in a residential installation. This equipment generates, uses and can radiate radio frequency energy and, if not installed and used in accordance with the instructions, may cause harmful interference to radio communications. However, there is no guarantee that interference will not occur in a particular installation. If this equipment does cause harmful interference to radio or television reception, which can be determined by turning the equipment off and on, the user is encouraged to try to correct the interference by one or more of the following measures:
-Reorient or relocate the receiving antenna.
-Increase the separation between the equipment and receiver.
-Connect the equipment into an outlet on a circuit different from that to which the receiver is connected.
-Consult the dealer or an experienced radio/ TV technician for help.

CAUTION! Any changes or modifications not expressly approved by the grantee of this device could void the user's authority to operate the equipment.
This device complies with Part 15 of the FCC Rules. Operation is subject to the following two conditions: (1) this device may not cause harmful interference, and (2) this device must accept any interference received, including interference that may cause undesired operation.
RF exposure warning
This equipment must be installed and operated in accordance with provided instructions and the antenna(s) used for this transmitter must be installed to provide a separation distance of at least 20 cm from all persons and must not be co-located or operating in conjunction with any other antenna or transmitter. End-users and installers must be provide with antenna installation instructions and transmitter operating conditions for satisfying RF exposure compliance.
Canada, Industry Canada (IC) Notices
This device complies with Canada licence-exempt RSS standard(s).
Operation is subject to the following two conditions: (1) this device may not cause interference, and (2) this device must accept any interference, including interference that may cause undesired operation of the device.
Canada, avis d'Industry Canada (IC)
Radio Frequency (RF) Exposure Information
The radiated output power of the Wireless Device is below the Industry Canada (IC) radio frequency exposure limits. The Wireless Device should be used in such a manner such that the potential for human contact during normal operation is minimized.
This device has also been evaluated and shown compliant with the IC RF Exposure limits under mobile exposure conditions. (antennas are greater than 20cm from a person's body).
Regional notice for California
WARNING! This product may contain chemicals known to the State of California to cause cancer, birth defects or other reproductive harm. Wash hands after handling.
ASUS Recycling/Takeback Services
ASUS recycling and takeback programs come from our commitment to the highest standards for protecting our environment. We believe in providing solutions for you to be able to responsibly recycle our products, batteries, other components as well as the packaging materials. Please go to http://csr.asus.com/english/Takeback.htm for detailed recycling information in different regions.
NCC 警語:
English AsusTek Inc. hereby declares that this device is in compliance with the essential requirements and other relevant provisions of CE Directives. Please see the CE Declaration of Conformity for more details.
DECLARATION OF CONFORMITY
EU Declaration of Conformity
| Manufacturer: | ASUSTEK COMPUTER INC. |
| Address: | 4F, No. 150, LPE RE, PEUTO, TAPEI 112, TAWAN |
| Authorized representative in Europe: | ASUS COMPUTER GmbH |
| Address, City: | HARKORT STR. 2T-23, 40880 RATINGEN |
| Country: | GERMANY |
Responsible Party Name: Asus Computer International
Address: 800 Corporate Way, Fremont, CA 94539.
Phone/Fax No: (510)739-3777/(510)608-4555
hereby declares that the product
Product Name : SmartHome Gateway
Model Number: HG100
Conforms to the following specifications:
☒ FCC Part 15, Subpart B, Unintentional Radiators
Supplementary Information:
This device complies with part 15 of the FCC Rules. Operation is subject to the following two conditions: (1) This device may not cause harmful interference, and (2) this device must accept any interference received, including interference that may cause undesired operation.
Representative Person's Name : Steve Chang / President

Signature :
Original Declaration Date : May. 17, 2016 Corrected Declaration Date : Nov. 9, 2016
| Manufacturer ASUSTek COMPUTER INC. | |
| Address 4F No. 150, LI-TE RD., PEITOU, TAIPEI 112, TAIWAN | |
| Authorized Representative in Europe | ASUS COMPUTER GmbH |
| Address HARKORT STR. 21-23, 40880 RATINGEN, GERMANY | |