SmartHome Meter Plug MW250 - Smart Home ASUS - Free user manual and instructions
Find the device manual for free SmartHome Meter Plug MW250 ASUS in PDF.

User questions about SmartHome Meter Plug MW250 ASUS
0 question about this device. Answer the ones you know or ask your own.
Ask a new question about this device
Download the instructions for your Smart Home in PDF format for free! Find your manual SmartHome Meter Plug MW250 - ASUS and take your electronic device back in hand. On this page are published all the documents necessary for the use of your device. SmartHome Meter Plug MW250 by ASUS.
USER MANUAL SmartHome Meter Plug MW250 ASUS
natural_image
Line drawing of a USB flash drive with power button and two socket ports (no text or symbols)A12196
First Edition
February 2017
Product specifications
| Wireless | ZigBee PRO |
| Operation Range | 100 m (without obstruction) |
| Operation Interface | ZigBee button; Power button |
| LED Indicator | White for power buttonBlue for ZigBee buttonBlue for over current protection |
| Operating Voltage / Over Current Protection | MW250: 250VAC, 13AMW500: 240VAC, 8A(refer to input/output rating information for more details) |
| Operating Temperature | 0~40°C |
| Operating Humidity | 0~90% |
NOTE: Specifications subject to change without notice.
Technical support
This manual is a guide for setting up your device for the first time only. Actual product content and app screen may vary per firmware and updates. Please refer to the ASUS support site for more information:

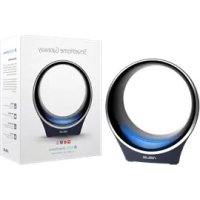
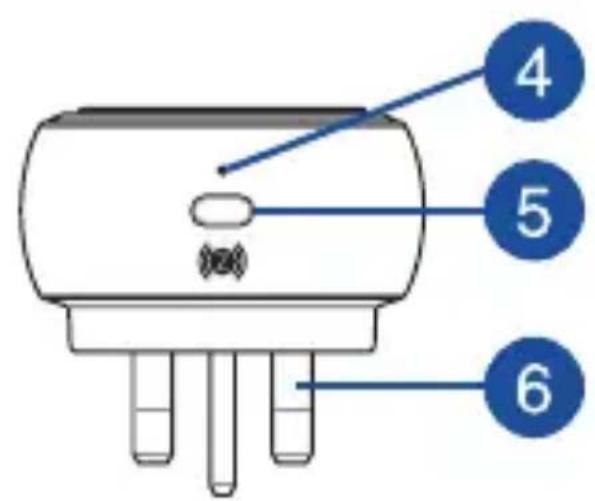
Product overview
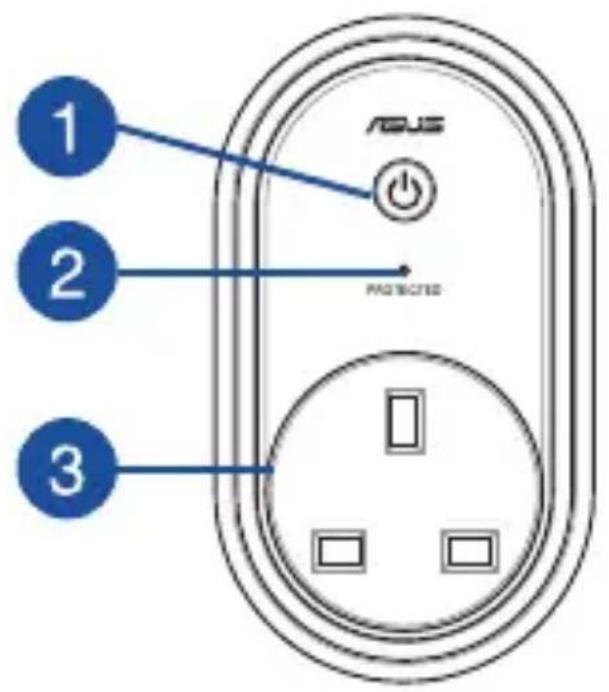

Power button with ON/OFF LED indicator
Press this button to turn the ASUS MW Series Wireless Smart Plug on or off. The LED turns white when the ASUS MW Series Wireless Smart Plug is turned on.

Protected LED indicator (on selected models)
This LED indicator will light up when the over current protection functions normally.
NOTE: If this LED indicator does not light up, turn the ASUS MW Series Wireless Smart Plug off and on again. If the incident continues, consult an authorized ASUS service center.

Power socket
Power socket may vary in appearance, depending on models and your region.

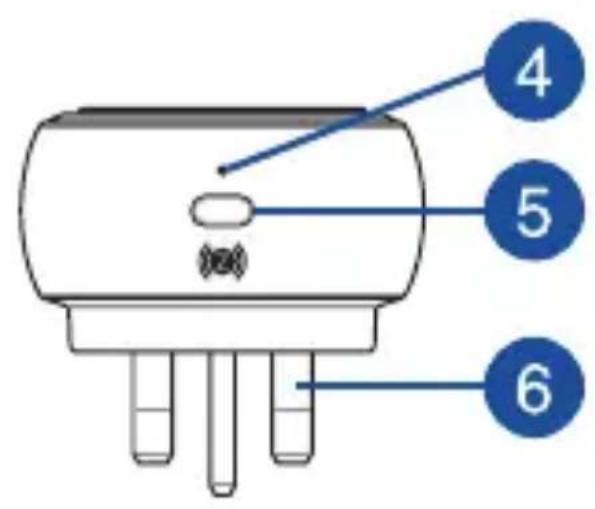
ZigBee LED indicator
Refer to the following table for details on the LED status indicator:
| Color Status Description | ||
| Solid Blue | Device powering on Lights up for 1 second | |
| Disconnecting with home gateway | Press and hold the ZigBee button for 5 seconds | |
| Identifying device Lights up for 5 seconds | ||
| Blinking Blue | Connecting with home gateway | Press the ZigBee button to connect with home gateway |

ZigBee button
Press to connect with home gateway. Press and hold for 5 seconds to reset the device.
NOTE: Ensure to reset your ASUS Smart Home device and delete the device from the companion app to remove it completely.

Power plug
Power plug may vary in appearance, depending on models and your region.
System requirements
- Three-prong outlet. DO NOT remove the ground prong.
- iOS or Android smartphone.
- Wi-Fi router with Internet access.
- Asus SmartHome gateway and SmartHome user account.
Safety tips
- DO NOT use this device for air conditioners, fridges, ovens or other high power consumption electrical appliances.
- Check the power rating on your electrical appliances before using it with this device.
- DO NOT connect power strips to this device.
- DO NOT attempt to repair the product yourself.
- Minimize the exposure to moisture including wet hands and direct contact with liquids.
- Use soft, dry cloth to clean and avoid cleaning with water, alcohol or other chemicals.
Installing ASUS SmartHome app
- This device can be set up and operated though the companion app. Search for ASUS SmartHome and download the companion app through the Apple App Store or Google Play.
- Ensure you have Internet connection before downloading.
- Ensure your smartphone is connected to your router before setting up.

ASUS
SmartHome
Refer to a qualified vendor or the ASUS website for the minimum system requirements.
Getting started
Connecting to your HG 100
-
Launch the ASUS SmartHome APP.
-
Tap + on the main page of Home Control to add devices for the home gateway.
-
Tap Add Device to join your ASUS SmartHome device to the SmartHome Gateway.
-
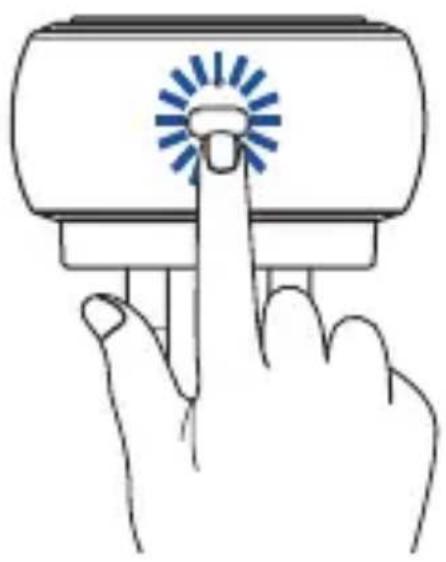
Press the Zigbee button on your ASUS Smart Home device to add the device.
natural_image
Illustration of a hand pressing a button with a blue circular indicator light (no text or symbols)NOTE: After tapping Add Device, you can press the
ZigBee button on all your ASUS Smart Home devices to add them all at once.
5. Tap Done once all the devices are added to complete.
NOTE:
- Ensure the ASUS MW Series Wireless Smart Plug is plugged to a power source before connecting. Refer to the LED indicator to check the status of your device.
- Ensure that your device is within 100 meters of your ASUS SmartHome Gateway, and there are no obstructions such as thick solid walls or other electronic devices that may cause interference.
- The LED status indicator on your ASUS SmartHome Gateway will blink blue for sixty (60) seconds to indicate that devices can be added.
- Ensure to reset your ASUS Smart Home device and delete the device from the companion app to remove it completely.
Additional information
- This device is set to OFF by default.
- This device will update data to the Home Gateway every 10 minutes. You can view the data through the companion app.
- When this device loses power, the companion app will display a gray icon and cannot be configured. The status will be updated every 10 minutes.
產品規格
產品功能介紹


natural_image
Illustration of a hand pressing a button with a blue circular indicator light (no text or symbols)
.ASUS SmartHome APP

natural_image
Illustration of a hand pressing a button with a blue circular indicator light (no text or symbols)Federal Communications Commission Interference Statement
This equipment has been tested and found to comply with the limits for a Class B digital device, pursuant to part 15 of the FCC Rules. These limits are designed to provide reasonable protection against harmful interference in a residential installation. This equipment generates, uses and can radiate radio frequency energy and, if not installed and used in accordance with the instructions, may cause harmful interference to radio communications. However, there is no guarantee that interference will not occur in a particular installation. If this equipment does cause harmful interference to radio or television reception, which can be determined by turning the equipment off and on, the user is encouraged to try to correct the interference by one or more of the following measures:
-Reorient or relocate the receiving antenna.
-Increase the separation between the equipment and receiver.
- Connect the equipment into an outlet on a circuit different from that to which the receiver is connected.
-Consult the dealer or an experienced radio/ TV technician for help.
CAUTION! Any changes or modifications not expressly approved by the grantee of this device could void the user's authority to operate the equipment.
This device complies with Part 15 of the FCC Rules. Operation is subject to the following two conditions: (1) this device may not cause harmful interference, and (2) this device must accept any interference received, including interference that may cause undesired operation.
RF exposure warning
This equipment must be installed and operated in accordance with provided instructions and the antenna(s) used for this transmitter must be installed to provide a separation distance of at least 20 cm from all persons and must not be co-located or operating in conjunction with any other antenna or transmitter. End-users and installers must be provide with antenna installation instructions and transmitter operating conditions for satisfying RF exposure compliance.
Canada, Industry Canada (IC) Notices
This device complies with Canada licence-exempt RSS standard(s).
Operation is subject to the following two conditions: (1) this device may not cause interference, and (2) this device must accept any interference, including interference that may cause undesired operation of the device.
Canada, avis d'Industry Canada (IC)
ASUS recycling and takeback programs come from our commitment to the highest standards for protecting our environment. We believe in providing solutions for you to be able to responsibly recycle our products, batteries, other components as well as the packaging materials. Please go to http://csr.asus.com/english/Takeback.htm for detailed recycling information in different regions.
Radio Frequency (RF) Exposure Information
The radiated output power of the Wireless Device is below the Industry Canada (IC) radio frequency exposure limits. The Wireless Device should be used in such a manner such that the potential for human contact during normal operation is minimized.
This device has also been evaluated and shown compliant with the IC RF Exposure limits under mobile exposure conditions. (antennas are greater than 20cm from a person's body).
English ASUSTeK Computer Inc. hereby declares that this device is in compliance with the essential requirements and other relevant provisions of related Directives. Full text of EU declaration of conformity is available at: www.asus.com/support
Regional notice for Singapore
Complies with IMDA Standards DB103778
This ASUS product complies with IMDA Standards.