NAG230 - Angle grinder Nutool - Free user manual and instructions
Find the device manual for free NAG230 Nutool in PDF.
| Product type | Angle grinder |
| Brand | Nutool |
| Model | NAG230 |
| Power supply | 230 V - 50 Hz |
| Power consumption | 2000 W |
| No-load speed | 6500 min-1 |
| Maximum disc diameter | 230 mm |
| Disc attachment | M14 |
| Weight | 4.6 kg |
| Sound pressure level (LpA) | 93 dB(A) |
| Sound power level (LwA) | 104 dB(A) |
| Vibration level | 4.19 m/s2 |
| Main functions | Grinding, cutting (with optional accessory) |
| Maintenance and cleaning | Regularly clean the ventilation slots; keep handles clean and dry. |
| Safety | Wear protective equipment (goggles, gloves, mask, hearing protection); use the protective guard; unplug before any adjustments. |
| Supplied accessories | Wrench, side handle, protective guard |
| Warranty | 2 years |
| After-sales service | Contact your dealer or Nutool customer service |
Frequently Asked Questions - NAG230 Nutool
User questions about NAG230 Nutool
0 question about this device. Answer the ones you know or ask your own.
Ask a new question about this device
Download the instructions for your Angle grinder in PDF format for free! Find your manual NAG230 - Nutool and take your electronic device back in hand. On this page are published all the documents necessary for the use of your device. NAG230 by Nutool.
USER MANUAL NAG230 Nutool
(Original instructions)
FR Meuleuse d'angle
m = 311 ;
GB - Waste electrical and electronic equipment (WEEE), should not be disposed of with household waste. Please recycle where facilities exist. Check with your Local Authority or retailer for recycling advice.
Important! The wires in the mains lead fitted to this product are coloured in accordance with the following code:
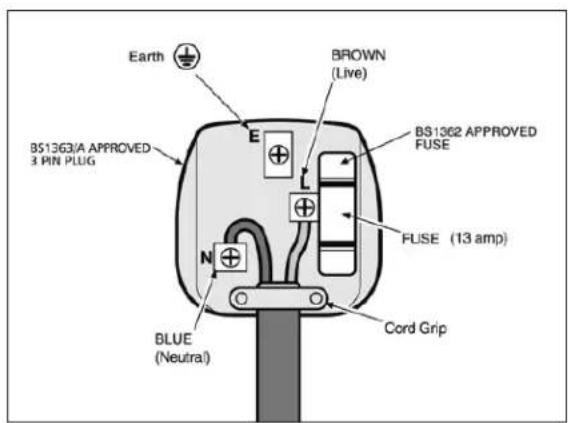
THIS PRODUCT IS DOUBLE INSULATED AND THEREFORE DOES NOT REQUIRE A CONNECTION TO EARTH. THE 3 PIN PLUG MUST COMPLY TO BS1363/A. FUSE MUST COMPLY TO BS1362.

Brown:Live (L) or Red Blue: Neutral (N) or Black
If for any reason the 13 amp plug fitted to this product requires replacement it must be wired in accordance with the following instruction:
DO NOT CONNECT THE BROWN LIVE OR BLUE NEUTRAL TO THE EARTH PIN MARKED 'E' ON THE 3 PIN PLUG.
Connect the Blue wire to the terminal marked Neutral (N). Connect the Brown wire to the terminal marked Live (L). Ensure that the outer insulation is gripped by the cord grip and that the wires are not trapped when replacing the plug cover. The mains lead on this product is fitted with a 13 amp (BS1363/A) plug. A 13 amp (BS1362) fuse must be fitted in the plug.
IF IN DOUBT CONSULT A QUALIFIED ELECTRICIAN
There are no user serviceable parts inside this product except those referred to in the manual. Always refer servicing to qualified service personnel. Never remove any part of the casing unless qualified to do so; this unit contains dangerous voltages.
WARNING!
For your protection if this product is to be used outdoors it should not be exposed to rain or used in damp locations. Do not place the product on damp surfaces, use a workbench if available. For added protection use a suitable residual current device (R.C.D.) at the socket outlet.
GB
INTRODUCTION
Thankyou for purchasing this product which has passed through our extensive quality assurance process. Every care has been taken to ensure that it reaches you in perfect condition. However, in the unlikely event that you should experience a problem, or if we can offer any assistance or advice please do not hesitate to contact our customer care department. For details of your nearest customer care department please refer to the telephone numbers at the back of this manual.
SAFETY FIRST
Before attempting to operate this power tool the following basic safety precautions should always be taken to reduce the risk of fire, electric shock and personal injury. It is important to read the instruction manual to understand the application, limitations and potential hazards associated with this tool.
CERTIFICATE OF GUARANTEE
This product is guaranteed for a period of 2 Years, with effect from the date of purchase and applies only to the original purchaser. This guarantee only applies to defects arising from, defective materials and or faulty workmanship that become evident during the guarantee period only and does not include consumable items. The manufacturer will repair or replace the product at their discretion subject to the following. That the product has been used in accordance with the guide lines as detailed in the product manual and that it has not been subjected to misuse, abuse or used for a purpose for which it was not intended. That it has not been taken apart or tampered with in any way whatsoever or has been serviced by unauthorised persons or has been used for hire purposes. Transit damage is excluded from this guarantee, for such damage the transport company is responsible. Claims made under this guarantee must be made in the first instance, directly to the retailer within the guarantee period. Only under exceptional circumstances should the product be returned to the manufacturer. In these case it shall be the consumer's responsibility to return the product at their cost ensuring that the product is adequately packed to prevent transit damage and must be accompanied with a brief description of the fault and a copy of the receipt or other proof of purchase. The manufacturer shall not be liable for any special, exemplary, direct, indirect, incidental, or consequential loss or damage under this guarantee. This guarantee is in addition to and does not affect any rights, which the consumer may have by virtue of the Sale of Goods Act 1973 as amended 1975 and 1999.
STATUTORY RIGHTS
This guarantee is in addition to and in no way affects your statutory rights.
PRODUCT DISPOSAL
When this product reaches the end of it's life or is disposed of for any other reason, it must not be disposed of in household waste. In order to preserve natural resources, and to minimise adverse environmental impact, please recycle or dispose of this product in an environmentally friendly way. It should be taken to your local waste recycling centre or other authorised collection and disposal facility. If in doubt consult your local waste authority for information regarding available recycling and / or disposal options.
GENERAL SAFETY INSTRUCTIONS
Before attempting to operate this machine, you must read, understand and follow these instructions very carefully as they are intended to ensure your safety and that of others and also a long and trouble-free service life of the machine.
Learn how to use the power tool, its limitations and potential hazards.
Keep these instructions in a safe place for future reference.
Avoid unintentional starting - Unplug the power tools
Before starting the power tool, always make sure that you have removed the key and adjusting wrenches.
Before plugging the tool into the mains supply, always make sure that the switch is in the OFF position.
Make sure that power tools are disconnected from the mains supply when not in use, prior to servicing, lubrication or adjustment and when replacing accessories such as blades, bits and cutters.
Check damaged parts
Before using the power tool, always inspect it carefully to determine that it will operate properly and perform its intended function.
Check correct alignment of moving parts, making sure they do not bind. Check for any damaged components and make sure that the power tool has been correctly assembled.
Check for any condition that may affect operation of the power tool.
Unless otherwise indicated in this instructions handbook, a guard or any other part of the power tool that has been damaged must be repaired or replaced by an authorized service center.
Any switch that does not work correctly must be replaced by an authorized service center.
Do not use the power tool if the ON/OFF switch does not turn the power tool ON and OFF.
Dust generated when machining materials is a health hazard.
Always wear a suitable dust mask.
When working, always wear personal protective equipment:
safety goggles, masks, ear protectors, non-slip shoes.
Never wear loose clothes or jewelry that may be trapped in moving parts; long hair must be tied back.
Always work on a stable base.
Always fasten the workpiece securely with a clamp.
Keep the work area clean and tidy.
Always use the power tool with both hands.
Never open or modify the power tool or its accessories in any way.
Do not expose the power tool to rain, or use in damp or wet locations. Keep the work area well lit.
Do not use power tools in areas where there is a risk of explosion or fire from combustible materials, flammable liquids, paint, varnish, petrol etc. flammable gases and dust of an explosive nature.
Beware children and pets
Children and pets should be kept out of the work area.
All power tools should be kept out of the reach of children and, preferably, stored or locked in a secure cabinet or dry room when not in use.
Use the right tool
Select the right tool for the job. Do not use a tool for a job for which it was not designed. Do not force a small tool to do the
job of a heavy-duty tool. Do not use tools for intended.
Do not force the power tool
The power tool will do a better and safer job and give you much better service if it is used at the rate for which it was designed.
Maintain tools with care
Keep cutting tools sharp and clean for better and safer performance.
Follow the instructions for lubricating and changing accessories.
Keep handles dry, clean and free from oil and grease.
Ensure that ventilation slots are kept clean and free from dust at all times. Restricted ventilation slots can cause overheating and damage to the motor.
If this machine is to be used when working at a certain height, scaffolding fitted with railing and kick-plate or a tower platform must be used in order to guarantee suitable stability.
Avoid body contact with earthed or grounded surfaces (e.g. pipes, radiators, dish-washers and refrigerators).
Power Cords
Never yank or pull the power cord to disconnect it from the mains supply socket.
Never carry the power tool by its power cord. Keep the power cord away from heat, oil, solvents and sharp edges.
The tool power cord periodically and if damaged have it replaced by an authorized service center.
Inspect extension cords periodically and replace if damaged.
DO NOT use 2-core extension cords or reels on with an earth path. Always use a 3-core extension cord or reel with the earth core connected to earth.
Always unwind any extension cords fully.
For extension cords up to 15 metres, use a wire cross section of 1.5mm^2
For extension cords over 15 metres, use a wire cross section of 2.5mm^2
Protect your extension cord from sharp objects, excessive heat and damp or wet locations.
This power tool complies with National and International Standards and safety requirements. Repairs should be carried only out by qualified persons using original spare parts. Failure to do so may result in considerable danger to the use.
GB
SPECIFIC SAFETY INSTRUCTIONS

Warning!
This angle grinder has not to be used for cutting operations. Pre-fitted disc guard is for grinding use only. If the user needs to apply it for cutting, the separated cutting guard has to be purchased.
The protection guard for cutting off is not included as standard delivery.
SAFETY WARNINGS SPECIFIC FOR GRINDING OPERATION
a) Use only wheel types that are recommended for your power tool and the specific guard designed for the selected wheel.
b) The guard must be securely attached to the power positioned for maximum safety, so the least amount of wheel is exposed towards the operator.
c) Wheels must be used only for recommended applications.
d) Always use undamaged wheel flanges that are of correct size and shape for your selected wheel.
e) Do not use worn down wheels from larger power tools.
SAFE USE OF ANGLE GRINDER'S GRINDING DISCS
Warning! Under no circumstances should any type of diamond coated disc be used for grinding metals.
Grinding discs are breakable and should be handled with the utmost care. The use of damaged, incorrectly mounted or worn grinding discs is dangerous and can cause serious injury.
Grinding discs should be handled and transported with care grinding discs should be stored in such a way as to prevent mechanical damage and contamination with substances that could cause deterioration of the bonding material.
The information on the grinding discs relating to restriction of use, safety indications or any other information should be followed. In case of doubt concerning the of grinding discs the user should request information from the
manufacturer or supplier.
Before mounting and before each use the grinding disc should be visually inspected for any cracks, chips, excessive wear, contamination or any other damage that could affect safe operation.
The grinding disc should be mounted in accordance with the instructions in the product manual. After mounting the grinding disc should be run for a reasonable time, if any unusual noise or excessive vibration is evident the machine must be stopped immediately and the cause investigated.
All guards must be correctly and securely fitted and positioned correctly. The angle grinder must not be used without the guard fitted.
Personal protective equipment suitable for the work being used and not just for the work being used. Personal protective equipment should include, suitable work gloves, ear protection, eye protection, respiratory protection and steel toe cap shoes or boots.
Only use grinding disc suitable for the work being done and observe all safety instructions and restrictions of use. Use of the wrong type of grinding disc could result in serious injury.
When using a grinding disc the angle between the grinding disc and work piece should be between 30^ and 40^ .
Before placing the angle grinder on the workbench or floor it must be switched off and the grinding disc must have stopped rotating.
Angle grinders must not be used above shoulder height.
Grinding discs must not be run at a rotational speed greater than that shown on the grinding disc.
Grinding discs must be used dry. Using water is highly dangerous and could result in an electric shock.
Do not use discs that are larger than specified, only use discs that are rated for the angle grinder.
correThe rotational speed (RPM) shown on the disc should always be higher than the rotational speed (RPM) of the angle grinder.
COMPONENTS AND CONTROLS (PIC. 1) OPERATING INSTRUCTIONS
| 1 | Angle grinder |
| 2 | Spindle lock |
| 3 | Backing washer |
| 4 | Disc clamping nut |
| 5 | Guard |
| 6 | LH & RH handle points |
| 7 | On/Off |
| 8 | Handle |
| 9 | Wrench |
ANGLE GRINDER CONTROLS (PICS.2 & 3)
Looking at the Angle Grinding from the top the spindle lo is located at the front centre of the gearbox casing (Pic.2 The location points for the handle (to suit left or right handed operators) are located each side of the grey gearbox housing at the front of the Angle Grinding. A direction arrow to show the direction of disc rotation is located at the front of the grey gearbox housing. The On/Off switch is located underneath the rear hand grip. Turn the Angle Grinding onto its back and locate the adjustable disc guard (Pic.3). The drive spindle can be seen along with the disc locking nut and the backing disc washer (Refer to installation of the discs).
FITTING THE DISC GUARD (PIC. 4)
NOTE: The disc guard must be fitted to the Angle Grinding at all times during use.
Locate the disc guard onto the guard mounting spigot and
secure by tightening the hex socket screw (Pic.4).
INSTALLING GRINDING DISCS (PICS.3 & 5)
Make sure the Angle Grinding is unplugged from supply socket. Turn the Angle Grinding onto its Locate and depress the spindle lock button. Using the wrench supplied insert the pins into the holes on the disc clamping nut. Turn the wrench anti-clockwise to release the disc clamping nut If the disc backing washer is removed it must be replaced the correct way round. The correct way to fit this onto the shaft can be seen in Pic.5.
NOTE: There are different types of discs used for different applications. Select the correct one for the work be. Make sure the disc backing washer flats are located correctly with the flats on the shaft. The grinding disc should be placed onto the Angle Grinding with the writing facing upwards.
INSTALLING A NEW DISC (PICS.6 & 7)
Place the disc over the shaft locating it onto the disc backing washer. It can be seen that the backing washer has a raised lip. The hole in the disc should match the diameter of the raised lip, keeping the disc mounted central (Pic.6) Refit the disc clamping nut (Pic.6). Tighten with fingers until the disc is clamped. Locate and depress the spindle lock and using the supplied wrench, (Pic.7) tighten the locking washer in a clockwise direction until the disc is firmly clamped but do not over tighten. Release the spindle lock and turn the Angle Grinding over.
The side handle can be fitted to either side of the machine to suit the operator (Pic.8) ensure that the side handle is secured but do not over tighten.
Connect the Angle Grinding to a suitable mains supply socket. It is advisable to use an approved Residual current device (RCD). If in doubt consult an approved electrician.
FOR YOUR SAFETY PLEASE FOLLOW THE THESE INSTRUCTIONS
Working with an Angle Grinding should always be done in a suitable designated work area for safety reasons. Hot sparks
are generated when grinding. Any debris nearby ignited resulting in a fire. Read all the safety instructions before using the Angle Grinding.
START/STOP AND ADJUSTMENT OF THE POSITION OF THE REAR GRIP (PHOTO 9).
This tool is fitted with a safety device that prevents accidental activation. To start the tool:
9.1) Press the small lock-off button first (without releasing it).
9.2) Then press this big button to switch on the machine.
The first button may be released while you are using the angle grinder.
Release the big button to switch off the machine.
The rear grip can be rotated 90^ top the left or right. Pull back
the lock key (9.3) and turn the grip in the
Release the lock button making sure that it has returned
completely in its housing.
If the machine makes an unfamiliar sound or vibrates excessively switch it off immediately and disconnect from the thpowarainpuy. Investigate the cause or consult a service centre bactor a(Ric8).
Pic.10 shows a typical grinding operation.
NOTE: The guard has been positioned to deflect hot sparks away from operator. Grinding operations should be done with the disc at an angle of between 30^ and 40^ to the work piece (Pic.11).
During use it is advisable to periodically check the security of the clamping nut, side handle and disc guard.
Be aware that grinding metal can cause harmful dust particles that will damage your respiratory system and it is advised that an approved dust mask is obtained from a reputable dealer.
NEVER immerse the grinding disc into any type of lubricar including water. The Angle Grinding is a dry grinder. Failure to observe will result in a fatal electric shock.
The guard is adjustable for different types of work. The picture
10 shows how the guard has been adjusted to deflect th sparks away from the operators eyes. See safety instructions for additional protective equipment.
Always keep mains power lead to the rear of the work being grind.
The sound intensity level for the operator may exceed 85 dB(A).
Suitable ear protection must be worn by the operator.
| TECHNICAL SPECIFICATION | |
| Voltage 230 V - 50 Hz | |
| Motor 2000 W | |
| No load speed 6500 min | -1 |
| Disc size 230 mm M 14 | |
| Sound Pressure Level | LpA 93 dB(A) |
| Sound Power Level | LwA 104 dB(A) |
| Vibration Level | 4,19 m/s² |
| Weight | 4,6 kg |
FR
INTRODUCTION
MISE AU REBUT DU PRODUIT
ELIMINACAO DO PRODUCTO
Desluge as ferramentas electricas
AVFALLSBEHANDLING AV PRODUKTEL
EeYTe TavTa Wte To KElaKa Ka Ta KElia Ppuoians Exou
Evéexipiv vauuvéoet To nεktpiko εpyaleio oTo δiktu Tpoopooaic,
Mny TIEcTe UTEpOaKa To nAekptiko EpyaIeio
To nEeKtpiO epyaaleo 0a 8oae KaIutepa aTTOTeAeouata Kai μe Veepayalutepn aoPaeia av xpnoiopoTIOeITai OTNv TaxUTnTa VIA Tnv oioia exiaxdeltaiae.
Kavete NaVt PtoeKTIK OuvtnpOn Twv Epyaleiw
AATnpTe AOKVIOeVA KAI KAbaTgApTa EApTnMaTcKOTnTPOKeIeVou WOTETINVETE KALUTpe Ka TIO aOpaAnrTOteAOpata.
Akooueite TIS Odyies Aittavons KAI avikataaotaans Tuw aEsoouap. Diatnpereite TIG Xeipolaes OTeyves, KaahapeKai Xwpic Ealovkai ypaosoo.
TEXHNA B30NACHOCTN IPEXDE BCEFO
PpeJeHemnpntyntbKpaote,piIMnTeBcMeBpbl,HTo6bl H36EkaTb OnaChOtn Bo3HKnHOBeHnnoXapara,3JKeTPOya n TpaBM.B IHCTpyKUHXNo paOte C INHCTpyMeHTOM pINBeHeBc BCE Heo6xOdHMble Yka3AHn, KaKOB Ha3HaueHne INHCTpyMeHTa N KaKo PnCK MoKet BO3HKNHYb npaPoTe c HmM.
TAPAHINHbI CEPTNΦHKAT
I3ROTOBHTbR rapaHTpyet 6e30Ka3Hyo paOby INHCTpyMeNTA B TeeyHe 2 let Co dHa erpno6peTHe.3rTOBHTbR rapaHTpyET 3ameHy He npabHBx Hn deFeKTHbIX Detanei. DHHAR rapaHTnRE BkIOUaET BO3MeueHne pPOMO nn KocBENHO yep6a, HactynBwero B peyIbTaPe aobtbc HNCTpyMeHToM. 3 rapaHTnHbX 68aTeBCTB TAKKe NCKIOaOTc: 3aMeHa pacxoDhX MATEPAIAOB, nCNOlb3OBAHNE INHCTpyMeTA He no PpAMomy Ha3auHEnIO, IpomblNeHoe IcNoIb3OBAHNE INHCTpyMeTA, a TaKke BO3MeueHne 3atpat Ha ynakOBky n DoCTABky INHCTpyMeTA K cHTpam TexOcbLyKXBANH (npOn3BOJATcra 3a CET NOB3OBATE). INHCTpyMEHT, oOpmNEHbC ONlatoDocTabKn 3a CET NOyATeR, B pMOHT He pInHMaETc. INHCTpyMEHT, MOINPHuropBaHH KaIM-NI6o 6pa3OMn INCNOJb3OBABWIMcB KOMNKeTE C HE PEKOMEHDOBAHNMI pOn3BODHTeM AEccceCyapAMn, TAKKe He NDnadaet NOr rapaTHnHbPEMOHT. RAPaHTnHbPEMOHT OcyueCTBnEeTc TOnbKO NoCe NepeDbapTeBHorO pNDctABHeNIG COOTBETCTByUeero 3anPoCA B cyk6y NocnepnoDAHXORO 6cNkBANH C pInIOXeHHeM DOKyMeHTOB, yOcTOBepRHOUs IX EPOno6peTeHE. Nocne NOKyKN INHCTpyMeTA peKOMEHdyETc CpaSy Xe y6eDnTBcB AERO CEIOCTHOCTN IN KOMNKeTHOCTN IN BHMAteLBO HO pOHTaTB INHCTpyKUnn PObote C HIM.
IOPUNUeCKNE IPIPABA
IINBnAeJIbCa INCTpyMeHTa DaHHaR rapAHN HKN KOMOBpa3OM He BnHReT Ha ero npaba, OROBOpEHbIe yCTABOM oBcctBa, YHeHOM KOTOPORO OH MOKET RBLITbc.
YHNUTOXKEHNEI3EJIIN
Ecnn daHHe n3eHnE doJHKHO bItb yHnTuKeHo B CBA3n CTm, YTO OHO He nCnObn3yeTcR, NIOB C BCA3n C HbIMn PnUHAMn, erO HeNb3a Bbl6paBbTa kak obHhble bItTOBBe OTXoDbI. C TEM, YTObI bbln coxpanHe bJeNoBceckne pecypcbI, n B CEJIAX CHNKeHnON aChbIX KONTAKTOB c npnpdo, no3a0bTeCb oHaDnHexauei nepepaoTke nn NKBnDaunu n3dennr nyTEm DoCTaBN erO MeCThle ceHTP no c6opy OTXoOB INoB INHOynoHMOeHHbI ueTp. Ecnn Bbl comHeBaTeCb, obpatntecB MeCTHoe yPeXeHnE, OTBeTCTBeHHOE 3a c6op i nepepaobTKy OTXoDB, no nobody anbTePhaTHBHO IHOpMaun, CB3aHHo C nepepa6oKoN u/INn ycTpaHeHem OTXoDB.
3NEKTPNUECKAR YACTb INHCTPYMEHTA
BHIMAHNE
IaHHbI INCTpyMeH NTMeET Hepa36bpHbI 3NEKtpueckn pa3bEM, KOTOpB COOTBeTCTBye paoemy HAnpReHIO INCTpyMeHTA, OTBeaET Tpe6oBaHnM CTpaHbIMNIOPTnpOBAHn IMekDyHApOHBIM 3NEKtpueckm CTAHapTAM.
HanpjaKeHne cTe n 3eKtpOniTahn DOJIKHO COOTBETCTBOBaT yka3aHHomy Ha 3aOBCo TbNue. NObpeXdHbIe pa3bem IIN TOKONDBOaun Ka6eJIb Heo6xOIMNo HemeDNEHNO 3aMeHHTb HA HOBb 6IOK OT pON3BDNTeIa.
Pn noKIOHueHN HNCTpyMeHTA K CETN 3NEKTPoNTaHn pyKOBOcTByTEc Tpe6OBAHmN HOpMaTHBaMn CBOe CTpaHbI. Pn HeoXoDMOCTN O6paauTecB K BANuHpUPOBaHOMy JNEKTPNKY.
OBUHE TPEBOAHN TEXHNI B3ONACHOCTN
I36eraaTe cnyauHoro BKNIOueHn 3Jektpnp6opob -OTKnOuaTe nx cpa3y no OKOHauHH pa60tbl
Ipejde yem Hauatb pa0taTb C INHcTpmeHToBHNMaTe BkIOUeHnEM INHCTpyMeHTa ybeNTecb, TTOBHeM He npOHTaTE HNCTpyKUIM NO ERO 3KcPnYatauIM, Tpe6oBaHnOCTaONc KIOHe, KOtOpBM NBI npOn3BOINPi perynpOBky, texHmKn 6eOtonacHOCTN, YTO NOMOKeT N36EkaTb TpaBM U mNoHOK. Ipeed NODKIOUeHnEM TOKOIOBOJouero Ka6eJI B paOtaOuix C HIM, a TaKke PPOdNIT cPOK cnXkbI GneKpOtniHaYbeNTecb, TTO bKIOHouateJIb HA Kopnyce IHCTpyMeHTa HxOOnTCB B nOToKHeH NBIKN.
Co6HnoJaTe npabIna pa6oTb C nHCTpyMeHTOM, HcNoJIb3yHe OKOHuaHN pa6oTb, a Taoka NepeXe, Yem Haatb JIO6BeJero cTPOrO no Na3auHcHnO. Pa6oTaOuIe C hIM DoJIxHb IMeTB onepaun No TeHXNeCKOMy xOxyD, cMa3Ke I peryUnipOBKe qTeKo pndTabIeHne o PnCKax, K KOToPbIM MOKeT npHeMeHaNn 3aMHe HOXA, CbePaI Nn Phe3b, yBeJeNTecB, Hec6oHIODeHne HcHTpyKU. TTOKOnoDbOdaIuN Ka6eJIb BvIKnOueH n3 CETn 3NEkTpONtAHa.
XpaHne DaHHbIe INcTpyKUIN B DOCTyINOM IJI pa6OtaIOx MeCTe.
PpOBepeIe cIeIOCTHOCTb HNCTpyMeNTa
Ipejde yem Haatb pa60y c HNCTpyMeHOM, BHIMATEJIepe3n, yepe3 KOtOpBle IpOncxOHT OxJiaXJeHne BHyTpeHHNX
OCMOTPNTe ero n y6edntecb, yTO OH He IMeET BNDIMoox opraHOB, bbln BCERda NHe3acopeHHbIMN,
NOPBEXDEHN n erO Ha3NaueHHe COOTBeCTByET ToI ONEpaunpoTIBOM Cnyae BHYtpeHHme paOChne opraHb, BKIOUaY
KOTOpyo Bbl XOTIE BblONHbC eero NMOuBu. 3NeKtPOdBnIaTeB, MOrTy nepepeTcB, n IHCTpyMeHT BblDeTn3
PiOBepbTe npabInbHoCTb cbopKn INCTpyMeHtA, ceIOCTHOCTbTPOr.
BCex erO qacteB coochoctb BpaauoUHXsCAqteN CBObOdy ux Ecnn Heo6xoImo BblOnHtB pa60bHa onpeDeneHHo
DBINKeHHN. Bbcote OT nola, neca, noDMocTKn mnn 6aunH, ha KOTopo
Y6eHNTecb, yTo Het HNKaknx BHeuHIX ppenATCTBNI dna 6yDet cTo8Pa6oTuHm, doJHKb6blt yCTouHNBIMi, MeMb
npabInbHo pa60bI INCTpyMeHTa. nepimTpalbHble orpaJzHeHne n 60pta.
Ha cBoeNoBepxHocTn.CneDnte 3a TEM,HTo6bl BEHTnIyMOHHbIe
3AUNTA OT 3NEKTPNUECKNX YAPOB
B CnueiuaH3npoBAHHOM ueHTpe TexNueckoro 06cnyuBaHna Bo BpempaBoTbI cneJeTe, YTO6bI KOpTyC3NeKtpOnHCTpyMeHa ecnn Hoe He yka3aHO B daHHOIN HCtpyKun. He Kacanca 3a3eMNEHbIX NOBepxHocTe NIM 3aMKHyTBix Ha POBpeXdEHHble nepeKlIOUaTeJI DoJNXbI peMOHTnpoBAbCg Maccy (Hanp., TpyOONpOBOdoB, paDANaTOPOB, MOeHbIX MaUNH TOJbKO B CneuuaH3npoBAHbIX ueHTpax TexNueckoro INX XOLOINNBHKOB).
3anpeetaetcpaobotb cHnctpymehTom,yKOTOPOROBpejdeh nepeknouatentb BKN-BblkI.
POMHNTe,TOO63aUoIeNcBBOBpM6Opa6OTKMAtePnAIOB pe3KO H Te TAnHtE 3a npOBOD. CTpykHa N IyIbeOpa3hbl NopoWbK BpeDbl DnTz 3dOpOB8PeDeBvRgA 3NeKtPOINCTPYMeHT, He TAnHtE 3a npOBOD 3aunuAte De bIXATEbHbIe npTpeCnPiATopOM. 3neKtPOnTHaAe CnPeHr YToBb 3aneKtPOnPOBn, He
Pn pa6othe HaeBaiTe CpeDCTb INHINBHyAunbHO 3aunTH HepepeBaIcra pROM c NCTOCHKAMN NOBbIeHHOro Tenna. Ouch, nepaTkn, pecnnapotop, uhyhle npobKn, jeeCTKnE 60TNHNk C CneDHTe, TTObEs erO IOHJIaNe He noBpEiJnacb 6b octpbeckCNb3aHIM NOKpbTMeM KPOMKu HTObS Ka Ero NOBEXHOCTb He nOpanaMaMaCpa H
OeKa DaONKHa NIOTHo npneraTb K TeNy H He IMeTb CBo6OHO CBncaUOxN KpaEB; NepeH hauHOM pa60Tb CHMNTe CBncaUOHe ykpaueHnA, a DInHHbIe BOncbl y6epnte Ha3a.
PobepxHOCTb nona donkha 6bITb POBHO u yctOuBOI.
06pa6aBbBaemyo DeTaNb NIOTHO 3aXMnTe B TnCKax.
POnepKnBaIe TcHCTOy n nopAOK Ha pa6ooyem MeCTe.
Ppna pa6oTe depknte HnctpymEnTo DByMa pykAm.
HEnb3B BCKpbIbTa KOpNc HcTpyMeHTa, MoINpUIpObaTb ero BByTpEHnE HaCTn ININ CbEMHbIe HacAdKn K HeMy.
3aunuaiTe HNCTpymeT O BnA, DoxJa. He xpaHnte ero n He pa6oTaIte C NIM BO BNaxhBIX MeCTax ININ TE Ha Hero MOKET Ierko nonactb Boda. MecTo pa6oTbI DOnkHO 6bITb XopoWo OCbeMeHo.
He pa6oTaIe C IHCTpyMeHTOM B MecTax, Ige ectb BO3HNKHOBEHnIOXkapa NINB B3pIbBa: Ige XpaHЯrTCJ IerKo BOcNlAmEHouOuEe CeIeCTBA, TOnJIbBO, KpaCKn I naKn, RTOyOpue rA3bl NIN B3pIbVNaTHbE BeIeCTBa.
He donyckaTe B 30Hy pa6oTbI DeTeH JXNBOTbIX
B 30he pa60tby He donxHbI HaxoDnTbcra Detn nnn XmBOThbIe. Bce 3neKTPnHEcKHe HCTpyMeHbI To dnXhJI xpaHnTbCn B HeOCTynOM dJeTeN MeCte,KeNaTeNbHO C ycxom N 3akpblTom Na KIOU O KaFy INOTdEhOBHom NOMeEHNI
NcnoB3yTe HnCTpyMeHT Ctporo No Ha3HaueHnIO
NcnoIb3yIe 3nEKeTPOINHCTpyMeHT CTporo no Ha3NaueHIO TOnbKO dIg Tex Oepaun, dIg KOtOpbIX OH 6blp pa3p MoUHOCTB INHCTpyMeHTA DOJXHa CTporo COOTBeTCTBOBaTb OBemY I TaKecTN BblONHReMbIX pa60T.
TokonodaunkKa6eJb
Bbiknoua 3neKtpoHCTpymeHT 3neKtpocTe, He epraIpe3ko HHe TAHNTe 3a npOBod.
peBnag 3neKToHCTpymeHT, He TAHTE 3a npOBd 3neKToHtAnH. CneIte, TTObI 3neKToPnpOBd He biperpeBanC pyoM c NcTOHnKaMn NOBIIeHHORo Tenna. CneIte, TTObI erO MIOJNuaHe NoBpeDnacb o6 ocTbpE KpOMKn HTObI Haero nobEPxHocTh He nona danu MaCna nn pactBOPHTenl.
IepnoDnueckn ocMaTpmbaTe npoBn Ha ceJIOCTHO. EcInu cNoctHocb npoBoda HapyHe, erO Heo6xOIMo 3aMeHntb BCneuaHnIOBaHHOM CEHTpe Texo6cnyKBAHn.
NepnoDnueckn OcmatnpBaHte Ha ZeNoCTHOCTb TaKKe ydNHInTeNbHbIe Ka6eN. Ppi Heo6xOaIMOCtN HeMeJeNHO 3aMeHReTc HX. Ppi pa6Ote c 3NeKTPoHNCTpyMeHTOM B KaHeCTBe TOKOIOBDOAunx IpOBoOBu YdNHInTeNei HEb3r NcNOB3OBaTb DByKINbHbIe Ka6eN C 3a3eMNEHEm, a ToNko TpeXKnBHe, OIN H N KOTOpbIX 3a3eMnEh. YdNHInTeNbHbIy Ka6eN BcERda DOnJKe NpIoHocTbIO pa3MaTbIBaTbCra. Jny UdNHInTeNe I CBIIe 15 M NcNoIb3yIte ToNko Ka6eN nonepHuIM CeEHmE 1,5 MM. Jnay ydNHInTeNeCB. 15 M Ho He Pke 40 M nCnObl3yIte ToNko Ka6eN nonepHuIM CeEHmE 2,5 MM.
O6epeaTe ydInHInTeBbHb Ka6eIb ot ocTpbix KpOMOK n pexuuxn noBepxHOCTe, He noDBepraTe ero qpe3MepHomy HarpEBAHHo, neDHTe, YTO6bHa hEr noBepxHOCTn He 6blNo BLaRn nnBODJI.
YpOBeHb 6e3oNaChOCTn n KOhCTpyKzma DaHHoro 3JIeKTPONHCTPymHeA OTBeYaAO TMeXyHaNpaOHIM Tpe6oBaHm HOpMaTHBAM cTpaHb-ImnopTepa.PeMoHT YcTPOCTBA DOnJKeOcUySeCTBIAETCB KBAIINΦuNpOBAHbIM NepcoHAnOM CneuHaN3nPoBAHHbIX CEHTPOB OcbLyXHBaHn
N C NcNoJIb3OBAHnEM 3aNaChbIX YacteI, peKoMeHIOBaHbIX
PpU3BOJNTeHem. HecobJIODeHne 3TOro Tpe6OBaHnJeJaAeT
3JEKTPOINHCTpyMeHT NOTeHuaJIbHO ONaCHbIM Bpa6ote.
He npBwaTe ckopocb pa60tbl 3neKtpOnHcTpymeHa
Bb6paHnA B COOTBcTBN C peKOMeHaaJMaM CKOpocTb paOToI - rapAHTN TOrO, YTO 3NeKtponHCTpyMeH TOUHO BInONHIT 3aAnHyO Emy paOToI 6yDet 6eOnaceH B 3KnPlnyatauIN.
TuataenbHo co6nHoaTe npabna yxoda 3a 3neKtpOHCTpymeHTOM
Pekyuine KpOMKn INOBepxHocTN DoJKNbI 6bITb BcerdaXopoWIO 3aTOeHHbIMN COpeKpaTbCBy BcHTOTE.CTpO cneyTe HnCTpykUmN O CMAKE IN CMEHe CbEMhBIX HacAOk.PykOATKn INpyu,3a KOtOpBle CneDyET DePxaTB 3neKtpOMHCTpyMeHT, DOnKbI 6bITb BCERDa YNCtBIMN IN He IMeTb CneIOB Macna INKupa
RU
CNEUΦNUECKNE NHCTPYKUNIPOBE3ONACHOCTN

BhumaHue!
3Ta yrIooJIHΦOBaHbHa MaunHa He DoJXHa HcNoB3OBAtbcn Dnpe3Kn.
IpebaepumenbHO ycmaHoeNHHb 3auumhb 3kpah npedha3nueh monko dny uufoeku. Ecnu nol3oabeJe bOJKeH 8bnHumb pe3ky, HeoXoUmo npuoobpecmu omdeNbHb 3auumhb 3kpan dny pe3ku.
3aunTHbI 3kpan pE3Kn He BXoNT B cTaHapTHyIO NOCTABKY.
CNEUANbHbI PNEyPExEHHIO B3ONACHOCTN JIA JINΦOBaJIbHbIX ONEPAUIM
a) IcnoIb3yIte TOnIbKO KOnEca, peKOMeHIOBaHHbIe Dnla BaIero MExaHnueckoro INCTpyMeHTa, n CneuaJIbHO cnpoeKTIpuoBAHHbI dNra Bbl6paHHOrO KOleca 3aunTHbI eKpaH.
6)3aunthbni 3kpan DOnKeH HAdEJHO KpenTbcra MexAHueckomy INChtpyMeHTy N MaKcImaJIbHO 6e3oNaCHO paCNoIaratbcr, TAKIM Opa3OM Konepatopy 6ydt ObpaueHa Mehlaa Yactb KOIEca.
B)UHnΦOBaHbHbe KOJIeCa DOnIKHbI pImMeHrTbCra TOnbKO dIpypeHa3HaHeHHoro NcONb3OBaHHa.
r) Bcerda nCnoB3yIte HneOBpeKdHbIe WnnpoBaNbHbIe rpeBn KOIEca, COOTBeTCTByUOuNE NO pa3MepY u FOpMe BbIbpaHOMy BAMn WnnpoBaNbHOMy KoneCy.
13aPueaaTcNcNoIb30BaTbWnHPOBaNbHbIeNHOUeHHbIe KOJIeCaC6OJIbXmExAHmecKINHCTpyMeHTOB.
IPABNIA TEXHNI B30NACHOCTN PPN 3KNCIyATAUIN UINΦOBAJbHbIX INCKOB YJLOUINΦUBaJIbHbIX MAUNH
BHHMaHHe: KaTeOpMueckn 3aIpeuAeTcR npImeHeHne HIObIX TINOB INCKOB C aIMa3HbIM NOKpbITNeM DnI UINΦOBK MeTaJIINuEeCKHX MdEnn
IINFOBAHbIe DNCKYABNIOCTOBOBbHO xpyknOJTeaIbHO INTpe6yOT npdeIbHO octopoxHoro obaueHn. IcnoIb3oBaHne NOBpeKDeHHbIX, HENpaBnIbHO yCTaHOBNEHHbIX mN N3HOWeHHbIX IINFOBAHbIX onaCHO n MOXET npNBecTN K cepbe3HbIM TpaBMam.
IINFOBaBbHBe IINCK Tpe6yIOBepxHOO bpaueHnI TpaHCnOpTIPOBKn. Cnoc6 XpAHENI IINFOBaBbHX DnCKOB DOJKeH OecneHNBaT PpeoTBpaueHne BO3HKNHOEHN MEXAHuecknx IOBpeKDeHn IIN 3aPra3HeHn BeueCTBaM, KOTopbIe MOrY BblBaT HApUeHne aRe3NuBA.
CnEpyET OTHOCITbCA CdoNkHbIM BHMaHmEH KINHOpMaUNO uMFOBaBbHX DnCKAX, KOTOPAR KacaetcOrpAunHeHH INX
npimHeHnI npaBnI TexHKn 6e3oNaChOCTn np3KcNpyTaun, a TaKe K INHOINHOpMaUN 063TNX N3dEnyX. PpB O3HKnHOBeHN COMHeH B npaBnIbHoCTn BblOpa IINPPOBaNBbIX DnCKOB NOIb3OBAteJIb DOJKeH 6opATuTBcR 3a pa3bAcHeHnMn K npOn3BOIDNTENIO INN NOCTABUKNY.
Ipeep yctahOBkoH n nepekKaKdbim NcNoJIb3ObaHnEM
IINFOBaJIbHbI DnCK HeoBXoDIMO OCMOTpeTb Ha HAIInHHe
(OTcyTCTBne) TpeuHH, 3ayceHeU, N36bItoHOrO H3HOca,
3aRpa3HEHm INn INhIX NOBpExdHn, KOtOpBe MoryT NOBnAeTB
Ha 6e3onacchoctb npn AekCnpyTaun.
IINFOBaHbI DNCK DOnJKe YcTaHaBnBaTcBcRA COOTBeCTBmC INHCTpyKUIMM, N3IOXeHHbIMN BYPKOBODCTBE NO 3KCNpyataaum.
Pocne yctahOBKn IINIOPOBaIbHO rDCKa MaunHy Ha HeKOtOpoe Bpemr CnEpyET BKNIOHTB BpaOOny peXm. Pn HAnHmN HeobuHOro Wyma NnN n3bToHON BbpaCmMaunHy Heo6xOIMHOHEMeDNEHNO OCTAHOBITb YcTahOBITb npUHY.
Bce 3aunTHbIe KOMnHOENTbl MaunHbI DoJXHbI 6bItb npabunbHO yctahOBnHeHb I HaedKHO 3akpenHeHb. He Donyckaetc nONb3ObaHne yrlouNFOBaHbHO MaunHbI 6e3 yCTaHOBnHHbx 3nEMeHTOB 3aunTbI.
PnBbInOpHeHm pa6oT cIeDyET npImHeHb INHbUdyaIbHbIe cpeCTBa 3aunIb, COOTBeCTByOuIe XapakTepy BbINOnHReMbIX pa6oT. B KOMIIeK T HINbUdyaIbHbIX cpeCTB 3aunITb DOJXHbI BXoINtB COOTBeCTByOuIe pa60ue pykABuIc, cpeCTBa 3aunITb oprAHOB CnyxA, rna3, OprAHOB DbxAHHNIO6yBc MTeaJIHneCKMIM BCTABKAMn Ira 3auNTb IaNbUEB HOR.
PpimmeHrTe TOnbKO COOTBcTByUOuN BnDy pa60f 1nnΦOBaHbHbI DnCK NcoBnOaIte MepbI ppeoCTOpoxHOCTn IN npabNa 3KcNpyataun. Icnonb3OBaHne 1nnΦOBaHbHbIX nckOB HnOxOJaeero Tnna MoKeT PnBeCTN K cepbeHbIM TpaBMam.
PnHcNoB3OaHHmIINFOBaHOrO DnCKa yron MeJxNyOBepXHoCTbO DnCKa I O6pa6aTbIbAeMbIM H3dennEm DoJIKeHcoCTabNtB OT 30 do 40 rpaDycob.
Ipeed tem kak nojokntb yrnooHnfoBaBHyO MaunHy Ha non ImboHa paobou Chon, BblKIOuHTe ee n y6eNTecb TOM, YTO hnfoBaJbHbI DNCK pKePaN BPaaTbcra.
3anpeaetc npn 3knnyataun yrnoHnfoBaIbIx MaHH NOHMATb BIIe yPOBn Pneu.
3anpeaetcncnolb3oBaTb nnHPOBaIbHbHe NcCKnHa cKOpOCTn BpaueHn, npeBbIwauoUeckopoctb yka3aHHyHa camOM DnCKe.
He donyckaetc nonadaHne Bnarn Ha shinfoBaIbHbe Incn npn IH 3Kcnpyataun. 3To OueHb onaCHO mOKeT npnbecn K npopaKeHHIO 3JKeKTPnueckm TOKOM.
He nCnoB3yIe DNCKN DnAmeTp a 6oJIbIero, cHem peKOMeHDoBaHO. Hx DnAmeTp dONKeH CToPO r COOTBeTCTBOBaT bTepeYEmBIM.
Ckopoctb BpaueHn (06/MnH, HnH rpm), yka3bIaemHa ha 3TKeTke dmcka, doJnxHa bbl Bcerda 5OJIbWE ckopoCTn BpaueHn (06/ MnH), cKOTOpoi pa6oTaet WnHpObaBnHn MaunHa.
COCTABHbIE YACTN N UYPABJIEHNE (ΦOTO 1)
KAK YCTAHOBNTb 3AUHTbI IN KPAH (FOTO 4)
PpmeaHne:Ha BpeMpa60TbMaunHb3aHTbIdoJIKeH o8a3aTeNbHO MOHTnpoBaTbcra.
YcTaHOBnTe 3KpaH Ha npEHa3HaueHHOM DnI 3TOrO n, 3aTAYB WecTnRpaHHyIO raIKy, 3aФNKcpyIe ero noJoxEHm (fOTo 4).
KAK CHATb IINΦOBALbHbI INCK (ΦOTO 3 N 5)
Y6eIntecb, yTO MaunHa oTKJIOyeHa oT cETn 3JeKtpoNTaHna.
Ipebehnte ee (f0To 3), haDnTe pbyar boknpobHn IonoKHe n 3aHne pyKoTm MoKHO mEHnB, noBepHyB ee TpaHcMnCCnOHoro Bana n nepeBnHbTe erO BHN3, 3aKnCpOBAB BnpBO uNn BNeBO Ha 90°.ДЯ 3TOr: pa3bokpyte pyky, TaKM obpazom BaH HeODBHXHO. Pn NOMOu MoTHaKHOYHB HzAD bokpoBOCHb PBayXOK IonoKHeH (9.3) IN KIOUa (BXODIT B KOMNKeT NOCTABKN) BCTABTE B OTBepcpepeBeNTe pykY B HyKHO IonoKHeH. OTNCTHTe pbayxOK, bokpoBOHraIKN WtHbTb.Tenepb nobephte KIOU npOTNB y6eINBNC, YTO OH NIOHOCTbIO BOWeB IN CBOE rHe3do IN To pyka cacBOI CTpeKIn n pa3boknyte raKy. UcTaHabIMBaH HO DEpKNTcB H haidEHOM IonoKHeH.
DnCK, npOBepbTe, YTO6bl Wai6a CHOBA 6blna Ha CBOEM MeTe N
B npabnblHom noJoxeHn. IpaBnIbHoe nnoJoxeHne WauTbI Ecn HNCTpyMeHT Ype3MepHO Bn6pnpyET nIN CbIaATcR noka3aHo Ha oTo 5. NOCTOPOHHe UyMbI, HEmdJIeHHO OCTaHOBInTe erOn OTKIOUHTe
PpmeHne:Ja KaKDoRo BVda Opeaui HA MaunHy DoJoxeH OT CETn NITAHN. BbYCHNTe npuHNbI INo6paTInTEcb B cHTp yCTaHaBnBaTcBcB DnCK. YCTaHaBnBaaDnCK, npOBepBXHnueckoro O6CnYkBaHnR.
yto6b 6a6bna npabnblno yctahOBHea. IINFOBANbHbI INCK DOJKeH yCTaHABnBaTcBcRA BcERda 3TKeKToB BBepX.
KAK YCTAHOBNTb HOBbI NCK (FOTO 6 N7)
HaJeHbTe DnCK Ha TpaHCMnCCNOHb BAN, Cbepy XaIb6bl. 1aIb6a
ImeET BInyKnbl KpaeBOB 6OpTNK. LcHTpAlhOe OTBepCTne Dncka
DOJHKHO COOTBeTCTBOBaTb DnAmEtpy KpaeBOrO 6OpTNKa (foto 6).
CHOBA NOCTaBBte 6NOKIpOBoCHyHO raHy (foto 6). 3AkpyuHBaTe
ee, Noka DNCK He BCTaHT EpHO Ha CBOE MeTo. TeNep b npi
NOMOUI MOHTaxHORO KIOHYo ONyTE BHN3 yCTPOCTBO 6NOKIpOBKn
TpaHCMnCCMOHOrBOBaJa (foto7), NOBOPaHbAte IaIb6yNoacBOB
CTpeJIke, Noka DNCK He OKaKeTcR IpOHO 3a6NOKIpOBaHHbIM B CBOeM
NtONJOxEHm, Ho He nepeTnBaIte Upe3MePHO. Pa3bNOkpyuTe
TpaHCMnCCMOHb BAN (OnyCTNb yCTPOCTBO 6NOKIpOBaHH) n
IpeBepHNTe MaunHy CHOBA B pa6OHee NoN0KeHme.
Bokobara pyka mokeT bItb yctahOBnHe Ka cnpaba, TaK n CTeBA, B 3aBNCIMOCtN OT yDObCTBa paOtaIOeTo (foto 8).Y6eINTEcB, YTO pyka npHOr CTouH, HO He 3aTARMaIte BInHbI Ye3MePHO. POnkHHTe UInFOBaIbHyIO MaunHy K NcTOUHNky NITAHNA. PeKOMeHNyEM IcNtIb3OaBt ToJIbKO yCtPOrCTBa DmpePeHUNaIBHO 3aUnTIb, OBeTuAOuNE TocyDapCTBeHHbIM HopMaTNUBbIM IpTaBbAHnM. PIn Heo6XoIMOCtN pPOKOHcyIbTnpyITecb y KBaINuLIpOBaHHORo 3NeKTpNka.
O HEOBXOJIMMOCTN CTPOFO COBJIOJEHNA TPEBOAHNI TEXHNK B30NACHOCTN
Babotb yIIOBOI IINIOBAIbHO MaIHNO MOXHO TOnbKO B npedexn CneuaJIbHO O6OpyIOBaHHbx Dn8 3TOO yAcTKax. Bo3HkaOuJe BO BpeMpa60TbI NcKpbl MOrY BocIIaMeHITb roipue MeTePAJIbI, ecNI OH HxOJaTCr CmIKOM 6Nl3KO.
Hauana paobTb co uNFOBaNbHO MaUNHO BHMaTeBHO TBAKOMbTcB CO BCEMN Tpe6oBaHnMn TB.
CM. TaKxke
NYCK/OCTAHOBKA IN PEGYINPOBKA NOJIOXEHNA 3ADHEI PYKOKTN (OTO9)
YMaunHbIMeETcRyCTPOIcTB0,3aUuuaIOoee eeOT CnyauHoro 1KHeHHn.3aynck yCTpOcTBa:
9.1) chauana Haxmnte Ha MaeneHbkyu KhoNky 6nokpOBKn (He rnye oTnyckae e).
HOMaTeMaHKMnTe Ha 3Ty 60JIbWyo KhoNky, YTO6bl BKNIOHTb MaUNHy.
Moxho OTnycntb nepByK HONky, KOrda nCNoB3yETc yILOuINΦOBaJIbHaMaIIHa.
OTnyctnte 60lbuyIO KHONky IINB BbIKIOHEnMaINHBI.
RU
HaΦoTo 10 noka3aHo, ka KaHao pa6oTaTb co uHnΦo DnCKOM.
PnmeaHne: 6paTtE BHMaHne, TTo 3aunTHbI 3KpaH yTaHOBHe TaK, YTO OTPXaET NCKpbI H OH He nonap a6oTaHooero. Bo Bpem onepaun shnfoBKn dNck Donp pacnonaratbc npd yrnom ot 30^ do 40^ oTHOCHTeNbHO 6pa6aTaBaEMo Detan (foto 11).
Bo Bpempa60peKOMeHdyem nepnoDnueckn npoBepaTb npouHocTb nocaikn dNcKa (CTeNEh 3aTAAKKn erO Kpenexkraik),60KOBoi pyuKn H aunTHoro kpaHa.
POMHHTe,TO BO Bpemr Opeaunu nnfoobn 0bpa3yETc MeTALIueckra nblB, BpeDna Ipn oprAHOB bIXAHn.Bo Bpemr pa6oIb peKoMeHdyETc HadeBaTb pecnnapatop.
AVGJ0RELSE AV PRODUKTET
Dugna违法犯罪 Dogma cannot be used in the country.
Verktoyets strmledning ma kontroleres med jevne mellomrom. Dersom den er skadet ma den skiftes ut av et autorisert sericesenter.
nca a intrat in mod complect in lacasul Sau.
Daca aparatul emite un zgomot neobisnuit sau vibreaza puternic, opriti-I imediat si deconectati-I de la reteaua electrica.
aCermetati cauzele dereglarii sau adresati-va unui centru de asistenta.
Fotografia 10 ilustreazão operatie tipica de polizare.
N.B. - Protectia a fost positianata pentru a devia scanteile eutaputat. de operator. Operatiunile de polizare trebuie sa fie afectate fia discul positianat la un unghi cuprins intre 30o si 40o fata de piesa de lucrat (Foto 11).
HnCTpykun, KaTo No To3n NaHH rapaHTnpaTe cnypnoctTa
Ha pa6oTeuHc HRe N Ha OKoHNHe, KaTo cbSeBpeMnpyckaIte CnyaHNo 3aedCTBaHc -
OCNpyBaTe DblroTpaHoc H CnryphocHa MaunHaTa.
Tpa6Ba da ce HayuTe da non3BaTe MaunHaTa, Da
OrpHueHnraTn noTeHuaHn pckObe npynoTebaTn.
AaeTe Te3n INCTpykun Ha CnrypHO MRCTO IN npn Heo6xOIMOCCT ce KOHCyTNpaTne.
HnnyckaTe clyaHaHO 3aedCTBaHe -
N3KJIIOUVABe Ha eJekTpueckaTa MaunHa
PpBaaBnTE BnHn DaIIN perynpaunTe KIOOyoe Ca CBaJeH
BG
OTeJektpnueckataMaunHa npedn da npcheteB Deictbme.
IpoBepTe dani KOnHeTo ON/OFFe Ha no3nua npedn da BkIOHHTe eNEKtpueckata MaunHa Bmpexkata.
13KIOUeTe eEKeTpuecknTe MaWInH OT MpeXaTa, Knn non3BaTe - npdeN NOdPbXka, Cma3BaHe nIN aCbIto Taka IN KOrato Ce 3aMeHrT HakpaHNIuTE KaTO HOKOBe, 6yprnN nΦpe3N.
PpOBepaBaiTe NoBpeDeHnTe qaCTn
PpeDn CneDbaa yNoTpe6a Ha eNeKtpueckata MaunHa, Tpa6Ba Da n3BbPunTe BHNMaTeJen OrJe, KaTO npOBepuTe daHn FyHKUHOHPa npABINHO B CbOTBeTCTBNE Cbc CneuΦHHTOTo IpeDa3NaHeHne.
IpoBepete npabunHaTa HacTpoJa Ha DmKeUHTe ce npoBepete daH He 3acNnat, daHn HMa cHyneHN
daJIeEKeTpueckataMaUNHa e MOHTnpaHa npaBnH0
IpoBepete BcNcYcNoBnKoNTO MoKaT Da OkKaTaBbpy npaBnHToO fHyHKUHOHpaHe Ha eNEKTpueckata MaunHa.
B cnyuai Ha nobpeedeHa npedna3Ha IIN dpyra qacteI eKeTpHueckata MaunHa, Ta Tpr6Ba da 6bde nonpabeHIII 3aMeHeHa B oTopnUnapan cepBu3, ocBeH aKO Hac
pbKOBOcTBo 3a yNoTppe6a He daBa dpyu yka3aHn.
BceKnIpeKbCBAu, KOITHe pa6oTn npabUNHO, Tp8Ba da 6bJe 3aMeHEN B OTOPINPAH CEPBn3.
He noJI3BaIte eNEKTPnueCKaTa MaIiHa B cnUyai, 6B KJIIOUeH/IM3KJIIOUeH He BKJIIOuBa n IM3KIIIOUBa eNEKTPnueCKaTaMaIiHa.
Ipaxta, no BpeMe Ha 6pa6oTkata Ha MaTePnAIn e3a 3dpabeTo. PpenOpBvBa ce non3BaHeTo Ha nOxOJa npTOBnPaxOBa ppeNa3Ha Macka.
IIO BPMEHa pa60Ta NOJ3BaJIe BINHn JInuHN 3aI cpeCTBA: PpeJNa3Hn OUYHa, pBkABNci, MACKA, 3ByKOBn 3aUHTHn CpeCTBA N PpeJNa3Hn O6yBKn 3a IN36raBaHe Ha H
NODXb3BaHnA.
He HocTe Cbo6oHn Dpexn HnN B6kyTa; XbHaTe Te bIInTe KcN, 3a Da He NnonaHnat BBB BbPTaun Ce enEmeHTN.
Pa6oTe BnHarn BbpxH HnoDbNgha NnOcKoCT.
Bunharu n3non3BaIte MeHReMe, 3a Da 3axBaHeTe HEN eHemEtTa 3a o6pa6oTka.
BnHaH noDdbpxKaIte YnCTO n noOpdeHOn pa60HTo MxCTO.
Pp np pa6oTa c eNeKtpnueckata MaunHa nON3BaTe DBeTe pue.
He OTBapRnTe Hn He IpomEHaTne, No KaKbBTo n Da 6nNo HaunH, eNEkTPnCheKaTa MaunHa N HeHnHTe HakpAHnI.
PaseTe eNeKtpWuecknTe ypeDn OT DbKd; He rN NOB BLaXHH N MOKPN MeCTa.
Pa60THOTOMrTO Tp6Ba Da 6bDe Oo6pe oCBeTeHO.
He noI3BaIte eneKtpuYecknte MaunHn Ha MeCTa c EekIIO3N IIN NOXap, npaI N HAIyue He rOpBHN MaTePnaIIN, Bb3IIaMeHIMM TeHOCTH, JakoBE, 601, 6EH3Hn n dp., Bb3IIaMeHIMN npaxOBE O BTpVBeh xapaKtep.
PanaTe OTea N Domaun HxNBOTHN
He donyckaIte dea n domaun HxNBOTHn Ha pa6oTHOTMOCTO. DpXkTe BcUKN eNEKTPnueckn ypeDn daJeue ot Deua. He non3BaTe eNEKTPnuecknTe MaunHn, e npenopbTuNTeHn Da rN cbxpanraBeTne KJHou B WkaFnnB cyxo NOMEuHne.
Non3BaIte MaunHaTa No npdeHa3NaueHne
I3KIOHPeTe NOxOJaUaTa MaunHa cnopeBnHa Ha pa6oTa. He H3NoJ3BaIte MaunHata 3a pa6OTn, 3a KOHTo He e npirodeHa. KOrato HAnon3BaIte MaIka MaunHa 3a TeKKn DeiCTBn, npKoNTo ce perynpaBa ynoTpebata Ha no-roJMa TAKaba. NOn3BaIte MaunHInTe, caMo No npedHa3NaueHHeTo IM.
He HATOBaBte DonbJIHHTeH MaunHaTa
Maunnatae pa6oTn no-dOpe, 6bJe no-cnpyHa n 13Bpnn no-dO6pa pa6oTa, ako ce noI3Ba Ha ckopoc T no npedna3NaueHne.
N3BbPwBaIte BnHar nCTapaTeHa noDpBxKa Ha MaunHInTe
aBpkaTe do6pe noocptpenH uCtne pexeunte Maunn,3a eennnyte do6pn n cnpyhnp neyntn.
CneBaBte HNCTpyKUHTe 3a CMa3BaHe n CMHa Ha
IpOdbPkaTe pBkoXBaTKte cyxN, uCTn, 6e3 Macna n rpec TgX. PpOBepBaTe BnHaT OTBOpNTe 3a oxJaXdHe; anoDbPkaTe nguCTn N 6e3 npax no TgX. 3anyueHtE OTbOpn Dda npedn3BnKaT 3arpaBaHe n NobpeHa Ha MoTopa.
Ako non3BaTe MaunHnata npaPoraHa onpeDeneHa BncoUHn, TpaBbJa n3non3BaTe cKeene C npanet N NOHTOnH INI NOBmKHa nnatopma, 3a da cn noCDnpynte noXdoYsca yctOuHBoCT.
KONHETO
KA DA CE INPEIINA3MUM OT EJEKTPUYECKN YAP
I368raBte DoInpa Ha TJIOTC NOBbpxHOCTN, 3a3eMeHN IIN HpeDmca (KATO Tpb6oPBOOBoN, paDnATOpN, MnaHn MaunHn N aalndnnn
BaxpaHbau nKa6eNn
He Xbaaai Te He DbpnaTe 3a 3axpaHbuaia Ka6en, 3a Da
He Hocete B HnKaKbB cnyaen eKeTpueckaTa MaunHa 3a 3axpaHbauu Ka6en. 3axpaHbauuT Ka6en Tpr6Ba BuHaMa Da CTOn Ha pa3CToRHe Oe NT0THNm Ha ToPnHa, Macna, pa3TBOpUTeN n peKeU p6oBe.
MIOHNOIPOBepaBaiTe 3axpaHbuaNka6enHaMaunHata; B cnuyaHa nobpeda, Ka6enbTpraBa Da 6bde OTOpu3npan cepBn3.
HOBeBaIe nepIOuHNO yIbIXNITeINTE B CnyaH HOBPe, I3aMeHETe C HOB.
HE non3BaIte ka6eIu nn ydbKnteIc DBe KnC 06o 3a3eMaBAhe.
aBn3BaTe BnHaru Ka6en NnYdbNknte C Tpr XnC, CbC 3a3eMeHa XnCa 3em.
BnHa pa3BnBaIte n3qno non3BaHITe ydbnxTei.
Ko non3BaTe ydbjNknten do 15 MeTpa, xuIe Tpr6Ba da sbDat C HanpeHNO CEHeNE 1,5 KB.MM. Ako non3BaTe ydbJNknten ot 15 do MeMa, XuIe Tpr6Ba da sbDat C HanpeHNO CEHeNE 2,5 KB.MM. Pa3e Te ydbjNknten OOTpnpneMetn, tonnHa, Bnara n Boda.
HaCToIaTa eNekTpuecka MaUNHa OTROBapn HaNaHOnaHnHTe mMeKdyHapOdHN H3NCKBaHn 3a 6e3OnacHOCT.
BceKn peMOHT Tp6Ba da 6bde n3BbpuBaH caMo ot HauuHnucpan nepcohan, kato ce noJ3BaT opnHaJIHN pe3epBHH qacTN. Hecna3BaHeto Ha hactoIto n3NCKBaHe MOKe da npedn3Bnka onachn nocneCTBn 3a notpe6nteIa.
TEXHINKA 3A BE3ONACHOCT

BhumaHue!
brnoonnaheTpra6Ba da ce n3non3Ba 3a p3aHe.
Ipebapumelno MoHmupaHa 3auuma Ha ducka e npedha3nueHa 3a u3non3ae hao npu unaufahe. Ako nompebumenam ce hyxdae da a u3non3ea u 3a p3ahe, mo mpr6ea da ce 3akynu omdeHa 3auuma 3a p3ahe.
3aunTa 3a n3KIOUBAHe npn pR3aHe, He e BKNIOUeHa B CTaHApTHaTAtOCTaBka.
PNEyPPEKDEHn3ABE3OnCHA PABOTA, CNEUΦuHn 3A WJlAΦAHE
a)Изпальгамсамо Вдоветe кола 3а 斯фоганe,КOTOMKCHOHTe MaHINHATAI NOТьрсTe npuHATA 3aTOBA. npenopbAHn 3a BaWata pa6OTHa MaHIna n CneUФнHATA BcHKn 3aunTHN NOKPITN Tpa6Ba Da ca npabUNHO MOnTIPaHn 3aunTa, pOeKTPpHa n 3pa6OteHa 3a IN6paHTo KOJIeO3dPBOФKKCUPAHn. BrNoJNaΦbT He 6BnBa da ce HsON3Ba npn shlФOBaHe. OTcbCTBHe Ha 3auTNH Kanau.
b) 3aunntata Tp6ba da ce 3akpeni 3dpabo 3a pa60thata Maunna Tp6ba da ce n3no13BAT BCNUK cpeCTBa 3a HnDnBnyanHa Da ce no3uohnpa Taka, ye da rapaHTnpa MakcmaHa 3aunta, noXoJn 3a To3n BnD pa60ta. CpeCTBaTa 3a 6e3onacHocT, Toec Bb3MOxHO Hai-MaIka Yact OTo KoneLIOUdyaJHn 3auTt BkIOUcbT NOxOJN pKaBUN, UInfOBAHe da 6bde n3NoKeHo KbM onepaTopa. HayuHnU npTNB uyma, 3aUnTHn OyHnMa, macka pa60THn
c)KoIeNaTa 3a ⅢnΦOBAHe TpI6Ba Da 6bDat I3noI3BaHn CaMo 3a 06yBKn IIN 6OtTuN C yKpeEN BpBX npenopbuaHnTe npINOKeHH. ⅢnoI3BaIte eINHCTBeHO nOxOJaU 3a N3BbPbBaHnB VnD
d) Binham n3no13baIte He noBpeDeHn pfanu Hn konenata 3a pa6ota DnCKOBeTe 3a nnaifoane. Ynotpe6ata Ha HneoDxOrau shnfoBaHe, KOInTo ca c noDxOrau pa3mep n fopMa 3a n36paHoto dmCKOBeTe 3a nnaifoane, MoKe da npunHn TeKKn TeneChn ot Bac konelno 3a nninfoBaHe. yBpeXdaHn.
e) He n3no13baIte n3HocEH K0JIeNa 3a WnHPOBaHe OT NO-ROJEMn PpN yNoTpe6aTa Ha DNCKOBe 3a WnAHaPHe, bYbNbT MeKdy DnCKa N pa6oTHM MaunHH. 06pa6oTBaHm DaTeaI Tpr6Ba Da e MeKdy 30^ n 40^ . N3KnUoyete BrloWnApa I N3YaKaaiTe cnnpaHTo Ha BbpTeHTo
BE30NACHA YNOTPEBA HA INCKOBETE 3A WJAAFAHE HA bILOUJAHMAUNHA
BHHMaHHe! HnKora He 6Ba Da ce ynoTpe6BaT DnAmaHTeHN dNCKOBe 3a WnaIpaHae Ha Metan.
DnCKOBeTe 3a 7JnaHpaHe ce YyNt IecHO nCneObaTeHNO npn pa60Ta c TEx e Heo6XoIMMa MaKcMmaHa npeDa3NBOCT.
YnOTope6aTaHa NoBpeHEn, HnepaBnHIO MOHTnpaHn NmN 3xa6eHN dNCKOBe 3a IuaIpaHene Oancho MoKe Da npuHH TeNECHN yBpeKdHnA.
Диckobete 3a shanpahe Tp6Ba da ce nnat n da ce TpaHcnpotupat MHORO BHIMateNHO. Te Tp6Ba da ce cbxpaHraBAT NO TaKbB HauNH, Ye Da He NpeTbpNt YBpeXdHaNr OMTexAHueh XapakTep ININ OT BeIeCTBa, KONTO MORAT DA BLOwAT KaYeCTBOTo Ha cnlaBTA,OT KOYTO ca n3paBoTeHn.
CbrnoiJaHnKoraHecepa60HaBncoHnKa,koTOn HaBnWaba pameHHata 0bnaCT ha pa6oTHnka.
CkopocTt Ha ekcnnoataaHa DNCKoBeTe 3a 7naiahe He 6BaDa HADBnBaNocOeHaTa Bbpxy camNTe DNCKoBe CKopoCT.
IeKOBete 3a Imaiahe pa6oTHa cyxo.YnoTe6bata Ha BOda
IeKpeMe Ha pa6oTa e MHoro onacHO MoKe da npedn3B
eJIeKTPnueckn ynap.
He n3no13BaIte no-rotemn DnCKOBE OITn3bpoeHnte, n3no13BaTe DnCKOB C npaBnHNTe 3a MaunHaTa pa3Mepu.
CkopocTtHa BbptHe (obopOtMNHyTa.) (Rpm) yka3aHa Bbpxy Dncka, Tp8Ba da 6bde BnHaH NIO-BNCOKA OT CkopocTt Ha BbptHe (obopOtMNHyTa.) (Rpm) Ha MaunHata.
KOMHOHETNI KOMAHDN (CHIMKA 1) INHCTPYKLUN 3A PABOTA
OPSTAUPUTSTVAOSPRECAVANJUPOVREDA
Unit 7, 2^nd Floor Napier House,
Corunna Court, Warwick, CV34 5HQ
Great Britain
+44(0)1926482880
:+44(0)1926419553
e-mail: customerservice@nutool.co.uk
FR
Mecafer
112, Chemin de la foret aux Martins
MÉS PAZINOJAM, KA SEKOJOŠAIS PRODUKTS
NAG230
(IT) Smerigliatricce angolare - (GB) Angle grinder - (FR) Meuleuse d'angle - (DE) Winkelschleifer - (ES) Esmeriladora angular -
(PT) Rebarbadora - (NL) Haakse slijpmchine - (DK) Vinkelsliber - (SE) Vinkelslip - (FI) Kulmahiomakone - (GR) Γωνιακός
tpooc - (PL) Szlliferka katowa - (HR) Kutna brusilica - (SI) Kotni brusilnik - (HU) Sarokcsizolgep - (CZ) Uhlova bruska -
(SK) Uhlova bruska - (RU) Utgobaa mnofoabna Maunha - (NO) Vinkelsliper - (TR) Koseli Perdahlama makinesi -
(RO) Polizor unghiular - (BG) brnooanai - (RS) Ugaona brusilica - (LT) Kampinis silfuoklis - (LV) Lenka slipmasina
É CONFORME ALLE SEGUENTI DISPOSIZIONI - WAS BUILT IN COMPLIANCE WITH THE FOLLOWING DISPOSITIONS
EST CONFORME AUX DISPOSITIONS SUIVANTES - MIT DEN FOLGENDEN VORSCHRIFTEN ÜBEREINSTIMMT
ESTÁ CONFORME CON LAS SIGUIENTES DISPOSICIONES - ESTÁ EM CONFORMIDADE COM AS SEGUMENTES DISPOSICOES
IN OVEREENSTEMMING IS MET DE VOLGENDE BEPALINGEN - OPFYLDER FOLLGENDE FORSKRIFTER
ARIOVERNSSTAMMSELSE MED FOLJANDE ForesKRIFTER -ALLAOLEVIEN SAAODOSTEN MUKAISESTI -ZYMMPOPQNETAI ME TIZ AKOAOYQEIAATAEIEI
JEST ZGODNA Z NIJEW WYMIENIONYMI NORMAMI - U SUKLABU SA SLIJEDECIM PROPISIMA - V SKLADU S SLEDECIM ODREDBAMI
MEGFELELO AZ ALABBI RENDETEKNEK - JE V SOULADU S NASLEDUJICIMI SMERNICEMI - JE V SULADES NASLEDOVNYMI SMERNICAMI
OTBEYAET TPEBOAHYIM CJEUYOUH X HOPMATIBOB - ER I OVERENSSTEMMELSE MED FOLGENDE BESTEMMLSER
IZLEYEN KURALLARA UYGUNLUGUNU BEYAN EDERIZ - A FOST EXECUTAT CONFORM DISPOZITILOR
E B CbOTBETCTBNE CbC CJIENHITPE PA3IOPEENI - U SKLADU SA SLEDEcIM PROPISIMA - PAGAMINTAS, REMIANTIS SEKANCIOMIS DIREKTYVOMIS
Unit 7, 2^nd Floor Napier House,
Corunna Court, Warwick, CV34 5HQ, UK

N.
-2013