JN480 - Saw Nutool - Free user manual and instructions
Find the device manual for free JN480 Nutool in PDF.
Frequently Asked Questions - JN480 Nutool
User questions about JN480 Nutool
0 question about this device. Answer the ones you know or ask your own.
Ask a new question about this device
Download the instructions for your Saw in PDF format for free! Find your manual JN480 - Nutool and take your electronic device back in hand. On this page are published all the documents necessary for the use of your device. JN480 by Nutool.
USER MANUAL JN480 Nutool
natural_image
Black Nutoil 480W(Jaw) electric shaver with visible power and circuit components (no text or symbols on device body)NJ480
NJ750L

natural_image
Black and silver Nutoool 750W power tool with visible circuitry and mounting base (no text or symbols on device body)GB Jig saw (Original instructions)
GB Do NOT approach the machine with loose clothing
GB Do NOT touch the moving blade
GB Danger Laser beam - Do NOT look directly at the LASER light
GB Do NOT remove safety guards and devices with the machine operating
GB Do NOT clean, lubricate or repair while the machine is running
natural_image
Close-up of a metallic object with a circular button and curved surface, no visible text or symbols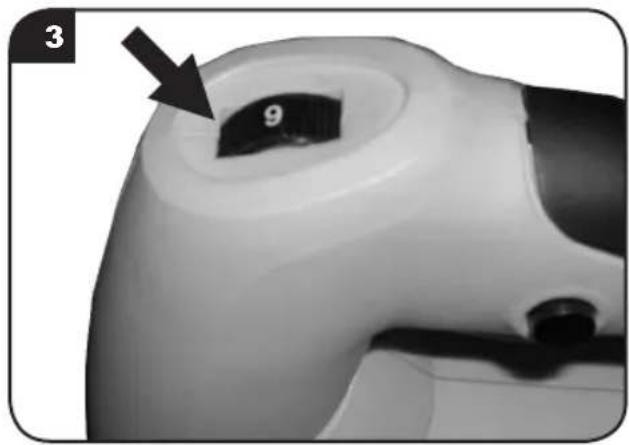
natural_image
Close-up of a white ergonomic device with a black arrow pointing to a numbered component (no text or symbols visible)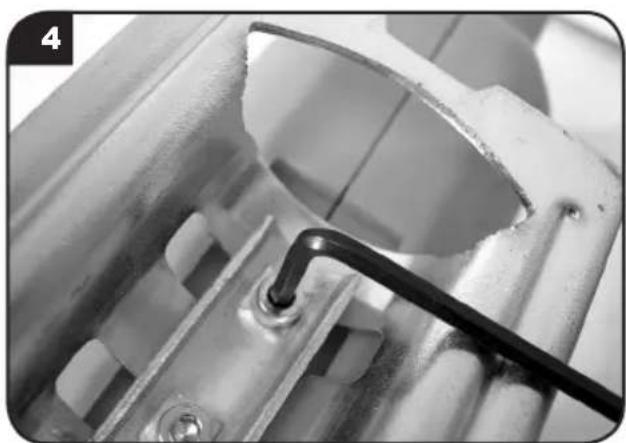
natural_image
Close-up of a mechanical component with a black tool inserted, showing internal parts and mounting holes (no text or symbols visible)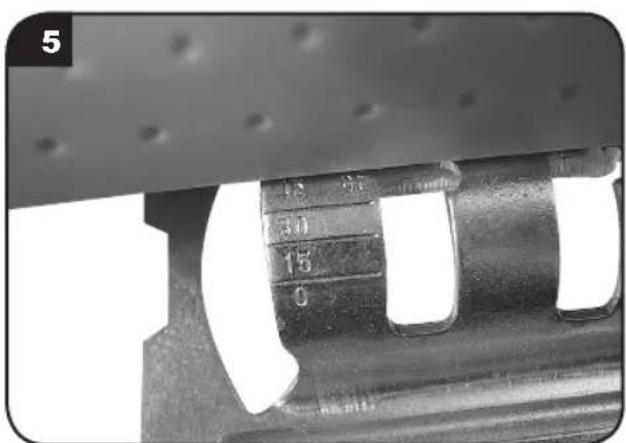
natural_image
Close-up of a mechanical component with curved slots and a central knob (no visible text or symbols)
natural_image
Close-up of a sewing machine's internal components, showing handle and socket mechanism (no text or symbols visible)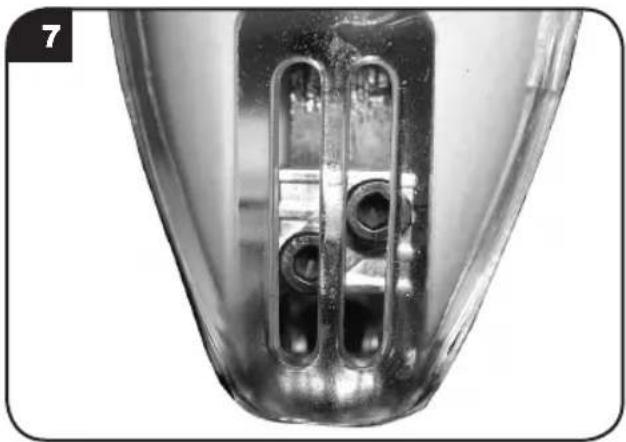
natural_image
Close-up of a metallic mechanical component with internal cavities and mounting holes (no visible text or symbols)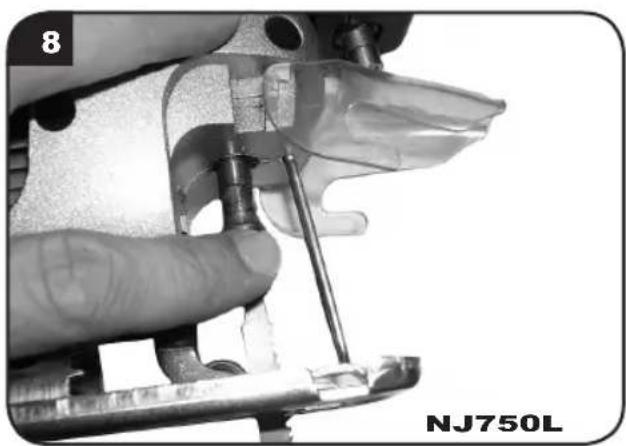
natural_image
Close-up of a hand using a pliers to adjust or install a component, no visible text or symbols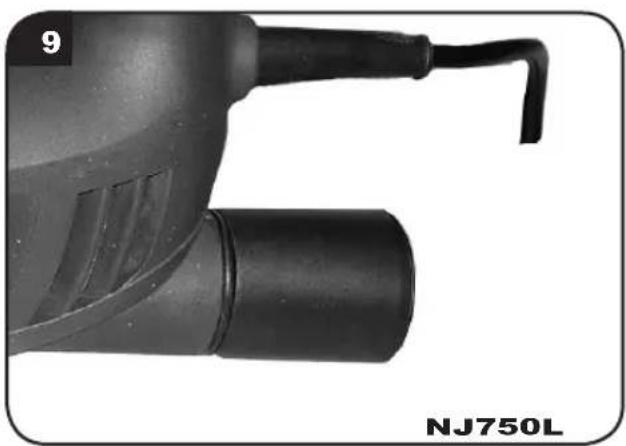
natural_image
Close-up of a black industrial tool with a handle and cylindrical body, labeled 'NJ750L' (no other text or symbols visible)INTRODUZIONE
Thankyou for purchasing this product which has passed through our extensive quality assurance process. Every care has been taken to ensure that it reaches you in perfect condition. However, in the unlikely event that you should experience a problem, or if we can offer any assistance or advice please do not hesitate to contact our customer care department. For details of your nearest customer care department please refer to the telephone numbers at the back of this manual.
SAFETY FIRST
Before attempting to operate this power tool the following basic safety precautions should always be taken to reduce the risk of fire, electric shock and personal injury. It is important to read the instruction manual to understand the application, limitations and potential hazards associated with this tool.
CERTIFICATE OF GUARANTEE
This product is guaranteed for a period of 2 Years, with effect from the date of purchase and applies only to the original purchaser. This guarantee only applies to defects arising from, defective materials and or faulty workmanship that become evident during the guarantee period only and does not include consumable items. The manufacturer will repair or replace the product at their discretion subject to the following. That the product has been used in accordance with the guide lines as detailed in the product manual and that it has not been subjected to misuse, abuse or used for a purpose for which it was not intended. That it has not been taken apart or tampered with in any way whatsoever or has been serviced by unauthorised persons or has been used for hire purposes. Transit damage is excluded from this guarantee, for such damage the transport company is responsible. Claims made under this guarantee must be made in the first instance, directly to the retailer within the guarantee period. Only under exceptional circumstances should the product be returned to the manufacturer. In these case it shall be the consumer's responsibility to return the product at their cost ensuring that the product is adequately packed to prevent transit damage and must be accompanied with a brief description of the fault and a copy of the receipt or other proof of purchase. The manufacturer shall not be liable for any special, exemplary, direct, indirect, incidental, or consequential loss or damage under this guarantee.
STATUTORY RIGHTS
This guarantee is in addition to and in no way affects your statutory rights.
PRODUCT DISPOSAL
in conformity with Regulations 2002/95/CE, 2002/96/CE and 2003/108/CE, on the matter of the reduction of use of hazardous substances in electric and electronic equipment and waste disposal.
The symbol carrying a crossed-out refuse container depicted on any equipment or the relative packaging means that, at the end of its useful life, said product must be disposed of separately from other waste.
The user must therefore take said equipment to the centres specialising in differentiated refuse collection of electric and electronic equipment or alternatively return it to the reseller when purchasing a new similar piece of equipment.
Thanks to differentiated refuse collection, discarded equipment can be sent to be recycled, treated and disposed of in an environmentally-friendly manner; this helps avoiding possible negative environment and on health and promotes the re-employment and/or recycling of the equipment's materials.
Any unauthorised disposal of the product by the user will result in the application of the fines provided for by the regulations in force.
ELECTRICAL DATA
IMPORTANT
This product is fitted with a sealed electric plug that is compatible with the tool and the power supply of your country and complies with international standards.
This appliance must be connected to a power supply corresponding to that indicated on the rating plate. If the plug or power cord is damaged, it must be replaced with one identical to the original.
Always comply with the regulations of your country regarding mains connections.
If in doubt, always consult a qualified electrician..
ELECTRICAL INFORMATION
Connection of the mains plug

Important!
The wires in the mains lead fitted to this product are coloured in accordance with the following code:
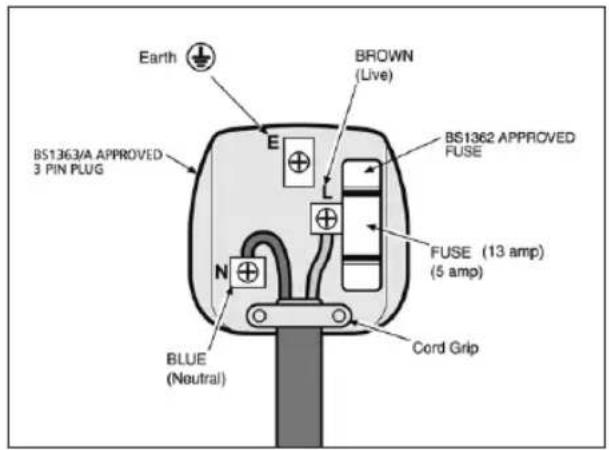
text_image
Earth BROWN (Live) BS1363/A APPROVED 3 PIN PLUG E L N BLUE (Neutral) FUSE (13 amp) (5 amp) BS1362 APPROVED FUSE Cord Grip
Brown: Live (L) or Red Blue: Neutral (N) or Black
THIS PRODUCT IS DOUBLE INSULATED AND THEREFORE DOES NOT REQUIRE A CONNECTION TO EARTH. THE 3 PIN PLUG MUST COMPLY TO BS1363/A. FUSE MUST COMPLY TO BS1362
If for any reason the 13 amp plug fitted to this product requires replacement it must be wired in accordance with the following instruction:
DO NOT CONNECT THE BROWN LIVE OR BLUE NEUTRAL TO THE EARTH PIN MARKED 'E' ON THE 3 PIN PLUG
Connect the Blue wire to the terminal marked Neutral (N). Connect the Brown wire to the terminal marked Live (L). Ensure that the outer insulation is gripped by the cord grip and that the wires are not trapped when replacing the plug cover. The mains lead on this product is fitted with a 13 amp (BS1363/A) plug. A 13 amp (BS1362) fuse must be fitted in the plug.
IF IN DOUBT CONSULT A QUALIFIED ELECTRICIAN
There are no user serviceable parts inside this product except those referred to in the manual. Always refer servicing to qualified service personnel. Never remove any part of the casing unless qualified to do so; this unit contains dangerous voltages.

WARNING!
For your protection if this product is to be used outdoors it should not be exposed to rain or used in damp locations. Do not place the product on damp surfaces, use a workbench if available. For added protection use a suitable residual current device (R.C.D.) at the socket outlet.
If the mains cable requires replacing it must be replaced with an identical one and fitted by a qualified person.
1 GENERAL SAFETY INSTRUCTIONS
Before attempting to operate this machine, you must read, understand and follow these instructions very carefully as they are intended to ensure your safety and that of others and also a long and trouble-free service life of the machine.
Learn how to use the power tool, its limitations and potential hazards.
Keep these instructions in a safe place for future reference. Avoid unintentional starting - Unplug the power tools
Before starting the power tool, always make sure that you have removed the key and adjusting wrenches.
Before plugging the tool into the mains supply, always make sure that the switch is in the OFF position.
Make sure that power tools are disconnected from the mains supply when not in use, prior to servicing, lubrication or adjustment and when replacing accessories such as blades, bits and cutters.
Check damaged parts
Before using the power tool, always inspect it carefully to determine that it will operate properly and perform its intended function.
Check correct alignment of moving parts, making sure they do not bind. Check for any damaged components and make sure that the power tool has been correctly assembled.
Check for any condition that may affect operation of the power tool.
Unless otherwise indicated in this instructions handbook, a guard or any other part of the power tool that has been damaged must be repaired or replaced by an authorized service center.
Any switch that does not work correctly must be replaced by an authorized service center.
Do not use the power tool if the ON/OFF switch does not turn the power tool ON and OFF.
Dust generated when machining materials is a health hazard. Always wear a suitable dust mask.
When working, always wear personal protective equipment: safety goggles, gloves, mask, ear protectors, non-slip safety shoes. Never wear loose clothes or jewelry that may be trapped in moving parts; long hair must be tied back.
Always work on a stable base. Always fasten the workpiece securely with a clamp. Keep the work area clean and tidy. Always use the power tool with both hands.
Never open or modify the power tool or its accessories in any way.
Do not expose the power tool to rain, or use in damp or wet locations. Keep the work area well lit.
Do not use power tools in areas where there is a risk of explosion or fire from combustible materials, flammable liquids, paint, varnish, petrol etc. flammable gases and dust of an explosive nature.
Beware children and pets
Children and pets should be kept out of the work area.
All power tools should be kept out of the reach of children and, preferably, stored or locked in a secure cabinet or dry room when not in use.
Use the right tool
Select the right tool for the job. Do not use a tool for a job for which it was not designed. Do not force a small tool to do the job of a heavy-duty tool. Do not use tools for purposes not intended.
Do not force the power tool
The power tool will do a better and safer job and give you much better service if it is used at the rate for which it was designed.
Maintain tools with care
Keep cutting tools sharp and clean for better and safer performance.
Follow the instructions for lubricating and changing accessories.
Keep handles dry, clean and free from oil and grease. Ensure that ventilation slots are kept clean and free from dust at all times. Blocked ventilation slots can cause overheating and damage to the motor.
If this machine is to be used when working at a certain height, scaffolding fitted with railing and kick-plate or a tower platform must be used in order to guarantee suitable stability.
Avoid body contact with earthed or grounded surfaces (e.g. pipes, radiators, dish-washers and refrigerators).
Power Cords
Never yank or pull the power cord to disconnect it from the mains supply socket.
Never carry the power tool by its power cord. Keep the power cord away from heat, oil, solvents and sharp edges.
Check the tool power cord periodically and if damaged have it replaced by an authorized service center. Inspect extension cords periodically and replace if damaged.
DO NOT use 2-core extension cords or reels on power tools with an earth path. Always use a 3-core extension cord or reel with the earth core connected to earth.
Always unwind any extension cords fully.
For extension cords up to 15 metres, use a wire cross section of 1.5mm^2 .
For extension cords over 15 metres, use a wire cross section of 2.5mm^2 .
Protect your extension cord from sharp objects, excessive heat and damp or wet locations.
⚠️ Important!
This power tool complies with National and International Standards and safety requirements. Repairs should be carried only out by qualified persons using original spare parts. Failure to do so may result in considerable danger to the use.
2 SPECIFIC SAFETY INSTRUCTIONS
Always keep your Jigsaw clean and free from grease.
Do not use caustic cleaning agents to clean the plastic housing.
Always keep the motor vent holes in the casing free of dirt, dust or other obstructions.
Only use recommended blades. Never try and adapt and use the machine for a purpose it was not intended.
Use the vacuum cleaner dust extraction outlet at all times. MDF particle board gives off dangerous dust which should not be inhaled.
Wear an approved dust mask and eye protection at all times.
Water must never come into contact with the machine or cables.
Do not use the Jigsaw as wet cutter, ie immersing the blade in water.
A fatal shock will occur.
When using an extension cable unreel fully (minimum wire diameter of extension lead to be 1 mm^2 ). If in doubt consult a qualified electrician.
Clamp work in a suitable work bench which allows both hands to operate the power tool.
In order to avoid cutting in to any nails, please check the workpiece and pull out all nails before operation.
Do not cut any workpiece which size is beyond the saws capacity.
Before cutting please check that the workpiece has a suitable gap below it, in order to prevent the saw touching the floor, table, etc.
Grip the tool firmly.
Ensure the saw is clear of the workpiece before turning on.
Never touch the moving blade by hand.
Check the position of power cables when cutting into walls or wall panels.
Do not remove the saw from the workpiece until the saw has completely stopped.
Do not touch the blade of the saw after operation, it will be very hot.
Keep Jigsaw cable away from blade. Clamp down if possible before cutting begins.
Keep hands from under work piece.
3 COMPONENTS AND CONTROLS (FIG. 1)
1 On/Off trigger
2 Continuous operation button
3 Handle
4 Rating plate
5 Base plate
6 Blade guard
7 Blade roller guide
8 Hex key
9 Pendulum adjustment (NJ750L)
10 Variable speed switch
11 Dust extraction outlet
12 Dust extraction adaptor (NJ750L)
13 Angle scale
14 Laser Unit (NJ750L)
4 OPERATION
This machine is fitted with a "continuous running switch". To start the machine squeeze the ON / OFF switch. When the machine starts press in the "continuous running switch" located on the side of the handle, release the ON / OFF trigger (pic. 2).
The machine will now run continuously without the need to maintain pressure on the ON / OFF trigger.
To stop the machine briefly squeeze then release the ON / OFF trigger.
Press the machine firmly down onto the work piece and push slowly forward letting the blade cut freely. Increasing the pressure will not result in a faster cut.

Important!
If the Jigsaw base is not held firmly into the work piece the blade will snag and break.
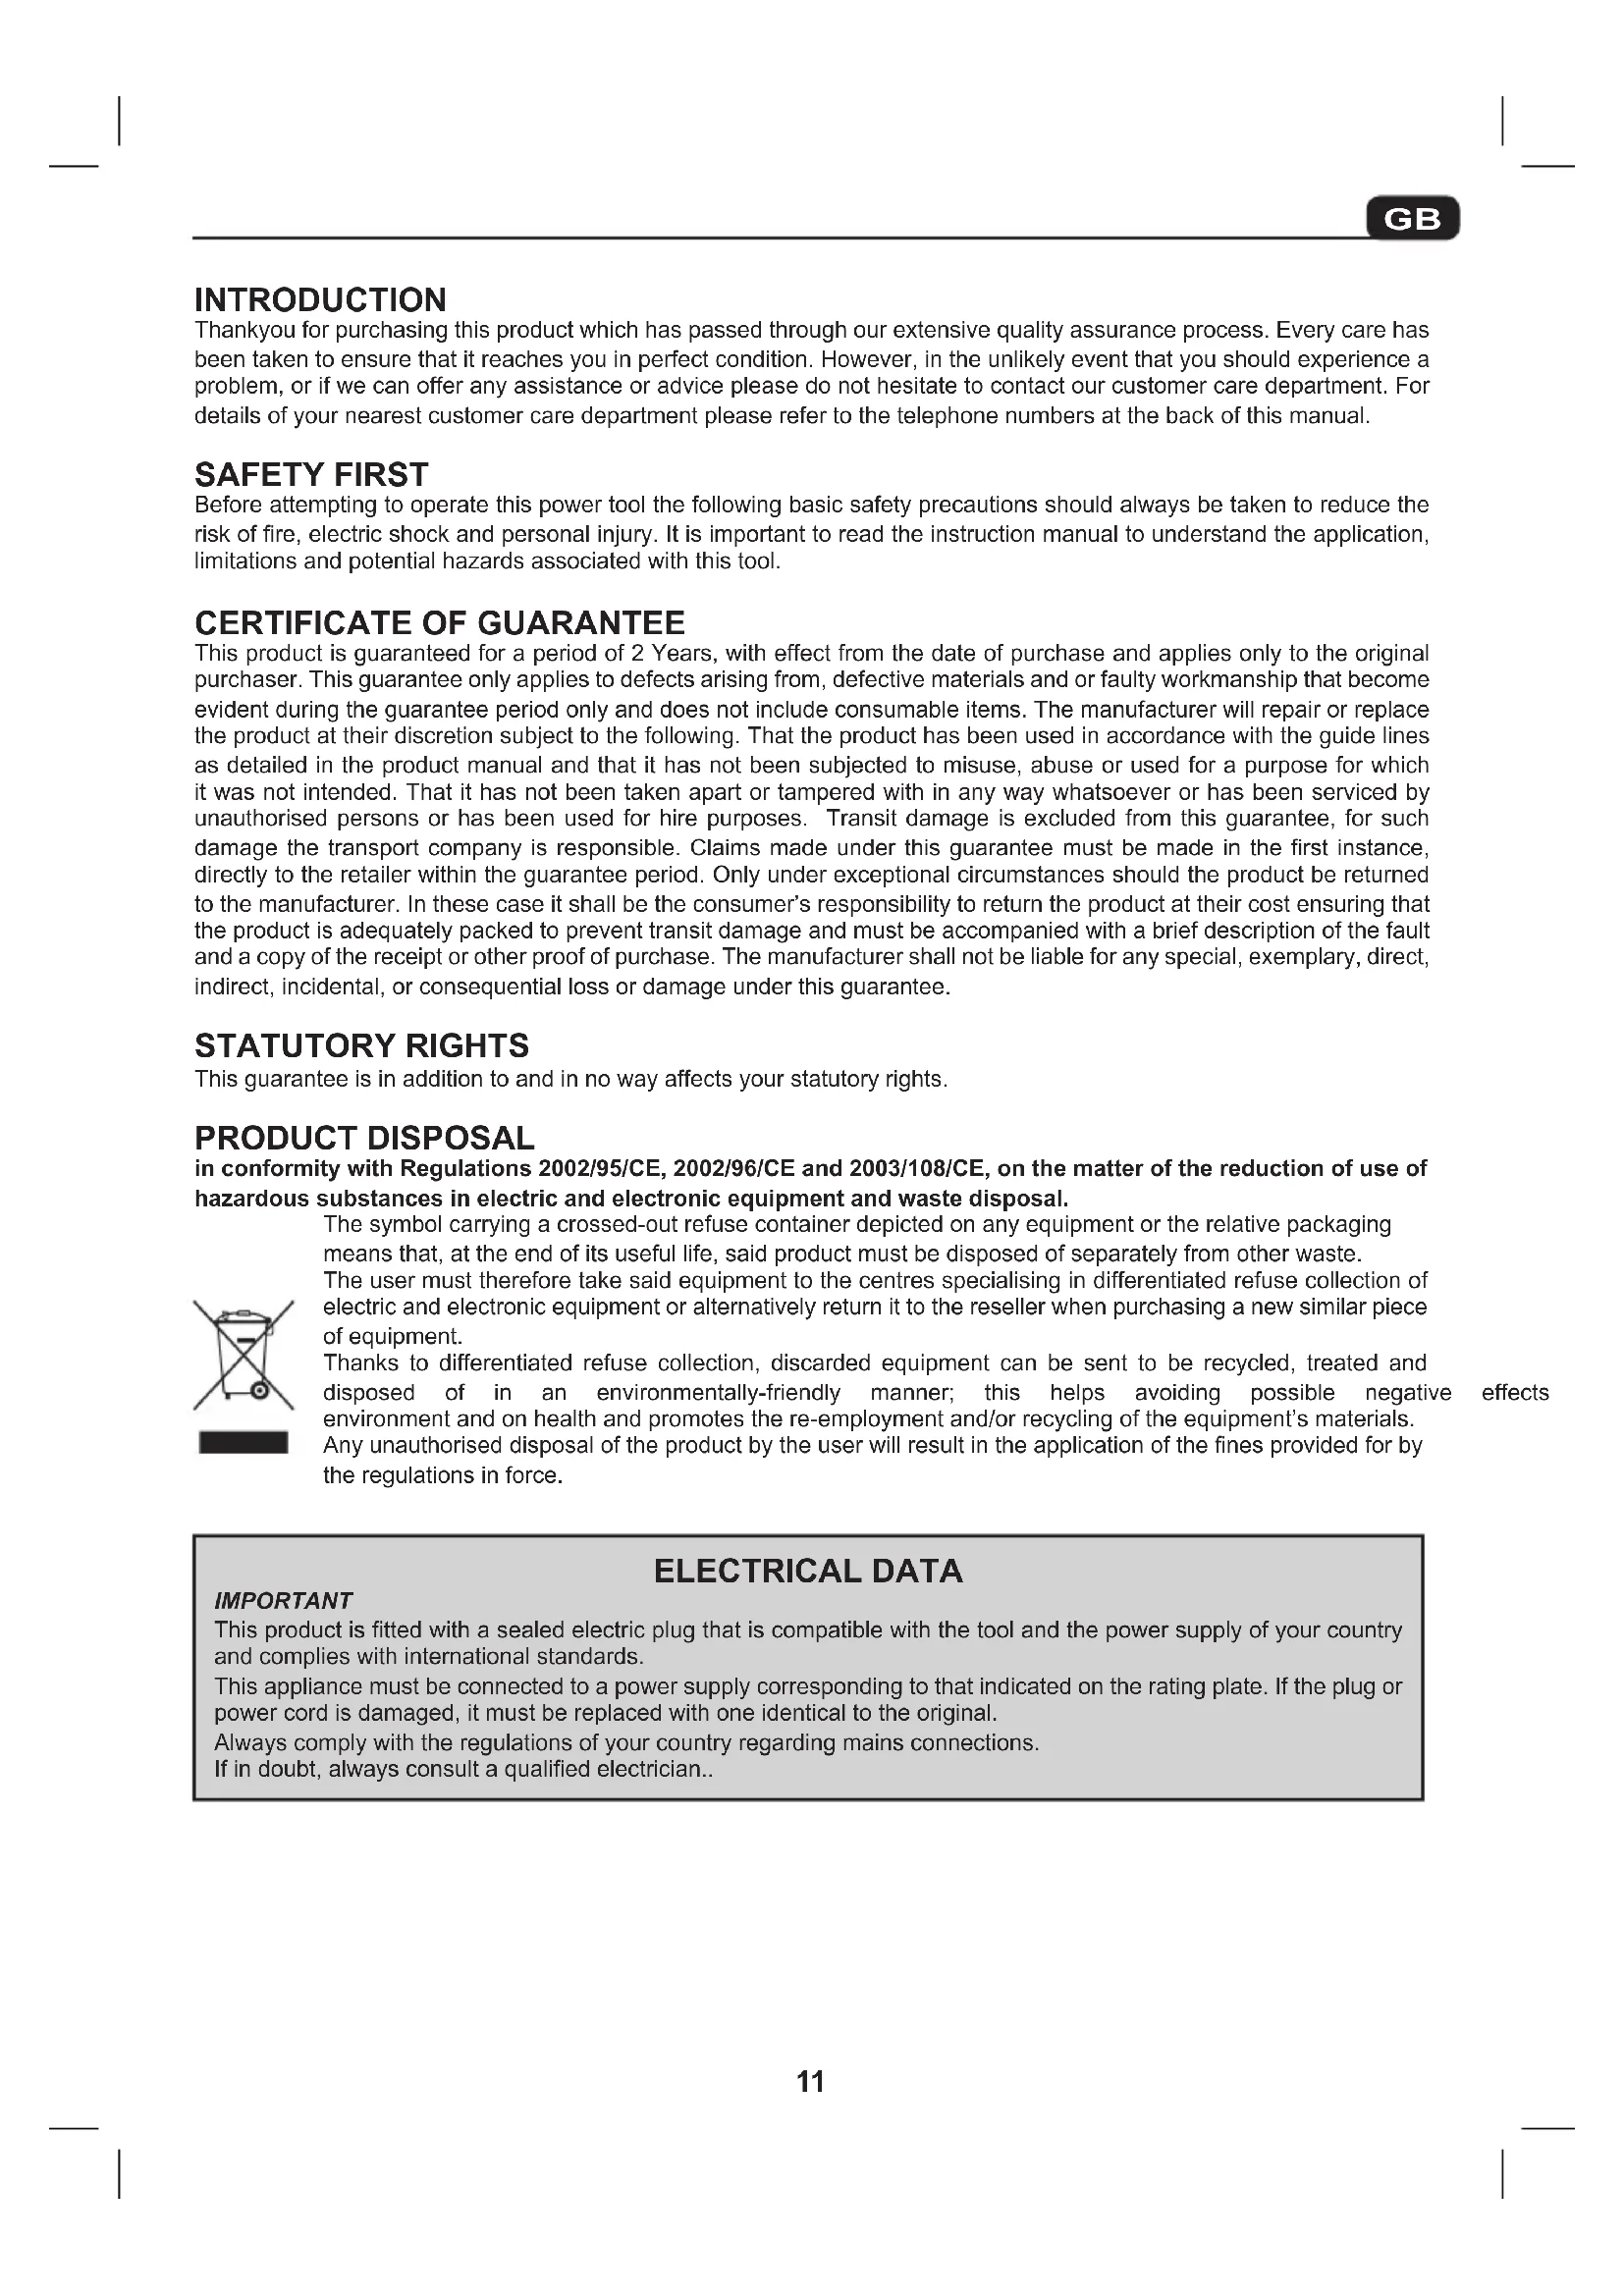
5 ELECTRONIC SPEED CONTROL
The motor speed is electronically controlled, by rotating the thumb wheel (pic. 3).
6 ANGLE CUTTING
To set the cutting angle to one of the preset angles of 15^ , 30^ or 45^ .
Loosen the two hexagon screws (Pic. 4) located on the underside of the machine using the hexagon key provided, slightly raise the base until the base can be moved to one of the preset cutting angles shown on the angle scale (Pic. 5). Finally re-tighten the hex screws.
7 PENDULUM ACTION (NJ750L)
The Jigsaw is equipped with an adjustable pendulum action roller. This roller moves back and forth to make the blade cut with a pendulum motion. As the adjustment lever is moved from numbers 0-3, the degree of pendulum motion increases (Pic. 6).
8 BLADE FITTING
(NJ480)
To fit the blade, loosen the 2 hex screws (Pic. 7) through the guard on the front of the machine. Slide the blade into the locating groove with teeth pointing forward, tighten the hex screws with hex key provided.
(NJ750L)
To fit the blade, push the lever (Pic. 8); slide the blade into the locating groove with teeth pointing forward, release the lever.
9 DUST EXTRACTION ADAPTOR
This Jigsaw is equipped with a bayonet fitting dust extraction adaptor (fig 9). Which can be fitted to a vacuum cleaner or suitable dust extraction unit. To fit the dust extraction adaptor, fit the rubber "O" ring onto the smaller diameter on the dust extraction adaptor and locate it into the dust outlet at the rear of the machine. Push in firmly and twist to engage the bayonet lugs.
Metal cutting
When cutting metals a suitable cooling/cutting oil must be used. Simply squirt the lubricant onto the blade or work piece at regular intervals during cutting to reduce blade wear.
Note: Do not immerse in water or allow coolant to enter the casing. A fatal electric shock could occur.
Circle cutting
When starting a cut from the centre of the work piece, drill a 12 mm diameter hole to ensure that there is enough clearance for the blade.
Tip
When cutting materials with a decorative or polished finish cover either the base of the Jigsaw or the surface of the material being cut with masking or other suitable tape to prevent scratching.
Laser safety
The Laser guide line used in this product uses a class 2 Laser with a maximum power output of 1.5mW at a wave length of between 635 and 670nm. These lasers do not normally present an optical hazard, although staring at the beam may cause temporary flash blindness.

WARNING!
Do not stare directly at the Laser beam.
The laser shall be used and maintained as detailed in this manual.
Never intentionally aim the laser beam at any person and prevented it from being directed towards the eye or an object other than the work piece.
Always ensure that the laser beam is directed at the work piece only when it is located on the mitre saw table.
Never direct the laser beam onto any bright, shiny reflective surface, the laser beam could be reflected back towards the operator.
Do not change the laser unit for any other type.
Do not tamper with the laser unit except when making adjustments.
Repairs to the laser must only be carried out by an authorised service centre
10 TECHNICAL DATA
| NJ480 NJ750L | ||
| Voltage 230 V ~ 50 Hz 230 V ~ 50 Hz | ||
| Rated Power 480 W 750 W | ||
| No load speed 0-3000 min | -1 | 0-3100 min^-1 |
| Cutting Angles | 15° - 30° - 45° 15° - 30° - 45° | |
| Sound Pressure Level LpA 85.5 dB(A) LpA 91 dB(A) | ||
| Sound Power Level LwA 96.5 dB(A) LwA 102 dB(A) | ||
| Vibration Level (when cutting) | wood: 7.411 m/s sheet mild steel: 7.698 m/s^2 | wood: 5.84 m/s^2 sheet mild steel: 4.42 m/s^2 |
| Weight | 1,6 kg | 2,02 kg |
| Max cutting capacity | ||
| Wood | 60 mm | 80 mm |
INTRODUCTION
AVFALLSBEHANDLING AV PRODUKTEN
FUNKCJONOWANIE WAHADŁOWE by (NJ750L)
1 OPŠTA UPUTSTVA O SPREČAVANJU POVREDA
Unit 7, 2 ^nd Floor Napier House,
Corunna Court, Warwick, CV34 5HQ
Great Britain

+44 (0) 1926 482880

+44 (0) 1926 419553
e-mail: customerservice@nutool.co.uk
D
Unit 7, 2 ^nd Floor Napier House, Corunna Court, Warwick, CV34 5HQ, UK
nutool
N. - 2013
CE
Dichiarazione di conformità CE - Declaration of compliance EEC - Déclaration de conformité CE - EG Konformitätserklärung Declaración de conformidad CE - Declaração de conformidade CE - Verklaring van overeenstemming EEG - CE-Overensstemmelseserklæring Försäkran om CE-överensstämmelse - CE Vaatimustenmukaisuusvakuutus - Δηλωση συμμορφωσης CE - Oświadczenie o zgodności KE - Izjava o sukladnosti direktivama EZ - Izjava o skladnosti ES - EK Megfelelési nyilatkozat - ES Prohlásení o shodě - Prehlásenie ES o zhode - Декларация o соответствии нормам EO - EF-overensstemmelseserklæring - AT uygunluk beyani - Declarație de conformitate CE - Декларация за съответствие по стандарт на EO Izjava o sukladnosti propisima EZ - Deklaracija del EB reikalavimų vykdymų - Vastavusdeklaratsioon EK - Paziņojums par atbilstību EK prasībām
NOI DICHIARIAMO CHE LA COSTRUZIONE DEL SEGUENTE PRODOTTO - WE DECLARE THAT THE FOLLOWING PRODUCT - LA SOCIETÉ DECLARE QUE LA CONSTRUCTION DU PRODUIT SUIVANT - WIR ERKLÄREN HIERMIT, DASS DIE KONSTRUKTION DES NACHFOLGEND AUFGEFÜHRTEN PRODUKTES NOSOTROS DECLARAMOS QUE LA CONSTRUCCIÓN DEL SIGUIENTE PRODUCTO - NÓS DECLARAMOS QUE A CONSTRUÇÃO DO PRODUCTO SEGUINTE WIJ VERKLAREN DAT DE CONSTRUCTIE VAN ONDERSTAAND PRODUCT - VI ERKLÄRER, AT KONSTRUKTIONEN AF NEDENSTÄENDE PRODUKT VI FÖRSÄKRAR ATT KONSTRUKTIONEN HOS FÖLJANDE PRODUKT - VAKUUTAMME, ETTÄ SEURAAVA TUOTE ON VALMISTETTU EMEIŞ ΔΗΛΩΝΟΥΜΕ OTI H KATAŞKEYH TOY ΠΑΡΑΚΑΤΩ ΠΡΟΪΟΝΤΟΣ - OŚWIADCZAMY, ŽE BUDOWA NASTĘPUJĄCEGO WYROBU MI POTVRĐUJEMO DA JE OVAJ PROIZVOD KONSTRUIRAN - IZJAVLJAMO, DA JE V NADALJEVANJU NAVEDEN PROIZVOD KIJELENTJÜK, HOGY AZ ALÄBBI TERMÉK SZERKEZETE - PROHLAŠUJEME, ŽE VÝROBA TOHOTO VÝROBKU - PREHLASUJEME, ŽE VÝROBA TOHOTO VÝROBKU ЗАЯВЛЯЕМ, ЧТО КОНСТРУКЦИЯ ИЗДЕЛИЯ - VI ERKLÄRER AT KONSTRUKSJONEN AV DET FÖLGENDE PRODUKTET - AŞAĞIDA BELİRTİLEN ÜRÜN İMALİNİN SE DECLARA CĂ DIN PUNCT DE VEDERE CONSTRUCTIV PRODUSUL - ДЕКЛАРИРАМЕ, ЧЕ ИЗРАБОТВАНЕТО НА СЛЕДНИЯ ПРОДУКТ MI POTVRĐUJEMO DA JE OVAJ PROIZVOD KONSTRUISAN - PAREIŠKIAME, KAD ŠIS PRODUKTAS - KINNITAME, ET JÄRGMINE TOODE MĚS PAZINOJAM, KA SEKOJOŠAIS PRODUKTS
NJ750L
(IT) Seghetto alternativo - (GB) Jig saw - (FR) Scie sauteuse - (DE) Stichsäge -
(ES) Sierra de calar - (PT) Serra tico tico - (SE) Sticksåg - (FI) Kuviosaha -
(GR) Πριονάκι - (PL) Wyrzynarka - (HR) Ubodna pila - (SI) Vbodna žaga - (RS) Ubodna testera
È CONFORME ALLE SEGUENTI DISPOSIZIONI - WAS BUILT IN COMPLIANCE WITH THE FOLLOWING DISPOSITIONS EST CONFORME AUX DISPOSITIONS SUIVANTES - MIT DEN FOLGENDEN VORSCHRIFTEN ÜBEREINSTIMMT
ESTÁ CONFORME CON LAS SIGUIENTES DISPOSICIONES - ESTÁ EM CONFORMIDADE COM AS SEGUINTES DISPOSIÇÕES IN OVEREENSTEMMING IS MET DE VOLGENDE BEPALINGEN - OPFYLDER FÓLGENDE FORSKRIFTER
ÄR I ÖVERENSSTÄMMELSE MED FÖLJANDE FÖRESKRIFTER - ALLAOLEVIEN SÄÄDÖSTEN MUKAISESTI - ΣΥΜΜΟΡΦΩΝΕΤΑΙ ΜΕ ΤΙΣ ΑΚΟΛΟΥΘΕΣ ΔΙΑΤΑΞΕΙΣ
JEST ZGODNA Z NIŽEJ WYMIENIONYMI NORMAMI - U SUKLADU SA SLIJEDEČIM PROPISIMA - V SKLADU S SLEDEČIMI ODREDBAMI MEGFELELŐ AZ ALÁBBI RENDELETEKNEK - JE V SOULADU S NÁSLEDUJÍCÍMI SMÉRNICEMI - JE V SÚLADE S NASLEDOVNYMI SMERNICAMI
ОТВЕЧАЕТ ТРЕБОВАНИЯМ СЛЕДУЮЩИХ НОРМАТИВОВ - ER I OVERENSSTEMMELSE MED FÖLGENDE BESTEMMELSER İZLEYEN KURALLARA UYGUNLUĞUNU BEYAN EDERİZ - A FOST EXECUTAT CONFORM DISPOZİTIILOR
Е В СЪОТВЕТСТВИЕ СЪС СЛЕДНИТЕ РАЗПОРЕДБИ - У SKLADU SA SLEDECİM PROPISIMA - PAGAMINTAS, REMIANTIS SEKANČIOMIS DIREKTYVOMIS ON VALMISTATUD KOOSKÖLAS JÄRGMISTE DIREKTIIVIDEGA - TIKA IZGATAVOTS ATBILSTOŠI SEKOJOŠAJÄM DIREKTÍVÄM
2006/42/CE - 2004/108/CE - 2006/95/CE - 2002/95/CE - 2002/96/CE
STANDARD:
EN 60745-1, EN 60745-2-11, EN 61000-3-3, EN 55014-1, EN 55014-2, EN 61000-3-2
Corunna Court, Warwick, CV34 5HQ, UK, 21/12/2012

text_image
M hMark Shannon
Direttore qualità e competenza - Quality Assurance Controller - Réglage de précision - Leiter der Qualitätssicherung - Responsable de la garantia de calidad - Controlador de garantia da qualidade - Directeur kwaliteit - Direktør for kvalitetsstyring og kompetence - Ansvarande för kvalitet och kompetens - Laadunvalvonnan johtaja - Διευθυντής ποιότητας και κατάρτισης - Dyrektor Jakości - Direktor odjela za kontrolu kakvoće - Direktor za kvaliteto - Minőségért felelös lgazgató - Vedoucí kvality a způsobilosti - Riaditef kvality a spôsobilosti - Direktor po качеству - Kvalitets- og kompetansedirektør - Kalite Múdürü - Director calitate - Direktor op osigurявane ha качествoto - Direktor odeljenja za kontrolu kvaliteta - Kokybés užtikinnimo kontrolierius - Kvaiteedigarantii direktor - Kokybés garantijos direktorius
Persona autorizzata a costituire il fascicolo tecnico - person authorised to compile the technical file - personne autorisée à constituer le dossier technique - die bevollmächtigt ist, die technischen Unterlagen zusammenzustellen - persona facultada para elaborar el expediente técnico - pessoa autorizada a constituir o dossiè técnico - persoon bevoegd om het technisch dossier op te stellen - person autoriseret til at affatte den tekniske fil - person som är behörig att ställa samman den tekniska dokumentationen - teknisen tiedoston täyttämiseen valtuutettu henkilò - εξουσιοδοτμμένο άτομο γικ τη σύνταξη του αρχείου τεχνικών δεδομένων - osoba upoważniona do stworzenia dokumentów technicznych - ovlaštena osoba za sastavljanje tehničkih podataka - oseba, ki je pooblaščena za izpolnitev tehničnega dokumenta - a műszaki dokumentáció összeállítására felhatalmazott személy - osoba oprávněná k sestavení technických údajú - osoba oprávnená na zostavenie technických údajov - лицо, уполномоченное составлять технический файл - person som er autorisert til á utarbeide den tekniske dokumentasjonen - teknik dosyayi derlemeye yetkili kiși - persoaná autorizatá pentru îndeplinirea fișei tehnice - Упълномощено лице за съставяне на техническото досие - ovlaščena osoba za sastavljanje tehničkih podataka - asmuo, igaliotas sudarytî techninių dokumentų bylą - isik, kes on volitatud koostama tehnilist faili - persona, kas pilnvarota sastādīt teknisko dokumentāciju
NUTOOL UK
Unit 7, 2 ^nd Floor Napier House, Corunna Court, Warwick, CV34 5HQ, UK
nutool
N. - 2013
CE