NRHD1100 - Electric drill Nutool - Free user manual and instructions
Find the device manual for free NRHD1100 Nutool in PDF.
| Product Type | Electric drill with hammer and chisel function |
| Brand | Nutool |
| Model | NRHD1100 |
| Power supply | 230 V ~ 50 Hz, 1100 W |
| No-load speed | 850 min⁻¹ |
| Impact frequency | 3200 ipm |
| Sound pressure level (LpA) | 92.7 dB(A) (K=3 dB(A)) |
| Sound power level (LwA) | 103.7 dB(A) (K=3 dB(A)) |
| Vibration (main handle) | 22.401 m/s² (K=1.5 m/s²) |
| Vibration (auxiliary handle) | 16.843 m/s² (K=1.5 m/s²) |
| Weight | 4.04 kg |
| Drilling capacity (concrete) | 26 mm |
| Drilling capacity (steel) | 13 mm |
| Drilling capacity (wood) | 40 mm |
| Chuck type | SDS (main) + Auxiliary 3-jaw chuck |
| Functions | Drilling, hammer drilling, chiseling |
| Included accessories | Chisels (x2), masonry bits (x3), auxiliary chuck, debris collector, chuck key, grease supply |
| Maintenance | Check gearbox grease level every 50 hours; clean ventilation slots regularly |
| Safety | Adjustable side handle, electrocution protection (three-conductor cable with grounding), emergency stop by releasing the switch |
| Warranty | Full legal warranty (details in the manual) |
Frequently Asked Questions - NRHD1100 Nutool
User questions about NRHD1100 Nutool
0 question about this device. Answer the ones you know or ask your own.
Ask a new question about this device
Download the instructions for your Electric drill in PDF format for free! Find your manual NRHD1100 - Nutool and take your electronic device back in hand. On this page are published all the documents necessary for the use of your device. NRHD1100 by Nutool.
USER MANUAL NRHD1100 Nutool
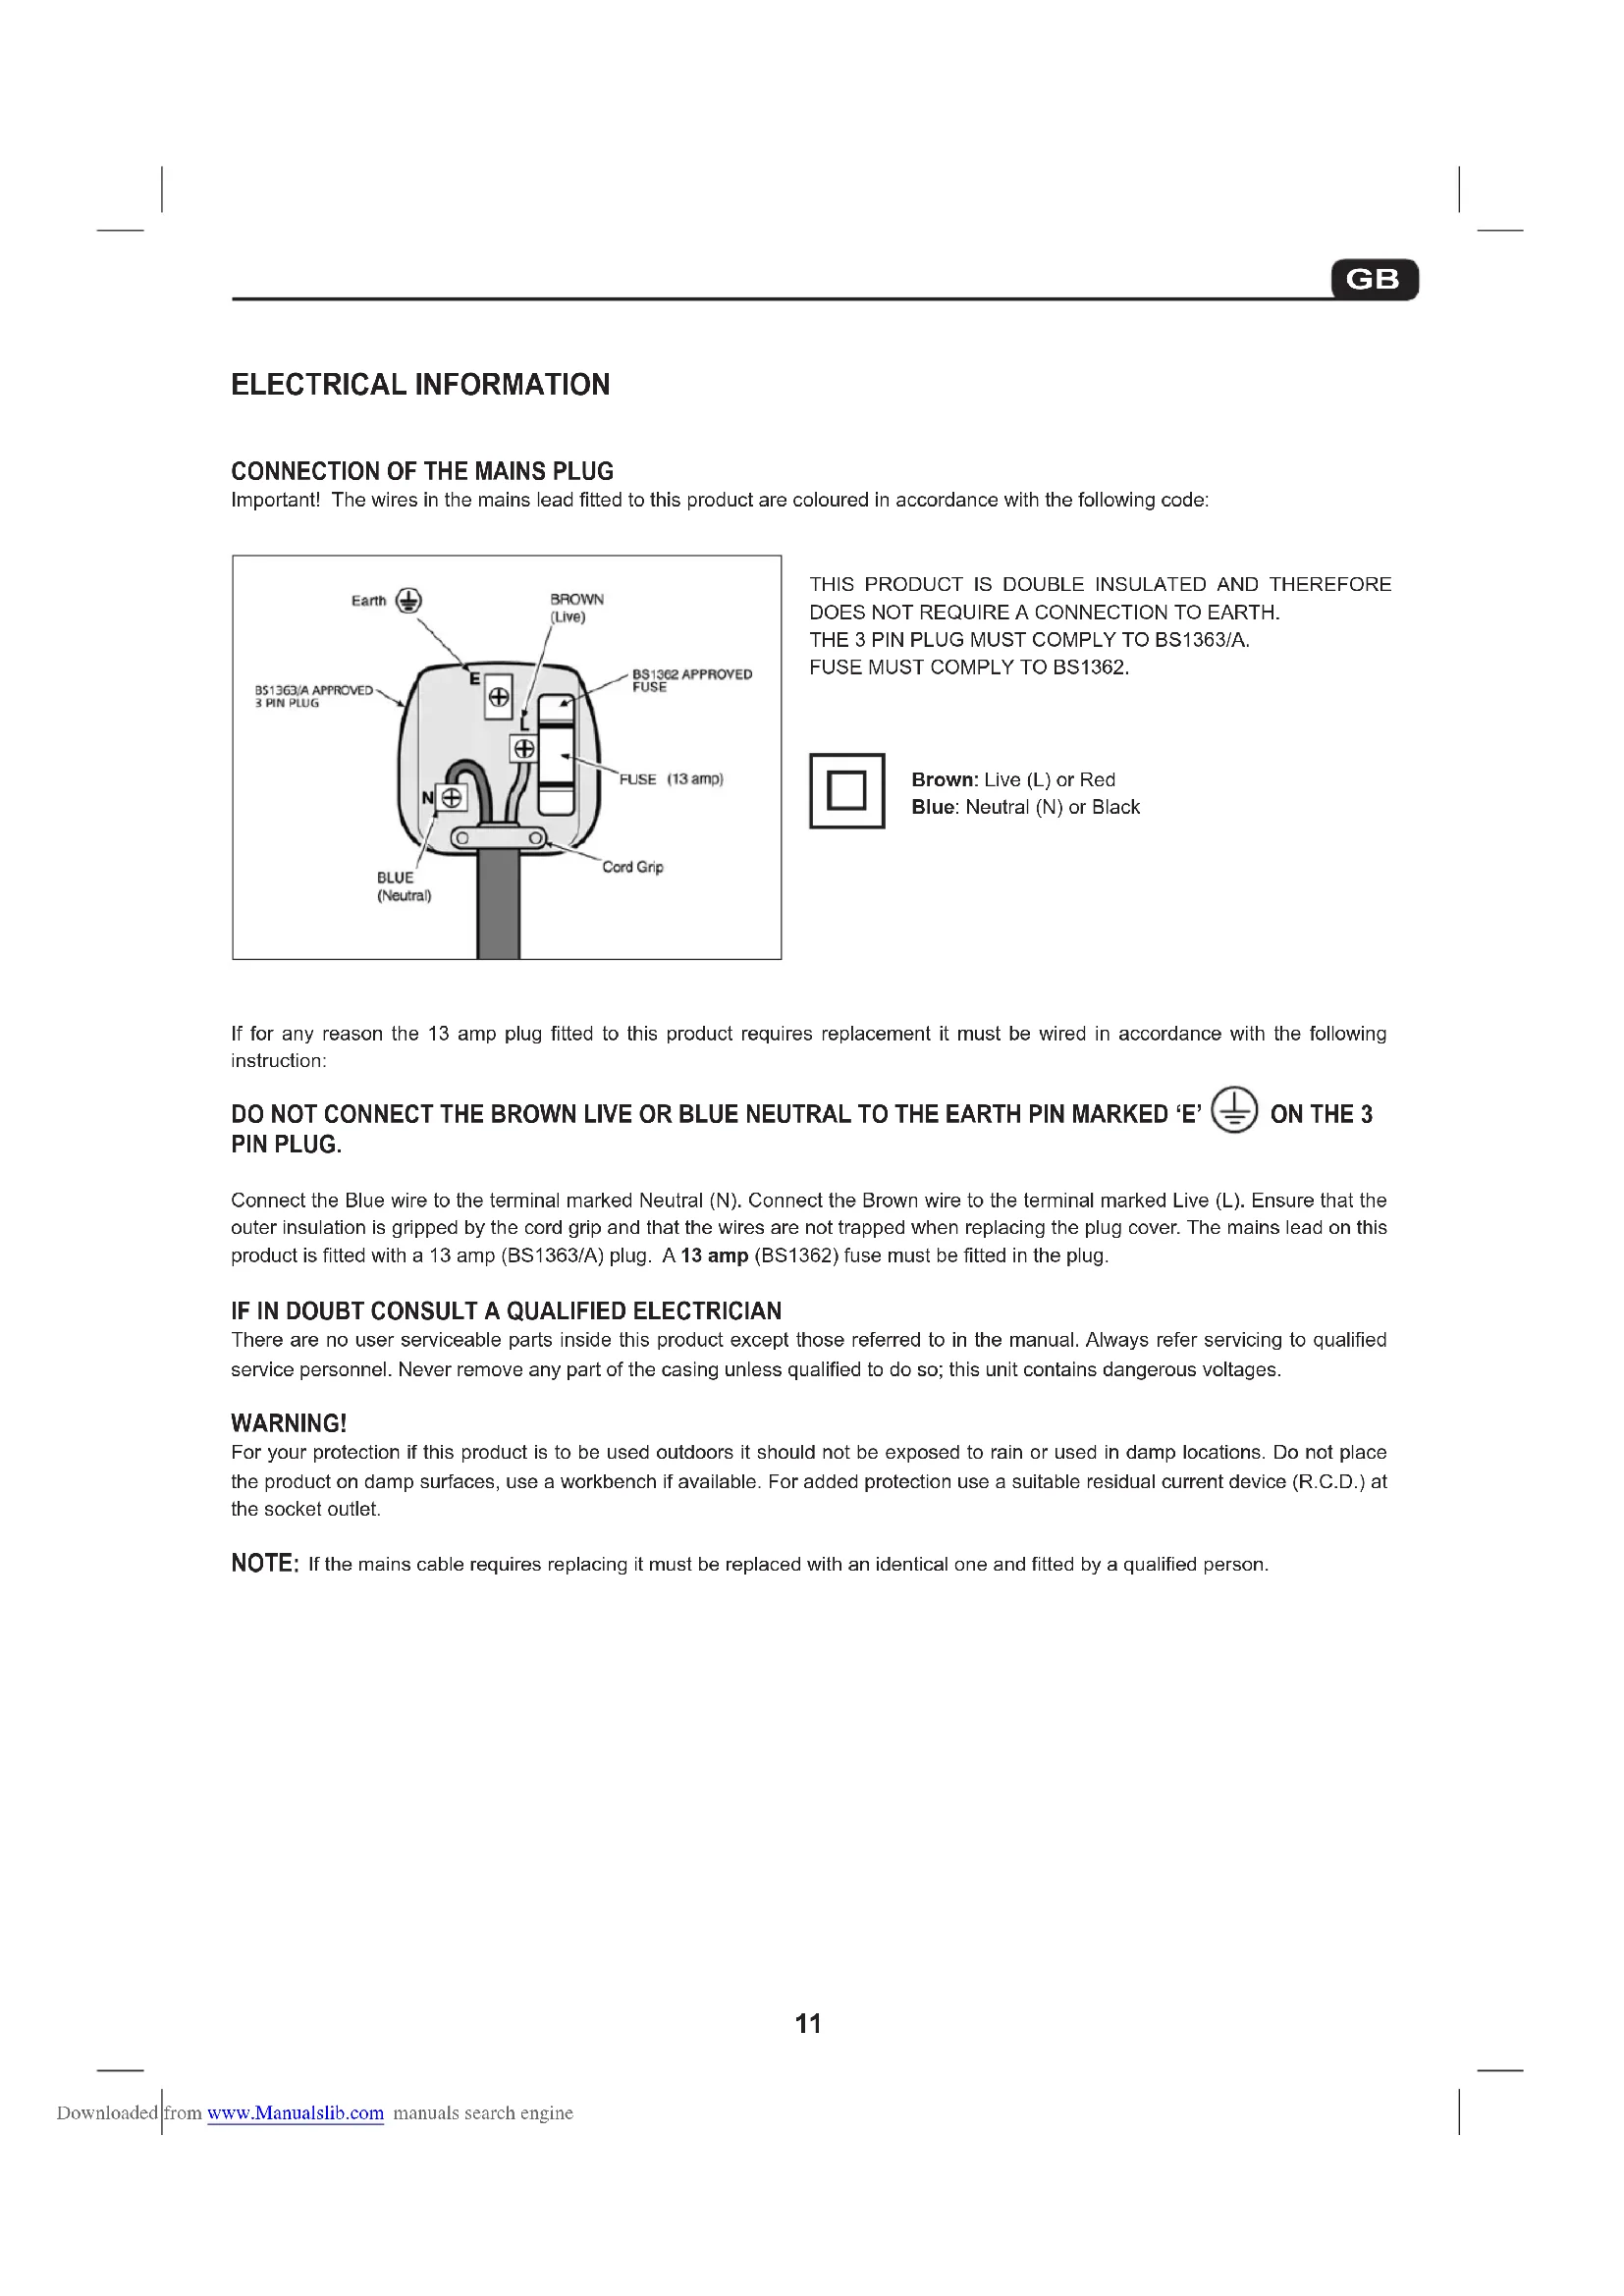
Important! The wires in the mains lead fitted to this product are coloured in accordance with the following code:
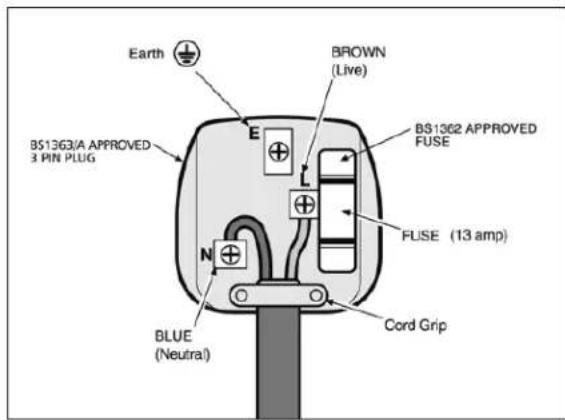
THIS PRODUCT IS DOUBLE INSULATED AND THEREFORE DOES NOT REQUIRE A CONNECTION TO EARTH. THE 3 PIN PLUG MUST COMPLY TO BS1363/A. FUSE MUST COMPLY TO BS1362.

Brown:Live (L) or Red Blue: Neutral (N) or Black
If for any reason the 13 amp plug fitted to this product requires replacement it must be wired in accordance with the following instruction:
DO NOT CONNECT THE BROWN LIVE OR BLUE NEUTRAL TO THE EARTH PIN MARKED 'E' ON THE 3 PIN PLUG.
Connect the Blue wire to the terminal marked Neutral (N). Connect the Brown wire to the terminal marked Live (L). Ensure that the outer insulation is gripped by the cord grip and that the wires are not trapped when replacing the plug cover. The mains lead on this product is fitted with a 13 amp (BS1363/A) plug. A 13 amp (BS1362) fuse must be fitted in the plug.
IF IN DOUBT CONSULT A QUALIFIED ELECTRICIAN
There are no user serviceable parts inside this product except those referred to in the manual. Always refer servicing to qualified service personnel. Never remove any part of the casing unless qualified to do so; this unit contains dangerous voltages.
WARNING!
For your protection if this product is to be used outdoors it should not be exposed to rain or used in damp locations. Do not place the product on damp surfaces, use a workbench if available. For added protection use a suitable residual current device (R.C.D.) at the socket outlet.
NOTE: If the mains cable requires replacing it must be replaced with an identical one and fitted by a qualified person.
GB
INTRODUCTION
Thankyou for purchasing this product which has passed through our extensive quality assurance process. Every care has been taken to ensure that it reaches you in perfect condition. However, in the unlikely event that you should experience a problem, or if we can offer any assistance or advice please do not hesitate to contact our customer care department. For details of your nearest customer care department please refer to the telephone numbers at the back of this manual.
SAFETY FIRST
Before attempting to operate this power tool the following basic safety precautions should always be taken to reduce the risk of fire, electric shock and personal injury. It is important to read the instruction manual to understand the application, limitations and potential hazards associated with this tool.
CERTIFICATE OF GUARANTEE
This product is guaranteed for a period of 2 Years, with effect from the date of purchase and applies only to the original purchaser. This guarantee only applies to defects arising from, defective materials and or faulty workmanship that become evident during the guarantee period only and does not include consumable items. The manufacturer will repair or replace the product at their discretion subject to the following. That the product has been used in accordance with the guide lines as detailed in the product manual and that it has not been subjected to misuse, abuse or used for a purpose for which it was not intended. That it has not been taken apart or tampered with in any way whatsoever or has been serviced by unauthorised persons or has been used for hire purposes. Transit damage is excluded from this guarantee, for such damage the transport company is responsible. Claims made under this guarantee must be made in the first instance, directly to the retailer within the guarantee period. Only under exceptional circumstances should the product be returned to the manufacturer. In these case it shall be the consumer's responsibility to return the product at their cost ensuring that the product is adequately packed to prevent transit damage and must be accompanied with a brief description of the fault and a copy of the receipt or other proof of purchase. The manufacturer shall not be liable for any special, exemplary, direct, indirect, incidental, or consequential loss or damage under this guarantee. This guarantee is in addition to and does not affect any rights, which the consumer may have by virtue of the Sale of Goods Act 1973 as amended 1975 and 1999.
STATUTORY RIGHTS
This guarantee is in addition to and in no way affects your statutory rights.
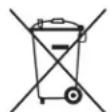
PRODUCT DISPOSAL
When this product reaches the end of it's life or is disposed of for any other reason, it must not be disposed of in household waste. In order to preserve natural resources, and to minimise adverse environmental impact, please recycle or dispose of this product in an environmentally friendly way. It should be taken to your local waste recycling centre or other authorised collection and disposal facility. If in doubt consult your local waste authority for information regarding available recycling and / or disposal options.
GENERAL SAFETY INSTRUCTIONS
Before attempting to operate this machine, you must read, understand and follow these instructions very carefully as they are intended to ensure your safety and that of others and also a long and trouble-free service life of the machine.
Learn how to use the power tool, its limitations and potential hazards.
Keep these instructions in a safe place for future reference.
Avoid unintentional starting - Unplug the power tools
Before starting the power tool, always make sure that you have removed the key and adjusting wrenches.
Before plugging the tool into the mains supply, always make sure that the switch is in the OFF position.
Make sure that power tools are disconnected from the mains supply when not in use, prior to servicing, lubrication or adjustment and when replacing accessories such as blades, bits and cutters.
Check damaged parts
Before using the power tool, always inspect it carefully to determine that it will operate properly and perform its intended function.
Check correct alignment of moving parts, making sure they do not bind. Check for any damaged components and make sure that the power tool has been correctly assembled.
Check for any condition that may affect operation of the power tool.
Unless otherwise indicated in this instructions handbook, a guard or any other part of the power tool that has been damaged must be repaired or replaced by an authorized service center.
Any switch that does not work correctly must be replaced by an authorized service center.
Do not use the power tool if the ON/OFF switch does not turn the power tool ON and OFF.
Dust generated when machining materials is a health hazard.
Always wear a suitable dust mask.
When working, always wear personal protective equipment:
safety goggles, gloves, mask, ear protectors, non-slip shoes.
Never wear loose clothes or jewelry that may be trapped in moving parts; long hair must be tied back.
Always work on a stable base.
Always fasten the workpiece securely with a clamp.
Keep the work area clean and tidy.
Always use the power tool with both hands.
Never open or modify the power tool or its accessories in any way.
Do not expose the power tool to rain, or use in damp or wet locations. Keep the work area well lit.
Do not use power tools in areas where there is a risk of explosion or fire from combustible materials, flammable liquids, paint, varnish, petrol etc. flammable gases and dust of an explosive nature.
Beware children and pets
Children and pets should be kept out of the work area.
All power tools should be kept out of the reach of children and, preferably, stored or locked in a secure cabinet or dry room when not in use.
Use the right tool
Select the right tool for the job. Do not use a tool for a job for which it was not designed. Do not force a small tool to do the job of a heavy-duty tool. Do not use tools for purposes intended.
Do not force the power tool
The power tool will do a better and safer job and give you much better service if it is used at the rate for which it was designed.
Maintain tools with care
Keep cutting tools sharp and clean for better and safer performance.
Follow the instructions for lubricating and changing accessories. Keep handles dry, clean and free from oil and grease.
Ensure that ventilation slots are kept clean and free from dust at all times. Restricted ventilation slots can cause overheating and damage to the motor.
If this machine is to be used when working at a certain height, scaffolding fitted with railing and kick-plate or a tower platform must be used in order to guarantee suitable stability.
Avoid body contact with earthed or grounded surfaces (e.g. pipes, radiators, dish-washers and refrigerators).
Power Cords
Never yank or pull the power cord to disconnect it from the mains supply socket.
Never carry the power tool by its power cord. Keep the power cord away from heat, oil, solvents and sharp edges.
tCheck the tool power cord periodically and if damaged have it replaced by an authorized service center.
Inspect extension cords periodically and replace if damaged.
DO NOT use 2-core extension cords or reels on power tools with an earth path. Always use a 3-core extension cord or reel with the earth core connected to earth.
Always unwind any extension cords fully.
For extension cords up to 15 metres, use a wire cross section of 1.5mm^2
For extension cords over 15 metres, use a wire cross section of 2.5mm^2
Protect your extension cord from sharp objects, excessive heat and damp or wet locations.
This power tool complies with National and International Standards and safety requirements. Repairs should be carried only out by qualified persons using original spare parts. Failure to do so may result in considerable danger to the use.
SPECIFIC SAFETY INSTRUCTIONS
If this machine is to be used when working at height a suitable, stable platform or scaffold tower with hand rails and kick boards should be used.
Keep drills, chisels and other cutters sharp and in good condition.
This will improve cutting, reduce load and give a longer working life to the machine and accessories.
Dachot attempt to modify the machine in any way.
Do not use extreme force on the machine.
Use approved safety glasses or goggles, face mask and Ear defenders. A safety helmet should also be worn especially when working above head height.
Do not force the chisel in to the work piece to far or you may have trouble removing it. It is far better to nibble away smaller pieces of masonry, concrete or brick.
Never use any drill or chisel as a lever. This will damage the machine and the bit.
Do not try to change the selection (hammer, chisel and normal) while the motor is running. Doing so will destroy the internal gearing.
Do not use this product with any attachment designed for mixing Mortar, Concrete, or plaster. Or for any other type of mixing operation.
COMPONENTS AND CONTROLS (PIC 1)
| 1 | Motor | 9 | Greasing point |
| 2 | Side handle | 10 | Brush housing |
| 3 | SDS (Spline Drive System) chuck | 11 | 2 x chisel |
| 4 | Selector switch | 12 | Masonry bits |
| 5 | On/Off switch | 13 | Auxiliary chuck |
| 6 | Handle | 14 | Dust collector |
| 7 | Spanner | 15 | Grease tub |
| 8 | Selector switch | 16 | Chuck key |
Familiarize yourself with the safety and operating instructions before using the drill
WARNING!
Do Not use the auxiliary 3 jaw chuck when using the product in Hammer Drill or Chisel mode. The auxiliary 3 jaw chuck should only be fitted and used with standard drill bits, for normal drilling in wood and steel.
IMPORTANT
When using the product in chisel or hammer drill mode for long period's periodically check the switches for the correct selection.
OPERATING INSTRUCTIONS
SIDE HANDLE (PIC.2)
This drill is supplied with a side handle fitted, to adjust the position of the side handle slacken the handle by rotating it in clockwise direction (Pic.2). Adjust the position of the handle to suit either left or right hand operation and to achieve a comfortable position for operating the Drill. To tighten the handle turn in a clockwise direction until it is sufficiently tight to stop it moving in use.
SWITCHING ON AND OFF (PIC.3)
This machine is fitted with a normal On/Off trigger switch To start the machine squeeze the ON / OFF trigger switch (Pic3).To stop the machine release the ON / OFF trigger switch.
FITTING THE AUXILIARY 3 JAW CHUCK (PIC.4)
Do Not use the auxiliary 3 jaw chuck when using the product in Hammer Drill or Chisel mode. The auxiliary 3 jaw chuck should only be fitted and used with standard drill bits, for normal drilling in wood and steel. Using the grease provided (Pic.1) apply a thin coating of grease to the splined drive system (SDS) shank fitted to the auxiliary 3 Jaw chuck. (fig 4).
Support the drill on a work bench. Grip the black shroud (Pic.4) around the SDS chuck and pull it back against the spring tension towards the body of the drill. Insert the auxiliary chuck spindle into the SDS chuck. Push inwards until resistance is felt. It may be necessary to rotate the auxiliary chuck until the shaft drops completely into place and engages with the drive mechanism.
When you are satisfied that the auxiliary chuck is correctly located release the black shroud this should lock the auxiliary chuck into position. The auxiliary chuck is correctly located if it cannot be removed without retracting the black shroud. If the black shroud does not return fully remove the auxiliary chuck and repeat the above procedure.
FITTING SDS DRILL AND CHISEL BITS
To fit SDS drill and chisel bits to the SDS chuck follow the procedure for Fitting the auxiliary 3 Jaw chuck. Do not forget to apply a thin coating of grease to the drill and chisel bit shanks.
SELECTOR SWITCHES (PICS.5 TO 9)
The following illustrations show the correct selector switch positions for the three drill functions.
NOTE: Please read these instructions before using the drill, they are provided for the safe operation of the drill.
The Rotary Hammer Drill can be used for three different functions.
- Drilling wood and metal (using the auxiliary 3 Jaw chuck)
- Hammer action (for drilling masonry, brick, concrete and block work)
- Chiseling action (for light to medium chiseling)
Pics.5&6 show the relative location of the selector switches. For example, three line drawings (Pics.7 to 9) are included.
WARNING!
Do not attempt to change the position of the selector switches when motor is running. Doing this will cause serious damage to the drill and possible injury to the operator.
DRILLING WOOD METAL AND PLASTIC (PIC.7)
When the drill is being used with the auxiliary 3 Jaw chuck for drilling wood, metal and plastic the selector switches must be set to the positions shown in (Pic7).
WARNING!
When using the following functions it is advisable to periodically check the position of both selector switches.
DRILLING MASONRY, BRICK, CONCRETE AND BLOCK WORK (PIC.8)
When the drill is to be used for drilling masonry, brick, concrete and block work the selector switches must be set to the positions shown in (Pic.8).
CHISELING MASONRY, BRICK, CONCRETE AND BLOCK WORK (PIC.9)
When the drill is to be used for breaking up masonry, brick, concrete and block work the selector switches must be set to the positions shown in (Pic.9).
USING THE AUXILIARY 3 JAW CHUCK (PICS.10 TO 12)
Do Not use the auxiliary 3 jaw chuck when using the product in Hammer Drill or Chisel mode. The auxiliary 3 jaw chuck should only be fitted and used with standard drill bits, for normal drilling in wood and steel.
Do Not use SDS drill or chisel bits when using the auxiliary 3 jaw chuck, use only drill bits designed for drilling wood or steel.
Select the correct drill required for the job. Open the jaws of the chuck by rotating the outer ring of the chuck (Pic.10) by hand to allow the drill shank to locate into the chuck.
Tighten the chuck outer ring by hand until the chuck jaws grip the drill shank (fig 11).
Locate the chuck key into each of the three holes in turn located around the chuck body and gradually tighten the chuck jaws onto the shank of the drill bit (fig 12). Do not over tighten.
USING THE DEBRIS COLLECTOR (PIC.13)
Caution: always wear safety goggles especially when drilling above head height.
The debris collector is a round rubber molding shaped to be fitted onto a drill bit to contain drilling debris when drilling ceilings etc. Place the debris collector over the drill bit, position the drill bit onto the work piece, slide the debris collector along the drill bit until it is in contact with the work piece. As the drill drives into the work piece the debris collector will move down the drill bit and collect the drilling debris. Always empty the debris collector frequently.
MAINTENANCE
CAUTION:
Make sure that the drill is isolated from the mains power supply before fitting accessories, maintenance and adjustment.
LUBRICATING THE GEARBOX (PIC.14)
It is recommended that after 50 hours of use the gearbox should be checked for grease and topped up if required using the grease supplied. Using the «Pin» spanner supplied. Locate the pins into the indentations in the gearbox inspection cover plate located on the top of the drill gearbox housing (fig 14).
Loosen in an anti-clockwise direction.
Lift away the inspection cover. Only use sufficient grease to coat the gears do not pack the gearbox full of grease. When the grease supplied has been used an alternative high melting point grease can be used. Re-fit the inspection cover and tighten in a clockwise direction.
Do not over tighten.
| TECHNICAL SPECIFICATION NRHD1100 | |
| Voltage 230-240 V ~ 50 Hz | |
| Rated power 1100 W | |
| No load speed 850 min | -1 |
| Rated impact rate 3200 ipm | |
| Sound Pressure Level LpA 92.7 dB(A) - K=3 dB(A) | |
| Sound Power Level LwA 103.7 dB(A) - K=3 dB(A) | |
| Vibration Level (K = 1,5 m/s2) | Main handle: 22,401 m/s2Auxiliary handle: 16,843 m/s2 |
| Weight 4.04 kg | |
| Maximum drilling capacities: | |
| Concrete 26 mm | |
| Steel 13 mm | |
| Wood 40 mm |
FR
INTRODUCTION
MISE AU REBUT DU PRODUIT
ASA LATERAL (ILUSTR. 2)
Evite activations involuntarias -
Desluge as ferramentas électricas
CABO LATERAL (FOTO 2)
Whenever you want to use the tool, please use the following instructions.
- Whenever you want to use the tool, use the same method as for using the other tools.
- When you want to use the tool, use the same method as for using the other tools.
- Whenever you want to use the tool, use the same method as for using the other tools.
- When you want to use the tool, use the same method as for using the other tools.
ATENÇAÖI
BUŠENJE DRVA, METALA I PLASTIKE (Slika 7)
Kad se bušilica s pomocnom steznom glavom s 3 Čeljusti koristi za buşenje drva, meta l plastike, birace je potrebno postavitu u položaj prikazan na Slici 7.
TPAZNJA!
Kad se busilicu koristi u sljedece svrhe, savjetujemo povremenu kontrlu položaja oba biraca.
BUSENJE ZIDOVA, CIGLA, BETONA I BLOKOVA (Slika 8)
Kad se bušilica koristi za buşenje zidova, cigle, betona i blokova, birăce je potrebno postaviti u połojak pri Kazan na Slici 8.
RAD DLIJETOM NA ZIDOVIMA, CIGLAMA, BETONU I BLOKOVIMA (Sika 9)
Kad se bušilica koristi za razbijanje zidova, cigle, betona blokova, birace je potrebno postavitu u połojak prikazan na Slici 9.
KAKO KORISTITI POMOCNU STEZNU GLAVU S 3 CELJUSTI (Slika 10 - 12)
Odaberite naprikladnje svrdlo za posao koji zeLite obaviti. Kako biste trupu svrdla omogucili da se pravalno smjesti u steznoj glavi, rastvorite celjusti stezne glave ruCno okrecuci vanjski prste (Silka 10).
Ručno pritežite vanjski prsten stezne glave dok se Čeljustu uhvate za trup svrdla (sl. 11). Naizmjenićno umecite kljuć u svaku od tri rupe koje se nalaze oko tijela stezne glave i postepeno zatežite Čeljustu za trup svrdla (sl. 12). Ne stežite pretjerano.
KAKO KORISTITI POSUDU ZA PRIKUPLJANJE KRHOTINA (slike 13)
m = 311
Simbol preskrabanog kontejnera, koji se nalazi na aparatu ili na pakovanju,Pokazuje da proizvod po isteku svog roka trajanja mora biti odstranjen odvojeno od ostalih odpadaka. Korisnik, znači,mora da odnese aparat koji višne nije upotrebljiv, u odgovarajuće deponije za.skuplanje odpada elektró i elektronskih aparata, ili da odnese aparat kod preprodavaca u momentu kupovine novog istovetnog aparata. Pravilno odstranjivanje odpadaka, radi dalje reciklaže,i koje je kompatibilno sa okolinom, doprinosi da se izbegnu svi moguci negativni efekti na okolinu i zdravlje gradjanina i omogucava ponovu upotrebu ili reciklažu materijala od kojih su sačinjeni aparati. Nepravilno uklanjanje proizvoda od strane korisnika, dovodi do primene administrativnih sankcija koje su predvidjene vazecom normom.
PODACIO ELEKTRICNIM DELOVIMA
VAZNO
Ovaj je proizvod opremljen zaptivenom elektricnom uticnicom koja je kompatibilna sa alatom i strujnim napajanjem vazecim za vašu zemlju i zadovoljava zahevima medunarodnih propisa. Ovaj aparat mora biti priključen na napajanje el.energijom koje jegnakoko onom koje je prikazano na fabričkoj etiketi. Ako utikač ili kabel napajanja izgledaju kao da su oštećeni moraju biti zamenjeni kompletnim sklopom identićim onom originalnom.
Sledite uvek propise koje vaze u vašoj zemlj na području prikljucenja na elektricnu naponsku mrežu.
1 OPSTA UPUTSTVA O SPRECAVANJU POVREDA
BOČNA DRŠKA (slide 2)
Unit 7, 2^nd Floor Napier House,
Corunna Court, Warwick, CV34 5HQ
Great Britain
+44(0)1926482880
:+44(0)1926419553
e-mail: customerservice@nutool.co.uk
F
Mecafer
112, Chemin de la foret aux Martins
MÉS PAZINOJAM, KA SEKOJOŠAIS PRODUKTS
NRHD1100
(IT) Martello tassellatore - (GB) Rotary Hammer Drill - (FR) Perforateur burineur - (DE) Bohrhammer -
(ES) Martilio perforador - (PT) Martelo Electropneumático - (FI) Poravasara - (PL) Młot udarowo-obrotowy -
(HR) Elektropneumatski cekic - (SI) Elektricno rotacijski kladivo - (RS) Elektro-pneumatski cekic
É CONFORME ALLE SEGUENTI DISPOSIZIONI - WAS BUILT IN COMPLIANCE WITH THE FOLLOWING DISPOSITIONS
EST CONFORME AUX DISPOSITIONS SUIVANTES - MIT DEN FOLGENDEN VORSCHRIFTEN UBEREINSTIMMT
ESTÀ CONFORME CON LAS SIGUIENTES DISPOSICIONES - ESTÀ EM CONFORMIDADE COM AS SEGUIENTES DISPOSICOES
IN OVEREENSTEMMING IS MET DE VOLGENDE BEPALINGEN - OPFYLDER FOLLGENDE FORSKRIFTER
ARIOVERNSSTAMMSELSE MED FOLJANDE ForesKRIFTER-ALLAOLEVIEN SAAIDOSTEN MUKAISESTI-SYMMOPQNETAI ME T1KAKOAYOE2IATAEIEZ
JEST ZGODNA Z NIJEJ WYMIENIONYMI NORMAMI - U SUKLADU SA SLIJEDECIM PROPISIMA - V SKLADU S SLEDECIM ODREDBAMI
MEGFELELO AZ ALABBI RENDELETEKNEK - JE V SOULADU S NÁSLEDUJÍMICI SMÉRNICEMI - JE V SULADES NASLEDOVNÍMI SMERNICAMI
OTBEUYOBAHRM CIEYIOHNS HOPMATIBOB - ER I OVERENSSTEMMELSE MED FOLGENDE BESTEMMLSER
IZLEYEN KURALLARA UYGUNLUGUNU BEYAN EDERIZ - A FOST EXECUTAT CONFORM DISPOZITILOR
E B CbOTBETCTBNE CbC cIeHnTE PA3IOPEEN - U SKLADU SA SLEDEcIM PROPISIMA - PAGAMINTAS, REMIANTIS SEKANCIOMIS DIREKTYVOMIS
2006/42/EC - 2004/108/EC - 2006/95/EC - 2002/96/EC - 2002/95/EC
STANDARD:
EN 60745-1; EN 60745-2-6; EN 55014-1; EN 55014-2; EN 61000-3-2; EN 61000-3-3
Corunna Court, Warwick, CV34 5HQ, UK
05/02/2013

Mark Shannon
Direttore qualita e competenza - Quality Assurance Controller - Reglage de precision - Leiter der Qualitatssicherung - Responsable de la garantia de calidad - Controlador de garantia da qualidade -
Dircteur kwaliteit - Direktar for kvalietsstyring og kompetence - Ansvarande for kvalitet och kompetens - Laadunvalvonnan johtaja - Auubuvntc rootnac kai Karapnnc - Dyrektor Jakosci
Direktor odjela za kontrolu kakvoce - Direktor za kvaliteto - Minosagert felelos igazgato - Vedouci kvality a sposobilosti - Riaditef kvality a sposobilosti - Dupektop no Kauectby
Kvalitets- og kompetansedirektor - Kalite Muddur - Director calitate - DipekTop no ochrypbahe Ha Kauectbto - Direktor odelenja za kontrolu kvaliteta -
Kokybes uztkinimo kontrlierius - Kvaliteedigaranti direktor - Kokybès garantijos direktorius
Persona autorizzata a costituire il fascicolo tecnico - person authorised to compile the technical file - personne autorisée à constituer le dossier technique -
die bevollmachtigt ist, die technischen Unterlagen zusammen zustellen - persona facultada para elaborar el expediente专业技术o - persona autorizada a constituir o dossi tecnico -
personoon bevoegd om het technisch dossier op te stellen - person autoriseret til at affatte den tekniske fil - person som ar behoig att stalla samman den tekniska dokumentationen -
teknises tiedoston tayttamiseen vaituutettu henvkilo - eouoiodtomevo aotoo yia tn ouvtauou apxicui tevikov edoov - osoba upowazniona do stworzenia dokumentow technicznych -
ovlastena osoba za sastavlanje tehnickih podataka - osea, ki je pooblascena za izpolnitev tehnicega dokumenta - a muszaki dokumentacio osszeallitasara felhatalmazott szemely
osobaopravnene k sestaveni technickych udaiu - osoba opravnena na zostavenie technickch udajov - nuo, yonHomoeHHoe coCTABTbTexHueckm daan
Unit 7, 2^nd Floor Napier House,
Corunna Court, Warwick, CV34 5HQ, UK

N. -2013