
BDASB18 - Hammer BLACK & DECKER - Free user manual and instructions
Find the device manual for free BDASB18 BLACK & DECKER in PDF.
| Product Type | Cordless Hammer Drill |
| Brand | Black & Decker |
| Model | BDASB18 |
| Power Supply | Li-Ion Battery 18 V, 1.5 Ah |
| Charger | Model 90589867 / 90590287-06 / 90634971, input 230 V AC |
| No-load Speed | 0-360 / 0-1400 min⁻¹ (two speeds) |
| Maximum Torque | 45 Nm |
| Chuck Capacity | 1-10 mm (keyless chuck) |
| Drilling Capacity (steel/wood/masonry) | 10 / 25 / 10 mm |
| Weight (with battery) | 1.3 kg |
| Sound Pressure Level | 87.5 dB(A) (uncertainty 5 dB(A)) |
| Sound Power Level | 98.5 dB(A) (uncertainty 5 dB(A)) |
| Vibrations (drilling concrete) | 14.2 m/s² (uncertainty 1.5 m/s²) |
| Vibrations (drilling metal) | 1.1 m/s² (uncertainty 1.5 m/s²) |
| Main Functions | Drilling, screwdriving, hammer drilling, LED lighting, variable speed, reverse rotation, torque adjustment |
| Maintenance and Cleaning | Clean ventilation slots with a soft brush; do not use abrasive or solvent-based detergents; clean the chuck by tapping to remove dust |
| Safety | Wear hearing and eye protection; use the auxiliary handle; do not expose to moisture; disconnect battery before maintenance |
| Spare Parts and Repairability | Battery (BL1518), charger (listed models), drill bits; repair by qualified personnel using genuine Black & Decker parts |
| Warranty | 24 months from date of purchase |
Frequently Asked Questions - BDASB18 BLACK & DECKER
User questions about BDASB18 BLACK & DECKER
0 question about this device. Answer the ones you know or ask your own.
Ask a new question about this device
Download the instructions for your Hammer in PDF format for free! Find your manual BDASB18 - BLACK & DECKER and take your electronic device back in hand. On this page are published all the documents necessary for the use of your device. BDASB18 by BLACK & DECKER.
USER MANUAL BDASB18 BLACK & DECKER
Your BLACK+DECKER BDASB18 - Impact drill, has been designed for screwdriving applications and for drilling in wood, metal and masonry. This tool is intended for consumer use only.
Safety instructions
General power tool safety warnings

WARNING Read all safety warnings, instructions, illustrations and specifications provided with this power tool. Failure to follow the warnings and instructions listed below may result in electric shock, fire and/or serious injury.
Save all warnings and instructions for future reference.
The term "power tool" in all of the warnings listed below refers to your mains operated (corded) power tool or battery operated (cordless) power tool.
- Work area safety
a. Keep work area clean and well lit. Cluttered or dark areas invite accidents.
b. Do not operate power tools in explosive atmospheres, such as in the presence of flammable liquids, gases or dust. Power tools create sparks which may ignite the dust or fumes.
c. Keep children and bystanders away while operating a power tool. Distractions can cause you to lose control.
- Electrical safety
a. Power tool plugs must match the outlet. Never modify the plug in any way. Do not use any adapter plugs with earthed (grounded) power tools.
Unmodified plugs and matching outlets will reduce risk of electric shock.
b. Avoid body contact with earthed or grounded surfaces such as pipes, radiators, ranges and refrigerators. There is an increased risk of electric shock if your body is earthed or grounded.
c. Do not expose power tools to rain or wet conditions. Water entering a power tool will increase the risk of electric shock.
d. Do not abuse the cord. Never use the cord for carrying, pulling or unplugging the power tool. Keep cord away from heat, oil, sharp edges or moving parts. Damaged or entangled cords increase the risk of electric shock.
e. When operating a power tool outdoors, use an extension cord suitable for outdoor use. Use of a cord suitable for outdoor use reduces the risk of electric shock.
f. If operating a power tool in a damp location is unavoidable, use a residual current device (RCD) protected supply. Use of an RCD reduces the risk of electric shock.
- Personal safety
a. Stay alert, watch what you are doing and use common sense when operating a power tool. Do not use a power tool while you are tired or under the influence of drugs, alcohol or medication. A moment of inattention while operating power tools may result in serious personal injury.
b. Use personal protective equipment. Always wear eye protection. Protective equipment such as dust mask, non-skid safety shoes, hard hat, or hearing protection used for appropriate conditions will reduce personal injuries.
c. Prevent unintentional starting. Ensure the switch is in the off-position before connecting to power source and/or battery pack, picking up or carrying the tool. Carrying power tools with your finger on the switch or energising power tools that have the switch on invites accidents.
d. Remove any adjusting key or wrench before turning the power tool on. A wrench or a key left attached to a rotating part of the power tool may result in personal injury.
e. Do not overreach. Keep proper footing and balance at all times. This enables better control of the power tool in unexpected situations.
f. Dress properly. Do not wear loose clothing or jewellery. Keep your hair, clothing and gloves away from moving parts. Loose clothes, jewellery or long hair can be caught in moving parts.
g. If devices are provided for the connection of dust extraction and collection facilities, ensure these are connected and properly used. Use of dust collection can reduce dust-related hazards.
h. Do not let familiarity gained from frequent use of tools allow you to become complacent and ignore tool safety principles. A careless action can cause severe injury within a fraction of a second.
4. Power tool use and care
a. Do not force the power tool. Use the correct power tool for your application. The correct power tool will do the job better and safer at the rate for which it was designed.
b. Do not use the power tool if the switch does not turn it on and off. Any power tool that cannot be controlled with the switch is dangerous and must be repaired.
c. Disconnect the plug from the power source and/or the battery pack from the power tool before making any adjustments, changing accessories, or storing power tools. Such preventive safety measures reduce the risk of starting the power tool accidentally.
d. Store idle power tools out of the reach of children and do not allow persons unfamiliar with the power tool or these instructions to operate the power tool. Power tools are dangerous in the hands of untrained users.
e. Maintain power tools. Check for misalignment or binding of moving parts, breakage of parts and any other condition that may affect the power tools operation. If damaged, have the power tool repaired before use. Many accidents are caused by poorly maintained power tools.
f. Keep cutting tools sharp and clean. Properly maintained cutting tools with sharp cutting edges are less likely to bind and are easier to control.
g. Use the power tool, accessories and tool bits etc. in accordance with these instructions, taking into account the working conditions and the work to be performed. Use of the power tool for operations different from those intended could result in a hazardous situation.
h. Keep handles and grasping surfaces dry, clean and free from oil and grease. Slippery handles and grasping surfaces do not allow for safe handling and control of the tool in unexpected situations.
- Battery tool use and care
a. Recharge only with the charger specified by the manufacturer. A charger that is suitable for one type of battery pack may create a risk of fire when used with another battery pack.
b. Use power tools only with specifically designated battery packs. Use of any other battery packs may create a risk of injury and fire.
c. When battery pack is not in use, keep it away from other metal objects, like paper clips, coins, keys, nails, screws, or other small metal objects, that can make a connection from one terminal to another.
Shorting the battery terminals together may cause burns or a fire.
d. Under abusive conditions, liquid may be ejected from the battery; avoid contact. If contact accidentally occurs, flush with water. If liquid contacts eyes, additionally seek medical help. Liquid ejected from the battery may cause irritation or burns.
e. Do not use a battery pack or tool that is damaged or modified. Damaged or modified batteries may exhibit unpredictable behaviour resulting in fire, explosion or risk of injury.
f. Do not expose a battery pack or tool to fire or excessive temperature. Exposure to fire or temperature above 130^ may cause explosion.
NOTE The temperature 130^ can be replaced by the temperature 265^ .
g. Follow all charging instructions and do not charge the battery pack or tool outside the temperature range specified in the instructions. Charging improperly or at temperatures outside the specified range may damage the battery and increase the risk of fire.
6. Service
a. Have your power tool serviced by a qualified repair person using only identical replacement parts. This will ensure that the safety of the power tool is maintained.
b. Never service damaged battery packs. Service of battery packs should only be performed by the manufacturer or authorized service providers.
Additional power tool safety warnings

Warning! Additional safety warnings for drills
Wear ear protectors when impact drilling. Exposure to noise can cause hearing loss.
Use auxiliary handles supplied with the tool. Loss of control can cause personal injury.
Brace the tool properly before use. This tool produces a high output torque and without properly bracing the tool during operation, loss of control may occur resulting in personal injury.
Hold power tool by insulated gripping surfaces when performing an operation where the cutting accessory may contact hidden wiring. Cutting accessory contacting a "live" wire may make exposed metal parts of the power tool "live" and could give the operator an electric shock.
Hold power tool by insulated gripping surfaces, when performing an operation where the fastener may contact hidden wiring. Fasteners contacting a "live" wire may make exposed metal parts of the power tool "live" and could give the operator an electric shock.
Safety instructions when using long drill bits
- Never operate at higher speed than the maximum speed rating of the drill bit. At higher speeds, the bit is likely to bend if allowed to rotate freely without contacting the workpiece, resulting in personal injury.
Always start drilling at low speed and with the bit tip in contact with the workpiece. At higher speeds, the bit is likely to bend if allowed to rotate freely without contacting the workpiece, resulting in personal injury.
Apply pressure only in direct line with the bit and do not apply excessive pressure. Bits can bend causing breakage or loss of control, resulting in personal injury.
Use clamps or another practical way to secure and support the workpiece to a stable platform. Holding the work by hand or against your body leaves it unstable and may lead to loss of control.
Before drilling into walls, floors or ceilings, check for the location of wiring and pipes.
Avoid touching the tip of a drill bit just after drilling, as it may be hot.
The intended use is described in this instruction manual. The use of any accessory or attachment or performance of any operation with this tool other than those recommended in this instruction manual may present a risk of personal injury and/or damage to property.
Safety of others
This tool is not intended for use by persons (including children) with reduced physical, sensory or mental capabilities, or lack of experience and knowledge, unless they have been given supervision or instruction concerning use of the tool by a person responsible for their safety.
Children should be supervised to ensure that they do not play with the appliance.
Residual risks
Additional residual risks may arise when using the tool which may not be included in the enclosed safety warnings. These risks can arise from misuse, prolonged use etc.
Even with the application of the relevant safety regulations and the implementation of safety devices, certain residual risks can not be avoided. These include:
Injuries caused by touching any rotating/moving parts.
Injuries caused when changing any parts, blades or accessories.
Injuries caused by prolonged use of a tool. When using any tool for prolonged periods ensure you take regular breaks.
Impairment of hearing.
Health hazards caused by breathing dust developed when using your tool (example:- working with wood, especially oak, beech and MDF.)
Vibration
The declared vibration emission values stated in the technical data and the declaration of conformity have been measured in accordance with a standard test method provided by EN 62841 and may be used for comparing one tool with another. The declared vibration emission value may also be used in a preliminary assessment of exposure.
Warning! The vibration emission value during actual use of the power tool can differ from the declared value depending on the ways in which the tool is used. The vibration level may increase above the level stated.
When assessing vibration exposure to determine safety measures required by 2002/44/EC to protect persons regularly using power tools in employment, an estimation of vibration exposure should consider, the actual conditions of use and the way the tool is used, including taking account of all parts of the operating cycle such as the times when the tool is switched off and when it is running idle in addition to the trigger time.
Labels on tool
The following symbols are shown on the tool along with the date code:

Warning! To reduce the risk of injury, the user must read the instruction manual.

Wear ear protectors with impact drills. Exposure to noise can cause hearing loss.

Do not stare at operating lamp
Additional safety instructions for batteries and chargers
Batteries
Never attempt to open for any reason.
Do not expose the battery to water.
Do not store in locations where the temperature may exceed 40^
Charge only at ambient temperatures between 10^ and 40^ .
Charge only using the charger provided with the tool.
When disposing of batteries, follow the instructions given in the section "Protecting the environment".

Do not attempt to charge damaged batteries.
Chargers
Use your BLACK+DECKER charger only to charge the battery supplied with the tool. Other batteries could burst, causing personal injury and damage.
Never attempt to charge non-rechargeable batteries.
Have defective cords replaced immediately.
Do not expose the charger to water.
Do not open the charger.
Do not probe the charger.

The charger is intended for indoor use only.

Read the instruction manual before use.
Electrical safety

Your charger is double insulated; therefore no earth wire is required. Always check that the mains voltage corresponds to the voltage on the rating plate. Never attempt to replace the charger unit with a regular mains plug.
If the supply cord is damaged, it must be replaced by the manufacturer or an authorised BLACK+DECKER Service Centre in order to avoid a hazard.
Features
This tool includes some or all of the following features.
- Variable speed switch
- Forward/reverse slider
- Torque adjustment collar
- Keyless chuck
- Dual range gearing
- LED work light
- Battery
- Battery release button
Assembly
Use
Warning! Let the tool work at its own pace. Do not overload.
Charging the battery (fig. A1, A2)
The battery needs to be charged before first use and whenever it fails to produce sufficient power on jobs that were easily done before. The battery may become warm while charging; this is normal and does not indicate a problem.
Warning! Do not charge the battery at ambient temperatures below 10^ or above 40^ . Recommended charging temperature: approx. 24^ .
Note: The charger will not charge a battery if the cell temperature is below approximately 10^ or above 40^ .
The battery should be left in the charger and the charger will begin to charge automatically when the cell temperature warms up or cools down.
Plug the charger (9) into any standard 230 Volts 50Hz electrical outlet.
Slide the battery pack (7) into the charger as shown in fig.A1,A2.

The LED (9a) will flash indicating that the battery is being charged.

The completion of charge is indicated by the LED (9a) remaining on continuously. The pack is fully charged and may be used at this
time or left on the charger.
Warning! fire Hazard. When removing the battery from the charger, be sure to unplug the charger from the outlet first, then remove the battery from the charger.
Charger diagnostics
This charger is designed to detect certain problems that can arise with the battery packs or the power source. Problems are indicated by one LED flashing in different patterns.
Bad battery

The charger can detect a weak or damaged battery. The LED flashes in the pattern indicated on the label. If you see this bad
battery blink pattern, do not continue to charge the battery. Return it to a service center or a collection site for recycling.
Hot/cold pack delay

When the charger detects a battery that is excessively hot or excessively cold, it automatically starts a Hot/Cold Pack Delay,
suspending charging until the battery has normalized.
After this happens, the charger automatically switches to the Pack Charging mode. This feature ensures maximum battery life. The light flashes in the pattern indicated on the label.
Leaving the battery in the charger
The charger and battery pack can be left connected with the LED glowing indefinitely. The charger will keep the battery pack fresh and fully charged. This charger features an automatic tune-up mode which equals or balances the individual cells in the battery pack to allow it to function at peak capacity. Battery packs should be tuned up weekly or whenever the battery no longer delivers the same amount of work. To use the automatic tune-up mode, place the battery pack in the charger and leave it for at least 8 hours.
Important charging notes
Longest life and best performance can be obtained if the battery pack is charged when the air temperature is between 18^ - 24^ . DO NOT charge the battery pack in an air temperature below +4.5^ , or above +40^ . This is important and will prevent serious damage to the battery pack.
The charger and battery pack may become warm to the touch while charging. This is a normal condition, and does not indicate a problem. To facilitate the cooling of the battery pack after use, avoid placing the charger or battery pack in a warm environment such as in a metal shed or an uninsulated trailer.
If the battery pack does not charge properly:
Check operation of receptacle by plugging in a lamp or other appliance;
Check to see if receptacle is connected to a light switch which turns power off when you turn out the lights;
Move the charger and battery pack to a location where the surrounding air temperature is approximately 18^ - 24^
If charging problems persist, take the tool, battery pack and charger to your local service center.
The battery pack should be recharged when it fails to produce sufficient power on jobs which were easily done
previously. DO NOT CONTINUE to use under these conditions. Follow the charging procedure. You may also charge a partially used pack whenever you desire with no adverse effect on the battery pack.
Foreign materials of a conductive nature such as, but not limited to, grinding dust, metal chips, steel wool, aluminum foil, or any buildup of metallic particles should be kept away from charger cavities. Unplug the charger before attempting to clean.
Do not freeze or immerse the charger in water or any other liquid.
Installing and removing the battery pack from the tool (fig. B)
Warning! Make certain the lock-off button (2) is engaged to prevent switch actuation before removing or installing battery.
To install battery pack:
Insert battery pack (7) into tool, until an audible click is heard (fig. B)
Removing the battery pack from the tool (fig. C)
Depress the battery release button (8) as shown in (fig. C) and pull battery pack out of tool.
Operating Instructions
Trigger switch & reversing button (fig. D)
- The drill is turned ON and OFF by pulling and releasing the trigger switch (1). The farther the trigger is depressed, the higher the speed of the drill.
A forward/reverse control button (2) determines the direction of the tool and also serves as a lock off button.
To select forward rotation, release the trigger switch and depress the forward/reverse control button to the left.
To select reverse, depress the forward/reverse control button the opposite direction.
Note: The center position of the control button locks the tool in the off position. When changing the position of the control button, be sure the trigger is released.
Torque control (fig.E)
This tool is fitted with a torque adjustment collar (3) to select the operating mode and to set the torque for tightening screws. Large screws and hard workpiece materials require a higher torque setting than small screws and soft workpiece materials.
For drilling in wood, metal and plastics, set the collar to the drilling position symbol
For screwdriving, set the collar to the desired setting. If you do not yet know the appropriate setting, proceed as follows:
Set the collar to the lowest torque setting.
Tighten the first screw.
If the clutch ratchets before the desired result is achieved, increase the collar setting and continue tightening the screw. Repeat until you reach the correct setting. Use this setting for the remaining screws.
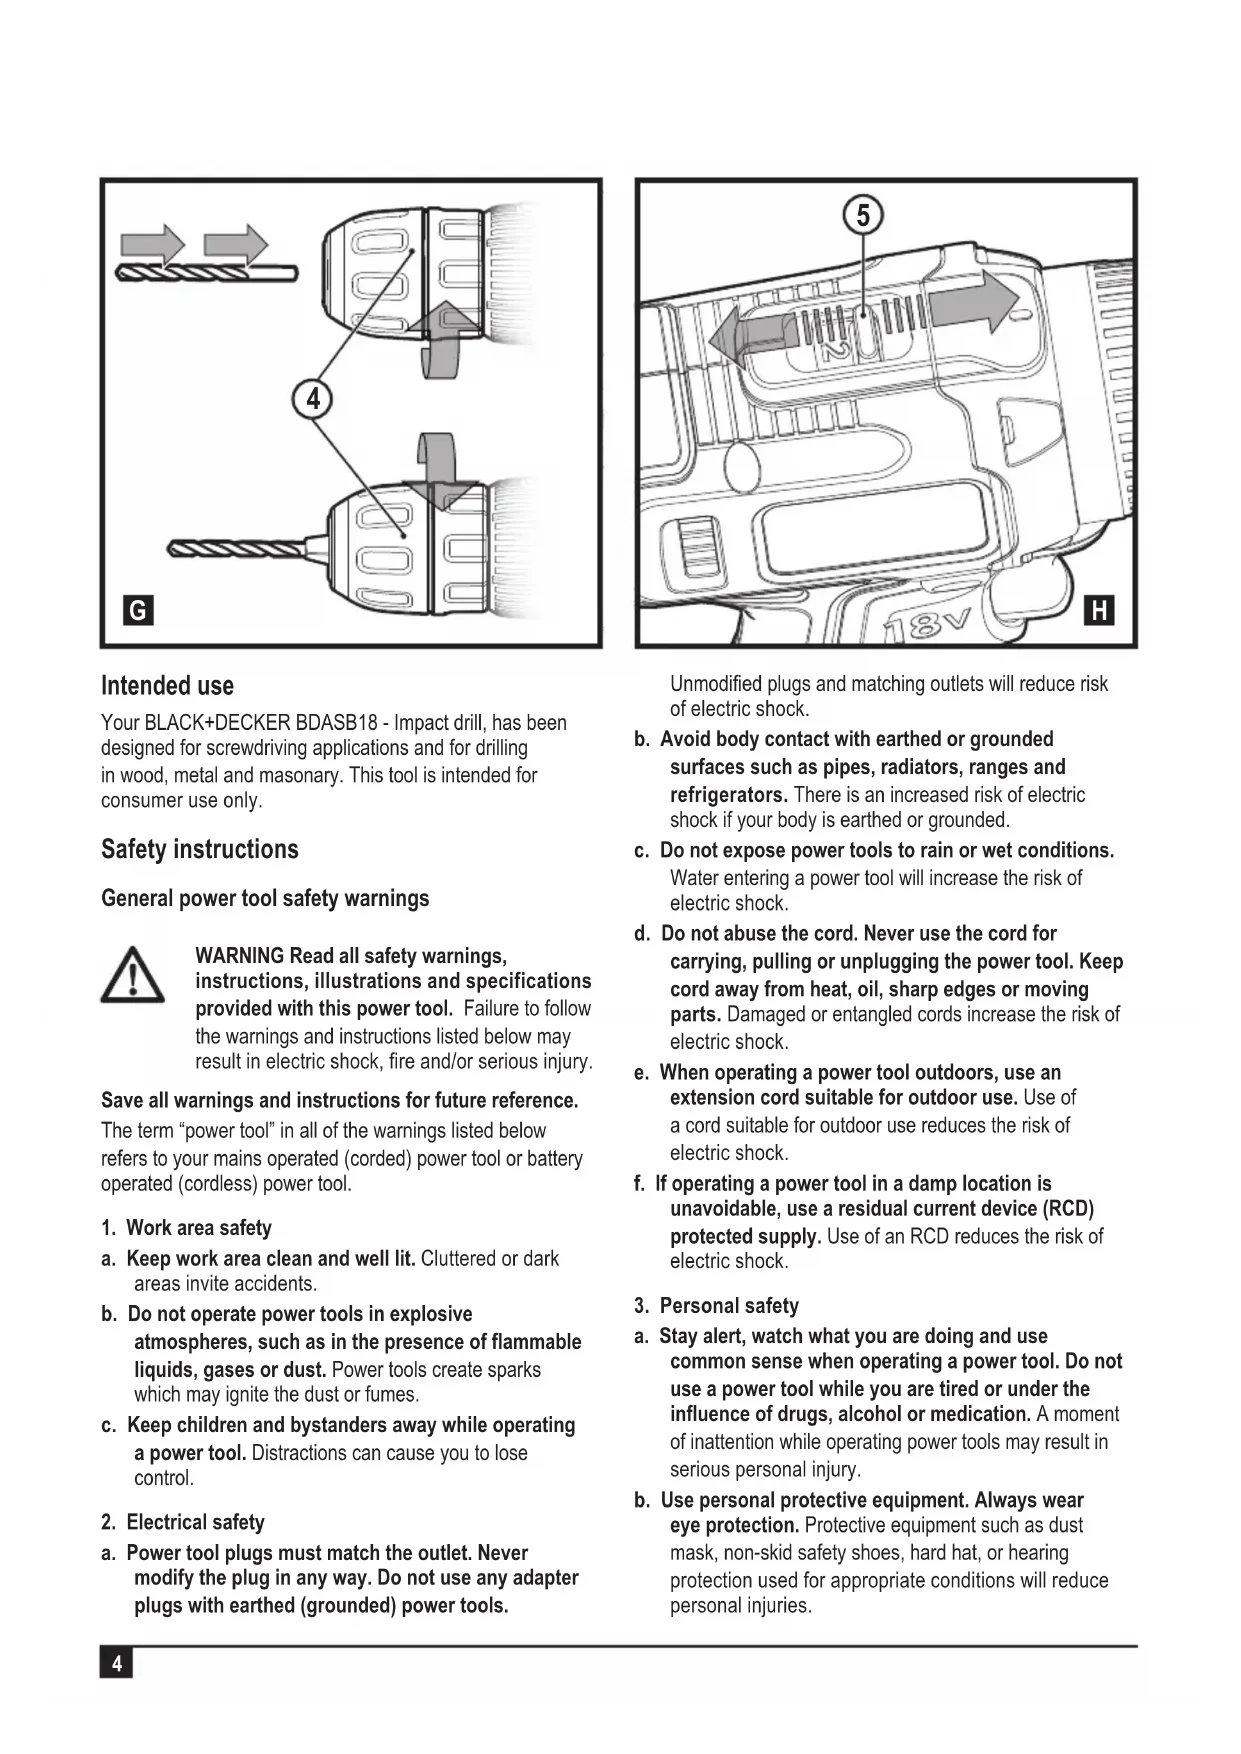
Keyless chuck (fig. F)
Warning! Make certain the lock-off button (2) is engaged to prevent switch actuation before installing or removing accessories.
To insert a drill bit or other accessory:
Grasp the rear half of the chuck (4) with one hand and use your other hand to rotate the front half in the counterclockwise direction, as viewed from the chuck end.
Insert the bit or other accessory fully into the chuck, and tighten securely by holding the rear half of the chuck and rotating the front portion in the clockwise direction as viewed from the chuck end.
Warning! Do not attempt to tighten drill bits (or any other accessory) by gripping the front part of the chuck and turning the tool on. Damage to the chuck and personal injury may occur when changing accessories.
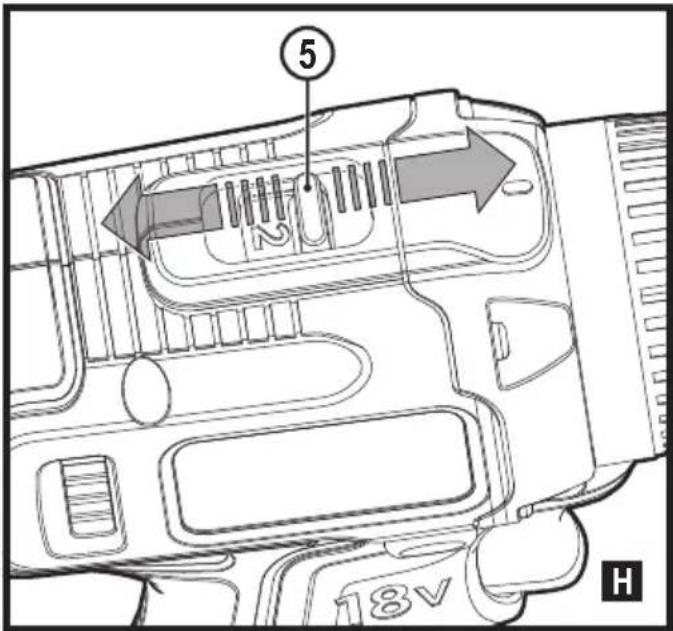
Dual range gearing (Figure G)
The dual range feature of your drill allows you to shift gears for greater versatility. To select low speed, high torque setting (position 1), turn tool off and permit to stop. Slide gear shifter button (5) away from the chuck. To select the high speed, low torque setting (position 2), turn tool off and permit to stop.
Slide gear shifter button towards the chuck.
Note: Do not change gears when tool is running. If you are having trouble changing gears, make sure that the dual range gear button is either completely pushed forward or completely pushed back.
Drilling/screwdriving
Select forward or reverse rotation using the forward/ reverse slider (2).
To switch the tool on, press the switch (1). The tool speed depends on how far you press the switch.
To switch the tool off, release the switch.
Hints for optimum use
Drilling
Use sharp drill bits only.
Support and secure work properly, as instructed in the Safety Instructions.
Use appropriate and required safety equipment, as instructed in the Safety Instructions.
Secure and maintain work area, as instructed in the Safety Instructions.
Run the drill very slowly, using light pressure, until the hole is started enough to keep the drill bit from slipping out of it.
Apply pressure in a straight line with the bit. Use enough pressure to keep the bit biting but not so much as to stall the motor or deflect the bit.
Hold the drill firmly with two hands to control its twisting action.
DO NOT CLICK THE TRIGGER OF A STALLED DRILL OFF AND ON IN AN ATTEMPT TO START IT. DAMAGE TO THE DRILL CAN RESULT.
Minimize stalling on breakthrough by reducing pressure and slowly drilling through the last part of the hole.
Keep the motor running while pulling the bit out of a drilled hole. This will help reduce jamming.
Make sure switch turns drill on and off.
Drilling in wood
Holes in wood can be made with the same twist drill bits used for metal or with spade bits. These bits should be sharp and should be pulled out frequently when drilling to clear chips from the flutes.
Drilling in metal
Use a cutting lubricant when drilling metals. The exceptions are cast iron and brass which should be drilled dry. The cutting lubricants that work best are sulfurized cutting oil or lard oil.
Drilling in masonry
For drilling in masonry, set the collar (3) to the hammer drilling position by aligning the symbol with the marking. Slide the speed selector (5) towards the front of the tool (2nd gear).
Screwdriving
Always use the correct type and size of screwdriver bit.
If screws are difficult to tighten, try applying a small amount of washing liquid or soap as a lubricant.
Always hold the tool and screwdriver bit in a straight line with the screw
Troubleshooting
| Problem Possible cause | Possible solution | |
| Unit will not start. Battery | pack not charged. | Check battery pack charging requirements |
| Battery pack will not charge. | Charger not plugged in. | Plug charger into a working outlet. |
| Surrounding air temperature too hot or too cold. | Move charger and battery pack to a surrounding air temperature of above 40 degrees F (45 °C) or below 105 degrees F (+40.5 °C) | |
| Unit shuts off abruptly. Battery pack has reached its maximum thermal limit. | Charge pack has reached its maximum thermal limit. | Allow battery pack to cool down. |
| Out of charge. (To maximize the life of the battery pack it is designed to shutoff abruptly when the charge is depleted | Place on charger and allow to charge. |
Maintenance
Your BLACK+DECKER tool has been designed to operate over a long period of time with a minimum of maintenance.
Continuous satisfactory operation depends upon proper tool care and regular cleaning.
Your charger does not require any maintenance apart from regular cleaning.
Warning! Before performing any maintenance on the tool, remove the battery from the tool. Unplug the charger before cleaning it.
Regularly clean the ventilation slots in your tool and charger using a soft brush or dry cloth.
Regularly clean the motor housing using a damp cloth. Do not use any abrasive or solvent-based cleaner.
Regularly open the chuck and tap it to remove any dust from the interior.
Protecting the environment

Separate collection. Products and batteries marked with this symbol must not be disposed of with normal household waste.
Products and batteries contain materials that can be recovered or recycled, reducing demand for raw materials. Please recycle electrical products and batteries according to local provisions.
Further information is available at www.2helpU.com
Technical data
| BDASB18 | ||
| Voltage V | DC | 18 |
| No-load speed Min | -1 | 0 - 360/0 - 1400 |
| Max. torque Nm 45 | ||
| Chuck capacity mm 1-10 | ||
| Max Drilling capacity | ||
| Steel/wood/Masonry | mm | 10/25/10 |
| Weight kg 0.9 (with battery 1.3) |
| Charger | ||||
| Input voltage V | AC | 230 | 230 | 230 |
| Output voltage | VDC | 18 | 18 | 18 |
| Current | mA | 200 | 400 | 1A |
| Approx. charge time | Hours | 8 | 3-5 | 1.5 |
| Battery | BL1518 | |
| Voltage V | AC | 18 |
| Capacity | Ah | 1.5 |
| Type | Li-Ion |
| Level of sound pressure according to EN 62841: |
| Sound pressure \( \left( {\mathrm{L}}_{\mathrm{{pa}}}\right) {87.5}\mathrm{\;{dB}}\left( \mathrm{A}\right) \) ,uncertainty (K) \( 5\mathrm{\;{dB}}\left( \mathrm{A}\right) \) |
| Sound power \( \left( {\mathrm{L}}_{\mathrm{{wa}}}\right) {98.5}\mathrm{\;{dB}}\left( \mathrm{A}\right) \) ,uncertainty (K) \( 5\mathrm{\;{dB}}\left( \mathrm{A}\right) \) |
| Vibration total values (triax vector sum) according to EN 62841: |
| Drilling into concrete (a_n, ID) 14.2 m/s², uncertainty (K) 1.5 m/s² |
| Drilling into metal (a_L) 1.1 m/s², uncertainty (K) 1.5 m/s² |
EC declaration of conformity
MACHINERY DIRECTIVE

BDASB18 - Impact drill
Black & Decker declares that these products described under "technical data" are in compliance with: 2006/42/EC, EN62841-1:2015 EN62841-2-1:2018+A11:2019.
These products also comply with Directive 2014/30/EU and 2011/65/EU. For more information, please contact Black & Decker at the following address or refer to the back of the manual.
The undersigned is responsible for compilation of the technical file and makes this declaration on behalf of Black & Decker.

Ed Higgins
Director - Consumer Power Tools
Black & Decker Europe, 270 Bath Road, Slough,
Berkshire, SL1 4DX
United Kingdom
29/11/2019
Guarantee
Black & Decker is confident of the quality of its products and offers consumers a 24 month guarantee from the date of purchase. This guarantee is in addition to and in no way prejudices your statutory rights. The guarantee is valid within the territories of the Member States of the European Union and the European Free Trade Area.
To claim on the guarantee, the claim must be in accordance with Black & Decker Terms and Conditions and you will need to submit proof of purchase to the seller or an authorised repair agent.
Terms and conditions of the Black & Decker 2 year guarantee and the location of your nearest authorised repair agent can be obtained on the Internet at www.2helpU.com, or by contacting your local Black & Decker office at the address indicated in this manual.
Please visit our website www.blackanddecker.co.uk to register your new Black & Decker product and receive updates on new products and special offers.
CESKY
Vibration total values (triax vector sum) according to EN 62841:
Vrtani do betonu (a_b,10) 14.2 m/s², odchylka (K) 1.5 m/s²
Vrtani do kovu (a_p) 1.1 m/s², odchyla (K) 1.5 m/s²
Prohlášeni shodě
SMÉRNICE PRO STROJÍ ZARÍZENÍ
CE
Director - Consumer Power Tools
Black & Decker Europe, 270 Bath Road, Slough,
Berkshire, SL1 4DX
United Kingdom
29/11/2019
Záruka
Vibration total values (triax vector sum) according to EN 62841:
Bohren in Beton (a_in) 14.2m / s^2 ,Unsicherheitsfaktor (K) 1.5m / s^2
Bohren in Metall (a 1.1m / s Unsicherheitsfaktor (K) 1.5 m/s2
Director - Consumer Power Tools
Black & Decker Europe, 270 Bath Road, Slough,
Berkshire, SL1 4DX
Director - Consumer Power Tools
Black & Decker Europe, 270 Bath Road, Slough,
Berkshire, SL1 4DX
Storbritannien
29/11/2019
Garanti
Director - Consumer Power Tools
Black & Decker Europe, 270 Bath Road, Slough,
Berkshire, SL1 4DX
Reino Unido
29/11/2019
PpOβλεπόμενn xρήση
To kpoouotiko oac dpantavo BLACK+DECKER BDASB18V exei oxediaotei yia eapmuoyec biowmuotc kai yia diatpno n 0e ulo, metalko kai ulika toixtoiaac. Auto to epyaaleio Tpoopicietai mvo yia katavaawtikn xphon.
O8nyiec a0qaaaleia
EvikéS TPOeIbOToIOInoEiC aovaaiaC yia nEktpiKa epyaleia

IPOEIIOIHHEiaBaoTe oAeTIS TPOEIOIOAEiC aOpaAeiac, TIG ODNYIEc, TIC EIKoVc KAI TIC TPODiaypaeC TOU TApexovtai ME auto TO nAeKtpiko Epyaieio. H un Tnpon Twv TPOEIOIOHOewv KAI ONDyiw Tou avapepovtai TapaKaTu MPoEv va evai aiia nAeKtpoANlqic, Tupkayiac kai/ noapou tpaumatou.
ΦuaéTe oles TIG PPOEIOIHOIS KAI ONDYIEC VIA
eAAovtikn avopopa. O opoc "NAEKPTIko Epyaieio" TOU
xpoiIOIOIEiTai OE 0AEc TIG TAPAKATW PPOEIOTIOINEOIC,
avaepetai iEt OE epyaieio TOU AETOUPyei ME peuca
deltaou (peuato - e Kaawdo) iTe OE epyaiaio TOU
AETOUPyei ME pTATApia (PITATApiaac - xwipc Kaawdo).
- Aσφαλειστο xωρo εργασίας
a. DiatnpieTe To xwpo EpyaoiaC kaapo kai kal a
Wtioevo.H akataotatoi n oKoteivoi xwpoi yiovvatai
aitc atuxnmuatv.
β. Mn xnpoiotoiite nAeKtpiKa epyaia oEeknkti Ka Tepiabaovta, otwC me napouia eupAeKtow uypwv, aepiwv nokovs. Ta nAeKtpiKa epyaia npayouv OTIVhpeo iOtioi mTPOUv va TpokaAeouv avaAeEg NOKovs navauuaeewv.
y. Kpatate Taiia kai TapeupioKoEvouc maKpiotav Xpnoioutoeite nEeKtpiko Epyaieio. Napayovte cTou aTTOIOUV TIV TPOOxN MTOpei va aac kavouv va xaote TOV EeYxo. - Aσφαλεια φρησης ηλεκτρικόν μεύματος
a. Ta Tuv nAekptikwv Epyaleiwv TpeTVE va taipiazouv otnv npica. Note mnu TpotoTOnoTe To C Kavevav TpTo. Mn xpoioTOIOE TE OTIOBHTOTE AVtATTOPa EYEIWUEVA nAektpiKa epyaleia. H xponn un TpOToTInveWv KAI kataaannspiacm EiwweTov Kivuvo nAekptoTAnxiac.
β. ATOpeuyete Tny Etnaipn Tou Owpatoc me YEIWVEECETIAPVEIEs OTWCS WAnVWOEIG, Owata KALOPIeP, OoKEUEc mayepuatoKaipsiyeia. YIapxieauEnuevos KivduvoNkTPOANJgacavToOwmaOACivAI YEIWevo.
y.Mnv EKETETe NkEPTIaEPYAAIEA O E BPOxH n UYPES ouhkec.H dioouan vepou eva NkTPIKO EPYAAEO aucaevi Tov Kivduo NkTPOTTNIGAc.8.Mnv KAOKETAXEIPICEOT KOAWIO.IOTE u npoiotoinote TO KAwIO yia va Metapepe,va TpaBHeTe n va aTOuOvOeOeTE aTNO TIVpiCa to NkETPIKO EPYAAEO.Kpatate To KAwIO paKpia aTo 8epoTnTA,laI.aXmupeacpec n KIVOUeVAePn.Ta KAwIO Tnou exou UTooTEI Zmua n Eivai NTepdevea auavouv Tov Kivduo NkETPOTTNIGiac.
ε. Šαταν χρησιμοποίe Ενα ηλεκτρικό εργαλείο Εpsilonωτερικό χωρο, χρησιμοποίe Καλώδιο επέκταοης καταλληλο για χρησι Εpsilonωτερικό χωρο. H χρησι καλωδίου καταλληλου για εργασία Εpsilonωτερικός χωρους μειώνει Tov Kīvδύνο ηλεκτροπληξίας.
OT. Av evai avatnopeuktn n xpion nAekptikou epyaaleiou e uypes ouvthkec, xpoiooioote npox npuato Tou npoateuetai ato diataq npootaoiac ato diappn peuatoC (pEe diappoc - RCD). H xpion pEe diappoc m EiwvTov Kivduvo nAekptoiAnjic.
3. Atoiikn aσφαλεια
a. Na eioTE naVt aE npnyopon, va TpoeexETi Kavete Kai va xpnoiotoeite koivn loyik notav xpnoiopoite nektpiko epyaiaio. Mn xnpoiotoeite nektpiko epyaiaio otav eioTE koupaouevoc/n n uTO tvv Etnpeia vapkwiKwO, oivonteuatoc n apuakwv. Mia mvo OTiyun anpoosjac katn xpnon nektpikwv epyaieiwv mtopei va evai atria oospapou tpaumatou.
β. XpnoiioToieEgottlao otoiknc Tpoostaiac. Opatte navta TpooTaia maivv. O eotlaOc TpooTiaoc otwC maoka akovns, avtioaogntika utobnmuata aqalaeic, kpavoc n TpooTaia akonc Tou xnpoiotroieiTai via tic katalanec ouvkeC mTopei va eiwoeTIC owatike Cbapec
y. AOTpETETe aEaItn Evapn aeIoupyiac. Na bEbaWveOT eO biaKoTTnc Eiva tN tOn tne aneepyoToinon TPIV ouvdeoeTe To epyaieio OTNV Tnyn peuatoC kai/n OTO TAKeto mTataipiw, PPIV TAPETe OTA xepia oac n MetapepeTo epyaieio. H metaopap naektpikwv epyaieiw v To dakTuAo oac oTo diaKoTTn n Ouvdeon oTo peua nAektpikwv epyaieiw TIOU exouv evepoytoinuevo To diaKoTTn anoteaoiv nynt atuxmuTow.
8. Apaieite kae Kaei opuoi n uXavko Kaeiip Tpiv Eepyoioane To nektpko eyaiaio. Av exie i eivei OTIOOHTote Kaei ouvoe evo oe TpiotpeoEv oepoc Tou nektpkoou eyaiaiou, Tnpei va TpoknEi Tpaumatouc.
ε. Mny TeVTwveote UTEpBoIAka. DiatnpieTe TAVta KaAn OTnpiEg Ta TIObia Kai KaH IOoppoia. EToI Egaopalizetai KaUtepoC EeYxoc Tou NkTPIKOU epyaieou Oe n avaevoevc kataotaeic.
σr. Na εiote ενδεδμενοι katαλληλa. Mn φopate poúxa με xαλapη εφαρμoyn η κοσμημata.
Kpatate Ta ta pouxka tayavta oac paekia aTo Kivoupeva eep. Ta xaapa pox, ta koanata na ta paekia paaiia mtopoov va TIAOTOUv OE Kivoueva eepn.
Z. Av TApexovTai diataeic yia tn ouvdeon eGottiaou aTouaKpuVOns kai oulloyns Tns oKovns, va 8epaiwveote ot autc esouv ouvOeEi kai xpnoioiouVTai OWTa. H xpon eoTIAIOU oulloyn tsOkoVns mTopei va peIowei Touk KIVouous ato tn okovn.
n. Mny afoe TNY OKEIOTnT ATOAIOKTHNKE ATO Tn OUXV Xpno Epyaleiwv va oac EITPpeyivive Eponoxaouevoi kai va ayvoite TIC apxcs aoaiaoc Tou epyaleiou. Mia atpoeektn dpao n Itopei va tpokaoleoi oobapo tpaumatioo meoa oe eva kaogau tou deutepoETTou.
4. Xpnoi kaipovtida nAekpiikw evpaaleiw
a. Mny aokite utepolikn duvaun otpaaleio. XpnoipooieTe to owto epyaaeio yia tnv eapuoyn oac. To owto nlektipko epyaaleio tha kavei tnv epyaosa kautepa kai aqaaetepa, me to puho yia tov otoio oxediaoTke.
β. Mn xnpoiotoinoTe To nAekptiko epyaleio av o diaKoTTnC dev to evEpyoTIOei nDev to aTVEpyoTIOeI. OTOIOHnTote nAekptko epyaleio dev μTopei va eAeyxOe iμ To diaKoTTn Eivai EtIKivuvo kai TpETTEva ETIOKEuaotei.
y. ATOOUVDEOTo 口 aTOn TnV TnVnPeuMaTOc KAI/To
TAKETO MTATAPIWv aTOn to Epyaaleio TPIV KAVETe
OTIOAONTOpeuOiog n aALayn aEeouap KAI TPOIV Tn
PAAGNTOWNkTPIKWv Epyaieiwv.Tetoia TPOANTTIKA
MEtpa aOpaaleiac meiwovuov Tov kivduvo aEaNTnc
EKKIVNOtCS TO NkTPKOU Epyaieou.
δ.ФuaosrTe Ta un xpnoiopoiouEv aekpiKa epaia maKpia ato piaia kai mnu etipette va xpnoiopoiouv to nekpiK oepyaleio npoWta u np Egoikeweva Te noekpiK oepyaleio n e autcTic odnyies.Ta nekpiKa epyaia evai tIKivuva Oa xepia avkraiDeutw xpnotwv.
ε. Συντηρείτα ΑλΕκτρικά εργαλεία. Ελέγχετε γία τυχόν κακή ευθυράμιση ἡύγκωμα των κίνουμενων μερών, Θραιού Εξαρτηματων και συνθήκη μπορείν απηρεάσει τη λειούργία του Λεκτρικό εργαλείου. Av to Λεκτρικό εργαλείο uποθείς Ιμία, φροντίσεν απιοκεύασει πριν χροσιμοποιθεί. Πολά ατυχήματα προκαλουνται από κακοσυντηρμένα Λεκτρικά εργαλεία.
OT. AATnpEITE ta epyaaleia KOttnc KoPtepa kai kaapa. Ta
Owotra ouvtnpneva KOttika epyaaleia me aixunpecs
KOTTIKc aixmuec exouv mikpotepn Tioavotnta va
aykwosovkai ExyovtaeukoIopepa.
Z. XpnoiooieTo nAeKtpiO epyaaleio, ta aEouap KAI TA KOITIKA EApTmuTa Tou epyaeiou oUWVAe autc TIC OOnyiec, AauBavovTac UToyn TIG OuvhkeC epyaoc Aai TIV TPOC EKTLEeON epyaia. H xpOtn Tou nAeKtpiKOU epyaaleiou ia epyaoies 0iaqopetikec atTO TIC TPOBLeIOveEc Ta MToPOUoe va TTPOKaE0E1 ETIKivDuvn kataotaon.
n. Diatnpie TIC KAI TIC ETTiAPVEIEs OULNPHG OTeyVc, Kaapcs KAI ATAAALayMEeC aTIO Aodia KAI ypaa. OI OIAOtnpc LABEC KAI OI ETTiAPVEIEs OULNPHG DEV EITIPTIOU VTOAOPaAN XEIPIOPO KAI TOV EAEYXOTOU EPyAeiou cATPPOAEVCATAOTAOEIG.
Director - Consumer Power Tools
Black & Decker Europe, 270 Bath Road, Slough,
Berkshire, SL1 4DX
Hvωμévo Baσiλειo
29/11/2019
Eyyunon
Director - Consumer Power Tools
Black & Decker Europe, 270 Bath Road, Slough,
Berkshire, SL1 4DX
Royaume-Uni
29/11/2019
Garantie
Director - Consumer Power Tools
Black & Decker Europe, 270 Bath Road, Slough,
Berkshire, SL1 4DX
Iso-Britannia
29/11/2019
Director - Consumer Power Tools
Black & Decker Europe, 270 Bath Road, Slough,
Berkshire, SL1 4DX
Egyesult Kiralysag
29/11/2019
Garancia határozat
Director - Consumer Power Tools
Black & Decker Europe, 270 Bath Road, Slough,
Berkshire, SL1 4DX
United Kingdom
29/11/2019
Jamstvo
Black & Decker siguran je u kvalitetu svojih proizvoda i svojim kupcima pruza 24-mjesechno jamstvo od datumak kupnje. Ovo jamstvo dodatak je vašim zakonskim pravima i ni na koji ih način ne narushava. Ovo jamstvo valjano je na području država Članica Europaške unije i Europaške zone slobodnog trgovanja.
Director - Consumer Power Tools
Black & Decker Europe, 270 Bath Road, Slough,
Berkshire, SL1 4DX
Regno Unito
29/11/2019
Garanzia
WAARSCHUWING Lees alle
Director - Consumer Power Tools
Black & Decker Europe, 270 Bath Road, Slough,
Berkshire, SL1 4DX
United Kingdom
29/11/2019
Garantie
Director - Consumer Power Tools
Black & Decker Europe, 270 Bath Road, Slough,
Berkshire, SL1 4DX
Storbritannia
29/11/2019
Garanti
Black & Decker er sikker på kvaliteten på sineprodukter og tilbyr sine kunder en 24 maneders garanti fra kjopsdato. Denne garantienkommen i tillegg til og kommer ikke i veien for dine lovbestemte rettigheter. Garantien er gyldig innen landområdene til medlemslandene i EU og i EØS.
For Å benytte deg av garantien, mA kravet vare i henhold til Black & Decker vilkár og du mä fremskaffe kjøpsbevis til forhandleren eller en autorisert reparasjonstekniker.
Betingelser og vilkår av Black & Decker 2 árs garanti og hvor du finner din ærmeste autoriserte reparasjonstekniker kan du finne på www.2helpU.com, eller ved Å kontakte ditt lokale Black & Decker kontor på adressen i dennebruksanvisningen.
Besk var nettside www.blackanddecker.no for a registreedit nye Black & Decker produkt og fopddateringer om nyeprodukter og spezialtilbud.
Przeznaczenia
Aby wlozyc akumulator:
Włȩdaco akumulator (7) do naręźdia,ź do usyśzenia klikniść (rys. B).
Director - Consumer Power Tools
Black & Decker Europe, 270 Bath Road, Slough,
Berkshire, SL1 4DX
Wielka Brytania
29/11/2019
Gwarancja
b. Utilize as ferramentas electrolyicas apenas com as
Director - Consumer Power Tools
Black & Decker Europe, 270 Bath Road, Slough,
Berkshire, SL1 4DX
Reino Unido
29/11/2019
Garantia
Director - Consumer Power Tools
Black & Decker Europe, 270 Bath Road, Slough,
Berkshire, SL1 4DX
United Kingdom
29/11/2019
Záruka
Spolocnost Black & Decker je presvedcena o kvalite svojich vyrobkov a ponuka spotrebitefom zaruku 24 mesiacov od datumu kupy. Tato zaruka sa ponuka v prospech zakaznika a nijako neovplyvní跟他 zakonne zaručné prava. Tato zaruka je platná vo vsetkych chenskych statoch EU a europsej zony volného obchodu EFTA.
Warning! Additional safety warnings for drills
Director - Consumer Power Tools Black & Decker Europe, 270 Bath Road, Slough, Berkshire, SL1 4DX Velika Britanija 29/11/2019
Garancija
Director - Consumer Power Tools
Black & Decker Europe, 270 Bath Road, Slough,
Berkshire, SL1 4DX
Storbritannien
29/11/2019
Garanti


- Safety instructions
- Additional power tool safety warnings
- Safety instructions when using long drill bits
- Safety of others
- Residual risks
- Vibration
- Labels on tool
- Additional safety instructions for batteries and chargers
- Batteries
- Chargers
- Electrical safety
- Features
- Assembly
- Use
- Charging the battery (fig. A1, A2)
- Charger diagnostics
- Bad battery
- Hot/cold pack delay
- Leaving the battery in the charger
- Important charging notes
- Installing and removing the battery pack from the tool (fig. B)
- Removing the battery pack from the tool (fig. C)
- Operating Instructions
- Trigger switch & reversing button (fig. D)
- Torque control (fig.E)
- Keyless chuck (fig. F)
- Dual range gearing (Figure G)
- Drilling/screwdriving
- Hints for optimum use
- Drilling
- Drilling in wood
- Drilling in metal
- Drilling in masonry
- Screwdriving
- Troubleshooting
- Maintenance
- Protecting the environment
- Technical data
- EC declaration of conformity
- Guarantee
- CESKY
- Prohlášeni shodě
- SMÉRNICE PRO STROJÍ ZARÍZENÍ
- CE
- Záruka
- Vibration total values (triax vector sum) according to EN 62841:
- Garanti
- PpOβλεπόμενn xρήση
- O8nyiec a0qaaaleia
- Eyyunon
- Garantie
- Garancia határozat
- Jamstvo
- Garanzia
- WAARSCHUWING Lees alle
- Przeznaczenia
- Gwarancja
- Garantia
- Garancija
Brand : BLACK & DECKER
Model : BDASB18
Category : Hammer