
MUM5XW20 - Food Processor BOSCH - Free user manual and instructions
Find the device manual for free MUM5XW20 BOSCH in PDF.
| Product type | Food processor (grater/slicer attachment) |
| Brand | Bosch |
| Model | MUM5XW20 |
| Main functions | Slicing, grating (fine, coarse, medium), julienne, potato pancakes |
| Included accessories | Reversible slicing disc (thick and thin sides), reversible grating disc (coarse and fine sides), medium grating disc, potato pancake disc, julienne disc, cover with opening, pusher and measuring cup |
| Compatibility | Food processor series MUM5 |
| Safety | Overload protection with predetermined breaking point on the disc holder shaft; sharp blades and edges – touch only by the edges; use only the pusher |
| Care and cleaning | Housing, cover, pusher and disc holder are dishwasher-safe (max 60°C); grating discs should be washed by hand with a soft brush |
| Spare parts | Replacement disc holder: part number 00630760 |
| Usage precautions | Do not process foods containing bones or hard parts; do not insert objects into the opening; disassemble before cleaning; assemble completely before use |
| General information | Instruction manual dedicated to the attachment; also follow the manual for the base unit |
Frequently Asked Questions - MUM5XW20 BOSCH
User questions about MUM5XW20 BOSCH
0 question about this device. Answer the ones you know or ask your own.
Ask a new question about this device
Download the instructions for your Food Processor in PDF format for free! Find your manual MUM5XW20 - BOSCH and take your electronic device back in hand. On this page are published all the documents necessary for the use of your device. MUM5XW20 by BOSCH.
USER MANUAL MUM5XW20 BOSCH
Register your new device on
MyBosch now and get free benefits
b Bosch-home.com/ welcome
VeggieLove
MUZ5VL1
m = 311

17

19
m = 311
21
m = 311

23


Sicherheit
Please read the safety information to ensure that you use your accessories safely.
General information
You can find general information for this instruction manual here.
- Read this instruction manual carefully. Only this will ensure that you operate accessories safely and efficiently.
- Observe the instructions for the base unit.
This manual is intended for the user of the appliance. - Follow the safety instructions and warnings.
- Keep the manual and the product information in a safe place for future reference or for the next owner.
- Check the accessories after unpacking. Do not use the accessories if they have been damaged in transit.
Intended use
Please read the information on intended use to ensure that you use the accessories correctly and safely.
Only use the accessories:
with a food processor from the same series MUM5.
As specified in this instruction manual.
- With genuine parts and accessories.
for cutting up, shredding and grating food.
Safety instructions
Take note of the safety instructions.
WARNING - Risk of cutting!
The cutting discs have sharp blades and edges.
- Only take hold of the cutting discs by the edge.
- Never touch the sharp blades and edges with bare hands.
WARNING - Risk of injury!
- Rotating drives, tools or accessory parts may cause injury.
- Do not reach into the filling shaft.
en Safety
- Only use the pusher to push down ingredients.
Improper use may cause injuries. - Never assemble the accessories on the base unit.
- Only attach and remove accessories once the drive has stopped and the appliance has been unplugged.
- Only use the accessories once fully assembled.
The accessories should only be used in the intended operating position.
#
WARNING - Risk of harm to health!
Soiling on surfaces may be harmful to health.
Follow the cleaning instructions.
- Clean surfaces which come in contact with food before each use.
Preventing material damage
Follow these instructions to prevent material damage to your appliance, accessories or other objects in your kitchen.
General
Follow these instructions when using the accessories.
ATTENTION!
Improper use may cause material damage.
- Do not process food that contains hard components, e.g. bones.
- Do not insert objects into the filling shaft or housing, e.g. wooden spoons.
Before use, check the filling shaft and housing for foreign objects. - Do not apply great force with the pusher.
Unpacking and checking
Find out here what you need to note when unpacking the appliance.
Unpacking the accessories and parts
- Take the accessories out of the packaging.
- Take all other parts and the accompanying documents out of the packaging and place them to hand.
- Remove any packaging material.
- Remove any stickers or film.
Contents of package
After unpacking all parts, check for any damage in transit and completeness of the delivery.
Fig. 1
A Continuous-feed shredder
B Cutting discs
C Accompanying documents
1 Depending on the appliance specifications
Cleaning the accessories before using for the first time
- Take the assembled accessories apart.
"Dismantling the continuous feed shredder", Page 21 - Clean all parts that come into contact with food before using for the first time.
"Cleaning and servicing", Page 21 - Put the cleaned and dried parts out ready for use.
Familiarising yourself with the accessories
Familiarise yourself with your accessory.
Components
You can find an overview of the parts of your accessories here.
Fig. 2
1 Housing
2 Disc holder
3 Lid with integrated filling shaft
Pusher and measuring jug
| 5 | Reversible slicing disc |
| 6 | Reversible shredding disc |
| 7 | Grating disc, medium-fine |
| 8 | Potato fritter disc |
| 9 | Asian vegetable disc |
Symbols
You can find an overview of the symbols used on your accessories here.
Symbol Description
| i | Follow the instructions in the oper-ating instructions. |
| Do not reach into the filling shaft. | |
| Attach the lid | |
| Position marking housing |
Overview of cutting discs
You can find an overview of the cutting discs and their purposes here.
| Designation | Use |
| Reversible slicing disc | Cutting food into thick or thin slices, e.g. fruit and vegetables. Note: Not suitable for processing hard cheese, bread, rolls or chocolate. Tip: Only cut up cooked potatoes once they have cooled down. |
| Reversible shredding disc | Shredding food coarsely or finely, e.g. fruit, vegetables or cheese as Gouda or Edam. Note: Not suitable for processing nuts or hard cheese, e.g. Parmesan. Tip: Shred soft cheese with the coarse side only. |
| Designation | Use |
| Grating disc, medium-fine | Shredding food medium-fine, e.g. raw potatoes or hard cheese such as Parmesan. Note: Not suitable for processing soft cheese and cheese slices. |
| Potato fritter disc | Grating raw potatoes or cutting into slices. |
| Asian vegetable disc | For cutting food into thin strips, e.g. fruit and vegetables. |
Markings on the reversible slicing discs
The sides of the reversible slicing discs are marked with numbers.
| Marking Use |
| 1 Reversible slicing disc, thick slicing side |
| 3 Reversible slicing disc, thin slicing side |
| 2 Reversible shredding disc, coarse shredding side |
| 4 Reversible shredding disc, fine shredding side |
Overload protection
The overload protection system prevents the motor and other components from being damaged through being overloaded. If the continuous feed shredder is overloaded or blocked, the disc holder shaft will break at the predetermined breaking point.
Note: Spare parts with a predetermined breaking point are not covered by our warranty obligations. A new disc holder is available from customer service under order number 00630760.
Before using for the first time
Prepare the base unit and the accessories for use.
Preparing the base unit
Note: The food processor shown in the pictures may differ from your model in terms of shape and features.
- Set up the base unit as described in the main operating instructions.
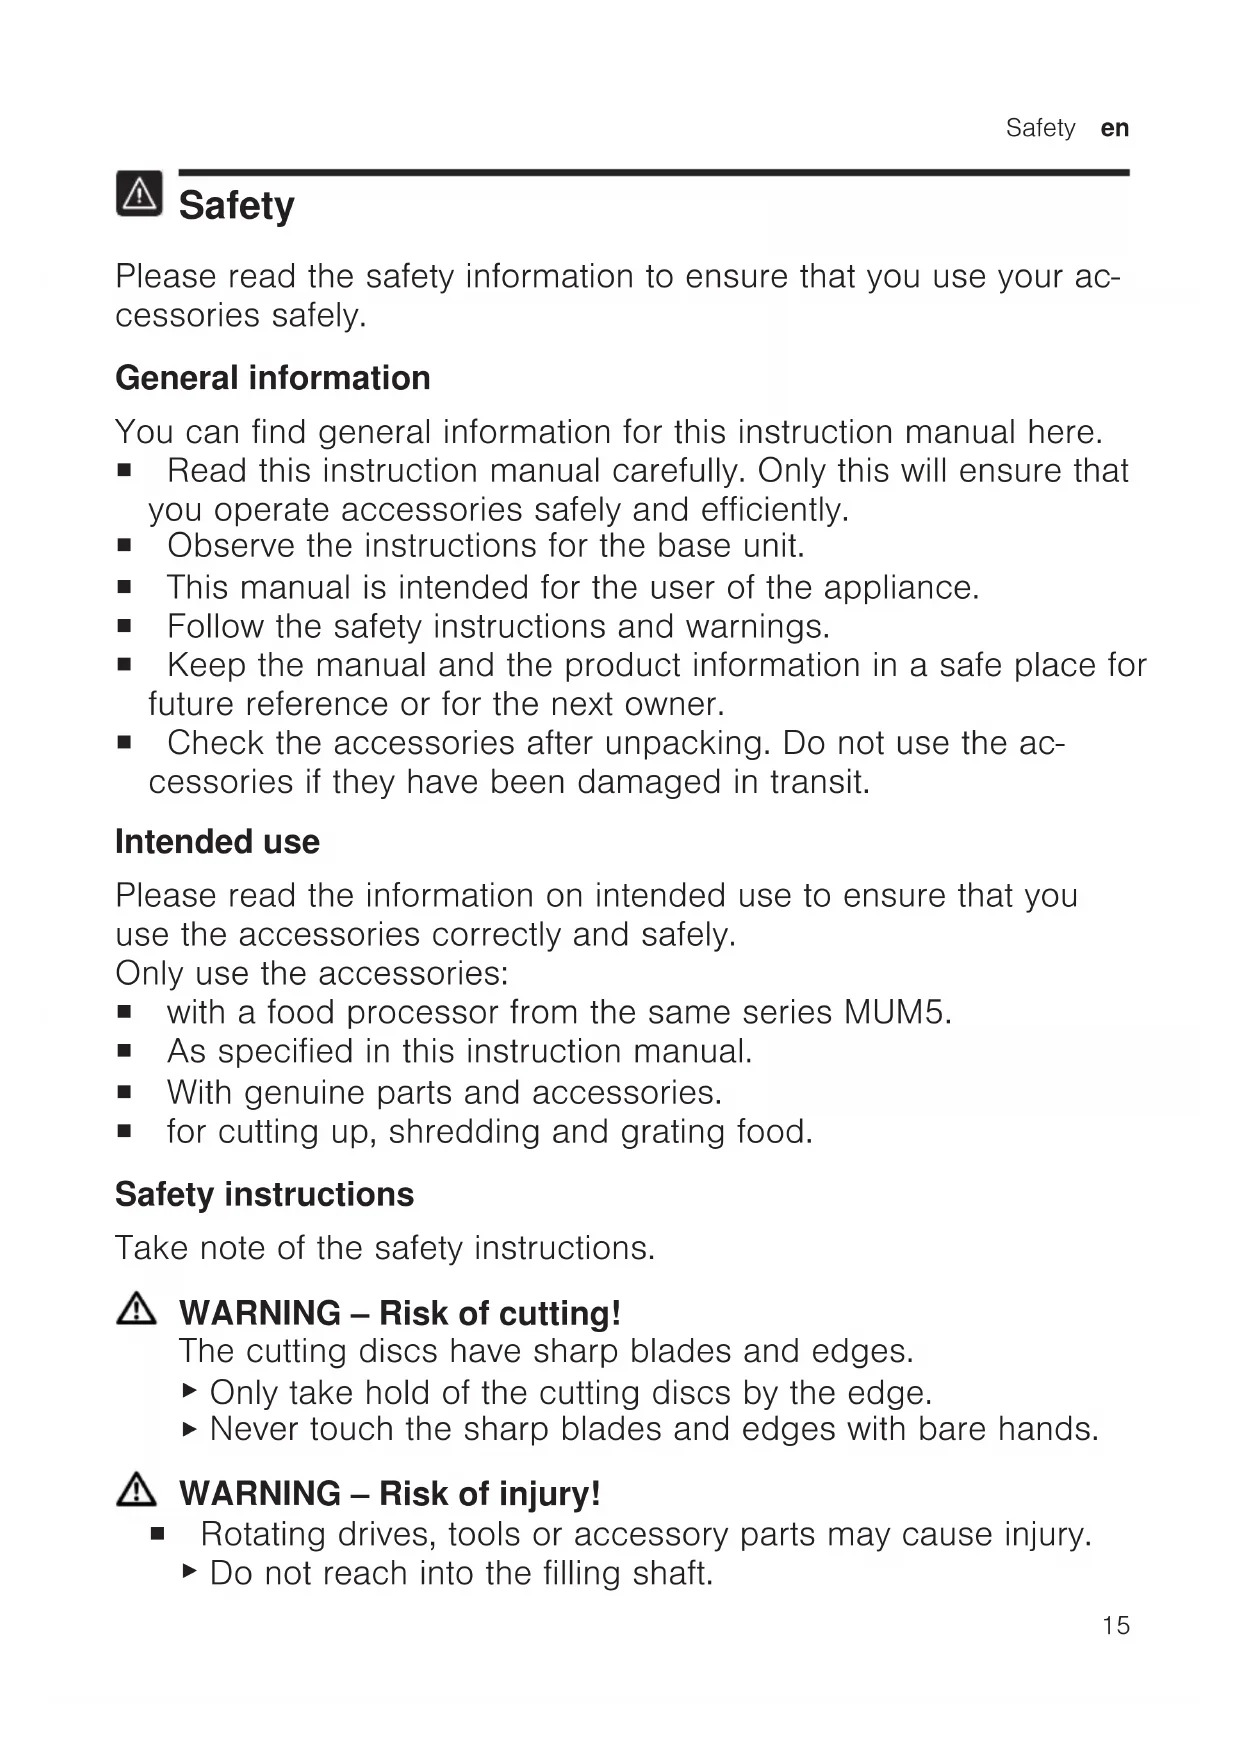
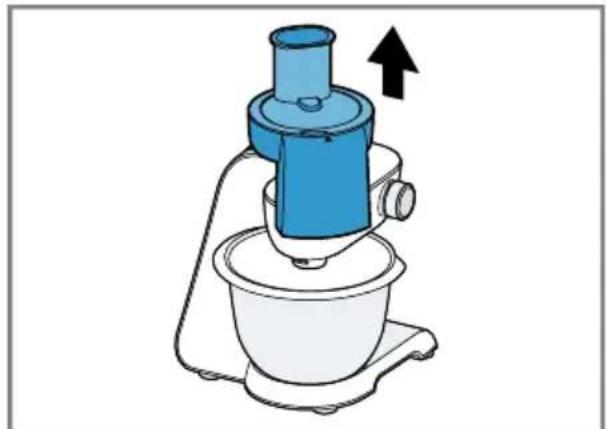
- Press the release button and raise the swivel arm until it engages. Fig. 3
- Place the bowl in the base unit. Fig. 4
- Turn the bowl anticlockwise until it engages. Fig. 5
- Press the release button and push the swivel arm down until it engages in position 1. Fig. 6
- Press down the protective cover for drive 2 at the marking and remove. Fig.7
Assembling the continuous feed shredder
WARNING Risk of cutting!
The cutting discs have sharp blades and edges.
- Only take hold of the cutting discs by the edge.
- Never touch the sharp blades and edges with bare hands.
WARNING Risk of injury!
Improper use may cause injuries.
- Never assemble the accessories on the base unit.
1. Grip the disc holder level with the wings.
Fig. 8
The two plastic tips must point up.
-
Take hold of the required cutting disc by the edge and fit onto the disc holder with the side you require facing up.
-
Fit single-sided discs with the blades or serrations facing up.
- Fit reversible slicing discs with the required marking facing up.
"Markings on the reversible slicing discs", Page 18
Fig. 9
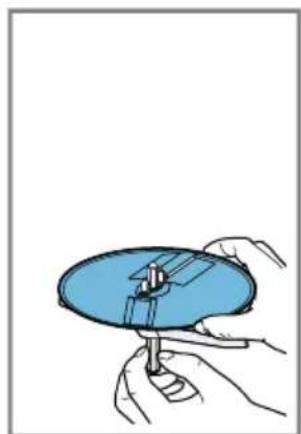
- Insert the disc holder with the cutting disc into the housing.
Fig. 10 - Place the lid on the housing.
Fig. 11
Markings and must match up. - Rotate the lid clockwise until it engages.
Fig. 12
Markings and must match up.
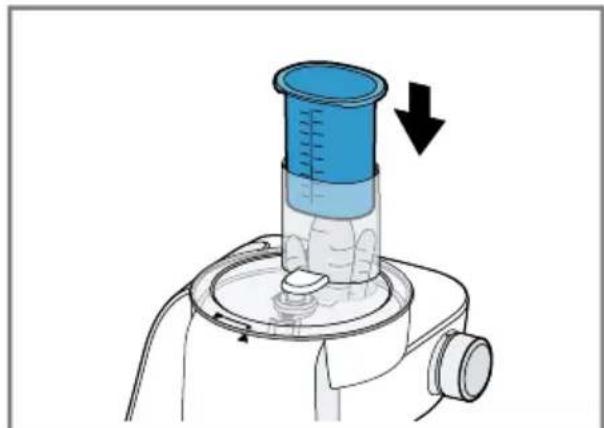
Fitting continuous feed shredder onto the base unit
WARNING
Risk of injury!
Improper use may cause injuries.
-
Only attach and remove accessories once the drive has stopped and the appliance has been unplugged.
-
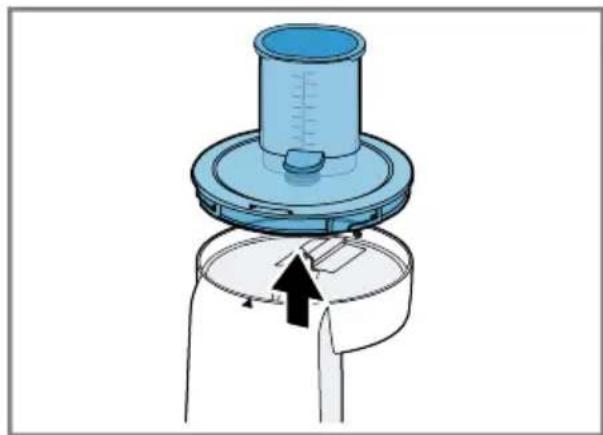
Place the continuous feed shredder on drive 2 as shown. Fig. 13
- Push the continuous feed shredder down and rotate clockwise until it engages. Fig. 14 The continuous feed shredder must be securely connected to the base unit.
Basic operation
You can find out everything you need to know about operating your accessory here.
Recommended speeds
Observe the recommended speeds for optimum results.
Note: Your model is equipped with a 4- or 7-level rotary switch depending on the features of the appliance. The recommended speeds for the 4-level rotary switch are always shown in brackets in these instructions for use.
Setting Use
7 (4) Slicing, shredding or grating food.
Reversible slicing disc
Grating disc, medium-fine
Potato fritter disc
Asian vegetable disc
Setting Use
3-4 (2-3) Shred food coarsely or finely using the reversible shredding disc, e.g. fruit or vegetables.
Processing food with the continuous feed shredder
WARNING
Risk of injury!
- Rotating drives, tools or accessory parts may cause injury.
Do not reach into the filling shaft.
- Only use the pusher to push down ingredients.
-
Improper use may cause injuries.
-
Only use the accessories once fully assembled.
The accessories should only be used in the intended operating position.
Note: The continuous feed shredder can only be used if the bowl is fitted properly.
Tip: For optimum results, process thin ingredients in bunches.
1.Prepare your food.
Cut large items of food into pieces so they fit into the filling shaft.
- Insert the mains plug.
- Set the rotary switch to the recommended speed. Fig. 15
- Insert the food into the filling shaft and press down with the pusher, applying light pressure. Fig. 16
-
Stop processing if
-
all food has been processed.
-
the food in the bowl almost reaches the outlet opening of the continuous shredder.
-
Set the rotary switch to O/off
Wait until the appliance stops.
7.Pull out the mains plug.
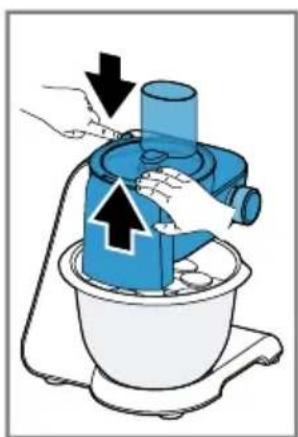
Emptying the bowl
Tip: You can empty the bowl during processing without removing the continuous feed shredder.
- Set the rotary switch to O/off Wait until the appliance stops.
- Press the release button and raise the swivel arm until it engages. Fig. 17
- Turn the bowl clockwise and remove. Fig. 18
- Empty the bowl.
Removing the continuous feed shredder

WARNING
Risk of injury!
Improper use may cause injuries.
- Only attach and remove accessories once the drive has stopped and the appliance has been unplugged.
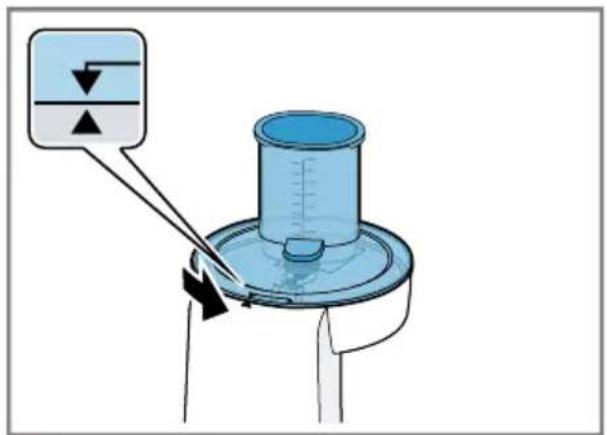
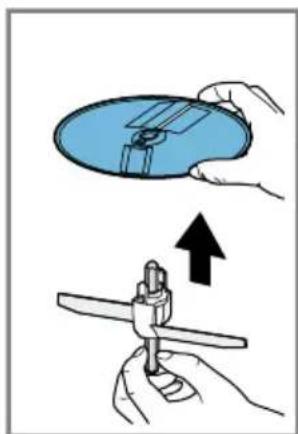
- Rotate the continuous feed shredder anticlockwise until it releases. Fig. 19
- Remove the continuous feed shredder from the base unit. Fig. 20
Dismantling the continuous feed shredder

WARNING
Risk of cutting!
The cutting discs have sharp blades and edges.
-
Only take hold of the cutting discs by the edge.
-
Never touch the sharp blades and edges with bare hands.
-
Rotate the lid anticlockwise. Fig. 21 Markings and must match up.
- Remove the lid.
Fig. 22
- Take hold of the disc holder by the shaft and take out of the housing with the cutting disc. Fig. 23
- Take hold of the cutting disc by the edge and remove. Fig. 24
Tip: Clean all parts immediately after use so that residues do not dry on.
Cleaning and servicing
To keep your accessory working efficiently for a long time, it is important to clean and maintain it carefully.
Dishwasher-safe components
Find out here which components can be put in the dishwasher.
ATTENTION!
Some parts may be damaged if they are put in a dishwasher.
- Only put dishwasher-safe parts in the dishwasher.
- Only use programmes that do not heat the water above 60^ .
- Do not wedge plastic parts in the dishwasher.
Dishwasher-safe:
Housing
Lid
Pusher
Disc holder

Not dishwasher-safe: Cutting discs

Cleaning products
Find out here what cleaning agents are suitable for your accessories.
ATTENTION!
Risk of material damage. Using unsuitable cleaning agents or incorrect cleaning may damage the accessories.
Do not use cleaning agents containing alcohol or spirits.
- Do not use sharp, pointed or metal objects.
- Do not use abrasive cloths or cleaning agents.
Cleaning the continuous feed shredder
WARNING
Risk of cutting!
The cutting discs have sharp blades and edges.
- Only take hold of the cutting discs by the edge.
-
Never touch the sharp blades and edges with bare hands.
-
Clean the cutting discs with detergent solution and soft brush.
- Clean all other parts with detergent solution and a soft cloth or sponge.
Tip: When processing food such as carrots, plastic parts may become discoloured. Remove discolouration with a soft cloth and a few drops of cooking oil.
Troubleshooting
You can rectify minor faults on your appliance yourself. Read the troubleshooting information before contacting our after-sales service. This will avoid unnecessary costs.
Malfunctions
| Fault Cause troubleshooting | ||
| Processed food does not fall into the bowl. | Outlet opening or housing is blocked. | 1. Finish processing and unplug from the mains. 2. Remove the accessory. 3. Take the accessory apart and remove the blockage. |
| Cutting disc does not rotate although the base unit is running. | Lid is not fitted and engaged properly. | Check whether the lid is fitted properly. → "Assembling the continuous feed shredder", Page 19 |
| Accessory has been overloaded and the disc holder shaft has broken at the predetermined breaking point. | You can order a new disc holder from customer service under order number 00630760. | |

Sécurité
Sécurité anti-surcharge
WAARSCHUWING - Gezondheidsrisico!
Verontreinigungen aan de oppervlakken können de gezondheid schaden.
- Vrid locket medurs tills det snapper fast.
→Figur 12
MapkapioaTwv biokwv duo oεωv
Oi Tw v 0kWv Duo oewv Eivai xapaktnpioevec e aipouc.
Mαρκάριαμ Xρήση α
Po3naKOByBaHHn I nepeBipka
Tyt Bn Di3HaTeC8, knx npaBnI cIiDOTpIMyBaTnC8, PO3naKOByUOu nPnIaI.
PoznaKOBvBaHH npHaIaIy I deTaJe
- BnIMtB npnaJ3 yNaKOBKn.
- BnMItb 3 ynaKOBKn n iIroTyIte Bci DoataKobI Detani N cynpoBIDHy DOKyMeHTaICIO.
- 3Himitb HaBn NaKyBaIbHn MaTepiJ.
4.3HIMITb HaABHi HaKJIeKN Ta NIIIBKN.
KomnJIeKT nOcTaBKn
Picra po3naKyBaHHn nepeBipTe, uKOMnIeKT NOBn i uH He N0uKOdInoYkicb yactnH nID uac TpaHcnpTyBaHHa.
→MaI. 1
A HackpizHa waTkiBnua
B Poiip6HIOBaJIbHi IINCKN
C CynpobiHa doKymeHTaCi
1 3aJIeJxHbIi KOMnJIeKtauI npIlaNy
UHsEHHaIaIpeI nepHIM KOpNcTyBaHHaM
- Po36epiB 3i6paHe npilaJa.
"Po36npaHHaACKpi3HOi WataKIBHnci", CToP. 132
2.Yci DeTani, Aki KOHTaKTyOToB i3 xa-puOBmN npOdyKTamN, nepei nepShM KOpNCtUBaHHaM CJId NOMTu.
"UHueHHa Ta DOIyA", CToP. 133
3.ПлгOTуYeВиMuTiйВиСуWeHi DeTaJIdo3aCTOCyBaHHa.
3HaHOMCTBO 3 npHJaDЯM
O3HaHOMTeC8 3 npIaIaIaM.
Складнки
Tyt MoXHa N03HaIOMNTNc8 3i CKlaIHNKAMN npIaIaI.
→MaI.
1 Kopnyc
2 DnCKOTpIMa
3 Kpuioka 3 y6yIOBaHOIO 3aBaHTaKyBaIbHOIO rOpIOBnHOIO
4 トobxauimipHnCTaKaHnK
3axnct bID nepeBaHTaJKeHn
3axnct BiD nepeBaHTaXeHHa 3anobi- rae NOWKOJKeHHIO DBNrHyNa iHUnx yactInH Ype3 3aBnCOke HaBaHTaXeHHa.
Y pa3i nepeBaHTaJxehn a6o 6IOKyBaHHaACKpI3HOI 7aTKIBHNCi Bicb INCKOTpIMaHaJaMaETbcB BCneCi-aNbHo nepeDbaueHOMy Micci.
Bka3iBka:Ha qactuHn 3 3aHaHIM Miccem 3IOMy HaSi rapaHTiHi 3O6OB'3aHHn He NOnPiIOITbcn. HOBn DnCKOTpMaU MoXHa 3aMOBnTn B cepBicHn CnyKoI 3a Homepom 00630760.
Перед Корисуваим
PiIroTuYte OCHOBnI 6Iok npUaNy I npUaIaI DaIO 3aCTOCyBaHna.
ПлгOTOBКОСHOBHOrO 6LoKa
Bka3iBka: Poka3aHn Ha iInoctpaui KyxOHn KOMbaH MoKe BiDpi3HrTnCra BID BaIo MoJeI 3a fOpMoIO I KOMNLeKTAciEHO.
- YctaHOBIb OCHOBnI 6IOK,ЯK OINCAHO B rOJOBHi iHCTpyKuII.
- HataNCHiTb PO36LOKyBaJIbHy KHOIky NPiHIMITb BiKnIHn KPOHHTeH Do oikcaui. Man. 3
- YCTaHOBIb yaIy B OCHOBnB 6JOK npIaNy. Man.4
4.Повернічашу пopotни HHHNOBOI CTPIKn Do φikcaqii. → Man. 5
5. HataNCHiTb po36IOKyBaJIbHy KHOKNy IOnyCTiTb BiIDKNHn KPOHHTeH Do fikcaii B no3nii 1. Man. 6
6.ПиТИСИТь 3axICHy KpIuKу npINBOda BHN3 2,HaTnCHyBUn Ha nO3HaUKy 3HIMITb KpIuKy. →MaI.
36npaHHaCKpi3HOI WaTKiBHuCi
NONEPEJKEHHa He6e3neka nopizib!
IoppiHIOBaJIbHI DNCKN MaOTb roCTpi HOKi N Kpa!.
IopipHOBaJIbHI INCKN MOKHa 6patn TiIbKn 3a KpaI.
Hikon He TopkaTeC HoxiB i Kpa- NOK roJIMN pyKaMn.
I NOPEДЖEHHA He6e3neKa TpaBMyBaHHa!
HehaJekHe KopnCTyBaHHa MoKe CnpuHHTn TpaBMn.
3abopoHNo 3bnpaTn npilaJaHa OCHOBHomy 6loCi.
-
Utpmuyte DnCKOTpMaH Ha pIBHi KpnIeCb. Man. 8 OnbBa nlaactMacObi BicTpMaHOt b 6yTu CnpaMObHi BVropy.
-
Bi3bmitb notpi6Hn noDpi6HOBaIbHn DNCK 3a Kpa i BCTaHOBiTb Ha DnCKOTpMaTuK, Uo6 BaKaHn 6iK 6yB 3rOpn.
-
OДновин ДИСКИВСТАНБЛЮМЕДОГори HOЖAMN a6O BИСТУРAMN.
-Двбічні ДиСКИВCTаHOBЛЮпTe Догори NOTpi6HO NO3HaUKOIO. →"ПоЗнauки HaДвБОбiчнx ДиСКax", CToP. 129
→ Man. 9 -
YctaHOBIb DnCKOTpMaU 3 NO- DiHOBaJIbHIM DnCKOM y KOpNyc. Man.10
4.YctaHObitbHaKOpnycKpnuKy. Man.11 P03HaUkaMaecpo3TaUyBaTnca HABNPOTNPO3HaUKN
5.Поверніть Кршky 3a ГдиНнИ КOBОЮ CTPIIKOJO Do ФIKcaць. → Man. 12 ПоЗнчka Mae po3TaшУВаТиСА HabIpOTn ПОЗнчКN ▲
Po3miueHnHaACKpi3HOi 7aTKiBnci Ha OCHOBHOMy 6loci
NONEPEДЖEHHe6e3neKa TpaBMyBaHnHa!
HehaJexHe KopnCTyBaHHa MoKe CnpuHHTn TpaBMn.
- Пиладя можна BCTaHOВЛOBаТи i 3HIMATи TIьКи 3a HepyxOMOro npINBOda n yCTaHOBJIeHOrO npINA-dy.
- YctaHOBiTb HAcKpi3Hy ⅢaTKiBHNIO Ha npIBoD 2,ЯK 3O6paJKeHo. → Man. 13
2.ПиTNCHiTb HAcKpi3Hy ⅢaTKiBHNIO BHN3 i NOBepHITb 3a rOINHHNKOBIOCTpIJKHO Do φikcaui. → Man. 14 HAcKpi3Ha ⅢaTKiBHNua Mae 6yTu MiUHO 3'EDHaHa 3 OCHOHN M6IOKOM.
Ochobhi BiIDOMoCTi npo KOpHcTyBaHHa
TytBn 3HaJTe HaCyTTcBiWi BiDOMOCTI pO KopNCTyBaHHr npnilaDJaM.
PekomeHaazii 0oOo WbNkocti
Ioo6doCraTn ONTImaJIbHnx pe3yIbTaTIB, 3BaJkaIte Ha peKOMeHdaUII OODO WBNkOcTi.
Bka3iBaKa: 3aJIeJxHO BiI KOMnJIeKTAuII npIaNy BaIa MoIeIb MoKe 6yTn yCTaTKoBaHa 4- a60 7-nO3NciHm IepemKauem. Y ciI iHcTpkyu II peKOMeHIOBaHy WbNdkICTb dIa 4- N03NciHOrO NOBOPOTHOpeMnKa-a 3aBXdN HabeJeHO B dyKkax.
Po36npaHnHaCkpi3HoI WaTkIBNci
ПОЕРДЖЕHHЯ He6e3neka nopizib!
IoppiHIOBaJIbHI DNCKN MaOTb roCTpi HOxI KpaI.
-Подрибновальни ДИСКИ мОЖHA
6рази тльки за краï.
Hikoli He TopKaItec HoxiB i Kpa- NOK rJIMn pykam.
1.Поверніть кршky npOTи ГДИНКOBоI CTPIKn. Man. 21 ПОЗнчka Mae po3TaUyBaTINcHЯВпOTи NO3HaUKN
- 3HIMITb KpNShKy. → Man. 22
- Bi3bMitb ДИСКОТРИМач 3a BiCb i BИ-IMiTb 3 KOPNYCY pa30M 3 NO-DpiOHOBAJIbHIM ДИСКOM. →MaI.23
- Bi3bmitb NOpi6HIOBaJIbHN INCK 3a KpaI 3HIMITb. Man. 24
Iopada: Odpa3y nicna KOpncTyBaHHnYnCTbTe Bci DeTani, 0o6 3aIIuKHe npncxann.
UHsEHHa Ta DOrJaD
Iio6 npilaJnpaUBOaIO IOBRO, CII peTeJIbHO UcHCTNT NOrO N OToIaTNI 3a HIM.
PnndaTHicTb DO MHTB nocydomnHi MaunHi
Ii3HaItecra, aki Detani npnilaNy MoKHa MNTN B NOCyIDOMnHiMauHHi.
YBARA!
Jeaki Detali BHaCNIIOK MNTTBA NOcyDOMNHi MaunHi MOxTyb 6yTN NO-UKoJKeHi.
Mnnte B nocydomnHi MaunHi TiIbKn npndaTHi Dna CboRo Detani.
BukopncToByte TlIbKn Ti npo- rpaMn, KOTpi He HarpiaIOb Body noHaD 60^
He 3aTnCKaIte nlaactMacObi deTaIi B NocyDOMnHiM aShNHi.
IeTani,IO MOxHa MNTN B NocyDOMnHiMaunHi:

Kopnyc
Kpnioka
TOBXau
Tpimau DnCKIB
IeTani, 0 He MoXHa MNTN B NOCyDOMnHi MaunHi:
Poiip6HIOBaJIbHi IINCKN

YnctnJIbHi 3acO6n
Ii3HaItec8,aki 3acobn npndaTHi IJIyUeHHN npuaand.
YBAGA!
He6e3neKa MaTepialbHoI uKOdN. HeBIDIOBIDHI 3acO6n dIa OUnUeHHa 6o HEnpaBnJIbHe OUnUeHHa MOxUTb npIN3BeCTn Do NOnKoJKeHHa npInlaDJa.
He BnKOpNCTOBuYTe 3acO6n dIa OunIeHHra,IO MICTAITb CnIPT.
He BnKOpncToBvIte 3aOcTpeHi a6o MeTaJIeBi IpeDMeTI.
He BnKOpNCTOByIte XOpCTKI rAnHiPKN a60 3acO6N dIra OUnIeHHa.
YcyHeHH HeCnpaBHOCTe
He3NaHi HeCnpaBHOCTI npilaJMy MoXHa ycBaTn BlnachOpyu. NepH HIX 3BePtaTnCn DO cepBicHOi CnyKoN, CKOpNCaTIeCn BiOMOCTmN Ipo yCyHeHHr HeCnpaBHOCTe.N Tak MOxHa yHnKHyTu 3aBnX BVtpaT.
HecnpabhocTi B po60ti
Y INCKOB-N3MeIbUHTeJIe OCTpIe HOJN I KpaJ.
-ДиСКИ-N3MeЛьчNTeJIМоЖнО 6paTb TOnьKO 3a Края.
He tporaTe octpble HOxN KpOMKn rOblm pyKaMn.
He nepepaTaBbAaTe npOdyKtbl, Co-epKaUne TBepDble KOMNOHeHTbl, HanpImep, KOCTN.
He BBOIte KaKne-Jn6o IpeDMeTbIB 3aRpy3OuHbI CTB0J nn KOpNyc, HApnMep, pa3JIbAteIbHyIO loXKy.
Ipeed nCnoB3OBAHHem npOBepbTe 3a- rpy30uHbI CTBOJ N KOpNc Ha HauHne NOCTOPOHHNx PpeDMeTOB.
He hanaBnBaIte Ha toIkaTeIb cIIuKOM CINbHO.
PacnaKobbIbAHne n KOHTpoJIb
3decb npBODNTcHΦOpMaun, KOTopyHne6xOIMO yueCTb np paCnakOBbBaHN.
PacnaKOBbIbAHne npHaJdJIeX-HoCTeH uacteH
- BbHbTe npHaJneKHOCTn n3 ynaKOBKn.
- BCE octaIbHbIe yactn n coIpoBOIDTeIbHyIO DOKymeHTaUHO BbIHbTe N3 ynaKOBKn I NOLOXHTe pIOM.
- YdaJIte HMeIOUINcra yNaKOBOHbIM MaTePnA.I.
- YdaJInte HMeIOUncEaHaKNeiKNI PJIeHKn.
KoMnJIeKT NoCTaBKn
Iocne pacnaKOBKn npOBepbTe Bce DetaHn Ha OTCyTCTBHe TpaHCnOpTHbIX NOBpeXKeHn H KOMNJIeKTHOCTb IOCTaBKn.
PnC.1
A YHnBepcaIbHaJpe3ka
B 1nckn-n3MeIbIyIeIIN
C COnpoBODHTeJIbHaJ DoKymeHtata
1 B 3aBnCmOCTn OT o6OpydoBaHnI npi-6opa
OuNCTka npHaJneJxHocTei neped nepBbIM nCNoJb3OBaHHem
- Pa36epnte co6paHbIe npHaJNeXHoCTN.
"Pa36opKa yHnBepcaJIbHOJ pe3KU", Ctp.142 - Bce deTann, cOpnKacauounec c npOdyKTamn, CneDyET Ounchntb nepe nepBbIM HcNoIb3OBaHHeM.
"OuHcTKa H yXoD", CTo.142 - OuHueHHbIe I npocyuHbIe DeTaJIH NOJOKHTe HaROTOBe DJIa HcNoJIb3OBA-HNIA.
O3haKOMJIeHHe c npHa,IaJIeXHOCTaMn
Y3HaIte 60JIbSe O npHAnJExKHOCTaX.
CocTBHbIe yactn
3decb npBedeH 630p coCTaHBbIX yacteepnHaJneKHOCTeI.
PnC. 2
1 Kopnyc
2 DepeKaTeIb IuCKOB
3 KpbIiKa co BCTpoeHHbIM 3aarpy- 30HbIM CTBOJOM
MeTkn Ha IBycSTOPOHnX nCKaX
CTopoHbI DByCTOpOHnX DNCKOB 06O3HaueHbI UΦpaMn.
MeTka PpHmHeHne
1ДBycTOPOHnI DnCK-HOJ, CTOPOHa IJI Hape3KN Ha TOJICTbIE JOMTNKIN
3ДByCTOpOHnДNCK-HOJ, CTOPoHaДЯHape3KNHa TOHKHe JOMTNKn
2ДBycTOPOHNNI DnCKДЯ
UHHKOBKN,CTOPOHaДЯ
KpyNHOUHHKOBKN
4ДByCTOpOHnI DnCK IJIA UHHKOBKn,CTOPoHa IJIa MEJIKOU HNKOBKn
3aunta ot neperpy3kn
3aunTa OT neperpy3Kn npenTCTByet noBpeJdeHnO 3neKtpOMOTopa N dpyrNIX KOMHOENTOB BCNEdCTBHe CNIuKOM BbICOKo Harpy3Kn.
B cnyuae neperpuy3kn nn 3aedanhyuHnBepcaIbHO np3KN Ocb dpXaTeJnDcKOB IomaeTcB CneuaJIbHO npedymOTpeHOM MecTe.
Yka3aHHe:Ha 3aIacHbIe yactn C 3aIaHbIM MeCTOM CLOMa HauN rapaHTnHbIE O6ra3aTeJIbCTBa He pacnpocTpaHrOTc. HoBbI DePkaTeIb DnCKOB MoKHO npNo6peCTn B cepBnCHo CnyX6e IIO Homepy 00630760.
Ipeed nCnoJb3OBaHneM
IodrotobTe OCHOBHO6nOK n npHaJLeKHOCTN K IcNoJIb3OBAHIO.
Iodrotobka ochOBHoro 6Joka
Yka3aHHe: N3o6paXeHHbI KxOHbI np6op MoKeT OTnHaTbcr OT BaSeM OdeNn no fOpMe n OcHaueHIO.
-
YCTaHOBInTe OCHOBHOJ 6JOK, KaK ONHcAHO B IJIaBHOn IHCTpyKcUN N0 3KcNpyaTaun.
-
HaKMnte Ha KhoNky pa36JIOKnpOBaHn I NOHMaTe NOBOPOTbI KPOHHTeH, Noka OH He 3aΦHKcpyETc.
Pnc. 3
- BCTaBbTe yauy B OCHOBHOJ 6JOK.
PnC.4
- NobepHnte yaIy npOTnB YacOBoN CTpeKN Do fHKcauN.
Pnc. 5
- HaKMITE Ha KONky pa36JOKnpoBaHnHaKIMaTe NOBOPOTbIKPOHHTeHN BHN3, NOKa OH He 3aΦNKcnpyeTcB NOJIOXKeHN 1.
Y DNCKOB-N3MeJIbUHTeIe OCTpbIe HOJN I KpaI.
ДиСКИ-N3MeJIbUHTeIIMMOJHO6paTb TOnIbKO 3a KpaI.
He TporaTe ocTpbIe HOxN IN KpOMKn rOJIbIMn pyKaMn.
I P E D Y I N P E K I D E H N E Onacnoctb TpaBmnpoBaHnA!
HeKOMnTeHTHOe HcNoIb3OBAHne MOKeT CTaTB PnUHHoTpaBM.
HnBkoemcnyaeHecoibaTe npHaJnEHHOCTNaOCHOBHom6loKe.
- YdepxnBaTe DepxkAteIb IJIa NsCKOB Ha ypoBHe IIIOCKNX BblCTyNoB.
PnC.8
O6a nlaactMaccoBbIX ocTpydoJHKhbl 6bIb o6paueHb BBepx.
2.Bo3bMnte HJxHbI DNCK-N3MeJIbHTeJIb 3a KpaN yCTaHOBtE Ha DePkaTeJIb DnA NcKOB Tpe6yEmoT CToPOHOB BBepX.
ru CtaHdapThoe ynpaBJeHne
-
OndocTopoHHne dNcKn yCTaHaBnBaIte HOKAMN HIN BbICTyPamNBbepx.
-ДВуCTOPOHHHeДиСКУCTaHaBJIbBaIte TaK,ЧTOБbl BBePx 6bIa O6paUSeHa COOTBeTCTByUOuaЯ MeTKa.→"MeTKn HaДВуCTOPOHHnxДиCKaX",Ctp.138
→Pnc.9 -
YCTaHOBInTe DepeKaTeJIb DJIЯ DiNcKOB C INCKOM-H3MeJIbUHTeJIeM B KOpNyc. PnC.10
- YcTaHOBInTe Ha KOpNyc KpbIuKy. Pnc.11 MeTKn 1 nnKhbl 6bITb COBMe- uHebl.
5.Поворачнваite Кршky no уасов стpeлke, пoka она He 3aфнсиpyetca. →Pnc.12 Меткn 14Лжнbl 6bITb COBMeue- Hbl.
Pa3MeUeHne yHnBepcaJIbHOpe3KN Ha OCHOBHOM 6JIOKe
ПЕДУПЕЖДEHNE Onachoctb TpaBMnpOBaHn!
HeKOMnTeHTHoe HcNoJIb3OBAHne MoKeT CTaTB pInuHOn TpaBM.
-ПинадлжнocTmoЖHO yCTaHbNBaTbИ ChmMaTb TOnbKO NocNe OCTaHOBKn ПпвODа И OTcoeДиHEnЯ пбopaOT cETN.
1. YcTaHOBInTe yHnBepcaIbHyIO pe3Ky Ha npINBoD 2, KaK nOKa3aHo Ha pncyHKe. Pnc.13
2.ПиЖМЛte yHnBepcaJIbHyIO pe3Ky BHN3 N NOBepHIne IO YacOBoi CTpeIKe Do ΦHKcaUIN. →Pnc.14 YHnBepcaJIbHaPe3Ka DOJIxHa 6bITb IpoUHO CoeDINHeHa C OCHOBHbIM 6JIo-KOM.
Ctanhapthoe ynpablenne
3decb Bbl y3haete OCHOBHyIO HΦOpMa- CnIO 06 NCNoIb3OBaHNN PpHaAdJeKHOCTeN.
PekomeHdaunnoHaCTpOKeCKOpocTH
Co6IouaTe peKOMeHdaaunn no HacTpoiKe ckOPOCTn DnA DOCTNKeHnna ONTImaJIb-HbIXpe3yJbTaTOB.
Yka3aHHe: B 3aBnCmOCTn OT OChaUeHn npnbopa BaWa MoedeIb HMeet 4-ctyneHauTbI nn 7-ctyneHauTbI NOBOPOTbI nepeKIOuATEIb. B DaHHo INHCTpyKcII N0 3KcNlyaTaUIN peKOMeHdaUIN NO CKOpOCTn DnA 4-CTyneHcuTORO NOBOPOTHO I nepeKIOuATEIg PnIBoADrCA COOTBeTCTBEHNO B CKO6kax.
PnHaJNeXHOCTM OXXHO NcNoJIb30BaTb TOJIbKO B NOJIHOCTbHO CO6paH-HOM BnDE.
HcnoIb3yIte npHaJnEJXHOCTN TOnbKO B IpeDyCMOTpeHHOM pa6OeM NOLOXKeHH.
Yka3aHHe: YHnBepcaIbHyIO pe3Ky MOxHO nCNoJIb3OBaTb TOnbKO C npaBnJIbHO yCTaHOBnEHNO YaWei.
Cobet: UTo6bI DoCTnCb ONTImaJIbHbIX pe3yIbTaTOB, TOHKne IPOdyKTbI HxKHO Hape3aTb CTONKaMn.
- NpOdrToOBbTe npOdyKtbl nHTaHnA.
IopexbTe 60nbUne npOdyKtbl Ha KycocKn, yTO6bl OHn pOoJIn B 3aRpy3OuHbI CTBOJ.
- BCTaBbTe BnIky cTeBOrO uHypa B po3eTKy.
- YctaHOBnte NOBOpOTbI NepeKlnOuaTeNb Ha peKOMeHdyemyIO CKOPoCTb.
→PnC.15
- 3arpy3nte npodykTBI IJIpe3KN B 3arpy-30HbI CTBOI IN CJIeRka NODTaIKNBAIte INX TOJKATeJeM.
PnC. 16
-
3aBepuHTe nepepa6oTKy, ecnn
-
BCE npodykTbI nepepa6oTaHbl.
-
npOdykTbI B qaWe NoOTn DoCTnIIN BblNyCKHOro OTBepCTn yHNBepcaJIb-HoJ pe3Kn.
-
YcTaHOBInTe NOBOpOTbI NepeKJIIOUaTeIb Ha O/off
Ioxntecb nonHoro octaHOBa npioopa. - BbInbTe BnIky ceTeBOrO uHypa n3 po-3eTKN.
OnopokHeHne cmeHTeIbHOu
Cobet: Bo Bpemr nepepa60Ku yaUy MOxHO ONOpOxHATb, He CHMaY yHnBepcaIbHo pe3Kn.
- YcTaHOBnTe NOBOpOTbI NepeKJIHOa-TeIb Ha O/off
Ioxntecb nonHoro octaHOBa npnbopa. - HaKMnte Ha KhoNky pa36JoknpOBaHnI N IOHMaTe NOBOPOTbIK KoHHTeH, Noka OH He 3aΦHKcnpyETc.
PnC. 17
- Повернite чаши по уасовь стpenke И симпе ee.
PnC. 18 - OnopokHHte yaHy.
ChTne yHnBepcaJIbHOJ pe3KN

PPEyIpeKDEHNE
OnachocTb TpaBMnpoBaHn!
HeKOMnTeHTHOe HcNoIb3OBAHne MOKeT CTaTB pNCHNO TpaBM.
-ПинадлжнocTи moKHO yCTaHbNnBaTbИ ChIMaTb TOnbKO nOcJIe OCTaHOBKN npIBoDa I OTcoEduHeHnI np6OpaOT cETn.
1.ПоворачиBaIte yHnBepcaIbHyIO pe3Kу npOTnB YacOBoi CTpeIKN, NOKa OHa He OCBO6OДNTcR.
PnC. 19
2. CHIMITE yHnBepcaJIbHyIO pe3Ky c OCHOBHOrO 6Joka.
→PUC. 20
Pa36opka yHnBepcaJbHOJ pe3KN

ПЕДУПЕЖДEHNE
Onachoctb nope3OB!
Y INCKOB-N3MeJIbUHTeNeI OCTpbIe HOXN I KpaI.
-ДИСКИ-ИЗМЕЛБЧИТЕП MOЖно 6paTb TOLьКо 3a Краз.
He TporaTe ocTpbIe HOxN KpOMKn roJbIMn pyKaMn.
- Повернite Крышky поTNв уасоВОй CTpeлки.
→PnC.21
MeKn 1 nnHbI Oblb COBMe- - CHIMITE KpbilKy.
→PnC.22
3.Bo3bMnte DepeKaTeIb IJIa DnCKOB 3a Ocb N BblbTe H3 Kopnyca BMeCTe C DnCKOM-N3MeJIbUHTeJIeM.
PnC. 23
4.Bo3bMNTe nCK-n3MeJIbYnteIb 3a KpaHn CHIMNTE eRO.
PnC.24
Cobet: Cpa3y nocne nCnoB3OBAHnA OunIaIte Bce qactn np6opa, yTo6bIOCTaTKI npOdyKTOB He npncbIXaII.
OuHCTka n yXoD
Длд Долговремени Испраьног pa6OTbl npHaIeKHOCTe Tpe6yETcT IaTeJIbHAn OuchTkA n yXoD.
PpHroDHOCTb IJIa MbITbA B NOcy-DMOeHOn MaunHe
Hnke onncaHo, KaKHe qactn npnbopa pa3peWaeTcMbItb B nocydomoeuHOn MaHNHe.
BHIMAHHE!
HekotopbIe qactn np6opa npn MbItbe B nocydomoeyno MaunHe MOryt 6bItb NOBpeJdeHbl.
B nocydomoeuHoi MaunHe MoTe TOnb-Ko npurohble dJa 3ToFo qactn.
HcnoIb3yIe ToIbKO nporpaMMbl, He HarpeBaIOUne BDOy BbIwe 60^
He 3aKImaIte PnactMacCOBbIe YacTIN B nocydomoeyHOn MaunHe.
PnroHbI JIyMbITbB NocyuOMoeHOn MaHNHe:

Kopnyc,
KpbliuKa,
TOJkataB,
He npiroDnbl IJyMbITbB Nocy- domoeyHOMaunHe:

HnCKn-H3MeJIbUHTeJIIn
UncTAAuHe CpeIcTBA
Hnke yka3aHbI YnCTaUne cpeDCTBa, npNroDhble dIaBaXx npHaADJeKHOCTeI.
BHIMAHHE!
Onacnoctb MaTePnaIbHoro yUepe6a. Pn INcNoIb3OBAHN HeNODXoJxN XuNCTaIINxCpeDCTB IIN Pn HEnpaBnIbHO N OUnCTKe BO3MOxHNOBpeKdEHe NpHaAdJeKHoCTeN.
He nCnoB3yIe moUoune cpeIcTBA, coepkaune aankorolb nIIN cnprt.
He nCnoB3yIe MeTaJIHueCKne H octpOKoHeUHbIe IpeDMtbl, a TaKKe npEIMTe C OCTpbIMN KpOMKaMn.
He npimehaTe rpy6yIO TkaHb nIa6pa3nBhble qHCTaUne cpeDCTBa.
YnCTka yHnBepcaIbHOJ pe3KN

PPEyIeHNE
Onachoctb nope3OB!
Y DNCKOB-N3MeJIbUHTeIeOCTpbIe HOXN IN KpaI.
-ДИСКИ-N3MeJIbUHTeIIMMOJH06paTb TOJIbKO 3a KpaI.
He TporaTe ocTpbie HOxN IN KpOMKn roJbIMn pyKaMn.
1. ДИСКИ-ИЗМЕЛБЧИТЕЛ ИСТИТЕ МЯГКОД 斯ЕТКОД, СMOУЕHHОВ B MБЛьHOM pactBOpe.
2. BCE ocTaJIbHbIe DeTaIIu YnCTHTe MrgKoJ TpIKNo IIN rY6KO, CMOueHHoB B MbIbHOM paCTBOpe.
Cobet:Ha nlaactMaCCOBbIX DeTaIAX MoKxET BO3HnKaTb CBeTHoH HAnpImep, npn nepepa6OTke MOpKOBn. HAnet ydaJIaTeCmRKO TpIKoN c NOMOuHO KaIInpaCTHTeBHO MaCna.
YcTpaHHe HEnCnPaBHOCTeI
Bb moKeTe cAmocToTJIbHO yCTpaHHTb He3HaunTeNbHbIe HeNCnPaBHOCTn npHaadJeKHOCTe. BocnoJb3yInTeCb nHΦopMaunE n3 rnaBbl «YcTaPHeHne HncnPabHOCTe » nepeo6paueHem B cepBnCHyIO cnyK6y. 3TO no3BOJNT n36ExKaTb DOONHtJIbHbIX paCXoDob.
C6onBpa6ote
MaiaaBbIw dNcKJIepDIn nbIaFbI MeH XnEKeTepi eTKip.
MaJdaIaFbIw dNcKInepDi TeK 6yHipiHeH yCTaHbI3.
kk Kayinci3ik
Ew JkaFdaJaTa eTKip nbIwaK peH XnKeTepre JkaJah KOnMeH TImeHi3.
ECKEPTY-JkapaKaTanyKayi6i!
■ Aиналын Турван ЛеТКтер, Кypалдap HeMece KepeK-JkapaКтapжарakat Tngi3yIMymKIn.
ToTbIpyHayacbHaKoI cyKaHbI3.
TantaybIbI TeK HrpeJeHTepei cany ywiH naJaHaHbIb3.
Kate konlahy japaKaT any Kayin H Tydbipybl MymKiH.
KepeK-JkapaKtbl eWkaWah Heri3ri KypbIfblda KypacTbIpMaHbI3.
KepeK-kaPaKbI JKeTeK TOKtaFaHda JxHe KypblFbl 1yIFapblFaHda faHa eHri3yre JxHe 1yIFapbl anyFa 60laDbI.
KepeK-JkapaTbI TeK TOnbIK KypacTbIPbIFaH Kynde naJaHaHbIHbI3.
KepeK-kaapkTbI TeK 03iHe Tnicti KymbIC KyHne naJaHaHbIHbI3.
ECKEPTY - Денисторда Катерл!
YctiHri beTepdiH naCTaHybI DeHCayIbIKKa 3nAH KeTtipyi MymKIn.
Ta3aay 6oBbHwa HycKayapfa Ha3ap ayapbIbI3.
- Ac eHimdepimeH JkaHacatbH 6eTTepdi ep naIdaIaIaHy aIdbIHda Ta3aJay KepeK.
MaTePnaIbIk 3nHdapIbIH aIdbIH any
Kypblfblda,KepeK-JkapaKTapda
Hemece acy3aTtapbIHda
3aKbIMdApdbH aIbH any yWih Ocbi
HyCKaylbIKTapdbOpbIHDaHbI3.
KannbI aKnapaT
KepeK-KapaKaTbI naДaJIaHу Ke3iHde aTaIbIsh HcayapdIe cKepiHi3.
HA3AP AYДAPbIHbI3!
Kate kondaHy MaTePnaIbIK 3aIaTytdbipybl MymKiH.
CyneKTepeKtki KaTbI Kypamdac 6oIweKeTpki KaMTnTBiH ac eHimdeepin EHeDeyre 6oImaNDbI.
ToIbpy HayacbHa HeMece Kopnycka ac KaCbIK CNaKtbl eWKaHdai 3aTap caImaHbI3.
- PanaJanaH6ac 6ypbH TOJtbyp HayacbMeH Kopnycta 6eIde 3aTapDbH 6ap-KOFbH TeKcepin WbIFbIHbI3.
TantaybIuNeH KaTTbI KbICbIM TycipMeHi3.
OpaybIUtah mbIfapy XaHe Tekcepy
OpaybIuTah IbIfapy Ke3iHne ecKepy KaKet HycKaynap OcbI JepDe 6epinreH.
KepeK-Jkapak peh 6eJIkTepei opaybIHTaH 1bIfapy
1.KepeK-kaPaKTbI opayblTah WblfapblHbl3.
2.Баckaбарлькболikteрmenine TecemdepeDi opaybltah 乌fapbIHbI3 XHe daHdAn KOHyHbI3.
3.Бар opaybI MATEpHaNbIH aNbIN TaCTaHbI3.
4.БархансырмалapMeH yIipdi anbI TaCTaHbI3.
Ketki3y HnHaFbl
Ketkiin anfah coh 6apnbik
6eKeTepdi TacbImaIay
3aKbIMdapbIH XHe XINHaK TOJIbIFbHa
TeKcepH3. Cyp.
A
Ac yinik MaandaFbIi
B
MaiaaFbIw nckinep
C
Inepe KyaKaTap
1 KypbIfbl Jha6dbIKTaIybiHa cai
KepeK-JkapaTbI aJfaw pet naJaHaHy aJdbHda Ta3aay
- KypacTbipBilFaH KepeK-KapaKTbI 6eJWeKeTeHi3.
"Ac yinik MaiaaafbIITbI 6eKey",Ber 152 - Ac eHimdeepimeH JkaHaCaTbIH 6apblk 6eJIkTepei anFaW pet naIdaIaH6ac 6ypbH Ta3aIan 1bIFbIHbI3.
"Ta3aay JHHe Kyty", Bet 152 - Ta3aHaHFaH JxHe KeNTipiIreH 6oJIkTepeI naJaIaNyFa DaBbIHdAn KObIHbI3.
KepeK-ЖapakTapMeH TaHbICY
KepeK-kaPaKaTapMeH TaHbICbIN WblfblHbl3.
Kypamdaoc 6oJweKeTep
Ocbl 6eImDe KepeK-JkapaKtbiH KypamDac 6eJWeKTepeiHe 70ny 6epinreH. Cyp. 2
| 1 | Kopnyс |
| 2 | Диск устаftышы |
| 3 | Толъру hayасы кіріктірілген Каікпак |
| 4 | Та паявіш XXэHe олшeyіш Стɑкан |
| 5 | Айналмалы Keşkiш ДиSC |
| 6 | Айналмалы YKKіш ДиSC |
| 7 | Уйkeлme ДиSC, орташa |
| 8 | Картон Күймамы-КүьірьлfaH Картон ДиSCiCi |
| 9 | Азnia Көкөніс ДиSCiCi |
Bérrinep
OcbI KepeKepeK-KapaKaTafbl 6enrinepre wony kentipinreH.
| Белri Синатама | |
| i | Пайдалиу 6овынша НУСКayльКТаБы НУСКayларДы Орынды3. |
| Толъру hayасына кол СУКпаHB13. | |
| КаКпаКъI opHaTy | |
| КорпунстаБы позири Таньалмасы | |
MaДаJaIbIsh InckiJIepdIn 7OJybl
OcbI 6eImde MaJdaJafbIiDnCKiInep MeH OJapDbH KOJaHy MaKcaTbHa 10ny 6epinreH.
Heri3ri KypblfblbI daibHday
Hycay: Cypette KepctiIreH ac yin KombaHbI ci3deri yIriDeH nIiHi MeH Ka6dbkTanybl 60bHwa 03ReWeJeHyi MymKIn.
- Heri3ri KypbIINFbIHbI 6aCTbl HcKayJIbIKTa CnNaTTaJFaHdaI OPhaTbIHbI3.
- Kʌŋbɪntaɪn 6ɔcaTy Tʌŋmecɪn 6aʊbɪn, aɪhʌmʌbɪt Tʌŋkɑhɒtɪpeɪn'reHwe KətepiHɪz.
$$ \rightarrow \mathrm {C y p .} 3 $$
- bɪdɪctbɪ Herɪʒri Kʌpɒlɪfɒrfa calɪhɒi3.
$$ \rightarrow \text {C y p .} 4 $$
- bIbIcIbI caFat tiinH 6aftbHa KapcbI TipeJIreHwe 6ypaHbI3.
$$ \rightarrow \mathrm {C y p .} ⑤ $$
- KyIbIInTaH 6ocaty Tymecin 6acbln, aHaIMaJIbI TyTKaHbI 1No3nucBHaTipeJreHwe ToMeH nTepiHi3.
$$ \rightarrow \text {C y p .} 6 $$
- 2-KeTeKtiH KOpFaHbIu KaKaNaFbIH TaHoJaMaCbHa TeMeH KapaB 6acbln, aIbIn TactaHbI3.
$$ \rightarrow \mathrm {C y p .} 7 $$
Ac yinik maandaafbIUtbl KypacTbIpy
ECKEPTY
Kecy Kayibi!
MaiaaftbIw dNCKineepin nblaafbMeH KneKtepi eTKip.
MaiaaFbIw nckinepei TeK
6yipiHeH yCTaHbI3.
kk Herizri bacekapy
EwJkaFdaJa eTkip nbIwaK neH KHeKTepeRe KaIah KOImeH TImeHi3.
ECKEPTY
HapaKaT any kayibi!
Kate KoIaHy JapaKaT any KayniH Tydbipybl MymKiH.
KepeK-kaKaTbI eWkaaH Heri3ri Kypblfblda KypacTbIPMaHbl3.
1.ДиCK yCTaFbIWBiH kanaKwahbIH 6niktirHde yCTan TypbHb3.
Cyp. 8
- KaKeTTi MaIdanaFbIu DNCKiHi KHeIHeN YCTaT, KaKeTTi KaFbIMeH KOfapbl Kapai DnCK YCTaFbIuHa OPhaTbIHbI3.
BipKaTbI DnCKiJIepdi, PbIshaKTapbIH HeMeCe DeHec KepJIepiH KOrapbI KaPaTbIN, OPHA TbIHbI3.
- AиHaImaIbI DnckiIepDi, KaKeTTI TaH6aJaMaHaBJI KOFapbl KapaTbIn, OPHA TbIHbI3.
"Aинмалы Диckineрдп.TaHбалamacbl",Bet 149
Cyp. 9
3.ДИСС YCTaFbIWBH MaДаЛaFbI W DnCKIMeH bIpRe KOpnycka caJIbIHbI3.
Cyp. 10
- Kopnycka KaKaNaTbI opHaTbIHbI3.
→Cyp.11
KHe TaHbamaMaIapbIH 6ip6ipimEn Typanay KepeK.
- KaKaNaKtbl caFat tiinH 6aftbImeH tipenreHwe 6ypaHbi3.
Cyp.12
KHe ▲aHbamaanapbH 6ip-6ipimEn Typalay KepeK.
Ac yinik MaiaaIbIbI Heri3ri Kypblfba opHaTy
ECKEPTY
KapaKaT any kayi6i!
Kate konlahy kapaKaT any KayniH Tydbipybl MymKiH.
KepeK-kaPaKtbl JKeTeK TOKtaFaHda KHe Kypblfbl WbIfapblFaHda faHa eHri3yre XHe WbIfapbln anyfa 6oJaBl.
- Ac yinik MaandaafbIWTbI cypETTE KOpceTIInReHdE 2-KeTeKKe KObIHbI3.
Cyp. 13
- Ac yinik MaindanaftbI TeMeH KapaBacbin, caFAT tiniH 6aftbIMeTipeJreHwe bpaHbi3.
Cyp. 14
Ac yinik Maandaafblwbl Heri3ri Kypblfba 6epik 6eKity KaKeT.
Heri3ri 6ackapy
BvI KepdEn ci3 Ka6DbIKTapdbI naHaJahyfa KaTbICTbI Heri3ri aKnapaTTapdbI 6ine anacbl3.
KbIJaMdbIK YcblHbICTapbl
OHTaIbI HAtnKeIepRe KOn KeTki3y YwIH XbIJaMdbIK YcBiHbICTapbIH naIdaHaHbIbI3.
Hycay: KypblfblHbH
KOMnIeKtauncBHa KaapyIriHi3 4
deHreJIi Hemece 7 deHreJIi
aHaMaIbI aXbIpaTKbIuNneH
Ka6DbIKTaJFaH. AtaMbIu NaJaIaNHy
KeHInDeI HcyckaybIKTa 4 deHreJIi
aHaMaIbI aXbIpaTKbIuKa apHaJFaH
KbIJaMdbIK YCbIHbICTapbl KaKwa
iWiInDe bepinReH.
Pettey Paimdanahy
7 (4) Ac eHimdeepin Typay, yry Hemece Ta3apTy.
AinHaImaJIbKeckiW DnCK
YinkeJme Dnck, optaHa
Kapton KymaFbl-KybipfaH Kapton DnCKici
A3nKaKeKHeC DnCKici
| 3-4 | Ae eHimdepiH, MbIcIbI, |
| (2-3) | Kekehic Hemece Xemicti |
| aHaIMaIbI YKKIIW DnCKIHIn | |
| KemeriMeH iPI Hemece | |
| UaFbH TINIMdepre yry. |
Ac eHimdeepin ac ynilik MaJaIaFbIuPneH ehdey
ECKEPTY
KapaKaT any kayi6i!
AinhaBIn TypFaH JeTeKTeP, KypaIap HeMece KepeK-JkapaKTap JkapaKaT Tnri3yi MyMKiH.
ToTbpyHayacbHaKoI cyKaHbI3.
TanTaybIbI TeK HrpeHneHTepdi cany yuH naJaHaHbIHb3.
Kate KoliandaHy kapaKaT any kayinH Tydbipybl MyMKiH.
KepeK-JkapaKTbI TEK TOJIbIK KypacTbIPbIFaH Kynde NaJdaJaHaHbIHbI3.
KepeK-kaPaKTbI TeK e3iHe Tnicti Kymblc KyHnde naJaIaHbIbI3.
Hycay:Ac yniK MaJaIaFbIuTbI TeK dypbic opHaTbIFaH bIDbcnEh 6ipre naJdaIaNyFa 6oIaDbI.
Kehe: OHTaIbI HAtNKeIepre KOn
Ketki3y ywiH XiHiWke eHIMdepeDi 6yda
60bIHwa eHDeHi3.
- Ac eHimdepiH daibihDaHbI3.
Ipi ac eHimdeepin ToTbipy HayacbHa cany MymKIn 60nyi ywiH, Onapbl TiniMden TypaHbI3.
- Keniik ashaHbI po3etKaFa KaNFaHbI3.
- AHaMaJIbI aKbIpaTKblTbI YCbIHbIJFaH KblJaMdbIKKa KOJIbIbI3. Cyp. 15
- Ac eHimIn ToIbipy HayacbHa caIbI, TaTaybiWneH a3FaHTaN KbICbIM KOJaHbI apbl KblJXbITbIHbI3. Cyp. 16
-
ΘндeydiMbHaJkaFdaIapda aKaTahbI3:
-
6apIbIK ac eHimdepi eHdErlreHHen KeiH.
-
bIDbICTaBbl ac ΘHIMdepi ac yNlIK MaIdaIaNbIbIbIH IbIFbc CaHbIaybHa KbldAm KetKeHne.
-
AHaMaJIbI aKbIpaTKblTbI O/off
No3nCBAHcBA KaBbIHbI3.
KpybIFbI TOKtaFaHwa KytHi3.
7.Keiik aHaHbI cybpIn WbIfapbl3.
bldbictb6ocaty
Kehe:blbictbl,ac yniik MaandaftbIHTbl 1bIfapMa, hdey 6apbcihda bocatya 6oana.
1.AHaMaIbI aKbIpaTKblTbI O/off
No3nucBcIHa KOBIHbI3.
Kypblfbl TOkTaFaHwa KytHi3.
2. Kʌŋbɪntaɪn 6ɔcaTy Tʌŋmecɪn 6aʊbɪn, aɪhʌmʌbɪt Tʌŋkɑhɒtɪpeɪrɛhʊe KətepiHɪz.
Cyp. 17
-
bIbICTbI cafat tiinH 6aftbImeH 6ypan WbIFapbIHb3.
Cyp. 18 -
bIDbICTbI 6OcatbIHbI3.
Ac yinik MaiaaIaftbIHTbl 1yifapy
ECKEPTY
Kapakat any kayi6i!
Kate konlahy kapaKaT any kayinH Tydbipybl MymKiH.
KepeK-kaPaKtbl JkTeK TOKtaFaHda XaHE Kypblfbl WbIFapblFaHda fHa eHri3yre XaHe WbIFapbln anyFa 6oIaBl.
- Ac yinik MaandaafbIUtbI cafAT tiinih 6aftbHa KapcbI 6ocfaHwa bypahbl3.
Cyp. 19
- Ac yinik MaandaafbIHTbI Heri3ri KypblfdaH sbIFapbIHb3.
Cyp. 20
Ac yHnik MaJaIaNafbIuTbI 6eJIweKTey
ECKEPTY
Kecy kayiö!
MaJdaIaFbIw DnCKiInepDIn nbIwaFbI MeH XneKTepi OTKip.
MaJdaIaFbIw DnCKiInepdi TeK 6yHipiHeH YcTaHbI3.
EwJkaDaa eTkip nbIwaK neH KHeKTepRe JkalaH KOImeH TImMeHi3.
- KaKaNaKtBi caFat tiHin 6aFbITbHa KapcbI 6ypaHbl3.
Cyp. 21
KHe aHbamaIapbIH 6ip6ipimeh Typaay KepeK. - KaKaNaKTbI aJIbI TaCTaHbI3.
Cyp. 22
3.ДиCK yCTaFbIbH 6iNirHeH yCTan, MaДаJIaFbIw DnCKIMeH 6ipre KOpnyctAh 6bIFapbIHbl3.
Cyp. 23 - MaДанafblI W dNcKiHi KHeRiHeH yCTan 7bIFapblHbI3.
Cyp. 24
Kehe: KaIbIKTap Keyin KaIMaybl ywiH, 6apIbIK 6oJIkTePdi JyMbIC aKaTaNfAH coH 6ipDeH ta3aJAN IbIFbIHbI3.
Ta3aay JxHe KyTy
Ka6dbIKTapdbIH y3ak yaKbIT 60nbl Dypbc Kbl3MeT etyi ywiH, Onapfa TnaHaKTbl KYTIM MeH Ta3aJIbIK KaKeT.
blbic kyy MaunHaCbHda Kyyfa JapaMdbIbIfbl
blbic kyy MaunHaCbHda Ka Kypamdac 6eJIkTepei Ta3aayFa 6oNaTbIHbH 6iIN anbHbI3.
HA3AP AYДAPbIHbI3!
Ke6ip 6oJIkTepeIbIbc Kyy MaunHacbIHda Ta3aJay Ke3iHde 3aKbIMdAnybl MyMKiH.
TeKaHa KaapaMdbI 6oJIkTepdi bIDbc Kyy MaunHacbIHda Ta3aJahbI3.
TeK cyIbI 60^ 7aMaacbHaH KOFapbI TEMpepaTpaFa DeiH KbIbITNaTbIH 6aFdApIaMaIapDbI NaIdaIaNbIHbI3.
- Пл actнкьолikтердыдьс куу MaшинacblHa 6eKITneH3.
blbic-aK Kyy MaunHaCbHdTa3aayFa KaapamDbI:
Kopnyc
KaKnaK
TanTaybIw
NCKYCTaFbIuBbl

blbic-aK Kyy MaunHacbHa Ta3aayFa Kapamcbl3: MandaIaNfBllN DnckiJeP

Ta3aJafbIsh KypaJIap
KepeK-JkapaK ywiH KaT Ta3aIaNfblW KypanDap JkapamDbI eKeHdiRiH 6iin aJIbIHbl3.
HA3AP AYДAPbIHbI3!
MaTepeHaIbIK 3aJaI TyDbIpy Kayni 6ap. KApamcbl3 Ta3aIaNfblw KypaImeH Ta3aJAHFaH HeMece TniciHwe Ta3aJAHbAfH KepeK-JkapA K3aKbIMdJIybl MyMKIn.
KypambHda cnpT Hemece aIKoRnl6ap Ta3aJay KypaIapbH naJaIaHaBbI3.
ΘTkip, yWtblk Hemece MeTaIbI 3aTTapbl naJaIaNbHaHbI3.
EwkaHdaKbipfbIuWy6epeKTeepi Hemece Ta3aIaNbIu KypaIapDbI naIdaIah6aHbI3.
Ac yinik maiandaiaftbI Ta3anay
ECKEPTY
Kecy kayişi!
MaДанafblI W DnCKiInepDIn nbIaFbI MeH XneKTePi OTKip.
MaJdaIaFbIw DnCKiInepDi TeK 6yHipHeH YcTaHbI3.
Ew JaaJaTa oTkip nbIwaK neH KneKTepRe JkaJah KOJIMeH TImeHi3.
- Maɪdanafblɪs Ṣnckiːepɒi cɪnti epɪtɪndicɪmeH XəHe KʌymcaK ʌy6epekneH tə3aɪaHbɪz.
- Baplbyk 6aca 6eJWeKTepei ciTt iepitHicimEn XHe KymcaK WybepeKeH HeMece bICKbIuNeH Ta3aHaB13.
Kehe: C6i3 cnaKtbl eHIMdeepdi
eHderen Ke3de, nlaactNK 6eJWeKTepe
6oJIbIn KeTyI MymKIn. BoarFaH
Keepepdi KymCaK Wy6epeKneH XHe TaFamDbIK EcIMdk MaBbHbN 6ipHeWe TaMdbicbImeT a3aHaHbI3.
AkaayapdbI JxOHO
KabTapbH 60MaBbI aKaynapbH e3 6eTIi3We JxHDei anacbl3. Myweep Kbi3MeTHe xaapnacy aNbHda aKaybIKbI JxOIO ywiH maiMeTTepdi NaJdaNaHbHbI3. Ocbinaa KaKeTcI 3 WbIFbIHapDbH aNdbH aJaacbl3.
$$ \left. \right.\left. \right.\left. \right.\left. \right.\left. \right.\left. \right.\left. \right.\left.\left.\left.\left.\left.\left.\left.\left.\left.\left.\left.\left.\left.\left.\left.\left.\left.\left.\left.\left.\left.\left.\left.\left.\left.\left.\left.\right.\right.\right.\right.\right.\right.\right.\right.\right.\right.\right.\right.\right.\right.\right.\right.\right.\right.\right.\right.\right.\right.\right.\right.\right.\right.\right\rangle_ {0} ^ {1} = 0, 0, 0, 0, 0, 0, 0, 0, 0, 0, 0, 0, 0, 0, 0, 0, 0, 0, 0, 0, 0, 0, 0, 0, 0, 0, 0, 0, 0, 0, 0, 0, 0, 0, $$
"dujuaillabIjAII 1sks
ddoo161
p|sawXlUg,d|Jgall
.UG
"duJg cbiill" 162
.01
- do all g do biell slj x1 jao
Jgoo jIJIaI
aaggl
JLJI
.
1j
Ugso Lc aol bj li s
.
2
jIJI JJ Sic dJcJo Ue Lc lo
.10 1
Jg lalall
Jlgo
auiJ
1
Jol
2
aoo dui jdoai sbc
3
1.
- U
3..g.
- c u
jIJI
jg. jg g ouc no aq
3..g
- c u
| ### | ### | ### | ### |
| ### | ### | ### | ### |
| ### | ### | ### | ### |
| ### | ### | ### | ### |
| ### | ### | ### | ### |
| ### | ### | ### | ### |
| ### | ### | ### | ### |
| ### | ### | ### | ### |
| ### | ### | ### | ### |
| ### | ### | ### | ### |
| ### | ### | ### | ### |
$$ \begin{array}{c} \dot {\cup} \quad \cup \quad \ddot {a c l} \omega \cup \cup \text {l o c} \quad \dot {\cup} \quad \text {l o g} \quad \cup \ . \quad \ddot {g} \quad \ddot {u} \quad \ddot {u} \end{array} $$
5
$$ 4. \cup \overline {{\cup}} \overline {{\cup}} \overline {{\cup}} \left. \right.\left. \right.\left. \right.\left. \right.\left. \right.\left. \right.\left. \right.\left. \right.\left. \right.\left. \right.\left. \right.\left. \right.\left. \right.\left. \right.\left. \right.\left. \right.\left. \right.\left. \right.\left. \right.\left. \right.\left. \right.\left. \right.\left. \right.\left. \right.\left. \right.\left. \right.\left. \right.\left. \right.\left. \right.\left. \right.\left. \right.\left. \right.\left.\left. 4 . U S L O L O L O L O L O L O L O L O L O L O L O L O L O L O L O L O L O L O L O L O L O L O L O L O L O L O L O L O L O L O L O L O L O L O L O L O L O L O L O L O L O L O L O L O L O L O L O L O L O L O L D I F T E R M A C H I N I T I E D E P T R I E D E P T R I E D E P T R I E D E P T R I E D E P T R I E D E P T R I E D E P T R I E D E P T R I E D E P T R I E D E P T R I E D E P T R I E D E P T R I E D E P T R I E D E P T R I E D E P T R I G H B A C K \right| ^ {2} - 1 0 0 0 0 0 0 0 0 0 0 0 0 0 0 0 0 0 0 0 0 0 0 0 0 0 0 0 0 0 0 0 0 0 0 0 0 0 0 0 0 0 0 0 0 0 0 0 0 0 0 1 \right| ^ {2} - 1 0 0 0 0 0 0 0 0 0 0 0 0 0 0 0 0 0 0 0 0 0 0 0 0 0 0 0 0 0 0 $$
2|gJl
$$ \dot {\mu} \dot {u} \dot {u} \mu \dot {u} $$
jg
4|gJl
$$ 5. 2 \dot {9} \mathrm {s l g} \cup \dot {0} \dot {0} \mathrm {l l} \mu \mathrm {j} \dot {\mathrm {j}} \mathrm {j j} _ {\rho \mathrm {t u}} \mathrm {l c} \frac {\mathrm {b} \dot {\mathrm {s}} \dot {\mathrm {o}} \mathrm {o l}}{\mu \omega} $$
$$ \begin{array}{c} \dot {u} \dot {1} \quad \cup \cup \omega \dot {\lambda} \mid \cup \mid \text {a g l j a l l} \varepsilon \mid \dot {\lambda} \mid \ \text {g o l l} \quad \dot {\zeta} \quad \text {g w s i t 1}. \end{array} $$
6
$$ \leftarrow \ddot {o} j g \varphi $$
$$ \downharpoonright \downharpoonright \downharpoonright \downharpoonright \downharpoonright \downharpoonright \downharpoonright $$
$$ . d e l a g \cup \dot {a} w \dot {8} | \cup | = \ddot {a} o l o l s i c $$
7
$$ \leftarrow \ddot {o} j g \varphi $$
$$ 6. \text {O J} \left{x, y, z \right} = \left{x, y, z \right} $$
$$ \left. \right.\left. \right.\left. \right.\left. \right.\left.\left.\left.\left.\left.\left.\left.\left.\left.\left.\left.\left.\left.\left.\left.\left.\left.\left.\left.\left.\left.\left.\left.\left.\left.\left.\left.\left.\left.\left.\right.\right.\right.\right.\right.\right.\right.\right.\right.\right.\right.\right.\right.\right.\right.\right.\right.\right.\right.\right.\right.\right.\right.\right.\right.\right.\right.\right.\right.\right. $$
$$ . \ddot {a} \dot {L} \dot {L} \dot {L} \dot {L} \dot {L} \dot {L} \dot {L} \dot {L} \dot {L} \dot {L} \dot {L} \dot {L} \dot {L} \dot {L} \dot {L} \dot {L} \dot {L} $$
$$ j \Delta \Delta g \Delta \Delta a _ {i} j \Delta \Delta a _ {j} j \Delta \Delta l o s i c $$
$$ \dot {g} \dot {o} g o \dot {s} i c \left[ \varphi \right] \left[ \varphi \right] \left[ \varphi \right] \left[ \varphi \right] \left[ \varphi \right] \left[ \varphi \right] $$
$$ . \cup \cup \cup \cup \cup \cup \cup \cup \cup \cup \cup \cup \cup \cup \cup \cup \cup \cup \cup \cup \cup \cup \cup \cup \cup \cup \cup \cup \cup \cup $$
:abdoog
$$ \dot {j} \in {j, j \in {j, j } } $$
$$ \dot {j} \dot {g} \dot {g} \dot {g} \dot {g} \dot {g} \dot {g} \dot {g} \dot {g} \dot {g} \dot {g} \dot {g} \dot {g} \dot {g} \dot {g} \dot {g} \dot {g} \dot {g} \dot {g} \dot {g} \dot {g} \dot {f} $$
$$ \cup \cup \cup \cup \cup \cup \cup \cup \cup \cup \cup \cup \cup \cup \cup \cup \cup \cup \cup \cup \cup \cup \cup \cup \cup \cup \cup \cup \cup \cup \cup \cup \cup \cup $$
$$ 0 0 6 3 0 7 6 0. = 1 2 5 2 $$
$$ \ddot {a} \dot {a} \dot {a} \dot {a} \dot {a} \dot {a} \dot {a} \dot {a} \dot {a} \dot {a} \dot {a} \dot {a} $$
$$ \mu \dot {s} \omega $$
$$ ! \text {a g} \text {j} \text {i} \text {i} \text {i} \text {i} \text {i} \text {i} \text {i} \text {i} \text {i} \text {i} \text {i} \text {i} \text {i} \text {i} \text {i} \text {i} $$
$$ \dot {s} \leq s \omega \quad \text {g} \quad \text {g} \quad \text {g} \quad \text {g} \quad \text {g} \quad \text {g} \quad \text {g} \quad \text {g} \quad \text {g} \quad \text {g} \quad \text {g} \quad \text {g} \quad \text {g} \quad \text {g} \quad \text {g} \dots $$
$$ . \ddot {o} \downarrow \dot {a} g \dot {a} g $$
$$ \dot {J} \omega \left. \right.\left. \right.\left. \right.\left. \right.\left. \right.\left. \right.\left. \right.\left. \right.\left. \right.\left. \right.\left. \right.\left. \right.\left. \right.\left. \right.\left. \right.\left. \right.\left. \right.\left. \right.\left. \right.\left. \right.\left. \right.\left. \right.\left. \right.\left.\left.\left.\left.\left.\left.\left.\left.\left.\left.\left. J _ {1} ^ {\prime} = 0, 0, 0, 0, 0, 0, 0, 0, 0, 0, 0, 0, 0, 0, 0, 0, 0, 0, 0, 0, 0, 0, 0, 0, 0, 0, 0, 0, 0, 0, 0, 0, 0, 0, J _ {1} ^ {\prime} = 0, 0, 0, 0, 0, 0, 0, 0, 0, 0, 0, 0, 0, 0, 0, 0, 0, 0, 0, 0, 0, 0, 0, 0, 0, 0, 0, 0, 0, 0 \right. = 0, 0, 0, 0, 0, 0, 0, 0, 0, 0, 0, 0, 0, 0 \right. = 0, 0, 0, 0, 0, 0, 0, 0 \right. = 0, 0, 0, 0 \right. = 0, 0, 0 \right. = 0, 0 \right. = \right|\right|\right|\right|\right| $$
$$ J U b x i $$
$$ \ddot {o} \dot {a} \dot {l} \dot {a} \dot {l} \dot {a} \dot {l} g \dot {n} \dot {s} \dot {k} \dot {w} \dot {u} \dot {u} \dot {a} \dot {l} \dot {x} $$
$$ . l ^ {\prime} \dot {w} \dot {w} \dot {w} \dot {w} \dot {w} \dot {w} \dot {w} $$
$$ \mu \dot {s} \omega $$
$$ ! \ddot {a} \dot {b} \omega \dot {s} \dot {1} j b \dot {s} $$
$$ \dot {1} \dot {1} \dot {2} \omega \omega \omega \omega \omega \omega \omega \omega \omega \omega \omega \omega \omega \omega \omega \omega \omega \omega \omega \omega \omega \omega \omega \omega \omega \omega $$
$$ 1 \text {s l a i l} \left. \right.\left. \right.\left. \right.\left. \right.\left. \right.\left. \right.\left. \right.\left. \right.\left. \right.\left. \right.\left. \right.\left. \right.\left. \right.\left. \right.\left. \right.\left. \right.\left. \right.\left. \right.\left. \right.\left. \right.\left. \right.\left. \right.\left. \right.\left. \right.\left. \right.\left. \right.\left. \right.\left. \right.\left. \right.\left. \right.\left. \right.\left. \right.\left. \right.\left. \right. j _ {j _ {j _ {j _ {j _ {j _ {j _ {j _ {j _ {j _ {j _ {j _ {j _ {j _ {j _ {j _ {j _ {j _ {j _ {j _ {j _ {j _ {j _ {j _ {j _ {j _ {j _ {j _ {j _ {j _ {j _ {j _ {j _ {j _ {j}}}}}}}}}}}}}}}}}}}}}}}}}}}}}}}}}} $$
$$ \begin{array}{c} \vdots \ \vdots \ \vdots \ \vdots \ \vdots \ \vdots \ \vdots \ \vdots \ \vdots \ \vdots \ \vdots \ \vdots \ \vdots \ \vdots \ \vdots \ \vdots \ \vdots \ \vdots \ \vdots \ \vdots \ \vdots \ \vdots \ \vdots \ \vdots \ \vdots \ \vdots \end{array} _ {1 s 1}, $$
$$ . \text {山} $$
$$ 1. g \varpi L $$
$$ \begin{array}{c} \ddot {w} \dot {w} \ddot {x} | \downarrow \downarrow \downarrow \downarrow \ \dot {g} \dot {g} \dot {g} \dot {g} \dot {g} \dot {g} \dot {g} \dot {g} \dot {g} \dot {g} \dot {g} \dot {g} \dot {g} \dot {g} \dot {g} \dot {g} \dot {g} \dot {g} \dot {g} \dot {g} \dot {g}. \end{array} $$
$$ 2. \dot {2} \dot {9} \vert \mathrm {J} $$
$$ . \ddot {G} \omega \omega \dot {\cup} \cup \cup \cup \cup \cup \cup \cup \cup \cup \cup \cup \cup \cup $$
3
$$ \leftarrow \ddot {o} j g \varphi $$
$$ 3. \underline {{\omega}} \omega \underline {{\omega}} $$
4
$$ \leftarrow \ddot {o} j g \dot {\varphi} $$
Thank you for buying a Bosch Home Appliance!
Register your new device on MyBosch now and profit directly from:
- Expert tips & tricks for your appliance
- Warranty extension options
- Discounts for accessories & spare-parts
- Digital manual and all appliance data at hand
- Easy access to Bosch Home Appliances Service
Free and easy registration - also on mobile phones:
www.bosch-home.com/welcome

Looking for help? You'll find it here.
Expert advice for your Bosch home appliances, help with problems or a repair from Bosch experts.
Find out everything about the many ways Bosch can support you:
www.bosch-home.com/service
Contact data of all countries are listed in the attached service directory.

8001159223 (991126)
de, en, fr, it, nl, da, no, sv, fi, es, pt, el, tr, uk, ru, kk, ar