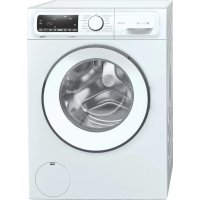
CWD14C00 - Washing machine CONSTRUCTA - Free user manual and instructions
Find the device manual for free CWD14C00 CONSTRUCTA in PDF.
| Product type | Washer-dryer |
| Brand | Constructa |
| Model | CWD14C00 |
| Dimensions (H x W x D) | 85 cm x 60 cm x 55 cm |
| Net weight | 75 kg |
| Power supply | 230 V, 50 Hz, 10 A |
| Washing capacity | 7 kg |
| Drying capacity | 4 kg |
| Maximum spin speed | 1400 rpm |
| Energy class | E (washing) / D (drying) |
| Loading type | Front |
| Washing programs | Cotton, Synthetics, Delicates, Wool, Quick, etc. |
| Additional functions | Delayed start, Condensation drying, Anti-crease |
| Maintenance and cleaning | Clean the drain filter, detergent drawer, and door seal regularly |
| Safety features | Child safety, Water leak protection, Overflow protection |
| Spare parts and repairability | Base cover, front panel, door, door seal, hinge: user-replaceable with appropriate tools |
| General information | Manual available in 22 languages, online support |
Frequently Asked Questions - CWD14C00 CONSTRUCTA
User questions about CWD14C00 CONSTRUCTA
0 question about this device. Answer the ones you know or ask your own.
Ask a new question about this device
Download the instructions for your Washing machine in PDF format for free! Find your manual CWD14C00 - CONSTRUCTA and take your electronic device back in hand. On this page are published all the documents necessary for the use of your device. CWD14C00 by CONSTRUCTA.
USER MANUAL CWD14C00 CONSTRUCTA
4.1 CMraHa Ha Kanaka Ha OCHOBata 7
4.1.1 CbajHe Ha Kanaka Ha OCHOBaTa.. 7
4.1.2 MoHTpaHe Ha KaNaka Ha OCHOBaTa. 7
4.2 CmHa Ha npednnahen 8
4.2.1 CbJIaHe Ha npednnaHenn 8
4.2.2 MoHTpaHHe Ha npednnaHn 8
4.3 CmHa Ha BpaTaTa 9
4.3.1 ⅢBaXdaHe Ha BpaTaTa... 9
4.3.2 MoHTnpaHe Ha BpaTata 9
4.4 CmHa Ha ynnbTheHnTo Ha BpaTata 10
4.4.1 CbAraHe Ha yNtBTHHeHTo Ha BpaTata 10
4.4.2 MoHTnpaHe Ha yIbTHHeHMeTo Ha BpTaTAt 11
4.5 CmHa Ha nHaTaHa BpaTata 12
4.5.1 CbJIaHe Ha nHaTaHa BpaTaTa 12
4.5.2 MoHTnpaHe Ha naHTaTa Ha BpaTata 12
OTHOCHO To3n DokyMeHT
1.1 Baxha nHΦopMaζη
1.1.1 Uen
TeHc cBbETn 3a pEmOH T NOMarat Ha Ntpe6nTEnla DpemOHtnpa Cam ypeiB C bOTBeTCTBnC pernameHTa 3a ekONOrOcb6paHO npoeKtnpaHe Ha ypeiNe (OT03.2021 r.).
Te cbdpkataHfOpmaIaKaJa cMaHeTpeOnpeIeHn pe3epBn qactN, BKNOH-TeNHO npdynpckdHn n pncKOBe.
Ako IMATE HRAKAKINBbnpoC,MOJIa CbPkeTe Ce c HAUNOOTDeN 3a OBCNYKBHe Ha KIMENTH. Hne HOCIM OTTOBOPHOCT 3a UETn, CAMO AKO CbBeNTe 3a peMOHT ca cna3eHN npabInHo.
1.2 06aCHeHne Ha cHMBOJInTe
1.2.1 HbHa onaCHOCT
IpeynpeintenHnBaCe cBcTOrT OT CmBOJ nCnHaHa Dyma.CnrHaHaTa yMa noka3Ba cepno3HOCTTA Ha onaCHOCTTA.
CIMBOHTE3aONACHOCTCa CIMBOHNUH N3o6paXeHNA, KOHTO DaBaT INDINKAUHA 3a BnDa ONACHOCT.
BTo3n DOKyMeHCTe H3N013BaT CneHHTe CMBOIN 3a OnaCHOCT:
4.1 CMRAHa Ha Kanaka Ha OCHOBaTa
M3nCKBaHe:
YpeBbTe H3KnIOueHOT 3axpaHBaHeTo.
YpeBt E n3KIOHcH OT BODOCHA6dITENHATA MpeXa.
4.1.1 CbanaHe Ha kanaka Ha ochobata
1.ИЗвадете Маркуca 3a ИТочbaHe.
2.CbaneKanaka3aH3TOUbaHe.
3.CbaneTe Kanaka Ha ochoBaTa.
- Otkaute Mapkya.
5.CBANE BHTOBETE.
6.Ocbo6oJeTe KpeKHeHnEneMeHT. - CbaJeTe kanaKa Ha ochoBaTa.
4.1.2 MoHTnpaHe Ha kanaka Ha oCHOBaTa
MOnTnpaIeB06paTeHpeI.

PemOH
4.2 CmHa Ha npedHnaHn
N3nCKBaHe:
YpeIbTe n3KIOueHOT 3aXpaHbHaHeTo.
YpeBt E n3KIOUeH OT BOOChA6DnTeNHaT MpeXa.
YekmeKeTo 3a nepinHn npenapaTe cBaIeHO.
ΦacadHnT nHaEn e CBaneH.
BpataTa e cBaneha.
YnnbTHHeHnETo Ha BpaTaTa e CBAJeHO.
KanaKbT Ha OCHOBatae CBAJEH.→7
4.2.1 CbajHe Ha npedHn paHen
BHMMATEHNO
Octpn p6oBe Ha Kopnyca!
HapaHbAHnO Tnp3BaHe
Hocete npedna3n pbkauu.

1.
BHIMATEHIO
Pnck ot nadaun yactn nopadn pa3xa6eHn BnHTOBe!
HapaHbAHe npaDn nadaun hactn.
3akpenete KOMnoHeHTa, Taka Ye da He naHe.

BHIMAHHE!
Pnck OT naaun qactn nopadn pa3xa6eHN BHTOBe!
NobpdaHa npyTu cactn Ha ypeDa NIN B DOMa H KIneHTA, HAp. 1DhTOO.
3akpenete KOMnoHeHTa, Taka Ye da He naHe.
OTCTpaHETe BHTOBeB CnEDHmpeD(1-2-3-4).

2.Canete npednnaHn.
4.2.2 MoHTnpaHe Ha nppeHnnaHn
MoHTnpaTBeB6paTeHpeI.
PemOH
4.3 CmHa Ha BpaTaTa
M3nCKBaHe:
YpeBbTe H3KnIOueHOT 3axpaHBAHeTo.
YpeBtE n3KNIOueH OT BOOCHa6nTENHa TpeKa.
4.3.1 N3BaxKaHe Ha BpTaTa
1.CBaneTe DbTa BnHTa(1).
2.OcbobodeTe KpeenexHnTe enemeHTn C nnoCKa OTBepTKa (2).
4.3.2 MoThnPaHe Ha BpTaTAt
MOHTnpaTBeBbpaTeHpeI.

PemOH
4.4 CmHa Ha yynbTheHneTo Ha BpaTaTa
BHIMATEJIHO
Octpn p6oBe Ha Kopnycal
HapaHbAHmO Tnp3BaHe
Hocete npedna3n pbkauu.
BHIMATEHNO
Pnck OT nadaun yactn nopadpa3xna6eHN BnHTOBe!
HapaHbHe npaPi nadaun Yactn.
3akpenete KOMHOENTA, TAKA He da He naHe.
BHHIMAHHE!
Pnck OT nadaun yactn nopadpa3xa6eHN BnHTOBe!
NoBpeHa Hpyn HAcTn Ha ypea nn B Doma Ha KHeHTa, HAp. dbHO
TO.
3akpenete KOmmnoeHTa, Taka He da He naHe.
N3nCKBaHe:
YpeBTe ENKIOUeHOT3xpaHbAHeTO.
YpeBTe H3KIOUeH OT BOOChA6DnTeINHaT MpeJka.
YekmeJeKeTo 3a nepHnHn npenapTa e cBaaneHO.
BpataTa e cBanHe.
Kanakyt Ha ochohota e caneH.7
4.4.1 CbAJIrHe Ha yIeBTHHeHTo Ha BpTaTa
1.

BHIMATEENHO
Pnck OT nadaaun yactn nopadn pa3xna6eHN BnHTOBe!
HapaHbAhe npaDn npaun Yactn.
3akpenTe KOMnoHEnTa, Taka Ye da He naDHe.

BHUMAHNEI
Pnck ot nadaaun yactn nopadpa3xaabeHN BnHTOBe!
PobpeHa npynn Hn Ha ypeHa B Doma Ha KIneHTa, HAp.
3akpenete KOMnoHeHTa, Taka ye da He naHe.
OTctpaHETe BHTOBeB CnEHNp eD(1-2-3-4).
2.Pa3xna6eTe BnHTOBTe OT3aHa ypeDa.
3.Cbane rophma pa6oTe HnOT.
4.Ocbo6oTe KpenexHnTe enemHTn Ha pacaHnnaHn otrope n OTJrCHata CTpaHa.
5.Canete facadnnahen.
6. Cbane TaBpkaa Ha OCBteHneHMeTo Ha 6apa6aHa oTrope.
7. Paxna6e BnHTOBe Ha Kopnyca Ha da3aTopa.
8.
BHIMAHHEI
PnckOT nobpeDeHa nobbpxHocT!
NoBpXHOCTa HA ypeA moKe ze ca Heapacka, aKo n3nONbATE HennpaHIN INCHPTyEMTN.
3nonBaTe cAmo nactMacOBn HCTpyMeHTn 3a noDMHa
Ha oBtTgAun npbCTeH.
CbaIeTe 08Tgauu npbcten OT yNtBTHHeHnETo C nactMacOB uHCTpyMeHT.
9.Ocbo6oTe ynnbTHHeHMeTo Ha BpTaT O TnpEHNnHaen.
10.Ocbo6oTe KOHeKTopa Ha Ka6eHa ot KInOuaIkaTHa BpaTaT,

PemOH
- Cbane npednnaen.
12.OcbooTe BCnK CbeHNHTeHN enMeHTn 3a MapkyH.

13.ИЗБАДЕУньТсЕНМЕТОHaВРаТа.
4.4.2 MoHTnpaHe Ha yynbTHHeHnETo Ha BpaTaTa
MoHTnpaTBe BoPaTeH peI.
MoHTnpaIteB06paTeHpeI.
4.2 Udskifting at frontpanel
Preindstilling:
Sorg for at sikre componenten mod at falde ned.
1 Concerning this document. 58
1.1 Important information 58
1.1.1 Purpose 58
1.2 Explanation of symbols 58
1.2.1 Danger levels.. 58
1.2.2 Hazard symbols 58
1.2.3 Structure of the warnings 59
1.2.4 General symbols 59
Safety 60
2.1 General Safety instructions 60
2.1.1 All domestic appliances 60
Tools and aids. 61
Repair 62
4.1 Replacing base cover 62
4.1.1 Removing base cover 62
4.1.2 Installing base cover 62
4.2 Replacing front panel 63
4.2.1 Removing front panel 63
4.2.2 Installing front panel 63
4.4 Replacing door seal.. 65
Concerning this document
1.1 Important information
1.1.1 Purpose
These repair hints support consumer to repair appliances by himself according to the applicable eco-design regulation (as of 03/2021).
They contain information how to exchange defined spare parts including warnings and risks.
In case of questions, please contact our customer service. We will only be liable for damages if the repair hints have been followed properly.
1.2 Explanation of symbols
1.2.1 Danger levels
The warning levels consist of a symbol and a signal word. The signal word indicates the severity of the danger.
Table 1: Danger levels
| Warning level Meaning | |
| Danger | Non-observation of the warning message will result in death or serious injuries. |
| Warning | Non-observation of the warning message could result in death or serious injuries. |
| Caution | Non-observation of the warning message could result in minor injuries. |
| Notice | Non-observation of the warning message could result in damage to property. |
1.2.2 Hazard symbols
Hazard symbols are symbolic representations which give an indication of the kind of danger.
The following hazard symbols are used in this document:
| Hazard symbol Meaning | |
| ! | General warning message |
| Danger from electrical voltage | |
| Risk of explosion | |
| Danger of cuts | |
| Danger of crushing |
Concerning this document
| Hazard symbol Meaning | |
| Danger from hot surfaces | |
| Danger from strong magnetic field | |
| Danger from non-ionizing radiation |
Table 2: Hazard symbols
1.2.3 Structure of the warnings
Warnings in this document have a standardised appearance and a standardised structure.
Danger
Type and source of danger!
Possible consequences of ignoring the danger / warning.
Measures and prohibitions for preventing the danger.
The following example shows a warning that warns against electric shock due to live parts. The measure for avoiding the danger is mentioned.
Danger
Risk of electric shock due to live parts!
Death by electrocution
- Disconnect appliances from electrical supply at least 60 seconds before starting repairs.
1.2.4 General symbols
The following general symbols are used in this document:
| Gen. symbol Meaning | |
| 1 | Identification of a special tip (text and/or graphic) |
| i | Identification of a simple tip (only text) |
| Identification of a link to a video tutorial |
Table 3: General symbols
| Gen. symbol Meaning | |
| Identification of required tools | |
| Identification of required preconditions | |
| Identification of a condition (if ..., then ...) | |
| Identification of a result | |
| [Start] Identification of a key or button | |
| [00123456] Identification of a material number | |
| Status Identification of displayed text / window(in the appliance's display) | |
Safety
2.1 General Safety instructions
2.1.1 All domestic appliances
Risk of electric shock due to live parts!
Errors by repairs involving electrical components can lead to electrical shock!
- Disconnect the appliance from the mains for at least 60 seconds before starting work.
After the repair have a safety test according VDE 0701 or country-specific regulations performed.
Risk of injury from sharp edges!
Wear protective gloves.
Risk of crushing during repair, maintenance, troubleshooting and service due to heavy and moving components
Wear protective shoes.
- Secure heavy components from falling down.
- Do not stick body parts into moving components.
Risk to the appliance's safety / function!
Only use original spare parts.
Risk of damage to electrostatically sensitive components (ESDs)!
- Do not touch the modules, including connections and conductor paths.

Tools and aids
| Designation Details Images | ||
| Auxiliary tool [15000155] | Tool for loosening out of plastic parts | |
| Screwdriver Torx T20 with bore hole [00340764] | 100 mm, for screws with safety pin | |
| Torque spanner [15000441] | Torque spanner 20 - 100 Nm | |
| Slot screwdriver [00340854] | Blade 3.5 mm x 0.6 mm x 100 mm, Protective Insulation 1000 V AC | |
| Slot screwdriver [00340855] | Blade 5.5 mm x 1.0 mm x 125 mm, Protective Insulation 1000 V AC | |
| Needle-nose pliers, angled pattern [00341269] | Length 200 mm | |
| Side-cutting pliers [00342182] | Length: 200 mm | |
| Designation Details Images | ||
| Combination wrench [00340811] | Wrench size 10°mm, M6 | |
| Combination wrench [00340814] | Wrench size 13°mm, M8 | |
| Combination wrench [00340817] | Wrench size 17 mm, M10 | |
| Combination wrench [15000459] | Wrench size 16°mm, M10 | |

Repair
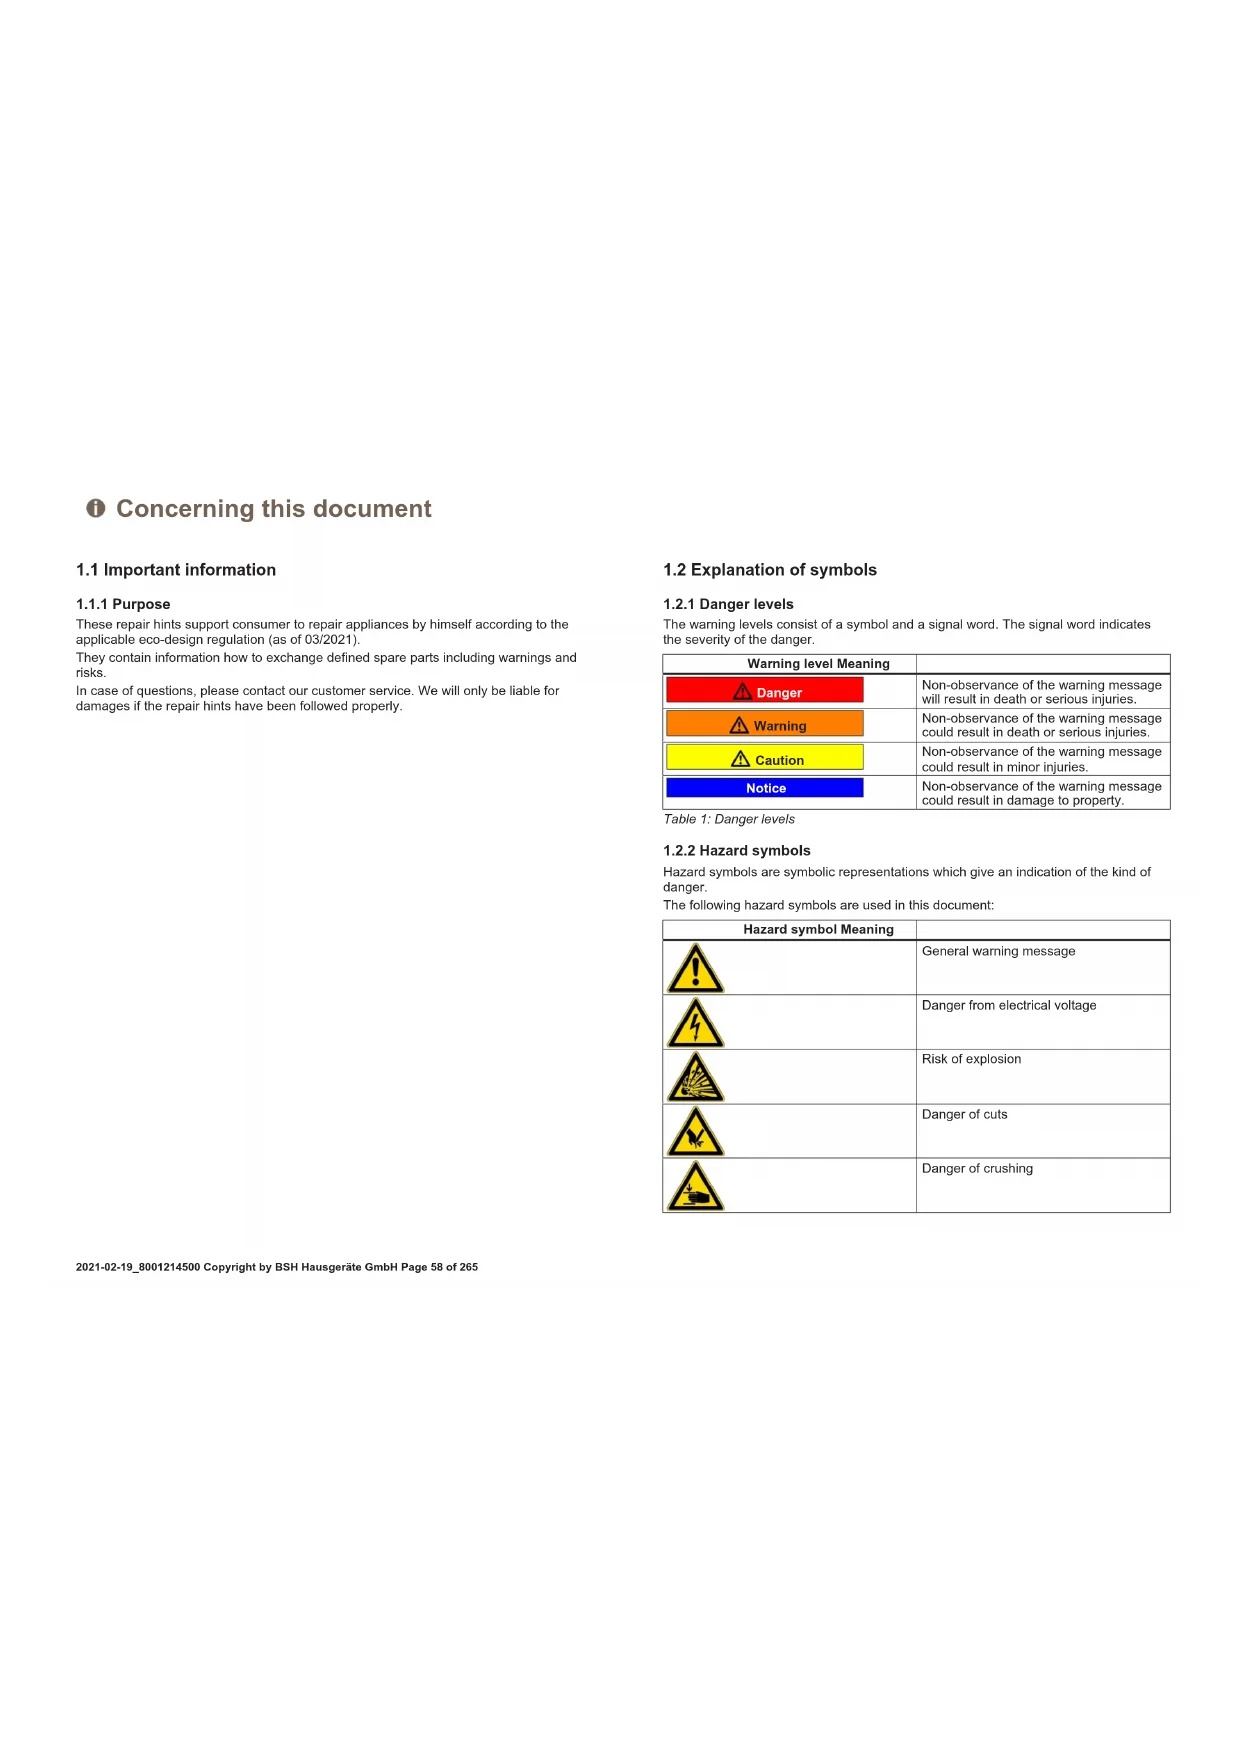
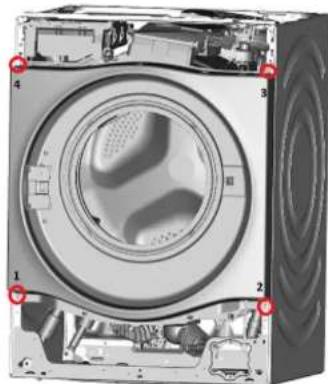
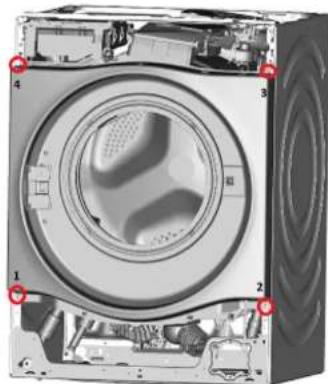
4.1 Replacing base cover
Prerequisite:
Appliance is disconnected from power supply.
Appliance is disconnected from water supply.
4.1.1 Removing base cover
- Remove drain hose.
- Remove drain cover.
- Remove base cover.
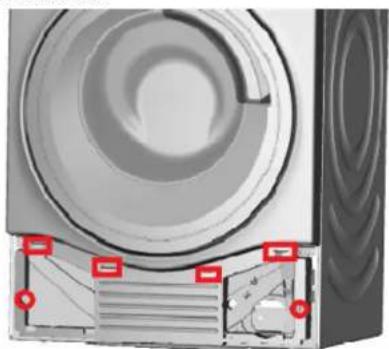
- Clip out hose.
- Remove screws.
- Release catch element.
- Remove base cover.
4.1.2 Installing base cover
Install in reverse order.

Repair
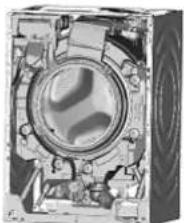
4.2 Replacing front panel
Prerequisite:
Appliance is disconnected from power supply.
Appliance is disconnected from water supply.
Detergent drawer has been removed.
Fascia panel has been removed.
Door has been removed.
Door seal has been removed.
Base cover has been removed. Page 62
4.2.1 Removing front panel
Caution
Sharp housing edges!
Cut injuries
Wear protective gloves.

1.
Caution
Risk of falling parts due to released screws!
Injury because of falling parts
Secure component from falling down.

Notice
Risk of falling parts due to released screws!
Damage to other parts of the appliance or at customers home e.g.
topm. Secure component from falling down.
Remove screws from in following order (1-2-3-4).
- Remove front panel.
4.2.2 Installing front panel
Install in reverse order.

Repair
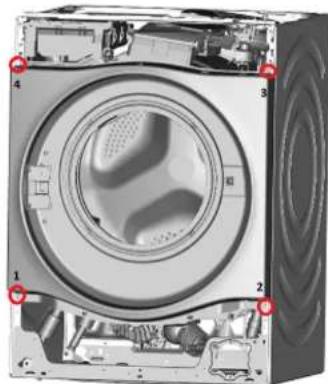
4.3 Replacing door
Prerequisite:
Appliance is disconnected from power supply.
Appliance is disconnected from water supply.
4.3.1 Removing door
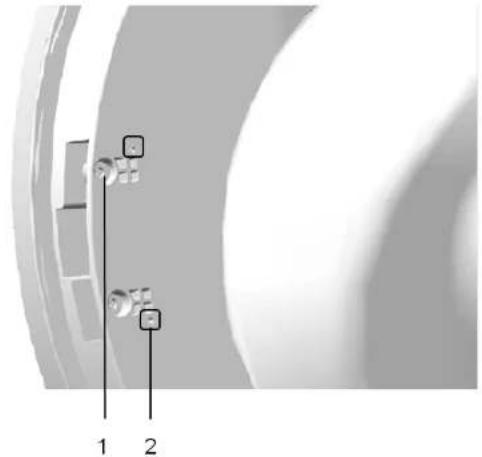
- Remove two screws (1).
- Release catch elements with slotted screwdriver (2).
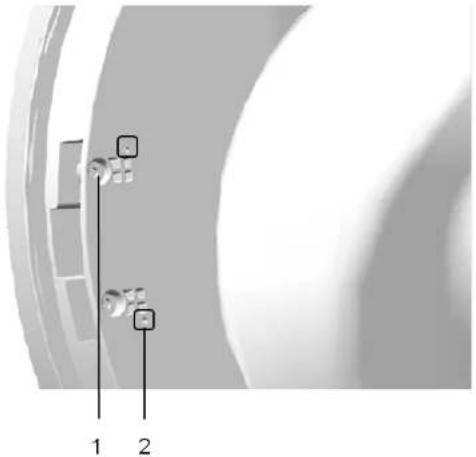
Install in reverse order.

Repair
4.4 Replacing door seal


Sharp housing edges!
Cut injuries
Wear protective gloves.


Risk of falling parts due to released screws!
Injury because of falling parts.
Secure component from falling down.

Risk of falling parts due to released screws!
Damage to other parts of the appliance or at customers home e.g. bot
tom.
Secure component from falling down.
Prerequisite:
Appliance is disconnected from power supply.
Appliance is disconnected from water supply.
Detergent drawer has been removed.
Door has been removed.
Base cover removed. Page 62
4.4.1 Removing door seal
1.

Caution
Risk of falling parts due to released screws!
Injury because of falling parts.
Secure component from falling down.

Notice
Risk of falling parts due to released screws!
Damage to other parts of the appliance or at customers home e.g.
Secure component from falling down
Remove screws from in following order (1-2-3-4).
- Release screws at back of appliance.
- Remove worktop.
- Release catch elements of fascia panel at top and on right side.
- Remove fascia panel.
- Remove drum light holder at top.
- Release screws of dispenser housing.
8.

Notice
Risk of damaged surface!
Surface of appliance can be scratched by using wrong tools. Only use plastic tools to replace the tension ring.
Remove tension ring from gasket with a plastic tool
- Release door seal from front panel.
- Release cable connector from door lock.
- Remove front panel.

Repair
- Release all hose connections.
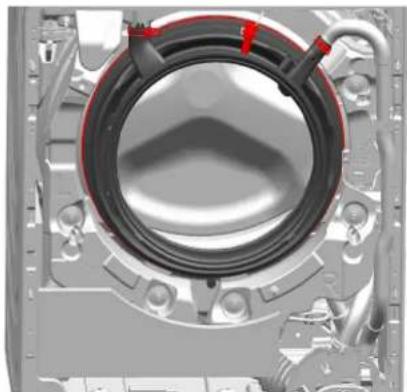
- Remove door seal.
Install in reverse order.

Repair
Appliance is disconnected from power supply.
Appliance is disconnected from water supply.
Detergent drawer has been removed.
Door has been removed.
Door seal has been removed.
Base cover removed. Page 62
Front panel has been removed.
- Remove two screws.
- Remove door hinge.

Install in reverse order.
Remonditeave - Kuivatiga pesumasin
1 Selle dokumendiga seoses 69
1.1 Tahtis teave 69
1.1.1 Eesmark 69
1.2 Sumbolite selgitus 69
1.2.1 Ohutased 69
1.2.2 Ohusumbolid 69
1.2.3 Hoiatuste struktuur 70
1.2.4 Üldised sumbolid 70
Ohutus 71
2.1 Uldised ohutusjuhised 71
2.1.1 Koki kodumasinad 71
Tabel 1: Ohutasedmed
1.2.2 Ohusumbolid
Mny avyicete TIOJovdc,ouMTpeiaqavopevwTov ouvdoewk KaT ovayuyuTw TAKETW.

EpyaIeia Kai BonOnmuata
m = 311 ;
PERIGO
m = 311
Risco deCHOque eltrico devidao a partes sob tensao!
- Remova o painei frontal.