BP 5 Home - Water pump Kärcher - Free user manual and instructions
Find the device manual for free BP 5 Home Kärcher in PDF.
User questions about BP 5 Home Kärcher
0 question about this device. Answer the ones you know or ask your own.
Ask a new question about this device
Download the instructions for your Water pump in PDF format for free! Find your manual BP 5 Home - Kärcher and take your electronic device back in hand. On this page are published all the documents necessary for the use of your device. BP 5 Home by Kärcher.
USER MANUAL BP 5 Home Kärcher
Maintenance and Care EN 2
Transport EN 2
Storage EN 2
Special accessories EN 3
Troubleshooting EN 4
Technical specifications EN 5
General information
Dear Customer.

Please read and comply with these original operating instructions and the enclosed safety instructions. Proceed ac
cordingly. Keep both booklets for future reference or subsequent owners.
Proper use
This appliance has been designed for use in private households and is not intended for commercial use.
The manufacturer is not responsible for any damages that may occur on account of improper use or wrong operations.
The device is meant for use as house water tank. This unit is only to be used indoors.
Note
The pump is not suited for increasing the existing line pressure.
Approved fluids
Used water
Well water
Water source
Rain water
Water from swimming pool (provided the dosing of additives is proper)
Environmental protection

The packaging material can be recycled. Please do not place the packaging into the ordinary refuse for disposal, but arrange for the proper recycling.

Old appliances contain valuable materials that can be recycled. Please arrange for the proper recycling of old appliances. Please dispose your old appliances using appropriate colloc
tion systems.
Notes about the ingredients (REACH)
You will find current information about the ingredients at:
www.kaercher.com/REACH
Warranty
The warranty terms published by the relevant sales company are applicable in each country. We will repair potential failures of your appliance within the warranty period free of charge, provided that such failure is caused by faulty material or defects in manufacturing. In the event of a warranty claim please contact your dealer or the nearest authorized Customer Service centre. Please submit the proof of purchase.
Operation
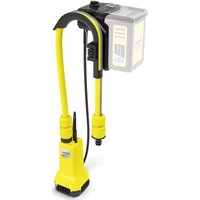
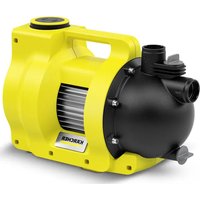
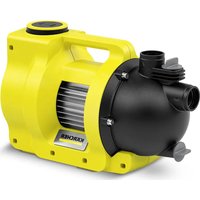
Description of the Appliance
Illustration A
1 Backflow valve
2 Connection adapter for pumps G1
3 Stopper
4 Connection G1(33.3mm) Suction pipe
5 Filling nozzle
6 Connection G1(33.3mm) Pressure pipe
7 Carrying handle
8 Power switch
9 Air valve (Schrader valve) with cap
10 Base with slotted hole for bolted connection
11 Pressure display
12 Drain screw
13 Power cord with plug
- only for BP 3 Home
Preparing the Appliance
Check max. air pressure in the storage tank prior to commissioning. If necessary, refill up to 2.0 bar with a commercially available air pump with the system switched off / zero-pressure state.
Secure device against slipping off (fix it with screws, if needed).
Remove the plug.
Screw the connection adapter in the suction connection of the pump (inlet).
Tighten manually.
Screw check valve onto connector adapter at the suction connection.
Tighten manually.
Connect the vacuum-proof suction hose with integrated backflow stop on the suction side. (available as optional accessory)
Screw the connection adapter in the delivery connection of the pump (outlet). Tighten manually.
Connect delivery line.
Illustration 8
Unscrew the lid of the filling nozzle and fill in water till it overflows.
Screw on the lid on the filling nozzle.
Open existing shutoff valves in the pressure pipe.
Note
Even the smallest of leakage leads to malfunctioning.
In case of leaks, seal all connections with a suitable sealant (e.g. Teflon tape) to prevent malfunction due to leakage or air intake.
Permanent installation
With a permanent installation the pump can be screwed onto a suitable surface.
Use suitable screws to screw the bases onto a level surface.
In case of a permanent installation the installation of a flexible component such as a flexible pressure compensating hose (see optional accessories) on the pressure side is recommended. This has the following benefits:
More flexibility during set-up and installation.
- Noise reduction, since no vibrations are transferred to pipes.
In case of small leaks, the pump does not switch as often.
Note
To facilitate subsequent emptying and pressure release of the system, we recommend the installation of a stopcock between pump and pressure line.
(not included in delivery)
By closing the shut-off valve when emptying the pump you can prevent water from escaping from the pressure line.
Operation
BP 3 Home:
Insert the mains plug into the socket.
Switch the appliance on at the appliance switch.
BP 5 Home:
Insert the mains plug into the socket.
Note
Pump starts running immediately. Wait till the pump sucks in and pumps uniformly, then shut the gate valve in the pressure pipe. The pressure switch deactivates the motor when the shut-off pressure is reached. The storage boiler is now full; the domestic water supply system is ready for operation.
If there is a lack of supplied water, the switch-off pressure is not reached; the pressure switch cannot shut off the appliance. The water in the pump head will then heat up.
In case of overheating, the power supply is interrupted by a thermal switch, to avoid damage to the pump from overheating.
The supply of power is switched back on after the appliance has cooled off.
Note
The cooling down time until the motor starts up again can be up to 150 min.
We recommend installing a dry run protection unit to regulate the lack of water situation (see special accessories).
CAUTION
System is under pressure!
(For pressure details see chapter on technical specifications)
Finish operation
BP 3 Home:
Switch the appliance off at the power switch.
Disconnect the main plug from the socket.
BP 5 Home:
Disconnect the main plug from the socket.
Maintenance and Care
△DANGER
Turn off the appliance and remove the mains plug prior to any care and maintenance works.
Care
Open the connected shutoff valves to relief pressure and reclose them. The system is free of pressure.
Rinse the pump after every use if you use to transport water with additives.
Maintenance
Check the pressure of the air filling in the storage boiler every six months. If necessary, refill up to 2.0 bar in switched off / zero-pressure state (disconnect device, open the water cock).
Illustration C
The air valve is located under the cover. Turn in anticlockwise direction to unscrew the cover.
Transport
CAUTION
In order to prevent accidents or injuries, keep in mind the weight of the appliance during transport (see Specifications).
When transporting in vehicles
Secure the appliance against shifting and tipping over.
Storage
CAUTION
In order to prevent accidents or injuries, keep in mind the weight of the appliance when selecting a storage location for it (see Specifications).
Storing the Appliance
Fully drain the appliance prior to storing it.
Store the appliance in a frost free area.
Special accessories
| The figures of the following special accessories can be found on page 4 of these instructions. | ||
| 6.997-343.0 Pump | pre-filter, small (flow rate up to 4000 l/h) | Pump pre-filter for all common pumps without integrated filters. To protect the pump against coarse dirt particles or sand. The fine filter can be washed. For pumps with G1 (33.3 mm) connection thread. |
| 6.997-344.0 Pump | pre-filter, large (flow rate up to 6,000 l/h) | Pump pre-filter for all common pumps without integrated filters. To protect the pump against coarse dirt particles or sand. The fine filter can be washed. For pumps with G1 (33.3 mm) connection thread. |
| 6.997-350.0 | Suction assembly 3.5 m, 3/4" | Completely ready for connection, vacuum-proof spiral hose with suction filter and backflow stop. Can also be used as an extension for the suction hose. For pumps with G1 (33.3 mm) connection thread. |
| 6.997-349.0 Suction assembly 7.0 m, 3/4" | ||
| 6.997-348.0 | Suction hose 3.5 m, 3/4" | Completely ready for connection, vacuum-proof spiral hose for direct connection to the pump. To extend the suction assembly or for use with suction filters. For pumps with G1 (33.3 mm) connection thread. |
| 6.997-359.0 Pump | connection G1 (33.3 mm) incl. Check valve | Vacuum-resistant connection of the hoses to the pump. For pumps with G1 (33.3 mm) connection thread and 3/4" as well as 1" hoses, including union nut, hose clamp, flat packing and check valve. ATTENTION → Do not install the check valve included in the set! |
| 6.997-347.0 Vacuumproof spiral hose, yard goods, 25 m, 3/4" | Vacuum-proof spiral hose. Yard goods for cutting hoses to individual lengths. When combined with the Kärcher connection pieces and the Kärcher suction filters, it can be used as an individual suction assembly. | |
| 6.997-346.0 Vacuumproof spiral hose, yard goods, 25 m, 1" | To be connected to the suction hose yard goods. The backflow stop prevents the return flow of the delivered water and thus reduces the time required for suction to start again. Including hose clamp. | |
| 6.997-345.0 Suction filter Basic 3/4"(19 mm) | ||
| 6.997-342.0 Suction filter with backflow stop, basic, 1" | ||
| 6.997-341.0 Suction filter with backflow stop, premium | To be connected to the suction hose meter length. The backflow stop prevents the return flow of the transported water and thus shortens the re-suction time. Durable metal/plastic construction. Suitable for 3/4" (19 mm) and 1" (25.4 mm) hoses. Including hose clamp. | |
| 6.997-360.0 Suction hose for pipes 0.5 m, 3/4" | Vacuum-tight hose to reduce noise with fixed installations. 1"(25.4 mm) hose with threaded connection G1(33.3 mm) on both ends. Caution: The suction hose may not be used as a pressure hose. | |
| 6.997-340.0 | Connection kit Premium | For the connection of 3/4" (19 mm) water hoses to pumps with G1 (33.3 mm) connection threads. For increased water flow. |
| 6.997-417.0 Pressurecompensating hose 3/4" (19mm), 1m | Connecting hose for the pressure compensation in the domestic water supply system. To connect the pump to rigid pipe line systems. Furthermore, the internal storage volume in the hose prevents frequent switching on and off of the pump. G1 (33.3 mm) connection thread. | |
| 6.997-355.0 | Dry run fuse | If no more water flows through the pump, the dry run fuse will protect the pump from damage and automatically turn it off. With G1" (33.3 mm) threaded connection. |
| 6.997-546.0 Dry run fuseType E (CEE7/5)Country version BE, CZ, ES, FR, PL SK | ||
Troubleshooting
| △DANGER To avoid risks, all repairs and replacement of spare parts may only be carried out by authorized customer service personnel. First pull out the plug from the mains before carrying out any tasks on the machine. | ||
| Fault Cause Remedy | ||
| Pump runs but does not transport | Air in the pump see chapter “Preparing the | Appliance" |
| Air does not come out on the pressure side | Open tap on pressure side | |
| No water available. Check the water reservoir. | ||
| Pump does not run or suddenly comes to a standstill during operations | Power supply interrupted Check fuses and electrical connections | |
| Thermal protection switch in the motor has switched off the pump as it was overheated. | Pull out the mains plug, let the pump cool down, clean the suction area, prevent dry running Note The cooling down time until the motor starts up again can be up to 150 min. | |
| Pump switches itself off and back on | Thermal protection fuse has switched the pump off to protect from overheating or turned it back on after it has cooled off. | In order to prevent a repetition, the system should be checked for leaks and sealed. |
| Motor starts up immedi-dately after switch off | Pressure is not retained in the system | Check connections including sealings and control the water outlet. The smallest of leakages can affect the operation adversely. |
| Air pressure in the storage boiler is too low. | Fill storage boiler with 2.0 bar. See chapter "Main-tenance" | |
| Backflow valve does not close properly | check backflow valve on suction side. | |
| Membrane in pressure tank is defective | Replace membrane | |
| Pump transports is reducing or transported quantity is too low | Suction filter or check valve (special accessories) contaminated | Clean suction filter or check valve (special accessories) |
| The quantity transported by the pump depends on the transport height and the connected periphery | Keep max. flow height, see technical data. If necessary, select a different hose diameter or hose length. | |
| Vibrating sound while taking out water | Membrane in pressure tank vibrates | Noise caused by operations and the noise can be reduced by reducing the pressure in the air filling of the storage tank. |
| Our Kärcher branch will be pleased to help you further in the case of questions or faults. See address on the reverse | ||
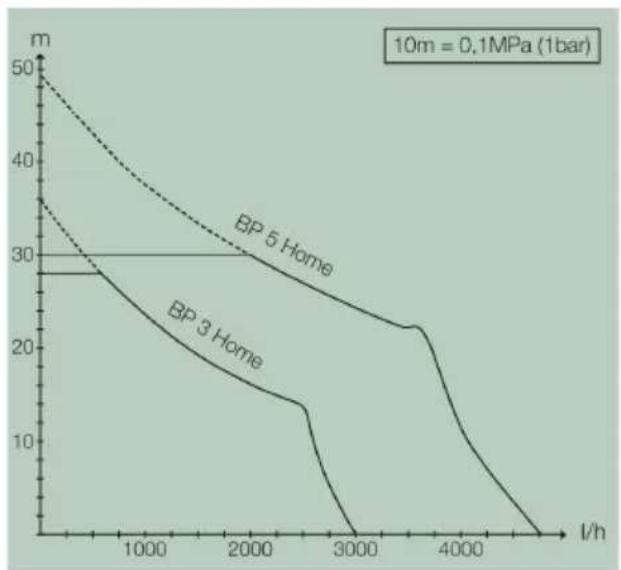
Technical specifications
| Voltage V 230 230 | BP 3 Home BP 5 | Home | |
| Frequency Hz 50 50 | |||
| Output Pnom | W 800 1100 | ||
| Max. flow rate l/h 3000 4500 | |||
| Max. Suction height m 7 8 | |||
| Max. pump pressure MPa (bar) 0,36 (3,6) | 0 | 5 (5,0) | |
| Working pressure | MPa (bar) | 0,17 - 0,28 (1,7 - 2,8) | 0,19 - 0,3 (1,9 - 3,0) |
| Max. air pressure in the storage tank | MPa (bar) | 0,18 - 0,2 (1,8 - 2,0) | 0,18 - 0,2 (1,8 - 2,0) |
| Max. permissible internal pressure in the storage tank | MPa (bar) | 0,50 (5,0) | 0,50 (5,0) |
| Weight | kg | 11,5 14,7 |
Subject to technical modifications!
Operating pressure and transported quantity depends on the suction height and the connected periphery!
The possible delivery rate is even larger:
-
the lower the suction and flow heights
-
the larger the diameter of the hoses used,
-
the shorter the hoses used are
-
the lower the pressure loss caused by the connected accessories
Table des matieres
Consignes generales FR 1
Utilisation FR 1
Entretien, maintenance FR 2
Transport FR 2
Entreposage FR 2
Accessoires en option FR 3
Assistance en cas de panne FR 4
www.kaercher.com/REACH
Garantie
(]+\$*e*e**e**e**e**e**e**e**e**e**e**e**e**e**e**e**e**e**e**e**e**e**e**e**e**e**e*
www.kaercher.com/REACH
Garanzia
www.kaercher.com/REACH
Garantia
www.kaercher.com/REACH
Garantia
www.kaercher.com/REACH
Garanti
www.kaercher.com/REACH
Garanti
www.kaercher.com/REACH
Garanti
System star under tryck!
www.kaercher.com/REACH
Garanti
System star under tryck!
www.kaercher.com/REACH
Takuu
www.kaercher.com/REACH
Eyyunon
Me nV eipuaaegxvikw aalayw!
H Ieiopyikn iieon kai n nooorta avilnoons eapwvrai ano ro upos avlnonc kai ano n c ouvdeepvecs πeippeiakec oovadεs!
www.kaercher.com/REACH
Garanti
AkyIbHbIe CBeHeHnO KOMNoHEHTax PpUBeHeHbI Ha Be6-y3ne no cIeMy aDpecy: www.kaercher.com/REACH
TapaHTn
B kaxdoi cTpaHe DeieCTbYOT COOTBETCTBeHNO rapaHTnHbIe ycNOBn, n3daHHbIe yNoHOMOeHHo OpraHn3auné C6bIta hawei npodykun B daHHo CTpaHe. Bo3moKhbIe HencnpabHocTN np6opba B TeueHne raPapHTnHOcPOka Mbl yCTpAHREM 6ecnnaTHo, ecn npuHaHa 3aknouaeTcB DepeKtax MaTePnAIOB nIn oOn6kax npn n3rTOBJeHN. B cnyae BO3NHKHOBeHn npTeH3n B TeueHne rapaHTnHOcPOka pOc6ba O6paatbcra, mEer npn ce6e Yek O NOKyKe, B TOpROByo opraHn3aunIO, npodawyBO Bam np6bOp nIN B 6nJaWyIO yNoHOMOeHHyIO cnyK6y cepBnCHOro 06cnyKBAHn.
Data BbInycka OTo6paXaETcHa 3aBOckoTae Ta6nueke B 3aKoOpOBaHHOM Bne.
Pn 3TOM OTdIeNbHbIe UnpbI NMeOT CneDyUoue 3HaueHHe::
Приимер: 30190
3 roD BbInycka
0 cToJeTne BbInycka
1 DecaTINETNE BbInycka
9 BTOPAuPpa Mecaa BBInycka
0 nepBaIuPpa MeCya BbInycka
TakIM o6pa3OM, B daHHOM npimepe KoI 30190 O3Haayet DaTy BbInycka 09/(2)013.
YnpaBneHne
Onncanne npn6opa
PmcyHOK A
106paTHbI KJIanaH
2 CoeHInHeIbHbI aIaITeP dIra Hacocob G1
3 p o 6 Ka
4 PoiKJIIOueHHe G1(33,3 MM) BCaCbIBaHOuI N Tpy6o-npOBOd
53aINBHOI nATpy6OK
6ПоdkлоченG1(33,3MM)нанорный trpyбогрOBД
7PyuKa dIJI nepeHocKn*
8Пиборнь ВьклочаTeJIb*
9 Bo3dyHbI KJIanaH (aBTOKJIanaH) C KJIanaHHbIM 3aTBOPOM
10 OnopHn HoxKa c npOoJIbHbIM OTBepCTnEM nI npuBuHvBaHn
11HnkaaJaabneHa
12 CImBnaI npo6ka
13 CeTeB0 WnHyp co wTeNceJIbHbIM pa3beMOM
*TOnbko DnB BP 3 Home
IodroTOBka
→ Ipeed BBODOM B 3KcNJIyatauIIO npOBepNTb daBJIeHHe HAnOJIHryIoo BO3dyxa BpacXoJHom peCnBepe. Pn Heo6xOJIMoCTn B BBIKJIOueHHOM/6e3HaOpHOM COCTOHN HaKaaytob 06bIyHbIM BO3- dyHbIM HAcOCOM Do 2,0 6ap.
3aunntnb npn6op ot cockaB3bBaHna (npn Heo6xOIMOCTN 3akpeNTb wypynamn).
→ ɪərʌnɛpɒkʌy.
→ PπBnHTntb CoeHnHTeIbHbI aIaITeP Ko BCacblBAIOUcMy 3JemeHTy HAcoca (BXoI).3aTAYtB BpyHyIO.
→ PnBnHTntb 6paTHbI KJIaHa Ha coeHNHTeJIbHbI aanTep BO BnyckHom natpy6ke.3aTAYt bByHyHO.
IopKnIIOHTb BaKyyM-NJIOTHbI BCaCbIBaHOuNIM
WJIaHr CO BCTpoEHHO 3aUHTOJ OT O6paTHOro NO-
TOKa K CTOpOHe BCaCbIBaHnA.
(NocTabIaRETCB KaueCTBe CneuaJIbHOJ npHaAD-
JeXHOCTn)
→ PnBnHTnTb CoeINHnTeIbHbI aanTep K HanOpHOMy natpy6ky Hacoca (BbIXoJ). 3aTAYb BpyHyJ.
→ ΠoДКIOUHTb HAnOpHbI Tpy6OIpOBoID.
Pcyhok B
OTkpTyntb KpbIuKy Ha 3aINBHom naTppy6Ke n 3a- NOHHTb BOoJ Do nepeJIiBa.
→ IIOTHO 3aKpyTNb KpbIuKy 3aJIINBHoro naTp6ka.
OTkpblbMeoUneec3anOpHbe KnaaHaHnOpHoro Tpy6oP0Ba.
PpmeaHne
Cna6a repmetuHocb BeTeK c6oM B pa6ote.
→ Pn HerepeMeTnHocTN BCE CoeINHeHn 3aJeNaTb NOxOJaUIM yNtOHnTeNbHbIM CpeDCTBOM (Ha- npImep, TeΦNoHOBo NEnTOI), UTo6bl N36ExKaTb C6oEB BCNEcTBnE yTeueK INN BCAcbIBaHn BO3- dyxa.
CTaCNoHapNbMoHTax
Pn CtauHApHOM MoHTaxe HAcOC MOxHO npBnHTb K NOxOJaEe NOBepXHOCTN.
OnopHbIe HOxKn PnBnHTntb NOxDxOJaUIMN BnHTAMn Ha POBHOI NOBepXHOCTn.
PnOtKaUKe BOJbI n3 HAcoca NyTem 3aKpbITn8 3anOpHoro KpaHa MoXHo He dOnyCTnTb BblTeKaHne BOJb I3 HanopHoro Tpy6oNpOBoVa.
3Kcnnyataun npn6opa
BP 3 Home:
Bctabntb ceTeByIO wTenCeIbHyIO BNJKy Bpo3eKy.
→ Bключntb yctpoiCTBO annapaTHbIM nepekeHouaTeJIEM.
BP 5 Home:
BCTaBnTb ceTeByIO wTenCeIbHyIO BnIKy Bpo3eKy.
Yka3aHne
Hacoc BkIIOUaETc Cpa3y. IOnOxJaTb, NOKa HACOC He 6yJET BCacbIBaTb IN ODNOBpeMeHHo C 3TNM KauaTb, NOtOM 3akpbITb 3anOpHbIe KJIanaHbI HanopHOro Tpy60npoB0da. Pn DOCTNKeHN DaJIeHNr BBKIOUeHn MaHOMeTpueckn BbIKIOUaTeJIb OTKNIOuAeT DBIrataTeNb. AkKymyIaCIOHbI KOTeTIeNpB 3aONHe, a DOMaUHNI BODONPOBOD rTOB K 3KCNJIyATAuIN.
Pn OTCyTCTBn NOaH NBObl DaBJeHne OTKNoueHn He DoCTNaeTc; BbIKNoUaTeJb, pa6oTaIOuIIN OT daBHeNn, BoJbWe He MoKeT OTKNoUaTb yCTpOietBO. 3a 3TOrO BOda B BepxHeu qactn Hacoca HarpeBaETc. TTo6bl N36ExKaTb NobpeXdEHHaCoc a np NeperpeBe, TepMOBbIKNoUaTeJem npepbIbAeTc NoDAca ToKa. Nocne OXnaJdeHn NODaHa TOKA Bo3o6HOBJaTc.
YkaHne
Bpem oxnackeHn do nepe3anycka Dnuratne MoKeT coCTaBnTb Do 150 MmH.
Mby peKOMeHdyem dny o6bIyHoi 3aunTbI npn HeoctaTke BOdBi NCIOJIb3OBAHne npeOxpaHnteY C cyXmXoDM (cm.CneuaNbHbIe npHaadNekHOCTn).
BHUMAHNE
Cucmema haxodumcnoD daeneHuem! (daeneHue, cm. anaby «TexHuueckue daHHbIe»)
OkoHuaHne pa6oTbI
BP 3 Home:
BbIKHouHTb yCTpOuCTBO annapaTHbIM nepeKIOUaTeJIeM.
→ Bbitaune tteNceIbHyIO BuIky u3 po3eTKn.
BP 5 Home:
BbTaunTe uTencelbHyu BuNky u3 po3eTKn.
YXoD,TexHnueckoe 06cnyxnbAHne
ONACHOCTb
Ppu npoeeehuu IIObix paob no yxody u mexHueckomy o6cnykueaHIO npu6op cneyem bIKnOumb, acemoeou wHyp - bHymb u3 po3emku.
yxo
OTkpblb noKJIHoueHHbI 3aOpHbI KJIanaH dJa c6poca daBHeHn I CHOBA 3akpbItb. DaBHeHne B CnCTeme OTCyTCTByeT.
www.kaercher.com/REACH
Garancia
www.kaercher.com/REACH
Záruka
www.kaercher.com/REACH
Garancija
www.kaercher.com/REACH
Gwarancja
Mult stimate client,

www.kaercher.com/REACH
Garantie
Transportul in vehicule
Asigura'i aparatul contra alunecarii si rasturnarii.
Depozitarea
△PRECAUTIE
www.kaercher.com/REACH
TapaHn
BbB BcKa CtpaHa BaxaT rapaHnOHHne ycNoBn, ny6JNKyBaHN OT OToPn3npaHata OT Hac nctpn6byTopckaΦnpMa.EBeHTyaHn NOpeDu Ha Baun ype du otCTpaHm B pAMKte Ha rapaHnOHHn Cpok 6e3nIaTHo,aKO CE Kacae 3a DepeKT B MaTePnaHnTE nn npi npOn3BOdCTBO.B rapaHnOHe CNyuaai Ce o6bPheTe KbM DnCTpn6Tyopa Nn Hau-6n3Kn OToPn3npaH cepBn3,KATO PpeCTabNTe KacOBaTa 6eJekka.
06cnyxbane
OncanHeHaypeda
Φuypa A
1Bb3BaPaTeHKnanaH
2 PnpcbéeHHnteH aanTep 3a nomn G1
3 3aTbapraTana
4 Cbbp3BaHe G1(33,3 MM) cmykaTeJIHa IINHIA
5 _b npOBnHa 3a nJIHeHe
6 Cbbp3BaHe G1(33,3 MM) HapopHa NHHa
7ДрьЖКаЗаHoceHe*
8Прекьсвачиуpeда*
9Bb3dyweh BeHTn(aBTOBeHTn)cKaNaUka
10 OnopHo Kpaue c HndIbXKeH OTBp 3a 3aBHTBaHe
11 HdkaTop Ha haJraHeTo
12 N3nyckaTeJIHa npo6ka
13 3axpaHbaKa6eI c uencen
*camo npn BP 3 Home
NoIroTobka
Ppei nyckahe B eKcnnoataun npOBepete HaIraHeTo Ha B3dyuHnna PbIHeK B 3axpaHbauu KOTeI. Pn Hxka DoBnHeTe B n3KnIOyeHo CbCToHne /cbCToHne 6e3 HaNraHe Cbc CtaHapTha B3dyuHa nomna do 2,0 bar.
YkpeneTe ypeDa cpeuynb3raHe (eBeHTyaJnHO ro 3aBnHTeTe).
OTeTpaHete 3aTbapuaTata Tana.
3abntete npncbeDnHnTeen aanTep B n3BOda 3a BCMyKBaHe Ha nomnata (BXoJ). 3aterhe Ta pka.
3abHTeTe Bb3BpaTe H Klaanah Ha npncbeHNHTeHHra aanTep Ha n3BOda 3a BCMyKbaHe.3aterHete Ha pbKa.
→ CbpxeTe yToHnHB Ha BakyM BCMyKbaU MapkyC INHTepnPauH CTOn HA ObaTHNIA NOTOK Ha BCMyKaTeHHaTcPana. (MOKe Da ce 3aKyPiN KATO CneuHaHO pncno6JIeHne)
3abntTe npncbdeHnHTeH e aanTep B n3BOda 3a HaJraHe Ha nomnata (n3xO). 3aterheHa pka.
→ CbpxkTe HAnopeH Tpb6oNpOBoD. Φnrypa B
3aBnHTeTe KaNaka KbM UyTepa 3a 3aBnBaHe n 3aBnHHe Tc BODa, DOKaTO 3anOuHe da npEINBa.
3aBnHTeTe Kanaka 3dpabo Bbpxy IbpnoBuHaTa 3a PbJIHeHe.
→ OTbopeTe HAnuHnTe CnnpaTeHN BeHTnJIN B Ha-nOpHnTp6oNpOBoD.
Yka3aHne
Dopn MHHMaJIHaTa JInCa Ha XepMeTNUHOC T BoN Do rpeuHn FyHKcun.
→ Pn IINca Ha XepMeTNUHOCYIINbTHeTe BCuKN Bpb3Kc C NOxOJaUo YIINbTHRaBauO CpeCTBO (Ha np. TeJIOHOBa JENTa), 3a Da N36eHHeTe rpeuHN FyHKun Nopadyn Yeukn INN 3acMyKbaHe Ha Bb3- dyx.
IocToHHa HnCTanaZna
Пи NOCTOЯнHa INHCTaIaIaIaIaIaIaIaIaIaIaIaIaIaIaIaIaIaIaIaIaIaIaIaIaIaIaIaIaIaIaIaIaIaIaIaIaIaIaIaIaIaIaIaIaIaIaIaIaIaIaIIb.3abHTeHa KbM NODXODJa Na NobbpxHOCT.
3aBnHTeTe onOpHnTE kpaueTa c noXoJauN BnHTOBe Bbpxy paBHa NOBbpxHOCT.
IOnbHnTeJIHO npn NOCToRHa HnCTaJauZnOr OT HanOpHaTcTpaHa ce npenopbYBa da ce MOHTnpa TbBkAB KOMNOHeHT, KaTO HAp. TbBkAB n3paBHnTeJeH HanOpEHMapkyu (BnxTe cneuaJHn npHaadJNEXKHOCTn).ToBa NMa CJIeHNTE ppeIMCTBa:
IIOBueYbBkABOCT npn pa3noJaraHeTo mOHTaKa.
HaamaJraBaHe Ha yMObTe, Tb' KaTo No Tpb6o npBoOHNHe Tpb6n He ce npedabat B6paun.
Pn no-MaNko yTeuKN NOMnata ce n3KIOUba nopraKO.
Yka3aHne
3a da ce ynechn no-Kbchoto n3npa3BaHe n 3nyckaHe Ha HnraHTo Ha cncTeMaT, Bu npenOpbYBaMe da MOHTnPate CnpaTeEn KpaH Mekdy nomNaTa n HanopHnra Tpb6onpOBoD.
(He ce cBdpbKAT B o6ema Ha doCTaKa)
Pn n3npa3BaHe Ha nomnata ype3 3aTbaprHe Ha cnnpaTeHnna KpaH MoKe Da ce PpeDoTbpaTu N3TuHaHe HbOda OT HanOpHnra Tpb6oNpOBoD.
Eknpnoataaia
BP 3 Home:
BkIIOUeTe UeIeCeIa B KOHTaKaTa.
BkIIOHe Te ypea ot npeKbCbaHa ypea.
BP 5 Home:
BkIIOyTe IeIeIa B KOHTaKaTa.
Yka3aHne
NOMnata noterIy BeHara. N3yakaIte, DOKaTO nomnata 3acMyue n 3NOMnBa paBHomepHo, CneT OBa CBbpKxTe CNnpateJIHnTE BeHTUNB HAnOpHn Tpb60npoBOD. CNeI DoCTnraHe Ha HAnJaHaTe Ho n3KNIOVAHe NHEBMATNUHnT PpeKbCBaY n3KJIOUvBa MoToPA. Cera 3axpaHbAunrT KOTe I e HanbJIHe, DomauHaTa NOMHe HA CTAHnE rOTOBa 3a pa6Ota.
PnIINCBaOIOndaBaHe Ha BOda HAJIraHaTeHO Ha N3- KIOUbaHe He Ce DOCTnA, INHEBMATuHnT IpeKbCBAu Beue He MoKe Da N3KIOUHypeJa. NopadToBa BOdaTa B rnaBata Ha NOMnTa ce 3arpaBa.
3a da ce n36erHe yBpeKdaHe Ha nomnata npaDi nperepaBaHe, pni nperepaBaHe 3axpaHbaHeTO C TOK ce npekcba O Tepmo npekcbaHa.
CneI oxnaKdaHe 3axpaHbaHeto C TOK OTHOBO CE Bb3-CTaHOBA..
Yka3aHne
BpemTo 3a oxnaXdaHe do pectapTnpaHeto Ha dBnraTeJI MOKe da OTHEme Do 150 MNH.
3a peoBHO npedna3BaHe OT HeocTnHa B0da npopoPbUBaMe n3noJ3BaHe Ha npedna3nte npu cyx XoD (BnxTe CneuaJIH npuHaJeNKeHocTn)..
BHIMAHNE
Cucmemama e noD HanraaHe!
(3a HanraaHemo bukme 2naea "TexHuuecku daHHu")
Kpaɪ ha pa6oTata
BP 3 Home:
→ N3kIIOUeTe ypeDa oT npEkbCbAa Ha ypeDa.
→ 3BaTeE uencena OT KOHTaKaTa.
BP 5 Home:
→ 3BaTeE uencena oT KOHTaKaTa.
Tpnxn, o6cnyXbaHe
ONACHOCT
Ipedu ecbko o6cnykeahe ypeobm da ce u3knouea u uencelb ma de c 3aekda om konhmaka.
PnDpBxka
OTBOpTe CBp3aHIne CnnpaTeJHn BeHTNJ 3a n3nyKaHe Ha HAnraHeTo N OTHOBo Tn 3aTbOpTe.CnCTemaTa e 6e3 HanraHe.
→ Ptnp TaHcnpTnpaHe Ha BOda Cdo6aBkn H3JIaKBAIte NOMnata CneD BcRAka Ynotpe6a C ncta BOda.
PnDpBxka
Ha noIobuH roDHa npOBepBaHTe HaIraHeTo Ha Bb3duHnna TbJIHeK B 3axpaHbAunpe3epBoap. EBeHT. dONbJHete B n3KJIIOHeHO cBCToHne / 6e3 HAnraHe Do 2,0 bar (n3KnIOte ypeDa, OTbOpTe KpaHa 3a BOda).
Φnrypa C
Bb3dyuHnTBeHTnIeHaMnpaNoIkanaka.Pa3BnTe kanaKa no nocoka o6paTha Ha yacobHnKOBata cTepeNka.
TpaHcnpT
△PENEPA3NBOCT
3a da ce u36e2ham 3nnononyku unu hapaehaun npumpancnpumupahe, 63ememe nod 8humane meznomoha ypeda (eux mexhueckume daHHU).
TpaHcnpoB T npeBo3n CpeDCTBa
OcnrypeTe ypea npotnB n3nnb3BaHe n ppeo6pb-
CbXpaHeHne
△PENEIA3NIBOCT
3a da ce u36e2ham 3nononyku unu HapaHaeHua npu u3bopa ha mAcmomo 3a cbxpaHeHue, e3ememe nod EHumaHue meJnomo Ha ypeDa (Eux mexHuYeckume daHHU).
CbxaheHneHa ypeda
IpeNi cxbxpanHeHn3npa3HeTe HnblHo ypeHa.
YpeJa da ce cbxpaHra Ha MrcTo, KbdeTo He MOKe Da 3aMpb3He.
EJeMeHTN OT cneuHaHaTa OKOMnJIeKTOBka
NOMOUInpHEn3npaBHOCTN
www.kaercher.com/REACH
Garantijas nosacijumi
www.kaercher.com/REACH
Garantija
PidHH, 0oD03BnJaTbcnpeekaayBaTu
CnoXnBva Boda
KoIOnJa3Ha B0da
JKepeBbBaBoDa
Oooba Boda
Boda y BaHHi (3a yMOBN BiINOBiHoro Do3yBaHHn do6aBOK)
OxopohaIOBkIIJIa

MATEPIAN ynakOBKn iDnAIOBc nepeo6ci DnnoBTOPO BRKOPNCTAHH. Byb nacka, He BkndaTe nakyBaIbHi MATEPIAn pa30m i3 DomauHIM CMITTM, BiDaIte ix dnn noBTOPO BRKOPNCTAHH.

CTapi npnctpoi MICTaHIMatepiaJIN, 0MOKyTB BHKOPNCTOBYBaTNCI NOBTOPO.H. Tomy,6ydb naCka,yTNi3yNe CTapi npnctpoi 3a DO-nOMOROIO CneuaJIbHnx CnCTeM 3bOpy CMITTA.
Ihctpykii i3 3acTocyBaHHKOMnoHeHtIB (REACH)
AkyJIbHI BiOMOCTI npo KOMNOHHTn HabeHeHi Ha Be6-By3JI 3a aDpecoIO:
www.kaercher.com/REACH
TapaHTiA
Y Koxhi KpaHii DIOb yMOBN rapaHTi, HadaHOI BiNObBIDHOO fipMOIO-npOaBcEM. HenoJaKn B po60Ti npnCTPOIO MN ycBaEMO 6e3KOuTobHO npOTaROM TepMHy DiI rapaHTi, kUso BOH BNKlnKaHI 6paKOM MATEpiaJy N NOMIKAMN BnTOBHeHH. Y BnNAky UHHOI rapaHTi 3BePTtbcra Do npOabua CH B HaJIckHMy ABTOpN3OBaHm CepBichn ceHTp 3 DOkymeHTaNbHM NiITBEpIXeHHM NOKyKN.
Ekcnnyatauia
Onnc npncptpo
Manohok A
1 3BOPOTHNI KJIaNAH
23'eHnYBaIbHn aanTep nHaHacociB G1
3 p o 6 Ka
4ПидклioчehнгG1(33,3MM)ВсасувальнгТубовповд
5 H a n n B h n i n n a T p y
6ПiДКЛЮЧЕнгG1(33,3MM)HanipHnTpy6oPobiD
7PykaIJInepeHeceHHa
8Bmikau npunaay*
9 NobitprHn Knaan (aBtOKnaan) C KnaanHHMM 3aKPNBOM
10 OnopHa Hixka 3 nO3IOBxHIM OTBOPOM IyBaHHa
11 INdkaTop Tncky
12 Pi3b60ba npo6ka 3nubHoro OTbOpy
13 MepexeBn Ka6enb 3i wTeKePOM
*Tilbkn DnB BP 3 Home
PiIroTobKa
Npeed BBeEeHnB EekCnnyatauio nepeBipTu TnCK NOBITpHaNOBHeHHa BYBtpaTHomy pecNBepi. Pn Heo6xIdHOCTi y BmKHeHOMy / 6e3HanipHOMy CTahi 3a DonomoroIO 3BuaHOrO NOBITpHOrO Ha-cocCy Hakaatn Do 2,0 6ap.
3axnctntnpnaBicnoB3aHHn (npn Heo6xHoccti ykpinnu npynamn).
→ BntraHnytn npo6ky.
IpnBnHTnTn 3'eHnYBaIbHn aanTeP Do BCMOK-TyBaIbHO eHemHTy HAcoca (BXiD). 3aTyrHyTu npuHy.
→ PnRbHTnTn 3BOpTHn KnaHn Do 3'EnHyBaJbHO ro aanTepa Ha BnyCKHOMy NaTppy6Ky. 3aTyrHyTu npuHy.
→Πικηουήν BaKyyM-πιJBH N BCMOKTyBaJbH N JIaHr 3i B6yIDOBAHM 3axNCTOM BiD 3BOPoTHORO NOTOKY DO CTOpOH N BCMOKTyBaHH. (NOCTABJRAETCB RA CNEciJIaJIbHE OCHAeHH)
IpnBnHTn3'6nHyBaIbHn aanTep do HanipHo-ro natpy6ka hacoca (Bnxi). 3aTARHyTu npUHy.
→Πικηύητην HαπipHητργδοπροBID.
MaJIHOHOK B
BikpyTnKpnuKyHa3aINBHOMy naTp6kyi 3a-nOBHHTN BOyD OnepeJIBy.
→Miucno npKpyTn KpnKy Ha 3aJIbHn NaTpPy60K.
Bikpnu HaeBhi 3anipHi KnaaHn HanipHoro Tpy-6onpoBoy.
PnmuItka
Cna6ka repmetnunHicTh npn3BOuNTb do 36oIB B po60ti.
3a BiCyTHOCTI repMeTnUHOCTI Bci 3'EdHaHH 3po-6bTN HEnpOHKnHM 3a DonOMoIO nIXOXKOrO yuINbHOBaHBO 3ac06y (HanpIKNaI, TeNoHOBa CTPIKA), uO6 yHNKHyTN 360iB B pO60ti Upe3 npOTiKaHH a60 BCMOKTyBaHH NOBITPra.
CTaioHapnMoHTax
Pn CtaioHApHomy MoHTaKi HAcoc MOxHa npRbntTu Do BiIDNoBIDHOI NOBepxHi.
OnopHi HIXKn npINrBnHTnTn nIXOXKmN TBnHTaMn Ha pIBHni NOBepxHi.
Дя StaцioHapHOrO BCTaHOBnEHnHa CTopoHIT NcKy peKOMeHnyEbCra TAKoK 3aCtOcyBaHHr HryuKnx KOMNoHentiB, HApP., rHyuKm WlaHr DnA BnpiBHBaHHN TnCKy (INB. "IodatkoBe npinadJa"). Y cIboro BapiaHTy e Ha-ctynHnepeBaHn:
■ Beñika rHyckictb npn BCTaHOBJIeHHI Ta MOHTaKi.
3HnKHeHH uMy, OckIbKn Bi6paui He nou npioHOtbcHa Tpy6oP0BOn.
■Пи He3Haunx BnTOKax Hacoc BMnKaetbca piDwe. Bka3iBka
TTO,IO6 cnpoCTn Ni3HlHi BUNyCK BOi i 3HNJKeHH TUCKY BCNTeMI, peKOMeHnycMo 3diNCHHTM MoTHaX 3anipHorO KpaHy mix Hacocom i HanipHm Tpy6o-npOBODom.
(He BXOДNTb B KOMПЛЕКТ NOCTaBKN)
PnBnuKauyBaHHi BOn 3 Hacocy WJnxom 3aKpNbAHH KpaHy MoXHa He DOnycTtN BNTiKaHHa BOn 3 HanipHo ro Tpy6o npObOy.
Eknnnyatauaia
BP 3 Home:
BCTaBTe MepeXeBn IwTeKep y po3eTKy.
YbIMKHyTN npucptpi anapaTHM nepemkaayem.
BP 5 Home:
BCTaBTe MepeXeBn uTeKepe y po3eTky.
Bka3iBka
Hacoc BMnkaeTbcBip3y. Nooekatn, DOKn Hacoc He 6ynde BCMOKTyBaTn Ta OJHOuAcHo i3 Lm KauATn, Notim 3aKpTN 3anipHi Klanahn HanipHOro TpybOpOBody.
PnDocrHeHHI TCKy BmMkaHHaHOMeTpHnBmKauchBdKJIIOUac DbIRHy.AkymJauHn KOTeTep 3anOBHeHn, a DomaHi BOOnpOBI drotobn Do eknnnyataui.
3a BiDcyTHOCTI NIDBeDEHNNBODN TNC BIKJIOUeHHHe DocraTaBC; BIMNKaU, 10 npauoE Bid TnCKy, He MoKe 6Inbwe BIMNKATn pncTpi. BhacjioK cboRHO HarpiBaetbcr BODA B BEPxHi YactnHi HAcocy.
Uo6 yHnKHyTn N0uKOJxHHeNHaHacocy uepe3 neperpiBaHHa, TepMOBIMKaayem nepepNbAcNoaCaCTpyM.
IicnOxONoJXeHHNoJaHa cTpyMy BiHOBJIIOCTbcra.
Bka3iBka
Yac oxoJIOxKeHHNo nepe3anycky DnBryHa MoKe cTaHOBHTn Do 150 XB.
Mn peKomeHdyEmO dIy 3BnuaHoro 3axNCTpy npi He-ctaqui BOIN cKOpNCtAtnCb 3aNo6ixHKnKOM 3 cyxIM XO-dom (DINB.Cneuiabhe npuana
YBARA
Cucmema 3haxodumbcn iid muckom!
(muck, due. 2na8y "Texhihi dahi")
3aikHueHH po60Tu
BP 3 Home:
Bumkhuty npucptpi anapaTHM nepemkaayem.
BntyHHTn wTeNCenb 3 pO3eTKn.
BP 5 Home:
BnTHyTN wTeNCeJIb 3 pO3eTKI.
Dorjra,Texhinyo6cnyroByBaHHa
HE6E3NEKA
Ipepe ycima pobomamu no dozraoy ma mexhinyomy ocbnyoeyeayHIO BUMKhim npunad ma eumahimb MepekHuwmekep.
Dorna
BiikpnTu niknuehen 3anipHKnanaH dny ckiandaHH TaCKy ta 3HOBy 3akpnTu. Tnck y cnctemi BiicTyHi.
→Пипдачи BOДи 3do6abkamn noIocKaTu HAcOC uHCTOBOHOIO nICJI KOKHO BKNBaHH.
Texhiue 06cnyroByaHHa
IpebiprTuCK HANOBHeHHy BnTPaTHOMy peCnBepi pa3 Ha nibpOy. Pn Heo6xIDHOCTi y BmKHeHOMy / 6e3HaIipHOMy cTaHi Hakaatn Do 2,0 6ap (npncptiBiknHouHTu BiM MepeXi, BiKpTn BoJn KpaH),
ManIOHOK C
IobitpHn Knaan3haxoHTbcra n3axncHOKpnko. BidBnHTnKpnkny npTo rOHHNKOBcTpIKN.
TpaHcnpTyBaHHN
△OBEPEXHO
Дяллбizaанн Heцachum eunadkam ma mpaMyBaHHIO npu mpaHcnpmyBaHHI npunaDy cnid npuHma do ybae u aay npunaDy (du. po3din "TexhiHi daHI").
TpaHcnpTyBaHHraPacnOpTHm3ac06amN
3aφikcyBaTn npnnaD BiD 3cyHeHHra Ta nepeKnudHnR.
36epiraHHN
△OBEPEXHO
- YMM MEHsa BnCota BCMOKTyBaHHa Ta noDAyI
- -HMM 6iBm Diametp WnAHHIB, 00 BnKOpNCOTByIOTBcR
- YHM KOPOTWI BKNKOPNCTOByBaHI WJnAHM
- YMM MeHwBtpaTN TCKy CnpuHHre npueHaHe npuaIaI
aai
| BP 3 Home | BP 5 Home | V23023 | |
| Hz5050 | |||
| W8 | |||
| /h30004 | |||
| 8 | 7 | m | JL |
| 0,5 (5,0) | 0,36 (3,6) | MPa (bar) | Ja |
| 0,19 - 0,3 | 0,17 - 0,28 | MPa | JL |
| (1,9 - 3,0) | (1,7 - 2,8) | (bar) | JL |
| 0,18 - 0,2 | 0,18 - 0,2 | (bar) | Ja |
| (1,8 - 2,0) | (1,8 - 2,0) | Ja | |
| 0,50 (5,0) | 0,50 (5,0) | MPa (bar) | Ja |
| kg |
!abga2o aio 1e JbJg>
alogall aabal /jgejllg bai// elaejly gai// aasg jiewll bdo

J 1
-1
aodawallpbljllbslj
a aasaaal pabj jll cals
Jogall Jusll jolll n c jil1gaaal Iaaiia
Jbcjdsic clwal
JlbcIgI gJgJgJgJgJgJgJgJgJgJgJgJgJgJgJgJgJgJgJgJgJgJgJgJgJgJgJgJgJgJgJgJgJgJgJgJgJgJgJgJgJgJgJgJgJgJgJgJgJgJgJ
| الإستعمال (م辩证ية) 3/4 ملاس ماني الحرفية الحرفية الحرفية الحرفية الحرفية الحرفية . مصحيى الحرفية الحرفية . مصحيى الحرفية . مصحيى الحرفية . مصحيى الحرفية . مصحيى الحرفية . مصحيى . مصحيى . مصحيى . مصحيى . مصحيى . مصحيى . مصحيى . مصحيى . مصحيى . مصحيى . مصحيى . مصحيى . مصحيى . مصحيى . مصحيى . مصحيى . مصحيى . مصحيى . مصحيى . مصحيى . مصحي弩 G1 (م辩证ية) 33.3) . مصحيى . مصحيى . مصحي弩 G1 (م辩证ية) 33.3) . مصحي弩 G1 (م辩证ية) 33.3) . مصحي弩 G1 (م辩证ية) 33.3) . مصحي弩 G1 (م辩证ية) 33.3) . مصحي弩 G1 (م辩证ية) 33.3) . مصحي弩 G1 (م辩证ية) 33.3) . مصحي弩 G1 (مinoxاله) . مصحي弩 G1 (مinoxاله) . مصحي弩 G1 (مinoxاله) . مصحي弩 G1 (مinoxاله) . مصحي弩 G1 (مinoxاله) . مصحي弩 G1 (مinoxاله) . مصحي弩 G1 (مinoxاله) . مصحي弩 G1 (مinoxاله) . مصحي弩 G1(الترجمة) . مصحي弩 G1(الترجمة) . مصحي弩 G1(الترجمة) . مصحي弩 G1(الترجمة) . مصحي弩 G1(الترجمة) . مصحي弩 G1(الترجمة) . مصحي弩 G1(الTRLीز) . مصحي弩 G1(الTRLीز) . مصحي弩 G1(الTRLीز) . مصحي弩 G1(الTRLीز) . مصحي弩 G1(الTRLीز) . مصحي弩 G1(الTRLीز) . مصحي弩 G1(الTRLीز) . مصحي弩 G1(الTRLीز) . مصحي弩 G1 (الTRLीز) . مصحي弩 G1 (الTRLीز) . مصحي弩 G1 (الTRLीز) . مصحي弩 G1 (الTRLीز) . مصحي弩 G1 (الTRLीز) . مصحي弩 G1 (الTRLीز) . مصحي弩 G1 (الTRLीز) . مصحي弩 G1 (الTRLीز) . مصimately مصحي弩 G1 (الTRLीز) . مصimately مصحي弩 G1 (الTRLीز) . مصimately مصحي弩 G1 (الTRLीز) . مصimately مصحي弩 G1 (الTRLीز) . مصimately مصحي弩 G1 (الTRLीز) . مصimately مصحي弩 G1 (الTRLीز) . مصimately مصحي驽 G1 (الTRLीز) . مصimately مصحي弩 G1 (الTRLीز) . مصimately مصحي弩 G1 (الTRLीز) . مصimately مصحي弩 G1 (الTRLीز) . مصimately مصحي弩 G1 (الTRLीز) . مصimately مصحي弩 G1 (الTRLीز) . مصimately مصحي弩 G1 (ALHANCED) . مصimately مصحي弩 G1 (ALHANCED) . مصimately مصحي弩 G1 (ALHANCED) . مصimately مصحي弩 G1 (ALHANCED) . مصimately مصحي弩 G1 (ALHANCED) . مصimately مصحي弩 G1 (ALHANCED) . مصimately مصحي弩 G1 (ALHANCED) . مصimately مصحي弩G1 (ALHANCED) . مصimately مصحي弩 G1 (ALHANCED) . مصimately مصحي弩 G1 (ALHANCED) . مصimately مصحي弩 G1 (ALHANCED) . مصimately مصحي弩 G1 (ALHANCED) . مصimately مصحي弩 G1 (ALHANCED) . مصimately مصحي弩 G1 (ALHANCED) . مص屆現 مصحي弩 G1 (ALHANCED) . مص屆現 M5 (ALHANCED) . مص屆現 M5 (ALHANCED) . مص屆現 M5 (ALHANCED) . مص屆現 M5 (ALHANCED) . مص屆現 M5 (ALHANCED) . مص屆現 M5 (ALHANCED) . مص屆現 M5 (ALHANCED) . مص屆現 M5 (ALHANCED) . مص屆現 M5 (ALHISC) . مص屆現 M5 (ALHISC) . مص屆現 M5 (ALHISC) . مص屆現 M5 (ALHISC) . مص屆現 M5 (ALHISC) . مص屆現 M5 (ALHISC) . مص屆現 M5 (ALHISC) . مص屆現 M5 (ALHISC) . مص屆現 M5 (ALHISC) . مس淡化 مصحي弩 G1 (الTRLीز) . مس淡化 مصحي弩 G1 (الTRLीز) . مس淡化 مصحي弩 G1 (ALHISC) . مس淡化 M5 (ALHISC) . مس淡化 M5 (ALHISC) . مس淡化 M5 (ALHISC) . مس淡化 M5 (ALHISC) . مس淡化 M5 (ALHISC) . مس淡化 M5 (ALHISC) . مس淡化 M5 (ALHISC) . مس淡化 M5 (ALHISC) . مس淡化 M5 (ALHISC) . مس淡化 M5(ALHISC) . مس淡化 M5(ALHISC) . مس淡化 M5(ALHISC) . مس淡化 M5(ALHISC) . مس淡化 M5(ALHISC) . مس淡化 M5(ALHISC) . مس淡化 M5(ALHISC) . مس淡化 M5(ALHISC) . مس淡化 M5(ALHISC) . مس淡化 M5(AlHISC) . مس淡化 M5(AlHISC) . مس淡化 M5(AlHISC) . مس淡化 M5(AlHISC) . مس淡化 M5(AlHISC) . مس淡化 M5(AlHISC) . مس淡化 M5(AlHISC) . مس淡化 M5(AlHISC) . مس淡化 M5(AlHISC) . مس淡化 M5(Al HISC) . مس淡化 M5(AlHISC) . مس淡化 M5(AlHISC) . مس淡化 M5(AlHISC) . مس淡化 M5(AlHISC) . مس淡化 M5(AlHISC) . مس淡化 M5(AlHISC) . مس淡化 M5(AlHISC) . مس淡化 M5(AlHISC) . مس淡化 M5(AlHSC) . مس淡化 M5(AlHSC) . مس淡化 M5(AlHSC) . مس淡化 M5(AlHSC) . مس淡化 M5(AlHSC) . مس淡化 M5(AlHSC) . مس淡化 M5(AlHSC) . مس淡化 M5(AlHSC) . مس淡化 M5(AlHSC) . مس淡化 M5(AlHSC) M5(ALHISC) . مس淡化 M5(ALHISC) . مس淡化 M5(ALHISC) . مس淡化 M5(ALHISC) . مس淡化 M5(ALHISC) . مس淡化 M5(ALHISC) . مس淡化 M5(ALHISC) . مس淡化 M5(ALHISC) . مس淡化 M5(ALHISC) . مس淡化 M2 (ALHISC) . مس淡化 M2 (ALHISC) . مس淡化 M2 (ALHISC) . مس淡化 M2 (ALHISC) . مس淡化 M2 (ALHISC) . مس淡化 M2 (ALHISC) . مس淡化 M2 (ALHISC) . مس淡化 M2 (ALHISC) . مس淡化 M2 (ALHISC) . مس淡化 M2 ( ALHISC) . مس淡化 M2 (ALHISC) . مس淡化 M2 (ALHISC) . مس淡化 M2 (ALHISC) . مس淡化 M2 (ALHISC) . مس淡化 M2 (ALHISC) . مس淡化 M2 (ALHISC) . مس淡化 M2 (ALHISC) . مس淡化 M2 (ALHISC) . مس淡化 M2 (AL HISC) . مس淡化 M2 (ALHISC) . مس淡化 M2 (ALHISC) . مس淡化 M2 (ALHISC) . مس淡化 M2 (ALHISC) . مس淡化 M2 (ALHISC) . مس淡化 M2 (ALHISC) . مس淡化 M2 (ALHISC) . مس淡化 M2 (ALHISC) . مس淡化 M2 (ALHSC) . مس淡化 M2 (ALHSC) . مس淡化 M2 (ALHSC) . مس淡化 M2 (ALHSC) . مس淡化 M2 (ALHSC) . مس淡化 M2 (ALHSC) . مس淡化 M2 (ALHSC) . مس淡化 M2 (ALHSC) . مس淡化 M2 (ALHSC) . مس淡化 M2 (ALHSC) M5 (ALHISC) . مس淡化 M5 (ALHISC) . مس淡化 M5 (ALHISC) . مس淡化 M5 (ALHISC) . مس淡化 M5 (ALHISC) . مس淡化 M5 (ALHISC) . مس淡化 M5 (ALHISC) . مس淡化 M5 (ALHISC) . مس淡化 M5 (ALHISC) . مس淡化 M2 (ALHISC) . مس淡化 M2 (ALHISC) . مس淡化 M2 (ALHISC) . مس淡化 M2 (ALHISC) . مس淡化 M2 (ALHISC) . مس淡化 M2 (ALHISC) . مس淡化 M2 (ALHISC) . مس淡化 M2 (ALHISC) . مس淡化 M2(ALHISC) . مس淡化 M2(ALHISC) . مس淡化 M2(ALHISC) . مس淡化 M2(ALHISC) . مس淡化 M2(ALHISC) . مس淡化 M2(ALHISC) . مس淡化 M2(ALHISC) . مس淡化 M2(ALHISC) . مس淡化 M2(ALHISC) . مس淡化 M2( ALHISC) . مس淡化 M2(ALHISC) . مس淡化 M2(ALHISC) . مس淡化 M2(ALHISC) . مس淡化 M2(ALHISC) . مس淡化 M2(ALHISC) . مس淡化 M2(ALHISC) . مس淡化 M2(ALHISC) . مس淡化 M2(ALHISC) . مس淡化 M2(AL HISC) . مس淡化 M2(ALHISC) . مس淡化 M2(ALHISC) . مس淡化 M2(ALHISC) . مس淡化 M2(ALHISC) . مس淡化 M2(ALHISC) . مس淡化 M2(ALHISC) . مس淡化 M2(ALHISC) . مس淡化 M2(ALHISC) . مس淡化 M2(ALHSC) . مس淡化 M2(ALHSC) . مس淡化 M2(ALHSC) . مس淡化 M2(ALHSC) . مس淡化 M2(ALHSC) . مس淡化 M2(ALHSC) . مس淡化 M2(ALHSC) . مس淡化 M2(ALHSC) . مس淡化 M2(ALHSC) . مس淡化 M2(ALHSC) M5 (ALHISC) . مس淡化 M5 (ALHISC) . مس淡化 M5 (ALHISC) . مس淡化 M5 (ALHISC) . مس淡化 M5 (ALHISC) . مس淡化 M5 (ALHISC) . مس淡化 M5 (ALHISC) . مس淡化 M5 (ALHISC) . مس淡化 M5 (ALHISC) . M5 (ALHISC) . مس淡化 M5 (ALHISC) . مس淡化 M5 (ALHISC) . مس淡化 M5 (ALHISC) . مس淡化 M5 (ALHISC) . مس淡化 M5 (ALHISC) . مس淡化 M5 (ALHISC) . مس淡化 M5 (ALHISC) . مس淡化 M5 (ALHISC) . مس淡化 M5 (ALHISC) . مس淡化 M5 (ALHISC) . مس淡化 M5 (ALHISC) . مس淡化 M5 (ALHISC) . مس淡化 M5 (ALHISC) . مس淡化 M5 (ALHISC) . مس淡化 M5 (ALHISC) . مس淡化 M5 (ALHISC) . مس淡化 M5 (ALHISC) . مس淡化 M5 (ALHISC) . مس淡化 M5 (ALHISC) . مس淡化 M5 (ALHISC) . مس淡化 M5 (ALHISC) . مس淡化 M5 (ALHISC) . مس淡化 M5 (ALHISC) . مس淡化 M5 (ALHISC) . مس淡化 M5 (ALHISC) . Mareta M5 (ALHISC) . Mareta M5 (ALHISC) . Mareta M5 (ALHISC) . Mareta M5 (ALHISC) . Mareta M5 (ALHISC) . Mareta M5 (ALHISC) . Mareta M5 (ALHISC) . Mareta M5 (ALHISC) . Mareta M5 (ALHISC) . Mareta |
a
aoljlaol
| . . . . . . . . . . . . . . . . . . . . . . . . . . . . . . . . . . . . . . . . . . . . . . . . . . . . . . . . . . . . . . . . . . . . . . . . . . . . . . . . . . . . . . . . . . . . . . . . . . . . . . . YII JI G1 (ma 33.3)JLJLJLJLJLJLJLJLJLJLJLJLJLJLJLJLJLJLJLJLJLJLJLJLJLJLJLJLJLJLJLJLJLJLJLJLJLJLJLJLJLJLJLJLJLJLJLJLJLJLJ L .YII JI G1 (ma 33.3)JLJLJLJLJLJLJLJLJLJLJLJLJLJLJLJLJLJLJLJLJLJLJLJLJLJLJLJLJLJLJLJLJLJLJLJLJLJLJLJLJLJLJL .YII JI G1 (ma 33.3)JLJLJLJLJLJLJLJLJLJLJLJLJLJLJLJLJLJLJLJLJLJLJLJLJLJLJLJLJLJLJLJLJLJLJLJLJLJLJLJLJLJL .YII JI G1 (ma 33.3) JLJLJLJLJLJLJLJLJLJLJLJLJLJLJLJLJLJLJLJLJLJLJLJLJLJLJLJL .YII JI G1 (ma 33.3) JLJLJLJLJLJLJLJLJLJLJLJLJLJLJ .YII JI G1 (ma 33.3) JLJLJLJLJLJLJLJLJLJLJLJL .YII JI G1 (ma 33.3) JLJLJLJLJLJLJLJLJLJL .YII JI G1 (ma 33.3) JLJLJLJLJLJLJLJL .YII JI G1 (ma 33.3) JLJLJLJLJLJLJL .YII JI G1 (ma 33.3) JLJLJLJLJLJL .YII JI G1 (ma 33.3) JLJLJLJLJLJL .YII JI G1 (ma 33.3) JLJLJLJLJL .YII JI G1 (ma 33.3) JLJLJLJLJL .YII JI G1 (ma 33.3) JLJLJLJL .YII JI G1 (ma 33.3) JLJLJLJL .YII JI G1 (ma 33.3) JLJLJLJL .YII JI G1 (ma 33.3) JLJLJLJL .YII JI G1 (ma 33.3) JLJLJLJL |
| . . . . . . . . . . . . . . . . . . . . . . . . . . . . . . . . . . . . . . . . . . . . . . . . . . . . . . . . . . . . . . . . . . . . . . . . . . . . . . . . . . . . . . . . . . . . . . . . . .. YII JI G1 (ma 33.3) JLJLJLJLJLJLJLJLJLJLJL YII JI G1 (ma 33.3) JLJLJLJLJLJLJLJLJL YII JI G1 (ma 33.3) JLJLJLJLJLJL YII JI G1 (ma 33.3) JLJLJLJLJL YII JI G1 (ma 33.3) JLJLJLJL YII JI G1 (ma 33.3) JLJLJLJL YII JI G1 (ma 33.3) JLJLJLJL YII JI G1 (ma 33.3) JLJLJLJL YII JI G1 (ma 33.3) JLJLJLJL |
| . . . . . . . . . . . . . . . . . . . . . . . . . . . . . . . . . . . . . . . . . . . . . . . . . . . . . . . . . . . . . . . . . . . . . . . . . . .. YII JI G1 (ma 33.3) JLJLJLJLJL YII JI G1 (ma 33.3) JLJLJLJL YII JI G1 (ma 33.3) JLJL YII JI G1 (ma 33.3) JLJL YII JI G1 (ma 33.3) JLJL YII JI G1 (ma 33.3) JLJL YII JI G1 (ma 33.3) JLJL YII JI G1 (ma 33.3) JLJL .YII JI G1 (ma 33.3) JLJL YII JI G1 (ma 33.3) JLJL YII JI G1 (ma 33.3) JLJL YII JI G1 (ma 33.3) JLJL YII JI G1 (ma 33.3) JLJL YII JI G2 (ma 33.3) JLJL YII JI G2 (ma 33.3) JLJL YII JI G2 (ma 33.3) JLJL YII JI G2 (ma 33.3) JLJL YII JI G2 (ma 33.3) JLJL YII JI G2 (ma 3.3) Y YII JI G2 (ma 3.3) Y YII JI G2 (ma 3.3) Y YII JI G2 (ma 3.3) Y YII JI G2 (ma 3.3) Y YII JI G2 (ma 3.3) Y YII JI G2 (ma 3.3) Y YII JI G2 (ma 3.3) Y YII JI G2 (ma 3.3) Y YII JI G2 (ma 3.3) Y YII JI G2 (ma 3.3) Y YII JI G2 (ma 3.3) Y YII JI G2 (ma 3.3) Y YII JI G2 (ma 3.3) Y YII Jl G2 (ma 3.3) Y YII Jl G2 (ma 3.3) Y YII Jl G2 (ma 3.3) Y YII Jl G2 (ma 3.3) Y YII Jl G2 (ma 3.3) Y YII Jl G2 (ma 3.3) Y YII Jl G2 (ma 3.3)Y YII Jl G2 (ma 3.3)Y YII Jl G2 (ma 3.3)Y YII Jl G2 (ma 3.3)Y YII Jl G2 (ma 3.3)Y YII Jl G2 (ma 3.3)Y YII Jl G2 (ma 3.3)Y YII Jl G2 (ma 3.3)Y YII Jl G2 (ma 3.3)Y YII Jl G2 (ma 3.3)Y YII Jl G2 (ma 3.3)Y YII Jl G2 (ma 3.3)Y YII Jl G2 (ma 3.3)Y YII Jl G2 (ma 3.3)Y YII JI G2 (ma 3.3)Y YII JI G2 (ma 3.3)Y YII JI G2 (ma 3.3)Y YII JI G2 (ma 3.3)Y YII JI G2 (ma 3.3)Y YII JI G2 (ma 3.3)Y YII JI G2 (ma 3.3) Y YII JI G2 (ma 3.3)Y YII JI G2 (ma 3.3)Y YII JI G2 (ma 3.3)Y YII JI G2 (ma 3.3)Y YII JI G2 (ma 3.3)Y YII JI G2 (ma 3.3)Y YII JI G2 (ma 3.3)Y YII JI G2 (ma 3.3)Y YII JI G2 (ma 3.3)Y YII JI G2 (ma 3.3)Y YII JI G2 (ma 3.3)Y YII JI G2 (ma 3.3)Y YII JI G2 (ma 3.3)Y YII Jl G2 (ma 3.3)Y YII Jl G2 (ma 3.3)Y YII Jl G2 (ma 3.3)Y YII Jl G2 (ma 3.3)Y YII Jl G2 (ma 3.3)Y YII Jl G2 (ma 3.3) Y YII Jl G2 (ma 3.3)Y YII Jl G2 (ma 3.3)Y YII Jl G2 (ma 3.3)Y YII Jl G2 (ma 3.3)Y YII Jl G2 (ma 3.3)Y YII Jl G2 (ma 3.3)Y YII Jl G2 (ma 3.3)Y YII Jl G2 (ma 3.3)Y YII Jl G2 (ma 3.3)Y YII Jl G2 (ma 3.3)Y YII Jl G2 (ma 3.3)Y YII Jl G2 (ma 3.3)Y YII JI G2 (ma 3.3)Y YII JI G2 (ma 3.3)Y YII JI G2 (ma 3.3)Y YII JI G2 (ma 3.3)Y YII JI G2 (ma 3.3)Y YII JI G2 (ma 3.3) Y YII Jl G2 (ma 3.3)Y YII Jl G2 (ma 3.3)Y YII Jl G2 (ma 3.3)Y YII Jl G2 (ma 3.3)Y YII Jl G2 (ma 3.3)Y YII Jl G2 (ma 3.3) Y YII Jl G2 (ma 3.3)Y YII Jl G2 (ma 3.3)Y YII Jl G2 (ma 3.3)Y YII Jl G2 (ma 3.3)Y YII Jl G2 (ma 3.3)Y YII Jl G2 (ma 3.3)Y YII Jl G2 (ma 3.3)Y YII JI G2 (ma 3.3)Y YII JI G2 (ma 3.3)Y YII JI G2 (ma 3.3)Y YII JI G2 (ma 3.3)Y YII JI G2 (ma 3.3)Y YII Jl G2 (ma 3.3)Y YII JI G2 (ma 3.3)Y YII JI G2 (ma 3.3)Y YII JI G2 (ma 3.3)Y YII JI G2 (ma 3.3)Y YII JI G2 (ma 3.3) Y YII JI G2 (ma 3.3) Y YII JI G2 (ma 3.3) Y YII JI G2 (ma 3.3) Y YII JI G2 (ma 3.3) Y YII JI G2 (ma 3.3) Y YII JI G2 (ma 3.3)Y YII JI G2 (ma 3.3)Y YII JI G2 (ma 3.3)Y YII JI G2 (ma 3.3)Y YII JI G2 (ma 3.3)Y YII JI G2 (ma 3.3)Y YII JI G2 (ma 3.3)Y YII J I G2 (ma 3.3)Y YII JI G2 (ma 3.3)Y YII JI G2 (ma 3.3)Y YII JI G2 (ma 3.3)Y YII JI G2 (ma 3.3)Y YII JI G2 (ma 3.3)Y YII JI G2 (ma 3.3) |
aIglll
jbs A
/1 111111111111111 111111111
a|e|
aJ> aalogall aaI Iolalg 1
←p|xw|
a aall al 10 1 1 1 1 1 1 1 1 1 1
a|
←1c
yj1s p .pL Js jzll cJal ola!
12y1 aJ>
jJJI JIJI IJI JIJI
(cele 191
C ojg
elalj p9. elalj 2g>go gell plw
aclll jlacoljusc
Jai
aai
j010100000000000000000000000000000000000
.(aio//bui//jbi)alai xic jge//
Jll
yIg yjI JgJgJg
#
4a
j01/2 111111111111111
//jlljbjil) jjj//kOjla/sicjge//
.(dujJ
jglj
.aaj jp p Jk w jg>1 g 0
.
abg>1
pblll bfoall fag g>Ull g jyul
bdoall oog aiaall nn yoo u s r, zai (paill gln cun)
o all gio n kaaiaall gic
.aaall gl qprn c bao all o
J
:BP3Home .JL JJ 1J 1J 1J 1J 1J 1J 1J 1J 1J
abg20
pJl JI jI jI jI jI jI jI jI jI jI jI jI jI jI jI jI jI jI jI jI jI jI jI jI jI jI jI jI jI jI jI jI jI jI jI jI jI jI jI jI jI jI jI jI jI jI jI jI jI jI jI J I J I J I J J J J J J J J J J J J J J J J J J J J J J J J J J J J J J J J J J J J J J J J J J J J J J J J J J J J J J J J J J J J J J J J J J J J J J J J J J J J J J J J J J J J J J J J JJJJJJJJJJJJJJJJJJJJJJJJJJJJJJJJJJJJJJJJJJJJJJJJJJJJJJJJJJJJJJJJJJ
Jc
:BP3Home
Jglll Jj j 1
.
BP5Home
J
J
J
J
J
J
J
J
J
J
J
J
J
J
J
J
J
J
J
J
J
J
J
J
J
J
J
J
J
J
J
J
J
J
J
J
J
J
J
J
J
J
J
J
J
J
J
J
J
J
J
J
J
J
J
J
J
J
J
J
J
J
J
J
J
J
J
J
J
J
J
J
J
J
J
J
J
J
J
J
J
J
J
J
J
J
J
J
J
J
J
J
J
J
J
J
J
J
J
J
J
J
J
J
J
J
J
J
J
J
J
J
J
J
J
J
J
J
J
J
J
J
J
J
J
J
J
J
J
J
J
J
J
J
J
J
J
J
J
J
J
a_i a_j
Oyly alIg f aodssalgall
aolal goggl no algul
www.kaercher.com/REACH
JaaJI
Lgssslllalaaaagwssdgs Jg Lg WnJ .Lg aaiiaaiaaagswssllg sW gJg Jg Jg Jg Jg Jg Jg Jg Jg Jg Jg Jg Jg Jg Jg Jg
x1 = · l00
gJgall g>gJgJbcll
a>glll jyjlaal glxwJg.
aoJgJgJg0jJcJrJll aaa
p|
j_Lg ≥ J_L( 1 - ) g
| A | a | b | c | d | e | f | g |
| G1 | J | J | J | J | J | J | J |
| G2 | J | J | J | J | J | J | J |
| G3 | J | J | J | J | J | J | J |
| J | J | J | J | J | J | J | J |
| J | J | J | J | J | J | J | J |
| J | J | J | J | J | J | J | J |
| J | J | J | J | J | J | J | J |
| J | J | J | J | J | J | J | J |
| J | J | J | J | J | J | ||
| J | J | J | J | J | J | J | J |
| J | J | J | J | J | J | J | J |
| J | J | J | J | J | J | J | J |
| J | J | J | J | J | J | J | J |
| J | J | J | J | J | J | J | J |
| J | J | J | |||||
| J | J | J | J | J | J | J | J |
| J | J | J | J | J | J | J | J |
| J | J | J | J | J | J | J | J |
| J | J | J | J | J | J | J | J |
| J | J | J | J | J | J | J | J |
| J | J | ||||||
| J | J | J | J | J | J | J | J |
| J | J | J | J | J | J | J | J |
| J | J | J | J | J | J | J | J |
| J | J | J | J | J | J | J | J |
| J | J | J | J | J | J | J | J |
BP 3 Home g
1g>all
| 1 | AR | ... |
| 1 | AR | aolec |
| 1 | AR | ρdss |
| 3 | AR | aalalg |
| 3 | AR | Jlll |
| 3 | AR | ... |
| 4 | AR | aola |
| 6 | AR | ... |
| 7 | AR | ... |
aole|daw
Jzj
Jl l J 100
Jl j 100
Jl 100
aalll lall pssy
http://www.kaercher.com/dealersearch

71364 Winnenden (Germany)
Tel.: +49 7195 14-0
Fax: +49 7195 14-2212