TwinTalker 3700 Duo Pack - Phone TOPCOM - Free user manual and instructions
Find the device manual for free TwinTalker 3700 Duo Pack TOPCOM in PDF.
User questions about TwinTalker 3700 Duo Pack TOPCOM
0 question about this device. Answer the ones you know or ask your own.
Ask a new question about this device
Download the instructions for your Phone in PDF format for free! Find your manual TwinTalker 3700 Duo Pack - TOPCOM and take your electronic device back in hand. On this page are published all the documents necessary for the use of your device. TwinTalker 3700 Duo Pack by TOPCOM.
USER MANUAL TwinTalker 3700 Duo Pack TOPCOM
UK The features described in this manual are published with reservation to modifications.
Thank you for purchasing the TOPCOM Twintalker 3700. It's a short range, low powered radio communication device that has no running costs other than the minimal cost of re-charging the batteries.
The TwinTalker 3700 operates on Private Mobile Radio frequencies and can be used in any country where the service is authorised as indicated on the packing box and in this manual.
2 INTENDED PURPOSE:
It can be used for different professional as well as for recreational purposes. For example: to keep in contact during travelling with 2 or more cars, biking, skiing. It can be used to keep in contact with your children when they are playing outside, etc...

Restriction: Check the local regulations before using it outside the country where it was purchased. The standard may be prohibited in this country.
3 CE-MARK
This product is in compliance with the essential requirements and other relevant provisions of the R&TTE directive 1999/5/EC.
This is confirmed by the CE-mark.
The Declaration of conformity can be found on: http://www.topcom.net/cdeclarations.php
4 SAFETY INSTRUCTIONS
4.1 GENERAL
Please read carefully through the following information concerning safety and proper use. Make yourself familiar with all functions of the device. Keep this manual on a safe place for future use.
4.2 BURNING INJURIES
-
If the cover of the antenna is damaged, do not touch because when an antenna comes in contact with the skin, a minor burn may result when transmitting.
-
Batteries can cause property damage such as burns if conductive material such as jewellery, keys or beaded chains touches exposed terminals. The material may complete an electrical circuit (short circuit) and become quite hot. Exercise care in handling any charged battery, particularly when placing it inside a pocket, purse or other container with metal objects.
4.3 PERSONAL SAFETY
- Do not place your device in the area over an air bag or in the air bag deployment area. Air bags inflate with great force. If a communicator is placed in the bag deployment area and the air bag inflates, the communicator may be propelled with great force and cause serious injury to the occupants of the vehicle.
- Keep the radio at least 15 centimetres away from a pacemaker.
- Turn your radio OFF as soon as interference is taking place with medical equipment.
- Do not replace batteries in a potentially explosive atmosphere. Contact sparking may occur while installing or removing batteries and cause an explosion.
- Turn your communicator off when in any area with a potentially explosive atmosphere. Sparks in such areas could cause an explosion or fire resulting in bodily injury or even death.
- Never throw batteries in fire as they may explode.

Areas with potentially explosive atmospheres are often, but not always, clearly marked. They include fuelling areas such as below deck on boats, fuel or chemical transfer or storage facilities; areas where the air contains chemicals or particles, such as grain, dust or metal powders; and any other area where you would normally be advised to turn off your vehicle engine.
- Keep batteries away from small children
4.5 LEGAL
- In some countries it is prohibited to use your PMR while driving a vehicle. In this case leave the road before using the device.
- Turn your unit OFF when on board an aircraft when instructed to do so. Any use of the unit must be in accordance with airline regulations or crew instructions.
- Turn your unit OFF in any facilities where posted notices instruct you to do so. Hospitals or health care facilities may be using equipment that is sensitive to external RF energy.
- Replacing or modifying the antenna may affect the PMR radio specifications and violate the CE regulations. Unauthorized antennas could also damage the radio.
4.6 NOTES
- Do not touch the antenna while transmitting, it could affect the range.
- Remove the battery if the device is not going to be used for a long period.
5 CLEANING AND MAINTENANCE
- To clean the unit, wipe with a soft cloth dampened with water. Don't use a cleaner or solvents on the unit; they can damage the case and leak inside, causing permanent damage.
- Battery contacts may be wiped with a dry lint-free cloth.
- If the unit gets wet, turn it off and remove the batteries immediately. Dry the battery compartment with a soft cloth to minimize potential water damage. Leave the cover off the battery compartment overnight or until completely dry. Do not use the unit until completely dry.
6 DISPOSAL OF THE DEVICE (environment)
At the end of the product lifecycle, you should not throw this product into the normal household garbage but bring the product to a collection point for the recycling of electrical and electronic equipments. The symbol on the product, user guide and/or box indicate this.
Some of the product materials can be re-used if you bring them to a recycling point. By re-using some parts or raw materials from used products you make an important contribution to the protection of the environment. Please contact your local authorities in case you need more information on the collection points in your area.

7 USING A PMR DEVICE
To communicate between PMR devices they need to be set all on the same channel and within receiving range (up to max. 3 km in open field). Since these devices use free frequency bands (channels), all devices in operation share these channels(total 8 channels). Therefore, privacy is not guaranteed. Anybody with a PMR set to your channel can overhear the conversation. If you want to communicate (transmitting a voice signal) you need to press the PTT button.
Once this button pressed, the device will go into transmit mode and you can speak into the microphone. All other PMR devices in range, on the same channel and in standby mode (not transmitting) will hear your message. You need to wait until the other party stops transmitting before you can reply to the message. At the end of each transmission the unit will send a beep. To reply, just press the button and speak into the microphone.

If 2 or more users press the button at the same time the receiver will receive only the strongest signal and the other signal (s) will be suppressed. Therefore you should only transmit a signal (press button) when the channel is free.
8 GETTING STARTED
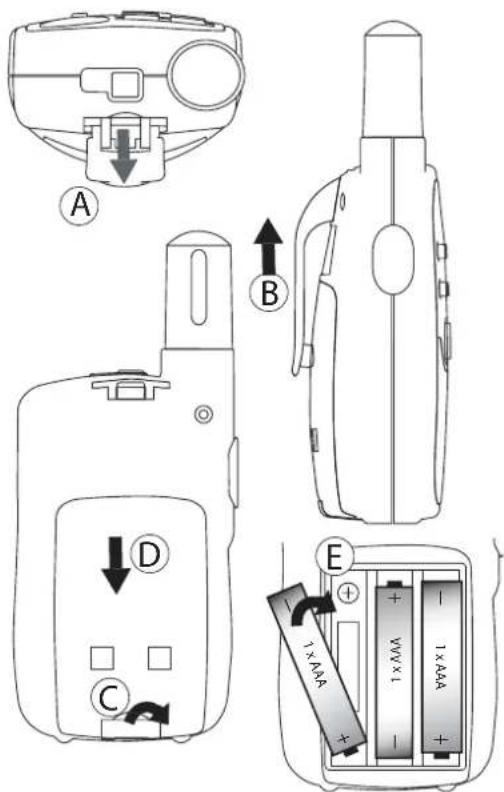
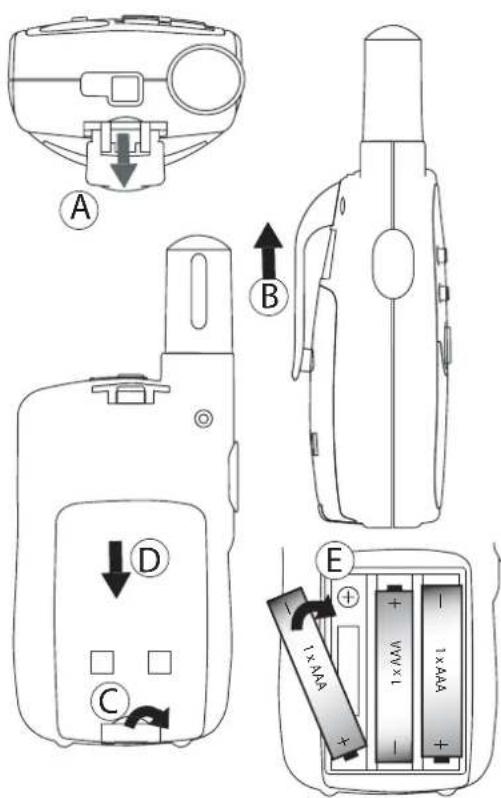
8.1 REMOVING/INSTALLING THE BELT CLIP
1.To remove the clip from the unit, push the belt clip (B) towards the antenna, while pulling the clip tab (A).
2.When re-installing the belt clip, a click indicates the BeltClip is locked into position.
8.2 BATTERY INSTALLATION
1.Remove the belt clip (7.1).
2.Pull the battery door tab down (C) and slide the battery cover away from the antenna. (D)
3.Install 3 'AAA' alkaline or rechargeable batteries following the polarity as shown (E)
4.Re-install the Battery Cover and Belt Clip (§ 7.1).
9 B U T T O N S
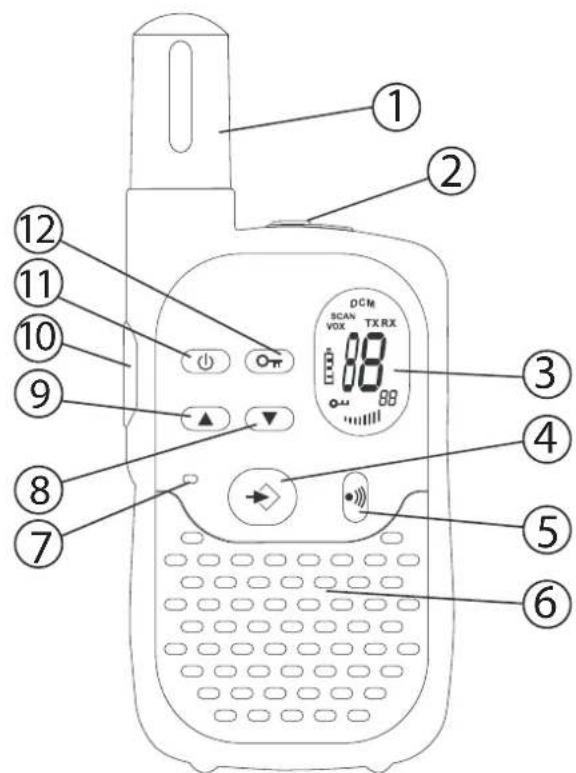


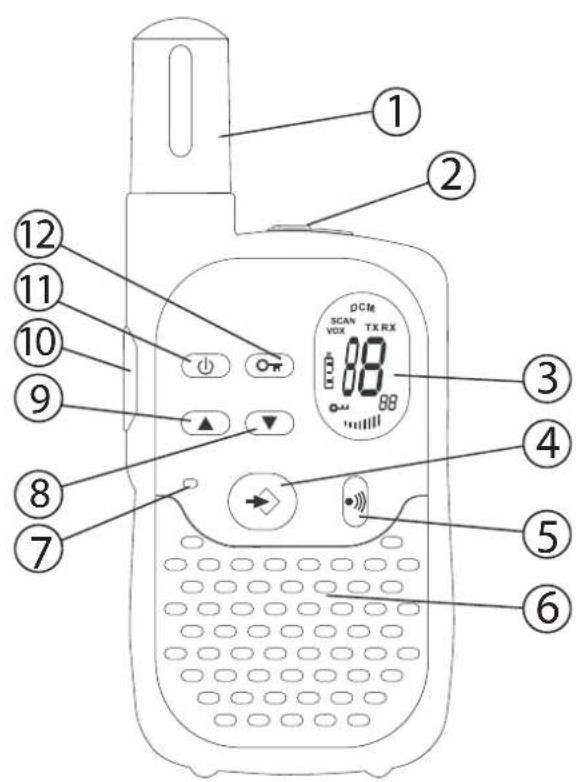
1.ANTENNA
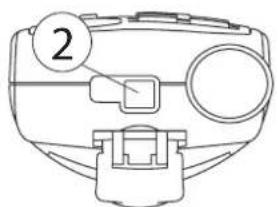
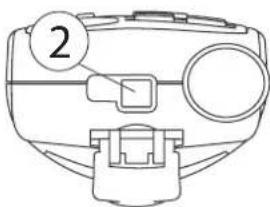
2.SPEAKER/MIC/CHARGER Connector
3LCD Display
4.MENU button
- Enter menu.
5.CALL button
- Transmit a call tone
6.SPEAKER
7.MICROPHONE
8.DOWN button
- Decrease the speaker volume
- Select the previous item in the menu.
9. UP button
- Increase the speaker volume
- Select the next item in the menu
10.PUSH TO TALK button (PTT)
- Press To Talk or release to listen
- Confirm a setting in the menu
11.ON/OFF button
12.LOCK button 0
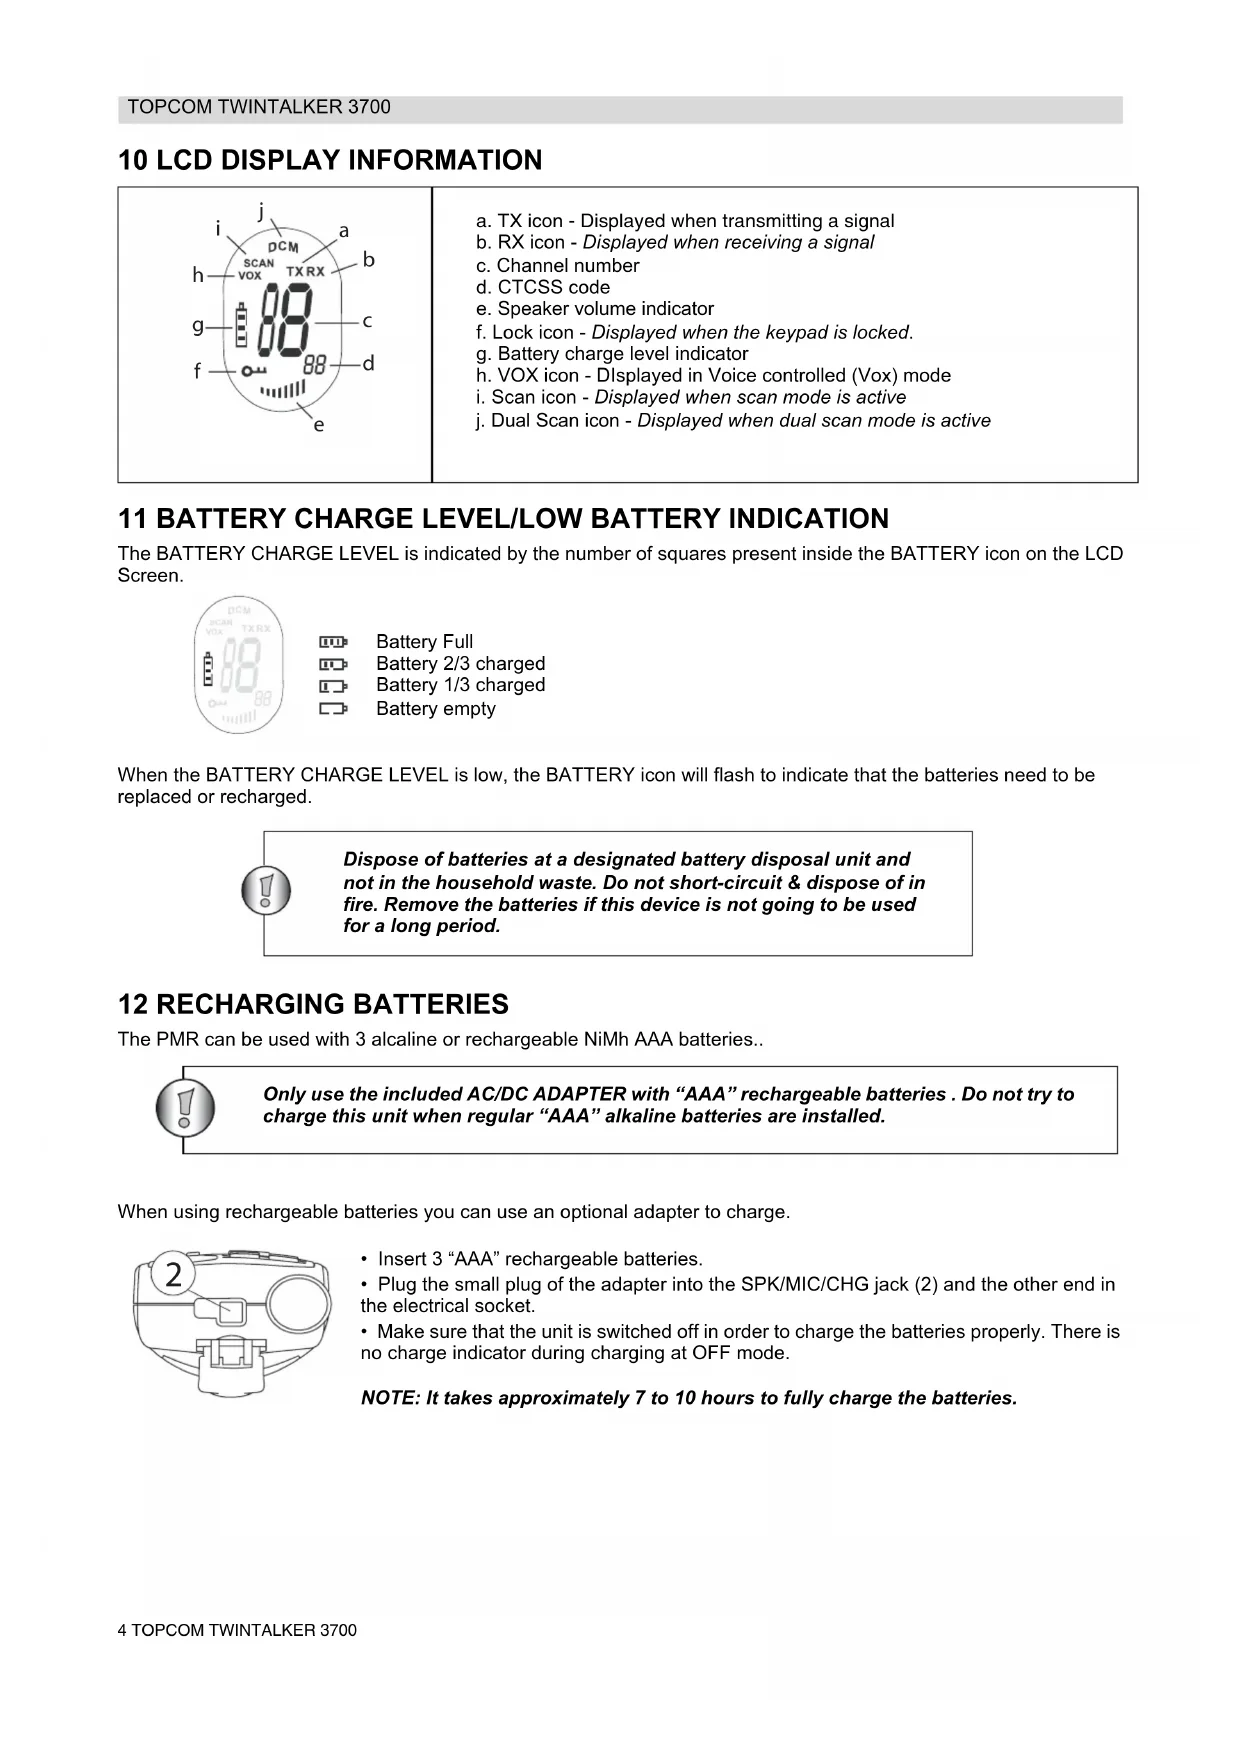
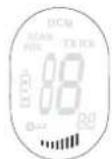
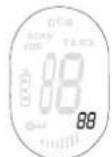
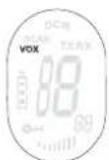
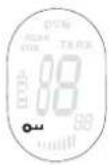
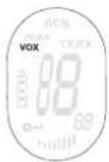
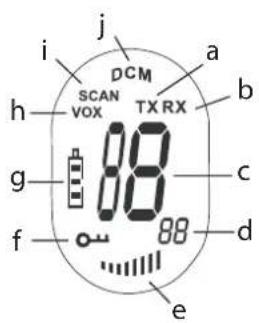
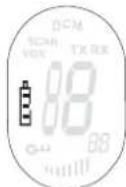
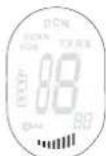
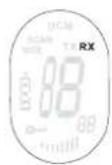
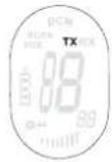
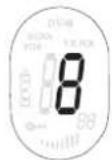
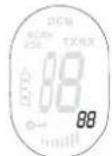
10 LCD DISPLAY INFORMATION
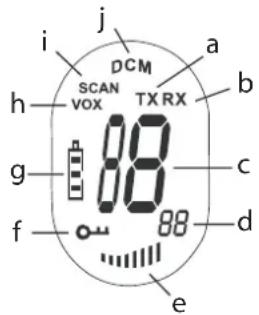
a. TX icon - Displayed when transmitting a signal
b. RX icon - Displayed when receiving a signal
c. Channel number
d. CTCSS code
e. Speaker volume indicator
f. Lock icon - Displayed when the keypad is locked.
g. Battery charge level indicator
h. VOX icon - Displayed in Voice controlled (Vox) mode
i. Scan icon - Displayed when scan mode is active
j. Dual Scan icon - Displayed when dual scan mode is active
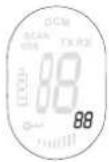
11 BATTERY CHARGE LEVEL/LOW BATTERY INDICATION
The BATTERY CHARGE LEVEL is indicated by the number of squares present inside the BATTERY icon on the LCD Screen.
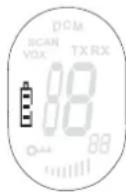
Battery Full
Battery 2/3 charged
Battery 1/3 charged
Battery empty
When the BATTERY CHARGE LEVEL is low, the BATTERY icon will flash to indicate that the batteries need to be replaced or recharged.

Dispose of batteries at a designated battery disposal unit and not in the household waste. Do not short-circuit & dispose of in fire. Remove the batteries if this device is not going to be used for a long period.
12 RECHARGING BATTERIES
The PMR can be used with 3 alcaline or rechargeable NiMh AAA batteries..

Only use the included AC/DC ADAPTER with "AAA" rechargeable batteries. Do not try to charge this unit when regular "AAA" alkaline batteries are installed.
When using rechargeable batteries you can use an optional adapter to charge.

- Insert 3 "AAA" rechargeable batteries.
- Plug the small plug of the adapter into the SPK/MIC/CHG jack (2) and the other end in the electrical socket.
- Make sure that the unit is switched off in order to charge the batteries properly. There is no charge indicator during charging at OFF mode.
NOTE: It takes approximately 7 to 10 hours to fully charge the batteries.
13 USING THE TWINTALKER 3700
13.1 TURNING THE UNIT ON/OFF
To activate; press and hold . The unit will "beep" and the LCD Screen will display the current channel.
To switch off; press and hold again. The unit will "beep" and the LCD Screen will turn blank.
13.2 ADJUSTING SPEAKER VOLUME
The Speaker Volume can be adjusted using and . The Speaker Volume level is displayed on the LCD.
13.3 RECEIVING A SIGNAL
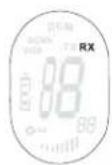
The unit is continuously in the RECEIVE mode when the unit is ON and not transmitting. When you receive a signal on the current channel, the RX icon is displayed.

In order for other people to receive your transmission, they must be set on the same channel and CTCSS code
13.4 TRANSMITTING A SIGNAL
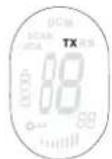
- Press and hold to TRANSMIT.
- Hold the unit in a vertical position with the MICROPHONE 10cm from the mouth and speak into the microphone.
- Release when you have finished transmitting.
13.5 CHANGING CHANNELS
The PMR has 8 available channels.
To change channels:

- Press once, the current channel number flashes on the LCD Screen.
- Press to change the channel.
- Press to confirm your selection and return to the NORMAL mode.
To confirm and shift to the next option, press
NOTE: Any PMR set on the same channel can receive and listen to the conversation, also when the other use a CTCSS code.
13.6 CTCSS (CONTINUOUS TONE CODED SQUEELCH SYSTEM)
The 2 digit CTCSS code corresponds to a specific tone frequency the radio emits. Two users, with the same channel and CTCSS set can hear one another. They will not be able to hear anyone else on the channel unless the other radios have the same exact CTCSS code enabled.
The PMR has 38 CTCSS codes available.
- Press twice, the CTCSS code will flash
- Press or to select another code.
- Press to confirm your selection and return to the NORMAL mode.
To confirm and shift to the next option, press
NOTE: Any PMR set on the same channel can receive and listen to the conversation, also when the other use a CTCSS code.
13.7 MONITOR
You can use the MONITOR feature to check for weaker signals in the current channel.
- Press and simultaneous to activate channel monitoring.
Press to stop monitoring.
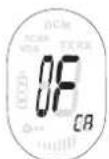
13.8 VOX SELECTION
The PMR is capable of voice activated (VOX) transmission. In VOX mode, the radio will transmit a signal when it is activated by your voice or other sound around you. VOX operation is not recommended If you plan to use your radio in a noisy or windy environment.
Press 3 times.
- Press to turn the VOX feature ON and press again to select the VOX sensitivity level which is indicated in the right corner of the display. Press until OF appears on the display, to turn VOX OFF.
- In the VOX mode, the VOX icon will be displayed.
To confirm your selection and return to the NORMAL mode, press (PTT)
13.9 CHANNEL SCAN
CHANNEL SCAN performs searches for active signals in an endless loop from channel 1 to 8.
- Press and hold Press briefly to start scanning.
- Release the buttons.
- When an active signal (one of 8 channels) is detected, CHANNEL SCAN pauses and you will hear the active signal.
- Press PTT to communicate through the active signal channel. Press to deactivate channel scan.
When an active signal (one of 8 channels) is detected, press to bypass the current channel and continue to search for another active channel
13.10 CALL TONES
A call tone alerts others that you want to talk.
a. Setting the Call Tone
5 different Call Tones can be selected.
- Press 4 times. CA will be displayed.
- Press to select another call tone or select OF to enable call tones.
- Press to confirm your selection and return to the standby mode.
b. Sending a call Tone
Press briefly. The call tone will be transmitted for 3 seconds on the set channel.
13.11 ROGER BEEP ON/OFF
After the button is released, the unit will send out a roger beep to confirm that you have stopped talking.
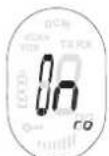
To set the Roger Beep.
- Press 5 times. 'ro' will be displayed.
- Press to enable (ON) or disable the Roger-Beep (OF).
- Press to confirm your selection and return to the standby mode.
13.12 KEY-TONE ON/OFF
When a button is pressed, the unit will beep briefly.
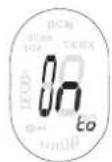
To set the key-tone.
- Press 6 times. 'to' will be displayed.
- Press to enable (ON) or disable the Roger-beep (OF).
- Press to confirm your selection and return to the standby mode.
13.13 DUAL CHANNEL MONITOR FUNCTION
In stand-by, the PMR is set on one set channel with CTCSS code. The PMR will only receive signals transmitted on that channel and CTCSS code.
Dual Channel Monitor allows you to monitor a second channel with CTCSS code.
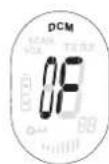

- Press 7 times, DCM appears on the display.
- Press to change the channel.
- Press to confirm the channel selection and go to CTCSS SUB-CHANNEL SELECTION
- Press to change the CTCSS.
- Press to confirm.
To disable the function select channel 'O'
When the Dual Channel Monitor function is activated, the PMR will switch sequentially between the standby channel + CTCSS and the Dual Channel + CTCSS.
13.14 BUTTON LOCK
- Press and hold for 2 seconds to activate or deactivate the BUTTON LOCK mode. The BUTTON LOCK icon is displayed on the LCD Screen.
- Press and hold again to deactivate BUTTON LOCK
13.15 STOPWATCH
- Press and hold for 3 seconds to enter stopwatch mode
Press to start counting
Press to stop counting
Press toreset the timer - Press and hold for 3 seconds to exit stopwatch mode
13.16 HEADSET CONNECTION
The Twintalker 3700 can be used with an included external microphone and speaker.
The connector is located under the protective rubber cover on the top of the unit. To attach the external speaker/microphone headsets or earpiece, lift the rubber flap on the top of the unit to expose the connector.
Insert the appropriate plug into the connector.
14 TECHNICAL SPECIFICATIONS
| Channels | 8 |
| CTCSS | 38 |
| Frequency | 446.00625MHz - 446.09375 MHz |
| Range | Up to 3 Km (Open field) |
| Batteries PMR | 3 x AAA Alkaline or NiMh rechargeable |
| Transmission Power | =< 500mW ERP |
| Modulation Type | FM - F3E |
| Channel spacing | 12,5 Khz |
| Channel Frequency Chart: C | CSS Code Chart | ||||||||
| Channel Frequency (MHz) | Code Frequency (Hz) | Code Freq. (Hz) | Code Freq. (Hz) | Code Freq. (Hz) | Code Freq. (Hz) | ||||
| 1 | 446,00625 | 0 | Disabled | 10 | 94,8 | 20 | 131,8 | 30 | 186,2 |
| 2 | 446,01875 | 1 | 67,0 | 11 | 97,4 | 21 | 136,5 | 31 | 192,8 |
| 3 | 446,03125 | 2 | 71,9 | 12 | 100,0 | 22 | 141,3 | 32 | 203,5 |
| 4 | 446,04375 | 3 | 74,4 | 13 | 103,5 | 23 | 146,2 | 33 | 210,7 |
| 5 | 446,05625 | 4 | 77,0 | 14 | 107,2 | 24 | 151,4 | 34 | 218,1 |
| 6 | 446,06875 | 5 | 79,7 | 15 | 110,9 | 25 | 156,7 | 35 | 225,7 |
| 7 | 446,08125 | 6 | 82,5 | 16 | 114,8 | 26 | 162,2 | 36 | 233,6 |
| 8 | 446,09375 | 7 | 85,4 | 17 | 118,8 | 27 | 167,9 | 37 | 241,8 |
| 8 | 88,5 | 18 | 123,0 | 28 | 173,8 | 38 | 250,3 | ||
| 9 | 91,5 | 19 | 127,3 | 29 | 179,9 | ||||
15 WARRANTY
15.1 WARRANTY PERIOD
Topcom units have a 24-month warranty period. The warranty period starts on the day the new unit is purchased. Consumables or defects causing a negligible effect on operation or value of the equipment are not covered.
The warranty has to be proven by presentation of a copy of the original purchase receipt, on which the date of purchase and the unit-model are indicated.
15.2 WARRANTY HANDLING
A faulty unit needs to be returned to an authorized service centre including a valid purchase note. If the unit develops a fault during the warranty period, the service centre will repair any defects caused by material or manufacturing faults free of charge.
The service centre will at its discretion fulfil its warranty obligations by either repairing or exchanging the faulty units or parts of the faulty units. In case of replacement, colour and model can be different from the original purchased unit. The initial purchase date shall determine the start of the warranty period. The warranty period is not extended if the unit is exchanged or repaired by the appointed service centres.
15.3 WARRANTY EXCLUSIONS
Damage or defects caused by incorrect treatment or operation and damage resulting from use of non-original parts or accessories are not covered by the warranty.
The warranty does not cover damage caused by outside factors, such as lightning, water and fire, nor any damage caused during transportation.
No warranty can be claimed if the serial number on the unit has been changed, removed or rendered illegal.
1 INLEIDING
5 RENGJØRING OG VEDLIKEHOLD
Auto E1IeBaiWvTea aTo TnV EvOeIGN CE.
13.6 CTCSS (Continuous Tone Coded Squelch System)
O diihioc KWDIOc CTCSS avioiOei o ie aoukepiEvn ouxovnta tovou Touk EKTEI O TOpTIDeKTNS. DuO Xpntec TIOU exoUV puoiie i cuaokeue tou oTO idIO kavai kai CTCSS mTropov va akououv o evas tv aAiov. ev aTropov va akououv kantoiov aAloi kavai EKTOC kAI av oi aAloi TOpTIDeKTEc exov EvpyotioNae Akipwos Toidio KWDIOCTCSS.
To PMR i 138 i k o u c CTCSS.
- Pntjote duo opec to TnAknTpo 念 kai O Kwoikoc CTCSS avaaboBnyei
- Piatnote To TnTto TnTto TnTto yia va eTIAeEETe aAov Kwoikó.
- Pntote to TAnKtpo PTYia va ETIIEBaiwoTe Tny ETTIAoyn oac KAI VA EITIOptpeyETe OTNV KANONIKH Aetoupyia.
- Ia va eTIIEbaIWOeTE kai va eTaeite OTNV EIOeyn EIIAOyN, TnHote To IAnktpo
HMEI H : OIOIOBNTOTPE MR exei puOHTe i 0to iio kavai ITOpei va aabeia kai va akouoei tn ouovipia, akopa kai av oiaaee cuaekuec xnpoiopoiouiv Kwiko CTCSS.
13.7 Napakolouθηση
MTopeTe va XpnoiOpOnoiTe Tn λeIoupyia NAPAKOAOYoHsH yia va eLeyEe γia TIO aoev n oμata a kavai.
- PatnoTe TauroxpoVa ta Koumuia Kaia yia va EvpyoToInoTe Tny TaPakOaouon kavaiuV.
- Patae To TnKtpo Pya oTapatnoe Tny TapaKaOauOnon.
13.8 Eπλογή VOX
To PMR utoatnpiei t n aeitoupyia ekitoumpinnc eveytooinc oyw uvns (VOX). aeitoupyia VOX, o EKTEEva ona otav eveytoointhei ato tn uvn oac n ato aalov nxo oTov TepiBaAovTa xwpo. H aeitoupyia VOX ouviotatai av TTPOKEiTai va xpnoiuTOIONE TOV TIOPTOIDEKTn e TEPiBaAov m TioLu bOpBo n TioLu aepa.
4.2 Oxorobbie TpaBmbi
- Ecni noBpeKdeH KOpNc aHTeHHbI, He npKacaiTecb K Hemy, NocKOJIbky BO3MOXHbI KOHTaKT aHTeHHbIC KOKei BO BpeMnpepaun MoKeT npNBecTN K MeCTHomy OxKOry.
Ecni Bo3HkaeT KOHTaK T MeKdy OOrJIeHHbIMN KOHTaKTHbIMN BbIBOaMn aKKyMyIaTOPOB INpOBOJaIIM MaTePnaIOM TaKnx PpeMeTob, KAK KJIIOUH, 6yCbI INI IOBeJIINPbIe YkpaWeHnA, BO3MOXHO NOBpeKJeHne IMyIecTBa TeNIOBbIM BO3DeIcTBnEM aKKyMlyaTOPOB.MaTePnaI MoKeT Bb3BaTb KOpOTKe 3AmbKaHne INI HArpeTbcrdo ouHb BbICOKo TempePaTypbI. Bydte OcToPOxKnbl npi paBoTe C IIObIMN 3apJxKeHHbIM 6BatapeKamn,OCo6EHNO pRn pa3MeueHn yCTpoIcTBa B KapMaHe, KoSeIbke INI NIObOM dpyrom cyTnpe, rde IMeIoTcRe MtaJIInuYeCKne PpeMeTbl.
4.3 JIuHa 6e3oNaChocTh
He nomeuai Te daHoe ycTpoCTBO HAD BO3dyuHoi NOdyuKo IIN B 30He ee paKpbITn. Bce noDywn paKpbIbAOTCB C BbICOKO ydapHO CnIOE. Ecn paun HaxODNTcB 30He paKpbITN BO3dyuHoi NOdyuKn, paKpbIbAOUeC C BbICOKO ydapHO CnIO, paun MOxET OTJeTeTB C 60JbWOn CKOpocTbU N HaHeCTn cepbe3hIe TpaBMbl naccaknapam ABTomO6nIa.
He noDHOCHTe paunIO K 3JIeKToPHHOMy KapDIOCTmMyIaTOpY 6nKe 15 cm.
- Ecni daHHa pauncaonomexn Ipaobtbi MeiHnckoro obopyoBaHn, BbIKIOHTe ee.
He 3ameHnTe 6aTapeeKn B noteHuaJIbHO B3pbIBOOnaCHO CpeJe. Pn n3BneHnn nn yCTaHOke 6aTaapeek BO3MOKHO NCKpeHne KOHTAKTOB, CNOCO6Hoe pnpBecTu K B3pbBy.
- HaxoJHnB JIO6om MeCTe, ABJIIOUeMcN oTeHuaIbHO B3pbIBOONaChbIM, BbIKIOuHaIte paunIO. NCKpo06pa3OBaHne B TaKIN MeCTAX MOKeT BbI3BaTb B3pbIB INI pINBecTNI K IOXapy C BO3MOXHBIMN NOCJeDCTBnAMN B BVNe cepBe3HbIX n DaXe CMepeJIbHbIX TpaBM.
HnBkoem cnyae He 6pocaiTe 6atapeKn B oroHb, nckOJIbky OHI MOrYt B3OpBaTbcra.

Mecma, reJraouuecnaomeHuaJIbHO 63pbIeOonacHbIMu, yacmo (Ho He 6ce2da)
rCHbIM o6pa3OM nOmeaomcra. K Hm omnoCMA mecma monnueo3anpaeku
(hanpumep noaanybo Ha cydax), mecma mpaHcnopmuoeku monnuea unu
xumueckux eeuecme xpaHunuax, mecma c codepxaHuem e 03dyxe
xumueckux eeuecme lu6o makux yacmu, ka necuHku, nbInb uU
memannueckui npowok, a makke IIO6bIe dpyue mecma, ade obbuHoo
pekomehdyemc eblKnlouyamb deusameB abomomobuJra.
4.4 OnachocTb OTPaBJIeHnA
CneDnte 3a Tem, UTo6bI yCTpoCTBO 6bIIO HeIOCTyHOMaJIeHbKIM DeTAM.
4.5 IOpndnueckne HOpMbI
B HeKOTopbIX cTpaHax 3anpeaetcnoJb3ObaHne yctpoiCTbAMn cTaHdapTa PMR npn BoKDeHm n ABTomobNJy. B TaKnx cTpaHax nepeB BKJIIOUeHHem ycTpoiCTBa cJeDyET npnnapKObaTbcra.
Ha 60py cmojeta, nnoJooHeo BbIKNoUaTb noO6HbIe yCTpoiCTBa, co6nIouaIte 3TO npaBnIO. IIO6bIe MaHInyJIaCm C yCTpOoiCTBOM DOJXHbI IOdUnHraTbcr npaBnIaM, DeIcTBYIOcIM Ha 60py, INIy Yka3aHnI MeknnaJa.
BbIKIIOUaIte yCTPOINCTBO B IIO6bIX MeCTax, Ie 3TO Tpe6yeTc corIacHO yCTAOHOBJIeHHbIM IppeDyIpEeJHnM. B 6OJIbHIuaX I neue6bIX yUpeKJdeHnX BO3MOxHO nCNOJIb3OBAHne o6OpyIDoBAHn, YyBCTBNTeJIbHOrO K BHeuHEmy paIIOuOAcToTHOMY n3JIyUeHnIO.
3aMeHa NIM MoNΦnKaUaHrTeHHb MoKcT NpNBecT N 3MeHeHIO XapakTePNC Tk PaDnOCB3N CTaHdApTa PMR IN K HapuSeHIO HopM CE. PnpunHO HApuSeHIN paDnOCB3N MOryT CInjKNTb TaKKe KOHTpaKaTHbIe aHTeHHbl.
4.6 Примechлия
He npikacaiTecb KaHTeHHe BO Bpemr nepeaun - 3TO MOKeT He6laornpraTHo NOBInraTb Ha paDnyc DeIcTBnA.
Ecni yctpoiCTBO BbIKNIOaETcra n3 pa6oTbHa nnTeNbHOe Bpemr, n3BNeKeNTe aKkyMnyTopbl.
5 OuInctka n TexHnueckoe 06cIyXnBaHne
-Дя ouHCTK yCTPOHCTBa npoctpnte erO mRkoT KaHbIO, cnerKa CMOeHHo BDoI. He o6pa6aTBaIte NOBepxHOCTb yCTPOHCTBa OCHNTeJIeM nII pa36abHTeIeM, NockOJIbky OHN MOryT NOBpeDITb KOpIyc I npoteYb BOBHtPb, Bbl3bIBa HEBOCCTaHOBMbIe NOBpeJdeHna.
-KoHTaKTbI 6aTapeek MOxH0 IpoTnpaTb cyXo TKaHbIO 6e3 BOpca.
EcIn B yctpoiCTBO nonaAet Bnara, BbIKIIOHTe ero HemeJeHNO 3BLeKNTe 6aTapeKN. TTo6bl CBeCTN K MHNmMy IOTeHuaJIbHbI BpeI OT Bo3deIcTBNA BObl, IpOTpIte aKKymJrTOPhyIO rYeKy cyXOITKaHbIO. KpbIuKy aKKymJrTOpHoi ryeKn cIeDyET npocuHTB TeueHne HOHn IIN Do nOLHO rCue3HOBeHn BnAr. He NOLb3yTECB yCTpoiCTBOM, IOKa IONHOCTbIO He NCue3HT Bnara.
6 Ytnn3aun yctpoictba (3aunTa Okpykaioe cpebl)
IocTeeHn cpoKa cnjXbI n3dJIeNIA 3aIpeuAetcraero yTNIIN3aUINBMeCTe CobHbIM 6bITOBbIM Mycopom. YcToPcTBo NOpJekNT cdaue B nyHK TnpEma IyTNIIN3aUIN 3JeKTPnuCeCKOrO n 3JeKTPoHHoro 6opdyoBaHnHa 3TO yKa3bIBaEt O603HaueHne Ha ycToPcTBe, B pyKOBOCTBe NOIb3OBaTeJI N/IIIN Ha yNaKOBKe.
HekotopbIe MaTePnAbl, npImeHReMbIe B npOn3BODCTBe n3dJIy, MoryT 6blb nepepa6oTaHbI, ecN doCTaBt bix B nyHKT nepepa6oTKI. BnaOapar NOBTOPHOMy npImeHeHIO HeKOTOpbIX DeTaeN IIN MaTePnAIOB Bbip6oTabJero CpOK cIyXkbI N3dEInr BHOCTcBaxKnbl BkNaB 3aunTy Okpykaioue Cpebl.
IJIIOJUyEHIN DOONHHTeBHO INHOpMaUN O nyHKTAX npHeMa CBxNTECb MecTHbIMn OprHaAMN BnactN.

7Испобзоване устpoиства CTандарта PMR
Дя obecneueHn CBy3m MeJy yctpoiCTBAMn PMR Heo6xOJIMO, YTO6bI BCE yctpoiCTBa 6bln HactpoeHbHa OdnH TOT Ke KaHn HaxOuINncB IpeDeJax DuaNan30Ha IpNeMa (He 60onee 3 KM Ha OTKpbIToM MecTHOCn). NockoJIbky 3TN yctpoiCTBa pa6oTAOT B OTKpbITbIX qactOTbIX dana30Hax (no KaHaNam), BCE haxoJusneCBA pa6ote yctpoiCTBa COBMecTHO nCOnb3yOT 3TN KaHaNb (BCero 8 KaHaNob). NoTomy cekpETHOCTb CBa3n He rapaHTnpyeTc. JIO6oN noIb3OBateNB annapata PMR, HACtpoeHHbHa KaHaN ppyrO NOb3OBaTeN, MoXeT npocnyuHBaTB erO pa3ROBOp. JYcTaHOBHeHn CBy3n (pepeaH peYeBOrO ciHana) Heo6xOJIMo HaxaTb KONkPy PTT. Haxatne daHHo KNonKn Bbl3bIAeT nepeBOD yctpoiCTBa B pexnM nepeDaun, Nocne Yero MOxHO ROBOpNTB MmKPOphn. PepeDaBaemoe npn 3tOM Cooo6UeHne npocnyuHBaETcra HA BcEx dpyrnx yctpoiCTbax PMR, HaxoJusNXCB B DnAna3OHe pnEma, HActpoeHHbIX Ha 3OT Ke KaHaN HaxoJusNXCB B pexnme OkndaHna (6e3 AKTNBOHn pepeDaun). Pepd OTBeTOM Ha cooo6UeHne Heo6xOJIMo DOx4taBc 3abpeHne nepeDaun ot dpyroro aboHentA. NOKOHAHNN KAKDOI nepeaHu yCTpoiCTBO Bbldaet COOTBEcTByOuN 3BYKOBoCNIHAN. INa OTBeta DoCTaTOHO HauKaTb KONKpyPTM nepeDaTb peyeBOe cooo6UeHne uee3 MmKpOphn.

Ecnu KhoNpyTHOHOpemHn HaxumaHm HeckoNbKO NOJb3OaMeNeU, npueMHuk npuHMaem moJbKO camBu MOuHbU cuHaN, c6paCbIaR OcmaJIbHbIe. N03momy cneDyem nepedabam buHaN (HaxumMb KhoNky PTT) moJbKO npu HanuYuCC6oBodHOz KaHaJa.
8 Hauano pa6oTbI
8.1 YctaHOBKa/chTne 3axnMa dJa peMeuKa
1.Дя Chяпя 3axmamc6JOKaHaJaBnTeHa3axmIMДЯpeMeuKa(B)B HAnpaBneHn aHTeHHbI N OTTAHnTE nPaHky3axmAm(A).
2.Pn NOBTOH OYCTAHOBKe 3aXIMa DnpeMeUka FHKcaunr 3aXIMa B COOTBeTCTByIOUeN PO3uIN COnpOBOxJaETcR 1eJyKOM.
8.2 YctaHObKa 6aTapeek
1.CHIMTe 3axm dIpa peMeuKa (7,1).
2.OTTnHTe Kn3y 3aueNky DBePcbl OTceKa 6aTapei (C) n CdBnHbTe KpbIuKy 6aTapeB HAnpaJIeHNn OTo aHTeHHbl. (D)
3.YctaHOBtTe 3 UeNoCHbIX HnH Hepe3apXaEMbIX 6aTape AAA,co6IIOgA NOJrPHoCTb TAK,KaK Noka3aHO Ha pucyHKe (E).
4.BHOb ycTaHOBuTe KpbIuKy aKkyMnyTopHoJ qYeKn n 3aXmM dJa peMeuKa ( § 7,1).
9 Khonkn
1.AHTEHHA
2.Pa3bEmIINMkpofoHa/rrpomKorOBOpnteIy/3apJHoro
yctpoiCTBa
3.JK-KnCnJIeI
4.KhONka MENU (MeHIO)
-Bxod MeHIO
5.KhonkaCALL(BbI3OB)
- Nocblnka moHaJIbHO20 cuHaHa 8bI3O6a
6.ДИНAMИK
7.MNKPOΦOH
8.KhonkaDOWN(BHn3)
-ymeHbweHue apomKocmu duhamuka.
-BbI6op npedbyuyezo nyHkma e MeHIO
9.KhONka UP (Bbepx)
-YeenuueHue apomKocmu duhamuka
-BbI6op cneodyouezo nyHKma e MeHIO
10.Khonka PUSH TO TALK (HaxaTbДЯ pa3roBopa) (PTT)
-Haxamue dpa3oepa unu omnyckaHue dna npocnyuueaHa
- NodmeepxdeHue ycmaHO8ku e MeHIO
11.Khonka ON/OFF (BKn./BbIKn.)
12.Khonka LOCK (Bnok)
10 INΦopMaúna Ha XXK-dncnnee
a. Cia ÷ iê TX - omobpaxaemc npu nepedae cuana.
b. 3haokRX - omobpaxaemcn npu npueMe cuhana.
c. Homep KaHana
d. KoCTCSS
e.Индикатор ГомКоctи ДИнhamиka
f. 3NaUOK Lock (6nokupobka) - omobpaxaemc npu 3a6nokupoahHou knaEuamype.
g.ИндикатopуpoBняЗapяdkn6atapeek
h. 3haok VOX - oTo6paxKaetcB peXmpeyeBOO ynpabHeHn (Vox).
i. 3NaUOK Scan (cKaHIpOBaHne) - omobpaXaemc e akmueHom peKume cKaHupOeaHua.
j. 3HaQOK Dual Scan (cDBoeHHe cKaHupoBaHne) - omobpaXaemc8 aKmueHOM peXume cDBoeHHO2O cKaHupoBaHua.
11 Hndnkaunpa3pRKn/Hn3KOrO ypoBna 3apra aKKymyIaTopa
BATTERY CHARGE LEVEL (ypoBHe 3apAaKMyJrTopa) o6o3Haayetc KOInueCTBOM KBaIpaTOB, OTo6paKaembIX 3HaKOM BATTERY (akKMyJrTop) Ha KK-3KpaH.
AkkymyTOp 3apJKeH NOHOCtBIO.
AkkymyIaTOp 3apJxKeH Ha 2/3 emKocTn.
AkkymyIaTOp 3apJxKeH Ha 1/3 emKoCTn.
AkkymyIaTOp pa3pJKeH.
Ecnn nndkaun BATTERY CHARGE LEVEL yka3bIbaeT ha pa3pJKeHoe coCToHne,TO 3naOK BATTERY miraet dIy o603NaueHn Heo6xOIMocTn 3aMeHb nnpe3apJkda 6ataeek.

IcnoB3oBaHbIe 6amaeuku ymuun3upyume 8 coomemcmuu c npaeunamu, He donyckar ux nonadnue 8 6bimoobie omxodbl. Nckloume Kopomkoe 3mbiKaHue u 0e3deucmeue o2H.Ecnu daHoe ycmpoucmeo 6bkniOaemca u3 pa6ombi Ha dnumenbHOe epeM, u3eNeKume u3 Heo 6amapeu.
12 έPE3APДКΑ ΕΑΤΑΕΝ
PMR MoXeT IcNoIb3ObTaBcra 3 1eNoUHbIMn Nnn nepe3apJkaembIMn Hukenb-MetAnIorN6pndHbIMn 6aTapeaMNAAA.

C nepe3apxkaembIMu 6amaeukamu AAA uonb3yume mojko npunaaembl adanmep nepemehnoo moka. Ecnu ycmahaueaomc o6bHbcie eNochbe 6amaeku AAA, 3apdka daHHO ycmpoucmea He npou3odumc.
Pn nCnoB3OBaHnn nepe3apxkaembix 6atapei nx 3apxckMOxHO noB3OBaTbcra OTdeNbHO npNo6peTaEMbIM aadantepom.
- YctaHOBtB 3 nepe3apXkaembIX 6atapeu AAA.
BCTaBbTe MInHaTIOpHyIO BnKy aAnITepa B pa3bEm SPK/MIC/CHG (2) IN BKnHouNTE dpyro KoHeu B 3NeKtprueckyio po3eKy. - 3apn. 3apn. Hopnt.
PIMMEAHNE. Nohna 3apka 6amapeek dnumc npumepno 7-10 yaco8.
13 Исторы Twintalker 3700
13.1 BkIIOueHHe/BBIKIOueHHe ycTpoiCTBa
ДяВКЛHOUHЯ yCTPOICTBA HAXMITE u YdePKNBaIte B HAXaTOM COCTOHN .YCTPOICTBO BbIaCT COOTBETCTBYUHIM 3ByKOBOu CnHaN, n Ha KK-3KpaHe NOBRTcH OMEp TEkyuero KaHana.
Дя Вькюуня устончы сныноги вудени. YcpoNTBO bIDACT COOTBETCTBYUO 3BykoBoN cHn, n KK-3kpannorachet.
13.2 PerynipoBka rpoMkoCTn dHAMKa
POMKOCtB DnHaMnKa MoXHO peryIINPOBaTb C NOMOuBIO △ n ▼ . POMKOCTb DnHaMnKa OTo6paXaETcA Ha KKД.
13.3 Ппем сигнада
Ecnu yctpoCTBO BKNIOHc Hne IcnoJIb3yETcIg nepeaun, OHO NOCToHHo HaxoITcB Pexnme npema (RECEIVE).PnpneMe cInHaJaNo TeKyuEmy KaHany OTo6paKaETc3NaUOK RX.

Cuzhan, nepedaembl noIb3oBamenm, npuHumaemc dpyzmu nolb3oBamenu npu ycNoBu, ymo ux ycmpoucmea hacmpoeHbHa mom je cambl kaHan u Kod CTCSS.
13.4пекдачacннала
-Дляпесдаи (TRANSMIT)нжмteи удрхьаite BнжатOM COCTOHRN (PT).
- UdepKnBaTe yCtpoiCTBO B BeptkAIBHom NOnOKeHmN IROBOpTE B MmKpOoH, HaxOJaUncsHa ydaJeHm 10 cm ot pta.
- No OKOHuaHn nepeDaHu HaxMHTe
13.5 NepekeJIOUeHne KaHaJIOB
PMR donyckaet nCnoJb3ObaHne 8 kaHaJIOB.
Дпя nepeknioyeHЯKaHaJIOB:
- OdnHOKpaTHo HaxMITE, Bbl3bBaMnraHne Homepa TekyuIero KaHaJaHa KK-3KpaHe.
-ⅡIaH3MeHeHHaHomepaKaHana HaxMATE
-Дя подеверждени BBбopaи BO3БраТВ obычны ржим HaЖмITE (PTT)
-Дя поТВержденя с nepexoDOM K cneyuOuSeI onuHaxMITE
PIMMEAHHE. B JIO6OM yCTPOHCTBE PMR, HAcTPOEHOM Ha TOT Je cMbI KaHJ, MOXHO npHIMaB INpOcnyuBaTB pa3ROBOP npu ycNOBn, YTO B DpyOM yCTPOHCTBE NcNoJIb3yETc KoD CTCSS.
13.6 CTCSS (Continuous Tone Coded Squelch System) (cncTeMa шуmonодаьеня c HeпрьIBHbIM ToHaJIbHbIM KoДиpoВанeМ)
DBy3HaHbKoCTCSS COOTBeTCTByET KOHKpeTHO ToHaJIbHOuACTOTE, BbIaBaEMo paINonepeTaYKOM. Dba NOIb3OBateJIA HAcTpoeHHbIX Ha OINH I TO T Ke KaHAn I HA OINH I TO T Ke CTCSS, MOrYT cNbIaATb dpyr dpyra. OHn HE CMOryT yCblbAsTb NO KaHany 60JIbWe HNKORO, NOKA B dpyrnx yCTpOInCTBax He 6ydet BBedeH B DeIcTBne TOHTOKoKe KOD CTCSS.
PMRДоунькаETИСПЛьЗВанe38KoДOBCTCSS.
IapaHTn He pacnpoctpaHreTcHa NoBpeKdEHHa, Bb3BaHHbE BHeUHHM BO3DeNCTBnEM (Hanpnmep, pa3pAOM MOHN, nonaDaHHem Bnarnn BO3ropAHm), a TAKKe Ha NobpeKdEHHa, BO3HKuNe npn TpaHCnOpTIpOBke.
IapaHTnHe DeiCTByET B OTHOWeHIn N3dGJIeHHbIM, yJaJIeHHbIM IIN yTpATNBUM DeIcTBNTBHOCTb CepuHbIM HOMepom.
1 U v o d
4 B E Z P E CNOSTNÉ POKNY
visit our website www.topcom.net