VCSV20AEU - Vacuum Cleaner SHARP - Free user manual and instructions
Find the device manual for free VCSV20AEU SHARP in PDF.
| Product Type | Cordless stick vacuum with digital motor |
| Model | VC-SV20AEU-S |
| Brand | Sharp |
| Dimensions (W x H x D) | 120 x 1205 x 270 mm |
| Unit Weight | 4.1 kg |
| Gross Weight | 5.4 kg |
| Color | Silver |
| Power Supply | Lithium-Ion battery 21.6 V / 2500 mAh / 54 Wh (2 batteries included) |
| AC Adapter | Input 100-240 V AC 50/60 Hz, output 26.5 V DC / 650 mA |
| Charging time (1 battery) | 4.5 hours |
| Charging time (2 batteries) | 9 hours |
| Run time (ECO) with 2 batteries | 90 minutes |
| Run time (Turbo) with 2 batteries | 30 minutes |
| Dust bin capacity | 0.55 L |
| Filter type | HEPA 13 |
| Motor power | 250 W |
| Noise level | ≤ 80 dB |
| Main functions | ECO and Turbo mode, LED display, LED headlight on brush, self-standing (hard floor), wall mount with charging |
| Included accessories | Motorized head with LED, metal wand, flexible adapter, 2-in-1 tool, long crevice tool, V-roller, roller brush, storage tube, wall mount, 2 batteries, charger |
| Maintenance and cleaning | Empty bin, wash HEPA filter (dry 24h), clean roller, manual unblocking |
| Spare parts | HEPA filter (VC-SVF1A), battery, rollers, AC adapter |
| Warranty and compliance | CE / UKCA, WEEE recycling |
Frequently Asked Questions - VCSV20AEU SHARP
User questions about VCSV20AEU SHARP
0 question about this device. Answer the ones you know or ask your own.
Ask a new question about this device
Download the instructions for your Vacuum Cleaner in PDF format for free! Find your manual VCSV20AEU - SHARP and take your electronic device back in hand. On this page are published all the documents necessary for the use of your device. VCSV20AEU by SHARP.
USER MANUAL VCSV20AEU SHARP
natural_image
Exploded view diagram of a vacuum cleaner assembly showing exploded and assembled parts (no text or labels)User manual
VC-SV12AEU-W, VC-SV20AEU-S, VC-SV28AEU-B
Stick vacuum
EN BG DA ES ET ELLDER FIITCER HU LT
NO NL PL PT RO SK SL SR SV UK
*Product images are for illustration purpose only. Actual product may vary.

Attention:
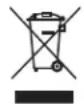
Your product is marked with this symbol.
It means that used electrical and electronic products should not be mixed with general household waste. There is a separate collection system for these products.
A. Information on Disposal for Users (private households)
1. In the European Union
Attention: If you want to dispose of this equipment, please do not use the ordinary dustbin! Used electrical and electronic equipment must be treated separately and in accordance with legislation that requires proper treatment, recovery and recycling of used electrical and electronic equipment.
Following the implementation by member states, private households within the EU states may return their used electrical and electronic equipment to designated collection facilities free of charge*.
In some countries* your local retailer may also take back your old product free of charge if you purchase a similar new one.
* Please contact your local authority for further details.
If your used electrical or electronic equipment has batteries or accumulators, please dispose of these separately beforehand according to local requirements. By disposing of this product correctly you will help ensure that the waste undergoes the necessary treatment, recovery and recycling and thus prevent potential negative effects on the environment and human health which could otherwise arise due to inappropriate waste handling.
2. In other Countries outside the EU
If you wish to discard this product, please contact your local authorities and ask for the correct method of disposal.
For Switzerland: Used electrical or electronic equipment can be returned free of charge to the dealer, even if you don't purchase a new product.
Further collection facilities are listed on the homepage of www.swico.ch or www.sens.ch.
B. Information on Disposal for Business Users
1. In the European Union
If the product is used for business purposes and you want to discard it:
Please contact your SHARP dealer who will inform you about the take-back of the product. You might be charged for the costs arising from take-back and recycling. Small products (and small amounts) might be taken back by your local collection facilities.
For Spain: Please contact the established collection system or your local authority for take-back of your used products.
2. In other Countries outside the EU
If you wish to discard of this product, please contact your local authorities and ask for the correct method of disposal.

www.sharpconsumer.com/
contact/

www.sharpconsumer.com/support/

www.sharpconsumer.com/documents-of-conformity/
Contents
Box contents ....3
Location of controls and parts ....4
Wall caddy 7
Display and controls....8
Battery charging, storage and use 9
Recommended cleaning methods ....12
Filter and dust bin 13
Tools and their use ....14
Self standing (VC-SV12AEU-W and VC-SV20AEU-S only)....17
Display panel 18
General cleaning and maintenance ....18
Dealing with blockages 18
AC Adapter....19
Troubleshooting....20
Technical specifications 21
Introduction
This cordless stick vacuum system features an intelligent digital motor with LED display, removable Li-Ion battery pack. It's lightweight and versatile and easily converts from whole home stick vacuum to handheld power vac for spot cleaning with the various accessory tools.
Box contents
| Item Description VC-SV12AEU-W VC-SV20AEU-S VC-SV28AEU-B | |||
| 1 Vacuum (without accessories or battery pack) | √ | √ | √ |
| 2 Mini Motorized Brush Roller × × | √ | ||
| 3 Flexible Bending Adapter × | √ | √ | |
| 4 2-in-1 Brush/Crevice Tool | √ | √ | √ |
| 5 Wide Brush Tool × × | √ | ||
| 6 Extended Crevice Tool | √ | √ | √ |
| 7 Extension Hose × × | √ | ||
| 8 Metal Extension Rod | √ | √ | √ |
| 9 Motorized Brush Roller with Roller(s) fitted | √ | √ | √ |
| 10 V-Roller | √ | √ | √ |
| 11 Brush Roller | √ | √ | √ |
| 12 Power Adapter (EU/UK) | √ | √ | √ |
| 13 Wall Caddy Storage Stand | √ | √ | √ |
| 14 Wall Caddy Screws, Wall Plugs and Blanking Plates | √ | √ | √ |
| 15 Quick Start Guide | √ | √ | √ |
| 16 Battery Pack x2 | √ | √ | √ |
| 17 Transprant Brush Container | √ | √ | √ |
| 18 Filter x2 (1 fitted in vacuum and 1 in the box) | √ | √ | √ |
| 19 Cleaning Tool | √ | √ | √ |
| 20 Caddy Hole Cover × | √ | √ |
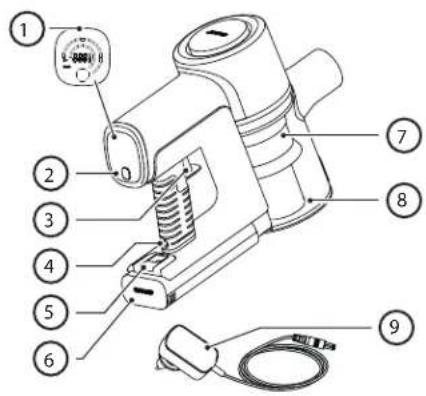
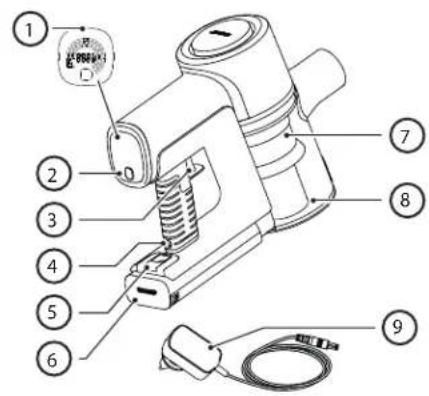
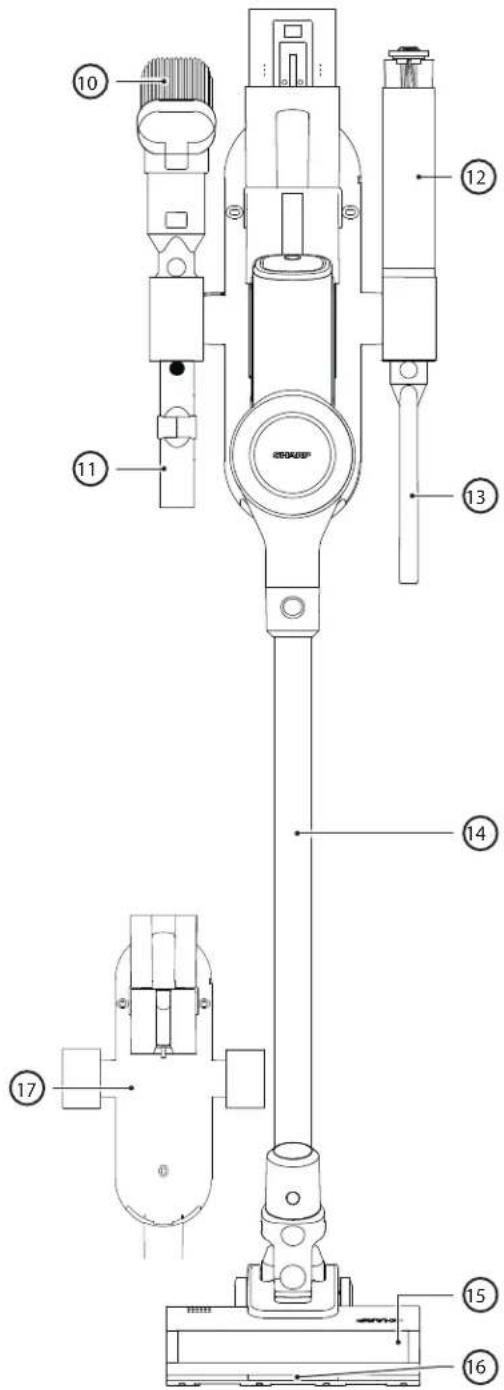
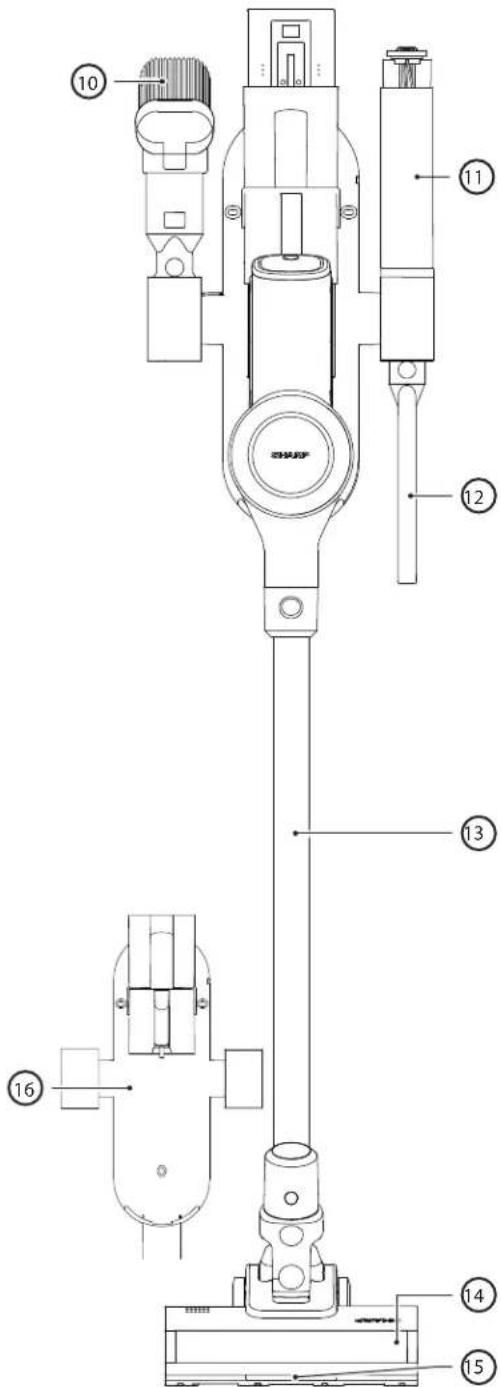
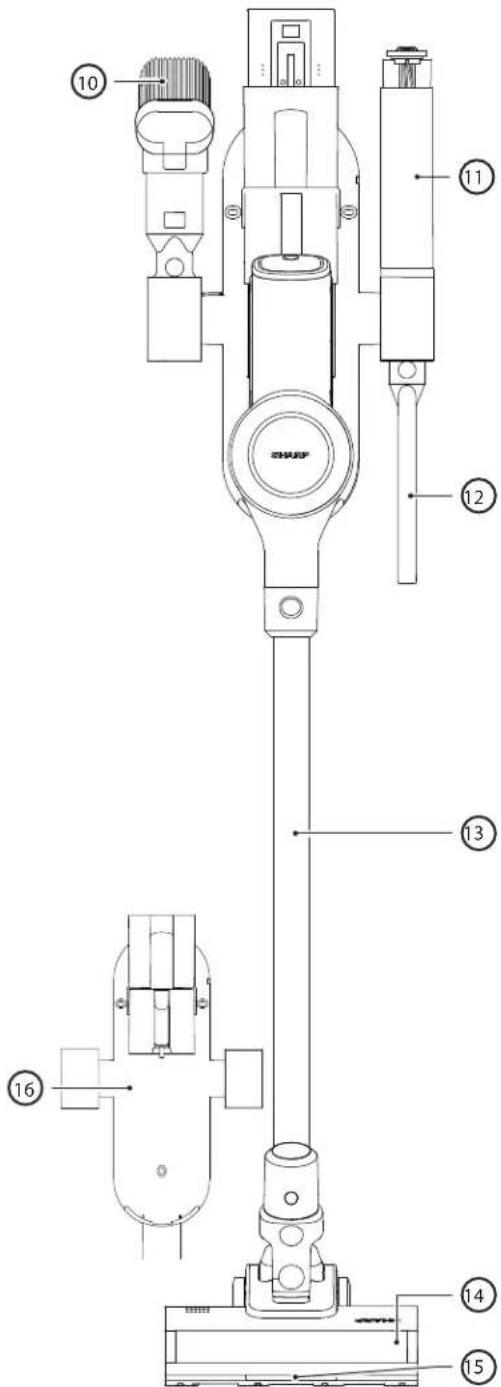
Location of controls and parts
| VC-SV12AEU-W | |
| Item Description | |
| 1 LED Display | |
| 2 Speed Selection Button | |
| 3 ON/OFF Power Trigger | |
| 4 Battery Charging Port | |
| 5 Battery Release Button | |
| 6 Rechargeable/Replaceable Battery | |
| 7 Filter Assembly | |
| 8 Dust Bin | |
| 9 AC Adapter | |
| 10 2-in-1 Brush/Crevice Tool | |
| 11 Brush Roller in Storage Tube | |
| 12 Extended Crevice Tool | |
| 13 Metal Extension Rod | |
| 14 Motorised Roller Head with LED Lights | |
| 15 LED Lights on Floor Brush Roller | |
| 16 Wall Caddy |

| VC-SV20AEU-S | |
| Item Description | |
| 1 LED Display | |
| 2 Speed Selection Button | |
| 3 ON/OFF Power Trigger | |
| 4 Battery Charging Port | |
| 5 Battery Release Button | |
| 6 Rechargeable/Replaceable Battery | |
| 7 Filter Assembly | |
| 8 Dust Bin | |
| 9 AC Adapter | |
| 10 2-in-1 Brush/Crevice Tool | |
| 11 Flexible Bending Adapter | |
| 12 Brush Roller in Storage Tube | |
| 13 Extended Crevice Tool | |
| 14 Metal Extension Rod | |
| 15 Motorised Roller Head with LED Lights | |
| 16 LED Lights on Floor Brush Roller | |
| 17 Wall Caddy |

| VC-SV28AEU-B | |
| Item Description | |
| 1 LED Display | |
| 2 Speed Selection Button | |
| 3 ON/OFF Power Trigger | |
| 4 Battery Charging Port | |
| 5 Battery Release Button | |
| 6 Rechargeable/Replaceable Battery | |
| 7 Filter Assembly | |
| 8 Dust Bin | |
| 9 AC Adapter | |
| 10 2-in-1 Brush/Crevice Tool | |
| 11 Extension Hose | |
| 12 Brush Roller in transparent storage container | |
| 13 Extended Crevice Tool | |
| 14 Flexible Bending Adapter | |
| 15 Mini motorized roller brush | |
| 16 Wide brush tool | |
| 17 Metal Extension Rod | |
| 18 Motorised Roller Head with LED Lights | |
| 19 LED Lights on Floor Brush Roller | |
| 20 Wall Caddy |

Wall caddy
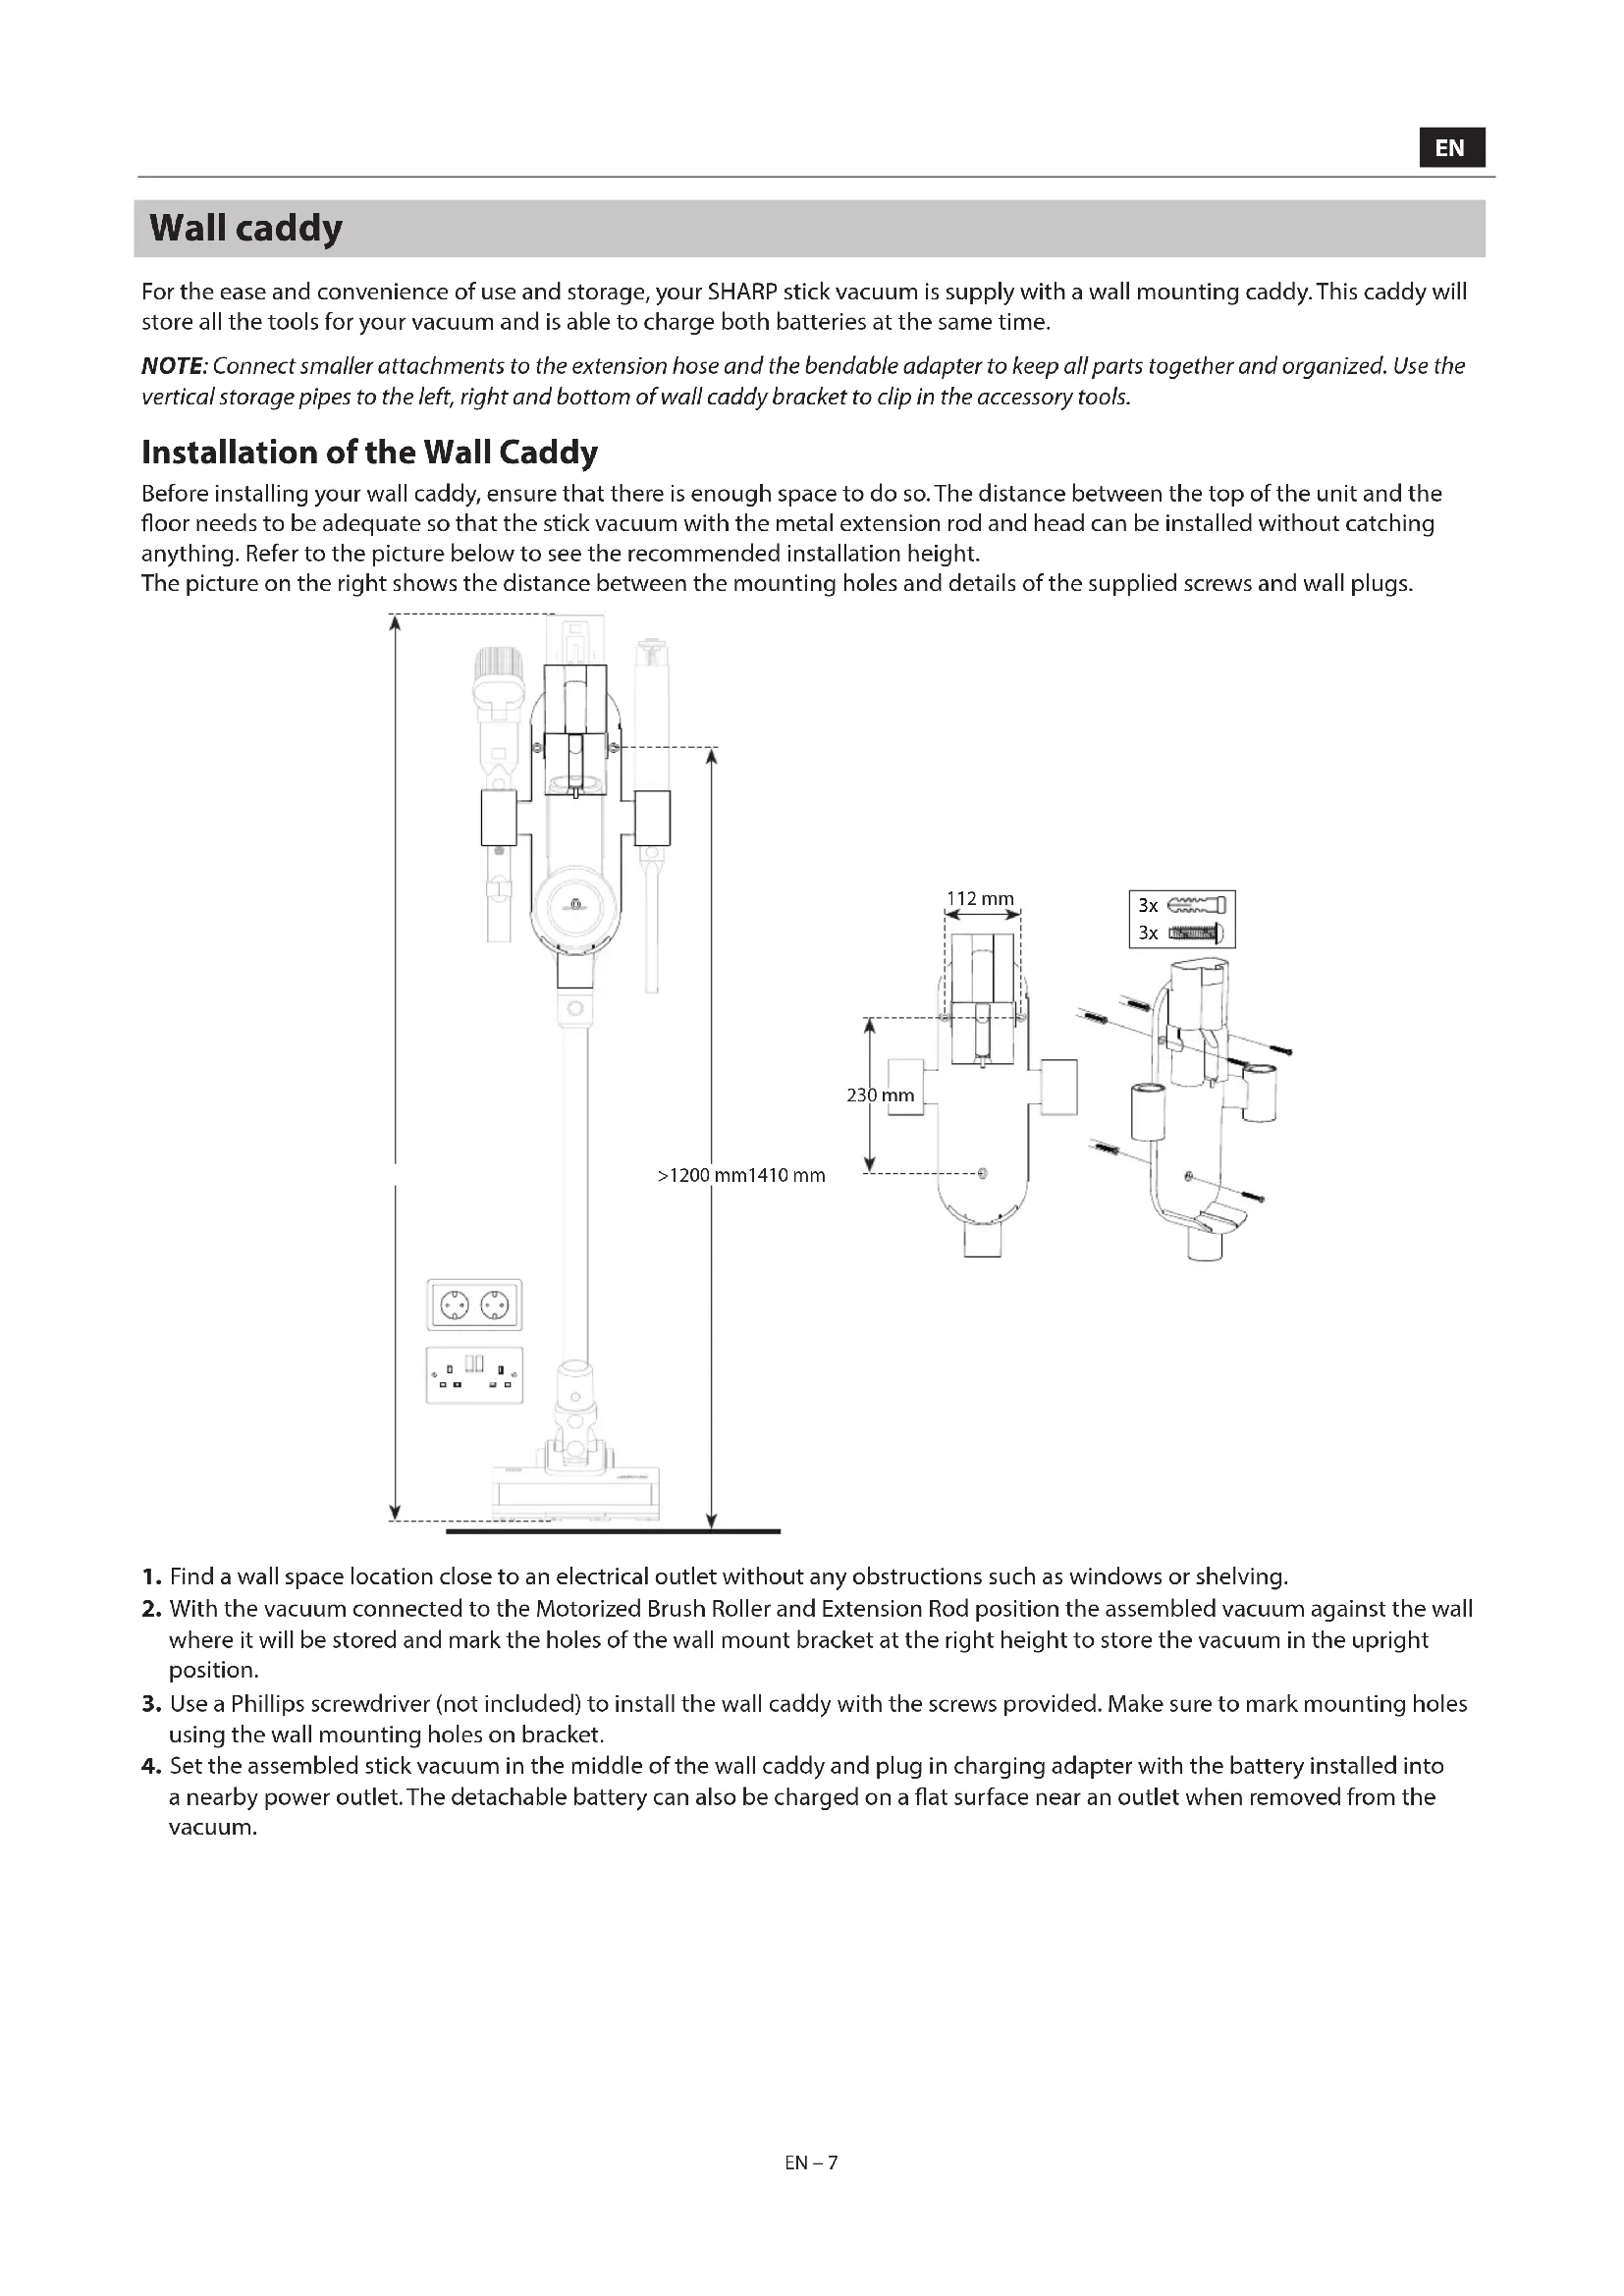
For the ease and convenience of use and storage, your SHARP stick vacuum is supply with a wall mounting caddy. This caddy will store all the tools for your vacuum and is able to charge both batteries at the same time.
NOTE: Connect smaller attachments to the extension hose and the bendable adapter to keep all parts together and organized. Use the vertical storage pipes to the left, right and bottom of wall caddy bracket to clip in the accessory tools.
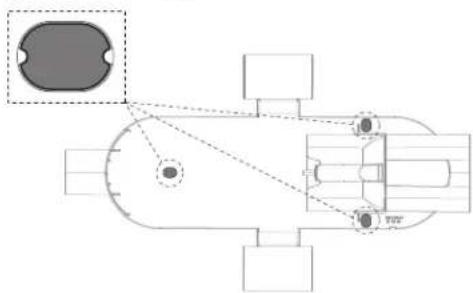
Installation of the Wall Caddy
Before installing your wall caddy, ensure that there is enough space to do so. The distance between the top of the unit and the floor needs to be adequate so that the stick vacuum with the metal extension rod and head can be installed without catching anything. Refer to the picture below to see the recommended installation height.
The picture on the right shows the distance between the mounting holes and details of the supplied screws and wall plugs.

- Find a wall space location close to an electrical outlet without any obstructions such as windows or shelving.
- With the vacuum connected to the Motorized Brush Roller and Extension Rod position the assembled vacuum against the wall where it will be stored and mark the holes of the wall mount bracket at the right height to store the vacuum in the upright position.
- Use a Phillips screwdriver (not included) to install the wall caddy with the screws provided. Make sure to mark mounting holes using the wall mounting holes on bracket.
- Set the assembled stick vacuum in the middle of the wall caddy and plug in charging adapter with the battery installed into a nearby power outlet. The detachable battery can also be charged on a flat surface near an outlet when removed from the vacuum.
Hole Blanking Plates
Also included in the screw and wall plug bag are 3 blanking plates which are used to cover the screw holes in the caddy.
natural_image
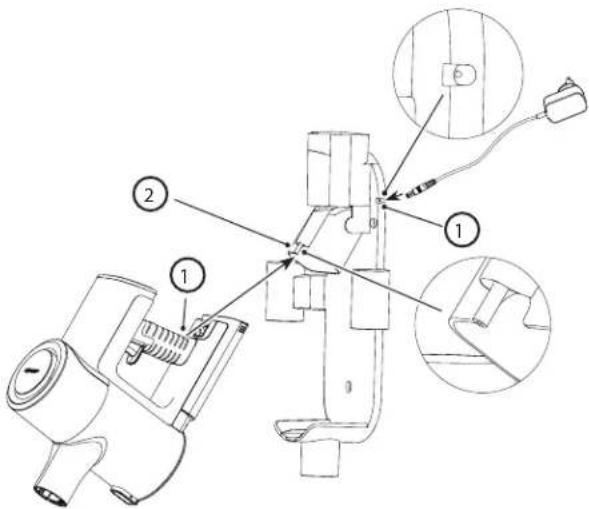
Top-down schematic of a vehicle or road intersection with labeled components and directional arrows (no text or symbols)Roller Storage Tube
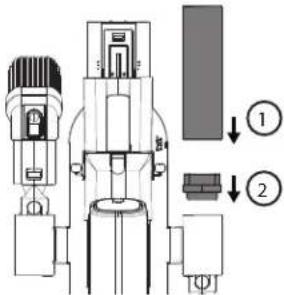
For easy storage of the unused roller for the VC-SV12AEU-W or VC-SV20AEU-S we have included a storage tube. The storage tube fits into one of the top storage holes, note that there is an adaptor (2) which needs to be fitted to the storage hole before inserting the tube (1).

Caddy Hole Cover
Supplied with the VC-SV12AEU-W and VC-SV20AEU-S is a cover which can be used to blank off one of the accessory holes. The VC-SV12AEU-W comes with 2 covers, the VC-SV20AEU-S comes with 1.
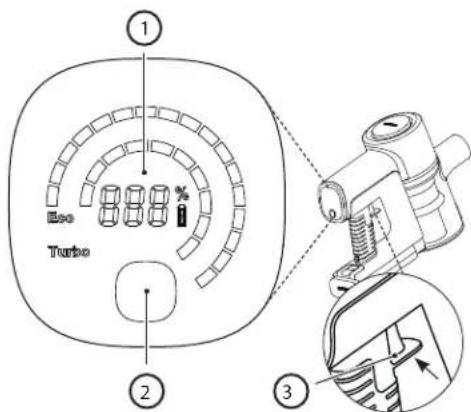
Display and controls
LED display:
- Remaining battery charge
- Speed selection button
- Power trigger button
How to operate
- Press the POWER TRIGGER button once to start cleaning. There is no need to keep the button pressed. Press the button again to turn off.
• The vacuum will automatically defaults to ECO Suction. Use the SELECTION button to choose from 3 Suction Modes: ECO, MED, TURBO for the VC-SV28AEU-B and ECO/TURBO for the VC-SV12AEU-W and VC-SV20AEU-S.
• ECO for larger rooms and surface areas.
• MED (VC-SV28AEU-B only) for smaller rooms and surface areas or an entire vehicle interior.
• TURBO for quick pick-ups or deep cleaning.
- During operational use, the digital display will indicate remaining battery charge percentage, speed, and any motor blocking or roller brush tangles impacting performance.
Battery charging, storage and use
Your SHARP stick vacuum cleaner has 2 Lithium-Ion batteries included as standard. The specifications of the batteries are as below. Note that the batteries are not interchangeable between models.
| Model VC-BA12A-W VC-BA20A-S VC-BA28A-B | |||
| Voltage (V) 22,2 21,6 21,6 | |||
| Cell Type ICR18650-20SG INR18650-25PG INR21700-40TG | |||
| Technology Lithium-Ion Lithium-Ion Lithium-Ion | |||
| Number of Cells 6 6 6 | |||
| Power (Wh) 44,4 54 86,4 | |||
| Capacity (mAh) 2000 | 2500 | 4000 | |
| Charging Time (hours) | 4 | 4,5 | 4,5 |
| Net Weight (kg) | 0,429 | 0,453 | 0,585 |
| Unit Dimension (W x D x H) mm | 158 x 65 x 85 | 158 x 65 x 85 | 158 x 65 x 85 |
| Standard/Certification | UKCA/CE/RoHS/REACH | UKCA/CE/RoHS/REACH | UKCA/CE/RoHS/REACH |
| Colour | White | Silver | Black |
| To be used with | VC-SV12AEU-W | VC-SV20AEU-S | VC-SV28AEU-B |
| Recommended AC Adapter | CZH015265065TRWQ | CZH015265065TRWQ | CZH024265100TRWQ |
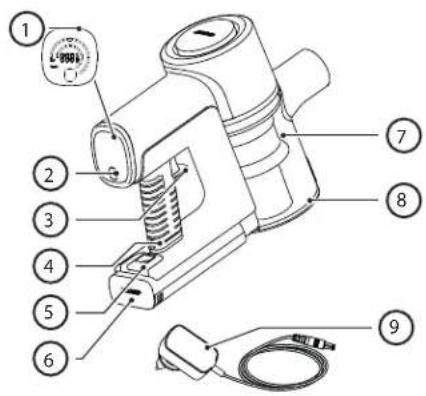
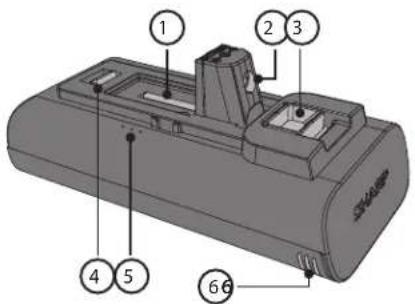
Location of parts and connection to the AC adapter for charging
- Main Unit Connector
- Charging Port
- Release Lever
- Securing Clip
- Charge Status
- Ventilation
Before first use the detachable lithium-ion battery must be fully charged. It can be charged either installed or uninstalled by connecting the power cord to the recharging port and a standard electrical outlet.
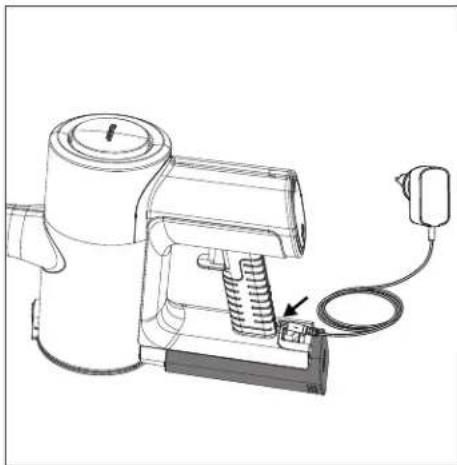
Charging the battery
There are several ways in which the battery or batteries can be charged. We recommend that the battery is charged while docked in the caddy as this allows for both batteries to be charged at the same time.
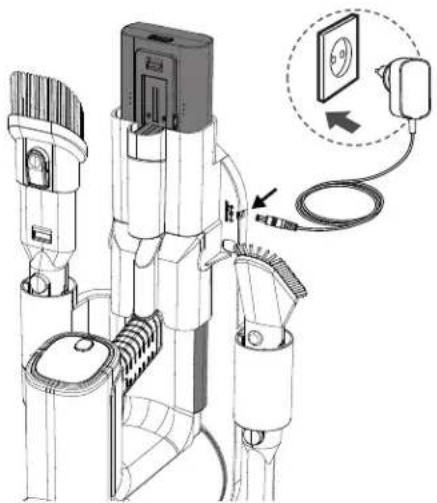
It is also possible to charge one battery either while connected to the vacuum, when it is out of the vacuum or by itself in the caddy. If the caddy is not used, place hand vacuum or battery on a flat, stable surface. Connect the power cord directly to charging port located on the hand grip.
natural_image
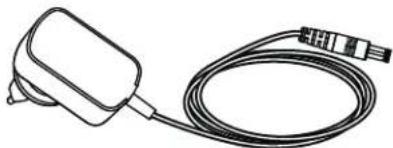
Line drawing of a portable air purifier with attached cable and power outlet (no text or symbols)
natural_image
Diagram of a device with a cable and plug, showing a connector or connector inserted into a base (no text or symbols present)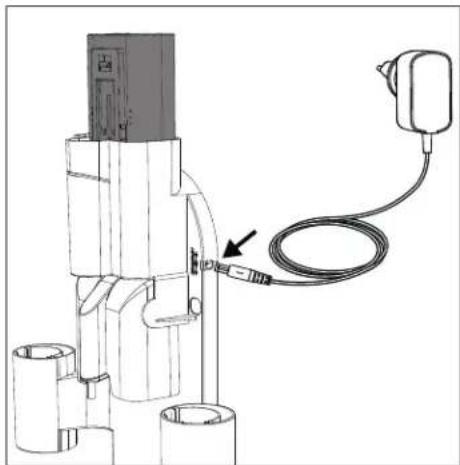
natural_image
Technical line drawing of a mechanical device with a cable and connector, no visible text or symbolsGood charging habits
- Use only the supplied Sharp AC adapter.
- Charge before the battery's capacity runs below 25% - Lithium-ion batteries have a limited number of charge cycles, so it's best to charge the battery before it is completely depleted to extend its lifespan.
- Avoid overcharging - once the battery is fully charged, unplug it from the charger to avoid overcharging, which can also shorten the battery's lifespan.
- If left unused, a fully charged battery will lose its charge over time.
- Store in a cool, dry place - extreme temperatures can damage the battery, so make sure to store it in a cool, dry place, ideally at room temperature.
- If you plan to store your device for longer than six months, charge the battery to 50% every six months to keep it fresh.
Charging on the wall caddy
- DC Power connection port
- Male plug
If using the wall caddy (recommended), follow instructions for installation. Plug in assembled product while stored in wall caddy. Unplug the AC adapter when not in use for extended periods of time.
NOTE: During first use, run the battery all the way down to properly condition it. Recommended charging times are as below.
| Charging Times (hours) | |||
| VC-SV12AEU-W V | C-SV20AEU-S VC-S | V28AEU-B | |
| 1 Battery 4 4.5 | 4 | ||
| 2 Batteries 8 | 9 | 8 | |
Usage Times
| Run Time for 2 Batteries (minutes) | |||
| Charging Times (hours) | |||
| VC-SV12AEU-W | VC-SV20AEU-S | VC-SV28AEU-B | |
| ECO 50 90 130 | |||
| Medium x | x | 48 | |
| Turbo | 32 30 24 | ||
Battery status indication
When the battery is charging or discharging the status can be checked by either looking at the charge percentage on the vacuum display or by the lights on the side of the battery itself.
| 10% - 30% | |
| 31% - 70% | |
| >70% |
There are 3 lights, if all of these are on then the battery charge is greater than 70%.
When the battery is flat, a single red light will flash. As the battery charges this light will turn blue and flash until the second light starts to flash and the first one becomes static. When the second light stops flashing and becomes static, the final light will start to flash, Charging is complete when all 3 lights are blue and static. The lights will stay in this condition until the battery is disconnected from the AC adapter.
WARNING: Special instructions for handling the Lithium-ion battery pack
Follow instructions carefully. This will reduce the risk of explosion, electric shock and possibly serious injury or death.
- Only use approved Sharp AC adapter to charge your battery pack.
- Use a power source with the voltage specified on the nameplate of the charger.
- The Sharp battery pack and AC Adapter are specifically designed to work together.
- Do not operate the AC adapter with a damaged cord or plug.
- Do not place the battery pack near fire or heat.
- Exposure to fire or temperature above 60^ may cause the battery pack to explode.
- Do not charge the battery pack in a damp or wet location.
- Do not charge in the presence of flammable liquids or gases.
- Ensure the battery pack is never immersed into water.
- Do not charge in an area of extreme heat (above 40^ ) or cold (below 10^ ).
- Charging will work best at normal room temperature.
- Do not crush, drop or damage the battery pack.
- Do not use a battery pack or AC adapter that has been dropped or received a sharp blow.
- Damage to the battery pack may cause the battery pack to explode. Properly dispose of the battery pack immediately by following instructions on how to dispose of battery pack or contact service centre for advice.
- Do not open, modify or attempt to repair a battery pack.
- The battery may give off fumes if it becomes damaged or is used incorrectly.
- Ensure the area is well ventilated and seek medical attention should you experience any adverse effects.
- The battery may leak liquid if it becomes damaged or is used incorrectly.
- If you come into contact with any liquid from the battery, rinse off immediately with mild soap and water. If the liquid comes into contact with your eyes, rinse with water and seek medical attention.
- Keep battery pack away from small metal objects which may result in the shortening of the battery terminals.
Disposal of equipment and batteries
This product does not contain any parts that are serviceable by the user.
Electronic products and batteries should not be mixed with general household waste. Household users should contact either the retailer where they purchased this product, or their local government office for details of where and how they can take these items for environmentally safe recycling.
Do not dispose as household waste or in a fire as the battery pack may explode.
Batteries should be disposed of according to local regulations.

This symbol means that the product contains batteries covered by European Directive 2013/56/EU which cannot be disposed of with normal household waste. Cd, Hg and Pb underneath the wheelie bin symbol shows whether the battery contains, cadmium (Cd), mercury (Hg) or lead (Pb).
This symbol on a product means that the product is covered by European Directive 2012/19/EU and must not be disposed of or dumped with your other household waste.

These symbols on the products, packaging and/or accompanying documents mean that used electrical and electronic products should not be mixed with general household waste.
CE and UKCA statement:
- The full CE text and UKCA declaration of conformity are available at sharpconsumer.eu, enter the download section of your model and choose "Declaration of Conformity".
Recommended cleaning methods
Your stick vacuum is designed for cleaning floor surfaces and higher vertical surfaces that are hard-to-reach. Start with the Metal Extension Rod and combine with the following tools.
- Attach the wider Motorized roller brush with LED headlights for hard floors, area rugs and carpeting.
- Attach the Flexible bending adaptor to reach under sofas, chairs and around furniture.
- Attach the Long crevice nozzle for corners and tight spots.
- Use the V Roller on all types of floors. The Brush Roller is recommended for hard floors.
- Attach the 2-in-1 brush/crevice tool for lamp shades, bookshelves and electronics.
For the VC-SV28AEU-B only
- Attach the Mini motorized roller brush for stairs and narrower pathways.
For quick vacuuming of small areas, you can convert the stick vacuum to a handheld vacuum by removing the metal extension rod. Choose the right tool as below for the job.
- Attach the Long Crevice Nozzle for deep cleaning between car seats, sofa cushions, and highchairs.
- Attach the 2-in-1 Brush/Crevice Tool for dressers, shelves and keyboards.
For the VC-SV28AEU-B only
- Attach the Mini Motorized Roller Brush for stairs and benches.
- Attach the Flexible Hose plus the Crevice or Brush Tool for deep cleaning car interiors, under seats, and in between.
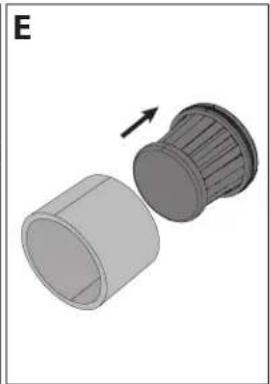
Filter and dust bin
Your vacuum has several filters contained within it to ensure that unclean air is not recycled into the room and for protection of the motor. The sealed dust bin captures and traps 99.9% of dust, allergens, dander and dirt.
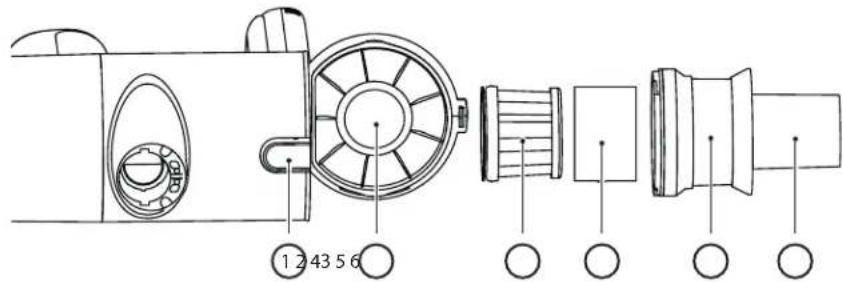
- Bin release button.
- Sealed dust bin
- HEPA 13 fi lter.
- Filter sleeve
- Metal mesh filter to separate large particles.
- Multi-cone cyclonic spinning to isolate dust particles
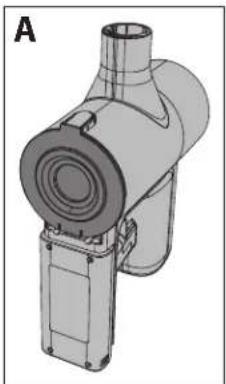
Emptying Dust Bin
- Hold the hand vacuum over a rubbish container.
- Then, press the bin release button to open the bin. Carefully empty contents into a rubbish container. If necessary, clean the HEPA filter.
- Make sure HEPA Filter Assembly is secure (turning the entire assembly clockwise) before closing dust bin door (a "click" will be heard when the door is locked).
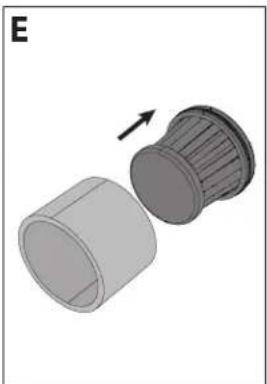
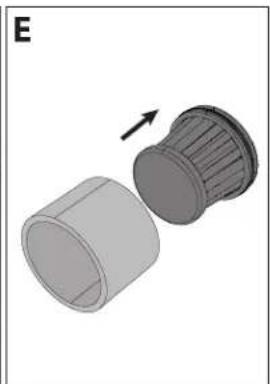
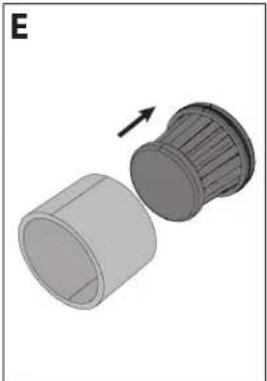
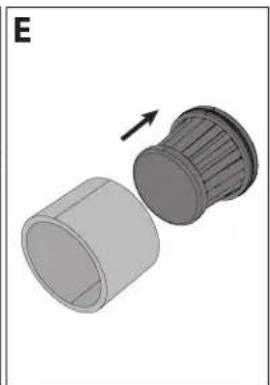
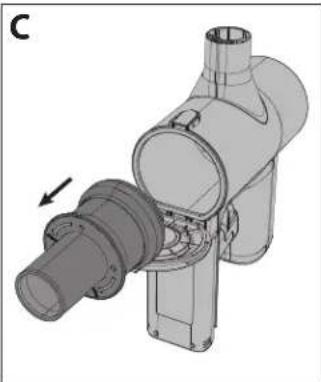
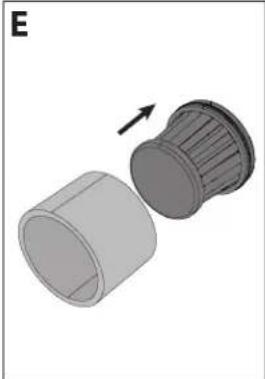
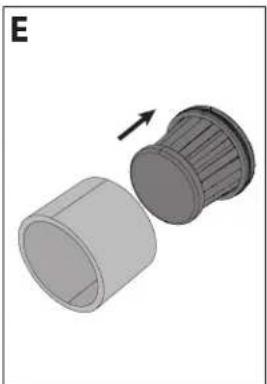
Removing and Cleaning High Density Filter
- Turn the HEPA filter assembly counterclockwise until it releases from unit.
- Pull out the HEPA filter assembly and clean as necessary (see below).
- Insert HEPA-density filter back into HEPA filter assembly.
- Make sure high density filter assembly is secure (by turning clockwise) before closing dust bin door.
NOTE: If the HEPA filter is very dirty, it can be washed in water. After washing, dry for at least 24 hours to ensure that it is completely dry before inserting back into the vacuum.
To ensure the high performance of the HEPA filter, it is recommended that it is replaced every 3 months. To order your replacement filter use model number VC-SVF1A.
natural_image
3D technical illustration of a mechanical component with no visible text or symbols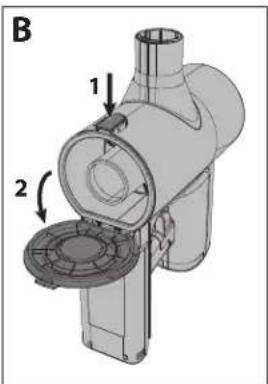

natural_image
3D mechanical assembly diagram showing a pipe fitting with a valve and housing (no text or symbols)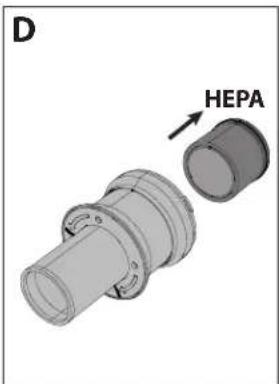
natural_image
3D rendering of two cylindrical mechanical components with an arrow indicating transformation (no text or symbols)NOTE: DO NOT use the vacuum without the Filter Sleeve, HEPA13 or Mesh Filter fitted. This will result in large dust particles or debris entering the motor and causing damage.
Tools and their use
Your SHARP stick vacuum comes with various tools as shown below. Depending on the model which you have will determine which tools are included in the box.
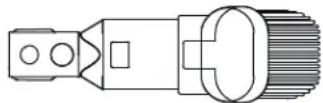
Two in One Brush
This tool can be used with either the brush extended or with the nozzle. To use the nozzle, press down the release knob and pull back the brush extension.
The two in one brush is ideal for cleaning lamp shades, bookshelves and various items of electronic equipment.
Wide Nozzle Brush (VC-SV28AEU-B only)
This useful tool can be used for the gentle cleaning of curtains, draperies, windowsills, blinds etc.
Long Crevice Tool
This versatile long crevice nozzle tool is ideal to clean corners and tight spots.

Extension Hose (VC-SV28AEU-B only)
To increase the useability of the smaller tools, they can be used with the extension hose. The hose can extend to allow easier access to tight or difficult to get to areas for enhanced cleaning.

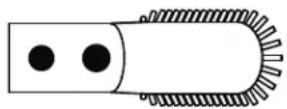
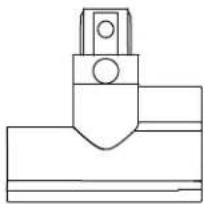
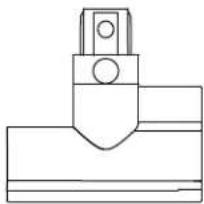
Metal Extension Rod
Use this tool with the motorised head to allow easy cleaning of floors.

natural_image
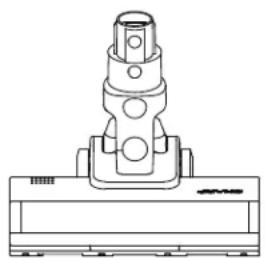
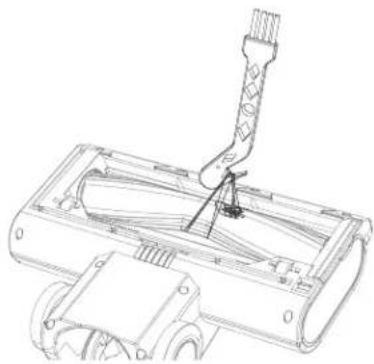
Line drawing of a mechanical lever or rod with two ports and a cylindrical head (no text or symbols)Motorized Brush Roller
The motorised brush roller is ideal for cleaning all types of floors. The V-Roller is fitted as standard and this is interchangeable with the brush roller. Both rollers provide excellent performance on all floor types. With the addition of a bright headlight, the motorised head allows you to see any dirt, dust and debris to be vacuumed, it also allows you to see into darker corners and edges for complete cleaning.
natural_image
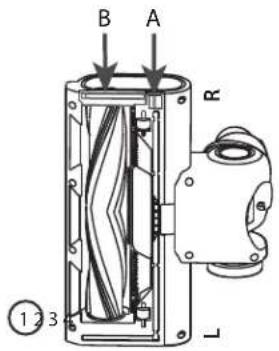
Technical line drawing of a mechanical component with no visible text or symbolsTo change, clean or maintain the roller, follow the instructions below.
- Push the lever marked A down and at the same time as pulling the brush roller plate (item B) up.
- Remove the roller brush plate.
- Take out the roller brush by pulling up from the right-hand side (R).
- Insert the roller by engaging on the left-hand side (L) then pushing down on the right so it locates securely. Now reinsert the roller brush plate by pushing it down so it clicks.

natural_image
Technical line drawing of a mechanical device with internal components and mounting holes (no text or symbols)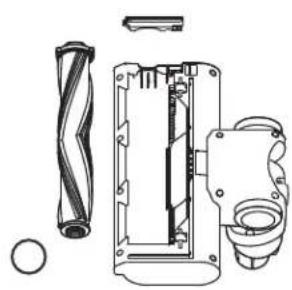
natural_image
Technical line drawing of a mechanical assembly with no visible text or symbols
natural_image
Cross-sectional diagram of a mechanical device showing internal components and housing (no text or labels)V-Roller
Use the V Roller on all types of floors.

natural_image
Technical line drawing of a conical tool or drill bit (no text or symbols)Brush Roller
The Brush Roller is recommended for carpeted floors.

Mini Motorized Brush (VC-SV28AEU-B only)
Attach the Mini motorized roller brush for stairs, upholstery and narrower pathways.
natural_image
Pure technical line drawing of a mechanical component without any text, numbers, or symbolsFlexible Bending Adapter (VC-SV20AEU-S and VC-SV28AEU-B only)
Use with the metal extension rod to allow for easy access underneath sofas, chairs, tables, etc.

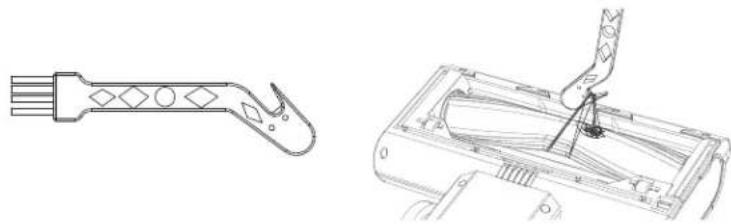
Cleaning Tool
Handy cleaning tool is included in the box. This tool enables the easy clearing of roller brush tangles using the recessed cutting blade. The brush can be used to clean any dust ingression into small areas of the vacuum or accessories.
natural_image
Technical line drawing of a mechanical component with two views: one showing a tool handle and the other showing a bracket assembly (no text or symbols)When using the cutting part of the cleaning tool be sure to hook the tangle securely and pull so that the material is cut. Be careful not to pull too hard as this may cause damage to the roller.
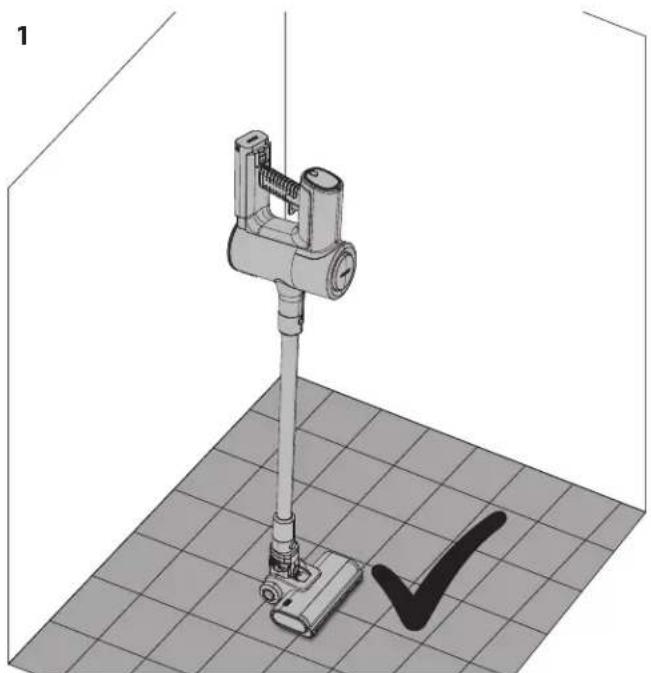
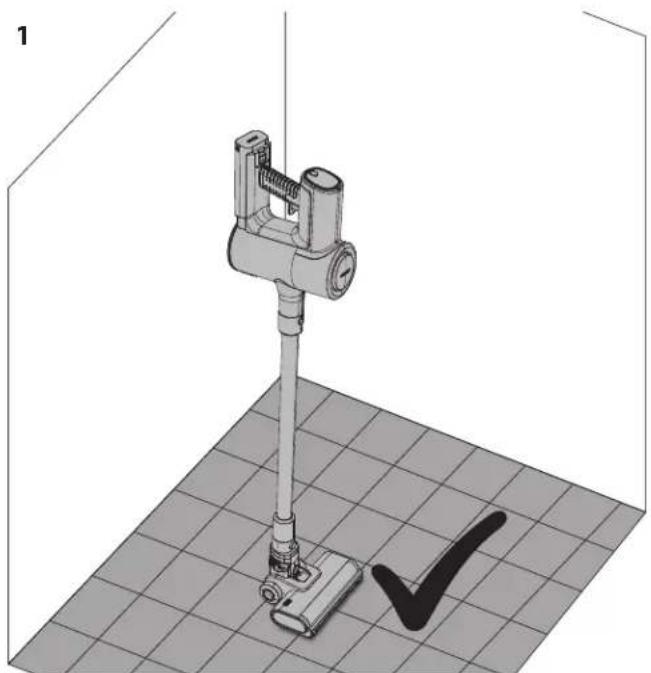
Self standing
natural_image
3D rendering of a mechanical device mounted on a grid floor, with a checkmark symbol placed at the base (no text or labels)
natural_image
3D diagram of a mechanical device mounted on a base with a cross symbol, placed on a textured floor (no text or labels)- Okay to use Self Standing on hard floor.
- DO NOT use Self Standing on soft/carpeted floors.
When using your SHARP stick vacuum on a hard floor it is possible to place your vacuum in the Self Standing position. For this to work correctly, the vacuum must be connected to the motorised head unit via the metal extension rod; also ensure that the battery is installed.
With your foot gently resting on the motorised head, move the vacuum so that the vacuum is in the upright position. You will hear a click when the head is locked.
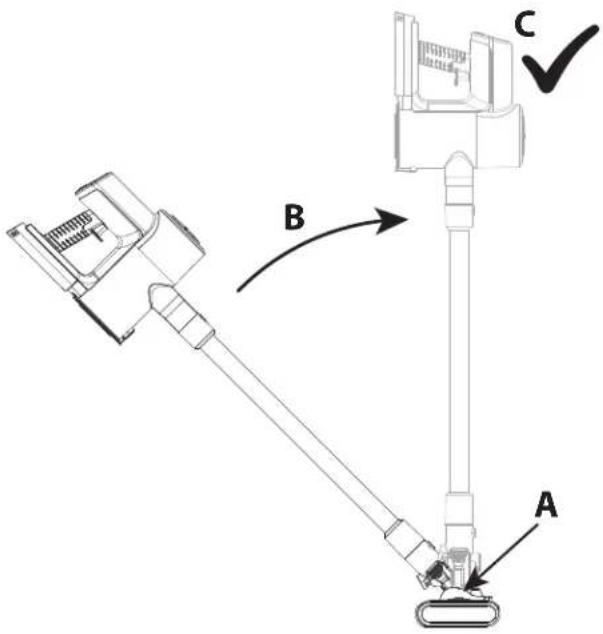
Gently let go of the vacuum and it will self-stand.
CAUTION: Your vacuum will self-stand on hard floors, if it is knocked over there it is possible that damage or injury may occur. Ensure that once in the self-stand position it is not pushed over. While in the self standing mode, do not leave unattended, especially if you have young children or pets.
Display panel
The multifunction display panel shows important information on the function and use of your stick vacuum.
To change the speed of the motor from ECO (most efficient) to Turbo (most powerful), press this button. When the unit is off, press this button to show how much power is left in the battery for each mode of operation.
VC-ST12AEU-W and VC-SV20AEU-S VC-SV28AEU-B
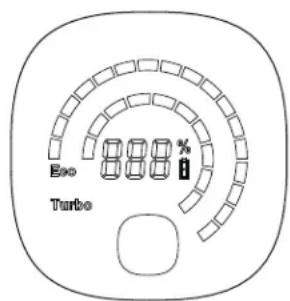

- Percentage of battery power remaining.
- Mode selection button – ECO, Medium or Turbo power.
- Visual indication of remaining power based on battery level. This wil change when the mode button is pressed.
- Operation mode. This will change when the mode button is pressed.
In the case of any issue occurring with your stick vacuum it is possible that an error code may be shown on the display panel.
Consult the Troubleshooting section of this user manual for more details should an error code appear.
General cleaning and maintenance
To ensure that your SHARP stick vacuum remains in good condition and continues to provide reliable service, it is recommended to clean and maintain it on a regular basis.
Exterior Parts can be cleaned with a soft cloth. If there are stubborn marks, use a non-abrasive, gentle cleaning fluid to remove.
Never use abrasive cleaners or cloths to maintain your SHARP stick vacuum as these will damage the surface.
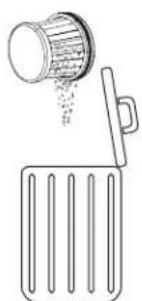
General tips after use are:
- Empty the Dust Chamber
Suction is reduced if the dust chamber is full of debris, so emptying after and during use will provide a much better cleaning experience.

natural_image
Line drawing of a kitchen grater with a lid and drain, showing powder being poured into it (no text or symbols)2. Clean the Rollers
Remove any hair or debris which may have been attached to and/or wrapped around the roller during use as this will improve the performance on the next use. For anything which has been wrapped around the roller, use the cleaning tool cutting edge to removed.
natural_image
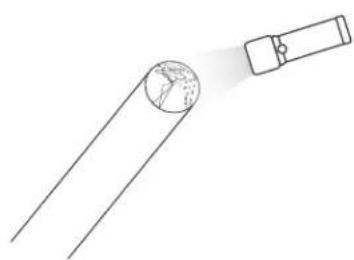
Technical line drawing of a mechanical assembly with a tool inserted, no visible text or symbols3. Check for Blockages
Ensure that the air pathways are clear of obstructions such as clumps of hair, pet hair or large items of debris. Use a light (the torch on your mobile phone) to look down the pipe to see if it is clear.
natural_image
Simple line drawing of a droplet falling from a pointed tube onto a surface, with no text or symbols present.4. Clean the Filter
Clogged filters are the most common reason for poor suction. Clean these after every use and if the performance is being degraded it can be washed in water and left to dry for 24 hours. It is recommended that the HEPA filter is replaced every 3 months.
natural_image
Simple line drawing of a container with liquid and a handle, above a slotted tray (no text or symbols)Dealing with blockages
It is possible that on occasion your stick vacuum will become block with debris. You may need to dismantle parts to gain access to clean and unblock.
When dealing with blockages it use a long stiff wire with a blunt end to clear pipes. Be careful not to damage the pipe.
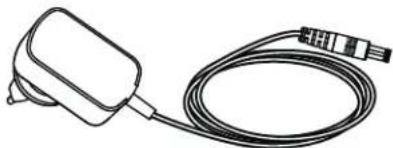
AC Adapter
natural_image
Simple line drawing of a connected cable with a rectangular component (no text or symbols)Your SHARP stick vacuum is supplied with an AC adapter which can be used with either a UK (3-pin) or EU (2-pin) mains socket. The AC adapter supplied with your stick vacuum will depend on the vacuum and battery model, refer to the table below to match up the vacuum model and AC adapter.
Only use the supplied and SHARP recommended AC adapter with your Stick Vacuum.
AC adapter specifications can be found at the end of this User Manual.
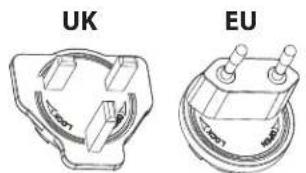
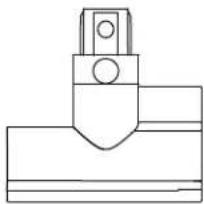
Changing the adapter mains connection type
Your AC adapter is supplied with 2 mains connection plates which can be interchanged depending on your mains outlet type. The connection plate on the left is for the UK, Ireland and Cyprus. The 2-pin coneciton plate on the right is for most other EU countries.
natural_image
Technical line drawings of two mechanical components labeled UK and EU (no text or symbols on the diagrams themselves)To install the correct plate fro your mains outlet, select the correct one (UK pr EU) and place on the AC adpater as shown in the picture below, the plate should sit in the recess. Turn clockwise until a click is heard and the connection plate is now installed. If you are unsure, please contact our helpline for advice.

To remove the plate, press the button A and rotate the plate anticlockwise. The plate can now be removed.

Troubleshooting
| Problem Reason Resolution | ||
| Error code E01 appears in the display. | Head motor has been stopped from rotating. | Remove obstruction from roller in the motorised head. |
| E02 appears in the display (VC-SV20AEU-S and VC-SV28AEU-B only). | Inlet blocked. Clear blockage from the | head, tube and/or inlet. |
| Poor pick up performance. Reduced suction. | Set the vacuum mode to Turbo.Empty the dust bin.Clean the fi Iters.Ensure that the vacuum airways are not blocked or obstructed. | |
| Vacuum has stopped or will not work. | Issue with battery or battery connec-tion. | Check that the battery is fully charged.Ensure that the battery is correctly connected to the vacuum. |
| Roller will not rotate. Mechanical issue. | Remove obstruction from roller in the motorised head.Clean roller and head unit. | |
| Battery light is flashing red. | Battery almost flat. | Recharge battery. |
| Accessory is broken or not working. | Contact the SAHRP call center to discuss. A new part can be supplied free of charge if under warranty or on a chargeable basis if necessary. | |
| Motorised head is noisy. Brush roller fi tted. | If the brush roller is fi tted, the bristles will make a noise as they connect with the casing of the head. | |
Should you experience any other problems with your SHARP stick vacuum, please contact our call centre for further advice and information.
To order replacement accessories, filters and batteries please call or email your SHARP service center.
Technical specifications
| Model VC-SV12AEU-W VC-SV20AEU-S VC-SV28AEU-B | |||
| Battery Capacity (mAh) 2000 2500 4000 | |||
| Battery Voltage (V) 22,2 21,6 21,6 | |||
| Battery Power (Wh) 44,4 54 86,4 | |||
| Battery Size (W x H x D in mm) 158 x 65 x 85 158 x 65 x 85 158 x 65 x 85 | |||
| Battery Weight (kg) | 0,429 | 0,453 | 0,585 |
| Number of Cells | 6 | 6 | 6 |
| Single Battery Charging Time (hours) | 4 | 4,5 | 4 |
| Dual Battery Charging Time (hours) | 8 | 9 | 8 |
| Colour Main Body | White | Silver | Black |
| Control Panel | Digital | Digital | Digital |
| Display Type | LCD | LCD | LCD |
| Dust Container Capacity (L) | 0,55 0,55 0,55 | ||
| Exhaust Filter Type | HEPA 13 | HEPA 13 | HEPA 13 |
| Gross Weight (kg) | 5,2 | 5,4 | 6,3 |
| Motor Power (W) | 150 | 250 | 380 |
| Motor Type | DC motor | Brushless DC motor | Brushless DC motor |
| Noise Level (dB) | ≤80 ≤80 | ≤80 | |
| Off Mode Power Consumption (W) | 0,5 | 0,5 | 0,5 |
| Over Heating Protection | Yes | Yes | Yes |
| Plug | EU/UK Plug Adapter | EU/UK Plug Adapter | EU/UK Plug Adapter |
| Motot Power Consumption (W) | 150 | 250 | 380 |
| Run Time in Max Power (minutes) | 16 | 15 | 12 |
| Run Time in Med Power (minutes) | N/A | N/A | 24 |
| Run Time in Min Power (minutes) | 25 | 45 | 65 |
| Safety Logo Certification | CE / UKCA | CE / UKCA | CE / UKCA |
| Suction Power Min (kPa) | 6 | 7 | 7 |
| Suction Power Max (kPa) | 12 | 20 | 28 |
| Suction Power Max (Air Watts) | 62 | 120 | 173 |
| LED Headlight | Yes | Yes | Yes |
| Headlight Colour | White | White | White |
| Unit Size (W x H x D in mm) | 120 x 1205 x 270 | 120 x 1205 x 270 | 120 x 1250 x 250 |
| Unit Weight (kg) | 3,9 | 4,1 | 5 |
| AC Adapter | |||
| Model CZH015265065TRWQ CZH01 | 15265065TRWQ CZH0242651 | 100TRWQ | |
| Input | 100-240V AC / 50/60Hz / 0.5A | 100-240V AC / 50/60Hz / 0.5A | 100-240V AC / 50/60Hz / 0.8A |
| Power Requirements AC 100-240V ~ 50/60Hz AC 100-240V ~ 50/60Hz AC 100-240V ~ 50/60Hz | |||
| Output 26.5V DC / 650mA 26.5V DC / 650mA 26.5V DC / 1000mA | |||
| Colour White White Black | |||
| Length of power cable (mm) 1500mm 1500mm 1500mm | |||
| To be used with VC-SV12AEU-W VC-SV20AEU-S | VC-SV28AEU-B | ||
| IP Rating | IP20 (indoor use only) | IP20 (indoor use only) | IP20 (indoor use only) |
| Manufacturer | Shenzhen Chanzeho Technology Co. Limited7/F, Spa Centre, No.53-55Lockhart Road, Wan Chai, Hong Kong | ||
Внимание:

www.sharpconsumer.com/support/

www.sharpconsumer.com/documents-of-conformity/


Стенна кошница
natural_image
Top-down schematic diagram of a vehicle or road with labeled components and directional arrows (no text or symbols)natural_image
Technical line drawing of a portable air purifier with attached cable and power outlet (no text or symbols)
natural_image
Diagram of a device with a cable and plug, showing a connector or socket connected to a power outlet (no text or symbols present)
natural_image
Technical line drawing of a mechanical device with a cable and connector, no visible text or symbolsБрой използвания
| 10% - 30% | |
| 31% - 70% | |
| >70% |
natural_image
3D technical illustration of a mechanical device with no visible text or symbols

natural_image
3D mechanical assembly diagram showing a pipe fitting with a valve and housing (no text or symbols)
natural_image
3D rendering of two cylindrical mechanical components with an arrow indicating transformation (no text or symbols)natural_image
Line drawing of a mechanical lever or rod with two ports and a cylindrical end (no text or symbols)natural_image
Technical line drawing of a mechanical component with no visible text or symbolsnatural_image
Technical line drawing of a conical mechanical component (no text or symbols)Четков валяк
natural_image
Pure technical line drawing of a mechanical component without any text, numbers, or symbolsnatural_image
Technical line drawing of a mechanical tool and its exploded view (no text or symbols)natural_image
3D rendering of a mechanical device mounted on a grid floor, with a checkmark symbol nearby (no text or labels)
natural_image
3D diagram of a mechanical device mounted on a base with a cross symbol at the base (no text or labels)natural_image
Line drawing of a manual toaster with a gridded tray and handle (no text or symbols)natural_image
Technical line drawing of a mechanical component with a tool inserted, no visible text or symbols3. Проверете за блокажи
natural_image
Simple line drawing of a droplet on a surface with a pointed tip, no text or symbols presentnatural_image
Simple line drawing of a trash bin with a spool of food being poured into it (no text or symbols)natural_image
Line drawing of a small electronic device connected to a coiled cable (no text or symbols)natural_image
Two technical diagrams of mechanical components labeled UK and EU, showing internal parts with no visible text or symbols.
www.sharpconsumer.com/support/

www.sharpconsumer.com/documents-of-conformity/
Obsah
Obsah balení 2


Nástěnný držák
Kryt otvoru pro držák
natural_image
Technical line drawing of a portable air purifier with attached cable and power outlet (no text or symbols)
natural_image
Diagram of a device with a cable and plug, showing a connector or socket connected to a power outlet (no text or symbols present)
natural_image
Technical line drawing of a mechanical device with a cable and connector, no visible text or symbols| 10% - 30% | |
| 31% - 70% | |
| >70% |
natural_image
3D technical illustration of a mechanical component with no visible text or symbols
natural_image
Mechanical assembly diagram showing a valve-like component with two directional arrows labeled 1 and 2 (no text or symbols present)
natural_image
3D mechanical assembly diagram showing a pipe fitting with a valve and housing (no text or symbols)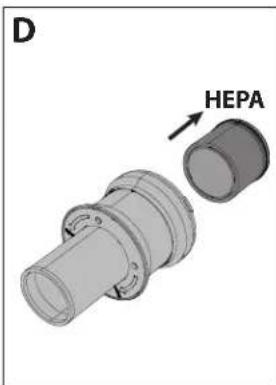

natural_image
3D rendering of two cylindrical mechanical components with an arrow indicating transformation (no text or symbols)natural_image
Line drawing of a mechanical lever or rod with two ports and a cylindrical head (no text or symbols)natural_image
Technical line drawing of a mechanical component with no visible text or symbols
natural_image
Technical line drawing of a mechanical device with internal components and mounting holes (no text or symbols)
natural_image
Technical line drawing of a mechanical assembly with no visible text or symbols
natural_image
Cross-sectional diagram of a mechanical device showing internal components and housing (no text or labels)V-válec
natural_image
Technical line drawing of a conical mechanical component (no text or symbols)Kartáčový válec
natural_image
Pure technical line drawing of a mechanical component without any text, numbers, or symbolsnatural_image
Technical line drawing of a mechanical tool and its assembly (no text or symbols)natural_image
3D rendering of a mechanical device mounted on a grid floor, with a checkmark symbol nearby (no text or labels)
natural_image
3D diagram of a mechanical device mounted on a base with a cross symbol at the bottom (no text or labels)
natural_image
Line drawing of a kitchen grater with granular powder and a side drawer (no text or symbols)2. Čistěte válce
natural_image
Technical line drawing of a mechanical assembly with a tool inserted (no text or symbols)natural_image
Simple line drawing of a droplet on a surface with a pointed tip, no text or symbols present4. Uklidit Sestavu fi ltru
natural_image
Simple line drawing of a trash bin with a lid and spout, no text or symbols presentnatural_image
Line drawing of a cable with a rectangular connector and a striped cable (no text or symbols)natural_image
Technical line drawings of two mechanical components labeled UK and EU (no text or symbols on the diagrams themselves)
www.sharpconsumer.com/support/

www.sharpconsumer.com/documents-of-conformity/
Indhold
Kassens indhold 2


Vægholder
Rulle Opbevaringsrør
natural_image
Technical line drawing of a portable air purifier with attached cable and power outlet (no text or symbols)
natural_image
Diagram of a device with a cable and plug, showing a connector or socket connected to a power outlet (no text or symbols present)
natural_image
Technical line drawing of a mechanical device with a cable and plug, no visible text or symbolsBatteri status indikation
| 10% - 30% | |
| 31% - 70% | |
| >70% |
natural_image
3D technical illustration of a mechanical component with no visible text or symbols

natural_image
3D mechanical assembly diagram showing a pipe fitting with a valve and housing (no text or symbols)
natural_image
3D rendering of a cylindrical mechanical component with an arrow indicating rotation (no text or symbols)natural_image
Line drawing of a mechanical lever or rod with two ports and a cylindrical head (no text or symbols)Motoriseret Børsterulle
natural_image
Technical line drawing of a mechanical component with no visible text or symbols
natural_image
Technical line drawing of a mechanical device with internal components and mounting holes (no text or symbols)
natural_image
Technical line drawing of a mechanical assembly with no visible text or symbols
natural_image
Cross-sectional diagram of a mechanical device showing internal components and housing (no text or labels)V-rulle
natural_image
Technical line drawing of a conical tool or drill bit (no text or symbols)Børsterulle
Børsterullen anbefales til tæppebelagte gulve.

Mini Motoriseret Børste (kun VC-SV28AEU-B)
Tilslut den mini-motoriserede børsterulle til trapper, polstring og smallere stier.
natural_image
Pure technical line drawing of a mechanical component without any text, numbers, or symbolsnatural_image
Technical line drawing of a mechanical tool or device with multiple ports and a handle (no text or symbols)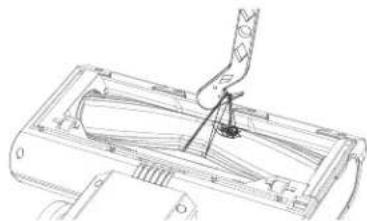
natural_image
Technical line drawing of a mechanical component with no visible text or symbolsnatural_image
3D rendering of a mechanical device mounted on a grid floor, with a checkmark symbol nearby (no text or labels)
natural_image
3D diagram of a vertical mechanical device mounted on a base, with a cross symbol at the base (no text or labels)natural_image
Line drawing of a kitchen grater with a lid and drain, showing powder and contents (no text or symbols)2. Rengør rullerne
natural_image
Technical line drawing of a mechanical assembly with no visible text or symbols3. Tjek for blokeringer
natural_image
Simple line drawing of a sunken emitting a beam to a spherical object (no text or symbols)4. Rengør Filteret
natural_image
Simple line drawing of a container pouring liquid into a trash bin (no text or symbols)natural_image
Line drawing of a small electronic device connected to a coiled cable (no text or symbols)natural_image
Two technical diagrams of mechanical components labeled UK and EU, showing cross-sectional views with no visible text or symbols.
www.sharpconsumer.com/support/

www.sharpconsumer.com/documents-of-conformity/
Inhalt
Packungsinhalt....2


Wandhalterung
natural_image
Top-down schematic diagram of a vehicle or road with labeled components and directional arrows (no text or symbols)natural_image
Line drawing of a portable air purifier with attached cable and power outlet (no text or symbols)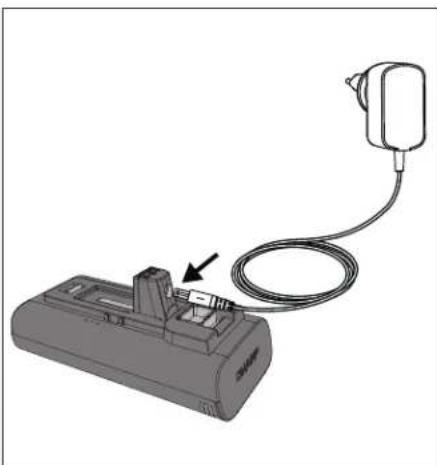
natural_image
Diagram of a device with a cable and plug, showing a connector and cable connection (no text or symbols)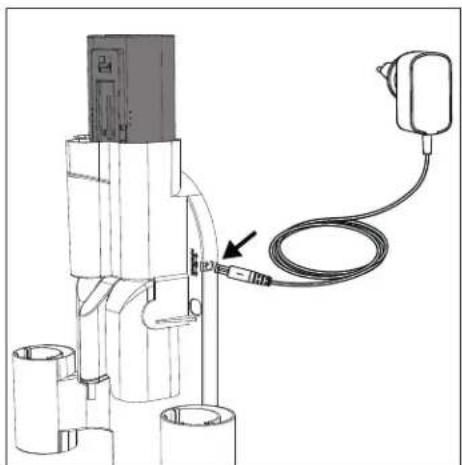
natural_image
Technical line drawing of a mechanical device with attached cable and connector (no text or symbols)Nutzungszeiten
| 10% - 30% | |
| 31% - 70% | |
| >70% |
natural_image
3D technical illustration of a mechanical component with no visible text or symbols

natural_image
3D mechanical assembly diagram showing a pipe fitting with a valve and housing (no text or symbols)
natural_image
3D rendering of two cylindrical mechanical components with an arrow indicating transformation (no text or symbols)natural_image
Line drawing of a mechanical lever or rod with two ports and a cylindrical end (no text or symbols)natural_image
Technical line drawing of a mechanical component with no visible text or symbolsnatural_image
Technical line drawing of a conical mechanical component (no text or symbols)Bürstenrolle
natural_image
Pure mechanical component diagram without any text, numbers, or symbolsnatural_image
Technical line drawing of a mechanical tool and its internal component (no text or symbols)natural_image
3D rendering of a mechanical device mounted on a grid floor, with a checkmark symbol nearby (no text or labels)
natural_image
3D diagram of a mechanical device mounted on a base with a cross symbol, no text or labels presentnatural_image
Line drawing of a manual hand mixer with granular material inside, no text or symbols presentnatural_image
Technical line drawing of a mechanical assembly with no visible text or symbolsnatural_image
Simple line drawing of a sunken emitting a beam to a spherical object (no text or symbols)natural_image
Simple line drawing of a container pouring liquid into a trash bin (no text or symbols)natural_image
Line drawing of a small electronic device connected to a coiled cable (no text or symbols)natural_image
Two technical diagrams of a mechanical component labeled UK and EU, showing internal components without any text or symbols.
www.sharpconsumer.com/support/

www.sharpconsumer.com/documents-of-conformity/


Soporte de pared
natural_image
Top-down schematic diagram of a vehicle or road with labeled components and directional arrows (no text or symbols)Cargando la batería
natural_image
Line drawing of a portable air purifier with attached cable and power outlet (no text or symbols)
natural_image
Diagram of a device with a cable and plug, showing a connector or socket connected to a power outlet (no text or symbols present)
natural_image
Technical line drawing of a mechanical device with attached cable and connector (no text or symbols)Veces de Uso
| 10% - 30% | |
| 31% - 70% | |
| >70% |
natural_image
3D technical illustration of a mechanical component with no visible text or symbols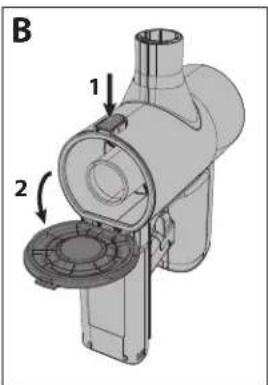

natural_image
3D mechanical assembly diagram showing a pipe fitting with a valve and housing (no text or symbols)

natural_image
3D rendering of two cylindrical mechanical components with an arrow indicating transformation (no text or symbols)natural_image
Line drawing of a mechanical lever or rod with two ports and a cylindrical head (no text or symbols)natural_image
Technical line drawing of a mechanical component with no visible text or symbolsnatural_image
Technical line drawing of a conical mechanical component with internal grooves (no text or symbols)Rodillo de cepillo
natural_image
Pure mechanical component diagram without any text, numbers, or symbolsnatural_image
Technical line drawing of a mechanical tool and its internal component (no text or symbols)natural_image
3D rendering of a mechanical device mounted on a grid floor, with a checkmark symbol nearby (no text or labels)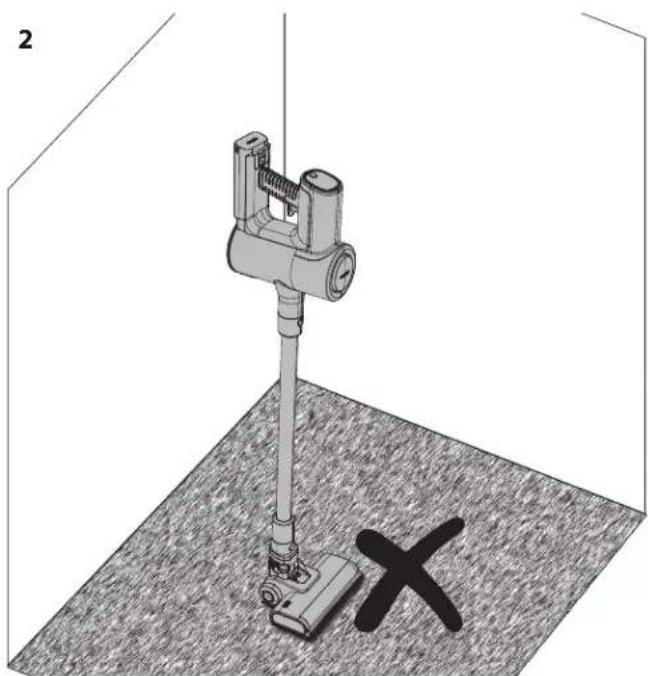
natural_image
3D diagram of a mechanical device mounted on a base with a cross symbol, placed on a textured floor (no text or labels)natural_image
Line drawing of a manual blender with lid and tray, no text or symbols presentnatural_image
Technical line drawing of a mechanical assembly with no visible text or symbolsnatural_image
Simple line drawing of a sunken emitting a beam to a spherical object (no text or symbols)4. Limpia el Filtro
natural_image
Simple line drawing of a trash bin with a spool of food being poured into it (no text or symbols)natural_image
Line drawing of a small electronic device connected to a coiled cable (no text or symbols)natural_image
Technical line drawings of two mechanical components labeled UK and EU (no text or symbols on the diagrams themselves)
www.sharpconsumer.com/documents-of-conformity/
Sisu
Karbi sisu 2


Seinariiul
natural_image
Top-down schematic of a vehicle or road with labeled components and directional arrows (no text or symbols)Rulli hoiutoru
Riiuli aukude kate
Aku laadimine
natural_image
Line drawing of a portable air purifier with attached cable and power outlet (no text or symbols)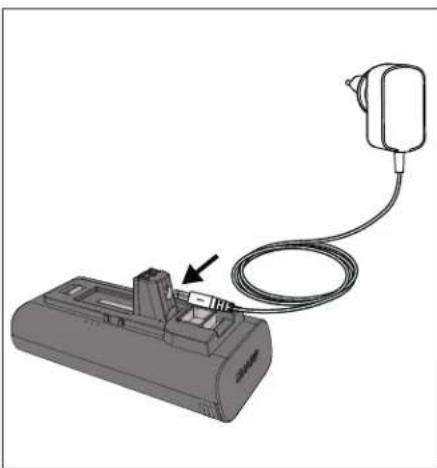
natural_image
Diagram of a device with a cable and plug, showing a connector or terminal (no text or symbols present)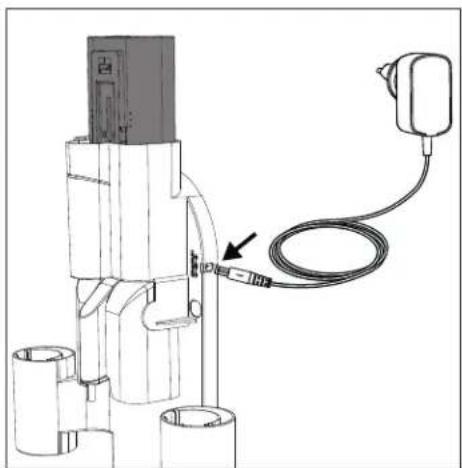
natural_image
Technical line drawing of a mechanical device with a cable and connector (no text or symbols)Head laadimistavad
Aku oleku näidik
| 10% - 30% | |
| 31% - 70% | |
| >70% |
natural_image
3D technical drawing of a mechanical component with no visible text or symbols
natural_image
Mechanical assembly diagram showing a valve-like component with two directional arrows labeled 1 and 2 (no text or symbols present)
natural_image
3D mechanical assembly diagram showing a pipe fitting with a valve and housing (no text or symbols)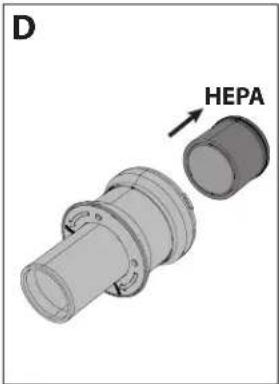
natural_image
3D rendering of two cylindrical mechanical components with an arrow indicating rotation (no text or symbols)natural_image
Line drawing of a mechanical lever or rod with two ports and a cylindrical end (no text or symbols)Mootoriga hari rull
natural_image
Technical line drawing of a mechanical component with no visible text or symbols
natural_image
Technical line drawing of a mechanical device with internal components and mounting holes (no text or symbols)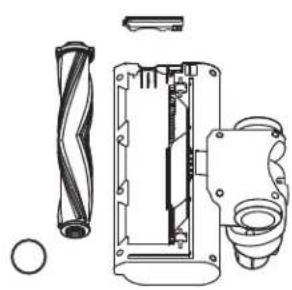
natural_image
Technical line drawing of a mechanical assembly with no visible text or symbols
natural_image
Cross-sectional diagram of a mechanical device showing internal components and housing (no text or labels)V-rull
natural_image
Technical line drawing of a conical tool or drill bit (no text or symbols)Harjarull
natural_image
Pure technical line drawing of a mechanical component without any text, numbers, or symbolsPaindlik paindeadapter (ainult VC-SV20AEU-S ja VC-SV28AEU-B)
Kasutage metallist pikendusvarrast, et hölbustada ligipääsu diivanite, toolide, laudade jne all.

Puhastustööriist
natural_image
Technical line drawings of a tool and a mechanical component (no text or symbols)natural_image
3D rendering of a mechanical device mounted on a grid floor, with a black checkmark symbol nearby (no text or labels)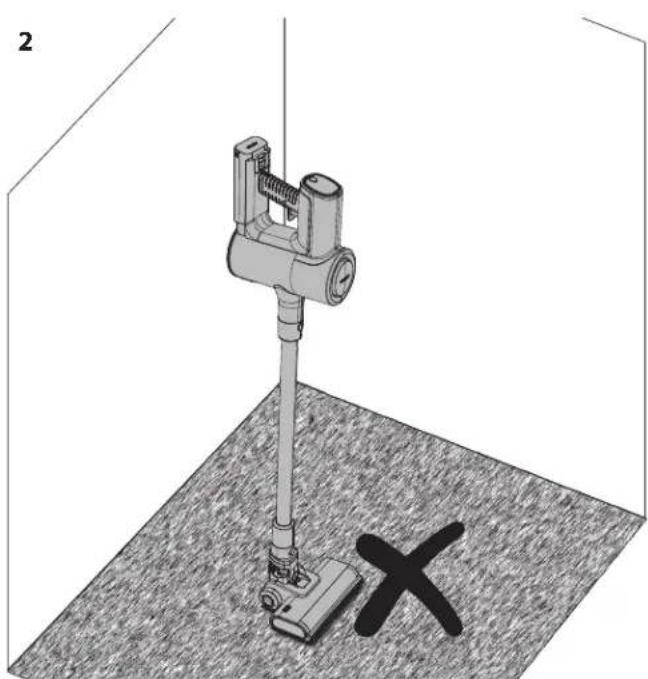
natural_image
3D diagram of a mechanical device mounted on a base with a cross symbol, placed on a textured floor (no text or labels)natural_image
Line drawing of a kitchen grater with a side panel and lid (no text or symbols)2. Puhastage rullid
natural_image
Technical line drawing of a mechanical assembly with a tool inserted into a housing (no text or symbols)3. Kontrollige ummistusi
natural_image
Simple line drawing of a telescope emitting a light beam through a lens (no text or symbols)4. Puhasta fi Iter
natural_image
Simple line drawing of a trash bin with a spool of grain falling from above (no text or symbols)natural_image
Line drawing of a small electronic device connected to a coiled cable (no text or symbols)natural_image
Two technical diagrams of a mechanical component labeled UK and EU, showing internal components without any text or symbols.
www.sharpconsumer.com/support/

www.sharpconsumer.com/documents-of-conformity/


Θήκη Τοίχου
natural_image
Top-down schematic diagram of a vehicle or meeting room layout with no visible text, numbers, or symbols.Κάλυμμα Οπής Θήκης
natural_image
Line drawing of a portable air purifier with attached cable and power outlet (no text or symbols)
natural_image
Diagram of a device with a cable and plug, showing a connector or socket connected to a power outlet (no text or symbols present)
natural_image
Technical line drawing of a mechanical device with attached cable and connector (no text or symbols)Φορές Χρήσης
| 10% - 30% | |
| 31% - 70% | |
| >70% |
natural_image
3D technical illustration of a mechanical device with no visible text or symbols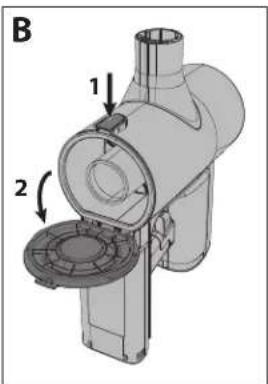

natural_image
3D mechanical assembly diagram showing a pipe fitting with a valve and housing (no text or symbols)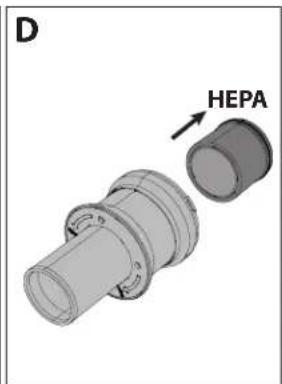

natural_image
3D rendering of two cylindrical mechanical components with an arrow indicating transformation (no text or symbols)natural_image
Line drawing of a mechanical lever or rod with two ports and a cylindrical end (no text or symbols)natural_image
Technical line drawing of a mechanical component with no visible text or symbolsnatural_image
Technical line drawing of a mechanical device with internal components and mounting holes (no text or symbols)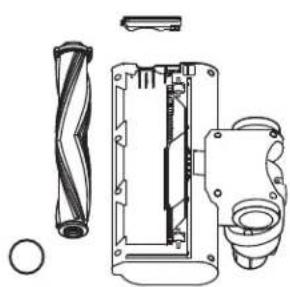
natural_image
Exploded view diagram of a mechanical device showing internal components and assembly (no text or labels)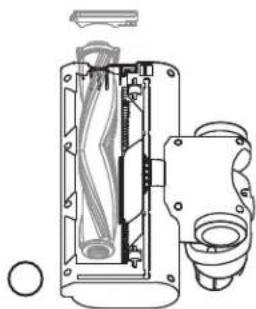
natural_image
Cross-sectional diagram of a mechanical device showing internal components and housing (no text or labels)V-Poλό
natural_image
Technical line drawing of a conical mechanical component (no text or symbols)Βούρτσα ρολού
natural_image
Pure technical line drawing of a mechanical component without any text, numbers, or symbolsnatural_image
Technical line drawing of a mechanical tool and its internal component (no text or symbols)natural_image
3D rendering of a mechanical device mounted on a grid floor, with a checkmark symbol nearby (no text or labels)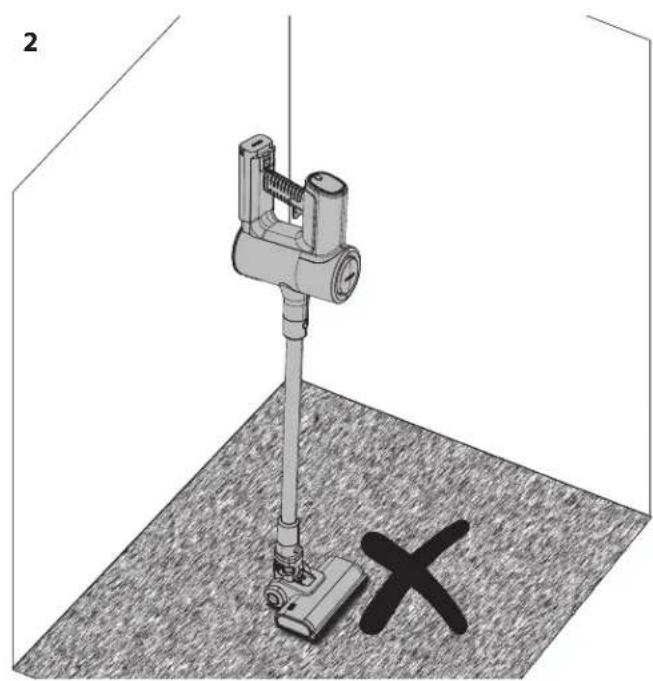
natural_image
3D rendering of a mechanical device mounted on a base with a cross symbol at the base (no text or labels)natural_image
Line drawing of a kitchen grater with a lid and drain, showing powder being poured into it (no text or symbols)natural_image
Technical line drawing of a mechanical assembly with no visible text or symbolsnatural_image
Simple line drawing of a droplet on a surface with a pointed tip, no text or symbols presentnatural_image
Simple line drawing of a trash bin with a spool of contents and a handle, no text or symbols present.natural_image
Simple line drawing of a connected electrical cable with a rectangular component (no text or symbols)natural_image
Technical line drawings of mechanical components labeled UK and EU (no text or symbols on the diagrams themselves)
www.sharpconsumer.com/support/

www.sharpconsumer.com/documents-of-conformity/
Contenus


Support mural
natural_image
Top-down schematic diagram of a vehicle or road with labeled components and directional arrows (no text or symbols)Couverture de Trou de Support Mural
natural_image
Line drawing of a portable air purifier with attached cable and power outlet (no text or symbols)
natural_image
Diagram of a device with a cable and connector, no text or symbols present
natural_image
Technical line drawing of a mechanical device with attached cable and connector (no text or symbols)Temps d'utilisation
| 10% - 30% | |
| 31% - 70% | |
| >70% |
natural_image
3D technical illustration of a mechanical component with no visible text or symbols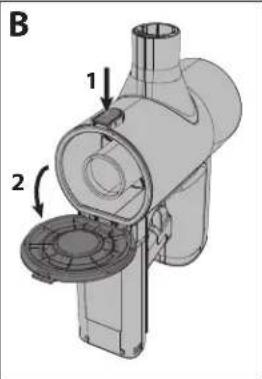
natural_image
3D technical illustration of a mechanical pipe assembly with no visible text or symbols
natural_image
3D rendering of a cylindrical mechanical component with an arrow indicating direction (no text or symbols)natural_image
Line drawing of a mechanical lever or rod with two end caps and a handle (no text or symbols)natural_image
Technical line drawing of a mechanical component with no visible text or symbolsnatural_image
Technical line drawing of a conical mechanical component (no text or symbols)Rouleau de brosse
natural_image
Pure technical line drawing of a mechanical component without any text, numbers, or symbolsnatural_image
Technical line drawing of a mechanical component with two views: one showing a handle and circular features, the other showing a bracket assembly (no text or symbols)natural_image
3D diagram of a mechanical device mounted on a grid floor, with a checkmark symbol nearby (no text or labels)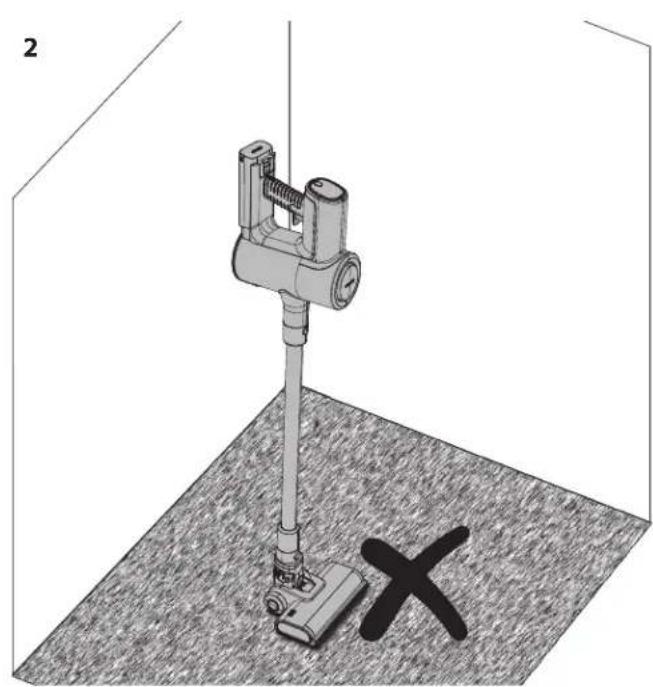
natural_image
3D diagram of a mechanical device mounted on a base with a cross symbol, no text or labels presentnatural_image
Line drawing of a kitchen grater with granular powder and a side drawer (no text or symbols)natural_image
Technical line drawing of a mechanical component with a handle and mounting base (no text or symbols)natural_image
Simple line drawing of a human eye with a magnified view of the eye (no text or symbols)natural_image
Simple line drawing of a trash bin with a spool of food being poured into it (no text or symbols)Gérer les blocages
natural_image
Line drawing of a small electronic device connected to a coiled cable (no text or symbols)natural_image
Two technical diagrams showing mechanical components labeled UK and EU, with no visible text or symbols.
www.sharpconsumer.com/support/

www.sharpconsumer.com/documents-of-conformity/
Sisältö


Seinäteline
Telineen reikäkansi
Akun lataaminen
natural_image
Technical line drawing of a portable air purifier with attached cable and power outlet (no text or symbols)
natural_image
Diagram of a device with a cable and plug, showing a connector or socket connected to a power outlet (no text or symbols present)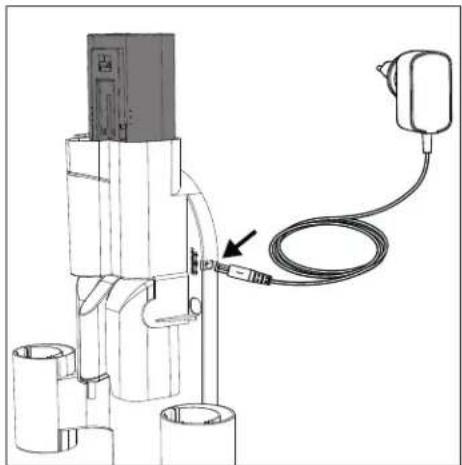
natural_image
Technical line drawing of a mechanical device with a cable and connector, no visible text or symbolsHyvät lataustavat
Akun tilan ilmaisu
| 10% - 30% | |
| 31% - 70% | |
| >70% |
natural_image
3D technical illustration of a mechanical component with no visible text or symbols

natural_image
3D mechanical assembly diagram showing a pipe fitting with a valve and housing (no text or symbols)

natural_image
3D rendering of two cylindrical mechanical components with an arrow indicating rotation (no text or symbols)natural_image
Line drawing of a mechanical lever or rod with two ports and a cylindrical end (no text or symbols)natural_image
Technical line drawing of a mechanical component with no visible text or symbolsnatural_image
Technical line drawing of a conical tool or drill bit (no text or symbols)Harjarulla
natural_image
Pure technical line drawing of a mechanical component without any text, numbers, or symbolsnatural_image
Technical line drawings of a mechanical component and its assembly (no text or symbols)natural_image
3D rendering of a mechanical device mounted on a grid floor, with a checkmark symbol nearby (no text or labels)
natural_image
3D rendering of a mechanical device mounted on a base with a cross symbol at the base (no text or labels)natural_image
Line drawing of a manual hand mixer with granular material inside (no text or symbols)2. Puhdista rullat
natural_image
Technical line drawing of a mechanical component with a lever and mounting base (no text or symbols)natural_image
Simple line drawing of a sun interacting with a globe, no text or symbols presentnatural_image
Simple line drawing of a trash bin with a spool of grain falling from above (no text or symbols)Tukosten käsittely
natural_image
Line drawing of a small electronic device connected to a coiled cable (no text or symbols)natural_image
Technical line drawings of two mechanical components labeled UK and EU (no text or symbols on the diagrams themselves)
www.sharpconsumer.com/support/

www.sharpconsumer.com/documents-of-conformity/
Sadržaj
Sadržaj paketa 2


Zidni nosač
Za jednostavnost i praktičnost korištenja i pohrane, vaš SHARP štapni usisavač dolazi s zidnim nosačem. Ovaj nosač će pohraniti sve alate za vaš usisavač i može napuniti obje baterije istovremeno.
natural_image
Top-down schematic diagram of a vehicle or road with labeled components and directional arrows (no text or symbols)Cijev za pohranu valjka
Za jednostavno pohranjivanje nekorištenog valjka za VC-SV12AEU-W ili VC-SV20AEU-S uključili smo cijev za pohranu. Cijev za pohranu stane u jednu od gornjih rupa za pohranu, napominjemo da postoji adapter (2) koji treba biti postavljen u rupu za pohranu prije umetanja cijevi (1).
Poklopac rupe za nosač
Uz VC-SV12AEU-W i VC-SV20AEU-S dolazi poklopac koji se može koristiti za zatvaranje jedne od rupa za dodatnu opremu. VC-SV12AEU-W dolazi s 2 poklopca, dok VC-SV20AEU-S dolazi s 1 poklopcem.
Zaslon i kontrole
LED zaslon:
- Preostala količina napunjenosti baterije
- Gumb za odabir brzine
- Gumb za aktiviranje napajanja
Kako koristiti
Punjenje baterije
natural_image
Line drawing of a portable air purifier with attached cable and power outlet (no text or symbols)
natural_image
Diagram of a device with a cable and connector, no text or symbols present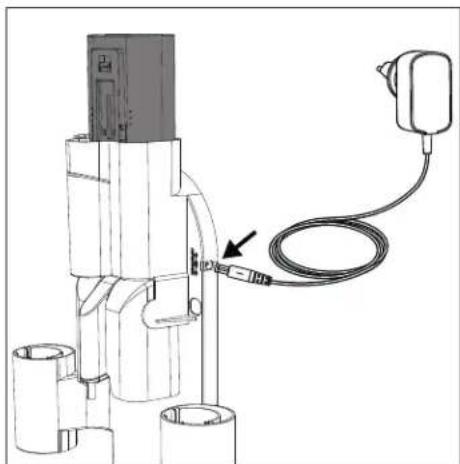
natural_image
Technical line drawing of a mechanical device with attached cable and connector (no text or symbols)Dobre navike punjenja
Indikacija statusa baterije
Kada se baterija puni ili prazni, status se može provjeriti ili gledanjem postotka punjenja na zaslonu usisavača ili prema svjetlima na strani same baterije.
| 10% - 30% | |
| 31% - 70% | |
| >70% |
natural_image
3D technical illustration of a mechanical component with no visible text or symbols

natural_image
3D mechanical assembly diagram showing a pipe fitting with a valve and housing (no text or symbols)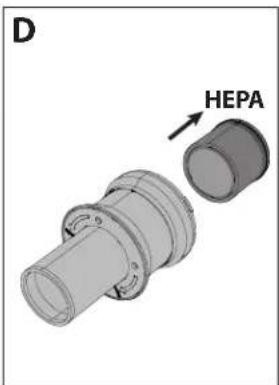

natural_image
3D rendering of two cylindrical mechanical components with an arrow indicating transformation (no text or symbols)NAPOMENA: NE koristite usisavač bez postavljenog filtra za rukav, HEPA13 ili mrežastog filtra. To će rezultirati ulaskom velikih čestica prašine ili otpada u motor i uzrokovati oštećenje.
Alati i njihova upotreba
natural_image
Line drawing of a mechanical lever or rod with two ports and a cylindrical head (no text or symbols)Motorizirani četkasti valjak
natural_image
Technical line drawing of a mechanical component with no visible text or symbols
natural_image
Technical line drawing of a mechanical device with internal components and mounting holes (no text or symbols)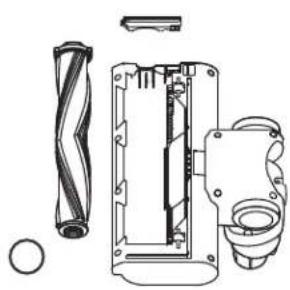
natural_image
Technical line drawing of a mechanical assembly with no visible text or symbols
natural_image
Cross-sectional diagram of a mechanical device showing internal components and housing (no text or labels)V-valjak
Koristite V valjak na svim vrstama podova.

natural_image
Technical line drawing of a conical tool or drill bit (no text or symbols)Četkasti valjak
Preporučuje se upotreba četkastog valjka za podove prekrivene tepihom.

Mini motorizirana četka (samo za VC-SV28AEU-B)
Priključite mini motorizirani četkasti valjak za stepenice, tapecirani namještaj i uže prolaze.
natural_image
Pure technical line drawing of a mechanical component without any text, numbers, or symbolsAdapter za fl eksibilno savijanje (samo VC-SV20AEU-S i VC-SV28AEU-B)
Koristite s metalnom produžnom šipkom za jednostavan pristup ispod sofa, stolica, stolova, itd.

Alat za čišćenje
natural_image
Technical line drawings of a tool and a mechanical component (no text or symbols)Kada koristite dio za rezanje alata za čišćenje, pobrinite se da sigurno uhvatite zapetljano i povucite tako da se materijal prereže. Budite oprezni da ne povučete prejako jer to može uzrokovati oštećenje valjka.
Samostojeći
natural_image
3D rendering of a mechanical device mounted on a grid floor, with a checkmark symbol nearby (no text or labels)
natural_image
3D diagram of a mechanical device mounted on a base with a cross symbol, placed on a textured floor (no text or labels)
- Postotak preostale energije baterije.
- Gumb za odabir načina rada – ECO, srednji ili Turbo snaga.
- Vizualna indikacija preostale energije temelji se na razini baterije. Ovo će se promijeniti kada se pritisne gumb za način rada.
- Način rada. Ovo će se promijeniti kada se pritisne tipka za način rada.
U slučaju bilo kakvog problema s vašim štapnim usisavačem, moguće je da će se na zaslonu prikazati kod pogreške. Ako se pojavi kod pogreške, za više detalja pogledajte odjeljak za rješavanje problema u ovom priručniku za korisnike.
natural_image
Line drawing of a kitchen grater with granular material and a side drawer (no text or symbols)2. Očistite valjke
natural_image
Technical line drawing of a mechanical assembly with a tool inserted, no visible text or symbolsnatural_image
Simple line drawing of a droplet on a surface with a pointed tip, no text or symbols present4. Očistite fi Iter
Začepljeni filtri najčešći su razlog lošeg usisavanja. Očistite ih nakon svake upotrebe, a ako se performanse smanjuju, mogu se oprati vodom i ostaviti da se suše 24 sata. Preporučuje se zamjena HEPA filtera svaka 3 mjeseca.

natural_image
Simple line drawing of a trash bin with a lid and spout, no text or symbols presentRješavanje blokada
Moguće je da će vaš štapni usisavač povremeno postati začepljen otpadom. Možda ćete mori rastaviti dijelove kako biste pristupili čišćenju i otklanjanju začepljenja.
Kada se bavite začepljenjima, koristite dugu čvrstu žicu s tupim krajem za čišćenje cijevi. Pazite da ne oštetite cijev.
AC adapter
natural_image
Line drawing of a small electronic device connected to a coiled cable (no text or symbols)Vaš SHARP štapni usisavač dolazi s AC adapterom koji se može koristiti s britanskom (3-pinskom) ili EU (2-pinskom) utičnicom. AC adapter koji dolazi s vašim štapnim usisavačem ovisi o modelu usisavača i baterije, pogledajte donju tablicu kako biste uskladili model usisavača i AC adapter.
Koristite samo priloženi i od SHARP preporučeni AC adapter s vašim usisavačem na štapu.
Specifi kacije AC adaptera mogu se pronaći na kraju ovog Korisničkog priručnika.
natural_image
Technical line drawings of two mechanical components labeled UK and EU (no text or symbols on the diagrams themselves)
www.sharpconsumer.com/documents-of-conformity/
Tartalomjegyzék


Fali tartó
natural_image
Top-down schematic diagram of a vehicle or road with labeled components and directional arrows (no text or symbols)Henger tárolócső
Tartó Lyuk Fedél
natural_image
Line drawing of a portable air purifier with attached cable and power outlet (no text or symbols)
natural_image
Diagram of a device with a cable and connector, no text or symbols present
natural_image
Technical line drawing of a mechanical device with attached cable and connector (no text or symbols)Jó töltési szokások
| 10% - 30% | |
| 31% - 70% | |
| >70% |
natural_image
3D technical illustration of a mechanical device with no visible text or symbols

natural_image
3D mechanical assembly diagram showing a pipe fitting with a valve and housing (no text or symbols)

natural_image
3D rendering of two cylindrical mechanical components with an arrow indicating transformation (no text or symbols)natural_image
Line drawing of a mechanical lever or rod with two ports and a cylindrical end (no text or symbols)Motorizált Söprühenger
natural_image
Technical line drawing of a mechanical component with no visible text or symbols
natural_image
Technical line drawing of a mechanical device with internal components and mounting holes (no text or symbols)
natural_image
Technical line drawing of a mechanical assembly with no visible text or symbols
natural_image
Cross-sectional diagram of a mechanical device showing internal components and housing (no text or labels)V-henger
natural_image
Technical line drawing of a conical tool or drill bit (no text or symbols)Kefe henger
natural_image
Pure technical line drawing of a mechanical component without any text, numbers, or symbolsnatural_image
Technical line drawing of a mechanical component with a tool handle and internal assembly (no text or symbols)natural_image
3D rendering of a mechanical device mounted on a grid floor, with a checkmark symbol nearby (no text or labels)
natural_image
3D diagram of a vertical tool mounted on a base with a cross symbol at the base (no text or labels)natural_image
Line drawing of a manual hand mixer with granular material and a side panel (no text or symbols)natural_image
Technical line drawing of a mechanical assembly with a tool inserted, no visible text or symbolsnatural_image
Simple line drawing of a droplet on a surface with a pointed tip, no text or symbols presentnatural_image
Simple line drawing of a trash bin with a lid and spools, no text or symbols presentnatural_image
Line drawing of a cable with a rectangular connector and a striped connector attached (no text or symbols)natural_image
Two technical diagrams of a mechanical component labeled UK and EU, showing internal components without any text or symbols.
www.sharpconsumer.com/support/

www.sharpconsumer.com/documents-of-conformity/


natural_image
Top-down schematic diagram of a vehicle or road with labeled components and directional arrows (no text or symbols)natural_image
Line drawing of a portable air purifier with attached cable and power outlet (no text or symbols)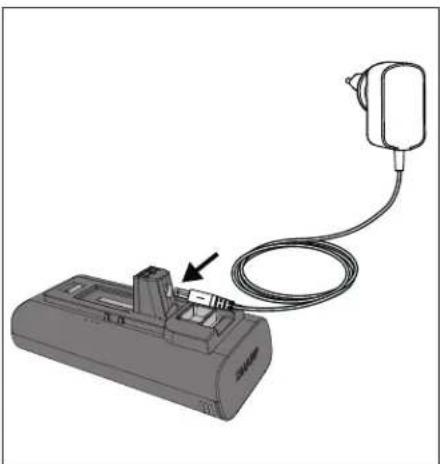
natural_image
Diagram of a device with a cable and connector, no text or symbols present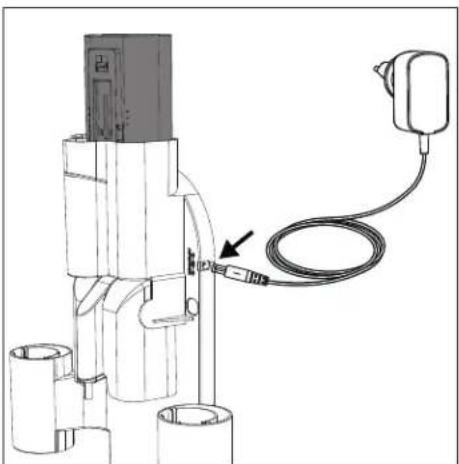
natural_image
Technical line drawing of a mechanical device with attached cable and connector (no text or symbols)Tempi di utilizzo
| Autonomia per 2 batterie (minuti) | |||
| Tempi di ricarica (ore) | |||
| VC-SV12AEU-W | VC-SV20AEU-S | VC-SV28AEU-B | |
| ECO 50 90 130 | |||
| Medio x | x | 4 | 8 |
| Turbo 32 30 24 | |||
| 10% - 30% | |
| 31% - 70% | |
| >70% |
natural_image
3D technical illustration of a mechanical component with no visible text or symbols

natural_image
3D mechanical assembly diagram showing a pipe fitting with a valve and housing (no text or symbols)

natural_image
3D rendering of two cylindrical mechanical components with an arrow indicating transformation (no text or symbols)natural_image
Line drawing of a mechanical lever or rod with two ports and a cylindrical head (no text or symbols)natural_image
Technical line drawing of a mechanical component with no visible text or symbols
natural_image
Technical line drawing of a mechanical device with internal components and mounting holes (no text or symbols)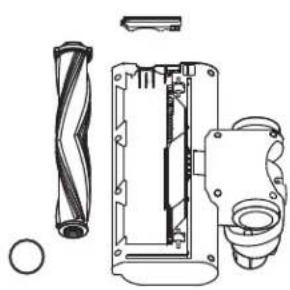
natural_image
Technical line drawing of a mechanical assembly with no visible text or symbols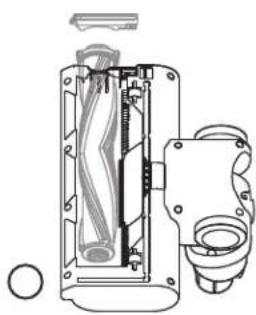
natural_image
Technical line drawing of a mechanical device with internal components and housing (no text or symbols)V-Roller
natural_image
Technical line drawing of a conical mechanical component (no text or symbols)Rullo spazzola
natural_image
Pure technical line drawing of a mechanical component without any text, numbers, or symbolsnatural_image
Technical line drawing of a mechanical component with two views: top shows a tool handle and bottom shows a bracket assembly (no text or symbols)natural_image
3D rendering of a mechanical device mounted on a grid floor, with a checkmark symbol placed at the base (no text or labels)
natural_image
3D rendering of a mechanical device mounted on a base with a cross symbol, placed on a textured floor (no text or symbols present)
natural_image
Line drawing of a manual shaver machine with granular material and a side panel (no text or symbols)2. Pulire i rulli
natural_image
Technical line drawing of a mechanical assembly with no visible text or symbolsnatural_image
Simple line drawing of a sphere emitting a beam to a cylindrical object (no text or symbols)4. Pulire il Filtro
natural_image
Simple line drawing of a container with liquid and a handle, above a slotted tray (no text or symbols)natural_image
Line drawing of a small electronic device connected to a coiled cable (no text or symbols)natural_image
Two technical diagrams of a mechanical component labeled UK and EU, showing internal components without any text or symbols.
www.sharpconsumer.com/support/

www.sharpconsumer.com/documents-of-conformity/
Turinys
Dėžės turinys....2


Sieninè lentyna
natural_image
Top-down schematic of a vehicle or road intersection with labeled components and directional arrows (no text or symbols)Volelio saugojimo vamzdis
Lentynos skylès dangtelis
natural_image
Line drawing of a portable electric shaver with cable and power outlet (no text or symbols)
natural_image
Diagram of a device with a cable and plug, showing a connector or socket connected to a power outlet (no text or symbols present)
natural_image
Technical line drawing of a mechanical device with a cable and connector, no visible text or symbolsGeroji jkrovimo praktika
Akumuliatoriaus büklès rodymas
| 10% - 30% | |
| 31% - 70% | |
| >70% |
natural_image
3D technical illustration of a mechanical component with no visible text or symbols

natural_image
3D mechanical assembly diagram showing a pipe fitting with a valve and housing (no text or symbols)
natural_image
3D rendering of two cylindrical mechanical components with an arrow indicating transformation (no text or symbols)natural_image
Line drawing of a mechanical lever or rod with two ports and a cylindrical head (no text or symbols)natural_image
Technical line drawing of a mechanical component with no visible text or symbols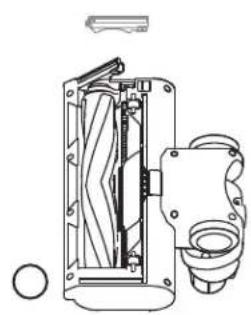
natural_image
Technical line drawing of a mechanical device with internal components and mounting holes (no text or symbols)
natural_image
Technical line drawing of a mechanical assembly with no visible text or symbols
natural_image
Cross-sectional diagram of a mechanical device showing internal components and housing (no text or labels)V-volelis
natural_image
Technical line drawing of a conical tool or drill bit (no text or symbols)Šepetélinis valas
natural_image
Pure technical line drawing of a mechanical component without any text, numbers, or symbolsLankstus lenkimo adapteris (tik VC-SV20AEU-S ir VC-SV28AEU-B)
natural_image
Technical line drawing of a tool and component assembly (no text or symbols)natural_image
3D rendering of a mechanical device mounted on a grid floor, with a checkmark symbol nearby (no text or labels)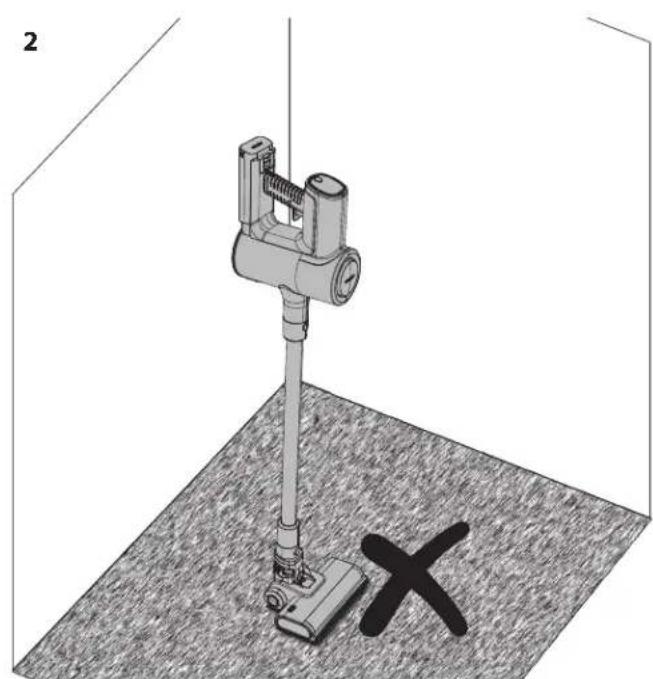
natural_image
3D diagram of a mechanical device mounted on a base, with a cross symbol and label '2' (no text or symbols on the device itself)
natural_image
Line drawing of a manual blender with lid and tray, no text or symbols presentnatural_image
Technical line drawing of a mechanical assembly with no visible text or symbolsnatural_image
Simple line drawing of a droplet falling from a cylindrical object onto a rod, with no text or symbols present.4. lšvalykite fi ltra
natural_image
Simple line drawing of a trash bin with a spool of grain and a handle, no text or symbols present.natural_image
Line drawing of a small electronic device connected to a coiled cable (no text or symbols)natural_image
Two technical diagrams of a mechanical component labeled UK and EU, showing internal components without any text or symbols.
www.sharpconsumer.com/support/

www.sharpconsumer.com/documents-of-conformity/
Saturs


Sienas turētājs
natural_image
Top-down schematic diagram of a vehicle or road with labeled components and directional arrows (no text or symbols)natural_image
Technical line drawing of a portable air purifier device with attached cable and power outlet (no text or symbols)
natural_image
Diagram of a device with a cable and plug, showing a connector or socket connected to a power outlet (no text or symbols present)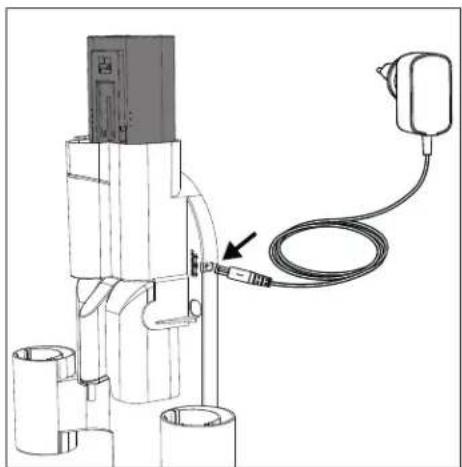
natural_image
Technical line drawing of a mechanical device with a cable and connector (no text or symbols)Labi uzlādes paradumi
| 10% - 30% | |
| 31% - 70% | |
| >70% |
natural_image
3D technical illustration of a mechanical device with no visible text or symbols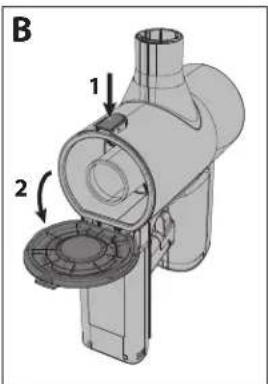

natural_image
3D mechanical assembly diagram showing a pipe fitting with a valve and housing (no text or symbols)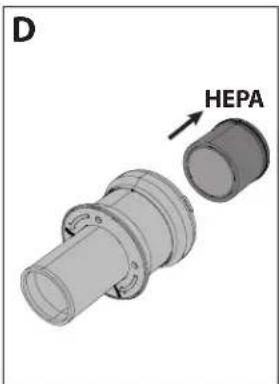

natural_image
3D rendering of two cylindrical mechanical components with an arrow indicating rotation (no text or symbols)natural_image
Line drawing of a mechanical tool or rod with two ports and a cylindrical end (no text or symbols)natural_image
Technical line drawing of a mechanical component with no visible text or symbols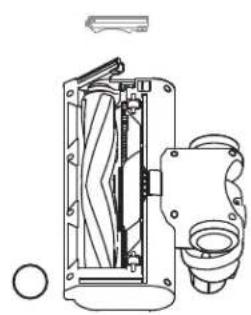
natural_image
Technical line drawing of a mechanical device with internal components and mounting holes (no text or symbols)
natural_image
Technical line drawing of a mechanical assembly with no visible text or symbols
natural_image
Cross-sectional diagram of a mechanical device showing internal components and housing (no text or labels)V-rullis
natural_image
Technical line drawing of a conical tool or drill bit (no text or symbols)Sukas rullis
natural_image
Pure technical line drawing of a mechanical component without any text, numbers, or symbolsElpojošs saliekamais adapteris (tikai VC-SV20AEU-S un VC-SV28AEU-B)
natural_image
Technical line drawing of a mechanical tool or device with multiple ports and a handle (no text or symbols)
natural_image
Technical line drawing of a mechanical component with no visible text or symbolsnatural_image
3D rendering of a mechanical device mounted on a grid floor, with a checkmark symbol nearby (no text or labels)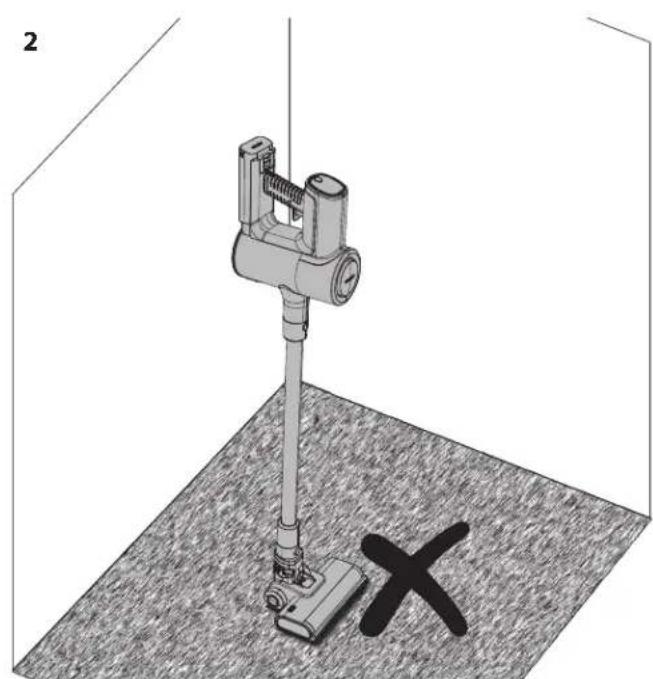
natural_image
3D rendering of a mechanical device mounted on a base with a cross symbol at the base (no text or labels)natural_image
Line drawing of a manual hand mixer with granular material inside (no text or symbols)2. Tiriet rullišus
natural_image
Technical line drawing of a mechanical assembly with a tool inserted, no visible text or symbolsnatural_image
Simple line drawing of a droplet on a surface with a pointed tip, no text or symbols present4. Tiriet filtru
natural_image
Simple line drawing of a trash bin with a lid and spools, no text or symbols presentnatural_image
Line drawing of a cable with a rectangular connector and a striped cable (no text or symbols)natural_image
Two technical diagrams of mechanical components labeled UK and EU, showing cross-sectional views with no visible text or symbols.
www.sharpconsumer.com/support/

www.sharpconsumer.com/documents-of-conformity/
Innhold


Veggstativ
natural_image
Top-down schematic of a vehicle or road intersection with labeled components and directional arrows (no text or symbols)Stativhullsdeksel
natural_image
Line drawing of a portable air purifier with attached cable and power outlet (no text or symbols)
natural_image
Diagram of a device with a cable and plug, showing a connector or socket connected to a power outlet (no text or symbols present)
natural_image
Technical line drawing of a mechanical device with attached cable and connector (no text or symbols)Gode ladevaner
Brukstider
| Kjøretid for 2 batterier (minutter) | |||
| Ladingstider (timer) | |||
| VC-SV12AEU-W | VC-SV20AEU-S | VC-SV28AEU-B | |
| ECO 50 90 130 | |||
| Middels x | x | 4 | 8 |
| Turbo | 32 30 24 | ||
| 10% - 30% | |
| 31% - 70% | |
| >70% |
natural_image
3D technical illustration of a mechanical component with no visible text or symbols

natural_image
3D mechanical assembly diagram showing a pipe fitting with a valve and housing (no text or symbols)

natural_image
3D rendering of two cylindrical mechanical components with an arrow indicating transformation (no text or symbols)natural_image
Line drawing of a mechanical tool or rod with two ports and a cylindrical end (no text or symbols)natural_image
Technical line drawing of a mechanical component with no visible text or symbols
natural_image
Technical line drawing of a mechanical device with internal components and mounting holes (no text or symbols)
natural_image
Technical line drawing of a mechanical device with internal components and exploded view (no text or labels)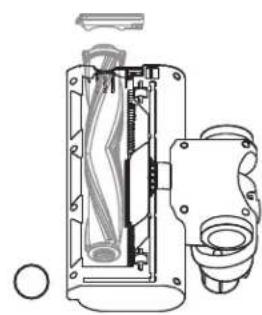
natural_image
Cross-sectional diagram of a mechanical device showing internal components and housing (no text or labels)V-Rull
Bruk V-rullen på alle typer gulv.
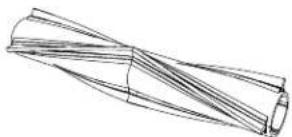
natural_image
Technical line drawing of a conical tool or drill bit (no text or symbols)Børsterulle
Børsterullen anbefales for teppede gulv.

Mini motorisert børste (kun VC-SV28AEU-B)
natural_image
Pure technical line drawing of a mechanical component without any text, numbers, or symbolsFleksibel bøyeadapter (kun VC-SV20AEU-S og VC-SV28AEU-B)
natural_image
Technical line drawings of a mechanical component and its assembly (no text or symbols)natural_image
3D rendering of a mechanical device mounted on a grid floor, with a checkmark symbol nearby (no text or labels)
natural_image
3D diagram of a mechanical device mounted on a base with a cross symbol, placed on a textured floor (no text or labels)- Det er greit å bruke Selvstäende på hardt gulv.
- IKKE bruk Selvstående på myke/teppede gulv.
natural_image
Line drawing of a manual blender with lid and tray, no text or symbols present2. Rengjør rullene
natural_image
Technical line drawing of a mechanical assembly with a tool inserted into a housing (no text or symbols)3. Sjekk for blokkeringer
natural_image
Simple line drawing of a telescope emitting a light beam through a lens (no text or symbols)natural_image
Simple line drawing of a trash bin with a spool of grain falling from above (no text or symbols)natural_image
Line drawing of a small electronic device connected to a coiled cable (no text or symbols)natural_image
Technical line drawings of two mechanical components labeled UK and EU (no text or symbols on the diagrams themselves)
www.sharpconsumer.com/support/

www.sharpconsumer.com/documents-of-conformity/
Inhoud


Wand Caddy
natural_image
Top-down schematic diagram of a vehicle or road with labeled components and directional arrows (no text or symbols)Opbergbuis voor rol
Caddy Gat Afdekking
natural_image
Line drawing of a portable air purifier with attached cable and power outlet (no text or symbols)
natural_image
Diagram of a device with a cable and connector, no text or symbols present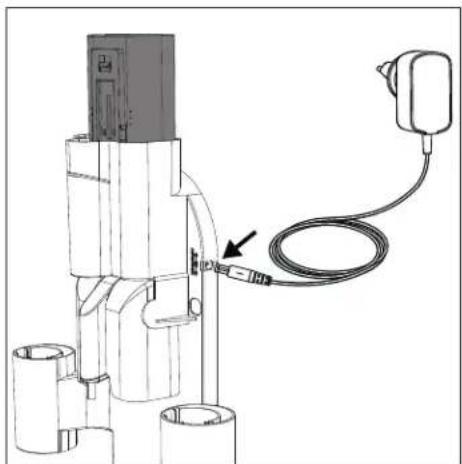
natural_image
Technical line drawing of a mechanical device with attached cable and connector (no text or symbols)Goede laadgewoonten
Gebruikstijden
| 10% - 30% | |
| 31% - 70% | |
| >70% |
natural_image
3D technical illustration of a mechanical component with no visible text or symbols
natural_image
Mechanical assembly diagram showing a valve-like component with two directional arrows labeled 1 and 2 (no text or symbols present)
natural_image
3D mechanical assembly diagram showing a pipe fitting with a valve and housing (no text or symbols)
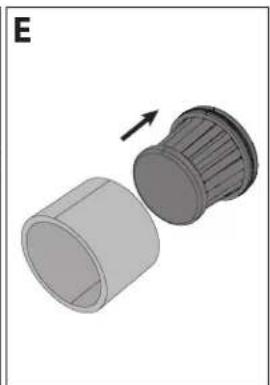
natural_image
3D rendering of two cylindrical mechanical components with an arrow indicating transformation (no text or symbols)natural_image
Line drawing of a mechanical lever or rod with two ports and a cylindrical head (no text or symbols)natural_image
Technical line drawing of a mechanical component with no visible text or symbols
natural_image
Technical line drawing of a mechanical device with internal components and mounting holes (no text or symbols)
natural_image
Technical line drawing of a mechanical assembly with no visible text or symbols
natural_image
Cross-sectional diagram of a mechanical device showing internal components and housing (no text or labels)V-Rolborstel
natural_image
Technical line drawing of a conical mechanical component (no text or symbols)Borstelrol
natural_image
Pure technical line drawing of a mechanical component without any text, numbers, or symbolsnatural_image
Technical line drawing of a mechanical tool and its assembly (no text or symbols)natural_image
3D diagram of a mechanical device with a checkmark on a grid background (no text or symbols)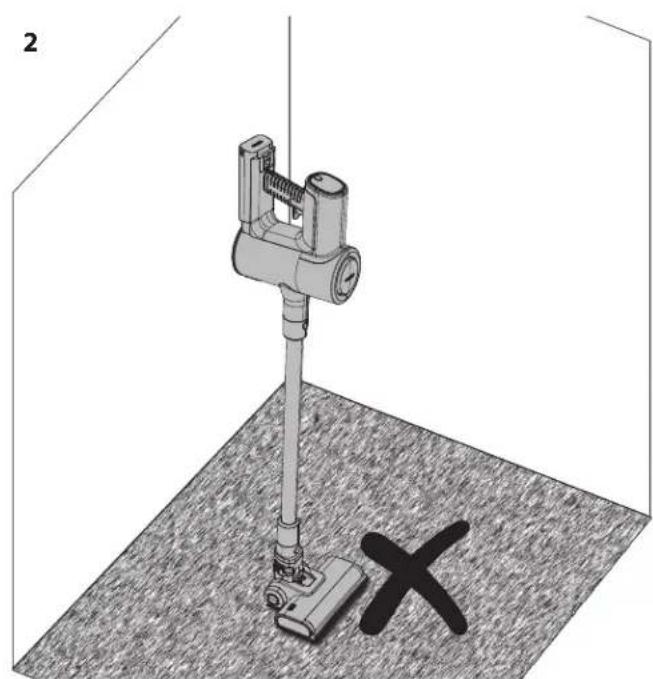
natural_image
3D diagram of a mechanical device mounted on a base with a cross symbol at the bottom (no text or labels)natural_image
Line drawing of a manual blender with lid and tray, no text or symbols present2. Reinig de Rollers
natural_image
Technical line drawing of a mechanical assembly with no visible text or symbolsnatural_image
Simple line drawing of a droplet falling from a pointed tube onto a surface, with no text or symbols present.natural_image
Simple line drawing of a trash bin with a spool of food being poured into it (no text or symbols)natural_image
Line drawing of a cable with a rectangular connector and a striped connector attached (no text or symbols)natural_image
Two technical diagrams of a mechanical component labeled UK and EU, showing internal components with no visible text or symbols.
www.sharpconsumer.com/support/

www.sharpconsumer.com/documents-of-conformity/
Spis treści

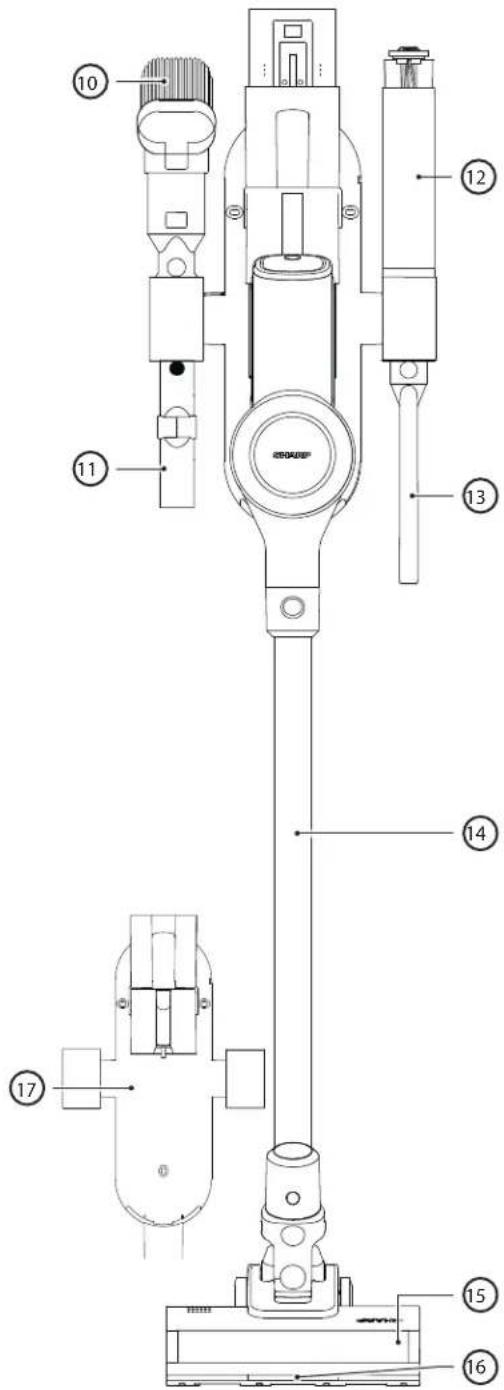

Ściankowy uchwyt
natural_image
Top-down schematic of a vehicle or road intersection with labeled components and directional arrows (no text or symbols)natural_image
Technical line drawing of a portable air purifier with attached cable and power outlet (no text or symbols)
natural_image
Diagram of a device with a cable and plug, showing a connector or socket connected to a power outlet (no text or symbols present)
natural_image
Technical line drawing of a mechanical device with attached cable and connector (no text or symbols)Good charging habits
Czasy użytkowania
| 10% - 30% | |
| 31% - 70% | |
| >70% |
natural_image
3D technical illustration of a mechanical component with no visible text or symbols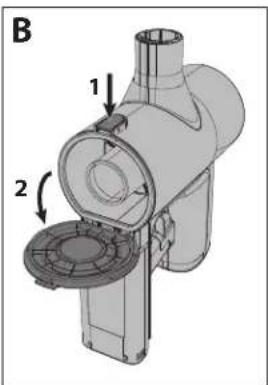
natural_image
Mechanical assembly diagram showing a valve-like component with two directional arrows labeled 1 and 2 (no text or symbols present)
natural_image
3D mechanical assembly diagram showing a pipe fitting with a valve and housing (no text or symbols)

natural_image
3D rendering of two cylindrical mechanical components with an arrow indicating transformation (no text or symbols)natural_image
Line drawing of a mechanical lever or rod with two ports and a cylindrical end (no text or symbols)natural_image
Technical line drawing of a mechanical component with no visible text or symbols
natural_image
Technical line drawing of a mechanical device with internal components and mounting holes (no text or symbols)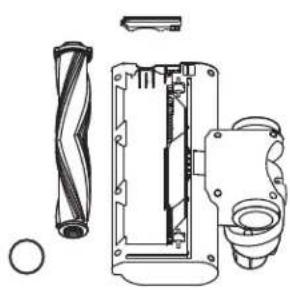
natural_image
Technical line drawing of a mechanical device with internal components and exploded view (no text or labels)
natural_image
Cross-sectional diagram of a mechanical device showing internal components and housing (no text or labels)V-Wałek
natural_image
Technical line drawing of a conical mechanical component (no text or symbols)Walek szczotki
natural_image
Pure technical line drawing of a mechanical component without any text, numbers, or symbolsAdapter do gięcia (tylko VC-SV20AEU-S i VC-SV28AEU-B)
natural_image
Technical line drawing of a mechanical tool and its assembly (no text or symbols)natural_image
3D diagram of a mechanical device with a checkmark on a grid background (no text or symbols)
natural_image
3D diagram of a mechanical device mounted on a base with a cross symbol at the bottom (no text or labels)natural_image
Line drawing of a manual blender with lid and tray, no text or symbols present2. Wyczyść rolki
natural_image
Technical line drawing of a mechanical assembly with no visible text or symbolsnatural_image
Simple line drawing of a sunken emitting a beam, with no text or symbols present.4. Wyczyść fi ltr
natural_image
Simple line drawing of a container with liquid and a handle, above a slotted tray (no text or symbols)natural_image
Line drawing of a small electronic device connected to a coiled cable (no text or symbols)natural_image
Two technical diagrams showing mechanical components labeled UK and EU, with no visible text or symbols.
www.sharpconsumer.com/support/

www.sharpconsumer.com/documents-of-conformity/
Conteúdo
Conteúdo da caixa 2


Suporte de parede
natural_image
Top-down schematic diagram of a vehicle or road with labeled components and directional arrows (no text or symbols)natural_image
Technical line drawing of a portable air purifier with attached cable and power outlet (no text or symbols)
natural_image
Diagram of a device with a cable and plug, showing a connector or socket connected to a power outlet (no text or symbols present)
natural_image
Technical line drawing of a mechanical device with a cable and connector, no visible text or symbolsTempos de Uso
| 10% - 30% | |
| 31% - 70% | |
| >70% |
natural_image
3D technical illustration of a mechanical component with no visible text or symbols
natural_image
Mechanical assembly diagram showing a valve-like component with two directional arrows labeled 1 and 2 (no text or symbols present)
natural_image
3D technical illustration of a mechanical pipe fitting with a directional arrow indicating assembly (no text or symbols)

natural_image
3D rendering of two cylindrical mechanical components with an arrow indicating direction (no text or symbols)NOTA: NÃO utilize o aspirador sem o Filtro de Manga, HEPA13 ou Filtro de Malha instalados. Isso resultará na entrada de grandes partículas de poeira ou detritos no motor, causando danos.
natural_image
Line drawing of a mechanical lever or rod with two ports and a cylindrical end (no text or symbols)natural_image
Technical line drawing of a mechanical component with no visible text or symbolsnatural_image
Technical line drawing of a conical mechanical component (no text or symbols)Rolo de escova
natural_image
Pure technical line drawing of a mechanical component without any text, numbers, or symbolsnatural_image
Technical line drawing of a mechanical tool and its assembly (no text or symbols)natural_image
3D rendering of a mechanical device mounted on a grid floor, with a checkmark symbol nearby (no text or labels)
natural_image
3D diagram of a mechanical device mounted on a base with a cross symbol at the base (no text or labels)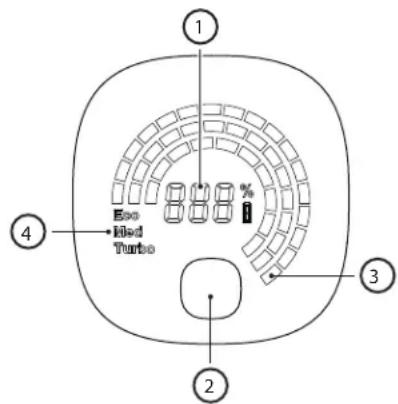
natural_image
Line drawing of a kitchen grater with a side panel and lid, showing no text or symbols2. Limpe os Rolos
natural_image
Technical line drawing of a mechanical component with a lever and mounting base (no text or symbols)natural_image
Simple line drawing of a sun interacting with a cylindrical object (no text or symbols)4. Limpe o Filtro
natural_image
Simple line drawing of a trash bin with a spool of food being poured into it (no text or symbols)Lidar com bloqueios
natural_image
Line drawing of a cable with a rectangular connector and a striped connector (no text or symbols)natural_image
Two technical diagrams of a mechanical component labeled UK and EU, showing internal components with no visible text or symbols.
www.sharpconsumer.com/support/

www.sharpconsumer.com/documents-of-conformity/
Cuprins


Suport de perete
natural_image
Top-down schematic diagram of a vehicle or road with labeled components and directional arrows (no text or symbols)natural_image
Technical line drawing of a portable air purifier with attached cable and power outlet (no text or symbols)
natural_image
Diagram of a device with a cable and plug, showing a connector or socket connected to a power outlet (no text or symbols present)
natural_image
Technical line drawing of a mechanical device with attached cable and connector (no text or symbols)Ori de utilizare
| Timp de functionare pentru 2 baterii (minute) | |||
| Timpuri de incărcare (ore) | |||
| VC-SV12AEU-W | VC-SV20AEU-S | VC-SV28AEU-B | |
| ECO 50 90 130 | |||
| Mediu x | x | 4 | 8 |
| Turbo 32 30 24 | |||
| 10% - 30% | |
| 31% - 70% | |
| >70% |
natural_image
3D technical illustration of a mechanical component with no visible text or symbols
natural_image
Mechanical assembly diagram showing a valve-like component with two directional arrows labeled 1 and 2 (no text or symbols present)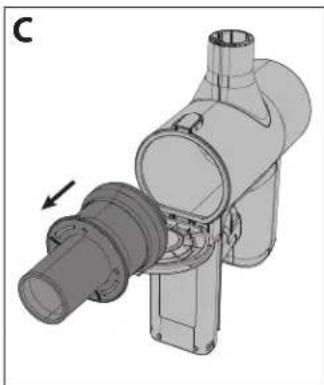
natural_image
3D technical illustration of a mechanical pipe fitting with a directional arrow indicating assembly (no text or symbols)
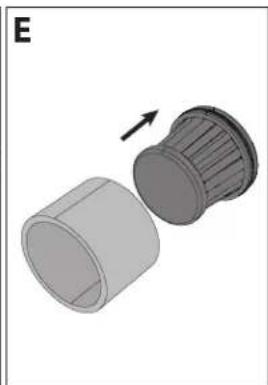
natural_image
3D rendering of two cylindrical mechanical components with an arrow indicating transformation (no text or symbols)natural_image
Line drawing of a mechanical lever or rod with two ports and a cylindrical end (no text or symbols)Rulou de perie motorizat
natural_image
Technical line drawing of a mechanical component with no visible text or symbolsnatural_image
Technical line drawing of a conical mechanical component (no text or symbols)Rulou perie
natural_image
Pure technical line drawing of a mechanical component without any text, numbers, or symbolsnatural_image
Technical line drawing of a mechanical tool and its assembly (no text or symbols)natural_image
3D rendering of a mechanical device mounted on a grid floor, with a checkmark symbol nearby (no text or labels)
natural_image
3D diagram of a mechanical device mounted on a base with a cross symbol at the bottom (no text or labels)natural_image
Line drawing of a manual blender with lid and tray, no text or symbols present2. Curățați rolele
natural_image
Technical line drawing of a mechanical component with a lever and mounting base (no text or symbols)natural_image
Simple line drawing of a droplet falling from a spherical object through a cylindrical container (no text or symbols)4. Curățați filtrul
natural_image
Simple line drawing of a trash bin with a spool of grain falling from above (no text or symbols)Tratarea blocajelor
natural_image
Line drawing of a small electronic device connected to a coiled cable (no text or symbols)natural_image
Two technical diagrams showing mechanical components labeled UK and EU, with no visible text or symbols.
www.sharpconsumer.com/
support/

www.sharpconsumer.com/
documents-of-conformity/
Obsah
Obsah balenia....2


| VC-SV28AEU-B | |
| Položka | Popis |
| 1 LED | Displej |
| 2 Tlačidlo pre výber rýchlosti | |
| 3 Spúšťač výkonu ON/OFF | |
| 4 Nabíjací port batérie | |
| 5 Tlačidlo na uvol’nenie batérie | |
| 6 | Dobíjateľná/Vymenitelňá batéria |
| 7 Filtrovacia súprava | |
| 8 Nádoba na prach | |
| 9 Adaptér AC | |
| 10 2-v-1 kefa/nástavec na štrbiny | |
| 11 Predlžovacia hadica | |
| 12 | Kartáčový valec v priehľadnom púzdre na sklado-vanie |
| 13 Predlížený nástavec na štrbiny | |
| 14 Flexibilný ohybný adaptér | |
| 15 Mini motorizovaný valček na kefu | |
| 16 Široká kefa | |
| 17 Kovová predlžovacia tyčinka | |
| 18 Hlavná válečková hlava s motorom a LED svetlami | |
| 19 LED svetlá na valčeku podlahovej kefy | |
| 20 Nástenný držiak | |


Nástenný držiak
Kryt otvoru držiaku
natural_image
Line drawing of a portable air purifier with attached cable and power outlet (no text or symbols)
natural_image
Diagram of a device with a cable and connector, no text or symbols present
natural_image
Technical line drawing of a mechanical device with attached cable and connector (no text or symbols)Počet použití
| Doba behu pre 2 batérie (minút) | |||
| Doby nabíjania (hodiny) | |||
| VC-SV12AEU-W V | C-SV20AEU-S VC-S | V28AEU-B | |
| ECO 50 90 130 | |||
| Stredne x | x | 4 | 8 |
| Turbo 32 30 24 | |||
Indikácia stavu batérie
| 10% - 30% | |
| 31% - 70% | |
| >70% |
natural_image
3D technical illustration of a mechanical component with no visible text or symbols
natural_image
Mechanical assembly diagram showing a valve-like component with two directional arrows labeled 1 and 2 (no text or symbols present)
natural_image
3D mechanical assembly diagram showing a pipe fitting with a valve and housing (no text or symbols)

natural_image
3D rendering of two cylindrical mechanical components with an arrow indicating transformation (no text or symbols)natural_image
Line drawing of a mechanical lever or rod with two ports and a cylindrical end (no text or symbols)natural_image
Technical line drawing of a mechanical component with no visible text or symbols
natural_image
Technical line drawing of a mechanical device with internal components and mounting holes (no text or symbols)
natural_image
Technical line drawing of a mechanical assembly with no visible text or symbols
natural_image
Cross-sectional diagram of a mechanical device showing internal components and housing (no text or labels)V-Valček
natural_image
Technical line drawing of a conical mechanical component (no text or symbols)Kartáčový valec
natural_image
Pure technical line drawing of a mechanical component without any text, numbers, or symbolsFlexibilný ohybový adaptér (iba VC-SV20AEU-S a VC-SV28AEU-B)
natural_image
Technical line drawing of a mechanical tool and its assembly (no text or symbols)natural_image
3D rendering of a mechanical device mounted on a grid floor, with a checkmark symbol nearby (no text or labels)
natural_image
3D diagram of a mechanical device mounted on a base with a cross symbol, placed on a textured floor (no text or labels)natural_image
Line drawing of a manual blender with lid and tray, no text or symbols present2. Čistite valčeky
natural_image
Technical line drawing of a mechanical component with a lever and base (no text or symbols)natural_image
Simple line drawing of a droplet on a surface with a pointed tip, no text or symbols present4. Umyte Filtro
natural_image
Simple line drawing of a trash bin with a lid and spout, no text or symbols presentZaoberanie sa s blokáciami
natural_image
Line drawing of a cable with a rectangular connector and a striped connector attached (no text or symbols)natural_image
Technical line drawings of two mechanical components labeled UK and EU (no text or symbols on the diagrams themselves)
www.sharpconsumer.com/support/

www.sharpconsumer.com/documents-of-conformity/
Vsebina
Vsebina škatle 2
Lokacija kontrol in delov ....3
Stenski nosilec 6
Zaslon in kontrole 7
Polnjenje baterije, shranjevanje in uporaba....8

| VC-SV20AEU-S | |
| Izdelek Opis | |
| 1 LED | zaslon |
| 2 Gumb za izbiro hitrosti | |
| 3 Stikalo za vklop/izklop napajanja | |
| 4 Priključek za polnjenje baterije | |
| 5 Gumb za sprostitev baterije | |
| 6 Ponovno polnilna/zamenljiva baterija | |
| 7 Sestav fi Itera | |
| 8 Prašni zabojnik | |
| 9 AC adapter | |
| 10 2-v-1 krtača/šoba za špranje | |
| 11 Gibljiv ukrivljeni adapter | |
| 12 Valčna krtača v shranjevalni cevi | |
| 13 Podaljšano nastavek za razpoke | |
| 14 Kovinska podaljševalna palica | |
| 15 Motorizirana glava valjka z LED lučmi | |
| 16 LED lučke na valjčku talne krtače | |
| 17 Stenski nosilec | |


| VC-SV28AEU-B | |
| Izdelek Opis | |
| 1 LED | zaslon |
| 2 Gumb za izbiro hitrosti | |
| 3 Stikalo za vklop/izklop napajanja | |
| 4 Priključek za polnjenje baterije | |
| 5 Gumb za sprostitev baterije | |
| 6 Ponovno polnljiva/zamenljiva baterija | |
| 7 Sestav fi Itera | |
| 8 Prašni zabojnik | |
| 9 AC adapter | |
| 10 2-v-1 krtača/šoba za špranje | |
| 11 Podaljševalna cev | |
| 12 Valj za čopiče v prozornem posod za shranjevanje | |
| 13 Podaljšano nastavek za razpoke | |
| 14 Gibljiv ukrivljeni adapter | |
| 15 Mini motorizirana valjčna krtača | |
| 16 Široka krtača | |
| 17 Kovinska podaljševalna palica | |
| 18 Motorizirana glava valjka z LED lučmi | |
| 19 LED lučke na valjčku talne krtače | |
| 20 Stenski nosilec | |


Stenski nosilec
natural_image
Top-down schematic of a vehicle or road intersection with labeled components and directional arrows (no text or symbols)Shranjevalna cev za valj
Za enostavno shranjevanje neuporabljenega valja za VC-SV12AEU-W ali VC-SV20AEU-S smo priložili shranjevalno cev. Shranjevalna cev se prilega v eno od zgornjih lukenj za shranjevanje, upoštevajte, da je potrebno v luknjo za shranjevanje vstaviti adapter (2), preden vstavite cev (1).
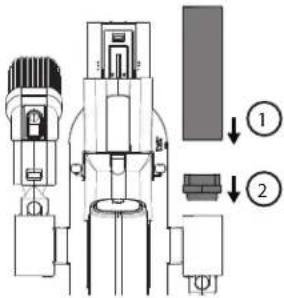
Pokrov za luknjo nosilca
natural_image
Technical line drawing of a portable air purifier with attached cable and power outlet (no text or symbols)
natural_image
Diagram of a portable electronic device with cable and connector, no text or symbols present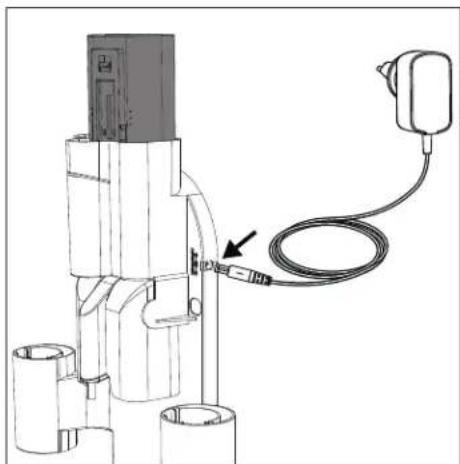
natural_image
Technical line drawing of a mechanical device with attached cable and connector (no text or symbols)Število uporab
| Čas delovanja za 2 bateriji (minute) | |||
| Časi polnjenja (ure) | |||
| VC-SV12AEU-W | VC-SV20AEU-S | VC-SV28AEU-B | |
| ECO 50 90 130 | |||
| Srednje X | X | 48 | |
| Turbo 32 30 24 | |||
Indikacija stanja baterije
| 10% - 30% | |
| 31% - 70% | |
| >70% |
natural_image
3D technical illustration of a mechanical component with no visible text or symbols
natural_image
Mechanical assembly diagram showing a valve-like component with two directional arrows labeled 1 and 2 (no text or symbols present)
natural_image
3D mechanical assembly diagram showing a pipe fitting with a valve and housing (no text or symbols)

natural_image
3D rendering of two cylindrical mechanical components with an arrow indicating transformation (no text or symbols)natural_image
Line drawing of a mechanical lever or rod with two ports and a cylindrical end (no text or symbols)Motorizirana valjčna krtača
natural_image
Technical line drawing of a mechanical component with no visible text or symbols
natural_image
Technical line drawing of a mechanical device with internal components and mounting holes (no text or symbols)
natural_image
Technical line drawing of a mechanical assembly with no visible text or symbols
natural_image
Cross-sectional diagram of a mechanical device showing internal components and housing (no text or labels)V-Valjček
natural_image
Technical line drawing of a conical mechanical component (no text or symbols)Krtačni valj
natural_image
Pure technical line drawing of a mechanical component without any text, numbers, or symbolsPrilagodljiv upogibni adapter (samo VC-SV20AEU-S in VC-SV28AEU-B)
natural_image
Technical line drawing of a mechanical component with a tool handle and internal assembly (no text or symbols)natural_image
3D rendering of a mechanical device mounted on a grid floor, with a checkmark symbol nearby (no text or labels)
natural_image
3D diagram of a vertical tool mounted on a base with a cross symbol at the base (no text or labels)- V redu je uporaba Samostoječ na trdem tleh.
- NE uporabljajte samostoječe funkcije na mehkih/tapisoniranih tleh.
Ko uporabljate vaš sesalnik SHARP na trdi podlagi, je mogoče sesalnik postaviti v samostoječi položaj. Da bi to delovalo pravilno, mora biti sesalnik preko kovinske podaljšane palice povezan z motorizirano glavo; prav tako se prepričajte, da je baterija nameščena.
Nežno spustite sesalnik in sam bo ostal pokonci.
POZOR: Vaš sesalnik bo samostojno stal na trdih tleh, će se prevrne, je možno, da pride do poškodb ali poškodb. Poskrbite, da ga, ko je v samostoječem položaju, ne prevrnete. Medtem ko je v samostoječem načinu, ga ne pustite brez nadzora, še posebej, će imate majhne otroke ali hišne ljubljenčke.
Prikazovalna plošča
natural_image
Line drawing of a manual hand mixer with granular material inside (no text or symbols)2. Očistite valje
natural_image
Technical line drawing of a mechanical assembly with a tool inserted, no visible text or symbolsnatural_image
Simple line drawing of a droplet on a surface with a pointed tip, no text or symbols present4. Očistite fi Iter
natural_image
Simple line drawing of a trash bin with a spool of food being poured into it (no text or symbols)natural_image
Line drawing of a small electronic device connected to a coiled cable (no text or symbols)natural_image
Technical line drawings of two mechanical components labeled UK and EU (no text or symbols on the diagrams themselves)
www.sharpconsumer.com/support/

www.sharpconsumer.com/documents-of-conformity/
Sadržaj
Sadržaji kutije 2
Lokacija kontrola i delova ....3
Zidni držač 6
Displej i kontrole ....7
Punjenje baterije, skladištenje i upotreba ....8
Preporučene metode čišćenja ....11

| VC-SV20AEU-S | |
| Artikal | Opis |
| 1 LED Displej | |
| 2 Dugme za izbor brzine | |
| 3 Prekidač za uključivanje/isključivanje | |
| 4 Priključak za punjenje baterije | |
| 5 Dugme za otpuštanje baterije | |
| 6 Punjiva/Zamenljiva baterija | |
| 7 Sklop fi Itera | |
| 8 Kanta za smeće | |
| 9 AC adapter | |
| 10 2-u-1 Četka/Alat za pukotine | |
| 11 Fleksibilni savijajući adapter | |
| 12 Četkasti valjak u skladišnoj tubi | |
| 13 Produženi nastavak za pukotine | |
| 14 Štap za proširenje metala | |
| 15 Motorizirana glava valjka sa LED svetlima | |
| 16 LED svetla na četki za pod sa valjkom | |
| 17 Zidni držač | |
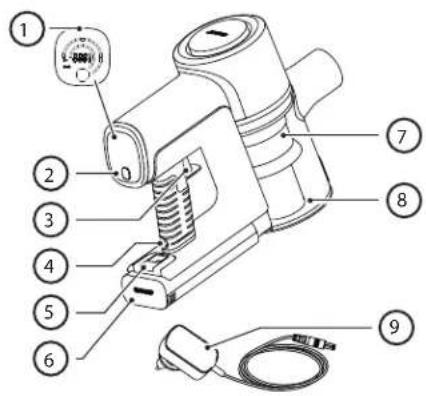

| VC-SV28AEU-B | |
| Arti-kal | Opis |
| 1 LED Displej | |
| 2 Dugme za izbor brzine | |
| 3 Prekidač za uključivanje/isključivanje | |
| 4 Priključak za punjenje baterije | |
| 5 Dugme za otpuštanje baterije | |
| 6 Punjiva/Zamenljiva baterija | |
| 7 Sklop fi ltera | |
| 8 Kanta za smeće | |
| 9 AC adapter | |
| 10 2-u-1 Četka/Alat za pukotine | |
| 11 Cev za produžetak | |
| 12 | Četkica za rolovanje u prozirnom kontejneru za skladištenje |
| 13 Produženi nastavak za pukotine | |
| 14 Fleksibilni savijajući adapter | |
| 15 Mini motorizovani četkasti valjak | |
| 16 Široka četka alat | |
| 17 Štap za proširenje metala | |
| 18 Motorizirana glava valjka sa LED svetlima | |
| 19 LED svetla na četki za pod sa valjkom | |
| 20 Zidni držač | |
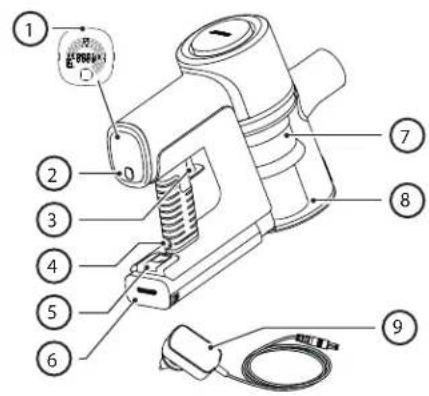

Zidni držač
Za jednostavnost i praktičnost upotrebe i skladištenja, vaš SHARP štapni usisivač dolazi sa zidnim držačem. Ovaj držač će skladištiti sve alate za vaš usisivač i može da napuni obe baterije istovremeno.
NAPOMENA: Povežite manje dodatke na produžni crevo i savitljivi adapter kako biste sve delove držali zajedno i organizovano. Koristite vertikalne cevi za skladištenje sa leve, desne i donje strane držača na zidu da biste priključili alate za dodatnu opremu.
Instalacija Zidnog držača
Pre instalacije držača na zidu, proverite da li ima dovoljno prostora za to. Rastojanje između vrha uređaja i poda mora biti adekvatno kako bi štapasti usisivač sa metalnom produžnom šipkom i glavom mogao biti instaliran bez zapinjanja za bilo šta. Pogledajte sliku ispod da biste videli preporučenu visinu instalacije.
Slika sa desne strane pokazuje razdaljinu između rupa za montažu i detalje isporučenih šrafova i tipli.
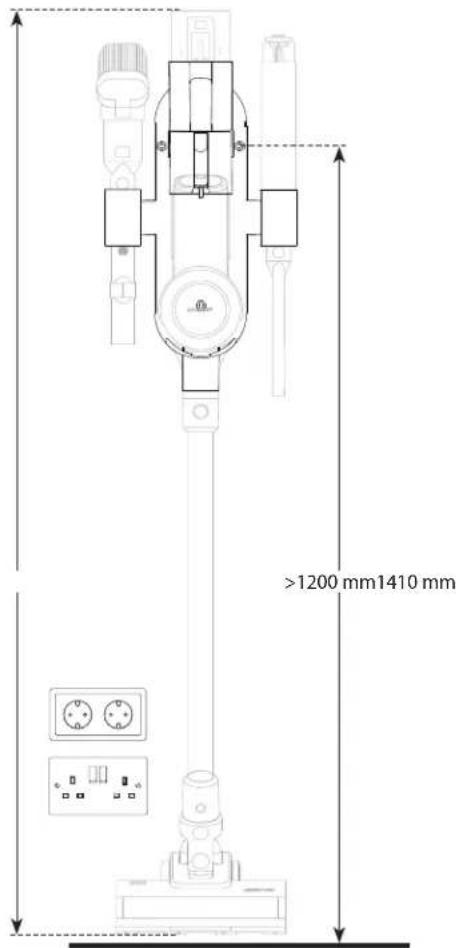

- Pronadite mesto na zidu blizu električne utičnice bez prepreka poput prozora ili polica.
- Sa usisivačem povezanim na motorizovanu četku za valjanje i produžnu šipku, postavite sastavljeni usisivač protiv zida gde će biti smešten i obeležite rupe nosača za montažu na zidu na pravoj visini za skladištenje usisivača u uspravnom položaju.
- Koristite Phillips odvijač (nije uključen) za instalaciju zidnog držača sa priloženim šrafovima. Obavezno obeležite rupe za montažu koristeći rupe za montažu na zidu na nosaču.
- Postavite sastavljeni štapasti usisivač u sredinu zidnog držača i priključite adapter za punjenje sa instaliranom baterijom u obližnju strujnu utičnicu. Odvojiva baterija takođe se može puniti na ravnoj površini blizu utičnice kada se ukloni iz usisivača.
Ploče za zatvaranje rupa
Takođe, u vrećici sa šrafovima i zidnim čepovima nalaze se 3 poklopca koji se koriste za prekrivanje rupa za šrafove na držaču.
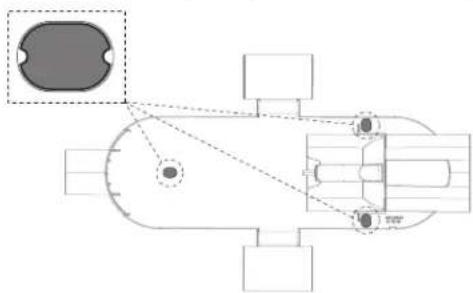
natural_image
Top-down schematic of a vehicle or road intersection with labeled components and directional arrows (no text or symbols)Poklopac za rupu držača
Uz VC-SV12AEU-W i VC-SV20AEU-S dolazi poklopac koji se može koristiti za zatvaranje jedne od rupa za dodatnu opremu. VC-SV12AEU-W dolazi sa 2 poklopca, dok VC-SV20AEU-S dolazi sa 1.

Displej i kontrole
LED displej:
Takođe je moguće puniti jednu bateriju dok je povezana sa usisivačem, kada je izvan usisivača ili sama u držaču. Ako se držač ne koristi, postavite ručni usisivač ili bateriju na ravnu, stabilnu površinu. Kabel za napajanje direktno povežite sa priključkom za punjenje koji se nalazi na ručki.
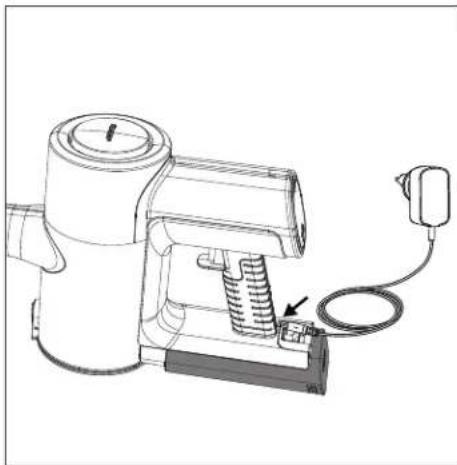
natural_image
Technical line drawing of a portable air purifier with attached cable and power outlet (no text or symbols)
natural_image
Diagram of a device with a cable and plug, showing a connector or socket connected to a base (no text or symbols present)
natural_image
Technical line drawing of a mechanical device with a cable and connector, no visible text or symbolsDobre odlike napajanja
- Koristite samo isporučeni Sharp AC adapter.
- Napunite pre nego što kapacitet baterije padne ispod 25% - litijum-jonske baterije imaju ograničen broj ciklusa punjenja, tako da je najbolje napuniti bateriju pre nego što se skroz istroši da bi se produžio njen vek trajanja.
- Izbegnite da se previše napuni - kada se baterija skroz napuni, isključite je iz punjača da biste izbegli da se previše napuni, što takođe može da skrati životni vek baterije.
- Ako se ostavi nekorišćena, u potpunosti napunjena baterija će izgubiti svoj napon tokom vremena.
- Čuvajte na hladnom, suvom mestu - ekstremne temperature mogu da oštete bateriju, postarajte se da je čuvate na hladnom, suvom mestu, idealno na sobnoj temperaturi.
- Ako planirate da čuvate svoj uređaj duže od šest meseci, napunite bateriju na 50% svakih šest meseci kako bi dobro radila.
Indikacija statusa baterije
Kada se baterija puni ili prazni, status možete proveriti ili gledanjem procenta punjenja na displeju usisivača ili prema svetlima na strani same baterije.
| 10% - 30% | |
| 31% - 70% | |
| >70% |
Postoje 3 svetla, ako su sva uključena onda je kapacitet baterije veći od 70%.
natural_image
3D technical illustration of a mechanical component with no visible text or symbols

natural_image
3D mechanical assembly diagram showing a pipe fitting with a valve and housing (no text or symbols)
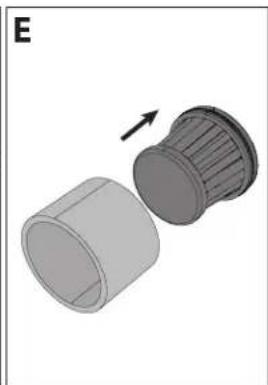
natural_image
3D rendering of two cylindrical mechanical components with an arrow indicating transformation (no text or symbols)NAPOMENA: NE koristite usisivač bez postavljenog filtera, HEPA13 ili mrežastog filtera. To će rezultirati ulaskom velikih čestica prašine ili otpada u motor i izazvati oštećenje.
Alati i njihova upotreba
Vaš SHARP štapni usisivač dolazi sa različitim alatima, kao što je prikazano ispod. U zavisnosti od modela koji posedujete, odrediće se koji su alati uključeni u kutiju.
Dva u jedan četka
Ovaj alat može se koristiti sa izvučenom četkom ili sa nastavkom. Da biste koristili nastavak, pritisnite dugme za otpuštanje i povucite nazad produžetak četke.
Dve u jednoj četka je idealna za čišćenje lampi, polica za knjige i različite elektronske opreme.
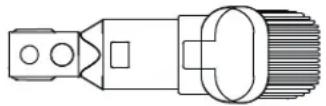
Široka četka za usisavanje (samo za VC-SV28AEU-B)
natural_image
Line drawing of a mechanical lever or rod with two ports and a cylindrical end (no text or symbols)Motorizovani četkasti valjak
natural_image
Technical line drawing of a mechanical component with no visible text or symbolsDa biste promenili, očistili ili održavali valjak, pratite uputstva ispod.
- Pritisnite polugu označenu sa A nadole i istovremeno povucite ploču četkastog valjka (stavka B) nagore.
- Uklonite ploču četkastog valjka.
- Izvucite četkasti valjak povlačenjem prema gore sa desne strane (R).
- Ubacite valjak tako što ćete ga postaviti na levoj strani (L), a zatim ga pritisnite na desnoj strani kako bi se sigurno postavio. Sada ponovo ubacite ploču četke za pod sa valjkom pritiskajući je prema dole dok ne klikne.
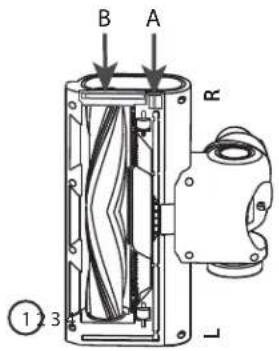

natural_image
Technical line drawing of a mechanical device with internal components and mounting holes (no text or symbols)
natural_image
Technical line drawing of a mechanical assembly with no visible text or symbols
natural_image
Cross-sectional diagram of a mechanical device showing internal components and housing (no text or labels)V-Valjak
Koristite V valjak na svim vrstama podova.

natural_image
Technical line drawing of a conical tool or drill bit (no text or symbols)Četkasti valjak
Preporučuje se Četkasti valjak za tepihane podove.
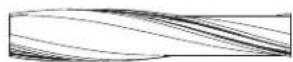
Mini motorizovana četka (samo za VC-SV28AEU-B)
natural_image
Pure technical line drawing of a mechanical component without any text, numbers, or symbolsAdapter za fl eksibilno savijanje (samo VC-SV20AEU-S i VC-SV28AEU-B)
Koristite sa štapom za proširenje metala za lak pristup ispod sofa, stolica, stolova, itd.
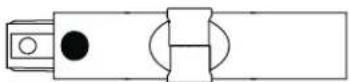
Alat za čišćenje
Korisna alatka za čišćenje je uključena u kutiju. Ova alatka omogućava lako uklanjanje zapetljane valjkaste četke pomoću ugrađene sečive oštrice. Četka se može koristiti za čišćenje prašine koja se uvukla u male delove usisivača ili dodataka.
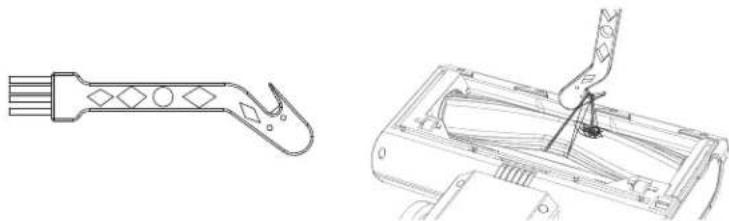
natural_image
Technical line drawing of a mechanical component with a tool and assembly detail (no text or symbols)natural_image
3D rendering of a mechanical device mounted on a grid floor, with a checkmark symbol nearby (no text or labels)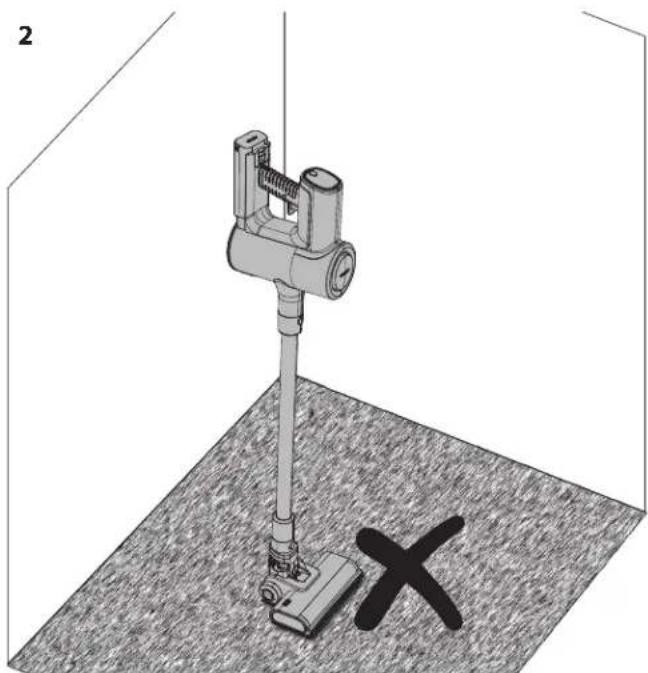
natural_image
3D diagram of a mechanical device mounted on a base with a cross symbol, placed on a textured floor (no text or labels)
natural_image
Line drawing of a kitchen grater with a lid and drain, showing powder and contents (no text or symbols)2. Očistite valjke
natural_image
Technical line drawing of a mechanical assembly with a tool inserted, no visible text or symbolsnatural_image
Simple line drawing of a droplet on a surface with a pointed tip, no text or symbols present4. Očistite fi Iter
Začepljeni filteri su najčešći razlog loše sile usisavanja. Očistite ih nakon svake upotrebe i ako se performanse pogoršavaju, mogu se oprati u vodi i ostaviti da se suše 24 sata. Preporučuje se da se HEPA filter zameni svaka 3 meseca.

natural_image
Simple line drawing of a trash bin with a lid and spout, no text or symbols presentRešavanje blokada
natural_image
Line drawing of a small electronic device connected to a coiled cable (no text or symbols)Vaš SHARP štapni usisivač dolazi sa AC adapterom koji se može koristiti sa UK (3-pinskom) ili EU (2-pinskom) strujnom utičnicom. AC adapter koji se isporučuje sa vašim štapnim usisivačem zavisiće od modela usisivača i baterije, pogledajte tabelu ispod da biste uparili model usisivača i AC adapter.
Koristite samo isporučeni i od SHARP preporučeni AC adapter sa vašim štapnim usisivačem.
Specifi kacije AC adaptera mogu se naći na kraju ovog Korisničkog priručnika.
natural_image
Two technical diagrams of mechanical components labeled UK and EU, showing cross-sectional views with no visible text or symbols.Da biste instalirali odgovarajuću ploču za vašu glavnu utičnicu, izaberite odgovarajuću (UK ili EU) i postavite je na AC adapter kao što je prikazano na slici ispod, ploča bi trebalo da se nalazi u udubljenju. Okrenite u smeru kazaljke na satu dok ne čujete klik i ploča za povezivanje je sada instalirana. Ako niste sigurni, molimo vas da kontaktirate našu službu za pomoć radi saveta.
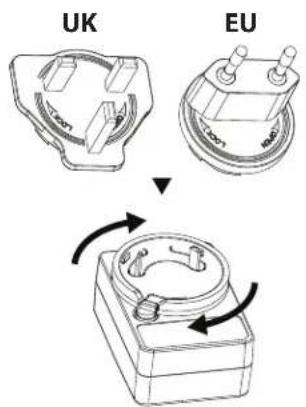
Da biste uklonili tanjir, pritisnite dugme A i okrenite tanjir u suprotnom smeru od kazaljke na satu. Tanjir sada može biti uklonjen.
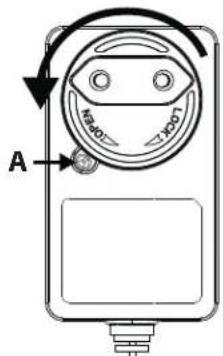
Rešavanje problema
| Problem Razlog Rezolucija | ||
| Kod greške E01 se pojavljuje na displeju. | Motor glave je zaustavljen od rotiranja. | Uklonite prepreku sa valjka u motorizovanoj glavi. |
| E02 se pojavljuje na displeju (samo VC-SV20AEU-S i VC-SV28AEU-B). | Ulaz blokiran. Uklonite blokadu iz glave, tube i/ili ulaza. | |
| Loša efi kasnost usisavanja. Smanjen usis. | Podesite režim usisivača na Turbo.Ispraznite kantu za smeće.Očistite fi Itere.Proverite da li su vazdušni kanali usisivača blokirani ili preprečeni. | |
| Usisivač je zaustavljen ili neće raditi. | Problem sa baterijom ili konekcijom baterije. | Proverite da li je baterija potpuno napunjena.Postarajte se da je baterija ispravno povezana sa usisivačem. |
| Valjak se neće rotirati. Mehanički problem. | Uklonite prepreku sa valjka u motorizovanoj glavi.Očistite valjak i glavnu jedinicu. | |
| Svetlo baterije treperi crveno. Baterija je skoro prazna. Punite bateriju. | ||
| Pribor je pokvaren ili ne radi. | Kontaktirajte SAHRP call centar za razgovor. Novi deo može biti dostavljen besplatno ako je pod garancijom ili naplativ ako je potrebno. | |
| Motorni deo je bučan. Četkasti valjak je postavljen. | Ako je četkasti valjak postavljen, čekinje će proizvesti buku kada dođu u kontakt sa kućištem glave. | |
Ako imate bilo kakvih drugih problema sa vašim SHARP štap usisivačem, molimo vas da kontaktirate naš call centar za dalje savete i informacije.
Da biste naručili zamenske dodatke, filtere i baterije, molimo vas da pozovete ili pošaljete e-mail vašem SHARP servisnom centru.

www.sharpconsumer.com/support/

www.sharpconsumer.com/documents-of-conformity/
Innehåll


Väggförvaring
Förvaringshålslock
natural_image
Technical line drawing of a portable air purifier with attached cable and power outlet (no text or symbols)
natural_image
Diagram of a device with a cable and plug, showing a connector or socket connected to a power outlet (no text or symbols present)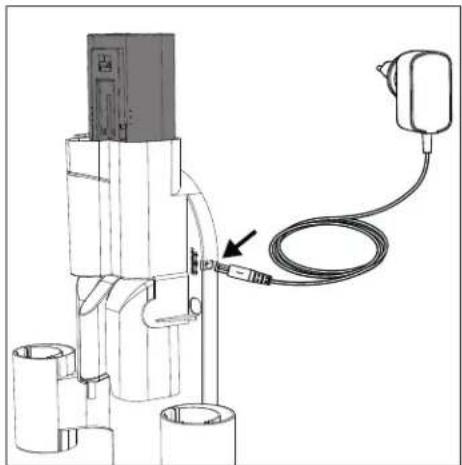
natural_image
Technical line drawing of a mechanical device with a cable and connector, no visible text or symbolsBra laddningsvanor
Användningstider
| Körtid för 2 batterier (minuter) | |||
| Laddningstider (timmar) | |||
| VC-SV12AEU-W | VC-SV20AEU-S | VC-SV28AEU-B | |
| ECO 50 90 130 | |||
| Medium x | x | 4 | 8 |
| Turbo | 32 30 24 | ||
| 10% - 30% | |
| 31% - 70% | |
| >70% |
natural_image
3D technical illustration of a mechanical component with no visible text or symbols

natural_image
3D mechanical assembly diagram showing a pipe fitting with a valve and housing (no text or symbols)
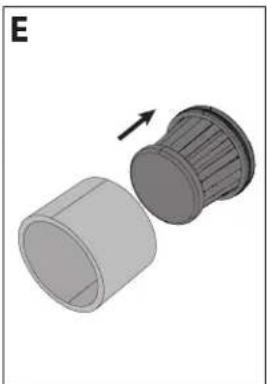
natural_image
3D rendering of two cylindrical mechanical components with an arrow indicating transformation (no text or symbols)natural_image
Line drawing of a mechanical lever or rod with two cylindrical ends and a central hub (no text or symbols)Motoriserad borstrulle
natural_image
Technical line drawing of a mechanical component with no visible text or symbols
natural_image
Technical line drawing of a mechanical device with internal components and mounting holes (no text or symbols)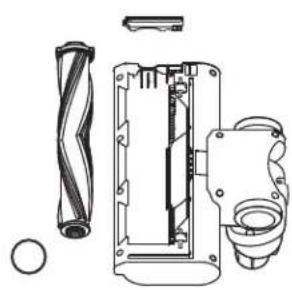
natural_image
Technical line drawing of a mechanical assembly with no visible text or symbols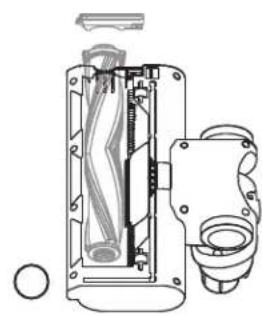
natural_image
Cross-sectional diagram of a mechanical device showing internal components and housing (no text or labels)V-rulle
natural_image
Technical line drawing of a conical mechanical component (no text or symbols)Borstrulle
natural_image
Pure technical line drawing of a mechanical component without any text, numbers, or symbolsnatural_image
Technical line drawing of a mechanical tool and its assembly (no text or symbols)natural_image
3D rendering of a mechanical device mounted on a grid floor, with a checkmark symbol nearby (no text or labels)
natural_image
3D diagram of a mechanical device mounted on a base with a cross symbol at the bottom (no text or labels)natural_image
Line drawing of a kitchen grater with a lid and drain, showing powder and contents (no text or symbols)2. Rengör rullarna
natural_image
Technical line drawing of a mechanical assembly with no visible text or symbolsnatural_image
Simple line drawing of a droplet on a surface with an arrow indicating light direction (no text or symbols)4. Rengör fi Itret
natural_image
Simple line drawing of a container with liquid and a handle, above a slotted tray (no text or symbols)Hantera blockeringar
natural_image
Line drawing of a cable with a rectangular connector and a striped cable (no text or symbols)natural_image
Technical line drawings of two mechanical components labeled UK and EU (no text or symbols on the diagrams themselves)
www.sharpconsumer.com/support/

www.sharpconsumer.com/documents-of-conformity/
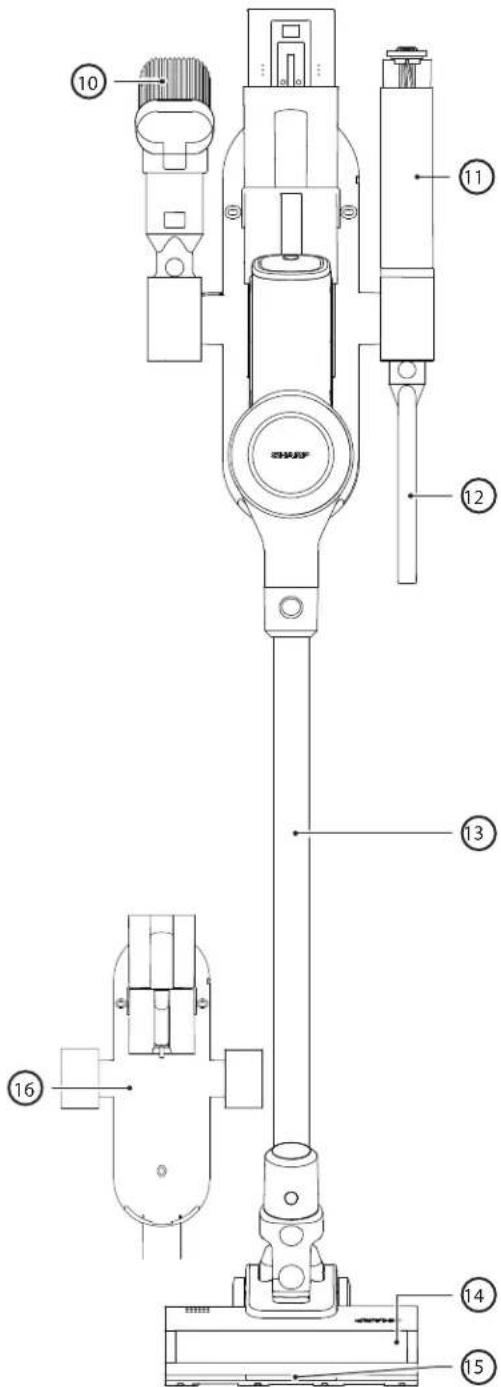


Стінний каді
natural_image
Line drawing of a portable air purifier with attached cable and power outlet (no text or symbols)
natural_image
Diagram of a device with a cable and connector, no text or symbols present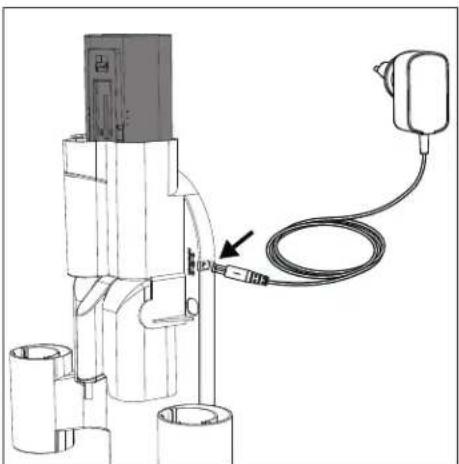
natural_image
Technical line drawing of a mechanical device with attached cable and connector (no text or symbols)Час використання
| 10% - 30% | |
| 31% - 70% | |
| >70% |
natural_image
3D technical illustration of a mechanical component with no visible text or symbols
natural_image
Mechanical assembly diagram showing a valve-like component with two directional arrows labeled 1 and 2 (no text or symbols present)
natural_image
3D technical illustration of a mechanical pipe fitting with a directional arrow indicating movement (no text or symbols)

natural_image
3D rendering of two cylindrical mechanical components with an arrow indicating direction (no text or symbols)natural_image
Line drawing of a mechanical lever or rod with two ports and a cylindrical head (no text or symbols)natural_image
Technical line drawing of a mechanical component with no visible text or symbolsnatural_image
Technical line drawing of a conical mechanical component (no text or symbols)Щітковий валок
natural_image
Pure technical line drawing of a mechanical component without any text, numbers, or symbolsnatural_image
Technical line drawing of a mechanical tool and its exploded view (no text or symbols)natural_image
3D rendering of a mechanical device mounted on a grid floor, with a checkmark symbol nearby (no text or labels)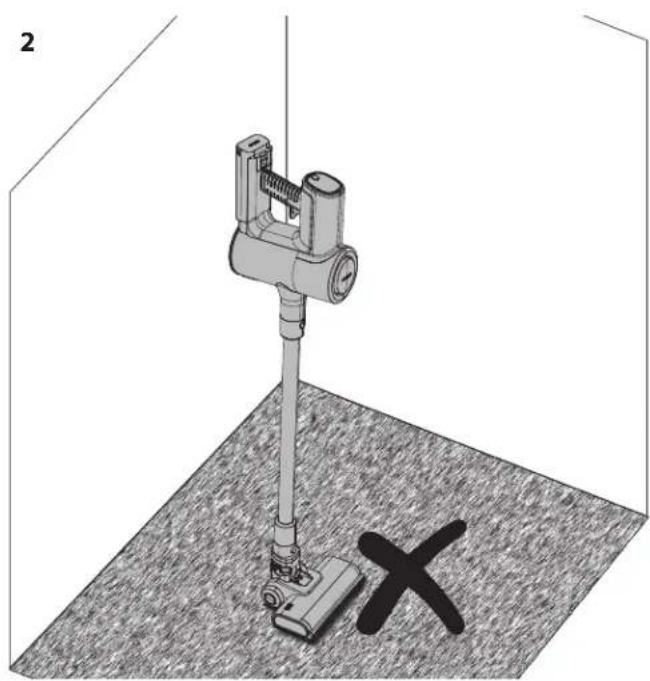
natural_image
3D diagram of a mechanical device mounted on a base with a cross symbol at the base (no text or labels)natural_image
Line drawing of a kitchen grater with granular powder and a side drawer (no text or symbols)2. Очистіть ролики
natural_image
Technical line drawing of a mechanical component with a tool inserted, no visible text or symbolsnatural_image
Simple line drawing of a droplet on a surface with a pointed tip, no text or symbols present4.Очистіть фільтр
natural_image
Simple line drawing of a trash bin with a lid and spout, no text or symbols presentnatural_image
Line drawing of a small electronic device connected to a coiled cable (no text or symbols)natural_image
Two technical diagrams of a mechanical component labeled UK and EU, showing internal components without any text or symbols.Sharp Consumer Electronics Poland sp. z o.o.
Ostaszewo 57B, 87-148 Łysomice, Poland
SHARP CORPORATION
1 Takumi-cho, Sakai-ku
Sakai City, Osaka
590-8522, Japan
SDA/MAN/0313 V1
www.sharpconsumer.eu
SHARP