
EC-SC95U-H - Vacuum Cleaner SHARP - Free user manual and instructions
Find the device manual for free EC-SC95U-H SHARP in PDF.


| Product Type | Cordless Vacuum Cleaner |
| Model | EC-SC95U-H |
| Brand | Sharp |
| Battery Type | Lithium-ion |
| Battery Voltage | 25.9 V |
| Battery Capacity | 2200 mAh |
| Charging Time | 3-4 hours |
| Power | 380 W |
| Adaptor Input | 100-240 V ~ 50/60 Hz |
| Adaptor Output | 30 V, 0.8 A |
| Suction Modes | Low, Medium, High |
| Floor Brush | Electric rotating brush |
| Mite-removing Brush | Included |
| Water Tank | Yes, for mopping |
| Filtration | HEPA filter and cyclone cone |
| Dust Cup Capacity | Approximately 0.5 L |
| Weight | Approximately 2.5 kg |
| Warranty | 24 months |
| Safety Features | Overheat protection, battery safety, dry use only |
Frequently Asked Questions - EC-SC95U-H SHARP
User questions about EC-SC95U-H SHARP
0 question about this device. Answer the ones you know or ask your own.
Ask a new question about this device
Download the instructions for your Vacuum Cleaner in PDF format for free! Find your manual EC-SC95U-H - SHARP and take your electronic device back in hand. On this page are published all the documents necessary for the use of your device. EC-SC95U-H by SHARP.
USER MANUAL EC-SC95U-H SHARP
Cordless Vacuum Cleaner
EC-SC95U-H
Instruction Manual
Read this user manual carefully before first use. Keep this manual for further guidance in case.
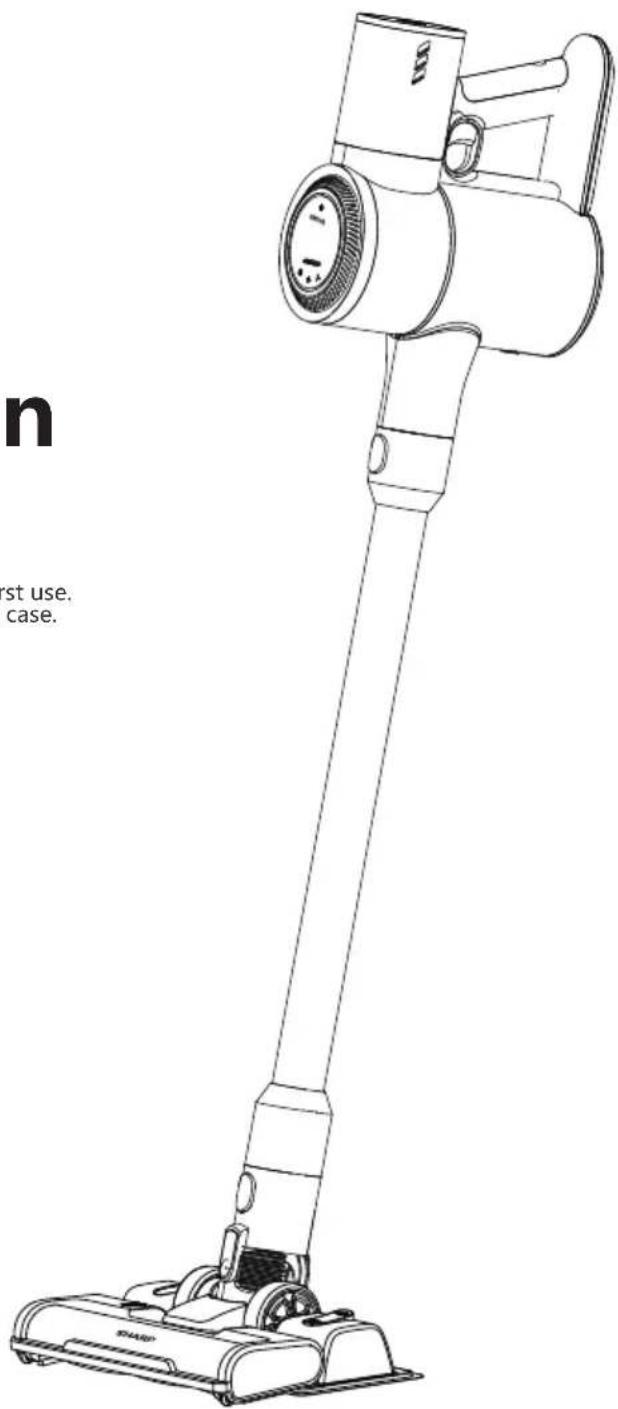
Introduction Contents
SHARP
Thank you for buying Sharp brand household cleaning electrical appliances, and wish you a pleasant use!
Please read this instruction carefully to know how to operate this product safely and correctly, and obtain the most ideal use effect from it.
This instruction includes the latest information as of the time of printing, and the Sharp
Sharp Corporation. is solely responsible for the revision, interpretation and explanation of this manual. The Company's strategy is to continuously modify the products, so the Company reserves the right to change the products without notice after this instruction is printed.
In the process of using, if you have any questions and suggestions about our products, please call our service hotline: 400-828-2055. We will serve you wholeheartedly!
SHARP
Safe operation guide 1-2
Introduction of product components 3
Using method 4
① Use of floor brush 4-6
② Handheld use....6
③ Use of mite-removing brush 7
④ Setting up the water tank 8
⑤ Charging method 9
⑥ Battery replacement 10
⑦ Cleaning of dust bucket 10-12
Troubleshooting 13
Technical specification 13
Precautions 13
Safe operation guide Safe operation guide
SHARP
Note: Please read and understand the instructions before use, and save it for later reference.

Please do not use the product outdoors in rainy days
Warnings: In the use of any household appliances, safety precautions shall be taken, including but not limited to the prevention of fire, short circuit and personal injury.
Personal safety:
- Please store the machine in a dry area indoors and stay it away from children;
- Children over 10 years old and people with physical and mental disabilities must use it under the supervision of their guardians;
- Please do not let children under 10 years old contact with the machine. When using and maintaining the machine, please keep away from children under 10 years old;
- Please use the matching accessories in the package; incorrect operation or use of other mismatched accessory may cause personal injury;
- Please pay special attention to operational safety when cleaning the stairs;
- Please keep the machine away from hot surfaces;
- Please keep the air inlet unobstructed and keep away from the fluff, cloth and other things that are easy to block the machine;
Power safety:
- Please use the battery and charger provided in the package;
- Please do not change the charger in any way;
- Please make sure that the input voltage matches the voltage marked on the charger;
- The charger and battery are matched with each other. If the charger of other specifications is used, fire risk may be caused;
- Please check the power cord of the charger for signs of damage and aging before use. Using a damaged or wrapped charger will increase the risk of fire and short circuit;
- Please use the power cord of the charger correctly;
- Please do not lift the charger through the charger wire;
- Please do not unplug the charger by pulling the charger wire. Please hold the charger with your hand for plugging;
- Please do not store the charger by wrapping the charger wire around the charger;
- The charger wire must be kept away from hot surfaces or sharp objects;
- The charger wire cannot be replaced by oneself. If the charger wire is damaged, please contact the after-sale service for replacement.
- Please do not touch the charger or the whole machine with wet hands;
- Please do not store the machine outdoors or charge the machine outdoors;
- When cleaning and maintaining the machine, please make sure that the charger has been removed from the charging plug.
Battery safety:
- The lithium battery is used in this product. Please do not burn or expose it to high temperature;
- Please use the original battery. Replacing the wrong type of battery may cause safety risks;
- The battery is forbidden to be disassembled, impacted, squeezed or put into the fire. If there is serious bulging, please do not continue to use;
- Please do not disassemble or collide to avoid the liquid leakage in the battery;
- Please do not short connect the metal contacts of the battery, or the danger of short-circuit will be caused (avoid personal injury, such as burns caused by overheating of the battery);
- Please handle the battery properly according to local regulations;
※ In order to reduce burns, fire, electric shock or any other injury, please observe the above regulations
Services:
- Before use, please carefully check the product for damage and abnormalities;
- Please do not use if there is any damage or defect in the product;
- Please contact Sharp approved service centre or a suitably qualified person and perform maintenance in accordance with relevant safety regulations. Maintenance by non-professionals may cause safety risks;
- Please do not change this product in any way to prevent personal injury;
- Please use replacement parts or spare parts provided or recommended by the manufacturer.
Tips for use:
- This is a dry vacuum cleaner;
- This vacuum cleaner does not have waterproof function. Please do not inhale water and wet dust;
- This vacuum cleaner cannot absorb any burning or smoking dust;
- Please only use in accordance with the instructions in the manual;
- Please do not use it on concrete pavement, asphalt pavement and other rough surfaces;
- The vacuum cleaner is used for household; please do not use it in factories or commercial places;
- Please do not use it to absorb construction waste and heavy metal dust.

Warnings:
-
Please do not use water, solvent or polishing agent to clean the surface of the appliance; Please clean with dry cloth;
-
It is forbidden to soak the vacuum cleaner in water or use a machine to clean it.
Introduction of product components using method
SHARP

Accessories

I. Use of floor brush
- As shown in the figure, align the electric head interface with the aluminium tube interface, and then gently push it. After hearing a "click", the installation is completed (when disassembling, just press and hold the latch button, and pull it down and away).

natural_image
Diagram of a vacuum cleaner with a lever and base, showing mechanical assembly (no text or symbols)- As shown in the figure, align the aluminium tube joint with the main body interface, and then gently push it. After hearing a "click", the installation is completed (when disassembling, just press and hold the latch button, and pull it down and away).

natural_image
Diagram of a mechanical device with a cylindrical component and a separate connector (no text or symbols)- Press the ON/OFF to start working
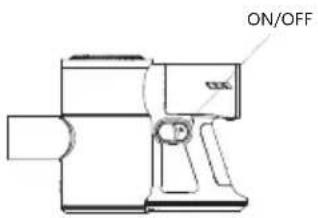
a) please press the power switch, the machine goes into lower suction speed mode;
b) then press the power switch again, the machine goes into middle suction speed mode;
c) please press the power switch once more, the machine goes into the high suction speed mode;
d) then press the power switch once again, the machine will stop work.

5
- Clean sweeping brush
a) Clean with a cleaning brush

Cut-off
Use a blade to cut off the hair and other garbage wrapped around the roller brush rod.

Harrow
Clean up the cut-off garbage with harrow.

Use a brush to clean up dust and other small particulate garbage.
b) Remove the roller brush rod
As shown in the figure, turn the ON/OFF, rotate the roller brush cover, and then take out the roller brush rod.

natural_image
Technical line drawing of a mechanical device component (no text or symbols)
natural_image
Technical line drawing of a mechanical device with cylindrical components and mounting brackets (no text or symbols)II. Handheld use
- Insert the attached accessory directly into the main body interface

natural_image
Diagram of a mechanical device being processed from a tool, showing part assembly and motion direction (no text or symbols)6
Using method Using method
SHARP
- As shown in the figure, turn the brush head to the front, and then insert the long flat nozzle into the main body
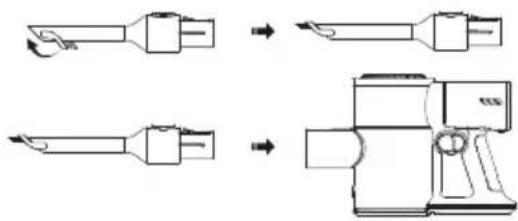
III. Use of mite-removing brush
- Insert the mite-removing nozzle directly into the main body interface

natural_image
Technical line drawing of a device with an arrow indicating transformation (no text or symbols present)- Clean the mite-removing nozzle a) Clean with a cleaning brush

natural_image
Three sequential illustrations of a pen tip application on a rectangular object, showing step-by-step shading (no text or symbols)Cut off Use a blade to cut off the hair and other garbage wrapped around the roller brush rod.
Harrow Clean up the cut-off garbage with harrow.
Use a brush to clean up dust and o the r small particulate garbage.
SHARP
b) Remove the roller brush rod
As shown in the figure, rotate the ON/OFF to unlock, and then pull out the roller brush rod.

natural_image
Technical line drawing of two mechanical components with directional arrows indicating movement (no text or symbols)IV: Setting up the water tank
Notice;
- After using, drain the water completely from the water tank.
-
Do not fill the water tank with anything other than tap water.
-
Fix the mop pad included with the water tank onto the head by pressing on the fastening tape.

- Open the plug to fill the tank with tap water.

- Fasten the water tank to the floor brush as shown in the figure. The Water tank is attached to the floor brush by magnet and you will notice a click when securely fastened.
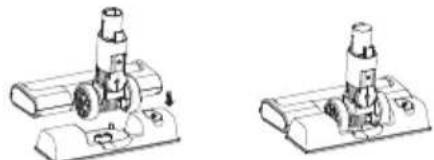
natural_image
Technical line drawings of mechanical components (no text or symbols)Using method
SHARP
- Attach onto the aluminium tube following instructions on page 4.

natural_image
Diagram showing two mechanical components with arrows indicating transformation or assembly (no text or symbols)V. Charging method
1) When there is only one cell left in the power indicator, it indicates that the machine is low in power and needs to be charged. When charging, after hanging the machine to the charging bracket, connect the charger to the machine. The White light flashes on the machine, indicating that it is charging.
Warm prompt: There are two ways to use the hanger:
① Use expansion screws to hang the vacuum cleaner on the wall.
② 4*3M glues are attached to the back of the hanger. The position of the hanger against the wall is the same as that of the vacuum cleaner, and the auxiliary vacuum cleaner is stored vertically (cannot be hung).

9
Using method
SHARP
2) Indicator light
- White LED 1 flashing, charging/undervoltage
- If the White LED1 is always on and LED2 light flashes, it indicates charging
- If the White LED1 and LED2 are always on and LED3 light flashes, it indicates charging
- If the White LED1, LED2 and LED3 are always on, it indicates full power

.Battery replacementVI

flowchart
graph LR
    A["Press the battery release button"] --> B["Pull out battery to the right"]
    B --> C["Insert the battery to the left"]
VII .Dust bucket cleaning method
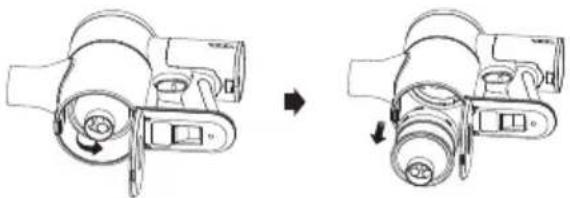
1) As shown in the figure, press the bottom cover button of the dust cup, and the bottom cover is suspended to expose the cyclone cone

10
Using method
SHARP
2) As shown in the figure, rotate the cyclone cone, and then pull it down to take out the cyclone cone
natural_image
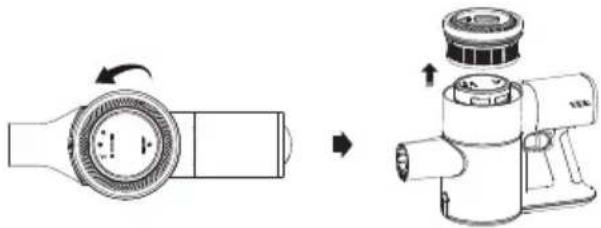
Diagram showing two views of a mechanical device before and after assembly, with no visible text or symbols.3) As shown in the figure, rotate the HEPA, and then pull it upwards to take out it
natural_image
Diagram showing a battery and a mechanical device with rotating components (no text or symbols)4) The HEPA and cyclone cone can be cleaned with water
5) After cleaning, be sure to dry the HEPA and the cyclone cone

natural_image
Diagram showing household air conditioners and a 24-hour timer with sun symbol (no text or labels)11
Using method
SHARP
6) Install the HEPA according to the direction shown in the figure

7) Install the cyclone cone in the direction shown in the figure

natural_image
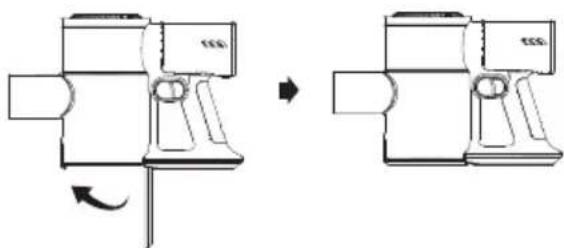
Diagram showing two mechanical components before and after assembly, with arrows indicating motion direction (no text or symbols)8) Rotate the bottom cover of the dust bucket as shown in the figure, and hear a 'click' to indicate that it is in place
natural_image
Diagram showing a mechanical assembly before and after rotation, with no visible text or symbols12
※Troubleshooting :
| Suction gets weak | 1、Empty the dust cup2、Check if the dust cup is installed correctly3、Check if the filter case and the filter are installed correctly4、Clean the filter |
| Stop working | 1、Charge the vacuum2、Clean the roller brush and the bearing thoroughly |
| Battery does’t hold a charger | 1、Check if the plug has been inserted already2、Check if the socket is useful |
※Technical Specification:
| Battery | 25.9V/2200mAh |
| Charging time | 3~4hours |
| Adaptor input | 100-240V~50/60Hz |
| Adaptor output | 30V--- 0.8A |
| Power | 380W |
※Precautions
1) When using the vacuum cleaner
Please keep away from heaters, such as radiators and cigarette butts, etc.
2) Before using the vacuum cleaner
Please remove large and sharp objects to prevent the machine from being damaged after collision. Do not suck up flammable materials or liquids, such as gasoline or cigarettes, alcohol, etc.
3) Do not turn the machine upside down when replacing the filter to prevent liquid or dust from falling into the motor, causing faults and dangers.
SHARP
WARRANTY
Congratulations on Your Purchase!
This Sharp vacuum cleaner is warranted against faults in material and manufacture for the 24 months period.
If service is required during the warranty period, please contact your nearest Sharp Approved Service Centre. These repairs would be carried out at no charge to the owner, subject to the conditions specified herein.
This warranty does not extend to defects or injuries caused by or resulting from causes not attributable to faulty parts or the manufacture of the product, including but not limited to, defect or injury caused by or resulting from misuse, abuse, neglect, lack of maintenance, accidental damage, improper voltage, liquid spillage, vermin infestation, software, or any alterations made to the product which are not authorised by Sharp.
Please retain your sales documentation, as this should be produced to validate a warranty claim. This warranty is in addition to and in no way limits, varies or excludes any implied rights and remedies under any relevant legislation in the country of sale.
This warranty does not cover transportation to and from the Sharp Approved Service Centre. Goods presented for repair may be replaced by refurbished goods of the same type rather than being repaired. Refurbished parts may be used to repair the goods. The repair of your goods may result in the loss of user generated data, please ensure that you have saved this data elsewhere prior to repair.
Australian customers: Our goods come with guarantees that cannot be excluded under the Australian Consumer Law. You are entitled to a replacement or refund for a major failure and for compensation for any other reasonably foreseeable loss or damage. You are also entitled to have the goods repaired or replaced if the goods fail to be of acceptable quality and the failure does not amount to a major failure. The criteria of a major failure is defined in the Australian Consumer Law. Should you require any assistance with a major failure please contact Sharp Customer Care.
SHARP
FOR LOCATION ENQUIRIES WITHIN
AUSTRALIA
SHARP APPROVED SERVICE CENTRE
Customer service helplines
1300 742 770
(calling within Australia)
Monday - Saturday, 9am - 6pm
Open Monday to Saturday except on public holidays.
Distributed by
Tempo (Aust) Pty Ltd
PO Box 132 Frenchs Forest NSW 1640 Australia
info@tempo.org
For an electronic copy of this manual, please contact our after sales support centre.
SHARP
Sharp Corporation



- Instruction Manual
- Introduction Contents
- SHARP
- Safe operation guide Safe operation guide
- Personal safety:
- Power safety:
- Battery safety:
- Services:
- Tips for use:
- Warnings:
- Introduction of product components using method
- Use of floor brush
- Handheld use
- Using method Using method
- Use of mite-removing brush
- IV: Setting up the water tank
- Using method
- Charging method
- VII .Dust bucket cleaning method
- ※Precautions
- 1) When using the vacuum cleaner
- 2) Before using the vacuum cleaner
- WARRANTY
- Congratulations on Your Purchase!
- AUSTRALIA
Brand : SHARP
Model : EC-SC95U-H
Category : Vacuum Cleaner