
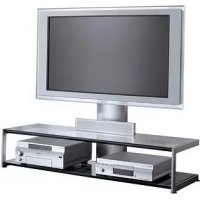
SUB461S - TV Stand SONY - Free user manual and instructions
Find the device manual for free SUB461S SONY in PDF.
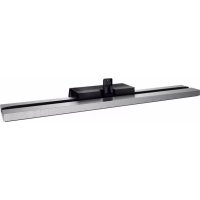



| Product type | TV stand (television support) |
| Brand | Sony |
| Model | SUB461S |
| Dimensions (W x H x D) | 107.9 x 68.7 x 27.7 cm (according to dimensions indicated for model SU-B461S) |
| Weight | 5.6 kg |
| Power supply | 100-240 V AC, 50/60 Hz |
| Power consumption (active) | 12 W |
| Power consumption (standby) | 0.7 W |
| Amplifier | S-Master digital, rated front output 2 x 10 W (8 ohms, 1 kHz), subwoofer 20 W (6 ohms, 100 Hz) |
| Supported audio formats | Dolby Digital, DTS, Dolby Pro Logic II |
| Connectivity | 1 HDMI input (ARC compatible), HDMI jack for TV and player connection |
| Main functions | HDMI control, audio synchronisation with TV, Position control (audio balance according to viewer position) |
| Front speakers | 2-way bass reflex, woofer 30 x 100 mm conical, tweeter 30 mm conical |
| Subwoofer | Bass reflex, 70 mm conical speaker |
| TV compatibility | KDL-46HX92x, KDL-46HX82x, KDL-46NX72x |
| Package contents | Stand, stopped panels, gasket, upright, spacer, screws, AC adapter, HDMI cable, instruction manual, warranty card |
| Care and cleaning | Soft dry cloth; for tough stains, cloth slightly dampened with mild soap, then wipe with dry cloth. Do not use thinner or gasoline. |
| Safety | Mandatory wall fixation to prevent tipping; install on stable surface; do not cover ventilation openings; use only with specified TVs. |
| Repairability | Power cord replacement exclusively in qualified workshop; contact Sony service in case of malfunction (flashing red light). |
Frequently Asked Questions - SUB461S SONY
User questions about SUB461S SONY
0 question about this device. Answer the ones you know or ask your own.
Ask a new question about this device
Download the instructions for your TV Stand in PDF format for free! Find your manual SUB461S - SONY and take your electronic device back in hand. On this page are published all the documents necessary for the use of your device. SUB461S by SONY.
USER MANUAL SUB461S SONY
A moulded plug complying with BS1363 is fitted to this equipment for your safety and convenience. Should the fuse in the plug supplied need to be replaced, a fuse of the same rating approved by ASTA or BSI to BS 1362 (i.e., marked with the appropriate symbol) must be used.
When an alternative type of plug is used, it should be fitted with the same rating of fuse; otherwise, the circuit should be protected by a 13 AMP FUSE at the distribution board. If the plug supplied with this equipment has a detachable fuse cover, be sure to attach the fuse cover after you change the fuse. Never use the plug without the fuse cover. If you should lose the fuse cover, please contact your nearest Sony service station.
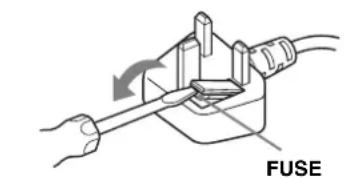
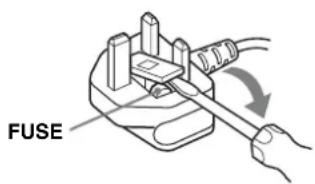
How to replace the fuse
Open the fuse compartment with a blade screwdriver, and replace the fuse.
Please refer to the illustration that actually equipped with the product.
On Safety
Thank you for purchasing this product. Products by Sony are designed with safety in mind. Incorrect use may result in a serious injury through fire, electric shock, the product toppling over, or the product being dropped. Be sure to observe the precautions for safety to prevent such accidents.
This instructions manual shows the correct handling of the product and important precautions necessary to prevent accidents. Be sure to read this manual thoroughly and use the product correctly. Keep this manual available for future reference.
The manufacturer of this product is Sony Corporation, 1-7-1 Konan Minato-ku Tokyo, 108-0075 Japan. The Authorized Representative for EMC and product safety is Sony Deutschland GmbH, Hedelfinger Strasse 61, 70327 Stuttgart, Germany. For any service or guarantee matters please refer to the addresses given in separate service or guarantee documents.
CAUTION
Specified products
This stand is designed for use with the Sony products specified below. Do not install other than the specified products.
The following products are subject to change without notice, may be out of stock, or discontinued.
Also, certain models are sold in some regions.
| LCD colour TV | |
| SU-B551S KDL-55HX92x/55HX82x/55NX72x | |
| SU-B461S KDL-46HX92x/46HX82x/46NX72x | |
| SU-B401S KDL-40NX72x | |
- In the actual model names, the "x" indicates numbers and/or characters specific to each model.
Location of the identification label
The label for the Model No. is located on the rear of the TV Stand.
Disposal of the TV Stand
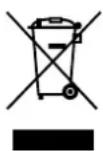
Disposal of Old Electrical & Electronic Equipment (Applicable in the European Union and other European countries with separate collection systems)
This symbol on the product or on its packaging indicates that this product shall not be treated as household waste. Instead it shall be handed over to the applicable collection point for the recycling of electrical and electronic equipment. By ensuring this product is disposed of correctly, you will help prevent potential negative consequences for the environment and human health, which could otherwise be caused by inappropriate waste handling of this product. The recycling of materials will help to conserve natural resources. For more detailed information about recycling of this product, please contact your local Civic Office, your household waste disposal service or the shop where you purchased the product.
WARNING
If the following precautions are not observed, serious injury or death can result through fire, electric shock, or the product toppling over.
Be sure to take measures to prevent the TV Stand from toppling over.
If you fail to do so, the TV may topple over and cause injury. Anchor the TV Stand and the rack, etc., to prevent toppling over.
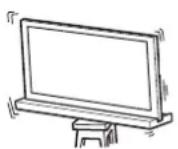
Be sure to install the TV Stand on a stable surface.
If you install the TV Stand on an unstable surface, it may lose its balance and topple over or fall off. This may cause injury or property damage.
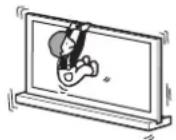
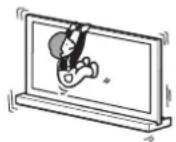
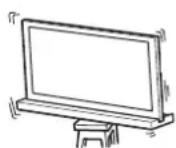
Do not lean on or hang from the TV with the TV installed on the TV Stand.
The TV Stand may topple over, or the TV may fall and cause serious injury or death.
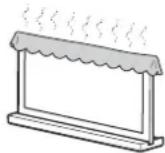
Do not cover the ventilation holes of the TV.
The ventilation openings in the TV are necessary to ensure reliable operation of the TV and to protect it from overheating.
- Do not block or cover the ventilation openings with cloth or other materials.
- Never allow liquid or solid objects to fall into the ventilation openings.
Do not place liquid filled objects such as a vase or potted plant on the TV.
Do not use a power line operated TV set near water; for example, near a bathtub, washbowl, kitchen sink, laundry tub, wet basement or near a swimming pool, etc.
Do not install the TV in places subject to extreme temperature, such as in direct sunlight, near a radiator or a heating vent.
The TV may overheat in such conditions which can cause deformation of the enclosure and/or TV malfunction.
Do not install the TV in a place exposed to direct air conditioning.
Moisture may condense inside and may cause TV malfunction.
Allow adequate space around the TV set to ensure proper air circulation.
Allow enough space around the TV as shown below.
Leave at least this much space around the set.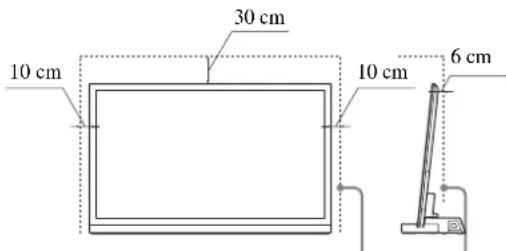
AC power cord (mains lead)
- Connect the TV set using a three-wire grounding type mains plug to a mains socket with a protective earthing connection.
- Use only Sony supplied AC power cords (mains lead), not those of other brands.
- Do not allow the AC power cord (mains lead) or the connecting cable to be pinched when you install the TV on the TV Stand. If the AC power cord (mains lead) or the connecting cable is damaged, this may result in fire or electric shock.
- Do not step on the AC power cord (mains lead) or the connecting cable when you carry the TV Stand. The AC power cord (mains lead) or the connecting cable may be damaged, and this may result in fire or electric shock.
- If you stumble over the AC power cord (mains lead) or the connecting cable, the TV Stand may topple over and cause injury.
- Unplugging the AC power cord (mains lead) from the wall outlet (mains) will completely remove power from the TV Stand.
NOTE ON AC adapter (mains adaptor)
Warning
To reduce the risk of fire or electric shock, do not expose this apparatus to rain or moisture.
To prevent fire or shock hazard, do not place objects filled with liquids, such as vases, on the apparatus.
Do not install this equipment in a confined space, such as a bookshelf or similar unit.
- Please ensure that the AC power outlet (mains socket) is installed near the equipment and shall be easily accessible.
- Be sure to use the supplied AC adapter (mains adaptor) and AC power cords (mains lead).
- Do not use any other AC adapter (mains adaptor). It may cause a malfunction.
- Connect the AC adapter (mains adaptor) to an easily accessible AC power outlet (mains socket).
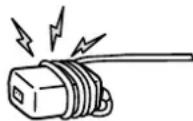
- Do not coil the AC power cord (mains lead) around the AC adapter (mains adaptor). The core wire may be cut and/or it may cause a malfunction of the TV.

- Do not touch the AC adapter (mains adaptor) with wet hands.
- If you notice an abnormality in the AC adapter (mains adaptor), disconnect it from the AC power outlet (mains socket) immediately.
- The set is not disconnected from the AC (mains) source as long as it is connected to the AC power outlet (mains socket), even if the set itself has been turned off.
CAUTION
If the following precautions are not observed, injury or property damage may occur.
Do not install any equipment other than the specified product.
This TV Stand is designed for use with the specified product only. If you install equipment other than specified, it may fall or break, and cause injury. Illustrations used in this manual show the KDL-40NX72x, unless otherwise stated.
Be sure to secure the TV.
Secure the TV to the TV Stand using the supplied screws. If the TV is not installed securely, it may fall, or the TV Stand may topple over, and cause injury.
Notes on installation
Do not allow the TV Stand to be installed at an angle or incline. To avoid this, observe the following precautions.
- If you install the TV Stand on a soft surface such as a mat or a carpet, lay a board over the designated location beforehand.
- Do not install the TV Stand in a place subject to direct sunlight or near a heater.
- Do not install the TV Stand in a hot or humid place, or outdoors.
Note on use
Cleaning
To keep the TV Stand clean, occasionally wipe it with a dry soft cloth. Stubborn stains may be removed by wiping with a cloth slightly dampened with mild soap. Be sure to dry the area afterwards with a dry soft cloth. Do not use chemicals, such as thinner or benzine, as they damage the finish of the TV Stand.
Be sure that two or more persons do the installation work.
Be sure that two or more persons install the TV on the TV Stand. If one person does the installation work alone, this may result in an accident or injury.
Do not modify the TV Stand.
It may fall and cause injury.
Be sure to install the TV securely following the instructions.
Tighten the screws securely. If the TV is not installed securely, it may fall and cause injury.
Be careful not to injure your hands or fingers while assembling.
- Do not move the TV Stand with holding the Neck section.
- Be careful not to hurt your fingers or hands when installing the TV.
PRECAUTIONS
On power sources
- If you are not going to use the TV Stand for a long time, be sure to disconnect the TV Stand from the wall outlet (mains). To disconnect the AC power cord (mains lead), grasp the plug itself; never pull the cord.
- AC power cord (mains lead) must be changed only at the qualified service shop.
On operation
Before connecting other components, be sure to turn off and unplug the TV Stand.
Copyrights
This TV Stand incorporates Dolby Digital and Pro Logic Surround and the DTS Digital Surround System.
- Manufactured under license from Dolby Laboratories. Dolby, Pro Logic, and the double-D symbol are trademarks of Dolby Laboratories. ** Manufactured under license under U.S. Patent #s: 5,451,942; 5,956,674; 5,974,380; 5,978,762; 6,487,535 & other U.S. and worldwide patents issued & pending. DTS and the Symbol are registered trademarks & DTS Digital Surround and the DTS logos are trademarks of DTS, Inc. Product includes software. © DTS, Inc. All Rights Reserved.
This TV Stand incorporates High-Definition Multimedia Interface (HDMI™) technology.
HDMI, the HDMI Logo, and High-Definition Multimedia Interface are trademarks or registered trademarks of HDMI Licensing LLC in the United States and other countries.
"BRAVIA" is a trademark of Sony Corporation.

DIGITAL
PRO LOGIC II

Digital Surround


PRO
FRONT SURROUND

Digital Amplifier
Note on taking the TV Stand out from the carton
Be sure to hold the TV Stand and handle it carefully.
Step 1: Checking the parts
| Name Quantity | |
| Stand | 1 |
| Rear Cover L* | 1 |
| Rear Cover R* | 1 |
| Joint | 1 |
| Neck | 1 |
| Neck-Spacer** | 1 |
| TV Stand Neck Attachment Screw (PSW5 × 16) (× 3) Joint Screw (PSW5 × 16) (× 3) | 6 |
| Neck Screw (PSW4 × 12) | 4 |
| AC adapter (mains adapter) (ACDP-001) 1 | |
| AC power cord (mains lead) | |
| High Speed HDMI cable 1 | |
| Instructions manual 1 | |
| Warranty card | |
- For SU-B551S model only. ** For SU-B551S/461S models only.
WARNING
If you allow the AC power cord (mains lead) to be pinched under or between pieces of equipment, this may result in a short circuit or an electric shock. If you stumble over the AC power cord (mains lead) or the connecting cable, the TV Stand may topple over and cause injury.
Decide on the installation location and lay the TV Stand down before installing the TV.
Since the TV is heavy, it is recommended that you decide on the installation location beforehand, and assemble the TV Stand on site.
Refer to the operating instructions supplied with your TV for information on how to remove the Table-Top Stand from the TV.
Step 2: Installing the TV
Before assembling
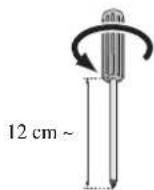
- Be sure to have a Phillips screwdriver that fits the screws prior to the assembly.
- When using an electric screwdriver, set the torque setting to approximately 1.5 N·m (15 kgf·cm).
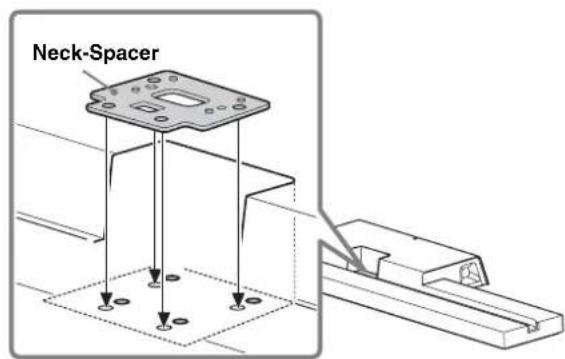
1 Position the Neck-Spacer on the TV Stand.
The Neck-Spacer is used for adjusting the height of the Neck and TV.
Be sure to attach the Neck-Spacer.
For KDL-55HX82x/46HX82x/55NX72x/46NX72x only:
2
Attach the Neck and the Neck-Spacer (for KDL-55HX82x/46HX82x/55NX72x/46NX72x only) to the TV Stand with the four Neck Screws (PSW4 × 12) (supplied).
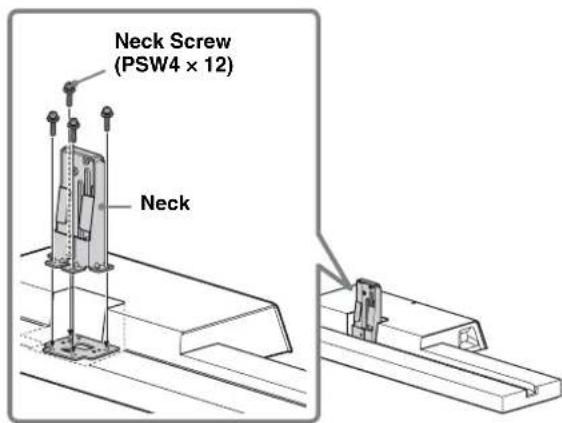
3
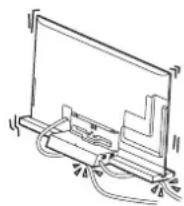
When moving the TV, hold the TV as shown below.
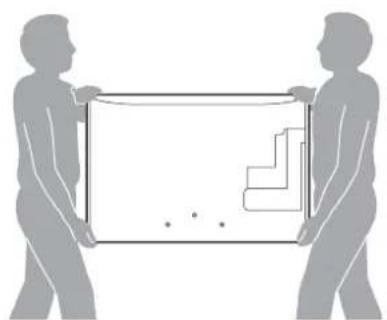
4 Attach the supplied Joint to the rear of the TV with the three screws (PSW5 × 16) (supplied).
Slide the supplied Joint up to attach.
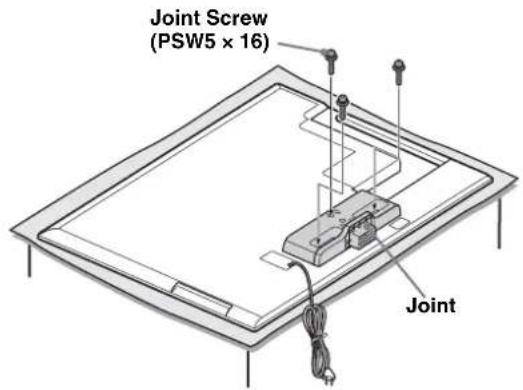
Make sure to keep the removed screws. - When removing the Table-Top Stand from the Display, lay the display face down on a stable work surface that is larger than the Display. - To prevent damaging the surface of the LCD display, make sure to place a soft cloth on the work surface.
CAUTION
- If pressure or shock is applied to the surface of the Display, the LCD display may break or become damaged.
- Lay the display face down on a stable and level surface with the Table-Top Stand hanging over the edge of the surface.
Having the display face and the base of the Table-Top Stand on the same level surface will create an unstable working condition and can damage the Display.
5 Install the TV onto the TV Stand.
The TV is installed by placing it in the groove of the TV Stand.
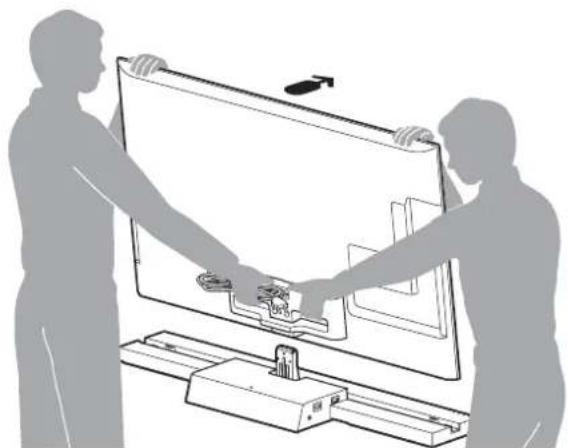

Arrow direction shows front of the TV Stand.
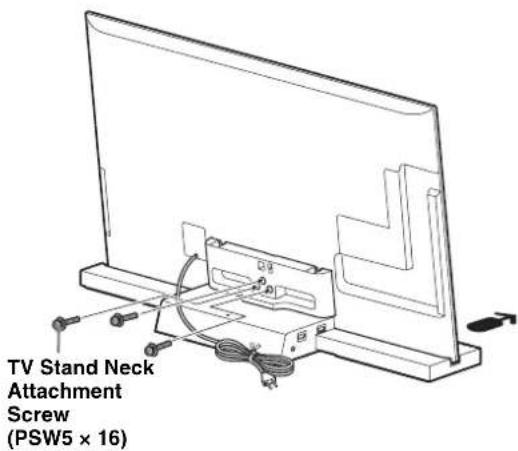
6 Secure the TV and the TV Stand with the three TV Stand Neck Attachment Screws (PSW5 × 16) (supplied).
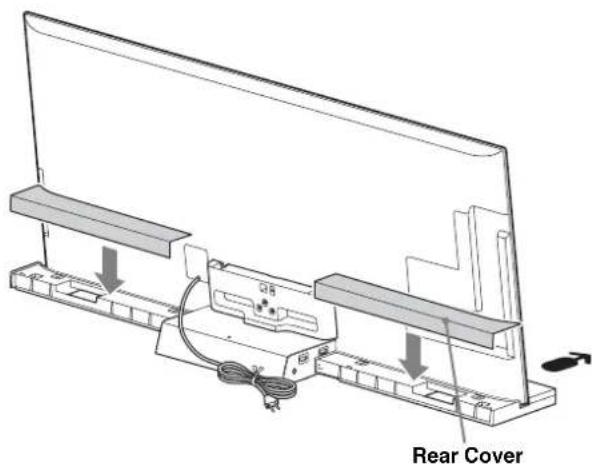
7 Attach the Rear Cover to the TV Stand. (For SU-B551S model only)
8
Bundling the cables.
Use the cable clampers supplied with the TV.
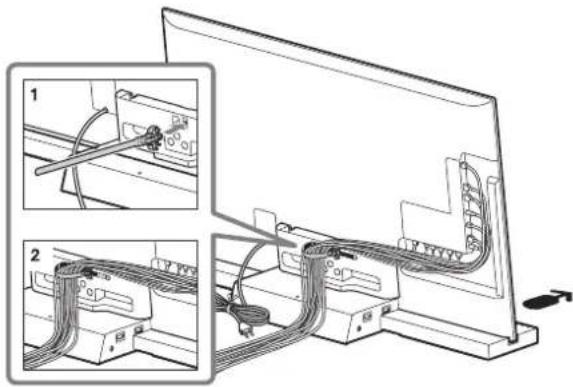
- Do not bundle the AC power cord together with other cables.
Step 3: Safety measures to prevent toppling over
WARNING
Be sure to take measures to prevent the TV Stand from toppling over, and causing possible injury and damage.
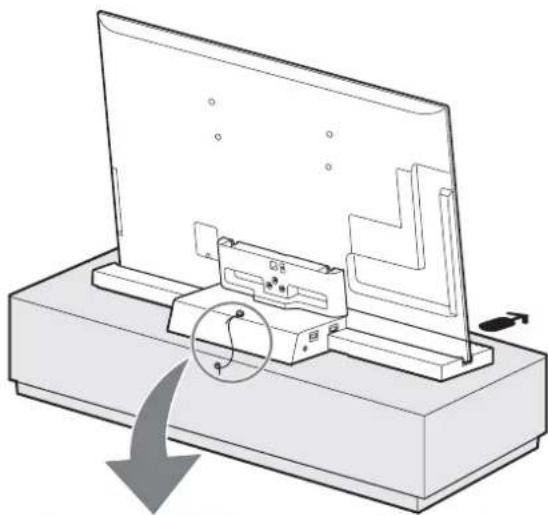
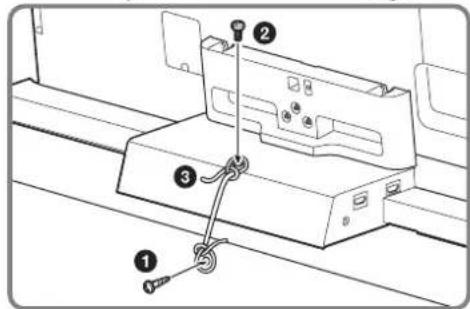
Install a wood screw (4 mm in diameter, not supplied) in the board. Install a machine screw (M4 × 16, not supplied) into the screw hole of the TV Stand. Tie the wood screw and the machine screw with a strong cord (not supplied).
Step 4:
Connecting the TV and
Player
Connect the TV with an HDMI IN 1 to the TV Stand using an HDMI cable.
By connecting Sony "BRAVIA" Sync-compatible components using HDMI cables, operation can be simplified when you set the Control for HDMI function for the TV.
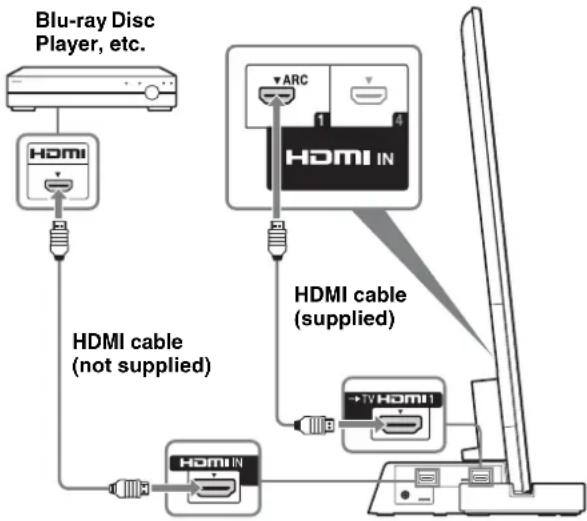

- Please do not connect PC with HDMI.
- The TV Stand is compatible with the Audio Return Channel (ARC) function. If you connect the TV Stand to the ARC compatible TV's HDMI IN 1 via an HDMI cable, you do not need to connect the TV to the TV Stand with the digital optical cord.
- You can see the letters "ARC" beside the TV's HDMI jack (socket) if it is compatible with the ARC function. Even if you connect an HDMI cable to the socket, if the HDMI input jack (socket) is not compatible with the ARC function, you cannot use the ARC function.
- The ARC function is available only when Control for HDMI is set to on.

- Even if the TV Stand is turned off (active standby mode), the HDMI signal will be sent from the connected component to the TV via the HDMI connection. You can enjoy image and sound from the component on the TV.
Notes on HDMI connections
- Use a High Speed HDMI cable. If you use a Standard HDMI cable, 1080p, Deep Colour, or 3D images may not be displayed properly. We recommend that you use an HDMI-authorized cable.
- Check the setup of the connected component if an image is poor or the sound does not come out of a component connected via the HDMI cable.
- Audio signals (sampling frequency, bit length, etc.) transmitted from an HDMI jack (socket) may be suppressed by the connected component.
- Sound may be interrupted when the sampling frequency or the number of channels of audio output signals from the playback component is switched.
- When the connected component is not compatible with copyright protection technology (HDCP), the image and/or the sound from the HDMI TV OUT socket may be distorted or may not be output. In this case, check the specification of the connected component.
- We do not recommend using an HDMI-DVI conversion cable.
- This system supports Deep Colour, "x.v.Color," and 3D transmission.
Step 5: Connecting the AC power cord (mains lead)
Connect all components and TV to the TV Stand before connecting the AC power cord (mains lead) of the TV Stand's AC Adapter (mains adapter) to a wall outlet.
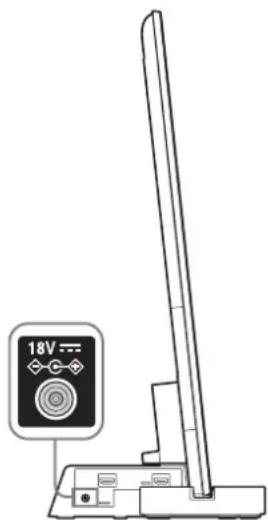
- Connect the TV Stand to an easily accessible AC outlet (mains). Should you notice an abnormality in the TV Stand, disconnect the main plug from the AC outlet (mains) immediately.
Step 6: Performing the TV settings
1Set to "On" in the "Control for HDMI" function.
Press the HOME button of the remote of the TV and select the menu as follows;
Settings > External Inputs > HDMI Set-up > Control for HDMI > On
2Set to "Audio System" in "Speakers" menu. Press the SYNC MENU button of the remote of the TV and select the menu as follows; Speakers > Audio System
After completing the settings for procedure 1 and 2, the (power) indicator lights up in green.

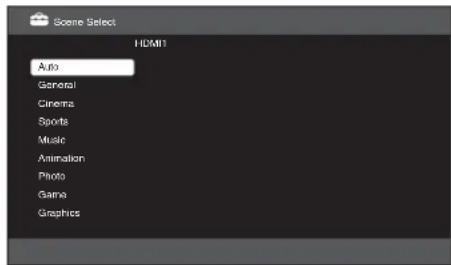
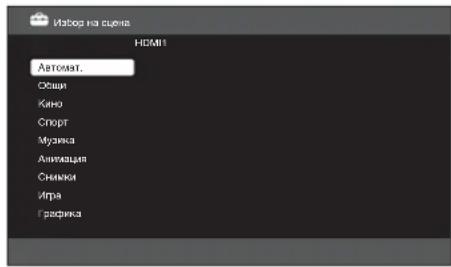
- Scene Select mode
This TV Stand is synchronized with the TV sound settings automatically, and works together with the Scene Select function, for you to choose your preferred sound for the selected scene.
To change the sound, change the TV sound settings.
- Position Control
If you set "External Device Control" to "On" on the TV, this TV Stand adjusts the volume balance between the left and right speakers according to viewing position. (Setting of the TV)
To set "Position Control", press the HOME button, then select System Settings > Position Control > the desired option.
Troubleshooting
Sound
No sound:
- Check the HDMI cable connection.
- Check the settings for "Control for HDMI" and "Audio System" in Step 6 (page 11).
Using with headphones:
- Switch "Audio System" to "TV Speakers" in the "Speakers" setting. Using with dual sound of the TV digital transmission:
- Depending on the transmission, the sound cannot switch. Switch the "Optical Out" setting of the TV from "Auto" to "PCM". Using with external equipment for dual sound:
- If the sound cannot be switched, switch the audio output setting of the external equipment to activate PCM.
Indicator
Although the TV power is turned on, the I (power) indicator of the TV Stand does not light up:
- Check whether the AC adapter (mains adapter)'s AC power cord (mains lead) is plugged into a wall outlet.
- Consult customer support services.
Flash I (power) indicator red: - A malfunction may have occurred with this product. Check how many times the LED flashes, and consult Sony service center.
Indicator
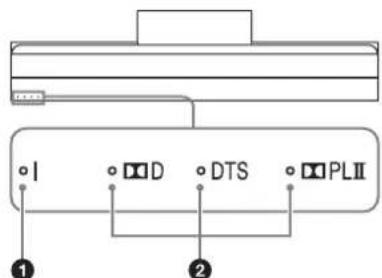
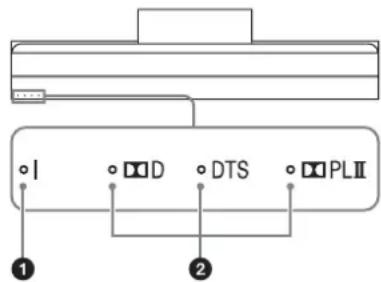
1 (power) indicator
Lights as follows:
Green: The TV Stand is power on. ("Audio System" is set for "Speakers.")
Off: The TV Stand is standby or power off.
Audio format indicators
Light up according to the audio format that is being input to the TV Stand.
D: Dolby Digital
DTS
PLII: Dolby Pro Logic II
Specifications
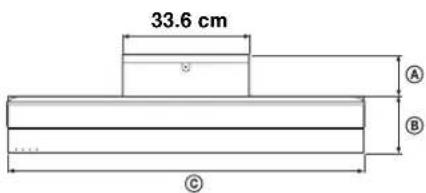
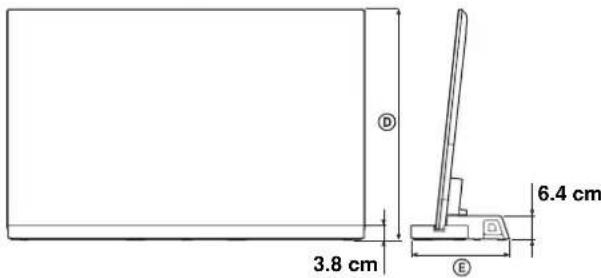
| SU-B551S SU | B461S SU-B401S | |||
| Dimensions:cm | A1 | 0.2 11.8 11.0 | ||
| B1 | 9.0 15.9 15.1 | |||
| C1 | 27.6 | 107.9 | 94.4 | |
| D | 55HX92x:79.6 | 46HX92x:68.6 | - | |
| 55HX82x:79.8 | 46HX82x:68.7 | - | ||
| 55NX72x:79.7 | 46NX72x:68.7 | 40NX72x:61.2 | ||
| E2 | 9.2 27.7 26.1 | |||
| Stand Weight: | 6.3 kg | 5.6 kg | 4.9 kg | |
Amplifier section
Rated Output Power Front: 10W + 10W (per channel) 8 ohms, 1kHz , THD less than 1% Subwoofer: 20W , 6 ohms, 100Hz , THD less than 1%
HDMI section
| Connector | HDMI™ | Connector |
| Video inputs/outputs | 720 × 480p (60Hz) 16:9 | |
| 1280 × 720p (60Hz) 16:9 | ||
| 1920 × 1080i (60Hz) 16:9 | ||
| 1280 × 720p (50Hz) 16:9 | ||
| 720 (1440) × 480i (60Hz) 4:3 | ||
| 720 (1440) × 480i (60Hz) 16:9 | ||
| 720 (1440) × 576i (50Hz) 4:3 | ||
| 720 (1440) × 576i (50Hz) 16:9 | ||
| 1920 × 1080p (60Hz) 16:9 | ||
| 720 × 576p (50Hz) 16:9 | ||
| 1920 × 1080i (50Hz) 16:9 | ||
| 1920 × 1080p (50Hz) 16:9 | ||
| 1920 × 1080p (24Hz) 16:9 | ||
| 1920 × 1080p (30Hz) 16:9 | ||
| 1280 × 720p (24Hz) 16:9 | ||
| 1280 × 720p (30Hz) 16:9 | ||
| Deep Colour: 30bit/36bit | ||
| Video inputs/ outputs (3D) Frame packing | ||
| 1920 × 1080i@59.94/60 Hz | ||
| Frame packing | ||
| 1920 × 1080i@59.94/60 Hz | ||
| Side-by-Side (Half) | ||
| 1920 × 1080p@59.94/60 Hz | ||
| Side-by-Side (Half) | ||
| 1280 × 720p@50 Hz | ||
| Frame packing | ||
| 1920 × 1080i@50 Hz | ||
| Frame packing | ||
| 1920 × 1080i@50 Hz | ||
| Side-by-Side (Half) | ||
| 1920 × 1080p@50 Hz | ||
| Side-by-Side (Half) | ||
| 1920 × 1080p@24 Hz | ||
| Frame packing | ||
| Deep Colour: 30bit/36bit | ||
| Audio inputs Linear PCM 2ch/5.1ch/7.1ch | ||
| Dolby Digital | ||
| DTS | ||
| Each signal is compliant with 32, 48 kHz. | ||
Speakers
Front speaker unit
Speaker system 2-way 2-driver, Bass reflex type. Speaker unit: Woofer: 30 x 100 mm cone type x 1, Tweeter: 30 mm cone type.
Subwoofer unit
Speaker system: Subwoofer, Bass reflex type. Speaker unit: 70 mm cone type.
General
Power requirements: 100 - 240 V, 50/60 Hz. Power consumption: On: 12 W, Standby: 0.7 W.
- Standby power consumption: 0.7 W.
- Halogenated flame retardants are not used in certain printed wiring boards. Over 85% power efficiency of the amplifier block is achieved with the full digital amplifier, S-Master.
Design and specifications are subject to change without notice.
Mode Selection scene
Power indicator (alimentation)
Deep Colour: 30 bits/36 bits
Inputs/ 1280 x 720p @ 59.94/60 Hz
Deep Colour: 30 bits/36 bits
Deep Colour: 30bit/36bit
Video inputs: 1280× 720p@ 59.94/60 Hz
Deep Colour: 30bit/36bit
Audio inputs: Linear
PCM
2/5.1/7.1-channel
Dolby Digital
DTS
Speaker system: Subwoofer, bass reflex type
Speaker 70
mm,
cone type
General
Power supply: 100 - 240V 50 / 60Hz
Power consumption
Power: 12 W
Standby: 0.7 W
Deep Colour: 30bit/36bit
Inputs/Outputs: 1280×720p@59.94/60 Hz
Video outputs (3D) Frame packing
1920×1080i@59.94/60 Hz
Frame packing
1920×1080i@59.94/60 Hz
Side-by-side (Half)
1920×1080p@59.94/60 Hz
Side-by-side (Half)
1280×720p@50 Hz
Frame packing
1920×1080i@50 Hz
Frame packing
1920× 1080i@50Hz
Side by side (Meta)
1920× 1080p@50Hz
Side by side (Meta)
1920× 1080p@24Hz
Frame packing
Deep Colour: 30bit/36bit
Linear PCM audio inputs 2ch/5.1ch/7.1ch
Dolby Digital
DTS
8 ohm, 1 kHz, THD less than 1%
Subwoofer: 20W 6 ohm, 100Hz
THD less than 1%
HDMI section
HDMITM connector
Video inputs/ 720× 480p (60Hz) 16:9
-outputs 1280× 720p (60Hz) 16:9
1920× 1080i (60Hz) 16:9
1280× 720p (50Hz) 16:9
720 (1440) × 480i (60 Hz) 4:3
720 (1440) × 480i (60 Hz) 16:9
720 (1440) × 576i (50 Hz) 4:3
720 (1440) × 576i (50 Hz) 16:9
1920× 1080p (60Hz) 16:9
720× 576p (50Hz) 16:9
1920× 1080i (50Hz) 16:9
1920× 1080p (50Hz) 16:9
1920× 1080p (24Hz) 16:9
1920× 1080p (30Hz) 16:9
1280× 720p (24Hz) 16:9
1280× 720p (30Hz) 16:9
Deep Colour: 30 bit/36 bit
Video inputs/ 1280× 720p@ 59.94/60 Hz
Deep Colour: 30 bit/36 bit
Audio inputs Linear PCM 2 ch./5.1 ch./7.1 ch.
Dolby Digital
DTS
Each signal conforms to 32,
44.1, 48 kHz.
Speakers
Deep Colour: 30 bits/36 bits
Inputs/ 1280× 720p@ 59.94/60 Hz
video outputs (3D) Frame packing
1920× 1080i@ 59.94/60 Hz
Frame packing
1920× 1080i@ 59.94/60 Hz
Side by Side (Half)
1920× 1080p@ 59.94/60 Hz
Side by Side (Half)
1280× 720p@50Hz
Frame packing
1920× 1080i@50Hz
Frame packing
1920× 1080i@50Hz
Side by Side (Half)
1920× 1080p@50Hz
Side by Side (Half)
1920× 1080p@24Hz
Frame packing
Deep Colour: 30 bits/36 bits
PCM Linear audio inputs 2 ch./5.1 ch./7.1 ch.
Dolby Digital
DTS
Be sure to secure the TV.
8 ohm, 1 kHz, THD under; 1%
Subwoofer: 20W 6 ohm, 100Hz
THD under; 1%
HDMI
HDMITM connector
Video inputs/ 720× 480p (60Hz) 16:9
-outputs 1280× 720p (60Hz) 16:9
1920× 1080i (60Hz) 16:9
1280× 720p (50Hz) 16:9
720 (1440) × 480i (60 Hz) 4:3
720 (1440) × 480i (60 Hz) 16:9
720 (1440) × 576i (50 Hz) 4:3
720 (1440) × 576i (50 Hz) 16:9
1920 × 1080p (60 Hz) 16:9
720 × 576p (50 Hz) 16:9
1920 × 1080i (50 Hz) 16:9
1920 × 1080p (50 Hz) 16:9
1920 × 1080p (24 Hz) 16:9
1920 × 1080p (30 Hz) 16:9
1280 × 720p (24 Hz) 16:9
1280 × 720p (30 Hz) 16:9
Deep Colour: 30 bit/36 bit
Video inputs: 1280 × 720p @ 59.94/60 Hz
Deep Colour: 30 bit/36 bit
Audio inputs: Linear PCM 2-channel/5.1-channel/
7.1-channel
Dolby Digital
DTS
Deep Colour: 30bit/36bit
Video inputs/outputs: 1280x720p @ 59.94/60 Hz
Outputs (3D) Frame packing
1920x1080i @ 59.94/60 Hz
Frame packing
1920x1080i @ 59.94/60 Hz
Side-by-side (half)
1920x1080p @ 59.94/60 Hz
Side-by-side (half)
1280x720p @ 50 Hz
Frame packing
1920x1080i @ 50 Hz
Frame packing
1920× 1080i@50Hz
side-by-side (half)
1920× 1080p@50Hz
side-by-side (half)
1920× 1080p@24Hz
Frame packing
Deep Colour: 30bit/36bit
Audio inputs Linear PCM 2ch/5.1ch/7.1ch
Dolby Digital
DTS
Each signal is compatible with 32,
44.1, 48kHz.
Speakers
Front speaker
Speaker system 2-way 2-driver, bass reflex type
Speaker unit Bass speaker: 30× 100mm
cone-type × 1
Tweeter: 30mm cone-type
Subwoofer unit
Speaker system Subwoofer, bass reflex type
Speaker unit 70 mm cone-type
General
Power requirements 100 - 240 V, 50/60 Hz
Power consumption
On: 12 W
Standby: 0.7 W
Output 1280×720p (60Hz) 16:9
1920× 1080i (60Hz) 16:9
1280× 720p (50Hz) 16:9
720 (1440) × 480i (60Hz) 4:3
720 (1440) × 480i (60Hz) 16:9
720 (1440) × 576i (50Hz) 4:3
720 (1440) × 576i (50Hz) 16:9
1920×1080p (60Hz) 16:9
720×576p (50Hz) 16:9
1920×1080i (50Hz) 16:9
1920×1080p (50Hz) 16:9
1920×1080p (24Hz) 16:9
1920×1080p (30Hz) 16:9
1280×720p (24Hz) 16:9
1280×720p (30Hz) 16:9
Deep Colour: 30bit/36bit
Eioo08o/Ex08o 1280 ×720p@59,94/60 Hz
Deep Colour: 30bit/36bit
Eioo0s nov Γαμμκσ PCM 2ch/5.1ch/7.1ch
Dolby Digital
DTS
Product Compliance Europe (PCE),
Deep Colour: 30 bit/36 bit
Video inputs/ 1280× 720p@ 59.94/60 Hz
outputs (3D) Frame packing
1920× 1080i @ 59.94 / 60Hz
Frame packing
1920× 1080i@ 59.94/60 Hz
Side-by-side horizontally (half)
1920× 1080p@ 59.94/60 Hz
Side-by-side horizontally (half)
1280× 720p@50Hz
Frame packing
1920× 1080i@50Hz
Frame packing
1920× 1080i@50Hz
Side-by-side horizontally (half)
1920× 1080p@50Hz
Side-by-side horizontally (half)
1920× 1080p@24Hz
Frame packing
Deep Colour: 30 bit/36 bit
8 ohm, 1 kHz, THD nizsincz 1%
Subwoofer: 20W 6 ohm, 100Hz
THD nizsnez 1%
HDMI section
HDMI connector
Video inputs/ 720× 480p (60Hz) 16:9
outputs 1280× 720p (60Hz) 16:9
1920× 1080i (60Hz) 16:9
1280× 720p (50Hz) 16:9
720 (1440) × 480i (60Hz) 4:3
720 (1440) × 480i (60Hz) 16:9
720 (1440) × 576i (50Hz) 4:3
720 (1440) × 576i (50Hz) 16:9
1920× 1080p (60Hz) 16:9
720× 576p (50Hz) 16:9
1920× 1080i (50Hz) 16:9
1920× 1080p (50Hz) 16:9
1920× 1080p (24Hz) 16:9
1920× 1080p (30Hz) 16:9
1280× 720p (24Hz) 16:9
1280× 720p (30Hz) 16:9
Deep Colour: 30bit/36bit
Video inputs/ 1280× 720p@59.94 / 60 Hz
outputs (3D) Frame packing
1920× 1080i @ 59.94 / 60Hz
Frame packing
1920× 1080i@ 59.94/60 Hz
Side-by-Side (Half)
1920× 1080p@ 59.94/60 Hz
Side-by-Side (Half)
1280× 720p@50Hz
Frame packing
1920× 1080i@50Hz
Frame packing
1920× 1080i@50Hz
Side-by-Side (Half)
1920× 1080p@50Hz
Side-by-Side (Polovicić)
1920× 1080p@24Hz
Frame packing
Deep Colour: 30-bit/36-bit
Audio inputs: Linear PCM 2 channels/5.1 channels/
7.1 channels
Dolby Digital
DTS
All signals correspond to 32
44.1, 48 kHz.
Speakers
Deep Colour: 30-bit/36-bit
Video inputs/ 1280× 720p@59,94 / 60Hz
Deep Colour: 30-bit/36-bit
Audio inputs: Linear PCM 2 ch/5.1 ch/7.1 ch
Dolby Digital
DTS
All signals are in accordance with 32,
44.1, 48 kHz.
Speakers
Front speaker
Step 1: Checking the parts
The table for the model and parts is located on the stand for the TV.
The table for the model and parts is located on the stand for the TV.
Removing the TV stand
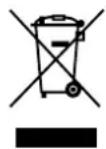
Disposal of old electrical and electronic equipment (applicable in the European Union and other European countries with separate collection systems)
This symbol on the product or on its packaging indicates that this product shall not be treated as household waste. Instead it shall be handed over to the applicable collection point for the recycling of electrical and electronic equipment. By ensuring this product is disposed of correctly, you will help prevent potential negative consequences for the environment and human health, which could otherwise be caused by inappropriate waste handling of this product. The recycling of materials will help to conserve natural resources. For more detailed information about recycling of this product, please contact your local city office, your household waste disposal service or the shop where you purchased the product.
WARNING
If the following precautions are not observed, it may lead to serious injury or death from fire, electric shock, or falling of the product.
Make sure you have taken measures to prevent the TV stand from falling.
If this happens, the TV may fall and cause injury.
Secure the TV stand, supplied accessories, etc. to prevent falling.
Make sure the TV stand is mounted on a stable surface.
If the TV is mounted on an unstable
surface, it may lose balance and fall or tip over. This may cause
injury or damage to property.
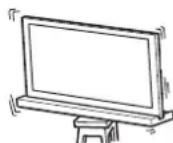
Do not lean on or push the TV while it is placed on the TV stand.
The TV stand may tip over, causing the TV to fall and result in serious injury or death.
Do not cover the ventilation openings of the TV.
The ventilation openings of the TV are necessary for the proper operation of the TV and for protection against overheating.
Do not block or cover the ventilation openings with cloth or other materials. Never allow liquids or solid objects to enter the ventilation openings.
Do not place objects, such as vases or cups, containing liquids on top of the TV.
Do not use the TV near water, for example, near a bathtub, sink, kitchen sink, swimming pool, or in a wet basement.
Do not place the TV in locations exposed to high temperatures, such as direct sunlight, near radiators, or heating vents.
Under such conditions, the TV may overheat, which could cause deformation of the cabinet and/or malfunction of the TV.
Install the TV on a location directly on the climate system.
In its interior, moisture may condense, which could cause damage to the TV.
Leave sufficient space around the TV to ensure proper air circulation.
Leave sufficient space around the TV, as shown below.
Leave enough space around the stand.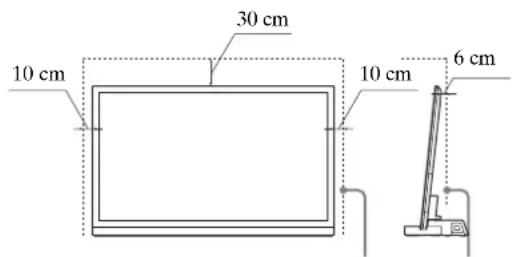
Power cord
Connect the TV using the three-prong plug with grounding to a grounded outlet.
- Use only the provided power cord from Sony, not other manufacturers.
Be careful not to pinch the power cord or connecting cable when mounting the TV on the TV stand. If the power cord or connecting cable is damaged, it may cause fire or electric shock.
Do not step on the power cord or connecting cable while carrying the TV stand. The power cord or connecting cable may be damaged, which could cause fire or electric shock.
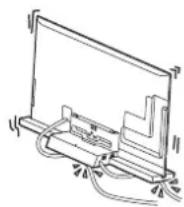
- If you step on the power cord or connecting cable, the TV stand may fall and cause injury.
- Disconnect the power cord from the wall outlet before installing the TV stand.
Warning
To avoid fire or electric shock, do not expose the apparatus to rain or moisture. To prevent fire or shock, do not place objects filled with liquids, such as vases, on the apparatus.
Do not mount this equipment in a confined space, such as a bookcase or similar piece of furniture.
- Make sure that the equipment is mounted close to the equipment and with easy access.
(Continued)
Make sure you use the supplied AC power cord and the wall outlet. Do not use other AC power cords. This may cause malfunction. Connect the AC power cord to an easily accessible outlet. Do not place the wall outlet near the AC power cord. The external conductors may be interrupted, which may cause malfunction of the TV. Do not touch the AC power cord with wet hands. If you spill liquid on the AC power cord, unplug it from the outlet immediately. The TV and the stand are not intended to be disconnected from the outlet, unless they are connected to the outlet, except when they are unplugged.
WARNING
If the following safety precautions are not followed, damage or injury may occur.
Do not mount any other equipment other than the specified product.
This TV stand is designed for use only with the specified products. If you mount equipment other than the specified one, it may fall or cause injury. The illustrations used in this manual show the KDL-40NX72x, unless otherwise noted.
Make sure you have the TV safely secured.
Securing the TV to the TV stand with the supplied bolts. If the TV is not securely mounted, it may fall, the TV stand may tip over and cause injury.
Notes on installation
Do not install the TV stand on a tilted surface. To avoid this, follow the safety precautions below.
-If you install the TV stand on a soft surface, such as carpet or flooring, place a board on top of it. -Do not install the TV stand in a place exposed to direct sunlight or near a heater.
-Do not install the TV stand on a hot or humid place, or on a surface that is not flat.
Note on use
To clean the TV stand, wipe it with a dry cloth. The protective film can be removed by peeling it off with a dry cloth. Don't forget to dry the area with a dry cloth after that. Do not use chemicals, such as solvents or benzene, as they may damage the surface of the TV stand.
Use two or more people to perform the installation.
Use two or more people to mount the TV on the TV stand. If one person performs the installation alone, it may lead to injury or damage.
Do not modify the TV stand.
Injury or damage may occur.
Mount the TV safely according to the instructions.
Then tighten the bolts. If the TV is not mounted safely, it may fall and cause injury.
Be careful not to damage the wires or cables during installation.
Do not place the TV stand on a surface that is not stable. Be careful not to damage the wires or cables when moving the TV.
SAFETY PRECAUTIONS
Regarding the power supply
Use the TV stand only for its intended purpose. Ensure that the TV stand is not in contact with the wall. To disconnect the power cord, pull the plug, never pull the cord. The power cord must be connected only to a qualified service.
Regarding operation
Before connecting other components, make sure that the TV stand is unplugged and disconnected from the power supply.
Copyright
This TV stand includes Dolby Digital and Pro Logic Surround, as well as a system for digital surround sound DTS *.
* Manufactured under license from Dolby Laboratories. Dolby, Pro Logic, and the double-D symbol are trademarks of Dolby Laboratories. ** Manufactured under license from U.S. Patent Nos: 5 451 942; 5 956 674; 5 974 380; 5 978 762; 6 487 535 and other U.S. and worldwide patents issued and pending. DTS and the Symbol are registered trademarks and DTS Digital Surround and the DTS logos are trademarks of DTS, Inc. The product includes software. © DTS, Inc. All rights reserved.
This TV stand includes High-Definition Multimedia Interface (HDMI™) technology.
HDMI, the HDMI logo, and High-Definition Multimedia Interface are trademarks or registered trademarks of HDMI Licensing LLC in the United States and other countries.
"BRAVIA" is a trademark of Sony Corporation.





Note on the TV stand installation
Make sure to handle the TV stand carefully.
Step 6: TV settings
Connect all components and the TV to the stand before connecting the AC power cord adapter of the stand to the outlet.
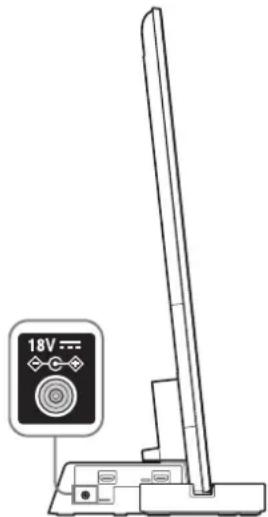
Connect the stand to the wall outlet. If you need to move the stand, unplug it from the outlet and do not forget.
Set the "On" function "Control via HDMI".
Press the button on the TV remote or select the menu as follows:
Settings > Inputs > HDMI settings > Control via HDMI
On
Press the "Audio System" button on the "Speaker" menu.
Press the SYNC MENU button on the TV remote, select the menu as follows: Speaker > Audio System.
Follow the settings to check 1 and 2, the indicator (screen) lights up in green.

-Scene selection mode
This TV stand is synchronized automatically with the TV sound settings and works with the scene selection function, to select the sound you prefer for the selected scene.
To change the sound, change the TV sound settings.
-Position control
If you set "Sound Control" to "On" on the TV, this TV stand adjusts the sound balance of the left and right speakers according to the viewing position. (TV setting)
To set "Position Control", press the HOME button, select System Settings > Position Control > desired option.
Troubleshooting
Sound
No sound:
-Check the HDMI cable connection. -Check the settings for "Control via HDMI" and "Audio System" in section 6 (page 11).
Using with headphones:
- Set "Audio System" to "TV Speaker" in the "Speaker" settings. Using with dual sound on digital TV broadcasting: Depending on the broadcast, the sound may not be switchable. Set the "Optical Output" setting on the TV from "Auto" to "PCM". Using with external equipment for dual sound: If the sound cannot be switched, switch the audio output setting on the external equipment to activate PCM.
The indicator (standby) on the TV set is off:
The standby indicator is off. The TV set is connected to the contact. Contact the service for customer support.
The indicator (standby) is red:
- A malfunction of the product may have occurred. Check the indicator several times and contact the Sony service center.
Indicator
0I (standby) indicator
The following applies:
Green: The TV set is on. ("Aynho system" is set to "Speaker".)
Off: The TV set is in standby or off.
2 Audio format indicator
The indicator depends on the audio format that the TV set is using.
D: Dolby Digital DTS PLII: Dolby Pro Logic II
Specifications
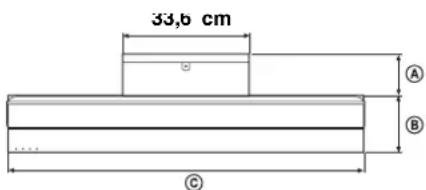
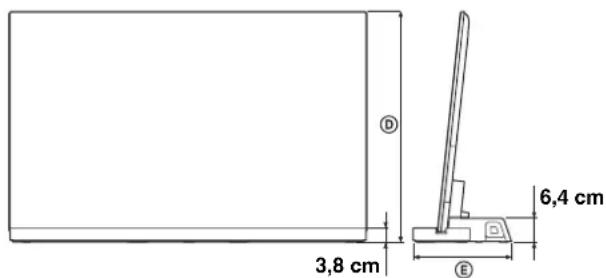
| SU-B551S SU | B461S SU-B401S | |||
| Разmersи: cm | A1 | 0,2 | 11,8 | 11.0 |
| B1 | 9,0 | 15,9 | 15.1 | |
| C | 127,6 | 107,9 | 94,4 | |
| D | 55HX92x: 79,6 | 46HX92x: 68,6 | - | |
| 55HX82x: 79,8 | 46HX82x: 68,7 | - | ||
| 55NX72x: 79,7 | 46NX72x: 68,7 | 40NX72x: 61,2 | ||
| E2 | 9,2 | 27,7 | 26.1 | |
| Терлю на Stонкata: | 6,3 kg | 5,6 kg | 4,9 kg | |
Section of the device
Rated output power
Front: 10W + 10W, (per channel
8 ohms, 1 kHz, THD less than 1%
Subwoofer: 20W, 6 ohms, 100 Hz
THD less than 1%
HDMI section
HDMI connector
Video input: 720 × 480p (60 Hz) 16:9
1280 × 720p (60 Hz) 16:9
1920 × 1080i (60 Hz) 16:9
1280 × 720p (50 Hz) 16:9
720 (1440) × 480i (60 Hz) 4:3
720 (1440) × 480i (60 Hz) 16:9
720 (1440) × 576i (50 Hz) 4:3
720 (1440) × 576i (50 Hz) 16:9
1920× 1080p (60Hz) 16:9
720× 576p (50Hz) 16:9
1920× 1080i (50Hz) 16:9
1920× 1080p (50Hz) 16:9
1920× 1080p (24Hz) 16:9
1920× 1080p (30Hz) 16:9
1280× 720p (24Hz) 16:9
1280× 720p (30Hz) 16:9
Input bit: 30 bit/36 bit
Input resolution: 1280× 720p@ 59.94/60 Hz
Output (3D) frame packing
1920× 1080i@ 59.94/60 Hz
Frame packing
1920× 1080i@ 59.94/60 Hz
Output bit: 30bit/36bit
Audio input/output channels PCM 2/5.1/7.1
Dolby Digital
DTS
All signals are compatible with 32,
44.1, 48 kHz.
High-frequency speaker
High-frequency speaker
System for high-frequency speaker
2-way, 2-driver, bass reflex
reflex
High-frequency driver: 30× 100mm cone × 1
High-frequency
High-frequency driver: 30 mm cone
Subwoofer
System for high-frequency speakers
Cyber, TnIbacpeJekc
High-voltage speaker 70 mm cone
0670
Power supply 100-240V, 50/60Hz
Power consumption
On: 12W
Standby mode: 0.7W
Consumption in standby mode: 0.7W. The standby power consumption is not used for certain purposes. At 85% of the energy consumption of the amplifier block, the digital amplifier S-Master is used.
Design and specifications may change without notice.
Safety
Thank you for purchasing this product. The Sony product has been designed with safety in mind. Incorrect use of the product may cause serious injury or damage due to electric shock, fire, tipping over, or dropping the product. To avoid such accidents, be sure to follow the appropriate safety precautions.
This installation guide provides important safety measures and information for proper handling of the product, which are necessary to prevent accidents. Be sure to read this guide carefully and use the product as intended. Keep this guide for future reference.
WARNING
Specified products
This product is intended for use only with the specified Sony products.
Install only the specified devices for delivery.
The specified devices may be changed without prior notice, may not be available in sales, or may be discontinued from production.
In addition, some models are not sold in all regions.
| TeJIeВиЗОр с ΒИБЕТHBIM | |
| SU-B551SKDL-55HX92x/55HX82x/55NX72x | |
| SU-B461SKDL-46HX92x/46HX82x/46NX72x | |
| SU-B401SKDL-40NX72x | |
*In actual model names, the "x" signs indicate numbers and/or symbols specific to a particular model.
Location of the identification label
The label with the model number and date of manufacture (month/year) is located on the rear panel of the TV stand.
Disposal of the TV
Disposal of waste electrical and electronic equipment (applies to EU countries and other European countries where separate collection systems are in effect)
This symbol on the device or its packaging indicates that this device cannot be disposed of with other household waste. It should be taken to an appropriate collection point for recycling of electrical and electronic equipment. Incorrect disposal of this product may lead to negative consequences for the environment and human health; therefore, to prevent such consequences, it is necessary to comply with special requirements for the disposal of this product. Recycling of these materials helps conserve natural resources. For more detailed information about recycling this product, contact your local city authorities, the household waste collection service, or the store where the product was purchased.
WARNING
Failure to follow the precautions below may result in death or serious injury due to electric shock, fire, or tipping over of the device.
Take all necessary precautions to prevent the TV stand from tipping over.
Otherwise, the TV may fall and cause injury.
To prevent tipping, secure the TV stand to a table or similar.
Always install the TV stand on a stable surface.
If the TV is placed on an unsuitable surface, it may lose its balance and fall. This could cause injury or damage to property.
Do not lean on the TV or hang on it when it is placed on the stand.
The stand may tip over, the TV may fall and become a cause of serious injury or death.
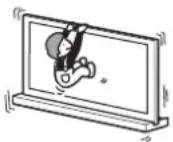
Do not block the ventilation openings of the TV.
The ventilation openings are necessary to ensure reliable operation of the TV and to protect it from overheating.
Do not block or cover the ventilation openings with cloth or other material. Never allow liquids or solid objects to enter the ventilation openings.
Do not place objects filled with liquid, such as vases or houseplants, on the TV.
Do not use the TV connected to the electrical network near water, for example, near a bathtub, sink, swimming pool, etc.
Do not install the TV in places with high temperature, for example, under direct sunlight, near radiators or hot air ducts.
In these cases, the TV may overheat, which could lead to deformation of the cabinet and/or malfunction of the TV.
Do not install the TV in close proximity to air conditioning systems.
Condensation may form inside the TV, which could lead to its malfunction.
Securely fasten the TV.
Fasten the TV to the stand using the provided screws. If the TV is not installed securely, it may fall or the stand may tip over and become a cause of injury.
When installing
He may install the TV stand at an angle or tilt. To avoid this, follow the precautions below.
- When installing the TV stand on a soft surface (mat or carpet), first place a board under the stand. Do not install the TV stand in a place exposed to direct sunlight or near a heater. Do not install the TV stand in rooms with high temperature/humidity or with soot.
Cleaning
To keep the TV stand clean, wipe it from time to time with a dry, soft cloth. Stubborn stains can be removed by slightly dampening the cloth in a mild soap solution. After that, be sure to wipe the area with a dry, soft cloth. Do not use chemical agents, such as thinner or benzene, as they may damage the stand's coating.
The installation must be performed by two or more people.
Make sure that the TV is installed on the stand by two or more people. If one person performs the installation, it may cause an accident or injury.
Do not modify the TV stand.
Otherwise, it may fall and cause injury.
Install the TV securely, following the instructions.
Tighten the screws securely. If the TV is not installed securely, it may fall and cause injury.
Be careful during assembly to avoid injuring your hands or fingers.
Do not use the TV stand while holding it by the vertical brackets. Make sure not to injure your hands or fingers when installing the TV.
Precautions
If you are not going to use the TV for a long period of time, be sure to disconnect the AC power cord from the AC outlet. When disconnecting the AC power cord, grasp the plug, not the cord. The AC power cord should be replaced only in a qualified service shop.
Operation
Before connecting other components, turn off the TV and disconnect the AC power cord from the AC outlet.
Copyright
This TV is supplied with Dolby* Digital and Pro Logic Surround, as well as DTS** Digital Surround System.
* Manufactured under license from Dolby Laboratories. Dolby, Pro Logic II, and the double-D symbol are trademarks of Dolby Laboratories. ** Manufactured under license under U.S. Patents: 5,451,942; 5,956,674; 5,974,380; 5,978,762; 6,487,535 and other U.S. and worldwide patents issued and pending. DTS and the Symbol are registered trademarks, and DTS Digital Surround and the DTS logos are trademarks of DTS, Inc. The product includes software. © DTS, Inc. All rights reserved.
This TV is equipped with High-Definition Multimedia Interface (HDMI) technology.
HDMI, the HDMI logo, and High-Definition Multimedia Interface are trademarks or registered trademarks of HDMI Licensing LLC in the United States and other countries.
"BRAVIA" is a trademark of Sony Corporation.





Sony Corporation, 1-7-1 Konan, Minato-ku, Tokyo Japan Assembled in Malaysia

CoHn KopnopeuH 1-7-1, KOHaH, MnHaTo-Ky, TokNo, HnoHnI, 108-0075 Co6paHO B VcnaHn, MaNa3nA

Importer in the territory of the Russian Federation: ZAO "SONY Electronics", 123103, Moscow, Karamyshevsky proezd, 6
Notes on unpacking
TV and packaging
Be sure to unpack the TV and be careful when carrying it.
Setup
Components
7 Install the stand cover for the TV. (For model SU-B551S only)
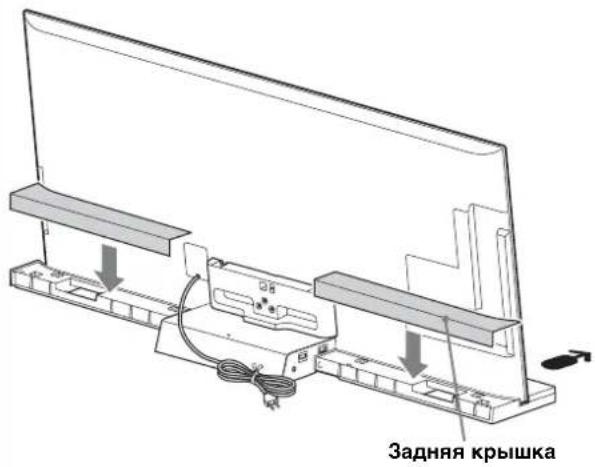
8 Cable management.
Use the cable clamp supplied with the TV.
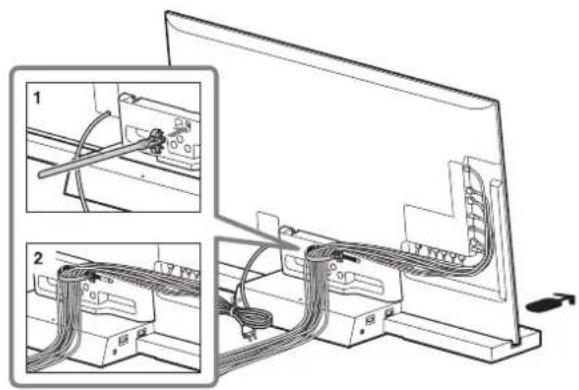

Do not route the power cord together with other cables.
Warning 3: Measures to prevent tipping
Prevention
Take all necessary precautions to prevent the TV stand from tipping over and causing possible injury or damage.
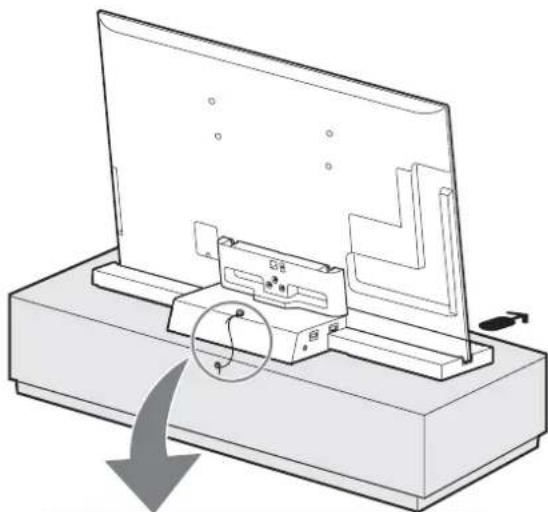
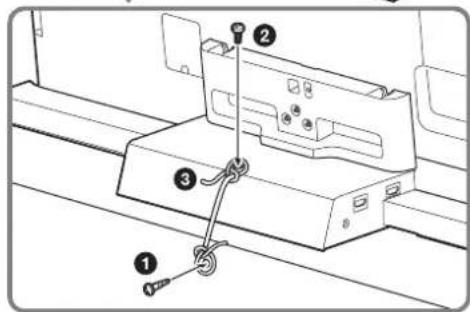
Tighten the screw (4 mm hex, not supplied) into the stand. Tighten the locking screw (M4 x 16, not supplied) into the hole under the screw on the TV stand. Secure the locking screw with the washer (supplied).
Warning 4:
Connecting
the TV
to the receiver
Selecting a scene
The broadcast for the TV is synchronized with the TV's audio settings. The automatic scene selection function works so that you can choose the most suitable sound for a specific scene.
To change the sound, adjust the TV's audio settings.
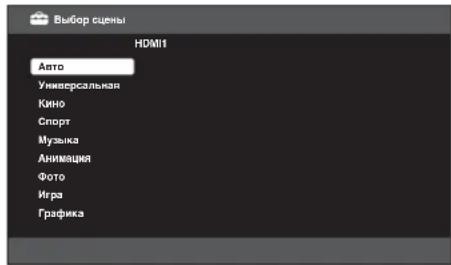
Position adjustment
When setting the "External Device" parameter to "On" on the TV, the TV's broadcast will adjust the volume balance between the left and right speakers according to the viewing position. (TV setting) To set the "Position Adjustment" parameter, press the HOME button, then select System Settings > Position Adjustment > Required parameter.
Using headphones:
- Set the "Audio System" parameter to "Headphones TV" in the "Headphones" menu. When using two-channel audio broadcasts: Depending on the broadcast, the sound may not switch. Set the "Optical Output" parameter of the TV to "PCM" instead of "Auto". When using external equipment with two-channel audio:
- If you cannot switch the sound, activate the PCM function for the external equipment.
Indicator
When the TV is turned on, the indicator
I (Power) for the TV does not light up.
- Check that the power cable is connected. - Check the power adapter's voltage to the electrical outlet. - Contact customer support.
The indicator (Power) blinks red. - A malfunction may have occurred. Count how many times the indicator blinks and contact the Sony service center.
Indicator
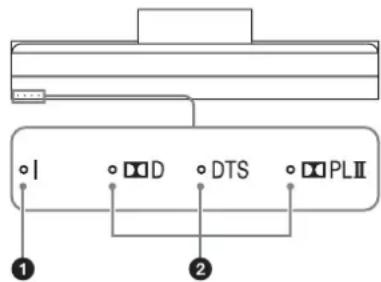
Indicator (Power)
Indicator lights:
Green: Power to the TV is supplied. (For the "Dynamic" parameter, the value "Auto standby" is set.)
Off: Power to the TV is not supplied.
The TV is in standby mode and power supply is off.
2. Indicator for the input format
The indicator depends on the input format of the signal received by the TV.
D: Dolby Digital DTS PLII: Dolby Pro Logic II
Technical specifications
Amplifier
Rated output power: Front: 10W + 10W, 8 ohms (per channel), 1 kHz, total harmonic distortion 1% Subwoofer: 20W, 6 ohms, 100 Hz, total harmonic distortion 1%
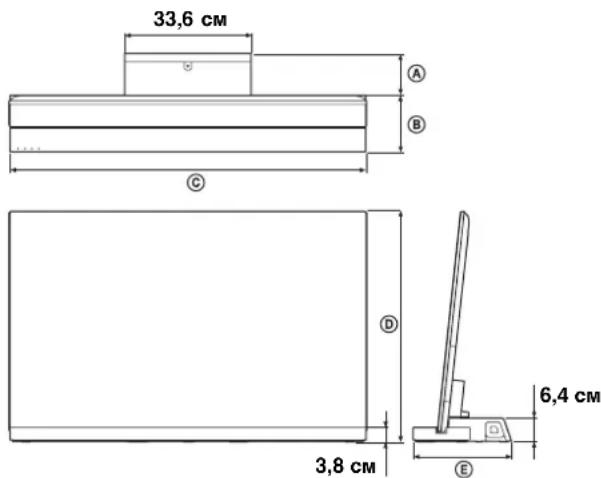
| SU-B551S SU | B461S SU-B401S | |||
| Размеры:сm | A1 | 0,2 11,8 11,0 | ||
| B1 | 9,0 15,9 15,1 | |||
| C | 127,6 | 107,9 | 94,4 | |
| D | 55HX92x:79,6 | 46HX92x:68,6 | - | |
| 55HX82x:79,8 | 46HX82x:68,7 | - | ||
| 55NX72x:79,7 | 46NX72x:68,7 | 40NX72x:61,2 | ||
| E2 | 9,2 27,7 26,1 | |||
| Вес пожд标签н: | 6,3 кг | 5,6 кг | 4,9 кг | |
HDMI
HDMI input/output: 720×480p (60 Hz) 16:9 Outputs 1280×720p (60 Hz) 16:9 1920×1080i (60 Hz) 16:9 1280×720p (50 Hz) 16:9 720 (1440)×480i (60 Hz) 4:3 720 (1440)×480i (60 Hz) 16:9 720 (1440)×576i (50 Hz) 4:3 720 (1440)×576i (50 Hz) 16:9 1920×1080p (60 Hz) 16:9 720×576p (50 Hz) 16:9 1920×1080i (50 Hz) 16:9 1920×1080p (50 Hz) 16:9 1920×1080p (24 Hz) 16:9 1920×1080p (30 Hz) 16:9 1280×720p (24 Hz) 16:9 1280×720p (30 Hz) 16:9 Deep Colour: 30 bit/36 bit
Video output: 1280×720p@59.94/60 Hz Output (3D) Frame packing 1920×1080i@59.94/60 Hz Frame packing 1920×1080i@59.94/60 Hz Side-by-side 1920×1080p@59.94/60 Hz Side-by-side 1280×720p@50 Hz Frame packing 1920×1080i@50 Hz Frame packing 1920×1080i@50 Hz Side-by-side 1920×1080p@50 Hz Side-by-side 1920×1080p@24 Hz Frame packing Deep Colour: 30 bit/36 bit
Resolution: HD input/output 720×480p (60 Hz) 16:9 output 1280×720p (60 Hz) 16:9 1920×1080i (60 Hz) 16:9 1280×720p (50 Hz) 16:9 720 (1440)×480i (60 Hz) 4:3 720 (1440)×480i (60 Hz) 16:9 720 (1440)×576i (50 Hz) 4:3 720 (1440)×576i (50 Hz) 16:9 1920×1080p (60 Hz) 16:9 720×576p (50 Hz) 16:9 1920×1080i (50 Hz) 16:9 1920×1080p (50 Hz) 16:9 1920×1080p (24 Hz) 16:9 1920×1080p (30 Hz) 16:9 1280×720p (24 Hz) 16:9 1280×720p (30 Hz) 16:9 Deep Colour: 30 bit/36 bit
Input/output 1280×720p@59.94/60Tb Output (3D) Frame packing 1920×1080i@59.94/60Tc Frame packing 1920×1080i@59.94/60Tc Graphics (overlay) 1920×1080p@59.94/60Tc Graphics (overlay) 1280×720p@50Tc Frame packing 1920×1080i@50Tc Frame packing 1920×1080i@50Tc Graphics (overlay) 1920×1080p@50Tc Graphics (overlay) 1920×1080p@24Tc Frame packing Deep Colour: 306HT/366HT
Inputs: PCM 2-channel / 5.1-channel / 7.1-channel Dolby Digital DTS All signals compatible with frequencies 32, 44.1, 48 kHz.
Speakers
Front speakers
Speaker system 2-way with 2 speakers Phase inverter type Bass speaker: 130 x 100 mm cone type x 1 Tweeter: 30 mm, cone type
Subwoofer
Speaker system Subwoofer, bass reflex type Speaker 70 mm, cone type
General
Power requirements 100-240V, 50/60 Hz Power consumption in standby mode: 12W Standby power consumption: 0.7W
- Power consumption in standby mode: 0.7W
- In the manufacture of certain printed circuit boards, lead-free solder is not used. More than 85% of the amplification is achieved through the use of the digital amplifier S-Master.
Design and specifications are subject to change without prior notice.
Safety Information
We thank you for purchasing this product. Sony's product development prioritizes safety. Improper use may cause serious injury or damage, electric shock, fire, or product damage. To avoid such incidents, be sure to follow the safety instructions.
This manual describes the correct operation of the product and provides important safety precautions necessary to prevent accidents. Be sure to read this manual carefully and use the product safely. Keep this manual for future reference.
WARNING
The accessory is intended for use with Sony products specified here. Do not install it on any products other than those specified.
The appearance of the products may change without notice, and they may not be in stock, as production may be discontinued.
In addition, some models are not sold in certain regions.
| К一步一步降 PK-теловиор | |
| SU-B551SKDL-55HX92x/55HX82x/55NX72x | |
| SU-B461SKDL-46HX92x/46HX82x/46NX72x | |
| SU-B401SKDL-40NX72x | |
*The model name is indicated by the letters and/or symbols specific to each model.
Location of the identification label
The label, which shows the model number, is located on the back or bottom of the TV.
Disposal of the TV set
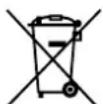
Disposal of old electrical and electronic equipment (applies in the European Union and other European countries with separate collection systems)
This symbol on the product or its packaging indicates that the product must not be treated as household waste. Instead, it should be handed over to the applicable collection point for the recycling of electrical and electronic equipment.
By ensuring the correct disposal of this product, you will help prevent potential negative consequences for the environment and human health, which could otherwise be caused by inappropriate waste handling. The recycling of materials will help to conserve natural resources. For more detailed information about recycling of this product, please contact your local city office, your household waste disposal service, or the shop where you purchased the product.
WARNINGS
If the following safety precautions are not observed, it may result in serious injury or death due to fire, electric shock, or the product falling over.
Be sure to take measures to prevent the TV set from tipping over.
If not done, the TV may fall over, which could cause injury.
Place the TV stand on a flat surface to prevent it from tipping over.
You must install the stand for the TV on a flat surface.
If installed on an uneven surface, the stand may tip over or fall. This could cause injury or damage.
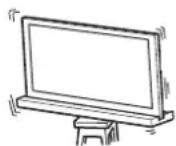
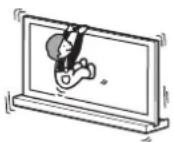
Do not lean on the TV mounted on the stand, and do not place any objects on it.
The stand could tip over or the TV could fall, which could lead to serious injury or death.
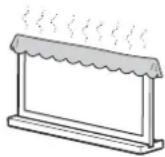
Do not cover the ventilation openings of the TV.
The ventilation openings on the TV are necessary to ensure its normal operation and to protect it from overheating.
Do not block or cover the ventilation openings with cloth or other materials. - Do not allow liquids or solid objects to enter the ventilation openings.
Do not place objects filled with liquids, such as vases or pots with plants, on the TV.
Do not use the TV near water, such as near a bathtub, washbasin, kitchen sink, washing machine, in a wet basement, or near a swimming pool.
Do not install the TV in places that are subject to extremely high or low temperatures, such as under direct sunlight, near radiators, or near heating vents.
In such conditions, the TV may overheat, which could lead to deformation of the casing and/or malfunction of the TV.
Do not install the TV on a surface that is subject to vibration.
Excessive vibration could cause malfunction of the TV.
Ensure there is sufficient space around the TV for proper ventilation.
To ensure stable operation of the TV, as shown below.
Only use the supplied power cord for the TV.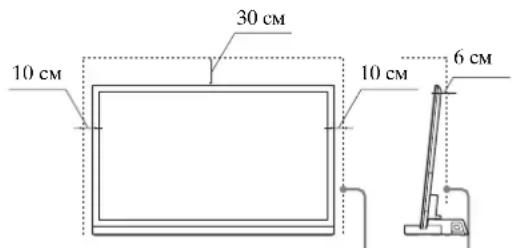
Power cord with AC plug
Connect the TV to a wall outlet with a grounding connection, using the grounded three-prong plug.
Use only the power cord supplied by Sony (from the accessory kit), not other power cords.
Make sure not to pinch or bend the power cord or the connecting cable when installing the TV on a stand. If the power cord or connecting cable is damaged, it may cause a fire or electric shock.
Do not step on the power cord or the connecting cable during installation or moving of the TV. The power cord or connecting cable may be damaged, which could cause a fire or electric shock.
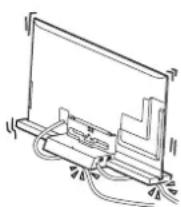
If you touch the power cord or the connecting cable, the TV may fall and cause injury. To disconnect the cable from the AC outlet, the TV will be completely disconnected.
NOTE for the AC adapter
Precautions
To reduce the risk of fire or electric shock, do not open the cabinet, especially the bottom.
To avoid fire or electric shock, do not place objects filled with liquids, such as vases, on the apparatus.
Do not install the apparatus in a confined space, such as a bookshelf or built-in cabinet.
It is recommended that the AC outlet be located near the apparatus for easy access.
- Be sure to use the AC adapter and power cord from the accessory kit.
Follow the instructions for the antenna. Do not connect it to an electrical outlet.
Connect the antenna adapter to the antenna input on the TV.
Do not wind the antenna cable around the antenna adapter. If the cable is wound, it may cause a short circuit and malfunction of the TV.
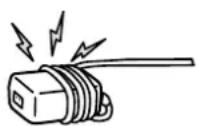
- Do not touch the antenna adapter with wet hands. If the antenna adapter is wet, unplug it from the electrical outlet. The TV will not be connected to the power source until you plug it into the electrical outlet, even if the TV is turned off.
WARNING
To avoid injury from falling objects, this may cause serious injury or damage.
Do not install any devices other than the specified stand.
The TV stand is intended for use with the specified stand only. If you install other stands not specified here, it may fall or break and cause injury. The illustrations in this manual are for the model KDL-40NX72x, unless otherwise noted.
Notes on installing the stand
TV from the box
Be sure to hold the TV stand and move it with care.
Step 1.
Check the parts
Check that the stand is installed and placed on the TV before installing the TV.
Since the TV is heavy, it is recommended to have two people install the stand and place the TV on a flat surface.
Read the operating instructions before using the TV. These instructions are part of the TV set and should be kept for future reference.
Step 2. Installing the TV
Before installation
Before installation, make sure to check the wall mount screws and their lengths. Using an electric screwdriver, set the torque to approximately 1.5 N·m (15 kgf·cm).
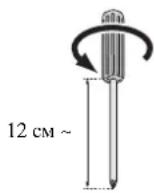
1. Set the width of the TV stand.
The stand width is used to adjust the width and position of the TV. Be sure to set the width.
Only for KDL-55HX82x/46HX82x/55NX72x/46NX72x:
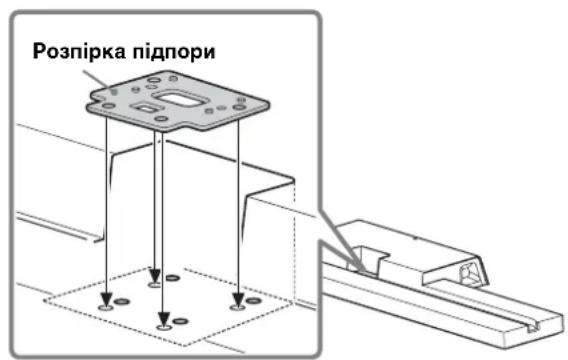
2. For the stand and stand width (only for KDL-55HX82x/46HX82x/55NX72x/46NX72x), use the supplied screws for the stand (PSW4 × 12) (included in the package).
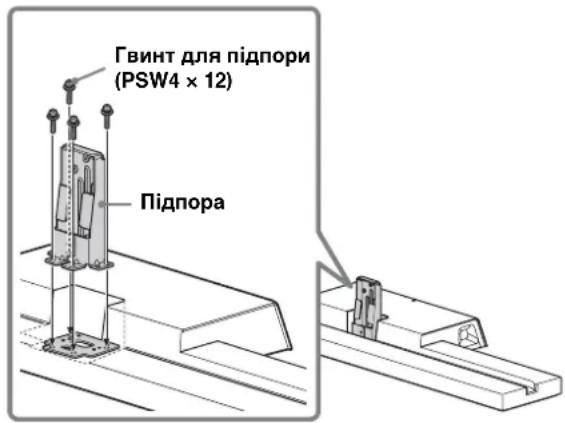
Audio format indicators
These indicators light up according to the audio format being input to the TV.
D: Dolby Digital DTS PLII: Dolby Pro Logic II
Technical specifications
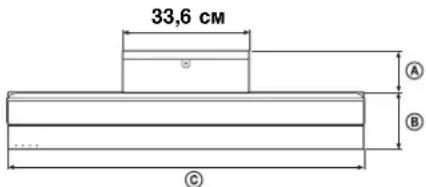
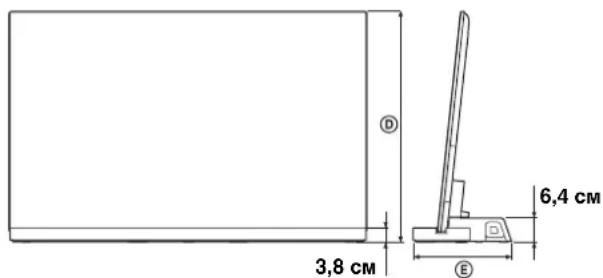
| SU-B551S SU-B461S SU-B401S | ||||
| Габашни розмірі: сm | A | 10,2 | 11,8 | 11,0 |
| B | 19,0 | 15,9 | 15,1 | |
| C | 127,6 | 107,9 | 94,4 | |
| D | 55HX92x: 79,6 | 46HX92x: 68,6 | - | |
| 55HX82x: 79,8 | 46HX82x: 68,7 | - | ||
| 55NX72x: 79,7 | 46NX72x: 68,7 | 40NX72x: 61,2 | ||
| E | 29,2 | 27,7 | 26,1 | |
| Вага піцstавки: | 6,3 кг | 5,6 кг | 4,9 кг | |
Power consumption
Rated output power
Front: 10 W + 10 W, (at
8 Ω, 1 kΩ, THD less than 1%
Subwoofer: 20 W, 6 Ω, 100 Hz,
THD less than 1%
HDMI input
Speaker Speaker
HDMI
Video output/720×480p (60 Hz) 16:9
Output 1280×720p (60 Hz) 16:9
1920×1080i (60 Hz) 16:9
1280×720p (50 Hz) 16:9
720 (1440) × 480i (60 Hz) 4:3
720 (1440) × 480i (60 Hz) 16:9
720 (1440) × 576i (50 Hz) 4:3
720 (1440) × 576i (50 Hz) 16:9
1920×1080p (60 Hz) 16:9
720×576p (50 Hz) 16:9
1920×1080i (50 Hz) 16:9
1920×1080p (50 Hz) 16:9
1920×1080p (24 Hz) 16:9
1920×1080p (30 Hz) 16:9
1280×720p (24 Hz) 16:9
1280×720p (30 Hz) 16:9
Deep Colour: 30 bit/36 bit
Input/1280×720p@59.94/60 Hz
1920×1080i @ 59.94/60 Hz
1920×1080i@59.94/60 Hz
Parallel connection
(Half)
1920× 1080p@59.94/60 u
Parallel placement
(Half)
1280 × 720p@50
Fill screen
1920× 1080i @ 50F
Fill screen
1920× 1080i@50 u
Parallel placement
(Half)
1920× 1080p@50 Γu
Parallel placement
(Half)
1920× 1080p@24 u
Fill screen
Deep Colour: 30 bit/36 bit
Audio: Linear PCM 2 channels/5.1 channels/
7.1 channels
Dolby Digital
DTS
Each signal is sampled at 32, 44.1,
48 kHz.
Dynamics
Front dynamics
Dynamic system with 2 subwoofers and 2 bass reflex
with phase inverter
Dynamic: 30 × 100
Cone
Subwoofer: 30 mm, cone type
Tweeter
Subwoofer system with amplifier
Dynamic 70 mm, cone
General information
Power consumption
100-240V, 50/60Hz
Power consumption
On: 12W
Standby: 0.7W
Standby power consumption: 0.7W. The indicators are used in the composition of printed circuit boards. The 85% efficiency of the power supply unit is achieved thanks to the full-featured digital signal processor S-Master.
Design and technical characteristics may be changed without notice.
- HOW TO REPLACE THE FUSE
- ON SAFETY
- CAUTION
- SPECIFIED PRODUCTS
- LOCATION OF THE IDENTIFICATION LABEL
- DISPOSAL OF THE TV STAND
- WARNING
- BE SURE TO TAKE MEASURES TO PREVENT THE TV STAND FROM TOPPLING OVER
- BE SURE TO INSTALL THE TV STAND ON A STABLE SURFACE
- DO NOT LEAN ON OR HANG FROM THE TV WITH THE TV INSTALLED ON THE TV STAND
- DO NOT COVER THE VENTILATION HOLES OF THE TV
- DO NOT PLACE LIQUID FILLED OBJECTS SUCH AS A VASE OR POTTED PLANT ON THE TV
- DO NOT USE A POWER LINE OPERATED TV SET NEAR WATER; FOR EXAMPLE, NEAR A BATHTUB, WASHBOWL, KITCHEN SINK, LAUNDRY TUB, WET BASEMENT OR NEAR A SWIMMING POOL, ETC
- DO NOT INSTALL THE TV IN PLACES SUBJECT TO EXTREME TEMPERATURE, SUCH AS IN DIRECT SUNLIGHT, NEAR A RADIATOR OR A HEATING VENT
- DO NOT INSTALL THE TV IN A PLACE EXPOSED TO DIRECT AIR CONDITIONING
- ALLOW ADEQUATE SPACE AROUND THE TV SET TO ENSURE PROPER AIR CIRCULATION
- AC POWER CORD (MAINS LEAD)
- NOTE ON AC ADAPTER (MAINS ADAPTOR)
- DO NOT INSTALL ANY EQUIPMENT OTHER THAN THE SPECIFIED PRODUCT
- BE SURE TO SECURE THE TV
- NOTES ON INSTALLATION
- NOTE ON USE
- CLEANING
- BE SURE THAT TWO OR MORE PERSONS DO THE INSTALLATION WORK
- DO NOT MODIFY THE TV STAND
- BE SURE TO INSTALL THE TV SECURELY FOLLOWING THE INSTRUCTIONS
- BE CAREFUL NOT TO INJURE YOUR HANDS OR FINGERS WHILE ASSEMBLING
- PRECAUTIONS
- ON POWER SOURCES
- ON OPERATION
- COPYRIGHTS
- NOTE ON TAKING THE TV STAND OUT FROM THE CARTON
- STEP 1: CHECKING THE PARTS
- DECIDE ON THE INSTALLATION LOCATION AND LAY THE TV STAND DOWN BEFORE INSTALLING THE TV
- STEP 2: INSTALLING THE TV
- BEFORE ASSEMBLING
- POSITION THE NECK-SPACER ON THE TV STAND
- ATTACH THE SUPPLIED JOINT TO THE REAR OF THE TV WITH THE THREE SCREWS (PSW5 × 16) (SUPPLIED)
- INSTALL THE TV ONTO THE TV STAND
- SECURE THE TV AND THE TV STAND WITH THE THREE TV STAND NECK ATTACHMENT SCREWS (PSW5 × 16) (SUPPLIED)
- ATTACH THE REAR COVER TO THE TV STAND. (FOR SU-B551S MODEL ONLY)
- BUNDLING THE CABLES
- STEP 3: SAFETY MEASURES TO PREVENT TOPPLING OVER
- STEP
- CONNECTING THE TV AND
- PLAYER
- CONNECT THE TV WITH AN HDMI IN 1 TO THE TV STAND USING AN HDMI CABLE
- NOTES ON HDMI CONNECTIONS
- STEP 5: CONNECTING THE AC POWER CORD (MAINS LEAD)
- STEP 6: PERFORMING THE TV SETTINGS
- SET TO "ON" IN THE "CONTROL FOR HDMI" FUNCTION
- SCENE SELECT MODE
- POSITION CONTROL
- TROUBLESHOOTING
- SOUND
- INDICATOR
- (POWER) INDICATOR
- AUDIO FORMAT INDICATORS
- SPECIFICATIONS
- AMPLIFIER SECTION
- HDMI SECTION
- SPEAKERS
- FRONT SPEAKER UNIT
- SUBWOOFER UNIT
- GENERAL
- POWER INDICATOR (ALIMENTATION)
- HDMI
- FRONT SPEAKER
- THE TABLE FOR THE MODEL AND PARTS IS LOCATED ON THE STAND FOR THE TV
- REMOVING THE TV STAND
- MAKE SURE YOU HAVE TAKEN MEASURES TO PREVENT THE TV STAND FROM FALLING
- MAKE SURE THE TV STAND IS MOUNTED ON A STABLE SURFACE
- DO NOT LEAN ON OR PUSH THE TV WHILE IT IS PLACED ON THE TV STAND
- DO NOT COVER THE VENTILATION OPENINGS OF THE TV
- DO NOT PLACE OBJECTS, SUCH AS VASES OR CUPS, CONTAINING LIQUIDS ON TOP OF THE TV
- DO NOT USE THE TV NEAR WATER, FOR EXAMPLE, NEAR A BATHTUB, SINK, KITCHEN SINK, SWIMMING POOL, OR IN A WET BASEMENT
- DO NOT PLACE THE TV IN LOCATIONS EXPOSED TO HIGH TEMPERATURES, SUCH AS DIRECT SUNLIGHT, NEAR RADIATORS, OR HEATING VENTS
- INSTALL THE TV ON A LOCATION DIRECTLY ON THE CLIMATE SYSTEM
- LEAVE SUFFICIENT SPACE AROUND THE TV TO ENSURE PROPER AIR CIRCULATION
- POWER CORD
- DO NOT MOUNT ANY OTHER EQUIPMENT OTHER THAN THE SPECIFIED PRODUCT
- MAKE SURE YOU HAVE THE TV SAFELY SECURED
- USE TWO OR MORE PEOPLE TO PERFORM THE INSTALLATION
- MOUNT THE TV SAFELY ACCORDING TO THE INSTRUCTIONS
- BE CAREFUL NOT TO DAMAGE THE WIRES OR CABLES DURING INSTALLATION
- SAFETY PRECAUTIONS
- REGARDING THE POWER SUPPLY
- REGARDING OPERATION
- COPYRIGHT
- NOTE ON THE TV STAND INSTALLATION
- STEP 6: TV SETTINGS
- SET THE "ON" FUNCTION "CONTROL VIA HDMI
- PRESS THE "AUDIO SYSTEM" BUTTON ON THE "SPEAKER" MENU
- SCENE SELECTION MODE
- I (STANDBY) INDICATOR
- AUDIO FORMAT INDICATOR
- SECTION OF THE DEVICE
- HIGH-FREQUENCY SPEAKER
- SUBWOOFER
- SAFETY
- DISPOSAL OF THE TV
- TAKE ALL NECESSARY PRECAUTIONS TO PREVENT THE TV STAND FROM TIPPING OVER
- ALWAYS INSTALL THE TV STAND ON A STABLE SURFACE
- DO NOT LEAN ON THE TV OR HANG ON IT WHEN IT IS PLACED ON THE STAND
- DO NOT BLOCK THE VENTILATION OPENINGS OF THE TV
- DO NOT PLACE OBJECTS FILLED WITH LIQUID, SUCH AS VASES OR HOUSEPLANTS, ON THE TV
- DO NOT INSTALL THE TV IN PLACES WITH HIGH TEMPERATURE, FOR EXAMPLE, UNDER DIRECT SUNLIGHT, NEAR RADIATORS OR HOT AIR DUCTS
- DO NOT INSTALL THE TV IN CLOSE PROXIMITY TO AIR CONDITIONING SYSTEMS
- SECURELY FASTEN THE TV
- WHEN INSTALLING
- THE INSTALLATION MUST BE PERFORMED BY TWO OR MORE PEOPLE
- INSTALL THE TV SECURELY, FOLLOWING THE INSTRUCTIONS
- BE CAREFUL DURING ASSEMBLY TO AVOID INJURING YOUR HANDS OR FINGERS
- OPERATION
- NOTES ON UNPACKING
- TV AND PACKAGING
- SETUP
- COMPONENTS
- INSTALL THE STAND COVER FOR THE TV. (FOR MODEL SU-B551S ONLY)
- CABLE MANAGEMENT
- WARNING 3: MEASURES TO PREVENT TIPPING
- PREVENTION
- CONNECTING
- THE TV
- TO THE RECEIVER
- INDICATOR (POWER)
- D: DOLBY DIGITAL DTS PLII: DOLBY PRO LOGIC II
- RATED OUTPUT POWER: FRONT: 10W + 10W, 8 OHMS (PER CHANNEL), 1 KHZ, TOTAL HARMONIC DISTORTION 1% SUBWOOFER: 20W, 6 OHMS, 100 HZ, TOTAL HARMONIC DISTORTION
- VIDEO OUTPUT: 1280×720P@59.94/60 HZ OUTPUT (3D) FRAME PACKING 1920×1080I@59.94/60 HZ FRAME PACKING 1920×1080I@59.94/60 HZ SIDE-BY-SIDE 1920×1080P@59.94/60 HZ SIDE-BY-SIDE 1280×720P@50 HZ FRAME PACKING 1920×1080I@50 HZ FRAME PACKING 1920×1080I@50 HZ SIDE-BY-SIDE 1920×1080P@50 HZ SIDE-BY-SIDE 1920×1080P@24 HZ FRAME PACKING DEEP COLOUR: 30 BIT/36 BIT
- FRONT SPEAKERS
- SAFETY INFORMATION
- DISPOSAL OF THE TV SET
- WARNINGS
- BE SURE TO TAKE MEASURES TO PREVENT THE TV SET FROM TIPPING OVER
- YOU MUST INSTALL THE STAND FOR THE TV ON A FLAT SURFACE
- DO NOT LEAN ON THE TV MOUNTED ON THE STAND, AND DO NOT PLACE ANY OBJECTS ON IT
- DO NOT PLACE OBJECTS FILLED WITH LIQUIDS, SUCH AS VASES OR POTS WITH PLANTS, ON THE TV
- DO NOT INSTALL THE TV IN PLACES THAT ARE SUBJECT TO EXTREMELY HIGH OR LOW TEMPERATURES, SUCH AS UNDER DIRECT SUNLIGHT, NEAR RADIATORS, OR NEAR HEATING VENTS
- DO NOT INSTALL THE TV ON A SURFACE THAT IS SUBJECT TO VIBRATION
- ENSURE THERE IS SUFFICIENT SPACE AROUND THE TV FOR PROPER VENTILATION
- POWER CORD WITH AC PLUG
- NOTE FOR THE AC ADAPTER
- DO NOT INSTALL ANY DEVICES OTHER THAN THE SPECIFIED STAND
- NOTES ON INSTALLING THE STAND
- TV FROM THE BOX
- CHECK THE PARTS
- CHECK THAT THE STAND IS INSTALLED AND PLACED ON THE TV BEFORE INSTALLING THE TV
- STEP 2. INSTALLING THE TV
- BEFORE INSTALLATION
- SET THE WIDTH OF THE TV STAND
- TECHNICAL SPECIFICATIONS
- POWER CONSUMPTION
- HDMI INPUT
- DYNAMICS
- FRONT DYNAMICS
- GENERAL INFORMATION
Brand : SONY
Model : SUB461S
Category : TV Stand