
CM2241W - Monitor ACER - Free user manual and instructions
Find the device manual for free CM2241W ACER in PDF.
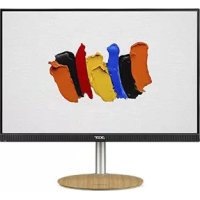


| Product Type | LCD Monitor |
| Brand | Acer |
| Model | CM2241W |
| Screen Size | 24 inches (61 cm) |
| Panel Type | IPS (In-Plane Switching) |
| Maximum Resolution | 1920 x 1200 @ 75 Hz |
| Brightness | 350 cd/m² (typical) |
| Contrast Ratio | 100,000,000:1 max (ACM) |
| Response Time | 1 ms (VRB) |
| Viewing Angle | 178° horizontal, 178° vertical (CR=10) |
| Horizontal Frequency | 30 to 94 kHz |
| Vertical Frequency | 56 to 76 Hz |
| Display Colors | 1.07 billion colors |
| Input Connectors | HDMI, DP (depending on model) |
| Built-in Speakers | 2 W x 2 |
| USB Ports | USB 3.0 x 3 (optional) |
| Height Adjustment | 0 to 120 mm |
| Tilt | -5° to +25° |
| Swivel (Pivot) | -90° to +90° |
| Dimensions (W x H x D) | 533.4 x 389.3–509.3 x 233.7 mm |
| Net Weight | 5.5 kg |
| Power Supply | 100–240 V, 50/60 Hz |
| Power Consumption (On Mode) | 17 W (typical) |
| Power Consumption (Standby) | 0.2 W (typical) |
| Operating Temperature | 0°C to 40°C |
Frequently Asked Questions - CM2241W ACER
User questions about CM2241W ACER
0 question about this device. Answer the ones you know or ask your own.
Ask a new question about this device
Download the instructions for your Monitor in PDF format for free! Find your manual CM2241W - ACER and take your electronic device back in hand. On this page are published all the documents necessary for the use of your device. CM2241W by ACER.
USER MANUAL CM2241W ACER
Important safety instructions
Please read the following instructions carefully.
- To clean the LCD monitor screen: Be sure that your monitor is electrically rated to operate with the AC power available in your location.
- Turn off the LCD monitor and unplug the power cord.
- Spray a non-solvent cleaning solution onto a rag and clean the screen gently. NEVER SPRAY OR POUR ANY LIQUID DIRECTLY ONTO THE SCREEN OR CASE.
- PLEASE DO NOT USE ANY AMMONIA OR ALCOHOL-BASED CLEANERS ON THE LCD DISPLAY SCREEN OR CASE.
- Acer will not be liable for damage resulting from use of any ammonia or alcohol-based cleaners.
- Do not place the LCD monitor near a window. Exposing the monitor to rain, moisture or sunlight can severely damage it.
- Do not apply pressure to the LCD screen. Excessive pressure may cause permanent damage to the display.
- Do not remove the cover or attempt to service this unit yourself. An authorized technician should perform servicing of any nature.
- Store the LCD monitor in a room with a temperature of -20° to 60° C (-4° to 140° F). Storing the LCD monitor outside this range may result in permanent damage.
- Immediately unplug your monitor and call an authorized technician if any of the following circumstances occur:
Monitor-to-PC signal cable is frayed or damaged. - Liquid spills onto the LCD monitor or the monitor is exposed to rain. The LCD monitor or case is damaged.
Attaching the monitor to the base
- Remove the monitor from the packaging.
- Attach the foot stand to the base. (for selected models)
- Turn clockwise to lock. Ensure that the base is locked onto the stand. (for selected models)
- Secure the base to the stand by turning the screw using the integrated tab or a suitable coin. (for selected models)
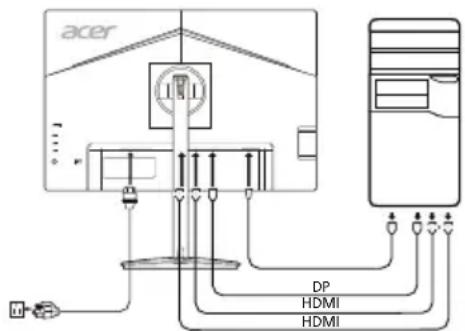
Connecting Your Monitor to a Computer
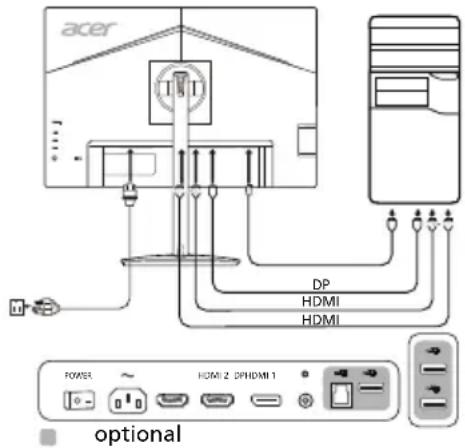
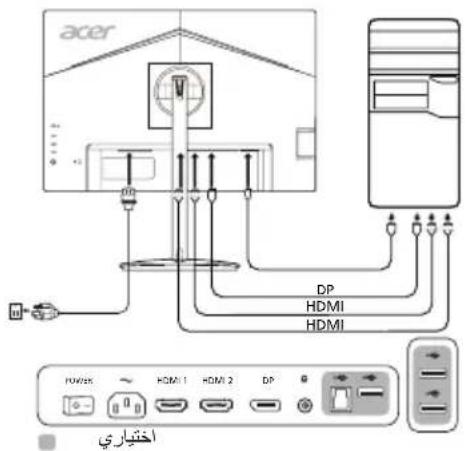
- Turn off your monitor and unplug your computer's power cord.
- 2-1 Connect HDMI Cable (Only HDMI-input model)
a. Make sure both the monitor and computer are powered-OFF. b. Connect one end of the HDMI cable to the back of the monitor and connect the other end to the computer's port.
2-2 Connect DP Cable (Only DP-input model)
a. Make sure both the monitor and computer are powered-OFF. b. Connect the DP cable to the computer.
- Insert the monitor power cable into the power port at the back of the monitor.
- Plug the power cords of your computer and your monitor into a nearby electrical outlet.
- Select Power-off USB charge ON/OFF to enable/disable Power-off USB charge function. (Optional)
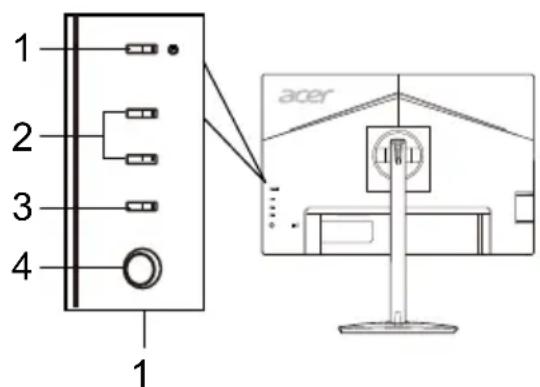
External Controls
| No.ItemDescription | ||
| 1 | Power button/indicator | Turns the monitor on/off. Amber indicates power on. Blinking amber indicates standby/power saving mode. |
| 2 | Hotkey 1, 2 buttons | Press to activate user defined hotkey function. |
| 3 | Input button Press to toggle input sources. | |
| 4 | Navi/OK button | Press to activate the OSD menu, then use it as directional key to highlight the desired function. Press it again to enter a selection. |
Regulations and safety notices
FCC notice
This device has been tested and found to comply with the limits for a Class B digital device pursuant to Part 15 of the FCC rules. These limits are designed to provide reasonable protection against harmful interference in a residential installation. This device generates, uses, and can radiate radio frequency energy and, if not installed and used in accordance with the instructions, may cause harmful interference to radio communications.
However, there is no guarantee that interference will not occur in a particular installation. If this device does cause harmful interference to radio or television reception, which can be determined by turning the device off and on, the user is encouraged to try to correct the interference by one or more of the following measures:
Reorient or relocate the receiving antenna. - Increase the separation between the device and receiver. - Connect the device into an outlet on a circuit different from that to which the receiver is connected. - Consult the dealer or an experienced radio/television technician for help.
CE declaration of Conformity
Hereby, Acer Inc., declares that this LCD monitor is in compliance with the essential requirements and other relevant provisions of EMC Directive 2014/30/EU, Low Voltage Directive 2014/35/EU, and RoHS Directive 2011/65/EU and Directive 2009/125/EC with regard to establishing a framework for the setting of ecodesign requirements for energy-related product.
Notice:
In order to prevent damage to the monitor, do not lift the monitor by its base.
Notice: Shielded cables
All connections to other computing devices must be made using shielded cables to maintain compliance with EMC regulations.
Notice:
Acer monitor is intended for video and visual display of information obtained from electronic devices.
Notice: Peripheral devices
Only peripherals (input/output devices, terminals, printers, etc.) certified to comply with the Class B limits may be attached to this equipment. Operation with non-certified peripherals is likely to result in interference to radio and TV reception.
Caution
Changes or modifications not expressly approved by the manufacturer could void the user authority, which is granted by the Federal Communications Commission, to operate this product.
Operation conditions
This device complies with Part 15 of the FCC Rules. Operation is subject to the following two conditions: (1) this device may not cause harmful interference, and (2) this device must accept any interference received, including interference that may cause undesired operation.
Notice: Canadian users
This Class B digital apparatus complies with Canadian ICES-003.
Disposal of Waste Equipment by Users in Private Household in the European Union
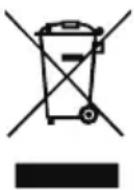
This symbol on the product or on its packaging indicates that this product must not be disposed of with your other household waste. Instead, it is your responsibility to dispose of your waste equipment by handing it over to a designated collection point for the recycling of waste electrical and electronic equipment. The separate collection and recycling of your waste equipment at the time of disposal will help to conserve natural resources and ensure that it is recycled in a manner that protects human health and the environment. For more information about where you can drop off your waste equipment for recycling, please contact your local city office, your household waste disposal service or the shop where you purchased the product.
SPECIFICATION
| LCD Panel | Driving System TFT Color LCD | |
| Size 24"W (61 cm) | ||
| Pixel Pitch 0.270 mm (H) x 0.270 mm (V) | ||
| Brightness | 350 cd/m² (Typical) | |
| Contrast 10000000:1 Max (ACM) | ||
| Viewable Angle 178° (H) 178° (V) (CR=10) | ||
| Response Time 1 ms (VRB) | ||
| Panel Type In-Plane Switching | ||
| H-Frequency 30 - 94 kHz | ||
| V-Frequency 56 - 76 Hz | ||
| Display Colors 1.07B Colors | ||
| Dot Clock 220 MHz | ||
| Maximum Resolution 1920 x 1200 @ 75 Hz | ||
| Plug & Play VESA DDCCI/DDC2B | ||
| Energy Efficiency Class A | ||
| *Annual Energy Consumption 34 (kWh) (for HDMI-Input Model) | ||
| Power Consumption (at 200 nits) | On Mode 17 W (Typical) | |
| Sleep Mode | 0.2 W (Typical) | |
| Off Mode | 0.2 W (Typical) | |
| Input Connector | HDMI (Only HDMI-Input Model) DP (Only DP-Input Model) | |
| Input Video Signal | HDMI (Only HDMI-Input Model) DP (Only DP-Input Model) | |
| Speakers | 2 W x 2 | |
| USB | USB 3.0 x 3 (Optional) | |
| Maximum Screen Size | Horizontal: 518.4 mm Vertical: 324.0 mm | |
| Power Source | 100-240 V, 50/60 Hz | |
| Environmental Considerations | Operating Temp: 0° to 40°C Storage Temp: -20° to 60°C Operating Humidity: 20% to 80% | |
| Dimensions | 533.4 (W) x 389.255 ~ 509.255 (H) x 233.65 (D) mm | |
| Weight (N. W.) | 5.5 kg (net) | |
| Mechanism Specifications | Tilt: -5° to +25° (Only at the highest point can 25 degrees of recline be offered for the angle of elevation) Swivel: 360° Height adjustment: 0 mm to 120 mm Pivot: -90° to 90° Detachable foot stand: Yes | |
| External Controls | Switch/Buttons | Power Button Input Hotkey 1 Menu/Navi/OK Hotkey 2 |
| Functions | Brightness Refresh Rate Num Contrast VRB Blue Light Ultra-Low Latency Black Boost Language ACM OSD Timeout Super Sharpness Transparency Gamma OSD Lock Color Temperature Input Uniformity Auto Source Modes DP Format Color Space Hot Key Assignment Calibration Wide Mode Grayscale Mode DCC/CI 6-axis Hue HDTV 6-axis Saturate Quick Start Mode LED Control Volume Quick Start Mode LED Control Mute Display information Over Drive Reset All Settings Adaptive-Sync Exit | |
| All specifications are subject to change without notice. | ||
Find manuals and other documents for your Acer product on the official Acer support website. *Annual energy consumption is calculated using the typical power consumption 4 hours per day, 365 days per year.
Acer LCD Monitor Quick Start Guide (QSG)
Therefore, m = 3/11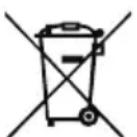
Acer LCD Monitor Quick Start Guide
Setting up the monitor on its base.
- Remove the monitor from the packaging.
- Connect the stand to the base (not for all models).
- Turn clockwise to secure. Make sure the base is secured to the stand (not for all models).
- Secure the base to the stand by turning the screw with a suitable screwdriver or coin (not for all models).
Connecting the monitor to your computer
- Turn off the monitor and disconnect the power cord from the computer and the power outlet.
- 2-1 Connect the HDMI cable (only for models with HDMI input)
a. Make sure the monitor and computer are turned off. b. Connect one end of the HDMI cable to the back of the monitor and the other end to the computer.
2-2 Connect the DP cable (only for models with DP input)
a. Make sure the monitor and computer are turned off. b. Connect the DP cable to the computer.
3. Connect the monitor power cable to the power port on the back of the device.
4. Connect the power cords of the computer and monitor to an electrical outlet. 5. Select "Charge via USB when power is on" to enable or disable the USB charging function when the power is on. (Purchased separately)
Control elements
Purchased separately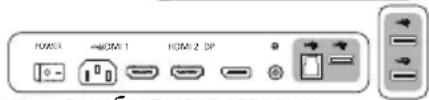
- Cleaning the LCD screen: Make sure the screen is electrically rated to operate with the available AC power where you are.
- Turn off the LCD screen and unplug the power cord.
- Spray a solvent-free cleaning agent on a cloth and gently clean the screen.
- DO NOT SPRAY OR POUR ANY LIQUID DIRECTLY ONTO THE SCREEN OR BACK COVER.
- DO NOT USE AMMONIA- OR ALCOHOL-BASED CLEANERS ON THE LCD SCREEN OR BACK COVER.
- Acer is not responsible for damage resulting from the use of ammonia- or alcohol-based cleaners.
- Do not subject the LCD screen to pressure. Excessive pressure can cause permanent damage to the screen.
- Remove the back cover, and do not attempt to perform repairs on the device yourself. Any form of inspection should be carried out by an authorized technician.
- Store the LCD screen in a room with a temperature of -20° to 60° C. Storing the LCD screen outside this temperature range can cause permanent damage.
- Immediately unplug all connectors from the screen and contact an authorized technician if any of the following situations occur:
- The PC signal cable to the screen is frayed or damaged. Liquid spills on the LCD screen, or the screen is exposed to rain.
- The LCD screen or the back cover is damaged.
- Apply cleaning solution without spraying it directly on the screen. Be careful. Do not spray or pour liquid directly onto the screen or the cabinet.
- Do not use cleaning agents containing ammonia or alcohol to clean the LCD screen or the cabinet.
- The manufacturer is not responsible for damage resulting from the use of cleaning agents containing ammonia or alcohol.
- Do not place the LCD monitor near a window. Exposure of the monitor to direct sunlight, moisture, or cold light can seriously damage it.
- Do not apply pressure to the LCD screen. Excessive pressure may cause permanent damage to the display.
- Do not remove the cover and do not attempt to repair this device yourself. Authorized technicians must perform servicing for any malfunction.
- Store the LCD monitor in a temperature range from -20° to 60°C (-4° to 140°F). Storing the LCD monitor outside this range may cause permanent damage.
- Immediately unplug the cables from the contact of your monitor and contact an authorized technician if any malfunction occurs.
The power cable from the monitor to the computer is damaged or broken. Do not expose the LCD monitor or the monitor to direct sunlight. The LCD monitor and the cabinet are damaged.
Attaching the monitor to the base
- Remove the monitor from the packaging.
- Attach the stand to the base. (For selected models)
- Attach the stand to the base by tightening the screw. Make sure the base is securely attached to the stand. (For selected models)
- Secure the base to the stand by turning the screw with the provided wrench or a coin. (For selected models)
Connecting the monitor to the computer
1. Turn off the monitor and disconnect the power cable from the computer outlet. 2. 2-1 Connect the HDMI cable (only for models with HDMI input)
a. Make sure both the monitor and the computer are turned off. b. Connect one end of the HDMI cable to the HDMI port on the monitor, and the other end to the HDMI port on the computer.
2-2 Connect the DP cable (only for models with DP input)
a. Make sure both the monitor and the computer are turned off. b. Connect the DP cable to the computer.
- Connect the power cable of the monitor to the power port on the back of the monitor.
- Connect the power cables of the computer and the monitor to a nearby electrical outlet.
- Press the power button to turn on the monitor. Use the function for charging via USB when the power is off to activate/deactivate this function. (Optional)
ONU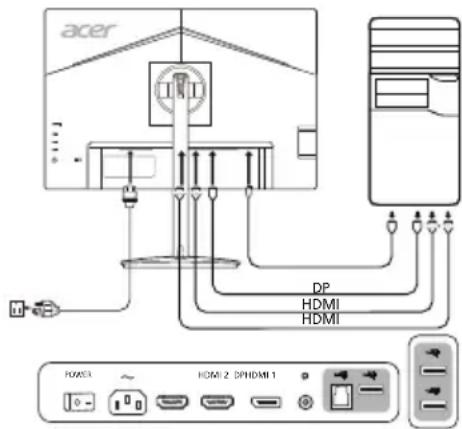
Control buttons
To prevent damage to the monitor, do not lift it by its base.
Note: Shielded cable.
All connections to other electronic devices must be made using shielded cables to comply with electromagnetic compatibility (EMC) regulations.
Note: Peripheral devices
Only peripheral devices (input/output devices, terminals, printers, etc.) that are certified to comply with the limits and for class B may be connected to this equipment. Operation with non-certified peripheral devices may cause interference to radio and television reception.
Caution
Changes or modifications not expressly approved by the manufacturer could void the user's authority to operate this product.
Operating conditions
This device complies with Part 15 of the FCC Rules. Operation is subject to the following two conditions: (1) This device may not cause harmful interference, and (2) This device must accept any interference received, including interference that may cause undesired operation.
Note: Canadian users
This digital device does not exceed the Class B limits for radio noise emissions from digital apparatus set out in the ICES-003 standard of Industry Canada.
Important safety instructions
Acer Inc., 2014/30/EU, Low Voltage Directive 2014/35/EU and RoHS Directive 2011/65/EU and Directive 2009/125/EC (to be amended) for the European Union
Class B digital device, pursuant to Part 15 of the FCC Rules. This equipment has been tested and found to comply with the limits for a Class B digital device, pursuant to Part 15 of the FCC Rules. These limits are designed to provide reasonable protection against harmful interference in a residential installation. This equipment generates, uses and can radiate radio frequency energy and, if not installed and used in accordance with the instructions, may cause harmful interference to radio communications. However, there is no guarantee that interference will not occur in a particular installation. If this equipment does cause harmful interference to radio or television reception, which can be determined by turning the equipment off and on, the user is encouraged to try to correct the interference by one or more of the following measures: Reorient or relocate the receiving antenna. Increase the separation between the equipment and receiver. Connect the equipment into an outlet on a circuit different from that to which the receiver is connected. Consult the dealer or an experienced radio/TV technician for help. This device complies with Part 15 of the FCC Rules. Operation is subject to the following two conditions: (1) This device may not cause harmful interference, and (2) this device must accept any interference received, including interference that may cause undesired operation. This Class B digital apparatus complies with Canadian ICES-003.
| LED | 24W (61 mΩ) | ||
| 24W (61 mΩ) | |||
| 24W (61 mΩ) | |||
| 24W (61 mΩ) | |||
| 350 cd/m | 2 (V/μA) | ||
| 350 cd/m | 0.270 mΩ. (unamai) x 0.270 mΩ. (unamai) | ||
| 350 cd/m | 178° (unamai) 178° (unamai) (CR=10) | ||
| 1 ms (VRB) | |||
| In-Plane Switching | |||
| H-Frequency | 30 - 94 kHz | ||
| V-Frequency 56 - 76 Hz | |||
| LED | 1.078 Ω | ||
| Dot Clock 220 MHz | |||
| Analog/Embedded Analog | 1920 x 1200 @ 75 Hz | ||
| Plug & Play VESA DDCCI/DDC2B | |||
| Analog/Embedded Analog | A | ||
| *Analog/Embedded Analog | 34 (kWh) (analog/Embedded HDMI) | ||
| Analog/Embedded Analog | 17W (v/μA) | ||
| 17W (v/μA) | |||
| 17W (v/μA) | |||
| 17W (v/μA) | |||
| Embedded Analog | Analog HDMI (analog/Embedded HDMI) DP (analog/Embedded DP) | ||
| Embedded Analog | Analog HDMI (analog/Embedded HDMI) DP (analog/Embedded DP) | ||
| USB | USB 3.0 x 3 (unamai) | ||
| Embedded Analog | Unamai: 518.4 mΩ. Unamai: 324.0 mΩ. | ||
| Embedded Analog | 100-240V, 50/60 Hz | ||
| Embedded Analog | Analog HDMI (analog/Embedded HDMI): 0° to 40°C Analog HDMI (analog/Embedded HDMI): -20° to 60°C Analog HDMI (analog/Embedded HDMI): 20% to 80% | ||
| USB | 533.4 (v/μA) x 389.255 ~ 509.255 (v/μA) x 233.65 (v/μA). | ||
| Embedded Analog (N.W.) | 5.5 nn. (v/μA) | ||
| Embedded Analog (n) | Analog: -5° to +25° (analog/Embedded HDMI) 25° to 25° (analog/Embedded HDMI)Analog: 360° Analog: 360° Analog: 360° Analog: 360° Analog: 360° Analog: 360° Analog: 360° Analog: 360° Analog: 360° Analog: 360° Analog: 360° Analog: 360° Adaptive Sync | ||
| Embedded Analog (n) | Analog/Embedded Analog | Analog/Embedded Analog Unamai: 1 Unamai: 2 | |
| Embedded Analog | Analog/Embedded Analog Unamai: 1 Unamai: 2 | ||
| Embedded Analog | Analog/Embedded Analog Unamai: 1 Unamai: 2 | ||
| Embedded Analog | Analog/Embedded Analog Unamai: 1 Unamai: 2 | ||
| Embedded Analog | Analog/Embedded Analog Unamai: 1 Unamai: 3 | ||
| Embedded Analog | Analog/Embedded Analog Unamai: 1 Unamai: 3 | ||
| Embedded Analog | Analog/Embedded Analog Unamai: 1 Unamai: 3 | ||
| Embedded Analog | Analog/Embedded Analog Unamai: 1 Unamai: 3 | ||
| Embedded Analog | Analog/Embedded Analog Unamai: 1 UnAMAI: 3 | ||
| Embedded Analog | Analog/Embedded Analog Unamai: 1 Unamai: 3 | ||
| Embedded Analog | Analog/Embedded Analog Unamai: 1 Unamai: 3 | ||
| Embedded Analog | Analog/Embedded Analog Unamai: 1 Unamai: 3 | ||
| Embedded Analog | Analog/Embedded Analog Unamai: 2 Unamai: 3 | ||
1
∴ 16 = 1
1
a i aai all j S( i) : j i ;
y
∴ S ΔOBC = S ΔCOD + S ΔBOC - S ΔBOC
j 1
A
15
(2).,
∴ S ΔOBC = S ΔCOD + S ΔBOC - S ΔBOC
ICES-003 1
Declaration of Conformity
We,
Acer Incorporated
8F, 88, Sec. 1, Xintai 5th Rd., Xizhi, New Taipei City 221, Taiwan
And,
Acer Italy s.r.l.
We, Acer Incorporated, hereby declare under our sole responsibility that the product described above is in conformity with the relevant Union harmonization legislations as below Directive and following harmonized standards and/or other relevant standards have been applied:
EMC Directive: 2014/30/EU
EN55032:2012/AC:2013 Class B
EN55024:2010
EN55032:2015/AC:2016 Class B
EN61000-3-3:2013
EN61000-3-2:2014 Class D
LVD Directive: 2014/35/EU
EN60950-1:2006/A11:2009/A1:2010/A12:2011/A2:2013
RoHS Directive: 2011/65/EU
EN50581:2012
ErP Directive: 2009/125/EC
Regulation (EC) No. 1275/2008; EN 50564:2011
Year to begin affixing CE marking: 2019.
Acer Incorporated
8F, 88, Sec. 1, Xintai 5th Rd., Xizhi
New Taipei City 221, Taiwan
8F, 88, Sec. 1, Xintai 5th Rd., Xizhi, New Taipei City 221, Taiwan
Acer Italy s.r.l.
RU Jan / Managing Director Acer Incorporated (Taipei, Taiwan)
Nov. 08, 2019
Date
8F, 88, Sec. 1, Xintai 5th Rd., Xizhi, New Taipei City 221, Taiwan
Acer Italy s.r.l.
Acer Incorporated (Taipei, Taiwan)
Nov. 08, 2019
Date
8F, 88, Sec. 1, Xintai 5th Rd., Xizhi, New Taipei City 221, Taiwan
Acer Italy s.r.l.
RU Jan / Sr. Manager Acer Incorporated (Taipei, Taiwan)
Nov. 08, 2019
Date
8F, 88, Sec. 1, Xintai 5th Rd., Xizhi, New Taipei City 221, Taiwan
Acer Italy s.r.l.
RU Jan / Senior Manager
Acer Incorporated (Taipei, Taiwan)
Nov. 08, 2019
Data
8F, 88, Sec. 1, Xintai 5th Rd., Xizhi, New Taipei City 221, Taiwan
En,
Acer Italy s.r.l.
RU Jan / Sr. Manager Acer Incorporated (Taipei, Taiwan)
Nov.08,2019
Date
8F, 88, Sec. 1, Xintai 5th Rd., Xizhi, New Taipei City 221, Taiwan
E,
Acer Italy s.r.l.
Acer's ENERGY STAR qualified products save you money by reducing energy costs and helps protect the environment without sacrificing features or performance. Acer is proud to offer our customers products with the ENERGY STAR mark.
What is ENERGY STAR?
Products that are ENERGY STAR qualified use less energy and prevent greenhouse gas emissions by meeting strict energy efficiency guidelines set by the U.S. Environmental Protection Agency. Acer is committed to offer products and services worldwide that help customers save money, conserve energy and improve the quality of our environment. The more energy we can save through energy efficiency, the more we reduce greenhouse gases and the risks of climate change. More information refers to http://www.energystar.gov.
Acer ENERGY STAR qualified products:
- Produce less heat and reduce cooling loads, and warmer climates.
- Automatically go into "display sleep" within 5 minutes of inactivity.
- Wake the monitor when it is in Active Off mode, move the mouse or press any keyboard key.
ENERGY STAR and the ENERGY STAR mark are registered U.S. marks
Say hello
to a more sustainable product
IT products are associated with a wide range of sustainability risks throughout their life cycle. Human rights violations are common in the factories. Harmful substances are used both in products and their manufacture. Products can often have a short lifespan because of poor ergonomics, low quality and when they are not able to be repaired or upgraded.
This product is a better choice. It meets all the criteria in TCO Certified, the world's most comprehensive sustainability certification for IT products. Thank you for making a responsible product choice, that help drive progress towards a more sustainable future!
Criteria in TCO Certified have a life-cycle perspective and balance environmental and social responsibility. Conformity is verified by independent and approved verifiers that specialize in IT products, social responsibility or other sustainability issues. Verification is done both before and after the certificate is issued, covering the entire validity period. The process also includes ensuring that corrective actions are implemented in all cases of factory non-conformities. And last but not least, to make sure that the certification and independent verification is accurate, both TCO Certified and the verifiers are reviewed regularly.
Want to know more?
Read information about TCO Certified, full criteria documents, news and updates at tcocertified.com. On the website you'll also find our Product Finder, which presents a complete, searchable listing of certified products.
For customers who own the EPEAT registered-products, Acer offers the following services:
- The availability of at least a 3 year warranty
- For product life extension, we offer upgrade, repair, or replacement parts for up to 5 years after end of production, using compatible after-market or refurbished parts with equal or higher specifications.
- Product take-back program for Notebooks, Desktops, and Monitors
- Battery take-back program for Notebook Battery Packs
For more details on the above services, please visit the local Acer website.
Message related to battery replacement
For customers who own EPEAT-registered products, your product may contain batteries that are replaceable once they reach the end of their useful life.
For products that ship with accessories such as remote controls, keyboards, mice, etc., containing alkaline batteries (AA, AAA, etc.), please refer to your product user guide for instructions on how to replace those batteries. Alkaline replacement batteries are available off-the-shelf at any retail store that carries standard alkaline batteries. Please dispose of spent batteries in accordance with your local waste disposal laws. For main product rechargeable batteries, such as those powering notebook PCs, tablets, etc., please refer to your local Acer customer support website or contact your local representative for detailed information on battery replacement services.
Regulatory Compliance









acer
barcode
MC,THN11,003
Model No.: CM2241W
Part No.: MC.THN11.003

Fecychth Paper


- IMPORTANT SAFETY INSTRUCTIONS
- ATTACHING THE MONITOR TO THE BASE
- CONNECTING YOUR MONITOR TO A COMPUTER
- EXTERNAL CONTROLS
- REGULATIONS AND SAFETY NOTICES
- FCC NOTICE
- CE DECLARATION OF CONFORMITY
- NOTICE
- NOTICE: SHIELDED CABLES
- NOTICE: PERIPHERAL DEVICES
- CAUTION
- OPERATION CONDITIONS
- NOTICE: CANADIAN USERS
- DISPOSAL OF WASTE EQUIPMENT BY USERS IN PRIVATE HOUSEHOLD IN THE EUROPEAN UNION
- ACER LCD MONITOR QUICK START GUIDE (QSG)
- ACER LCD MONITOR QUICK START GUIDE
- SETTING UP THE MONITOR ON ITS BASE
- CONNECTING THE MONITOR TO YOUR COMPUTER
- CONTROL ELEMENTS
- CONNECTING THE MONITOR TO THE COMPUTER
- CONTROL BUTTONS
- NOTE: SHIELDED CABLE
- NOTE: PERIPHERAL DEVICES
- OPERATING CONDITIONS
- NOTE: CANADIAN USERS
- DECLARATION OF CONFORMITY
- WHAT IS ENERGY STAR
- ACER ENERGY STAR QUALIFIED PRODUCTS
- SAY HELLO
- TO A MORE SUSTAINABLE PRODUCT
- WANT TO KNOW MORE
- FOR CUSTOMERS WHO OWN THE EPEAT REGISTERED-PRODUCTS, ACER OFFERS THE FOLLOWING SERVICES
- MESSAGE RELATED TO BATTERY REPLACEMENT
- ACER
Brand : ACER
Model : CM2241W
Category : Monitor