USER MANUAL Barista T Smart MELITTA
trical and Electronic Equipment).
1 Overview of the appliance 37
1.1 The appliance at a glance 37
1.2 The control panel at a glance 38
2 For your safety 39
2.1 Proper use 39
2.2 Danger from electric current 39
2.3 Risk of burns and scalds 40
2.4 General safety 40
3 First steps. 40
3.1 Unpacking the appliance 40
3.2 Checking the delivery contents 41
3.3 Installing the appliance 41
3.4 Connecting the appliance. 41
3.5 Switching on the appliance for the first time. 41
3.6 Installing the Melitta-Connect-App 42
4 Basic operation 42
4.1 Switching the appliance on and off 42
4.2 Using the control panel 43
4.3 Navigating in the menu 43
4.4 Establishing the Bluetooth connection 44
4.5 Filling with coffee beans and using Bean Select. 45
4.6 Using ground coffee 46
4.7 Filling with water 46
4.8 Adjusting the outlet 47
4.9 Using milk 47
4.10 Emptying the drip tray and coffee grounds container 47
5 Preparing beverages 48
5.1 Preparing espresso and café crème 48
5.2 Preparing cappuccino and latte macchiato 48
5.3 Preparing milk froth and warm milk 49
5.4 Preparing hot water 49
5.5 Preparing beverages with recipes (BARISTA TS model only) 49
5.6 Changing beverage settings before and during preparation............49
5.7 Stopping beverage preparation 50
5.8 Preparing two beverages simultaneously 50

6 Permanently changing beverage settings 50
6.1 Selecting recipes 50
6.2 Changing default settings.. 51
7 Personal settings - "My Coffee" 51
7.1 Editing personal user profiles 51
7.2 Selecting/changing personal settings 52
7.3 Preparing beverages with personal settings.. 52
8 Changing basic settings 53
8.1 Setting the language 53
8.2 Setting the time 53
8.3 Activating/deactivating Auto Bean Select (BARISTA TS model only)..53
8.4 Setting energy save mode 53
8.5 Setting Auto OFF 54
8.6 Activating/deactivating rinsing 54
8.7 Resetting the appliance to the factory settings 55
8.8 Statistics and System menu 55
8.9 Setting the grinding fineness 55
8.10 Converting the connection for the milk hose (depending on the model) 56
9 Care and maintenance. 56
9.1 General cleaning 56
9.2 Rinsing the coffee system 56
9.3 Cleaning the brewing unit 57
9.4 "Easy Cleaning" programme 57
9.5 "Cleaning milk system" programme 58
9.6 "Cleaning coffee system" programme 59
9.7 "Dscaling"programme 59
9.8 Setting the water hardness 60
9.9 Using a water filter 60
10 Transport, storage and disposal 62
10.1 Venting the appliance 62
10.2 Transporting the appliance 62
10.3 Disposing of the appliance 62
11 Technical data. 62
12 Troubleshooting 63
1 Overview of the appliance
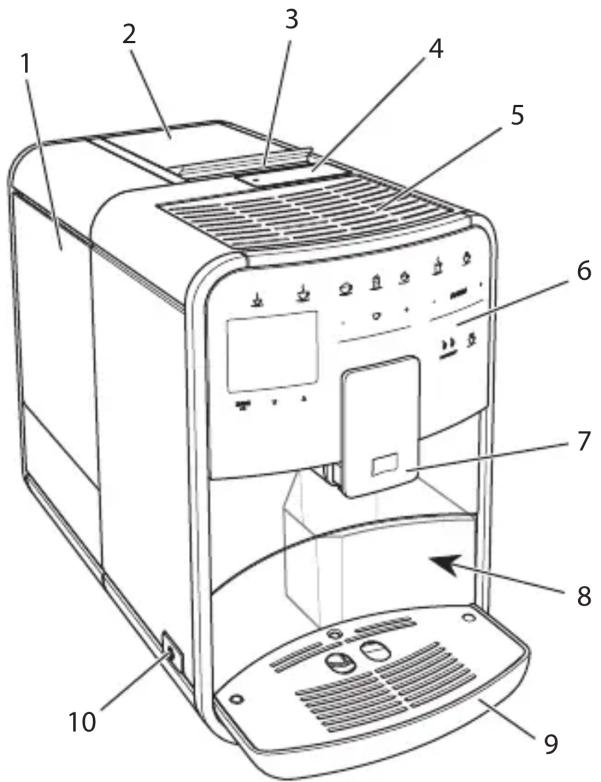
1.1 The appliance at a glance

Fig. 1: Front left of the appliance
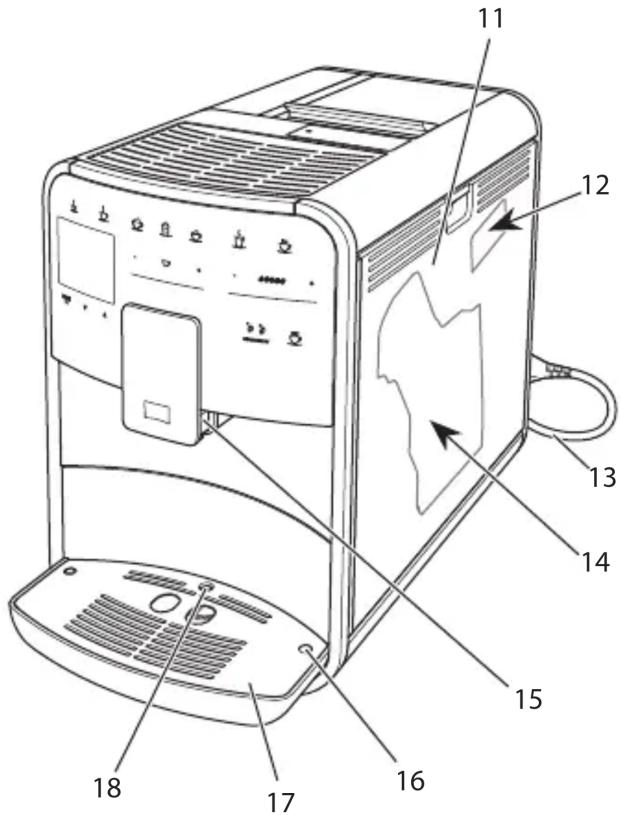
Fig.2: Front right of the appliance
1 Water tank
2 2-chamber bean container
3 "BEAN SELECT" slider (BARISTA T model only) For "BEAN SELECT" in BARISTA TS, see item number 30.
4 Ground coffee chute
5 Cup tray
6 Control panel
7 Height-adjustable outlet with 2 coffee nozzles, 2 milk nozzles, 1 hot water nozzle, cup illumination (in BARISTA TS model only)
8 Coffee grounds container (inner)
9 Drip tray
10 ON/OFF button
11 Cover
12 "Grinding fineness adjustment" lever (behind the cover)
13 Power cable with cable insert compartment
14 Brewing unit (behind the cover)
15 Milk hose connection at the outlet
16 Milk hose connection to the drip tray
17 Cup plate
18 Float

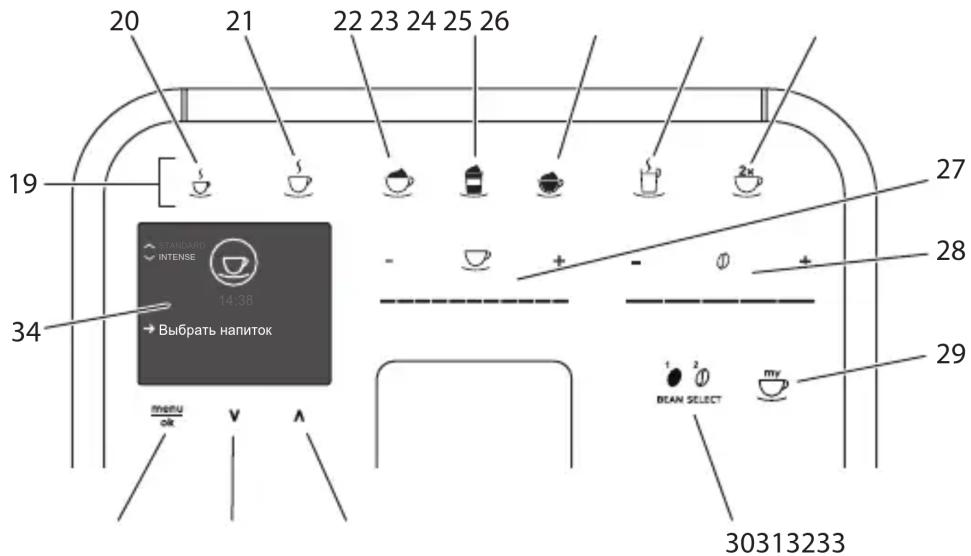
1.2 The control panel at a glance

Fig.3: Control panel
Item Designation Function
19 Direct keys Preparing beverages
20 Espresso Preparing espresso
21 Café crème Preparing café crème
22 Cappuccino Preparing cappuccino
23 Latte macchiato Preparing latte macchiato
24 Milk froth/Warm Preparing milk froth or warm milk milk
25 Hot water Preparing hot water
26 2 cups Two-cup dispensing
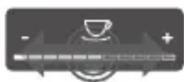
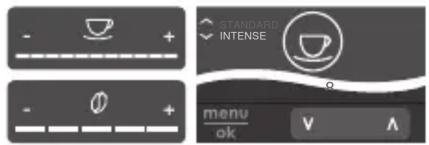
27 Beverage quantity Setting the beverage quantity slider
28 Coffee strength Setting the coffee strength slider
29 My Coffee/Recipes Selecting personal settings for beverages or preparing (in BARISTA TS) beverages with recipes.
My Coffee (in BARISTA T)
30 BEAN SELECT
31 Up arrow button Navigating up in the menu or set the STANDARD coffee flavour
32 Down arrow Navigating down in the menu or set the INTENSE coffee button flavour
33 menu/ok Calling up the menu or confirming inputs
34 Display Display of current menus and messages Example: Ready symbol
Dear Customer,
Thank you for purchasing the BARISTA Smart® fully automatic coffee maker.
The operating instructions will help you discover the diverse options offered by the appliance and enjoy your coffee to the full.
Read through the operating instructions carefully. This helps avoid personal injury and material damage. Store the operating instructions carefully. If you pass on the appliance, include the operating instructions with it.
Melitta accepts no liability for damage caused by failure to observe the operating instructions.
If you require further information or have any questions on the appliance, contact Melitta or visit our website at: www.international.melitta.de
We hope you enjoy using your appliance.
2 For your safety
The appliance conforms to the relevant European directives and has been built using the latest technology. Nevertheless, some residual dangers remain.
Observe the safety instructions to avoid dangers. Melitta accepts no liability for damage caused by failure to observe the safety instructions.
2.1 Proper use
The appliance is used to prepare coffee beverages made from coffee beans or ground coffee, and to heat milk and water.
The appliance is intended for use in private households.
Any other use is regarded as improper and may lead to personal injury and material damage. Melitta accepts no liability for damage that arises due to improper use of the appliance.
2.2 Danger from electric current
If the appliance or the power cable is damaged, there is a risk of fatal electric shock.
Observe the following safety instructions to avoid danger from electric current:
Do not use a damaged power cable.
A damaged power cable may only be replaced by the manufacturer or its customer service or service partner.
Do not open any covers firmly screwed onto the appliance housing.
Only use the appliance when it is in a technically flawless condition.
A defective appliance may only be repaired by an authorised workshop. Do not repair the appliance yourself.
Do not make any changes to the appliance, its components or its accessories.
Do not immerse the appliance in water.
ū Do not let the power cable come into contact with water.

2.3 Risk of burns and scalds
Escaping fluids and steam may be very hot. Parts of the appliance can also become very hot. Observe the following safety instructions to avoid scalds and burns:
Avoid escaping fluids and steam coming into contact with the skin.
Do not touch any nozzles on the outlet during operation.
2.4 General safety
Observe the following safety instructions to avoid personal injury and material damage:
Do not operate the appliance in a cabinet or similar.
Do not reach into the interior of the appliance during operation.
Keep the appliance and its power cable out of the reach of children under 8 years of age.
This appliance may be used by children over 8 years of age and by persons with reduced physical, sensory or mental capabilities or a lack of experience and knowledge if they are supervised or have been instructed in using the appliance safely and understand the resulting risks.
u Children must not play with the appliance. Cleaning and maintenance must not be undertaken by children younger than 8 years of age.
Children over 8 years of age must be supervised during cleaning and maintenance.
If the appliance is remotely controlled by a mobile terminal, make sure there are no children in the immediate vicinity of the appliance and that a cup has been placed underneath.
Disconnect the appliance from the power supply when left unsupervised for a long time.
The appliance must not be operated at altitudes over 2,000m .
Please observe the instructions in the corresponding section when cleaning the appliance and its components (,Care and maintenance" on page 56).
3 First steps
This chapter describes how to prepare your appliance for use.
3.1 Unpacking the appliance
CAUTION
Contact with cleaning agents can lead to eye and skin irritation.
-
Keep the supplied cleaning agents out of the reach of children.
-
Unpack the appliance. Remove the packaging material, the adhesive
strips and the protective films from the appliance.
- Keep the packaging material for transport and any return shipments.
The appliance may contain traces of coffee and water. The appliance has been tested in the factory to ensure that it functions perfectly.
3.2 Checking the delivery contents
Check the completeness of delivery using the following list. If parts are missing, contact your retailer.
Coffee spoon with screw-in aid for the water filter
Plastic milk container or thermal milk container each with milk hose or just the milk hose (depending on the model)
Coffee system cleaning agent
Milk system cleaning agent
u Water filter
Test strip for determining the water hardness.
3.3 Installing the appliance
Observe the following instructions:
ü Do not install the appliance in damp rooms.
Install the appliance on a stable, flat and dry surface.
ü Do not install the appliance in the vicinity of sinks or the like.
Do not install the appliance on hot surfaces.
ū Install the appliance at a sufficient distance (approx. 10 cm) from the wall and other objects. The space above the appliance should be at least 20 cm.
Route the power cable so it cannot be damaged by edges or hot surfaces.
3.4 Connecting the appliance
Observe the following instructions:
Check that the supply voltage matches the operating voltage specified in the technical data (see the table, page 62).
Only connect the appliance to a properly installed earthing contact socket. If in doubt, consult a specialist electrician.
ü The socket must have a fuse of at least 10 A.
3.5 Switching on the appliance for the first time
During initial start-up, the language, the time and the water hardness can be set. The settings can be changed at a later point in time (see chapter 8, page 53 and section 9.8, page 60).
Use the enclosed test strip to determine the water hardness. Observe the instructions on the test strip packaging and in the table Item, page 38.
We recommend pouring away the first two cups of coffee after initial start-up.
Requirement: The appliance has been installed and connected.
- Place a vessel beneath the outlet.
- Press the ON/OFF button.
» The welcome display appears on the appliance.
The request to carry out the setup appears on the display: Please set up the machine.
» The "menu/ok" button flashes.
- Confirm with "menu/ok".
» The Language menu appears.
- Select your language with the arrow buttons. Confirm with "menu/ok".
» The Clock menu appears.
-
Select the hour and the minutes with the arrow buttons. Confirm each setting with "menu/ok".
» The Water hardness menu appears.
-
Select the determined water hardness range with the arrow buttons or confirm the default value with "menu/ok".
The request Please refill and insert water tank appears.
- Remove the water tank. Rinse out the water tank with clean water. Insert the new water filter (see section „Inserting the water filter" on page 61).
Fill the water tank with fresh water and insert it.
The appliance heats up and performs automatic rinsing.
» The ready symbol and the request Fill beans appear on the display.
- Fill coffee beans into the bean container. To do this, read section Filling with coffee beans and using Bean Select, page 45.
3.6 Installing the
Melitta-Connect-App
The appliance can be operated with suitable mobile iOS devices via Bluetooth or with android devices that support Bluetooth. You need the Melitta-Connect-App for this. Detailed information at www.melitta.de.
The App provides simplified operation of the appliance, convenient management of settings and user profiles, as well as other functions and access to the Smart Service (Service Hotline, appliance data, etc.).
The term Smartphone is used to represent Smartphones and Tablets in these operating instructions.
Downloading the App
- Search in the App Store of your Smartphone for the Melitta-Connect-App.
- Install the App on your Smartphone.
4 Basic operation
This chapter describes basic operating steps for using the appliance on a daily basis.
4.1 Switching the appliance on and off
Before switching on after starting up the appliance for the first time, read section 3.5, page 41.
When switched on and off, the appliance performs automatic rinsing.
During rinsing, rinsing water is also conducted into the drip tray.
The automatic switch-off rinsing can be switched on or off in the Settings menu.
Switching on the appliance
- Place a vessel beneath the outlet.
- Press the ON/OFF button.
» The welcome display appears on the appliance.
The appliance heats up and performs automatic rinsing.
» The appliance is ready for operation.
Switching off the appliance
- Place a vessel beneath the outlet.
- Press the ON/OFF button.
» The appliance performs automatic rinsing.
» The appliance switches off.
The appliance switches off automatically when it is not operated for a long time. Automatic rinsing is also carried out in this case.
The off time can be set in the Auto OFF menu, see section 8.5, page 54.
If no beverage has been prepared since switching on or if the water tank is empty, no rinsing takes place.

4.2 Using the control panel
The essential functions can be accessed using the control panel.
Press the button with a fingertip. The control panel does not react when touched with a pen or other objects.
Only those buttons that can be used in the appliance's current status light up.
Use the following actions to operate the control panel:

Brief press
Briefly press a button to select a function.

Long press
Press a button for longer than 2 seconds to select a second function that may be available.

Pressing "+" or "-"
Press "+" or "-" to increase or reduce the current value. Hold a button down to change the value continuously.

Pressing the slider
Press the slider to select a value.
Pulling the slider
Press and pull the slider to increase or reduce the current value.
To set individual beverages and for maintenance and care, you must call up the menu on the display and navigate in the menu.
Observe the instructions on the display.
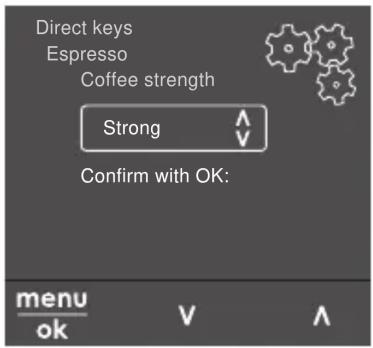
Fig. 6: Example: Display with buttons
Use the following options to navigate in the menu:
Calling up the menu and confirming the selection
menu Ok Press the "menu/ok" button for longer than 2 seconds to call up
the menu.
Press the "menu/ok" button briefly to confirm your selection.
Navigating in the menu
Press the arrow buttons to navigate down or up in the menu. Hold down an arrow button to quickly switch to the menu options.
Exiting a menu
Exit Select the Exit command with the arrow buttons and confirm with "menu/ok" to exit a menu.
Exit sub-menus, which only display information and in which you do not carry out any settings, with "menu/ok".
Calling up submenus
Some of the appliance's functions are reached by calling up several submenus in succession.


Submenus are always called up in a similar way. Navigation to the Descaling programme is described here as an example.
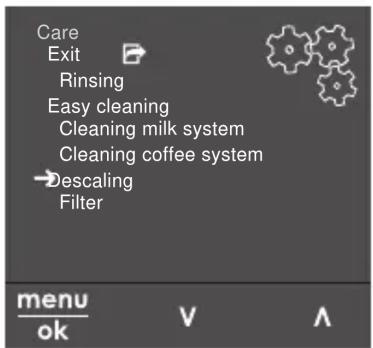
Fig. 7: Navigating to the Descaling programme
- Press the "menu/ok" button for 2 seconds.
» The menu appears on the display.
- Use the arrow buttons to select Care and confirm with "menu/ok".
- Use the arrow buttons to select Descal-ing and confirm with "menu/ok".
The selection of functions is always shown in shortened form in these operating instructions:
- Navigate to the Care > Descaling menu.
4.4 Establishing the Bluetooth connection
Bluetooth connection is required to operate the appliance by means of a Smartphone.
Connecting the appliance for the first time
Requirements:
The appliance is switched on.
The Melitta-Connect-App is installed and open on the Smartphone (see section Installing the Melitta-Connect-App, page 42).
The Smartphone is in the reception range (max. 5 - 10 m away) of the appliance.
ü The Smartphone supports Bluetooth.
The Bluetooth function is activated on the Smartphone.
The appliance is not connected to any other Smartphone via Bluetooth.
The appliance is displayed on the Smartphone.
- Press the "menu/ok" button for 2 seconds on the appliance.
» The menu appears on the display.
- Use the arrow buttons to select Bluetooth and confirm with "menu/ok".
- Select Connect on the appliance.
- Select Connect on the Smartphone and follow the instructions of the App.
» The appliance is connected to the Smartphone.
- Select the Exit command to exit the menu.
If a connection between the appliance and the Smartphone is not established within 1 minute, the appliance switches to the ready to operate display.
Only one user can be connected to the appliance via Bluetooth. If there is a change of user, the previous user must disconnect the Bluetooth connection by closing the App. Only then can the new user connect to the appliance.
Resetting the appliance to the factory settings deletes all Bluetooth connections.
Re-connecting the appliance to the Smartphone
Requirements:
The appliance is switched on.
The appliance has already been connected to the Smartphone.
No other user is currently connected to the appliance.
- Open the App on the Smartphone.
» The appliance automatically connects to the Smartphone via Bluetooth.
4.5 Filling with coffee beans and using Bean Select
Roasted coffee beans lose their aroma. Only fill the bean container with as many coffee beans as will be consumed over the next 3-4 days.
The 2-chamber bean container enables the use of two different types of coffee for different coffee specialities. For example, fill one chamber with espresso beans and the other with café crème beans.
ATTENTION
The use of unsuitable types of coffee can lead to clogging of the grinder.
- Do not use freeze-dried or caramelised coffee beans.
- Do not pour ground coffee into the bean container.
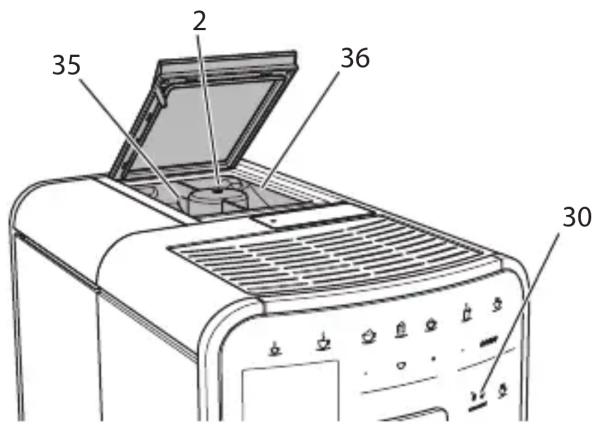
Auto Bean Select, BARISTA TS model
Fig.8: BARISTA TS 2-chamber bean container
Auto Bean Select ensures that the best coffee beans are automatically selected for various coffee specialities. Espresso-based beverages take their coffee beans from left bean chamber 1 (35), Café Crème-based beverages take them from right bean chamber 2 (36).
The following table shows the assignment of the bean chambers to the coffee beverages. These settings can be changed (see section 6.2, page 51).
| Bean chamber Coffee beverage |
| 1 (35) | Espresso, cappuccino, latte macchiato |
| 2 (36) | Café crème |
The grinder is emptied during each grinding process. Nevertheless, minimal coffee type mixing may occur.
Grinding when empty causes a different type of noise and is normal.
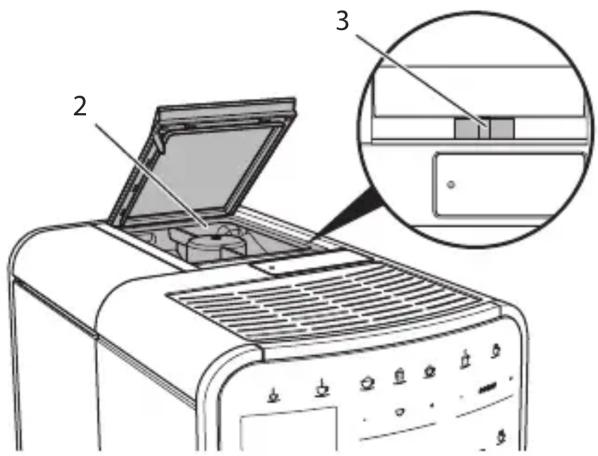
Manual Bean Select, BARISTA T
Fig. 9: BARISTA T 2-chamber bean container
Using the "BEAN SELECT" slider (3), you can switch between the bean chambers (2).
CAUTION
When switching bean chambers in the BARISTA T, a residual amount of coffee beans remains in the grinder. The first two coffee beverages after switching to decaffeinated beans may still contain caffeinated coffee. This may affect the health of people with caffeine intolerance.
- Persons with caffeine intolerance should only consume the third coffee beverage after switching over.
When the slider is in the centre position, no coffee beans enter the grinder.

Filling with coffee beans
- Open the lid of the 2-chamber bean container (2).
- Fill coffee beans into the bean chambers.
- Close the lid of the 2-chamber bean container.
The "BEAN SELECT" button (30) (BARISTA TS model) or the "Bean Select" slider (3)(BARISTA T model) can be used to select a bean type prior to preparation (see section 5.6, page 49).
4.6 Using ground coffee
Ground coffee may also be used to prepare coffee beverages.
ATTENTION
The use of unsuitable types of coffee can lead to clogging of the brewing unit.
- Do not use any instant products.
- Fill a maximum of one coffee spoon of ground coffee into the ground coffee chute.
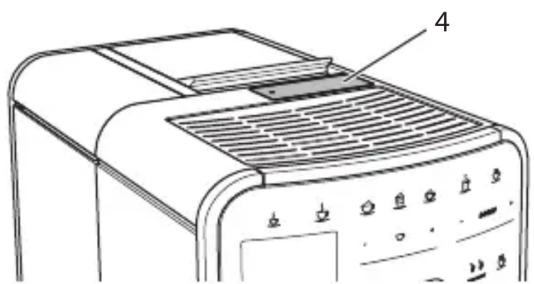
Fig. 10: Ground coffee chute
- Open the lid of the ground coffee chute (4).
- Use the enclosed coffee spoon for dosing. Fill a maximum of one coffee spoon of ground coffee into the ground coffee chute.
- Close the lid of the ground coffee chute.
- Proceed as described in sections 5 to 7.
Two-cup dispensing is not possible when using ground coffee.
If no coffee is prepared within 3 minutes of opening the ground coffee chute, the appliance switches to operation with coffee beans and the ground coffee is discharged into the coffee grounds container.
4.7 Filling with water
Only use fresh, cold water without carbon dioxide for optimum coffee enjoyment. Change the water daily.
The quality of the water largely determines the flavour of the coffee. Therefore, use a water filter (see section 9.8, page 60 and section 9.9, page 60).
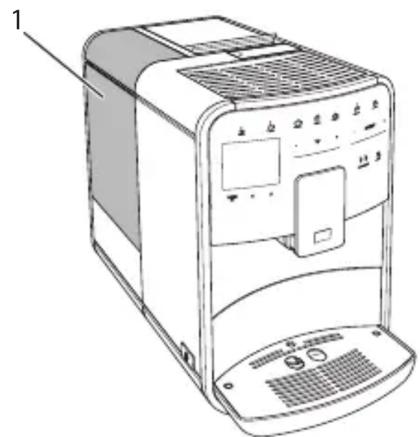
Fig. 11: Water tank
- Open the lid of the water tank and pull the water tank (1) upwards out of the appliance by the handle.
- Fill the water tank with water. Note the maximum capacity of 1.8 litres.
- Insert the water tank into the appliance from above and close the lid.
4.8 Adjusting the outlet
The outlet (7) is height-adjustable. Set the greatest possible distance between the outlet and the vessel. Depending on the vessel, push the outlet up or down.
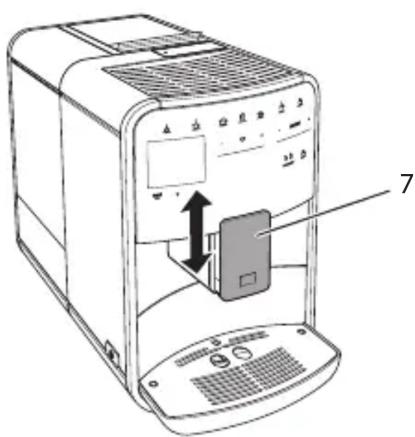
Fig. 12: Height-adjustable outlet
4.9 Using milk
Use cooled milk for optimum coffee enjoyment.
Depending on the model, the enclosed milk container or the milk hose and conventional milk packs can be used.
Connecting the milk container (depending on the model)
Only fill as much milk into the milk container as will be used immediately.
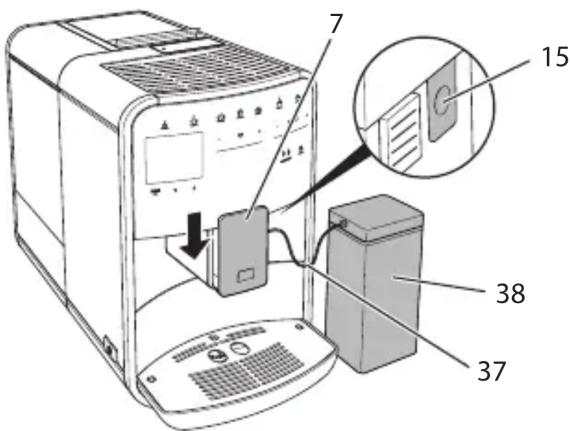
Fig. 13: Connecting the milk container to the appliance (figure can vary)
- Fill the desired amount of milk into the milk container (38).
- Push down the outlet (7).
- Connect the milk hose (37) to the milk container and the connection (15) at the outlet.
Store the filled milk container in the refrigerator.
Connecting the milk hose (depending on the model)
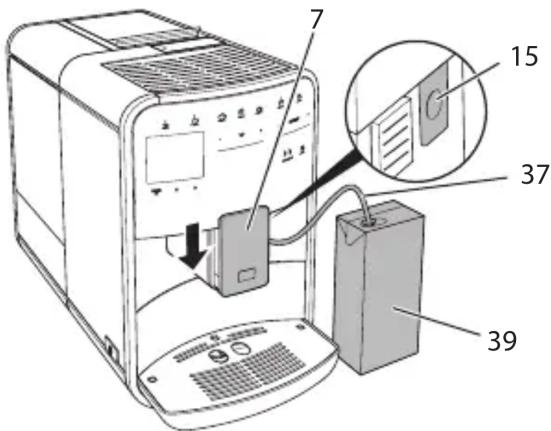
Fig. 14: Connecting the milk hose to the appliance
- Push down the outlet (7).
- Connect the milk hose (37) to the connection at the outlet (15).
- Insert the milk hose into a conventional milk pack (39).
4.10 Emptying the drip tray and coffee grounds container
When the drip tray (9) and the coffee grounds container (8) are full, the appliance requests you to empty them. The projecting float (18) also indicates that the drip tray is full. Always empty both containers.


Fig. 15: Drip tray, coffee grounds container and float
- Pull the drip tray (9) forwards out of the appliance.
- Remove the coffee grounds container (8) and empty it.
- Empty the drip tray.
- Insert the coffee grounds container.
- Push the drip tray into the appliance up to the stop.
The appliance requests you to empty the drip tray and the coffee grounds container after a defined number of beverages have been dispensed. If the containers are emptied while the appliance is switched off, it does not register this process. Therefore, it is possible that you are requested to empty the containers although the drip tray and the coffee grounds container are not yet full.
5 Preparing beverages
There are three options for preparing beverages:
Standard dispensing with direct keys and recipes (BARISTA TS model),
Preparation with modified beverage settings (see chapter 6, page 50)
Use of personal settings with the "My Coffee" function (see chapter 7, page 51)
Standard dispensing is described in this section.
Please note:
The storage containers should contain sufficient amounts of coffee and water. Otherwise the appliance requests you to refill it.
The appliance does not indicate a lack of milk.
When selecting a beverage with milk, connect the milk container or a commercially available milk pack.
The vessels for the beverages should be sufficiently large.
For beverage preparation, the display must show the ready for use display.
u Beverage dispensing is ended automatically.
After a beverage preparation with milk, the appliance automatically prompts for the Easy Cleaning programme.
5.1 Preparing espresso and café crème

- Place a vessel beneath the outlet.
- Press the "Espresso" or "Café Crème" button.
» The beverage is prepared.
- Remove the vessel.
5.2 Preparing cappuccino and latte macchiato

Requirement: Milk is connected.
- Place a vessel beneath the outlet.
- Press the "Cappuccino" or "Latte Macchiato" button.
» The beverage is prepared.
» The display shows: Easy Cleaning? (OK for start).
- Remove the vessel.
- Run the Easy Cleaning programme or prepare another beverage and then carry it out, see section 9.4, page 57.
5.3 Preparing milk froth and warm milk
The preparation of milk froth and warm milk is similar.

Requirement: Milk is connected.
- Place a vessel beneath the outlet.
- Press the "Milk froth/milk" button.
a) Milk froth = briefly press button
b) Warm milk = press the button for longer (2 seconds)
» Milk dispensing begins.
» The display shows: Easy Cleaning? (OK for start).
- Remove the vessel.
- Run the Easy Cleaning programme or prepare another beverage and then carry it out, see section 9.4, page 57.
5.4 Preparing hot water

- Place a vessel beneath the outlet.
- Press the "Hot water" button.
Hot water dispensing begins.
- Remove the vessel.
5.5 Preparing beverages with recipes (BARISTA TS model only)
When selecting a recipe with milk, connect the milk container or a commercially available milk pack.
The direct starting of recipes is similar for all beverages. The selection of a lungo is described as an example here.

Requirement: The appliance is ready for operation.
- Place a vessel beneath the outlet.
- Press the "My Coffee/Recipes" button until the Recipes profile appears and confirm with "menu/ok".
The recipe selection appears on the display.
Alternatively, you can also press the "My Coffee/Recipes" button for 2 seconds to access the recipe selection directly.
- Use the arrow buttons to select Lungo and confirm with "menu/ok".
- Remove the vessel.
5.6 Changing beverage settings before and during preparation
Beverage settings can be changed before and during beverage preparation.
These settings only apply to current beverage preparation.
Changing beverage settings before preparation
The bean type, the total beverage quantity, the coffee strength and the coffee flavour can be changed before selecting a beverage.
The coffee flavour is set with the Intense aroma function. STANDARD and INTENSE are available for selection. In the INTENSE setting, the brewing time is longer and the coffee has a more intense aroma.
- Select a bean type with the "BEAN Select" button (BARISTA TS model) or with the "Bean Select" slider (BARISTA T model).
Before selecting a beverage, use the "Beverage quantity" slider to set a beverage quantity.
Before selecting a beverage, use the "Coffee strength" slider to set the coffee strength.
- Set the coffee flavour with the "arrow buttons".
When preparing latte macchiato and cappuccino, the total beverage quantity is subdivided into a coffee and a milk amount according to a specified ratio.
If a beverage is not prepared within 1 minute, the appliance switches to the default settings.
Changing beverage settings during preparation
The beverage quantity and the coffee strength can be changed during beverage preparation.


During beverage dispensing (coffee or milk), use the "Beverage quantity" slider to set the relevant beverage amount.
During the grinding process, use the "Coffee strength" slider to set the coffee strength.
5.7 Stopping beverage preparation
To stop beverage preparation prematurely, press the selected direct key again.
5.8 Preparing two beverages simultaneously

The "2 cups" button is used to prepare two beverages simult
ously. Two-cup dispensing is not possible for the beverages americano, long black, hot water, milk and milk froth. For two-cup dispensing, the appliance carries out two grinding processes.
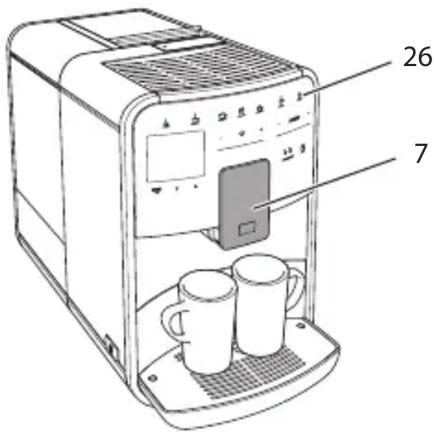
Fig. 16: Two-cup dispensing
- Place two vessels beneath the outlet (7).
- Press the "2 cups" button (26).
- Continue as described for the relevant beverage preparation.
This setting only applies to the next beverage preparation.
If a beverage is not prepared within 1 minute, the appliance switches to single-cup dispensing.
6 Permanently changing beverage settings
The appliance offers further options for preparing coffee specialties. Default recipes can be used or the beverage settings can be permanently changed.
6.1 Selecting recipes
Direct keys can be assigned with stored recipes. Pressing the corresponding direct key now uses the recipe.
The following recipes are available:
The recipes marked with a * are only available in the BARISTA TS.
Recipe selection is similar for all beverages. The selection of a ristretto is described as an example here.
Requirement: The appliance is ready for operation.
- Press the "menu/ok" button for 2 seconds.
The menu appears on the display.
- Navigate to the Direct keys > Espresso > Recipes menu.
- Use the arrow buttons to select Ristretto and confirm with"menu/ok".
- Repeatedly select the Exit command to exit the menu.
» The appliance is ready for operation.
The next time an espresso is prepared, the ristretto recipe will be used.
The recipe selection remains valid until it is changed again.
In the Barista TS, recipes can also be selected directly with the "My Coffee/Recipes" button (see section 5.5, page 49).
6.2 Changing default settings
Depending on the beverage, the following default settings can be changed: Coffee amount, amount of froth, milk amount, hot water amount, temperature, beans (BARISTA TS model only), coffee strength and coffee flavour.
Changing the beverage settings is similar for all beverages. Changing the coffee strength for an Espresso is described here as an example.
Requirement: The appliance is ready for operation.
- Press the "menu/ok" button for 2 seconds.
» The menu appears on the display.
- Navigate to the Direct keys > Espresso > Coffee strength menu.
- Use the arrow buttons to select the desired coffee strength and confirm with "menu/ok".
- Repeatedly select the Exit command to exit the menu.
» The appliance is ready for operation.
» The selected coffee strength is used the next time an espresso is prepared.
The default settings remain valid until they are changed again.
7 Personal settings - "My Coffee"
The "My Coffee" function lets you to save personal beverage settings and assign them to a user.
7.1 Editing personal user profiles
Up to four user profiles can be used in the BARISTA T and up to eight in the BARISTA TS.
Changing the name of a user profile
The names of the user profiles can be changed.
Requirement: The appliance is ready for operation.
- Press the "menu/ok" button for 2 seconds.
» The menu appears on the display.
- Navigate to the My Coffee menu.
- Use the arrow buttons to select a user and confirm with "menu/ok".
- Use the arrow buttons to select Change name and confirm with "menu/ok".
The menu for selecting individual characters appears.
- Use the arrow buttons to select individual characters and confirm each with "menu/ok".
- Repeatedly select the Exit command to exit the menu.
» The appliance is ready for operation.
Activating/deactivating a user profile
Only users whose profile is activated can be used.
Requirement: The appliance is ready for operation.
- Press the "menu/ok" button for 2 seconds.
>> The menu appears on the display.
- Navigate to the My Coffee menu.
- Use the arrow buttons to select a user and confirm with "menu/ok".
- Use the arrow buttons to select Enabled/disabled and confirm with "menu/ok".
- Use the arrow buttons to select Enabled or Disabled and confirm with "menu/ok".
- Repeatedly select the Exit command to exit the menu.
» The appliance is ready for operation.
7.2 Selecting/changing personal settings
Depending on the beverage, the following settings can be assigned to a user:
Recipes, coffee amount, amount of froth, milk amount, hot water amount, temperature, beans (BARISTA TS model only), coffee strength and coffee flavour.
The assignment of personal settings to a user is always similar. Setting the coffee amount for a Cappuccino is described here as an example.
Requirement: The appliance is ready for operation.
- Press the "menu/ok" button for 2 seconds.
» The menu appears on the display.
- Navigate to the My Coffee menu.
- Use the arrow buttons to select a user and confirm with "menu/ok".
- Navigate to the Cappuccino > Coffee amount menu.
- Use the arrow buttons to select an amount and confirm with "menu/ok".
- Repeatedly select the Exit command to exit the menu.
The appliance is ready for operation.
The next time a cappuccino is prepared by the user, the selected amount of coffee is used.
7.3 Preparing beverages with personal settings

BARISTA TS model.

BARISTA T model.
The preparation of beverages using the "My Coffee" function is similar for all beverages. The preparation of a cappuccino is described here as an example.
Requirement: The ready symbol appears on the display and milk is connected.
- Place a vessel beneath the outlet.
- Press the "My Coffee" button until the desired user is shown on the display.
- Press the "Cappuccino" button.
Beverage dispensing starts and ends automatically.
-
Remove the vessel.
» The display shows: Easy Cleaning? (OK for start).
-
You can execute the Easy Cleaning programme or prepare further beverages.
a) Execute the Easy Cleaning programme. To do so, follow the instructions on the display, see section 9.4, page 57.
b) Prepare further beverages and execute the Easy Cleaning programme later.
» The appliance is ready for operation.

To exit the "My Coffee" function, press the "My Coffee" button until the ready symbol appears.
If a beverage is not prepared within 3 minutes, the appliance automatically switches to the ready symbol.
8 Changing basic settings
Operating steps that change the appliance's basic settings are described in this chapter.
8.1 Setting the language
The display text language can be set.
Requirement: The appliance is ready for operation.
- Press the "menu/ok" button for 2 seconds.
» The menu appears on the display.
- Navigate to the Settings > Language menu.
- Use the arrow buttons to select a language and confirm with "menu/ok".
- Exit the menu with the Exit command.
» The appliance is ready for operation.
8.2 Setting the time
The time shown on the display can be set.
Requirement: The appliance is ready for operation.
- Press the "menu/ok" button for 2 seconds.
» The menu appears on the display.
- Navigate to the Settings > Clock menu.
- Use the arrow buttons to select the hours and minutes. Confirm each setting with "menu/ok".
- Exit the menu with the Exit command.
» The appliance is ready for operation.
To prevent the time being shown on the display, set the time to 00:00.
8.3 Activating/deactivat ing Auto Bean Select (BARISTA TS model only)
Automatic selection of a bean type can be activated or deactivated.
Requirement: The appliance is ready for operation.
- Press the "menu/ok" button for 2 seconds.
» The menu appears on the display.
- Navigate to the Settings > Auto Bean Select menu.
- Use the arrow buttons to select Enabled or Disabled and confirm with "menu/ok".
- Repeatedly select the Exit command to exit the menu.
The appliance is ready for operation.
8.4 Setting energy save mode
Energy save mode lowers the heating temperature and switches off the illumination on the control panel. The "menu/ok" button remains lit.
If the appliance is not operated for a long time, it automatically switches to energy save mode after a specified time. The period of time until energy save mode is activated is set in the Energy save mode menu.

Requirement: The appliance is ready for operation.
- Press the "menu/ok" button for 2 seconds.
» The menu appears on the display.
- Navigate to the Energy save mode menu.
- Use the arrow buttons to select a period of time and confirm with "menu/ok".
- Exit the menu with the Exit command.
» The appliance is ready for operation.
Energy save mode is ended by pressing the "menu/ok" button.
Energy save mode cannot be deactivated completely. After 4 hours without being operated at the latest, the appliance switches to energy save mode.
8.5 Setting Auto OFF
If the appliance is not operated for a long time, it switches off automatically after a specified time. Set the duration until the appliance switches off in the Auto OFF menu. A specific point in time can also be defined.
If the duration and point in time are activated simultaneously, the appliance switches off after the event that occurs first.
Setting the duration for Auto OFF
Requirement: The appliance is ready for operation.
- Press the "menu/ok" button for 2 seconds.
» The menu appears on the display.
-
Navigate to the Auto OFF > OFF after... menu.
-
Use the arrow buttons to select a time and confirm with "menu/ok".
- Repeatedly select the Exit command to exit the menu.
» The appliance is ready for operation.
Setting the point in time for Auto OFF
The OFF time point is deactivated as default in the factory.
Requirement: The appliance is ready for operation.
-
Press the "menu/ok" button for 2 seconds.
» The menu appears on the display.
-
Navigate to the Auto OFF > OFF at... menu.
- Use the arrow buttons to select the hours and minutes. Confirm each setting with "menu/ok"
- Repeatedly select the Exit command to exit the menu.
» The appliance is ready for operation.
To deactivate the Off time, set the off time to 00:00.
8.6 Activating/deactivating rinsing
Rinsing is always carried out immediately after switching on the coffee system. Only the Off rinsing can be activated/deactivated. If this is activated, rinsing is carried out after switching off the coffee system.
Permanent deactivation is not recommended.
Activating/deactivating switch-off rinsing
Requirement: The appliance is ready for operation.
- Press the "menu/ok" button for 2 seconds.
» The menu appears on the display.
- Navigate to the Settings> Switch-off rinsing menu.
- Use the arrow buttons to select Enabled or Disabled and confirm with "menu/ok".
- Repeatedly select the Exit command to exit the menu.
» The appliance is ready for operation.
8.7 Resetting the appliance to the factory settings
The appliance can be reset to the factory settings.
If the appliance is reset to the factory settings, all personal settings are lost, including the settings in the My Coffee menu.
Requirement: The appliance is ready for operation.
- Press the "menu/ok" button for 2 seconds.
The menu appears on the display.
- Navigate to the Settings > Factory settings menu.
- Use the arrow buttons to select Reset and confirm with "menu/ok".
- Repeatedly select the Exit command to exit the menu.
» The appliance is ready for operation.
8.8 Statistics and System menu
Statistics
The Statistics menu provides information on the number of beverages dispensed and for maintenance.
System
The System menu provides information on the software version and access to the Venting function, see „10.1 Venting the appliance" on page 62.
8.9 Setting the grinding fineness
The grinding fineness of the coffee beans influences the flavour of the coffee. The grinding fineness has been optimally set prior to delivery.
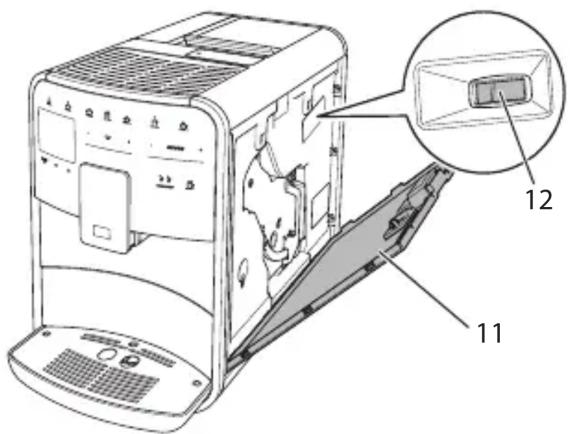
Fig. 17: Setting the grinding fineness
- Open the cover (11). To do this, reach into the recess on the right of the appliance and pull the cover off upwards.
- Move the lever (12) forwards or backwards.
ü Backwards = grinding fineness coarser
Forwards = grinding fineness finer
- Close the cover. To do this, insert the bottom of the cover into the appliance and swing it up until it engages.
If the grinding fineness is set finer, the coffee flavour is stronger.
The grinding fineness is optimally set when the coffee flows evenly out of the outlet and a fine, dense crema appears.
8.10 Converting the connection for the milk hose (depending on the model)
Optionally, the milk hose can be connected on the left or right side of the spout.
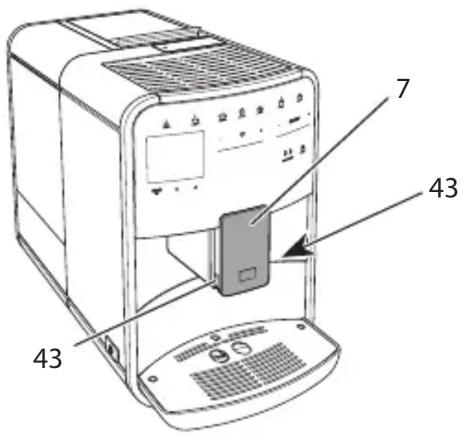
Fig. 18: Turn the inlet, 1
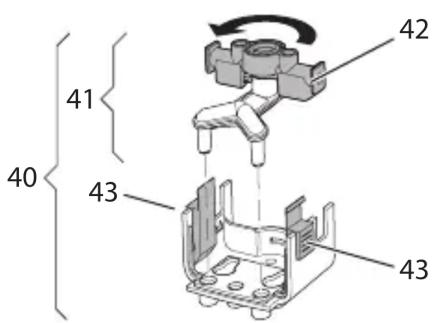
Fig. 19: Turn the inlet, 2
- Pull the milk hose off the appliance.
- Push the outlet (7) down as far as it will go.
- Press the locking mechanism (43) of the milk unit (40) together using two fingers and pull the milk unit downwards off the outlet.
- Pull the milk distributor (41) upwards out of the milk unit.
- Turn the inlet (42) by 180^ .
Installation is carried out as described in reverse order.
To install, push the milk unit (41) onto the outlet (7) using both hands. Make sure that the locking mechanism (43) audibly engages on both sides.
9 Care and maintenance
Regular cleaning and maintenance ensure the consistent high quality of your beverages.
9.1 General cleaning
Clean the appliance regularly. Immediately remove external soiling caused by milk and coffee.
ATTENTION
The use of unsuitable cleaning agents can lead to scratched surfaces.
- Do not use any abrasive cloths, sponges or cleaning agents.
Requirement: The appliance is switched off.
Clean the outside of the appliance with a soft, damp cloth and normal washing-up liquid.
- Rinse the drip tray and the coffee grounds container with a soft, damp cloth and normal washing-up liquid.
Clean the bean container with a soft, dry cloth.
9.2 Rinsing the coffee system
During rinsing, the nozzles at the outlet and the internal parts of the coffee system are rinsed. As a result, rinsing water from the interior enters the drip tray.
If switch-off rinsing is not deactivated, the appliance rinses the coffee system when switching on and off.
Rinsing can also be carried out manually.
Requirement: The appliance is ready for operation.
- Place a vessel beneath the outlet.
- Press the "menu/ok" button for 2 seconds.
» The menu appears on the display.
- Navigate to the Care > Rinsing menu.
- Use the arrow buttons to select Start and confirm with "menu/ok".
» The coffee system is rinsed.
» The appliance is ready for operation.
9.3 Cleaning the brewing unit
To avoid damage to the appliance, we recommend cleaning the brewing unit once a week.
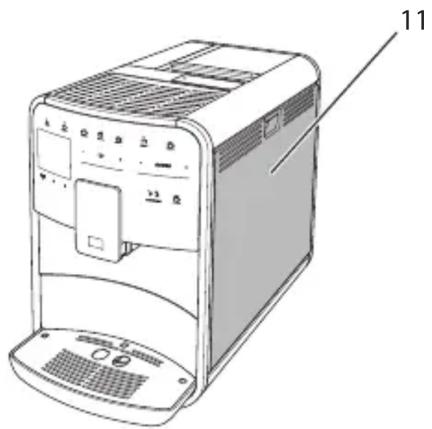
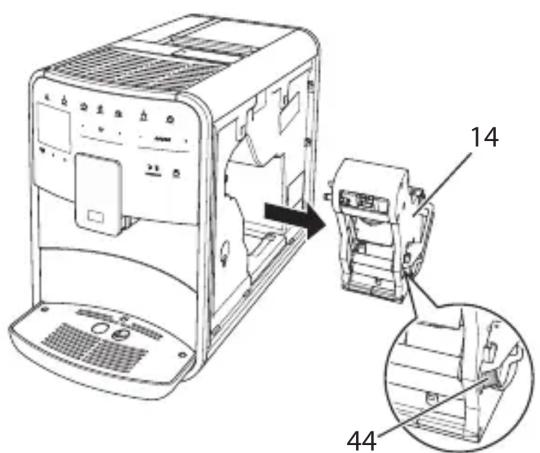
Fig. 20: Removing the brewing unit, 1
Fig.21: Removing the brewing unit, 2
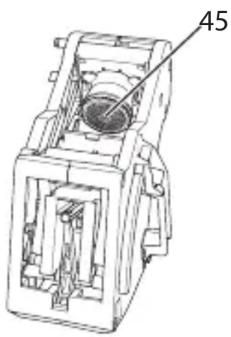
Fig.22: Cleaning the brewing unit
Requirement: The appliance is switched off.
- Open the cover (11). To do this, reach into the recess on the right of the appliance and pull the cover off upwards.
- Press and hold the red lever (44) on the brewing unit handle (14) and turn the handle clockwise until it engages at the stop.
- Pull the brewing unit out of the appliance by the handle.
- Rinse the entire brewing unit thoroughly from all sides under running water. In particular, make sure that coffee residues are removed from the sieve (45).
- Allow the brewing unit to drip dry.
- Use a soft, dry cloth to remove coffee residues from the surfaces inside the appliance.
- Insert the brewing unit into the appliance. Press and hold the red lever on the handle of the brewing unit and turn the handle counter anticlockwise until it engages at the stop.
- Close the cover. To do this, insert the bottom of the cover into the appliance and swing it up until it engages.
9.4 "Easy Cleaning" programme
The milk system is rinsed using the "Easy Cleaning" programme.
Each time after a beverage has been prepared with milk, the appliance requests you to execute the "Easy Cleaning" programme.

The "Easy Cleaning" programme can also be run manually.
Requirement: The appliance is ready for operation.
- Place a vessel beneath the outlet.
- Press the "menu/ok" button for 2 seconds.
» The menu appears on the display.
- Navigate to the Care > Easy Cleaning menu.
- Use the arrow buttons to select Start and confirm with "menu/ok".
- Follow the further instructions on the display up to the end of the "Easy Cleaning" programme.
» The appliance is ready for operation.
9.5 "Cleaning milk system" programme
This programme is used to clean the milk system with the aid of a milk system cleaning agent.
To maintain hygiene and avoid damage to the appliance, we recommend carrying out the cleaning programme once a week.
The cleaning programme takes approximately 3 minutes and should not be interrupted.
ATTENTION
The use of unsuitable milk system cleaning agents can damage the appliance.
- Only use Melitta® PERFECT CLEAN milk system cleaning agent for fully automatic coffee makers.
- Observe the processing instructions on the packaging of the milk system cleaning agent.
Requirement: The appliance is ready for operation.
- Place a vessel with a capacity of at least 0.7 litres beneath the outlet (e.g. the coffee grounds container).
- Press the "menu/ok" button for 2 seconds.
» The menu appears on the display.
- Navigate to the Care > Cleaning milk system menu.
- Use the arrow buttons to select Start and confirm with "menu/ok".
- Follow the further instructions on the display up to the end of the milk system cleaning programme.
» The appliance is ready for operation.
Cleaning the milk unit
In addition, we recommend cleaning the milk unit, the milk hose and the milk container regularly.
The plastic milk container (depending on the model), without lid and riser pipe, is dishwasher-safe.
The thermal milk container (depending on the model) and its individual parts must not be cleaned in the dishwasher.
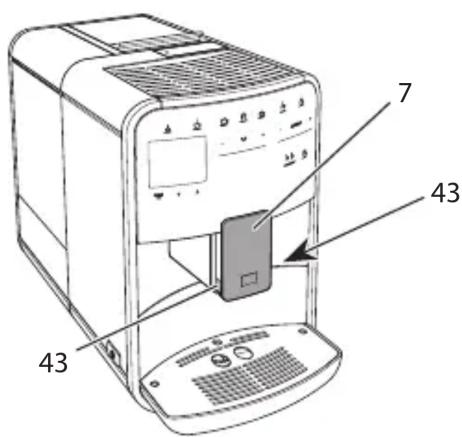
Fig.23: Removing the milk unit, 1
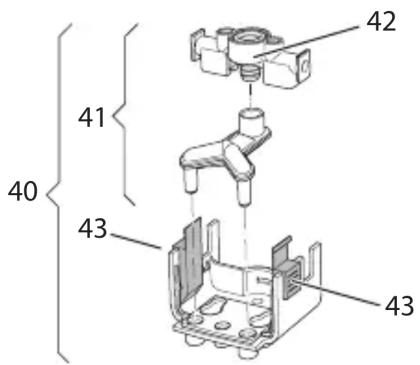
Fig. 24: Removing the milk unit, 2
- Pull the milk hose off the appliance.
- Push the outlet (7) down as far as it will go.
- Press the locking mechanism (43) of the milk unit (40) together using two fingers and pull the milk unit downwards off the outlet.
- Pull the milk distributor (41) upwards out of the milk unit.
- Pull the inlet (42) out upwards.
- Clean the individual parts with warm water. Use a soft, damp cloth and normal washing-up liquid.
Installation is carried out as described in reverse order.
To install, push the milk unit (40) onto the outlet (7) using both hands. Make sure that the locking mechanism (43) audibly engages on both sides.
9.6 "Cleaning coffee system" programme
This cleaning programme is used to remove residues and coffee oil residues with the aid of coffee machine cleaning agents.
To avoid damage to the appliance, we recommend carrying out the cleaning programme every 2 months or as requested by the appliance.
Before starting the cleaning programme, clean the brewing unit and the interior (see section 9.3, page 57).
The cleaning programme takes approximately 15 minutes and should not be interrupted.
CAUTION
Contact with coffee machine cleaning agent may lead to eye and skin irritation.
- Observe the processing instructions on the packaging of the coffee machine cleaning agent.
ATTENTION
The use of unsuitable coffee machine cleaning agents can damage the appliance.
- Only use Melitta® PERFECT CLEAN cleaning tabs for fully automatic coffee makers.
Requirement: The appliance is ready for operation.
- Press the "menu/ok" button for 2 seconds.
The menu appears on the display.
- Navigate to the Care > Cleaning coffee system menu.
- Use the arrow buttons to select Start and confirm with "menu/ok".
- Follow the further instructions on the display up to the end of the cleaning programme.
» The appliance is ready for operation.
9.7 "Dscaling" programme
The descending programme is used to remove limescale deposits in the interior of the appliance with coffee machine descending agents.
To avoid damage to the appliance, we recommend carrying out the descaling programme every 3 months or as requested by the appliance.
With consistent use of a Melitta water filter, carry out the descending program at least once a year.

The descending programme takes approximately 15 minutes and should not be interrupted.
CAUTION
- Observe the processing instructions on the packaging of the descaling agent.
ATTENTION
Use of unsuitable descending agent may damage the appliance.
Only use Melitta® ANTI CALC liquid descaling agent for fully automatic coffee makers.
- Observe the processing instructions on the packaging of the descaling agent.
ATTENTION
A water filter may be damaged if it is screwed in during the descaling programme.
- Remove the water filter when the appliance requests you to do so (see Fig. 25, page 61).
- Place the water filter into a vessel filled with tap water during the descaling programme.
The water filter can be reinserted and reused when the descaling programme is complete.
Requirement: The appliance is ready for operation.
- Press the "menu/ok" button for 2 seconds.
» The menu appears on the display.
- Navigate to the Care > Descaling menu.
- Use the arrow buttons to select Start and confirm with "menu/ok".
- Follow the further instructions on the display up to the end of the descending programme.
» The appliance is ready for operation.
9.8 Setting the water hardness
The set water hardness influences the frequency of descending. The harder the water, the more frequently the appliance has to be descaled.
The water hardness cannot be set if you use a water filter (see section 9.9, page 60).
Determine the water hardness with the enclosed test strip. Observe the instructions on the test strip packaging and in the table Water hardness range, page 62.
Requirement: The appliance is ready for operation.
- Press the "menu/ok" button for 2 seconds.
» The menu appears on the display.
- Navigate to the Settings > Water hardness menu.
- Use the arrow buttons to select the water hardness range and confirm with "menu/ok".
- Exit the menu with the Exit command.
» The appliance is ready for operation.
9.9 Using a water filter
The use of a water filter extends the service life of the appliance and the appliance has to be descaled less frequently. The water filter contained in the scope of delivery filters calcium and other pollutants out of the water.
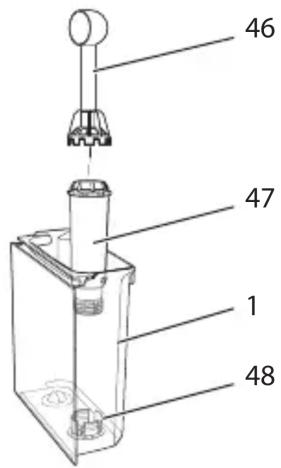
Fig.25: Screwing/unscrewing the water filter
The water filter (47) is screwed into and unscrewed from the thread (46) on the base of the water tank (48) using the screwing aid at the end of the enclosed coffee spoon (1).
Inserting the water filter
Place the water filter into a vessel filled with fresh tap water for a few minutes before inserting it.
Requirement: The appliance is ready for operation.
- Press the "menu/ok" button for 2 seconds.
» The menu appears on the display.
- Navigate to the Care > Filter > Insert filter menu.
- Use the arrow buttons to select Start and confirm with "menu/ok".
- Follow the further instructions on the display.
The water hardness is automatically adjusted on the water filter by the appliance.
» The appliance is ready for operation.
Changing the water filter
Change the water filter when the appliance requests you to do so.
Requirement: The appliance is ready for operation.
- Press the "menu/ok" button for 2 seconds.
» The menu appears on the display.
- Navigate to the Care > Filter > Change filter menu.
- Use the arrow buttons to select Start and confirm with "menu/ok".
- Follow the further instructions on the display.
The appliance is ready for operation.
Removing the water filter
The water filter should not be left standing dry for a long period of time. When it is not used for a long time, we recommend storing the water filter in a vessel filled with tap water in the refrigerator.
Requirement: The appliance is ready for operation.
- Press the "menu/ok" button for 2 seconds.
» The menu appears on the display.
- Navigate to the Care > Filter > Remove filter menu.
- Use the arrow buttons to select Start and confirm with "menu/ok".
- Follow the further instructions on the display.
The water hardness is automatically reset to the previous setting.
» The appliance is ready for operation.

10 Transport, storage and disposal
10.1 Venting the appliance
We recommend venting the appliance when it is not used for a long period, prior to transport and when there is a risk of frost.
During venting, residual water is removed from the appliance.
Requirement: The appliance is ready for operation.
- Place a vessel beneath the outlet.
- Press the "menu/ok" button for 2 seconds.
» The menu appears on the display.
- Navigate to the System > Venting menu.
- Select Start using the arrow buttons and confirm with "menu/ok".
- Follow the further instructions on the display.
The appliance switches off.
10.2 Transporting the appliance
ATTENTION
Freezing residual water can damage the appliance.
Prevent the appliance from being exposed to temperatures below 0^ C .
Transport the appliance in the original packaging. This avoids damage in transit.
Before transporting the appliance, carry out the following activities:
- Vent the appliance (see section 10.1, page 62).
- Empty the drip tray and the coffee grounds container.
- Empty the water tank.
- Empty the bean container.
-
Clean the appliance (see section 9.1, page 56).
-
Secure loose parts (cup plate, etc.) with suitable adhesive tape.
- Package the appliance.
10.3 Disposing of the appliance
Appliances marked with this symbol are subject to the European Directive 2012/19/EU for WEEE (Waste Electrical and Electronic
Equipment).
Electrical appliances do not belong in domestic waste.
- Dispose of the appliance in an environmentally friendly manner via suitable collection systems.
11 Technical data
| Technical data |
| Operating voltage 220 V to 240 V, 50–60 Hz |
| Power consumption Max. 1450 W |
| Pump pressure Static, max. 15 bar |
| Dimensions |
| Width | 255 mm |
| Height | 365 mm |
| Depth | 465 mm |
| Capacity |
| Bean container | 2 × 135 g |
| Water tank | 1.8 l |
| Weight (empty) 10.6 kg (Barista TS) |
| 10.4 kg (Barista T) |
| Ambient conditions |
| Temperature | 10 °C to 32 °C |
| Relative humidity | 30 % to 80 %
(non-condensing) |
| Bluetooth | Bluetooth low energy 4.2 |
| Frequency used | 2,400–2,483.5 MHz |
| Maximum transmission power | < 2.5 mW |
| Water hardness range | °dH °e | °fH | |
| Soft | 0 to 10 | 0 to 13 | 0 to 18 |
| Medium | 10 to 15 | 13 to 19 | 18 to 27 |
| Hard | 15 to 20 | 19 to 25 | 27 to 36 |
| Very hard | >20 | >25 | >36 |
12 Troubleshooting
If the actions listed below fail to rectify the problems or other problems not listed here occur, contact our hotline (local rate).
The service number can be found on the lid of the water tank or in the Service area of our website.
| ProblemCauseAction |
| Coffee only emerges from the outlet in drips. | Grinding fineness too fine. | ■ Set a coarser grinding fineness (see section 8.9 on page 55). |
| Appliance soiled. | ■ Clean the brewing unit (see section 9.3 on page 57).■ Run the cleaning programme (see section 9.6 on page 59). |
| Appliance is covered inside with limescale. | ■ Descale the appliance (see section 9.7 on page 59). |
| Coffee does not flow. Water tank not filled or inserted incorrectly. | ■ Fill the water tank and ensure it is positioned correctly (see section 4.7 on page 46). |
| Brewing unit clogged. | ■ Clean the brewing unit (see section 9.3 on page 57). |
| Fill beans appears on the display although the bean container is full. | Beans do not drop into the grinder. | ■ Tap lightly on the bean container.■ Clean the bean container.■ Coffee beans too oily. Use different coffee beans. |
| Loud grinder noise. Foreign object in the grinder. | ■ Contact the hotline. |
| Brewing unit cannot be inserted after removing. | Brewing unit is not correctly locked. | ■ Check that the handle for the brewing unit locking mechanism is correctly engaged (see section 9.3 on page 57). |
| Drive is not in the correct position. | ■ Press and hold the "My Coffee/Recipes" button. Also press the ON/OFF button. The appliance initialises. Release the buttons again. |
| System error appears on the display. | Software problem. | ■ Switch the appliance off and on again (see section 4.1 on page 42).■ Contact the hotline. |
| The appliance can be operated using the Melitta-Connect-App. | ■ No Bluetooth connection. | ■ Establish the Bluetooth connection for the first time (see section 4.4 on page 44)■ The Smartphone does not support the Bluetooth function.■ Bluetooth connection not activated on the Smartphone. |
| ■ Appliance reset to its factory settings. | ■ Re-connect the appliance with the Smartphone for the first time (see chapter 4.4 on page 44). |
| ■ The Smartphone is outside the reception range. | ■ Bring the Smartphone into the reception range (max. 5 - 10 m). |
| ■ Another Smartphone is already connected to the appliance. | ■ Close the App on the connected Smartphone. |

Sommaire
www.melitta.nl of www.melitta.be
" +" of " - " drukken
Manuele Bean Select, BARISTA T

Afb. 9: 2-vaks-bonnen reservoir BARISTA T
8.6 Spoeling activeren/deactiveren
Electronic Equipment).
9.4 Programma "Easy Cleaning"
Il programma Easy Cleaning serve a risciac-quare ilsystemadelatte.
- Retire el recipient.
5.2 Preparar capuchino y latte macchiato


- Retire el recipient.
9.4 Programa "Easy Cleaning"
10.2 Transportar laquina
PRECAUCION
3.6 Installation of Melitta-Connect-app
Manuel Bean Select, BARISTA T
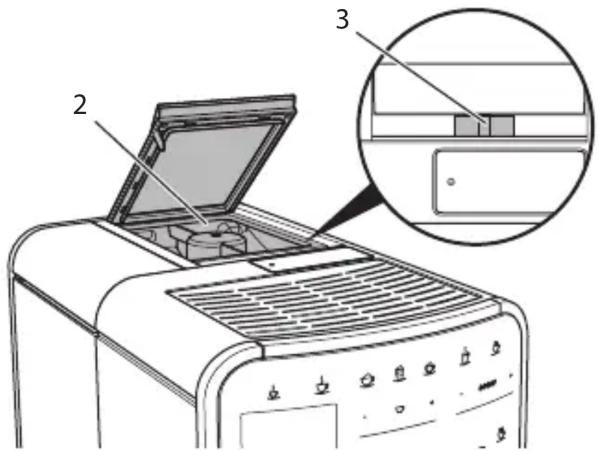
Fig. 9: 2-kammer-bonnebeholder BARISTA T
Med/slideren "BEAN SELECT" (3) kan du skifte mullem kamrene tilarbonateholderen (2).
FORSIGTIG
I displayet vises Easy Cleaning? (OK for start).
» I displayet vises Easy Cleaning? (OK for start).
9.4 Programmet "Easy Cleaning"
Mælkesystemet skylles med Easy Cleaning-programmet.
10.2 Transport of maskinen
OBS
Frossent restvand kan medføre skader på maskinen.
Electronic Equipment).
9.4 Programmet "Easy Cleaning"
Med programmet Easy Cleaning spolas mjölksystemet.
Manuell Bean Select, BARISTA T
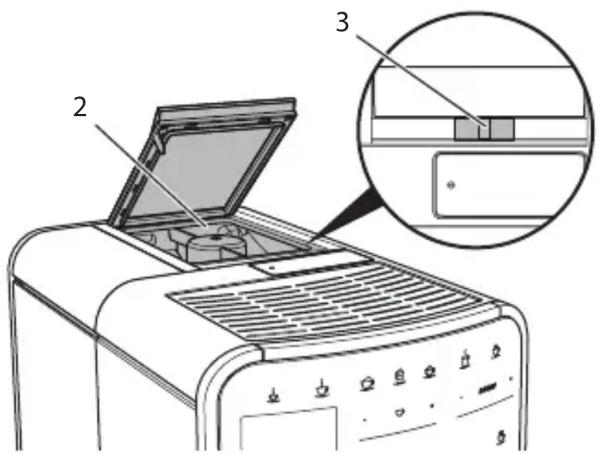
Fig. 9: 2-kammer bxonnebeholder BARISTA T
Med skyveren "BEAN SELECT" (3) kan du skifte mellom kammerne til bonnebeholderen (2).
A FORSIKTIG
Ved omkoplingen av bønnekammeret forblir ved BARISTA T en resterende mange de kaffebeɒnner i kvernen. De første to kaffedrikkene etter skiftet til koffeinfri kaffe kan fremdeles inneholde koffeinholdig kaffe. Helsemessige skadevirkninger for personer som/DDke taler koffein kan være konsekvensen.
» Drikk tilberedes.
» i displayet vises Easy Cleaning? (OK for start).
Melkeleveringen beginnner.
» i displayet vises Easy Cleaning? (OK for start).
» i displayet vises Easy Cleaning? (OK for start).
9.4 Programmet "Easy Cleaning"
Med "Easy Cleaning"-programmet skyles melkesystemet.
Sette inn vannfilter
- Unngå ä utsette apparater for temperaturer under 0^ .
Transporter apparatet i originaleballasjen. Dermen unngar du transportskader.
Electronic Equipment).
5 PnuroToBLeHne HAnrTkoB 319
5.1 PpuroToBvIeHne 3cnpcecco n Kofo-Kpema 320
5.2 PnpuroToBHeHne KaynuHNo I NaTte MaKKnato 320
5.3 PnpuroToBJeHne MOnOuHOI NeHbI TeNlOro MoLoKa 320
5.4 PnpuroToBJIeHne ropeuey BOIby 320
5.5При��ToBJIeHHe NaHNTKOB nopeceIaM (ToIbko MoIeJIb BARISTA TS) 320
5.6Измениностroекдя наNTKOBdo,BOВреми послпригOTOBеон.. 321
5.7 Otmeha npirotoBneHnaHnTka 321
5.8 PnpuroToBJeHne DByx HauNTKOB OndHOBpeMeHHO 322
6 CoxpanenHe NaCTpoek Ira HaNTKOB 322
6.1 BbIbOppeuenTob 322
6.2 N3MeHeHne npedBapnteIbIhIx HacTpoEK 323
7 PercoHaJIbHbIe HacTpoiKn -,Moi KoΦe" 323
7.1 06pa6otka nepcoHaJIbHbIX npoΦnIe nOJIb3OBATeIeI .323
7.2 Bb6op/n3MeHeHne nepcoHaJIbHbIX HacTpoEK 324
7.3ПригOTOBЛЕне НаиNTКовспесоньнынHaCTрОйКамn.....324
8 ⅢmeHeHne OCHOBbIX HacTpoEK. 325
8.1 HactpoRka J3bika 325
8.2 HactpoIka BpeMeHn Ha yacax 325
8.3 A bTOMaTnuecka aKTbBaCua/daekTbBaCua nepeKlIouaTeJI BbI6Op 3epeH (ToJbKO MoJeB BARISTA TS) 326
8.4 Hactpoikapexkmaekohomn3heprnn 326
8.5 HactpoIka aBtOMaTnueCKoro BbIKJUoyeHnra 326
8.6 AktuBaun/daekTuaun npomblk 327
8.7 BocctaHOBJIeHne 3aBOcknX yCTaHOBOK aannapata 327
8.8 MeHIO CmamucmuKa u Cucmema 328
8.9 HactpoIka ToHkOCTn NOMOJa 328
8.10 I3meHHe IOdkIIOUeHn Tpy6Kn dJa MoJOKa (B 3aBvNCIMOCTn OT MoJeN) 328
9 Yxoid TeXnueckoe 6cbnyKuBaHne 329
9.1 O67aJyNCTka 329
9.2 PpombbKa KofoeHOn cnCTembl 329
9.3 Ynctka 6JIOKa 3aBapuBaHnra 330
9.4 Iporpamma,JIerka yncTkac" 331
9.5 IporpaMMA, YnCTka MoNoUHOcNCTeMbI 331
9.6 PpOrpaMMA ,UncTkA KoFeHoi CnCTembl" 332
9.7 Iporpamma,uaaleHne haknn" 333
9.8 HactpoRka JecTkoCTn BOdbl.. 334
9.9 IcnoIb3OBAHne 6nIbTp a nra BOJbl 334
10 TpaHcnpTnpOBka, xpaHeHne n yTuIn3aunia 335
10.1 BbIapuBaHne annapaTa 335
10.2 TpaHcnpTnpoBka annapaTa 336
10.3 YtniHaaun aannapata 336
11 TexHHueckne xapaKTepeNCTnKn 336
12 HeicnpaBHOCTn 337

1 063op annapata
1.1 06иьвдappapata
Puc. 1: Buδ annapama cnepeδu cneba

Puc.2:Budannapama cnepedu cnpa8a
1KoHTeHepIJI BODbl
2Дыхкамернь КОТTeHep ДЯ КофeнHyIx 3epeH
3Пepeключateь BbIbOP 3EPEH (Toьko moДeль BARISTA T) BbIbOP 3EPEH b BARISTA TS cm. n03. N° 30.
4 OTeK dIy MoJIoTOro KoOfe
5 PoiDCTabKa dJa yaushKn
6 NaheJIb ynpaBJeHnA
7 Perynipyemoe no BbICote BbInyckHoe OTBepCTne c 2 Hacdkamn dIy Ipoayn Kofoe, 2 Hacdkamn dIy Ipoayn MoJoka, 1 HacdkoN dIy Ipoayn ropayeB BoDbl, IPOCBETKO nIy YaAaKN (ToJIbKO B MoJeTI BARISTA TS)
8 EMKoCTbДЯ KOFeHOrO JKMbya (BHyTp.)
9Поддондясбopaкаль
10 KhoIIka"BkJI./BbIKJ."
11 Koxyx
12 Pbyar "PerynlpobKa ToHkoCTn nomola" (3a KoJxom)
13 CeTeBOI Ka6eJIb CO cneUHaNbHbIM BbIDBnXhBbIM OTCEKOM
14БLOK3aBapuBaHn(3aKOxyxOM)
15 Pa3bem ДЯ NOДКЛЮЧЕНИТубкДЯ MOJOKa Ha BblIpyCKHOM OTBepCTIN.
16 Pa3bem Дя поДКЛЮЧЕпгТуБкДЯ молOKа Н рОДдОHe Дя сбopa KaIeNB
17 PóDorpeBaemá PóDcTaBka DЯчseK
18Понлавok
1.2 06иьд панелуправлесия
Puc.3: PanaHenb ynpaBneHua
I03.Ha3BaHneФyHKcUra
19 Khonkn noaun PnrotoBneHne HanntkoB
20 3cnpecco PpuroToBVeHne 3cnpecco
26 2 yaushknpnroTOBJIeHne DByx YaueK Kofo
27 PeryIaTOp 6bema HacTpoIka 6bema HaNTKaHaNTKa
28 PerylaTOp KpeNoCTn HacTpoJa KpeNoCTn Kofoe Kofoe
29 Moi Kofoe/PeueentbI Bbl6op nepcoHaJIbHbIX HAcTpoEk IJIa HaNTKOB IIIN (B BARISTA TS) npnroTOBJIeHne HaNTKOB nO peceNTam.
Moi Kofo Bb6op nepcoHaJIbHbIX HactpoeK JIa HAnITkoB. (B BARISTA T)
30 BbIbOP 3EPEH Bbl6op copTa KofoeHbIX 3epeH (ToJIbKO MoJeB bARISTA TS).
"BbI5OP 3EPEH" B BARISTA T cm. n03. N° 3.
31 KhoNka co cTpeKoI IepemeueHne BBePx nO MeHIO uIN HacTpoKa apOMaTa BBepx KoΦe CTAHДAPT.
32 Khonka co ctrpeIkoB Hn3 Kofo HHTECBbI.
33 MeHIO/ok BbI3OB MeHIO IIN IOITBepXJeHne BBOda
34Диспел IHHДИКацЯ TeKуцnx MeHNo n COO6eHn IPrIMep: INHДИKaця rOTOBHOCtN
YBaXaEmbI NOKyNaTeIb,
6laqoapm Bac 3a To, uTo Bbl BbIbpaII KofoeHbI aBtOMaT BARISTA Smart®.
u He donyckaTe norgyKeHna annapata B Body.
ü HeДonykaIte KOHTaKTa ceTeBOrO Ka6eIa C BODoI.
2.3 Onachoctb polyuhenia okoRa
IopdaBaemaj KnKoCTb n nap MOryT 6bITb OueHb RopayMn. DeTaII aannapata TaKxke MOryT HaRpeBaTbCra Do OueHb BbICOKoI TempepaTypbI.
CobioaTe cJeDyUoJne yka3aHnI NO TexNke 6e3OpacHOCTn, UTObI PpeODTbPaTNTb ONaHOCtB NOLyueHnOxORA:
He donyckaIte nonadaHnnaPOnaBaembIX rOpayx KndKOCTeN n npa Ha KoJy.
U Bo Bpemra pa6oTbI aPnapaTa He npKacaiTeCb K HaCakam Ha BbInyCKHOM OTBepCTIN.
2.4 06цая 6e3o nanopoctb
Co6lIoJaIe cIeDyUoIne yKa-3aHnI IO TexHnke 6e3OpaC-HocTn, UTO6bI IpeDOTBpaTHTb ONaCHOCTb TpaBMIpOBaHnI nII npuHHeHnMaTePnaJIbHOro yUeR6a:
ü He ṄκcpnlyaTnpuǐte aπnapaT B škaΦy n T. π.
ü 3aŋpeɪəeTcŋ KacatbCŋ BHy- TpɛnHnx DeTalēŋ aʌnpaTa B Inpoʊçec eero pa60tbl.
ü XpaHnte aannapat n ceTeBOJ Ka6eJIb B MeCTe, HeIOCTyINHOM DnI JeTei MlaIaIwe 8 Iet.
UДанньй apnapaT moxet
NcnoIb3OBaTbCЯ DeTbMn
CTap7e 8 leT, a taKxe IIncaMn
C OrgaHnueHHbIMn Φn3nue-CKIMn I NCNXnueCKIMn BO3-MOxHOCTaMn, IIn6O IIncaMn,
He IMeIOuIMn COOTBeTCTBvIO-
Iux 3HaHni n OnbIta, TOnbKO
POnd NaD3OpOM nIIN PocLe
POnyuHnja Heo6XoIMbIX
HNCTpyKcni nO o6paueHniO
C DaHHbIM aPnpaTOM n OCBe-
DomJIeHnra O CBa3aHHbIX C 3TmB
BnDaX ONaCHOCTn.
ü DeTЯm 3aIpeuaeTcra nIgpaTb c aIappaTOM. YnCTka n IIOJIb-3OBaTeJIbCKOE TexHnueCKOE O6CJyKINBaHne DoJXHbI BbINOJIHrTbCS TOLbKO JInCaMn CTapWe 8 JeT. DeTЯm CTapWe 8 JeT pa3peuaeTcra BbINOJIHrTb ChCTKy n IIOJIb3OBaTeJIbCKOE TexHnueCKOE O6CJyKINBaHne TOJIbKO PoI HaI3Opom CTap-IXX.
ü Ecni ynpaBleHne aPnapaTOM OcyuaceTBJAreTcC Mo6nIb-Horo yCTpOiCTBa, y6eIntEcB B TOM, uTO B6n3n aPnapaTa OTCyTCTByIOT JeTI N TO B aPnapat yCTaHOblHa qAshaKa.
ü Octablaя annapaT haДлntelbHoe Bpem8 6e3 npncmo-tpa,OTcoeDHHTe erO OT cetnəJIekTpOPITaHnY.
ü 3anpeucaetcyaTauaunnaapata Ha BbICOTe CBblse2000 metpoB.
ü Пи оочстke прибора и erо
КOMПОНЕТов соблюдайт
уka3aня, привedeнные в
СоOTВЕТСТВУОSUЧЕД
(,)Ухod umexнUCHECKoe obслу-
жubahue"Ha cmp. 329).
3 C yero haayatb
B daHnoI rnaBe onncbIbaeTc npraDOK NOdROTOBKn aannapaTa K nCNoJIb3OBaHnIO.
3.1 PacnaKobka annapata
A OCTOPOXHO
KoHTaKT C qHCTaUIMN CpeIcTBaMn MOKeT BbI3BaTb pa3dpaXeHne cIn3n-CToI O6OLOUKN rla3 N KOKhbIX POKPOBOB.
XpaHnTe NOCTaBJIeMbIe B KOMnJIeKTe YnCTaUHe CpeDcTBa B HeNoctyHOM DJa DeTeMecTe.
Pacnakyte annapaT. CnmuTe c anpa- paTa ynpaKOBouHbMATEpnaI, KJIeKyIO IeHTy n 3aunTHyIO PIIeHKy.
CoxpaHnTe ynaKOBOHybIMaTePnHa HcLyuayTpaHCnOpTnPOBKn IN BO3MOx-HoI OTnpaBKn I3rTOBnTeJIIO.
iHΦopmaçnA
B aappaTe MoryT haoOnTbcra octaTKn Kofoe nnn BODbl. Ha 3aOBe n3ROTOBNTeJIa
npoBODITcI npOBepKa nCnpaBHOCTn yHKUOHNPOBaHna aPnapaTa.
HaNoJIHnTe KOHTeHep CBExeN BODoN U BCTaBbTe Ha MeCTO.
» AnnapaT Harpeetca N BbINOJIHNT aBTOMaTnueckyU npOMbIBKy.
»HaДиСплee NOЯВИТСЯ ИнДИКАТОР ГOTOBHOCHTИЗаПСОС 3acbInamb 3epHa.
- 3acbIbTe KofoeHbIe 3epHa B COOTBeTCTBvUOuN KOHTeHep. DOnoJIHnTeJbHyU INΦOpMauNcM. B rJaBe HanolHeHue KofoeHbIMu 3epHamu uucnoIb3ObaHue nepeKIOyamEna Bb6Op 3epen, cmp. 315.
3.6 UctaHOBka Пиюжену Melitta-Connect
YnpabLeHne aannapatom moKeT ocyu
IeCTBJIaTBcra nO Bluetooth c IomoubIO
MO6nJIbHbIX yCTpOcTB, pa6OtaUoXn Ha
OpeauOnHOi cnCTeme iOS nIi Android
I IOdepKNaUoXh FyHKCuIO Bluetooth.
Jlra 3TOrTO Tpe6yeTc npInIoXeHne Melitta-
Connect. PoIpo6Ha nHfOpMaun npINBe-
deHa Ha caIte WwW.melitta.ru.
Приложенnesпразлагаet урочен-Ноe управлиныаappaTom, удбнoeуравlene Habстюйамиnpoшлamyнользовател,а ТAKже другпсункци

n doctyn K Smart Service (cepBucnoi ropaeyen liHHn, daHbIM aappaTa n T. n..). IcnoIb3yembl B daHHOM pyKOBOdCTBe TepmH "cMapTfoh" npda3yMeBaet cMapTfohbl n PnaHweTbl.
Сkaуновприложеня
- HanDiTe B MaRa3Ine npNuOxKeHn BaUero cMapTfoHa npNuOxKeHne Melitta-Connect.
- YcTaHOBInTe npuIooKeHne B BaWeM cMapTfoHe.
4 OchOBhble npHcnpbluynpaBleHna
B daHno rnaBe onncbIbaOTcOCHOBHbIe 3TaNbI ynpaBHeHn, Heo6XoIMMbIe IJy NOBceDHeBHO nCNoJIb3OBaHn aPpapaT.
yTO6bI BbI6paTb yHKcHIO.

YdepeKnBaIte KhoNky "MeHIO/ok" HaxaToB TeueHne 6oJee 2 CeKYND, YTO6bI Bbl3BaTb MeHIO.
HaKmnte Ha KhONky "MeHIO/ok", uTo6bI NOdTBePdNtB CBOI Bbl6Op.
Habiracnyo MeHIO
HaJKMnte Ha KHOJIKN CO CTpeJIKAmU, UTO6bI NepeMeCTNTbCBy BHN3 ININ BBepx NO MeHIO. YdePJKBaIte KHOJKY CO CTpeIKoN HaxaToN, UTO6bIBBINOJHNTb 6bICTpbI NepexOJ K HxKhbIM NyHKTaM MEHIO.
BbIXoI n3 MeHIO

C pOMOuIbKHOIpOK co cTppeI- KaMn Bbl6epnte KOMaHny BbxO
I NIOITBepiTe HaKaTneHa "MeHIO/ok", YTO6bI BbIHTN U3 MeHIO.
BbIXoI N3 NOIMeHIO, B KOTOpbIX TOnbKO OTo6paKaTeCn IHΦopMauzn I Ne Ocy- tceTBJIaOTc NaCTpOJKN, OCyUeCTBJIa- etc PocpeDCTBOM HaKaTnHa Ha "MeHIO/ ok".
BbI3OB NOmEHO
IocTyN K HeKOTOpbIM fYHKUaM OcyuEcT-BJAreTc NOCpeDCTBOM NOCJeIOBaTeJIb-HOrO Bbl3OBA HeCKoJIbKIN NOmEHIO.
BbI3OB NpDMeHIO BbIINJHReTcra Bcerda OdHaKoBO.HanpIMep,3decb npIBO-DnTcR ONuCaHne nepexOJa K nporpaMMe YdaJIeHue HaKunu.
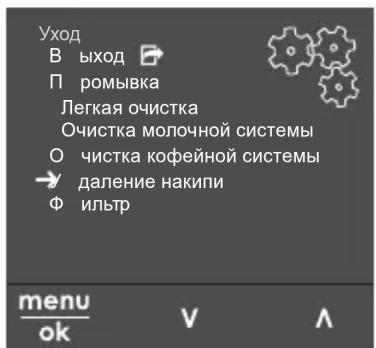
Puc.7: IepexoK npoZpaMMe ouucmku om Hakunu
-
YdepxnBaIte KHONky "MeHIO/ok" HaxaToB B TeueHne 2 ceKyuHd. Ha nCpIee IPOBNTcMHeIO.
-
C nOMOuKHOJOK co CTpeJIkaMn Bbl6epnte onuYxod n noTBePdTe Bbl6Op haxaTneH na "MeHIO/ok".
- C nOMOu bKHOJOK co CTpeJIkAmn Bbl6epnte onu YdaJeHue HAKunu N IOdTBePdTe Bbl6Op HaKaTneM Ha "MeHIO/ok".

B daHOM pyKOBODCTBe NO 3KcPlyaTaun BB6Op fYHKuN BceRa OTo6paKaetcB COKpaueHHOM BnDe:
- Перашист К мени Yxod > YdaneHue Hakuunu
Heo6xoJnOme yCNoBne:HaIncPJIee OTO- 6paKaTec nHdNKaTOp rOTOBHOCTN.
- YdepxnBaIte KhoNky "MeHIO/ok" haxaToiB TeueHne 2 cekyHd.
»HaДиСпле NOЯВИТСЯ MEHIO.
- ПерейдитЕ к мени Кнонкu nodau > Эспесо > Peuenmbi
- BbI6epNTe c nOMoUIO KHOJOK co CTpeIkanM Pucmpemmo I NOITBep- DInTe BbI6Op, HaxaB Ha "MeHIO/ok".
- BbI6epnte NOBtOpHo KOMaHny BbIXoD, UTO6bI BbIInTu N3 MeHOr.
»HaДиСплес NOЯВИТСУ ИнДИКаTOpI TOTOBHOCHTN.
» B cIeIyUoIuI pa3 npI npnroTOBJIeHnn 3cnpcecco 6yJeT nCNoJb3OBA TbCBpeIeNT pncTpTeTIO.
IHHΦOpMaζηa
ü BbI6paHbI peuENT nCNoJIb3YeTcJ Do Tex nop, NOKa He 6yDyT BHeceHbI HOBbie I3MeHEnIA.
ü B moJIeJI Barista TS Bbl MoJxTe TaKxe Bbl6npaTb peuNTbI HapryMyU, nCNoJIb3yA KHOJKy «MoI KoΦe/ PeuNTbI» (cM. rII. 5.5, cTp. 320).
IpeBapntbHbIe HaCTpoiKn COxpaHJIO Tc DO Tex nOp, POKa He 6yDyT BHeceHbI HOBbl E3MeHeHn.
Heo6xOJnOe yCIOBne:HaIINcPJIee OTO- 6paKaTec INHdNKaTOp rOTOBHOCTN.
- YdepxnBaIte KhoNky "MeHIO/ok" haxaToiB TeueHne 2 cekyHd. Ha dinCpIee nOABNTcMaHIO.
2.ПерейдиTeВМeнюMoU Kofoe.
- Bb6epntecnmoosbIO KHOPOK co cTpeIkaMn POnb3ObaTeIaN IOdTBep- dIte Bb6Op haxaTneM Ha "MeHIO/ok".
- Cпомоью кногok coстpeлkaMuBbIберnte onциAoKmubHbIiHeakmuB-HbIu I NOITBepdnte Bbl6Op HaxKaTneMHa "MeHIO/ok".
- C nOMOuBHO KHOONo cTpeJkAmn BbI6epnte onuH OaMubHbI uNHeaKmubHbI u NpOITBepdTe Bbl6Op HaxkaTneHa "MeHIO/ok".
- BbI6epnte NOBtOpHc KOMaHny BbIXoD, UTO6bI BbIInu3 MeHIO.
»HaДиСплee NOЯВИТСЯИнДИКaTOp rOTOBHOCHTN.
7.2 BbI6Op/ɪnʒMeHeHne ěpeco- HaJIbHbIX HacTpOeK
B 3aBnCmOCTN OT HaNTKa MOxHOb Ha3Ha- uTbДЯ OJHO rOJIb3OBaTeJIr CJeDyUo- uIe HAcTpoiKu:
peceTbI, KOJInueCTBO KoOe, KOJInueCTBO NeHbI, KOJInueCTBO MOJOKa, KOJInueCTBO rOpaei BODbl, TeMnepaTypa, cOpT (ToJbKO moJeB BARISTA TS), KpeNoctb KoOe n apomat KoOe.
Ha3haueHne nepcoHaJIbHbIX HaCTpoE KOnHOMy NOpIb3OBaTeJIIO BCeRda BbINOJIHЯ-ETcra OndHaKOBbIM o6pa3Om. HanpImep, 3DeCb ONICbIBaETcra HaCTpoJka o6bema Kofoe dIpyODHOIN POpCNI KAnyuHNo.
Heo6xoJnmoe ycIobne:Ha dncnnee OTO- 6paKaTeC nHdNkATOp rOTOBHOCTn.
- YdepxnBaIte KhoNky "MeHIO/ok" haxa- ToB TeueHne 2 cekyHd. Ha dinCpIee nOABITcra MeHIO.
- Перейд范围内 Мени мου кофе.
- BbI6epnte c nOmoUbIO KHOJOK co CTpeJIkaMn IOnb3OBaTeJI N IOdTBep- dIte Bbl6Op haxatneH Ma "MeHIO/ok".
- Перашисту в мени КanyuHo >Оьем Кофe.
- C nOmoUbIO KHOJOK CO cTpeJIkAmn Bbl6epNTe Huxhbl Osbem N IOdTBePdnte Bbl6Op HaxaTneM Ha "MeHIO/ok"
- BbIbepnte IOBTOPOHO KOMaHdy BbIXoD, UTo6bl BbIITn N3 MeHIO.
»HaДиСплес NOЯВИТСУ ИнДИКаTOp TOTOBHOCHTN.
》Pn npnroTOBHeHn OndHn nopCnKanyuHNO IJy ONpeJeHHO NOb-3OBaTeJI NcNoJIb3yeTcB bI6paHHaHaHacTroKa 06bema.
7.3 ПригOTOBлесне напт-KOB с персоньними Habстpoйами

Moelb BARISTA TS.

MoJeB BARISTA T.
ПригOTOBеHne HaNTKOB c ФункциeМой Koфe BblOJIHЯETcAHaJOrnHybIMДля BCex HaNTKOB o6pa3OM. Hanpimep,3deCb OINcblBaetcI NOPaDOK prirotobLeHnry NOpCn KaNyUHNo..
Heo6xoJnMoE yCNoBne:HaIncnJIee OTo6paXaETcN HdNKaTOp rOTOBHocTN, IN POnaHa MOnOKa NODKJIouCeHa.
- Повсявтуемкоctь под Выпунckhoe OTверсти.
- HαχиMaIte Ha KhoNky "MoJ KoΦe"do Tex nop, Noka He OTo6pa3ntc HγχHbI NOJIb3OBATeJIb.
-
Hαχmnte Ha Khoŋkγ "KanuynHo". » ΠoДача NaHNTka NaUnHaetcЯ n 3aKaHUnBaETcA ABTomaTnueckN.
-
ChIMMTE emKOCTb c NOДТаВКИ.
Heo6xOaHmoe yCIOBVE:HaIINcPJIe e OTO- 6paKaTeCnIHdNkAToP rOTOBHOCTN.
-
YdepxnBaTe KhoNky "MeHIO/ok" haxaToiB TeueHne 2 cekyHd. Ha dinCpIee nOABNTcMaHIO.
2.Перейдпту в Meню HacmpoКU >ЯзИK.
-
C nOMOuKHOJOK co CTpeIKAmN BbI6epNTe Ra3bIK I NOdTBePdITe Bbl6Op, Haxkab Ha "MeHIO/ok".
- BbIaNTe n3 MeHIO c NOMOuKOMaHdbi BbIXoD
»HaДиСплee ПОЯВИТСЯИнДИКaTOp ГOTOBHOCtN.
8.2 Hac troponka BpeMeHn Ha yacax
Heo6xOJnOe yCIOBne:HaIINcPJIee OTO- 6paXaETcNHNikKaTOp rOTOBHOCTN.
- YdepxnBaIte KhoNky "MeHIO/ok" HaXa- Toi B TeueHne 2 cekyHd. Ha nCpIee IoRbTcMHeIO.
- Перашист В мени Хаимου Ку >Время.
- Bb6epnte c nOMOu KHOOK CO CTpeKamu Yacbl MHyTbI. PoTBePdNTe HAcTPOkN, HaKaB Ha "MeHIO/ok".
- BbIaNTe n3 MeHIO c NOMOuKOMaHDbI BbIXoD
»HaДиСплес NOЯВИТСУнДИКаТОР ГOTOBHOCHTN.
HΦopMaçnA
YTo6bI Ha DnCpJIe He OTo6paXaJIoCb BpeM, yCTaHOBInTe NOKa3aHnB VpeMeHn Ha 00:00.
Ha nucnlee noBntc HndkaTOp rTOOBHOCTN.
8.4 Hac tropona pejknma 3koHOMN N3HeprnN
В р缩水иеме зкономи знергш снжаetсу Temпература награви и OTКлючаetсу посветка панели. Кнорka "Мени/ok" Рпи заим рpoДОЛЖаET CBETNBcR.
B cnyuae npoJOnjNtIeIbHOrO npocToI no nCTueHn 3aJaHHoro BpemeHn aPnapaT aBTOMaTnueCKn nepeKJIouHTcR B peXm 3KOHOmHn 3Heprn. B MeHIO PeXum 3KOHOmuu 3aJaIte Bpemr, KOtopoe DOJxHo npoITn Do MOMeHTa nepeXoJa aPnapaTa B peXm 3KOHOmHn 3Heprn.
Heo6xOaHmoe ycNoBne:Ha dncnnee OTO- 6paJkaTcra INdNkATOp rOTOBHOCTN.
- YdepxBaIte KhoNky "MeHIO/ok" HaxaToiB TeueHne 2 cekyHd.
»HaДисплец NOЯВИТСЯ MEнЮ.
-
Перашипец в мени Ржим лковому у зерцу.
-
C nOMOuKHOJOK co CTpeJkAmn Bbl6epnte Bpemn IOdTBePdnte Bbl6op, Haxab Ha "MeHIO/ok".
- BbIaNTe n3 MeHIO c NOMOu bIO KOMaHdbI BbIXoD.
Ha nucnlee noBntc HndkaTOp rTOOBHOCTN.
IINΦopMaζηa
ú Hακαν Ḥα ΚΗΟΝΚγ "Meιο/ok", ſΤΚΙΟ-чιTe peχιΜ ἐΚΟΗΟΝι ἄΗερΓιN.
ü PexkIM ΘKOHOMN ΘHeprnH HeIb3a DeakTNBnPoBaTb NOnHocTbIO. He 6oJIee Yem uepe3 4 qaca npocTo aannapat IpeKeKJIouHTcB PexkIM ΘKOHOMN ΘHeprnH.
8.5 Hac tropoKa aBtOMaTnueCKOTo BblKJIoueHnA
AnnapaT aBTOMaTnueckn BbIKJIOuHTcno nCTeHn yCTaHOBJIeHHOro BpeMeHn BCnyae npOdoJXnteJbHoro npocToR. MeHIO AByMObIKJIOueHue 3aJaTe BpeM, PO nCTeHn KOTOporo 6yDet BblOnHeHO aBTOMaTnueckoe OTKJIIOueHne. Bby TaKxe MOxKeTe yCTaHOBITb TOUHOE BpeM.
IHHOpMaun
EcnOJHOBpeMeHHo aKTINBnPOBaTb npOJXnteJIbHOCTb N TOUHoe BpeM, anPapaT BbIKIouHTc NO IcTeueHn 60nee KOpOTKOTo OTpE3Ka BpeMeHN n3 yCTaHOBJIeHHbIX.
Hac troяka npodoljntelbnoctn BpeMeHn ДЯ abTomatuyeckoro OTKIOUeHn
Heo6xOaHmoe ycNoBne:HaIncnpee OTO- 6paXaTcra INdNkATOp rOTOBHOCTN.
- YdeprKnBaIe KhoNky "MeHIO/ok" HaxaToiB TeueHne 2 cekyHd.
»HaДиСпле NOЯВИТСМЕнЮ.
- Перейд范围内 Meню АмовьikлочеHue >BbIKIOUumb uepe3...

- C nOMOu bIO KHOJOK co CTpeJIkAmn BbI6epNTe BpEmn IOJTBePdnte Bbl6Op, HaxaB Ha "MeHIO/ok".
- BbI6epnte NOBtOPOHo KOMaHny BbIXoD, UTO6bI BbIITn N3 MeHIO.
»HaДиСплee ПОВВИТСЯИнДИКaTOp TOTOBHOCHTN.
Hactpoia ToCHoro BpeMeHn IaABTOMaTnueCKOrO OTKJIoueHn
Tochoe BpeM OTKJIUoyeHnJaEAKTUNIPOBaHO B COOTBETCTBnC 3aBOJCKIMNaCTpOJKaMn.
Heo6xoJnMoE yCIOBne:HaIncPJIee OTO- 6paKaTecNHNikKaTOp rOTOBHOCTN.
- YdepxnBaIte KhoNky "MeHIO/ok" haxaToiB TeueHne 2 cekyHd. Ha dinCpIee nOABITcA MeHIO.
2.ПерейдnteВMeHIOAzmobbiklIoueHue > BbIKIIOUumb e...
- BbI6epNTe c nOMOuKHOJONOK co CTpeJIkAmn Yacbl MInHytbl. PoIITBepDInTe HAcTPOJKN, HaxKaB Ha "MeHIO/ok".
- BbI6epNTe NOBTOPOHo KOMaHny BbIXO, yTO6bl BbIITN N3 MeHIO.
»HaДиСплquee NOЯВИТСУнДИКаTOpTROTOBHOCTN.
HOpMaun
Прин Heобховимости DeakTиBaци n abToMaTNueCKOro OTKJIQUeHnY cTaHOBNTe BpeM OTKJIQUeHnHa 00:00.
8.6 AkTnBaZnA/JeakTnBaZnA npOMbIBKn
Bcerda cpa3y je nocJe BkIoueHnBbIOJIHReTc npOMbIBKa KofoeHOnCnCTeMbI. MoKHO aKTNBUPoBaTb/DeaKTI-BNPOBaTb TOJbKO npOMbIKy pRn BbIKIOueHn. Ecnn OHa aKTNBUPoBaHa, To npN BbIKIOueHn BbIOJIHReTc npOMbIBKa KofoeHOn CnCTeMbI.
IdeaKTHBaucnHa IInTeHbHoe BpeM He peKOMeHnyetc.
AektuBaun/daekTuaqn npomblKn npn BbIKlOyeHn
Heo6xOaHmoe ycNoBne:HaIncnnee OTO- 6paKaTeCnHdNkAToP rOtOBHOCTn.
- YdepxnBaIte KhoNky "MeHIO/ok" haxaToiB TeueHne 2 cekyHd. Ha dinCpIee nOABITcA MeHIO.
- Перейд范围内 Мени Хашику >ПюМьвka npu вikлочиш.
- C nomoubko KhoNOK co cTpeJkamn Bbl6epnte onuio Akmubhui nn HeakmuBhui u noDTBePdnte Bbl6op HaxkaTneHa "MeHIO/ok".
- BbI6epnte NOBtOpHOn KOMaHny BbIXoD, UTO6bI BbIInTu N3 MeHNo.
»HaДиСплес NOЯВИТСУHДИКaTOp TOTOBHOCHTN.
8.7 BocstahOBJIeHne 3aBODcKnx yCTaHOBOK aPnapaTa
Mожно BOCCTaHOBNTb 3aBOДСКи e yCTa-HOBKN aПпapаТa.
iHΦopMaçnay
B clyuae BOCCTaHOBJeHn3aBODcKnx yCTaHOBOK aPnapaTa TepraIOTcB Cce nepcoHaJIbHbIe HAcTpoiKN, B TOM YnCJIe HAcTpoiKN B MeHIO MoJ KoΦe.
Heo6xOaHmoe yCIOBne:HaIncPJIe e OTO- 6paKaTecI INdIKaTOp rOTOBHOCTN.
- YdeprKnBaIte KhoNky "MeHIO/ok" NaKaToiB TeueHne 2 cekyHd.
»HaДисплец NOЯВИТСМЕнЮ.
- Перашист В мени Наимου К > 3abodckue ycmahOBku.
- C nOMOuH KHOJOK co CTpeJIkaMn BbI6epnte C6poc n IIOJTBePdnte Bbl6Op, HaxaB Ha "MeHIO/ok".
- BbI6epnte NOBtOPOHo KOMaHny BbIXoD, UTO6bI BbIInTn IN3 MeHIO.
Ha nucnlee noBntc uHnKaTOp rTOOBHOCTN.
8.8 Мени СмамUCMuka u Cucmema
CtataCTuka
B MeHIO CmamucmuKa npNBOJNTcI INHΦOpMaциЯ O KOJIueCTBe NOJIyEHHbIX HAnITKOB I o6 yxoJe.
CnCTema
B MeHIO Cucmema npuBoNTcI INHOpMa- cIa o bepcuu npoepamMHOzo oBeceneueHua n DocType K cyHKUIN BbInapubAHue, cm. 10.1 BbInapubAHue annapama"Ha cmp. 335.
8.9 HabstpoiKa ToHkoCTI NOMOJa
ToHKoCTb NOMOJa KOfoeHbIX 3epeH BnIaTeHa Bkyc Kofoe. Annapat noctabLnEtcra C ONTImaJIbHOJ HAcTpoiKOJ TOHKoCTN NOMOJa.
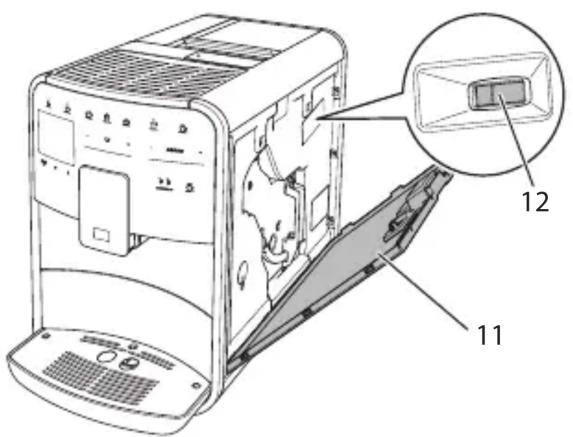
Puc. 17: Hacmpouka mohkocmu nomola
- OtkpoiTe KoJyX (11).ДЯэТOro BO3bMntecb 3a yrIy6JIeHne C npaBoi CTOpOHbl aIInapaTa n NOTAHnTe KoJyX BBepx.
2.Перемecnte pyuag (12)Вперед nln Ha3aД. 乌Ha3aD=6OJIeKpynHbI NOMOJ U BppeD=6OJIeMeJKnNOMOJ
- 3aKpoITe KoxyX.ДЯЭTORO BCTaBbTe KoxyxB aIIpaT CHN3Y I NOdBnHbTe erO BBePx Do UeIyKa.
iHnΦopMaζηa
ü Ecni NaCTpoNTb 6oJIe MeJKN IOMOJI, To BKyc Kofoe cTaHET KpeNue.
üПиЗнak ONТИмальНоH NaCTpoIKN TOHKOCTN NOMOJa - paBHomepHoe NOCTyPJIeHne KOFe I3 BbIpyCKHOrO OTBepCTnI IN OJUyeHne JERKOrO rYcTOrO KpeMa.
Heo6xoJnMoE yCIOBne: aInpaT BbIKJIHO-yeH.
- OtkpoiTe KoJyX (11).ДяЭтOro BO3bMntEcB 3a yIy6JIeHne C npaBoi CTOpOHbl aIInapaTa I NOTAHnTe KoJyX BBepx.
- Haxmnte u ydepxnbaiTe haxaTbIM KpacHbI pbUar (44)Ha puYke 6Joka 3aBapuBaHnra (14), nobepHnte pyko- rTKy no yacOBoN CTpeJIKe Do ynpa co ⅢeJIyKOM.
- BbItaunTe 6Iok 3aBapnBaHnJa pyuKy n3 aannapata.
- OchobateNbHO npomOte 6nok 3aBapuBaHnaZeIHKOM NOI npoTOUHO BDOOnco BCex CTOpOH.B nepByIO oupeDbCJeNTe 3a Tem, uTo6bIB CnTe (45) He 6blIO OCTaTKOB Kofoe.
- Побождente, пoka с SFOKa 3aBapNBaHnЯ CteuyET BODa.
-
C nOMOuMЯrKoN cyXoN TkaHn ydaJIte oCTaTKN KoΦe c NOBepxHOCTe BHyTpN aIpaPata.
-
BCTaBbTe 6IOK 3aBapuBaHnB aannapat.HaJmnte n ydepxuBaIte HaKaTbIM KpaChbI pyIur Ha puKe 6Ioka 3aBapuBaHn, NOBepHnTe puKy npOTNB YacOBoN CTpeJIKN Do ynpOa Co IeJUcOM.
- 3aKpoITe KOxUx.ДЯЭTORO BCTaBbTe KOxUx CHN3yВ aPnapaTи NOdBnHbTe erO BBePx Do UeLcKa..
Heo6xOaHmoe ycNoBne:HaIncnIee OTO- 6paKaTeCnHdNkAToP rOTOBHOCTN.
- YdepxnBaIte KhoNky "MeHIO/ok" HaxaToiB TeueHne 2 cekyHd. Ha nCpIee IoRbNTcMHeIO.
-
Перейдпerte KM MeHIO Yxod >YdaJeHue Haku.nu.
-
C nOMOuIbIO KHOJOK co CTpeJIkaMn Bbl6epnte onuHIO 3anyck u noTBePdIte Bbl6Op, HaxaB Ha "MeHIO/ok".
- Cnédyǔnte dαβbHeɪsɪm HNCTpyKzɪnM Na ἀπcπλee Σθ3aBεpψeHηr pO-rgpAMMbI ΠO ydαJIeHŋU HaKɪΠN.
»HaДиСплee ПОЯВИТСЯнДИКаTOpI FOTOBHOCTN.
9.8 Hac troponka jeceTkoctn BOdbl
OT NaCTPOJKN JXeCTKOCTN BOJb 3aBnCIT TO, HAcKoJIbKO YacTo HeO6XoJIMo 6yJeT yJaJIb Tb HaKnIb. Yem JxecTue BOda, Tem YaIe aIppaT HjXJaETcR B yJaJIeHIn HaKnIIN.
iHΦopmaζηa
Ecnn nCpOJb3yeTcra HJIbTp dJa BOdbI (CM. rnaBy 9.9, cTp. 334), MoXHo HaCTponTb JECTKOCTb BOdbI.
Heo6xOJnOe yCIOBne:HaIINcPJIee OTO- 6paKaTec INHdNKaTOp rOTOBHOCTN.
- YdeprKuBaIe KhoNky "MeHIO/ok" HaxaToiB TeueHne 2 cekyHd.
»HaДиСплел NOЯВИТСМЕHQ.
2.ПерейдиTeКMeHIOHacmpouka> JKecmKocmb bOdbI.
- CnomoBIO KHONOK CO CTpeKamn Bbl6epNTe DnaPAn3OH JeCTKOCTN BObl NpOITBePdNTe Bbl6Op, HaxKaB Ha "MeHIO/ ok".
- BbIyInTe n3 MeHIO c NOMOuKOMaHDbI BbIXoD
»HaДиСплес NOЯВИТСУнДИКаTOpI FOTOBHOCTN.
Manualy Bean Select, model BARISTA T
9.4 "Easy Cleaning" programi
Easy Cleaning programıyla sutmDMI yikanir.
(angl. Waste Electrical and Electronic Equipment, WEEE).
Elektros jrenginai negali buti šalinami su buitinémis atliekomis.
Manuãs Bean Select, BARISTA T
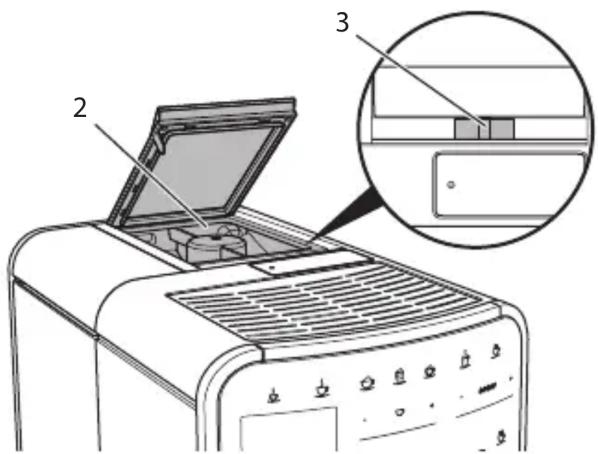
Att. 9: BARISTA T divkameru kafijas pupiñutvertne
Electronic Equipment).
Elektroierices aizliegts izmest sadzives atkritumos.
Utilizejiet ieri videi draudziga veidapiemerotā savaksanas punkta.
11 Tehniskie dati
| Tehniskie dati |
| Darba spiregums no 220 V lidz 240 V, 50 - 60 Hz |
| Strāvas pateriš maks. 1450 W |
| Sūkṇa spiediens statistiki maks. 15 bar |
| Izmēri | |
| Platums | 255 mm |
| Augstums | 365 mm |
| Džilʒums | 465 mm |
| Tilpums | |
| Kafījas pupiṇu tvertne | 2 × 135 g |
| Udens tvertne | 1,8 l |
| Svars (tukšs) 10,6 kg (Barista TS) | 10,4 kg (Barista T) |
| Vides apstākli | |
| Temperatura | no 10 °C lidz 32 °C |
| Relativais gaisa mitrums | no 30 % lidz 80 %
(nekondensejosss) |
| Bluetooth | Bluetooth low energy 4.2 |
| Izmantotā frekvence | 2 400 - 2 483,5 MHz |
| Maksimālā radišanas jauda | < 2,5 mW |
| Üdens cietibas
diapazons | °dH °e °fH |
| Miksts no 0 lidz 10 | no 0 lidz 13 | no 0 lidz 18 | |
| Vidëjs | no 10 lidz 15 | no 13 lidz 19 | no 18 lidz 27 |
| Ciets | no 15 lidz 20 | no 19 lidz 25 | no 27 lidz 36 |
| Loti ciets | >20 | >25 | >36 |

12 Traucejumi
Ja nevarat noverst zemak minetos traucejumus vai ari citrus traucejumus, kas seit nav doti, sazinieties ar musu klienu apkalposanas dienestu (vietejs zvanu tarifs).
electrice 日 electronic).
Division Household Products
Ringstr. 99
D-32427 Minden
Germany
www.melitta.de
Editorial department:
ZINDEL AG
www.zindel.de