CAFFEO Lounge - Coffee machine MELITTA - Free user manual and instructions
Find the device manual for free CAFFEO Lounge MELITTA in PDF.

User questions about CAFFEO Lounge MELITTA
0 question about this device. Answer the ones you know or ask your own.
Ask a new question about this device
Download the instructions for your Coffee machine in PDF format for free! Find your manual CAFFEO Lounge - MELITTA and take your electronic device back in hand. On this page are published all the documents necessary for the use of your device. CAFFEO Lounge by MELITTA.
USER MANUAL CAFFEO Lounge MELITTA
natural_image
Modern stainless steel industrial machine with control panel and transparent glass casing (no visible text or symbols)Bedienungsanleitung
Operating Instructions
Guide d'utilisation
Gebruiksaanwijzing
natural_image
3D rendered mechanical part with a rectangular housing and stepped base (no text or symbols)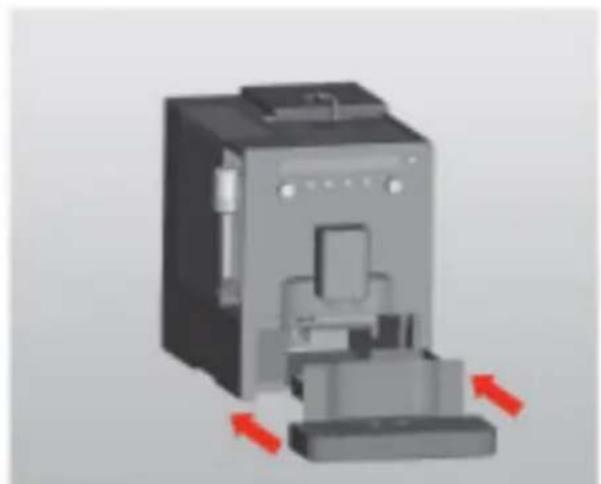
natural_image
3D rendering of a mechanical device with red directional arrows indicating movement or force (no text or symbols visible)C
D
text_image
Technical diagram showing two mechanical components with red arrows indicating motion or force directions, labeled ① and ②.E
natural_image
3D rendered illustration of a mechanical device with a central component and control panel (no text or symbols visible)F
G
natural_image
Mechanical component diagram showing a disassembly or assembly with numbered parts (1, 2) and label D, no readable text or symbols beyond labels.H
natural_image
3D rendering of a mechanical device with a lid and internal structure (no text or symbols visible)J
text_image
Handwritten signature or scribble on white background, possibly a signature or artistic markUnterschrift
Congratulations on buying a CAFFEO®
We would like to welcome you as a coffee lover and a CAFFEO ^® gourmet.
With this CAFFEO ^® quality product you will experience many special coffee moments. Enjoy your favourite coffee specialities and indulge yourself with all your senses. The milk frother, Perfect Cappuccino, with which you can prepare a wonderful milk foam for various coffee specialities, as well as the Bean Select, twin-chamber bean container that offers the possibility of selecting from two different bean types, ensure unique coffee enjoyment.
Please read these operating instructions carefully all the way through so that you and your guests enjoy the longest possible satisfaction with the Melitta® CAFFEO®. Keep these operating instructions in a safe place.
Should you require more information or have any questions on the coffeemaker, please contact us directly, or visit us on the Internet under www.melitta.de.
We extend our best wishes for your satisfaction with the Melitta ^® CAFFEO ^® .
Your CAFFEO ^® Team
Table of Contents
Information about these operating instructions ....42
Symbols in the text of these operating instructions ....42
Intended use 43
Non-intended use 43
General safety instructions ....44
Description of the appliance ....45
Legend for Fig. A....45
Legend for Fig. B 45
Display....46
Start up 47
Setting up....47
Connecting....48
Filling the bean container 48
Inserting the Claris ^® water filter 49
Filling the water reservoir....50
Switching on and venting....50
Adjusting the brewing strength ....51
Adjusting the coffee quantity in this regard ....52
Preparing coffee/espresso 52
Preparing coffee/espresso with coffee beans....52
Preparing coffee/espresso with ground coffee 53
Frothing milk 54
Preparing hot water 56
Switching off and operating modes 57
Switching off 57
Operating modes....57
Function settings....58
Setting the water hardness category - function setting 1 ....58
Setting the timer for energy-saving stand-by mode - function setting 2 ....59
Adjusting the timer for stand-by mode - function setting 3 ....60
Adjusting the brewing temperature - function setting 4 ....61
Resetting the device to the factory settings 62
Adjusting grinding fineness....62
Care and maintenance 63
General cleaning....63
Cleaning the Perfect Cappuccino ....63
Cleaning the brewing unit....64
Integrated cleaning programme ....65
Integrated decalcifying programme ....67
Decalcifying the water reservoir 69
Transport and disposal 70
Preparation for transport, protection against freezing and measures for longer periods of non-use....70
Troubleshooting....72
Declaration of Conformity 74
1 Information about these operating instructions
- For better orientation fold out the fold-out pages on the front and back of these operating instructions.
Symbols in the text of these operating instructions
The symbols in these operating instructions indicate specific hazards associated with handling your Melitta ^® CAFFEO ^® , or provide useful tips.
Warning!
Texts with this symbol contain information for your safety and indicate possible accident and injury hazards.
! Caution!
Texts with this symbol contain information about incorrect operation that should be avoided and indicate possible dangers of material damage.
Note
Texts with this symbol contain additional valuable information for handling your Melitta ^® CAFFEO ^® .
Intended use
The Melitta ^® CAFFEO ^® is exclusively designed for preparation of coffee and coffee specialities, for heating water as well as for heating milk outside of the appliance.
Intended use includes,
- that you carefully read, understand, and comply with the operating instructions.
• that you particularly comply with the safety instructions. - that you use the Melitta® CAFFEO® within the operating conditions specified in these instructions.
Non-intended use
Non-intended use applies when you use the MelittaCAFFEO ^® in a manner that differs from the use described in these operating instructions.

Warning!
Through non-intended use you can injure yourself or scald yourself with the hot water.

Note
The manufacturer bears no liability for damage that is attributed to non-intended use.
2 General safety instructions
Please read the following instructions all the way through. Failure to comply with the instructions can affect your own safety and the safety of the appliance.
! Warning!
- Keep the following objects out of the reach of children: packaging materials, small parts.
- All persons who use the appliance must be familiar with the operation of the appliance beforehand, and they must be instructed in the possible hazards associated with the appliance.
- Never allow children to use the appliance or play near the appliance unattended.
- The appliance is not designed to be used by persons (including children) with restricted physical, sensory, or mental capabilities or with lack of experience and/or knowledge, unless they are supervised by a person who is responsible for their safety, and have received instructions from this supervising person in how the appliance should be used.
- Only use this appliance if it is in faultless condition.
- Never attempt to repair the appliance yourself. If repairs are necessary contact the Melitta® Service Hotline only.
- Do not make any changes to the appliance, its components, or to the supplied accessories.
– Never immerse the appliance in water. - Never touch the appliance with wet hands or feet.
- Never reach into the interior of the appliance when it is in operation.
- Never touch hot appliance surfaces.
- Also comply with the safety instructions in the other sections of these operating instructions.
3 Description of the appliance
Legend for Fig. A
| Fig. number Explanation | |
| 1 | Drip tray with cup plate and coffee grounds container (interior) |
| 2 "Perfect Cappuccino" milk frother | |
| 3 Water reservoir | |
| 4 | Button for brewing strength ⏻ |
| 5 | Button for steam dispensing ⏻ |
| 6 Valve switch | |
| 7 Display | |
| 8 2-chamber "Bean Select" bean container | |
| 9 Rocker switch for "Bean Select" bean container | |
| 10 Ground coffee chute with lid | |
| 11 | On/off button ⏻ |
| 12 Coffee quantity regulator | |
| 13 | Button for single-cup dispensing ⏻ |
| 14 | Button for two-cup dispensing ⏻ |
| 15 Height-adjustable coffee outlet | |
| 16 Float for the water level indicator in the drip tray | |
Legend for Fig. B
| Fig. number Explanation | |
| 17 Power-supply cord | |
| 18 Brewing unit and type plate (behind the cover) | |
| 19 Grinding fineness adjustment | |
| 20 Power switch |
Display
| Symbol Meaning Display Explanation/prompt | |||
 | Steam valve | Illuminated | Temperature for steam dispensing has been reachedOpen valve |
| Flashing Valve open | |||
 | Water reservoir Illuminated Fill the water reservoir | ||
 | Ground coffee chute | Flashing Ground coffee chute lid open | |
| Illuminated | Ground coffee dispensing executed after pressing the button for single-cup dispensing | ||
 | Brewing strength | Illuminated | 1 bean: mild2 beans: normal3 beans: strong4 beans: very strong |
| Flashing | Fill bean container, flashing ends after the next coffee dispensing process. | ||
 | Clean | Illuminated Clean appliance | |
| Flashing | Integrated cleaning programme is running | ||
 | Drip tray and coffee grounds container | Illuminated | Empty drip tray and coffee grounds container |
| Flashing | Insert drip tray and coffee grounds container | ||
 | Decalcifying | Illuminated Decalcifying appliance | |
| Flashing | Integrated decalcifying programme is running | ||
4 Start up
Prior to starting up the appliance please execute the following points. Execution of the following points is described on the following pages.
- Setting up
- Connecting
• Filling the bean container - Inserting the Claris® water filter
• Fill the water reservoir - Switching on and venting
• Adjusting the coffee quantity
• Adjusting the brewing strength
When you have executed these points the appliance is ready for operation. You can make coffee. We recommend pouring the first two cups of coffee after first start up down the drain.
Setting up
- Place the appliance on a stable, level, and dry surface. Ensure that there is a distance of 10 cm to the wall and to other objects.
! Caution!
- Never place the appliance on hot surfaces or in wet areas.
- Do not transport or store the appliance in cold vehicles or rooms with low temperature because the residual moisture could freeze and damage the appliance. Follow the instructions on page 70.
- The coffee grounds container is located in the drip tray. Please ensure that the drip tray is pushed into the appliance all the way to the stop.

Notes
- Keep the packaging material, including the hard foam element, on hand for transport and possible return shipments, to avoid transport damage.
- It is normal to find traces of coffee and water in the machine before it is started up for the first time. This is because the appliance was tested for faultless function in the factory.
Connecting
- Plug the power-supply cord into a 10A carthing contact socket outlet.

Warning!
Danger of fire and danger of electric shock due to incorrect supply voltage, incorrect or damaged connections and power cord.
- Ensure that the supply voltage agrees with the supply voltage specified on the type plate of the appliance. The type plate is on the right side of the appliance behind the cover (Fig. B, no. 18).
- Ensure that the power outlet satisfies the applicable standards for electrical safety. If in doubt contact a specialized electrical company.
- Never use damaged power cords (damaged insulation, bare wires).
- During the guarantee period only have the damaged power-supply cord replaced by the manufacturer; after the guarantee period only have it replaced by qualified specialists.
Filling the bean container
Thanks to the 2-chamber "Bean Select" bean container you can use two different types of coffee in parallel. For example, fill one chamber with espresso beans, and the other with café crème beans. Then you can conveniently change between the two types via the rocker lever.
- Remove the lid of the bean container and fill the container with fresh coffee beans. Each of the two chambers can be filled with a maximum of 135 g of coffee beans.
! Caution!
- Only fill the bean container with coffee beans.
- Never fill ground, freeze-dried, or caramelised coffee beans into the bean container.
- Place the lid on the container.
- Select the desired bean type by placing the rocker lever (Fig. A, no. 9) on the appropriate chamber. Lever to the left means that the beans in the left chamber are selected; lever to the right means that the beans of the right chamber are selected.
Warning!
Hazard for persons who are allergic to caffeine.
Since a residual quantity of the previously used beans remains above the grinder, the two types of beans mix when changing to a different bean type. Consequently, when switching over to decaffeinated beans the first two cups may still contain coffee that is not decaffeinated. Thus, the third cup of coffee prepared after the switchover is caffeine free.
Note
If the rocker lever is vertical during the brewing process beans do not get into the grinder.
Inserting the Claris ^® water filter
A Claris® water filter for filtering out lime scale is included with the appliance. When you use the filter you do not have to decalcify the appliance as often and you can set the water hardness to water hardness category 1 (see page 58). The service life of your machine is extended by the high level of protection against calcification. The water filter should be replaced regularly - however at the latest after 2 months.
- Set the current month on the blue ring at the top of the Claris® water filter. Thus you can easily tell when the Claris® water filter must be changed.
- Use the attachment aid on the lower end of the supplied coffee scoop (assemble before use) to screw the Claris® water filter into the thread on the floor of the water container.
- Flip up the lid of the water reservoir (Fig. A, no. 3) and pull the water reservoir up and out of the appliance.
- Fill the water reservoir up to the mark with 0.5 litres of fresh water and put the reservoir back into the device.
- Place a vessel under the Perfect Cappuccino and slide the steam pipe downward until it is below the edge of the vessel.
- Turn the valve switch (Fig. A, no. 6) clockwise to open the valve. → Water will flow into the vessel under the Perfect Cappuccino.
- As soon as the symbol for the water reservoir is illuminated turn the valve switch anti-clockwise to close the valve. → The appliance is ready for operation.
Note
The Claris ^® water filter should not remain dry for an extended period of time. Consequently we recommend storing the Claris ^® water filter in a glass of water in the fridge if the device will not be used for an extended period of time.
Filling the water reservoir
- Flip up the lid of the water reservoir (Fig. A, no. 3) and pull the water reservoir up and out of the appliance.
- Fill the water reservoir with fresh water and reinsert it in the appliance.
Switching on and venting
All lines in the appliance have been drained and vented in the factory. Consequently, the first time the appliance is switched on after the heat-up phase the symbol for the valve will be illuminated and the appliance must be vented via the valve. Venting is only necessary the first time that the appliance is started up.
- Switch the power switch (Fig. B, no. 20) to the "I" position.
- Press the on/off button ⏻ to switch the appliance on.
→ The on/off button ⏻ flashes. The appliance heats up. After heating up the symbol for the valve will be illuminated.
- Place a vessel under the Perfect Cappuccino.
- Place a vessel under the outlet.
• Turn the valve switch (Fig. A, no. 6) clockwise to open the valve.
→ The symbol for the valve is flashing. Water runs into the vessel under the Perfect Cappuccino.
- When water is no longer discharged and the symbol for the valve is illuminated, turn the valve switch anticlockwise to close the valve.
→ The appliance executes an automatic rinsing process and hot water flows out of the outlet. Subsequently the on/off button will be illuminated. The appliance is ready for operation.
Adjusting the brewing strength
- Press the button for brewing strength several times to select from among four degrees of strength.
→ Your selection is indicated by the bean symbols in the display.
| Display Brewing strength | |
| Mild | |
| Normal(factory setting) | |
| Strong | |
| Very strong | |
- You can also change the coffee flavour via the fineness level of the grinder. See page 62.
Adjusting the coffee quantity in this regard
- Turn the coffee quantity regulator (Fig. A, no. 12) to variably adjust the dispensing quantity (regulator to the left: less coffee, regulator to the right; more coffee).
| Coffee quantity Regulator far left | Regulator in the middle | Regulator far right |
| for single-cup dispensing | 30 ml 125 ml | 220 ml |
| for two-cup dispensing | 2 x 30 ml 2 x 125 ml | 2 x 220 ml |
5 Preparing coffee/espresso
Preparing coffee/espresso with coffee beans
Preparing one cup of coffee/espresso
Prerequisites: The appliance must be ready for operation. The desired brewing strength and cup fill level must be adjusted. The desired coffee type in the bean container must be selected.
- Place a cup under the outlet.
- Press the button for single-cup dispensing Ⓞ.
→ The grinding process and coffee dispensing start. Dispensing is automatically concluded when the set cup fill level is reached. - To break off the dispensing of coffee prematurely, press the button for single-cup dispensing
Preparing two cups of coffee/espresso
Prerequisites: The appliance must be ready for operation. The desired brewing strength and cup fill level must be adjusted. The desired coffee type in the bean container must be selected.
- Place two cups under the outlet.
- Press the button for two-cup dispensing 📋.
→ The double grinding process and the dispensing of coffee start. Dispensing is automatically concluded when the set cup fill level is reached.
- To break off dispensing of coffee prematurely press the button for two-cup dispensing 📋.
Preparing coffee/espresso with ground coffee
Prerequisites: The appliance must be ready for operation. The desired cup fill level must be set.
- Open the lid of the ground coffee chute (Fig. A, no. 10).
→ The symbol for the ground coffee chute is flashing.
• Fill fresh ground coffee into the ground coffee chute.
! Caution!
- Only fill the ground coffee chute with ground coffee. Instant products can jam the brewing unit.
- Never fill more than one coffee scoop (included with the appliance) of ground coffee, otherwise the brewing unit will be overfilled.
- Close the lid of the ground coffee chute.
→ The symbol for the ground coffee chute and the button for single-cup dispensing are illuminated.
- Place a cup under the outlet.
- Press the button for single-cup dispensing Ⓞ.
→ The machine will start to dispense coffee. Dispensing will be concluded automatically when the set cup fill level is reached.
- To break off the dispensing of coffee prematurely, press the button for single-cup dispensing

Note
If you do not dispense coffee from the appliance within 90 seconds after opening the ground coffee chute the appliance will switch over to operation with coffee beans automatically and will throw the ground coffee into the coffee grounds container to prevent the later risk of overfilling the brewing chamber.
6 Frothing milk
Prerequisite: The appliance must be ready for operation.
- Place a vessel with milk under the Perfect Cappuccino. Ensure that the whisk of the Perfect Cappuccino is immersed in the milk.
- Fill the appliance to one third maximum; when frothing the volume of milk increases significantly.
- Press the button for steam dispensing
→ The button for steam dispensing is flashing. The appliance heats up. When the steam temperature is reached the button for steam dispensing and the symbol for the valve will be illuminated.

Warning!
There is danger of burn injuries and scalding due to the hot steam pipe, steam hose and hot whisk.
Never touch the steam pipe, the steam hose, or the whisk of the Perfect Cappuccino.
• Turn the valve switch (Fig. A, no. 6) clockwise to open the valve.
→ The symbol for the valve and the button for steam dispensing are flashing. The whisk froths the milk and heats it at the same time. You will get better frothing results if you move the whisk up and down when frothing.
- Turn the valve switch anticlockwise to close the valve and thus to end the frothing process. The volume of milk should have doubled and the vessel should be warm to the touch.
- Press the button for steam dispensing to change from steam mode to normal operating mode.
- Wait until the steam pipe has cooled down and then turn the steam pipe with whisk away from the Perfect Cappuccino anticlockwise (Fig. E).
- Rinse the steam pipe and the whisk under running water or in the dishwasher.
- Turn the cleaned steam pipe with whisk clockwise to the Perfect Cappuccino until it engages in place.

Note
We recommend using cold milk with a high protein content. It is not the fat content, but rather the protein content that is the determining factor for good milk froth.
7 Preparing hot water
Prerequisite: The appliance must be ready for operation.
- Place a cloth under the Perfect Cappuccino to catch any residual water that may escape.
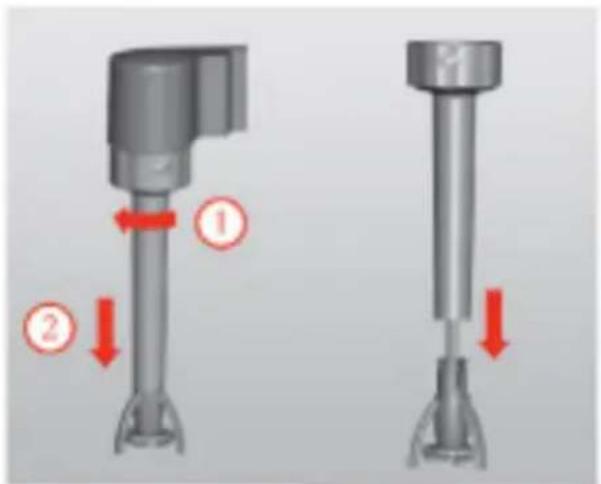
- Pull the whisk of the Perfect Cappuccino downward and off of the steam pipe (Fig. F).
- Place a vessel under the steam pipe and slide the steam pipe downward until it is below the edge of the vessel.
• Turn the valve switch (Fig. A, no. 6) clockwise to open the valve.
→ The symbol for the valve is flashing. Hot water flows out of the steam pipe and into the vessel. - When the desired quantity of water is reached, turn the valve switch anticlockwise to close the valve.
- Wait until the steam pipe has cooled off and then slide the whisk onto the steam pipe from below until it locks in place.
8 Switching off and operating modes
Switching off
• If possible place a vessel under the outlet.
- Press the on/off button ⏻ to switch the appliance to stand-by mode.
→ The appliance executes an automatic rinsing of the coffee channel. The brewing chamber moves into idle position. The on/off button will be illuminated red.
- Switch the power switch (Fig. B, no. 20) into position "0" to completely switch off the appliance.
Note
Only switch the appliance off via the power switch, when it is in standby mode, otherwise there is a possibility that the brewing unit will not be in the correct position.
Operating modes
| Mode indicated by What is possible? | ||
| Ready for operation | The buttons and the bean symbols are illuminated. | Operating function for beverage preparation |
| Energy-saving stand-by mode | On/off button and bean symbols are illuminated | Switch on by pressing any button |
| Stand-by mode | On/off button illuminated red | Make the function settings Run the integrated cleaning programme and decalcifying programme |
Energy-saving stand-by mode
The appliance switches to energy-saving standby mode automatically (temperature is lowered to save energy) after the last action (depending on the setting). For this you can set the timer to different times. See page 59 for more information in this regard.
Stand-by mode
In stand-by mode the appliance consumes very little energy (< 1 W). However, we recommend switching the appliance off via the power switch if it will not be used for an extended period (e.g. also overnight). The appliance automatically switches to stand-by mode one hour after the last action. You can set the timer for a different time. See page 60 for more information in this regard.
9 Function settings
Setting the water hardness category - function setting 1
Use the included test strip to determine the water hardness in your area. Please comply with the instructions on the test strip packaging.
Water hardness is set to 4 in the factory.
To maintain appliance quality please adjust the water hardness as follows:
Prerequisite: The appliance must be in stand-by mode.
→ The on/off button ⏻ will be illuminated red.
- Simultaneously press the button for single-cup dispensing and the button for steam dispensing ⏻, until the four buttons are faintly illuminated.
- Press the button for steam dispensing several times ⏻ to select between the possible water hardness categories.
→ The button for steam dispensing will be brightly illuminated. Your selection of water hardness category in accordance with the table is indicated via the bean symbols in the display.
| Water hardness range | Properties °dH °f | |
 | soft0-7,2°dH0-13°f | |
 | medium7,2-14°dH13-25°f | |
 | hard14-21,2°dH25-38°f | |
| very hard >21,2°dH >38°f |
- Press the on/off button to confirm the selected water hardness category.
→ Depending on the selection 1 to 4 bean symbols 📄 will be flashing in the display. The appliance is in stand-by mode again.
Setting the timer for energy-saving stand-by mode - function setting 2
Additional information on energy-saving stand-by mode is provided on page 58.
The timer is factory-set to level 2 (15 minutes).
Please adjust the timer as follows:
Prerequisite: The appliance must be in stand-by mode.
→ The on/off button ⏻ will be illuminated red.
- Simultaneously press the button for single-cup dispensing and the button for steam dispensing ⏻, until the four buttons are faintly illuminated.
- Press the button several times for brewing strength Ⓞ to select from four possible times for the timer.
→ The button for brewing strength Ⓞ brightly illuminated.
→ Your selection is indicated by the bean symbols ☐ in the display.
| Display Time | |
 | 5 minutes |
 | 15 minutes |
 | 30 minutes |
 | off |
- Press the on/off button to confirm the selected time.
→ Depending on the selection 1 to 4 bean symbols will be flashing as confirmation. The appliance is in stand-by mode again.

Note
Press any button to wake the machine out of energy-saving standby mode. The function of the pressed button (e.g. prepare coffee) will be directly executed, only the heat-up phase will last somewhat longer.
Adjusting the timer for stand-by mode - function setting 3
Additional information on stand-by mode is provided on page 58.
The timer is factory-set to level 2 (2 hours).
Please adjust the timer as follows:
Prerequisite: The appliance must be in stand-by mode.
→ The on/off button ⏻ will be illuminated red.
- Simultaneously press the button for single-cup dispensing and the button for steam dispensing ⏻, until the four buttons are faintly illuminated.
- Press the button several times for two-cup dispensing ⏻, to select between four possible times for the timer.
→ The button for two-cup dispensing Ⓥ brightly illuminated.
→ Your selection is indicated by the bean symbols ☐ in the display.
| Display Time | |
 | 1 hour |
 | 2 hours |
 | 4 hours |
 | 8 hours |
- Press the on/off button to confirm the selected time.
→ Depending on the selection 1 to 4 bean symbols 📄 will be flashing as confirmation. The appliance is in stand-by mode again.
Adjusting the brewing temperature - function setting 4
Adjust the brewing temperature as follows to meet your requirements:
The brewing temperature is factory-set to level 2 (medium).
Prerequisite: The appliance must be in stand-by mode.
→ The on/off button ⏻ will be illuminated red.
- Simultaneously press the button for single-cup dispensing and the button for steam dispensing ⏻, until the four buttons are faintly illuminated.
- Press the button for single-cup dispensing Ⓥ, to switch between three possible brewing temperatures.
→ The button for single-cup dispensing is brightly illuminated.
→ Your selection is indicated via the bean symbols in the display.
| Display Brewing temperature | |
| [2ccw] | low |
 | medium |
 | high |
- Press the on/off button to confirm the selected brewing temperature.
→ Depending on the selection 1 to 3 bean symbols 📄 will be flashing in the display. The appliance is in stand-by mode again.
Resetting the device to the factory settings
Follow the instructions below to reset the CAFFEO ^® to the factory settings:
Prerequisite: The appliance must be in stand-by mode.
- Switch the device off via the power switch.
- Wait until the red light in the on/off button ⏻ goes out.
- Simultaneously press the button for coffee strength Ⓤ and the button for two-cup dispensing ⏻.
- At the same time switch the power switch on again.
→ All settings are reset to the factory settings.
Adjusting grinding fineness
The grinding fineness level was optimally adjusted prior to delivery. Consequently, we recommend that you only readjust grinding fineness after approximately 1,000 coffee preparation processes.
You can only set the grinding fineness while the grinder is running. Thus, adjust grinding fineness directly after coffee dispensing starts.
If the coffee flavour is not sufficiently intense then we recommend the fine grinding level.
- Place the lever (Fig. B, no. 19) in one of the three positions (as viewed from the rear of the appliance).
| Lever position Grinding fineness | |
| left finer | |
| middle medium | |
| right coarser | |
10 Care and maintenance
General cleaning
- Wipe off the outside of the appliance with a soft, damp cloth and an off-the-shelf dishwashing detergent.
- Empty and clean the drip tray regularly, at the latest however when the float (Fig. A, no. 16) projects out of the drip grate.
- Clean the coffee grounds container regularly, for example in the dish washer.
! Caution!
Do not use any micro-fibre cloths, scouring cloths, sponges or cleaning agents to avoid damage to the appliance surface.
Cleaning the Perfect Cappuccino
- Place a cloth under the Perfect Cappuccino to catch any residual water that may escape.
- Turn the steam pipe with whisk anticlockwise, away from the Perfect Cappuccino (Fig. E).
- Pull the whisk of the Perfect Cappuccino downward and off of the steam pipe (Fig. F).
- Rinse the steam pipe and the whisk under flowing water or wash them in the dishwasher.
- Slide the whisk onto the steam pipe from below until it locks in place.
- Turn the cleaned steam pipe with whisk clockwise toward the Perfect Cap-puccino until it locks in place.
Note
Frequent cleaning in the dishwasher can cause slight discolouration on the coffee grounds container and on the Perfect Cappuccino.
Cleaning the brewing unit
Prerequisite: The appliance must be in stand-by mode.
- Switch the power switch (Fig. B, no. 20) into position "0" to completely switch off the appliance.
- Reach into the recess on the right side of the appliance (Fig. B, no. 18) and pull off the cover to the right.
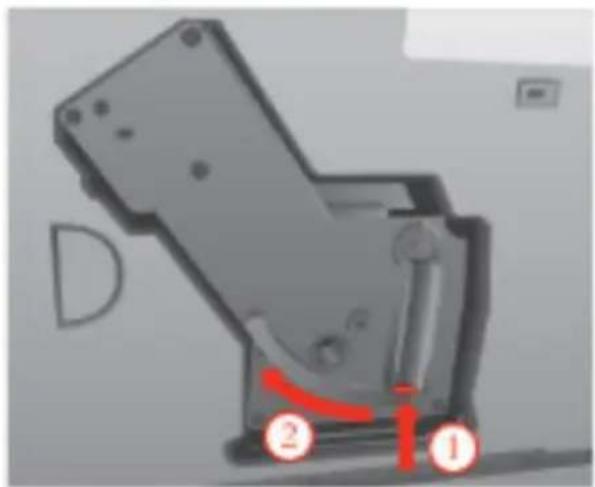
- Activate the red button on the handle of the brewing unit (Fig. H) and turn the handle in the direction of the arrow to the stop (approximately 75°).
- Use the handle to pull the brewing unit out of the appliance.
- Leave the brewing unit as it is (do not move or twist the components of the brewing unit).
- Thoroughly rinse off the brewing unit as a whole from all sides under running water. Particularly ensure that the surface shown in Fig. J is free of coffee residue.
• Let the brewing unit drip dry. - If necessary, remove coffee residues from the surfaces in the interior of the appliance where the brewing unit is inserted.
- Put the brewing unit back into the appliance.
- Activate the red button on the handle of the brewing unit and turn the handle clockwise to the stop (approximately 75°). In this process ensure that the handle locks in place.
- Insert the two catches of the cover in the back of the appliance and swing the cover to the left until it engages.
- Switch the power switch (Fig. B, no. 20) to the "I" position.
→ The appliance is in stand-by mode again.

Note
For optimal protection of your appliance, we recommend that you clean the brewing unit once a week.
Integrated cleaning programme
The integrated cleaning programme removes residues including coffee oil residues that cannot be eliminated by hand. It takes a total of approximately 15 minutes. The cleaning symbol flashes during the entire process.
For optimal cleaning results we recommend that you clean the brewing unit beforehand (see page 64).
! Caution!
- Run the integrated cleaning programme every 2 months or after approximately 200 brewed cups of coffee, at the latest however run the programme when the symbol for cleaning is illuminated in the display.
- Only use the cleaning tabs from Melitta ^ for automatic coffee makers. These tabs are precisely matched to the Melitta ^ CAFFEO ^ . Use of other cleaning agents can damage the appliance.
Please execute the integrated cleaning programme as follows:
Prerequisite: The appliance must be in stand-by mode.
1 Simultaneously press the button for single-cup dispensing and the on/off button ⏻ for longer than 2 seconds.
→ The symbol for cleaning is flashing. The symbol for the drip tray is illuminated.
2 Empty the drip tray and the coffee grounds container.
3 Re-insert the drip tray without the coffee grounds container and place the coffee grounds container under the outlet.
→ First, two rinsing processes will be executed.
→ The symbol for the ground coffee chute is illuminated.
4 Open the lid of the ground coffee chute.
→ The symbol for the ground coffee chute 10 flashing.
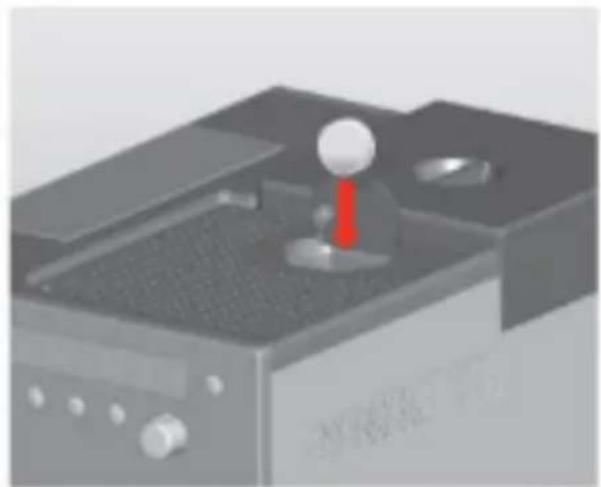
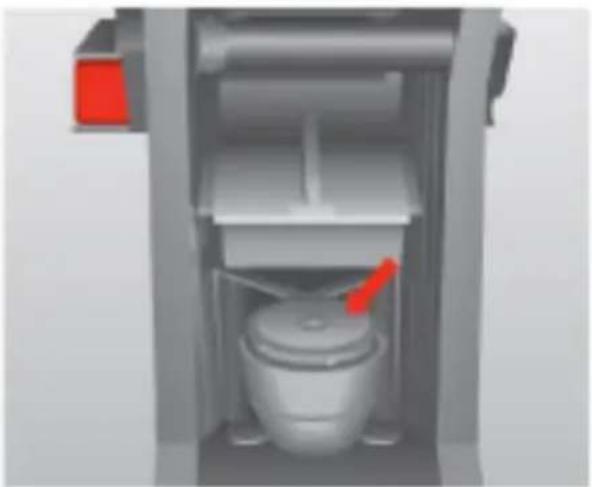
5 Introduce a cleaning tab into the ground coffee chute (Fig. G).
6 Close the lid of the ground coffee chute.
→ The symbol for the water reservoir is illuminated.
7 Fill the water reservoir to the Max. mark and re-insert it.
→ The button for steam dispensing is illuminated.
8 Press the button for steam dispensing.
→ The integrated cleaning programme will start. This process lasts approximately 10 minutes. Subsequently, the button for steam dispensing will be illuminated
9 Empty the coffee grounds container and return it to its position under the outlet.
10 Press the button for steam dispensing ⏻.
→ The integrated cleaning programme will continue. This process lasts approximately 5 minutes. Water flows inside the appliance into the drip tray. Subsequently, the symbol for the drip tray will be illuminated
11 Empty the drip tray and the coffee grounds container.
12 Reinsert the drip tray with the coffee grounds container.
→ The on/off button will be illuminated after a brief heat-up phase. The buttons and the bean symbols are illuminated. The appliance is ready for operation.

Note
If the symbol for the valve is illuminated during the cleaning process:
- Place a bowl under the Perfect Cappuccino and turn the valve switch (Fig. A, no. 6) clockwise to open the valve.
- The symbol for the valve is flashing.
- As soon as the symbol for the valve is continuously illuminated, turn the valve switch counter-clockwise to close the valve.
- The integrated cleaning programme will continue.
Integrated decalcifying programme
The integrated decalcifying programme removes calcium deposits that cannot be removed by hand. It takes a total of approximately 15 minutes. The symbol for decalcifying flashes during the entire process.
! Caution!
- Execute the integrated decalcifying programme every 3 months or when the symbol for decalcifying is illuminated in the display.
- Only use the decalcifying agent from Melitta® for automatic coffeemakers. This decalcifying agent is precisely matched to the Melitta® CAF-FEO®.
- Never use vinegar or other decalcifying agents.
Execute the integrated decalcifying programme as follows:
Prerequisite: The appliance must be in stand-by mode. Remove the Claris ^® water filter - if present - from the water reservoir (see page 49).
1 Simultaneously press the button for two-cup dispensing and the on/off button ⏻ for longer than 2 seconds.
→ The symbol for decalcifying is illuminated. The symbol for the drip tray is illuminated.
2 Empty the drip tray and the coffee grounds container.
3 Insert the drip tray without the coffee grounds container and place the coffee grounds container under the Perfect Cappuccino.
→ The symbol for the water reservoir is illuminated.
4 Flip up the lid of the water container (Fig A, no. 3) and pull the water container up and out of the device.
5 Fill the water reservoir with lukewarm water to the 0.5 l mark and stir in the decalcifying powder (e.g. with a long spoon). When the decalcifying powder is dissolved, insert the water reservoir.
→ The button for steam dispensing is illuminated.

Warning!
The decalcifying agent can cause skin irritations
Comply with the safety instructions and the quantity information specified on the decalcifying agent packaging.
6 Press the button for steam dispensing .
→ The integrated decalcifying programme will start. This process lasts approximately 5 minutes. Water flows inside the appliance into the drip tray. Subsequently, the symbol for the valve will be illuminated.
7 Pull the whisk of the Perfect Cappuccino off of the steam pipe with a downward motion (Fig. F).
8 Turn the Perfect Cappuccino so that the steam pipe is in the coffee grounds container.

Warning!
Danger of burn injuries due to the hot steam pipe or hot whisk
Never touch the steam pipe or the whisk of the Perfect Cappuccino when the coffee machine is dispensing hot water.
9 Turn the valve switch (Fig. A, no. 6) clockwise to open the valve.
→ The symbol for the valve is flashing. The decalcifying agent flows out of the steam pipe and into the vessel. Subsequently the symbol for the drip tray and the symbol for the water reservoir will be illuminated, because the decalcifying agent has completely flowed through the system.
10 Empty the drip tray and the coffee grounds container.
11 Reinsert the drip tray without the coffee grounds container.
12 Place the coffee grounds container under the Perfect Cappuccino.
13 Rinse out the water reservoir and fill it with tap water to the Max. marking. → The button for steam dispensing is illuminated.
14 Press the button for steam dispensing
→ The symbol for the valve 🏠 is flashing. Water flows out of the steam pipe and into the vessel. Subsequently the symbol for the valve 🏠 will be illuminated.
15 Turn the valve switch anticlockwise to close the valve.
→ Water flows inside the appliance into the drip tray. Subsequently, the symbol for the drip tray will be illuminated.
16 Empty the drip tray and the coffee grounds container.
17 Wait until the steam pipe cools down and slide the whisk onto the steam pipe, from below, until it locks in place.
18 Reinsert the drip tray with the coffee grounds container.
→ The on/off button will be illuminated after a brief heat-up phase. The buttons and the bean symbols are illuminated. The appliance is ready for operation.
Decalcifying the water reservoir
You should decalcify the water reservoir regularly to ensure faultless function.
- Flip up the lid of the water reservoir (Fig. A, no. 3) and pull the water reservoir up and out of the appliance.
- Remove the Claris® water filter - if present - from the water reservoir (see page 49).
- Fill the water tank with an off-the-shelf decalcifier. We recommend using the liquid quick decalcifier from Swirl®. Comply with the instructions provided by the manufacturer of the decalcifier.
- Then thoroughly rinse the water reservoir with clean water.
- Replace the Claris® water filter - if present - in the water reservoir (see page 49).
• Fill the water reservoir with fresh water and reinsert it into the appliance.
11 Transport and disposal
Preparation for transport, protection against freezing and measures for longer periods of non-use
Draining and venting the appliance
We recommend that you drain and vent the appliance if it will not be used for a longer period. This protects the appliance from damage due to freezing.
Prerequisite: The appliance must be in stand-by mode.
- Place a vessel under the Perfect Cappuccino.
-
Simultaneously press the button for steam dispensing ⏻ and the on/off button for more than 2 seconds.
→ The button for steam dispensing is flashing. The symbol for the water reservoir is illuminated. -
Remove the water reservoir.
→ The button for steam dispensing is flashing.
- As soon as the symbol for the valve is illuminated in the display, turn the valve switch (Fig. A, no. 6) clockwise to open the valve.
→ Steam will escape from the Perfect Cappuccino. The symbol for the valve and the button for steam dispensing are flashing. As soon as the appliance is drained and vented, the buttons for steam dispensing and the symbol for the valve will be illuminated.
- Turn the valve switch anticlockwise to close the valve.
→ The appliance is in stand-by mode.
• Empty the water reservoir and put it back in the appliance.
- Switch the appliance completely off via the power switch.
• Unplug the power plug.

Note
The Claris ^® water filter should not remain dry for an extended period of time. Consequently we recommend storing the Claris ^® water filter in a glass of water in the fridge if the device will not be used for an extended period of time.
Transport
- Drain and vent the appliance.
- Clean the drip tray and the coffee grounds container.
• Empty the bean container.
- Transport the appliance in the original packaging if possible, including hard foam elements, to prevent transport damage.

Caution!
Do not transport or store the appliance in low-temperature vehicles or rooms, as the residual moisture could freeze or condense and cause damage to the appliance.
Disposal
- Please dispose of the appliance in an environmentally responsible manner via suitable collection systems.
12 Troubleshooting
| Malfunction Cause | use Measure | |
| Coffee only runs drop-by-drop | Grinding level too fine | Set the grinding fineness coarser Clean the brewing unit Decalcify, if necessary Run the integrated cleaning programme, if necessary |
| Coffee does not run | Water reservoir not filled or it is not inserted correctly | Fill water reservoir and ensure that it is seated properly if necessary open valve until water runs out of the appliance and then re-close the valve |
| Brewing unit is clogged Clean the brewing unit | ||
| Grinder does not grind coffee beans | Beans do not drop into the grinder (beans are too oily) | Tap lightly on the bean container |
| The tilt lever is vertical | Move the tilt lever to the right or left | |
| Foreign objects in the grinder | Contact the hotline | |
| Loud grinder noise Fo | foreign objects in the grinder | Contact the hotline |
| Bean symbols are flashing although the bean container is filled | Insufficiently ground beans in the brewing chamber | Press the control button for single-cup dispensing or two-cup dispensing |
| Symbol for the valve lights up out of sequence | There is air in the lines inside the appliance | Open valve until water runs out of the appliance and then re-close the valve, if necessary clean the brewing unit |
| Malfunction Cause | se Measure | |
| Buttons for single-cup and two-cup operation flash alternately with on/off button | Brewing unit is missing or is not inserted correctly | Insert the brewing unit properly |
| Brewing chamber is overfilled | Switch the appliance off and on again via the power switch (repeat this step if necessary), until stand-by mode is indicated. | |
| Continuous flashing of all buttons | System error Switch the appliance | pliance off and on via the power switch, if this is unsuccessful send the appliance to the service organization |
13 Declaration of Conformity
CE Declaration of Conformity
The following harmonized standards have been applied as stipulated by the EMC Directive (2004/108/EEC) as well as the Low Voltage Directive (2006/95/EC):
| DIN EN 60335-1: 2002 + A11: 2004 + A1: 2004 + A12: 2006 + Corr. + A2: 2006 | Specification for safety of household and similar electrical appliances: Part 1, General requirements |
| DIN EN 60335-2-14: 2006 | Specification for safety of household and similar electrical appliances: Part 2-14, Particular requirements for kitchen machines |
| DIN EN 60335-2-15: 2002 + A1: 2005 | Specification for safety of household and similar electrical appliances: Part 2-15, Particular requirements for appliances for heating fluids |
| DIN EN 61000-3-2: 2006 Electromagnetic compatibility (EMC) Part 3-2: Limit for harmonic current emissions (equipment input currents <= 16 A per phase) | |
| DIN EN 61000-3-3: 1995 + A1: 2001 + A2: 2005 | EMC, Part 3-3: Limit values - limiting voltage changes, fluctuations and flicker in public low-voltage supply networks for equipment with a nominal current <=16 A per conductor with no special connection requirements applicable |
| DIN EN 61000-4-13: 2002 Electromagnetic compatibility (EMC), Part 4-13: Testing and measurement techniques including mains signalling at AC power port, low-frequency immunity tests. Test for immunity to harmonics and interharmonics including mains signalling on AC power port | |
| DIN EN 55014-1: 2006 | Electromagnetic compatibility (EMC) - Specifications for household appliances, power tools and similar electrical devices - Part 1: Interference emission |
| DIN EN 55014-2: 1997 + A1:01 | Electromagnetic compatibility (EMC) - Requirements for household appliances, power tools and similar apparatus - Part 2: Immunity; Product family standard |
| DIN EN 50366: 2003 + A1: 2006 | Household and similar electrical appliances - Electromagnetic fields - Methods for evaluation and measurement |
Updating the standards to the latest version through the quality assurance organization pursuant to DIN/ISO 9001.
Minden/09/15/2008
City/date
Signature

natural_image
Abstract sketch of a stylized human figure with curved lines (no text or symbols)CEO engineering
Information regarding the signer
Chère cliente, cher client!
text_image
SignatureGérant technique
text_image
Handwritten signature or scribble on white background, possibly a signature or autographFirma
Gerente técnica