
Barista SE - Coffee machine MELITTA - Free user manual and instructions
Find the device manual for free Barista SE MELITTA in PDF.

| Product type | Automatic coffee machine |
| Brand | Melitta |
| Model | Barista SE |
| Dimensions (W × H × D) | 255 mm × 365 mm × 465 mm |
| Weight (empty) | 10.4 kg |
| Power supply | 220–240 V, 50–60 Hz, 1450 W |
| Pump pressure (max.) | 15 bar |
| Bean container capacity | 2 × 135 g (double compartment) |
| Water tank capacity | 1.8 L |
| Beverages | Espresso, long coffee, cappuccino, latte macchiato, milk foam, hot milk, hot water |
| Grain selection | Manual via Bean Select slider (2 types of beans) |
| Grind adjustment | Fineness adjustment lever (behind the cover) |
| My Coffee function | Up to 4 customizable profiles |
| Preparation for 2 cups | Yes (for espresso, long coffee, cappuccino, latte macchiato) |
| Height-adjustable spout | Yes |
| Cup warmer | Yes |
| Automatic maintenance programs | Easy cleaning, milk system cleaning, coffee cycle cleaning, descaling |
| Compatible water filter | Yes (Melitta cartridge, screwable) |
| Adjustable automatic shut-off | Yes (timer or fixed time) |
| Energy eco mode | Yes (adjustable up to 4 h) |
| Safety | Automatic shut-off, burn protection, electrical safety (On/Off switch) |
| Ambient operating temperature | 10 °C to 32 °C |
Frequently Asked Questions - Barista SE MELITTA
User questions about Barista SE MELITTA
0 question about this device. Answer the ones you know or ask your own.
Ask a new question about this device
Download the instructions for your Coffee machine in PDF format for free! Find your manual Barista SE - MELITTA and take your electronic device back in hand. On this page are published all the documents necessary for the use of your device. Barista SE by MELITTA.
USER MANUAL Barista SE MELITTA
1 Overview of the appliance 35
1.1 The appliance at a glance 35
1.2 The control panel at a glance 36
2 For your safety. 37
2.1 Proper use 37
2.2 Danger from electric current 37
2.3 Risk of burns and scalds 37
2.4 General safety 38
3 First steps. 38
3.1 Unpacking the appliance 38
3.2 Checking the delivery contents 38
3.3 Setting up the appliance 39
3.4 Connecting the appliance 39
3.5 Switching on the appliance for the first time 39
4 Basic operation 39
4.1 Switching the appliance on and off 39
4.2 Using the control panel 40
4.3 Navigating in the menu 40
4.4 Filling with coffee beans and using Bean Select. 41
4.5 Using ground coffee 42
4.6 Filling with water 43
4.7 Adjusting the outlet 43
4.8 Using milk 43
4.9 Emptying the drip tray and coffee grounds container 44
5 Preparing beverages 45
5.1 Preparing espresso and café crème 45
5.2 Preparing cappuccino and latte macchiato 45
5.3 Preparing milk froth and warm milk 45
5.4 Preparing hot water 45
5.5 Preparing beverages with recipes (BARISTA TS model only) 46
5.6 Changing beverage settings before and during preparation. 46
5.7 Stopping beverage preparation 47
5.8 Preparing two beverages simultaneously.. 47

6 Permanently changing beverage settings 47
6.1 Selecting recipes 47
6.2 Changing default settings 48
7 Personal settings - "My Coffee" 48
7.1 Editing personal user profiles 48
7.2 Selecting/changing personal settings 49
7.3 Preparing beverages with personal settings 49
8 Changing basic settings 49
8.1 Setting the language 49
8.2 Setting the time 50
8.3 Activating/deactivating Auto Bean Select (BARISTA TS model only)..50
8.4 Setting energy save mode 50
8.5 Setting Auto OFF 50
8.6 Activating/deactivating rinsing 51
8.7 Resetting the appliance to the factory settings 51
8.8 Statistics and System menu 51
8.9 Setting the grinding fineness 52
8.10 Converting the connection for the milk hose (depending on the model) 52
9 Care and maintenance. 53
9.1 General cleaning 53
9.2 Rinsing the coffee system 53
9.3 Cleaning the brewing unit 53
9.4 "Easy Cleaning" programme 54
9.5 "Cleaning milk system" programme 54
9.6 "Cleaning coffee system" programme 55
9.7 "Dscaling"programme 56
9.8 Setting the water hardness 56
9.9 Using a water filter 57
10 Transport, storage and disposal 58
10.1 Venting the appliance 58
10.2 Transporting the appliance 58
10.3 Disposing of the appliance 58
11 Technical data. 59
12 Problems 60
1 Overview of the appliance
1.1 The appliance at a glance
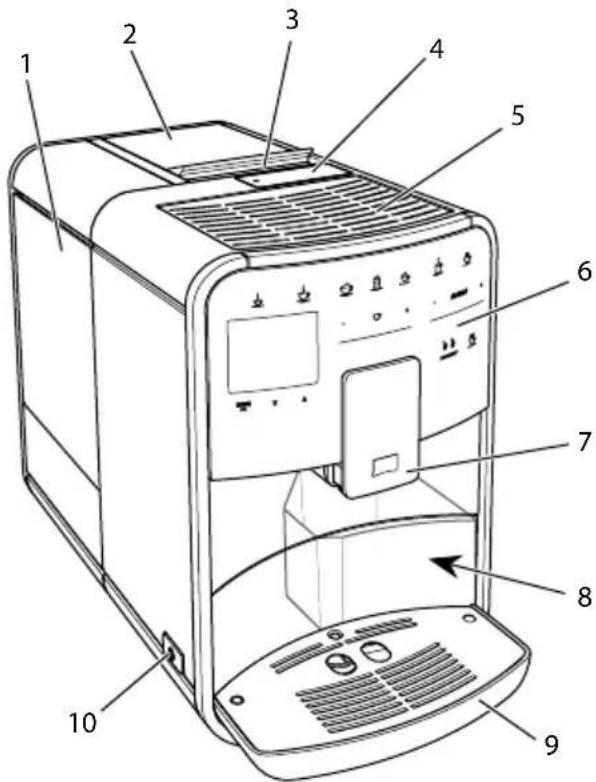
Fig. 1: Front left of the appliance
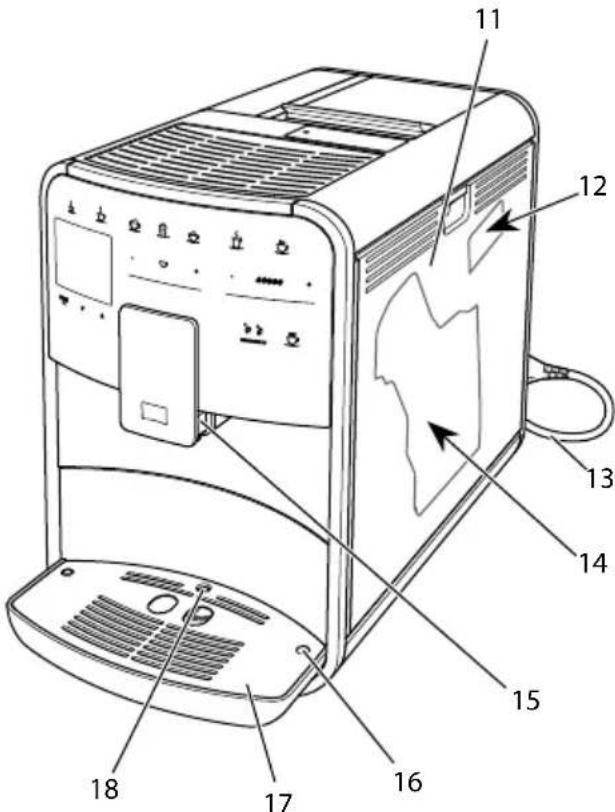
Fig.2:Front right of the appliance

1 Water tank
2 2-chamber bean container
3 "BEAN SELECT" slider (BARISTA T and SE model only) For "BEAN SELECT" slider in BARISTA TS, see item number 30.
4 Ground coffee chute
5 Cup rest
6 Control panel
7 Height-adjustable outlet with 2 coffee nozzles, 2 milk nozzles, 1 hot water nozzle, cup illumination (in BARISTA TS model only)
8 Coffee grounds container (inner)
9 Drip tray display
10 "On/Off" button
11 Cover
12 "Grinding fineness adjustment" lever (behind the cover)
13 Power cable with cable insert compa- ment
14 Brewing unit (behind the cover)
15 Milk hose connection at the outlet
16 Milk hose connection to the drip tray
17 Cup plate
18 Float
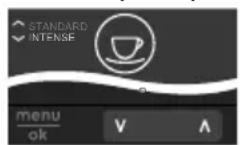
1.2 The control panel at a glance
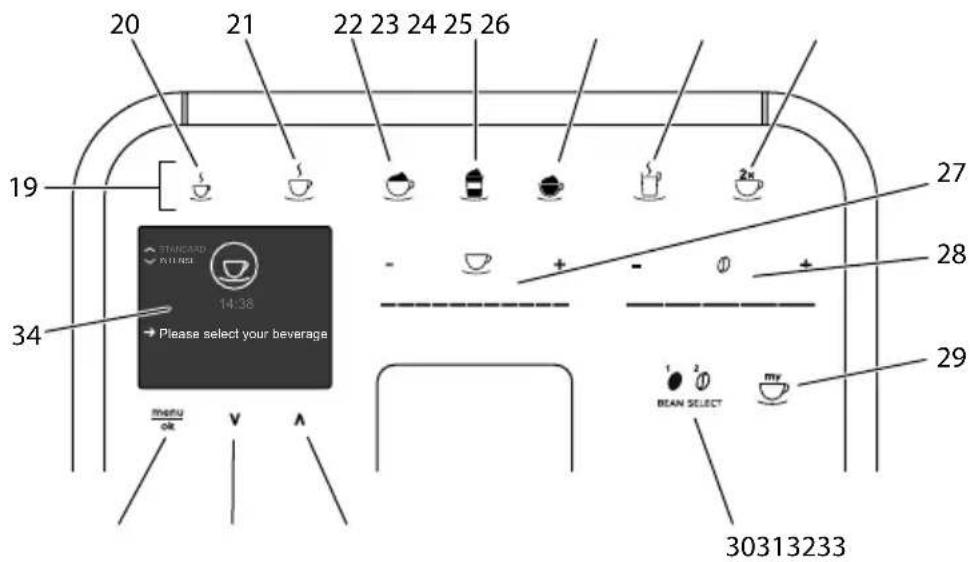
Fig. 3: Control panel
Item Designation Function
19 Direct keys Preparing beverages
20 Espresso Preparing espresso
21 Café crème Preparing café crème
22 Cappuccino Preparing cappuccino
23 Latte macchiato Preparing latte macchiato
24 Milk froth/Warm Preparing milk froth or warm milk milk
25 Hot water Preparing hot water
26 2 cups Two-cup dispensing
27 Beverage quantity slider Setting the beverage quantity
28 Coffee strength Setting the coffee strength slider
29 My Coffee/Rec- Selecting personal settings for beverages or preparing 10000000000000000000000000000000000000000000000000000000000000000000000000000000000000000000000000000
Selecting personal settings for beverages.
30 BEAN SELECT Selecting the bean type (BARISTA TS model only).
For "BEAN SELECT" in BARISTA T and SE, see item number 3.
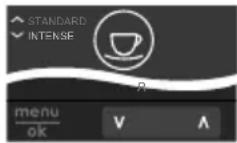
31 Up arrow Navigating up in the menu or set the STANDARD coffee button flavour
32 Down arrow Navigating down in the menu or set the INTENSE coffee button flavour
33 menu/ok Calling up the menu or confirming inputs
34 Display Display of current menus and messages
Example: Ready symbol
Dear Customer,
Thank you for purchasing the BARISTA fully automatic coffee maker.
The operating instructions will help you discover the diverse options offered by the appliance and enjoy your coffee to the full.
Read through the operating instructions carefully. This helps avoid personal injury and material damage. Store the operating instructions carefully. If you pass on the appliance, include the operating instructions with it.
Melitta accepts no liability for damage caused by failure to observe the operating instructions.
If you require further information or have any questions on the appliance, contact Melitta or visit our website at: www.international.melitta.de
We hope you enjoy using your appliance.
2 For your safety
The appliance conforms to the relevant European directives and has been built using the latest technology. Nevertheless, some residual dangers remain.
Observe the safety instructions to avoid dangers. Melitta accepts no liability for damage caused by failure to observe the safety instructions.
2.1 Proper use
The appliance is used to prepare coffee beverages made from coffee beans or ground coffee, and to heat milk and water.
The appliance is intended for use in private households.
Any other use is regarded as improper and may lead to personal injury and material damage. Melitta accepts no liability
for damage that arises due to improper use of the appliance.
2.2 Danger from electric current
If the appliance or the power cable is damaged, there is a risk of fatal electric shock.
Observe the following safety instructions to avoid danger from electric current:
Do not use a damaged power cable.
A damaged power cable may only be replaced by the manufacturer or its customer service or service partner.
Do not open any covers firmly screwed onto the appliance housing.
Only use the appliance when it is in a technically flawless condition.
A defective appliance may only be repaired by an authorised workshop. Do not repair the appliance yourself.
Do not make any changes to the appliance, its components or its accessories.
Do not immerse the appliance in water.
Do not let the power cable come into contact with water.
2.3 Risk of burns and scalds
Escaping fluids and steam may be very hot. Parts of the appliance can also become very hot.

Observe the following safety instructions to avoid scalds and burns:
Avoid escaping fluids and steam coming into contact with the skin.
Do not touch any nozzles on the outlet during operation.
2.4 General safety
Observe the following safety instructions to avoid personal injury and material damage:
Do not operate the appliance in a cabinet or similar.
Do not reach into the interior of the appliance during operation.
Keep the appliance and its power cable out of the reach of children under 8 years of age.
This appliance may be used by children over 8 years of age and by persons with reduced physical, sensory or mental capabilities or a lack of experience and knowledge if they are supervised or have been instructed in using the appliance safely and understand the resulting risks.
Children must not be allowed to play with the appliance.
Cleaning and maintenance must not be undertaken by children younger than 8 years of age. Children over 8 years of age must be supervised during cleaning and maintenance.
Disconnect the appliance from the power supply when left unsupervised for a long time.
The appliance must not be operated at altitudes over 2000 m.
Please observe the instructions in the corresponding section when cleaning the appliance and its components (,Overview of the appliance" on page 35).
3 First steps
This chapter describes how to prepare your appliance for use.
3.1 Unpacking the appliance
- Unpack the appliance. Remove the packaging material, the adhesive strips and the protective films from the appliance.
- Keep the packaging material for transport and any return shipments.
Information
The appliance may contain traces of coffee and water. The appliance has been tested in the factory to ensure that it functions perfectly.
3.2 Checking the delivery contents
Check the completeness of delivery using the following list. If parts are missing, contact your retailer.
Coffee spoon with screw-in aid for the water filter
Test strip for determining the water hardness.
3.3 Setting up the appliance
Observe the following instructions:
Do not install the appliance in damp rooms.
Set up the appliance on a stable, flat and dry surface.
Do not install the appliance in the vicinity of sinks or the like.
Do not install the appliance on hot surfaces.
Set up the appliance at a sufficient distance (approx. 10cm ) from the wall and other objects. The space above the appliance should be at least 20~cm .
u Route the power cable so it cannot be damaged by edges or hot surfaces.
3.4 Connecting the appliance
Observe the following instructions:
Check that the supply voltage matches the operating voltage specified in the technical data (see table, page 59).
Only connect the appliance to a correctly installed earthed mains socket. If in doubt, consult a specialist electrician.
The socket must have a fuse of at least 10 A.
3.5 Switching on the appliance for the first time
During initial start-up, the language, the time and the water hardness can be set. The settings can be changed at a later point in time (see chapter 8, page 49 and section 9.8, page 56).
Use the enclosed test strip to determine the water hardness. Observe the instructions on the test strip packaging and in the table Water hardness range, page 59.
Information
We recommend pouring away the first two cups of coffee after initial start-up.
Requirement: The appliance has been installed and connected.
- Place a vessel beneath the outlet.
- Press the ON/OFF button.
The welcome display appears on the appliance.
The request to carry out the setup appears on the display: Please set up the machine.
» The "menu/ok" button flashes.
- Confirm with "menu/ok".
» The Language menu appears. - Select your language with the arrow buttons. Confirm with "menu/ok".
» The Clock menu appears. - Select the hour and the minutes with the arrow buttons. Confirm each setting with "menu/ok".
» The Water hardness menu appears. - Select the determined water hardness range with the arrow buttons or confirm the default value with "menu/ok".
The request Please refill and insert water tank appears. - Remove the water tank. Rinse out the water tank with clean water. Insert the new water filter (see section "Changing the water filter" on page 57).
Fill the water tank with fresh water and insert it.
» The appliance heats up and performs automatic rinsing.
The ready symbol and the request Fill beans appear on the display.
- Fill coffee beans into the bean container. To do this, read section Filling with coffee beans and using Bean Select, page 41.
4 Basic operation
This chapter describes basic operating steps for using the appliance on a daily basis.
4.1 Switching the appliance on and off
Before switching on after starting up the appliance for the first time, read section 3.5, page 39.

Information
When switched on and off, the appliance performs automatic rinsing.
During rinsing, rinsing water is also conducted into the drip tray.
The automatic switch-off rinsing can be switched on or off in the Settings menu.
Switching on the appliance
- Place a vessel beneath the outlet.
- Press the ON/OFF button.
The welcome display appears on the appliance.
The appliance heats up and performs automatic rinsing.
The ready symbol appears on the display.
Switching off the appliance
- Place a vessel beneath the outlet.
- Press the ON/OFF button.
The appliance performs automatic rinsing.
The appliance switches off.
Information
The appliance switches off automatically when it is not operated for a long time. Automatic rinsing is also carried out in this case.
The off time can be set in the Auto OFF menu, see section 8.5, page 50.
If no beverage has been prepared since switching on or if the water tank is empty, no rinsing takes place.
4.2 Using the control panel
The essential functions can be accessed using the control panel.
Press the button with a fingertip. The control panel does not react when touched with a pen or other objects.
Only those buttons that can be used in the appliance's current status light up.
Use the following actions to operate the control panel:

Brief press
Briefly press a button to select a function.

Long press
Press a button for longer than 2 seconds to select a second function that may be available.

Pressing "+" or "-"
Press "+" or "-" to increase or reduce the current value. Hold a button down to change the value continuously.
Pressing the slider
Press the slider to select a value.

Pulling the slider
Press and pull the slider to increase or reduce the current value.
4.3 Navigating in the menu
To set individual beverages and for maintenance and care, you must call up the menu on the display and navigate in the menu.
Observe the instructions on the display.
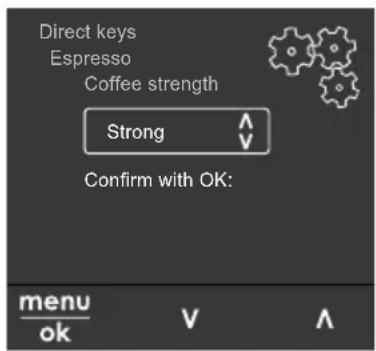
Fig.6:Example:Display with buttons
Use the following options to navigate in the menu:
Calling up the menu and confirming the selection

Press the "menu/ok" button for longer than 2 seconds to call up
the menu.
Press the "menu/ok" button briefly to confirm your selection.
Navigating in the menu

Press the arrow buttons to navigate down or up in the menu. H
down an arrow button to quickly switch to the menu options.
Exiting a menu

Select the Exit command with the arrow buttons and confirm with
"menu/ok" to exit a menu.
Exit sub-menus, which only display information and in which you do not carry out any settings, with "menu/ok".
Calling up submenus
Some of the appliance's functions are reached by calling up several submenus in succession.
Submenus are always called up in a similar way. Navigation to the Descaling programme is described here as an example.
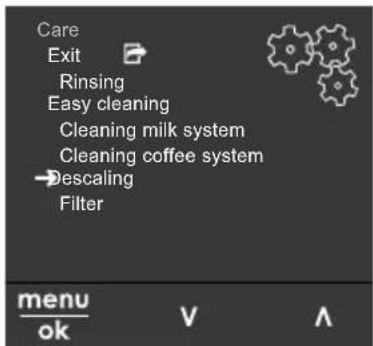
Fig. 7: Navigating to the Descalging programme
- Press the "menu/ok" button for 2 seconds.
» The menu appears on the display.
- Use the arrow buttons to select Care and confirm with "menu/ok".
- Use the arrow buttons to select Descal ing and confirm with "menu/ok".
The selection of functions is always shown in shortened form in these operating instructions:
- Navigate to the Care > Descaling menu.
4.4 Filling with coffee beans and using Bean Select
Roasted coffee beans lose their aroma. Only fill the bean container with as many coffee beans as will be consumed over the next 3-4 days.
The 2-chamber bean container enables the use of two different types of coffee for different coffee specialities. For example, fill one chamber with espresso beans and the other with café crème beans.
ATTENTION
The use of unsuitable types of coffee can lead to clogging of the grinder.
- Do not use freeze-dried or caramelised coffee beans.
- Do not pour ground coffee into the bean container.
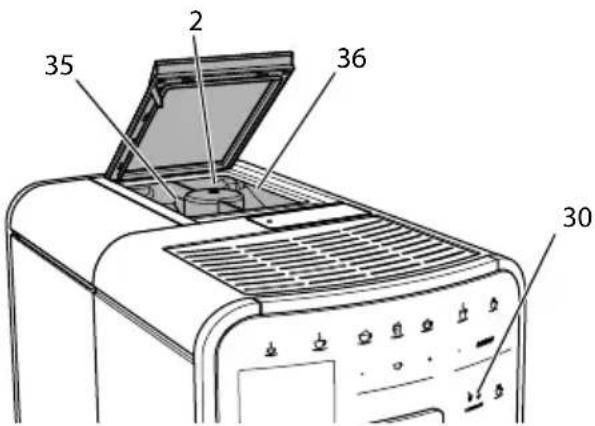
Auto Bean Select, BARISTA TS model
Fig.8: BARISTA TS 2-chamber bean container
Auto Bean Select ensures that the best coffee beans are automatically selected for

various coffee specialities. Espresso-based beverages take their coffee beans from left bean chamber 1 (35), Café Crème-based beverages take them from right bean chamber 2 (36).
The following table shows the assignment of the bean chambers to the coffee beverages. These settings can be changed (see section 6.2, page 48).
| Bean chamber Coffee beverage | |
| 1 (35) | Espresso, cappuccino, latte macchiato |
| 2 (36) | Café crème |
Information
The grinder is emptied during each grinding process. Nevertheless, minimal coffee type mixing may occur.
Grinding when empty causes a different type of noise and is normal.
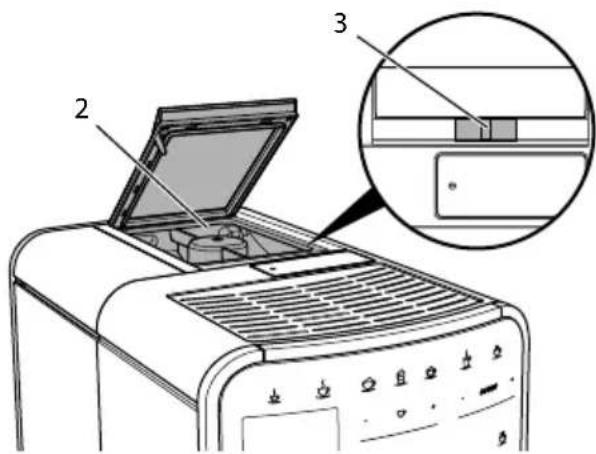
Manual Bean Select, BARISTA T and SE
Fig.9: BARISTA T and SE 2-chamber bean container
Using the "BEAN SELECT" slider (3), you can switch between the bean chambers (2).
CAUTION
When switching bean chambers in the BARISTA T and SE, a residual amount of coffee beans remains in the grinder. The first two coffee beverages after switching to decaffeinated beans may still contain
caffeinated coffee. This may affect the health of people with caffeine intolerance.
Persons with caffeine intolerance should only consume the third coffee beverage after switching over.
Information
When the slider is in the centre position, no coffee beans enter the grinder.
Filling with coffee beans
- Open the lid of the 2-chamber bean container (2).
- Fill coffee beans into the bean chambers.
- Close the lid of the 2-chamber bean container.
The "BEAN SELECT" button (30) (BARISTA TS model) or the "Bean Select" slider (3) (BARISTA T and SE model) can be used to select a bean type prior to preparation (see section 5.6, page 46).
4.5 Using ground coffee
Ground coffee may also be used to prepare coffee beverages.
ATTENTION
The use of unsuitable types of coffee can lead to clogging of the brewing unit.
- Do not use any instant products.
- Fill a maximum of one coffee spoon of ground coffee into the ground coffee chute.
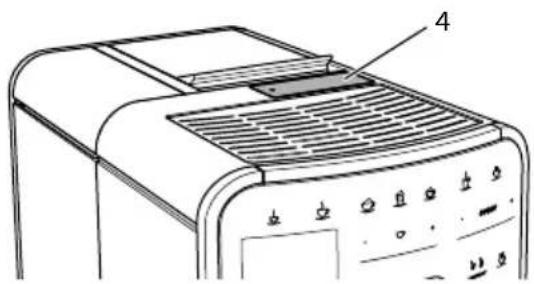
Fig. 10: Ground coffee chute
- Open the lid of the ground coffee chute (4).
- Use the enclosed coffee spoon for dosing. Fill a maximum of one coffee spoon of ground coffee into the ground coffee chute.
- Close the lid of the ground coffee chute.
- Proceed as described in sections 5 to 7.
Information
Two-cup dispensing is not possible when using ground coffee.
If no coffee is prepared within 3 minutes of opening the ground coffee chute, the appliance switches to operation with coffee beans and the ground coffee is discharged into the coffee grounds container.
4.6 Filling with water
Only use fresh, cold water without carbon dioxide for optimum coffee enjoyment. Change the water daily.
Information
The quality of the water largely determines the flavour of the coffee. Therefore, use a water filter (see section 9.8, page 56 and section 9.9, page 57).

Fig. 11: Water tank
- Open the lid of the water tank and pull the water tank (1) upwards out of the appliance by the handle.
- Fill the water tank with water. Note the maximum capacity of 1.8 litres.
- Insert the water tank into the appliance from above and close the lid.
4.7 Adjusting the outlet
The outlet (7) is height-adjustable. Set the greatest possible distance between the outlet and the vessel. Depending on the vessel, push the outlet up or down.
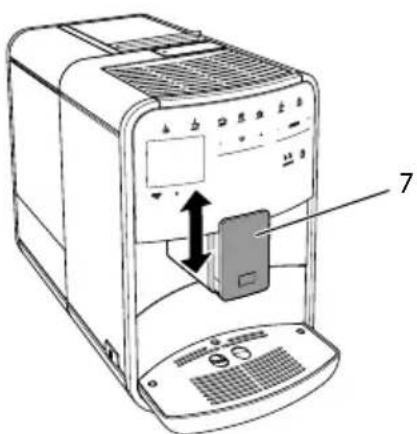
Fig. 12: Height-adjustable outlet
4.8 Using milk
Use cooled milk for optimum coffee enjoyment.
Depending on the model, the enclosed milk container or the milk hose and conventional milk packs can be used.
Connecting the milk container (depending on the model)
Only fill as much milk into the milk container as will be used immediately.


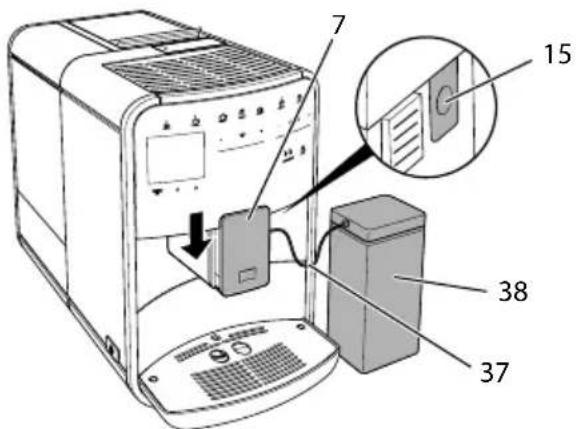
Fig. 13: Connecting the milk container to the appliance (figure can vary)
- Fill the desired amount of milk into the milk container (38).
- Push down the outlet (7).
- Connect the milk hose (37) to the milk container and the connection (15) at the outlet.
Information
Store the filled milk container in the refrigerator.
Connecting the milk hose (depending on the model)
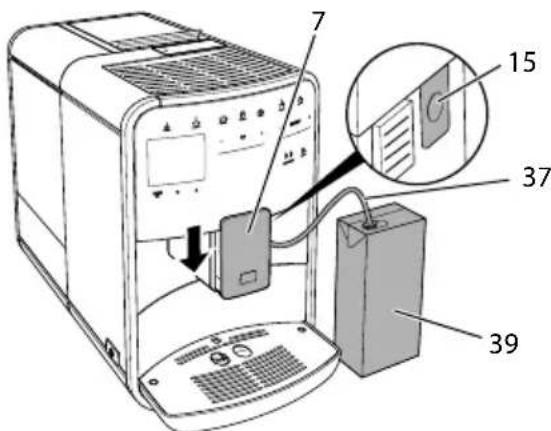
Fig. 14: Connecting the milk hose to the appliance
- Push down the outlet (7).
- Connect the milk hose (37) to the connection at the outlet (15).
- Insert the milk hose into a conventional milk pack (39).
4.9 Emptying the drip tray and coffee grounds container
When the drip tray (9) and the coffee grounds container (8) are full, the appliance requests you to empty them. The projecting float (18) also indicates that the drip tray is full. Always empty both containers.
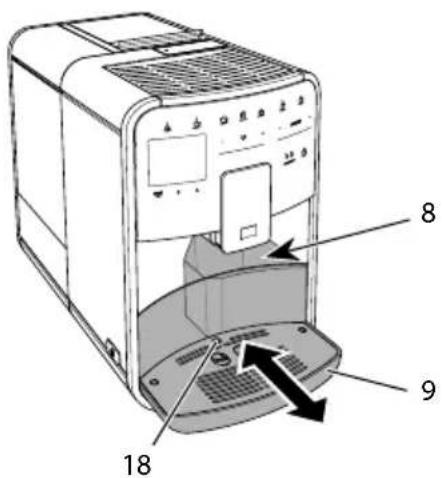
Fig. 15: Drip tray, coffee grounds container and float
- Pull the drip tray (9) forwards out of the appliance.
- Remove the coffee grounds container (8) and empty it.
- Empty the drip tray.
- Insert the coffee grounds container.
- Push the drip tray into the appliance up to the stop.
Information
The appliance requests you to empty the drip tray and the coffee grounds container after a defined number of beverages have been dispensed. If the containers are emptied while the appliance is switched off, it does not register this process. Therefore, it is possible that you are requested to empty the containers although the drip tray and the coffee grounds container are not yet full.
5 Preparing beverages
There are three options for preparing beverages:
Standard dispensing with direct keys and recipes (BARISTA TS model),
Preparation with modified beverage settings (see chapter 6, page 47)
u Use of personal settings with the "My Coffee" function (see chapter 7, page 48)
Standard dispensing is described in this section.
Please note:
The storage containers should contain sufficient amounts of coffee and water. Otherwise the appliance requests you to refill it.
The appliance does not indicate a lack of milk.
u When selecting a beverage with milk, connect the milk container or a commercially available milk pack.
The vessels for the beverages should be sufficiently large.
For beverage preparation, the display must show the ready for use display.
u Beverage dispensing is ended automatically.
After a beverage preparation with milk, the appliance automatically prompts for the Easy Cleaning programme.
5.1 Preparing espresso and café crème


- Place a vessel beneath the outlet.
- Press the "Espresso" or "Café Crème" button.
The beverage is prepared.
- Remove the vessel.
5.2 Preparing cappuccino and latte macchiato


Requirement: Milk is connected.
- Place a vessel beneath the outlet.
- Press the "Cappuccino" or "Latte Macchiato" button.
The beverage is prepared.
The display shows: Easy Cleaning? (OK for start).
- Remove the vessel.
- Run the Easy Cleaning programme or prepare another beverage and then carry it out, see section 9.4, page 54.
5.3 Preparing milk froth and warm milk
The preparation of milk froth and warm milk is similar.

Requirement: Milk is connected.
- Place a vessel beneath the outlet.
- Press the "Milk froth/milk" button.
a) Milk froth = briefly press button
b) Warm milk = press the button for longer (2 seconds)
Milk dispensing begins.
The display shows: Easy Cleaning? (OK for start).
- Remove the vessel.
- Run the Easy Cleaning programme or prepare another beverage and then carry it out, see section 9.4, page 54.
5.4 Preparing hot water

- Place a vessel beneath the outlet.
- Press the "Hot water" button.
» Hot water dispensing begins.
- Remove the vessel.


5.5 Preparing beverages with recipes (BARISTATS model only)
Information
When selecting a recipe with milk, connect the milk container or a commercially available milk pack.
The direct starting of recipes is similar for all beverages. The selection of a lungo is described as an example here.

Requirement: The ready symbol appears on the display.
- Place a vessel beneath the outlet.
- Press the "My Coffee/Recipes" button until the Recipes profile appears and confirm with "menu/ok".
The recipe selection appears on the display.
Alternatively, you can also press the "My Coffee/Recipes" button for 2 seconds to access the recipe selection directly.
- Use the arrow buttons to select Lungo and confirm with "menu/ok".
- Remove the vessel.
5.6 Changing beverage settings before and during preparation
Beverage settings can be changed before and during beverage preparation.
Information
These settings only apply to current beverage preparation.
Changing beverage settings before preparation
The bean type, the total beverage quantity, the coffee strength and the coffee flavour can be changed before selecting a beverage.
Information
The coffee flavour is set with the Intense aroma function. STANDARD and INTENSE are available for selection. In the INTENSE setting, the brewing time is longer and the coffee has a more intense aroma.
- Select a bean type with the "BEAN Select" button (BARISTA TS model) or with the "Bean Select" slider (BARISTA T and SE model).


Before selecting a beverage, use the "Beverage quantity" slider to set a beverage quantity.
Before selecting a beverage, use the "Coffee strength" slider to set the coffee strength.
Set the coffee flavour with the "arrow buttons".
Information
When preparing latte macchiato and cappuccino, the total beverage quantity is subdivided into a coffee and a milk amount according to a specified ratio.
If a beverage is not prepared within 1 minute, the appliance switches to the default settings.
Changing beverage settings during preparation
The beverage quantity and the coffee strength can be changed during beverage preparation.


During beverage dispensing (coffee or milk), use the "Beverage quantity" slider to set the relevant beverage amount.
During the grinding process, use the "Coffee strength" slider to set the coffee strength.
5.7 Stopping beverage preparation
To stop beverage preparation prematurely, press the selected direct key again.
5.8 Preparing two beverages simultaneously

The "2 cups" button is used to prepare two beverages simultane
ously. Two-cup dispensing is not possible for the beverages americano, long black, hot water, milk and milk froth. For two-cup dispensing, the appliance carries out two grinding processes.
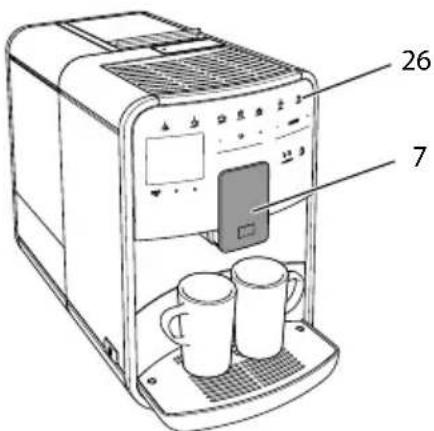
Fig. 16: Two-cup dispensing
- Place two vessels beneath the outlet (7).
- Press the "2 cups" button (26).
- Continue as described for the relevant beverage preparation.
Information
This setting only applies to the next beverage preparation.
If a beverage is not prepared within 1 minute, the appliance switches to single-cup dispensing.
6 Permanently changing beverage settings
The appliance offers further options for preparing coffee specialties. Default recipes can be used or the beverage settings can be permanently changed.
6.1 Selecting recipes
Direct keys can be assigned with stored recipes. Pressing the corresponding direct key now uses the recipe.
The following recipes are available:
The recipes marked with a * are only available in the BARISTA TS.
Recipe selection is similar for all beverages. The selection of a ristretto is described as an example here.
Requirement: The ready symbol appears on the display.
- Press the "menu/ok" button for 2 seconds.
The menu appears on the display.
- Navigate to the Direct keys > Espresso > Recipes menu.
- Use the arrow buttons to select Ristretto and confirm with"menu/ok".
- Repeatedly select the Exit command to exit the menu.
The ready symbol appears on the display.
The next time an espresso is prepared, the ristretto recipe will be used.
Information
The recipe selection remains valid until it is changed again.
In the Barista TS, recipes can also be selected directly with the "My Coffee/Recipes" button (see section 5.5, page 46).


6.2 Changing default settings
Depending on the beverage, the following default settings can be changed: Coffee amount, amount of froth, milk amount, hot water amount, temperature, beans (BARISTA TS model only), coffee strength and coffee flavour.
Changing the beverage settings is similar for all beverages. Changing the coffee strength for an Espresso is described here as an example.
Requirement: The ready symbol appears on the display.
- Press the "menu/ok" button for 2 seconds.
The menu appears on the display.
- Navigate to the Direct keys > Espresso > Coffee strength menu.
- Use the arrow buttons to select the desired coffee strength and confirm with "menu/ok".
- Repeatedly select the Exit command to exit the menu.
The ready symbol appears on the display.
The selected coffee strength is used the next time an espresso is prepared.
Information
The default settings remain valid until they are changed again.
7 Personal settings - "My Coffee"
The "My Coffee" function lets you to save personal beverage settings and assign them to a user.
7.1 Editing personal user profiles
Up to four user profiles can be used in the BARISTA T and SE and up to eight in the BARISTA TS.
Changing the name of a user profile
The names of the user profiles can be changed.
Requirement: The ready symbol appears on the display.
- Press the "menu/ok" button for 2 seconds.
The menu appears on the display. - Navigate to the My Coffee menu.
- Use the arrow buttons to select a user and confirm with "menu/ok".
- Use the arrow buttons to select Change name and confirm with "menu/ok".
The menu for selecting individual characters appears. - Use the arrow buttons to select individual characters and confirm each with "menu/ok".
- Repeatedly select the Exit command to exit the menu.
The ready symbol appears on the display.
Activating/deactivating a user profile
Only users whose profile is activated can be used.
Requirement: The ready symbol appears on the display.
- Press the "menu/ok" button for 2 seconds.
» The menu appears on the display. - Navigate to the My Coffee menu.
- Use the arrow buttons to select a user and confirm with "menu/ok".
- Use the arrow buttons to select Enabled/disabled and confirm with "menu/ok".
- Use the arrow buttons to select Enabled or Disabled and confirm with "menu/ok".
- Repeatedly select the Exit command to exit the menu.
The ready symbol appears on the display.
7.2 Selecting/changing personal settings
Depending on the beverage, the following settings can be assigned to a user: Recipes, coffee amount, amount of froth, milk amount, hot water amount, temperature, beans (BARISTA TS model only), coffee strength and coffee flavour.
The assignment of personal settings to a user is always similar. Setting the coffee amount for a Cappuccino is described here as an example.
Requirement: The ready symbol appears on the display.
- Press the "menu/ok" button for 2 seconds.
The menu appears on the display.
- Navigate to the My Coffee menu.
- Use the arrow buttons to select a user and confirm with "menu/ok".
- Navigate to the Cappuccino > Coffee amount menu.
- Use the arrow buttons to select an amount and confirm with "menu/ok".
- Repeatedly select the Exit command to exit the menu.
The ready symbol appears on the display.
The next time a cappuccino is prepared by the user, the selected amount of coffee is used.
7.3 Preparing beverages with personal settings

BARISTA TS model.

BARISTA T and SE model.
The preparation of beverages using the "My Coffee" function is similar for all beverages. The preparation of a cappuccino is described here as an example.
Requirement: The ready symbol appears on the display and milk is connected.
-
Place a vessel beneath the outlet.
-
Press the "My Coffee" button until the desired user is shown on the display.
- Press the "Cappuccino" button.
Beverage dispensing starts and ends automatically.
- Remove the vessel.
The display shows: Easy Cleaning? (OK for start).
- You can execute the Easy Cleaning programme or prepare further beverages.
a) Execute the Easy Cleaning programme. To do so, follow the instructions on the display, see section 9.4, page 54.
b) Prepare further beverages and execute the Easy Cleaning programme later.
The ready symbol appears on the display.
Information
To exit the "My Coffee" function, press the "My Coffee" button until the ready symbol appears.
If a beverage is not prepared within 3 minutes, the appliance automatically switches to the ready symbol.
8 Changing basic settings
Operating steps that change the appliance's basic settings are described in this chapter.
8.1 Setting the language
The display text language can be set.
Requirement: The ready symbol appears on the display.
- Press the "menu/ok" button for 2 seconds.
» The menu appears on the display. - Navigate to the Settings > Language menu.

- Use the arrow buttons to select a language and confirm with "menu/ok".
- Exit the menu with the Exit command.
The ready symbol appears on the display.
8.2 Setting the time
The time shown on the display can be set.
Requirement: The ready symbol appears on the display.
- Press the "menu/ok" button for 2 seconds.
The menu appears on the display. - Navigate to the Settings > Clock menu.
- Use the arrow buttons to select the hours and minutes. Confirm each setting with "menu/ok".
- Exit the menu with the Exit command.
The ready symbol appears on the display.
Information
To prevent the time being shown on the display, set the time to 00:00.
8.3 Activating/deactivat ing Auto Bean Select (BARISTA TS model only)
Automatic selection of a bean type can be activated or deactivated.
Requirement: The ready symbol appears on the display.
- Press the "menu/ok" button for 2 seconds.
The menu appears on the display. - Navigate to the Settings > Auto Bean Select menu.
- Use the arrow buttons to select Enabled or Disabled and confirm with "menu/ok".
- Repeatedly select the Exit command to exit the menu.
The ready symbol appears on the display.
8.4 Setting energy save mode
Energy save mode lowers the heating temperature and switches off the illumination on the control panel. The "menu/ok" button remains lit.
If the appliance is not operated for a long time, it automatically switches to energy save mode after a specified time. The period of time until energy save mode is activated is set in the Energy save mode menu.
Requirement: The ready symbol appears on the display.
- Press the "menu/ok" button for 2 seconds.
The menu appears on the display. - Navigate to the Energy save mode menu.
- Use the arrow buttons to select a period of time and confirm with "menu/ok".
- Exit the menu with the Exit command.
The ready symbol appears on the display.
Information
Energy save mode is ended by pressing the "menu/ok" button.
Energy save mode cannot be deactivated completely. After 4 hours without being operated at the latest, the appliance switches to energy save mode.
8.5 Setting Auto OFF
If the appliance is not operated for a long time, it switches off automatically after a specified time. Set the duration until the appliance switches off in the Auto OFF menu. A specific point in time can also be defined.
Information
If the duration and point in time are activated simultaneously, the appliance switches off after the event that occurs first.
Setting the duration for Auto OFF
Requirement: The ready symbol appears on the display.
- Press the "menu/ok" button for 2 seconds.
The menu appears on the display. - Navigate to the Auto OFF > OFF after... menu.
- Use the arrow buttons to select a time and confirm with "menu/ok".
- Repeatedly select the Exit command to exit the menu.
The ready symbol appears on the display.
Setting the point in time for Auto OFF
The OFF time point is deactivated as default in the factory.
Requirement: The ready symbol appears on the display.
- Press the "menu/ok" button for 2 seconds.
The menu appears on the display. - Navigate to the Auto OFF > OFF at... menu.
- Use the arrow buttons to select the hours and minutes. Confirm each setting with "menu/ok"
- Repeatedly select the Exit command to exit the menu.
The ready symbol appears on the display.
Information
To deactivate the Off time, set the off time to 00:00.
8.6 Activating/deactivating rinsing
Rinsing is always carried out immediately after switching on the coffee system. Only the Off rinsing can be activated/deactivated. If this is activated, rinsing is carried out after switching off the coffee system.
Permanent deactivation is not recommended.
Activating/deactivating switch-off rinsing
Requirement: The ready symbol appears on the display.
- Press the "menu/ok" button for 2 seconds.
» The menu appears on the display. - Navigate to the Settings>Switch-off rinsing menu.
- Use the arrow buttons to select Enabled or Disabled and confirm with "menu/ok".
- Repeatedly select the Exit command to exit the menu.
The ready symbol appears on the display.
8.7 Resetting the appliance to the factory settings
The appliance can be reset to the factory settings.
Information
If the appliance is reset to the factory settings, all personal settings are lost, including the settings in the My Coffee menu.
Requirement: The ready symbol appears on the display.
- Press the "menu/ok" button for 2 seconds.
» The menu appears on the display. - Navigate to the Settings > Factory settings menu.
- Use the arrow buttons to select Reset and confirm with "menu/ok".
- Repeatedly select the Exit command to exit the menu.
The ready symbol appears on the display.
8.8 Statistics and System menu
Statistics
The Statistics menu provides information on the number of beverages dispensed and for maintenance.

System
The System menu provides information on the software version and access to the Venting function, see "10.1 Venting the appliance" on page 58.
8.9 Setting the grinding fineness
The grinding fineness of the coffee beans influences the flavour of the coffee. The grinding fineness has been optimally set prior to delivery.
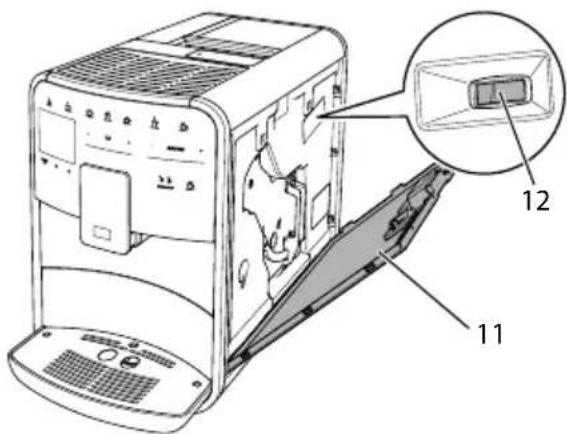
Fig. 17: Setting the grinding fineness
- Open the cover (11). To do this, reach into the recess on the right of the appliance and pull the cover off upwards.
- Move the lever (12) forwards or backwards.
Backwards grinding fineness coarser
Forwards grinding fineness finer
- Close the cover. To do this, insert the bottom of the cover into the appliance and swing it up until it engages.
Information
If the grinding fineness is set finer, the coffee flavour is stronger.
The optimum grinding fineness is set when the coffee flows evenly out of the outlet producing a fine, dense crema.
8.10 Converting the connection for the milk hose (depending on the model)
Optionally, the milk hose can be connected on the left or right side of the spout.
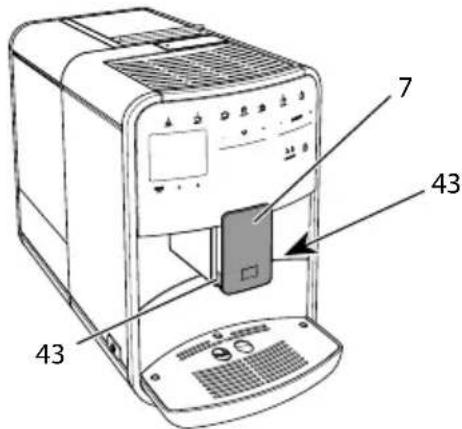
Fig. 18: Turn the inlet, 1
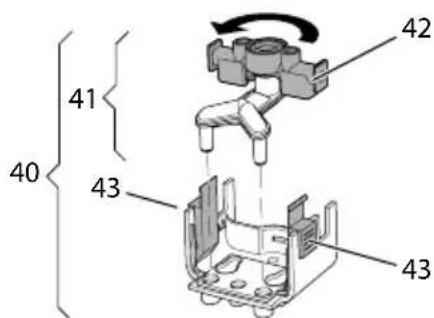
Fig. 19: Turn the inlet, 2
- Pull the milk hose off the appliance.
- Push the outlet (7) down as far as it will go.
- Press the locking mechanism (43) of the milk unit (40) together using two fingers and pull the milk unit downwards off the outlet.
- Pull the milk distributor (41) upwards out of the milk unit.
- Turn the inlet (42) by 180^ .
Installation is carried out as described in reverse order.
Information
To install, push the milk unit (41) onto the outlet (7) using both hands. Make sure that the locking mechanism (43) audibly engages on both sides.
9 Care and maintenance
Regular cleaning and maintenance ensure the consistent high quality of your beverages.
9.1 General cleaning
Clean the appliance regularly. Immediately remove external soiling caused by milk and coffee.
ATTENTION
The use of unsuitable cleaning agents can lead to scratched surfaces.
- Do not use any abrasive cloths, sponges or cleaning agents.
Requirement: The appliance is switched off.
Clean the outside of the appliance with a soft, damp cloth and normal washing-up liquid.
- Rinse the drip tray and the coffee grounds container with a soft, damp cloth and normal washing-up liquid.
Clean the bean container with a soft, dry cloth.
9.2 Rinsing the coffee system
During rinsing, the nozzles at the outlet and the internal parts of the coffee system are rinsed. As a result, rinsing water from the interior enters the drip tray.
If switch-off rinsing is not deactivated, the appliance rinses the coffee system when switching on and off.
Rinsing can also be carried out manually.
Requirement: The ready symbol appears on the display.
- Place a vessel beneath the outlet.
- Press the "menu/ok" button for 2 seconds.
The menu appears on the display.
- Navigate to the Care > Rinsing menu.
- Use the arrow buttons to select Start and confirm with "menu/ok".
» The coffee system is rinsed.
The ready symbol appears on the display.
9.3 Cleaning the brewing unit
To avoid damage to the appliance, we recommend cleaning the brewing unit once a week.
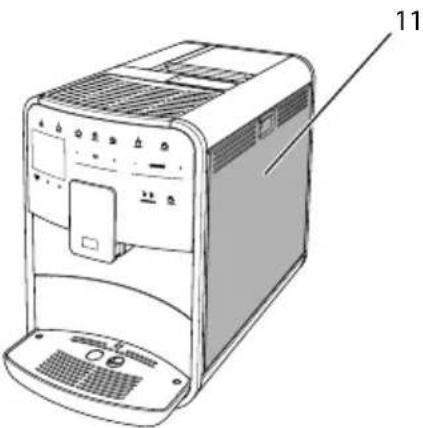
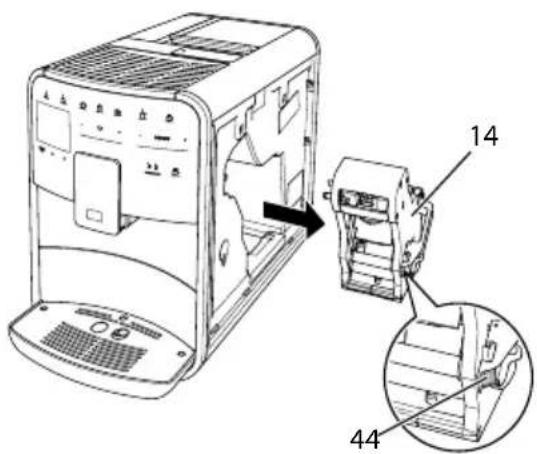
Fig.20: Removing the brewing unit, 1
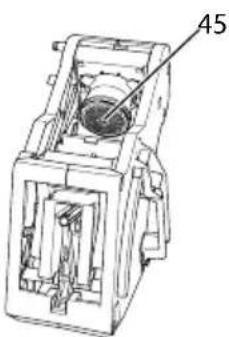
Fig.21: Removing the brewing unit, 2
Fig.22: Cleaning the brewing unit

Requirement: The appliance is switched off.
- Open the cover (11). To do this, reach into the recess on the right of the appliance and pull the cover off upwards.
- Press and hold the red lever (44) on the brewing unit handle (14) and turn the handle clockwise until it engages at the stop.
- Pull the brewing unit out of the appliance by the handle.
- Rinse the entire brewing unit thoroughly from all sides under running water. In particular, make sure that coffee residues are removed from the sieve (45).
- Allow the brewing unit to drip dry.
- Use a soft, dry cloth to remove coffee residues from the surfaces inside the appliance.
- Insert the brewing unit into the appliance. Press and hold the red lever on the handle of the brewing unit and turn the handle anticlockwise until it engages at the stop.
- Close the cover. To do this, insert the bottom of the cover into the appliance and swing it up until it engages.
9.4 "Easy Cleaning" programme
The milk system is rinsed using the "Easy Cleaning" programme.
Each time after a beverage has been prepared with milk, the appliance requests you to execute the "Easy Cleaning" programme.
The "Easy Cleaning" programme can also be run manually.
Requirement: The ready symbol appears on the display.
- Place a vessel beneath the outlet.
- Press the "menu/ok" button for 2 seconds.
The menu appears on the display.
-
Navigate to the Care > Easy Cleaning menu.
-
Use the arrow buttons to select Start and confirm with "menu/ok".
- Follow the further instructions on the display up to the end of the Easy Cleaning programme.
The ready symbol appears on the display.
9.5 "Cleaning milk system" programme
This programme is used to clean the milk system with the aid of a milk system cleaning agent.
To maintain hygiene and avoid damage to the appliance, we recommend carrying out the cleaning programme once a week.
The cleaning programme takes approximately 3 minutes and should not be interrupted.
ATTENTION
The use of unsuitable milk system cleaning agents can damage the appliance.
Only use Melitta® PERFECT CLEAN milk system cleaning agent for fully automatic coffee makers.
- Observe the processing instructions on the packaging of the milk system cleaning agent.
Requirement: The ready symbol appears on the display.
- Place a vessel with a capacity of at least 0.7 litres beneath the outlet (e.g. the coffee grounds container).
- Press the "menu/ok" button for 2 seconds.
The menu appears on the display.
- Navigate to the Care > Cleaning milk system menu.
- Use the arrow buttons to select Start and confirm with "menu/ok".
- Follow the further instructions on the display up to the end of the milk system cleaning programme.
The ready symbol appears on the display.
Cleaning the milk unit
In addition, we recommend cleaning the milk unit, the milk hose and the milk container regularly.
Information
The plastic milk container (depending on the model), without lid and riser pipe, is dishwasher-safe.
The thermal milk container (depending on the model) and its individual parts must not be cleaned in the dishwasher.

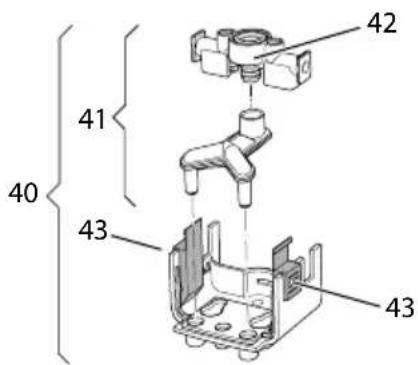
Fig.23: Removing the milk unit, 1
Fig.24: Removing the milk unit, 2
- Pull the milk hose off the appliance.
- Push the outlet (7) down as far as it will go.
- Press the locking mechanism (43) of the milk unit (40) together using two fingers and pull the milk unit downwards off the outlet.
-
Pull the milk distributor (41) upwards out of the milk unit.
-
Pull the inlet (42) out upwards.
- Clean the individual parts with warm water. Use a soft, damp cloth and normal washing up liquid for this.
Installation is carried out as described in reverse order.
Information
To install, push the milk unit (40) onto the outlet (7) using both hands. Make sure that the locking mechanism (43) audibly engages on both sides.
9.6 "Cleaning coffee system" programme
This cleaning programme is used to remove residues and coffee oil residues with the aid of coffee machine cleaning agents.
To avoid damage to the appliance, we recommend carrying out the cleaning programme every 2 months or as requested by the appliance.
Before starting the cleaning programme, clean the brewing unit and the interior (see section 9.3, page 53).
The cleaning programme takes approximately 15 minutes and should not be interrupted.
CAUTION
Contact with coffee machine cleaning agent may lead to eye and skin irritation.
- Observe the processing instructions on the packaging of the coffee machine cleaning agent.
ATTENTION
The use of unsuitable coffee machine cleaning agents can damage the appliance.
Only use Melitta® PERFECT CLEAN cleaning tabs for fully automatic coffee makers.


Requirement: The ready symbol appears on the display.
- Press the "menu/ok" button for 2 seconds.
The menu appears on the display.
- Navigate to the Care > Cleaning coffee system menu.
- Use the arrow buttons to select Start and confirm with "menu/ok".
- Follow the further instructions on the display up to the end of the cleaning programme.
The ready symbol appears on the display.
9.7 "Dscaling" programme
The descending programme is used to remove limescale deposits in the interior of the appliance with coffee machine descending agents.
To avoid damage to the appliance, we recommend carrying out the descaling programme every 3 months or as requested by the appliance.
With consistent use of a Melitta water filter, carry out the descending program at least once a year.
The descending programme takes approximately 15 minutes and should not be interrupted.
CAUTION
Contact with descending agent may lead to eye and skin irritation.
- Observe the processing instructions on the packaging of the descaling agent.
ATTENTION
Use of unsuitable descending agent may damage the appliance.
Only use Melitta® ANTI CALC liquid descaling agent for fully automatic coffee makers.
- Observe the processing instructions on the packaging of the descaling agent.
ATTENTION
A water filter may be damaged if it is screwed in during the descaling programme.
- Remove the water filter when the appliance requests you to do so (see Fig. 25, page 57).
- Place the water filter into a vessel filled with tap water during the descaling programme.
The water filter can be reinserted and reused when the descending programme is complete.
Requirement: The ready symbol appears on the display.
- Press the "menu/ok" button for 2 seconds.
The menu appears on the display. - Navigate to the Care > Descaling menu.
- Use the arrow buttons to select Start and confirm with "menu/ok".
- Follow the further instructions on the display up to the end of the descending programme.
The ready symbol appears on the display.
9.8 Setting the water hardness
The set water hardness influences the frequency of descending. The harder the water, the more frequently the appliance has to be descaled.
Information
The water hardness cannot be set if you use a water filter (see section 9.9, page 57).
Determine the water hardness with the enclosed test strip. Observe the instructions on the test strip packaging and in the table Water hardness range, page 59.
Requirement: The ready symbol appears on the display.
- Press the "menu/ok" button for 2 seconds.
» The menu appears on the display.
- Navigate to the Settings > Water hardness menu.
- Use the arrow buttons to select the water hardness range and confirm with "menu/ok".
- Exit the menu with the Exit command.
The ready symbol appears on the display.
9.9 Using a water filter
The use of a water filter extends the service life of the appliance and the appliance has to be descaled less frequently. The water filter filters calcium and other pollutants out of the water.

Fig.25: Screwing/unscrewing the water filter
The water filter (47) is screwed into and unscrewed from the thread (46) on the base of the water tank (48) using the screwing aid at the end of the enclosed coffee spoon (1).
Inserting the water filter
Information
Place the water filter into a vessel filled with fresh tap water for a few minutes before inserting it.
Requirement: The ready symbol appears on the display.
- Press the "menu/ok" button for 2 seconds.
» The menu appears on the display. - Navigate to the Care > Filter > Insert filter menu.
- Use the arrow buttons to select Start and confirm with "menu/ok".
- Follow the further instructions on the display.
The water hardness is automatically adjusted on the water filter by the appliance.
The ready symbol appears on the display.
Changing the water filter
Change the water filter when the appliance requests you to do so.
Requirement: The ready symbol appears on the display.
- Press the "menu/ok" button for 2 seconds.
» The menu appears on the display. - Navigate to the Care > Filter > Change filter menu.
- Use the arrow buttons to select Start and confirm with "menu/ok".
- Follow the further instructions on the display.
The ready symbol appears on the display.
Removing the water filter
The water filter should not be left standing dry for a long period of time. When it is not used for a long time, we recommend storing the water filter in a vessel filled with tap water in the refrigerator.
Requirement: The ready symbol appears on the display.
- Press the "menu/ok" button for 2 seconds.
» The menu appears on the display. - Navigate to the Care > Filter > Remove filter menu.

- Use the arrow buttons to select Start and confirm with "menu/ok".
- Follow the further instructions on the display.
The water hardness is automatically reset to the previous setting.
The ready symbol appears on the display.
10 Transport, storage and disposal
10.1 Venting the appliance
We recommend venting the appliance when it is not used for a long period, prior to transport and when there is a risk of frost.
During drying out, residual water is removed from the appliance.
Requirement: The ready symbol appears on the display.
- Place a vessel beneath the outlet.
- Press the "menu/ok" button for 2 seconds.
The menu appears on the display.
- Navigate to the System > Venting menu.
- Select Start using the arrow buttons and confirm with "menu/ok".
- Follow the further instructions on the display.
The appliance switches off.
10.2 Transporting the appliance
ATTENTION
Freezing residual water can damage the appliance.
Prevent the appliance from being exposed to temperatures below 0^ .
Information
Transport the appliance in the original packaging. This avoids damage in transit.
Before transporting the appliance, carry out the following activities:
- Dry out the appliance (see section 10.1, page 58).
- Empty the drip tray and the coffee grounds container.
- Empty the water tank.
- Empty the bean container.
- Clean the appliance (see section 9.1, page 53).
- Secure loose parts (cup plate, etc.) with suitable adhesive tape.
- Package the appliance.
10.3 Disposing of the appliance
Appliances bearing this symbol are subject to the European Directive 2012/19/EU for WEEE (Waste Electrical and Electronic
Equipment).
Electrical appliances do not belong in domestic waste. Dispose of the appliance in an environmentally friendly way via suitable collection systems.
11 Technical data
| Technical data | |
| Operating voltage 220 V to 240 V, 50 - 60 Hz | |
| Power consumption Max. 1450 W | |
| Pump pressure Static, max. 15 bar | |
| Dimensions | |
| Width | 255 mm |
| Height | 365 mm |
| Depth | 465 mm |
| Holding capacity | |
| Bean container | 2 × 135 g |
| Water tank | 1.8 l |
| Weight (empty) 10.6 kg (Barista TS) | |
| 10.4 kg (Barista T) | |
| 10.4 kg (Barista SE) | |
| Ambient conditions | |
| Temperature | 10°C to 32°C |
| Relative humidity | 30% to 80% |
| (non-condensing) | |
| Water hardness range | °dH °e °fH | ||
| Soft 0 to 100 to 130 to 18 | |||
| Medium 10 to 15 | 13 to 19 | 18 to 27 | |
| Hard | 15 to 20 | 19 to 25 | 27 to 36 |
| Very hard | >20 | >25 | >36 |


12 Problems
If the actions listed below fail to rectify the problems or other problems not listed here occur, contact our hotline (local rate).
The service number can be found on the lid of the water tank or in the Service area of our website.
| Problem Cause Action | ||
| Coffee only emerges from the outlet in drips. | Grinding fineness too fine. | ■ Set a coarser grinding fineness (see section 8.9 on page 52). |
| Appliance soiled. | ■ Clean the brewing unit (see section 9.3 on page 53).■ Run the cleaning program (see section 9.6 on page 55). | |
| Appliance is covered inside with limescale. | ■ Descale the appliance (see section 9.7 on page 56). | |
| Coffee does not flow. Water tank not filled or inserted incorrectly. | ■ Fill the water tank and ensure it is positioned correctly (see section 4.6 on page 43). | |
| Brewing unit clogged. | ■ Clean the brewing unit (see section 9.3 on page 53). | |
| Fill beans appears on the display although the bean container is full. | Beans do not drop into the grinder. | ■ Tap lightly on the bean container.■ Clean the bean container.■ Coffee beans too oily. Use different coffee beans. |
| Loud grinder noise. Foreign object in the grinder. | ■ Contact the hotline. | |
| Brewing unit cannot be inserted after removing. | Brewing unit is not correctly locked. | ■ Check that the handle for the brewing unit locking mechanism is correctly engaged (see section 9.3 on page 53). |
| Drive is not in the correct position. | ■ Press and hold the "My Coffee/Recipes" button. Also press the ON/OFF button. The appliance initialises. Release the buttons again. | |
| System error appears on the display. | Software problem. | ■ Switch the appliance off and on again (see section 4.1 on page 39).■ Contact the hotline. |
Sommaire
Chere cliente, cher client,
www.melitta.nl of www.melitta.be
" +" of " - " drukken
8.6 Spoeling activeren/deactiveren
9.4 Programma "Easy Cleaning"
No permitted to be placed in the water.
- Retire el recipient.
- Retire el recipient.
9.4 Programa "Easy Cleaning"
10.2 Transportar laquina
PRECAUCION
Abning af undermenuer
Drikken tilberedes.
I displayet vises Easy Cleaning? (OK for start).
9.4 Programmet "Easy Cleaning"
Maelkesystemet skylles med Easy Cleaning-programmet.
Menuen vises i displayet.
10.2 Transport of maskinen
OBS
Frossent restvand kan medfore skader pa maskinen.
» På displayen visas Easy Cleaning? (OK for start).
9.4 Programmet "Easy Cleaning"
Med programmet Easy Cleaning spolas mjolksystemet.
i displayet vises Easy Cleaning? (OK for start).
Melkeleveringen beginner.
i displayet vises Easy Cleaning? (OK for start).
i displayet vises Easy Cleaning? (OK for start).
9.4 Programmet "Easy Cleaning"
Med "Easy Cleaning"-programmet skyles melkesystemet.
Sette inn vannfilter
1 Informasjon
- Unngå ä utsette apparater for temperaturer under 0^ .
25TopaayBoaI PnroToBneHne ropey BoDbl
26 2aushknpnroTOBneHne DByx aweK Kofo
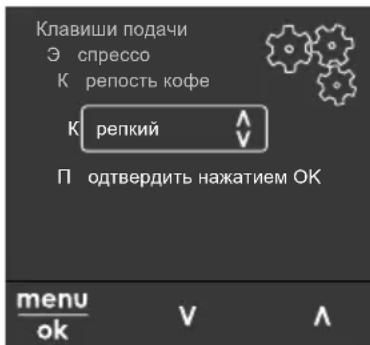
27 PeryIaTOp o6b- HacTpoIka o6bema HanNTKa eMa HAnNTKa
28 PerylaTOp HacTpoIka KpeNoCTn Kofoe KpeNoCTn Kofoe
29 Moi Kofoe/ BbI6Op nepcoHaJIbHbIX HAcTpoEk IJRA HAHTKOB IIN PeCNTbl npiroTOBLeHne HAnrTKOB no pecntam.
Moi Kofoe Bb6op nepcoHaJIbHbIX HAcTpoEKN HaNTKOB. (B BARISTA T n SE)
30 BbIbOP 3EPEH BbIbOp copTa KofoeHbIX 3epeH (ToJIbKO MoJeB bARISTA TS).
"BbI6P 3EPEH" B BARISTA T n SE cm. n03. N° 3.
31 Khonka co ctpeknkoi KepeMeueHne BBePx nO MeHIO nIIN HacTpoiKa apomata
32 Khonka co cTpeIkoJ Kofo HHTEHCUBHbI.
33 MeHIO/ok BbI3OB MeHIO IIN NOITBepXeHne BBOda
34Диспл徳 INHДИКацЯ Tekyuix MeHIO n COO6eHn ПрIMep: INHДИKauZI rOTOBHOCTN
Ybaxkaemblnokynatelb!
6laogapm Bac 3a To, uTo Bbl BbIbpaN KofoeHbI aBtOMaT BARISTA.
Данhoe руковдъно Экплuyaаташи nomoxket Bam O3haKOMITbCЯрзHOO- 6pa3HBIM BO3MOxHOCTЯMn apnapaTaи при�OTOBt b Koфe,doCTонь ВOCXиц- ня.
BHHMaTeIbHO npOuTHe daHHepe pyKOBoCTBO.3To nO3BoIIT Bam nckIIOUHTb onacHOCTb TpaBMnPOBaHn I npNHyEnHa MaTePnaJIbHO rO yUepe6a.XpaHnte daHHepe pyKOBODCTBO B HAdNeXaUeM BVne. DaHHOe pyKOBODCTBO DOJxHo 6bITb nepeDaHO HOBOMy BlaAeIbUy BMcTe c aannapaTom.
Фирма Melitta He HeceT OTBETCTBEHNOCTN 3a NOBpeJdeHn, OBCNObJIeHHbIe HecO6JIIOJeHnEM Tpe6OBaHn DaHHoro pyKOBODCTBa.
Pn Heo6xOJIMOCn POnyuEHHa 60nee
NoDpO6Hoi HOpMauN nn npn HaNNBOPCOb O6paauTecb B OOpuaNbHbIe PpeCTaBnteBCTBa FnpMbI Melitta
nn NocTeHaaw caNT:
www.melitta.ru
XeNaem Bam MHOro paIOCTHbIX MNHyT C KOfe, npriROTOBneHHbIM C NOMOu bIO HaWero HOBOro aannapata.
2ДяВашев6e3oNaChOCTN
C E Annapat COOTBeTCTByet DeiCTBy- 10uIIM EbponeNCKM DnpeKTNBaM I npOn3BeDeH B COOTBeTCTBUN C COBpeMeHHbIM yPOBHeM TexHnKn. Tem He MeHee, CyueCTBYOT OCTaTOUHbIe PNCKN. Bo n36exKaHne ONaCHOCTn Heo6xOdmo Co6JIOdaTb yka3aHnI NO TexHnKe 6e3- OnaCHOCTn. DnpMa Melitta He Hecet OTBeTCTBeHHOCTn 3a NOBpeXJeHnI, ObyCNOBJIeHHbIe HcO6JIIODeHnEM yka3aHn IIO TexHnKe 6e3ONaCHOCTn.
AnnapaT npedHa3Hauaetc
IJI npiroTOBHeHnKoFeiHbIX
HaNTKOvN3 KoFeiHbIX 3epeH
IIIMMOJOTOrO KoFe, a TaKKe IJI
IOOrPeBa MoIOKa N BObl.
Annapat He npedHa3Hauen dIy IcnoIb3OBaHnB KOMMepuecknx ceJx.
JIIO6oe npyroe npIMeHne paccMaTPnBaetcKaK nCNOJb- 3OBaHHe He IIO Ha3NaueHIO mOKeT cTaTb npuHOn TpaBM m MaTePnaIbHoro yUep6a. DnpMa Melitta He HecET OTBETCTBeHHoCTN 3a NOBpeXdEHH, npuHOn KOTOpbIX cTaI0 npIMeHne annapata He no Ha3NaueHIO.
2.2 Onacnoctb, o6ycnOBneHna 3neKtpnueckm TOKOM
B clyuae noBpeJdeHn yctpoiCTBa nIcTeBOrKa6eI cyueCTByET ONaCHOCTb NopaxeHn 3JIeKTPnueCKm TOKOM, npedCTaBJIIOUIm yrpo3y BaWeMy 3DOpOBbIO.
CoblaaTe cJeUoune yka3aHnnoTexnke 6e30nacHOCTn, uTo6bln36eKaTb yrpo3bl npaJxHnna 3JIeKTpueCKm TOKOM:
ü 3aπpeucaetcncnoIb3OBaTb NOBpeKdENHbI cTeBOJ Ka6eJIb.
ü 3aMeHa NOBpeKdEHHORO ceTeBOrO Ka6eJa DoJXHa BbIIOJIHrTbCЯ NCKJIQUHTeJIbHO n3rTOBnTeJeM,ero Cnyx6oJ
no pa6oTe c KIneHTaMn nn erO cepBnC-napTHePOM.
u 3anpeaetcra OTKpbBaTb KOxyn, npBnHueHHbIe 6oJ TAmN K Kopnycy aannapata.
u IcnoIb3yIte aannapat TolbKO B TexHnueckN nCnpaBHom COCTOAHIN.
U PeMOHT NOBpeKdEHHORO aannapata DOJKeH BbINOJI-NaTbCnCKJIIOuHTeJIbHO BAbTOpN3OBaHHoMaCTepcKOJ. 3aIpeuaetcCaMoCToRATeJIbHO BbINOJIHrTb peMOHT aannapata.
3aPepaetcBHOCTb N3MeHHeNBA KOHCTpyKUIOI NOpAOK yHKUNOHPOBaHnAappata,ero KOMNOHETOB INpHaJExKHOCTe.
u He donyckaTe norgyKeHnna npapaTa B Body.
u He donykaite KOHTaKta ceteBoro Ka6eIc BDOJ.
2.3 Onachoctb noIyueHn oXkora
Iopabaembe XndKoctb n nap MOryt 6bITb OueHb RopayMn. DeTaN aannapata TAKKe MOryt HArpeBaTbcra Do OueHb BbICOKoI TemnepaTypbl.
Co6IIOJaIte cJeDyUOJne yKa3a-HnI NO TexHnke 6e3OnaChOCTn, UTO6bI npeDOrBpaTntb ONaC-HOCTb NOLyueHnra OXORA:
He donyckaTe nonadHnnaIPOdaBaembIX rOpayx KndKOCTeN n npa Ha KoJy.
U Bo Bpemra pa6oTbI aannapata He npKacaiTeCb K HaCaKaM Ha BblnyCKHOM OTBepCTIN.
2.4 067a86e3oNaChOcTb
Co6IIOaIte cIeDyUoIne yKa-3aHnI NO TexHnke 6e3Oanac-HocTn, YTO6bI IpeDOrBpaTnTb ONaCHOCTb TpaBMIpOBaHnI nII npuHHeHnMaTePnaJIbHOro yuepe6a:
He 3Kcnpnyte annapat B uKafo n T. n.
ü 3anpeuetaetcKaacatbcbBHy- TpeHHnx DeTalei aannapata B npouece eropa60tbl.
ü XpaHnte annapaT n ceTeBOJ Ka6eIb B MeCTe, HeIOCTyPHOM dIra DeTei MnaDwe 8 neT.
U DaHbI aHpaT MoKeT
NcNoIb3OBaTbCra DeTbMn
CTapWe 8 let, a TaKxe IuCaMn
C OrpaHnueHHbIMn Φn3NuYeCKIMn I NCNXnueCKIMn BO3-MOxHOCTaMn, Jn6o LnuaMn,
He NMeIOUIMN COOTBeTCTByIO-
Iux 3HaHn I ONbITa, TOnbKO
POn Ha3OpOM INI NocLe
POnyueHnA Heo6XoDmBIX
INCTpykUnn PO O6paUeHNUO
C DaHHbIM aAnnapaTom I OCBe-DOMJIeHnO CBa3aHHbIX C 3TNM
BnDaX ONaCHOCTn.
u 3aPpeUaEeTcA daBaTb DeTm INrpaTb C yCTpOJCTBOM. YnCTKa N NOIb3OBaTeJIbCKOE TexHnueckoe O6CnyKINBaHne DOJIKNbI BbINOJIHrTbC TOnbKO IInCaMn CTapWe 8 let. DeTm CTapWe 8 let pa3peUaETcRA BbINOJIHrTb UnCTKy N NOIb3OBaTeJIbCKOE TexHnueckoe O6CnyKINBaHne TOJIbKO IOd HaI3OpOM CTap-IXX.
ü OctabJЯ yCTpoiCTBO HaДЛ-TeIbHoe BpeM 6e3 npncMO-
Tpa,OTCOeINHInTe erO OT cETn 3JIeKTPoPNTaHnIa.
u 3anpeaetcyaataun annapata Ha BbICote Cbbiwe 2000 metpoB.
u Pn Ounchke npnbopa n erokomnoheHOB co6IoudaIte yKa3aHnA, npNBedeHHbIE B COOTBeTCTByIOUeN rnaBe ("O63op apnapaTa" Ha cTp. 267).
3 C yero haayatb
B daHnoI rnaBe onncbIbaeTcra NopraDOK NOdroTOBKn aannapaTa K nCNoJIb3OBAHNIO.
3.1 PacnaKOBka yctpoiCTBa
Pacnakyte annapaT. Chmnte c annpaTa ynaKOBOHbMaTePnaI, KJeKyIO IeHTy n 3aunTHyIO PHeHKy.
CoxpaHnTe ynaKOBOuHbIM MaTePnHa cnyaTpaHCnOpTnPOBKn N BO3MOX-HoI OTnpaBKn n3rTOBnTeJIIO.
HOpMaun
B aappapate moryt haoontbc octaTKn Kofo nn BObl. Ha 3aBoJe-n3rotobnte ne npoBOHTc npOBepka npaBnIbHocTn pa60tbl yCTpoiCTBa.
KaToPhyU NOLOCKy. Co6JIIOaIte INHCTpyKcUN, yKa3aHHbIe Ha yNaKOBKe INHdNKaTOPHOJNOLOCKN, nB Ta6JInce Duana3OH JecmKocmu B0dbI, cmp. 294.
HΦopmaçnA
PekomeHdyetc HyeNtpe6nTb nepBbIe DBe yaKKn KoFe nocJe npBOrO BKIOueHnIa.
Heo6xoAnmoe yCIOBne:annapat yCTa-HOBJIeH I NOKJIIOUeH.
- ПОДСТаВБTe EMKOCTb NOД ВьИУСКHOЕ OTВЕРСТи.
- Haxmnte Ha KhoNky "Bkn./BbIKn." Ha dincnee noBtca npuBeTCTBeHna HaDnncb. Ha dincnee noBtca 3anpoc Ha BbINOJIHeHne HAcTpOa: BbInolHume Hacmpouku annapama. 3amiraet KhoNka MeHIO/ok".
3.ПоДТВЕРДИТЕДЕICTBVE,нжав на КНОПКУ"MeHIO/OK". » ПОВИТСЯ MeHIO 836I.K. - BbI6epnte c NOMOuBIO KHOJOK CO CTpeJIkAmN HxKhBn J3bIK. PoITBepDNTe HaxKaTneM Ha "MeHIO/ok" POBNTcMa MeHIO BpeMra.
- BbIePnte c nOMOu KHOIOK CO CTpeKamN qac N MInHyTbI. PoTBePdIte HaCTpoiKn, Haxkab Ha "MeHIO/ok". POnBNTcM MeHIO XecMKocmb BoDbI.
- BbIepeNTc nOMOuH KHOK co CTpeIkamn ONpeJeHHyIO JecTKoCTb BObl IIN NODTBepNTe NpeBapNTeNbHO yCTaHOBHeHHOe 3HaueHne, Haxab Ha "MeHIO/ok". POBNTc3anpoc Ioxaanyucma, HanoJIhume u BCmAbme KOHmuHep dIra BoDbI.
7.CHIMnTe KOHTeHep DnB BOdbI.PpOMoNte erO uHcToB BOoB.BCTaBbTe HnIbTp DnB BOdbI (CM. rI., BKnIOueHne annapata"Ha cTp.272). HanONHtE KOHTeHep CBeKeB BOoB N BCTaBbTe Ha MeCTO. AAnnapaT HarpeetCn BblNOJHNT aBTOMaTnueCKyIO pPOMbIBKy.
Ha nucnnee noBntc uHnkaTop roTOBHOCTu 3anpoc 3acbinamb 3epHa.
- 3acbIbTe KoFeHbIe 3epHa B COOTBeTCTByIOuN KOnTeHep. DOnONHtJIbHyIO INHΦOpMaUIO CM. B rIaBe O6uU bud annapama, cmp. 267.
4 OCHOBhIe npHcIIpbI ynpaBHeHn
B daHno rnaBe onncbIbaOTcOCHOBhble 3TaNbI ynpaBHeHn, Heo6XoIMMbIe IJn NOBceDHeBHOrO nCNoJIb3OBaHn aPpapaT.
4.1 Bключени n Вьikлючене annapapa
Ipeπ nepBbIM BkIoueHneM aannapata npoHTte rnaBy 3.5, ctp.271.
UHΦopMaçnA
u Pn BkIIOueHnn N BbIKIOueHnn aannapaT bInOJIHReT aBTOMaTNUeCKyIO npombibKy.
ü IcnoIb3yema npn npombIBKe BOda BBIOJNTcB NODON DnA c6opa KaJIb.
u ABTomatnueckyIO npombIKy npn BbIKJIQUeHm MOKHO BKJIOHTb NIN BbIKIQUHTb MHeH O Hacmpouku.
BkIoueHne annapata
- ПОДСТаВБTe EMKOCTb NOД ВБИNYCKHoe OTBepCTne.
- HaxmTe Ha KhoNky "Bkn./BbIKl."
Ha nncnnee noBntc npNBetCTBeHHa Haanscb.
Annapat Harpeetca N BbINOHHT aBToMaTHUeCKyIO npOMbIBKy.
»HaДиСплгпЕ ПОВИТСУНДИКАТОР ГOTOBHOCHTN.
BbiknueHne annapata
- ПОДСТаБTe eMКоCTb NOД BыИнсKhoe OTВерстпe.
- HaxmTe Ha KhoNky "Bkn./BbIKl."
》AnnapaT BbINOJHIT aBTOMaTnueckyIO npombiBky.
》3aTeMaannapaT BbIKNIOUHTCra.
iHΦopmaun
u AnnapaT aBtOMaTnueCKN BbIKIouHTcB cnUyae npoJOnKInTeIbHOro npocToR. B daHHOM cnyae TaKke 6yJeT BblONHeHa aBTOMaTnueCKa npombIBka.
U Bpemrdo OTKIOUeHnMoXHO HaCTpoNTbBMehIO AbmOBbIKIOueHue,CM. rnaBy 8.5,ctp.285.
ü Ecni nocne BKJIOUeHnHaHNTKHe IOTOBUNcB, INI KOHTeHep IJIa BOdbl OCTaBaICr NyCTbIM, IpOMbIBKa He BblNOJIHReTCr.
4.2 ПорядOK ИспOLTБОВАньпанелуypaВлЕнь
YnpabIeHne Han60Jee BaXhbIMN yHKn-AMN BblOJIHReTcR C NOMOUsbIO CNeuJaB-HoI naHei.
HaxmTe naIbceM Ha KhoNky. NaHeIb ynpaBleHn He pearnpyeT, ecn HaxaTne BbIOJHReTc NOMOuKapaHdaWa IIN NOo6HOro npedMeta.
IopcBueuBaOTcTolbKO Te KHOKN, KOToPbIE MOxHNOINoJIb3OBaTb B TeKyuempeXnme.
Дя упраьеня annapaTOM c nomоцью панели NCNoIb3yIOTc CneDyUOuNe DeiCTBn:

KpaTkoe Haxkatae
HaKMnte Ha KHOKNy, yTO6bI Bbl6paTb 0HKnIO.

PpOdoJIxNtTeNbHoe HaxaTne
YdepnBaTe KHOpy
HaKaToB TeueHne 6OJIee
2ceKHy, UTo6bI Bbl6paTb
BTOpyU OyHKuIO.

Haxknte Ha "+" nnn"-" Haxmnte Ha "+" nnn"−", yTO6bI yBENuNTb nIN yMeNbHTb TEkyuee 3NaueHne. UdepXnBaITe KHOKNy HAXaToi, yTO6bl HePpepbIBHO n3MeHrTb 3NaueHne.

Haxkatae Ha peryarnTop Haxmnte Ha peryarnTop, yTO6bI Bbl6paTb 3HaueHne.

IpeetacknBaHne peryJyTopa
HaxmTe npoBeNTe
Panbem BDOJb peyIaTopa, yTo6bl yBelenuHTb
HnYMeHbWHTb TeKyuuee
3HaueHne.
4.3 Habirataи no MeHIO
ДлЯ ИндИиДуаЛьНоH NaCTpoКи HAnIT-KOB,ТexHnueCKOrO O6CnyKuBaHЯ N yXoJa Heo6xOДIMO Bbl3BaTb MeHIO HaДиСплee N nepeMeCTNTbCBy HyKHBiI pyHKT MeHIO.
Co6nOaIte yka3aHn, daHHbIe Ha nCnnnee.
Puc.6:IpuMep:ducnneu cKhonKaMu
Дя Habirraци NO MeHIO nCNoIb3yIte CneDyuOuNe BO3MOxHOCTN:
BbI3OB MeHIO I NOITBePKeHne Bbl6opa

YdepeKnBaIe KhoNky "MeH0/ok" HaxaToB TeueHne 6oJee 2
CeKyH, UTo6bl Bbl3BaTb MeHIO.
HaKmTe Ha KhONky "MeHIO/ok", uTo6bI NOdTBePdNTb CBOB Bbl6Op.
Habiracny no MeHIO
V Haxmte Ha KhoNk CO CTpeKamn, 1TO6bI NepMeCTNTbCBAH3 ININ BBepx NO MeHIO. YdePkaHTe KHOKNy CO CTpeKoHaKaToi, 1TO6bIBbINHHTb 6bICTpbI NepexoK HxHBIM NyHKTaM MEHIO.
BbIXoU3 MeHIO

C nOmoIbIO KHOJOK CO cTpeI- kAmN BbI6epNTe KOMaHny BbIXoD
I NOITBepDnte HaxKaTneM Ha "MeHIO/ok", YTO6bl BblTN N3 MeHIO.
BbIXoN3 NODMeHIO, B KOTOpbIX TOnbKO OTo6paKaTeCn HΦopMaunn He ocU-uctbnIOTc HaCTpOuKn, OcuJeCTBnEeTc nocpeDCTBOM HaxaTna Ha Ha "MeHIO/ ok".
BbI3OB IOMeHIO
OCTyn K HeKOTOpbIM FyHKUaM OcyuEcT-BIaETcNOCpeiCTBOM NocJeIOBaTeNb-HORo Bbl0Ba HECKoJIbKIN NOmHeHIO.
BbI3OB NOdMeHIO BbIIOJNHeTcra Bcerda OINHaKoBO.HanpIMep,3dec npIBoDNTcR ONCaHne nepexOJa K nporpaMme YdaJeHue Hakunu.
Puc.7: IepexoK npo2pAMMe oucMku om Hakunu
-
YdepxnBaIte KHONKy "MeHIO/ok" HaxaToB B TeueHne 2 ceKyuHd. Ha dinCnnee nOraBntcMaHIO.
-
C nOMObIO KHOJOK co CTpeJIkAmn Bbl6epHTe onuio yxod n noTBepeIuTe
Bb6op HaxaTneM Ha "MeHIO/ok".
- C nOMOsbIO KHOJOK CO CTpeKNaMn BbI6epNTe ONU YdaJIeHue HAKUNu N NOITBepdTe BbI6Op HaxKaTneM Ha "MeHIO/ok".
B daHHOM pyKOBOdCTBe NO 3KcIIyatauIN Bbl6Op fYHKU IN Bcerda OTo6paXaETcR B COKpaueHHOM BnDE:
- Ipeennte K MeHIO Yxod >YdaneHue HAKUNU
4.4 HanoJIHeHne KofoeINbIMn 3epHaMn INIcNoJIb30- BaHne nepeKIOUaTeJЯ Bbl6Op 3epeH
O6kaepHHbIe KOfeHbIe 3epHa TepaOT CBO apOMaT. 3acblbTe B pe3epByap CTOBKO KOfeHbIX 3epH, CKoJIbKO CMO-KeTe ynoTpE6ntb 3a 6nJaMne 3-4 nHa.
IJIa ONTImaJIbHOro Bkyca HAnNTKa IcNoJIb3yIte OXIAKdEHHOe MOJOKO.
B 3aBnCmOCTN OT MOeJI N MoXHO nCNoIb-3OBaTb NOCTaBJIeMbIe B KOMJIeKTe EMKOCTb IIN Tpy6ky IJRA MOnOKa, a TaKKe CTaHdApTHblc yNaKOBKn IJRA MOnOKa.
IopknioueHne emKoctn nna MoNoka (B 3aBnCmOCTn OT MOnen)
Haene Te B eMKoCTb CTOnbKO MOLOKa, CKoIbKO CMOKeTe NcNoIb3OBaTb 3a OdNH pa3.
Puc.13:IodKnIOueHue emKocmu dna MoIoka K annapamy (pucyHok Moxem omluayambcra om deu-cmbumeIbHOzo buda annapama)
- HanoHnTe emKoCTb Heo6xOIMMbIM o6beMOMMOloka (38).
- Nepemecnte Bbinyckhoe OTBepctne (7) BHn3.
- CoeHInHe Tpy6ky dny MoNoka (37) C EMKoCTbIO dny MoNoka n pa3beMOM (15) Ha BbInyCKHom OTBepCTnN.
IHHOpMaun
XpaHnte emKoCTb dIa MOIOKa B XOJOnDnBHNKe.
IopKnIOueHne Tpy6kn Iy MoNoka (B 3aBnCmOCTN OT MOneenn)

Puc.14: PndKluueHue mpy6ku dna MoIoka Kannapamy
-
NpeMeCTNe BbInyCKHoe OTBepCTne (7) BHN3.
-
CoeHnHTe Tpy6ky IJRA MOnoka (37) c pa3bemOM Ha BblnyCKHOM OTBepCTIN (15).
- BCTaBbTe Tpy6ky dnia MONoka B cTaHdapTHyO ynaKOBky dnia MONoka (39).
4.9 OuNTka noDoHa dJa c6opa Kaenb N eMKoCTn dJa KofoHOrO XMbIXa
EcnnoDOnIc6opaKapeIb(9) n EMKocTbIJa KofoHOrO XMbixa (8) 3aONHeBbl, aannapat BbIaCT 3anpoc Ha OunchKy DaHHbIX EMKOCTe. YpoBeHb HApONHeHnna POnDoHa IJra c6opa KapeIb TaKke MoXHO ONpeJeNITb NO NOLoxeHIO nonlaBka (18).Bcerda OunuauTe oBe EMKOCTn.
Puc.15: Ioddoh dna c6opa kanenb, emkocmbdna KofoeHooXMbixa unnonnaBOK
- ɪЗbvкnte noДон (9) n3 aannapata, notянв erо вперд.
- CHIMnTe emKoCTb IJRA KOeHOrO XMbIXa (8) n ydaIInTe XMbIX.
- CneTe KnIkoCTb n3 NOdOHa dna c6opa kaenb.
- BCTaBbTe emKoCTb dЯ KoΦeHOrO XMbIXa Ha MeCTO.
- 3aBnHbTe nOdoH B aannapat do ynpa.
HOpMaun
AnnapaT BbIaet 3anpoc Ha ounctky noDOna dna c6opa Kaenb n emKoCTn dna KofoHoro XMbIXa nocne onpeDe
JIeHHORO KOJINUYeCTBa UIKNOB pIuROTOBJIeHnRA HAnITKOB. Pn OunCTKe annapataB BbIKIOUeHHOM COCTOHNn AnnapaT HepeNtPnpPyET DaHHoe DeiCTBne. NToTomy3aIPOC Ha OUnCTKY MOKeT BbIDaBA TbCBnHECMOTpy Ha To, YTO NOdON dJa c6opaKaIeNb I EMKOCTb dJa KoFeHOrO XMbIXa eJe He 3aIOnHeHbl.
5ПригOTOBЛЕнneHaNTKOB
Дя npirotoBneHnHaNTKOB npedymaTpNBaeTcTpN BO3MOXHOCTN:
U CTaHdapTHbI BApNaHT C NOMOuBIO KHOJOK NOaun IpeeENTOB (MOeJIb BARISTA TS),
ü npnroTOBJIeHne c n3MeHeHHbIMn HacTpoiKaMn IЯ HaNTKOB (6, cTp. 281),
u nCnoJb3OBAHne nepcoHaJIbHbIX NaCTpoE K c NOMoU bO fYHKcN MoKoFe (cM. rI. 7, cTp. 282).
B daHnoI rnaBe onncbIbaeTcraHdaprHbI BapnAHT npnroTOBneHnaHaNTka.
06patnte BHMmaHne:
B COOTBeTCTByUOuNx pe3epByapax DOnJxKeH HAXoIITbCra IOCTaTOUHbI O6bEm KoFe N BObl. B npOTNBOM cnyae aannapaT BblAcT 3aInpoc Ha HAnONHeHne.
U HnKauHa cnyaonOTcyTCTBm MOJOKa He npedyucMaTpnaeTc.
ü B cnyuæ Bb6opa HanNTka C MOJOKOM Heo6xOДIMO npncoeDnHTb emKoCTb ДЯ MONoka nIN CTaHdapTHyU yna-KOBky MONoka.
U EMKOCn nIa HAnITKOB DOJXHbI 6bITb DOCTaTOUHO 6OJIbUIMN.
uДяпри�ROTOBHeHЯHaNTKaHaДиCnIeДOLJKeH OTO6paXaTbcr INHdNka-ToprotOBHOCTN.
üПодачаHaNTka3aKOHHTcayABTOMaTnueCKn.
üПослпригOTOBнЯHaNTka C MOnOKOM aAnnapaT aBToMaTnueckN BbIaCT 3aPoc Ha BbINOJIHHe NpeIpo- rpaMmblIerKaOuNcTKa.
Heo6xOaHmoe yCIOBne:Ha dnc- pIee oTo6paKaetcN HdNKaTOP
FOTOBHOCTN.
- ПОДСТаББTe EMKOCTb NOД BыИсКhoe OTВЕРСТе.
- Haxmaite KhoKy «Moi Kofe/ PeentbI» Do Tex nop, noka He noBnTc npoHnb Peuenmbi, n noTBePdnte HaxaTne MHOKn «MeHIO/ok>.
Ha nucnlee noBtca Bb6op peeNTOB. KaueCTBe aIbTepHaTINBbl MOxHO akke yapedknaBt b KhoNky MoKoFe/ eentb> HaxaToi 2 cekyHdbI, UTO6bl pa3y nonactb K Bbl6Opy peeNTOB.
- C nOMOu bIO KHOJOK CO CTpeKamn BbI6epHTe ONUH JyH2O IN NOdTBePdnte Bbl6Op,HaXaB Ha "MeHIO/ok".
- CHIMMTE emKoCTb c NOcTaBKn.
I3meHHe NaCTpoE K JIA HAHTKOB DO npuroTOBHeHn
Moxho n3MeHrB BbI6Op copTa 3epeH, o6uH o6bem HApNTKa, KpeNoCTb H apOMaT KoFe Do TORO, KaK 6yJeT Bbl6paH HApNTOK.
HOpMaun
Apomat Kofopeperynpyetc c nomoubO cyHKunn HHTeHCBHOCTb apomata. Ha Bby6op npednaTcraOTcOnuN CTAHAPNT u HHTEHCBHbI. Pnp hactpoKe HHTEH-CNBbIyBennuBaETcJdnteNbHOCTb 3aBapuBaHn, n Kofo npno6pTaet eue 60nee MHORoPahHbI apomat.
BbI6epnte c nOmoaio KhoNKn "BbIBOP 3EPEH" (MoJeB BARISTA TS) nn nepeKIOuataTeJ "BbI6op 3epeH" (MoJeB BARISTA Tn SE) copT 3epeH.
Heo6xOumoe ycNoBne:Ha dncnnee oTo- 6paKaTeC nHdkaTOp rOtOBHOCTN.
- YdepxnBaIte KhoNky "MeHIO/ok" HaxaToT B TeueHne 2 cekyHd.
»HaДисплес NOЯВИТСМЕПО.
-
Перейдente К мени Кнонкуnodау > эcnpecco > Kpenocmb Koфe.
-
C nOmoUbI KHOJOK CO cTpeKamu Bbl6epnte HuykHyIO KpeNoCTb Kofoe N NOdTBePdNTe Bbl6Op, HaxKaB Ha "MeHIO/ ok".
-
BbI6epnte NOBTOPOHO KOMaHny BbIXoD, UTO6bl BbIHTN N3 MeHIO.
Ha nncnnee noBntc HndkaTOp rTOBOHOCN.
B cIeIyUoI npn npiroTOBLeHnn 3cnpceco 6yTe nCIOb3OBaTbcBbIbpaHHa HaCTpoiKa KpeNoCTN Kooe.
UHΦopMaçùnA
IpeBapntbHbIe NaCTpOIKn COxpaHryIO Tex nOp, NOKa He 6yDyT BHeceHbIHOBbie N3MeHeHn.
7 NepcoHaJIbHbIe NaCTpoiKN- MoKoΦe"
C nomoubI O cyHKun MoJ KoOe moXHo coxpaHnTb NepcoHaJIbHbIe HaCTpOuKn dJa ONpeDeJIeHHOro NOJIb3OBaTeJIa.
7.1 O6pa6oTKa nepcoHaJIbHbIX npoФиЕнпьЗОВаTeЛeŋ
B moeenn BARISTA T n SE moxho nCnojB3OBaTb do yeTbipex npofoJIe nOJb3OBaTeJe, a B moeenn BARISTA TS -do Bocbm.
I3MeHHe Ha3BaHnI npoHnIaNoJIb3OBATeJI
Heo6xOaHmoe ycNoBne:HaIncnnee OTO-6paKaTeCnHdNkAToP rOTOBHOCTn.
- YdepxnBaTe KhoNky "MeHIO/ok" HaxaToI B TeueHne 2 cekyHd.
Ha nucnnee noaBntc MeHIO.
2.ПерейдnteВMeHIOMoKofoe.
-
BbI6epnte c nOMOuBIO KHOIOK co CTepeKAMn Nolb3OBaTeN I NOITBePdIte BbI6Op HaxaTneM Ha "MeHIO/ok".
-
BbI6epNTe c nOMOu bIO KHOJOK co CTpeKamn ONUH N3MeHeHue Ha3Ba-Hua I NOITBePdTe BblOp, HaxaB Ha "MeHIO/ok".
》PONBNTcMeHIOJIA Bb6opaOTDeJIbHbIX CmMBOJOB.
-
Bb6epntc nOMOuH KHOJOK co CTePknAMN OTdJIbHbIe CNMBOJIb, NOdTBeRJaB BblOp HaKaTneM Ha "MeHIO/ok".
-
BbIbepuTe NOBTOPOHO KOMaHdy BbIXoD, UTObblBbIITNn3 MeHIO.
»HaДиСплгпЕ ПОВВИТСУНДИКАТОР ГOTOBHOCHTN.
AknBaun/daeknBaun npoynn PnIb3OBaTeJ
Moxho nCnONb3OBaTb TOnbKO aKTINBHyI npoΦnNb NOnb3OBaTeJIa.
Heo6xOaMoe ycNoBne:HaIncnnee OTO- 6paKaTcNnKaTOP roTOBHOCTN.
- YdepxnBaIte KhoNky "MeHIO/ok" HaxaToiB TeueHne 2 cekyHd.
Ha nucnnee noaBntc MeHIO.
2.ПерейдиTeВMeHIOMoU Kofoe.
-
BbI6epnte c nOmoUbIO KHOJOK co CTpeJIkaMn IOnb3OBaTeN I NODTBePdIte Bbl6Op HaxaTneM Ha "MeHIO/ok".
-
C nOMOuBIO KHONOK CO CTpeNkAMn BbIePnte onuio AkmuBHyIHeakmuB-HbI u N IOdTBePNTe Bbl6Op HaxaTneM Ha "MeHIO/ok".
- C nomoubIO KHOONK CO CTpeIKA M N Bbl6epnTe onuio AkmuBHy uNn HeakmuBHy u NoDTBePdnte Bbl6Op HaxkaTneM Ha "MeHIO/ok".
- BbIbepuTe NOBTOPOHO KOMaHdy BbIXoD, UTO6bl BbIHTN N3 MeHIO.
»HaДиСплге NOЯВNTсИнДИКaTOp rOTOBHOCHTN.
7.2 BbI6Op/ɪn3MeHeHne nepcoHaJIbHbIX HaCTpoEK
B 3aBucnMoCTN OT HaNTKa MOxH0 Ha3Ha-HTb dIy OndHO rONb3OBaTeJI CNeDyIO-UIne HAcTPOkN:
peeNTbI, KOINueCTBO KoFe, KOINueCTBO NeHbI, KOINueCTBO MOlOKa, KOINueCTBO rOpAeN BOdbl, TempepaTpa, copT (ToIbKO moIeNb BARISTA TS), KpenocTb KoFe n apomat KoFe.
Ha3haueHne nepcoHaJIbHbIX HaCTpoE KOnHOMy NOpIb3OBaTeJIIO BCeRJa BbINOJIHReTcra OOnHaKOBbIM O6pa3OM. HanpImep, 3DeCb ONcBIBaETcRA HAcTpoJka O6bema Kofoe dIra ODoHoi nopCnN KaNyUHO.
Heo6xOaMoe ycNoBne:Ha nCnnee OTO- 6paKaTcNnKAtOp rOtOBHOCTN.
- YdepxnBaIte KhoNky "MeHIO/ok" HaxaToiB TeueHne 2 cekyHd.
»HaДисплесиЯВИТСЯMeHIO.
2.ПерейдnteВMeHIOMoKofoe.
3. Bb6epnte c nOMOu bIO KHOJOK co CTepeKAMn NOpB3OBaTeJI N IOITBePdIte Bb6Op HaxaTneM Ha "MeHIO/ok".
4. Перейдente в мени КanyuHo >Оьем Кофe.
5. C NOMOUIKHOIOK CO CTpeIKAIMN BbI6epNTe HxHbI O6bEM I NOITBep- DITe Bbl6Op HaxaTneM Ha "MeHIO/ok"
6. BbI6epnte NOBTOPOHO KOMaHny BbIXoD, UTO6bl BbIHTN N3 MeHIO.
»HaДиСплес NOВNTсИнДИКaTOp TOTOBHOCHTN.
》Pn npiroTOBlenoOHO npu KaynHNO DnO npedeHnHO nOB-
3OBaTeJIyNCNoJIb3YeTcBbl6paHHa NaCTpoIka Osbema.
7.3ПригOTOBЛeнеHaNT-KOB CперсоньныIMN HabТрОйКамN

Moelb BARISTA TS.

Moelb BARISTA Tn SE.
PnroOBHeHne HAnrKOB C yHKcnei Mo Koe BbIOJIHReTc aHaIOnuHbIM IaBCEx HAnrKOB o6pa3oM. HanpImep, 3decb OINCbIbAeTc npraDOK npiroTOBHeHnRnnpun KaynuHo..
Heo6xoJnMoE yCNoBne:HaIncnnee OTo6paKaTeTcNHNkAToP rOToBHOCTN, IN POnaHa MOnOKa NODKIIIOUeHa.
- ПОДСТаБТе EMКОCTь NOД ВВИСКHOЕ OTВЕРСТиE.
- Haxmaite Ha KhoNky "Moi KoOe" do Tex nop, Noka He OTo6pa3ntc HxHbI INb3OBaTeJIb.
- Haxmnte Ha KhoNky "KanyuHNo". IopaHa HnTka HauHaeTc n 3aKaHnBaeTc aBTOMaTnueCKn.
- Chmnte emkocb c noctabkn. Ha nucnnee noBtca Jekar oucmcka? (OK dna 3anycka).
- MoXHo BbIIOJHnTb npoRpaMMy IerKa OuNCTka NIN npOJOnJxNtB npiROTOBJIeHNHe HAnITKOB.
a) BbInonHnTe nporpaMMy IerKaoyncTa. CneDyIte npn 3Tom HNCTpyKcIaM Ha dIscPJIee, CM. rI.9.4, cTp.289.
b) PnroToBbTe dpyrne HanNTKn, a no3dHee BbINOJIHHTe nporpaMMy IerkaOuNCTka.
»HaДиСплге NOЯВNTсИнДИКаТОР rOTOBHOCHTN.
UHΦopmaucnA
u UTo6bI OTKnIOUHTb FyHKcNIO "MoJ KOe", HaxmaiTe Ha KhoNky "MoJ KOe" Do Tex NOp, Noka He NoBtCn INHdkaTOP rTOBOHOCTN.
ü Ecni B TeueHne 3 MInHyT He BBiINOHaETc npriROToBLeHne HAnITka, aannapat NepeKJIouaetc Ha INDnKaUIO rOTOB-HOCTN.
8ИЗме HeHne OCHOBHyX HacTpOeK
B cneyuoue rnaBe onncbibaOTcraTaNby npablenHn, Heo6xoDmble dIy n3MeHnO OCHOBhIX HaCTpoE aannapata.
8.1 HactpoikKa 3bika
Mожно HabctpoNTbЯ3bIK OTO6paXeHnTeKCTOB HaДиСплee.
Heo6xOaHmoe ycNoBne:HaIncnnee OTO-6paKaTcNHNkAToP rOtOBHOCTN.
- YdepxBaIte KhoNky "MeHIO/ok" HaxaToiB TeueHne 2 ceKyHd.
»HaДисплес NOЯВИТСЯ MeHIO.
2.ПерейдиTe B MeHIO HacmpouKu >ЯзбИK. - C nOMOu bIO KHOJOK CO CTpeIKNAMn BbI6epNTe RaBIK N IOITBepdnte BbI6Op, Haxkab Ha "MeHIO/ok".
- BbIaNTe n3 MeHIO c NOMOuBIO KOMaHdbI BbIXoD
Ha nucnnee noBntc uHnkaTOp rTOOBHOCTN.
8.2 Hac troponka BpeMeHnHa yacax
Moxho HacptpoNTb Bpem, KOtOpoe OTO6paKaetcHa dncnnee.
Heo6xOaHmoe ycNoBue:HaIncnnee OTO- 6paKaTcNHNkAToP rOTOBHOCTN.
-
YdepxBaIte KHOIIky "MeHIO/ok" HaxaToiB TeueHne 2 cekyHd.
»HaДисплес NOBHTcMeHIO.
2.Перейдente В мени Хаим pouku > Bpema. -
BbIePnte C NOMOuKHOHONOK CO CTpeIkanM Yacbl MNHyTbI. PoITBep- dnte HaCTPOIN, HaxBaHa MeHIO/ok".
- BbIaNTe n3 MeHIO c NOMOuKOMaHdbi BbxoD
Ha nucnlee noBntcHnKaTOp rTOBOHOCTN.
IHHOpMaun
YTo6bHa DnCnIee He OTo6paXaIocb Bpem, yCTaHOBNTe Noka3aHnBpeMeHn Ha 00:00.
8.3 ABTOMaTnuecka aKTNbauZna/daekTNaCuZna nepeKlouaTeJI BbI6Op 3epeN (ToIbKO MoJeB BARISTA TS)
Moxho aKTHBnpoBaTb nIeakTNBnpoBaTb aBTOMaTnueckn Bbl6Op copTa 3epen.
Heo6xOumoe yCIOBue:HaIncnnee OTO- 6paXaTcNHNkAToP rOtOBHOCTN.
- YdepxnBaIte KhoNky "MeHIO/ok" HaxaToiB TeueHne 2 cekyHd.
Ha nucnnee noBNTc MeHIO. - Перейдente в мени Хану Амомамочиьбор зрп.
- C nOMOu bIO KHOJOK co CTpeKAMn BbI6epnte onuio AkmubHbI uIN HeakmuHbI u NOITBepDNTe Bbl6Op HaxkaTneM Ha "MeHIO/ok".
- BbI6epnte NOBtOpHo KOMaHny BbIXoD, UTO6bI BbIInTu N3 MeHNo.
Ha nncnnee noBntc uHnkaTOp rTOBOHOCTN.
8.4 Hac tropona pejkma 3koHOMN 3Heprn
B pexime 3KOHOMn 3Heprn CNJXaeTc TaemepaTypa HarpeBa n OTKnIOuaeTc NocCBetKa naHEni. KhoNka "MeHIO/ok" npn 3TOM npoDOnJxaeT CBETbCra.
B cnyuae npoDoljntelbHoro npocToI no nCTeueHn 3aDaHHoro BpeMeHn annapaT
aBTOMaTnueckn nepeKJIIOuHTcB pexm 3KOHOMn 3Heprn. B MeHIO Pexm 3KOHOMuu 3Hep2u 3aJaTe BpeM, KOTOpoe DOJXHO npoITn Do MOMeHTa nepexOda aPnpapTa B pexm 3KOHOMn 3Heprn.
Heo6xoJnMoE yCNoBne:Ha nCnIee OTO- 6paKaTcNnKaTOp rOToBHOCTN.
- YdepxnBaIte KhoNky "MeHIO/ok" HaxaToiB TeueHne 2 cekyHd.
Ha nucnne noBNTc MeHIO. - Перейдente в MeHIO Pexum эКOHOMUu эHepzuu.
- C nOMOu bH KHONoK co CTpeNkAmn BbI6epnte Bpemn IOaTBePdTe Bbl6Op, Haxab Ha "MeHIO/ok".
- BbIyNTe N3 MeHIO C NOMOuBIO KOMaHDbI BbIXoD
»HaДиСплee NOЯВИТСЯИнДИКaTOp rOTOBHOCHTN.
iHΦopMaun
Hakab Ha KhoNky "MeHIO/ok", oTKIO- uTe peKIM 3KOHOMN 3Heprn.
ü PexKIM 3KOHOMN 3Heprn HeIb3a DeakTNBnPOBaTb NOnHOCTbIO. He 60Jee yem uepe3 4 qaca npocTo aannapat nepeKIOUHTcB PexKIM 3KOHOMN 3Heprn.
8.5 HactpoJa aBTomatUeCKOTO BblIOUeHnA
Annapaat aBTOMaTnueeKn BbIKIouHTCn NO nCTeHn yCTaHOBJIeHHOro BpeMeHn B clyuae npOdoJNKeIbHoro npocToR. B MeHIO AbmOBbIKIouHe 3aJaTe BpeMn PO nCTeHn KOTOpRo 6yDet BblOnlHeHO aBTOMaTnueeKoe OTKIIouHeHne. BbI TaKke MOxKeTe yCTaHOBITb TOUHOe BpeMn.
iHΦopmaucna
EcnOJHOBpeMeHNo aKTINBnPOBaTb npoJXnteIbHOCTb N TOUHO BpeM, annapaT BbIKIOHTcN NO nCTeueHn 60lee KOpOTKOrO OTpe3Ka BpeMeHn U3 yCTaHOBJIeHHbIX.
HacrpoKa npoOJXHTeJIbHOCTN BpeMeHN dJa aBTOMaTnueCKOrO OTKlIOUeHnA
Heo6xoJnMoE yCNoBne:Ha nCnIee OTO- 6paKaTcNnKaTOp rOToBHOCTN.
- YdepeKnBaIe KhoNky "MeHIO/ok" HaxaToiB TeueHne 2 cekyHd.
Ha dncnnee noBNTc MeHIO. - Перейд范围内 MeHIO A8mo6bIKIQUeHue >BbIKIIOUumb uepe3...
- C nOMOuKHOJOK co CTpeJkAmn Bbl6epnte Bpemn noTBePdnte Bbl6op, Haxab Ha "MeHIO/ok".
- BbI6epnte NOBtOPOHcKOMaHdy BbIXoD, yTO6bl BbIInTu N3 MeHIO.
Ha nucnnee noBntc uHnkaTOp rTOBOHOCTN.
HactpoJa Ka ToUHOro BpeMeHH dJIa ABToMaTnueCKOrO OTKJIuOeHnA
Toohoe Bpemr OTKIOUeHnA DeaKTNBnPobaoHO B COOTBETCTBn C 3aBOIDCKMnHaCTPOIKAmN.
Heo6xOaHmoe yCNoBne:Ha dncnnee oTo- 6paKaTcNHNkAToP rOtOBHOCTN.
- YdepxnBaTe KhoNky "MeHIO/ok" HaxaToI B TeueHne 2 cekyHd.
Ha dncnne noBNTc MeHIO.
2.ПерейдnteВMeHIOAzmobbIKIQUeHue >BbIKIQUumb e... - Bb6epntc nOMOuKHOOK co cTpeIkamn yacbl mHytbl. NoITBepdnte Hactpoikn, Haxkab Ha "MeHIO/ok".
- BbI6epnte NOBtOPOHcKOMaHdy BbIXoD, UTO6bl BbIHTn N3 MeH0.
»HaДиСплес NOЯВNTсИнДИКаTOp TOTOBHOCHTN.
HΦopmaçnA
Pn Heo6xoJIMOCTn DeaKTNaCn n aBToMaTnueCKOrO OTKIOUeHn
yctaHOBNTe Bpemr OTKJIIOUeHnHa 00:00.
8.6 AkTnBaun/JeakTnBaun npombibkn
Bcerda cpa3y ke nocne BkIIOueHnBaBbIOJIHReTc npOMbIBKa KofoeHOn
CNCTembl. MoXHO aKTHBnPoBaTb/JeakTNBnPoBaTb TOnbKO npOMbIKy npN BbIKIOueHnn. EcIn OHa aKTHBnPoBaHa, To npN BbIKIOueHnn BbINOJIHReTc npOMbIBKa KOeHHO CNCTembl.
IeakTnBaunHa dInTeNbHoe Bpem He peKOMeHnyetc.
AKTUBaJy/DeaKTSBaJn npomblKn npBbIKIoueHnn
Heo6xoJnmoe ycNoBne:HaIncnnee OTO-6paKaTeCnHdNkATOp rOTOBHOCTN.
- YdepknBaIte KhoNky "MeHIO/ok" HaxaToi B TeueHne 2 cekyHd.
»HaДисплес NOBNTcMeHIO.
2.Першдente В мениногау >порьк npu BBIKIOueHuU. - C nOMOsbIO KHOONK CO CTpeKNaMn BbI6epNTe ONUIO AkmubHbI uNn HeakmubHbI u NOATBepdnte Bbl6Op HaxkataHem Ha "MeHIO/ok".
- BbI6epnte NOBtOPOHcKOMaHny BbIXoD, UTO6bl BbIHTN3 MEHIO.
»Ha nucnnee noBntc uHnkaTOp rTOBOHOCTN.
8.7 BocstahOBJIeHne 3aBODCKNX yCTaHOBOK aannapaTa
MOxHO BOCCTaHOBnTb 3aBOJCKne yCTaHOBKn aannapata.
iHΦopmaucna
B Cnyae BOCCTaHOBJIeHn 3aBOcKnx YcTaHOBOK aannapata TepIOTc BCE nepcoHaJIbHbIe HAcTPOIN, B TOM YnCJIe HaCTPOIN B MeHIO Mou Kofoe.
Heo6xoJnMoE yCIOBne:HaIncnnee OTO- 6paKaTeCnHnKaTOp rOToBHOCTN.
- YdepxnBaIte KhoNky "MeHIO/ok" HaxaToi B TeueHne 2 cekyHd.
»HaДиспjee NOBNTcMeHIO.
2.ПерейдnteВMeHIOHaCmpouku> 3abodckueycmaHObku.
- C nOMObIO KHOJOK CO CTpeIKNAMn Bbl6epNTe C6poc N NOITBepdnte Bbl6Op, HaxaB Ha "MeHIO/ok".
- BbI6epnte NOBTOPOHKOAmHy BbIXoD, YTO6bl BbIHTN3 MEHIO.
Ha nncnnee noBntc uHnkaTOp TOTOBHOCTN.
8.8 MeHIO Cmamucmuka N Cucmema
CTaTnCTnKa
B MeHIO CmamucmuKa npNBOJNTcR HΦOpMaζη O KOJIueCTBe NOJUyeHHbIX HaHTKOB I 06 yXoJe.
Cnctema
B MeHIO Cucmema npuBoNTcN HOpMa- nO bepcuu npoepaMMHOzo oecneueHn IocTyne K cyHKun Bbinapubahue, cm. 10.1 Bbinapubahue annapama"Ha cmp. 293.
8.9 Hac tropona Tohkoctn NOMOA
ToHKoCTb NOMOJa KOfeHbIX 3epeH BnIaReT Ha BKyc KoFe. Annapat noCTaBnIaTeC C ONTImaJIbHOH HAcTPOIN KOJ TOHKoCTN NOMOJa.
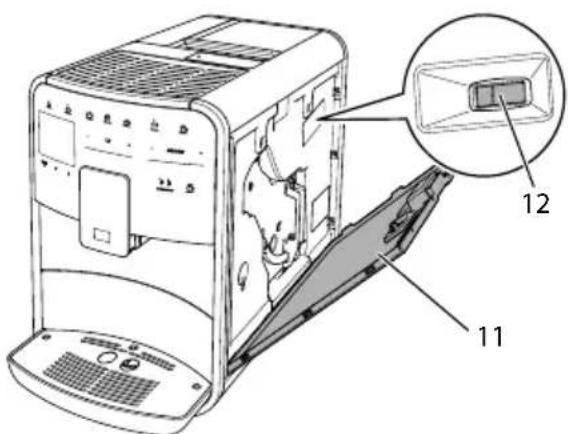
Puc. 17: Hacmpouka moHKocmu nomola
- OtkpoiTe KoJyX (11).ДЯЭТоRO BO3bMntecb 3a yrIy6JIeHne C npaBOI CTOpOHbl aIInapaTa N NOTAHnTe KoJyX BBepx.
2.Перемechitepbiuar(12)Впeрдин Ha3aД. uHa3aD=60leeKpynHbI nOMoI uBpepe=60leeMeJkn nOMoI
3. 3aKpoITe KoxyX.ДЯЭTORO BCTaBbTe KoxyxB aannapat CHN3Y N NOdBnHbTe erO BBepx Do ueuKa.
UHΦopmaçnA
U Ecnn HacptpoNTb 6oJee MeJkn NOMON, TO BKyc KoOe cTaHET KpeNue.
U Pn3HaK ONTmAbbHOH HaCTpOKn TOHKoCTn NOMOA — paBHOMepHOe NOcTyPJIeHne Kofo n3 BbInyCKHoro OTBepCTnI NOnyuHHe JERKOro RycTOrO Kpema.
8.10Изменипоdkючену Tpy6knДЯ MONOKA (ВЗвсmoCTNOTMOdEN)
Tpy6ka IJRA MOJOKa MoKeT,Ha Bbl6Op, NOkJIIOUaTbCra CJeBOI UIN C npaBOI CTOpOHbl OT BblNcKHO OTBepCTnA.
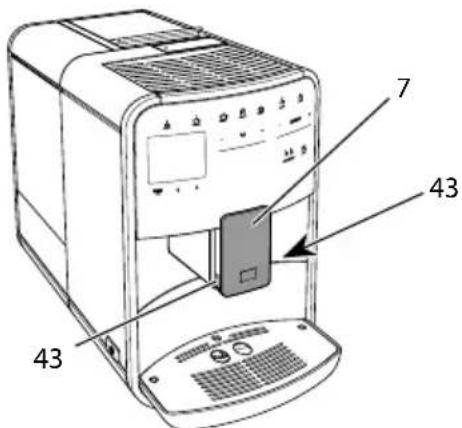
Puc.18:Iobopom bnyckho0 ombepcmu,1

Puc.19: Nobopom bnyckhozo ombepcmu,2
- BbTaunTe Tpy6ky dny MoIoka n3 annapata.
2.ПереметиTe BbIyckHoe OTBepCTne (7)do ynpa Bn3. - CoKmTe DByMa NaIbUaMn OJHOpyKn _IKCaTOP (43) MoOuHOH CNCTeMBI (40) n CHmTe CNTeMy C BblnyCKHOrO OTBepCTN, NOTAHyB BHIN3.
4.ПOTЯнTeДОЗАТOPMOLOKa(41) BBePxИИЗВЛЕКИTe eRo ИЗ мОЛоЧОН CNTeMbI. - Повернite Впунькhoe OTверсте (42) Ha 180°.
yCTaHOBka CnCTeMbI BbINONHReTcB 06paTHOM noprKe.
1HΦopmaçn
Ipn yctaHOBKe HaedeHbTe MOOnuHyo CnCTeMy (41) 06eIMn pykamn Ha BblnyckHoe OTBepCTne (7).CneiTe 3a Tem, uTo6bI fNKcaTop (43) 3abNOKpOBaJcR c 06eNX CTOpOH c XapaKTePbIM 9eJyKom.
9 YxOДи TexHnueckoe 06cnyKnBaHne
PerylaepHOe BbINOJIHeHne YnCTKn n TexHnueckoro 06cnyxnbAHn I03BOJNT o6eCNeuTb Hen3MeHHO BbICOKoe KaueCTBO BaIHX HaNTKOB.
9.1 067a qnctka
PerylaRHO npoBOnTe uNcTky annapaTa. Be3OraIaTeIbHo ydaIyTe BHeuHne 3arpa3HeHry B BVNe pTeH MOkA N Kofoe.
BHIMMAHVE
IcnoIb3OBAHHe HEnoIxOJaux YnCTaIX CpeIcTB MoKeT CTaTb PnUHoi NOBLeHn ZaapanH Ha NOBepXHOCTAx.
He nCnoB3yIte a6pa3nBhble TkaHn, ry6kn n YnCTaune CpeDCTBa.
Heo6xoJnMoE yCIOBne: annapaT BbIKIO-ueH.
BbINOHnIte HapyKHyU qNCTky annapaTApn NOMOuMgKO, BnaXHOITKaHn I CTaHdapTHbIX CpeDCTB DnMaTbY IOCyDbI.
PpOMbIBKa NOdOHa dJa c6opa KapeIb BbIPOJIHReTc C NOMOuBIO MrgKoI, BnaxHO TkaH N CTaHApTHoro CpeICTBa IJRA MbITb IOcyDbI.
ДячNTК KOHTeHepaДЯЗернСПОЛь3уITEМRkyO,CYXyTOTKaHb.
Heo6xOaHmoe ycNoBne:Ha dncnnee OTO- 6paKaTcNnKaTOp rOTOBHOCTN.
- ПОДСТаБTe EMKOCTb NOД BыИсКhoe OTВЕРСТи.
-
YdepknBaIte KhoNky "MeHIO/ok" HaxaToiB TeueHne 2 cekyHd. Ha dncJIee nOABNTcMHeIO.
3.Перштев MeHIO Yxod>JezkaJyucmka. -
C nOMOu bIO KHOONo CTpeJIKAmNBbI6epnTe onuHIO 3anyck n noTBepeJNTe BbI6Op, HaxKaB Ha "MeHIO/ok".
- CneyuIte daIbHeiUHm HnCTpyKuIaM Ha dncnlee do 3aBepWeHn npo- rpaMMbl Ierkaa uctka.
Ha nncnnee noBntc HndkaTOp rTOBOHOCtN.
9.5 Поррамma „Чистka Mолочно системы"
Даннай порразмma ocушecTBЯeТ чистку Моночнoi СИСТЕмbl C ПОМоцьЮ Спeци- альНOrO СpeДСТВa.
I3 coo6paXeHn rHneHbI, a TaKxe BO n36exKaHne NOBpeXeHn annapaTa peKoMeHdyem BbINOLHrTb npOprpamMy uNCTKN pa3 B HeJeIO.
IporpaMa uNCTKn dInTcR OKONo 3 MInHyr N He DoJxHa npepbBaTbcra.
BHIMMAHVE
IcnoJb3OBAHHe HEnoXoJxuX CpeiCTB DnA YnCTKn MOnOuHOn CNCTeMbI MOKeT CTaTb npUHHoN NOBpeKdEHNr annapata.
IcnoJb3yIte TOnbKO cpeCTBO JnJ YNCTKN MOIOUHbIX CnCTEM KOeINHbIX abOMaTOB Melitta PERFECT CLEAN.
Co6IIOJaTe INHCTpyKcNn NO npImeHeHNIO, yKa3aHHbIe Ha yNaKOBKe cpeDCTBaДЯ YNCTKN MOnOuHbIX CNTEm.
Heo6xOumoe ycNoBne:Ha nucnnee oTo- 6paKaTeCnHnKaTOp rOtOBHOCTN.
- ПобстаБыт eмкocь He MeHee Yem Ha 0,7 nItpa nOД BbInyckHoe OTBepCTne (HaNPIMep, emKocbДЯ KOфeHORO XMbIXa).
- YdepxnBaIte KhoNky "MeHIO/ok" HaxaToiB TeueHne 2 cekyHd. Ha dncnnee nOABNTcMaHIO.
-
Перейдente К мени Ухod >Усмka MOJOUHOU CUCMEMbl.
-
C nOMOu bIO KHOJOK CO CTpeJIkAmn BbI6epnte Ounu 3anyck u noDTBep- dnte BbI6Op, Haxab Ha "MeHIO/ok".
- CneyuIte daJIbHeIM HNCTpyKUmaH aDnCnlee Do 3aBepWeHn npo- rpaMMbl YNCTKN MOnOuHOH CNCTEmbl.
Ha nncnnee noBntc uHdkaTOp rTOBOHOCTN.
OuNTKa MOJouHoi CNCTembl
DOnOHnTeJbHO peKOMeHnyeTcpeRyJIaPHO pOBoUHTb uNCTKy MOnOuHOINCCTembl, Tpy6Kn n EMKOCTn dJa MOJOKa.
iHhOpmaun
UПл actMaccobyEO mKoCTbДЯ MOnOKa (B 3aBnCmOcTN OT MoJeN),6e3 KpbIuKN HaOpHOn Tpy6Kn,MOxHO MbITb B NOCyDOMOeHOn MaUnHe.
u TepMoEKMocTb dIy MoIOKa (B 3aBN-CMOCTN OT MOeJI) I ee DeTaJI 3aNpeUaETcA MbITb B NocyDOMOeHOn MaUNHe.
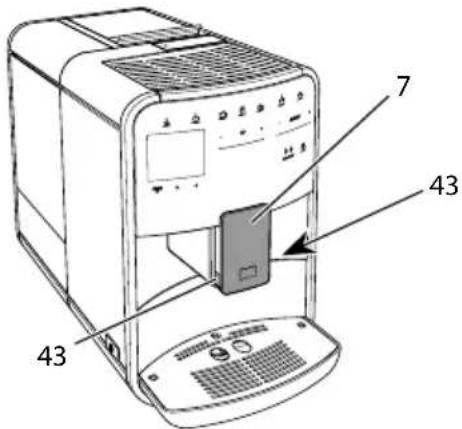

Puc.23:Demohmax monouhou cucmembi,1
Puc.24:Demohmax MONOCHOU cucmembi,2
- BbTaunTe Tpy6ky dny MoJoka n3 annapata.
- NepemecTe BbInyckHoe OTBepCTne (7)doynopa Bn3.
- CoKmTe DByMa NaIbCuAMn OJHOyPyKn ΦNKcaTOp (43) MoJouHOB CNCTeMbI (40) n CHMnTe CNCTeMy C BblNyCKHOrO OTBepCTn, NOTaHyB BHn3.
4.ПOTЯнITEДОЗАТOPMOLOKA(41) BBepxИИЗВЕКИTe eRo ИЗ мОЛочHOI CNTeMbI. - BbItaunTe BnucKHoe OTBepCTne (42), NOTAHyB BBepx.
- BbINONHnTe YNCTKy OTdEJIbHbIX DeTaJIeN TeIIOB BOIO.NcNoJb3yIte MraKyo, BnaXHyO CaΦeTKy I CTaHApTHoe CpeDCBO DnMbITbI NOCyDbI.
yCTaHOBka CnCTeMbI BblIOJIHReTcB 06paTHOM noprKe.
iHOpmaun
Ipn yctaHOBKe HaedeHbTe MOOnuHyo cnCTemy (40) 6eumn pykamn Ha BblnyckHoE OTBepCTne (7).CneiTe 3a Tem, uTo6bI fHKcaTop (43) 3a6noknpobanc c o6exx CTOpOH C xapaKtepHbIM UeNkOM.
Heo6xoJnMoE yCNoBne:Ha dncnnee OTo- 6paXaTcNnKaTOP roTOBHOCTN.
- YdepxnBaIte KhoNky "MeHIO/ok" HaxaToiB TeueHne 2 cekyHd. Ha nCnJee NOABITcA MeHIO.
2.ПерейдnteКMeHToYxod>YucmKa KofoeuHOu cucmembl. - C nOMOu bHO KHOJOK co CTpeJIKAmN BbI6epNTe ONU 3anyck N NOdTBePdIte BbI6Op, HaxaB Ha "MeHIO/ok".
- CneyuIte daIbHeiHm HNCTpyKcIyMaHa dncnlee do 3aBepWeHn npo- rpaMMbl NCTKN.
Ha nncnnee noBntc uHnkaTOp rTOBOHOCTN.
9.7 Порогамma „Удалене накпп"
PporpaMa ydaIeHnHaKnPi No3BOJraTe ydaJIaTb OTIOKeHn I3BeCTn BHyTp n aIIpaPaTa C NOMOsbIO cpeDCTBa IJy DaJIeHn HaKnPi dJa KoΦeBapOK.
Bo n36eXaHne noBpeXdEHN aannapata peKOMeHdyetc BbIIOJNHTb npOrpaMMy INo ydaJIeHnIO hAKIIIN KajkDble 3 MeCya - IIn6o pRn NpOABLeHn 3aInpoca, reHepnpyeMOro aannapatom.
IpnnoCToHHOM nCnOJb3OBaHnI nIb- Tpa Ira Bobl Melitta BbInonHnyTe npo
rpaMMy IJy ydaJIeHnHaKuIHepeKe OJHO rpa3aB rOJ.
BbINONHeHne nporpaMMbl ydaJIeHnHaKnn 3aHmMaet OKoJ0 15 MmHyT n HeDOLXHO npepbIbTaBcra.
A OCTOPOXHO
KoHTaKT CO cpeiCTBaMn IydaJIeHnHaKINMOKeT Bbl3BaTb pa3IpaXeHneCIn3NtOJ O6OLOUKN Tla3 N KOKHbIX NOKPOBOB
Co6IIOJaIte INHCTpyKcIIN NO npImeHeHNIO, yKa3aHHbIe Ha yPaKOBKe cpeIcTba DnIydaJIeHnHaKInN.
BHIMMAHVE
IcnoIb3OBAHHe HenoIxOJaIcx CpeICTB IydaJIeHnHaKnn MoKeT CTaTb npuHNo nobpeJdeHn annapata.
IcnoJb3yInTe TOnbKO XnIDKoe CpeiCTBO dlya ydaJIeHnHaKnIN B KOfeINbIX abTomatax Melitta ANTI CALC.
Co6IIOJaTe HNCTpyKcHn No npImeHeHNIO, yKa3aHHbIe Ha yNaKOBKe cpeDCTBaДЯ ydaJIeHnHaKuII.
BHIMMAHVE
3aBnHcHbI ΦNlbTp dIy BODbl B npOceCBe BbINJHEnI npOrpaMMbl NO ydaJIeHIO HaKUN MoXeT cTaTb npUHHO NobpeKdEHN aannapata.
CHIMITE NlbTp DnB BObI npN NOCTyIIeHN COOTBeTcTByoUeO 3a npoca O Tannapata (cm.Pnc.25,ctp.292).
B npouece BbInonHeHn nporpaMMbl NO ydaIeHIO HaKINI NOMECTITE 0nbTp IJIa BOdbI B EMKOcTb C BOIOnpoBOHOB BOOn.
Iocne 3aBepueHn nporpaMMbI NO ydaJIeHIO HaKINMOxHO CHOBA BCTaBNTb FInbTp Ira BOdbI NNCNoJb3OBaTbe O daJIbWe.
Heo6xOaHmoe ycNoBne:HaIncnIee OTO- 6paKaTeCnHdNkAToP rOtOBHOCTn.
-
YdepxnBaIte KhoNky "MeHIO/ok" HaxaToiB TeueHne 2 cekyHd.
»HaДисплес NOBHTcMeHIO. -
Перейдente К мени Yxod > YdaeneHue HAKUNU.
- C nOMOJIbIO KHOJOK CO CTpeJIkAmn Bbl6epnte onIuIIO 3anyck n noDTBep- dnte Bbl6Op, HaxaB Ha "MeHIO/ok".
- CneyuIte daIbHeiUIM HNCTpyKuIaM Ha Iincnlee Do 3aBepWeHn Ipo- rpaMMbl NO ydaJIeHNIO HaKNII.
Ha nucnnee noBntc uHdkaTOp rTOBOHOCTN.
9.8 Hac tropona JeeCTKocTN BOdbl
OT HacTPOKNU XeCTKOCTN BObI 3aBnCIT TO, HAcKoJIbKO YactO Heo6XoIMO 6yJeT ydaJIaTb HauKnIb. Yem XeCTue BOda, Tem YaSe aannapat HyJdaetcR B ydaJIeHnHaKuIIN.
iHΦopmaun
Ecnn nCnoB3yeTcAΦnIbTp dIy BOdbI (CM. rnaBy 9.9, cTp. 292), MoXHo HAcTpOuTb XeCTKoCTb BOdbI.
Дя onpejenenЯ kecKocTn BObl nCnoB3yIte npnaIaIooIocr TeCTOByIO nOLOCKy. Co6IIOJaTe uHcTpyKuN, yKa3aHHbIe Ha yNaKOBKe uHdNKaTOpHOI nOLOckN, vBa6Ince Duana3OH kecmKocMu BObl, cmp. 294.
HeoXoIumoe yCIOBue:Ha dncnnee oTO-6paKaetcHnIKaTOp rOTOBHOCTN.
- YdepxnBaIte KhoNky "MeHIO/ok" HaxaToi B TeueHne 2 cekyHd. Ha nCnlee NoBnTc MeHIO.
2.ПерейдnteКMeHIOHacmpouka> KecmKocmb bOdbI. - C nOmoUbIO KHOJOK CO CTpeKamn Bbl6epNTe DnApa3OH JeCTKOCTN BObl NODTBePdNTe Bbl6Op, Haxkab Ha "MeHIO/ ok".
- BbIaNTe n3 MeHIO c NOMOu bIO KOMaHdbI BbIXoD
Ha nncnnee noBntcnaTop rTOBOHOCtN.
9.9 IcnoIb3OBAHne fIJIbTpaДЯ BODbl
IcnoIb3OBAHne fIbTpapnBODbl npOJIeBaET cPOK cnJx6bl annapaTa n yBeIINuIBaET INHTepBaIbl ydaJeHnHaKInN. OINbTp dIy BObl OTfNilbTpOBbIBaeT 13BeCTb n dpyrHe BpeHbIe BeueCTBa n3 BOIOpOBoHOBIObl.
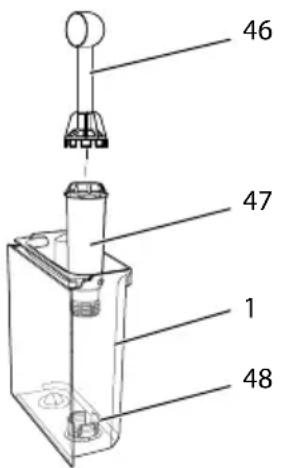
Puc.25:3abuHueaHue/ombuHuaHue unbmpa dna bodbl
ФиьTpДЯВODbl(47)ЗabHnHBaETcN OTBHHuBaETcC NOMOUBO CneuaJIb-HORO pncnoCo6JeHnHa KOHcI NOCTaBJIaEMoB KOMPNeKTe MepHOJ loXKnДЯ Kofoe(46)Bpe3b6y(48)Ha dHe KOHTeHepa DnBAObl(1).
YCTaHOBkaΦnIbTpdaJRABObl
UHΦopMaçnA
IpeepnpimmeHnemOnyctnte pInbTp Ha HeckoJIbKO MmHyT B EMKoCTb CO CBexKe Tpy6OpPoBOdHO BDOJ.
Heo6xOumoe ycNoBue:Ha nCnnee OTO- 6paKaetc HnDnKaTOp rOtOBHOCTN.
-
YdepxnBaTe KhoNky "MeHIO/ok" HaxaToiB TeueHne 2 cekyHd. Ha dinCnlee NOBNTcMa MeHIO.
2.ПерейдnteКMeHIOyxoD>Φunbmp> BcmaumbbФunbmp. -
C nOMOu bIO KHOJOK co CTpeKamn BbI6epNTe OUcNIO 3anyck N NOdTBePdIte BbI6Op, HaxaB Ha "MeHIO/ok".
- CneyuIte daIbHeIM nHcTpkyuMaM Ha dncnnee.
XeCTKoCTb BObl aBTOMaTnueCKn aanTpyeTcra annapaTom K nIbtpy IJI BODbl.
»HaДиСплес NOЯВИТСУнДИКaTOp rOTOBHOCHTN.
3aMeHaΦnIbTpAДЯ BOdBi
BbINONHnTe 3aMeHy fNbTpapn BODbl npNoCTynIeHN COOTBeTcTByUoero 3anpoca oT aannapaTa.
Heo6xOaHmoe ycNoBne:Ha dncnnee OTO- 6paXaTcN HdNKaTOP rOTOBHOCTN.
- YdepknBaIte KhoNky "MeHIO/ok" HaxaToiB TeueHne 2 cekyHd.
»HaДисплес NOBNTcMeHIO.
2.ПерейдnteКMeHIOyxod>ФuIbmp> 3aMeHaΦuIbmpa.
3. C nOMOu bIO KHOJOK CO CTpeJIKAmN BbI6epNTe OIcIIo 3anycn I noTBePdIte Bbl6Op, HaxaB Ha "MeHIO/ok".
4. CneyuTe daIbHeiM uHcTpkyuMaHa dncnnee.
Heo6xOaHmoe ycNoBne:Ha dncnnee OTO- 6paXaTcN HdNKaTOP rOTOBHOCTN.
- ПОДТаБTe EMKOCTb NOД BBInyCKHoe OTBepCTne.
- YdepxnBaIte KhoNky "MeHIO/ok" HaxaToiB TeueHne 2 cekyHd.
»HaДисплгп NOЯВИТСМЕнJO.
- Перейдente в MeHIO Cucmema > Bbina-pubahue.
- C nOMOu bIO KHOJOK CO CTpeJIKAmNBbI6epnTe onuHIO 3anyck N noTBePdITe Bbl6Op, HaxKaB Ha "MeHIO/ok".
- CneyuTe daIbHeiM uHCTpyKcIyMa Ha dncnlee.
》3aTeMaannapaT BbIKIIOHTcra.
10.2 TpaHcnpTnpoBka aannapaTa
BHIMMAHNE
3aMep3aHHe OCTaTKOB BObI B aannapate MoKeT PnBecTu K NOBpeKdEHHIO aannapata.
He octabla Te annapat npn Temnepa-type Hxke 0^
iHΦopMaζηa
TpaHcnpTpyuTe aannapaT B opnunHaB-Hoyn ynaKOBke.3To nomoxet npedotbpa-TNTb NOBpeXdEHe aannapaTa BO Bpemr TpaHCnpTnpOBKn.
IpeTeKak TpaHcnpTnpoBaTb aPapTa, BblONHHe CJeDyUOuNe DeiCTBnA:
- BbInapTe annapat (cM. rnaBy 10.1, ctp. 293).
- CneTe XnIaKoCTb N3 NOIaHa dIa c6opa KaIeJIb I eMKoCTn IJa KoFeiHoro KMbIXa.
- CneTe BOy u3 KOHTeHepa JIBy BObl.
- OnopokHNte KOHTeHep dJa KoOeINbIX 3epeH.
- Почистуа anecdарат (см. галы 9.1,ст. 287).
- 3aФИКСИРУTe He3aKpeNJIeHHbIe DeTaN (NoDCTaBky NOD YaWKn I T.Д.) C NOMOuBIO NOxOJaUeN KJIeKoJ JHeHTbl.
- YnakyuTe annapaT.
10.3 Ytuln3aun annapata
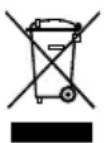
Длг OTмeueHHbIX ДaHHbIM CmBOM annapaTOB DeiCTByET Ebponeckaj DnpeKTHBa 2012/19/ECO cTapom 3JIeKTPnuYeCKOM n
3JIeKtpoHHom 6OpydoBaHn (WEEE).
3NeKtpnueckne np6opbyyTINn3npyOTc8 OTdJIbHOOT 6bITOBbIXOTXoIOB.YTNIN-3npyTe yCTPOICTBO 6e3ONaChbIM dIn OKpykaIOUeI cpebl O6pa3OM B COOTBeTCTByIOSeM NyHKTe C6opa.
11 TexHnueckne xapaKTepeNCTnKn
Ecn He ydaetc yctpaHnTb HenCnpaBHOCTN C NOMOu HNXepeueNCHeHHbIX ININ INhIX, He yka3aHHbIX 3decb MEP, o6paTNTecb 3a NOMOuK CneuaJIncTam HaWeI ropayen IINHN (MeCTbI TaPiΦ).
Homep cepBnchOn cnyk6bl yka3aH ha KpbIuKe KOHTeHepa dIy BObl Ha Hauem caTe B pa3dene "O6cnyKuBaHne".
| HéncπpaВHOCbT BpRcHnHa CπocO6 yCtpanHeHnI | ||
| Кофе постуает n3 ByiPyCKHOrO OTBepCTnЯ no KaJIpe. | Слшkom мелкийnomол. | ■ HactrpoNTb 6oJee круньйnomOL (cm.rIaBy 8.9 ha cTp. 286). |
| Annapat zacopinca. | ■ ПрочиТь 3aBapHoe uCtpoiCTBO (cm.rIaBy 9.3 ha cTp. 288).■ ВыIpONHITb nporpammy ouNCTKn (cm.rIaBy 9.6 ha cTp. 290). | |
| В annapate obpaZobalacb NaKINb. | ■ Ouchrtb annapat ot hakini (cm.rIaBy 9.7 ha cTp. 291). | |
| Кофe He IyBeTcR. KoHTeHep Ддя ВОдьпуSTИЗВВСБАЛБЕнНeрразиьHO. | ■ HanoJHITb BODоJ KOHTeHepи убeДИТьсR,чTO OH npaBUNbHO BCTaBIneH Bannapat (cm.rIaBy 4.6 ha cTp. 276). | |
| ■ БLOK 3aBapuBaHnIA 3acopeH. | ■ ПрочиТь 3aBapHoe uCtpoiCTBO (cm.rIaBy 9.3 ha cTp. 288). | |
| Ha duSsPlee noRavilSry InDnIKaTOp 3acbInamb 3eRNa,хOTЯ KoHTeHep Ддя ЗepeH noIOnH. | 3eRNa He nonaJaT BkoΦeMOLky. | ■ Clerka noctuyaTb NO KoHTeHepdЯ KofeIbIX зepeH.■ Ouchrtb KoHTeHepдЯ KofeIbIX зepeH.■ KofeIbIe 3eRNa сlshKom MaCJHnICTbIcSpOJIb3OBAbT dpyrIe KofeIbIe 3eRNa. |
| МelbHnUHb MExaHnI3m mIzdaet CnIbHbI Shym pri na pa6ote. | B KoΦeMOLky nonaI noCTopOHNII ppeDMet. | ■ CBa3aTbcR co cneuaJIncTAmI rOprayeJlnHnI. |
| He ydaETcR BCTaBUTb Ha MeCTO n3BLeueHnOE 3aBapHoe uCtpoIcTBo. | HeprabInbHO bYIpON-HeHa 6blOKuPOBKa 6Ioka 3aBapuBaHnIa. | ■ ПрòBepuTb, npaBunbHo Лз зацeКнУтApуКOTka дЯ 6blOKuPOBK 6Ioka 3abapu-BaHnIa (cm.rIaBy 9.3 ha cTp. 288). |
| HeprabInbHO noLo-JeHne npivBODHOro MexaHnI3Ma. | ■ HaxaTb Ha KhONk"MoJ KoΦe/Peuzntb"ydexKINBaTbe ee HaxaToJ.ДоюЛнiteьHObHaxaTb Ha KhONk"ВkL./BbIK."Annapat BbINOJIHIT nHIuZaJIaNIZaIciIIO. OtnyucttB KhoIKN. | |
| Ha dinSsPlee noRavilSry InDnIKaTOp CusMeHna oUu6ka. | C6oI nporpammby | ■ BbIKIouHTb И сCHOBA BkIouHTb apnapat (cm.rIaBy 4.1 ha cTp. 272).■ CBa3aTcR co cneuaJIncTAmI rOprayeJlnHnI. |

Spistresci

Pav. 1: Irenginys is kaires puses, is priekio

Pav.2: Irenginys is desines puses, is priekio
1 Vandens talpykla
2 2 kameru pupeliu talpykla
3 Slankiklis, "BEAN SELECT" (tik modelyje, "BARISTA T ir SE") del slankiklis, "BEAN SELECT" modelyje, "BARISTA TS" zr. Nr. 30.
4 Maltos kavos detuvé
5 Puodeliu pašildymo padéklas
6 Valdymo laukas
7 Reguliuojamo aukscio piltuvelis su 2 kavos antgaliais, 2 piano antgaliais, 1 karsto vandens antgaliu, puodeliu apsvietimu (tik modelyje ,BARISTA TS")
8 Kavos tiršcić talpykla (viduje)
9 Laśu surinktuvas
10 Pagrindinis jungiklis
11 Uždanga
12 Malimo smulkumo reguliavimo svirtelé (po gaubtu)
13 Maitinimo laidas su laido déklu
14 Plikymo blokas (už uždangos)
15 Pieno Žarnelès jungtis prie piltuvélio
16 Pieno Žarnelès jungtis prie lasu surinktuvo
17 Puodeliu padeklas
18 Pludé
1.2 Valdymo lauko apzvalga
Division Household Products
Ringstr. 99
D-32427 Minden
Germany
www.melitta.de
Editorial department:
ZINDEL AG
www.zindel.de

- Overview of the appliance
- The appliance at a glance
- The control panel at a glance
- Item Designation Function
- Dear Customer,
- For your safety
- Proper use
- Danger from electric current
- Risk of burns and scalds
- General safety
- First steps
- Unpacking the appliance
- Information
- Checking the delivery contents
- Setting up the appliance
- Connecting the appliance
- Switching on the appliance for the first time
- Basic operation
- Switching the appliance on and off
- Switching on the appliance
- Switching off the appliance
- Using the control panel
- Brief press
- Long press
- Pressing "+" or "-"
- Pressing the slider
- Pulling the slider
- Navigating in the menu
- Calling up submenus
- Filling with coffee beans and using Bean Select
- ATTENTION
- CAUTION
- Filling with coffee beans
- Using ground coffee
- Filling with water
- Adjusting the outlet
- Using milk
- Emptying the drip tray and coffee grounds container
- Preparing beverages
- Preparing espresso and café crème
- Preparing cappuccino and latte macchiato
- Preparing milk froth and warm milk
- Preparing hot water
- Preparing beverages with recipes (BARISTATS model only)
- Requirement: The ready symbol appears on the display.
- Changing beverage settings before and during preparation
- Changing beverage settings before preparation
- Changing beverage settings during preparation
- Stopping beverage preparation
- Preparing two beverages simultaneously
- Permanently changing beverage settings
- Selecting recipes
- Changing default settings
- Personal settings - "My Coffee"
- Editing personal user profiles
- Changing the name of a user profile
- Selecting/changing personal settings
- Preparing beverages with personal settings
- Changing basic settings
- Setting the language
- Setting the time
- Activating/deactivat ing Auto Bean Select (BARISTA TS model only)
- Setting energy save mode
- Setting Auto OFF
- Setting the duration for Auto OFF
- Setting the point in time for Auto OFF
- The OFF time point is deactivated as default in the factory.
- Activating/deactivating rinsing
- Activating/deactivating switch-off rinsing
- Resetting the appliance to the factory settings
- The appliance can be reset to the factory settings.
- Statistics and System menu
- Statistics
- System
- Setting the grinding fineness
- Converting the connection for the milk hose (depending on the model)
- Care and maintenance
- General cleaning
- The use of unsuitable cleaning agents can lead to scratched surfaces.
- Rinsing the coffee system
- Cleaning the brewing unit
- "Easy Cleaning" programme
- "Cleaning milk system" programme
- Cleaning the milk unit
- "Cleaning coffee system" programme
- "Dscaling" programme
- Contact with descending agent may lead to eye and skin irritation.
- Use of unsuitable descending agent may damage the appliance.
- A water filter may be damaged if it is screwed in during the descaling programme.
- Setting the water hardness
- Using a water filter
- Changing the water filter
- Removing the water filter
- Transport, storage and disposal
- Venting the appliance
- Transporting the appliance
- Disposing of the appliance
- Technical data
- Problems
- Sommaire
- Chere cliente, cher client,
- " +" of " - " drukken
- Spoeling activeren/deactiveren
- Programma "Easy Cleaning"
- Programa "Easy Cleaning"
- Transportar laquina
- PRECAUCION
- Programmet "Easy Cleaning"
- Transport of maskinen
- OBS
- Informasjon
- Ybaxkaemblnokynatelb!
- 2ДяВашев6e3oNaChOCTN
- Onacnoctb, o6ycnOBneHna 3neKtpnueckm TOKOM
- Onachoctb noIyueHn oXkora
- 067a86e3oNaChOcTb
- C yero haayatb
- PacnaKOBka yctpoiCTBa
- HOpMaun
- HΦopmaçnA
- Heo6xoAnmoe yCIOBne:annapat yCTa-HOBJIeH I NOKJIIOUeH.
- OCHOBhIe npHcIIpbI ynpaBHeHn
- Bключени n Вьikлючене annapapa
- UHΦopMaçnA
- BkIoueHne annapata
- BbiknueHne annapata
- iHΦopmaun
- ПорядOK ИспOLTБОВАньпанелуypaВлЕнь
- KpaTkoe Haxkatae
- PpOdoJIxNtTeNbHoe HaxaTne
- IpeetacknBaHne peryJyTopa
- Habirataи no MeHIO
- Habiracny no MeHIO
- BbIXoU3 MeHIO
- BbI3OB IOMeHIO
- HanoJIHeHne KofoeINbIMn 3epHaMn INIcNoJIb30- BaHne nepeKIOUaTeJЯ Bbl6Op 3epeH
- IHHOpMaun
- OuNTka noDoHa dJa c6opa Kaenb N eMKoCTn dJa KofoHOrO XMbIXa
- 5ПригOTOBЛЕнneHaNTKOB
- UHΦopMaçùnA
- NepcoHaJIbHbIe NaCTpoiKN- MoKoΦe"
- O6pa6oTKa nepcoHaJIbHbIX npoФиЕнпьЗОВаTeЛeŋ
- BbI6Op/ɪn3MeHeHne nepcoHaJIbHbIX HaCTpoEK
- 7.3ПригOTOBЛeнеHaNT-KOB CперсоньныIMN HabТрОйКамN
- UHΦopmaucnA
- 8ИЗме HeHne OCHOBHyX HacTpOeK
- HactpoikKa 3bika
- Hac troponka BpeMeHnHa yacax
- ABTOMaTnuecka aKTNbauZna/daekTNaCuZna nepeKlouaTeJI BbI6Op 3epeN (ToIbKO MoJeB BARISTA TS)
- Hac tropona pejkma 3koHOMN 3Heprn
- HactpoJa aBTomatUeCKOTO BblIOUeHnA
- iHΦopmaucna
- AkTnBaun/JeakTnBaun npombibkn
- BocstahOBJIeHne 3aBODCKNX yCTaHOBOK aannapaTa
- MeHIO Cmamucmuka N Cucmema
- CTaTnCTnKa
- Cnctema
- Hac tropona Tohkoctn NOMOA
- 8.10Изменипоdkючену Tpy6knДЯ MONOKA (ВЗвсmoCTNOTMOdEN)
- 1HΦopmaçn
- YxOДи TexHnueckoe 06cnyKnBaHne
- 067a qnctka
- BHIMMAHVE
- Поррамma „Чистka Mолочно системы"
- OuNTKa MOJouHoi CNCTembl
- iHOpmaun
- Порогамma „Удалене накпп"
- A OCTOPOXHO
- Hac tropona JeeCTKocTN BOdbl
- IcnoIb3OBAHne fIJIbTpaДЯ BODbl
- 3aMeHaΦnIbTpAДЯ BOdBi
- TpaHcnpTnpoBka aannapaTa
- BHIMMAHNE
- iHΦopMaζηa
- Ytuln3aun annapata
- TexHnueckne xapaKTepeNCTnKn
- Spistresci
- Valdymo lauko apzvalga
Brand : MELITTA
Model : Barista SE
Category : Coffee machine