
Cloud Revolver S - Headphones HYPERX - Free user manual and instructions
Find the device manual for free Cloud Revolver S HYPERX in PDF.



| Product Type | Closed-back circumaural headset |
| Brand | HyperX |
| Model | Cloud Revolver S |
| Speakers | Dynamic, 50 mm with neodymium magnets |
| Frequency Response | 12 Hz – 28,000 Hz |
| Impedance | 30 Ω |
| Maximum Sound Pressure Level | 100.5 dBSPL/mW at 1 kHz |
| Total Harmonic Distortion (THD) | < 2% |
| Rated / Max Power | 30 mW / 500 mW |
| Weight (without microphone) | 360 g |
| Weight (with microphone) | 376 g |
| Microphone Type | Electret condenser, unidirectional noise-cancelling |
| Microphone Frequency Response | 50 Hz – 18,000 Hz |
| Microphone Sensitivity | -40 dBV (0 dB=1 V/Pa, 1 kHz) |
| Connectivity | 3.5 mm 4-pole jack (headset); USB (control box) |
| Main Features | Virtual 7.1 Dolby Surround, USB control box with EQ and volume control, detachable microphone |
| Compatibility | PC, Mac, PS4, PS4 Pro, Xbox One, Xbox One S, Wii U, mobile devices |
| Materials | Steel headband, memory foam, leatherette ear pads |
| Box Contents | Headset, detachable microphone, USB audio control box, PC extension cable |
| Care and Cleaning | Clean with a soft dry cloth. Do not use chemicals. Disconnect before cleaning. |
| Safety | Use at a moderate volume to prevent hearing damage. Keep out of reach of children. |
| Spare Parts and Repairability | Detachable microphone and extension cable. For other parts, contact HyperX support. |
Frequently Asked Questions - Cloud Revolver S HYPERX
User questions about Cloud Revolver S HYPERX
0 question about this device. Answer the ones you know or ask your own.
Ask a new question about this device
Download the instructions for your Headphones in PDF format for free! Find your manual Cloud Revolver S - HYPERX and take your electronic device back in hand. On this page are published all the documents necessary for the use of your device. Cloud Revolver S by HYPERX.
USER MANUAL Cloud Revolver S HYPERX
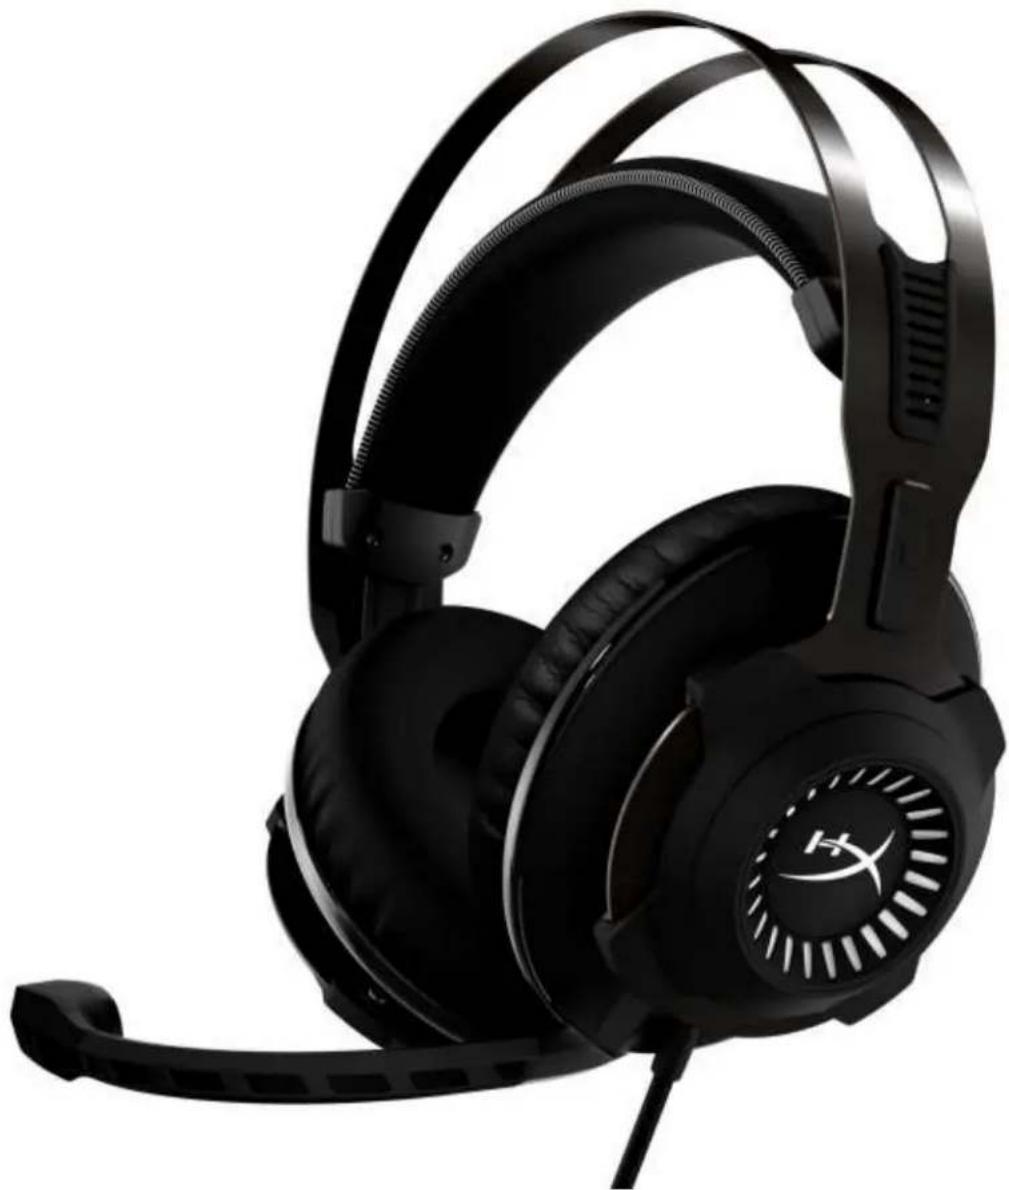
HyperX Cloud Revolver S Headset
Find the language and latest documentation for your HyperX Cloud Revolver S Headset here.
HyperX Cloud Revolver S Headset Installation Guide
For instructions in English, Spanish, German, French, Italian, Portuguese, Polish, Russian, Turkish, Japanese, Korean, Thai, Vietnamese, Simplified Chinese, and Traditional Chinese.
HyperX Cloud Revolver S Headset
Part Numbers: HX-HSCRS-GM/AS
HX-HSCRS-GM/EE
HX-HSCRS-GM/EM
HX-HSCRS-GM/LA
HX-HSCRS-GM/NA
TABLE OF CONTENTS
Introduction 3
What's included....3
Features 4
Technical Specifications....4
Overview 5
USB Audio Control Box operation....6
Usage with USB Audio Control Box (PC/Mac)....7
Configuration with USB Audio Control Box (Windows)......8
Configuration with USB Audio Control Box (Mac)....11
Usage (PC) with PC extension cable 15
Usage (Xbox One™ & Xbox One S™) 16
Usage (PS4™ & PS4™ Pro) with USB Audio Control Box 17
Usage (PS4™ & PS4™ Pro) with direct 3.5mm connection .....18
Usage (Wii U™) 19
Usage (Mobile Device)....20
Introduction
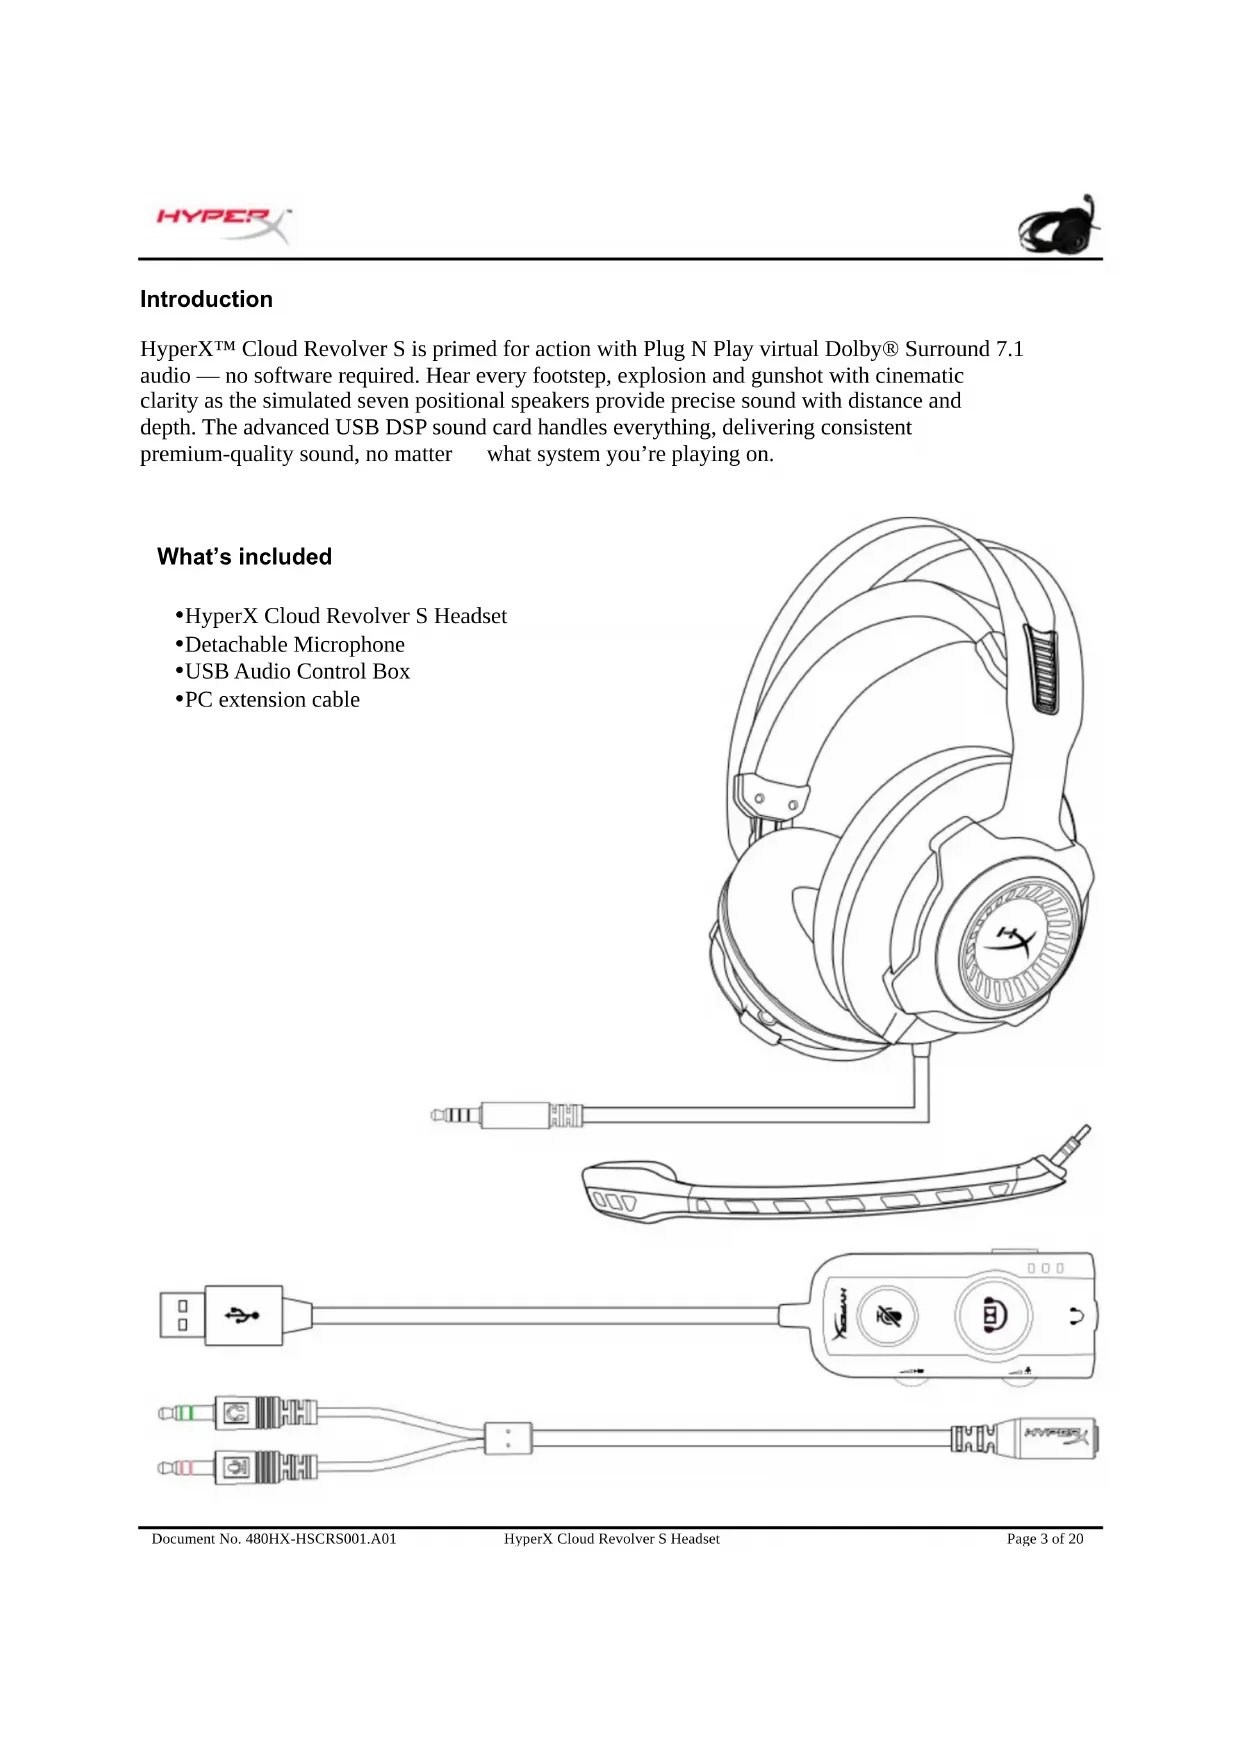
HyperX™ Cloud Revolver S is primed for action with Plug N Play virtual Dolby® Surround 7.1 audio — no software required. Hear every footstep, explosion and gunshot with cinematic clarity as the simulated seven positional speakers provide precise sound with distance and depth. The advanced USB DSP sound card handles everything, delivering consistent premium-quality sound, no matter what system you're playing on.
What's included
• HyperX Cloud Revolver S Headset - Detachable Microphone • USB Audio Control Box • PC extension cable

Features
- Plug N Play Dolby® Surround 7.1 audio technology • Advanced USB Audio Control Box with DSP Sound Card • Studio grade sound stage • Signature HyperX memory foam
- Wide Headband for Maximum Comfort
Technical Specifications Headphone
- Driver: Dynamic, 50mm with neodymium magnets • Type: Circumaural, Closed back • Frequency Response: 12Hz–28,000 Hz
- Impedance: 30 Ω • Sound pressure level: 100.5dBSPL/mW at 1kHz • T.H.D.: < 2%
- Input power: Rated 30mW, Maximum 500mW • Weight: 360g • Weight w/ mic: 376g • Cable length:
Headset (1m) USB Audio Control Box (2.2m) PC extension cable (2m)
- Connection:
Headset - 3.5mm plug (4 pole)
USB Audio Control Box – USB
PC extension cable - 3.5mm stereo and mic plugs
Microphone
- Element: Electret condenser microphone • Polar Pattern: Uni-directional, Noise-canceling • Frequency Response: 50Hz-18,000 Hz • Sensitivity: -40dBV (0dB=1V/Pa,1kHz)
Overview
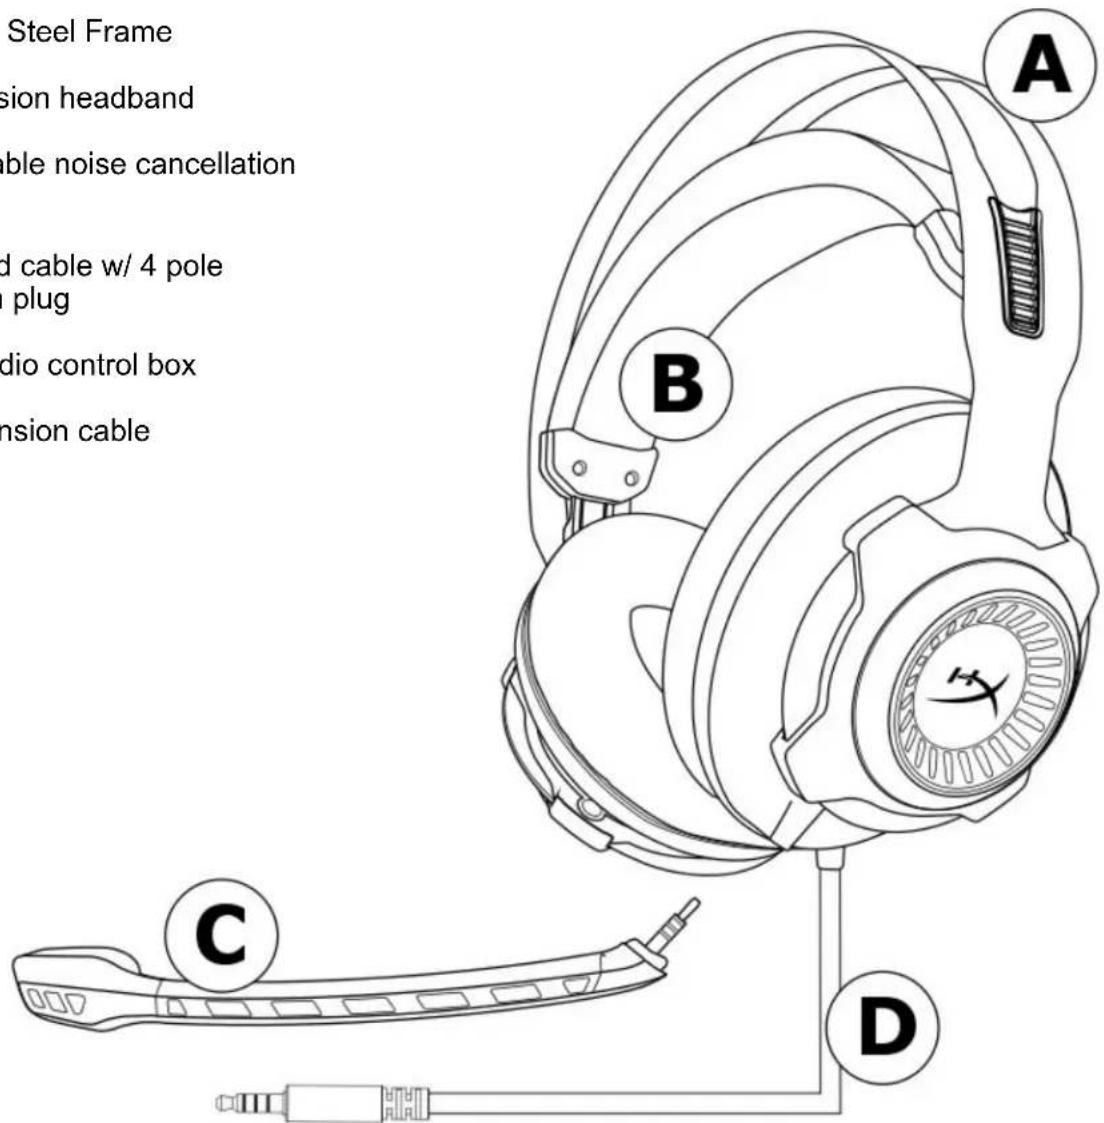
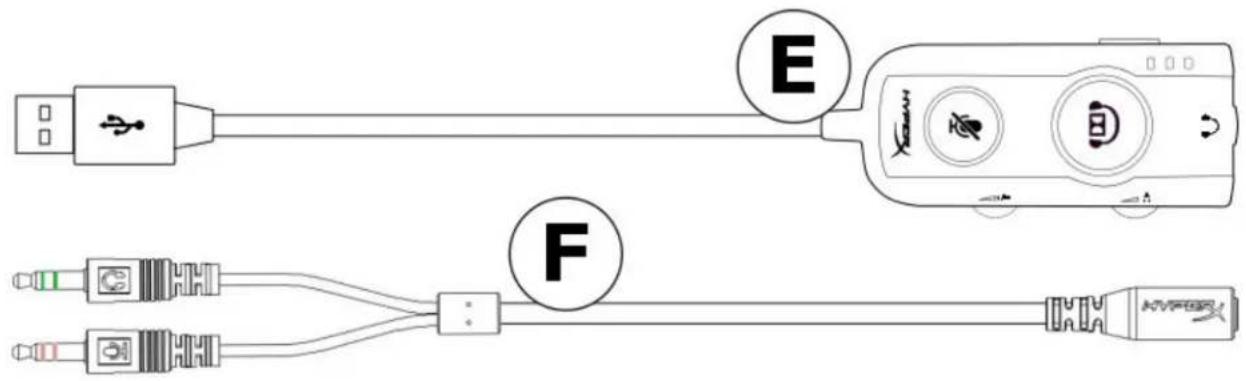
A. Durable Steel Frame B. Suspension headband C. Detachable noise cancellation mic D. Attached cable w/ 4 pole 3.5mm plug E. USB Audio control box F. PC extension cable
USB Audio Control Box operation
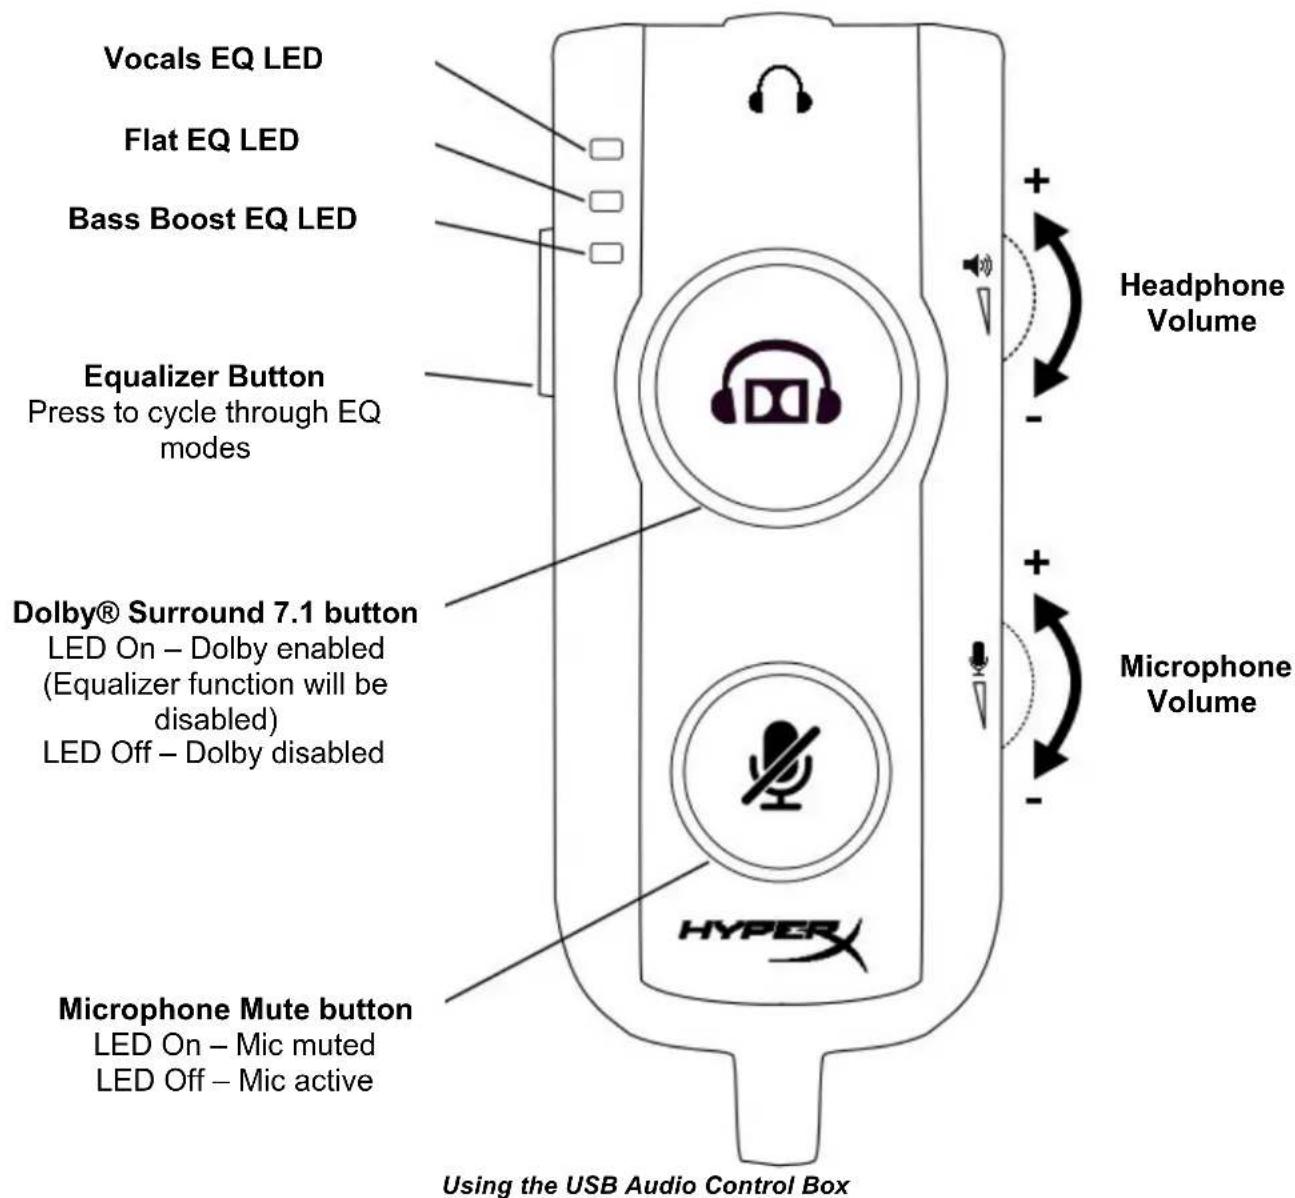
The USB Audio Control Box has the following features:
• Dolby® Surround 7.1 audio technology • 3 preset equalizer modes - Microphone Mute • Headphone volume adjustment • Microphone volume adjustment
Usage with USB Audio Control Box (PC/Mac)
To use the headset with your computer, connect the headset's 3.5mm plug to the female 3.5mm jack on the USB Audio Control Box, then plug the USB cable into your computer.

Using with USB Audio Control Box
Configuration with USB Audio Control Box (Windows)
For optimal surround sound performance, configure Windows using the steps below.
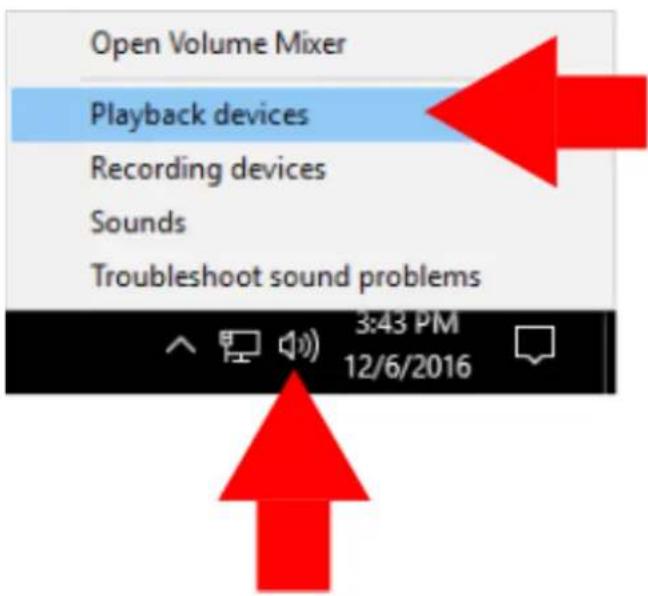
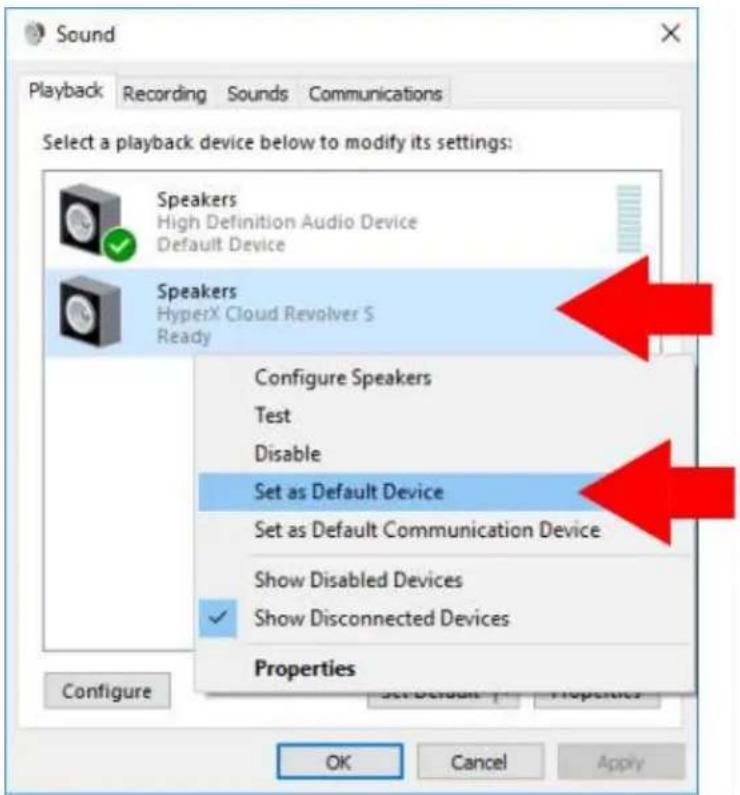
- Right-click the speaker icon in the task tray and select 'Playback Devices'.
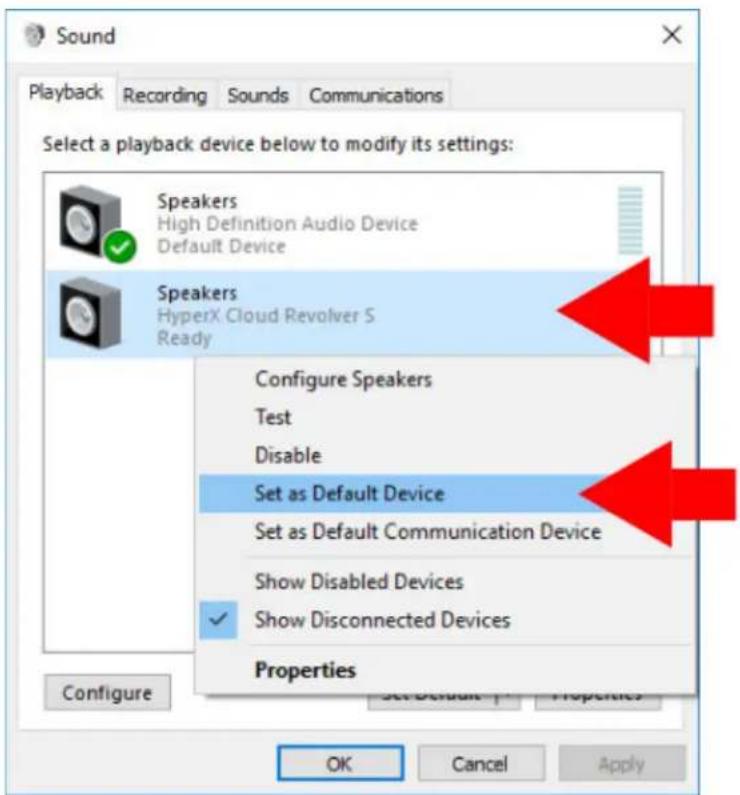
- Right-click on 'HyperX Cloud Revolver S' and select 'Set as Default Device'.
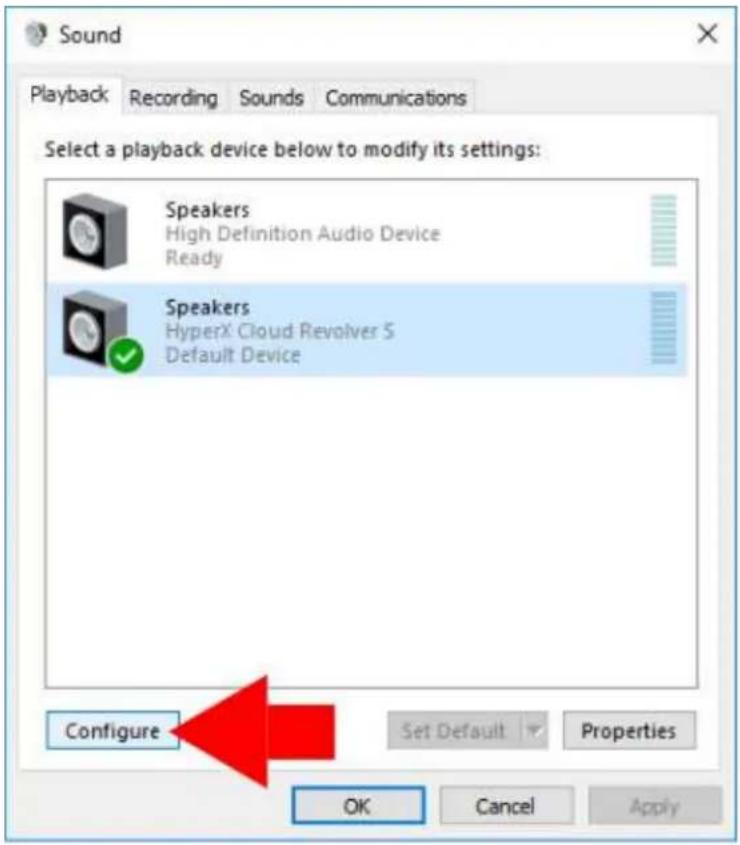
- With 'HyperX Cloud Revolver S' selected, click on the 'Configure' button.
- In the 'Audio channels' list, select 7.1 Surround and click on 'Next'.
- In the 'Optional speakers' list make sure all boxes are checked then click 'Next'.
- In the 'Full-range speakers' list make sure all boxes are checked then click 'Next'.
- Click 'Finish' to save the settings.
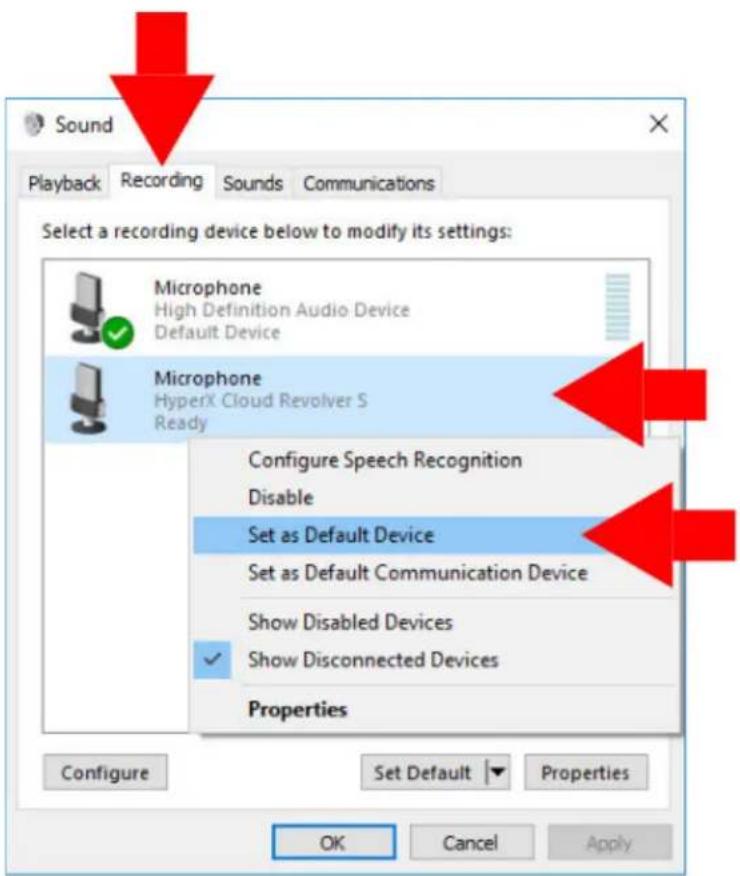
- Click on the 'Recording' tab, then right-click 'HyperX Cloud Revolver S' and select 'Set as Default Device'.
Your HyperX Cloud Revolver S is now ready to use.
Configuration with USB Audio Control Box (Mac)
For optimal surround sound performance configure Mac using the steps below.
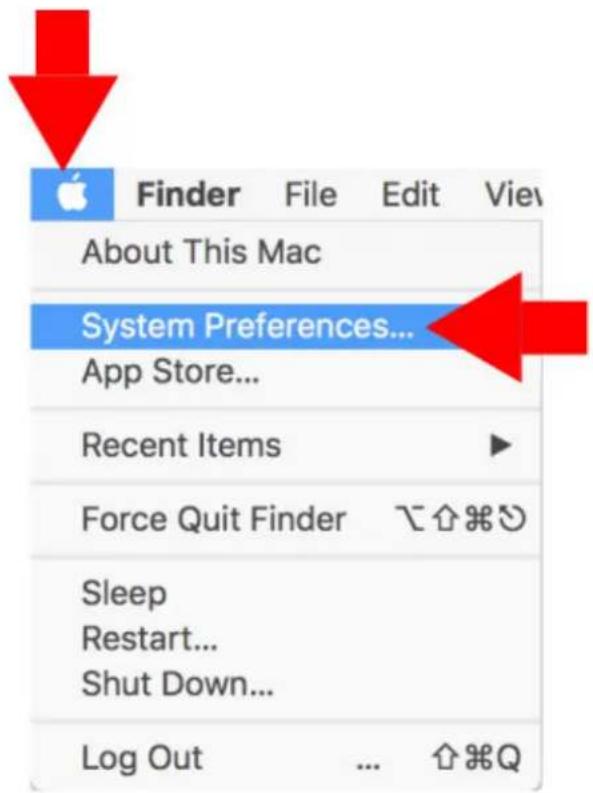
- Click the Apple menu, then select 'System Preferences'.
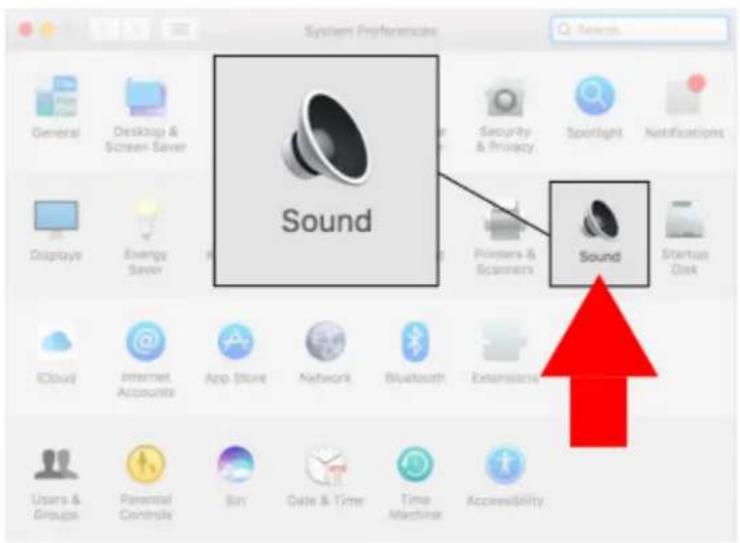
- In 'System Preferences' click on 'Sound'.
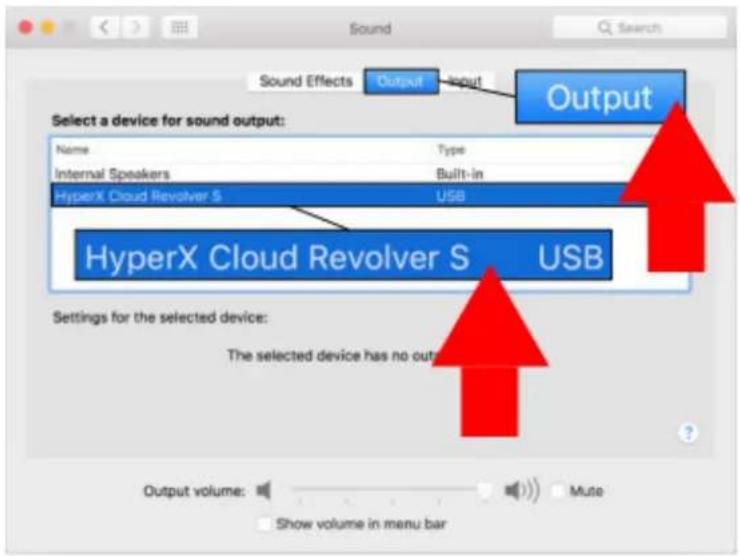
- Select output then select 'HyperX Cloud Revolver S'.
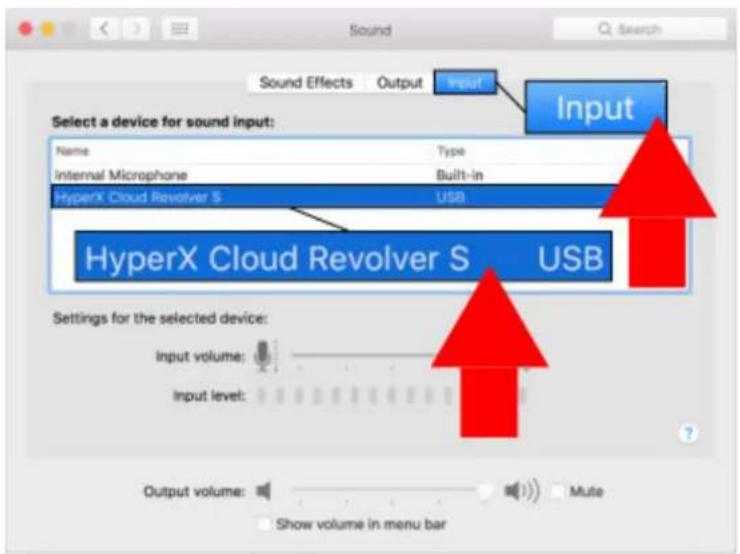
- Select input then select 'HyperX Cloud Revolver S'.
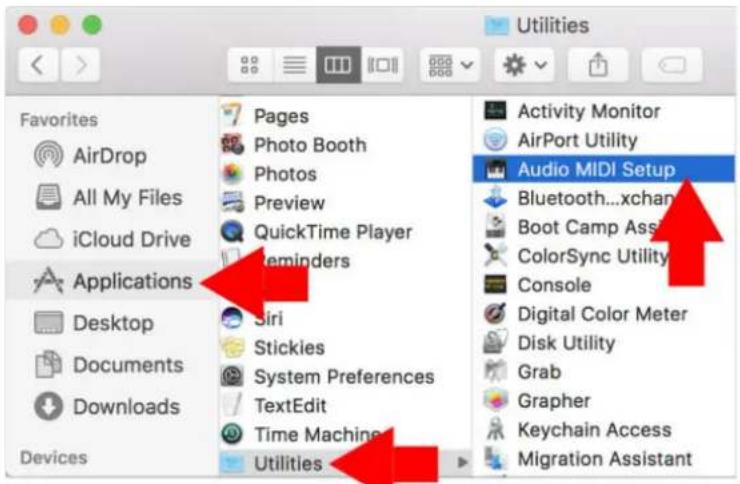
- Open Finder then select Applications > Utilities > Audio MIDI Setup.
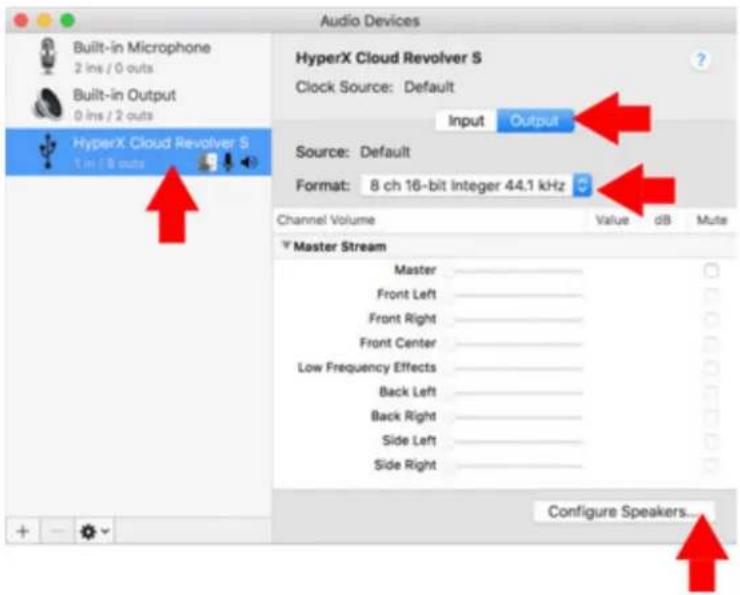
- Select 'HyperX Cloud Revolver S' then select Output.
- Click the 'Format' drop down and select '8 ch 16-bit Integer 44.1 kHz'.
- Click 'Configure Speakers'.
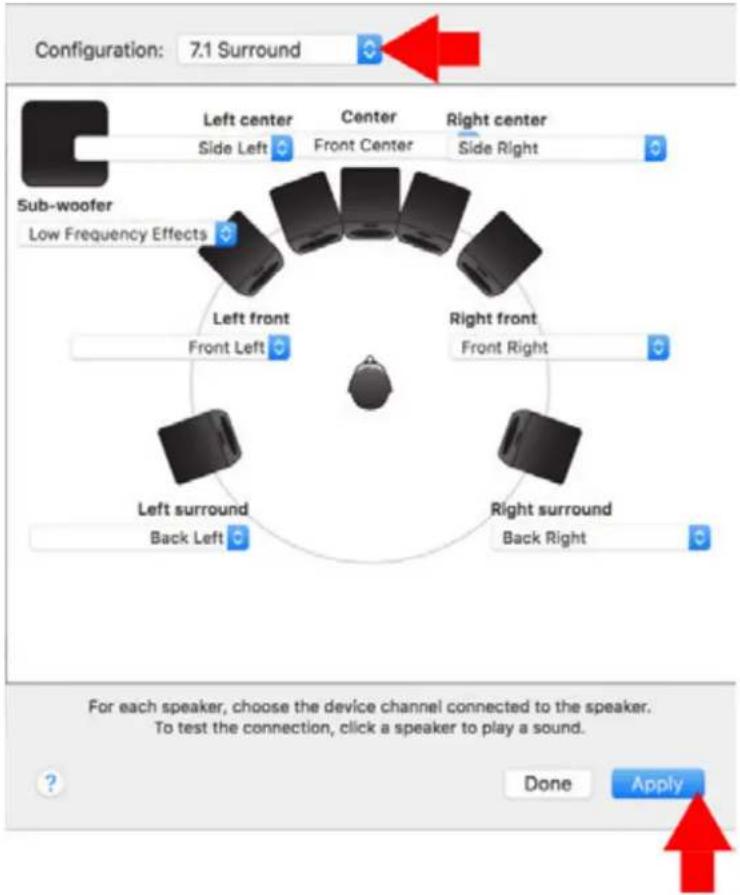
- Click the 'Configuration' drop down and select 7.1 Surround.
- Click Apply.
Your HyperX Cloud Revolver S is now ready to use.
Usage (PC) with PC extension cable
To connect the headset to your computer (or other device) that has both a headphone jack and a microphone jack, connect the headset's 3.5mm plug to the female 3.5mm jack on the PC extension cable. The PC extension cable has two 3.5mm plugs. The headphone plug, which has green stripes, plugs into the port signified by a green input or headphone symbol. The extension cable microphone plug, which has pink stripes, plugs into the port signified by a pink input or a microphone symbol.
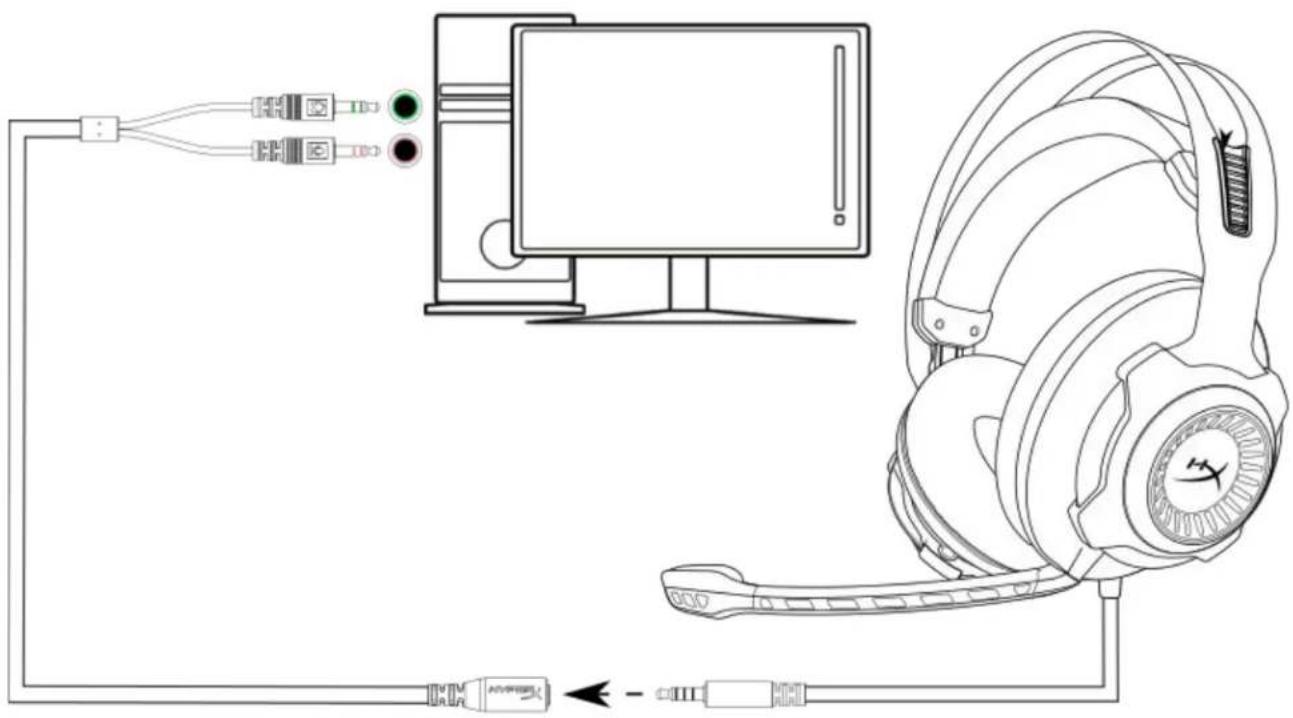
Using with PC extension cable
Usage (Xbox One and Xbox One S)
To use the headset with Xbox One, connect the 3.5mm plug on the headset directly to the 3.5mm jack on the Xbox One controller.
* If your Xbox One controller does not have a 3.5mm jack, you will need the Xbox One Stereo Headset adapter (sold separately) that plugs into the Xbox One controller (pictured below).
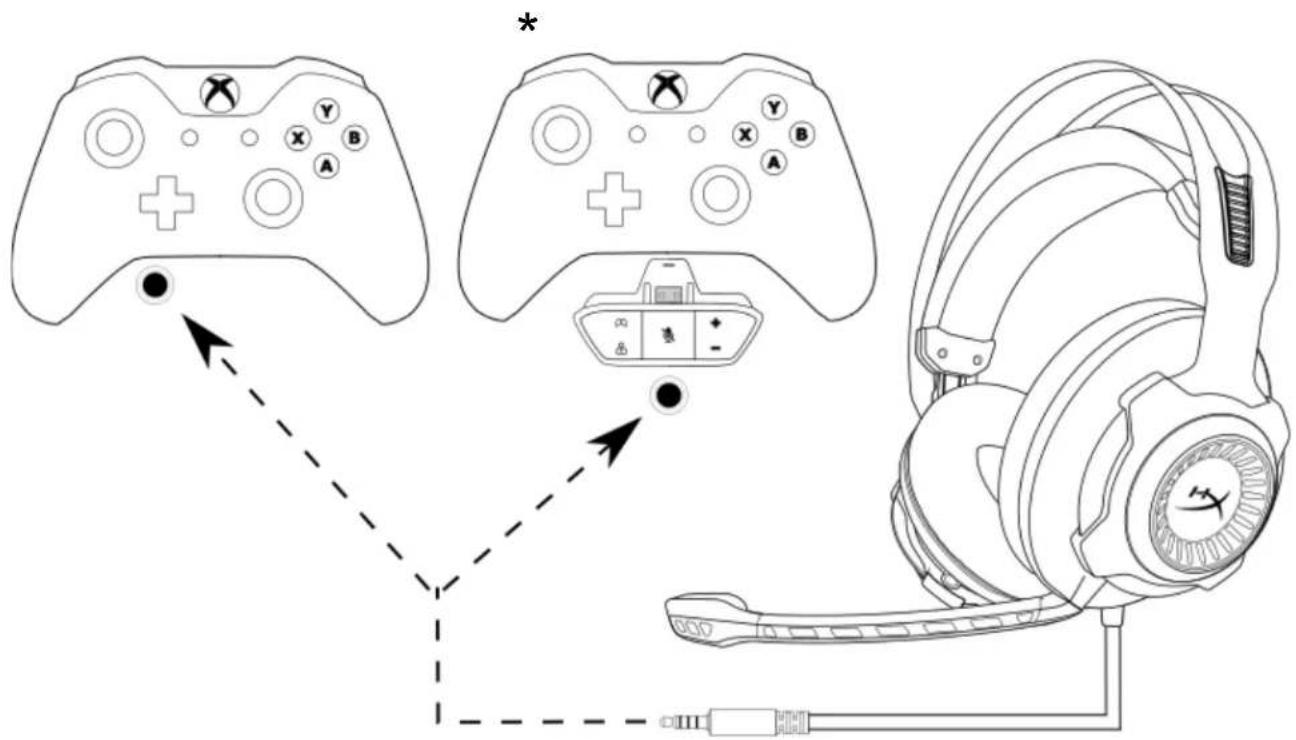
Using with Xbox One™
Usage (PS4™ & PS4™ Pro) with USB Audio Control Box
To use the headset with PlayStation™ 4 (PS4™), connect the headset's 3.5mm plug to the female 3.5mm jack on the USB audio control box, then plug the USB cable to the PS4™ USB port.
Once the 'HyperX Cloud Revolver S' device is detected, configure the PS4™ Audio Devices using the steps below:
- Turn on your PS4™ game console.
- Navigate to the Settings Menu and select it.
- Highlight the 'Devices' menu option and select it.
- Scroll down to 'Audio Devices' and select it.
- Set 'Input Device' to HyperX Cloud Revolver S.
- Set 'Output Device' to HyperX Cloud Revolver S.
- Choose 'Output to Headphones' and select 'All Audio.'
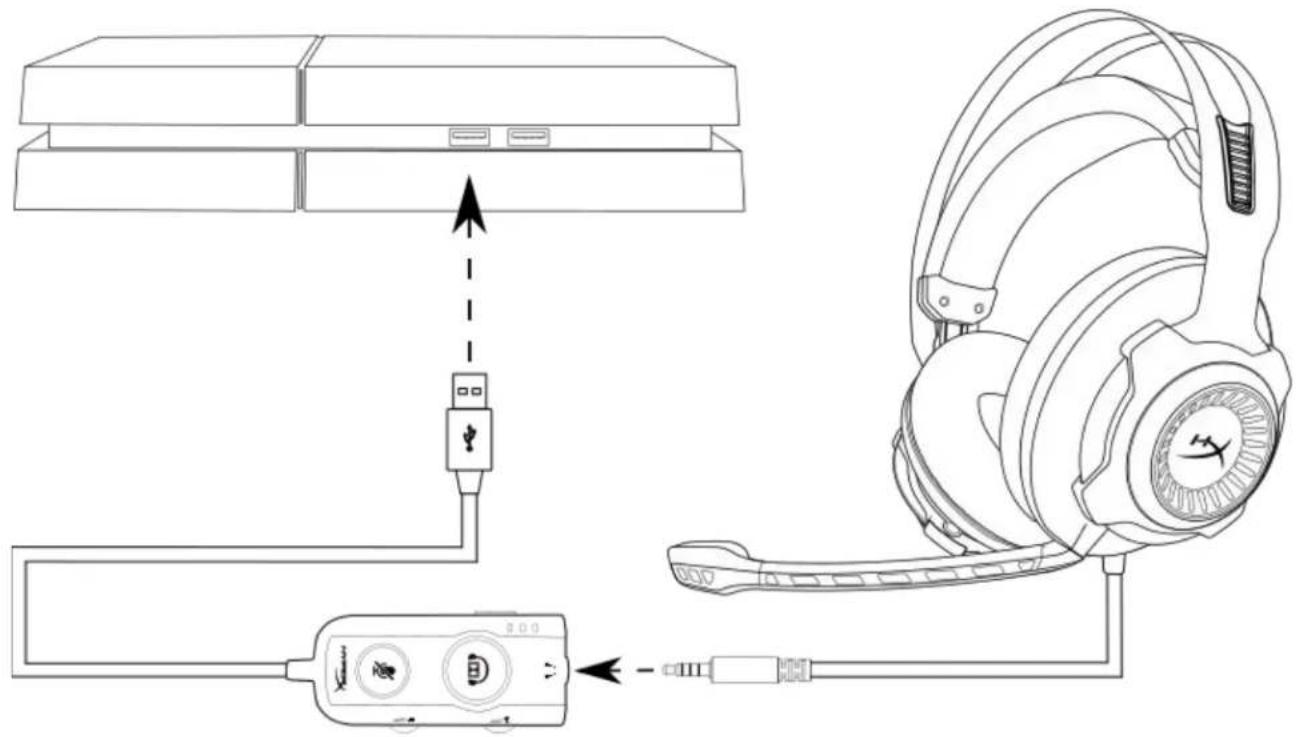
Using with PS4™
Usage (PS4™ & PS4™ Pro) with direct 3.5mm connection
To use the headset with PlayStation™ 4 (PS4™), connect the 3.5mm plug on the headset directly to the PS4™ game controller and follow these steps:
- Turn on your PS4™ game console.
- Navigate to the Settings Menu and select it.
- Highlight the 'Devices' menu option and select it.
- Scroll down to 'Audio Devices' and select it.
- Choose 'Output to Headphones' and select 'All Audio.'
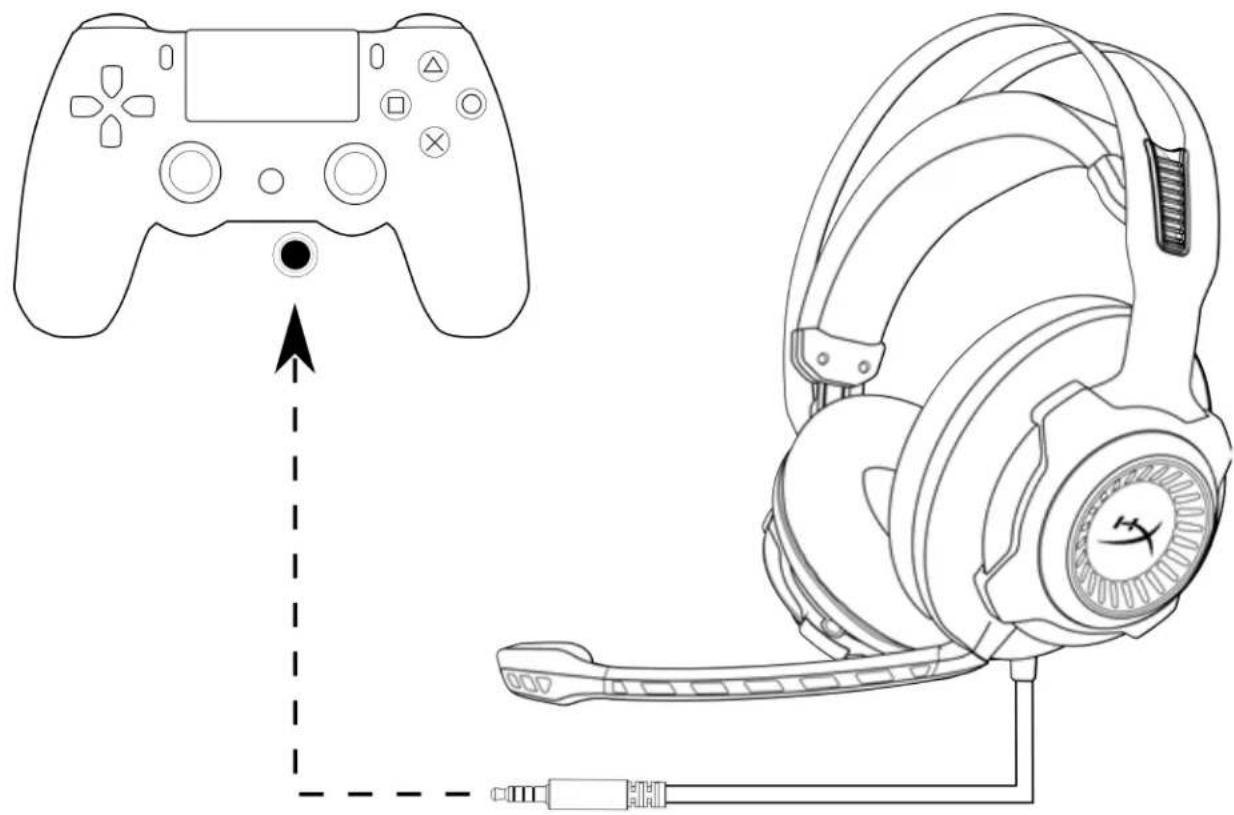
Using with PS4™
Usage (Wii U™)
To use the headset with Wii U™, connect the 3.5mm plug on the headset directly to the Wii U™ gamepad controller.
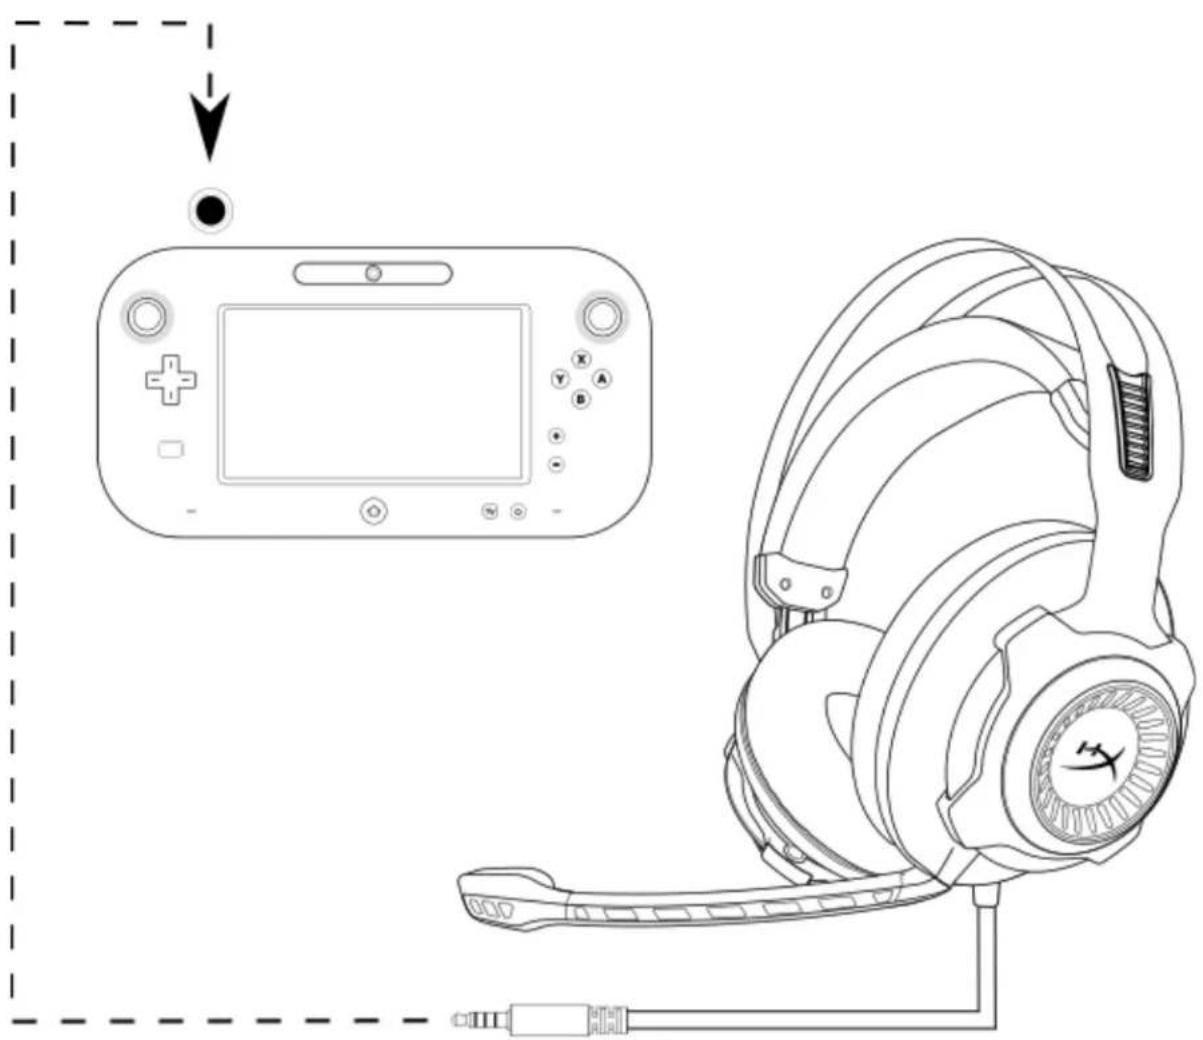
Using with Wii U™
Usage (Mobile Device)
To use the headset with a mobile device (or other device) with a headset jack (4 pole CTIA), connect the 3.5mm plug directly into the headset jack on your device.
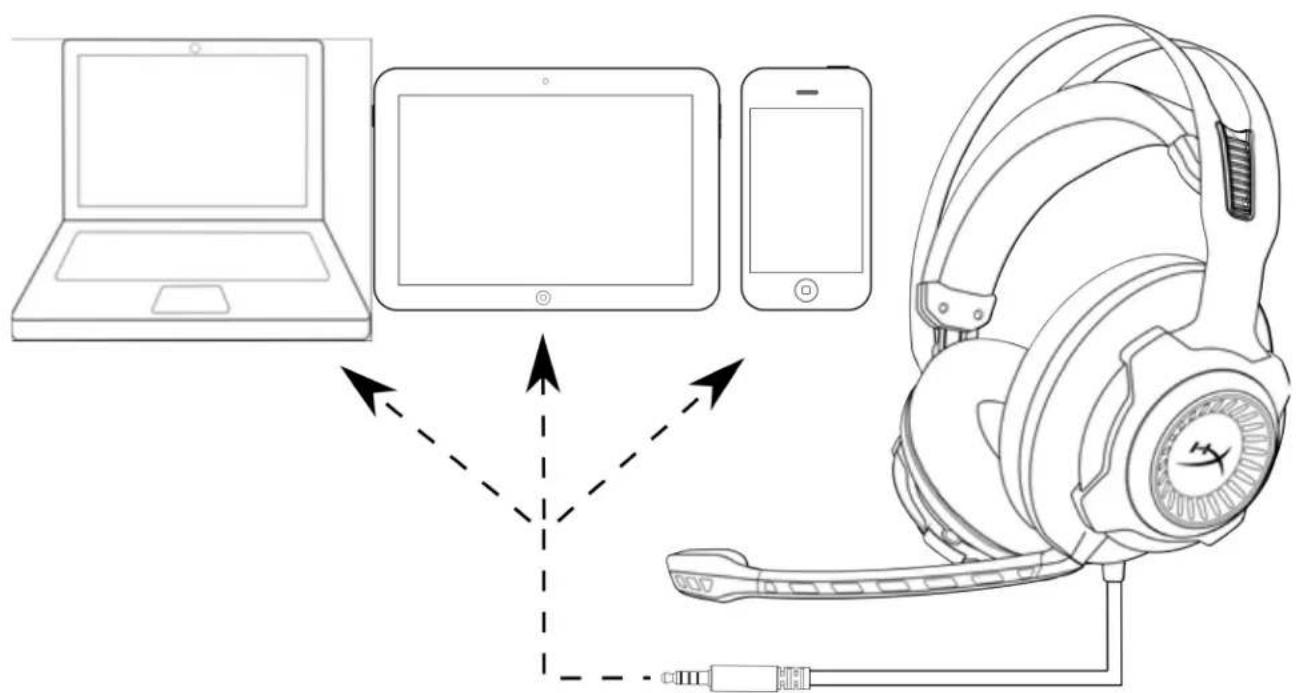
Using with mobile device (phone, tablet or notebook)
HyperX Cloud Revolver S Headset
Reference numbers: HX-HSCRS-GM/AS
HX-HSCRS-GM/EE
HX-HSCRS-GM/EM
HX-HSCRS-GM/LA
HX-HSCRS-GM/NA
INDEX
Introduction....3
Use with PS4 TM
Use with Wii U TM
Part numbers: HX-HSCRS-GM/AS
HX-HSCRS-GM/EE
HX-HSCRS-GM/EM
HX-HSCRS-GM/LA
HX-HSCRS-GM/NA
TABLE OF CONTENTS
Introduction 3
Use with PS4 TM
Use with Wii U™
Headset HyperX Cloud Revolver S
Using with the USB sound card
Using with PS4 TM
Use (Wii U TM)
Using with Wii U TM
Use (Mobile Device)
Catalog numbers: HX-HSCRS-GM/AS
HX-HSCRS-GM/EE
HX-HSCRS-GM/EM
HX-HSCRS-GM/LA
HX-HSCRS-GM/NA
TABLE OF CONTENTS
Introduction....3
Package contents....3
Features 4
- Select the output
device, then
- Select the input
device, then
HyperX Cloud Revolver S Headset
Part Numbers: HX-HSCRS-GM/AS
HX-HSCRS-GM/EE
HX-HSCRS-GM/EM
HX-HSCRS-GM/LA
HX-HSCRS-GM/NA
CONTENTS
Introduction 3
Part Numbers: HX-HSCRS-GM/AS
HX-HSCRS-GM/EE
HX-HSCRS-GM/EM
HX-HSCRS-GM/LA
HX-HSCRS-GM/NA
Table of Contents
Product Description....3
Product Contents....3
Features 4
Product Specifications....4
Overview 5
Using the PC Extension Cable
Connecting to PS4™
Connecting to PS4™
Connecting to Wii U™
Using with Mobile Devices
USB Audio Control Box Operation
Using the USB Audio Control Box
- Right-click the speaker icon in the taskbar, then
select 'Playback Devices'.
Right-click 'HyperX Cloud Revolver S' and select 'Set as Default Device'.
Using the PC extension cable
- For use with Xbox One™
For use with PS4™
For use with PS4™
For use (Wii U™)
For use with Wii U™
For use (mobile devices)
Usage (Wii U™)
For use with Wii U™
Usage (mobile device)

Use with PS4™
Use with PS4™
Use (Wii U™)
Use with Wii U™
Use with PS4™
Use (Wii U™)
Part number: HX-HSCRS-GM/AS
HX-HSCRS-GM/EE
HX-HSCRS-GM/EM
HX-HSCRS-GM/LA
HX-HSCRS-GM/NA
Table of Contents
Introduction....3
What's Included....3
Product Features....4
Technical Specifications....4
Overview 5
USB Audio Control Box Operation....6
USB Audio Control Box Operation
The USB audio control box has the following features:
Using the USB audio control box
Use with PC extension cable
Use with PS4™
Use with PS4™
Use with Wii U™
Model: HX-HSCRS-GM/AS
HX-HSCRS-GM/EE
HX-HSCRS-GM/EM
HX-HSCRS-GM/LA
HX-HSCRS-GM/NA
Table of Contents
Introduction....3
Contents 3
Product Features....4
Technical Specifications....4
Overview 5
USB Volume Controller Operation....6
Using the USB Volume Controller
Using the PC Extension Cable
Using with Xbox One™
Using with PS4™
Using with PS4™
Using with Wii U™
Usage (Mobile Devices)
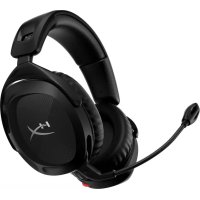
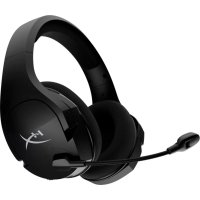
- HYPERX CLOUD REVOLVER S HEADSET
- HYPERX CLOUD REVOLVER S HEADSET INSTALLATION GUIDE
- TABLE OF CONTENTS
- INTRODUCTION
- WHAT'S INCLUDED
- FEATURES
- TECHNICAL SPECIFICATIONS HEADPHONE
- MICROPHONE
- OVERVIEW
- USB AUDIO CONTROL BOX OPERATION
- USAGE WITH USB AUDIO CONTROL BOX (PC/MAC)
- CONFIGURATION WITH USB AUDIO CONTROL BOX (WINDOWS)
- CONFIGURATION WITH USB AUDIO CONTROL BOX (MAC)
- USAGE (PC) WITH PC EXTENSION CABLE
- USAGE (XBOX ONE AND XBOX ONE S)
- USAGE (PS4™ & PS4™ PRO) WITH USB AUDIO CONTROL BOX
- USAGE (PS4™ & PS4™ PRO) WITH DIRECT 3.5MM CONNECTION
- USAGE (WII U™)
- USAGE (MOBILE DEVICE)
- INDEX
- USE WITH WII U TM
- USE WITH WII U™
- HEADSET HYPERX CLOUD REVOLVER S
- USE (WII U TM)
- USE (MOBILE DEVICE)
- CONTENTS
- USING WITH MOBILE DEVICES
- USE (WII U™)
- USAGE (MOBILE DEVICES)
Brand : HYPERX
Model : Cloud Revolver S
Category : Headphones