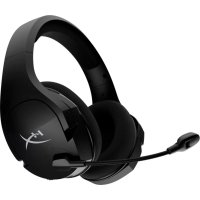
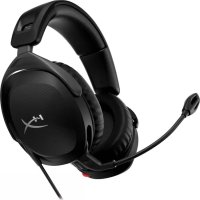
Cloud Stinger 2 Wireless - Headphones HYPERX - Free user manual and instructions
Find the device manual for free Cloud Stinger 2 Wireless HYPERX in PDF.

| Product type | Wireless headset |
| Brand | HyperX |
| Model | Cloud Stinger 2 Wireless |
| Driver | Dynamic, 50mm with neodymium magnets |
| Frequency response | 10 Hz - 20.2 kHz |
| Impedance | 32 Ω |
| Sensitivity | 104.5 dB SPL/mW at 1 kHz |
| Total harmonic distortion (THD) | ≤ 2% |
| Microphone type | Electret condenser microphone, noise-cancelling |
| Microphone polar pattern | Bidirectional |
| Microphone frequency response | 20 Hz - 6.68 kHz |
| Microphone sensitivity | -12 dBFS/Pa at 1 kHz |
| Connectivity | Wireless USB 2.4 GHz |
| Virtual surround sound | DTS Headphone:X |
| Battery life | 20 hours (tested at 50% volume) |
| Battery type | Rechargeable lithium-polymer |
| Charging time | 3.5 hours |
| Charging port | USB-C |
| Weight | 275g |
| Customization software | HyperX NGENUITY (equalizer, DTS, auto power-off) |
| Onboard controls | Volume wheel, power button, swivel-to-mute microphone |
| Ear cushions | Memory foam and leatherette |
| Part number | 676A2AA |
Frequently Asked Questions - Cloud Stinger 2 Wireless HYPERX
User questions about Cloud Stinger 2 Wireless HYPERX
0 question about this device. Answer the ones you know or ask your own.
Ask a new question about this device
Download the instructions for your Headphones in PDF format for free! Find your manual Cloud Stinger 2 Wireless - HYPERX and take your electronic device back in hand. On this page are published all the documents necessary for the use of your device. Cloud Stinger 2 Wireless by HYPERX.
USER MANUAL Cloud Stinger 2 Wireless HYPERX
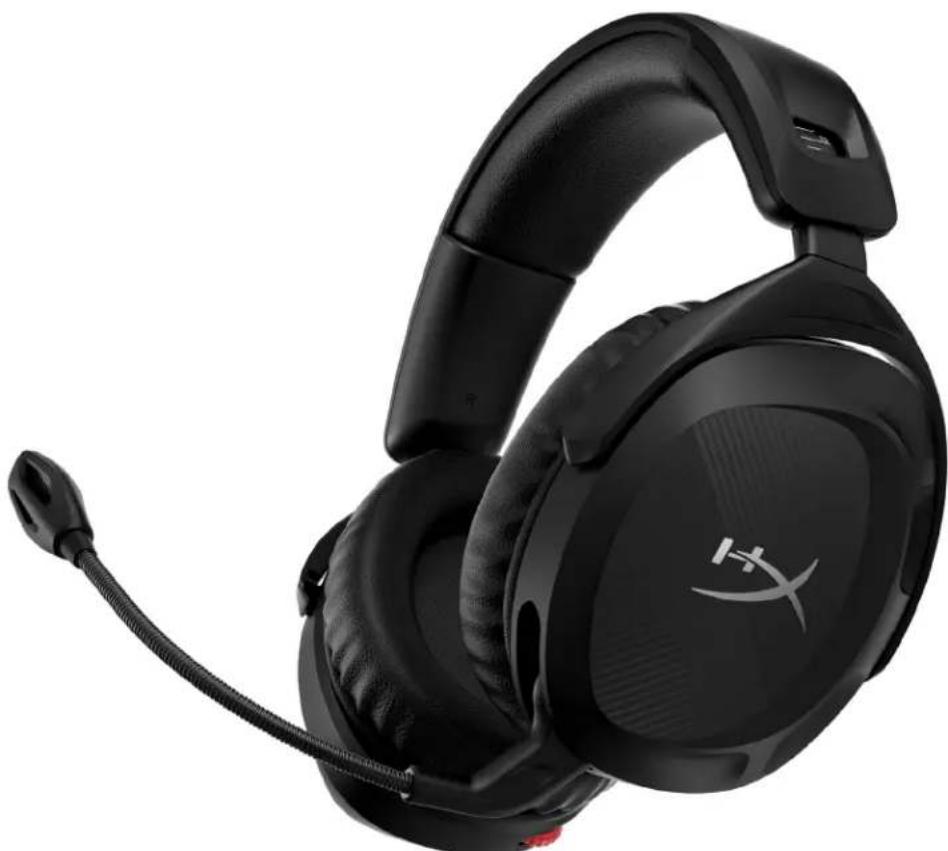
HyperX Cloud Stinger 2 Wireless
Find the language and latest documentation for your HyperX Cloud Stinger 2 Wireless here.
HyperX Cloud Stinger 2 Wireless User Manual
For instructions in English
Para instrucciones en Espanol
Fur Anleitungen in Deutsch
Pour des instructions en Francais
Per le istruzioni in Italiano
...... Por as instruções em Português
Instrukcje w jezyku Polskim
..Hnctpykun Ha Pycckom
C. Turkce talimatlar icin
日本語マニアル用
......
..
.De xem hong dan bang tieng Viet
Simplified Chinese....简体中文说明书
Traditional Chinese....繁體中文說明
Arabic.
HyperX Cloud Stinger 2 Wireless

Part Numbers
676A2AA
TABLE OF CONTENTS
Overview 3
Specifications 4
Charging the Headset. 6
Setting up with PC 7
Setting up with PlayStation 4 10
Setting up with PlayStation 5 11
Controls 13
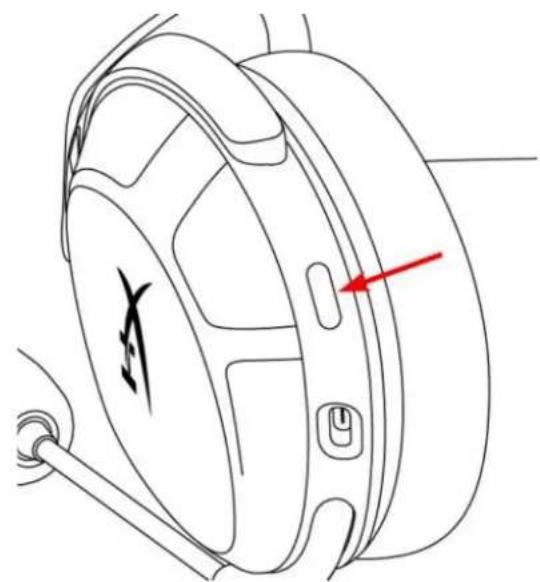
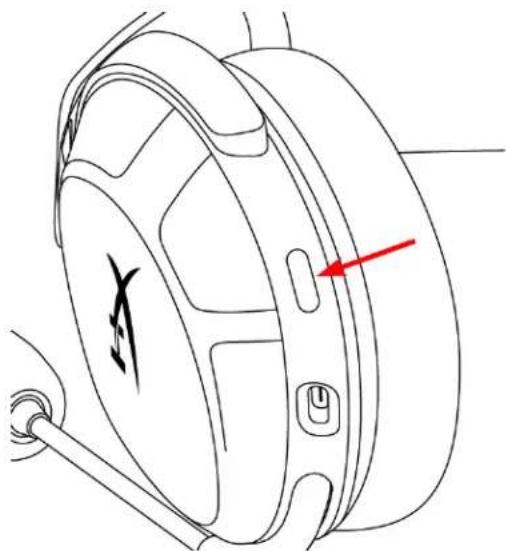
Status LED. 13
Power Button 13
Swivel to Mute Microphone 14
Volume Wheel 15
Tone Notifications 15
HyperX NGENUITY Software 16
Manually Pairing the Headset and Wireless Adapter 17
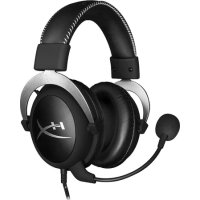
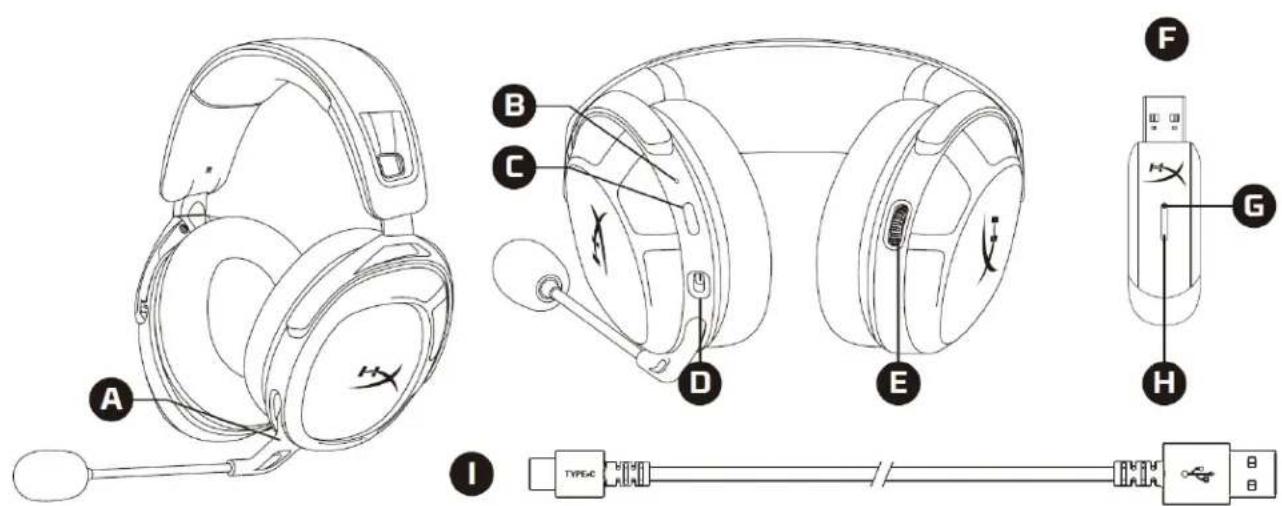
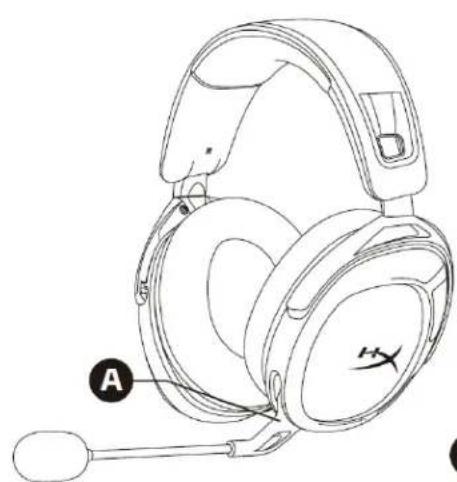
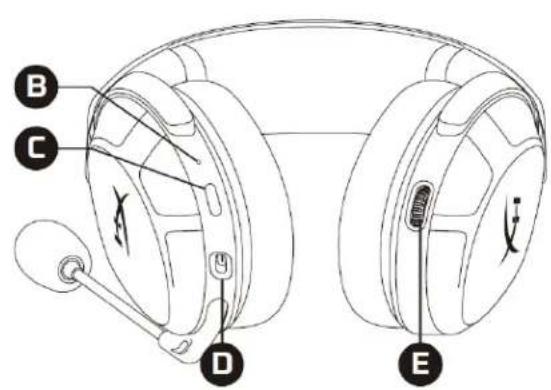
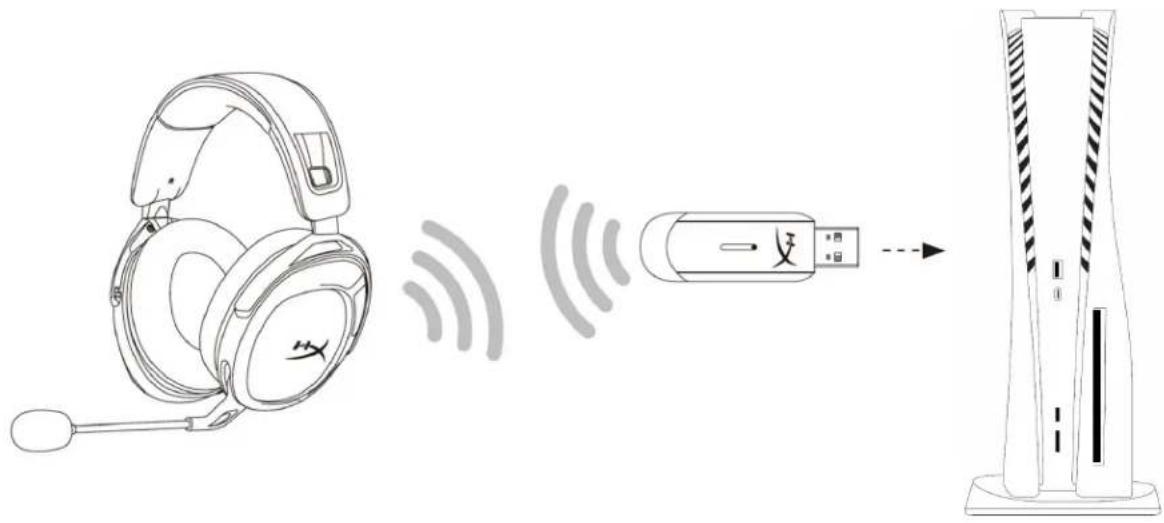
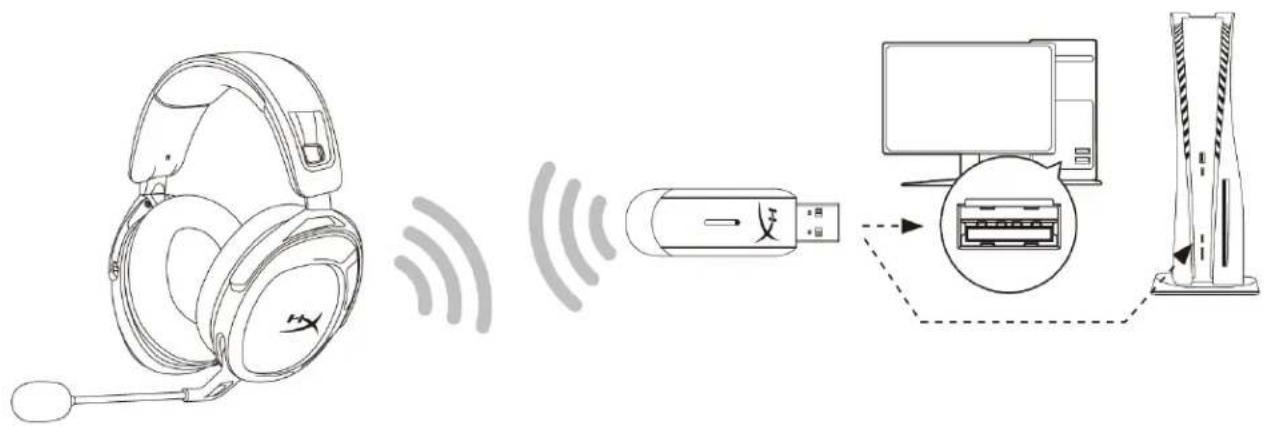
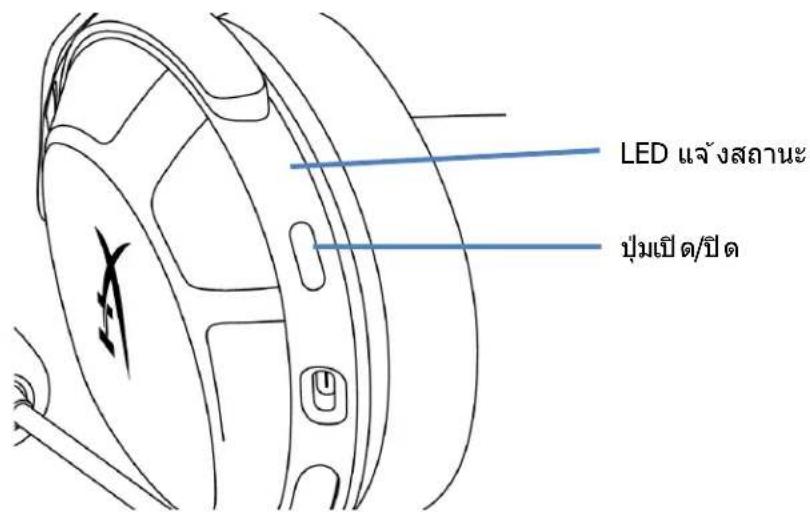
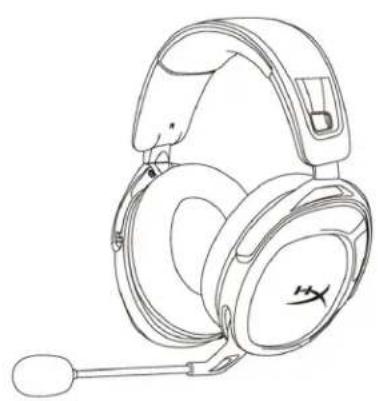
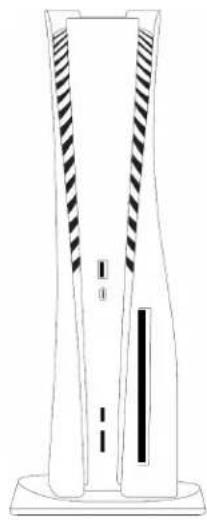
Overview
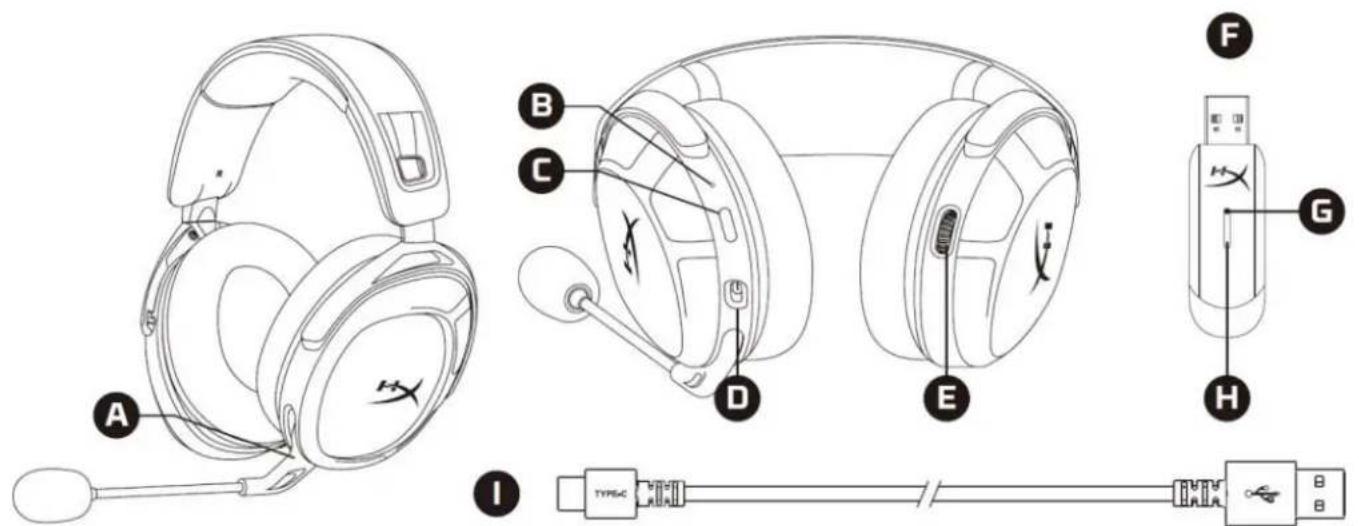
A. Swivel to mute microphone
B. Status LED
C. Power button
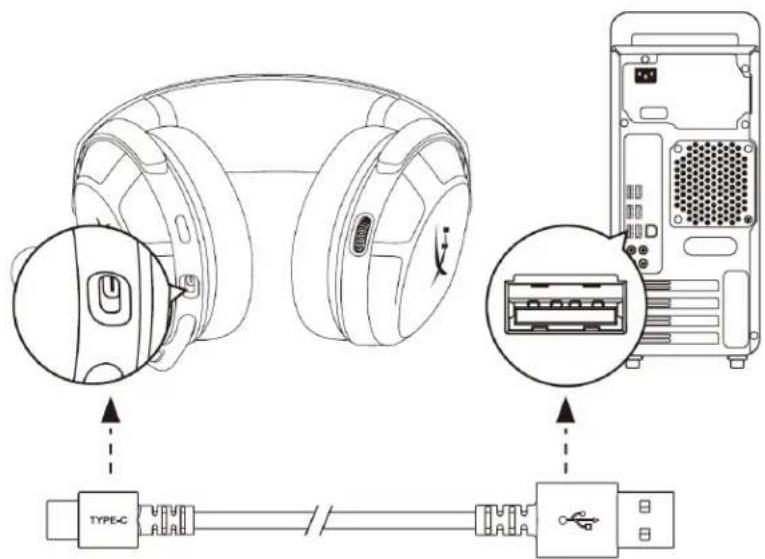
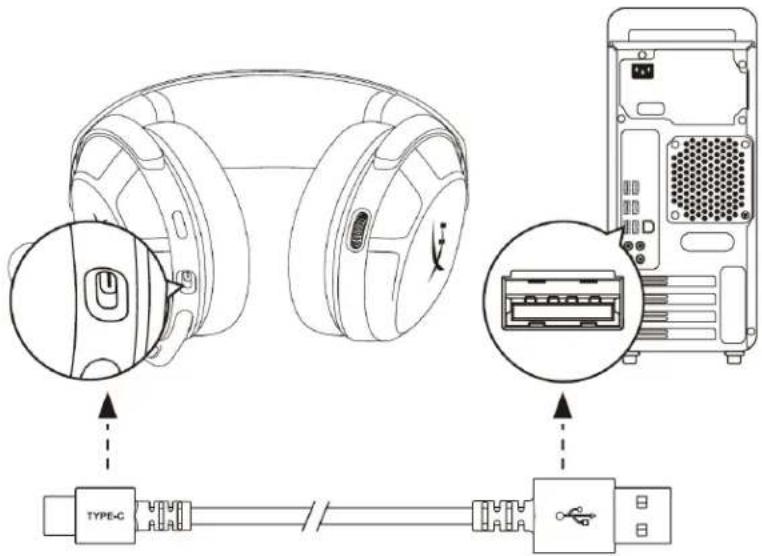
D. USB-C charge port
E. Volume wheel
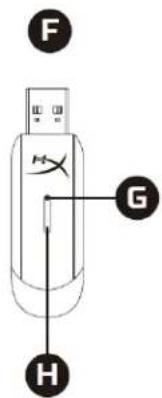
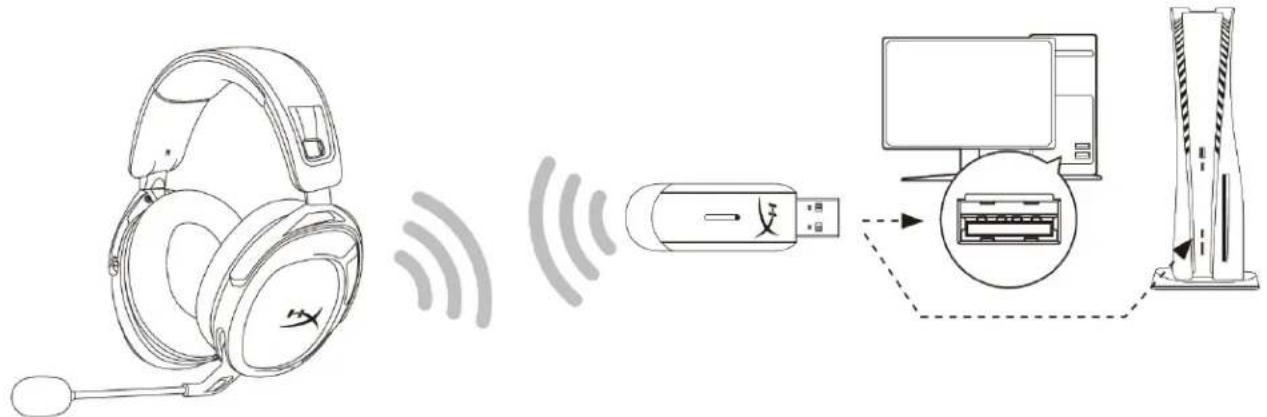
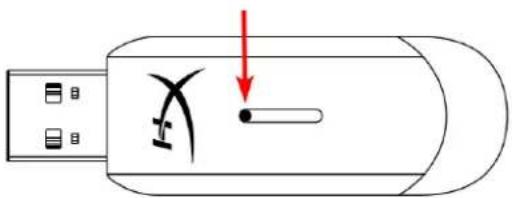
F. USB wireless adapter
G. Wireless pairing pin hole
H. Wireless status LED
I. USB-C charge cable
Specifications
Headphone
Driver: Dynamic, 50mm with Neodymium magnets
Form factor: Closed Back
Frequency response: 10Hz - 20.2kHz
Impedance: 32 Ω
Sensitivity: 104.5 dB SPL/mW at 1 kHz
T.H.D.: ≤ 2%
Frame type: Plastic
Ear cushions: Memory foam and premium leatherette
Microphone
Element: Electret condenser microphone
Polar pattern: Bi-directional, Noise-cancelling
Frequency response: 20Hz - 6.68kHz
Sensitivity: -12 dBFS/Pa at 1kHz
Connections and Features
Audio connection: Wireless USB
USB audio format: Stereo
USB specification: USB 2.0
Sampling rates: 48 kHz
Bit-Depth: 16 bit
Included virtual surround sound: DTS Headphone:X
Audio controls: Onboard audio controls
Battery
Type: Rechargeable lithium-polymer
Battery life: 20 Hours*
Charge time: 3.5 hours
Wireless
Type: 2.4GHz
Wireless range: Up to 20 meters**
Physical
Weight: 275g
Cable length(s) and type(s): 0.5m USB charge cable
*Tested at 50% headache volume. Battery life varies based on volume and usage.
**Wireless range may vary due to environmental conditions.
Charging the Headset
It is recommended to fully charge your headset before first use.
When charging the headset, the headset status LED will indicate the current charge status.
| Charge Status Status LED | |
| Fully charged Solid | green |
| 10% - 99% battery level | Breathing green |
| < 10% battery level | Breathing red |
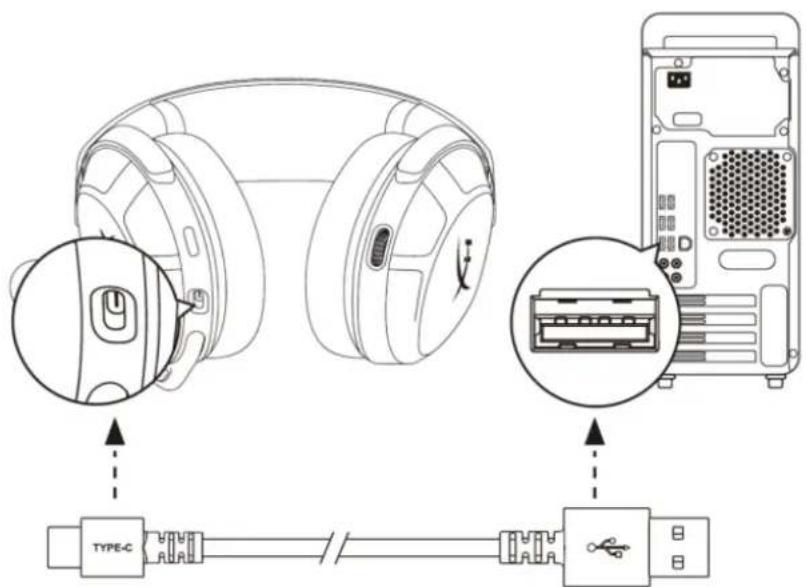
To charge the headset, plug the headset to a USB port with the USB-C charge cable.
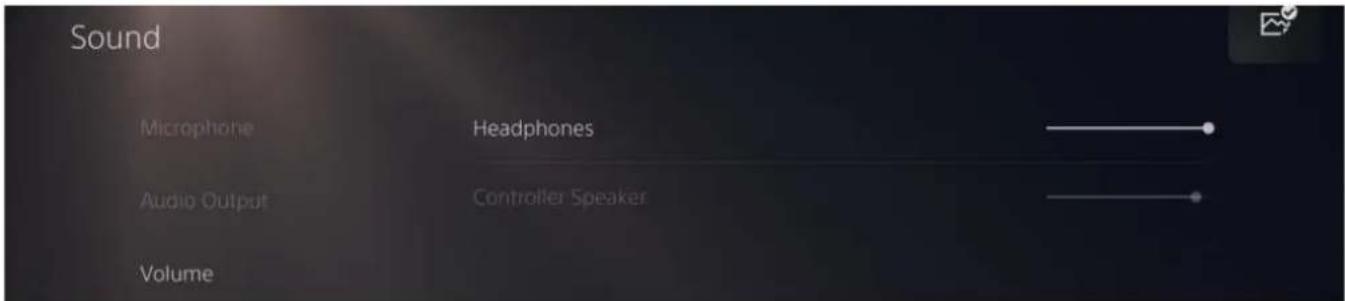
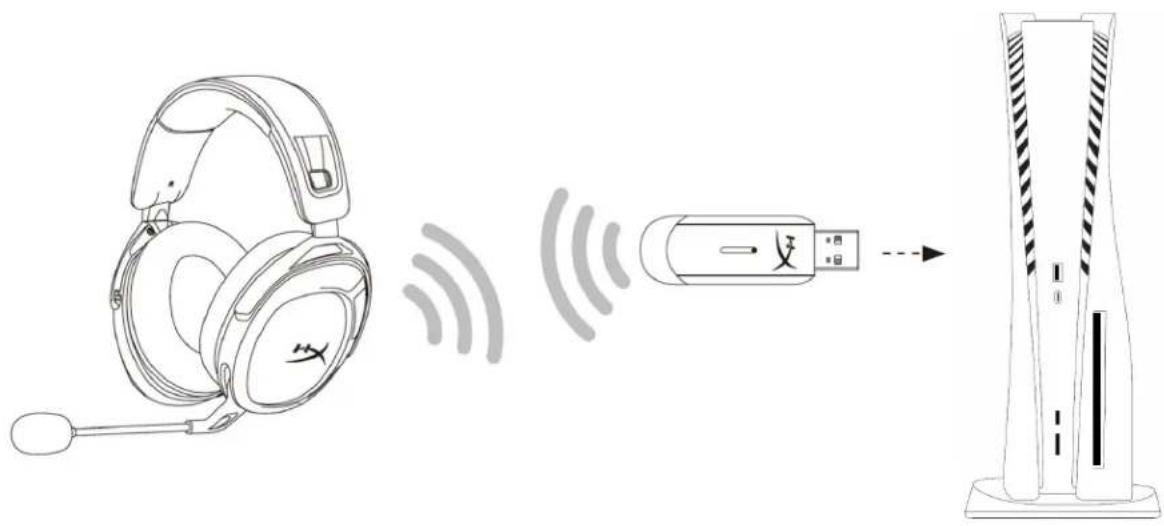
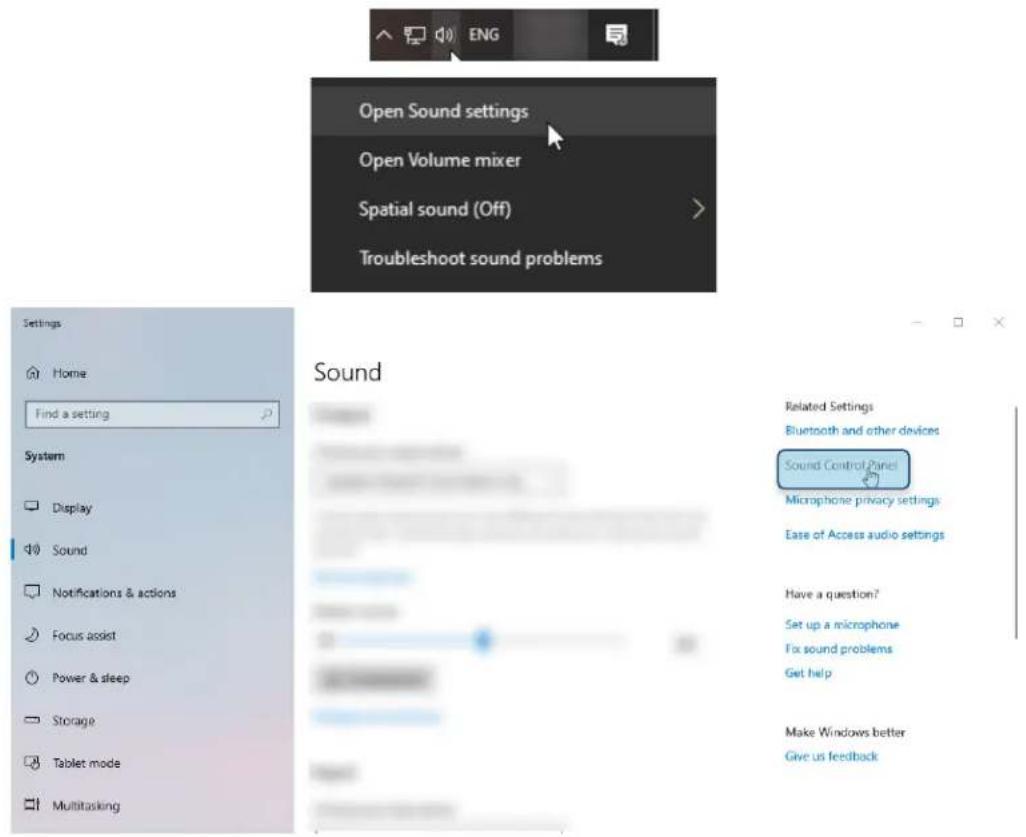
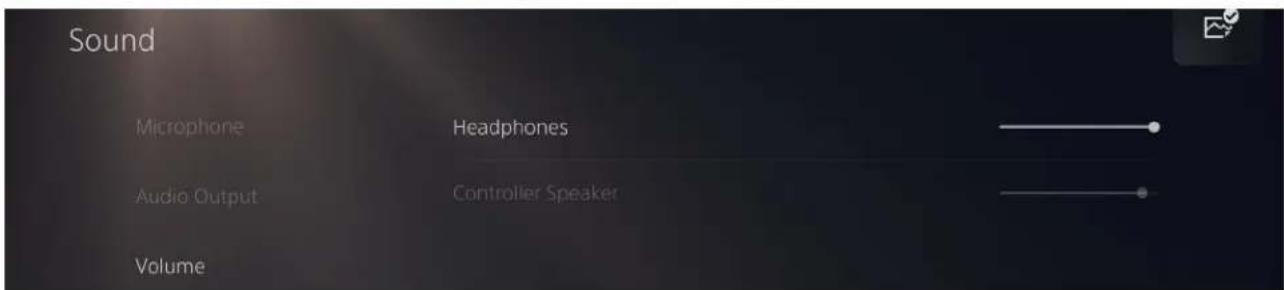
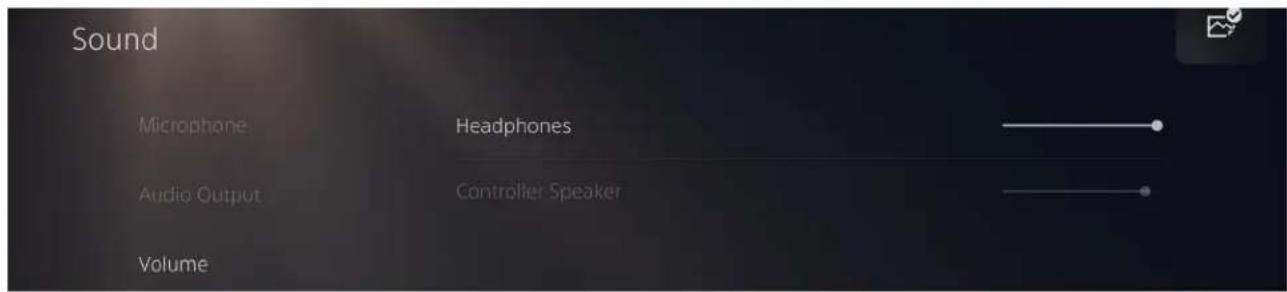
Setting up with PC
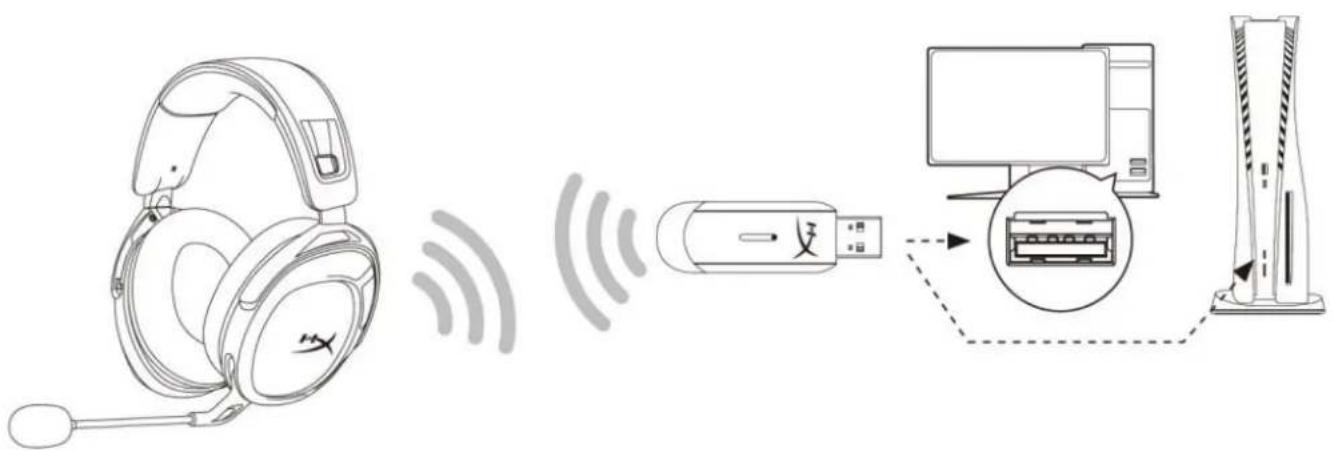
- Connect the wireless adapter to the PC.
- Power on the headset.
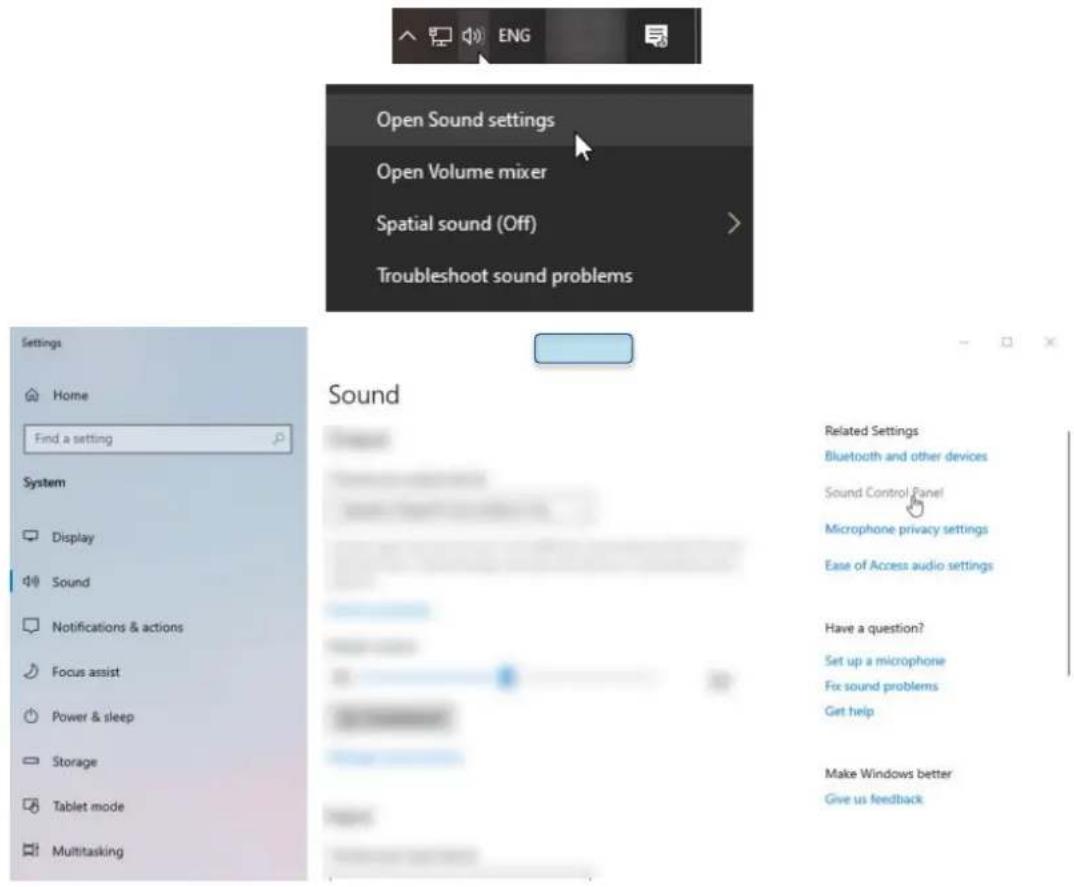
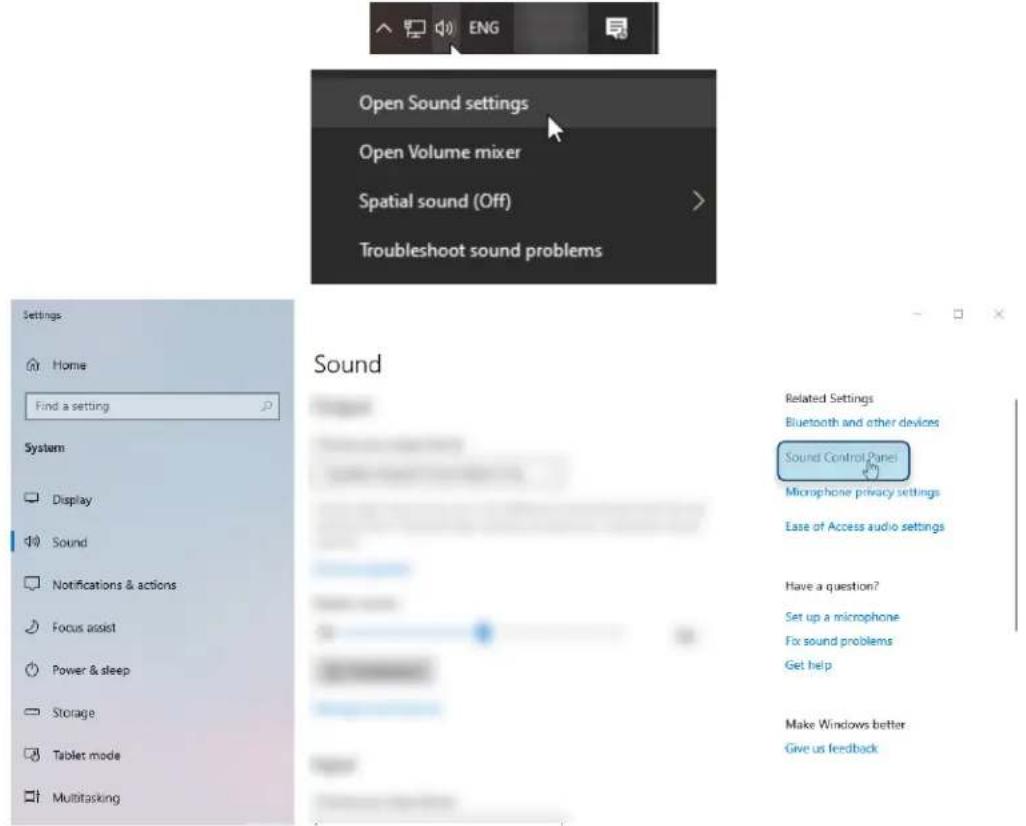
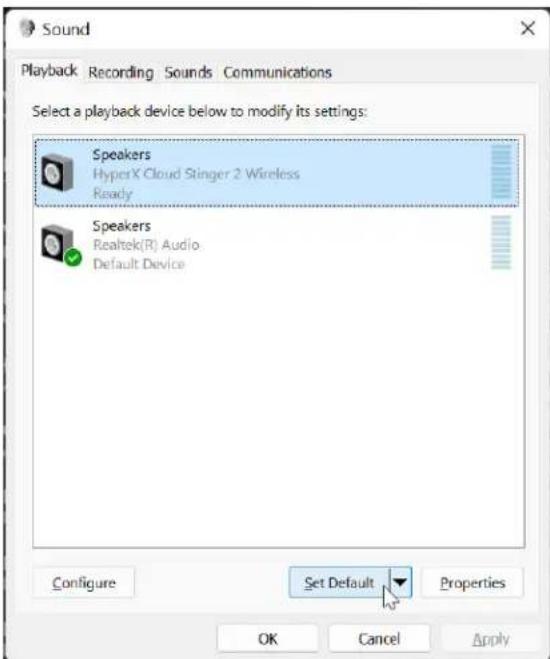
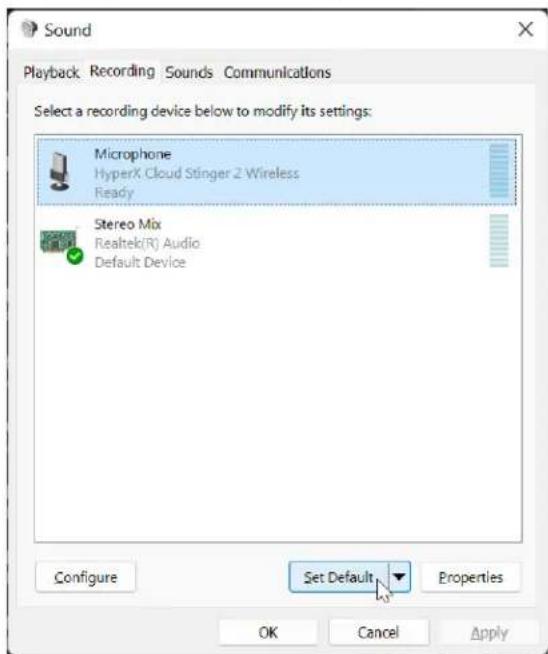
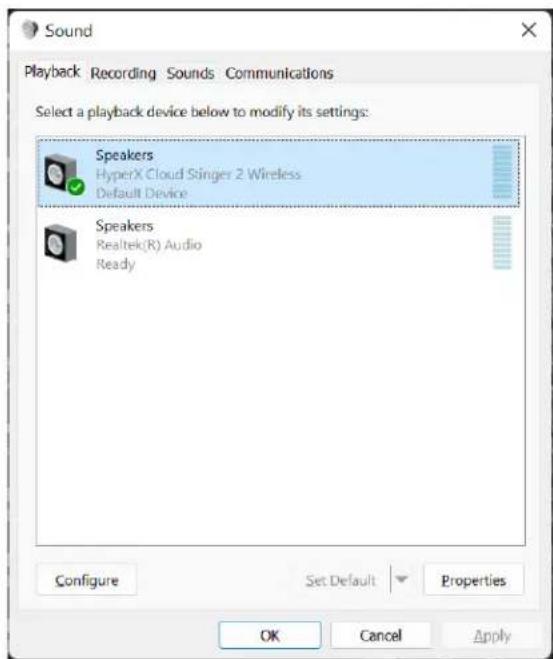
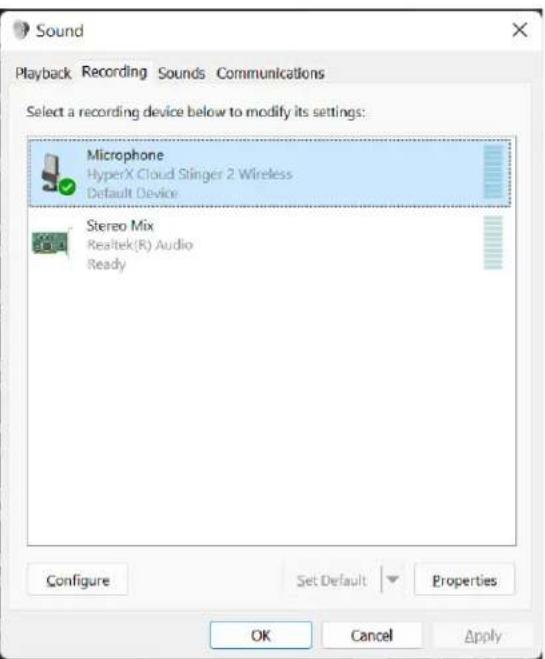
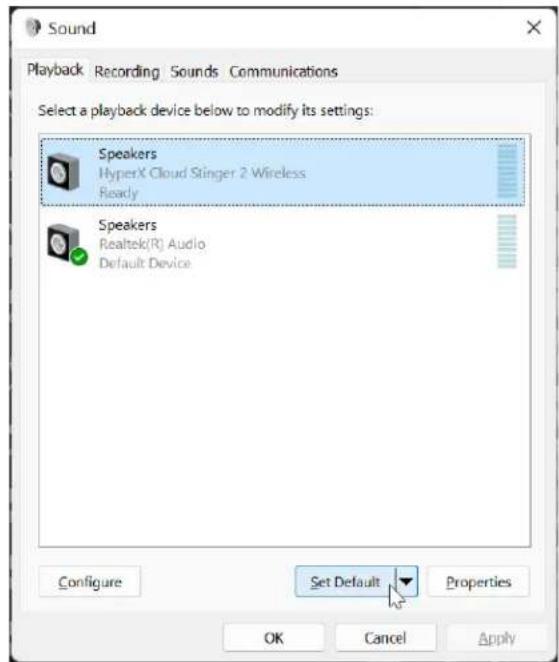
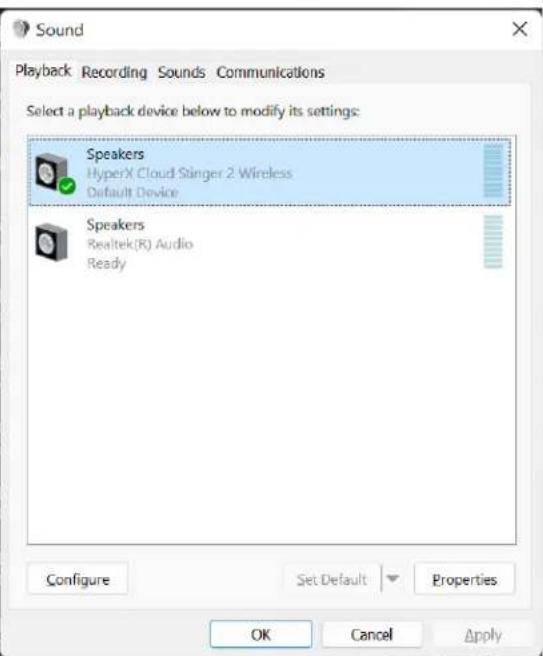
- Right click speaker icon > Select Open Sound settings > Select Sound Control Panel
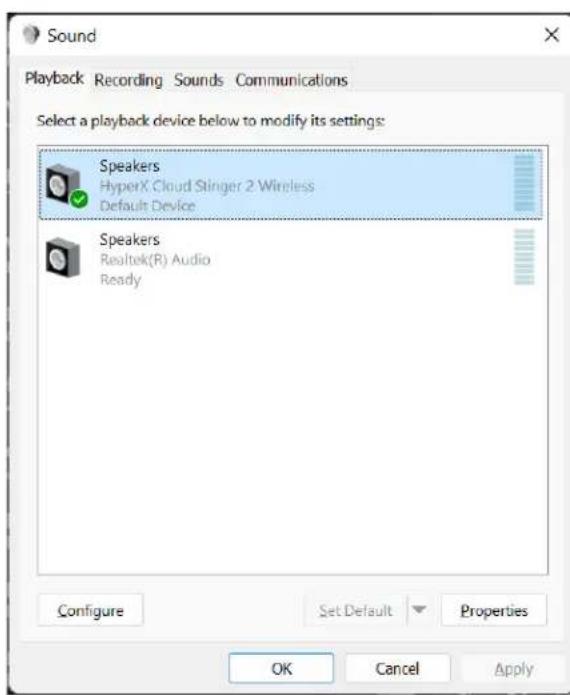
- Under the Playback tab, click on "HyperX Cloud Stinger 2 Wireless" and click on the Set Default button.

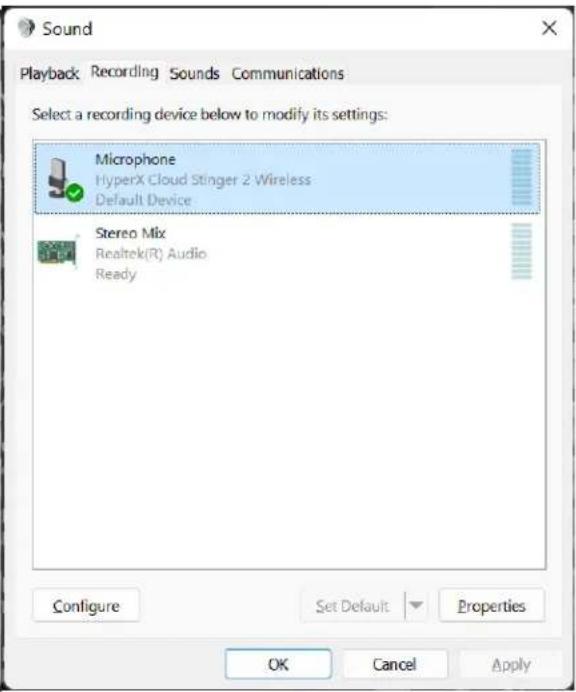
- Under the Recording tab, click on "HyperX Cloud Stinger 2 Wireless" and click on the Set Default button.
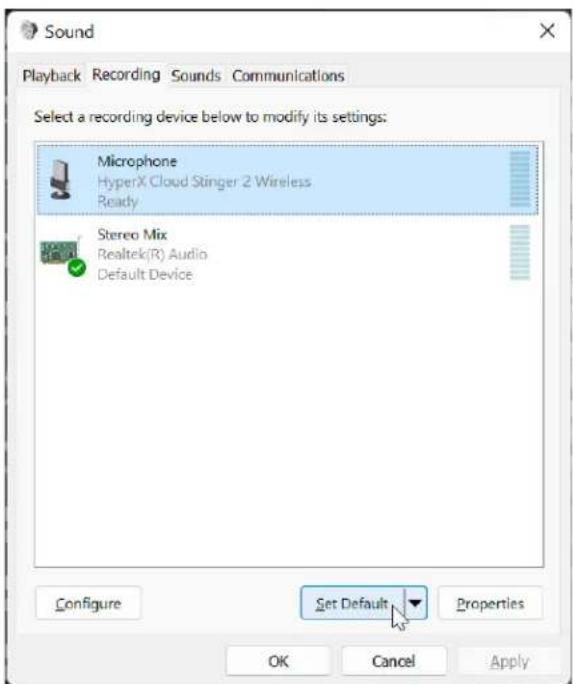
- Under the Playback tab, verify that "HyperX Cloud Stinger 2 Wireless" is set as Default Device and Default Communication Device. Under the Recording tab, verify that "HyperX Cloud Stinger 2 Wireless" is set as Default Device.
- To set up DTS Headphone:X, please download the HyperX NGENUITY software at hyperx.com/ngenuity and follow the instructions in the app to install the required drivers. DTS Spatial Audio is controlled within NGENUITY software.

NGENUITY

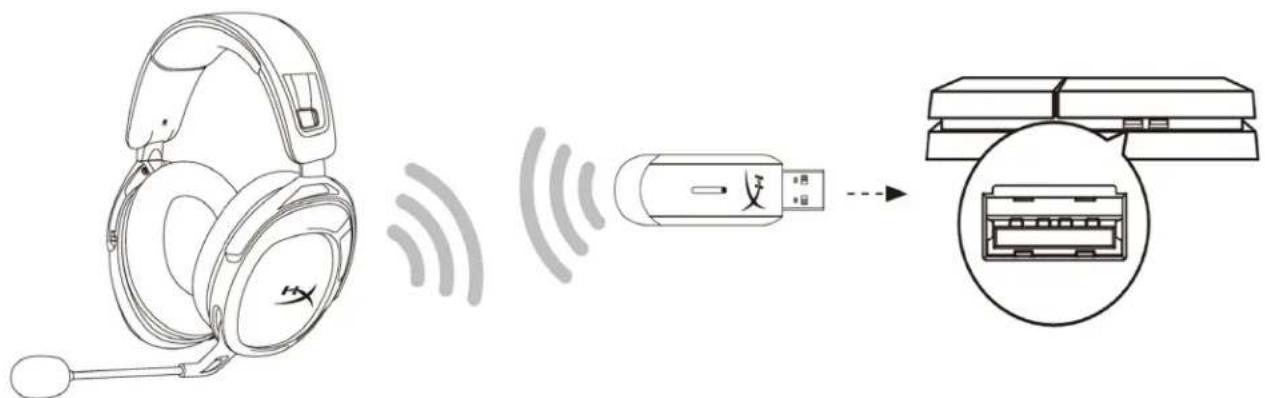
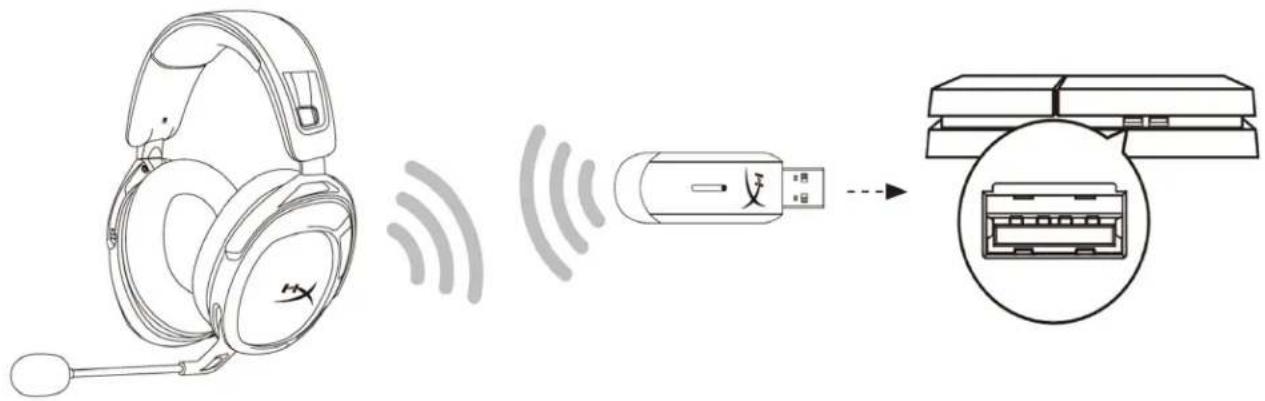
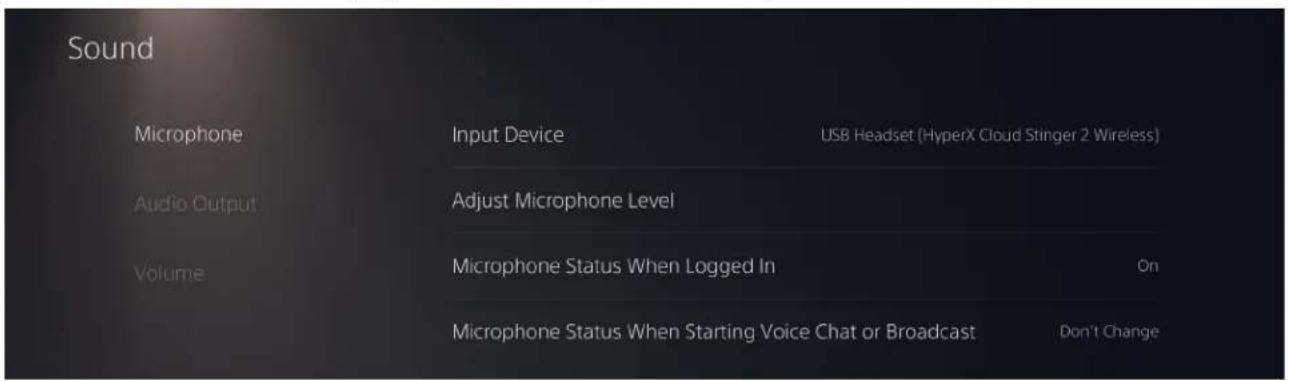
Setting up with PlayStation 4
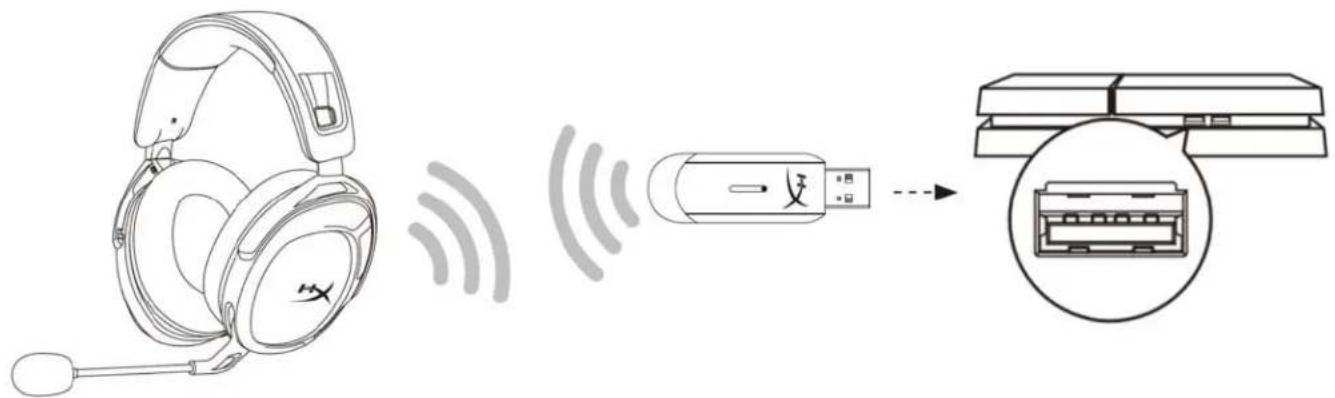
- Connect the wireless adapter to the PlayStation 4 console.
- Set Input Device to USB Headset (HyperX Cloud Stinger 2 Wireless).
- Set Output Device to USB Headset (HyperX Cloud Stinger 2 Wireless).
- Set Output to Headphones to All Audio.
- Set Volume Control (Headphones) to maximum.
Audio Devices

Input Device
USB Headset (HyperX Cloud Stinger 2 Wireless)

Output Device
USB Headset (HyperX Cloud Stinger 2 Wireless)

Adjust Microphone Level

Volume Control (Headphones)


Output to Headphones
All Audio

Switch Output Device Automatically

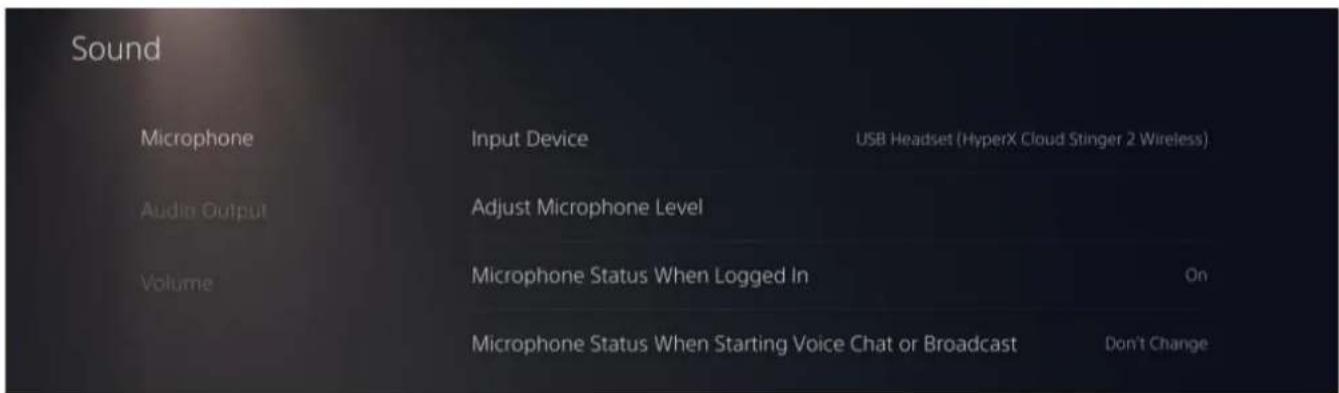
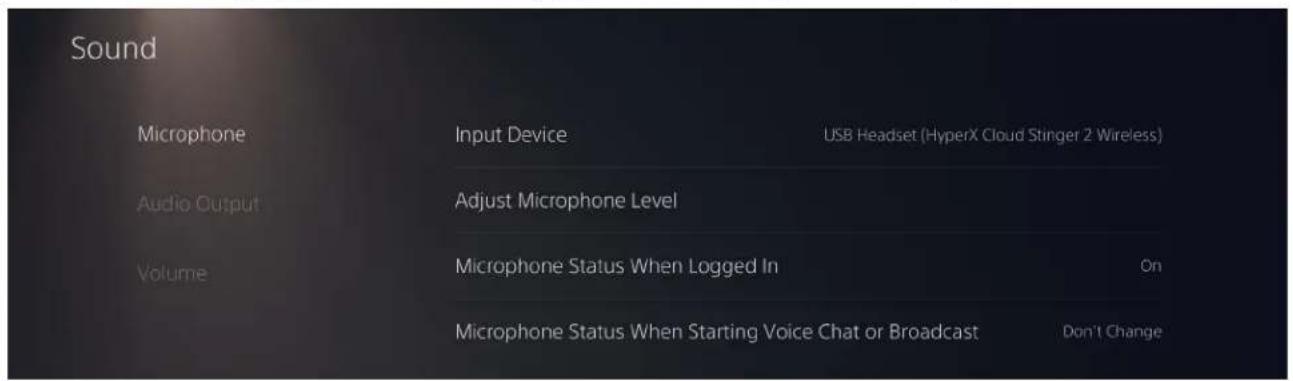
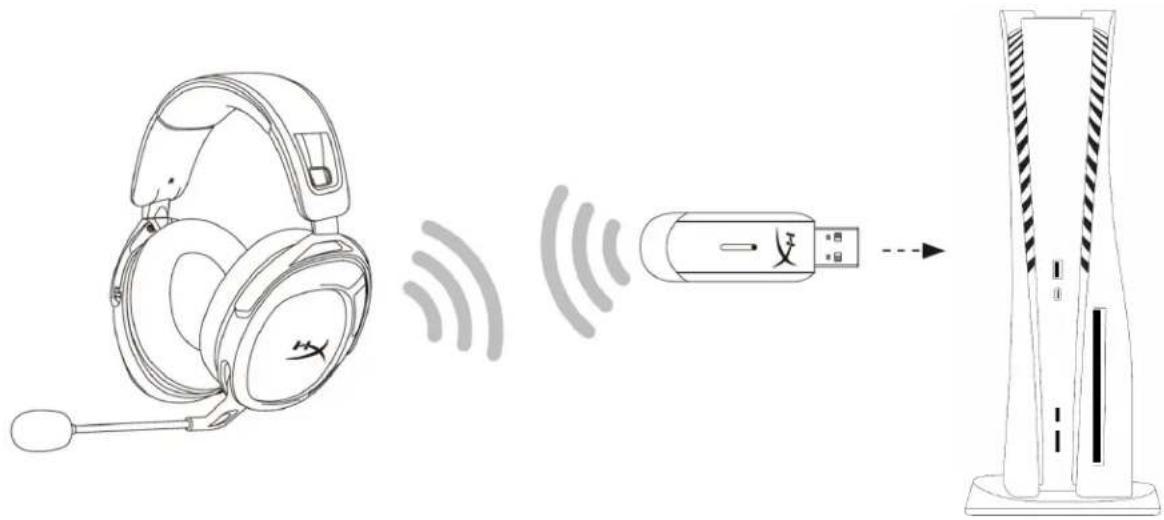
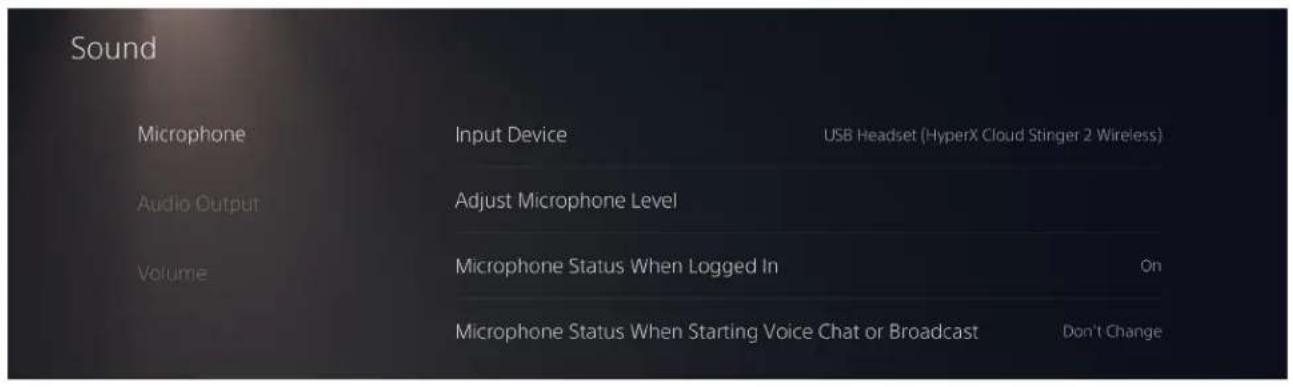
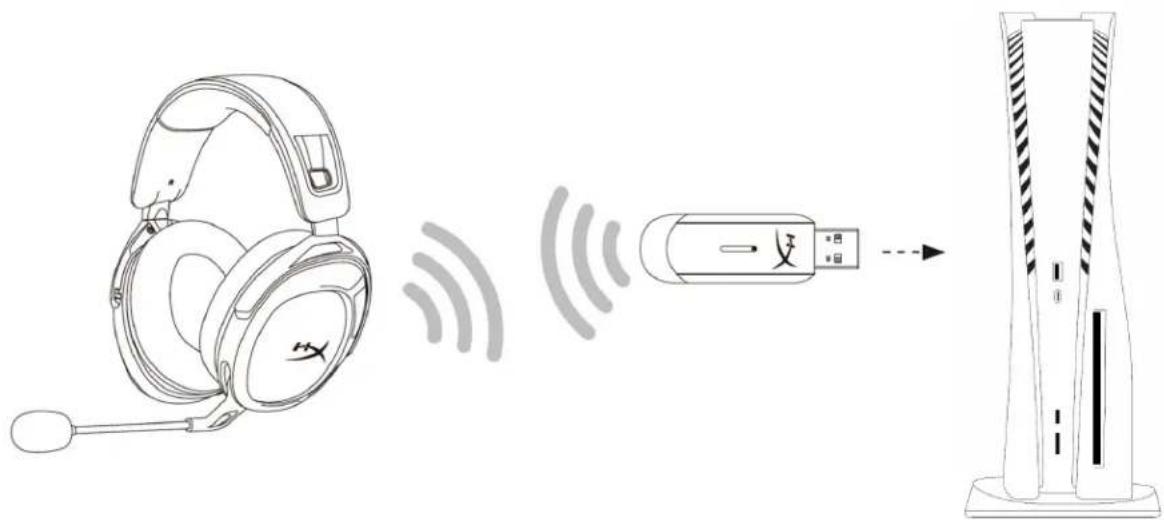
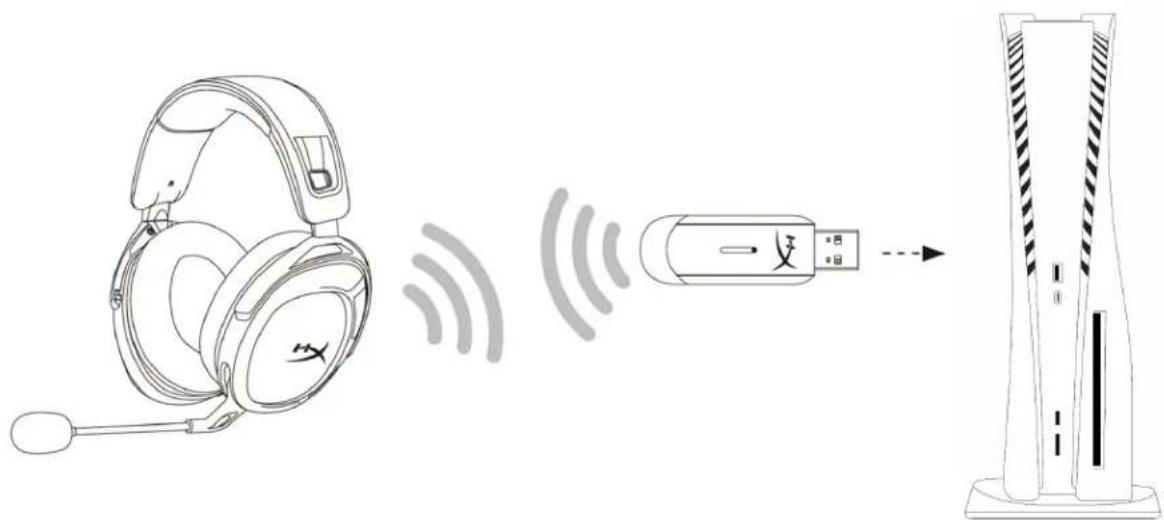
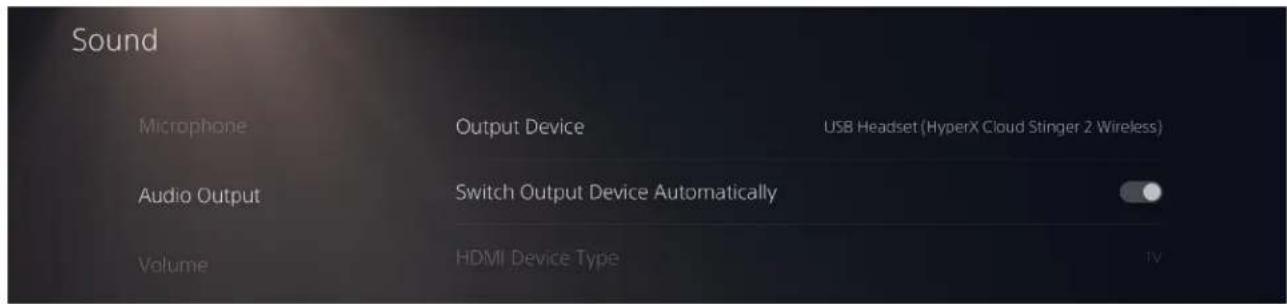
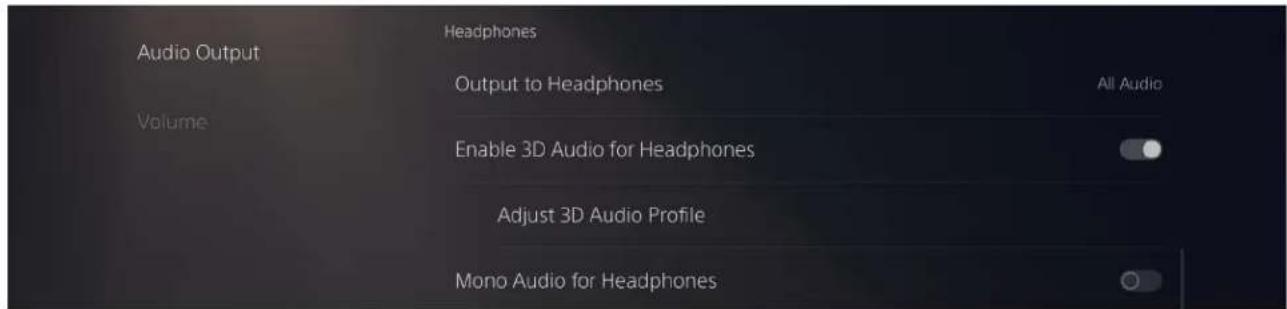
Setting up with PlayStation 5
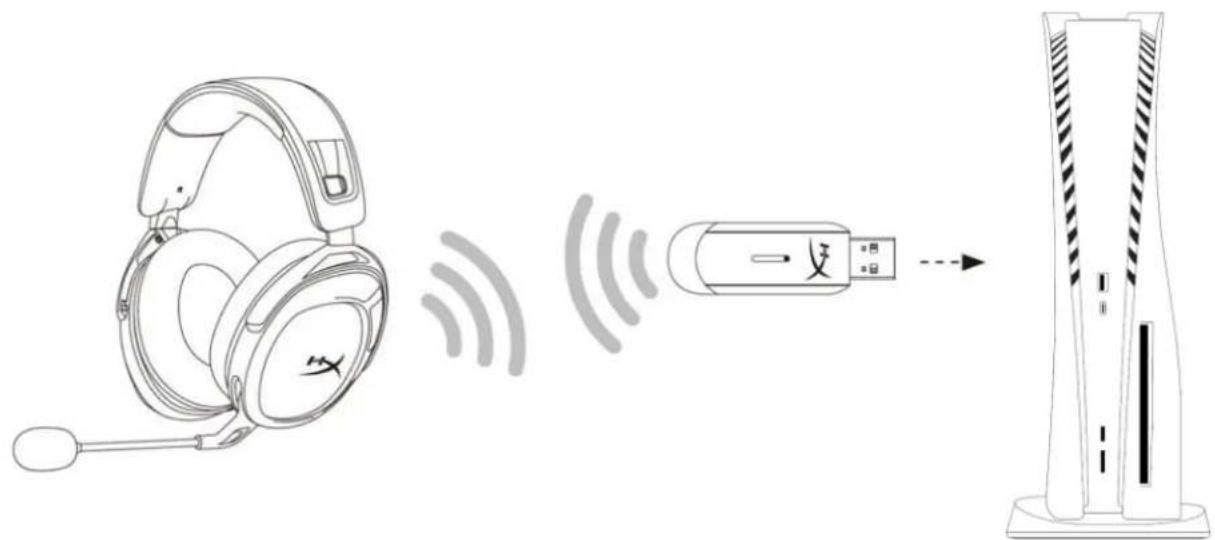
- Connect the wireless adapter to the PlayStation 5 console.
- Go to the home page and select Settings > Sound
-
Under Microphone, set the following:
-
Input Device: USB Headset (HyperX Cloud Stinger 2 Wireless)
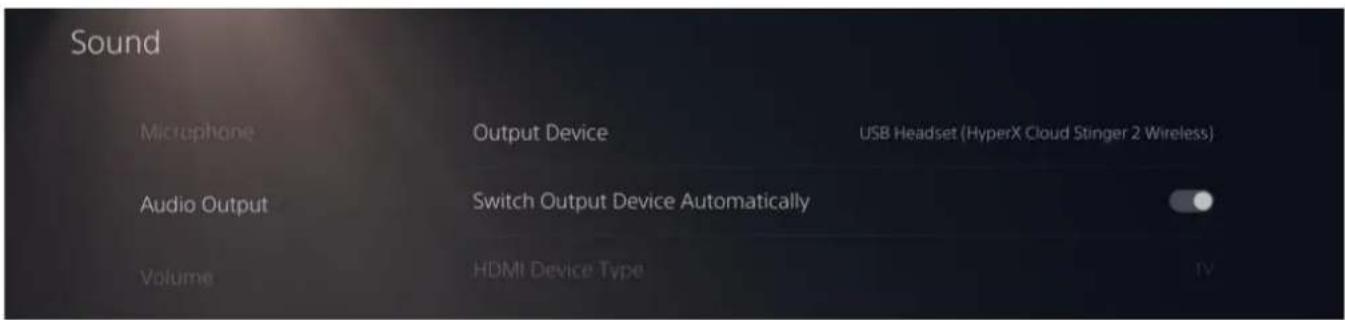
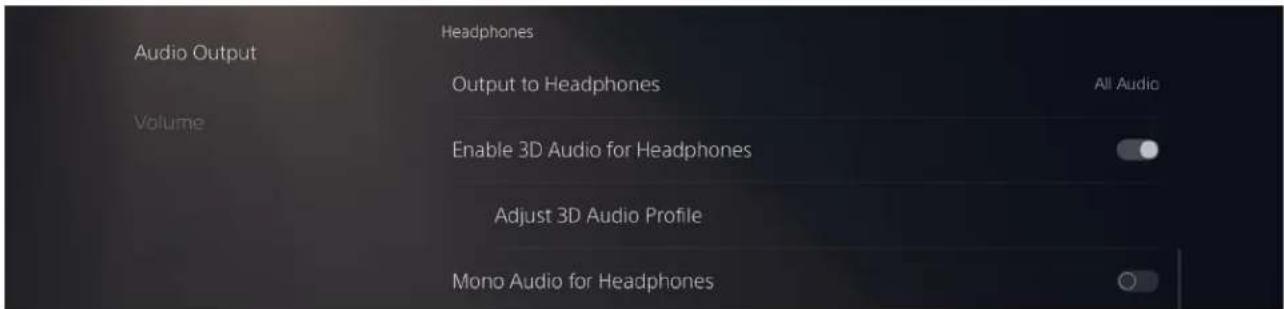
- Under Audio Output, set the following:
Output Device: USB Headset (HyperX Cloud Stinger 2 Wireless)
Output to Headphones: All Audio

- Under Volume, set Headphones slider to maximum level.
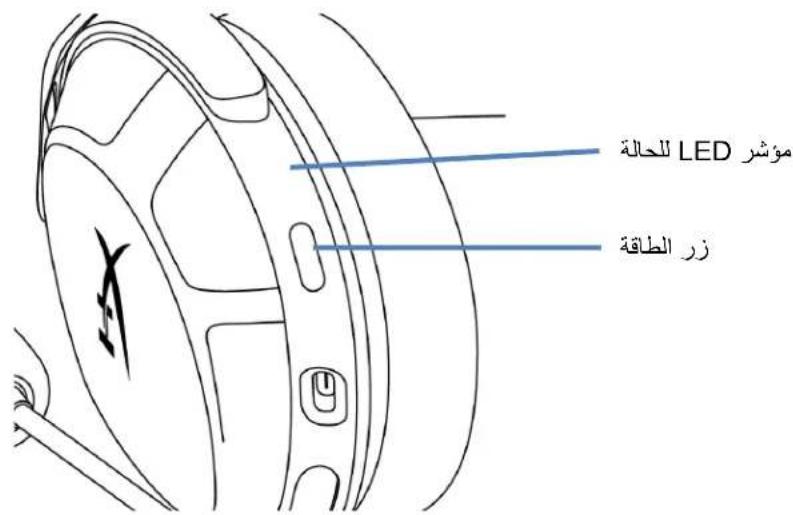
Controls
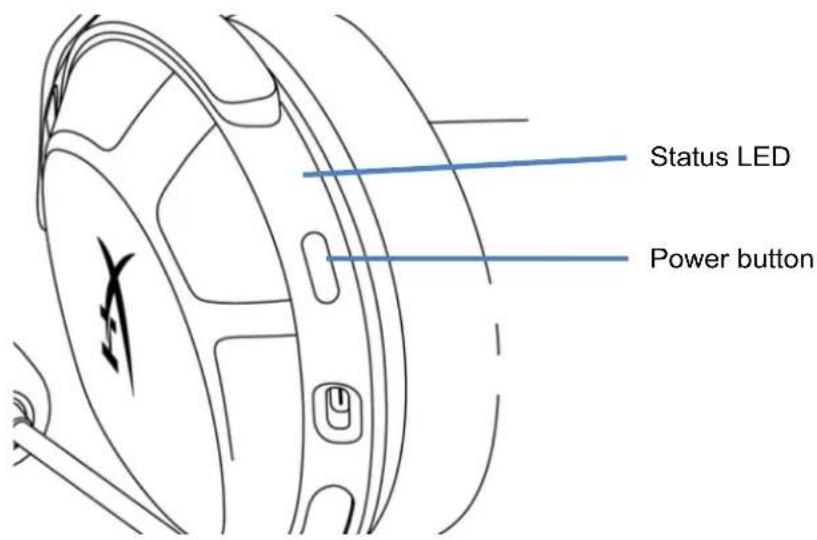
Status LED
| Status Battery Level LED | ||
| Searching - | Slow breathing green | |
| Connected* | 90% - 100% Solid green for 5s | |
| 10% - 90% Blinking green for 10s | ||
| < 10% Blinking red for 10s | ||
*Battery level indication
*The status LED will automatically turn off to conserve battery life
Power Button
- Hold for 3 seconds to power headset on/off
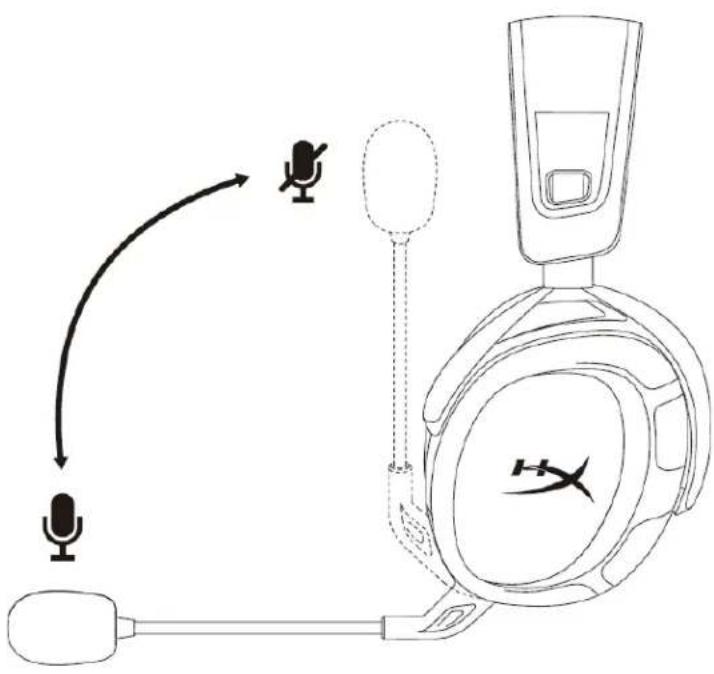
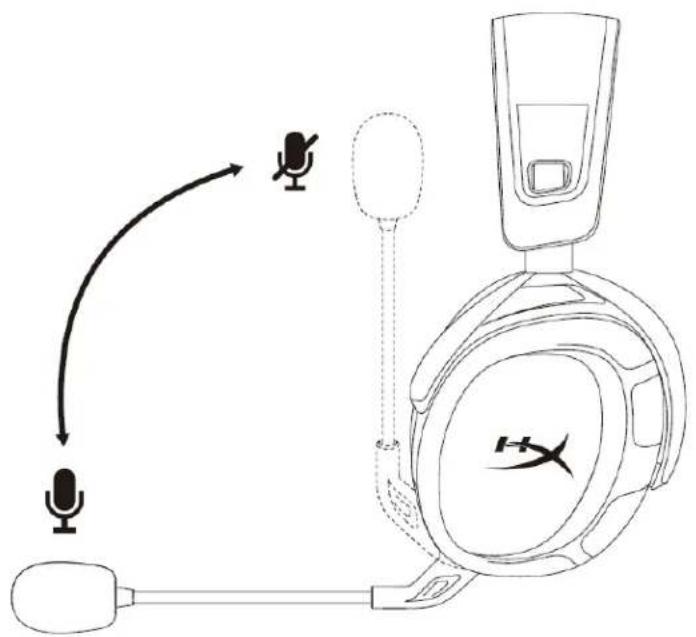
Swivel to Mute Microphone
- Swivel up to mute microphone
- Swivel down to unmute microphone
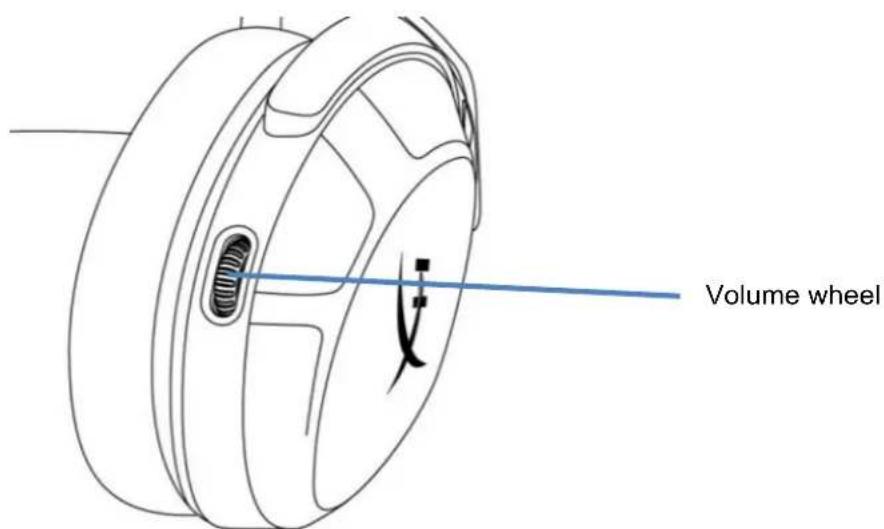
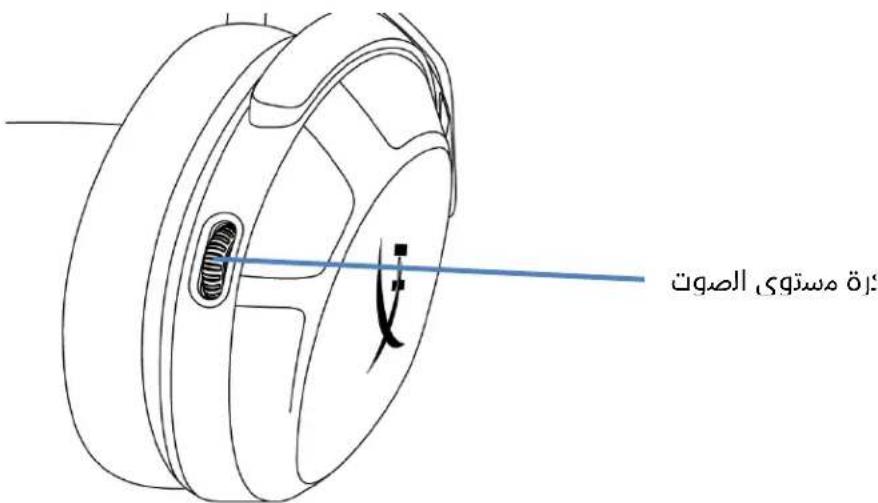
Volume Wheel
- Scroll up and down to adjust volume level
WARNING: Permanent hearing damage can occur if a headset is used at high volumes for extended periods of time
Tone Notifications
Headset status Tone Notification
| Power On 1 tone (mid) | |
| Power Off 2 tones (high, low) | |
| Maximum volume reached 3 tones (high) | |
| Minimum volume reached 3 tones (low) | |
| Low battery (10%) 4 tones (mid, low, mid, low) | |
| Microphone muted 2 tones (high, high) | |
| Microphone active 1 tone (high) | |
| Mic monitoring on/off 2 tones (mid, mid) |
HyperX NGENUITY Software
Go to hyperx.com/ngenuity to download the NGENUITY software. Software features include:
- DTS Headpone:X
- Adjustable EQ settings
Adjustable auto shut-off behavior - Battery level indicator
Manually Pairing the Headset and Wireless Adapter
The headset and wireless adapter are automatically paired together out of the box. But if manual pairing is needed, follow the steps below to pair the headset and wireless adapter.
- While the headset is off, hold the power button until the headset status LED starts blinking red/green rapidly.
- While the wireless adapter is plugged in, use a small tool (e.g. paper clip, SIM tray ejector, etc.) to press the button inside the pin hole until the adapter LED starts blinking rapidly.
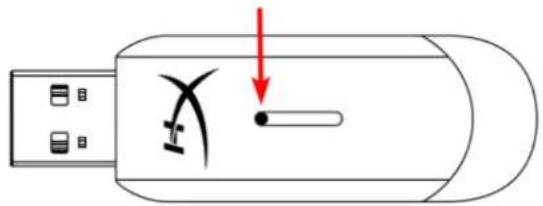
- Wait until both the headset LED and the USB adapter LED are solid. The headset and wireless adapter are now paired together.
Questions or Setup Issues?
Contact the HyperX support team at: hyperx.com/support
HyperX Cloud Stinger 2 inalámbrico
Numeros de parte
676A2AA
INDICE
USB Headset (HyperX Cloud Stinger 2 Wireless)

Output Device
USB Headset (HyperX Cloud Stinger 2 Wireless)

Adjust Microphone Level

Volume Control (Headphones)

Output to Headphones

Switch Output Device Automatically
All Audio

Inkclusive virtuellem Surround-Sound: DTS Headphone:X
USB Headset (HyperX Cloud Stinger 2 Wireless)

Output Device
USB Headset (HyperX Cloud Stinger 2 Wireless)

Adjust Microphone Level

Volume Control (Headphones)


Output to Headphones
All Audio

Switch Output Device Automatically

USB Headset (HyperX Cloud Stinger 2 Wireless)

Output Device
USB Headset (HyperX Cloud Stinger 2 Wireless)

Adjust Microphone Level

Volume Control (Headphones)


Output to Headphones
All Audio

Switch Output Device Automatically

Audio Virtual Surround incluso: DTS Headphone:X
Controlli audio: controlli audio integrati
Batteria
USB Headset (HyperX Cloud Stinger 2 Wireless)

Output Device
USB Headset (HyperX Cloud Stinger 2 Wireless)

Adjust Microphone Level

Volume Control (Headphones)


Output to Headphones
All Audio

Switch Output Device Automatically

USB Headset (HyperX Cloud Stinger 2 Wireless)

Output Device
USB Headset (HyperX Cloud Stinger 2 Wireless)

Adjust Microphone Level

Volume Control (Headphones)


Output to Headphones
All Audio

Switch Output Device Automatically

CBeToIIOHbI INDnKaTOp COCTOHNIA 13
Khonka nHTaHn. 13
MnKpoohc NOBOpOTbIM OTKnIOueHHeM 14
KoIecnko perynipovkn rpoMkoCTN 15
3BykoBbIe CnHaJIbI 15
IporpamMHOe oecneueHHe HyperX NGENUITY 16
Conpexene raphntypb i aadantepa 6ecnpoBODHO CB83N BpyHyu 17
063op
A. MinkpofoH C NOBOPOTbIM OTKJIHOeHHeM
B. CBeToDnOuHbI uHdNkATOp COCToHn
C. Khonka nHTaHn
D. NopT USB-C Dnra 3aprKn
E. Konecupepyu npOBn rpomkoctn
F. BeçnpoBɔdHoi USB-aʌanTep
G. KoHTaKTHOe MmKpOoTBePCTne IJn coIpyKeHn 6ecPiPoBODHOrO yCTpoiCTBa
H.CBeToIOHOHyI INHnKaTOp COCTOHN H 6ecnpoBOHOrO yCtpoNCTBa
I. Ka6eBb USB-C dnnr 3apnKn
TexHnueckne xapaKTepeNCTnKN
Hayushnkn
I3nyuataJIb: DnHaMnueckn (50 MM) C HeOДmOBbIM MArHNTaMI
ΦopM-φakTop:3aKpbITOro Tnna
YactothaXapaKTepeNtka:10Tc-20,2kTc
NIMpeIaHc:32OM
UyBCTBnteHocb: 104,5 AB Y3M/MBT npu cactote 1 Kf
Ko3ΦΦnUeHT HeJIInHeHbIX NCKaKeHm: ≤ 2%
MATEPnAn oroNoBb: nnaCTnK
Am6yIIOpbI: nHa c 3oΦΦeKToM nAMrTn N BbICOKOKaYeCTBeHHbIK KOx3aMeHInTeNb
MnKpOΦoH
Tun: 3neKtpetHbIKoHdeHcATOpHbIMNKpOΦOH
Hnarpma HnnpabHeHHocTn: DByHnpaBHeHHa, C WymOnoDaBneHneM
YactothaXapaKTepeNtka:20F-6,68K
UyBCTBnteHocb: -12 dFS/Na npu yactote 1 K
Pa3bemblnФyHKUH
Aynopa3bEm:6ecnpoBOndHou USB
Aydnoopmat USB: ctepeo
CneuΦkaa USB:USB2.0
Yactota nckpeu3aun: 48 K
BntOBa rnybHa:16 6nt
BcTpoEHbI BnptyaIbHbI o6bEmHbI 3ByK: DTS Headphone:X
Perynnpobka 3Byka: BCTpoeHHbIe cpeIcTba KOHTpOJa aydno
Batapea
Tun: napezaprajaemaj Nttn-nolnmepehna
Cpok aBOHOMHO pa6Otby ot 6atapen: 20 yacob*
Bpem3apn:3,5yaca
BecnpoBODHoe nooknoueHne
Tun:2,4ΓΓ
Даьнocтб 6ecnpoBODHOn CBЯЗ:do 20 MeTpOB **
Физунecкneх.apakTepehntkn
Macca: 275 r
Динани ТИКабелЯ:USB-ka6eIbДлЯЗapяДк,0,5M
- TecturopobaHne npoBeHeNo npn rpoMkoCTn HayuHnKOB 50%. Cpok cnyk6bI 6aTapeN 3aBnCtOT ot rpoMkoCTn nncnoB3OBAHn.
**PaDnyc DeiCTBna 6ecnpoBOJHO CoeHHeNMA MoXeT OTnUaTbC8 B 3aBNCMOCTN OT yCNOBn OkpykaIOuSeI cpebl.
3apraKa raphNtypbl
IpeepnepBbIM nCNOb3OBaHHe m peKOMeHdyTeTc NOHOCbU 3apAHTpy.
Iprn 3aprAKe raphHtpybI CBeToDIOHbI INHdNKaTOp COCTOHNr raphHTpybI 6yDeT NOKa3bIBaTb TeKyuee COCTOHNr 3aprKn.
USB Headset (HyperX Cloud Stinger 2 Wireless)

Output Device
USB Headset (HyperX Cloud Stinger 2 Wireless)

Adjust Microphone Level

Volume Control (Headphones)


Output to Headphones
All Audio

Switch Output Device Automatically

CBeToIDNoHbIM INHdNkATOp COCTOHNIA
KhONka NHTAHNA
CBeToIIOHbI INHdNKaTOP COCTOHHN
Dahili sanal surround ses: DTS Headphone:X
Se s kumandalari: Kulaklik uzeri ses kumandalari
Pil
Tip: Sarj edible bilir lityum polymer
Pil omr: 20 Saat*
Sarj suresi: 3,5 saat
Kablosuz
Tip: 2,4 GHz
USB Headset (HyperX Cloud Stinger 2 Wireless)

Output Device
USB Headset (HyperX Cloud Stinger 2 Wireless)

Adjust Microphone Level

Volume Control (Headphones)


Output to Headphones
All Audio

Switch Output Device Automatically

PlayStation 5 ayarlari
- Kablosuz adaptorü PlayStation 5 konsoluna baglayin.
- Ana sayfaya gidin ve Ayarlar > Ses ögesini seksin
- Mikrofon sekmesinden asaigidaki ayari yapin:
Giris Aygiti: USB Kulaklik (HyperX Cloud Stinger 2 Kablosuz)
- Ses Cikisi sekmesinden asaigidaki ayarleri yapin:
USB Headset (HyperX Cloud Stinger 2 Wireless)

Output Device
USB Headset (HyperX Cloud Stinger 2 Wireless)

Adjust Microphone Level

Volume Control (Headphones)

1

Output to Headphones
All Audio

Switch Output Device Automatically

3
4
He33E 6
PC 7
PlayStation 4 [ ] 10
PlayStation 5 家庭装修 ..... 11
13
상태 foTI LED 13
第1章 13
14
第15页
15
HyperX NGENUITY Sófré Tewer 16
He3d3e&JfJFJFJFJFJFJFJFJFJFJFJFJFJFJFJFJFJFJFJFJFJFJFJFJFJFJFJFJFJFJFJFJFJFJFJFJFJFJFJFJFJFJFJFJFJFJFJFJFJFJFJ
#
DraIiBa: DaIInM, 50mm(NeOdiM qA
音:
挂卡数:10Hz~20.2kHz
IMFJNTS:32Ω
1kHz 104.5dBSPL/mW
T.H.D.: ≤ 2%
FRALELMUH:PALLASTK
1
叶i
主:日
琵拉:安韻,
孕:20Hz\~6.68kHz
MnKmD:1kHz 电-12dBFS/Pa
关联找功
OdiOnJnJ:M
USB ODOO 形式:STETRE
USB SAING: USB 2.0
生成器:48kHz
Birte:16
表1-30 转换器的参数
OdiOJr:OnbDOnoDiOJr
B
用:查前式 韓则 轮利
[BaTReLi Su:20]
首页:3.5页
早
U形:2.4GHz
| 증선상arra상arraPBSI LED | |
| 원前端증前端 lit | 相關목일 doesn't have the stock in |
| 개터리수지 10%~99% | stock stock is on the stock in |
| 개터리수지 < 10% | stock stock is on the stock in |
he3e to hienhre 1sB-C hieni blo he3e to USB foet an engeln.
PC 画师
- 本页为阿德托瓦PC页的页码。
- HeutéfjinteJitn#
- Sfo/fo/fofofofofofofofofofofofofofofofofofofofofofofofofofofofofofofofofofofofofofofofofofofofofofofofofofofofofofo
- HyperX Cloud Stinger 2 Wireless' to kikh o f bokto ro selng bertns to kikh hni.

USB Headset (HyperX Cloud Stinger 2 Wireless)

Output Device
USB Headset (HyperX Cloud Stinger 2 Wireless)

Adjust Microphone Level

Volume Control (Headphones)


Output to Headphones
All Audio

Switch Output Device Automatically

PlayStation 5 썸서 힘명
104.5 dBSPL/mW n 1 kHz
T.H.D.: ≤ 2%
山:
y:wwuuaaunueanw
waiwu
aunuau: uwnwuaanrnnnnaa
Sampling rates: 48 kHz
Bit-Depth: 16 10
Vrtual DTS Headphone:X
:
山
J51:
yuvuun:20w
13.5
#
15mm:2.4GHz
2005**
Tnssnnnnaa
unwn: 275 n.
| xiaojunqiuang | LED |
| wuxue | wuxue |
| 15% - 20% | 15% - 20% |
| 20% - 30% | 20% - 30% |
| 30% - 40% | 30% - 40% |
27777777777777777777777777777777777777777777777777777777777777777777
nna PC
- 1 PC
- 国学
- 3.3.3.3.3.3.3.3.3.3.3.3.3.3.3.3.3.3.3.3.3.3.3.3.3.3.3.3.3.3.3.3.3.3.3.3.3.3.3.3.3.3.3.3.3.3.3.3.3.3.3
-
- Playback "HyperX Cloud Stinger 2 Wireless" Set Default
-
- Recording "HyperX Cloud Stinger 2 Wireless" Set Default
- Playback "HyperX Cloud Stinger 2 Wireless" Default Device Default Communication Device Recording "HyperX Cloud Stinger 2 Wireless" Default Device
- DTS Headphone:X HyperX NGENUITY hyperx.com/ngenuity ngenuity

NGENUITY

PlayStation 4
- 1 playStation 4
- Input Device USB Headset (HyperX Cloud Stinger 2 Wireless)
- Output Device USB Headset (HyperX Cloud Stinger 2 Wireless)
- Output to Headphones All Audio
- Volume Control (Headphones)
Audio Devices

Input Device
USB Headset (HyperX Cloud Stinger 2 Wireless)

Output Device
USB Headset (HyperX Cloud Stinger 2 Wireless)

Adjust Microphone Level

Volume Control (Headphones)


Output to Headphones
All Audio

Switch Output Device Automatically

PlayStation 5
- 1
- 1nnnnnnaan Settings >Sound
-
wu mu Microphone uan an oia山
-
Input Device: USB Headset (HyperX Cloud Stinger 2 Wireless)
- Audio Output
Output Device: USB Headset (HyperX Cloud Stinger 2 Wireless)
Output to Headphones: All Audio

- Volume Headphones
#
LED u
| SONY | SONY WUAN | LED |
| - | - | SONY WUAN 电声屏 |
| 90% - 100% | SONY WUAN 电声屏 5 yrs | |
| 10% - 90% | SONY WUAN 电声屏 10 yrs | |
| < 10% | SONY WUAN 电声屏 10 yrs |
USB Headset (HyperX Cloud Stinger 2 Wireless)

Output Device
USB Headset (HyperX Cloud Stinger 2 Wireless)

Adjust Microphone Level

Volume Control (Headphones)


Output to Headphones
All Audio

Switch Output Device Automatically

Thiet lape voi PlayStation 5

USB Headset (HyperX Cloud Stinger 2 Wireless)

Output Device
USB Headset (HyperX Cloud Stinger 2 Wireless)

Adjust Microphone Level

Volume Control (Headphones)

1

Output to Headphones

Audio

Switch Output Device Automatically

在PlayStation5上设置
USB Headset (HyperX Cloud Stinger 2 Wireless)

Output Device
USB Headset (HyperX Cloud Stinger 2 Wireless)

Adjust Microphone Level

Volume Control (Headphones)

1

Output to Headphones
All Audio

Switch Output Device Automatically

PlayStation 5 設定
% 2≥ [1]
S AOB = S AOC + S_ OBC
aai 5gss Jkui bia j
#
(yj)jle jaygsojgj:juaiell
clisgial 2j0j0j0j0oljglil: aalll bai
6.68 20:
jys1 1ie Jksw/Joall aayll 12-
aalldlgl
LS USB:
:USB
USB2.0:USB
j48:cllal
16:
DTS:X aJrclaw:gsal gaiy
aall gall yasill jolic: gall
2
a 1
*clw 20:
3.5:
j2.4:
**jia 20 jiu la:glulil
aalal
275:
0.5 USB
alillll llll 50
ailllll lll llll
J
5.8aJ 1234567890
lll jnnn nnnnnnnnnnnnnnnnnnnnnnnnnnnnnnnnnnnnnnnnnnnnnnnnnnnnnnnnnnnnnnnnnnnnnnnnnnnnnnnnnnnnnnnnnnnnnnnnnnnnnnnnnnnnnnnnnnnnn
Bluetooth and other devices

Microphone privacy settings
Ease of Access audio settings
Have a question?
Set up a microphone
Fix sound problems
Get help
Make Windows better
Give us feedback
HyperX Cloud Stinger 2 Wireless"
4.
HyperX Cloud Stinger 2 Wireless"
5.

"HyperX Cloud Stinger 2 Wireless"
"HyperX Cloud Stinger 2 Wireless"
y
j/1j/1j/1j

hyperx.com/ngenuity HyperX NGENUITY DTS:X .7
DTS DTS

NGENUITY

PlaySt
jul playStation4.11 J
.(HyperX Cloud Stinger 2 Wireless) USB
.(HyperX Cloud Stinger 2 Wireless) USB
"usll 5" 1
gai 5
Audio Devices

Input Device
USB Headset (HyperX Cloud Stinger 2 Wireless)

Output Device
USB Headset (HyperX Cloud Stinger 2 Wireless)

Adjust Microphone Level

Volume Control (Headphones)

Output to Headphones

Switch Output Device Automatically
All Audio

PlaySt


J,PlayStation
< 2
yla la biaol.
(HyperX Cloud Stinger 2 Wireless) USB
1y la bai 1 yal jia 4
(HyperX Cloud Stinger 2 Wireless) USB
5
pail yalee
LED
| LED | النبات الحرفية | ||
| النبات وصحي بعبي | - | النبات | |
| النبات 5较为5较为5较为5较为5较为5较为5较为5较为5较为5较为5较为5较为5较为5较为5较为5较为5较为5较为5较为5较为5较为5较为5较为5较为5较为5较为5较为5较为5较为5较为5较为5较为5较为5较为5较为5较为5较为5较为5较为5较为5较为5较为5较为5较为5较为5较为5较为5较为5较为5较为5极为5较为5较为5较为5较为5较为5较为5较为5较为5较为5较为5较为5较为5较为5较为5较为5较为5较为5较为5较为5较为5较为5较为5较为5较为5较为5较为5较为5较为5较为5较为5较为5较为5较为5较为5较为5较为5较为5较为5较为5较为5较为5较为5较为5较为5较为5较为5较为5较为5较为5最为5较为5较为5较为5较为5较为5较为5较为5较为5较为5较为5较为5较为5较为5较为5较为5较为5较为5较为5较为5较为5较为5较为5较为5较为5较为5较为5较为5较为5较为5较为5较为5较为5较为5较为5较为5较为5较为5较为5较为5较为5较为5较为5较为5较为5较为5较为5较为5较为5较为5 | %100 - %90 | *444 | |
| %90 - %10 | |||
| %10 > | |||
yjbls g jn
y jll yie gic blll lledt LED allll jjg jie
a11
Jlllcalu/1j3 3ssal jssal
Cgall pisi dai aiaa
goll gjwoo ojs
gol sgjwohb jawg Jc8 90
:ngenuityhyperx.com/ngenuity
DTS:X
bail (EQ) 1
yall yie
aclaw an jyolal yolal yolal yolal yolal yolal yolal yolal yolal yolal yolal yolal yolal yolal yolal yolal yolal yolal yolal yolal yolal yolal yolal yolal yolal yolal yolal yolal yolal yolal yolal yolal yolal yolal y
12
USB LED LED LED 3.
J 1
hyperx.com/support/ HyperX