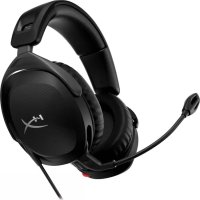
Cloud Alpha Wireless - Headphones HYPERX - Free user manual and instructions
Find the device manual for free Cloud Alpha Wireless HYPERX in PDF.
| Product Type | Wireless gaming headset |
| Brand | HyperX |
| Model | Cloud Alpha Wireless |
| Speakers | Dynamic 50 mm with neodymium magnets |
| Frequency Response | 15 Hz - 21 kHz |
| Impedance | 32 Ω |
| Microphone Type | Detachable microphone with noise reduction |
| Connectivity | Wireless 2.4 GHz (USB adapter), wired 3.5 mm jack |
| Battery Life | Up to 300 hours |
| Charging Time | Approximately 3 hours |
| Charging Port | USB Type-C |
| Functions | Volume control (wheel), microphone mute (button), LED (on/breathing/off) |
| Compatibility | PC, PS4, PS5, Nintendo Switch |
| Weight | Approximately 336 g |
| Material | Aluminum frame |
| Warranty | 2 years |
| Care and Cleaning | Soft dry cloth, do not use harsh products |
| Spare Parts and Repairability | Earpads, cables, adapter, microphone available from HyperX |
| Safety | Use at moderate volume to protect hearing |
Frequently Asked Questions - Cloud Alpha Wireless HYPERX
User questions about Cloud Alpha Wireless HYPERX
0 question about this device. Answer the ones you know or ask your own.
Ask a new question about this device
Download the instructions for your Headphones in PDF format for free! Find your manual Cloud Alpha Wireless - HYPERX and take your electronic device back in hand. On this page are published all the documents necessary for the use of your device. Cloud Alpha Wireless by HYPERX.
USER MANUAL Cloud Alpha Wireless HYPERX
User Manual of Product 1:
FURINNO JAYA Simple Home 3-Tier Adjustable Shelf Bookcase, Black
User Manual of Product 2:
Furinno Pasir 4-Tier Bookcase / Bookshelf / Storage Shelves, Espresso
HyperX Cloud Flight for PS
Quick Start Guide
Overview
text_image
Technical diagram of two types of headsets with labeled parts A through FAlic mute button
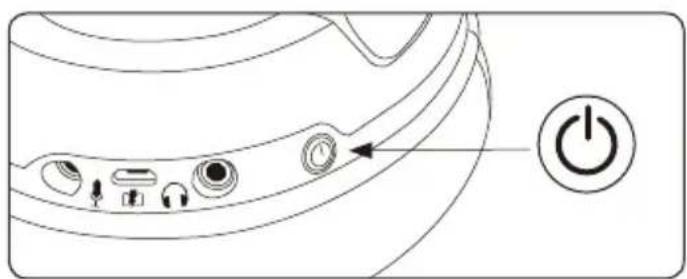
- power button
C analog headphone port
D SB charge port
E Microphone port
Volume wheel
G etachable microphone
H wireless adapter
1 wireless status light
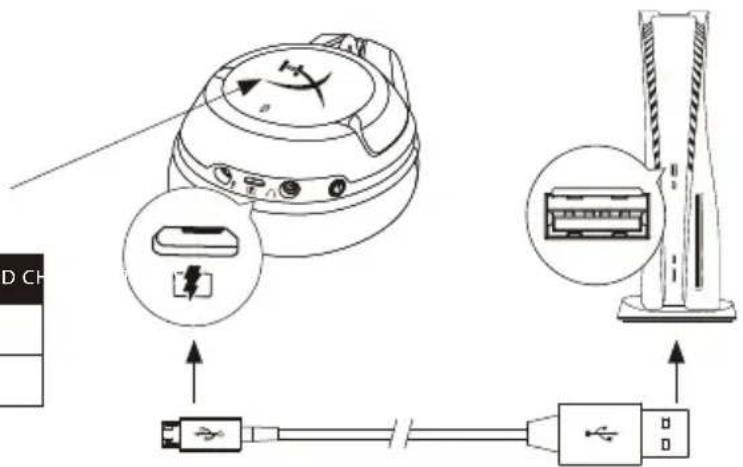
USB charge cable
text_image
Diagram showing three types of USB connectors: connector G, connector H, and connector J, with labeled pins.Usage
Charging
It is recommended to fully charge your headset before first use.
When the charge cable is connected the ear cup LED will indicate the status.
| EAR CUP LED CH | |
| Charging Breathing | |
| Complete Off |
text_image
Diagram showing connections between a device with labeled components and connectors, including a switch and USB cable.Power Button
Power on/off – Hold power button for 3 seconds
LED effect – Short press power button to toggle ear cup LED pattern between on/breathing effect/off
natural_image
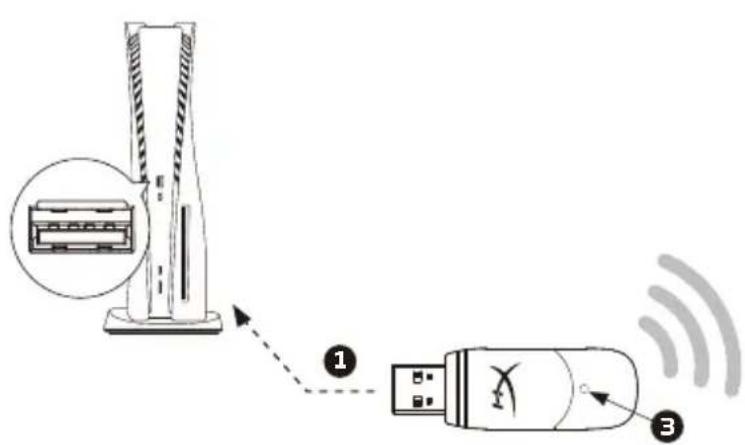
Line drawing of a device rear panel with buttons and an 'Power' button (no text or symbols beyond basic diagram)Use with PS5™ Console
text_image
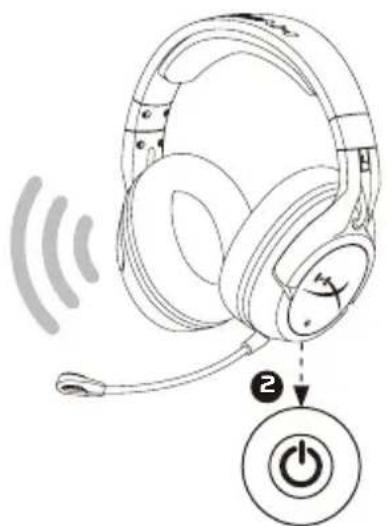
Diagram showing a device with a rack-mounted tower and connected to a USB via wireless signal transmission, labeled with components 1, 2, and 3.- Connect the wireless USB adapter to PS5™. (The wireless status light will blink.)
- Power on the headset.
- When the wireless adapter status light is solid the headset is connected.
text_image
Diagram showing a headset with signal waves and an icon of a power button labeled '2' pointing to it.PlayStation 5 Audio Settings
Settings > Sound
Microphone
Input Device: USB Headset (HyperX Cloud Flight for PS)
Audio Output
Output Device: USB Headset (HyperX Cloud Flight for PS)
Output to headphones: All Audio
Questions or setup issues?
Contact the HyperX support team or see the user manual at: hyperxgaming.com/support/headsets
ENGLISH
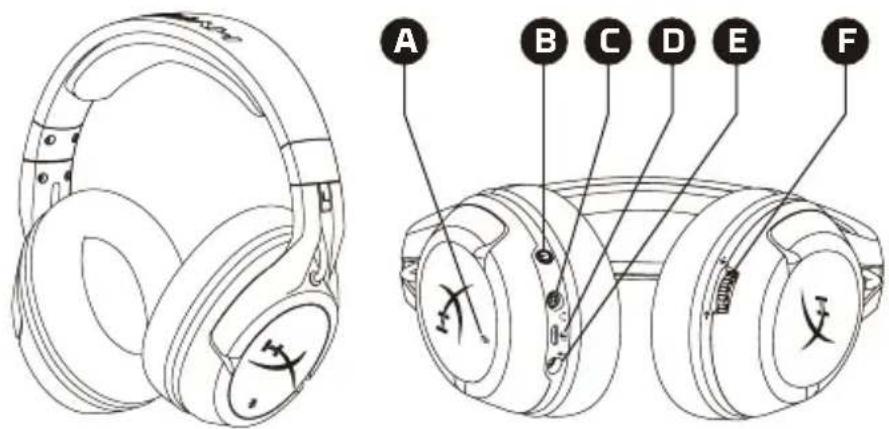
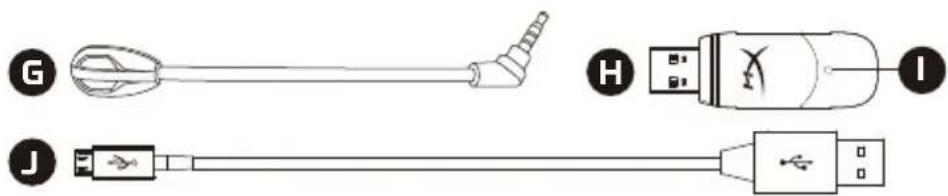
Overview
A - Mic mute button
F - Volume wheel
B - Power button
G - Detachable microphone
C - Analog headphone port
H - Wireless adapter
D - USB charge port
I - Wireless status light
E - Microphone port
J - USB charge cable
Usage
Charging
It is recommended to fully charge your headset before first use.
When the charge cable is connected the ear cup LED will indicate the status.
Power on/off - Hold power button for 3 seconds
LED effect – Short press power button to toggle ear cup LED pattern between on/breathing effect/off
Use with PS5 ^TM Console
- Connect the wireless USB adapter to PS5. (The wireless status light will blink.)
- Power on the headset.
- When the wireless adapter status light is solid the headset is
connected.
PlayStation 5 Audio Settings
Settings > Sound
Microphone
Input Device: USB Headset (HyperX Cloud Flight for PS)
Audio Output
Output Device: USB Headset (HyperX Cloud Flight for PS)
Output to headphones: All Audio
Questions or setup issues?
Contact the HyperX support team or see the user manual at: hyperxgaming.com/support/headsets
FRANÇAIS
Présentation
H - Wireless-Adapter
hyperxgaming.com/support/headsets
ESPAÑOL
Resumen
hyperxgaming.com/support/headsets
繁體中文
概觀
hyperxgaming.com/support/headsets
简体中文
概览
A-麦克风静音按钮
F - 音量滚轮
B - 电源按钮
G - 可拆卸麦克风
C - 模拟耳机端口
H - 无线适配器
D - USB 充电端口
I- 无线状态指示灯
E·麦克风端口
J-USB充电线
使用
充电
第一次使用之前,建议将耳机电量充满。
hyperxgaming.com/support/headsets
日本語
各部紹介
A マイクミュートボタン
F-音量調整ホイール
B - 電源ボタン
G-取り外し可能なマイク
C-アナログヘッドホンポート
H-ワイヤレスアダプター
D - USB 充電ポート
Ⅰ-ワイヤレスステータスライト
E-マイクポート
J-USB 充電ケーブル
使用方法
充電中
설명서를 참조하십시오: hyperxgaming.com/support/headsets
Simplified Declaration of Conformity
Hereby, HP declares that the radio equipment is in compliance with Directive 2014/53/EU. The full text of the EU Declaration of Conformity is available at the following internet address: www.hp.eu/certificates (search with Model Name) UK only: Hereby, HP declares that the radio equipment is in compliance with the relevant statutory requirements. The full text of the declaration of conformity is available at the following internet address: www.hp.eu/certificates (search with Model Name)
Battery/TX Power Info
Battery Information
Contains 3.7 V, 1500 mAh Li-ion Battery, 5.55Wh
Cannot be replaced by user
Frequency & TX Power Information
Frequency Bands: 2.4GHz (TX Power 1.5dBm ≤ TX ≤ 3.5dBm)
FCC Compliance and Advisory Statement
This device complies with Part 15 of the FCC rules. Operation is subject to the following two conditions: (1) this device may not cause harmful interference, and (2) this device must accept any interference received, including interference that may cause undesired operation.
This equipment has been tested and found to comply with the limits for a Class B digital device, according to Part 15 of the FCC rules. These limits are designed to provide reasonable protection against harmful interference in a residential installation.
This equipment generates, uses and can radiate radio frequency energy and if not installed and used in accordance with the instructions, may cause harmful interference to radio communications. However, there is no guarantee that interference will not occur in a particular installation. If this equipment does cause harmful interference to radio or television reception, which can be determined by turning the equipment off and on, the users encouraged to try correct the interference by one or more of the following measures:
-
Reorient the receiving antenna.
-
Increase the separation between the equipment and receiver.
-
Connect the equipment into and outlet on a circuit different from that to which the receiver is connected.
-
Consult the dealer or an experienced radio/TV technician for help.
Any special accessories needed for compliance must be specified in the instruction manual.
Warning: A shielded-type power cord is required in order to meet FCC emission limits and also to prevent interference to the nearby radio and television
reception. It is essential that only the supplied power cord be used. Use only shielded cables to connect I/O devices to this equipment.
CAUTION: Any changes or modifications not expressly approved by the party
responsible for compliance could void your authority to operate the equipment.
FCC ID: B94-CF001
Canada Notices
This Class B digital apparatus complies with Canadian ICES-003.
Avis Canadian
This device contains licence-exempt transmitter(s) that comply with Innovation, Science and Economic Development Canada's licence-exempt RSS(s). Operation is subject to the following two conditions:
(1) this device may not cause interference,
(2) this device must accept any interference, including interference that may cause undesired operation of the device.
Taiwan NCC Statement
Turkey WEEE Statement
India RoHS Statement
This product, as well as its related consumables and spares, complies with the reduction in hazardous substances provisions of the "India E-waste (Management and Handling) Rule 2016." It does not contain lead, mercury, hexavalent chromium, polybrominated biphenyls or polybrominated diphenyl ethers in concentrations exceeding 0.1 weight % and 0.01 weight % for cadmium, except for where allowed pursuant to the exemptions set in Schedule 2 of the Rule.
IFETEL Statement
Brazil ANATEL statement (Resolution 680)
Complies with IMDA Standards DB106008


Find the language and latest documentation for your HyperX QuadCast S here.
HyperX QuadCast S Installation Guide
For instructions in English
Para instrucciones en Español
Für Anleitungen in Deutsch
Pour des instructions en Français
...... Per le istruzioni in Italiano
Por as instruções em Português
Instrukcje w języku Polskim
Для инструкции на Русском
Turkce talimatlar icin
日本語マニュアル用
한국어 안내
......คำแนะนำภาษาไทย
Đế xem hướng dẫn bằng tiếng Việt
Simplified Chinese ..... 简体中文说明书
Traditional Chinese ....繁體中文說明
natural_image
Black HYPER audio recording device with hexagonal grid effect and red/magenta/magenta tones (no text or symbols on body)Part Numbers
HMIQ1S-XX-RG/G
TABLE OF CONTENTS
Overview....3
Specifications....4
Microphone Controls....5
Using with PC or Mac 7
Using with PS4 ^TM 12
Connecting Headphones....13
Controlling Microphone Monitoring....14
Installing the Mount Adapter 16
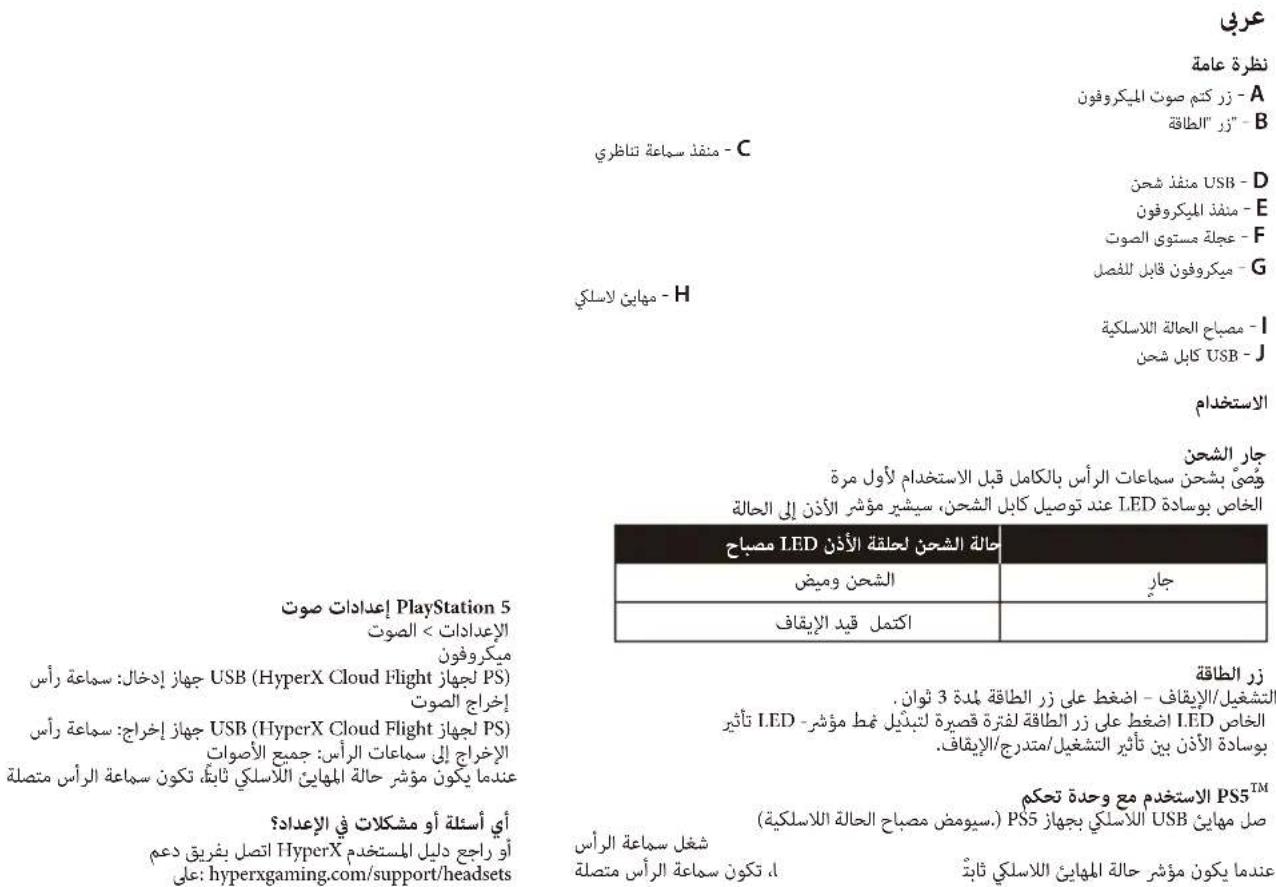
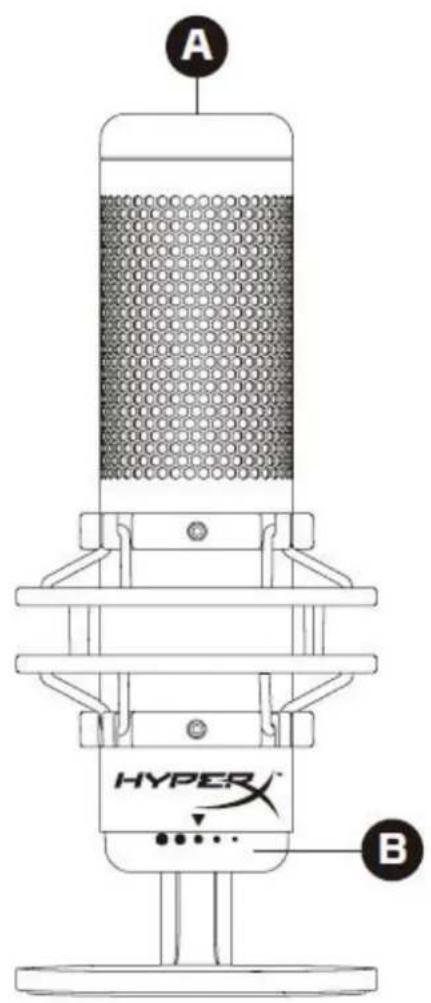
Overview
text_image
A HYPER B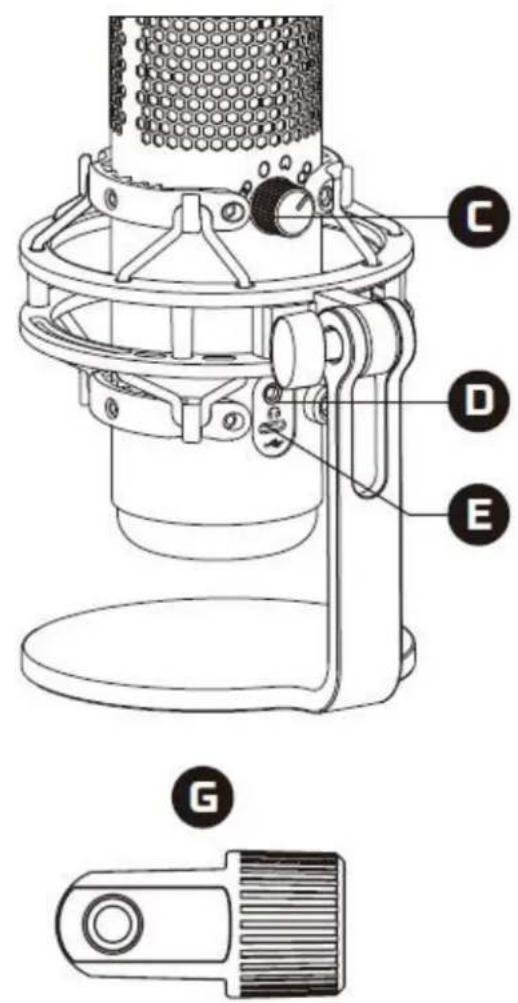
text_image
Technical diagram of a desktop microphone with labeled parts including head, neck, and base components
natural_image
Pure electrical circuit lines without any symbolsA. Tap-to-mute sensor
B. Gain control knob
C. Polar pattern knob
D. Headphone jack
E. USB-C port
F. USB cable
G. Mount adapter*
*Supports both 3/8" and 5/8" thread sizes
Specifications
Microphone
Power consumption: 5V 220mA (white light)
Sample/bit rate: 48kHz/16-bit
Element: Electret condenser microphone
Condenser type: Three 14mm condensers
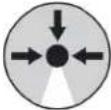
Polar patterns: Stereo, Omnidirectional, Cardioid, Bidirectional
Frequency response: 20Hz - 20kHz
Sensitivity: -36dB (1V/Pa at 1kHz)
Cable length: 3m
Weight:
- Microphone: 254g
- Shock mount and stand: 360g
• Total with USB cable: 710g
Headphone Output
Impedance: 32 Ω
Frequency response: 20Hz - 20kHz
Maximum power output: 7mW
THD: ≤ 0.05% (1kHz/0dBFS)
SNR: ≥ 90dB (1kHz, RL=∞)
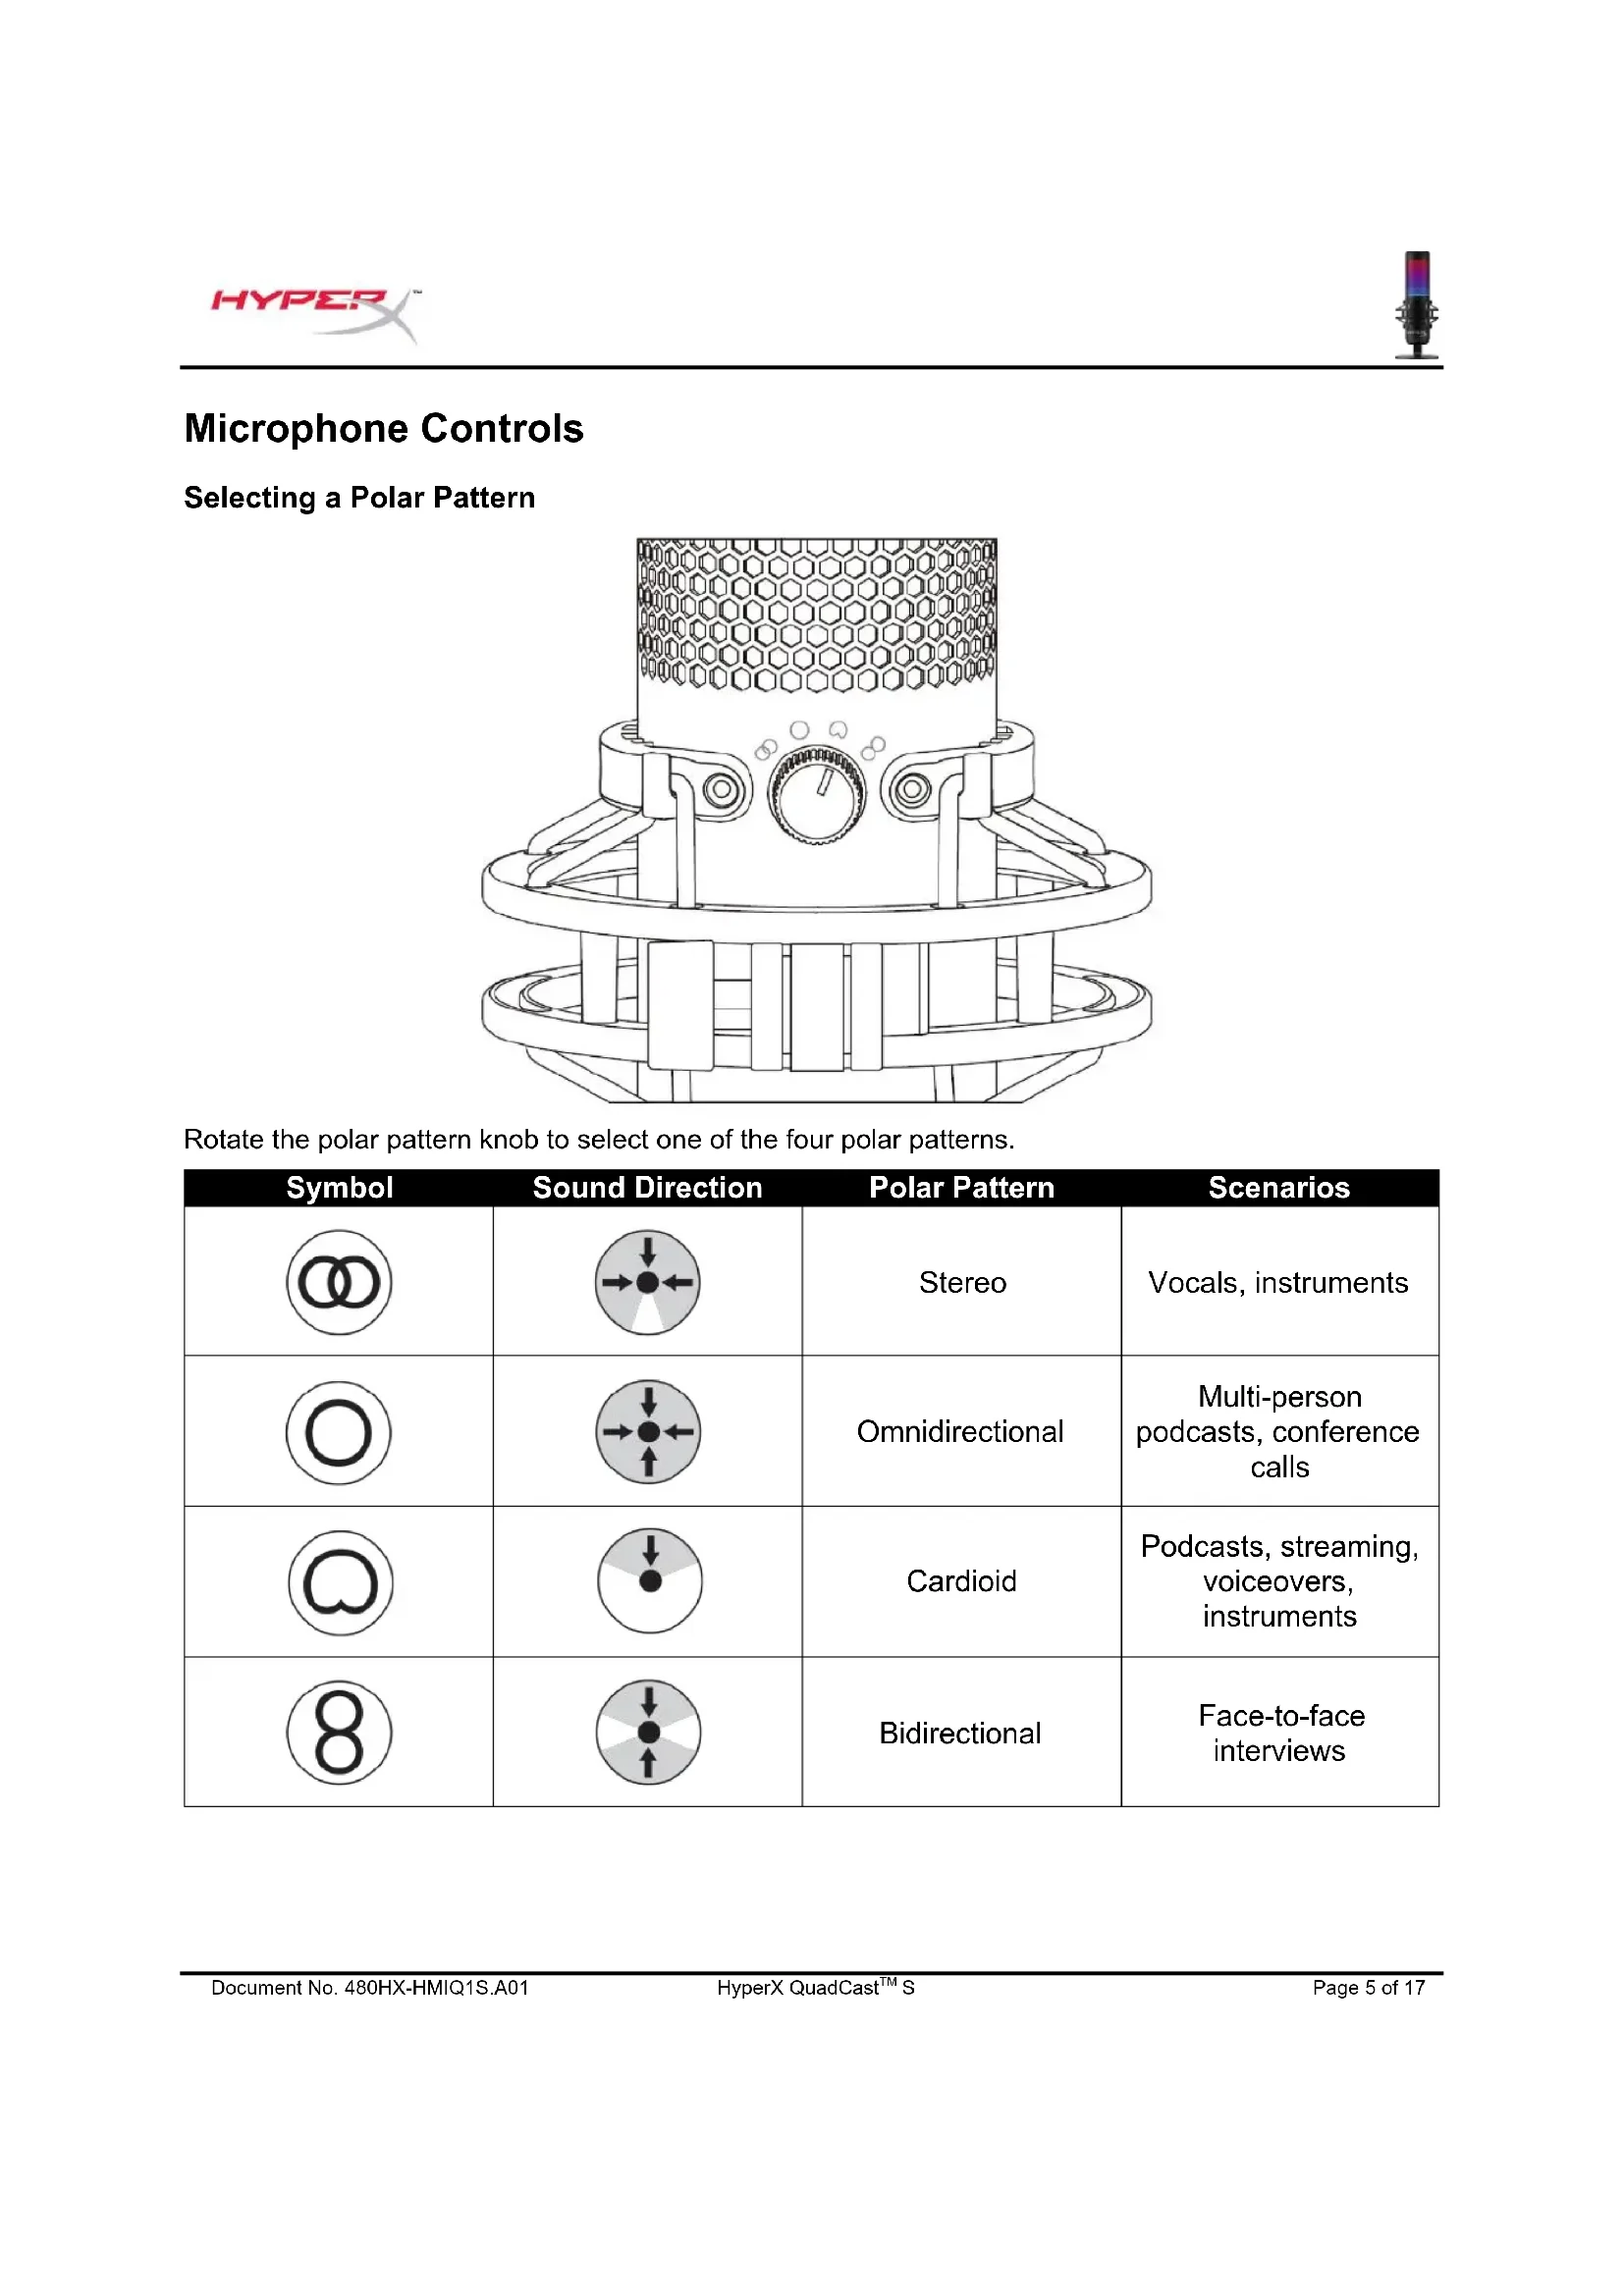
Microphone Controls
Selecting a Polar Pattern
natural_image
Technical line drawing of a mechanical device with hexagonal grid pattern and control knob (no text or symbols)Rotate the polar pattern knob to select one of the four polar patterns.
| Symbol | Sound Direction | Polar Pattern | Scenarios |
 |  | Stereo | Vocals, instruments |
 | 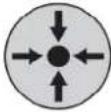 | Omnidirectional | Multi-person podcasts, conference calls |
 | 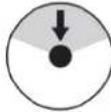 | Cardioid | Podcasts, streaming, voiceovers, instruments |
 | 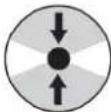 | Bidirectional | Face-to-face interviews |
Adjusting Gain Control
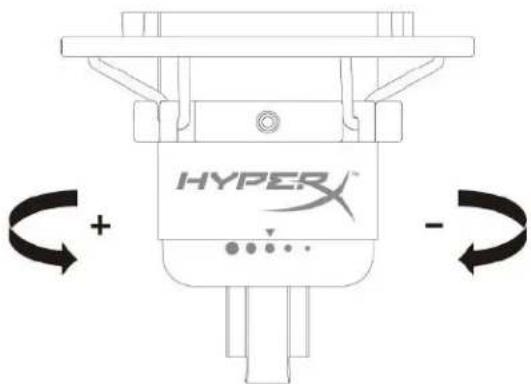
text_image
HYPER + -Rotate the gain control knob to adjust the gain of the microphone.
Muting the Microphone
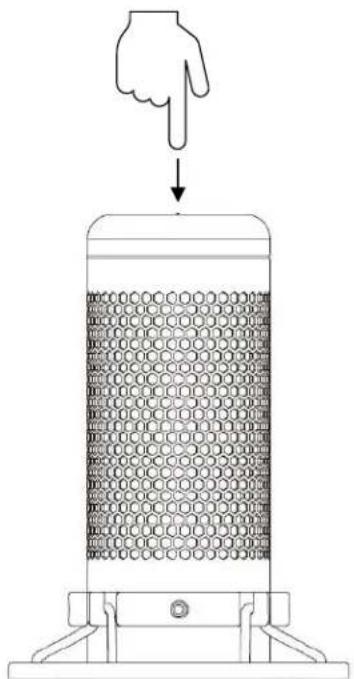
natural_image
Diagram of a hand pointing downward to a cylindrical container filled with hexagonal patterns, no text or symbols presentTap the top of the microphone to mute/unmute the microphone. The microphone LED will indicate the current mute status of the microphone.*
| Microphone LED | Mute Status |
| RGB | Mute off |
| Off | Mute on |
*LED behavior can be reversed and customized with HyperX NGENUITY software
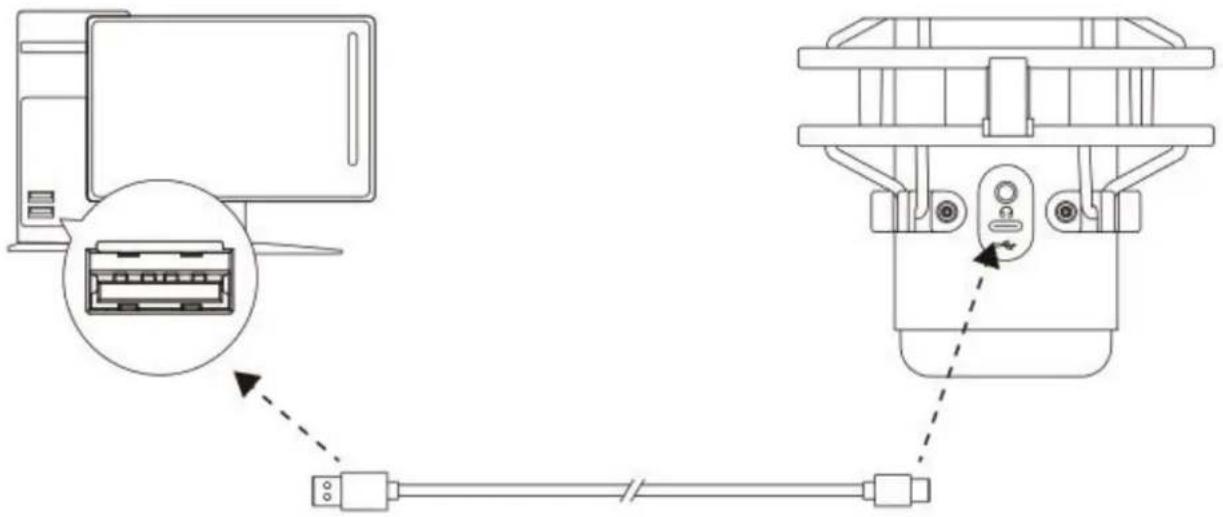
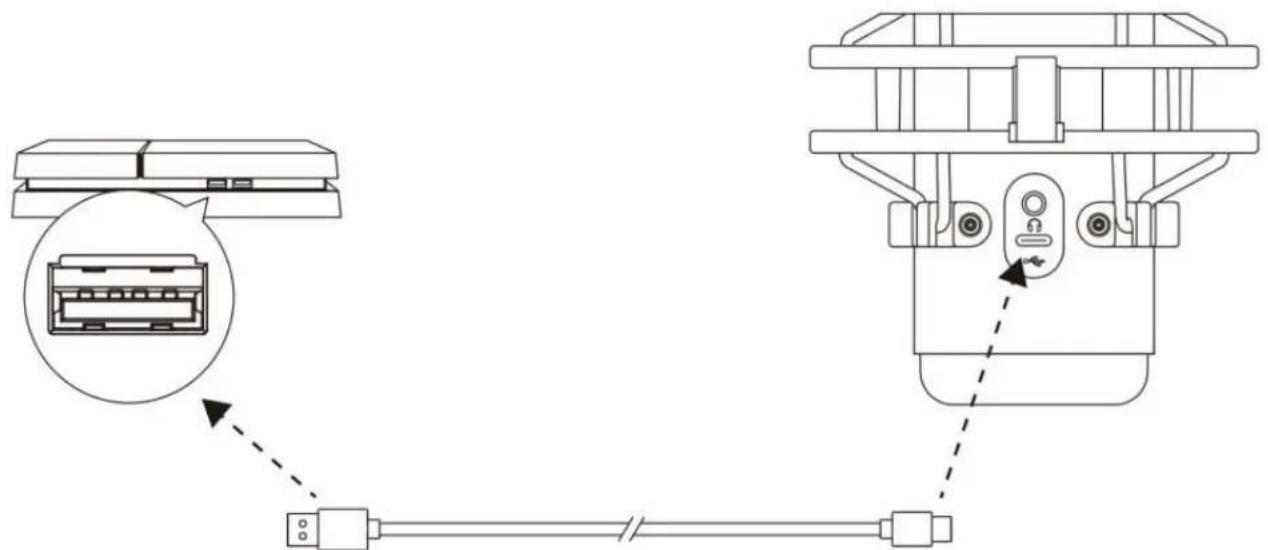
Using with PC or Mac
text_image
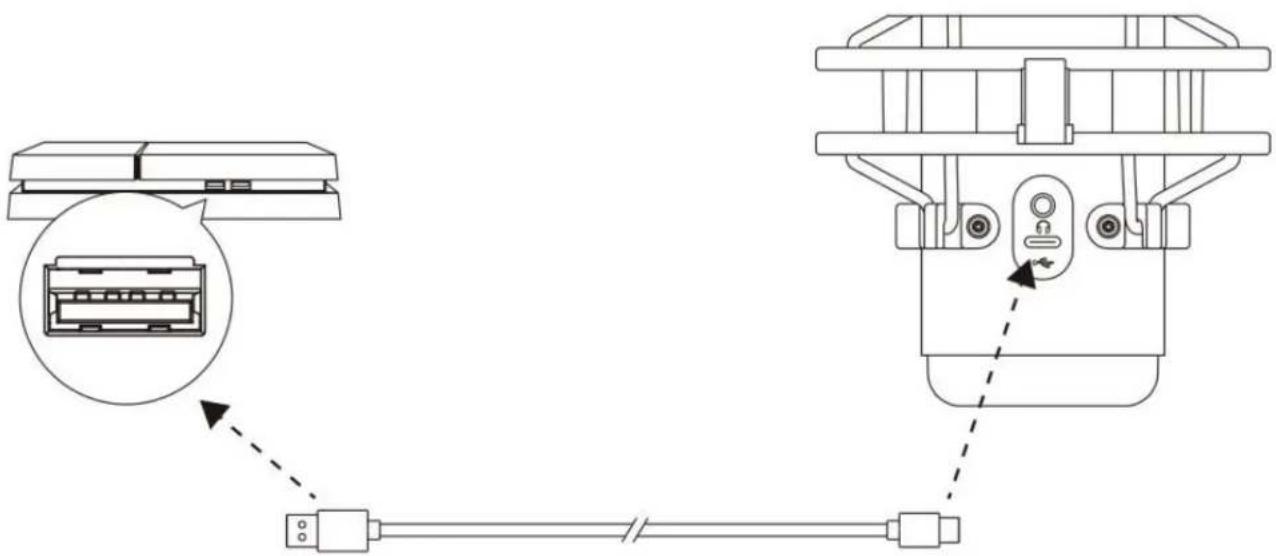
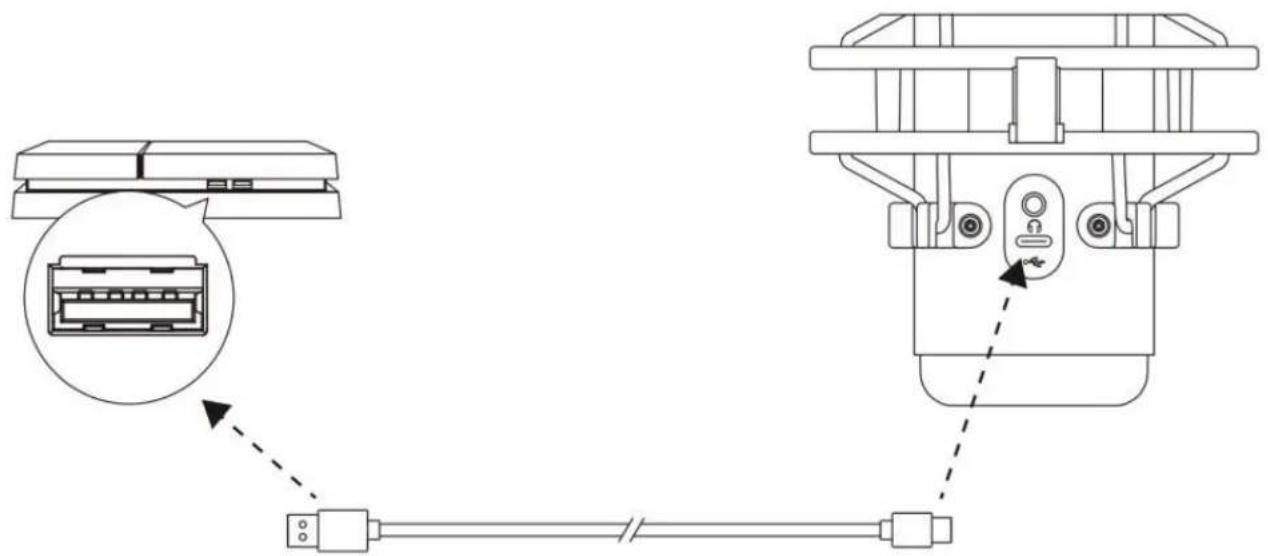
Technical diagram showing connection between a computer and a device with labeled ports and cable routingConnect the microphone to a USB port on the PC or Mac with the included USB cable.
Windows
To ensure the microphone is configured correctly on the PC, follow the steps below:
- Right-click on the sound icon in the system tray and select Open Sound Settings.

text_image
Open Sound settings Open Volume mixer Spatial sound (Off) Sounds Troubleshoot sound problems2. Select Sound Control Panel

text_image
Settings Home Find a setting System Display Sound Notifications & actions Focus assist Power & sleep Storage Tablet Multitasking Projecting to this PC Shared experiences Clipboard Remote Desktop About Sound Output Choose your output device Speakers (HyperX QuadCast S) Certain apps may be set up to use different sound devices than the one selected here. Customize app volumes and devices in advanced sound options. Device properties Master volume 54 Troubleshoot Manage sound devices Input Choose your input device Microphone (HyperX QuadCast S) Certain apps may be set up to use different sound devices than the one selected here. Customize app volumes and devices in advanced sound options. Device properties Test your microphone Troubleshoot Manage sound devices Advanced sound options Related Settings Bluetooth and other devices Sound Control Panel Microphone privacy settings Ease of Access audio settings Help from the web Fixing sound problems Setting up a microphone Get help Give feedback-
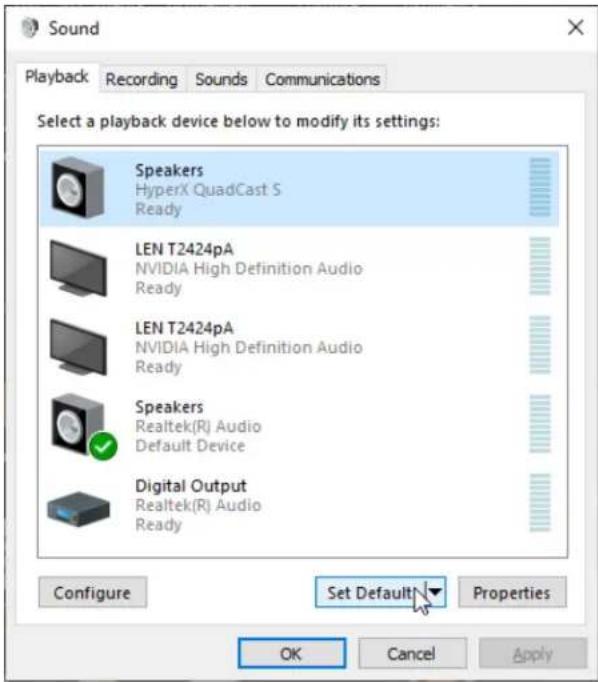
On the Playback tab, select Speakers HyperX QuadCast S and click on the Set Default button.
-
On the Recording tab, select Microphone HyperX QuadCast S and click on the Set Default button.
text_image
Sound Playback Recording Sounds Communications Select a playback device below to modify its settings: Speakers HyperX QuadCast S Ready LEN T2424pA NVIDIA High Definition Audio Ready LEN T2424pA NVIDIA High Definition Audio Ready Speakers Realtek(R) Audio Default Device Digital Output Realtek(R) Audio Ready Configure Set Default Properties OK Cancel Apply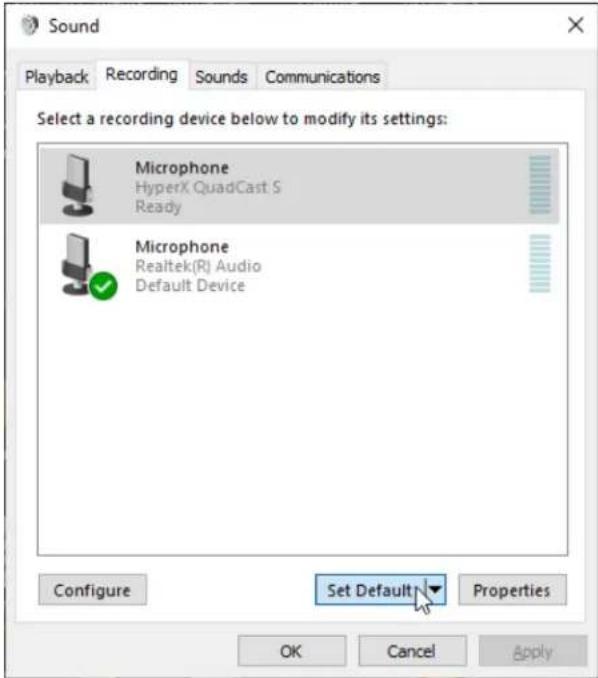
text_image
Sound Playback Recording Sounds Communications Select a recording device below to modify its settings: Microphone HyperX QuadCast S Ready Microphone Realtek(R) Audio Default Device Configure Set Default Properties OK Cancel ApplymacOS
To ensure the microphone is configured correctly on the macOS, follow the steps below:
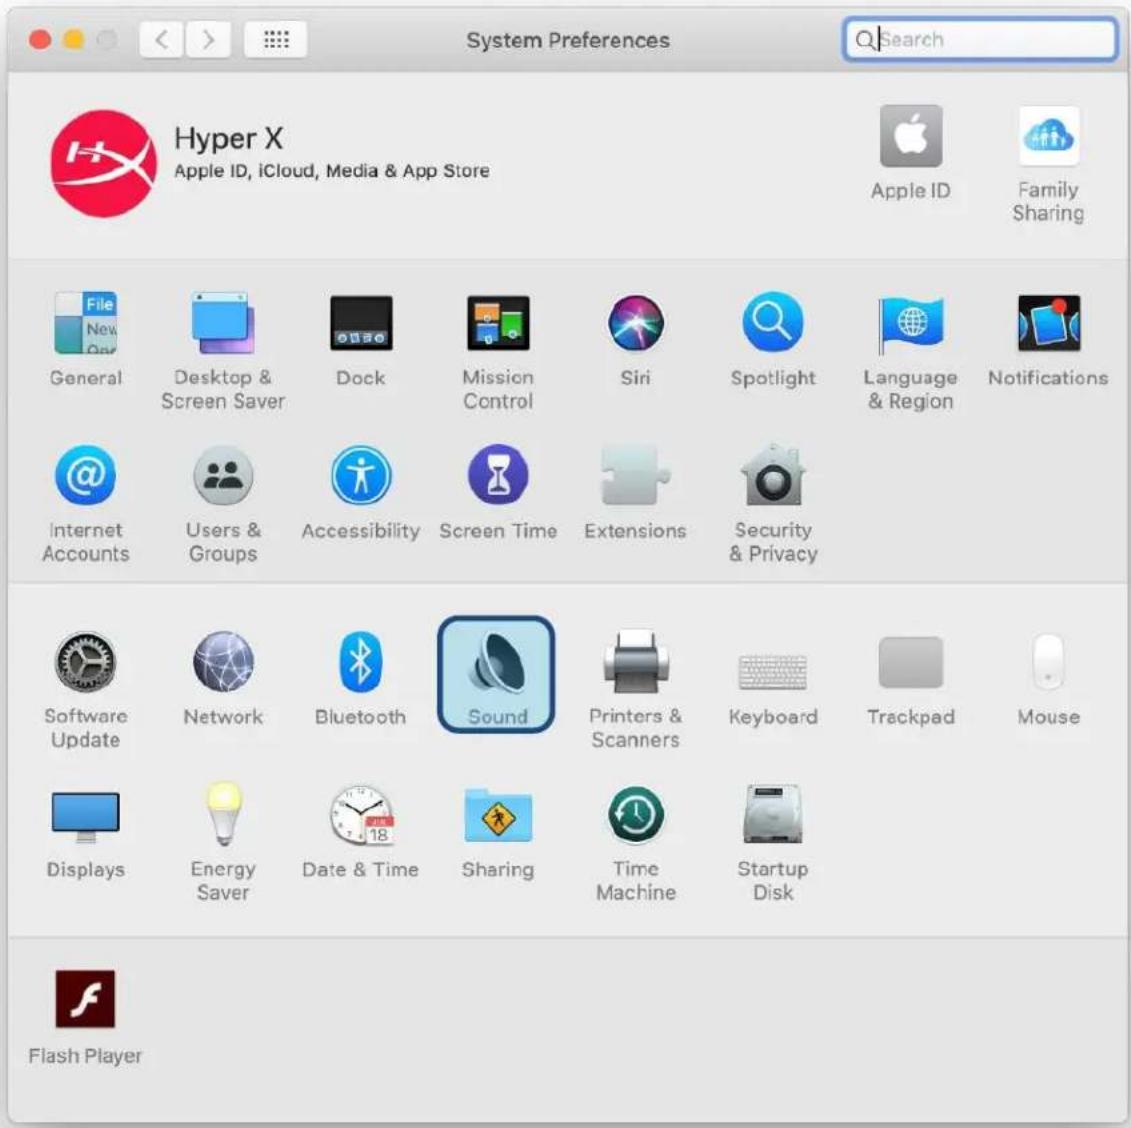
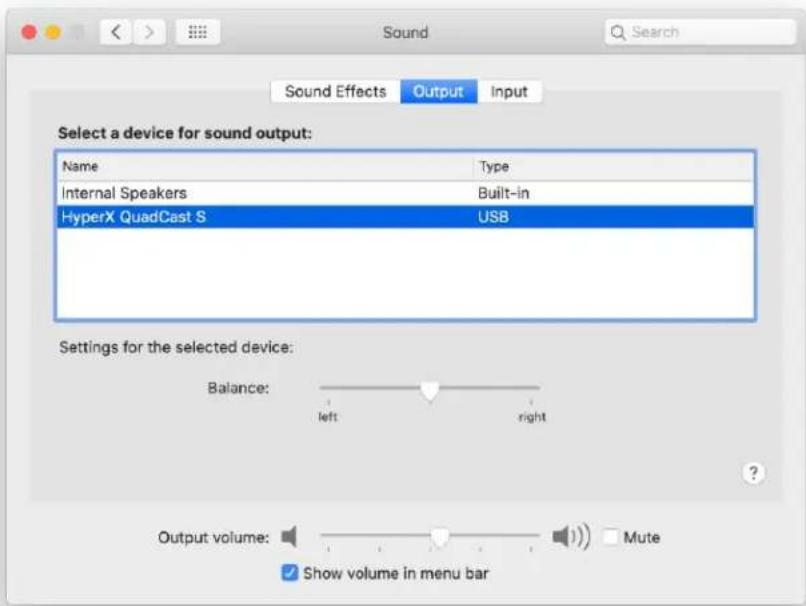
- Open System Preferences and select Sound.
text_image
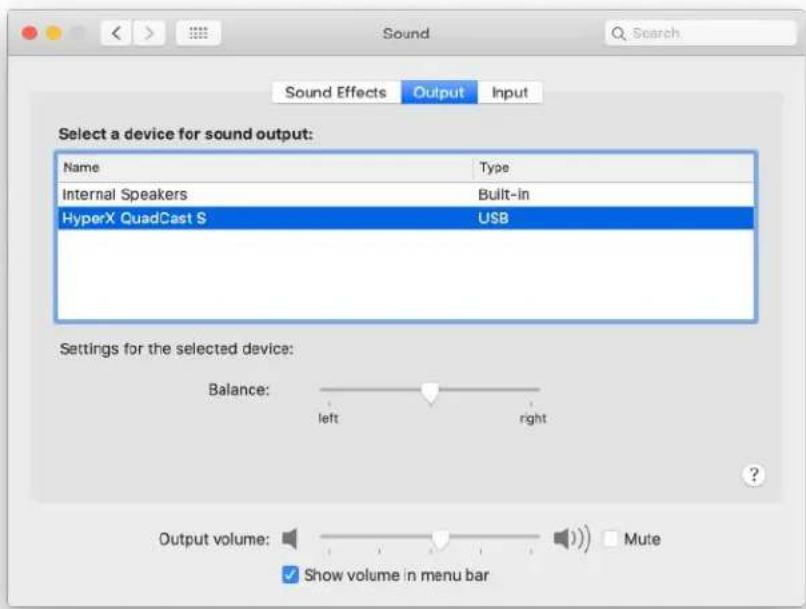
System Preferences Hyper X Apple ID, iCloud, Media & App Store Apple ID Family Sharing General Desktop & Screen Saver Dock Mission Control Siri Spotlight Language & Region Notifications Internet Accounts Users & Groups Accessibility Screen Time Extensions Security & Privacy Software Update Network Bluetooth Sound Printers & Scanners Keyboard Trackpad Mouse Displays Energy Saver Date & Time Sharing Time Machine Startup Disk Flash Player2. On the Output tab, select HyperX QuadCast S
text_image
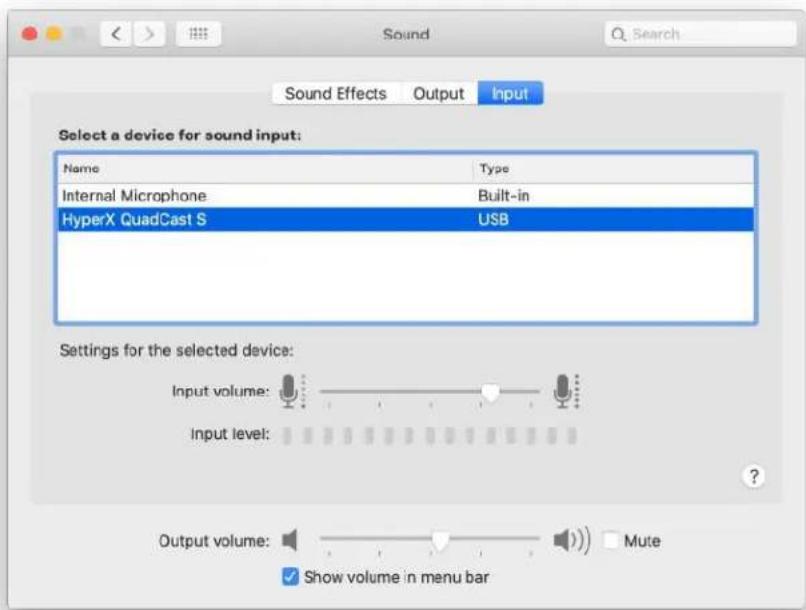
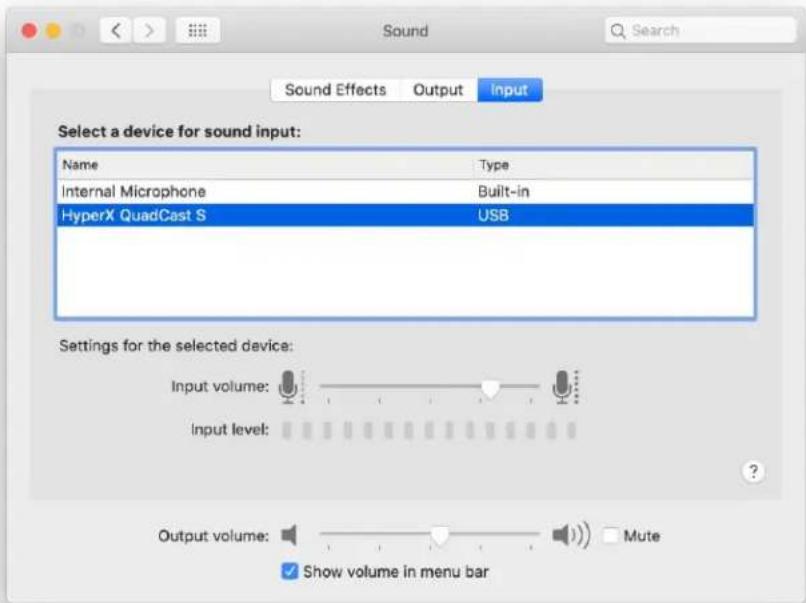
Sound Sound Effects Output Input Select a device for sound output: Name Type Internal Speakers Built-in HyperX QuadCast S USB Settings for the selected device: Balance: left right Output volume: Show volume in menu bar Mute3. On the Input tab, select HyperX QuadCast S
text_image
Sound Sound Effects Output Input Select a device for sound input: Name Type Internal Microphone Built-in HyperX QuadCast S USB Settings for the selected device: Input volume: Input level: Output volume: Mute Show volume in menu barUsing with PS4™
natural_image
Technical diagram showing a connector assembly with an inset image of a device (no text or symbols present)Connect the microphone to a USB port on the PS4 with the included USB cable.
To ensure the microphone is configured with the most optimal settings on the PS4, follow the steps below:
- From the PS4 main menu, go to Settings > Devices > Audio Devices
- Set Input Device to USB Headset (HyperX QuadCast S)
- Set Output Device to USB Headset (HyperX QuadCast S)
- Set Output to Headphones to All Audio
- Set Volume Control (Headphones) to desired volume.
Audio Devices

Input Device
USB Headset (HyperX QuadCast S)

Output Device
USB Headset (HyperX QuadCast S)

Adjust Microphone Level

Volume Control (Headphones)

←

Output to Headphones
All Audio

Switch Output Device Automatically

Connecting Headphones

natural_image
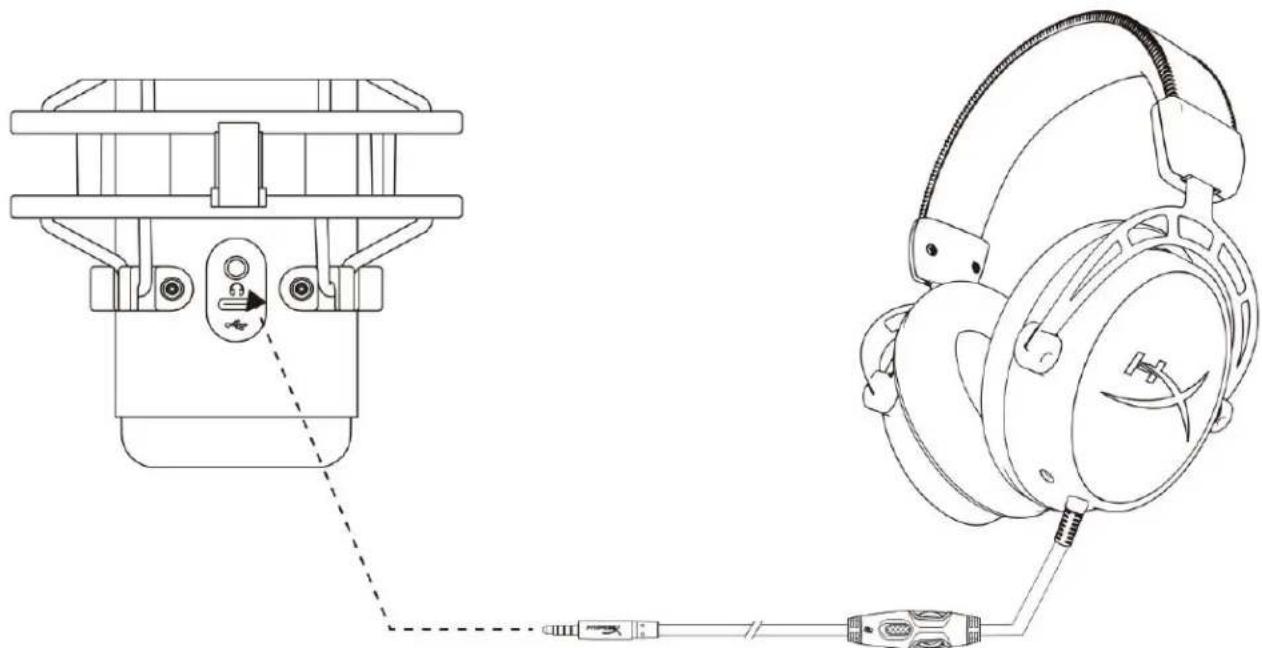
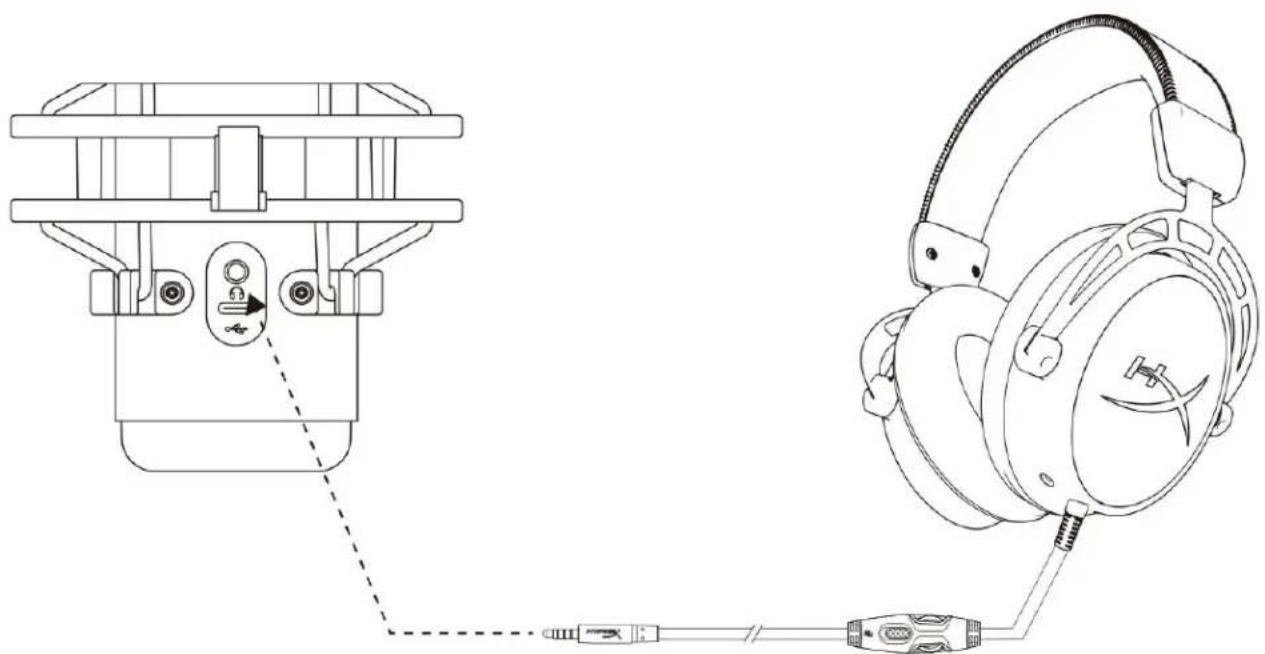
Technical line drawing of a headset assembly showing front and side views with connector details (no text or symbols)Connect headphones to the headphone jack on the microphone for microphone monitoring and playback audio.
Controlling Microphone Monitoring
PC
-
From the Sound control panel, on the Playback tab, right-click on Speakers HyperX QuadCast S and select Properties.
-
On the Levels tab, adjust the Microphone volume slider to adjust the level of microphone monitoring.

text_image
Sound Playback Recording Sounds Communications Select a playback device below to modify its settings: Speakers HyperX QuadCast S Default Device Configure Speakers Test Disable Show Disabled Devices Show Disconnected Devices About Software MIDI Synthesizer Properties Digital Output Realtek(R) Audio Ready Configure Set Default Properties OK Cancel Apply Speakers Properties General Levels Enhancements Advanced Spatial sound Speakers 53 Balance Microphone 70 Balance OK Cancel ApplymacOS
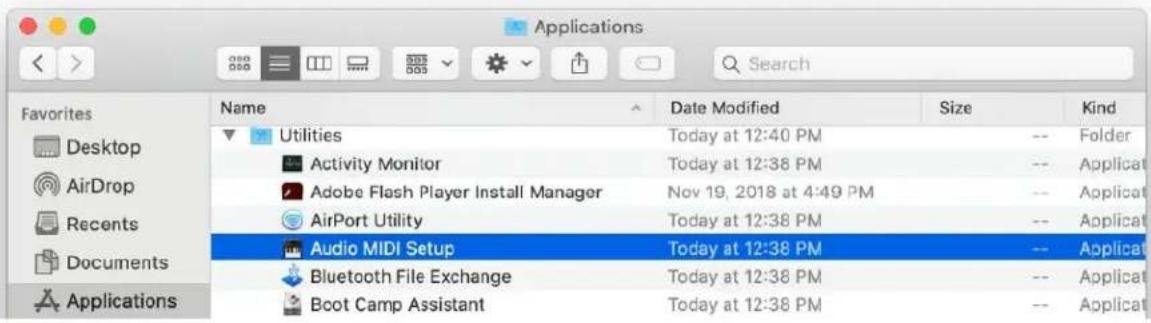
- Open the Finder app and go to Applications > Utilities > Audio MIDI Setup
text_image
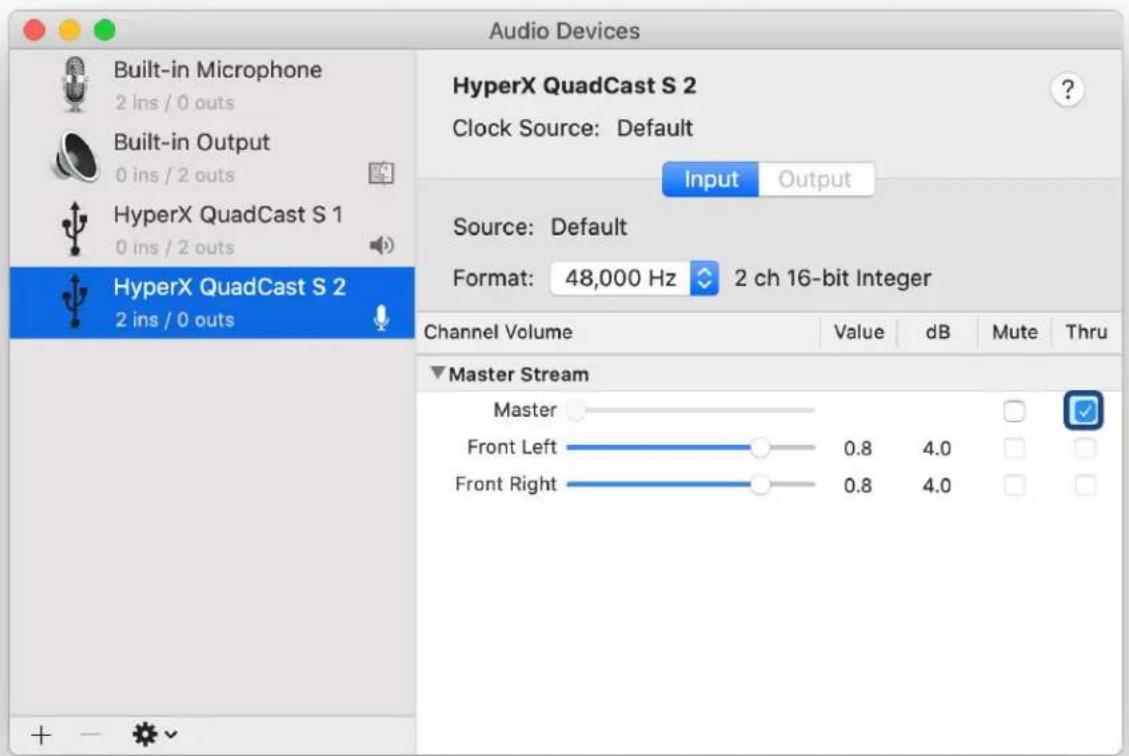
Applications Favorites Desktop AirDrop Recents Documents Applications Name Utilities Activity Monitor Adobe Flash Player Install Manager AirPort Utility Audio MIDI Setup Bluetooth File Exchange Boot Camp Assistant Date Modified Today at 12:40 PM Today at 12:38 PM Nov 19, 2018 at 4:49 PM Today at 12:38 PM Today at 12:38 PM Size -- Folder -- Applicat -- Applicat -- Applicat- Click on HyperX QuadCast S 2 and click on the checkbox under the Thru column to toggle microphone monitoring on or off.
text_image
Audio Devices Built-in Microphone 2 ins / 0 outs Built-in Output 0 ins / 2 outs HyperX QuadCast S 1 0 ins / 2 outs HyperX QuadCast S 2 2 ins / 0 outs HyperX QuadCast S 2 Clock Source: Default Input Output Source: Default Format: 48,000 Hz 2 ch 16-bit Integer Channel Volume Value dB Mute Thru Master Stream Master Front Left 0.8 4.0 Front Right 0.8 4.0PS4
Microphone monitoring level cannot be directly controlled on PS4.
Installing the Mount Adapter
- Secure the included mount adapter onto a microphone boom arm. The mount adapter supports 3/8" and 5/8" thread sizes.
- Remove both the thumb screw and nut from the microphone stand.
- Remove the microphone stand from the microphone.
- Align the mount adapter with the microphone mount holes and secure the adapter with the thumb screw and nut.
HyperX NGENUITY Software
To customize lighting, download the HyperX NGENUITY software at: hyperxgaming.com/ngenuity
Questions or Setup Issues
Contact the HyperX support team at: hyperxgaming.com/support/microphones
HyperX QuadCast™ S
natural_image
Black HYPER audio recording device with hexagonal grid effect and 'Hyper' branding (no text-heavy elements)text_image
Technical diagram of a microphone with labeled parts (A, B, C, D, E) and a separate view of the internal structure.
natural_image
Pure electrical circuit lines without any symbolsSNR: ≥ 90 dB (1 kHz, RL=∞)
natural_image
Technical line drawing of a mechanical component with hexagonal lattice structure and control knob (no text or symbols)natural_image
Diagram of a hand pointing downward to a cylindrical device with hexagonal pattern (no text or symbols)text_image
Technical diagram showing connection between a computer monitor and a device with labeled ports and cable routingtext_image
Open Sound settings Open Volume mixer Spatial sound (Off) Sounds Troubleshoot sound problemstext_image
Settings Home Find a setting System Display Sound Notifications & actions Focus assist Power & sleep Storage Tablet Multitasking Projecting to this PC Shared experiences Clipboard Remote Desktop About Sound Output Choose your output device Speakers (HyperX QuadCast S) Certain apps may be set up to use different sound devices than the one selected here. Customize app volumes and devices in advanced sound options. Device properties Master volume 54 Troublashoot Manage sound devices Input Choose your input device Microphone (HyperX QuadCast S) Certain apps may be set up to use different sound devices than the one selected here. Customize app volumes and devices in advanced sound options. Device properties Test your microphone Troublashoot Manage sound devices Advanced sound options Related Settings Bluetooth and other devices Sound Control Panel Microphone privacy settings Ease of Access audio settings Help from the web Fixing sound problems Setting up a microphone Get help Give feedbacktext_image
Sound Playback Recording Sounds Communications Select a playback device below to modify its settings: Speakers HyperX QuadCast S Ready LEN T2424pA NVIDIA High Definition Audio Ready LEN T2424pA NVIDIA High Definition Audio Ready Speakers Realtek(R) Audio Default Device Digital Output Realtek(R) Audio Ready Configure Set Default Properties OK Cancel Apply
text_image
Sound Playback Recording Sounds Communications Select a recording device below to modify its settings: Microphone HyperX QuadCast S Ready Microphone Realtek(R) Audio Default Device Set Default Configure Set Default Properties OK Cancel ApplymacOS
text_image
System Preferences Hyper X Apple ID, iCloud, Media & App Store Apple ID Family Sharing General Desktop & Screen Saver Dock Mission Control Siri Spotlight Language & Region Notifications Internet Accounts Users & Groups Accessibility Screen Time Extensions Security & Privacy Software Update Network Bluetooth Sound Printers & Scanners Keyboard Trackpad Mouse Displays Energy Saver Date & Time Sharing Time Machine Startup Disk Flash Playertext_image
Sound Sound Effects Output Input Select a device for sound output: Name Type Internal Speakers Built-in HyperX QuadCast S USB Settings for the selected device: Balance: left right Output volume: Mute Show volume in menu bartext_image
Sound Sound Effects Output Input Select a device for sound input: Name Type Internal Microphone Built-in HyperX QuadCast S USB Settings for the selected device: Input volume: input level: Output volume: Mute Show volume in menu barUso con PS4™

natural_image
Technical diagram showing two connected electrical connectors with a close-up inset of the connector (no text or symbols)text_image
Audio Devices Input Device USB Headset (HyperX QuadCast S) Output Device USB Headset (HyperX QuadCast S) Adjust Microphone Level Volume Control (Headphones) All Audio Output to Headphones Switch Output Device Automaticallynatural_image
Technical line drawing of a mechanical device with attached ear and connector (no text or symbols)text_image
Sound Playback Recording Sounds Communications Select a playback device below to modify its settings: Speakers HyperX QuadCast S Default Device Configure Speakers Test Disable Show Disabled Devices Show Disconnected Devices About Software MIDI Synthesizer Properties Digital Output Realtek(R) Audio Ready Configure Set Default Properties OK Cancel Apply Speakers Properties General Levels Enhancements Advanced Spatial sound Speakers 53 Balance Microphone 70 Balance OK Cancel ApplymacOS
text_image
Applications Favorites Desktop AirDrop Recents Documents Applications Name Utilities Activity Monitor Adobe Flash Player Install Manager AirPort Utility Audio MIDI Setup Bluetooth File Exchange Boot Camp Assistant Date Modified Today at 12:40 PM Today at 12:38 PM Nov 19, 2018 at 4:49 PM Today at 12:38 PM Today at 12:38 PM Size -- Folder -- Applicat -- Applicat -- Applicattext_image
Audio Devices Built-in Microphone 2 ins / 0 outs Built-in Output 0 ins / 2 outs HyperX QuadCast S 1 0 ins / 2 outs HyperX QuadCast S 2 2 ins / 0 outs HyperX QuadCast S 2 Clock Source: Default Input Output Source: Default Format: 48,000 Hz 2 ch 16-bit Integer Channel Volume Value dB Mute Thru Master Stream Master Front Left 0.8 4.0 Front Right 0.8 4.0PS4
natural_image
Black HYPER audio recording device with hexagonal grid effect and 'Hyper' branding (no text-heavy elements)Artikelnummern
HMIQ1S-XX-RG/G
INHALTSVERZEICHNIS
Überblick 3
Spezifikationen 4
Mikrofonsteuerung 5
text_image
Technical diagram of a desktop microphone with labeled parts (A, B, C, D, E, G) and internal components.
natural_image
Pure electrical circuit lines without any symbolsSample-/Bitrate: 48kHz/16-bit
Element: Elektrolytkondensatormikrofon
Kondensator: Drei 14-mm-Kondensatoren
Richtcharakteristiken: stereo, omnidirektional, kardioid, bidirektional
natural_image
Technical line drawing of a mechanical device with hexagonal grid pattern and control knob (no text or symbols)natural_image
Diagram of a hand pointing downward to a cylindrical device with hexagonal pattern (no text or symbols)text_image
Technical diagram showing connection between a computer monitor and a device with labeled ports and wiring, including an inset image of the device's internal structure.text_image
Open Sound settings Open Volume mixer Spatial sound (Off) Sounds Troubleshoot sound problemstext_image
Settings Home Find a setting System Display Sound Notifications & actions Focus assist Power & sleep Storage Tablet Multitasking Projecting to this PC Shared experiences Clipboard Remote Desktop About Sound Output Choose your output device Speakers (HyperX QuadCast S) Certain apps may be set up to use different sound devices than the one selected here. Customize app volumes and devices in advanced sound options. Device properties Master volume 54 Troublashoot Manage sound devices Input Choose your input device Microphone (HyperX QuadCast S) Certain apps may be set up to use different sound devices than the one selected here. Customize app volumes and devices in advanced sound options. Device properties Test your microphone Troublashoot Manage sound devices Advanced sound options Related Settings Bluetooth and other devices Sound Control Panel Microphone privacy settings Ease of Access audio settings Help from the web Fixing sound problems Setting up a microphone Get help Give feedbacktext_image
Sound Playback Recording Sounds Communications Select a playback device below to modify its settings: Speakers HyperX QuadCast S Ready LEN T2424pA NVIDIA High Definition Audio Ready LEN T2424pA NVIDIA High Definition Audio Ready Speakers Realtek(R) Audio Default Device Digital Output Realtek(R) Audio Ready Configure Set Default Properties OK Cancel Apply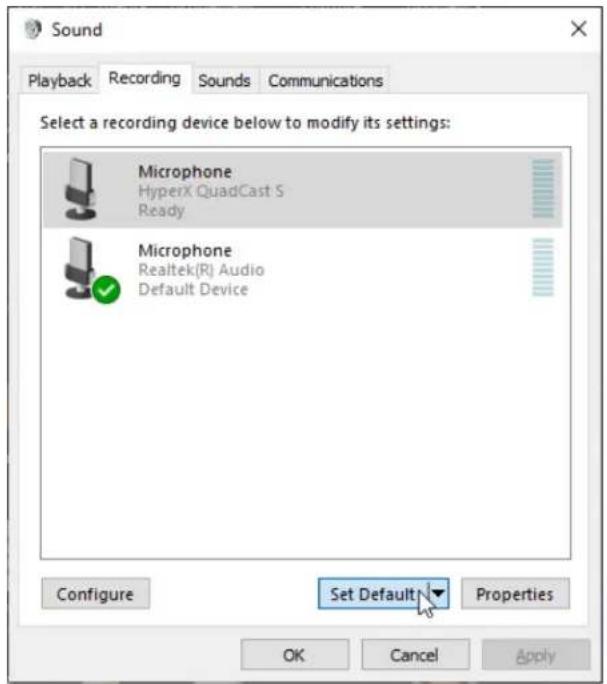
text_image
Sound Playback Recording Sounds Communications Select a recording device below to modify its settings: Microphone HyperX QuadCast S Ready Microphone Realtek(R) Audio Default Device Set Default Configure Set Default Properties OK Cancel ApplymacOS
text_image
System Preferences Hyper X Apple ID, iCloud, Media & App Store Apple ID Family Sharing General Desktop & Screen Saver Dock Mission Control Siri Spotlight Language & Region Notifications Internet Accounts Users & Groups Accessibility Screen Time Extensions Security & Privacy Software Update Network Bluetooth Sound Printers & Scanners Keyboard Trackpad Mouse Displays Energy Saver Date & Time Sharing Time Machine Startup Disk Flash Playertext_image
Sound Sound Effects Output Input Select a device for sound output: Name Type Internal Speakers Built-in HyperX QuadCast S USB Settings for the selected device: Balance: left right Output volume: Mute Show volume in menu bartext_image
Sound Sound Effects Output Input Select a device for sound input: Name Type Internal Microphone Built-in HyperX QuadCast S USB Settings for the selected device: Input volume: input level: Output volume: Mute Show volume in menu barNutzung mit PS4™
natural_image
Technical diagram showing two connected electrical connectors with a close-up inset of the connector (no text or symbols)Adjust Microphone Level

Volume Control (Headphones)


Output to Headphones
All Audio

Switch Output Device Automatically

natural_image
Technical line drawing of a mechanical device with attached ear and connector (no text or symbols)text_image
Sound Playback Recording Sounds Communications Select a playback device below to modify its settings: Speakers HyperX QuadCast S Default Device Configure Speakers Test Disable Show Disabled Devices Show Disconnected Devices About Software MIDI Synthesizer Properties Digital Output Realtek(R) Audio Ready Configure Set Default Properties OK Cancel Apply Speakers Properties General Levels Enhancements Advanced Spatial sound Speakers 53 Balance Microphone 70 Balance OK Cancel ApplymacOS
text_image
Applications Favorites Desktop AirDrop Recents Documents Applications Name Utilities Activity Monitor Adobe Flash Player Install Manager AirPort Utility Audio MIDI Setup Bluetooth File Exchange Boot Camp Assistant Date Modified Today at 12:40 PM Today at 12:38 PM Nov 19, 2018 at 4:49 PM Today at 12:38 PM Today at 12:38 PM Size -- Folder -- Applicat -- Applicat -- Applicat -- Applicattext_image
Audio Devices Built-in Microphone 2 ins / 0 outs Built-in Output 0 ins / 2 outs HyperX QuadCast S 1 0 ins / 2 outs HyperX QuadCast S 2 2 ins / 0 outs HyperX QuadCast S 2 Clock Source: Default Input Output Source: Default Format: 48,000 Hz 2 ch 16-bit Integer Channel Volume Value dB Mute Thru Master Stream Master Front Left 0.8 4.0 Front Right 0.8 4.0PS4
natural_image
Black HYPER audio recording device with hexagonal grid effect and 'Hyper' branding (no text-heavy elements)text_image
Technical diagram of a desktop microphone with labeled parts (A, B, C, D, E, G) showing internal components and wiring.
natural_image
Pure electrical circuit lines without any symbolsSNR : ≥ 90 dB (1 kHz, RL = ∞)
natural_image
Technical line drawing of a mechanical component with hexagonal lattice structure and control knob (no text or symbols)natural_image
Diagram of a hand pointing downward to a cylindrical container filled with hexagonal patterns, no text or symbols presenttext_image
Technical diagram showing connection between a computer monitor and a device with labeled ports and wiring, including an inset image of the device's internal structure.text_image
Open Sound settings Open Volume mixer Spatial sound (Off) Sounds Troubleshoot sound problemstext_image
Settings Home Find a setting System Display Sound Notifications & actions Focus assist Power & sleep Storage Tablet Multitasking Projecting to this PC Shared experiences Clipboard Remote Desktop About Sound Output Choose your output device Speakers (HyperX QuadCast S) Certain apps may be set up to use different sound devices than the one selected here. Customize app volumes and devices in advanced sound options. Device properties Master volume 54 Troublashoot Manage sound devices Input Choose your input device Microphone (HyperX QuadCast S) Certain apps may be set up to use different sound devices than the one selected here. Customize app volumes and devices in advanced sound options. Device properties Test your microphone Troublashoot Manage sound devices Advanced sound options Related Settings Bluetooth and other devices Sound Control Panel Microphone privacy settings Ease of Access audio settings Help from the web Fixing sound problems Setting up a microphone Get help Give feedbacktext_image
Sound Playback Recording Sounds Communications Select a playback device below to modify its settings: Speakers HyperX QuadCast S Ready LEN T2424pA NVIDIA High Definition Audio Ready LEN T2424pA NVIDIA High Definition Audio Ready Speakers Realtek(R) Audio Default Device Digital Output Realtek(R) Audio Ready Configure Set Default Properties OK Cancel Applytext_image
Sound Playback Recording Sounds Communications Select a recording device below to modify its settings: Microphone HyperX QuadCast S Ready Microphone Realtek(R) Audio Default Device Configure Set Default Properties OK Cancel ApplymacOS
text_image
System Preferences Hyper X Apple ID, iCloud, Media & App Store Apple ID Family Sharing General Desktop & Screen Saver Dock Mission Control Siri Spotlight Language & Region Notifications Internet Accounts Users & Groups Accessibility Screen Time Extensions Security & Privacy Software Update Network Bluetooth Sound Printers & Scanners Keyboard Trackpad Mouse Displays Energy Saver Date & Time Sharing Time Machine Startup Disk Flash Playertext_image
Sound Sound Effects Output Input Select a device for sound output: Name Type Internal Speakers Built-in HyperX QuadCast S USB Settings for the selected device: Balance: left right Output volume: Mali Show volume in menu bartext_image
Sound Sound Effects Output Input Select a device for sound input: Name Type Internal Microphone Built-in HyperX QuadCast S USB Settings for the selected device: Input volume: input level: Output volume: Mute Show volume in menu barnatural_image
Technical diagram showing two connected electrical connectors with a close-up inset of the connector (no text or symbols)text_image
Audio Devices Input Device USB Headset (HyperX QuadCast 5) Output Device USB Headset (HyperX QuadCast 5) Adjust Microphone Level Volume Control (Headphones) Output to Headphones All Audio Switch Output Device AutomaticallyConnexion du casque

natural_image
Technical line drawing of a mechanical device with attached ear and connector (no text or symbols)text_image
Sound Playback Recording Sounds Communications Select a playback device below to modify its settings: Speakers HyperX QuadCast S Default Device Configure Speakers Test Disable Show Disabled Devices Show Disconnected Devices About Software MIDI Synthesizer Properties Digital Output Realtek(R) Audio Ready Configure Set Default Properties OK Cancel Apply Speakers Properties General Levels Enhancements Advanced Spatial sound Speakers 53 Balance Microphone 70 Balance OK Cancel ApplymacOS
text_image
Applications Favorites Desktop AirDrop Recents Documents Applications Name Utilities Activity Monitor Adobe Flash Player Install Manager AirPort Utility Audio MIDI Setup Bluetooth File Exchange Boot Camp Assistant Date Modified Today at 12:40 PM Today at 12:38 PM Nov 19, 2018 at 4:49 PM Today at 12:38 PM Today at 12:38 PM Size -- Folder -- Applicat -- Applicat -- Applicat -- Applicattext_image
Audio Devices Built-in Microphone 2 ins / 0 outs Built-in Output 0 ins / 2 outs HyperX QuadCast S 1 0 ins / 2 outs HyperX QuadCast S 2 2 ins / 0 outs HyperX QuadCast S 2 Clock Source: Default Input Output Source: Default Format: 48,000 Hz 2 ch 16-bit Integer Channel Volume Value dB Mute Thru Master Stream Master Front Left 0.8 4.0 Front Right 0.8 4.0PS4
natural_image
Black HYPER audio recording device with hexagonal grid effect and 'Hyper' branding (no text-heavy elements)Numeri di parte
HMIQ1S-XX-RG/G
INDICE
text_image
Technical diagram of a microphone with labeled parts (A, B, C, D, E) and a separate view of the internal structure.
natural_image
Pure electrical circuit lines without any symbolsSNR: ≥ 90 dB (1 kHz, RL=∞)
Controllo microfono
natural_image
Technical line drawing of a mechanical component with hexagonal lattice structure and control knob (no text or symbols)natural_image
Diagram of a hand pointing downward to a cylindrical container filled with hexagonal patterns, no text or symbols presenttext_image
Technical diagram showing connection between a computer monitor and a device with labeled ports and cable, including an inset image of the device's internal structure.text_image
Open Sound settings Open Volume mixer Spatial sound (Off) Sounds Troubleshoot sound problemstext_image
Settings Home Find a setting System Display Sound Notifications & actions Focus assist Power & sleep Storage Tablet Multitasking Projecting to this PC Shared experiences Clipboard Remote Desktop About Sound Output Choose your output device Speakers (HyperX QuadCast S) Certain apps may be set up to use different sound devices than the one selected here. Customize app volumes and devices in advanced sound options. Device properties Master volume 54 Troublashoot Manage sound devices Input Choose your input device Microphone (HyperX QuadCast S) Certain apps may be set up to use different sound devices than the one selected here. Customize app volumes and devices in advanced sound options. Device properties Test your microphone Troublashoot Manage sound devices Advanced sound options Related Settings Bluetooth and other devices Sound Control Panel Microphone privacy settings Ease of Access audio settings Help from the web Fixing sound problems Setting up a microphone Get help Give feedbacktext_image
Sound Playback Recording Sounds Communications Select a playback device below to modify its settings: Speakers HyperX QuadCast S Ready LEN T2424pA NVIDIA High Definition Audio Ready LEN T2424pA NVIDIA High Definition Audio Ready Speakers Realtek(R) Audio Default Device Digital Output Realtek(R) Audio Ready Configure Set Default Properties OK Cancel Applytext_image
Sound Playback Recording Sounds Communications Select a recording device below to modify its settings: Microphone HyperX QuadCast S Ready Microphone Realtek(R) Audio Default Device Set Default Configure Set Default Properties OK Cancel ApplymacOS
text_image
System Preferences Hyper X Apple ID, iCloud, Media & App Store Apple ID Family Sharing General Desktop & Screen Saver Dock Mission Control Siri Spotlight Language & Region Notifications Internet Accounts Users & Groups Accessibility Screen Time Extensions Security & Privacy Software Update Network Bluetooth Sound Printers & Scanners Keyboard Trackpad Mouse Displays Energy Saver Date & Time Sharing Time Machine Startup Disk Flash Playertext_image
Sound Sound Effects Output Input Select a device for sound output: Name Type Internal Speakers Built-in HyperX QuadCast S USB Settings for the selected device: Balance: left right Output volume: Mute Show volume in menu bartext_image
Sound Sound Effects Output Input Select a device for sound input: Name Type Internal Microphone Built-in HyperX QuadCast S USB Settings for the selected device: Input volume: input level: Output volume: Mute Show volume in menu barnatural_image
Technical diagram showing two connected electrical connectors with a close-up inset of the connector (no text or symbols)text_image
Audio Devices Input Device USB Headset (HyperX QuadCast 5) Output Device USB Headset (HyperX QuadCast 5) Adjust Microphone Level Volume Control (Headphones) All Audio Output to Headphones Switch Output Device Automaticallynatural_image
Technical line drawing of a mechanical device with attached ear and connector (no text or symbols)text_image
Sound Playback Recording Sounds Communications Select a playback device below to modify its settings: Speakers HyperX QuadCast S Default Device Configure Speakers Test Disable Show Disabled Devices Show Disconnected Devices About Software MIDI Synthesizer Properties Digital Output Realtek(R) Audio Ready Configure Set Default Properties OK Cancel Apply Speakers Properties General Levels Enhancements Advanced Spatial sound Speakers 53 Balance Microphone 70 Balance OK Cancel ApplymacOS
text_image
Applications Favorites Desktop AirDrop Recents Documents Applications Name Utilities Activity Monitor Adobe Flash Player Install Manager AirPort Utility Audio MIDI Setup Bluetooth File Exchange Boot Camp Assistant Date Modified Today at 12:40 PM Today at 12:38 PM Nov 19, 2018 at 4:49 PM Today at 12:38 PM Today at 12:38 PM Size -- Folder -- Applicat -- Applicat -- Applicattext_image
Audio Devices Built-in Microphone 2 ins / 0 outs Built-in Output 0 ins / 2 outs HyperX QuadCast S 1 0 ins / 2 outs HyperX QuadCast S 2 2 ins / 0 outs HyperX QuadCast S 2 Clock Source: Default Input Output Source: Default Format: 48,000 Hz 2 ch 16-bit Integer Channel Volume Value dB Mute Thru Master Stream Master Front Left 0.8 4.0 Front Right 0.8 4.0PS4
natural_image
Black HYPER audio recording device with hexagonal grid effect and 'Hyper' branding (no text-heavy elements)Código do Produto
HMIQ1S-XX-RG/G
ÍNDICE
Visão geral 3
Especificações....4
text_image
Technical diagram of a desktop microphone with labeled parts (A, B, C, D, E, G) showing internal components and wiring.
natural_image
Pure electrical circuit lines without any symbolsnatural_image
Technical line drawing of a mechanical device with hexagonal grid pattern and control knob (no text or symbols)natural_image
Diagram of a hand pointing downward to a cylindrical device with hexagonal pattern (no text or symbols)text_image
Technical diagram showing connection between a computer monitor and a device with labeled ports and wiring, including an inset image of the device's internal structure.text_image
Open Sound settings Open Volume mixer Spatial sound (Off) Sounds Troubleshoot sound problems2. Seleccione Painel de Controle do Som

text_image
Settings Home Find a setting System Display Sound Notifications & actions Focus assist Power & sleep Storage Tablet Multitasking Projecting to this PC Shared experiences Clipboard Remote Desktop About Sound Output Choose your output device Speakers (HyperX QuadCast S) Certain apps may be set up to use different sound devices than the one selected here. Customize app volumes and devices in advanced sound options. Device properties Master volume 54 Troublashoot Manage sound devices Input Choose your input device Microphone (HyperX QuadCast S) Certain apps may be set up to use different sound devices than the one selected here. Customize app volumes and devices in advanced sound options. Device properties Test your microphone Troublashoot Manage sound devices Advanced sound options Related Settings Bluetooth and other devices Sound Control Panel Microphone privacy settings Ease of Access audio settings Help from the web Fixing sound problems Setting up a microphone Get help Give feedbacktext_image
Sound Playback Recording Sounds Communications Select a playback device below to modify its settings: Speakers HyperX QuadCast S Ready LEN T2424pA NVIDIA High Definition Audio Ready LEN T2424pA NVIDIA High Definition Audio Ready Speakers Realtek(R) Audio Default Device Digital Output Realtek(R) Audio Ready Configure Set Default Properties OK Cancel Applytext_image
Sound Playback Recording Sounds Communications Select a recording device below to modify its settings: Microphone HyperX QuadCast S Ready Microphone Realtek(R) Audio Default Device Set Default Configure Set Default Properties OK Cancel ApplymacOS
text_image
System Preferences Hyper X Apple ID, iCloud, Media & App Store Apple ID Family Sharing General Desktop & Screen Saver Dock Mission Control Siri Spotlight Language & Region Notifications Internet Accounts Users & Groups Accessibility Screen Time Extensions Security & Privacy Software Update Network Bluetooth Sound Printers & Scanners Keyboard Trackpad Mouse Displays Energy Saver Date & Time Sharing Time Machine Startup Disk Flash Player2. Na aba Saída, seleccione HyperX Quadcast S.
text_image
Sound Sound Effects Output Input Select a device for sound output: Name Type Internal Speakers Built-in HyperX QuadCast S USB Settings for the selected device: Balance: left right Output volume: Mute Show volume in menu bar3. Na aba Entrada, selecione HyperX Quadcast S.
text_image
Sound Sound Effects Output Input Select a device for sound input: Name Type Internal Microphone Built-in HyperX QuadCast S USB Settings for the selected device: Input volume: input level: Output volume: Mute Show volume in menu barUtilizando com PS4™

natural_image
Technical diagram showing two connected electrical connectors with a close-up inset of the connector (no text or symbols)text_image
Audio Devices Input Device USB Headset (HyperX QuadCast S) Output Device USB Headset (HyperX QuadCast S) Adjust Microphone Level Volume Control (Headphones) Output to Headphones All Audio Switch Output Device Automaticallynatural_image
Technical line drawing of a mechanical device with attached ear and connector (no text or symbols)text_image
Sound Playback Recording Sounds Communications Select a playback device below to modify its settings: Speakers HyperX QuadCast S Default Device Configure Speakers Test Disable Show Disabled Devices Show Disconnected Devices About Software MIDI Synthesizer Properties Digital Output Realtek(R) Audio Ready Configure Set Default Properties OK Cancel Apply Speakers Properties General Levels Enhancements Advanced Spatial sound Speakers 53 Balance Microphone 70 Balance OK Cancel ApplymacOS
text_image
Applications Favorites Desktop AirDrop Recents Documents Applications Name Utilities Activity Monitor Adobe Flash Player Install Manager AirPort Utility Audio MIDI Setup Bluetooth File Exchange Boot Camp Assistant Date Modified Today at 12:40 PM Today at 12:38 PM Nov 19, 2018 at 4:49 PM Today at 12:38 PM Today at 12:38 PM Size -- Folder -- Applicat -- Applicat -- Applicat -- Applicattext_image
Audio Devices Built-in Microphone 2 ins / 0 outs Built-in Output 0 ins / 2 outs HyperX QuadCast S 1 0 ins / 2 outs HyperX QuadCast S 2 2 ins / 0 outs HyperX QuadCast S 2 Clock Source: Default Input Output Source: Default Format: 48,000 Hz 2 ch 16-bit Integer Channel Volume Value dB Mute Thru Master Stream Master Front Left 0.8 4.0 Front Right 0.8 4.0PS4
natural_image
Black HYPER audio recording device with hexagonal grid effect and 'Hyper' branding (no text-heavy elements)Numery katalogowe
HMIQ1S-XX-RG/G
SPIS TREŚCI
text_image
Technical diagram of a microphone with labeled parts (A, B, C, D, E) and a separate view of the internal structure.
natural_image
Pure electrical circuit lines without any symbolsnatural_image
Technical line drawing of a mechanical device with hexagonal grid pattern and control knob (no text or symbols)natural_image
Diagram of a hand pointing downward to a cylindrical device with hexagonal pattern (no text or symbols)text_image
Technical diagram showing connection between a computer monitor and a device with labeled ports and wiring, including an inset image of the device's internal structure.text_image
Open Sound settings Open Volume mixer Spatial sound (Off) Sounds Troubleshoot sound problemstext_image
Settings Home Find a setting System Display Sound Notifications & actions Focus assist Power & sleep Storage Tablet Multitasking Projecting to this PC Shared experiences Clipboard Remote Desktop About Sound Output Choose your output device Speakers (HyperX QuadCast S) Certain apps may be set up to use different sound devices than the one selected here. Customize app volumes and devices in advanced sound options. Device properties Master volume 54 Troublashoot Manage sound devices Input Choose your input device Microphone (HyperX QuadCast S) Certain apps may be set up to use different sound devices than the one selected here. Customize app volumes and devices in advanced sound options. Device properties Test your microphone Troublashoot Manage sound devices Advanced sound options Related Settings Bluetooth and other devices Sound Control Panel Microphone privacy settings Ease of Access audio settings Help from the web Fixing sound problems Setting up a microphone Get help Give feedbacktext_image
Sound Playback Recording Sounds Communications Select a playback device below to modify its settings: Speakers HyperX QuadCast S Ready LEN T2424pA NVIDIA High Definition Audio Ready LEN T2424pA NVIDIA High Definition Audio Ready Speakers Realtek(R) Audio Default Device Digital Output Realtek(R) Audio Ready Configure Set Default Properties OK Cancel Applytext_image
Sound Playback Recording Sounds Communications Select a recording device below to modify its settings: Microphone HyperX QuadCast S Ready Microphone Realtek(R) Audio Default Device Set Default Configure Set Default Properties OK Cancel ApplymacOS
text_image
System Preferences Hyper X Apple ID, iCloud, Media & App Store Apple ID Family Sharing General Desktop & Screen Saver Dock Mission Control Siri Spotlight Language & Region Notifications Internet Accounts Users & Groups Accessibility Screen Time Extensions Security & Privacy Software Update Network Bluetooth Sound Printers & Scanners Keyboard Trackpad Mouse Displays Energy Saver Date & Time Sharing Time Machine Startup Disk Flash Playertext_image
Sound Sound Effects Output Input Select a device for sound output: Name Type Internal Speakers Built-in HyperX QuadCast S USB Settings for the selected device: Balance: left right Output volume: Mute Show volume in menu bartext_image
Sound Sound Effects Output Input Select a device for sound input: Name Type Internal Microphone Built-in HyperX QuadCast S USB Settings for the selected device: Input volume: input level: Output volume: Mute Show volume in menu barnatural_image
Technical diagram showing two connected electrical connectors with a close-up inset of the connector (no text or symbols)text_image
Audio Devices Input Device USB Headset (HyperX QuadCast 5) Output Device USB Headset (HyperX QuadCast 5) Adjust Microphone Level Volume Control (Headphones) Output to Headphones All Audio Switch Output Device Automaticallynatural_image
Technical line drawing of a mechanical device with attached ear and connector (no text or symbols)text_image
Sound Playback Recording Sounds Communications Select a playback device below to modify its settings: Speakers HyperX QuadCast S Default Device Configure Speakers Test Disable Show Disabled Devices Show Disconnected Devices About Software MIDI Synthesizer Properties Digital Output Realtek(R) Audio Ready Configure Set Default Properties OK Cancel Apply Speakers Properties General Levels Enhancements Advanced Spatial sound Speakers 53 Balance Microphone 70 Balance OK Cancel ApplymacOS
text_image
Applications Favorites Desktop AirDrop Recents Documents Applications Name Utilities Activity Monitor Adobe Flash Player Install Manager AirPort Utility Audio MIDI Setup Bluetooth File Exchange Boot Camp Assistant Date Modified Today at 12:40 PM Today at 12:38 PM Nov 19, 2018 at 4:49 PM Today at 12:38 PM Today at 12:38 PM Size -- Folder -- Applicat -- Applicat -- Applicat -- Applicattext_image
Audio Devices Built-in Microphone 2 ins / 0 outs Built-in Output 0 ins / 2 outs HyperX QuadCast S 1 0 ins / 2 outs HyperX QuadCast S 2 2 ins / 0 outs HyperX QuadCast S 2 Clock Source: Default Input Output Source: Default Format: 48,000 Hz 2 ch 16-bit Integer Channel Volume Value dB Mute Thru Master Stream Master Front Left 0.8 4.0 Front Right 0.8 4.0PS4
natural_image
Black HYPER audio recording device with hexagonal grid effect and 'Hyper' branding (no text-heavy elements)Номера по каталогу
HMIQ1S-XX-RG/G
СОДЕРЖАНИЕ
Обзор 3
text_image
Technical diagram of a microphone with labeled parts (A, B, C, D, E) and a separate view of the internal structure.
natural_image
Pure electrical circuit lines without any symbolsnatural_image
Technical line drawing of a mechanical device with hexagonal grid pattern and control knob (no text or symbols)natural_image
Diagram of a hand pointing downward to a cylindrical device with hexagonal pattern (no text or symbols)text_image
Technical diagram showing connection between a computer monitor and a device with labeled ports and wiring, including an inset image of the device's internal structure.text_image
Open Sound settings Open Volume mixer Spatial sound (Off) Sounds Troubleshoot sound problems2. Выберите Sound Control Panel

text_image
Settings Home Find a setting System Display Sound Notifications & actions Focus assist Power & sleep Storage Tablet Multitasking Projecting to this PC Shared experiences Clipboard Remote Desktop About Sound Output Choose your output device Speakers (HyperX QuadCast S) Certain apps may be set up to use different sound devices than the one selected here. Customize app volumes and devices in advanced sound options. Device properties Master volume 54 Troubleshoot Manage sound devices Input Choose your input device Microphone (HyperX QuadCast S) Certain apps may be set up to use different sound devices than the one selected here. Customize app volumes and devices in advanced sound options. Device properties Test your microphone Troubleshoot Manage sound devices Advanced sound options Related Settings Bluetooth and other devices Sound Control Panel Microphone privacy settings Ease of Access audio settings Help from the web Fixing sound problems Setting up a microphone Get help Give feedbacktext_image
Sound Playback Recording Sounds Communications Select a playback device below to modify its settings: Speakers HyperX QuadCast S Ready LEN T2424pA NVIDIA High Definition Audio Ready LEN T2424pA NVIDIA High Definition Audio Ready Speakers Realtek(R) Audio Default Device Digital Output Realtek(R) Audio Ready Configure Set Default Properties OK Cancel Apply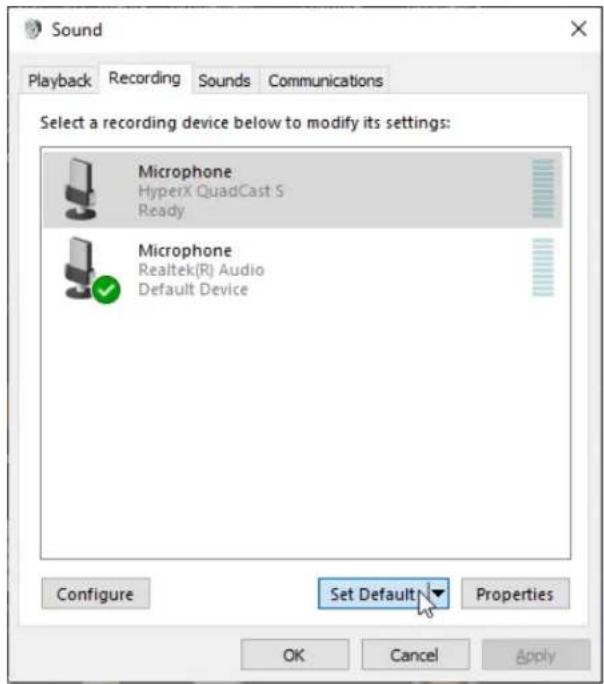
text_image
Sound Playback Recording Sounds Communications Select a recording device below to modify its settings: Microphone HyperX QuadCast S Ready Microphone Realtek(R) Audio Default Device Configure Set Default Properties OK Cancel ApplymacOS
text_image
System Preferences Hyper X Apple ID, iCloud, Media & App Store Apple ID Family Sharing General Desktop & Screen Saver Dock Mission Control Siri Spotlight Language & Region Notifications Internet Accounts Users & Groups Accessibility Screen Time Extensions Security & Privacy Software Update Network Bluetooth Sound Printers & Scanners Keyboard Trackpad Mouse Displays Energy Saver Date & Time Sharing Time Machine Startup Disk Flash Playertext_image
Sound Sound Effects Output Input Select a device for sound output: Name Type Internal Speakers Built-in HyperX QuadCast S USB Settings for the selected device: Balance: left right Output volume: Mute Show volume in menu bartext_image
Sound Sound Effects Output Input Select a device for sound input: Name Type Internal Microphone Built-in HyperX QuadCast S USB Settings for the selected device: Input volume: input level: Output volume: Mute Show volume in menu barnatural_image
Technical diagram showing two connected electrical connectors with a close-up inset of the connector (no text or symbols)text_image
Audio Devices Input Device USB Headset (HyperX QuadCast 5) Output Device USB Headset (HyperX QuadCast 5) Adjust Microphone Level Volume Control (Headphones) Output to Headphones All Audio Switch Output Device Automaticallynatural_image
Technical line drawing of a mechanical device with attached ear and connector (no text or symbols)text_image
Sound Playback Recording Sounds Communications Select a playback device below to modify its settings: Speakers HyperX QuadCast S Default Device Configure Speakers Test Disable Show Disabled Devices Show Disconnected Devices About Software MIDI Synthesizer Properties Digital Output Realtek(R) Audio Ready Configure Set Default Properties OK Cancel Apply Speakers Properties General Levels Enhancements Advanced Spatial sound Speakers 53 Balance Microphone 70 Balance OK Cancel ApplymacOS
text_image
Applications Favorites Desktop AirDrop Recents Documents Applications Name Utilities Activity Monitor Adobe Flash Player Install Manager AirPort Utility Audio MIDI Setup Bluetooth File Exchange Boot Camp Assistant Date Modified Today at 12:40 PM Today at 12:38 PM Nov 19, 2018 at 4:49 PM Today at 12:38 PM Today at 12:38 PM Size -- Folder -- Applicat -- Applicat -- Applicat -- Applicattext_image
Audio Devices Built-in Microphone 2 ins / 0 outs Built-in Output 0 ins / 2 outs HyperX QuadCast S 1 0 ins / 2 outs HyperX QuadCast S 2 2 ins / 0 outs HyperX QuadCast S 2 Clock Source: Default Input Output Source: Default Format: 48,000 Hz 2 ch 16-bit Integer Channel Volume Value dB Mute Thru Master Stream Master Front Left 0.8 4.0 Front Right 0.8 4.0PS4
natural_image
Black HYPER audio recording device with hexagonal grid effect and 'Hyper' branding (no text-heavy elements)text_image
Technical diagram of a desktop microphone with labeled parts (A, B, C, D, E, G) showing internal components and wiring.
natural_image
Pure electrical circuit lines without any symbolsSNR : ≥ 90 dB (1 kHz, RL = ∞)
natural_image
Technical line drawing of a mechanical device with hexagonal grid pattern and control knob (no text or symbols)natural_image
Diagram of a hand pointing downward to a cylindrical container filled with hexagonal patterns, no text or symbols presenttext_image
Technical diagram showing connection between a computer monitor and a device with labeled ports and wiring, including an inset image of the device's internal structure.text_image
Open Sound settings Open Volume mixer Spatial sound (Off) Sounds Troubleshoot sound problemstext_image
Settings Home Find a setting System Display Sound Notifications & actions Focus assist Power & sleep Storage Tablet Multitasking Projecting to this PC Shared experiences Clipboard Remote Desktop About Sound Output Choose your output device Speakers (HyperX QuadCast S) Certain apps may be set up to use different sound devices than the one selected here. Customize app volumes and devices in advanced sound options. Device properties Master volume 54 Troublashoot Manage sound devices Input Choose your input device Microphone (HyperX QuadCast S) Certain apps may be set up to use different sound devices than the one selected here. Customize app volumes and devices in advanced sound options. Device properties Test your microphone Troublashoot Manage sound devices Advanced sound options Related Settings Bluetooth and other devices Sound Control Panel Microphone privacy settings Ease of Access audio settings Help from the web Fixing sound problems Setting up a microphone Get help Give feedbacktext_image
Sound Playback Recording Sounds Communications Select a playback device below to modify its settings: Speakers HyperX QuadCast S Ready LEN T2424pA NVIDIA High Definition Audio Ready LEN T2424pA NVIDIA High Definition Audio Ready Speakers Realtek(R) Audio Default Device Digital Output Realtek(R) Audio Ready Configure Set Default Properties OK Cancel Applytext_image
Sound Playback Recording Sounds Communications Select a recording device below to modify its settings: Microphone HyperX QuadCast S Ready Microphone Realtek(R) Audio Default Device Configure Set Default Properties OK Cancel ApplymacOS
text_image
System Preferences Hyper X Apple ID, iCloud, Media & App Store Apple ID Family Sharing General Desktop & Screen Saver Dock Mission Control Siri Spotlight Language & Region Notifications Internet Accounts Users & Groups Accessibility Screen Time Extensions Security & Privacy Software Update Network Bluetooth Sound Printers & Scanners Keyboard Trackpad Mouse Displays Energy Saver Date & Time Sharing Time Machine Startup Disk Flash Playertext_image
Sound Sound Effects Output Input Select a device for sound output: Name Type Internal Speakers Built-in HyperX QuadCast S USB Settings for the selected device: Balance: left right Output volume: Mali Show volume in menu bartext_image
Sound Sound Effects Output Input Select a device for sound input: Name Type Internal Microphone Built-in HyperX QuadCast S USB Settings for the selected device: Input volume: input level: Output volume: Mute Show volume in menu barnatural_image
Technical diagram showing two connected electrical connectors with a close-up inset of the connector (no text or symbols)text_image
Audio Devices Input Device USB Headset (HyperX QuadCast 5) Output Device USB Headset (HyperX QuadCast 5) Adjust Microphone Level Volume Control (Headphones) Output to Headphones All Audio Switch Output Device AutomaticallyConnexion du casque
natural_image
Technical line drawing of a mechanical device with attached ear and connector (no text or symbols)text_image
Sound Playback Recording Sounds Communications Select a playback device below to modify its settings: Speakers HyperX QuadCast S Default Device Configure Speakers Test Disable Show Disabled Devices Show Disconnected Devices About Software MIDI Synthesizer Properties Digital Output Realtek(R) Audio Ready Configure Set Default Properties OK Cancel Apply Speakers Properties General Levels Enhancements Advanced Spatial sound Speakers 53 Balance Microphone 70 Balance OK Cancel ApplymacOS
text_image
Applications Favorites Desktop AirDrop Recents Documents Applications Name Utilities Activity Monitor Adobe Flash Player Install Manager AirPort Utility Audio MIDI Setup Bluetooth File Exchange Boot Camp Assistant Date Modified Today at 12:40 PM Today at 12:38 PM Nov 19, 2018 at 4:49 PM Today at 12:38 PM Today at 12:38 PM Size -- Folder -- Applicat -- Applicat -- Applicat -- Applicattext_image
Audio Devices Built-in Microphone 2 ins / 0 outs Built-in Output 0 ins / 2 outs HyperX QuadCast S 1 0 ins / 2 outs HyperX QuadCast S 2 2 ins / 0 outs HyperX QuadCast S 2 Clock Source: Default Input Output Source: Default Format: 48,000 Hz 2 ch 16-bit Integer Channel Volume Value dB Mute Thru Master Stream Master Front Left 0.8 4.0 Front Right 0.8 4.0PS4
natural_image
Black HYPER audio recording device with hexagonal grid effect and 'HYPER' branding (no text-heavy elements)製品番号
HMIQ1S-XX-RG/G
目次
概要 3
仕様 4
マイクコントロール 5
text_image
Technical diagram of a microphone with labeled parts (C, D, E, G) and internal components
natural_image
Pure electrical circuit lines without any symbolsnatural_image
Technical line drawing of a mechanical device with hexagonal grid pattern and control knob (no text or symbols)natural_image
Diagram of a hand pointing downward to a cylindrical container filled with hexagonal patterns, no text or symbols presenttext_image
Technical diagram showing connection between a computer and a device with labeled ports and wiring, including an inset image of the device's internal structure.text_image
Open Sound settings Open Volume mixer Spatial sound (Off) Sounds Troubleshoot sound problemstext_image
Settings Home Find a setting System Display Sound Notifications & actions Focus assist Power & sleep Storage Tablet Multitasking Projecting to this PC Shared experiences Clipboard Remote Desktop About Sound Output Choose your output device Speakers (HyperX QuadCast S) Certain apps may be set up to use different sound devices than the one selected here. Customize app volumes and devices in advanced sound options. Device properties Master volume 54 Troubleshoot Manage sound devices Input Choose your input device Microphone (HyperX QuadCast S) Certain apps may be set up to use different sound devices than the one selected here. Customize app volumes and devices in advanced sound options. Device properties Test your microphone Troubleshoot Manage sound devices Advanced sound options Related Settings Bluetooth and other devices Sound Control Panel Microphone privacy settings Ease of Access audio settings Help from the web Fixing sound problems Setting up a microphone Get help Give feedback3. 再生タブで Speakers HyperX QuadCast S
text_image
Sound Playback Recording Sounds Communications Select a playback device below to modify its settings: Speakers HyperX QuadCast S Ready LEN T2424pA NVIDIA High Definition Audio Ready LEN T2424pA NVIDIA High Definition Audio Ready Speakers Realtek(R) Audio Default Device Digital Output Realtek(R) Audio Ready Configure Set Default Properties OK Cancel Apply- 録音タブで Microphone HyperX QuadCast
text_image
Sound Playback Recording Sounds Communications Select a recording device below to modify its settings: Microphone HyperX QuadCast S Ready Microphone Realtek(R) Audio Default Device Configure Set Default Properties OK Cancel ApplymacOS
text_image
System Preferences Hyper X Apple ID, iCloud, Media & App Store Search Apple ID Family Sharing General Desktop & Screen Saver Dock Mission Control Siri Spotlight Language & Region Notifications Internet Accounts Users & Groups Accessibility Screen Time Extensions Security & Privacy Software Update Network Bluetooth Sound Printers & Scanners Keyboard Trackpad Mouse Displays Energy Saver Date & Time Sharing Time Machine Startup Disk Flash Playertext_image
Sound Sound Effects Output Input Select a device for sound output: Name Type Internal Speakers Built-in HyperX QuadCast S USB Settings for the selected device: Balance: left right Output volume: Mute Show volume in menu bartext_image
Sound Sound Effects Output input Select a device for sound input: Name Type Internal Microphone Built-in HyperX QuadCast S USB Settings for the selected device: Input volume: Input level: Output volume: Mute Show volume in menu barPS4™ との使用
natural_image
Technical diagram showing two connected electrical connectors with a close-up inset of the connector (no text or symbols)Adjust Microphone Level

Volume Control (Headphones)

The image contains no text. The vertical lines are stylistic or background elements and must be ignored according to the rules.

Output to Headphones
All Audio

Switch Output Device Automatically

ヘッドホンの接続
natural_image
Technical line drawing of a mechanical device with attached ear cap and connector (no text or symbols)text_image
Sound Playback Recording Sounds Communications Select a playback device below to modify its settings: Speakers HyperX QuadCast 5 Default Device Configure Speakers Test Disable Show Disabled Devices Show Disconnected Devices About Software MIDI Synthesizer Properties Digital Output Realtek(R) Audio Ready Configure Set Default Properties OK Cancel Apply Speakers Properties General Levels Enhancements Advanced Spatial sound Speakers 53 Balance Microphone 70 Balance OK Cancel ApplymacOS
text_image
Applications Favorites Desktop AirDrop Recents Documents Applications Name Utilities Activity Monitor Adobe Flash Player Install Manager AirPort Utility Audio MIDI Setup Bluetooth File Exchange Boot Camp Assistant Date Modified Today at 12:40 PM Today at 12:38 PM Nov 19, 2018 at 4:49 PM Today at 12:38 PM Today at 12:38 PM Today at 12:38 PM Size -- Folder -- Applicat -- Applicat -- Applicat -- Applicattext_image
Audio Devices Built-in Microphone 2 ins / 0 outs Built-in Output 0 ins / 2 outs HyperX QuadCast S 1 0 ins / 2 outs HyperX QuadCast S 2 2 ins / 0 outs HyperX QuadCast S 2 Clock Source: Default Input Output Source: Default Format: 48,000 Hz 2 ch 16-bit Integer Channel Volume Value dB Mute Thru Master Stream Master Front Left 0.8 4.0 Front Right 0.8 4.0PS4
natural_image
Black HYPER audio recording device with hexagonal grid effect and 'HYPER' branding (no text-heavy elements)부품 번호
HMIQ1S-XX-RG/G
목차
개요 3
사양 4
마이크 제어장치 5
PC 또는 Mac 과 사용 7
PS4™ 와 사용 12
헤드폰 연결....13
마이크 모니터링 조절 14
마운트 어댑터 설치 16
text_image
Technical diagram of a microphone with labeled parts (A, B, C, D, E, G) and internal components
natural_image
Pure electrical circuit lines without any symbolsnatural_image
Technical line drawing of a mechanical device with hexagonal grid pattern and control knob (no text or symbols)natural_image
Diagram of a hand pointing downward to a cylindrical container filled with hexagonal patterns, no text or symbols presenttext_image
Diagram showing connection between a computer and a device with labeled ports and cable, including an inset image of the device's internal structure.text_image
Open Sound settings Open Volume mixer Spatial sound (Off) Sounds Troubleshoot sound problems2. 사운드 제어판을 선택하십시오

text_image
Settings Home Find a setting System Display Sound Notifications & actions Focus assist Power & sleep Storage Tablet Multitasking Projecting to this PC Shared experiences Clipboard Remote Desktop About Sound Output Choose your output device Speakers (HyperX QuadCast S) Certain apps may be set up to use different sound devices than the one selected here. Customize app volumes and devices in advanced sound options. Device properties Master volume 54 Troubleshoot Manage sound devices Input Choose your input device Microphone (HyperX QuadCast S) Certain apps may be set up to use different sound devices than the one selected here. Customize app volumes and devices in advanced sound options. Device properties Test your microphone Troubleshoot Manage sound devices Advanced sound options Related Settings Bluetooth and other devices Sound Control Panel Microphone privacy settings Ease of Access audio settings Help from the web Fixing sound problems Setting up a microphone Get help Give feedbacktext_image
Sound Playback Recording Sounds Communications Select a playback device below to modify its settings: Speakers HyperX QuadCast S Ready LEN T2424pA NVIDIA High Definition Audio Ready LEN T2424pA NVIDIA High Definition Audio Ready Speakers Realtek(R) Audio Default Device Digital Output Realtek(R) Audio Ready Configure Set Default Properties OK Cancel Applytext_image
Sound Playback Recording Sounds Communications Select a recording device below to modify its settings: Microphone HyperX QuadCast S Ready Microphone Realtek(R) Audio Default Device Configure Set Default Properties OK Cancel ApplymacOS
text_image
System Preferences Hyper X Apple ID, iCloud, Media & App Store Search Apple ID Family Sharing General Desktop & Screen Saver Dock Mission Control Siri Spotlight Language & Region Notifications Internet Accounts Users & Groups Accessibility Screen Time Extensions Security & Privacy Software Update Network Bluetooth Sound Printers & Scanners Keyboard Trackpad Mouse Displays Energy Saver Date & Time Sharing Time Machine Startup Disk Flash Playertext_image
Sound Sound Effects Output Input Select a device for sound output: Name Type Internal Speakers Built-in HyperX QuadCast S USB Settings for the selected device: Balance: left right Output volume: Mute Show volume in menu bartext_image
Sound Sound Effects Output Input Select a device for sound input: Name Type Internal Microphone Built-in HyperX QuadCast S USB Settings for the selected device: Input volume: Input level: Output volume: Mute Show volume in menu barPS4™와사용

text_image
Technical diagram showing connector connection with labeled ports and wiring, including a zoomed-in view of the internal component.Adjust Microphone Level

Volume Control (Headphones)

[Non-Text]

Output to Headphones
All Audio

Switch Output Device Automatically

헤드폰 연결

natural_image
Technical line drawing of a mechanical device with attached ear cap and connector (no text or symbols)text_image
Sound Playback Recording Sounds Communications Select a playback device below to modify its settings: Speakers HyperX QuadCast 5 Default Device Configure Speakers Test Disable Show Disabled Devices Show Disconnected Devices About Software MIDI Synthesizer Properties Digital Output Realtek(R) Audio Ready Configure Set Default Properties OK Cancel Apply Speakers Properties General Levels Enhancements Advanced Spatial sound Speakers 53 Balance Microphone 70 Balance OK Cancel ApplymacOS
text_image
Applications Favorites Desktop AirDrop Recents Documents Applications Name Date Modified Size Kind Utilities Today at 12:40 PM -- Folder Activity Monitor Today at 12:38 PM -- Applicat Adobe Flash Player Install Manager Nov 19, 2018 at 4:49 PM -- Applicat AirPort Utility Today at 12:38 PM -- Applicat Audio MIDI Setup Today at 12:38 PM -- Applicat Bluetooth File Exchange Today at 12:38 PM -- Applicat Boot Camp Assistant Today at 12:38 PM -- Applicattext_image
Audio Devices Built-in Microphone 2 ins / 0 outs Built-in Output 0 ins / 2 outs HyperX QuadCast S 1 0 ins / 2 outs HyperX QuadCast S 2 2 ins / 0 outs HyperX QuadCast S 2 Clock Source: Default Input Output Source: Default Format: 48,000 Hz 2 ch 16-bit Integer Channel Volume Value dB Mute Thru Master Stream Master Front Left 0.8 4.0 Front Right 0.8 4.0natural_image
Black HYPER audio recording device with hexagonal grid effect and 'Hyper' branding (no text-heavy elements)หมายเลขชิ้นผ่วน
HMIQ1S-XX-RG/G
สารบัญ
ภาพรวม 3
text_image
Technical diagram of a desktop microphone with labeled parts including head, front panel, and internal components
natural_image
Pure electrical circuit lines without any symbolsnatural_image
Technical line drawing of a mechanical device with hexagonal grid pattern and control knob (no text or symbols)text_image
Diagram showing a hand pointing downward to a cylindrical device with hexagonal grid pattern, indicating a process or measurement.text_image
Technical diagram showing connection between a computer monitor and a device with USB cable, including a magnified inset of the device's internal structure.text_image
Open Sound settings Open Volume mixer Spatial sound (Off) Sounds Troubleshoot sound problemstext_image
Settings Home Find a setting System Display Sound Notifications & actions Focus assist Power & sleep Storage Tablet Multitasking Projecting to this PC Shared experiences Clipboard Remote Desktop About Sound Output Choose your output device Speakers (HyperX QuadCast S) Certain apps may be set up to use different sound devices than the one selected here. Customize app volumes and devices in advanced sound options. Device properties Master volume 54 Troubleshoot Manage sound devices Input Choose your input device Microphone (HyperX QuadCast S) Certain apps may be set up to use different sound devices than the one selected here. Customize app volumes and devices in advanced sound options. Device properties Test your microphone Troubleshoot Manage sound devices Advanced sound options Related Settings Bluetooth and other devices Sound Control Panel Microphone privacy settings Ease of Access audio settings Help from the web Fixing sound problems Setting up a microphone Get help Give feedbacktext_image
Sound Playback Recording Sounds Communications Select a playback device below to modify its settings: Speakers HyperX QuadCast S Ready LEN T2424pA NVIDIA High Definition Audio Ready LEN T2424pA NVIDIA High Definition Audio Ready Speakers Realtek(R) Audio Default Device Digital Output Realtek(R) Audio Ready Configure Set Default Properties OK Cancel Applytext_image
Sound Playback Recording Sounds Communications Select a recording device below to modify its settings: Microphone HyperX QuadCast S Ready Microphone Realtek(R) Audio Default Device Configure Set Default Properties OK Cancel ApplymacOS
text_image
System Preferences Hyper X Apple ID, iCloud, Media & App Store Apple ID Family Sharing General Desktop & Screen Saver Dock Mission Control Siri Spotlight Language & Region Notifications Internet Accounts Users & Groups Accessibility Screen Time Extensions Security & Privacy Software Update Network Bluetooth Sound Printers & Scanners Keyboard Trackpad Mouse Displays Energy Saver Date & Time Sharing Time Machine Startup Disk Flash Playertext_image
Sound Sound Effects Output Input Select a device for sound output: Name Type Internal Speakers Built-in HyperX QuadCast S USB Settings for the selected device: Balance: left right Output volume: Mute Show volume in menu bartext_image
Sound Sound Effects Output Input Select a device for sound input: Name Type Internal Microphone Built-In HyperX QuadCast S USB Settings for the selected device: Input volume: ? Input level: ? Output volume: Mute Show volume in menu barการใช้กับ PS4™

natural_image
Technical diagram showing a connector assembly with an inset image of a device (no text or symbols present)text_image
Audio Devices Input Device USB Headset (HyperX QuadCast S) Output Device USB Headset (HyperX QuadCast S) Adjust Microphone Level Volume Control (Headphones) All Audio Output to Headphones Switch Output Device Automaticallyการเชื่อมต่อเฮดโฟน

natural_image
Technical line drawing of a mechanical device with attached ear cap and connector (no text or symbols)text_image
Sound Playback: Recording Sounds Communications Select a playback device below to modify its settings: Speakers HyperX QuadCast S Default Device Configure Speakers Test Disable Show Disabled Devices Show Disconnected Devices About Software MIDI Synthesizer Properties Digital Output Realtek(R) Audio Ready Configure Set Default Properties OK Cancel Apply Speakers Properties General Levels Enhancements Advanced Spatial sound Speakers 53 Balance Microphone 70 Balance OK Cancel ApplymacOS
text_image
Applications Favorites Desktop AirDrop Recents Documents Applications Name Utilities Activity Monitor Adobe Flash Player Install Manager AirPort Utility Audio MIDI Setup Bluetooth File Exchange Boot Camp Assistant Date Modified Today at 12:40 PM Today at 12:38 PM Nov 19, 2018 at 4:49 PM Today at 12:38 PM Today at 12:38 PM Size -- Folder -- Applicat -- Applicat -- Applicat -- Applicattext_image
Audio Devices Built-in Microphone 2 ins / 0 outs Built-in Output 0 ins / 2 outs HyperX QuadCast S 1 0 ins / 2 outs HyperX QuadCast S 2 2 ins / 0 outs HyperX QuadCast S 2 Clock Source: Default Input Output Source: Default Format: 48,000 Hz 2 ch 16-bit Integer Channel Volume Value dB Mute Thru ▼ Master Stream Master Front Left 0.8 4.0 Front Right 0.8 4.0PS4
natural_image
Black HYPER audio recording device with hexagonal grid effect and 'Hyper' branding (no text-heavy elements)Mã sản phẩm
HMIQ1S-XX-RG/G
Mục LỤC
Tổng quát 3
text_image
Technical diagram of a microphone with labeled parts (A, B, C, D, E) and a separate view of the internal structure.
natural_image
Pure electrical circuit lines without any symbolsnatural_image
Technical line drawing of a mechanical component with hexagonal lattice structure and control knob (no text or symbols)natural_image
Diagram of a hand pointing downward to a cylindrical container filled with hexagonal patterns, no text or symbols presenttext_image
Technical diagram showing connection between a computer monitor and a device with labeled ports and wiring, including an inset image of the device's internal structure.text_image
Open Sound settings Open Volume mixer Spatial sound (Off) Sounds Troubleshoot sound problems2. Chon Sound Control Panel
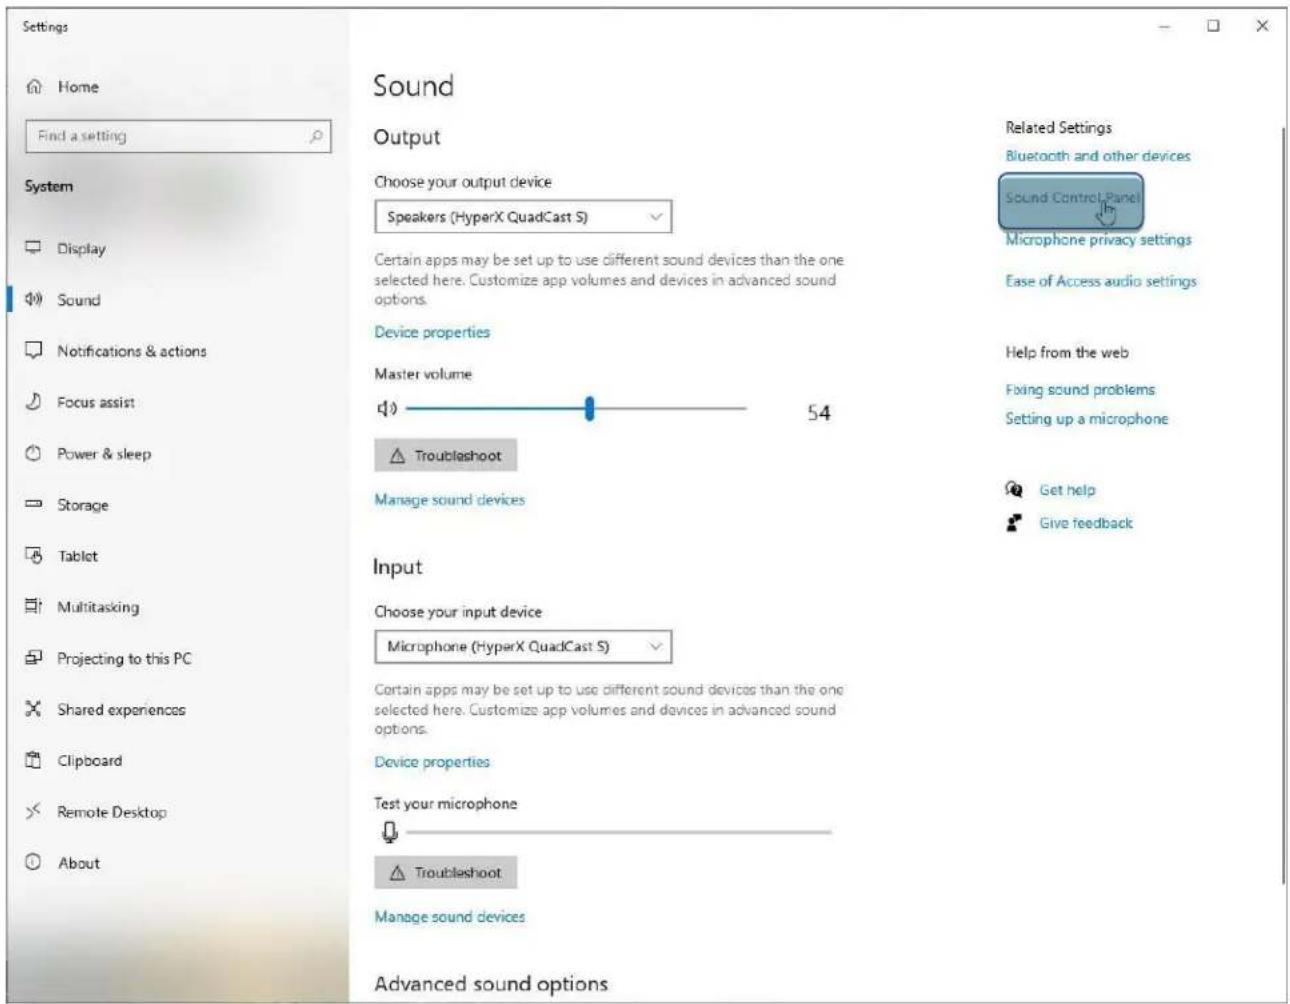
text_image
Settings Home Find a setting System Display Sound Notifications & actions Focus assist Power & sleep Storage Tablet Multitasking Projecting to this PC Shared experiences Clipboard Remote Desktop About Sound Output Choose your output device Speakers (HyperX QuadCast S) Certain apps may be set up to use different sound devices than the one selected here. Customize app volumes and devices in advanced sound options. Device properties Master volume 54 Troubleshoot Manage sound devices Input Choose your input device Microphone (HyperX QuadCast S) Certain apps may be set up to use different sound devices than the one selected here. Customize app volumes and devices in advanced sound options. Device properties Test your microphone Troubleshoot Manage sound devices Advanced sound options Related Settings Bluetooth and other devices Sound Control Panel Microphone privacy settings Ease of Access audio settings Help from the web Fixing sound problems Setting up a microphone Get help Give feedbacktext_image
Sound Playback Recording Sounds Communications Select a playback device below to modify its settings: Speakers HyperX QuadCast S Ready LEN T2424pA NVIDIA High Definition Audio Ready LEN T2424pA NVIDIA High Definition Audio Ready Speakers Realtek(R) Audio Default Device Digital Output Realtek(R) Audio Ready Configure Set Default Properties OK Cancel Applytext_image
Sound Playback Recording Sounds Communications Select a recording device below to modify its settings: Microphone HyperX QuadCast S Ready Microphone Realtek(R) Audio Default Device Configure Set Default Properties OK Cancel ApplymacOS
text_image
System Preferences Hyper X Apple ID, iCloud, Media & App Store Apple ID Family Sharing General Desktop & Screen Saver Dock Mission Control Siri Spotlight Language & Region Notifications Internet Accounts Users & Groups Accessibility Screen Time Extensions Security & Privacy Software Update Network Bluetooth Sound Printers & Scanners Keyboard Trackpad Mouse Displays Energy Saver Date & Time Sharing Time Machine Startup Disk Flash Playertext_image
Sound Sound Effects Output Input Select a device for sound output: Name Type Internal Speakers Built-in HyperX QuadCast S USB Settings for the selected device: Balance: left right Output volume: Mute Show volume in menu bartext_image
Sound Sound Effects Output Input Select a device for sound input: Name Type Internal Microphone Built-in HyperX QuadCast S USB Settings for the selected device: Input volume: input level: Output volume: Mute Show volume in menu barSử dụng với PS4™

natural_image
Technical diagram showing two connected electrical connectors with a close-up inset of the connector (no text or symbols)Adjust Microphone Level

Volume Control (Headphones)


Output to Headphones
All Audio

Switch Output Device Automatically

Kết nối tai nghe

natural_image
Technical line drawing of a mechanical device with attached ear and connector (no text or symbols)text_image
Sound Playback Recording Sounds Communications Select a playback device below to modify its settings: Speakers HyperX QuadCast S Default Device Configure Speakers Test Disable Show Disabled Devices Show Disconnected Devices About Software MIDI Synthesizer Properties Digital Output Realtek(R) Audio Ready Configure Set Default Properties OK Cancel Apply Speakers Properties General Levels Enhancements Advanced Spatial sound Speakers 53 Balance Microphone 70 Balance OK Cancel ApplymacOS
text_image
Applications Favorites Desktop AirDrop Recents Documents Applications Name Utilities Activity Monitor Adobe Flash Player Install Manager AirPort Utility Audio MIDI Setup Bluetooth File Exchange Boot Camp Assistant Date Modified Today at 12:40 PM Today at 12:38 PM Nov 19, 2018 at 4:49 PM Today at 12:38 PM Today at 12:38 PM Size -- Folder -- Applicat -- Applicat -- Applicat -- Applicattext_image
Audio Devices Built-in Microphone 2 ins / 0 outs Built-in Output 0 ins / 2 outs HyperX QuadCast S 1 0 ins / 2 outs HyperX QuadCast S 2 2 ins / 0 outs HyperX QuadCast S 2 Clock Source: Default Input Output Source: Default Format: 48,000 Hz 2 ch 16-bit Integer Channel Volume Value dB Mute Thru Master Stream Master Front Left 0.8 4.0 Front Right 0.8 4.0PS4
natural_image
Black HYPER audio recording device with hexagonal grid effect and 'HYPER' branding (no text-heavy elements)部件号
HMIQ1S-XX-RG/G
目录
概述 3
规格 4
麦克风控件....5
text_image
Technical diagram of a microphone with labeled parts (C, D, E, G) and internal components
natural_image
Pure electrical circuit lines without any symbolsnatural_image
Technical line drawing of a mechanical device with hexagonal grid pattern and control knob (no text or symbols)natural_image
Diagram of a hand pointing downward to a cylindrical container filled with hexagonal patterns, no text or symbols presenttext_image
Technical diagram showing connection between a computer and a device with labeled ports and cable routingtext_image
Open Sound settings Open Volume mixer Spatial sound (Off) Sounds Troubleshoot sound problems2. 选择声音控制面板
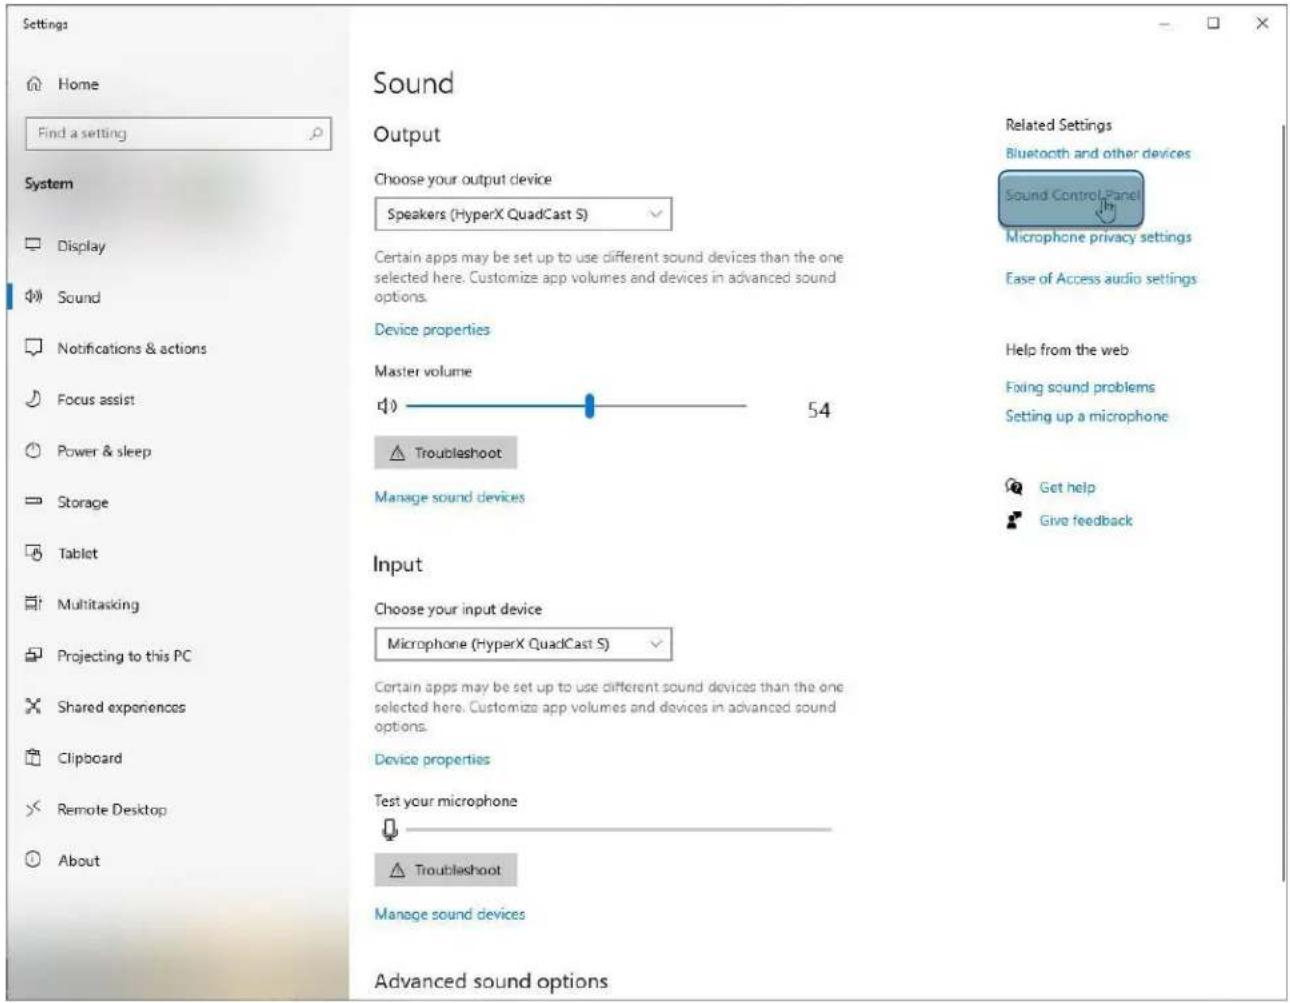
text_image
Settings Home Find a setting System Display Sound Notifications & actions Focus assist Power & sleep Storage Tablet Multitasking Projecting to this PC Shared experiences Clipboard Remote Desktop About Sound Output Choose your output device Speakers (HyperX QuadCast S) Certain apps may be set up to use different sound devices than the one selected here. Customize app volumes and devices in advanced sound options. Device properties Master volume 54 Troubleshoot Manage sound devices Input Choose your input device Microphone (HyperX QuadCast S) Certain apps may be set up to use different sound devices than the one selected here. Customize app volumes and devices in advanced sound options. Device properties Test your microphone Troubleshoot Manage sound devices Advanced sound options Related Settings Bluetooth and other devices Sound Control Panel Microphone privacy settings Ease of Access audio settings Help from the web Fixing sound problems Setting up a microphone Get help Give feedbacktext_image
Sound Playback Recording Sounds Communications Select a playback device below to modify its settings: Speakers HyperX QuadCast S Ready LEN T2424pA NVIDIA High Definition Audio Ready LEN T2424pA NVIDIA High Definition Audio Ready Speakers Realtek(R) Audio Default Device Digital Output Realtek(R) Audio Ready Configure Set Default Properties OK Cancel Applytext_image
Sound Playback Recording Sounds Communications Select a recording device below to modify its settings: Microphone HyperX QuadCast S Ready Microphone Realtek(R) Audio Default Device Configure Set Default Properties OK Cancel ApplymacOS
text_image
System Preferences Hyper X Apple ID, iCloud, Media & App Store Search Apple ID Family Sharing General Desktop & Screen Saver Dock Mission Control Siri Spotlight Language & Region Notifications Internet Accounts Users & Groups Accessibility Screen Time Extensions Security & Privacy Software Update Network Bluetooth Sound Printers & Scanners Keyboard Trackpad Mouse Displays Energy Saver Date & Time Sharing Time Machine Startup Disk Flash Playertext_image
Sound Sound Effects Output Input Select a device for sound output: Name Type Internal Speakers Built-in HyperX QuadCast S USB Settings for the selected device: Balance: left right Output volume: Mute Show volume in menu bartext_image
Sound Sound Effects Output Input Select a device for sound input: Name Type Internal Microphone Built-in HyperX QuadCast S USB Settings for the selected device: Input volume: Input level: Output volume: Mute Show volume in menu bar与 PS4 ^TM 一起使用

natural_image
Technical diagram showing two connected electronic devices with connectors and a close-up view of the internal components (no text or symbols)text_image
Audio Devices Input Device USB Headset (HyperX QuadCast S) Output Device USB Headset (HyperX QuadCast S) Adjust Microphone Level Volume Control (Headphones) Output to Headphones All Audio Switch Output Device Automatically连接耳机

natural_image
Technical line drawing of a mechanical device with attached ear cap and connector (no text or symbols)text_image
Sound Playback Recording Sounds Communications Select a playback device below to modify its settings: Speakers HyperX QuadCast S Default Device Configure Speakers Test Disable Show Disabled Devices Show Disconnected Devices About Software MIDI Synthesizer Properties Digital Output Realtek(R) Audio Ready Configure Set Default Properties OK Cancel Apply Speakers Properties General Levels Enhancements Advanced Spatial sound Speakers 53 Balance Microphone 70 Balance OK Cancel ApplymacOS
text_image
Applications Favorites Desktop AirDrop Recents Documents Applications Name Utilities Activity Monitor Adobe Flash Player Install Manager AirPort Utility Audio MIDI Setup Bluetooth File Exchange Boot Camp Assistant Date Modified Today at 12:40 PM Today at 12:38 PM Nov 19, 2018 at 4:49 PM Today at 12:38 PM Today at 12:38 PM Size -- Folder -- Applicat -- Applicat -- Applicat -- Applicattext_image
Audio Devices Built-in Microphone 2 ins / 0 outs Built-in Output 0 ins / 2 outs HyperX QuadCast S 1 0 ins / 2 outs HyperX QuadCast S 2 2 ins / 0 outs HyperX QuadCast S 2 Clock Source: Default Input Output Source: Default Format: 48,000 Hz 2 ch 16-bit Integer Channel Volume Value dB Mute Thru Master Stream Master Front Left 0.8 4.0 Front Right 0.8 4.0PS4
natural_image
Black HYPER audio recording device with hexagonal grid effect and 'HYPER' branding (no text-heavy elements)產品型號
HMIQ1S-XX-RG/G
目錄
概觀 3
產品規格 4
麥克風控制....5
使用於 PC 或 Mac....7
text_image
Technical diagram of a desktop microphone with labeled parts including head, neck, and base
natural_image
Pure electrical circuit lines without any symbolsnatural_image
Technical line drawing of a mechanical device with hexagonal grid pattern and control knob (no text or symbols)轉動旋鈕,切換指向性型式。
natural_image
Diagram of a hand pointing downward to a hexagonal grid structure, with no text or symbols present.text_image
Technical diagram showing connection between a computer and a device with labeled ports and cable routingtext_image
Open Sound settings Open Volume mixer Spatial sound (Off) Sounds Troubleshoot sound problems2. 選取 [聲音控制台]
![HYPERX Cloud Alpha Wireless - 選取 [聲音控制台] - 1](/content/2026/04/593255/images/8fa860c2e41b91c99959e40f406915f373cfb86d2ae3239451d8a78bb18cdd5b.jpg)
text_image
Settings Home Find a setting System Display Sound Notifications & actions Focus assist Power & sleep Storage Tablet Multitasking Projecting to this PC Shared experiences Clipboard Remote Desktop About Sound Output Choose your output device Speakers (HyperX QuadCast S) Certain apps may be set up to use different sound devices than the one selected here. Customize app volumes and devices in advanced sound options. Device properties Master volume 54 Troubleshoot Manage sound devices Input Choose your input device Microphone (HyperX QuadCast S) Certain apps may be set up to use different sound devices than the one selected here. Customize app volumes and devices in advanced sound options. Device properties Test your microphone Troubleshoot Manage sound devices Advanced sound options Related Settings Bluetooth and other devices Sound Control Panel Microphone privacy settings Ease of Access audio settings Help from the web Fixing sound problems Setting up a microphone Get help Give feedbacktext_image
Sound Playback Recording Sounds Communications Select a playback device below to modify its settings: Speakers HyperX QuadCast S Ready LEN T2424pA NVIDIA High Definition Audio Ready LEN T2424pA NVIDIA High Definition Audio Ready Speakers Realtek(R) Audio Default Device Digital Output Realtek(R) Audio Ready Configure Set Default Properties OK Cancel Applytext_image
Sound Playback Recording Sounds Communications Select a recording device below to modify its settings: Microphone HyperX QuadCast S Ready Microphone Realtek(R) Audio Default Device Set Default Configure Set Default Properties OK Cancel ApplymacOS
text_image
System Preferences Hyper X Apple ID, iCloud, Media & App Store Search Apple ID Family Sharing General Desktop & Screen Saver Dock Mission Control Siri Spotlight Language & Region Notifications Internet Accounts Users & Groups Accessibility Screen Time Extensions Security & Privacy Software Update Network Bluetooth Sound Printers & Scanners Keyboard Trackpad Mouse Displays Energy Saver Date & Time Sharing Time Machine Startup Disk Flash Playertext_image
Sound Sound Effects Output Input Select a device for sound output: Name Type Internal Speakers Built-in HyperX QuadCast S USB Settings for the selected device: Balance: left right Output volume: Mute Show volume in menu bartext_image
Sound Sound Effects Output Input Select a device for sound input: Name Type Internal Microphone Built-in HyperX QuadCast S USB Settings for the selected device: Input volume: Input level: Output volume: Mute Show volume in menu bar與 PS4™ 搭配使用

natural_image
Technical diagram showing two connected electrical connectors with a close-up inset of the connector (no text or symbols)Adjust Microphone Level

Volume Control (Headphones)

The image contains no text. The vertical lines are stylistic or background elements and must be ignored according to the rules.

Output to Headphones
All Audio

Switch Output Device Automatically

連接耳機

natural_image
Technical line drawing of a mechanical device with attached ear cap and connector (no text or symbols)text_image
Sound Playback Recording Sounds Communications Select a playback device below to modify its settings: Speakers HyperX QuadCast 5 Default Device Configure Speakers Test Disable Show Disabled Devices Show Disconnected Devices About Software MIDI Synthesizer Properties Digital Output Realtek(R) Audio Ready Configure Set Default Properties OK Cancel Apply Speakers Properties General Levels Enhancements Advanced Spatial sound Speakers 53 Balance Microphone 70 Balance OK Cancel ApplymacOS
text_image
Applications Favorites Desktop AirDrop Recents Documents Applications Name Utilities Activity Monitor Adobe Flash Player Install Manager AirPort Utility Audio MIDI Setup Bluetooth File Exchange Boot Camp Assistant Date Modified Today at 12:40 PM Today at 12:38 PM Nov 19, 2018 at 4:49 PM Today at 12:38 PM Today at 12:38 PM Size -- Folder -- Applicat -- Applicat -- Applicat -- Applicattext_image
Audio Devices Built-in Microphone 2 ins / 0 outs Built-in Output 0 ins / 2 outs HyperX QuadCast S 1 0 ins / 2 outs HyperX QuadCast S 2 2 ins / 0 outs HyperX QuadCast S 2 Clock Source: Default Input Output Source: Default Format: 48,000 Hz 2 ch 16-bit Integer Channel Volume Value dB Mute Thru Master Stream Master Front Left 0.8 4.0 Front Right 0.8 4.0PS4
text_image
Audio Devices Built-in Microphone 2 ins / 0 outs Built-in Output 0 ins / 2 outs HyperX QuadCast S 1 0 ins / 2 outs HyperX QuadCast S 2 2 ins / 0 outs HyperX QuadCast S 2 Clock Source: Default Input Output Source: Default Format: 48,000 Hz 2 ch 16-bit Integer Channel Volume Value dB Mute Thru Master Stream Master Front Left 0.8 4.0 Front Right 0.8 4.0HyperX NGENUITY 軟體
若要自訂燈光效果,請於下列網址下載 HyperX NGENUITY 軟體:hyperxgaming.com/ngenuity
有任何安裝或使用問題?
請聯絡 HyperX 支援團隊,網址為:hyperxgaming.com/support/microphones
HyperX QuadCast™ S

natural_image
Black HYPER audio recording device with hexagonal grid effect and red/magenta/magenta gradient, mounted on a stand (no text or symbols visible on device body)ارقام الأجنبية
HMIQ1S-XX-RG/G
لمحتويات جدول
text_image
Technical diagram of a desktop microphone with labeled parts (A, B, C, D, E) and a separate view of the internal structure.
natural_image
Pure electrical circuit lines without any symbolsA. لkitم الصوت
natural_image
Technical line drawing of a mechanical device with hexagonal grid pattern and control knob (no text or symbols)natural_image
Diagram of a hand pointing downward to a cylindrical container filled with hexagonal patterns, no text or symbols presenttext_image
Technical diagram showing connection between a computer monitor and a device with labeled ports and wiring, including an inset image of the device's internal structure.text_image
Open Sound settings Open Volume mixer Spatial sound (Off) Sounds Troubleshoot sound problemstext_image
Settings Home Find a setting System Display Sound Notifications & actions Focus assist Power & sleep Storage Tablet Multitasking Projecting to this PC Shared experiences Clipboard Remote Desktop About Sound Output Choose your output device Speakers (HyperX QuadCast S) Certain apps may be set up to use different sound devices than the one selected here. Customize app volumes and devices in advanced sound options. Device properties Master volume 54 Troubleshoot Manage sound devices Input Choose your input device Microphone (HyperX QuadCast S) Certain apps may be set up to use different sound devices than the one selected here. Customize app volumes and devices in advanced sound options. Device properties Test your microphone Troubleshoot Manage sound devices Advanced sound options Related Settings Bluetooth and other devices Sound Control Panel Microphone privacy settings Ease of Access audio settings Help from the web Fixing sound problems Setting up a microphone Get help Give feedbacktext_image
Sound Playback Recording Sounds Communications Select a recording device below to modify its settings: Microphone HyperX QuadCast S Ready Microphone Realtek(R) Audio Default Device Set Default Configure Properties OK Cancel Apply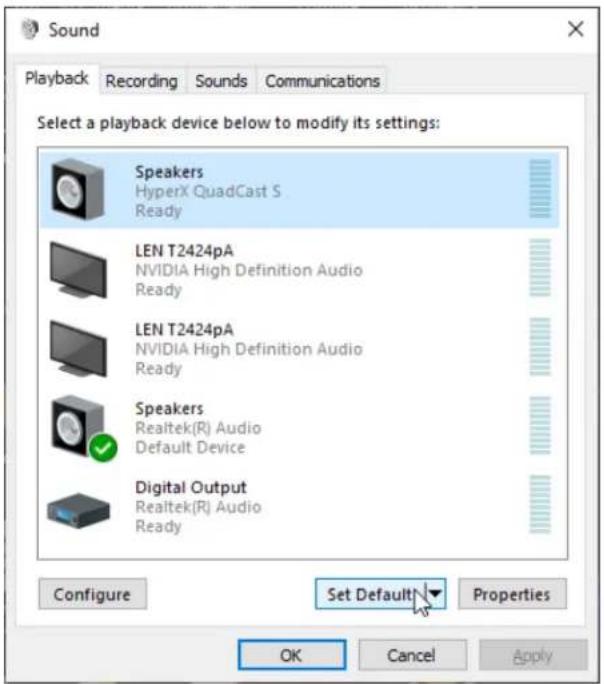
text_image
Sound Playback Recording Sounds Communications Select a playback device below to modify its settings: Speakers HyperX QuadCast S Ready LEN T2424pA NVIDIA High Definition Audio Ready LEN T2424pA NVIDIA High Definition Audio Ready Speakers Realtek(R) Audio Default Device Digital Output Realtek(R) Audio Ready Configure Set Default Properties OK Cancel Applytext_image
System Preferences Hyper X Apple ID, iCloud, Media & App Store Apple ID Family Sharing General Desktop & Screen Saver Dock Mission Control Siri Spotlight Language & Region Notifications Internet Accounts Users & Groups Accessibility Screen Time Extensions Security & Privacy Software Update Network Bluetooth Sound Printers & Scanners Keyboard Trackpad Mouse Displays Energy Saver Date & Time Sharing Time Machine Startup Disk Flash Playertext_image
Sound Sound Effects Output Input Select a device for sound output: Name Type Internal Speakers Built-in HyperX QuadCast S USB Settings for the selected device: Balance: left right Output volume: Mute Show volume in menu barHyperX QuadCastS
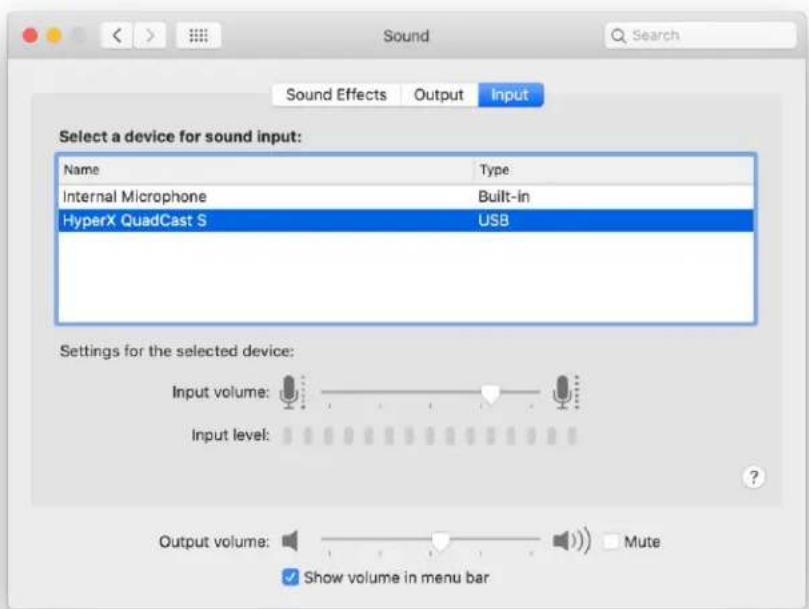
text_image
Sound Sound Effects Output Input Select a device for sound input: Name Type: Internal Microphone Built-in HyperX QuadCast S USB Settings for the selected device: Input volume: Input level: Output volume: Mute Show volume in menu bar
text_image
PS4™ الassextCAD مع PS4™Adjust Microphone Level

Volume Control (Headphones)

[Non-Text]

Output to Headphones
All Audio

Switch Output Device Automatically

توصيل سماعات الأدن
natural_image
Technical line drawing of a headset assembly showing front and side views with connector connections (no text or symbols)text_image
Sound Playback Recording Sounds Communications Select a playback device below to modify its settings: Speakers HyperX QuadCast S Default Device Configure Speakers Test Disable Show Disabled Devices Show Disconnected Devices About Software MIDI Synthesizer Properties Digital Output Realtek(R) Audio Ready Configure Set Default Properties OK Cancel Apply Speakers Properties General Levels Enhancements Advanced Spatial sound Speakers 53 Balance Microphone 70 Balance OK Cancel Applytext_image
Applications Favorites Desktop AirDrop Recents Documents Applications Name Utilities Activity Monitor Adobe Flash Player Install Manager AirPort Utility Audio MIDI Setup Bluetooth File Exchange Boot Camp Assistant Date Modified Today at 12:40 PM Today at 12:38 PM Nov 19, 2018 at 4:49 PM Today at 12:38 PM Today at 12:38 PM Size -- Folder -- Applicat -- Applicat -- Applicat -- Applicattext_image
Audio Devices Built-in Microphone 2 ins / 0 outs Built-in Output 0 ins / 2 outs HyperX QuadCast S 1 0 ins / 2 outs HyperX QuadCast S 2 2 ins / 0 outs HyperX QuadCast S 2 Clock Source: Default Input Output Source: Default Format: 48,000 Hz 2 ch 16-bit Integer Channel Volume Value dB Mute Thru Master Stream Master Front Left 0.8 4.0 Front Right 0.8 4.0PS4