Cloud Five - Basket ELICA - Free user manual and instructions
Find the device manual for free Cloud Five ELICA in PDF.

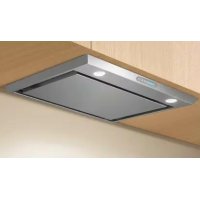
Download the instructions for your Basket in PDF format for free! Find your manual Cloud Five - ELICA and take your electronic device back in hand. On this page are published all the documents necessary for the use of your device. Cloud Five by ELICA.
USER MANUAL Cloud Five ELICA
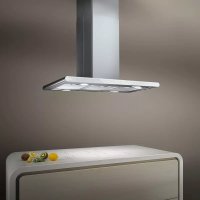
- Il filtro carbone non sia usurato. Manutenzione Pulizia Per la pulizia usare ESCLUSIVAMENTE un panno inumidito con detersivi liquidi neutri. NON UTILIZZARE UTENSILI O STRUMENTI PER LA PULIZIA! Evitare l’uso di prodotti contenenti abrasivi. NON UTILIZZARE ALCOOL! Filtro antigrasso Trattiene le particelle di grasso derivanti dalla cottura. Il filtro antigrasso metallico deve essere pulito una volta al mese con detergenti non aggressivi, manualmente oppure in lavastoviglie a basse temperature ed a ciclo breve. Con il lavaggio in lavastoviglie il filtro antigrasso metallico può scolorirsi ma le sue caratteristiche di filtraggio non cambiano assolutamente. Filtro ai carboni attivi (Solo per Versione Filtrante) Trattiene gli odori sgradevoli derivanti dalla cottura. La saturazione del filtro carbone si verifica dopo un uso più o meno prolungato a seconda del tipo di cucina e della regolarità della pulizia del filtro grassi. In ogni caso è necessario sostituire la cartuccia al massimo ogni quattro mesi. NON può essere lavato o rigenerato Sostituzione Lampade Disinserire l’apparecchio dalla rete elettrica. Attenzione! Prima di toccare le lampade sincerarsi che siano fredde. Sostituire la lampada danneggiata con una dello stesso tipo così come specificato nell'etichetta caratteristica o vicino alla lampada stessa sulla cappa. Per la sostituzione delle lampade nei faretti di forma quadrata premere il telaio del faretto in corrispondenza della sigla “PUSH”, quindi sostituire la lampade e chiudere il faretto premendo sempre il telaio per agganciarlo. Utilizzare solo lampade alogene da 12V -20W max - G4, avendo cura di non toccarle con le mani. Se l'illuminazione non dovesse funzionare, controllate il corretto inserimento delle lampade nella sede prima di chiamare l'assistenza tecnica.9 EN - Instruction on mounting and use Closely follow the instructions set out in this manual. All responsibility, for any eventual inconveniences, damages or fires caused by not complying with the instructions in this manual, is declined. This appliance is intended to be used in household and similar application such as: - staff kitchen areas in shop, offices and other working environments; - farm houses; - by clients in hotels, motels and other residential type environments; - bed and breakfast type environments. The hood can look different to that illustrated in the drawings in this booklet. The instructions for use, maintenance and installation, however, remain the same. ! It is important to conserve this booklet for consultation at any moment. In the case of sale, cession or move, make sure it is together with the product. ! Read the instructions carefully: there is important information about installation, use and safety. ! Do not carry out electrical or mechanical variations on the product or on the discharge conduits. ! Before proceeding with the installation of the appliance verify that there are no damaged all components. Otherwise contact your dealer and do not proceed with the installation. Caution Before any cleaning or maintenance operation, disconnect hood from the mains by removing the plug or disconnecting the mains electrical supply. Always wear work gloves for all installation and maintenance operations. This appliance can be used by children aged from 8 years and above and persons with reduced physical, sensory or mental capabilities or lack of experience and knowledge if they have been given supervision or instruction concerning use of the appliance in a safe way and understand the hazards involved. Children shall not be allowed to tamper with the controls or play with the appliance. Cleaning and user maintenance shall not be made by children without supervision. The premises where the appliance is installed must be sufficiently ventilated, when the kitchen hood is used together with other gas combustion devices or other fuels. The hood must be regularly cleaned on both the inside and outside (AT LEAST ONCE A MONTH). This must be completed in accordance with the maintenance instructions provided. Failure to follow the instructions provided regarding the cleaning of the hood and filters will lead to the risk of fires. Do not flambé under the range hood. The use of exposed flames is detrimental to the filters and may cause a fire risk, and must therefore be avoided in all circumstances. Any frying must be done with care in order to make sure that the oil does not overheat and ignite. CAUTION: Accessible parts of the hood may become hot when used with cooking appliances. For lamp replacement use only lamp type indicated in the Maintenance/Replacing lamps section of this manual. WARNING! Do not connect the appliance to the mains until the installation is fully complete. With regards to the technical and safety measures to be adopted for fume discharging it is important to closely follow the regulations provided by the local authorities. The air must not be discharged into a flue that is used for exhausting fumes from appliance burning gas or other fuels. Do not use or leave the hood without the lamp correctly mounted due to the possible risk of electric shocks. Never use the hood without effectively mounted grids. The hood must NEVER be used as a support surface unless specifically indicated. Use only the fixing screws supplied with the product for installation or, if not supplied, purchase the correct screws type. Use the correct length for the screws which are identified in the Installation Guide. In case of doubt, consult an authorised service assistance centre or similar qualified person. WARNING! Failure to install the screws or fixing device in accordance with these instructions may result in electrical hazards. Do not use with a programmer, timer, separate remote control system or any other device that switches on automatically.10 This appliance is marked according to the European directive 2012/19/EC on Waste Electrical and Electronic Equipment (WEEE). By ensuring this product is disposed of correctly, you will help prevent potential negative consequences for the environment and human health, which could otherwise be caused by inappropriate waste handling of this product. The symbol on the product, or on the documents accompanying the product, indicates that this appliance may not be treated as household waste. Instead it should be taken to the appropriate collection point for the recycling of electrical and electronic equipment. Disposal must be carried out in accordance with local environmental regulations for waste disposal. For further detailed information regarding the process, collection and recycling of this product, please contact the appropriate department of your local authorities or the local department for household waste or the shop where you purchased this product. Appliance designed, tested and manufactured according to:
- EMC: EN 55014-1; CISPR 14-1; EN 55014-2; CISPR 14-2; EN/IEC 61000-3-2; EN/IEC 61000-3-3. Suggestions for a correct use in order to reduce the environmental impact: Switch ON the hood at minimum speed when you start cooking and kept it running for few minutes after cooking is finished. Increase the speed only in case of large amount of smoke and vapour and use boost speed(s) only in extreme situations. Replace the charcoal filter(s) when necessary to maintain a good odour reduction efficiency. Clean the grease filter(s) when necessary to maintain a good grease filter efficiency. Use the maximum diameter of the ducting system indicated in this manual to optimize efficiency and minimize noise. Use The hood is conceived for the suction of cooking fumes and steam and is destined only for domestic use. The hood has been made for use in the internal recirculating filtering version. Cooking fumes and steam are aspirated inside the hood, filtered and cleaned, passing through the fat filter/s and the carbon filter/s that MUST be supplied with the hood. When installing the hood in extracting version, you must remove the air outlet grid, fixed as shown in Fig.8.
Installation The minimum distance between the supporting surface for the cooking equipment on the hob and the lowest part of the range hood must be not less than 65cm from electric cookers and 65cm from gas or mixed cookers. If the instructions for installation for the gas hob specify a greater distance, this must be adhered to. Electrical connection The mains power supply must correspond to the rating indicated on the plate situated inside the hood. If provided with a plug connect the hood to a socket in compliance with current regulations and positioned in an accessible area, after installation. If it not fitted with a plug (direct mains connection) or if the plug is not located in an accessible area, after installation, apply a double pole switch in accordance with standards which assures the complete disconnection of the mains under conditions relating to over-current category III, in accordance with installation instructions. Warning! Before re-connecting the hood circuit to the mains supply and checking the efficient function, always check that the mains cable is correctly assembled. Warning! If the supply cord is damaged, it must be replaced by the manufacturer, its service agent or similarly qualified persons in order to avoid hazard. Mounting This type of cooker hood must be fixed to the ceiling. Very heavy product; hood handling and installation must be carried out by at least two persons. Before beginning installation:
- Check that the product purchased is of a suitable size for the chosen installation area.
- Check (for transport reasons) that there is no other supplied material inside the hood (e.g. packets with screws (*), guarantees (*), etc.), eventually removing them and keeping them.
- If possible, disconnect and move freestanding or slide-in range from cabinet opening to provide easier access to rear wall/ceiling. Otherwise put a thick, protective covering over countertop, cooktop or range to protect from damage and debris. Select a flat surface for assembling the unit. Cover that surface with a protective covering and place all canopy hood parts and hardware in it.
- In addition check whether near the installation area of the hood (in the area accessible also with the hood mounted) an electric socket is available.
- Carry out all the masonry work necessary (e.g. installation of an electric socket). Expansion wall plugs are provided to secure the hood to most types of walls/ceilings. However, a qualified technician must verify suitability of the materials in accordance with the type of wall/ceiling. The wall/ceiling must be strong enough to take the weight of the hood. Do not tile, grout or silicone this appliance to the wall. Surface mounting only. Identify on the ceiling a reference point from the exact installation center of the hood (see fig. 1), and then trace the reference points for the holes to be made in accordance with the dimensions shown in Fig. 2. Make the holes in the ceiling using a suitable twist drill bit with 8 mm diameter and insert the supplied plugs.11 Approach the hood to the ceiling and make the electrical connection. Open the stainless steel panel placed on the underside of the product, where the four lamps are located. The opening of the panel is made by pulling on the side corresponding to the air outlet grill. (Fig. 3). Support the panel with your hands while opening it. After the opening of the panel you can access the grease filter and after removing it, by acting on the handle, you can reach the seat of the charcoal filter (Fig. 4) Place the hood on the set position and secure it with the supplied screws, see Figure 5. Place the charcoal filter in its seat as shown in Figure 6. Restore the grease filter removed earlier and close the steel panel. To close the panel, simply bring it back to the horizontal position until the automatic hooking of the closing takes place. Operation Fig. 7 Radio remote control for the remote control of extractor hoods. Technical Specifications - Power supply - alkaline battery: 12V mod 23° - Working frequency: 433.92 MHz - Max consumption: 25 mA - Operating temperature: -20°C +55°C Operation To turn on or off the hood, press once the button: To increase the speed up to the 4th (max), press button: To reduce the speed up to the 2
t the first start, hold the light button for 5 seconds
The far right LED will start flashing (every 5 sec.), the hood stays on for a period of 10min at the selected speed and then it turns off automatically. If you increase or reduce the speed while the timer is activated, the timer will be disabled. Mode of operation: If there are two radio remote control systems in the same room or in immediate vicinity, having the same transmission code could influence them, therefore you need to change the code of one remote control. ATT.: The battery must be replaced every year to ensure the optimal transmitter range: To replace the battery remove the plastic cover, remove the battery in use and insert a new one respecting the polarity indicated on the container. Used batteries should be disposed of in the appropriate containers. The product is equipped with a device which automatically switches off after 4 hours of operation since the last performed operation. Generating a new transmission code: The remote control is supplied from the factory with default codes. If you want to generate new codes you must perform the following steps: Simultaneously press the UP (+), STOP (0/1) and DOWN (-) continuously for 2 seconds, at the same time you will have the LEDs light up; then press the UP (+) and DOWN (-), 3 flashes of the LEDs indicate that the operation has been completed. ATT.: This action completely deletes the preexisting default codes. Teaching the new transmission code: After changing the transmission code in the radio remote control, you need to teach the electronic control unit of the hood the new code as follows: press the emergency button (visible after opening the stainless steel panel) for two consecutive times in order to remove and restore power supply to the product; from this moment there are 15 seconds in which to press the light button " " so that the hood will synchronize with the new code. Disposal of the batteries Ultimate disposal of the batteries should be handled according to all national laws and regulations. Do not place used batteries in your regular waste. Ultimate disposal of the batteries must be done safely. Contact your local waste management officials for other information regarding the environmentally sound collection, recycling, and disposal of the batteries.12 Operation anomalies The hood does not work Make sure that:
- There is no current blackout
- A speed has been effectively selected.
- The red reset button located above the filters inside the hood is pressed. The hood has low efficiency Make sure that:
- The motor speed selected is sufficient for the quantity of fumes present
EC/96/2002 Waste Electrical and Electronic Equipment (WEEE).